

Page 1
Download the User M anual at
gopro.com/support
QUICK START GUIDE
Page 2

When u sing your GoPro camera as p art of your activ e lifestyle, alwa ys be
aware of your surrou ndings to avoid injury to yours elf and others, an d to
prevent dama ge to your cam era.
Before using y our GoPro camera, pleas e read caref ully all
the safety p recautio ns in the Importa nt Produc t + Safety
Infor mation Guid e included w ith your cam era.
/ Hello
Cong ratulatio ns on your new HERO4 Bl ack camer a. This Quic k Start
Guide w ill show you th e basics of c apturing l ife’s most incredib le
moments with your G oPro.
To learn more, dow nload the Us er Manual at gopro.com/support.
JOIN T HE GOP RO MOV EME NT
youtube.com/GoProfacebook.com/GoPro
twitter.com/GoPro
instagram.com/GoPro
Page 3
/ The Basics/ Getting Started
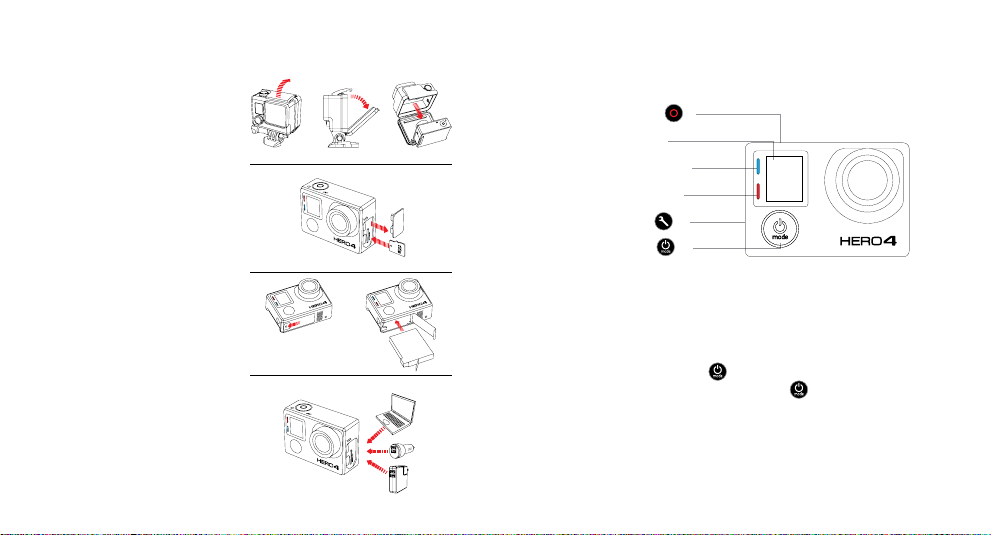
STE P 1
Remove t he camera from
the housing.
STE P 2
Remove t he camera si de
door a nd insert a m icroSD
card (sold separately).
(Requires a C lass 10 or UHS-1 card.
For a list of the r ecommende d SD cards,
visit gopro.com/support.)
STEP 3
Open t he batter y door and insert
the battery.
STE P 4
Charge the battery using the
included USB cab le.
Shutter/Select Button [ ]
Camera Status Screen
Wireless Status Light (blue)
Camera Status Light (red)
Settings/Tag Button [
Power/Mode Button [
]
]
POW ERIN G CAME RA O N AND OF F
To Power On:
Pres s the Power/Mode butt on [
].
To Power Off:
Press and ho ld the Power/Mode
button [
] for two seco nds.
Page 4

/ Selecting Camera Modes
1. Press the Power/Mode button [
camera modes.
Camera Modes Description
Video Vide o, Video + Photo, Vid eo Looping
Photo Single, Night, Continuous
Multi-Shot Burs t, Time Laps e, Night Laps e
Playback*
Setup Adjust general camera settings
Play b ack content o n a TV or LCD
Touch BacPac
] repea tedly to cyc le through the
™
/ Capturing Video and Photos
Select you r camera mode, the n press the Shutter/Select button [ ] to
star t/stop recording or take a p hoto.
2. If necessa ry, select a differ ent capture m ode:
a. Press the Settings/Tag butto n [ ] to open the set tings menu.
b. Press the Shutter/Select button [ ] repeatedly until you get to
the desired capture mode.
c. Press the Settings/Tag butto n [
*Playba ck only appear s when the camera i s connected to a T V or LCD Touch BacPac (sold sep arately).
] to close the settings men u.
QUIKCAPTURE
When the camera is off and
QuikC apture is ena bled, you ca n
turn t he camera o n and immed iately
begi n capturin g video or Ti me Lapse
photos just by p ressing th e Shutter/
Select [
for vid eo, press and hold for two
seconds for Time L apse photos .
Pres s again to stop r ecording a nd
power o ff the camer a. You can turn
QuikC apture on/off in Setup mo de.
] button. Press on ce
HIL IG HT TAG
Press the Settings/Tag button
] to tag key moments while
[
recording video. HiLight Tags
help yo u quickly fin d the highli ghts
later for eas y play back , editing
and sharing.
Page 5

/ Adjusting Camera Settings
1. Press the Power/Mode button [ ] to cycle to your desi red mode.
2. Press the Settings/Tag button [ ] to enter the S ettings me nu
for that mode.
3. Press the Power/Mode but ton [
] to cyc le through the options.
4. Press the Shutter/Select butto n [
] to sele ct your desired option.
5. Press the Settings/Tag button [ ] to exit the settings men u.
To learn more abo ut settings, dow nload the User Manual at
gopro.com/support
Camera
Reset
Page 6

/ Mounting Your Camera
Mount your GoP ro to helmets, gear and mo re with the in cluded Cur ved +
Flat Adhesive Mou nts and hardware.
APPLYING + REMOVING ADHESIVE MOUNTS
Apply adhesive mount s to clean, smo oth surfa ces at room temperature
only, at least 24 h ours before u se. To remove, heat with a hair dryer the n
peel off m ount.
/ Mounting Your Camera
VERTICAL MOUNTING
FLAT S URFACE M OUNT ING
CURVED SURFACE MOUNTING
SIDE MOUNTING
SURFBOARD MOUN TING*
To learn more abo ut mounting your ca mera, visit gopro.com/support.
*Surfb oard mounts a re included wi th HERO4 Black/Sur f only.
Page 7

/ Housing Backdoors / Swapping Backdoors
Your HERO4 B lack came ra comes with two ba ckdoors, each d esigned for
different uses and environments.
STANDARD BACKDOOR
Provides waterproof protection to 131’ (40m).
Use when shooting under water or in wet, damp
or dirty conditions.
SKELETON BACKDOOR
Not waterproof—use in dry, dirt-free environments
only. Enables enhanced audio capture during
low-speed activities.
STE P 1
Open t he housing so the ba ckdoor
hangs downward.
STE P 3
Align t he new backd oor with
the hinge.
STE P 2
Pull d own on the backdoor until it
snaps free from the hinge.
STE P 4
Push u p on the backd oor until it
clicks into place.
Page 8

/ Playing Back Videos and Photos
There are several w ays to play ba ck your vide os and view your photos.
/ Sharing Videos and Photos
There are a few ways to s hare your vid eos and photos.
COMPUTER
Conn ect the ca mera to your
computer with the included USB
cab le to transf er content for p laybac k.
For hel p accessin g your GoPro
content, download the latest GoPro
sow are at gopro.com/getstarted.
SMARTPHONE + TABLET
Use the GoPro A pp to play back
content on your smartphone
or tab let. For more info, see
GoPro App.
*For video re solutions ab ove 1080p60 fps, HDMI pla yback may onl y be support ed at 1080p 60 fps.
LCD TOUCH BACPAC
This remova ble LCD touch s creen
seamlessl y attache s to the back
of your GoPro, delive ring quick
play back of videos an d photos
(sold separately).
TV
See your content on the big screen.
Conn ect your ca mera to your T V
with a mi cro HDMI
combo cable (sold separately).
™
*
, composite or
COMPUTER
Conn ect the ca mera to your
computer with the included USB
cable to tra nsfer conte nt for sharin g.
SMARTPHONE + TABLET
Use the GoPro A pp to share videos
and ph otos by text, email or o n your
socia l network s. For more info, see
GoPro App.
Page 9

/ GoPro App
CONTROL. VIEW. SHARE.
The GoPro Ap p lets you cont rol your came ra remotely using a smart phone
or tab let. See wha t your camer a sees with li ve preview. View photos and
play back vi deos, then share y our favorites via em ail, text, Facebook,
Twitter a nd more.
TO CON NEC T TO THE G OPR O APP
1. Download t he GoPro App a nd open it
on your s martpho ne or tablet .
2. When the app stops searching,
tap Conne ct Your Camer a.
3. Follow the app’s on-screen
instruc tions to connec t your camer a.
The default pass word is goprohero.
To learn more abo ut the GoPro App, visit
gopro.com/getstarted.
/ Help and Resources
DOWNLOAD THE USER MANUAL
To learn more abo ut your HERO4 Bl ack camer a, download the User
Manual at gopro.com/support.
CAMERA SOFTWARE UPDATES
To get the latest features and best perfor mance from your GoPro,
make sure you’re us ing the most c urrent cam era sowa re. You can
update your c amera soware via the Go Pro App or GoPro so ware.
For more info, visit gopro.com/getstarted.
TUTORIAL VIDEOS
Watch ho w-to tutorials an d get pro tips + tricks on making the most of
your GoPro pro ducts at gopro.com/getstarted.
CUSTOMER SUPPORT
Need help? Want more info? Find an swers to com monly asked q uestions
and co ntact Cus tomer Support at gopro.com/support.
REGULATORY INFORMATION
To see the co mplete list of countr y certifi cations, r efer to the Important
Product + S afety Infor mation Guid e include d with your camera .
 Loading...