


USER MANUAL

To download this user ma nual in a different la nguage, visit
gopro.com/support.
Pour télécharger ce manuel de l’utilis ateur dans u ne autre langue,
rend ez-vous sur gopro.com/support.
Wenn Sie d ieses Benutzer handbuch in ein er anderen Spra che
/ Join the GoPro Movement
youtube.com/GoProfacebook.com/GoPro
twitter.com/GoPro
2 3
instagram.com/GoPro
herunterladen möchten, besuchen Sie gopro.com/support.
Per sc aricare questo m anuale utente in un’altr a lingua, vi sita
gopro.com/support.
Para d escargar este ma nual de usua rio en otro idioma, visite
gopro.com/support.
Para b aixar este ma nual do usuá rio em outro id ioma, aces se
gopro.com/support.
このユーザーマニュアルの他言 語版をダウンロードするに
は、 gopro.com/supportにアクセスしてください。
若要下載其他語言版本的使用說明書,請前往:
gopro.com/support。
如需下载本用户手册的其他语言版本,请访问
gopro.com/support。

/ Table of Contents
/ Table of Contents
Optional Accessories
The Ba sics
Getting Star ted
Camera Status Screen
Camera Ico ns
Camera Menus
Camera Modes
Video Mode
Photo Mode
Burst Mode
Time Lapse Mode
Settings Mode
Minimum System Requirements
Transferring and Playing Back Files
Battery
Important Messages
Camera Housing
Using the Mounts
4 5
6
8
10
17
18
19
20
21
22
23
24
25
32
33
34
37
39
42
Frequently Asked Questions
Customer Support
Trademarks
Regulatory Information
45
46
46
46
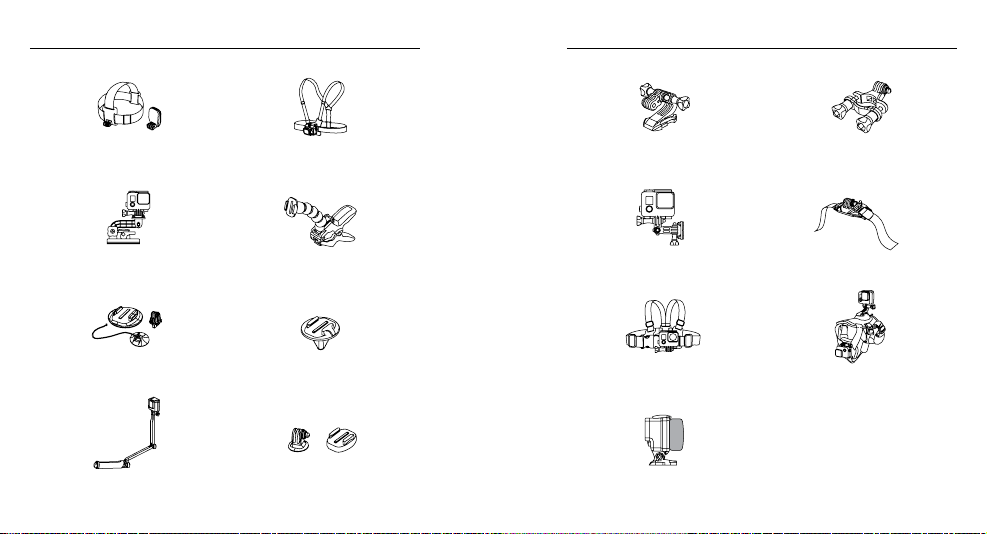
/ Optional Accessories
/ Wear It. Mount It. Love It.
™
Head Strap + QuickClip Chesty (Chest Harness)
Suction Cup Jaws: Flex Clamp
Surfboard Mounts Bodyboard Mount
3-Way Tripod Mounts
6 7
Helmet Front Mount
Side Mount Vented Helmet Strap Mount
Junior Chesty (Chest Harness) Fetch (Dog Harness)
Floaty Backdoor
Handlebar/Seatpost/
Pole Mount
See more at
gopro.com.
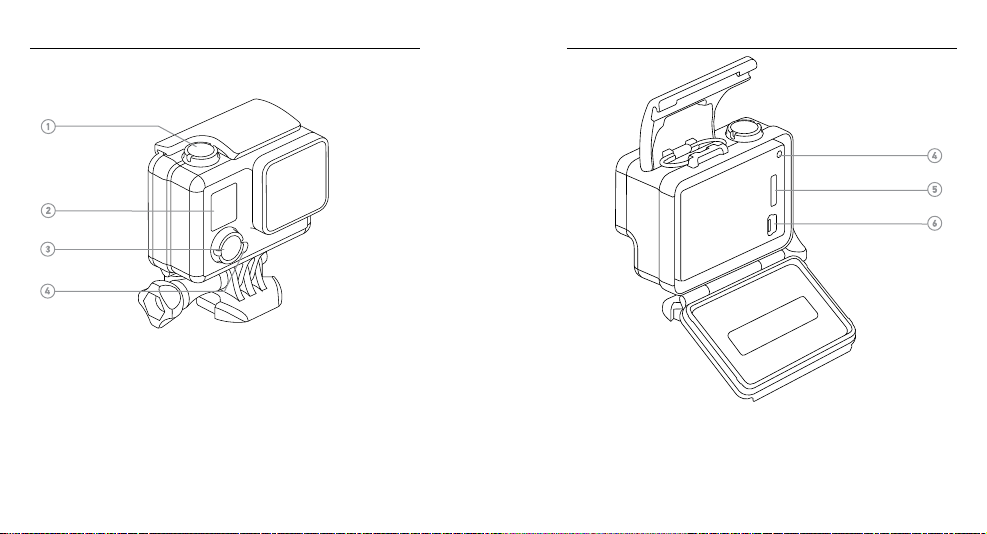
/ The Basic s
/ The Basic s
1. Shutter/Select Button
2. Camera Status Screen
8 9
3. Power/Mode Button
4. Camera Status Light
5. microSD Card Slot
(microSD card sold separately)
6. Mini-USB Port

/ Getting Started
Slim housing remove camera
Slim housing insert camera
Slim housing closed Swapping housing doors
Quick Release Buckle + Thumb Screw + Slim housing = Complete Unit
/ Getting Started
CHARGING THE BATTERY
1. Open the bac kdoor of the ho using.
Note: Your HERO camer a, battery, an d housing are int egrated. You cann ot remove the came ra
from the hou sing, or remove th e battery f rom the camera.
2. Charge the b attery by conne cting the c amera to a com puter or
other USB charging a dapter with t he included USB cable.
When c harging with a comp uter, be sure that t he computer i s
connecte d to a power sour ce. If the camera status li ght does not
turn o n or you do not see t he chargin g indicator, use a different
USB por t.
For fastest c harging, make sure t he camera i s powered off aer
connecting it to a computer or USB c harging adapter. The came ra
status light turn s on during chargi ng and turn s off when char ging
is complete.
The integrated lithium-ion battery comes partially charged. No
damage occ urs to the cam era or battery if u sed prior to a f ull charge.
For more batte ry information, see Battery (page 3 4).
NOTICE: Only use USB charging adapters mar ked 5V 1A. If you
do not know the voltage and a mperage of your cha rger, use the
WARNING: Us e cautio n when usin g your GoPr o as part o f your
active l ifest yle. Alway s be aware of yo ur surro undings t o avoid
injury t o yoursel f and other s. Abid e by all loca l laws when u sing
your GoPr o and relat ed mounts a nd access ories.
included USB cab le to charge th e camera from your computer.
10 11
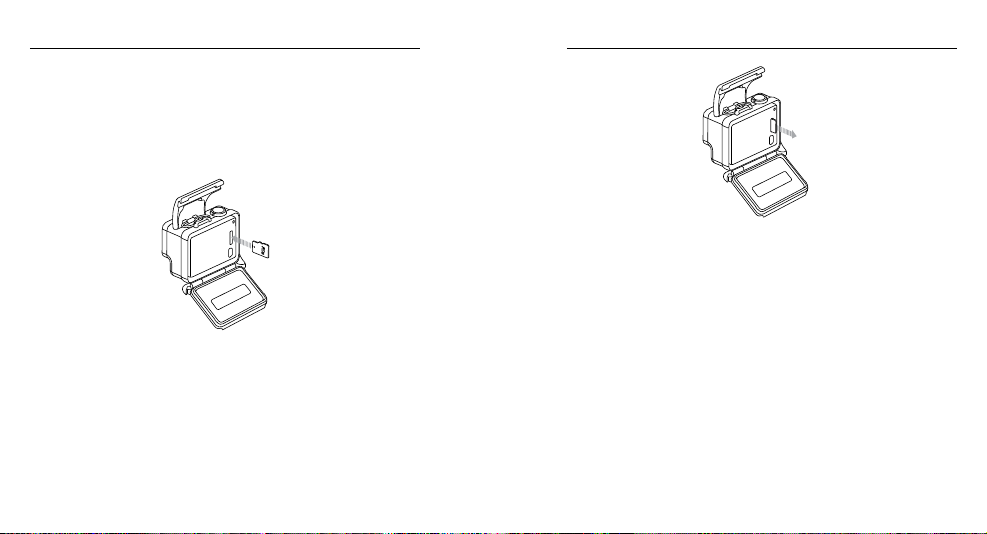
/ Getting Started
INSERTING + REMOVING MICROSD CARDS
The HER O camera is compat ible with mic roSD, microSDHC, and
micro SDXC memory c ards (sold s eparately) up to 32GB c apacity.
You must us e a microSD ca rd with a Clas s 10 or a UHS-1 rati ng.
GoPro recommend s using bran d name memor y cards fo r maximum
reliability in high-vibration activities.
To Remove the microSD C ard:
Place your fingernail ag ainst the edge of th e memory c ard and lightly
press it fur ther into the came ra.
The card spr ings out far enoug h to be removed .
NOTICE: Use care when ha ndling mem ory card s. Avoid liquid s, dust,
To Insert th e microSD Card:
Slide the memor y card into the card slot with t he label fa cing the
GoPro logo on the bac k of the camer a.
When f ully inser ted, the ca rd clicks i nto place.
12 13
and de bris. As a preca ution, powe r off the camer a before inserting
or removing the car d. Check ma nufactu rer guideli nes regarding use
in acceptable temperature ranges.
/ Getting Started
/ Getting Started / Getting Started
POWERING ON + OFF
To Power On:
Press the Power/Mode button onc e. The camer a status lig hts flash
three times and the sound indicator emits three beeps. When the
came ra status sc reen displ ays information , your camer a is on.
To Power Off:
Press and hold the Power/Mode but ton for two se conds. The
came ra status lights fl ash severa l times and th e sound indicato r
emits seven beeps.
14 15
PRO TIP: You can quickly turn your camera on and immediately
being capturing v ideo or Time L apse photos just by pressing the
Shutter/Select but ton. Press a nd release for video, press and h old
for 2 seconds for Tim e Lapse photos. For detail s, see QuikCapture
(page 29).

/ Getting Started / Camera Status Screen
CAMERA SOFTWARE UPDATES
To get the latest features and be st perfor mance from your HERO
came ra, make sure you are using th e most curre nt camera so ware.
You can update your cam era soware usin g GoPro sow are. For more
info, visit gopro.com/getstarted.
CAMER A DEFAULT SET TINGS
The HER O camera powers up w ith the follo wing default settings :
Video 720p60 Super View, Auto Low Light
Photo 5MP
Burst 10 photos in 2 seco nds (5 fps)
Time Lapse 0.5 seconds
QuikCapture On
PRO TIP: To change your Video or Q uikCaptur e settings , see Settings
Mode (page 25).
16 17
Your HERO fea tures a statu s screen on the front of the c amera.
CAMERA STATUS SCREEN
The camera statu s screen displays the fo llowing information about
modes and settings:
1. Camera Modes/FOV
(field of view)
2. Spot Meter
(when Spot Met er is turned o n)
3. Resolution/fps
(frames per s econd)
4. Time Lapse I nterval Settin g
(not shown)
5. Counter
6. Time/Storage/Files
7. Batter y Life
Note: The ico ns that appear o n the camera stat us screen var y by mode.

/ Camera Icons / Camera Menus
Camera Modes
Video
Photo
Burst
Time Lapse
Settings
18 19
Settings
Resolution
Spot Meter
Upside Down
QuikCapture
NTS C/PAL
LEDs
Beeps
Date/Time
Delete
Exit

/ Camera Modes / Video Mode
The HER O features several camera mod es. To display th e modes,
press the Power/Mode button repeatedly.
These modes appear:
Video (default) Record video
Photo Capture a single ph oto
Burst Capture 10 phot os in 2 second s
Time Lapse Capt ure a photo ever y 0.5 seconds
Settings Adjust camera settings
20 21
CAPTURING VIDEO
To capture v ideo, verify that the c amera is in Video mo de. If the Video
] does not appear in the upper le on you r camera st atus
icon [
scre en, press th e Power/Mode button repeatedly until it appears.
To Start Recording:
Press the Shutter/Select butto n. The came ra emits one beep a nd the
came ra status lights fl ash while re cording.
To Stop Recording:
Press the Shutter/Select butto n. The came ra status lights fl ash three
times a nd the came ra emits three beeps to in dicate recording has
stopped.
If the memor y card is ful l or the battery is out of power, your camera
autom atically stops re cording. Your v ideo is save d before the camera
pow ers off.
PRO TIP: With QuikCapture, you can quickly turn your camera on
and immediately begin capturing video just by pressing the Shutter/
Select but ton. To turn off QuikCapture, see QuikCapture (page 29).

/ Photo Mode
/ Burst Mode
In Photo mode, you can capture photos at a res olution of 5MP with
Ultra W ide FOV.
CAPT URING A PHOTO
To capture a p hoto, verif y that the ca mera is in Photo mod e. If the
Photo icon [
status screen, press the Power/Mode butto n repeatedl y until it
appears.
To Capture a Photo:
Press the Shutter/Select butto n. The came ra beeps two times , the
came ra status lights fl ash and the c ounter on the c amera status
scre en increas es by one.
22 23
] does not appear in the upper le on you r camera
With Bu rst mode, you can capture 10 photos in 2 secon ds (5 fps).
CAPT URING BURST PHOTOS
To capture a Burst photo se ries, verify that the c amera is in Burst
mode. If the Burst icon [
came ra status sc reen, pres s the Power/Mode button repeatedly until
it appears.
To Capture Burst Photos:
Press the Shutter/Select butto n. The came ra status lights fl ash and
the ca mera beeps multip le times. Th e counter on th e camera status
scre en increas es by 10.
] does not appear in th e upper le on your

/ Time Lapse Mode
/ Settings Mode
In Time L apse mode, y ou can capture a photo ever y 0.5 second s.
CAPT URING TIME LAPSE PHOTOS
To capture a T ime Lapse series, verify that the c amera is in Time
Lapse mode. If t he Time Lapse icon [
upper le on your camera st atus screen, press the Power/Mode
button repeatedly until it appears.
To Capture Time Lapse Photos:
Press the Shutter/Select butto n. The came ra status lights fl ash each
time a ph oto is taken.
To Stop Time Lapse Photos:
Press the Shutter/Select butto n. The came ra status lights fl ash three
times a nd the came ra emits three beeps.
PRO TIP: With QuikCapture, you can quickly turn your camera
on and immediately be gin capturing Time Lapse photos just by
pressin g and holding the Shutter/Select but ton for two s econds. To
turn o ff QuikCapture, see QuikCapture (page 29).
24 25
] does not appear in the
In Settings mode [ ], you can cha nge the video reso lution and
chan ge settings that apply to a ll camera mo des.
NAVIGATING SETTINGS MENUS
With yo ur HERO, you can n avigate the s ettings me nus using the
buttons on the camera.
To Navigate S ettings Menus:
1. Press the Power/Mode button repeated ly to cycle to Settings
2. Press the Power/Mode but ton repeatedly to c ycle throug h the
3. Press the Shutter/Select butto n to open a setting.
4. Press the Power/Mode but ton repeatedly to c ycle throug h the
5. Press the Shutter/Select butto n to select an optio n.
6. To exit, pr ess the Power/Mode button to cyc le to EXIT, and th en
PRO TIP: To exit from t he Setting s menu at any ti me, press and hold
the Shutter/Select button for two seco nds.
], then press the Shutter/Select button to select it.
mode [
various settings.
options for that set ting.
press the Shutter/Select button.

/ Settings Mode
/ Settings Mode
RESOLUTION
The HER O includes the video ca pture resolution s listed belo w.
All vid eo is captur ed at an Ultra Wide FOV, whi ch provide s the larges t
field of view and best image stability. Ultra Wide FOV is b est when you
want to i nclude as much content as possi ble within the fra me.
SuperView delivers th e world’s most immer sive field of vie w. More
vert ical 4:3 content is au tomatically str etched to ful l-screen 16:9 for
stunning wides creen play back on your computer or T V.
Video
Resolution
FPS
(NTSC/
PAL)
FOV Screen Resolution
108 0p 30/25 Ultra W ide 192 0x1080 , 16:9
Video Setting Best Us e
108 0p
Highe st resolution enhance s clarity a nd detail
to yield stunning results.
Great fo r handheld shots of other s and when
720p
slow mot ion is desire d. Best for captur ing
fast-moving objects.
Great fo r body- or gea r-mounted shot s, when
720p SuperView
you want to cap ture your own p erspective, and
when you want the maximum vertical FOV.
PRO TIP: Easily crea te epic GoPro -style videos using free
GoPro soware. Lea rn more and d ownload th is soware a t
gopro.com/getstarted.
720p* 60/50 Ultra Wide 1280x720, 16:9
720p* SuperView 60/50 Ultra Wide 1280X720, 16:9
* All 720p resolutio ns include Auto Lo w Light. This featur e automatical ly optimizes fps a ccording to
lighting conditions.
26 27

/ Settings Mode
/ Settings Mode
SPOT METER
Spot Meter is good for filming into a sett ing where th e lighting is
differ ent from where you are, such a s filming the o utdoors from within
a car or a shade d environment while sta nding in the sun. Spot Meter
autom atically sets th e exposure ba sed on a single spot in t he middle
of the im age. When Spot Meter is turn ed on, [
came ra status sc reen. The o ptions for this setting ar e Off (default)
and On .
UPSIDE DOWN
If you mount your came ra upside down, you might have to rotate the
files du ring editi ng. This set ting eliminates th e need to flip your video
or photos aer c apture whe n the camera is mounted ups ide down.
The default setti ng is Up.
Setting Description
Up
Down
28 29
Camera is us ed right-sid e up.
Camera is us ed upside do wn.
] appears on the
QUIKCAPTURE
With QuikCapture, you can quickly turn your came ra on and begin
capturing video or Time Laps e photos. The o ptions for th is setting a re
On (default) a nd Off.
To Use QuikCapture to Capture Video:
With the cam era powered o ff, press and release t he Shutter/Select
button. Your ca mera automatically po wers on and begins c apturing
video.
To Use QuikCapture to Capture Time Lapse Photos:
With the cam era powered o ff, press and ho ld the Shutter/Select
button for two seconds . Your cam era automat ically powers on a nd
begins capturing Time Lapse photos.
To Stop Recording:
Press and release the Shutter/Select button to stop recording and
power off the ca mera.

/ Settings Mode
/ Settings Mode
NTSC/PAL
The Vi deo Format s ettings govern fr ame rates for recording a nd
play back when v iewing vid eo on a TV/HDTV.
Setting Description
NTSC (default)
PAL
LED
This setting determines whi ch camera status light s to activate. The
options for this set ting are Both O n (front and rear), Bot h Off, Front On,
and Rea r On. The def ault settin g is Both On.
BEEPS
You can set t he volume for t he sound ind icators to be 100% (defa ult),
70%, or Off.
30 31
Viewing video on a N TSC TV/HDTV (most
televisions in Nor th Americ a)
Viewing video on a PAL T V/HDTV (most
televisions outs ide of North America)
DATE/TIME
Your camera’s date a nd time are automat ically set w hen you conn ect
your ca mera to GoPro sow are. This set ting lets you manually set the
date an d time, if needed.
DELETE
This setting lets y ou delete the l ast file, or delete all files and forma t the
memor y card. LE D lights bli nk until the op eration is co mplete.
NOTICE: If you sele ct All/For mat, the memory card is refor matted,
whic h deletes ever y video an d photo file on your card.

/ Minimum System Requirements
/ Transferring and Playing Back Files
For bes t results pl aying back your co ntent on a computer, visit
gopro.com/getstarted to download th e latest GoPro sow are.
Be sure your Mac
®
or Windows® computer meets these minimum
system requirements:
Windows Mac
Operating
System
CPU
Wind ows 7, 8.x OS X
®
Intel
Core 2 Duo™ (Intel
™
Quad Core
i7 or bet ter
recommended)
Graphics Card
Screen
Resolution
RAM
Card that supports
OpenGL1.2 or later
1280 x 800 1280 x 768
2GB (4GB or g reater
recommended)
5400 RPM inter nal drive
(7200 RPM dri ve or
Hard Dr ive
SSD recommended)
If external , use USB 3.0
or e SATA
32 33
®
10.8 or later
™
Intel Du al Core
(Intel
Quad C ore i7 or better
recommended)
4GB
5400 RPM inter nal drive
(7200 RPM dri ve or
SSD recommended)
If external , use
Thunderbolt, FireWire
or USB 3.0
To play bac k your video a nd photos on a co mputer, you must fi rst
tran sfer these files to a compute r.
TO TRANSFER FILES TO A COMPUTER:
1. Download an d install the late st GoPro so ware from
gopro.com/getstarted. The HERO camera was d esigned to
commu nicate with GoPro s oware to he lp you easily locate
and tr ansfer your files.
2. Connect the ca mera to your co mputer usin g the includ ed
USB cable.
3. Power on the camera.
4. Copy the files to your co mputer or externa l hard drive.
5. To p lay back th e files, use GoP ro soware.
PRO TIP: You can al so transfer files to a comp uter using a ca rd reader
(sold s eparately). C onnect t he card reader to your comp uter and ins ert
the microSD c ard into the re ader. You can then t ransfer yo ur files to
your compute r or delete sele cted files on your ca rd.

/ Battery / Battery
Your HERO ca mera, bat tery, and housing a re integrate d. You cannot
remove the ca mera from th e housing, or remove t he batter y from
the camera.
The ba ttery ico n displaye d in the camera status screen blink s
when t he batter y drops below 10%. If the ba ttery rea ches 0% while
recording , the camer a saves the file a nd powers off.
MAXIMIZING BATTERY LIFE
Extreme cold temperatures can decrease batter y life. To maximize
battery life in cold cond itions, keep the c amera in a war m place prior
to use.
PRO TIP: QuikCapture helps maximize bat tery life. For deta ils, see
QuikCapture (page 29).
CHARGING TIME
The ba ttery cha rges to 80% in approxi mately one hour and 100% i n
approximately two h ours when using a USB charging ad apter. Some
chargers might charge at a slower rate.
34 35
USING THE CAMERA WHILE CHARGING
You can ca pture video and ph otos while cha rging the ca mera’s
battery. Plug the c amera into a US B charging device using the
included USB cab le. Perfor mance of non-GoPr o chargers c annot be
guarantee d. You cannot us e your HERO while c harging it throug h a
co mpu te r.
NOTICE: Only use USB cha rging adapters ma rked 5V 1A. If you do not
know t he voltage an d amperage of your c harger, use the i ncluded USB
cable to charge the camera from your compute r.

/ Battery
/ Impor tant Messages
BATTERY STORAGE A ND HANDLING
The camera contains sensitive components, including the battery.
Avoid exp osing your ca mera to ver y cold or very h ot temperat ures.
Low or high temp erature con ditions may tempo rarily shorten t he
battery life or ca use the cam era to tempor arily stop worki ng properly.
Avoid dramati c changes in temperatur e or humidit y when using t he
came ra, as cond ensation may form on or wit hin the camera.
The integra ted camera h ousing prote cts the camera and ba ttery fro m
water damage. For mor e information, se e Camera Housing (page
39). Do not tur n on your cam era if the camera (insid e the housing)
gets wet. If your cam era is already on, turn it o ff immediately. Allow
the ca mera to dry thoro ughly before using i t again. Do not d ry the
came ra or batter y with an externa l heat source such a s a microwave
oven or hair dr yer. Damage to th e camera or batter y caused by cont act
with liquid (insid e the housin g) is not covere d under the warra nty.
WARNING: Do not drop, di sassem ble, open , crush, b end, defo rm,
punctu re, shred, m icrowave, i ncinera te, or paint t he camer a.
Do not inse rt forei gn objects into any o pening on t he camer a,
such as th e mini-US B port . Do not use t he camer a if it has been
damaged —for example, if cr acked, puncture d, or harm ed by
water. Disas sembling or punc turing t he integra ted batter y can
cause an ex plosion or fire.
36 37
MICROSD CARD MESSAGES
No card prese nt. The cam era require s a
NO SD
microSD, microSDHC or microSDXC card to
capture vid eos and photos.
Card i s not formatted or is improp erly
forma tted. Sele ct Yes to format t he card,
FORMAT SD?
or sele ct No and ins ert a different card.
NOTICE: If you sele ct Yes, all of th e content
on the c ard is delete d.
FULL Card is f ull. Delete files or sw ap card.
SD ERR
Camera is un able to read c ard format ting.
Reformat the c ard in the ca mera.
PRO TIP: Reformat you r microSD card on a reg ular basis t o ensure
that th e card can co ntinue to rec eive inform ation from th e camera.

/ Impor tant Messages
/ Camera Housing
FILE REPAIR ICON
If you se e the File Repa ir icon on the c amera stat us
scre en, your las t video file wa s corrupte d during
recording . Press any button to repair the file.
TEMPERATURE ICON
The Temperature icon appears on the cam era status
scre en when the c amera becomes too hot and need s
to cool d own. Simply let it sit a nd cool before attem pting
to use it a gain. Your camera was designed to i dentify
condition s of overheating an d is designe d to respond
accordingly.
38 39
Your HERO ca mera comes w ith two ty pes of backdoors: Standard
Backdoor (waterproof) and Skeleton Backdoor (non-waterproof).
The Standa rd Backdoo r makes the housing
water proof to 131’ (40m). Us e this door wh en you
need to protect the c amera from water, dir t, sand,
and other environmental hazards.
The Skeleton Backdoor (non-waterproof)
provides better so und qualit y by allowin g more
sound to reac h the camer a’s micro phone. It al so
redu ces wind noise at spe eds up to 100mph w hen
mounted on helmet s, motorcy cles, bikes, and
other f ast-movin g vehicles. Use this backdoor
only when sa nd, excessive dir t/dust, and water
damage are not a risk . This backd oor is also
recommended for use inside vehicles.
®
PRO TIP: Apply Rain-X
came ra housing le ns to prevent water spots from forming when usi ng
your ca mera in rain or water.
or a simil ar anti-beading solution to t he

/ Camera Housing
/ Camera Housing
SWAPPING BACKDOORS
You can sw itch the backdoor of your HERO cam era to suit your activit y
and shooting conditions.
Note: Your HERO canno t be removed fro m the housing.
PREVENTING WATER DAMAGE TO YOUR CAMER A
The rubbe r seal that lines the Standard Backdoor for ms a waterpr oof
barr ier that protect s your HERO in wet conditions .
Keep th e Standard B ackdoor’s rubber seal clean . A single hair or grain
of san d can cause a leak an d damage your camera.
Aer every use in sa lt water, close the Standard Backdoor tig htly, and
then r inse the out side of the camer a housing with non-s alt wate r and
dry. Not doing this can eventually cause corrosion of the hinge pin
and sa lt buildup in t he seal, which ca n cause failure.
To clean the seal, remove it from t he backdoo r, rinse it i n fresh water,
To Change the Backdoor:
1. Open the bac kdoor of the ho using so that i t hangs downward s.
2. Firmly pull the ba ckdoor dow nwards until it sna ps free from the
main housing.
3. Line up the replacement backd oor into the hinge op ening.
4. Push upwar ds on the bac kdoor until it c licks into place.
40 41
and shake dr y (drying with a cl oth may caus e lint to compro mise the
seal). Re-install the seal into the grooves in the Standard Backdoor.
WARNING: Fai lure to fol low thes e steps eac h time you us e
your GoPr o can resu lt in leaks t hat may damage or des troy your
camera . Water will d amage bo th the cam era and th e batter y,
which cou ld cause a n explosi on or fire. Your wa rranty d oes not
cover water d amage re sulting f rom user er ror.

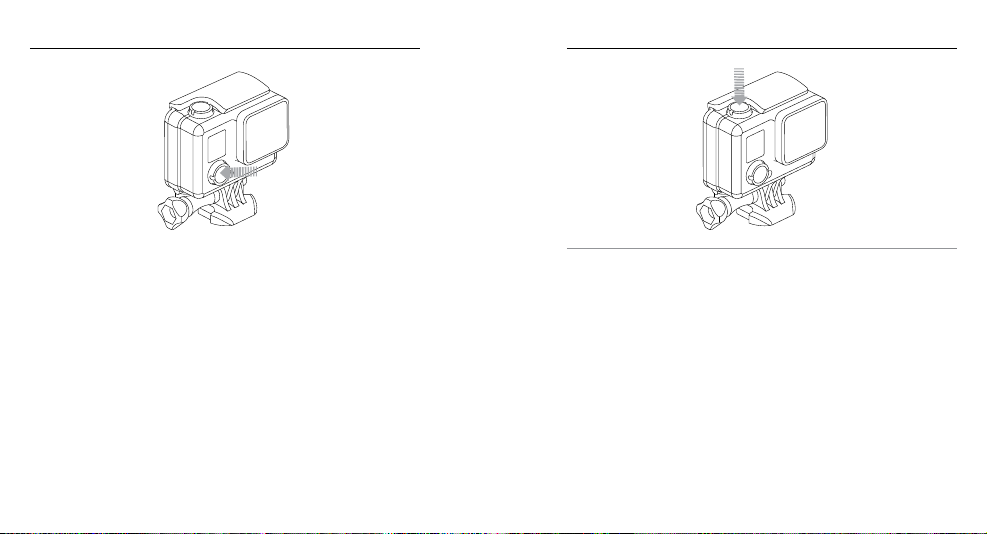
/ Using the Mounts
/ Using the Mounts
ATTACHING YOUR CAMERA TO MOUNTS
To attach your HER O camera to a mo unt, you need a Quick Releas e
Buckle, thum b screw or har dware dep ending on th e mount you are
using . For more infor mation on mounts , visit gopro.com/support.
MOUNTING GUIDELINES
Follow these guidelines when attaching mounts:
• Attach th e adhesive mount s at least 24 hou rs before use. Allow
72 hours for com plete adhesion.
• Adhesive mount s must be mounted onl y on smooth sur faces.
Porou s or textured surf aces do not enable a proper b ond. When
applying the mount, firmly press it into place and en sure full
conta ct over the entire su rface.
Quick Release
Buckle
Thumb Screw Housing Complete Unit
USING CURV ED + FLAT ADHESIVE MOUNTS
The Curve d + Flat Adhesive Mounts make it easy to at tach the ca mera
to cur ved and flat surfaces of helmets, vehicl es, and gear. Using the
Quick Release Buckle, the assembled camera housing can be clicked
on and off the se cured Cur ved or Flat Adhesive Mounts.
• Apply adh esive mount s to clean sur faces onl y. Wax, oil , dirt, or
other d ebris red uce adhesi on, which c an result in a weak bon d
and risk of losing the camera should the connecti on fail.
• Attach ad hesive mounts in room tem perature co nditions.
Adhesives d o not bond properly if appl ied in cold or damp
environme nts to cold or da mp surfa ces.
For more infor mation on mou nts, visit gopro.com/support.
WARNING: If u sing your c amera wi th a GoPro h elmet moun t or
strap, a lways sel ect a helme t that meet s the appl icable s afety
standa rd. Choos e the right helmet fo r your par ticula r sport o r
activ ity and ma ke sure that i t is the rig ht fit and size f or you.
Inspec t your helm et to ensure t hat it is in go od condit ion, and
follow t he helmet ma nufact urer's in struct ions on safe helmet
use. Any he lmet that ha s sustained a major i mpact sh ould be
replace d. No helme t can prote ct again st injur y in every accident .
Flat Adhesive Mount Curved Adhesive Mount
42 43

/ Using the Mounts
/ Frequently Asked Questions
ATTACHING THE LOCKING PLUG
If you are using t he HERO in high -impact sports suc h as surfing or
skiin g where significant impa ct might occur, use th e locking plug to
secu rely lock the Quick Releas e Buckle finge rs into place. The lo cking
plug he lps to prevent t he housing f rom accide ntally releasing f rom
the mount.
MY GOPRO WON’T POWER ON
Make sure your Go Pro is charged. To char ge your camera, us e the
included USB cab le and a computer or USB c harging ad apter.
MY GOPRO WON’T RE SPOND WHEN I PRE SS A BUTTON
Press and ho ld the
Power/Mode button
for 8 seconds to reset your
camera. This reset saves a ll of your conte nt and settings, a nd powers
off your c amera.
MY PLAYBACK IS CHOPPY
Chop py playba ck is typic ally not a prob lem with the file. If your footage
skips , one of these s ituations is likely t he cause:
• Using an incompatible v ideo player. Not all vid eo players s upport
To Attach the Locking Plug:
1. Loop th e circular r ing over the thumbscrew. The cir cular ring act s
as a leash to prevent droppin g or losing the l ocking plug.
2. Slide the Quick Release Buckle into the m ount until it cl icks
into place.
3. Press the U-shaped par t of the plug into the U-shaped space in
the Quick Release Buckle.
WARNING: To avoid in jury in t he event of an a ccident, d o not use
the lock ing plug or tether wh en using a mo unting dev ice on a
helmet or o ther pers onal prot ective g ear.
44 45
the H.26 4 codec. For best result s, use the latest GoPro so ware,
avail able for fre e at gopro.com/getstarted.
• The computer doe s not meet the mi nimum requi rements for HD
play back. The highe r the resolution an d frame rate of your video,
the harder the computer has to wor k to play it bac k. Make sure
that your computer meets the minimum requirements listed in
Minimum System Requirements (page 32).
• Playing your content direct ly from your camera over a USB
connection. Tran sfer the file to t he computer to play b ack. If your
computer does not me et the minimu m requireme nts, make sure
that al l other progr ams on your compute r are closed .

/ Customer Support
GoPro is dedicated to providing the best possible
service. To reach GoPro Customer Support, visit
gopro.com/support.
/ Trademarks
GoPro, HERO, the GoPro logo, th e GoPro Be a Hero logo, Ba cPac,
Protune, Sup erView, and Wear It. Mount It . Love It. are tradem arks
or regi stered trademarks of G oPro, Inc. in t he US and inter national ly.
Other names and ma rks are the p roperty of their respe ctive own ers.
/ Regulatory Information
To see additional information regarding country certifications, refer
to the Im portant P roduct + Safety Informatio n Guide included w ith
your camera.
46
 Loading...