

Page 1
Gigaset 4 010 C o m fort, CHIN eng, A31008-G4010-C102-1-
umschl_v.fm
25.09.0
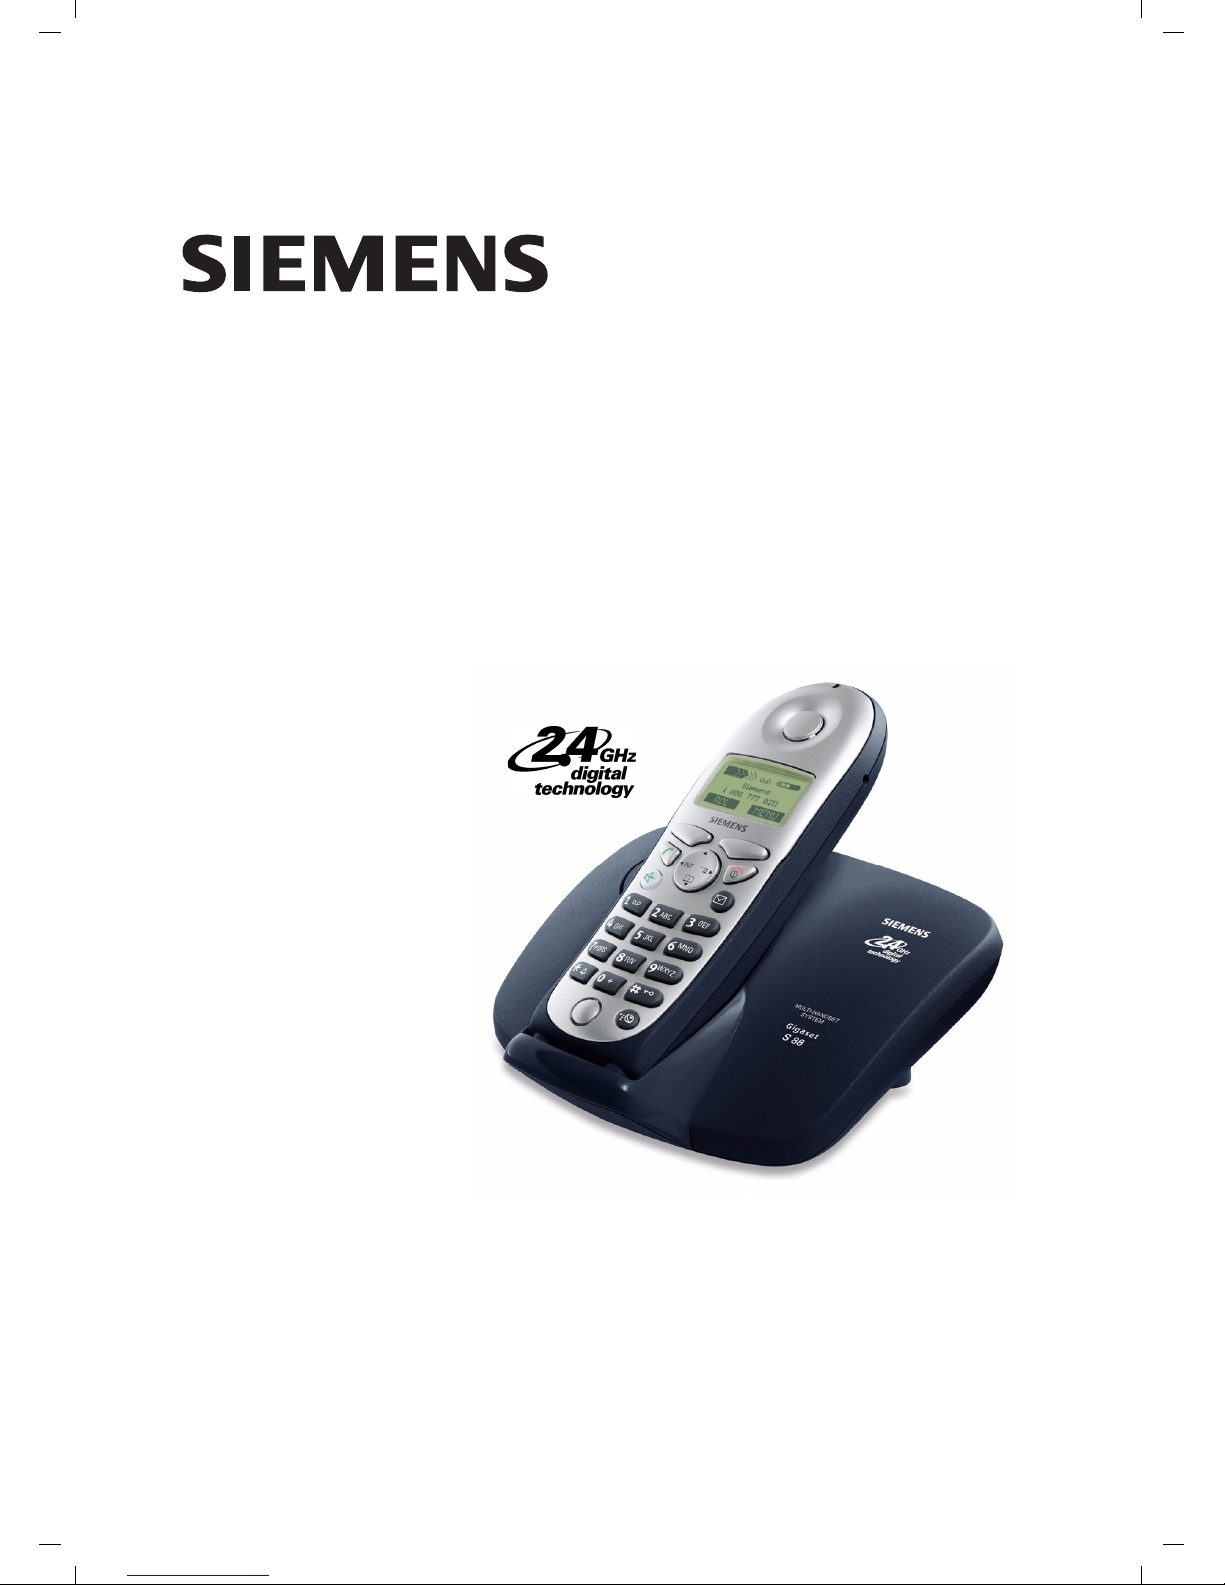
Gigaset S 88
Be inspired
User Manual and
Safety Precautions
Page 2

II
General
Gigaset 4 010 C o m fort, CHIN eng, A31008-G4010-C102-1-
umschl_v.fm
25.09.0
Congratulations
Congratulations on your purchase of the Siemens Gigaset telephone system! This
phone´s 2.4 GHz frequency and high-speed digital voice encoding provide reception
and voice clarity that is superior to other cordless phones. And, its digital spread spectrum technology will provide you with secure, private conversations.
Page 3
General
III
Gigaset 4 010 C o m fort, CHIN eng, A31008-G4010-C102-1-
umschl_v.fm
25.09.0
Quick Reference
Handset
Turning on/off the handset
(see page 5)
hold down a
Turning keypad protection on/
off (see page 6)
hold down ª
Turning tones on/off
(see page 40)
hold down «
Making an external call
(see page 8)
o
c
Redialing a number
(see page 13)
z if necessary D select entry c
Saving a called number
in the directory (see page 19)
z MENU D [
Dialing from the directory
(see page 20)
D
o[Name] if necessary D c or D c
Setting the handset volume
(see page 40)
MENU D [ [
DF
or
G
Save
Making an Internal call to a specific handset
F
and D to select internal user c
Making an Internal call to a all
handsets (see page 8)
F
and D c
Transferring a call to another
handset
F
and D to select internal user [ a
Making a consultation call
F
and D to select internal user [ ; end: End
Setting the date and time
(see page 7)
MENU D [ D [
Set
date and time F G D Save
Setting the alarm clock
(see page 15)
MENU D [ D [
Enter settings
F G D Save
Send to Dir
Sound Settings
Handset Volume
Intercom Call
Appoint./Clock Date/Time
Appoint./Clock Alarm Clock
Page 4
IV
Gigaset 4 010 C o m fort, CHIN eng, A31008-G4010-C102-1-
umschl_v.fm
25.09.0
General
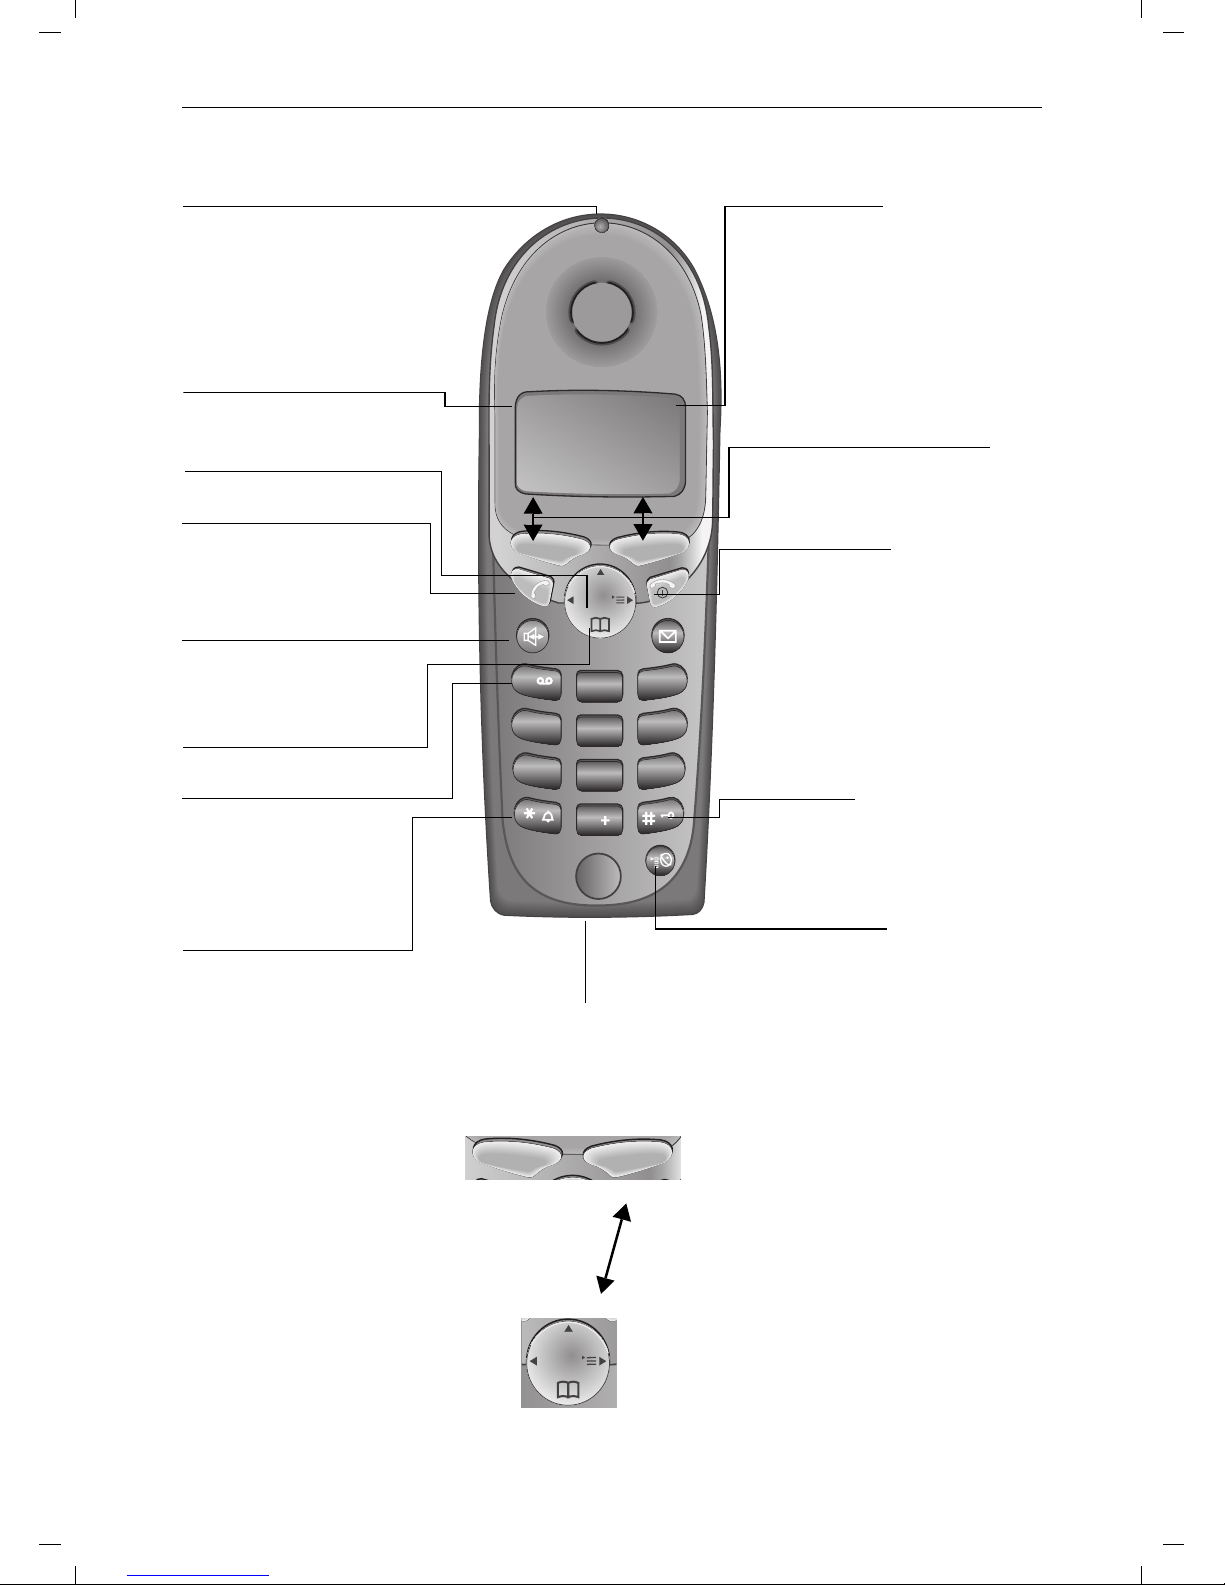
Handset Diagram
Using the Navi Key and Soft Keys
1
2
3
ABC
DEF
INT
4
5
6
JKL
MNOGHI
7
8
9
TUV
WXYZPQRS
0
Open directory
End call and On/
Off key
Ta l k ke y
Memory key
Accesses speed dial
numbers
– end call
– cancel function
– back one menu level
(press briefly)
– return to idle state
(hold down)
– on/off in idle status
(hold down)
Speakerphone key
Ñe
Annabella
07.19.01 13:13
{ MENU
– Accept call
– Dial number
Star key (*)
Hold down to turn on
and off the ringer
Charging status
= empty e 1/3
U full V2/3
flashes when low
Signal strength
(strong, medium, weak)
Navi key
Status LED (light)
Soft keys
The soft keys give you access to
the function shown in the display.
Lights up during a call;
Flashes for:
– Incoming calls
– New messages
– Alarm calls, appoint-
ments, anniversaries
Key 1
(Programmable) Hold
down to select telco
voice mailbox
Microphone
Pound key
Hold down to turn on and
off the keypad protection
INT
With the right soft keys you
can carry out functions that
can also be partly controlled
with the navi key.
The side of the navi key
which you must press is indi-
cated in the operating instructions by arrows:
F/ G (left/right)
E/ D (top/bottom)
Navi key
Soft keys
Switch from handset to
speakerphone.
Page 5
General
V
Gigaset 4 010 C o m fort, CHIN eng, A31008-G4010-C102-1-
umschl_v.fm
25.09.0
Functions of the Navi Key
The navi key has different functions in specific operating situations.
Displays
The following symbols appear in the display, depending on the operating situation:
Example for Menu Operation: Setting the Volume for the
Speakerphone
Navi key When the tele-
phone is idle
In lists and menus In an entry field
E
Upward Cursor one
line up
D
Open directory Downward Cursor one
line down
G
Open menu Select entry (OK) Cursor to the right
F
Open the list of internal users
One menu level
back (cancel)
Cursor to the left
Soft keys Meaning
MENU Menu button: Activate the general menu when telephone is idle.
Z
Confirm menu function and select. End and save the setting.
W
Delete key (Backspace): Delete entries from right to left.
{
Automatic redial key: Open the list of the last 5 numbers dialed.
I
Displays if telco voice mail or call log is active
Í
One menu level back, cancel
1. MENU Press
G or the right soft key ¿.
2.
D
Scroll to Sound Settings.
3.
Z
Select Sound Settings.
4.
Z
Select Handset Volume.
5.
G
or F Select the required volume for speakerphone.
6.
Save
Store the required volume for speakerphone.
Page 6

VI
Gigaset 4 010 C o m fort, CHIN eng, A31008-G4010-C102-1-
umschl_v.fm
25.09.0
General
Page 7

1
Gigaset 4010 Comfort, CHIN eng, A31008-G4010-
4010CoIVZ.fm
25.09.0
Contents
Setting Up the Telephone . . . . . . . . . . . . . . . . . . . . . . . . . . . . . . . . 2
Date and Time . . . . . . . . . . . . . . . . . . . . . . . . . . . . . . . . . . . . . . . . . . 7
Making Calls . . . . . . . . . . . . . . . . . . . . . . . . . . . . . . . . . . . . . . . . . . . 8
Enhanced Telephone Features . . . . . . . . . . . . . . . . . . . . . . . . . . 13
Handset Operation . . . . . . . . . . . . . . . . . . . . . . . . . . . . . . . . . . . . . 29
Customizing Handset Settings . . . . . . . . . . . . . . . . . . . . . . . . . . . 40
Base Station Settings . . . . . . . . . . . . . . . . . . . . . . . . . . . . . . . . . . 44
Advanced Settings . . . . . . . . . . . . . . . . . . . . . . . . . . . . . . . . . . . . . 46
Appendix . . . . . . . . . . . . . . . . . . . . . . . . . . . . . . . . . . . . . . . . . . . . . 49
Safety Precautions . . . . . . . . . . . . . . . . . . . . . . . . . . . . . . . . . . . . . 51
Limited Warranty . . . . . . . . . . . . . . . . . . . . . . . . . . . . . . . . . . . . . . 52
Menu table . . . . . . . . . . . . . . . . . . . . . . . . . . . . . . . . . . . . . . . . . . . 54
Index . . . . . . . . . . . . . . . . . . . . . . . . . . . . . . . . . . . . . . . . . . . . . . . . . 56
Page 8
2
Setting Up the Telephone
Gigaset 4010 Comfort, CHIN eng, A31008-G4010-C102-1-7619
vorberei.fm
25.09.03
Setting Up the Telephone
This delivery units contains:
• 1 Gigaset base station
• 1 Gigaset S 88 handset
• 1 power supply unit
• 1 telephone cord
• 1 belt clip
• 2 AA rechargeable NiCd batteries
• 1 user manual
• 1 Quick Start Guide
Installing the Base Station
The base station is designed for operation in protected rooms with a
temperature range from +40°F to +100°F.
IMPORTANT! For best reception, place the base in a high central location, away from other electrical devices.
F
Page 9
3
Setting Up the Telephone
Gigaset 4010 Comfort, CHIN eng, A31008-G4010-
vorberei.fm
25.09.0
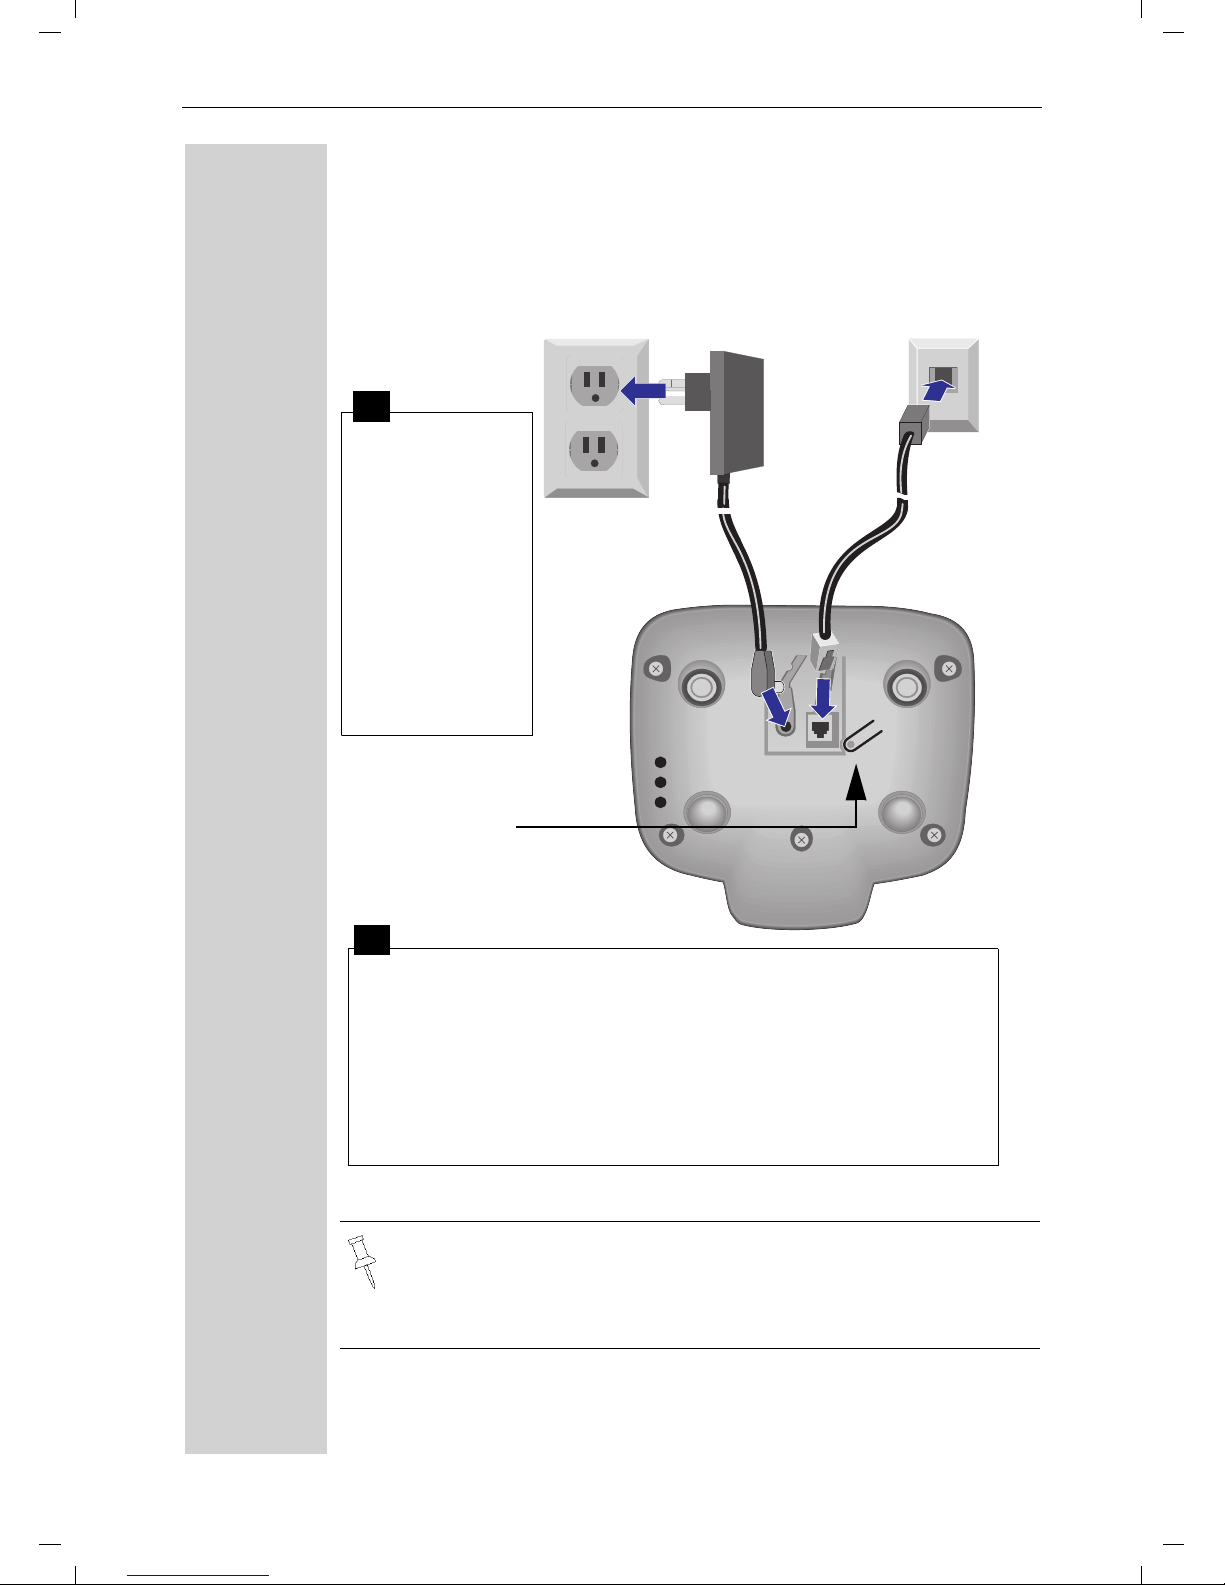
Connecting the Base Station
● Only use the power supply unit included as indicated on the
underside of the base.
● Use the telephone cord supplied. Do not use any old cords.
● Do not use an outlet controlled by a wall switch.
Power supply unit
with cord
(110 VAC/60 Hz)
● Insert the
small plug on
cord into phone jack
● Place cord in
the base cable
channel,
● insert power
supply unit
into wall outlet.
● Insert plug on the telephone cord into telephone jack on
base unit (clicks into place),
● Place cord in cable channel on the bottom of the base,
● Insert other end of plug into telephone jack on the wall.
● The installation of the base unit should allow at least 8 inches
between the base and persons to be in compliance with FCC
RF exposure guidelines
Telephone jack with telephone cord
Key to register
additional
handsets/Page
handsets.
1
2
Page 10
4
Setting Up the Telephone
Gigaset 4010 Comfort, CHIN eng, A31008-G4010-C102-1-7619
vorberei.fm
25.09.03
Operating the Handset
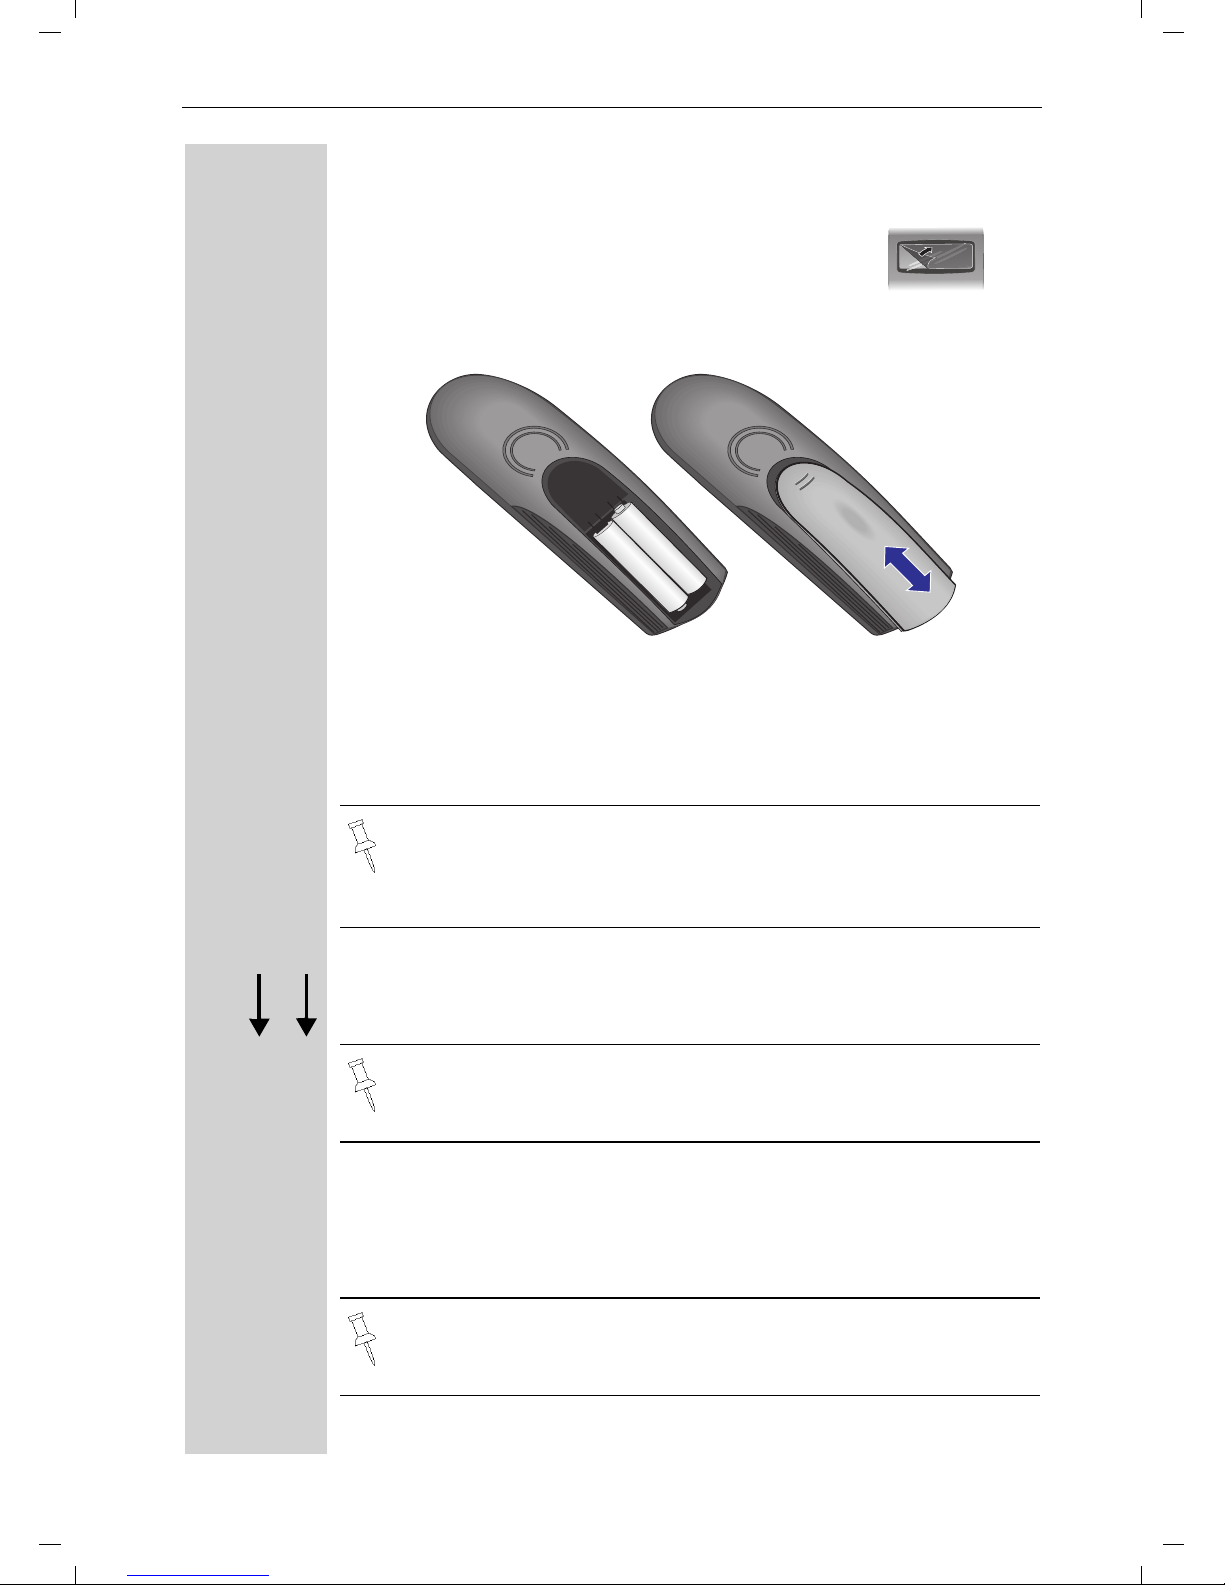
Inserting the Batteries
● Insert the batteries, as shown above.
● Place cover and push gently upward until it clicks into place (the unit
is shipped with the battery cover off).
● To open, press the grooved area on the cover and slide back.
Placing Handset into the Base Station and Charging the
Batteries
Turn the handset off by holding down the END key then place it in the
base station with the display facing upward toward you. After about
one minute, the handset's internal number will appear on the display
(for example“INT 1”). Successful registration is signaled by a confirmation beep (crescendo tone sequence).
The display is protected by a plastic film.
Remove the protective plastic film!
● Use only “AA” rechargeable NiCd or NiMH batteries. Do not
use Alkaline, Lithium or non-rechargeable batteries.
● Never use non-Siemens charging units as these can damage
the batteries.
IMPORTANT! Before using your handset, you must register it
first.
For information on how to register additional handsets (bought
separately), see page 29.
+
–
+
–
k
Ö
Page 11
5
Setting Up the Telephone
Gigaset 4010 Comfort, CHIN eng, A31008-G4010-
vorberei.fm
25.09.0
Leave the handset in the base station for about 12–14 hours the first
time the batteries are charged. The charging status symbol flashes on
the handset, indicating that the batteries are being charged:
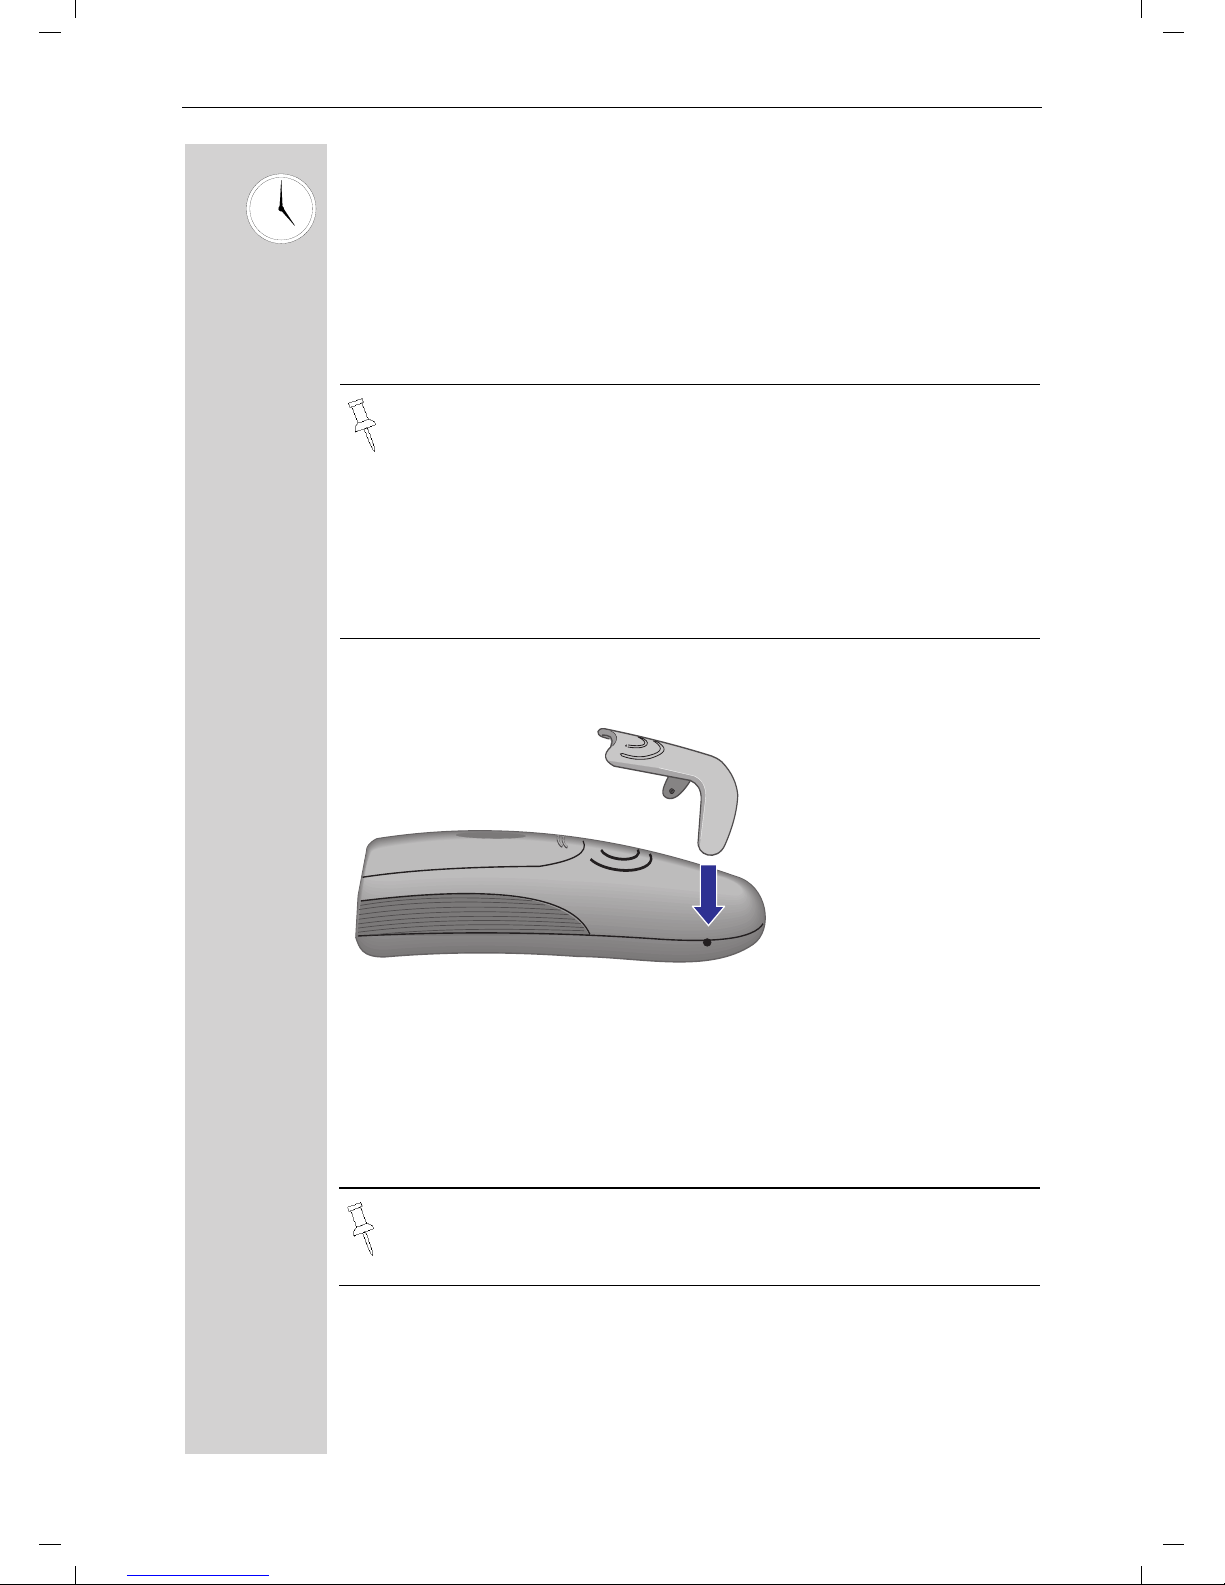
Attaching the Belt Clip
Push the belt clip onto the back of the handset until the tabs click into
place.
Turning Handset On/Off
a To turn handset on/off, hold down the End key – you will hear a con-
firmation beep.
Ý
Batteries empty (symbol
flashes)
Û
Batteries 2/3 charged
Ü
Batteries 1/3 charged
Ú
Batteries fully charged
● Once the initial charging operation is completed, you can re-
place your handset into the base station or charger after each
call. Charging is controlled electronically. This ensures optimum charging and prolongs battery life.
● The batteries heat up during charging. This is normal and not
dangerous.
● The battery charging status is correctly displayed only after
uninterrupted charging/discharging. You should therefore avoid opening the battery compartment unnecessarily.
The handset is turned on as soon as you insert the batteries and
place the handset in the base station.
Page 12

6
Setting Up the Telephone
Gigaset 4010 Comfort, CHIN eng, A31008-G4010-C102-1-7619
vorberei.fm
25.09.03
Turning Keypad Lock On/Off
You can disable the handset keys when carrying the unit in your pocket
or bag. This protects from accidental key presses. If there is an incoming call, the key lock is automatically turned off and turned back on after the call has ended.
c
Accepting a call: Press the Talk key.
ª To turn on/off, hold down the keypad lock, hold down the pound key –
you will hear the confirmation beep1!
1. Confirmation beep = rising tone sequence,
Error beep = falling tone sequence.
Note: 911/Emergency calls can not be made when the key pad
is locked.
Page 13
7
Press keys:
Date and Time
Gigaset 4010 Comfort, CHIN eng, A31008-G4010-C102-1-7619
uhrzeit.fm
25.09.03
Date and Time
Setting the Date and the Time
The date and time settings are necessary in order for
the date and time of the arriving of messages/incoming
calls to be displayed correctly.
You can also set the clock mode, to the 12 hour mode
(AM and PM) or 24 hour mode. If you subscribe the
Caller ID the date and time are automatically set. If you
do not subscribe to Caller ID follow the steps below to
set the date and time.
Date
MENU Press Menu.
ееееееееееееееееееееееееееееееее
D Appoint./Clock [
Scroll to Appoint/Clock and press OK.
ееееееееееееееееееееееееееееееее
D Date/Time [
Scroll to Date/Time and press OK.
The current setting is displayed in theMM-DD-YY
mode.
For example:
Þ¢ŸÞÞ] Enter the month/day/year (for example: 05-20-01, as
shown).
Time
D Scroll down one line.
] ¬ Þ ¢ Enter the hours/minutes (for example: 10.05, as
shown).
Factory default: 12 hour mode. If am or pm is displayed
next to the time, 12 hour mode is activated. If you
move the cursor to the time field, you can change from
am to pm using the left display key.
Clock Mode (12 or 24 Hours)
D Scroll down one line to set mode.
F G If necessary, select either 24 hour or 12 hour display
mode.
Save Save the settings.
• The default setting is 12 hour mode.
• If you subscribe to Caller ID, the date and time
may be sent from your telephone service and
will be automatically set.
By default, the clock is set to the 12 hour mode
and am or pm is displayed next to the time. If
you move the cursor to the time field, you can
change from am to pm using the left soft key.
Page 14

8
Press keys:
Making Calls
Gigaset 4010 Comfort, CHIN eng, A31008-G4010-C102-1-7619
telef.fm
25.09.03
Making Calls
Making an External Call
o X Dial the telephone number. If necessary use the back-
space key to correct mistakes.
c Press the Talk key.
a To end the call, press the End key.
To insert a pause when dialing a number:
MENU Press Menu.
ееееееееееееееееееееееееееееееее
D Insert Pause [
Scroll to Insert Pause and press Ok.
Making an Intercom Call
Intercom calls are calls to other registered handsets
and do not tie up your telephone line (for example, calls
within your home from the kitchen to the living room).
For example:
F Press INT on the navi key. Your own handset is identi-
fied by “<”.
D E c Scroll to the handset you want to call and press the Talk
key.
or
e.g. Ÿ Simply enter the number of the handset you want to
call.
Paging All Handsets
F Press INT on the navi key.Your own handset is identi-
fied by “<”.
« Press the « key
• You can also press the Talk key first
and then
enter the telephone number – each digit is dialed immediately.
• You can cancel the dialing operation with the
End key.
Page 15

9
Press keys:
Making Calls
Gigaset 4010 Comfort, CHIN eng, A31008-G4010-C102-1-7619
telef.fm
25.09.03
Ending an Internal Call
a Press the END key to end the call.
Answering a Call
Your handset rings (ringer) and the status LED flashes.
c
/u Press the TALK or speakerphone u key.
or
With the “Auto Answer” feature you may answer a call
by simply removing the handset from the base station
or charger (for instructions on how to turn on the “Auto
Answer” feature see page 43).
Page 16
10
Press keys:
Making Calls
Gigaset 4010 Comfort, CHIN eng, A31008-G4010-C102-1-7619
telef.fm
25.09.03
Answering Caller ID Calls
An incoming call is displayed as follows:
ееееееееееееееееееееееееееее
5125551234
If both number and name were transmitted, then
ееееееееееееееееееееееееееее
John Smith
both will be shown. If the number is stored in the telephone book, only the name stored will appear.
еееееееееееееееееееееееееееееее
External
If you have not applied for Caller ID service.
ееееееееееееееееееееееееееее
Private Call
The caller has chosen to block his or her number.
ееееееееееееееееееееееееееее
Out of Area
If the number is not available to your telephone company, Out of Area will be displayed instead.
Caller ID is a service provided by the local telephone company which allows your Gigaset S88
to display the name and number of the person
who is calling you. Contact your local telephone
company to subscribe to Caller ID service.
Rgr Off Accept
0891234567
Telephone
number
Bell Icon
In the first displayline you see a bell:
● if you have not applied for Caller ID Service,
● if the caller has chosen to block his or her name,
● if the name is not available to your telephone com-
pany.
Page 17

11
Press keys:
Making Calls
Gigaset 4010 Comfort, CHIN eng, A31008-G4010-C102-1-7619
telef.fm
25.09.03
Handset Speakerphone
Using your handset speakerphone offers the following
advantages:
● Before dialing, you hear the dial tone without having
to lift the handset to your ear.
● Other people can listen in and join on the call.
● Leaves your hands free, for example to take notes.
Dialing with the Speakerphone
o Dial the desired number.
u Press the speakerphone key u.
Using the Handset Speakerphone During a Call
u Press to turn on the handset speakerphone.
To set the volume during a call, press the speakerphone key
u again.
F G Raise or lower the volume using the navi key.
Save Save the volume level.
c To change from speakerphone to the handset, press
Talk to end the call, press End or replace the handset in
base or charger.
a End the call.
Muting the Handset
You can mute your handset during an external call to
talk privately to another person in the room. The external caller cannot hear your conversation. You cannot
hear your caller either.
F While on an active call, Press Int on the navi key to
mute the microphone – the call is placed on hold and
the external caller will hear music.
Î To return to the external caller, press the escape key.
If you want to replace the handset in the base
station during a call (if for example the battery is
low), hold down the speakerphone key u
.
Page 18

12
Press keys:
Making Calls
Gigaset 4010 Comfort, CHIN eng, A31008-G4010-C102-1-7619
telef.fm
25.09.03
Telco Voice Mail
If you subscribe to voice mail from your local telephone
company, you may use your Gigaset S88 handset to retrieve messages. It is recommended you store the access number in the "1" key.
Storing Access Number for Retrieving Voice
Mail
MENU Press Menu.
ееееееееееееееееееееееееееееееее
D Answering M. [
Scroll to Ans Machine and press OK.
ееееееееееееееееееееееееееееееее
D Set Key 1 [
Select to Set Key 1 and press OK.
ееееееееееееееееееееееееееееееее
D Voice Mail [
Set the Voice Mail.
o Dial the voice mail access number.
MENU Press Menu.
ееееееееееееееееееееееееееееееее
Save Entry [
Scroll to Save Entry and press OK.
Once you have entered the voice mail access
number, simply hold down the ] key on the
handset and you are directly connected to the
Telco voice mail system. Follow the Telco instructions.
Page 19

13
Press keys:
Enhanced Telephone Features
Gigaset 4010 Comfort, CHIN eng, A31008-G4010-C102-1-7619
komfort.fm
25.09.03
Enhanced Telephone Features
In addition to its standard features, your Gigaset S88
offers a number of other fast, convenient, enhanced
features.
Redial
Your handset automatically saves the last five telephone numbers dialed (see page 24).
Manual Redial
z Press the Redial soft key.
D Select the desired telephone number/name using the
navi key.
c Press the Talk or Speakerphone key – the telephone num-
ber is dialed.
Automatic Redial
The Gigaset S88 can automatically redial a telephone
number ten times (with an interval of 20 seconds in
each case.) The speakerphone key flashes and the
speaker is active during this operation.
This function turns itself off after 10 unsuccessful
tries.
To cancel automatic redial, press or any key.
The person you called is not available:
z Press the Redial soft key.
D Scroll to the desired telephone number/name.
MENU Press Menu.
ееееееееееееееееееееееееееееееее
D Auto Redial [
Scroll to Auto Redial and press OK – After a few moments the phone will start redialing the number.
When the user answers:
c Press the Talk or Speakerphone key.
Off
Automatic redialing is turned off if you subsequently make a call. You must turn it back on afterwards.
Page 20

14
Press keys:
Enhanced Telephone Features
Gigaset 4010 Comfort, CHIN eng, A31008-G4010-C102-1-7619
komfort.fm
25.09.03
Delete Entry from Redialing List
z Press the Redial soft key.
D Scroll to desired telephone number.
MENU Press Menu.
ееееееееееееееееееееееееееееееее
D Delete Entry [
Scroll to Delete Entry and press OK.
Copying the Redial Number to the Directory
z Press the Redial soft key.
D Scroll to desired telephone number.
MENU Press Menu.
ееееееееееееееееееееееееееееееее
D Send to Dir [
Scroll to Send to Dir and press OK.
The telephone number is already entered.
o If desired, edit the name and number (and, if appropria-
te, an anniversary, (see page 23)).
MENU Press Menu.
ееееееееееееееееееееееееееееееее
Save Entry [
Save the entry by pressing OK.
For more information about editing letters and
characters (see page 49).
Page 21

15
Press keys:
Enhanced Telephone Features
Gigaset 4010 Comfort, CHIN eng, A31008-G4010-C102-1-7619
komfort.fm
25.09.03
Setting the Alarm
Your Gigaset S88 has an alarm function to help you
keep track of your schedule. You must set the time and
date first (see page 8) in order for the alarm to work.
Turning the Alarm On
The active alarm clock rings every day at the set time.
If you have set a time for the alarm call, this is indicated
by the ¼ icon in the display.
The telephone is idle:
MENU Open the menu.
ееееееееееееееееееееееееееееееее
D Appoint./Clock [
Scroll to Appoint./Clock and press OK.
ееееееееееееееееееееееееееееееее
D Alarm Clock [
Scroll to Alarm Clock and press OK.
The current setting is displayed.
F G Scroll right (on) or left (off) with the navi key to turn
alarm on or off.
D Scroll down one line to enter time.
Entering the time for the alarm
for example
Þ £Þ Þ Enter the hours/minutes. The example here is 6.00.
D Scroll down one line.
Choosing the ringer melody for the alarm
F G Scroll left or right to choose the ringer melody.
Save Save the settings.
When the handset is idle, a stored time for the alarm
call is indicated by the
¼
icon.
Alarm will not sound if the room monitor is on or
during automatic redial.
Page 22

16
Press keys:
Enhanced Telephone Features
Gigaset 4010 Comfort, CHIN eng, A31008-G4010-C102-1-7619
komfort.fm
25.09.03
Turning the Alarm Off
When the alarm rings and the LED flashes (about 30
seconds) press any key on the handset to turn off the
alarm sound.
MENU Press Menu.
ееееееееееееееееееееееееееееееее
D Appoint./Clock [
Scroll to Appoint./Clock and press OK.
ееееееееееееееееееееееееееееееее
D Alarm Clock [
Scroll to Alarm Clock and press OK.
F G Scroll left with the navi key to turn the alarm off.
Save Save the settings.
Stopping the Alarm Sound
An alarm clock rings and the LED flashes (about 30
seconds). Press any key on the handset to turn off the
alarm sound.
Schedule
Your handset is able to remind you of one appointment. You need to store the date and time of this appointment. You may only set one appointment at a
time.
If you have set an appointment, this is indicated by the
¼
icon in the display.
Setting an Appointment
MENU Press Menu.
ееееееееееееееееееееееееееееееее
D Appoint./Clock [
Scroll to Appoint./Clock and press OK.
ееееееееееееееееееееееееееееееее
Set Appointment [
Scroll to Set Appointment and press OK.
Activating the appointment alarm
F G Scroll right on the navi key to turn on.
D Scroll down one line to enter date.
Entering the date
for example
Þ¢ŸÞ Enter month/day (for example: 05.20 as shown).
D Scroll down one line to enter time.
There is no snooze setting. The alarm will sound
until turned off.
The alarm will sound daily at the set time until
you turn it off through the menu.
Page 23

17
Press keys:
Enhanced Telephone Features
Gigaset 4010 Comfort, CHIN eng, A31008-G4010-C102-1-7619
komfort.fm
25.09.03
Entering the time
for example
Þ¬Þ¢ Enter the hours/minutes (for example: 9.05 am as
shown).
Factory setting: 12 h mode. If am or pm is displayed
next to the time, the 12 h format is active.
If you move the cursor into the time field, you can use
the left display key to change from am to pm.
D Scroll down one line to choose ringer melody.
Choosing the ringer melody for the appointment
alarm
F G Scroll with the navi key to choose the ringer melody.
Save Save the settings.
Turning off the Appointment Alarm
An appointment alarm sounds the same way as an incoming call. The handset rings and the status LED flashes (approx. 30 sec).
Press any key to turn off the appointment alarm.
An appointment alarm will ring only if the handset is idle. An appointment alarm can not ring if
the room monitor is on or during automatic redial.
Page 24

18
Press keys:
Enhanced Telephone Features
Gigaset 4010 Comfort, CHIN eng, A31008-G4010-C102-1-7619
komfort.fm
25.09.03
Display Missed Appointments and
Anniversaries
If you do not answer an appointment call after nine
rings, it will automatically turn off. The calls are then saved in an appointment list.
The display will show date in lower right hand corner of
the display to show an new, unanswered appointment.
Press the right soft key to show the list of events.
Then select OK.
Proceed as follows to display the appointment:
MENU Press Menu.
ееееееееееееееееееееееееееееееее
D Appoint./Clock [
Scroll to Appoint./Clock and press OK.
ееееееееееееееееееееееееееееееее
D Dates [
Scroll to Dates and press OK.
D [ Select a missed appointment. The information on the
missed appointment is displayed.
A missed appointment is identified by ¼.
A missed anniversary (see page 23) is identified by
‚.
Press Delete to delete a missed appointment/anniversary.
[ Go back to the list.
Missed Appt.
¼
Page 25

19
Press keys:
Enhanced Telephone Features
Gigaset 4010 Comfort, CHIN eng, A31008-G4010-C102-1-7619
komfort.fm
25.09.03
Directory
The Directory D allows you to store up to 200 telephone numbers.
Storing a Directory Entry
D Open the Directory list by pressing the bottom of the
navi key.
ееееееееееееееееееееееееееееееее
D New Entry [
Scroll to New Entry and press OK.
o Enter the telephone number (max. 32 digits).
D o Scroll to the name field and enter the name (max. 16
characters)
(Optionally you can also enter the anniversary, (see
page 23) ).
MENU Press the menu.
ееееееееееееееееееееееееееееееее
Save Entry [
Save the entry by pressing OK.
Copying a Telephone Number to the Directory
During a Call
You are conducting an external call:
MENU Press Menu
ееееееееееееееееееееееееееееееее
D Send to Dir [
Scroll to Save to Dir and press OK.
A menu opens in which you can enter the telephone
number and the name of the caller. If the number has
been transmitted it automatically appears in the menu.
o Enter the name of the caller if desired.
MENU Press the menu.
ееееееееееееееееееееееееееееееее
Save Entry [
Save the entry by pressing OK.
Follow all local telephone company dialing requirements, such as 7-digit, 10-digit or 11-digit dialing.
● Refer to character map in the Appendix
(page 49) for using the keypad to enter names
and numbers.
● Control the cursor with Gor F. Delete a
character with X. Characters are always inserted to the left of the cursor.
Page 26

20
Press keys:
Enhanced Telephone Features
Gigaset 4010 Comfort, CHIN eng, A31008-G4010-C102-1-7619
komfort.fm
25.09.03
Dialing a Number from the Directory
D Open the directory by pressing the bottom of the navi
key.
The names are listed in alphabetical order.
D Scroll to the desired name.
or You may enter the first letter of the desired name using
the keypad to jump ahead in the list.
For example:
^ Press the 3 key
once for David.
^^ Press the 3 key
twice for Eric.
^^^ Press the 3
key three times for Frank.
c Press the Talk or Speakerphone key. The telephone
number is dialed.
Displaying and Editing a Directory Entry
D Open the Directory list by pressing the bottom of the
navi key.
D Scroll to desired name.
Display Press Display.
If desired, you can change the telephone number/
name:
Edit Press Edit to open the menu for making changes.
o If desired change the telephone number.
D o Scroll to the name field and, if desired, change the
name.
D o Scroll to the anniversary field and, if desired, change
the date and time of the anniversary (see page 23).
MENU Press the menu.
ееееееееееееееееееееееееееееееее
Save Entry [
Confirm changes by selecting Save Entry and pressing
OK.
● Refer to character map in the Appendix
(page 49) for using the keypad to enter names
and numbers.
● Control the cursor with Gor F. Delete a
character with X. Characters are always inserted to the left of the cursor.
Page 27

21
Press keys:
Enhanced Telephone Features
Gigaset 4010 Comfort, CHIN eng, A31008-G4010-C102-1-7619
komfort.fm
25.09.03
Deleting a Single Entry from the Directory
D Open the Directory list by pressing the bottom of the
navi key.
D Scroll to desired name.
MENU Press Menu.
ееееееееееееееееееееееееееееееее
D Delete Entry [
Scroll to Delete Entry and press OK - A confirmation
beep sounds as the entry is deleted.
Deleting All Numbers in the Directory
D Open the Directory list by pressing the bottom of the
navi key.
D Scroll to any name.
MENU Press Menu.
ееееееееееееееееееееееееееееееее
D Delete Log [
Scroll to Delete Log and press OK.
Yes Confirm to delete all entries by pressing Yes - A confir-
mation beep sounds as the log is deleted.
Copying an Entry to Another Handset
You can copy an entry to another Gigaset S88 handset to
save yourself time and effort.
D Open the Directory list by pressing the bottom of the
navi key.
D Scroll to desired name.
MENU Press Menu.
ееееееееееееееееееееееееееееееее
D Send Entry [
Scroll to Send Entry and press OK.
D [ Scroll to handset number where entry is to be sent and
press OK - A confirmation beep sounds as the entry is
sent.
Yes You may copy further entries by pressing Yes and follo-
wing the same steps above.
or
No Exit by pressing No
You can not send an entry from an S88 handset
to an SL88 handset.
Page 28

22
Press keys:
Enhanced Telephone Features
Gigaset 4010 Comfort, CHIN eng, A31008-G4010-C102-1-7619
komfort.fm
25.09.03
Copying the Directory
You can copy the entire directory to another
Gigaset S88 handset to save yourself time and effort.
D Open the Directory list by pressing the bottom of the
navi key.
Scroll to any name.
MENU Press Menu.
ееееееееееееееееееееееееееееееее
D Send Log [
Scroll to Send Log and press OK.
The list of internal users is displayed.
D [ Scroll to handset number where log is to be sent and
press OK - A confirmation beep sounds as the log is
sent.
Receiving the Telephone Book
Once a log has been sent the display shows how many
entries have been received by the telephone. Entries
with identical numbers are not overwritten. For this reason the number of stored entries can differ from the
number of transmitted entries.
The transmission will be interrupted:
● if the memory of the receiving handset is full (the
last entry is displayed)
● if you are called
Displaying Available Memory
D Open the Directory list by pressing the bottom of the
navi key.
D Scroll to any name.
MENU Press Menu.
ееееееееееееееееееееееееееееееее
D Available Memory: [
Scroll to Available Memory and press OK - The memory
available is displayed.
You can not send the directory from an S88 handset to an SL88 handset.
Page 29

23
Press keys:
Enhanced Telephone Features
Gigaset 4010 Comfort, CHIN eng, A31008-G4010-C102-1-7619
komfort.fm
25.09.03
Entering Birthdays or Anniversaries
You can store the date and time for birthday or anniversary reminders.
D Open the Directory list by pressing the bottom of the
navi key.
D Scroll to desired name.
Display Press Display.
Edit Press Edit.
D Scroll to birthday/annivers. field.
Edit Press Edit.
o Enter or change the date ().
Do Scroll down one line and enter the time and select am/
pm.
If am or pm is displayed in addition to the time the 12
hour mode is on. If you move the cursor into this field
you can use the left display key to toggle between 12
hour mode and 24 hour mode.
D Scroll down one line and choose a visual reminder or
melody.
F G Choosing the indicator for the alarm.
You can choose from 10 ringer melodies in combination
with a visual indicator or a visual indicator without a ringer.
[ Press OK to return to the display menu.
[ Press OK again to save entry.
Page 30

24
Press keys:
Enhanced Telephone Features
Gigaset 4010 Comfort, CHIN eng, A31008-G4010-C102-1-7619
komfort.fm
25.09.03
Memory Dial List
C
CC
C The Memory Dial allows you to store up to 8 frequently
dialed numbers for quick access using the 2–8 keys. It
is recommended that you use the "1" for answering
machine or voice mail from the telephone company.
Storing a Memory Dial Entry
C Press the MEM key.
ееееееееееееееееееееееееееееееее
New Entry [
Scroll to New Entry and press OK.
o Enter the telephone number (max. 32 digits).
D o Scroll to the name field and use the keypad to first sel-
ect a quick access key then enter the name.
Example: 3 ERIC
4x
^ = 3;
2x
^= E,
3x
¤ = R,
3x
¡ = I,
3x
Ÿ = C).
(Optionally you can: enter the anniversary, where applicable, (see page 23) ).
MENU Press Menu.
ееееееееееееееееееееееееееееееее
Save Entry [
Scroll to Save Entry and press OK.
Dialing a Number from the Memory List
Long press ^ will display Eric.
c Press Talk to connect.
Page 31

25
Press keys:
Enhanced Telephone Features
Gigaset 4010 Comfort, CHIN eng, A31008-G4010-C102-1-7619
komfort.fm
25.09.03
Displaying and Editing a Memory Dial Number
C Press the MEM key.
D Scroll to desired number.
Display Press Display to see the number and name.
Edit Press Edit.
FG Scroll to the name or number field and use the keypad
to make the desired changes.
o
If necessary change the telephone number.
D
o
Scroll to the name field and, if necessary, change the
name.
MENU Press Menu.
ееееееееееееееееееееееееееееееее
Save Entry [
Scroll to Save Entry and press OK.
Deleting a Single Entry from the Memory Dial
List
C Press the MEM key.
D Scroll to desired number.
MENU Press Menu.
ееееееееееееееееееееееееееееееее
D Delete Entry [
Scroll to Delete Entry and press OK - A confirmation
beep sounds as the entry is deleted.
● Refer to character map in the Appendix
(page 49) for using the keypad to enter names
and numbers.
● Controlling the cursor with Gor F. Dele-
ting a character with X. Characters are always inserted to the left of the cursor.
Page 32

26
Press keys:
Enhanced Telephone Features
Gigaset 4010 Comfort, CHIN eng, A31008-G4010-C102-1-7619
komfort.fm
25.09.03
Call Log
*
The numbers of the last 30 calls are saved in the Call
Log.
Call Log Settings
You can set the following options:
● only store missed calls
● store all incoming calls
? Press the Mailbox key.
ееееееееееееееееееееееееееееееее
D Calls: [
Scroll to Calls: and press OK.
MENU Press Menu.
ееееееееееееееееееееееееееееееее
Call Log [
Scroll to Call Log and press OK.
ееееееееееееееееееееееееееееееее
Missed Calls [
Scroll to Missed calls and press OK
or
ееееееееееееееееееееееееееееееее
D All Calls [
Scroll to All Calls and press OK.
* Requires a subscription to Caller ID from your local telephone com-
pany
• Calls picked up on the first ring will not be
saved in the Call Log.
• Call Waiting calls are included in the Call Log if
you have subscribed to Caller ID with Call
Waiting from your local telephone company.
• If several calls are received under the same
number, only the last call is recorded.
• You must subscribe to Caller ID for the Call
Log to record numbers.
Default setting of Call Log is .
Page 33

27
Press keys:
Enhanced Telephone Features
Gigaset 4010 Comfort, CHIN eng, A31008-G4010-C102-1-7619
komfort.fm
25.09.03
New Call and Message Alert
If you have received new calls or messages, the alert
symbol will be displayed and the light on top of the
handset will flash.
If the light does not flash, no new calls or messages
have been saved.
Example of a display for an entry from the missed calls
list:
? Press the Mailbox Key.
ееееееееееееееееееееееееееееееее
D Calls: [
Scroll to Calls: and press OK
E D Scroll to the desired number.
c Press Talk to dial the number - The number is copied to
the redialing list.
Status of the entry
The call is new in the list.
The call is old in the list.
The call has been answered.
With the key
?
you can open the following lists:
● Message list of the Telco Voice Mail
● Call Log
If there is only one list that contains new messages or calls you are taken directly to this list
after
pressing
?
.
If there are several lists with new messages or
calls you can select one by pressing ?.
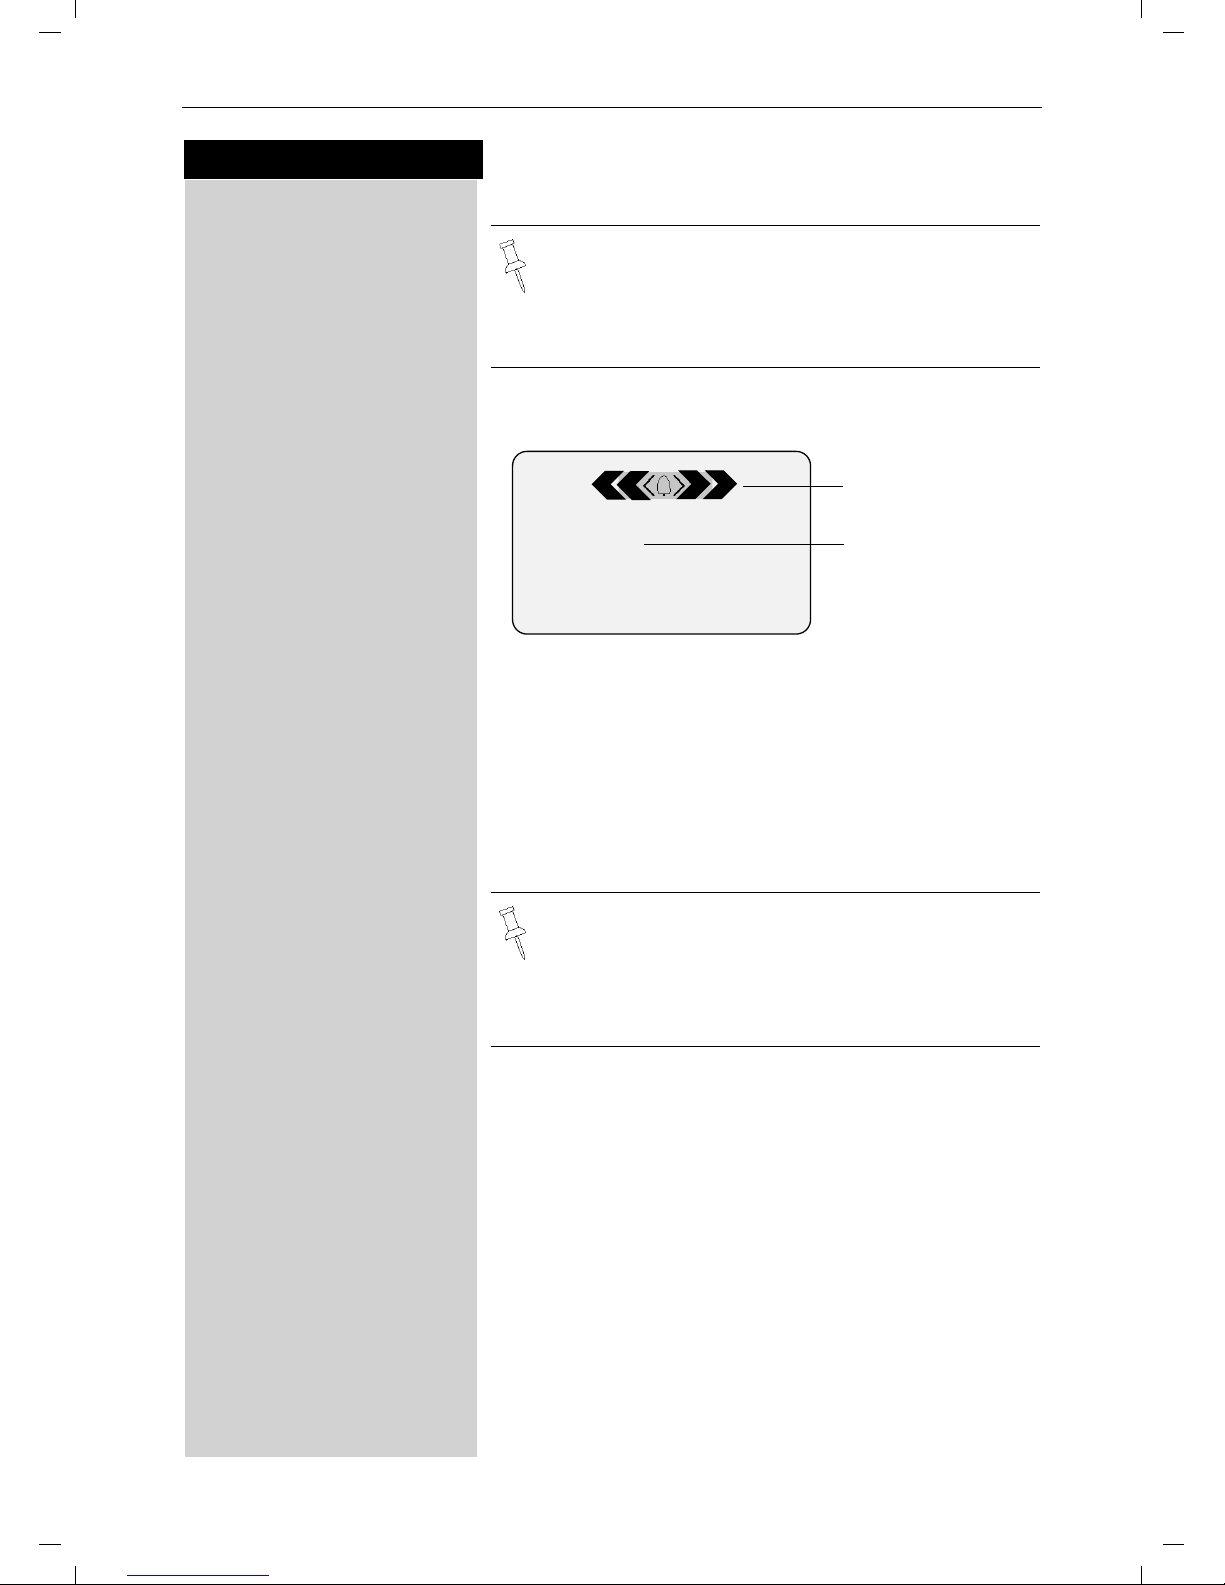
Missed Calls
New Call 02/04
51212345678
07.09.2000
Delete MENU
Total number of
new calls
Number of this particular new call
Date and time of the call
Call number or name
New Call
Old Call
Calls answ.
Page 34

28
Press keys:
Enhanced Telephone Features
Gigaset 4010 Comfort, CHIN eng, A31008-G4010-C102-1-7619
komfort.fm
25.09.03
Deleting a Number from the Call Log
If there are new calls a prompt appears on the display
and the status LED flashes.
? Press the Mailbox Key.
ееееееееееееееееееееееееееееееее
D Calls: [
Scroll to Calls: and press OK
E/D Scroll to the desired number. Press Delete to remove
the number from the Call Log.
Copying a Call Log Number to the Directory
? Press the Mailbox Key.
ееееееееееееееееееееееееееееееее
D Calls: [
Scroll to Calls: and press OK.
E D Scroll to the desired number.
MENU Press Menu.
ееееееееееееееееееееееееееееееее
D Send to Dir [
Scroll to Send to Dir and press OK.
D o Scroll to the name field and enter a name.
MENU Press Menu.
ееееееееееееееееееееееееееееееее
Save Entry [
Scroll to Save Entry and press OK.
Deleting the Call Log
? Press the Mailbox Key.
ееееееееееееееееееееееееееееееее
D Calls: [
Scroll to Calls: and press OK.
MENU Press Menu.
ееееееееееееееееееееееееееееееее
D Delete Log [
Scroll to Delete Log and press OK.
● For more information about the input of letters
and characters (see page 49).
● Please note that numbers copied from the call
log list to the telephone book may require editing, for example adding a "1" or removing the
Area Code.
Page 35

29
Press keys:
Handset Operation
Gigaset 4010 Comfort, CHIN eng, A31008-G4010-C102-1-7619
mobilt_an.fm
25.09.03
Handset Operation
You can register and operate up to four handsets at
your Gigaset base station.
Registering Handsets
In order for a handset to work it must be registered to
your base. Handsets can either be registered automatically or manually. The handset that comes with
your Gigaset S 88 needs to be first registered to
the base in order for it to work.
Automatic Registration
To automatically register a handset:
a Turn the handset off by holding down the End key
Place the handset in the base station with the display
facing toward you.
The handset will turn on once it is placed into the base.
After approximately one minute, the handset's intercom number is shown (for example, “INT1”).
The handset is now registered and ready for use.
Up to three additional handsets may be added to the
system for a total of four handsets.
The next unassigned intercom number (2 through 4) is
automatically assigned to each handset as it is registered. If all numbers are assigned, the intercom number 4 is automatically reassigned.
It is possible to assign a different intercom number
(see page 85) or a different intercom name (see
page 85) to a handset.
k
1
. . .
k
2
k
4
k
Ö
Page 36

30
Press keys:
Handset Operation
Gigaset 4010 Comfort, CHIN eng, A31008-G4010-C102-1-7619
mobilt_an.fm
25.09.03
Manual Registration
If automatic registration does not work properly, or you
wish to register your handset to another base station
you may manually register a handset. A handset can
only be registered to one Gigaset base station at a
time.
Step 1: On the Handset
MENU Press Menu.
ееееееееееееееееееееееееееееееее
D H/Set Settings [
Scroll to H/Set Settings and press OK.
ееееееееееееееееееееееееееееееее
D Reg. Handset [
Scroll to Reg. Handset and press OK.
D [ Select the base station ( is recommended un-
less you are registering your handset to an additional
base).
o [ Enter the PIN (factory setting: 0000).
Step 2: Underside of the base station
Hold down the Page/Registration key on the underside
of the base station for approximately 5 seconds until a
signal tone is heard at the base station.
When the handset has been successfully registered,
the intercom number is shown (for example, “INT1”).
If all internal handset numbers are assigned, the intercom number 4 is reassigned. The handset that has
been registered under number 4 will be deregistered.
Base 1
Page 37

31
Press keys:
Handset Operation
Gigaset 4010 Comfort, CHIN eng, A31008-G4010-C102-1-7619
mobilt_an.fm
25.09.03
Deregistering Handsets
Prerequisite:
You can only deregister Gigaset S88 handsets.
F Press left on the navi key (INT) and the list of handsets
is displayed.
E D Scroll to the handset that is to be deregistered.
MENU Press Menu.
ееееееееееееееееееееееееееееееее
D Dereg. Handset [
Scroll to Dereg. Handset and press OK.
PIN
[ Enter the PIN (factory setting 0000) and press OK.
Yes a Confirm by pressing Yes.
Switching Base Stations
Prerequisite: The handset is registered at more than
one base stations.
The handset can be
● set to a certain base station (e.g. at home or in the
office)
or
● set to and it is automatically switched to
the base station with the best reception.
MENU Press Menu.
ееееееееееееееееееееееееееееееее
D H/Set Settings [
Scroll to H/Set Settings and press OK.
ееееееееееееееееееееееееееееееее
D Select Base [
Scroll to Select Base and press OK.
D [ Scroll to the desired base or select Best Base and
press OK.
You can only deregister handsets with a
Gigaset S88.
Best Base
Page 38

32
Press keys:
Handset Operation
Gigaset 4010 Comfort, CHIN eng, A31008-G4010-C102-1-7619
mobilt_an.fm
25.09.03
Changing the Name of a Handset
The names INT 1, INT 2, and so on are assigned automatically. However, you can change these names, for
example, to ANNE or OFFICE (10 characters maximum).
F Press left on the navi key (INT) and the list of handsets
is displayed.
E D Scroll to the desired handset
Edit Press Edit.
o Enter the new name.
Save Press Save.
Changing a Handset's Intercom Number
You can change the number of a handset.
F Press left on the navi key (INT) and the list of handsets
is displayed.
MENU Press Menu.
ееееееееееееееееееееееееееееееее
Assign Number [
Scroll to Assign Number and press OK. All registered
handsets are displayed.
E D Select the desired handset
o Enter an available intercom number.
If necessary:
E D o Scroll to a different intercom and change it first.
[ Press OK to save changes.
Intercom
4
Intercom Call
INT <
Eric
Four handsets are
registered already.
“Intercom Call” is
only displayed if
more than one user
is registered.
Î MENU
If the selected intercom telephone number has
already been assigned to a different handset, you
will hear an error tone (descending tone sequence).
Page 39

33
Press keys:
Handset Operation
Gigaset 4010 Comfort, CHIN eng, A31008-G4010-C102-1-7619
mobilt_an.fm
25.09.03
Making Internal Calls
Internal calls are calls to other registered handsets;
they do not require an outside line.
For example:
F Press INT on the navi key (left side) and the list of hand-
sets is displayed – Your own handset is identified by
“<”.
D E Scroll to the handset you wish to call.
c Press Talk.
or
e.g. Ÿ Simply enter the number of the handset you wish to
call and you are automatically connected.
End the call:
a Press End.
Call Forwarding
You can forward an external call to another handset.
F Press INT on the navi key (left side) and the list of hand-
sets is displayed – Your own handset is identified by
“<”
E D Scroll to the handset you wish to call.
c Press Talk.
When the other handset answers, announce the external call then:
a Press End.
Instead of announcing the call, you can immediately press the End key.
If the internal user does not answer or if the line
is busy the call goes automatically back to you.
Page 40

34
Press keys:
Handset Operation
Gigaset 4010 Comfort, CHIN eng, A31008-G4010-C102-1-7619
mobilt_an.fm
25.09.03
Consultation Call
If you are on an external call you can call another internal handset and conduct a consultation call without
hanging up on the external caller. You are automatically
reconnected to the external caller when you end the
consultation call.
F Press INT on the navi key (left side) and the list of hand-
sets is displayed – Your own handset is identified by <.
The external caller is put on hold.
E D c Scroll to the handset you wish to call and press Talk.
Ending the Consultation Call:
End Press the End softkey - You are now reconnected to the
external call.
or
a Press the End key and the call is transferred to the con-
sulted handset.
Accepting or Rejecting a Waiting Call
If you receive an external call during an internal call you
will hear the call waiting tone if you subscribe to this
feature from your local telephone company.
Accept Press Accept - The internal call is ended; you are con-
nected to the external call.
or
Reject Press Reject –You stay connected to the internal user.
Turning the Ringer Off
You may turn off the ringer on any handset.
« Hold down the star key until the handset does not ring
any more.
The ringer is permanently off until until you turn it back
on. To turn the ringer back on press the star key.
Page 41

35
Press keys:
Handset Operation
Gigaset 4010 Comfort, CHIN eng, A31008-G4010-C102-1-7619
mobilt_an.fm
25.09.03
Paging all Handsets from the Base (Locating
Handsets)
Press the Page/Registration buttons on the bottom
side of the base station very briefly.
All handsets ring at the same time.
To End Paging
Press the Page/Registration button again.
or
c Press the Talk key on a handset.
Page 42

36
Press keys:
Handset Operation
Gigaset 4010 Comfort, CHIN eng, A31008-G4010-C102-1-7619
mobilt_an.fm
25.09.03
Room Monitor
You can use any Gigaset S88 handset to monitor a
room. If a certain noise level is reached (for example
a baby crying or a door opening) the handset will automatically dial the number you stored. When you answer the call you will hear the noises in the room being
monitored. The distance from the handset to the object or space being monitored should be at least .
The number you store can be:
● An internal number - An additional registered hand-
set required.
● An external number - A cell phone number or
another fixed network number where you can be
contacted (i.e. your neighbor’s home number.).
Incoming Calls on the Handset Set to Room
Monitor
Incoming calls on the handset being used as the room
monitor:
● Signaled without the ringer
● The call is only displayed.
● The keypad and display are not illuminated.
If you use an external telephone number for the
room monitor you should inform the owner of the
telephone so that the call from the room monitor
is answered.
This feature considerably reduces the operating
time of the handset being used as the room monitor.
Page 43

37
Press keys:
Handset Operation
Gigaset 4010 Comfort, CHIN eng, A31008-G4010-C102-1-7619
mobilt_an.fm
25.09.03
Storing the Internal Number for the Room
Monitor
MENU Press Menu.
ееееееееееееееееееееееееееееееее
D Room Mon. [
Scroll to Room Mon. and press OK.
ееееееееееееееееееееееееееееееее
D Room Monitor. [
Scroll to Room Monitor and press OK.
F G Press left or right on the navi key to turn On and Off the
room monitor feature.
D Edit Scroll down one line to Set No. and press Edit.
If the Set No. line has an existing external number you
can overwrite it with X first.
You can delete a preset internal telephone number
with
Yes.
Press
Edit and enter the required telephone number.
F Press INT.
D E [ Scroll to desired internal number and press OK.
D Scroll down one line to Set Level.
F G Press left or right on the navi key to set the sensitivity
level to “high” or “low”
Save Press Save.
The room monitor is now on. It can be turned off by
pressing the soft key marked Off on the handset set to
monitor.
Page 44

38
Press keys:
Handset Operation
Gigaset 4010 Comfort, CHIN eng, A31008-G4010-C102-1-7619
mobilt_an.fm
25.09.03
Storing an External Number for Room
Monitoring
MENU Press Menu.
ееееееееееееееееееееееееееееееее
D Room Mon. [
Scroll to Room Mon. and press OK.
ееееееееееееееееееееееееееееееее
D Room Monitor. [
Scroll to Room Monitor and press OK.
F G Press left or right on the navi key to turn On and Off the
room monitor feature.
D Scroll down one line to Set No. and press Edit.
Edit If the Set No. line has an existing external number you
can overwrite it with X first.
You can delete a preset internal number with
Yes.
Press Edit and enter the required telephone number.
o Enter the desired external phone number.
or
D Open the directory.
D [ Select the desired number.
MENU Press Menu.
ееееееееееееееееееееееееееееееее
Save Entry [
Scroll to Save Entry and press OK.
D Scroll down one line to Set Level.
F G Press left or right on the navi key to set the sensitivity
level to “high” or “low”.
Save Press Save.
The room monitor is now on. It can be turned off by
pressing the soft key marked Off on the handset set to
monitor.
Turning off the room monitor remotely
You can turn off the room monitor remotely (e.g. from
a cell phone) during a room monitor call.
Accept the call from the room monitor.
¬andª Enter 9 and # - The room monitor is now deactivated.
A room monitor call will no longer be from the handset
set to monitor.
Page 45

39
Press keys:
Handset Operation
Gigaset 4010 Comfort, CHIN eng, A31008-G4010-C102-1-7619
mobilt_an.fm
25.09.03
Resetting the Handset to the Default
Settings
At some point you may want to reset your handset to
its factory default settings. The Directory, the Memory
Dial list, and the Call Log are not deleted when you reset the handset. Registration at the base station is not
affected either.
MENU Press Menu.
ееееееееееееееееееееееееееееееее
D H/Set Settings [
Scroll to H/Set Settings and press OK.
ееееееееееееееееееееееееееееееее
D Default Sett. [
Scroll to Default Sett. and press OK.
Yes Press Yes to confirm.
k
Page 46

40
Press keys:
Customizing Handset Settings
Gigaset 4010 Comfort, CHIN eng, A31008-G4010-C102-1-7619
mobilt.fm
25.09.03
Customizing Handset Settings
You can customize each handset to distinguish it from
the other handsets or to best suit your needs.
Changing the Display Language of a
Handset
The Gigaset S88 offers you the choice of 2 different
menu languages (Chinese and English).
MENU Press Menu.
ееееееееееееееееееееееееееееееее
D H/Set Settings [
Scroll to H/Set Settings and press OK.
ееееееееееееееееееееееееееееееее
D Language [
Scroll to Language and press OK – the current language is marked with a check 9.
D [ Scroll to the desired language and press OK.
Changing Volumes, Melodies and Tones
Handset and Speakerphone Volume
You can set the handset volume to one of three levels
and you can set the speakerphone to one of five levels.
MENU Press Menu.
ееееееееееееееееееееееееееееееее
D Sound Settings [
Scroll to Sound Settings and press OK.
ееееееееееееееееееееееееееееееее
D Handset Volume [
Scroll to Handset Volume and press OK.
F G Press left or right on the navi key to turn the volume of
the speakerphone up or down.
D Scroll down one line.
F G Save Press left or right on the navi key to turn the volume of
the earpiece up or down and press Save.
k
Chinese is the factory default setting.
Page 47

41
Press keys:
Customizing Handset Settings
Gigaset 4010 Comfort, CHIN eng, A31008-G4010-C102-1-7619
mobilt.fm
25.09.03
Ringer Volume and Melody
Yo u can choose from a number of options:
● Five ringer volumes (the factory setting is volume 2)
● “Crescendo” ring (increasing volume)
● Ringer off
● Any of ten ringer melodies
MENU Press Menu.
ееееееееееееееееееееееееееееееее
D Sound Settings [
Scroll to Sound Settings and press OK.
ееееееееееееееееееееееееееееееее
D Set Ring Tone [
Scroll to Set Ring Tone and press OK – You will hear the
current ringer volume and its level will be displayed.
F G Press left or right on the navi key to turn the volume of
the ringer up or down.
D Scroll down one line.
F G Press left or right on the navi key to chose the ringer
melody.
Save Press Save
Setting the Time for Ringer Volume
You can set a different ringer volume for a certain periods of time (e.g. lower volume at night time).
MENU Press Menu.
ееееееееееееееееееееееееееееееее
D Sound Settings [
Scroll to Sound Settings and press OK.
ееееееееееееееееееееееееееееееее
D Set Ring Tone [
Scroll to Set Ring Tone and press OK – You will hear the
current ringer volume and its level will be displayed.
Nite Sv Press Nite Sv.
F G Press left or right on the navi key to turn the time con-
trol on or off.
D Scroll down one line.
----------time control--------Nite Sv Status: <On>
From: 06:00 AM
Until: 08:00 AM
Status ON or OFF
Period
Ringer volume
Page 48

42
Press keys:
Customizing Handset Settings
Gigaset 4010 Comfort, CHIN eng, A31008-G4010-C102-1-7619
mobilt.fm
25.09.03
o Enter the start time (From:).
F G Scroll down one line.
o Enter the end time (Until:)
D Scroll down one line.
F G Press left or right on the navi key to turn the volume up
or down.
Save Press Save
D Save Store the time control settings.
Save or a Press Save.
Attention Tone
All tones are turned off if you activate the attention tone. If there is an incoming call a short tone (attention
tone) is generated and the status light and the speakerphone key flash to signal a call.
To turn on the attention tone:
« Hold down the * key.
To turn off the attention tone:
« Hold down the * key – all tones are turned back on.
Page 49

43
Press keys:
Customizing Handset Settings
Gigaset 4010 Comfort, CHIN eng, A31008-G4010-C102-1-7619
mobilt.fm
25.09.03
Turning On and Off the Warning and Signal
To ne s
● Key tones: Every keystroke is confirmed with a
click.
● Confirm.: Sets confirmation tones (a rising tone se-
quence) when you make entries/settings and when
you replace the handset in the base station; error
tones (a descending tone sequence) when you
make an incorrect entry; menu end tone at the end
of the menu.
● Battery: Low battery tone when battery must be re-
charged.
MENU Press Menu.
ееееееееееееееееееееееееееееееее
D Sound Settings [
Scroll to Sound Settings and press OK.
ееееееееееееееееееееееееееееееее
D Alarm Tones [
Scroll to Alarm Tones and press OK.
F G Press left or right on the navi key to turn the key tones
on or off.
D Scroll down one line.
F G Press left or right on the navi key to turn the confirma-
tion tones on or off.
D Scroll down one line.
F G Press left or right on the navi key to turn the low battery
tone on, off or Dur. Call only.
Save Press Save.
Turning On and Off Auto Answer
When Auto Answer is turned on you can answer a call
by simply removing the handset from the base or char-
ger. Pressing c is not necessary.
Voice Announced Caller ID calls must always be answered by pressing Talk
c.
MENU Press Menu.
ееееееееееееееееееееееееееееееее
D H/Set Settings [
Scroll to H/Set Settings and press OK.
ееееееееееееееееееееееееееееееее
Auto Answer [
Scroll to Auto Answer and press OK to switch between
on and off – A check mark indicates the feature is on.
Page 50

44
Press keys:
Base Station Settings
Gigaset 4010 Comfort, CHIN eng, A31008-G4010-C102-1-7619
basisst.fm
25.09.03
Base Station Settings
All base station settings are conveniently made using
the handset!
Changing the System PIN
To protect the system settings from unauthorized access you should change the system PIN (default: 0000)
to a PIN that only you know.
MENU Press Menu.
ееееееееееееееееееееееееееееееее
D Base Settings [
Scroll to Base Settings and press OK.
ееееееееееееееееееееееееееееееее
System-PIN [
Scroll to System-PIN and press OK.
System PIN
[ Enter the current system PIN and press OK
(default: 0000).
o Enter the new system PIN (4 digits).
D Scroll down one line.
o Re-Enter the new system PIN.
[ Press OK to save the new PIN.
Resetting the Base Station to the Default
Settings
Resetting the base station does not affect the system
PIN or handset registration. Voice patterns are deleted.
MENU Press Menu.
ееееееееееееееееееееееееееееееее
D Base Settings [
Scroll to Base Settings and press OK.
ееееееееееееееееееееееееееееееее
D Default Settings [
Scroll to Default Settings and press OK.
PIN
[ Enter the system PIN and press OK (default 0000).
[ Press Yes to confirm.
Ö
Page 51

45
Press keys:
Base Station Settings
Gigaset 4010 Comfort, CHIN eng, A31008-G4010-C102-1-7619
basisst.fm
25.09.03
Saving and Changing the Emergency
Number
Emergency numbers are set to (default). You can save
an additional emergency number if desired. The emergency numbers are valid for all handsets.
MENU Press Menu.
ееееееееееееееееееееееееееееееее
D Base Settings [
Scroll to Base Settings and press OK.
ееееееееееееееееееееееееееееееее
D Spec.Functions [
Scroll to Spec. Functions and press OK.
ееееееееееееееееееееееееееееееее
D Emergency No. [
Scroll to Emergency No and press OK.
System PIN
[ Enter the system PIN and press OK - If an emergency
number is already saved it is displayed and can be
changed
o Enter desired emergency number.
MENU Press Menu.
ееееееееееееееееееееееееееееееее
Save Entry [
Scroll to Save Entry and press OK.
Displaying and Dialing the Emergency
Number
c Press the talk key.
911? Press the display key. Local emergency numbers and
the emergency numbers you saved is displayed.
D E [ Select the emergency number you want.
The connection is set up.
Page 52

46
Press keys:
Advanced Settings
Gigaset 4010 Comfort, CHIN eng, A31008-G4010-C102-1-7619
anlagen.fm
25.09.03
Advanced Settings
In certain cases you may be required to change some
of the advanced settings in order for your phone to
work on your particular network. One example is if you
connect your Gigaset to a PBX.
Changing the Dialing Mode
It may be necessary to change the dialing mode if your
network does not operate with tone dialing (DTMF)
Options:
• Tone dialing (DTMF),
• Pulse dialing (P).
MENU Press Menu.
ееееееееееееееееееееееееееееееее
D Base Settings [
Scroll to Base Settings and press OK.
ееееееееееееееееееееееееееееееее
D Spec.Functions [
Scroll to Spec. Functions and press OK.
ееееееееееееееееееееееееееееееее
Dial Mode [
Scroll to Dial Mode and press OK.
E D [ Press up or down on the navi key to select desired
mode and press OK – selected mode is marked with a
check.
Setting the Flash Time
Certain networks may require a flash time different
from the factory default setting.
MENU Press Menu.
ееееееееееееееееееееееееееееееее
D Base Settings [
Scroll to Base Settings and press OK.
ееееееееееееееееееееееееееееееее
D Spec.Functions [
Scroll to Spec. Functions and press OK.
ееееееееееееееееееееееееееееееее
D Flash Time [
Scroll to Flash Time and press OK.
E D [ Press up or down on the navi key to select desired
flash time and press OK – selected time is marked with
a check.
Page 53

47
Press keys:
Advanced Settings
Gigaset 4010 Comfort, CHIN eng, A31008-G4010-C102-1-7619
anlagen.fm
25.09.03
Saving an Access Code
On some networks it may be necessary to add a prefix,
such as “9”, before the telephone numbers for external
calls.
MENU Press Menu.
ееееееееееееееееееееееееееееееее
D Base Settings [
Scroll to Base Settings and press OK.
ееееееееееееееееееееееееееееееее
D Spec.Functions [
Scroll to Spec. Functions and press OK.
ееееееееееееееееееееееееееееееее
D Access Code [
Scroll to Access Code and press OK.
e.g.
Þ Enter the number (up to 3 digits).
MENU Press Menu.
ееееееееееееееееееееееееееееееее
Save Entry [
Scroll to Save Entry and press OK.
Switching To Temporary Tone Dialing
If your network operates with pulse dialing but tone dialing (DTMF) is required (for example, to check the
mailbox), you must switch to tone dialing (DTMF) during the call.
Prerequisite: You are conducting a call!
MENU Press Menu.
ееееееееееееееееееееееееееееееее
D Tone Dialing [
Scroll to Tone Dialing and press OK – tone dialing is
now on.
● When storing numbers in the directory (see
page 24) you must enter the prefix.
For example: 9 555 2222.
● The code that you store here is always inser-
ted and dialed automatically before the telephone numbers in the caller list and the emergency numbers.
Page 54

48
Press keys:
Advanced Settings
Gigaset 4010 Comfort, CHIN eng, A31008-G4010-C102-1-7619
anlagen.fm
25.09.03
Setting Pauses
c With this feature you can set the length of the pause
inserted automatically after pressing the Talk key but
before transmitting the telephone number.
Pause after Line Seizure
MENU Press Menu.
¥ ¬]£ Enter 8,9,1,6.
e.g.
] Enter the pause length.
Enter the pause length -1 second = 1; 3 seconds = 2;
7 seconds = 3; 3.2 seconds = 4
[ Press OK to save.
Pause for the MEM Key
With this feature you can set the length of the pause
that is inserted after holding down the
C key.
MENU Press Menu.
¥ ¬]Ÿ Enter 8,9,1,2.
e.g. ] Enter the pause length - None = 1; 800 ms = 2;
1600 ms = 3; 3200 ms = 4
[ The setting is saved
Pause after Access Code
Prerequisite: you have saved an access code and
want to change the pause.
The base station always automatically inserts this pause after the prefix. Please refer to the operating instructions for your network to see whether there has to be
a pause and how long it must be.
MENU Press Menu.
¥ ¬]] [ Enter 8,9,1,1.
e.g.
] Enter the pause length - 1 second = 1; 2 seconds = 2;
3 seconds = 3; 3.2 seconds = 4
[ Press OK to save
Page 55

Appendix
49
Gigaset 4 010 C o m fort, CHIN eng, A31008-G4010-C102-1-7619
umschl_v.fm
25.09.03
Appendix
Character Map
*Blank
Press the relevant key repeatedly or hold it down.
The entries are sorted in the following sequence:
1. Blank:
s
2.Digits: (0 - 9)
3.Letters (alphabetical)
4.Other characters
To bypass the alphabetical sequence of entries in the directory, enter a blank before
the name. This entry then goes to the start of the directory (for example, “
sEric”).
1 x 2 x 3 x 4 x 5 x 6 x 7 x 8 x 9 x 10 x 11x 12x 13x 14x
]
s* 1
â
£$¥¤
Ÿ
a bc2дбавгз
^
d ef 3ëéèê
¡
gh i4ïíìî
¢
jkl5
£
mno6цсутфх
¤
pqrs7ß
¥
t uv8üúùû
¬
wxyz9яэжше
«
a→A* / ( ) <=>%
Þ
. ,?!0+-:¿¡“‘ ;_
ª
#@\&§
The first letter of the name is automatically written in upper case (also after punctuation marks), the letters immediately afterwards are written in lower case.
To change a letter from upper case to lower case or vice versa press «.
Control the cursor with F G E D.
The letter to the left of the cursor is deleted with
X.
Letters are always inserted to the left of the cursor.
Page 56

50
Gigaset 4 010 C o m fort, CHIN eng, A31008-G4010-C102-1-
umschl_v.fm
25.09.0
Appendix
Maintenance
Simply wipe the base station and handset with a damp cloth or an antistatic wipe.
Never
Never Never
Never use a dry cloth as this can cause static discharge.
Troubleshooting
If your telephone does not behave the way you want it to, first try to solve the problem
using the following list.
Fault Possible cause Solution
No display Handset not activated Hold down end call key a
for 1 second
Batteries empty Charge or replace the batte-
ries (page 4)
No reaction to keystroke Keypad protection activated Hold down the
ª key for
1 second
No radio connection to the
base station – E.g. base sta-
tion 1 is flashing
Handset outside the base
station range
Move closer to the base station
Handset not registered Register the handset
(page 29)
Base station not activated Check the connector at base
station (page 3)
Handset that is in the base
station is not charging
Line seized by a second
handset for a long period
Maximum charging power is
only possible while nobody
is making calls
Handset does not ring Ringer off Activate the ringer
Hold down the
« key
You cannot hear The key F was pressed –
the microphone is “muted”
Press Î, to activate the
microphone
The incoming call number is
not displayed although Caller ID is set.
The telephone number
transmission is blocked
The callers must permit the
transmission of their telephone numbers at their network provider
The ringer/dialing tone
cannot be heard.
You have changed the telephone cord on your Gigaset.
Ensure, when purchasing a
new cord, that it has the correct pin assignment (3-4 assignment of the telephone
leads/EURO CTR37).
Error beep is generated (descending tone sequence)
Wrong input Repeat the procedure; note
the display and, if necessary,
refer to the operating instructions
Page 57

Safety Precautions
51
Gigaset 4 010 C o m fort, CHIN eng, A31008-G4010-C102-1-7619
umschl_v.fm
25.09.03
Safety Precautions
Before using your telephone equipment, basic safety instructions should always be followed to reduce the risk
of fire, electric shock and injury to persons.
1. Read and understand all instructions.
2. Follow all warnings and instructions marked on the product.
3. Unplug this product from the wall telephone jack and power outlet before cleaning. Do not use liquid cleaners
or aerosol cleaners. Use damp cloth for cleaning.
4. Do not use this product near water, for example, near a bathtub, wash bowl, kitchen sink, or laundry tub, in a
wet basement or near a swimming pool.
5. Place this product securely on a stable surface. Serious damage and/or injury may result if the unit falls.
6. Slots or openings in the cabinet and the back and bottom are provided for ventilation, to protect it from
overheating. These openings must not be blocked or covered. This product should never be placed near or over
a radiator or heat register, or in a place where proper ventilation is not provided.
7. This product should be operated only from the type of power source indicated on the marking label. If you are
not sure of the type of power supply to your home, consult your dealer or local power company.
8. Do not place objects on the power cord. Install the unit where no one can step or trip on the cord.
9. Do not overload wall outlets and extension cords as this can result in the risk of fire or electric shock.
10. Never push objects of any kind into this product through cabinet slots as they may touch dangerous voltage
points or short out parts that could result in the risk of fire or electric shock. Never spill liquid of any kind on this
product.
11. To reduce the risk of electric shock or burns, do not disassemble this product. Take it to a qualified service
center when service is required. Opening or removing covers may expose you to dangerous voltages,
dangerous electrical current or other risks. Incorrect reassembly can cause electric shock when the appliance
is subsequently used.
12. Unplug the product from the wall outlet and refer servicing to qualified service personnel under the following
conditions:
a.) When the power cord is damaged or frayed. b.) If liquid has been spilled into the product. c.) If the product
has been exposed to rain or water. d.) If the product does not operate normally by following the operating
instructions. Adjust only those controls that are covered by the operating instructions because improper
adjustment of other controls may result in damage and may require extensive work by a qualified technician to
restore the product to normal operation. e.) If the product has been dropped or physically has been damaged.
f.) If the product exhibits a distinct change in performance.
13. Avoid using a telephone (other than a cordless type) during a thunderstorm. There may be a remote risk of
electrical shock from lightning.
14. Do not use the telephone to report a gas leak in the vicinity of the leak.
15. Emergency/911 numbers may not be dialed if the keypad is locked.
BATTERY SAFETY PRECAUTIONS
BATTERY SAFETY PRECAUTIONSBATTERY SAFETY PRECAUTIONS
BATTERY SAFETY PRECAUTIONS: To reduce the risk of fire, injury or electric shock, and to properly dispose of
batteries, please read and understand the following instructions.
CONTAINS NICKEL CADMIUM BATTERY. BATTERY MUST BE RECYCLED OR DISPOSED OF PROPERLY. DO NOT
DISPOSE OF IN MUNICIPAL WASTE.
1. Only use the batteries specified for use with this product.
2. DO NOT USE ALKALINE OR LITHIUM BATTERIES, or mix batteries of different sizes or from different
manufacturers in this product. DO NOT USE NONRECHARGEABLE BATTERIES.
Page 58

52
Gigaset 4 010 C o m fort, CHIN eng, A31008-G4010-C102-1-
umschl_v.fm
25.09.0
Limited Warranty
3. Do not dispose of the batteries in a fire; the cells may explode. Do not expose batteries to water. Check with
local codes for special disposal instructions.
4. Do not open or mutilate the batteries. Released electrolyte is corrosive and may cause damage to the eyes or
skin. The electrolyte may be toxic if swallowed.
5. Exercise care in handling the batteries in order not to short the batteries with conducting materials such as
rings, bracelets, and keys. The batteries or conducting material may overheat and cause burns or fire.
6. Charge the batteries provided with, or identified for use with, this product only in accordance with the
instructions and limitations specified in the user’s manual. Do not attempt to charge the batteries with any
means other than that specified in the user’s manual.
7. Periodically clean the charge contacts on both the charger and handset.
Limited Warranty
This limited, non-transferable warranty is provided to the original purchaser. The product is warranted to be free
from defects in materials and workmanship under normal installation, use, and service for period of one (1) year
from the date of purchase as shown on the purchaser’s receipt.
Our obligation under this warranty is limited to repair or replacement (at our option) of the product or any part(s)
which are defective provided that the product is returned to Siemens Customer Care during the warranty period.
A copy of the purchase receipt must accompany products returned. In the absence of a purchase receipt, the
warranty period shall be one (1) year from the date of manufacture. Repair or replacement of the product is your
sole and exclusive remedy.
If the product is repaired, reconditioned component parts or materials may be used. If the product is replaced,
we may choose to replace it with a new or reconditioned product of the same or similar design. The repaired or
replacement product will be warranted for either (a) 90 days or (b) the remainder of the original one (1) year
warranty period, whichever is longer. Batteries are warranted to be free from defects at the time of purchase.
This warranty does not apply to defects outside of our control, including but not limited to acts of God, fire, flood,
damage while in transit to service facility. We do not warranty that the product will be compatible with any
telephone equipment or systems or party lines.
This warranty shall be void if the product is damaged as a result of defacement, misuse, abuse, neglect,
accidents, destruction, or alteration of the serial number, improper electrical voltages or currents, repair,
alteration or maintenance by any person or party other than our authorized service facility or any violation of
instructions furnished by us.
This warranty is also void if this product is removed from the country in which the original purchaser purchased
it, if it is used in a country, which it not registered for use, or if it is used in a country for which it was not designed.
Due to variations in telephone systems and communications laws, this product may be illegal for use in some
countries. We assume no responsibility for damages or penalties incurred resulting from the use of this product
in a manner or location other than that for which it is intended.
THIS ONE-YEAR LIMITED WARRANTY IS IN LIEU OF ALL OTHER WARRANTIES EXPRESS OR IMPLIED. ANY
IMPLIED WARRANTIES, INCLUDING BUT NOT LIMITED TO THE IMPLIED WARRANTIES OF
MERCHANTABILITY AND FITNESS FOR A PARTICULAR PURPOSE, SHALL BE LIMITED IN DURATION TO THE
ONE-YEAR DURATION OF THIS WRITTEN LIMITED WARRANTY. WE DISCLAIM ANY LIABILITY FOR DAMAGES
FOR LOSS OF USE OF THE PRODUCTS, LOSS OF TIME, INCONVENIENCE, INJURY TO CUSTOMER OR ANY
OTHER PERSON, OR DAMAGE TO CUSTOMER PROPERTY CAUSED BY THE PRODUCT, LOSS OF REVENUE OR
PROFIT, OR DAMAGES FOR ANY FAILURE TO PERFORM. IN NO EVENT SHALL WE BE LIABLE FOR ANY
SPECIAL, INCIDENTAL, PUNITIVE OR CONSEQUENTIAL DAMAGES EVEN IF WE ARE ADVISED OF THE
POSSIBILITY OF SUCH DAMAGES.
Some states do not allow limitations on how long an implied warranty lasts, so the above limitations may not
apply to you.
Page 59

Limited Warranty
53
Gigaset 4 010 C o m fort, CHIN eng, A31008-G4010-C102-1-7619
umschl_v.fm
25.09.03
This warranty is the sole and exclusive warranty provided for the product. There are no other express
warranties. This warranty gives you specific legal rights, and you may also have other rights, which vary from
state to state.
If you want to learn more about Siemens Gigasets, or for technical assistance with your Gigaset, visit our web
site at
or, please call .
Siemens Cordless Products
Siemens is a registered trademark of Siemens AG.
Siemens Cordless Products is a division of Siemens Information and Communication Mobile, LLC.
Information subject to change since Siemens reserves the right, without notice, to make changes in equipment
design or components as progress in engineering or manufacturing methods warrant.
Part Number: A31008-G4010-C102-1-7619
© Copyright June 2001
www.siemens.com.cn/shc
4006 706 007
Page 60

Menu table
Gigaset 4010 Comfort, CHIN eng, A31008-G4010-C102-1-7619
menu.fm
25.09.03
54
Menu table
It is faster to select a menu function by pressing MENU than selecting the digit com-
binations by scrolling! For example: ¡¡= 4-4 to set the date.
Main menu
MENU when the telephone is idle, press:
1 Not Available
2 Not Available
3 Room Mon. 3-1 Room Monitor. [entry]
4 Appoint./Clock 4-1 Set Appointment [entry]
4-2 Alarm Clock [entry]
4-3 Dates [entry]
4-4 Date/Time [entry]
5 Sound Settings 5-1 Handset Volume [entry]
5-2 Set Ring Tone [entry]
5-3 Alarm Tones [entry]
6 Not Available
7 H/Set Settings 7-1 Auto Answer
7-2 Language [list]
7-3 Reg. Handset [list]
7-4 Select Base [list]
7-5 Default Sett.
8 Base Settings 8-2 System-PIN [entry]
8-3 Default Settings
8-4 Spec.Functions 8-4-1 Dial Mode 8-4-1-1 To n e
8-4-1-2 Pulse
8-4-1-3 DTMF-Earth
8-4-2 Flash Time 8-4-2-1 80 ms
8-4-2-[...] [etc. until]
8-4-2-8 800 ms
8-4-4 Access Code [entry]
8-4-5 Emergency No. [entry]
8-4-6 Barge In
8-4-7 Caller ID
8-5 Not Available
Page 61

Menu table
Gigaset 4010 Comfort, CHIN eng, A31008-G4010-
menu.fm
25.09.0
55
Directory/Memory Dial List
Press D / C to open the corresponding list.
After selecting an entry and pressing
MENU the following menu functions are available
Messages
Press
?
to open the list with the messages.
The following menu functions are now available:
1 Edit Entry
2 Delete Entry
3 Send Entry
5 Delete Log
6 Send Log
7 Available Memory
1 Not Available
3 VM:
4 Calls: 4-1 Save to Dir.
4-2 Del Call Log
4-3 Call Log
4-3-1 Missed Calls
4-3-2 All Calls
Page 62

56
Index
Gigaset 4010 Comfort, CHIN eng, A31008-G4010-
4010CoSIX.fm
25.09.0
A
Activating
handset 5
keypad protection 6
warning and signal tones 43
Alarm call 16
Alarm clock 15
activating 15
deactivating 16
Appointment alarm turning off 17
Appointments (missed) 18
Auto Talk 43
B
Base station
connecting 3
resetting to the factory setting 44
setting pauses 48
Batteries
charging 4
inserting 4
Battery low beep 43
Belt clip 5
C
Call
ending 8
Call waiting 34
Caller ID Calls 10
Caller list 26
Calls
connecting 33
Character map 20, 49
Charging status icon 5
Collective call (making internal calls) 33
Confirmation beeps activating/
deactivating 43
Connecting 33
D
Date setting 7
Deactivating
handset 5
keypad protection 6
warning and signal tones 43
De-registering handsets 31
Dialing modes 46
Directory 19, 24
changing an entry 20
copying an entry 21
copying the directory 22
deleting all entries 21
deleting an entry 21
dialing a number 20
displaying an entry 20
entering names 49
storing a telephone number 24
storing an entry 19
Display keys IV
Display language changing 40
DP (Dial pulsing) 46
E
Emergency number
saving 45
Enquiry call (internal) 34
Error beep 6
Error tones 43
F
Factory setting
handset 39
Flash time 46
H
Handset
automatic registration 29
changing the display language 40
changing the name 32
de-registering 31
registration 29
resetting to the factory setting 39
switching the base station 31
turning on/off 5
Handset volume 40
Handsfree talking 11
volume setting 11
Index
Page 63

57
Index
Gigaset 4010 Comfort, CHIN eng, A31008-G4010-
4010CoSIX.fm
25.09.0
K
Key beeps activating/deactivating 43
Keypad protection 6
L
Loudspeaker volume setting 40
M
Mailbox 12
Maintenance 50
Making calls
answering a call 9
external 8
internal 8
Memory Dial List 24
Microphone muting 11
N
Network access list
copying an entry 21
copying the entire list 22
deleting a single entry 25
deleting all entries 21
dialing a number 20
entering names 49
storing a number 24
Network access list (call-by-call)
displaying and changing an entry 20
storing an entry 19
P
Paging 35
PBX
storing the pause after the prefix 48
storing the prefix 47
switching to tone dialing 47
Picking up a call 12
PIN changing 44
Preparing the telephone 2
Protective plastic film 4
R
Redial
automatic 13
manual 13
Registering handsets 29
Ringer volume setting 41
Room monitor 36
S
Saving
emergency numbers 45
system -PIN 44
Schedule 16
Settings 40
display language 40
handset volume 40
loudspeaker volume 40
ringer volume 41
Storing
telephone numbers 24
System PIN changing 44
T
Telco voice mailbox 12
Telephone number 19
Time setting 7
Tone dialing 47
Tones 43
Troubleshooting 50
Turning off the alarm call 16
W
warranty 52
 Loading...