

Page 1
g
GEH6271 Installation Instructions R04
Power Break® II Devices
Draw-Out 800–4000 Ampere Frames
Page 2

Page 3

WARNINGS
CAUTIONS
NOTES
GEH6271
WARNINGS, CAUTIONS, AND NOTES
AS USED IN THIS PUBLICATION
Warning notices are used in this publication to emphasize that hazardous voltages, currents, or
other conditions that could cause personal injury are present in this equipment or may be
associated with its use.
Warning notices are also used for situations in which inattention or lack of equipment knowledge
could cause either personal injury or damage to equipment.
Caution notices are used for situations in which equipment might be damaged if care is not taken.
Notes call attention to information that is especially significant to understanding and operating the
equipment.
This document is based on information available at the time of its publication. While efforts have
been made to ensure accuracy, the information contained herein does not cover all details or
variations in hardware and software, nor does it provide for every possible contingency in
connection with installation, operation, and maintenance. Features may be described herein that
are not present in all hardware and software systems. GE Industrial Systems assumes no obligation
of notice to holders of this document with respect to changes subsequently made.
GE Industrial Systems makes no representation or warranty, expressed, implied, or statutory, with
respect to, and assumes no responsibility for the accuracy, completeness, sufficiency, or usefulness
of the information contained herein. No warrantees of merchantability or fitness for purpose shall
apply.
The following are trademarks of GE Company:
Power Break®, MicroVersaTrip PM™, MicroVersaTrip Plus™, Power+™, POWER LEADER™
© 2001 GE Company
All Rights Reserved
i
Page 4

Power Break® II Devices
Draw-Out Device Installation
Table of Contents
Description.............................................................................................................................................. 1
Features......................................................................................................................................1
Installing the Device ...............................................................................................................................3
Removing the Device ..............................................................................................................................5
Maintenance Procedures ........................................................................................................................ 6
Lubrication .............................................................................................................................................6
List of Figures
1. Rear view of the Power Break® II draw-out device................................................................................. 1
2. Left side of device, showing padlock accessory and racking shaft lockout plate. ................................... 1
3. Right side of the device, showing the rejection feature, drawout position indicator, and electric
operator cutoff switch. ............................................................................................................................2
4. Lifting Bar attached to a draw-out device for manual lifting. ................................................................3
5. Lifting Bar attached to a draw-out device for lifting with a hoist........................................................... 3
6. Device installed on rails, ready to be pushed into the substructure........................................................4
7. Wrench attached to the device racking shaft. ........................................................................................4
8. Compartment position indicator on the front of the device. .................................................................4
9. Withdrawing the substructure rails......................................................................................................... 5
10. Rotating the device forward for inspection. ...........................................................................................5
List of Tables
1. Catalog numbers of draw-out circuit breakers and corresponding substructures. .................................1
2. Catalog numbers of draw-out switches and corresponding substructures.............................................. 1
3. Illustration of the rejection-scheme logic, showing which circuit breakers may be installed in
which substructures.................................................................................................................................2
4. Illustration of the rejection-scheme logic, showing which switches may be installed in which
substructures. ..........................................................................................................................................2
ii
Page 5

Power Break® II Devices
Draw-Out Device Installation
Description
Types SSD and SHD Power Break II draw-out circuit
breakers are used in types SPS and SPH substructures, with
appropriate catalog numbers listed in Table 1. Power
Break II switches are used only with type SPH
substructures, with appropriate catalog numbers listed in
Table 2. Draw-out construction permits activation of a new
feeder, allows rapid replacement of a device, and
facilitates inspection and maintenance of the draw-out
device with no need to de-energize the entire switchboard.
Draw-Out Breaker Substructure
SSD08X2## SPSDOS08
SHD08X2## SPHDOS08
SSD16X2## SPSDOS16
SHD16X2## SPHDOS16
SSD20X220 SPSDOS20
SHD20X220 SPHDOS20
SSD25X### SPSDOS25
SHD25X### SPHDOS25
SSD30X3## SPSDOS30
SHD30X3## SPHDOS30
SSD40X4## SPSDOS40
SHD40X4## SPHDOS40
Note: In the circuit breaker catalog number, replace “X”
with “B” for MicroVersaTrip Plus™ or MicroVersaTrip
PM™ Trip Units or with “D” for Power+™ Trip Units
Table 1. Catalog numbers of draw-out circuit breakers and
corresponding substructures.
Draw-Out Switch Substructure
SHD08Y2## SPHDOS08
SHD16Y2## SPHDOS16
SHD20Y2## SPHDOS20
SHD25Y### SPHDOS25
SHD30Y3## SPHDOS30
SHD40Y4## SPHDOS40
Table 2. Catalog numbers of draw-out switches and corresponding
substructures.
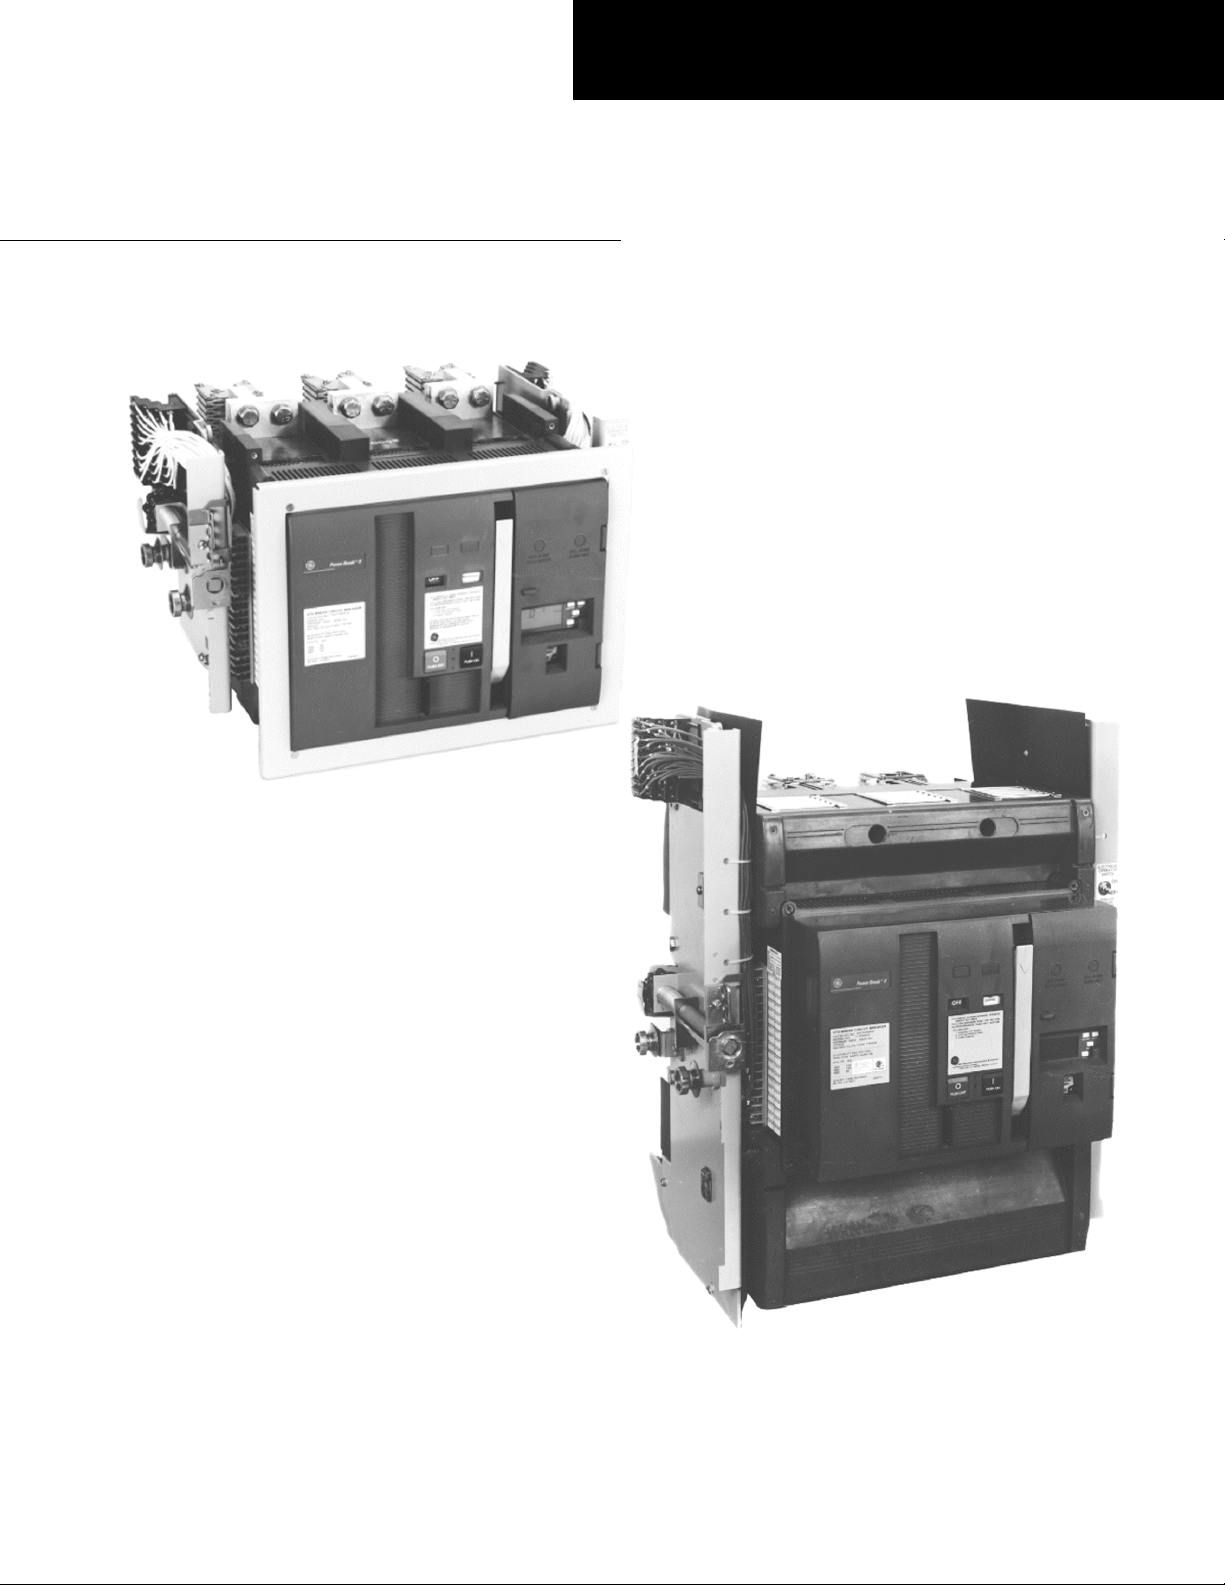
Rollers. The rollers on the sides of the device ride on
retractable rails in the draw-out substructure for easy
installation and removal.
Draw-Out Mechanism. A racking shaft powers a centrally
mounted screw through a chain drive into a fixed nut in
the substructure. A special speed wrench is supplied with
an integral
1
2 -inch square-drive socket to aid in
installation and removal.
Racking Shaft Wrench Lockout Plate. This interlock prevents
engagement of the wrench when the device contacts are
closed.
Rollers
Shutter
Actuator
Disconnects
Primary
Secondary
Disconnects
Draw-Out
Interlock
Draw-Out
Mechanism
Bypass Switch
Actuator
Figure 1. Rear view of the Power Break® II draw-out device.
Features
The features described below are illustrated in Figures 1,
2, and 3.
Primary Disconnects. Primary power is fed through multiplefinger primary disconnects when the device is in the
connected position.
Secondary Disconnects. Control power is provided through
the secondary disconnects in the test and connected
positions only. All accessories terminate at dedicated
positions regardless of the combination of accessories
installed.
Draw-Out Padlock
Accessory
Cat. No. TDOPC
Racking Shaft
Wrench Lockout
Plate
Figure 2. Left side of the device, showing the padlock accessory and
racking shaft lockout plate.
1
Page 6

Power Break® II Devices
Draw-Out Device Installation
Rejection
Feature
Draw-Out
Position
Indicator
Figure 3. Right side of the device, showing the rejection feature, draw-
out position indicator, and electric operator cutoff switch.
Draw-Out Position Indicator. Indicates whether the device is
in the connected, test, or disconnect position.
Electric Operator Cutoff Switch. Prevents cycling of the springcharging motor during installation or removal of a device.
Draw-Out Interlock. This feature trips a closed device if the
wrench interlock is deliberately defeated. The device is
tripped before the primary disconnects part as the device
is racked out and before the primary disconnects engage
as the device is racked in.
Rejection Feature. This feature prevents insertion of a device
into a substructure of lower ampere rating or higher shortcircuit rating. It does not reject a device with incompatible
control wiring. See the label on the device or Tables 1 or 2
for the proper substructure catalog number. (Also shown
in Figure 8.)
Tables 3 and 4 illustrate the rejection scheme logic. Note
that devices may be safely used in higher-rated
substructures. However, local and industry codes and
standards require that conductors be sized to the
substructure. Therefore, installing devices in substructures
with higher ratings is possible, but not economical.
Draw-Out Padlock Accessory. When a padlock is installed,
this feature works with the racking shaft lockout plate to
prevent engagement of the racking shaft wrench.
Shutter Actuator. A stud actuates the optional shutter
accessory.
By-Pass Switch Actuator
. Operates the optional by-pass
switch accessory.
Lifting Bar. The Lifting Bar, catalog number TDOLB, is
available for safe handling of the draw-out device, as
illustrated in Figures 4 and 5.
Note: In the device catalog number, replace “X” with “B” for
MicroVersaTrip Plus™ or MicroVersaTrip PM™ Trip Units or
with “D” for Power+™ Trip Units
Table 3. Illustration of the rejection-scheme logic, showing which
circuit breakers may be installed in which substructures.
Table 4. Illustration of the rejection-scheme logic, showing which
switches may be installed in which substructures.
2
Page 7

Power Break® II Devices
Draw-Out Device Installation
Installing the Device
Use the following procedure to install the draw-out device
into the substructure.
1. Attach the Lifting Bar, catalog number TDOLB, by
locating the hooks on the bar beneath the shoulder
studs of the device, as illustrated in Figures 4 and 5.
2. Pull out the substructure rails until they drop into the
horizontal locked position. Lower the device so that
the grooves in the rollers drop over the rails.
3. Make sure the grooves in all rollers straddle the rails,
as illustrated in Figure 6, then remove the Lifting Bar
and push the device into the substructure until it
stops in the
rails and push them in to the stored position.
CAUTION: The device must be
connected. If the device is charged, press the ON button
to close the device contacts, then press the OFF button to
open the contacts.
ATTENTION: Le mécanisme doit être à OFF avant qu’il
ne soit embroché. Si le ressort de fermeture de
mécanisme est chargé, fermer les contacts de mécanisme
par action sur le bouton ON, puis appuyer sur le bouton
OFF pour ouvrir les contacts.
DISCONNECTED position. Then lift the
OFF before it is
Pipe
Lifting Bar
Shoulder
Stud
Figure 4. Lifting Bar attached to a draw-out device for manual lifting.
4. Engage the 12-inch square end of the racking shaft
with the supplied wrench, catalog number TDORT,
and rotate the shaft clockwise to draw the device into
the
TEST or CONNECTED position, as illustrated in
Figure 7. The compartment position indicator is
shown in Figure 8.
NOTE: If the device does not fit the structure, check the
rejection relationship, illustrated in Figure 8, to verify
that a correctly rated device is being installed. Table 1
lists the correct draw-out substructure for each device
frame.
NOTE: Si le mécanisme ne rentre pas dans le berceau,
vérifier le détrompeur illustré dans les figure 8, qui
empêche l’insertion d’un mauvais calibre de mécanisme.
La Table 1 définis le berceau convenable à chaque taille
de mécanisme.
Figure 5. Lifting Bar attached to a draw-out device for lifting with a
hoist.
3
Page 8

Power Break® II Devices
Draw-Out Device Installation
Substructure
Rejection
Feature
.06 in
minimum
Device
Rejection
Feature
Figure 6. Device installed on rails, ready to be pushed into the
substructure.
Racking Tool
Figure 7. Wrench attached to the device racking shaft.
Compartment
Position Indicator
Figure 8. Compartment position indicator on the front of the device.
4
Page 9

Removing the Device
Use the following procedure to remove the draw-out
device from the substructure.
Power Break® II Devices
Draw-Out Device Installation
CAUTION: The device must be
connected and removed.
ATTENTION: Le mécanisme doit être à OFF avant qu’il
ne soit débroché et déposé.
1. Engage the 1 2 -inch square end of the racking
shaft with the supplied wrench, catalog number
TDORT, as illustrated in Figure 7, and rotate the
shaft counter-clockwise to withdraw the device to the
TEST or DISCONNECTED position. The compartment
position indicator is shown in Figure 8.
2. Pull the substructure rails out as far as possible until
they drop into the horizontal locked position, as
illustrated in Figure 9.
3. From the
out on the rails until the front rollers fall into the
detent, as illustrated in Figure 6.
4. The device can now be rotated about the front roller
by pulling forward, as illustrated in Figure 10, for
inspection of the rear of the device, or it can be
completely removed after attaching the Lifting Bar,
as illustrated in Figures 4 and 5.
DISCONNECTED position, pull the device
OFF before it is dis-
Figure 10. Rotating the device forward for inspection.
Figure 9. Withdrawing the substructure rails.
5
Page 10

Power Break® II Devices
Draw-Out Device Installation
Maintenance Procedures
A regular maintenance schedule should be established to
obtain the best service and reliability. Plant operating and
local conditions dictate the frequency of inspections
required.
A permanent record should be kept of all maintenance
work. It will be a valuable reference for subsequent
maintenance work and station operation. Records should
include reports of tests performed, condition of
equipment, and repairs and adjustments.
Maintenance employees must follow all recognized safety
practices, such as those contained in the National
Electrical Safety Code and in company or other safety
regulations. Solid insulation surrounding an energized
conductor in power apparatus must never be relied upon
to provide protection to personnel.
Draw-out structure and connections should be given the
following overall maintenance at least annually.
Maintenance frequency depends on the severity of service
and atmospheric conditions. Equipment subject to highly
repetitive operation may require more frequent
maintenance.
While some of these steps can be done with the device in
the tilt-out position, a complete check can only be made
after removing the device from the rails.
WARNING: Before attempting any work on draw-out
devices, ensure that all sources of power—primary and
secondary—have been de-energized.
AVERTISSEMENT: Avant de commencer toute
intervention sur des mécanismes débrochable, vérifier
que toutes les alimentations de puissance, à la fois
primaire et secondaire, sont coupées.
1. Thoroughly clean the equipment by removing all
dust and other accumulations. Wipe or vacuum clean
the buses and supports. Do not use compressed air
for blowing out equipment.
2. Inspect buses and/or terminal lug connections for
signs of overheating or weakening of insulating
supports. Check indicating devices and mechanical
and key interlocks for proper functioning. Lubricate
all moving and rubbing parts with a suitable
lubricant, such as Mobil 28 red grease.
3. Check primary and secondary disconnecting surfaces
for signs of abnormal wear or overheating. If
required, clean contacts with a suitable solvent.
Discoloration of silvered surfaces is not harmful
unless atmospheric conditions cause deposits, such as
sulfides, on the contact surfaces.
4. Check to see that all anchor bolts and structure bolts
are tight. Inspect all cable or bus connections for
signs of overheating and tighten all loose
connections. Check that all secondary connections
are secure and all control wiring is intact.
5. After cleaning with the device removed, measure and
record resistances to ground and between phases of
insulation on buses and connections. Since definite
limits cannot be given for satisfactory resistance
values, keep a record of resistance readings so that
weakening of insulation from one maintenance
period to the next can be recognized by comparing
readings. Readings should be taken under similar
conditions each time, if possible, and the record
should include temperature and humidity.
High potential tests are not required, but if it seems
advisable, based on insulation resistance tests or after
repairs, test voltage should not exceed 75% of the
factory test voltage, which is two times the rating plus
1000 volts.
6. Operate each device in the
proper functioning. This is particularly important for
devices that normally remain in either the opened or
closed positions for long periods.
7. When the equipment is subject to unusual
conditions, such as contaminating fumes and
excessive moisture, schedule maintenance at more
frequent intervals. In this case, this procedure may
not be sufficient and additional precautions may be
necessary to protect the equipment.
TEST position to ensure
Lubrication
All the areas subject to friction are liberally coated at the
factory with Mobil 28 red grease. If the contact surfaces,
the device power screw, and the interlock pin are cleaned
during maintenance, coat the primary disconnect contact
surfaces, the threads of the nut or screw, and the interlock
pin with Mobil 28.
6
Page 11

Page 12

GE Industrial Systems
General Electric Company
41 Woodford Ave., Plainville, CT 06062
GEH6271 R04 0501 © 2001 General Electric Company
g
 Loading...