

Page 1

GE Energy
Position Switch Kit
Accessory Kit for Retrofill CB
This position switch actuator, mounted on the cassette using simple hardware,
is an actuator or actuator bracket. It makes a strong contact with the position
switch assembly when the racked-in breaker provides mechanical pressure
against the arm.
imagination at work
Page 2

Table of Contents
Related Publications ..................................................................................................................................................................2
Estimated Time to Complete Tasks ......................................................................................................................................... 2
General Description ...................................................................................................................................................................2
Ordering Info ............................................................................................................................................................................................................... 4
Compartment Switch Options ............................................................................................................................................................................ 4
AKD-5—AK25 Position Switch Actuator .................................................................................................................................. 4
Description ................................................................................................................................................................................................................... 4
AK25 Cassette ............................................................................................................................................................................................................ 5
AKD-5—AK50 Position Switch Actuator .................................................................................................................................. 6
Description ................................................................................................................................................................................................................... 6
Installation .................................................................................................................................................................................................................... 7
AKD-6—Position Switch Actuator ............................................................................................................................................ 8
Description ................................................................................................................................................................................................................... 8
Installation .................................................................................................................................................................................................................... 8
AKD-8—Position Switch Actuator ............................................................................................................................................ 9
Notes ..........................................................................................................................................................................................10
Position Switch Kit for Retrofill CB
1
DEH-41530 02/12
Page 3

Related Publications
Publication Publication Number
Brochure DEA-532
Snapshot DEE-543
Installation Manual AKD8 DEH-41549
Installation Manual AKD6 DEH-41548
Installation Manual AKD5 DEH-41547
Accessory: Door Interlock (Door Interlock Kit) DEH-41529
Accessory Retrofill Doors Assembly DEH-41563
Accessory: Position Switch Plate & Position Switch
Assembly & Wiring (Position Switch Kit)
Accessory: Neutral Rogowski CT Disconnect
(Neutral Assemblies)
Accessory: Programmer Disconnects DEH-41532
Accessory: Finger Clusters (Cluster Assemblies) DEH-41533
Accessory: Secondary Disconnects DEH-41534
FAQ DEQ-171
Application Guide DET-753
Guideform Spec DET-754
Spare/Renewal Parts Guide DET-755
DEH-41530
DEH-41531
Estimated Time to Complete Tasks
It takes about 15 minutes to install or replace the assembly.
General Description
For the retrofill, the following information is for either installing or replacing the mechanism for the position
switch (not the position switch itself) on the retrofill circuit breaker; the position switch assembly is already
mounted in the compartment; if not, it can be ordered as an option. The mechanical subassembly is a simple
ancillary lever-and-tension device that pushes against the position switch arm when the retrofill breaker is
racked in completely. This device, mounted on the cassette using simple hardware, is called the actuator or actuator
bracket. Its purpose is to make a strong contact with the position switch when the racked-in breaker provides
mechanical pressure against the arm. The mechanical force on the lever and tension mechanism then activates
the position switch. The position switch, when activated, determines that the racked-in circuit breaker is connected.
Figure 1 is an example of an installed position switch. It is activated mechanically when the breaker is racked in.
DEH-41530 02/12
Position Switch Kit for Retrofill CB
2
Page 4
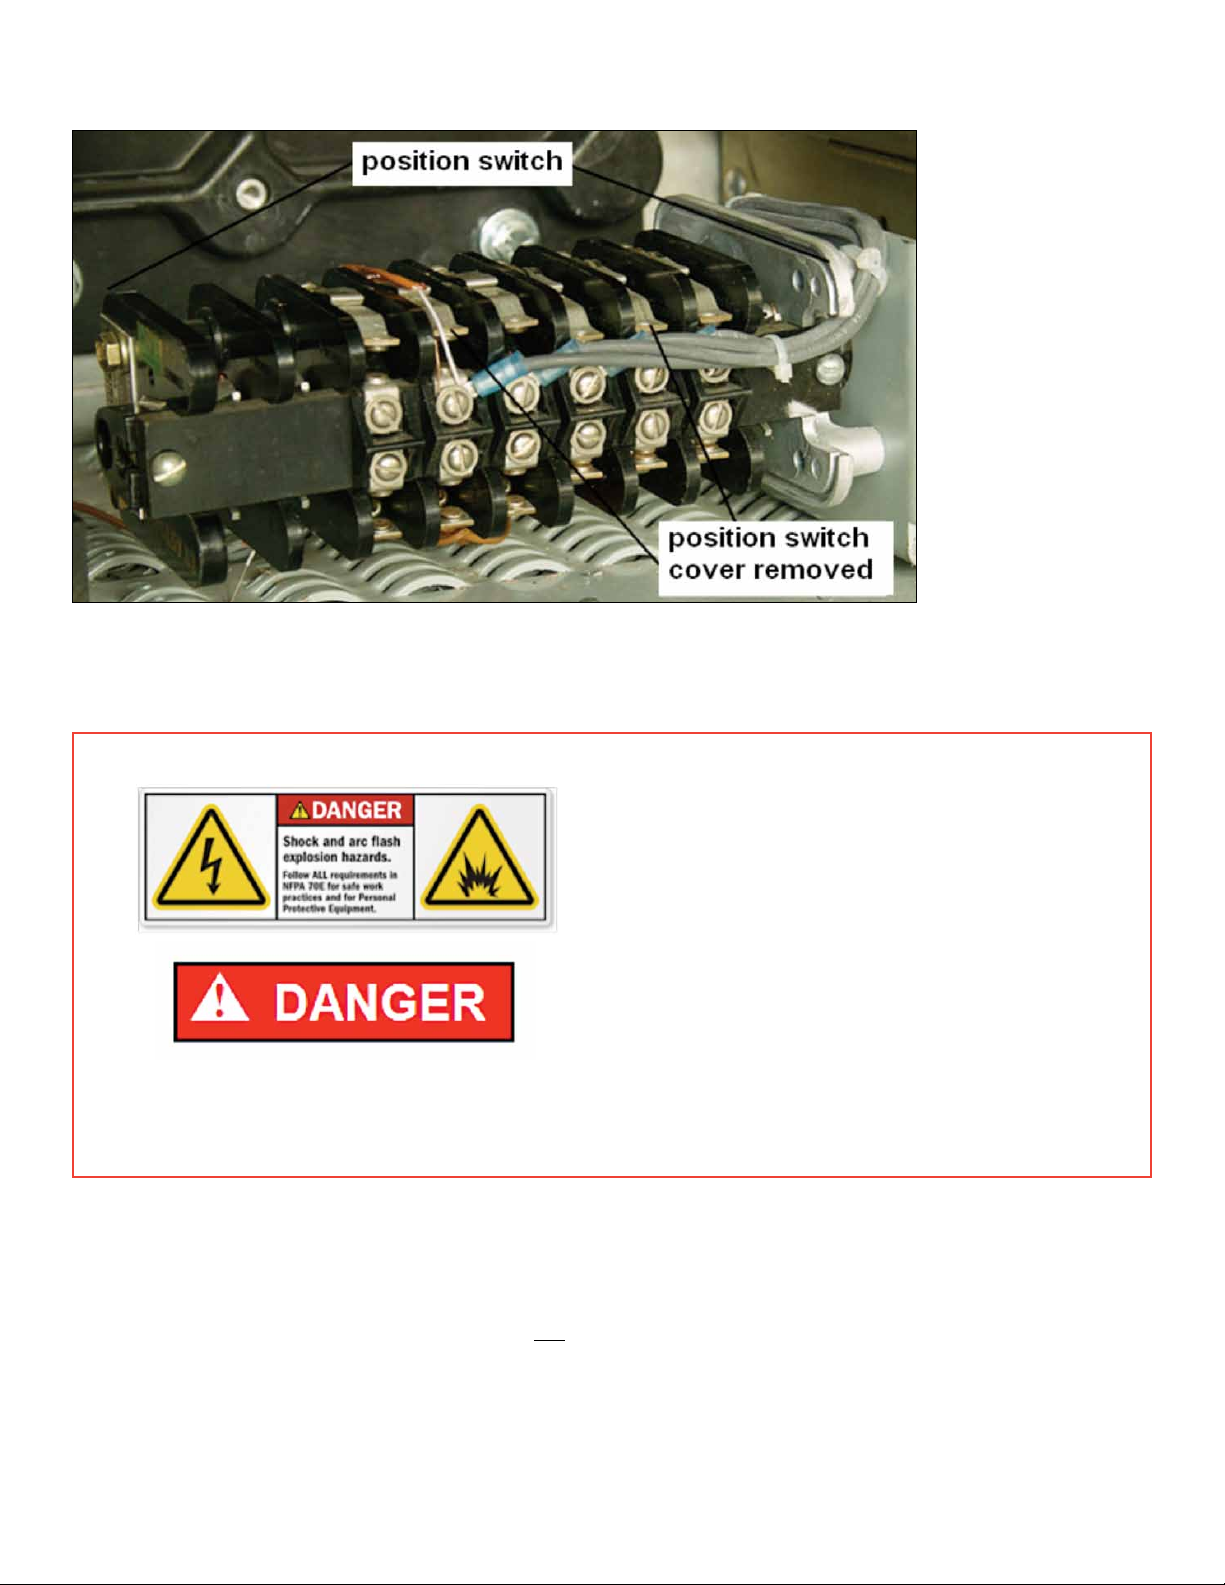
Figure 1. Position Switch, an Example
The mechanical subassembly comes with mounting hardware, lever, and bracket. Depending on the switchgear,
this simple device is mounted in different locations.
• Turn off all power to switchgear. Tagout
and lockout main source, up-stream or
main breaker.
• Failure to comply with these instructions
will result in death or serious injury from
severe burns caused by arc flashing that
has exceedingly high temperatures.
• Always wear personal protection equipment
according to OSHA standards and appropriate
to the severity of potential burns.
• Ensure only qualified personnel install, operate, service, and maintain all electrical equipment.
Note:
• ItisstronglyadvisedthattheLVS(lowvoltageswitchgear)beswitchedoff/de-energizedbeforeyouassemble
and mount the position switch actuator.
• Thecompartmentpositionswitchassemblyisnot part of the retrofill kit. If the customer desires to install or
replace a position switch assembly in the compartment, the customer can order it separately. Refer to Table 1.
Position Switch Kit for Retrofill CB
3
DEH-41530 02/12
Page 5

Ordering Info
Table 1. Retrofill Portion—Position Switch Assemblies Ordering Information
AK50
AK25
AKD6
AKD8
10106296G1
10106269G1
10106480G1
Not Applicable
Position Switch Actuation Assembly – AK50
Position Switch Actuation Assembly – AK25
Position Switch Actuation Activator Assembly – AKD6
No separate order required.
Compartment Switch Options
Available as an option for mounting within the base of the cassette/substructure or compartment, the position
switch provides six single-pole changeover contacts for local or remote electrical indication of the circuit breaker
status: CONNECTED, TEST, and DISCONNECTED. The DISCONNECTED position is indicated only when the minimum
isolating distances between contacts on both the main (primary disconnects) and auxiliary (secondary
disconnects) have been achieved. This option is in addition to the mechanical indicators, which are fitted as
standard components. When installed, the switch is IP2X-protected and includes wiring to a terminal block on
the left side of the cassette. Table 2 displays the available normally-open and normally closed switches. The
ratings for position switches are shown in Table 3.
Table 2. Position Switches
Table 3. Position Switch Ratings
(Common NO/NC Contact Configuration)
Switch Configuration Catalog # Ratings
One NO/NC switch per position GCPS1R AC
Set of two NO/NC switches per position GCPS2R DC
120Vac 6 A
250Vac 6 A
125Vac 0.5 A
250Vac 0.25 A
AKD-5—AK25 Position Switch Actuator
Description
The position-switch actuator assembly for the AK25 should be mounted on the bottom plate of the cassette assembly
of the AK25 retrofill. The actual actuator assembly consists of two plates, one each on the top and bottom of the
baseplate. The top plate of the actuator interfaces with the breaker when it is racked in and its motion is transferred
to the bottom plate, which interfaces with the position switch lever on the legacy compartment.
Completing the racking in of the EntelliGuard breaker into the cassette corresponds to the end-of-stroke of the
positionswitchsysteminthecompartmentforAK25inAKD-5LVS.Figure 2 shows the exploded view of the AK25
retrofill position-switch actuator (actually a bracket assembly); Figure 3 displays the assembly from the bottom.
DEH-41530 02/12
Position Switch Kit for Retrofill CB
4
Page 6

Figure 2. AKD-5—AK25 Retrofill Breaker, Actuator for
Position Switch Assembly (Exploded View)
Figure 3. AKD-5—AK25 Retrofill Breaker, Actuator for
Position Switch Assembly (Bottom View)
AK25 Cassette
Note: While racking the EntelliGuard ACB breaker into the cassette, while actually racking in the breaker, the position
indicator window begins to read “connected”. This position indicator means that the retrofit system has activated
theexistingpositionswitchintheLVS.
Installing the position switch actuator needs to be done before the cassette is racked into the compartment.
Steps for installing the position switch actuator are as follows:
1. Place the retrofit EntelliGuard ACB cassette assembly for AK25 on an elevated surface, such as a table, to mount
the position switch actuator assembly on to the base plate. Sufficient space should be available at the bottom of
the cassette and the mounting table to provide easy access for inserting the 3-pin bracket from the bottom.
2. Unpack the position switch actuator components and mount them as shown in the exploded view in Figure 4.
Position Switch Kit for Retrofill CB
5
DEH-41530 02/12
Page 7

Figure 4. AKD-5—AK25 Retrofill Breaker, Actuator for Position Switch Assembly (Top View)
3. Insert the 3-pin bracket from the bottom of the base of the cassette assembly, such that the two pins are
within the longer slot and the single pin goes inside the smaller slot of the plate.
4. PlacetheL-bracketfromthetopofthecassetteassembly,suchthatthepinsfromthebottom3-pinplate
get inserted into the top plate.
5. Secure the connection by fastening the nuts and washers provided in the actuator kit.
6. Mount the extension springs between the groove of the pin on this actuator assembly and the fixed pin
provided on the cassette base plate.
7. Check that the position switch actuator on the cassette is now installed and ready to function as the breaker
is being racked in the compartment.
8. Mount the cassette assembly on the rails of the AK25 cabinet in the AKD-5 and rack the cassette into the
compartmentoftheAKD-5LVS.
AKD-5—AK50 Position Switch Actuator
Description
The position switch actuator assembly for the AK50 should be mounted on the bottom right side of the cassette
assembly of the AK50 retrofill. The actuator assembly consists of a linkage system that interfaces with the racking
shaft assembly at one end and the position switch actuator arm at the other. Completing the racking in of the
EntelliGuard breaker in the cassette corresponds to the end-of-stroke of the position switch system in the
compartmentforAK50inAKD-5LVS.
DEH-41530 02/12
Position Switch Kit for Retrofill CB
6
Page 8

Figure 5, below, shows the AK50 position switch actuator assembly in an exploded view. The position switch actuator
for the AK50 is a field-fit type of assembly and is assembled on the retrofill cassette before inserting the cassette into
the compartment of the AKD-5.
It needs to be ensured that the cassette is in the “disconnected” state. This can be verified by checking the racking
position status in the window located at the right side window, located on the frame of the AK50 retrofil cassette,
placed at the front. The position-switch actuator kit for the AKD5-AK50 retrofits needs to be installed on the bottom
rear side of the right side sheet of the AK50 retrofit cassette.
This installation can be done by placing the cassette on a work table. The cassette should be placed such that there
is enough overhang of the side where there’s room to insert the position switch actuator components from underneath. Alternately, the installation can also be achieved by placing the cassette assembly on the retrofit AK50, that is,
on the telescopic rails of the AKD5 compartment that is being retrofit.
Installation
1. Once the access for installing the position switch actuator is achieved, slide the assembly up from the bottom
of the cassette. When inserted, the plate is placed on the outside of the cassette side sheet and the movable
flaps are on the inside.
2. Lineuptheholesonthecassettesidesheetwiththeholesontheactuatorassembly.
3. Fasten the three M6-bolts and 6-mm washers, provided with the actuator assembly, to the three holes on the
cassette side sheet. Two holes are placed on the side and one hole on back of the cassette assembly.
4. Check that the position switch actuator on the cassette is now installed and ready for use as the breaker is
being racked into the compartment.
5. Mount the cassette assembly on the rails of the AK50 cabinet in the AKD-5 and rack the cassette into the
compartmentoftheAKD-5LVS.
Figure 5. AKD-5—AK50, Actuator for Position Switch Assembly
(Exploded View)
Note: While racking the EntelliGuard ACB
breaker into the cassette, as you rack in the
breaker, the position indicator window reads
“connected”. This position indicator means that
the retrofit system has activated the existing
positionswitchintheLVS.
Position Switch Kit for Retrofill CB
7
DEH-41530 02/12
Page 9

AKD-6—Position Switch Actuator
Description
PositionswitchactuatorbracketcanbeinstalledonallversionsofRetrofillEntelliGuardACBforAKD6LVS.Stepsfor
installing are below:
Retrofills use the legacy position switch already mounted in the cubicle. If a new position switch has to be installed,
refer to legacy position switch installation manual.
Installation
1. Unpack the position switch bracket. Each bracket is provided with a pair of M6X16mm Allen-type bolts
and washers.
2. Place the bracket on the bottom right side of the AKD6 base. 2 locating holes are provided for mounting
of the position switch bracket.
3. Fasten the 2 bolts to the locating holes after placing the washers so securely mount the bracket
4. The bracket is ready for use.
Note: Individual hardware for the position switch actuator cannot be ordered separately. The item numbers given below
are for reference only (Table 4). The assembly comes as a unit or a kit. Order the actuator assembly by part number.
Table 4. AKD-6 Position Switch Actuator Components
Level Item or Part Number Description Quantity
1
1
1
1
10105289P1
10100950P4
10100380P1
10100545P1
POSITION SWITCH BRKT, AKD6 1
WASHER M6 2
SERRATEDBELLEVILLEWASHERM6 2
CAP HEAD SCREW M6X16 2
DEH-41530 02/12
Position Switch Kit for Retrofill CB
8
Page 10

AKD-8—Position Switch Actuator
Position switch actuator comes pre-installed on all versions of Retrofill EntelliGuard ACB. Therefore, no installation is
required (Figure 6). Retrofills use the legacy position switch already mounted in the cubicle. If a new position switch
has to be installed, refer to legacy position switch installation manual.
Figure 6. AKD-8—Actuator for Position Switch Assembly (Exploded Views)
Surfaces which activate the position
switch for AKR30/30H/30L/50/50H
Surfaces which activate the
position switch for AKR30R
Position Switch Kit for Retrofill CB
9
DEH-41530 02/12
Page 11

Notes
DEH-41530 02/12
Position Switch Kit for Retrofill CB
10
Page 12

GE Energy
41 Woodford Avenue
Plainville, CT 06062
www.geindustrial.com
© 2012 GE Company
imagination at work
DEH-41530 02/12
 Loading...