

Page 1
Installation, Operation,
and Maintenance Manual
Retain for Future Use.
EntelliGuard® G Circuit
Breaker
Page 2

2 ©2012 General Electric All Rights Reserved
Page 3

DANGER
WARNING
CAUTION
NOTICE
HAZARD CATEGORIES
The following important highlighted information appears
throughout this document to warn of potential hazards or
to call attention to information that clarifies a procedure.
Carefully read all instructions and become familiar with
the devices before trying to install, operate, service or
maintain this equipment.
Indicates a hazardous situation which, if not avoided, will
result in death or serious injury.
Indicates a hazardous situation which, if not avoided,
could result in death or serious injury.
Failure to comply with these instructions may result in
product damage.
Indicates important information that must be
remembered and aids in job performance
TRADEMARKS
EntelliGuard™ G
EntelliGuard™ TU
WARRANTY
This document is based on information available at the
time of its publication. While efforts have been made to
ensure accuracy, the information contained herein does
not cover all details or variations in hardware and
software, nor does it provide for every possible
contingency in connection with installation, operation,
and maintenance. Features may be described herein that
are not present in all hardware and software systems. GE
Consumer & Industrial assumes no obligation of notice to
holders of this document with respect to changes
subsequently made. GE Consumer and Industrial makes
no representation or warranty, expressed, implied, or
statutory, with respect to, and assumes no responsibility
for the accuracy, completeness, sufficiency, or usefulness
of the information contained herein. No warrantees of
merchantability or fitness for purpose shall apply.
Contact your local sales office if further information is
required concerning any aspect of EntelliGuard G circuit
breaker operation or maintenance.
©2012 General Electric All Rights Reserved 3
Page 4

EntelliGuard® G Circuit Breaker DEH-41304C
Table of Contents 13 March 2014
SECTION 1 – GENERAL INFORMATION
STORAGE ......................................................................................................................................................................................................................... 7
INTRODUCTION ........................................................................................................................................................................................................... 7
Quality Assurance ........................................................................................................................................................................................ 7
Options Check Sheet ................................................................................................................................................................................... 7
Product Serial Number............................................................................................................................................................................... 7
Measurement Units ..................................................................................................................................................................................... 7
PRODUCT DESCRIPTION ......................................................................................................................................................................................... 7
HAND TOOLS NEEDED FOR INSTALLATION .................................................................................................................................................. 7
Table 1.1. Required Hand Tools ............................................................................................................................................................ 7
Figure 1.1. EntelliGuard G Power Circuit Breaker Features and Characteristics...................................................................... 8
SECTION 2 – PRODUCT SPECIFICATIONS
Table 2.1. Environmental Conditions ............................................................................................................................................................... 9
Table 2.2. EntelliGuard G Short Circuit and Interrupting Ratings: ANSI/UL1066 ...................................................................... 9
Table 2.3. EntelliGuard G Short Circuit and Interrupting Ratings: UL489 ..................................................................................... 9
Table 2.4. EntelliGuard G Non-Automatic Circuit Breaker: ANSI Version................................................................................... 10
Table 2.5. EntelliGuard G Non-Automatic Circuit Breaker/Molded Case Switch: UL Version ......................................... 10
Table 2.6. Key to Tables 2.2 Through 2.5 .................................................................................................................................................... 10
Table 2.7. Agency Certification ........................................................................................................................................................................ 10
Table 2.8. Product Dimensions and Weights – ANSI/UL ..................................................................................................................... 11
SECTION 3 – LIFTING, MOUNTING AND INSTALLATION
CIRCUIT BREAKER UNPACKING ........................................................................................................................................................................ 12
BASIC CIRCUIT BREAKER CONSTRUCTION ............................................................................................................................................. 12
LIFTING AND MOUNTING .................................................................................................................................................................................... 13
Using a Lifting Truck ................................................................................................................................................................................. 13
Drawout Cassette Lifting, Mounting and Installation ............................................................................................................. 13
Circuit Breaker Installation in to the Cassette ............................................................................................................................ 13
Drawout Circuit Breaker Installation into the Cassette ......................................................................................................... 13
Circuit Breaker Removal from the Cassette ................................................................................................................................ 15
Fixed-Mounted Circuit Breaker Mounting .................................................................................................................................... 16
TRIP UNIT ................................................................................................................................................................................................................... 16
General Information ................................................................................................................................................................................. 16
Trip Unit Installation ................................................................................................................................................................................. 16
WIRING ......................................................................................................................................................................................................................... 17
Table 3.1. Wiring Schematic for Block-A ....................................................................................................................................... 17
Table 3.2. Wiring Schematic for Block-B ....................................................................................................................................... 17
Table 3.3. Wiring Schematic for Block-C ....................................................................................................................................... 17
Table 3.4. Electronic Interlock ............................................................................................................................................................. 18
Table 3.5. Wiring Schematic Nomenclature Definitions ........................................................................................................ 18
SECONDARY DISCONNECT BLOCKS .............................................................................................................................................................. 19
Table 3.6. Terminal Wiring ..................................................................................................................................................................... 19
SELECTIVITY/BACKUP PROTECTION ............................................................................................................................................................... 19
SECTION 4 – OPERATION
STORED ENERGY MECHANISM KEY FEATURES ......................................................................................................................................... 20
Table. 4.1. Stored Energy Mechanism Sequences of Operation ....................................................................................... 20
Circuit Breaker Charging........................................................................................................................................................................ 20
Two Step Mechanism Design .............................................................................................................................................................. 20
CLOSING SPRING DISCHARGE PROCEDURE .............................................................................................................................................. 21
Table 4.2. Cassette Operating Positions ........................................................................................................................................ 21
4 ©2012 General Electric All Rights Reserved
Page 5

DEH-41304C EntelliGuard® G Circuit Breaker
13 March 14 Table of Contents
CLOSING PROCEDURE ..................................................................................................................................................................................................... 21
CONDITIONS WHEN CLOSING CANNOT OCCUR ................................................................................................................................................ 21
CIRCUIT BREAKER OPENING PROCEDURE ............................................................................................................................................................. 21
SECTION 5 – LOCKS AND INTERLOCKS
GENERAL INFORMATION ................................................................................................................................................................................................ 22
CIRCUIT BREAKER FRONT PANEL LOCKING .......................................................................................................................................................... 22
Pushbutton Locking .......................................................................................................................................................................................... 22
Key Lock for Breaker Trip Free Condition .............................................................................................................................................. 23
DRAWOUT CASSETTE FRONT PANEL LOCKING ................................................................................................................................................... 23
Security Locking .................................................................................................................................................................................................. 23
Isolation Shutters Locking (If Installed) ................................................................................................................................................... 23
Door Interlock Installation ............................................................................................................................................................................. 24
KEY LOCKS AND INSTALLATION .................................................................................................................................................................................. 25
TWO-BREAKER CABLE INTERLOCK INSTALLATION ........................................................................................................................................... 25
Vertical Mounting ............................................................................................................................................................................................... 25
Horizontal Mounting ......................................................................................................................................................................................... 26
SAFETY SHUTTERS INSTALLATION ............................................................................................................................................................................. 26
Table 5.1: Fixed-Mounted Circuit Breaker Locking ........................................................................................................................... 26
Table 5.2: Drawout Circuit Breaker Locking ......................................................................................................................................... 26
SECTION 6 – ACCESSORIES DESCRIPTION
GENERAL INFORMATION ................................................................................................................................................................................................ 27
INDIVIDUAL ACCESSORIES............................................................................................................................................................................................. 27
Motorized Spring Charging Unit ................................................................................................................................................................. 27
Table 6.1. Motor Operators .............................................................................................................................................................. 27
Circuit Breaker Closing Coils – Standard and Commanded ........................................................................................................ 28
Table 6.2. Closing Coil Characteristics ....................................................................................................................................... 28
Command Operation Module ...................................................................................................................................................................... 28
Shunt Trip (ST) ...................................................................................................................................................................................................... 28
Table 6.3. Extended Range Shunt Trip for UL Ground Fault and ANSI DC Rating Applications ................... 28
Status Indication Switch (Coil Signaling Contact) .............................................................................................................................. 28
Table 6.4. Coil Signaling Contact Module ................................................................................................................................. 28
Under Voltage Release (UVR) with Fixed Time Delay....................................................................................................................... 28
Table 6.5. UVR Operating Characteristics ................................................................................................................................ 29
Time Delay Module (TDM) for UVR (Externally Mounted) ............................................................................................................... 29
Table 6.6. TDM Characteristics ....................................................................................................................................................... 29
Remote Operation Coil Combination ....................................................................................................................................................... 29
Table 6.7. Remote Operation Coil Combination .................................................................................................................... 29
Auxiliary Switches .............................................................................................................................................................................................. 29
Table 6.8. Auxiliary Switches ........................................................................................................................................................... 29
Table 6.9. Auxiliary Switch Ratings and Secondary Disconnect Points .................................................................... 29
Circuit Breaker – Key Interlock Facility.................................................................................................................................................... 30
Table 6.10. Key Interlocks and Door Interlocks ..................................................................................................................... 30
Carriage Position Switch (TOC) .................................................................................................................................................................... 30
Table 6.11. Carriage Position Switches ...................................................................................................................................... 30
Table 6.12. Carriage Position Switch Ratings (Common NO/NC Contact Configuration................................. 30
Mechanical Interlocks (Cable/Rod) ............................................................................................................................................................ 30
Table 6.13. Mechanical Interlocks (Cable/Rod) ...................................................................................................................... 30
Cables ....................................................................................................................................................................................................................... 30
Table 6.14. Cables for Mechanical Interlocks ......................................................................................................................... 30
Table 6.15. Interlock Configurations ........................................................................................................................................... 31
Bell Alarm with Lockout .................................................................................................................................................................................. 31
Bell Alarm Switches ........................................................................................................................................................................................... 31
Table 6.16. Bell Alarm Switches ........................................................................................................................................................ 31
©2012 General Electric All Rights Reserved 5
Page 6

EntelliGuard® G Circuit Breaker DEH-41304C
Table of Contents 13 March 2014
Table 6.17. Bell Alarm Ratings (Common NO/NC Contact Configuration) ................................................................ 31
Charging Spring Status Indicator .............................................................................................................................................................. 32
Table 6.18. Spring Charged Contact (1 NO) ............................................................................................................................ 32
Secondary Disconnects (Factory-Installed/Field Installable) ..................................................................................................... 32
Table 6.19. Block Location ............................................................................................................................................................... 32
Table 6.20. Secondary Disconnect Parts .................................................................................................................................. 32
Ground Fault ........................................................................................................................................................................................................ 32
Table 6.21. Neutral Rogowski CTs ......................................................................................................................................... 32-33
Ready to Close Contact .................................................................................................................................................................................. 33
Table 6.22. Ready to Close Contacts (1NO) ............................................................................................................................. 33
Sealed Door Panel Escutcheon .................................................................................................................................................................. 33
Mechanical Operations Counter................................................................................................................................................................ 33
Table 6.23. Miscellaneous Accessories ..................................................................................................................................... 33
Cassette Substructure .................................................................................................................................................................................... 33
Position Indicators............................................................................................................................................................................................. 33
Rejection Device ................................................................................................................................................................................................. 33
Front Flat Terminations .................................................................................................................................................................................. 33
Table 6.24. Optional Front Flat Terminations ......................................................................................................................... 33
SECTION 7 – ACCESSORIES INSTALLATION
CIRCUIT BREAKER FRONT COVER REMOVAL ....................................................................................................................................................... 34
MOTOR OPERATOR – SPRING CHARGING UNIT INSTALLATION ................................................................................................................. 34
SHUNT TRIP, CLOSING COIL AND UNDER VOLTAGE RELEASE DEVICE INSTALLATION .................................................................. 35
Closing Coil Installation .................................................................................................................................................................................. 35
Closing Coil Removal ....................................................................................................................................................................................... 35
NETWORK INTERLOCK INSTALLATION .................................................................................................................................................................... 35
Trip Alarm/Bell Alarm Switch Installation ............................................................................................................................................. 35
Ready to Close Switch Installation ........................................................................................................................................................... 35
SHUTTER PROP OPEN FEATURE ................................................................................................................................................................................. 35
CARRIAGE POSITION SWITCH INSTALLATION ..................................................................................................................................................... 36
BUSBAR/CABLE GROUNDING (OPTIONAL) ............................................................................................................................................................ 36
CLUSTERS .............................................................................................................................................................................................................................. 36
Upper Cluster Contact Set Grounding .................................................................................................................................................... 37
Lower Cluster Contact Set Grounding .................................................................................................................................................... 37
MECHANICAL TRIP ALARM INSTALLATION ............................................................................................................................................................ 37
MECHANICAL OPERATIONS COUNTER INSTALLATION (OPTIONAL) ......................................................................................................... 38
REJECTION FEATURE ........................................................................................................................................................................................................ 38
SECTION 8 – MAINTENANCE, TESTING AND TROUBLESHOOTING
MAINTENANCE .................................................................................................................................................................................................................... 39
Inspection Schedule ......................................................................................................................................................................................... 39
Cleaning Procedure .......................................................................................................................................................................................... 39
Contact Wear Indicator Inspection (Optional) .................................................................................................................................... 39
Circuit Breaker Main Mechanism Inspection ...................................................................................................................................... 40
Cassette Inspection .......................................................................................................................................................................................... 40
Isolating Contacts (Drawout Type) Inspection ................................................................................................................................... 40
Power Terminals and Busbar Inspection .............................................................................................................................................. 40
Lubrication ............................................................................................................................................................................................................ 40
TRIP UNIT TESTING ............................................................................................................................................................................................................ 40
Trip Unit Testing .................................................................................................................................................................................................... 40
TROUBLESHOOTING ......................................................................................................................................................................................................... 41
PUBLICATIONS .................................................................................................................................................................................................................... 42
6 ©2012 General Electric All Rights Reserved
Page 7
DEH-41304C EntelliGuard® G Circuit Breaker
CAUTION
PRODUCT DAMAGE
Do not store circuit breaker in corrosive
environments above LC1 (sea salt mist) and G1 as
per ANSI/ISA-S71.04-1985.
Ensure circuit breakers and cassettes are stored in a
clean, dry location in their original packaging.
Failure to comply with these instructions may result
in product damage.
Tool Name
Function
Cluster pliers (two pairs, each with a different
gap, are supplied under Cat. No. GUNI)
To remove primary contacts for inspection and maintenance.
Screwdriver (8 mm)
To operate racking shutter drive.
Allen wrench (5 mm)
To remove arc chutes for inspection and maintenance.
To remove or adjust fixed and moving arcing contacts.
To remove mechanism.
Allen wrench key (4 mm)
To remove motor and gearbox mounting screws.
Metric feeler gauges
To check and adjust arcing contact gaps.
Pozidrive terminal screwdriver
To remove mechanical and electronic component mounting screws.
To connect wiring to secondary isolating contact terminals.
Pozidrive screwdriver (#1 and #3)
To remove front cover mounting screws.
To remove Rogowski coil and Power current transformer cover plate at the
rear of the circuit breaker moving portion.
Full Set of Metric Hex Allen Wrenches and
Socket Set
To remove PMU base, auxiliary switch assembly, etc.
13 March 14 Section 1 – General Information
SECTION 1 – GENERAL INFORMATION
STORAGE
INTRODUCTION
Quality Assurance
All EntelliGuard G circuit breakers have been designed
and manufactured to the highest technical standards.
Strict procedures ensure first class product quality.
Options Check Sheet
Each circuit breaker comes with a detailed factoryassembled side label that lists all optional features
included on both the circuit breaker and on the trip unit.
Product Serial Number
Please have the serial number available when
communicating about the circuit breaker. Each circuit
breaker has a unique serial number located on the left
side (viewed from front) of the front fascia.
Table 1.1. Required Hand Tools
Measurement Units
All data in this document is specified in conventional
metric/SI units.
All internal/external accessory and external
cable/bus bar connections are metric for both IEC
and UL/ANSI versions.
PRODUCT DESCRIPTION
The EntelliGuard G Circuit Breaker is suitable for
application on power systems up to 1000 Vac 50/60 Hz
systems and up to 750 Vdc as a main/source breaker,
feeder breaker, bus coupler or tie breaker. See Section 2
for complete product specifications.
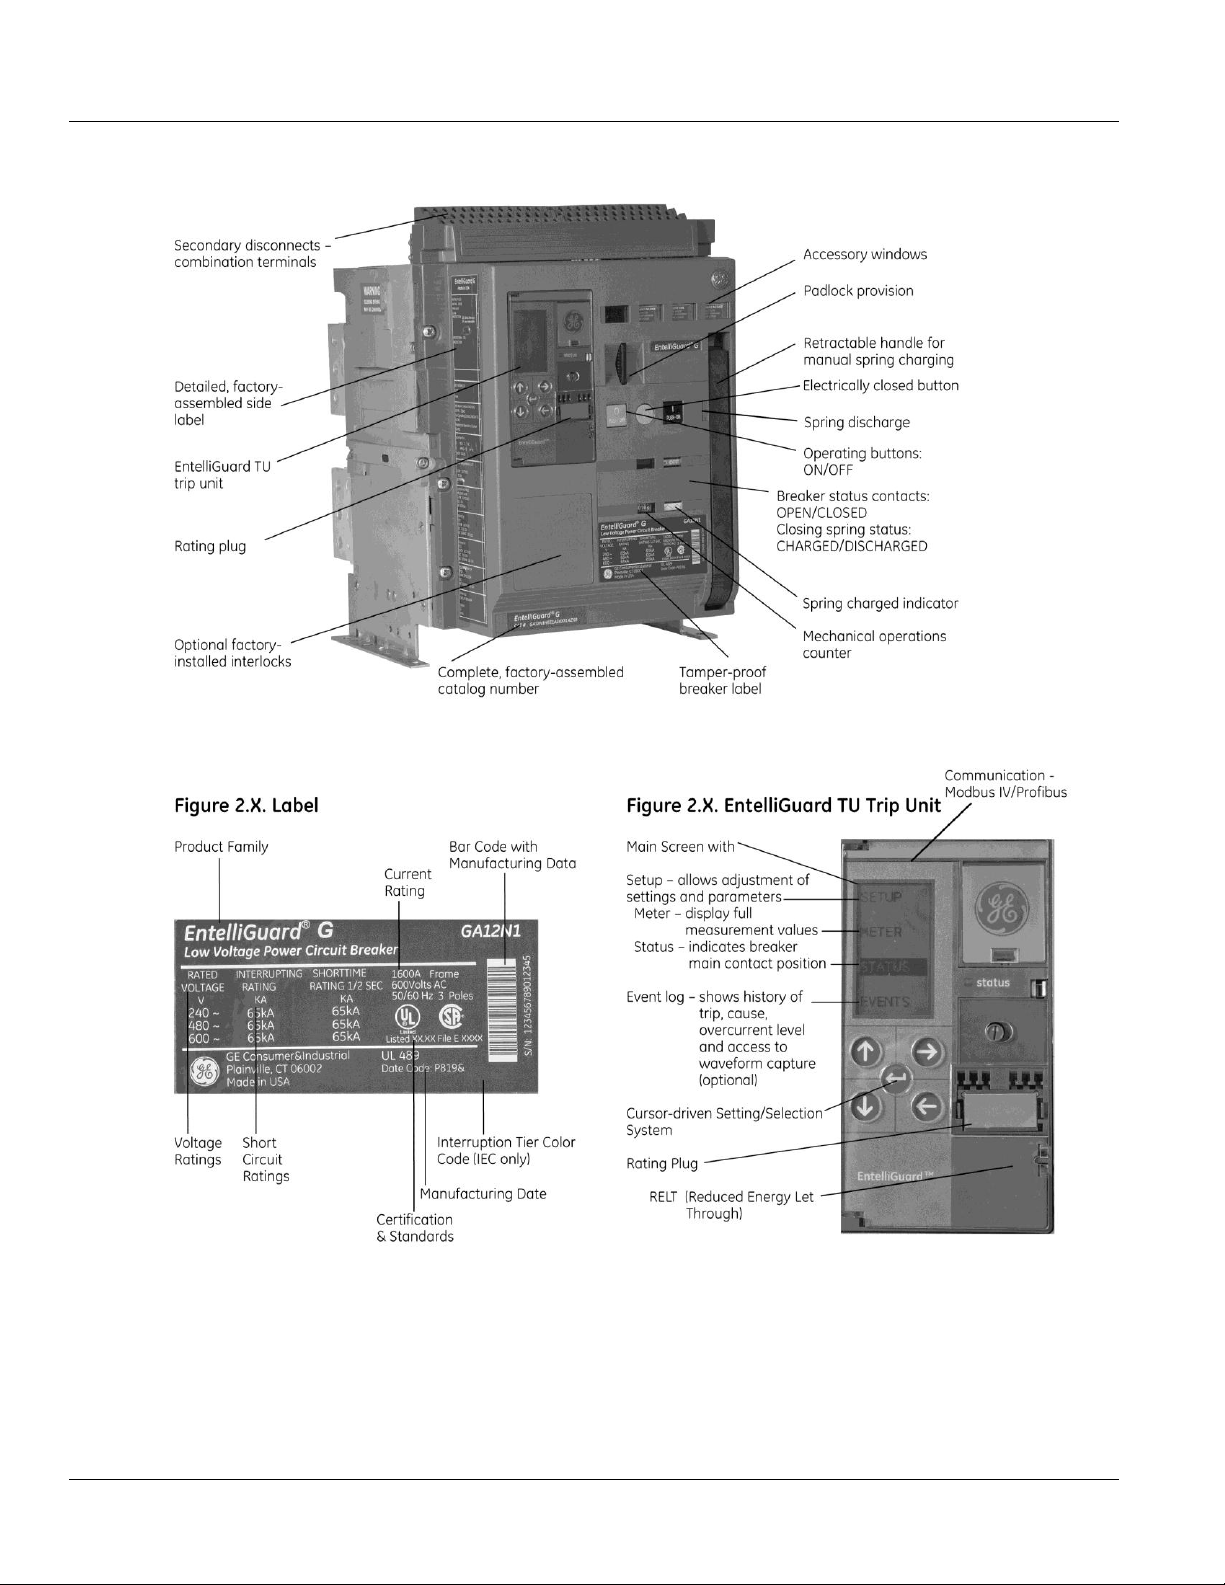
Figure 1.1 shows a front view of the EntelliGuard G. The
indicated features are referenced in this document.
HAND TOOLS NEEDED FOR INSTALLATION
Table 1.1 provides a list of the hand tools required to
install, operate and maintain the EntelliGuard G Circuit
Breaker.
©2012 General Electric All Rights Reserved 7
Page 8
EntelliGuard® G Circuit Breaker DEH-41304C
Section 1 – General Information 13 March 14
Figure 1.1. EntelliGuard G Power Circuit Breaker Features and Characteristics
8 ©2012 General Electric All Rights Reserved
Page 9
DEH-41304C EntelliGuard® G Circuit Breaker
WARNING
IMPROPER INSTALLATION, OPERATION AND
MAINTENANCE
Ensure only qualified personnel install, operate, service
and maintain all electrical equipment.
Failure to comply with these instructions could
result in death or serious injury.
Characteristic
Parameter
Temperature:
Operating
Ambient (surrounding circuit breaker)
Storage
-5 ºC to 70 ºC
-20 ºC to -5 ºC
-40 ºC to 70 ºC
Humidity
20% RH to 95% RH
Salt fog
per ASTM-B117
Vibration (random and sinusoidal)
1 G max., 50 Hz to 500 Hz in X, Y, Z directions
Fungus resistance
per ASTM G21
Voltage and current de-rating at altitude above sea level
per ANSI C37.20.1, Tables 2 and 3
Noise level
<30 dB
Endurance:
closing coil, Shunt trip
motor operator, under voltage release, accessories
20,000 operations
12,500 operations
Interrupting Rating Tier ANSI/UL1066 Devices, LVPCB
Envelope 1
Envelope 2
Envelope 3
Type
240 V
480 V
600 V
1/2S Withstand
400,
800,
1200
400, 800,
1600,
2000
3200
400-3200
3200
4000-5000
S
65,000
65,000
50,000
50,000
X
N
65,000
65,000
65,000
65,000
X X H
85,000
85,000
65,000
85,000
X
P
100,000
100,000
65,000
65,000
X E
85,000
85,000
85,000
85,000
X M
100,000
100,000
85,000
85,000
X X B
100,000
100,000
100,000
100,000
X
X
L
150,000
150,000
100,000
100,000
X X W
200,000
200,000
100,000
100,000
X
X
Interrupting Rating Tier ANSI/UL1066 Devices, LVPCB
Envelope 1
Envelope 2
Envelope 3
Type
240 V
480 V
600 V
1/2S Withstand
400-
1200
400-2000
2500-3000
400-3000
3000
4000
5000-
6000
S
65,000
65,000
50,000
42,000
X
N
65,000
65,000
65,000
42,000
X X H 85,000
85,000
65,000
50,000
X X
P
100,000
100,000
65,000
50,000
X
M
100,000
100,000
85,000
65,000
X X X L 150,000
150,000
100,000
85,000
X X X
W
200,000
200,000
100,000
85,000
X X X
13 March 14 Section 2 – Product Specifications
SECTION 2 – PRODUCT SPECIFICATIONS
Table 2.1. Environmental Conditions
Table 2.2. EntelliGuard G Short Circuit and Interrupting Ratings: ANSI/UL1066
Table 2.3. EntelliGuard G Short Circuit and Interrupting Ratings: UL489
©2012 General Electric All Rights Reserved 9
Page 10

EntelliGuard® G Circuit Breaker DEH-41304C
Envelope
Type
Amps
Rated
Interrupting
Current
Rated Endurance
Minimum Mechanical
Endurance
Minimum Electrical
Endurance at 480 V
Minimum Electrical
Endurance at 600 V
1 S 800
42
12,500
10,000
7,500
1 N 800
42
12,500
10,000
7,500
1
N
1600
42
12,500
10,000
7,500
1
N
2000
42
12,500
7,500
5,000
2
M
3200
65
5,000
5,000
5,000
3
B
4000
100
5,000
3,000
2,000
3
B
5000
100
5,000
2,000
1,500
Envelope
Type
Amps
Short
Interrupting
Current (kA)
Rated Endurance
Minimum Mechanical
Endurance
Minimum Electrical
Endurance at 480 V
Minimum Electrical
Endurance at 600 V
1 S 800
42
12,500
10,000
7,500
1
S
1200
42
12,500
10,000
7,500
1 N 800
42
12,500
10,000
7,500
1
N
1600
42
12,500
10,000
7,500
1
N
2000
42
12,500
7,500
5,000
2
M
3000
65
5,000
5,000
5,000
3
B
4000
100
5,000
3,000
2,000
3
B
5000
100
5,000
3,000
1,500
3
B
6000
100
5,000
1,500
1,000
Type
Description
Type
Description
E
Sq. Rated (ICW = ICU) 400 A to 2000 A, 85 kAIC at 480/508 V
H
85 kAIC at 480/508 V; 65 kAIC at 600/635 V
B
Sq. Rated (ICW = ICU) 3200 A to 6000 A, 100 kAIC at 480/508 V
M
100 kAIC at 480/508 V; 85 kAIC at 600/635 V
N
65 kAIC at 480/508/600/635 V
L
150 kAIC at 480/508 V; 100 kAIC at 600/635 V
W
200 kAIC at 480/508 V; 100 kAIC at 600/635 V
Standard Number
Title
ANSI C37.13,16,17, 20, 50
Low-voltage AC Power Circuit Breakers
NEMA SG 3, 5
Low-voltage Power Circuit Breakers
NEMA AB1
UL 1008*
Automatic Transfer Switches
UL 1066
Low voltage AC and DC Power Circuit Breakers Used in Enclosures
UL 489
Molded-Case Circuit Breakers, Molded-Case Switches and Circuit-Breaker Enclosures
CSA 22.2, No 5.1
Molded-Case Circuit Breakers, Molded-Case Switches and Circuit-Breaker Enclosures
IEC 60947 Part 1
Low Voltage Switchgear and Control Gear - General Rules
IEC 60947 Part 2
Low Voltage Switchgear and Control Gear - Circuit-Breakers
IEC 60947 Part 5
Low Voltage Switchgear and Control Gear - Accessories
IEC 60947 Part 3
Low Voltage Switchgear and Control Gear - Switches, Disconnects, Switch-Disconnects and
Fuse-Combination Units
IEC Environmental: 68-2-1,-2,-3,-6,-11,14,-14,-27,-29,-30,-31
IEC Environmental: 721
GB14048
China standards and CCC Mark
ABS (American Bureau of Shipping
Germanischer Lloyds
CUL
Low-voltage AC Power Circuit Breakers
Section 2 – Product Specifications 13 March 14
Table 2.4. EntelliGuard G Non-Automatic Circuit Breaker: ANSI Version*
Table 2.5. EntelliGuard G Non-Automatic Circuit Breaker/Molded Case Switch: UL Version*
* GE internal quality testing requirements exceeded 20,000 mechanical and electrical operations.
Table 2.6. Key to Tables 2.2 through 2.5
Table 2.7. Agency Certification (All industry standards referenced in this table are the latest version at the time the
product is sold.)
*Suitable for use in UL1008 applications.
10 ©2012 General Electric All Rights Reserved
Page 11

DEH-41304C EntelliGuard® G Circuit Breaker
Type
Design
Width
Depth
Height
Weight
in.
mm
in.
mm
in.
mm
lbs.
kg
3-pole
Envelope 1, Top Mounted, UL/ANSI
Fixed breaker - back connected
13.50
343
17.17
436
17.40
442
136.7
62
Drawout breaker - Moving portion
13.07
332
16.34
415
17.24
438
149.9
68
Cassette/substructure
13.50
343
20.83
529
17.44
443
110.2
50
Envelope 1, Side Mounted, UL/ANSI
Fixed breaker - back connected
16.14
410
17.17
436
15.98
406
136.7
62
Drawout breaker - Moving portion
15.35
390
16.34
415
15.83
402
149.9
68
Cassette/substructure
15.83
402
20.83
529
15.98
406
110.2
50
Envelope 2, Up to 2000A, UL/ANSI
Fixed breaker - back connected
17.17
436
17.17
436
17.40
442
165.3
75
Drawout breaker - Moving portion
17.01
432
16.34
415
17.24
438
176.4
80
Cassette/substructure
17.44
443
20.83
529
17.44
443
114.6
52
Envelope 2, Up to 3000A, UL
Fixed breaker - back connected
17.17
436
22.17
563
17.40
442
253.5
115
Drawout breaker - Moving portion
17.01
432
16.34
415
17.24
438
209.4
95
Cassette/substructure
17.44
443
26.14
664
17.44
443
231.5
105
Envelope 2, Up to 3200A, ANSI
Fixed breaker - back connected
17.17
436
22.17
563
17.40
442
275.6
125
Drawout breaker - Moving portion
17.01
432
16.34
415
17.24
438
209.4
95
Cassette/substructure
17.44
443
26.14
664
17.44
443
246.9
112
Envelope 3, Up to 4000A, ANSI/UL
Fixed breaker - back connected
28.98
736
17.17
436
17.40
442
286.6
130
Envelope 3, Up to 5000A ANSI / 6000A UL
Fixed breaker - back connected
28.98
736
22.17
563
17.40
442
463.0
210
Envelope 3, All Ratings
Drawout breaker - Moving portion
28.82
732
16.34
415
17.24
438
330.7
150
Cassette/substructure
29.25
743
26.14
664
17.44
443
396.8
180
Envelope 3-200kA, All Ratings
Drawout breaker - Moving portion
28.82
732
16.34
415
17.24
438
339.5
154
Cassette/substructure
29.25
743
26.14
664
20.47
520
407.8
185
4-pole
Envelope 1, Top Mounted, UL/ANSI
Fixed breaker - back connected
17.44
443
17.17
436
17.40
442
180.8
82
Drawout breaker - Moving portion
17.01
432
16.34
415
17.24
438
198.4
90
Cassette/substructure
17.44
443
20.83
529
17.44
443
143.3
65
Envelope 1, Side Mounted, UL/ANSI
Fixed breaker - back connected
20.08
510
17.17
436
15.98
406
180.8
82
Drawout breaker - Moving portion
19.29
490
16.34
415
15.83
402
198.4
90
Cassette/substructure
19.76
502
20.83
529
15.98
406
143.3
65
Envelope 2, Up to 2000A, UL/ANSI
Fixed breaker - back connected
22.28
566
17.17
436
17.40
442
220.5
100
Drawout breaker - Moving portion
22.13
562
16.34
415
17.24
438
242.5
110
Cassette/substructure
22.56
573
20.83
529
17.44
443
154.3
70
Envelope 2, Up to 3000A, UL
Fixed breaker - back connected
22.28
566
22.17
563
17.40
442
330.7
150
Drawout breaker - Moving portion
22.13
562
16.34
415
17.24
438
275.6
125
Cassette/substructure
22.56
573
26.14
664
17.44
443
308.6
140
Envelope 2, Up to 3200A, ANSI
Fixed breaker - back connected
22.28
566
22.17
563
17.40
442
363.8
165
Drawout breaker - Moving portion
22.13
562
16.34
415
17.24
438
275.6
125
Cassette/substructure
22.56
573
26.14
664
17.44
443
330.7
150
Envelope 3, Up to 4000A, ANSI/UL
Fixed breaker - back connected
38.03
966
22.17
563
17.40
442
385.8
175
Envelope 3, Up to 5000A ANSI / 6000A UL
Fixed breaker - back connected
38.03
966
22.17
563
17.40
442
617.3
280
Envelope 3, All Ratings
Drawout breaker - Moving portion
37.87
962
16.34
415
17.24
438
440.9
200
Cassette/substructure
38.31
973
26.14
664
17.44
443
529.1
240
Envelope 3-200kA, All Ratings
Drawout breaker - Moving portion
37.87
962
16.34
415
17.24
438
451.9
205
Cassette/substructure
38.31
973
26.14
664
20.47
520
542.3
246
13 March 14 Section 2 – Product Specifications
Table 2.8. Product Dimensions and Weights – ANSI/UL
©2012 General Electric All Rights Reserved 11
Page 12
EntelliGuard® G Circuit Breaker DEH-41304C
WARNING
IMPROPER INSTALLATION, OPERATION AND
MAINTENANCE
Ensure only qualified personnel install, operate, service
and maintain all electrical equipment.
Failure to comply with these instructions could
result in death or serious injury.
WARNING
FALLING OBJECT
Ensure lifting equipment has capability for device
being lifted.
Wear hard hat, gloves and safety shoes.
Failure to comply with these instructions could
result in death or serious injury.
CAUTION
PRODUCT DAMAGE
Ensure circuit breaker and its accessories are
always used within their designated ratings.
Do not allow the circuit breaker to hit a hard
surface while handling.
Do not drag or slide the circuit breaker across a
hard or rough surface.
Failure to comply with these instructions may result
in product damage.
NOTICE
A factory-installed rejection feature prevents
mismatching circuit breakers and
cassettes/substructures, preventing the insertion of a
circuit breaker with a lower rating into a higher rated
cassette/substructure, or the insertion of a higher
rated circuit breaker into a lower rated
cassette/substructure.
Section 3 – Lifting, Mounting and Installation 13 March 14
SECTION 3 – LIFTING, MOUNTING AND
INSTALLATION
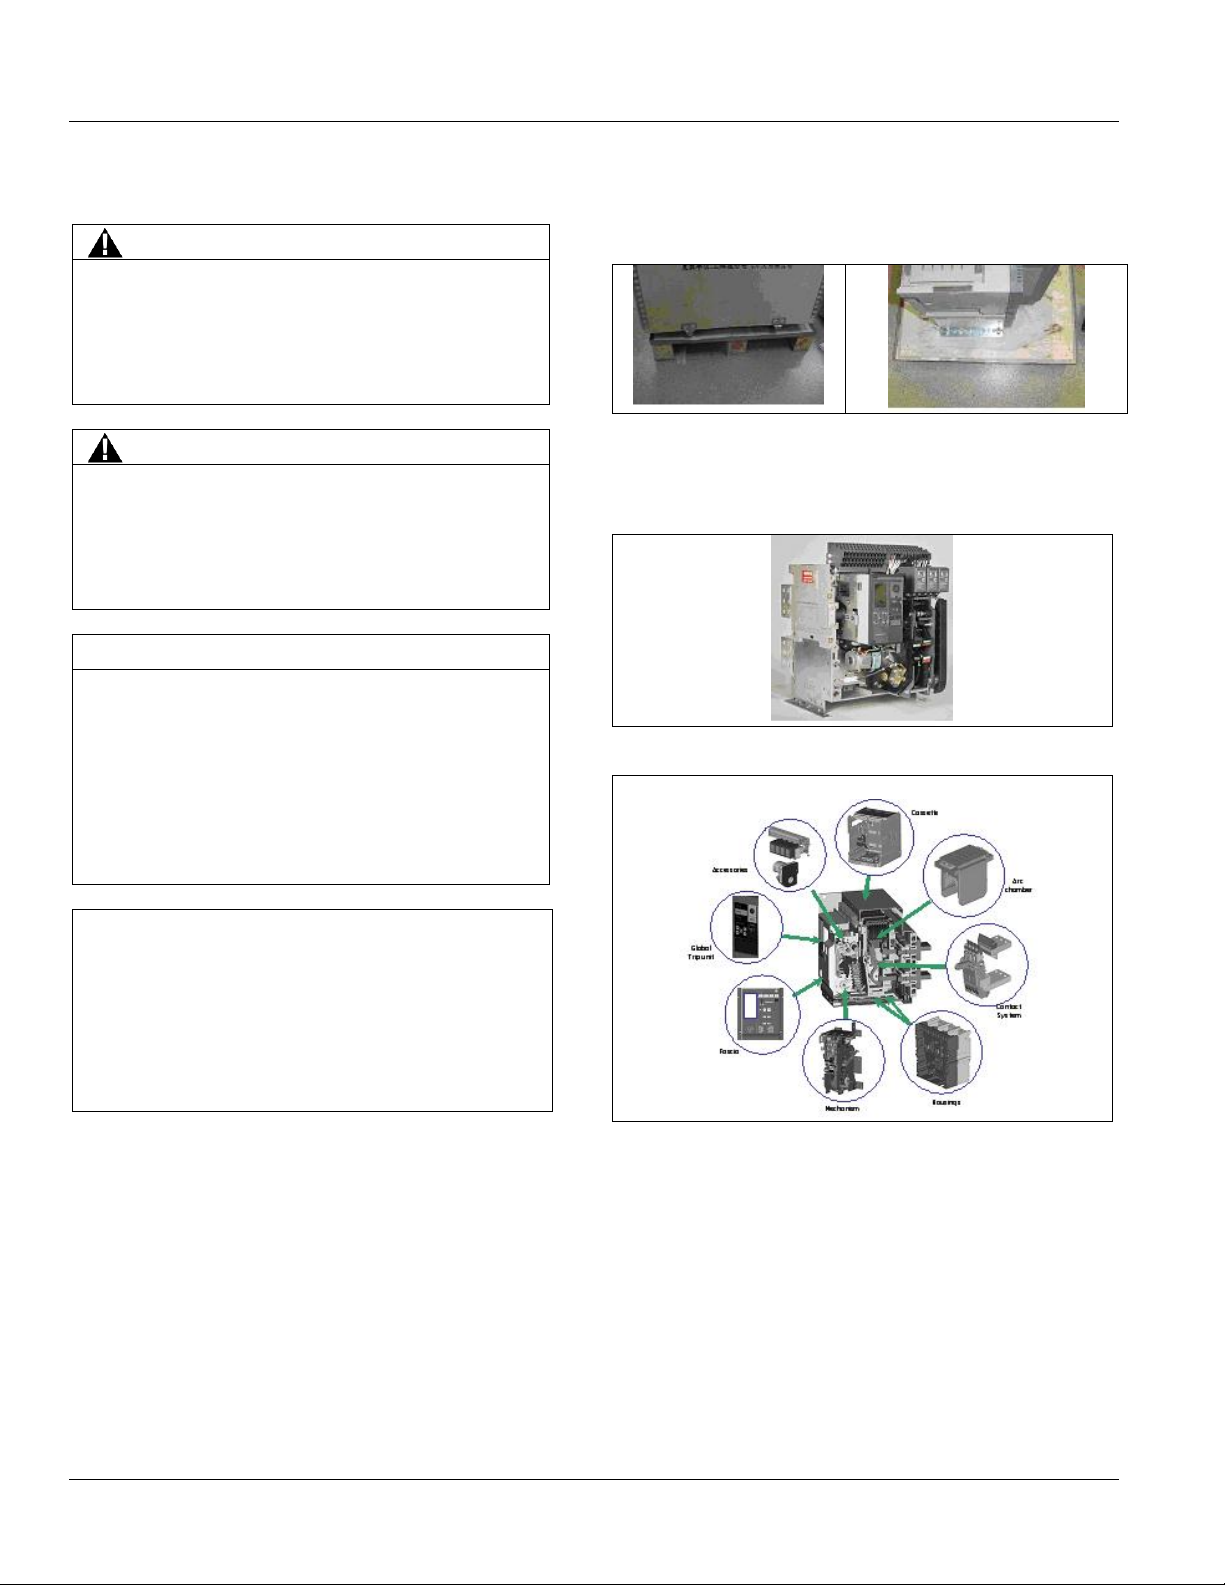
6. Unscrew the mounting screws that fasten the circuit
breaker to the bottom of the shipping palette and
remove the circuit breaker.
Figure 3.1. Unpacking the Circuit Breaker
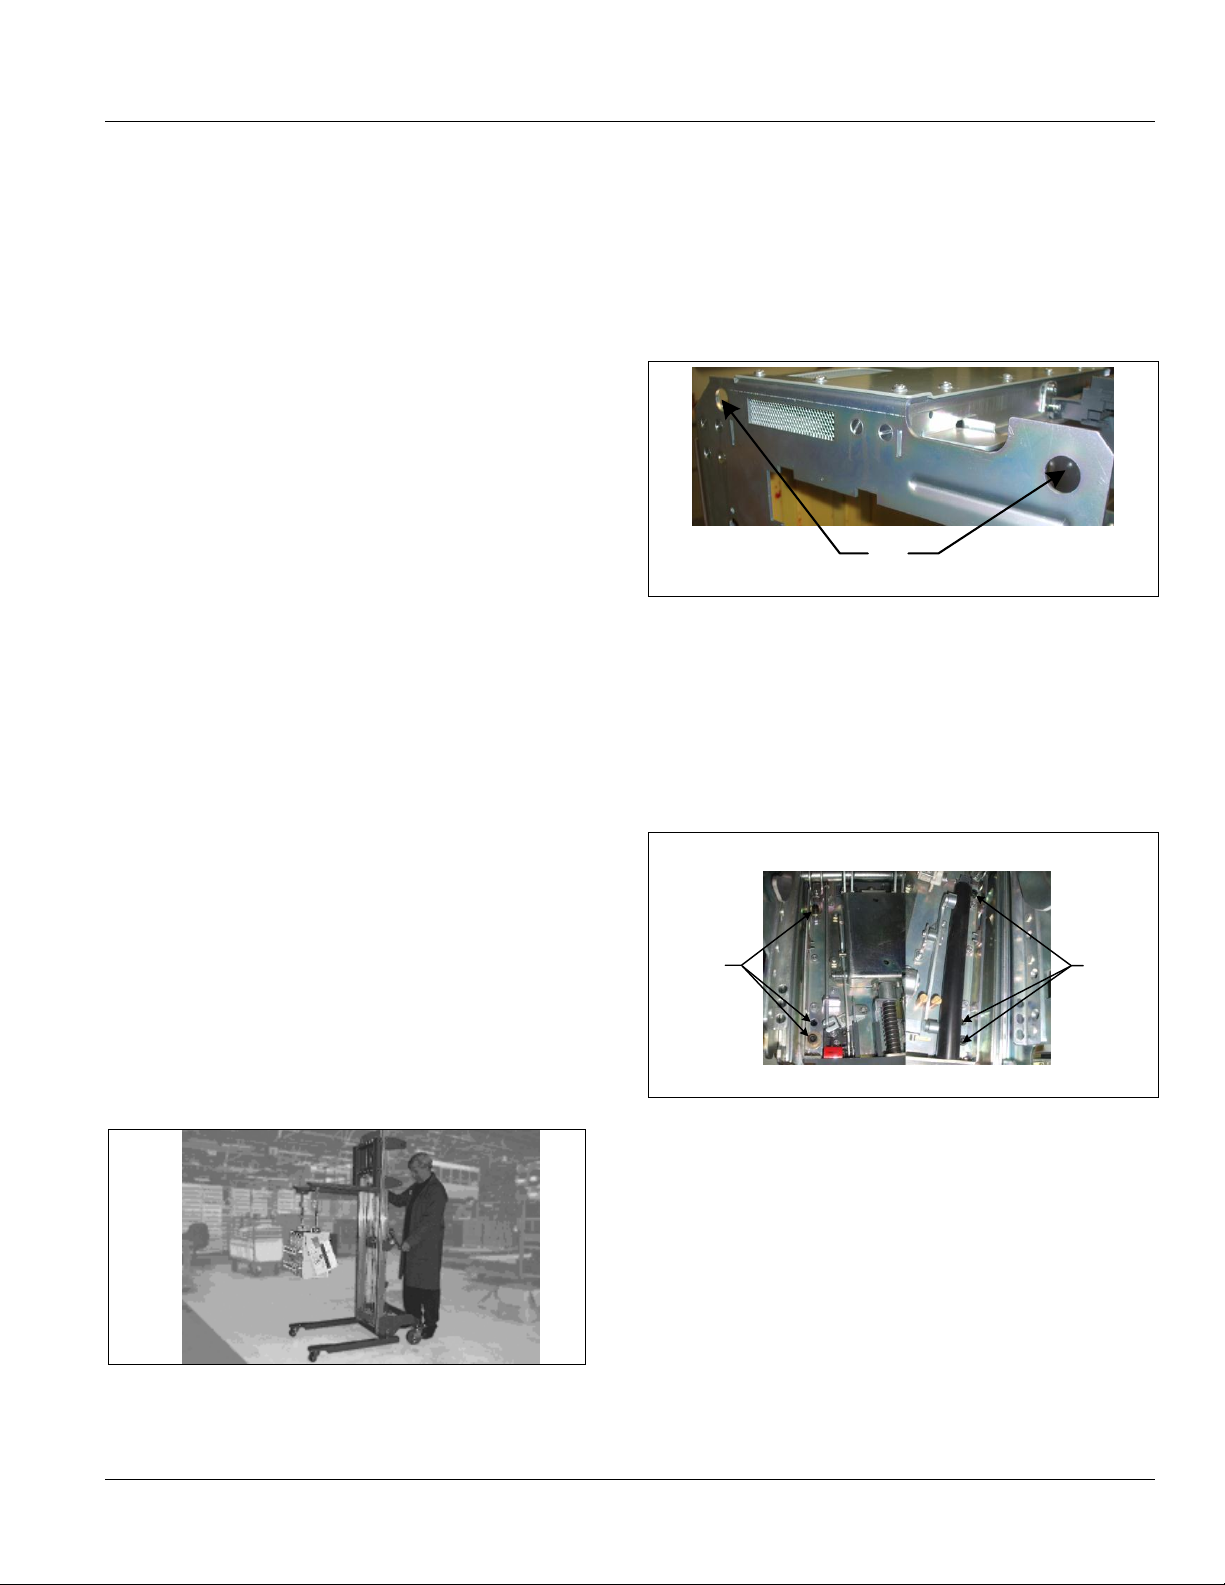
BASIC CIRCUIT BREAKER CONSTRUCTION (Figs. 3.2 and
3.3)
Figure 3.2. Circuit Breaker Construction A
CIRCUIT BREAKER UNPACKING (Fig. 3.1)
1. Inspect the shipping container for obvious signs of
rough handling and/or external damage incurred during
transportation.
2. Record any observed damage for reporting to the
carrier. Ensure all recorded reports and claims include
the order number and name plate information.
3. Remove the banding straps and lift off the top cover.
4. Remove all packaging material.
5. Remove all product documentation and store properly.
12 ©2012 General Electric All Rights Reserved
Figure 3.3. Circuit Breaker Construction B
EntelliGuard G circuit breakers consist of rigid front and rear
housings made of thermoset composite resins which
provide high structural strength and excellent dielectric
properties. These housings enclose a contact system
consisting of a moving portion and a fixed portion:
Moving portion: comprised of multiple finger assemblies
connected to a conductor through flexible copper
connections. The number of finger assemblies depends
on the circuit breaker’s continuous and short circuit
ratings. Each finger assembly has an arcing contact and
a main contact.
Page 13
DEH-41304C EntelliGuard® G Circuit Breaker
A
A Lifting eyes
A
A
Left Right
A M8 bolts
13 March 14 Section 3 – Lifting, Mounting and Installation
Fixed portion: consists of a main fixed contact which is
brazed to a conductive pad, and arc runner which is
fastened to the conductive pad which guides the arc to
the arc chamber.
Each pole has an arc chamber comprised of arc chamber
molds which houses the de-ion plates and filtering system.
The pole configuration depends upon the breaker frame
size. For larger frames, the two pole units are connected
mechanically in parallel to form one phase.
The operating mechanism is mounted on the front housing.
The energy stored in the mechanism is used to close the
contact system. The mechanism is coupled to each pole by
a common layshaft/drive shaft.
The global trip unit measures CT current and compares the
output with set parameters. It gives a trip command during
overload and short circuit to trip the breaker within a
specified time, circuit monitors the current passing through
the circuit breaker and keeps a history of faults.
The fascia has interface buttons and features for safety
locks.
The cassette, which is used for drawout breakers, consists
of a mechanism which enables the circuit breaker to be
racked in and out, and houses the interlocks.
The front panel on the cassette has three markings which
indicate whether the breaker is in the CONNECTED, TEST or
DISCONNECTED position.
LIFTING AND MOUNTING
Using a Lifting Truck
Circuit breaker removal can be made easier by using a
specifically-designed lifting truck (Fig. 3.4). Contact the
nearest sales office for availability.
Figure 3.4. Lifting Truck
Drawout Cassette Lifting, Mounting and Installation
1. Place the cassette on a rigid, leveled appropriate
support on the switchboard. If a handling truck or
other lifting gear is used, install four. M10 lifting bolts
on to the M10 nuts available on the cassette channels
as shown in Fig. 3.5. Use all four lifting bolts at front
and rear of the cassette.
Figure 3.5. Cassette Lifting
2. Mount the cassette on to the switch board using six M8
bolts, nuts and lock washers through the mounting
holes shown in Fig. 3.6. Do not tighten.
3. Ensure the cassette side walls are square to the switch
board.
4. Tighten the mounting bolts to a torque of 25 N m at
the front and rear mounting points (Fig. 3.6).
Figure 3.6. Cassette Mounting
5. Ensure there is minimal deflection/stress to the back of
the cassette when connecting busbars.
6. Connect the incoming and outgoing cables/busbars.
7. Ensure any safety shutters move freely after the
cassette is installed.
Drawout Circuit Breaker Installation into the Cassette
1. Pull the lifting handles on both side walls of the circuit
breaker.
2. Attach the lifting bar between the two holes of the lifting
eyes as shown in Fig. 3.7.
©2012 General Electric All Rights Reserved 13
Page 14

EntelliGuard® G Circuit Breaker DEH-41304C
Section 3 – Lifting, Mounting and Installation 13 March 14
Figure 3.7. Circuit Breaker Lifting
3. Remove any padlocks and keep the key in place for key
locks if applied from the racking panel of the cassette.
4. Ensure the cassette position indicator shows
DISCONNECTED and the racking handle is disengaged.
5. Ensure the cassette racking cams on both side walls of
the cassette are in the completely racked out position
as shown in Fig. 3.8.
Figure 3.8. Racking Drive in the DISCONNECTED Position
Figure 3.10. Circuit Breaker in Disconnected Position.
9. Push back both the extended rails of the cassette to the
stowed position.
10. If the circuit breaker is ON and the springs are charged,
press the OFF button on the circuit breaker fascia and
ensure the circuit breaker contacts are open (Fig. 3.11).
Figure 3.11. Setting the Circuit Breaker to OFF
6. Pull out the cassette rails until they drop into the
horizontal locked position.
7. Lower the circuit breaker gradually so that the rollers
drop over the rails. Ensure the grooves in all rollers
straddle the rails as shown in Fig. 3.9.
Figure 3.9. Circuit Breaker Rollers Straddled on the
Loading Rails
8. Using the hand grips on either side, remove the lifting
bar and push the circuit breaker into the cassette until
it reaches a positive stop (the rollers on circuit breaker
are engaged with the racking cams of the cassette on
both sides). The circuit breaker is now in the
DISCONNECTED position (Fig. 3.10).
11. Remove the racking tool from the storage location on
the cassette front panel by grabbing the handle (Fig.
3.12).
Figure 3.12. Racking Handle Storage Location
12. Pull out the torque bar from inside the handle and
extend (Fig. 3.13).
Figure 3.13. Racking Handle Extended
14 ©2012 General Electric All Rights Reserved
Page 15

DEH-41304C EntelliGuard® G Circuit Breaker
DANGER
ELECTROCUTION
Ensure the circuit breaker has been tripped, indicating
OFF, and the main springs are fully discharged.
Do not touch the circuit breaker’s isolating contacts
during lifting.
Failure to comply with these instructions will result in
death or serious injury.
13 March 14 Section 3 – Lifting, Mounting and Installation
13. With a screwdriver, turn the racking handle shutter
drive A clockwise (Fig. 3.14).
Figure 3.14. Racking Handle Shutter Drive Location
14. Insert the racking handle in the handle insertion hole
on the cassette front panel.
15. Rotate clockwise to rack the circuit breaker into the
cassette. As the breaker approaches the TEST position
check the alignment of the fixed and moving parts of
the secondary circuit isolating contacts (Fig. 3.15).
Figure 3.15. Turning the Racking Handle
Circuit Breaker Removal from the Cassette
1. Repeat Steps 10 through 13 as explained in the previous
section. Insert the racking handle in the handle insertion
hole on the cassette front panel
2. Rotate counter clockwise to rack the circuit breaker out
of the cassette. As the circuit breaker approaches the
TEST position, check the alignment of the fixed and
moving parts of the secondary circuit isolating contacts.
3. Continue rotating the racking handle counter clockwise
until the position indicator first shows TEST, then
DISCONNECTED.
4. Pull out the cassette rails until they drop into the
horizontal locked position (Fig. 3.16).
Figure 3.16. Cassette Rails Pulled Out for Circuit Breaker
Unloading
16. Continue rotating the racking handle clockwise until
the position indicator first shows TEST, then
CONNECTED. When approaching the CONNECTED
position, effort to turn the racking handle will increase
as the clusters engage with the cassette-mounted
contacts. If a motor spring charge or under voltage to
release is installed, these may operate when
approaching the TEST position.
17. Remove and store the racking handle in its storage
location.
18. The circuit breaker is now ready for normal operation.
©2012 General Electric All Rights Reserved 15
5. Using the hand grips on either side, pull the circuit
breaker out of the cassette until it reaches a positive
stop (rollers on the circuit breaker will stop against the
extended rail projection as shown in Fig. 3.17).
Figure 3.17. Circuit breaker Pulled Out of the Cassette for
Unloading
Page 16

EntelliGuard® G Circuit Breaker DEH-41304C
A
A Mounting Location
Section 3 – Lifting, Mounting and Installation 13 March 14
6. Attach the lifting bar to remove the circuit breaker.
Fixed-Mounted Circuit Breaker Mounting
1. Ensure adequate clearance above the circuit breaker
to allow removal of the arc chutes and inspection of
the arcing contacts.
2. Mount the circuit breaker into position, using the
mounting location shown in Fig. 3.18 and four M8
bolts, on a suitable support structure using. Torque to
25 N m. A clearly-marked grounding point is provided
on either side of the circuit breaker.
Figure 3.18. Mounting Location
TRIP UNIT
General Information
All EntelliGuard G power circuit breakers are equipped with
a digital electronic trip unit available in four basics versions
E, S, N, and H.
Each trip unit has a screen that provides an ammeter and a
menu-driven adjustment of the breaker parameters across
a broad current range. The menu has four settings and one
enter key, allowing fast and accurate setting of the device
(Fig. 3.19).
Figure 3.19. Trip Unit
Trip Unit Installation
1. The trip unit is mounted on the PMU base. Press the
lever and align the trip unit as shown in Fig. 3.20.
Figure 3.20. Trip Unit Being Mounted on the PMU Base.
2. Insert the trip unit knob on the PMU base as shown in
Fig. 3.21.
Fig 3.21. Trip Unit Knob
3. Release the lever once the trip unit is inserted. This
action will lock the trip unit to the PMU base as shown in
Fig. 3.22.
Figure 3.22. Trip Unit Alignment
16 ©2012 General Electric All Rights Reserved
4. Install the front cover as shown in Fig. 3.23.
Fig 3.23. Front Cover Installation
Page 17

DEH-41304C EntelliGuard® G Circuit Breaker
A1
A2
A3
A4
A5
A6
A7
A8
A9
A10
A11
A12
A13
Motor
Motor
Spr NO/
RTC NO
Spr NO/
RTC NO
ST1
ST1
UV1
UV1
CC COM
CC IMM
CC CMD
ST2/
UV2
ST2/
UV2
Max. Current (I)
14.8 A
14.8 A
10 A
10 A
1.9 A
1.9 A
1.9 A
1.9 A
1.9 A
1.9 A
1.9 A
1.9 A
1.9 A
Max. Voltage (V)
440 V
440 V
240 V
240 V
440 V
440 V
440 V
440 V
440 V
440 V
440 V
440 V
440 V
A14
A15
A16
A17
A18
A19
A20
A21
A22
A23
A24
A25
A26
NC3
NC3
NC2
NC2
NC1
NC1
NO3
NO3
NO2
NO2
NO1
NO1 - Max. Current (I)
15 A
15 A
15 A
15 A
15 A
15 A
15 A
15 A
15 A
15 A
1 A
15 A
-
Max. Voltage (V)
440 V
440 V
440 V
440 V
440 V
440 V
440 V
440 V
440 V
440 V
440 V
440 V -
A27
A28
A29
A30
A31
A32
A33
A34
A35
A36
A37
A38
A39
O/P1a
O/P1b
O/P2a
O/P2b
24 V+
24 V-
BA NC
BA NO
BA COM
N-RC-
N-RC+
Eleg-CT
Eleg-CT
Max. Current (I)
1 A
1A
1 A
1 A
<500 mA
<500 mA
10 A
10 A
10 A
<50 mA
<50 mA
5 A
5 A
Max. Voltage (V)
30 Vdc/
25 Vac
30 dc/
25 Vac
30 Vdc/
25 Vac
30 Vdc/
25 Vac
30 V
30 V
240 V
240 V
240 V
480 mV
480 mV
2 V
2 V
B1
B2
B3
B4
B5
B6
B7
B8
B9
B10
B11
B12
B13
INPUT1
INPUT2
I/P
COM
ST1 NO/
NC8
ST1 COM/
NC8
UV1
NO/
NC7
UV1
COM/
NC7
NC6
NC6
NC5
NC5
NC4
NC4
Max. Current (I)
<50 mA
<50 mA
<50 mA
10 A/15 A
10 A/15 A
10 A/15 A
10 A/15 A
15 A
15 A
15 A
15 A
15 A
15 A
Max. Voltage (V)
30 Vdc/
25 Vac
30 Vdc/
25 Vac
30 Vdc/
25 Vac
240 V/
440 V
240 V/
440 V
240 V/
440 V
240 V/
440 V
440 V
440 V
440 V
440 V
440 V
440 V
B14
B15
B16
B17
B18
B19
B20
B21
B22
B23
B24
B25
B26
RELT
INPUT
COM
-
CC NO/
NO8
CC COM/
NO8
ST2 NO/
UV2 NO/
NO7
ST2 COM/
UV2
COM/
NO7
NO6
NO6
NO5
NO5
NO4
NO4
Max. Current (I)
<50 mA
<500 mA
-
10 A/
15 A
10 A/
15 A
10 A/
15 A
10 A/
15 A
15 A
15 A
15 A
15 A
15 A
15 A
Max. Voltage (V)
5 V
0.1V
-
240 V/
440 V
240 V/
440 V
240 V/
440 V
240 V/
440 V
440 V
440 V
440 V
440 V
440 V
440 V
B27
B28
B29
B30
B31
B32
B33
B34
B35
B36
B37
B38
B39
ZSI
out+
ZSI
out-
ZSI
in+
ZSI
in-
ISO
GND
5V
ISO
TX EN 1
RX
TX
GND
Volt-IN
Volt-A
Volt-B
Volt-C
Max. Current (I)
<50 mA
<50 mA
<50 mA
<50 mA
<500 mA
<500 mA
<50 mA
<50 mA
<50 mA
<500 mA
<50 mA
<50 mA
<50 mA
Max. Voltage (V)
28 Vdc
28 Vdc
30 Vdc
30 Vdc
0.1 V
5 V
5 V
5 V
5 V
0.1 V
1.76 V
1.76 V
1.76 V
C1
C2
C3
C4
C5
C6
C7
C8
C9
C10
C11
C12
C13
C14
C15
C16
C17
C18
C19
C20
C21
BA
NC
BA
NO
BA
COM
ST1
NO
ST1
COM
UV1
NO
UV1
COM
CC
NO
CC
COM
ST2/
UV2
NO
ST2/
UV2
COM
NO5
NO5
NO4
NO4
NC3
NC3
NC2
NC2
NC1
NC1
C22
C23
C24
C25
C26
C27
C28
C29
C30
C31
C32
C33
C34
C35
C36
C37
C38
C39
C40
C41
C42
Spr
NO/
RTC
NO
Spr
NO/
RTC
NO
ST1
ST1
UV1
UV1
CC
COM
CC
IMM
CC
CMD
ST2/
UV2
ST2/
UV2
NC5
NC5
NC4
NC4
NO3
NO3
NO2
NO2
NO1
NO1
13 March 14 Section 3 – Lifting, Mounting and Installation
WIRING
Tables 3.1 through 3.3 show the wiring schematic for Blocks-A, -B and -C. Table 3.4 provides information on the factoryinstalled network interlock feature and is for use by maintenance organizations for optional network interlock connections.
Table 3.5 provides nomenclature definitions for Tables 3.1 through 3.4.
Table 3.1. Wiring Schematic for Block-A (Three Layer Secondary Disconnect with Basic GTU and Basic Accessories)
Table 3.2. Wiring Schematic for Block-B (Three Layer Secondary Disconnect to be Added for GTU with Full I/O and
Additional Accessory Signals)
Table 3.3. Wiring Schematic for Block-C (Internal to the breaker, not used by customer.) (Two Layer Intermediate
Secondary Disconnect at the Top for the Side Mounted Secondary Disconnect.)
©2012 General Electric All Rights Reserved 17
Page 18

EntelliGuard® G Circuit Breaker DEH-41304C
Network Interlock Connections
Network Interlock Status Switch
A5
A6
A7
A8
B4
B5
B6
NI TRIP
NI TRIP
NI RESET
NI RESET
NI NC
NI NO
NI COM
1.9 A
1.9 A
1.9 A
1.9 A
10 A
10 A
10 A
240 V
240 V
240 V
240 V
240 V
240 V
240 V
Pin
Nomenclature
Description
Pin
Nomenclature
Description
A1
Motor
power input to motor operator
B1
Input 1
relay input to trip unit
A2
Motor
B2
Input 2
relay input to trip unit
A3
SPR NO/RTC NO
spring charge status contact/
ready to close signaling contact
B3
I/P COM
relay input to trip unit
A4
SPR NO/RTC NO
B4
ST1 NO/NC8
shunt trip 1 signaling contact/normally
open contact 8
A5
ST1
power input to shunt trip 1
B5
ST1 COM/NC8
A6
ST1
B6
UV1 NO/NC7
under voltage release 1 signaling
contact/normally closed contact 7
A7
UV1
under voltage release 1
B7
UV1 COM/NC7
A8
UV1
B8
NC6
normally closed contact 6
A9
CC COM
closing coil neutral wire-common
(CC or CCC)
B9
NC6
A10
CC IMM
closing coil (CC), continuous
control power (CCC)
B10
NC5
normally closed contact 5
A11
CC CMD
closing coil close signal (CCC)
B11
NC5
A12
ST2/UV2
power input to shunt trip 2/under
voltage release 2
B12
NC4
normally closed contact 4
A13
ST2/UV2
B13
NC4
A14
NC3
normally closed contact 3
B14
RELT
RELT signal output
A15
NC3
B15
COM
trip unit communication
A16
NC2
normally closed contact 2
B16 - -
A17
NC2
B17
CC NO/NO8
closing coil signaling contact/normally
open contact 8
A18
NC1
normally closed contact 1
B18
CC COM/NO8
A19
NC1
B19
ST2 NO/UV2
NO/NO7
shunt trip 2 signaling contact/under
voltage release 2 signaling contact/
normally open contact 7
A20
NO3
normally open contact 3
B20
ST2 COM/UV2
COM/NO7
A21
NO3
B21
NO6
normally open contact 6
A22
NO2
normally open contact 2
B22
NO6
A23
NO2
B23
NO5
normally open contact 5
A24
NO1
normally open contact 1
B24
NO5
A25
NO1
B25
NO4
normally open contact 4
A26 - -
B26
NO4
A27
O/P1a
relay output 1 from trip unit
B27
ZSI out+
GF zone selective interlock output
A28
O/P1b
relay output 1 from trip unit
B28
ZSI out-
A29
O/P2a
relay output 2 from trip unit
B29
ZSI in+
GF zone selective interlock input
A30
O/P2b
relay output 2 from trip unit
B30
ZSI in-
A31
24 V+
auxiliary power supply to trip unit
B31
ISO GND
trip unit communication
A32
24 V-
B32
5V Iso
A33
BA NC
bell alarm switch
B33
TX EN 1
A34
BA NO
B34
RX
A35
BA COM
B35
TX
A36
N-RC-
neutral Rogowski coil
B36
Voltage Input
GND
ground point for voltage input to trip unit
A37
N-RC+
B37
Volt-A
system phase voltage signals
A38
Eleg-CT
earth leg CT (multi-source ground
fault)
B38
Volt-B
A39
Eleg-CT
B39
Volt-C
Section 3 – Lifting, Mounting and Installation 13 March 14
Table 3.4. Electronic Interlock
Table 3.5. Wiring Schematic Nomenclature Definitions
18 ©2012 General Electric All Rights Reserved
Page 19

DEH-41304C EntelliGuard® G Circuit Breaker
Number of Terminals
78
Terminal capacity
1x
2x
Screw type (bare
conductors)
12 AWG,
solid or stranded
-
Screw type (bare
conductors)
22 AWG to 14 AWG,
0.5 mm² to 2.5 mm²
Ring/spade terminals
20 AWG to 12 AWG
-
13 March 14 Section 3 – Lifting, Mounting and Installation
SECONDARY DISCONNECT BLOCKS
Located for easy customer wiring to the accessories
and to the trip unit:
- Top-mounted for all envelopes.
- Optional side mounting is available for UL
envelope 1.
In case of drawout, by removing one screw, the
cassette-mounted secondary disconnect block can be
tilted in the mounted state and can be removed for
easy control circuit wiring (Fig. 3.24).
Figure 3.24. Secondary Disconnect
Block-A contains a set of 39 self-aligning secondary
circuit isolating contacts. Each contact is clearly
labeled with the connection point. For certain
protection configurations and additional accessories,
an additional block (Block-B) is installed.
Current rating of each terminal is 10 A/240 Vac and
5 A/250 Vdc.
Terminals are suitable for ring or spade terminals and
bare conductors (Table 3.6). Recommended max. width
or diameter of the connector is 7.4 mm.
Connector examples:
- Ring terminals: TYCO-35684 (wire gauge 14-12)
- Spade terminals: TYCO-34384 (wire gauge 12-10)
- Molex-0190690230 (wire gauge 10-12)
Table 3.6. Terminal Wiring
SELECTIVITY/BACKUP PROTECTION
The circuit breaker is time-selective with the
downstream ACB and MCCBs up to the lowest of the
breaking capacity of the combination.
Selectivity levels are determined by the selection
settings of short time and instantaneous pickup and
time delay on the Trip Unit.
No backup protection/cascading (series ratings) is
available with this product.
©2012 General Electric All Rights Reserved 19
Page 20

EntelliGuard® G Circuit Breaker DEH-41304C
WARNING
IMPROPER INSTALLATION, OPERATION AND
MAINTENANCE
Ensure only qualified personnel install, operate, service
and maintain all electrical equipment.
Failure to comply with these instructions will result in
death or serious injury.
WARNING
PERSONAL INJURY
Avoid risk of injury from moving parts while handling
the breaker.
If advisable, use a cable/busbar lockable grounding
device (optional accessory) to provide additional safety
during system maintenance.
Failure to comply with these instructions could result in
death or serious injury.
CAUTION
PRODUCT DAMAGE
Ensure circuit breaker and its accessories are always
used within their designated ratings.
Use the specially designed circuit breaker handling
truck (optional accessory) when removing the circuit
breaker from its cassette.
Failure to comply with these instructions may result in
product damage.
NOTICE
Each charging action provides sufficient charge for an
O-C-O (Open-Close-Open) operation without requiring
additional charging.
The mechanism works properly only when the circuit
breaker is mounted on a horizontal plane with bottom
mounting or on vertical plane with front mounting.
ON/OFF
Indicator
Main Breaker
Contacts
Charging Spring
Indicator
Condition of
Charging Springs
Next Permissible Operating Function
OFF
open
discharged
discharged
closing springs may be charged
OFF
open
charged
fully charged
contacts may be closed, then opened
ON
closed
discharged
discharged
contacts may be opened or closing springs may be charged
ON
closed
charged
fully charged
pen-closed-open sequence may be carried out and the closing
springs can be charged after the close operation opened
OFF
open
charged
fully charged
closing spring may be discharged without closing contacts
ON
closed
charging
partially charged
complete charging
OFF
open
charging
partially charged
complete charging
Section 4 – Operation 13 March 14
SECTION 4 – OPERATION
STORED ENERGY MECHANISM KEY FEATURES (Table 4.1)
Circuit Breaker Charging
The circuit breaker can be charged in one of two ways:
Manually, using a charging handle.
- The charging handle lies flush within the circuit
breaker front cover. It is easily retracted without
special tools.
- Full spring charging is accomplished with 10 full
pumps or less of the handle. Handle movement
includes suitable stops so that it cannot be over
extended and cause operator injury.
- The handle engages the charging ratchet during
motion away from the circuit breaker front cover
and rotates freely on the return stroke.
Electrically, via a motor operator that is automatically
activated after the closing operation.
Two Step Mechanism Design
The first step charges the closing spring through the
manual charging handle or through the spring
charging motor.
The second step closes the circuit breaker via the
PUSH ON (UL)/CLOSE (ANSI) pushbutton on the front
cover or closes the breaker through energizing the
closing coil.
The mechanism is trip free and incorporates an anti-
pumping system:
- The circuit breaker may be closed only after the
mechanism is fully charged and there is no active
open command.
- The closing coil has an electrical anti-pumping
feature. The coil supply, if maintained
continuously, will attempt to close the circuit
breaker only one time. To achieve a second
closing attempt, the closing coil must be deenergized and energized a second time.
Table 4.1. Stored Energy Mechanism Sequences of Operation
20 ©2012 General Electric All Rights Reserved
Page 21

DEH-41304C EntelliGuard® G Circuit Breaker
Circuit Breaker
Position in the
Cassette
Primary
Disconnects
Secondary
Disconnects
Circuit Breaker Functionality
Circuit Breaker
Door Position
CONNECTED
engaged
engaged
circuit breaker may be operated both mechanically or electrically
ready for service
closed
TEST
disengaged
engaged
circuit breaker may be operated both mechanically or electrically
circuit breaker and control circuit operations may be tested and
verified
closed
DISCONNECTED
disengaged
disengaged
circuit breaker may be operated only mechanically
circuit breaker may not be removed from the circuit breaker
compartment
closed
WITHDRAWN
disengaged
disengaged
circuit breaker may be operated only mechanically
circuit breaker may be removed from the circuit breaker
compartment
open
13 March 14 Section 4 – Operation
CLOSING SPRING DISCHARGE PROCEDURE (Table 4.2)
The main spring may be discharged (also known as
“crashing the mechanism”) without closing the breaker by
using a special tool operated through a small window on
the front cover.
One of the following safety-related capabilities should be
provided per the applicable ANSI standard:
Drawout version only:
- ANSI versions: The mechanism closing springs
are automatically discharged (crashed) when the
circuit breaker is moved from the DISCONNECT
position to the WITHDRAWN fully disconnected
position and vice versa.
- UL and IEC versions. The automatic spring
discharge feature is optional.
Fixed-mounting and drawout versions:
- The front cover has a label indicating the
position of the hidden spring charged indicator
button and clearly indicates that the springs
must be discharged prior to any maintenance
activity or circuit breaker disassembly.
The closing springs must be discharged prior to removal
of the arc-chute cover.
Table 4.2. Cassette Operating Positions
CLOSING PROCEDURE
Pull the charging handle out and down to charge the
closing springs (requires approximately 10 pumps of
the handle to fully charge).
If a motorized spring charging unit is installed, the
springs will be automatically charged as soon as the
motor is energized.
Pressing the ON pushbutton or energizing the
closing coil (if installed) will close the circuit breaker.
CONDITIONS WHEN CLOSING CANNOT OCCUR
The OFF button is in a depressed position.
The trip unit is not installed.
If racking handle is inserted, remove it.
The breaker is positioned anywhere between
CONNECTED, TEST and DISCONNECTED positions.
Trip unit reset button is protruding from the front
cover. Press the reset button.
An under voltage release is installed but not
energized.
A key interlock (Ronis, Profalux, Castell, etc.) or direct
inter-breaker mechanical interlock is operating on
the breaker.
CIRCUIT BREAKER OPENING PROCEDURE
Press the OFF pushbutton or energize the shunt trip
coil (if installed).
Tripping under fault conditions will be automatic
depending on the protective device installed and its
settings.
©2012 General Electric All Rights Reserved 21
Page 22

EntelliGuard® G Circuit Breaker DEH-41304C
DANGER
ELECTROCUTION
Ensure the circuit breaker has been tripped, indicating
OFF, and the main springs are fully discharged before
installing locks and interlocks.
Failure to comply with these instructions will result
in death or serious injury.
WARNING
IMPROPER INSTALLATION, OPERATION AND
MAINTENANCE
Ensure only qualified personnel install, operate,
service and maintain all electrical equipment.
Failure to comply with these instructions could
result in death or serious injury.
WARNING
PERSONAL INJURY
Avoid risk of injury from moving parts while
handling the circuit breaker.
Failure to comply with these instructions could
result in death or serious injury.
CAUTION
PRODUCT DAMAGE
Ensure the circuit breaker and its accessories are
always used within their designated ratings.
Use the specially-designed circuit breaker handling
truck (optional accessory) when removing the
circuit breaker from its cassette.
Failure to comply with these instructions may result
in product damage.
NOTICE
Ensure all padlocks are scissor compatible.
Section 5 – Locks and Interlocks 13 March 14
SECTION 5 – LOCKS AND INTERLOCKS
CIRCUIT BREAKER FRONT PANEL LOCKING
Pushbutton Locking
This function denies unauthorized access to ON/OFF
pushbuttons.
1. Ensure padlock shaft diameter is 3 mm to 9.5 mm.
2. Raise the appropriate window(s) and pass padlock hasp
through the locking eye (Fig. 5.1).
Figure 5.1. Pushbutton Padlock Location
Padlock or Scissor Lock for Breaker Trip Free Condition
1. While pressing the OFF pushbutton, pull out the
padlock lever.
2. Pull the padlock lever out.
3. Ensure padlock shaft diameter is 3 mm to 9.5 mm.
4. Insert padlock hasp (Fig. 5.2).
Figure 5.2. Padlock for Breaker Trip Free Condition
GENERAL INFORMATION
A variety of locks and interlock accessories are available.
The operation of most of these accessories is described in
this section.
22 ©2012 General Electric All Rights Reserved
Page 23

DEH-41304C EntelliGuard® G Circuit Breaker
A Security Locking Bar
A
13 March 14 Section 5 – Locks and Interlocks
Key Lock for Breaker Trip Free Condition
A total of four key locks (Ronis/Profalux/Kirk and one Castel
lock) can be installed.
1. Press the OFF pushbutton until the padlock lever is
pulled out
2. Pull the padlock lever and remove the key from lock by
rotating it in counterclockwise direction (Fig. 5.3).
Figure 5.3. Key Lock for Breaker Trip Free Condition
DRAWOUT CASSETTE FRONT PANEL LOCKING
Security Locking
This function locks the entry of the racking handle in the
crank insertion hole of the cassette front panel when the
padlock is installed when circuit breaker in the
DISCONNECTED/ CONNECTED position. Up to three
padlocks (shaft diameter of 3 mm to 9.5 mm) may be
installed for additional security (Fig. 5.4).
Figure 5.4. Circuit Breaker Security Padlocking Location
Figure 5.5. Padlock Insertion and Lock-Out on the
Security Locking Bar
4. Using a screwdriver, turn the racking handle
shutter drive A clockwise.
Isolation Shutters Locking (If Installed)
This function locks the operation of the safety shutters
when the pad lock is installed on the security locking
bar B only when the cassette is in the DISCONNECTED
position. Only one padlock (shaft diameter of 3 mm to
9.5 mm) may be installed.
1. Ensure the position indicator shows the
DISCONNECTED/CONNECTED position.
2. Remove the racking handle from the operating
position.
3. Pull the locking bar until the locking eye is
exposed and hold while inserting the padlock
hasp (Fig. 5.6).
Figure 5.6. Padlock Insertion and Lock-Out on the
Security Locking Bar
1. Ensure the position indicator shows the
DISCONNECTED/CONNECTED position.
2. Remove the racking handle from the operating
position.
3. Pull the locking bar until the locking eye is exposed
and hold while inserting the padlock shaft (Fig. 5.5).
©2012 General Electric All Rights Reserved 23
1. Using a screwdriver, turn the racking handle
shutter drive clockwise.
2. Check installation by trying to lift the front shutter
plate up and down (for horizontal terminations) or
sliding it left to right (for vertical terminations)
which are installed on the cassette in front of the
terminals (Fig. 5.7).
Page 24

EntelliGuard® G Circuit Breaker DEH-41304C
A End of spring locates below Circlip
B Spring pin
C Circlip
D End of spring fits below boss in inside of lever
E Fulcrum boss with Circlip
Section 5 – Locks and Interlocks 13 March 14
Fig. 5.7. Safety Shutter in Closed Position
Door Interlock Installation
A door interlock mechanism may be installed inside the
cassette on the right for L/H (left-hand) hinged door or left
for R/H (right-hand) hinged door. Specify whether the door
is L/H or R/H hinged when ordering interlock kits (Figs. 5.8
and 5.9). Each kit contains:
One interlock lever
One helical spring
Door Catch Assembly
Washers
Circlips
Figure 5.8. Door Interlock Pack Contents
Figure 5.9. Door Interlock Showing both L/H and R/H Sets
To assemble (Fig. 5.10):
1. Place the spring over the pivot pin protruding from
cassette side plate.
2. Position interlock lever as shown. Ensure one end of
spring is located below the nut and the other rests over
the small boss on the lever.
3. While holding the interlock lever in position: Insert two
Circlip into the groove in the pivot pins and secure.
Figure 5.10. Door Interlock Assembly)
4. Mount the door catch assembly to the panel door using
2 X M5 – 8 long socket head screws, lock washers
through the mounting holes shown in Fig. 5.11 and Fig.
5.12. Tighten the bolts to a torque of 8 N m on the panel
door.
Figure 5.11. Left-Hand Hinged Board Door Bracket
Location Detail
24 ©2012 General Electric All Rights Reserved
Page 25

DEH-41304C EntelliGuard® G Circuit Breaker
Top
Circuit
Breaker
Bottom
Circuit
Breaker
“A” cm
10 cm (Min.) Cable
13 March 14 Section 5 – Locks and Interlocks
Figure 5.12. Right-Hand Hinged Board Door Bracket
Location Detail
5. Ensure the circuit breaker is in the DISCONNECTED
POSITION.
6. Close the panel door. Ensure the interlock lever is in the
lifted position.
7. Close the door and rack-in the circuit breaker in the
cassette. Follow steps 7 thru 12 in the section “Drawout
Circuit Breaker Operation“ already illustrated for
racking the circuit breaker in the cassette.
8. After reaching CONNECTED position, test the now
locked panel door to ensure it does not open.
KEY LOCKS AND INSTALLATION
Two types of key locks fit on the cassette (Figs. 5.13 and
5.14).
Profalux
Ronis
Figure 5.13. Profalux Key Interlock
Figure 5.14. Ronis Key Interlock
TWO-BREAKER CABLE INTERLOCK INSTALLATION
Figs. 5.15 and 5.16 provide information needed to calculate
the correct cable length. More information on three-breaker
and other combinations of cable interlocks is available on
request.
Vertical Mounting (Fig. 5.15)
1. Cassette pitch “A” is from the bottom face of one
cassette to the bottom face of the other. Dimension
“A” must be no less than 60 cm.
2. Ensure that the minimum cable radius is not less than
125 mm. Minimum cable length is “A” + 100 cm.
Longer cables may be used; however, they must be
free from obstruction and no longer than 3 m.
Figure 5.15. Vertical Mounting Dimensions
©2012 General Electric All Rights Reserved 25
Page 26

EntelliGuard® G Circuit Breaker DEH-41304C
Circuit
Breaker 1
Circuit
Breaker 2
“A”
cm
14 cm (Min.) Cable
A
A Shutter locking bar
Function
Number and Type of Padlocks/Locking Devices
Padlock Shaft Diameter
Padlock for “ON” pushbutton restricting access to
the button in raised position
maximum of one lock of may be mounted
3 mm to 9.5 mm
Padlock for “OFF” pushbutton restricting access
to the button in depressed state to block ON
operations
maximum of one lock of may be mounted
3 mm to 9.5 mm
Padlock for breaker trip free condition
maximum of three locks may be mounted
3 mm to 9.5 mm
Breaker Key Lock in OPEN position (Optional)
maximum of four key locks of any one type
(optional Kirk/Ronis/Profalux) may be used
maximum one of Castle lock may be installed
N/A
Function
Number and Type of Padlocks/Locking Devices
Padlock Shaft Diameter
Racking mechanism screw access blocking
padlock in DISCONNECTED/TEST/CONNECTED
positions
three locks may be mounted in one slot
3 mm to 9.5 mm
Racking mechanism screw access blocking and
breaker trip free position key lock in
DISCONNECTED/TEST/CONNECTED positions
(Ronis/Profalux)
maximum of two locks
3 mm to 9.5 mm
Padlocking provisions on the drawout rails
prevent unauthorized installation of a breaker
that has been removed from the cassette for
equipment or load maintenance.
maximum of three padlocks
3 mm to 9.5 mm
Section 5 – Locks and Interlocks 13 March 14
Horizontal Mounting (Fig. 5.16)
1. Measure distance ”A” from the right hand face of one
cassette to the right hand face of the other.
2. Ensure the minimum cable radius is not less than
125 mm. Cable length is “A” + 67 cm. Longer cables
may be used; however, they must be free from
obstruction and no longer than 3 m.
Figure 5.16: Horizontal Mounting Dimensions
Table 5.1. Fixed-Mounted Circuit Breaker Locking
SAFETY SHUTTERS INSTALLATION (Fig. 5.17)
1. Ensure circuit breaker is in the DISCONNECTED position
and the racking handle is removed.
2. Pull out the top or bottom shutter locking bar, or both
as required, to reveal the locking eye.
3. Hold while inserting padlock(s). (Shaft diameter is 6 mm
min. to 8 mm max.).
4. Apply the provided “BUSBAR” and “CIRCUIT” designation
labels.
Figure 5.17. Shutter Padlocking
Table 5.2. Drawout Circuit Breaker Locking
26 ©2012 General Electric All Rights Reserved
Page 27

DEH-41304C EntelliGuard® G Circuit Breaker
WARNING
IMPROPER INSTALLATION, OPERATION AND
MAINTENANCE
Ensure only qualified personnel install, operate, service
and maintain all electrical equipment.
Failure to comply with these instructions could
result in death or serious injury.
Envelope
Power
Consumption
Nominal Control
Voltage
IEC Range (85% to 110%)
ANSI Range
UL Range
(85% to 110%)
Cat No.
1
DC – 300 W
24 Vdc/30 Vdc
20.4 V to 26.4 V
-
20.4 V to 26.4 V
GM0124DR
48 Vdc
40.8 V to 52.87 V
38 V to 56 V
40.8 V to 52.87 V
GM01048DR
60 Vdc
51 V to 66 V
-
51 V to 66 V
GM01060DR
72 Vdc
61.2V to 79.2 V
-
61.2 V to 79.2 V
GM01072DR
110 Vdc/130 Vdc
106.25 V to 137.5 V
100 V to 140 V
106.25 V to 137.5 V
GM0113ODR
250 Vdc
212.5 V to 275 V
200 V to 280 V
212.5 V to 275 V
GM01250DR
AC – 350 VA
48 Vac
40.8 V to 52.87 V
-
40.8 V to 52.87 V
GM01048AR
120 Vac
102 V to 132 V
104 V to 127 V
102 V to 132 V
GM01120AR
240 Vac
204 V to 264 V
208 V to 254 V
204 V to 264 V
GM01240AR
277 Vac
235.5 V to 304.7 V
-
235.5 V to 304.7 V
GM01277AR
2 and 3
DC – 480 W
24 Vdc/30 Vdc
20.4 V to 26.4 V
-
20.4 V to 26.4 V
GM0224DR
48 Vdc
40.8 V to 52.87 V
38 V to 56 V
40.8 V to 52.87 V
GM02048DR
60 Vdc
51 V to 66 V
-
51 V to 66 V
GM02060DR
72 Vdc
61.2 V to 79.2 V
-
61.2 V to 79.2 V
GM02072DR
110 Vdc/130 Vdc
106.25 V to 137.5 V
100 V to 140 V
106.25 V to 137.5 V
GM0213ODR
250 Vdc
212.5 V to 275 V
200 V to 280 V
212.5 V to 275 V
GM02250DR
AC – 560 VA
48 Vac
40.8 V to 52.87 V
-
40.8 V to 52.87 V
GM02048AR
120 Vac
102 V to 132 V
104 V to 127V
102 V to 132 V
GM02120AR
240 Vac
204 V to 264 V
208 V to 254 V
204 V to 264 V
GM02240AR
27 Vac
235.5 V to 304.7 V
-
235.5 V to 304.7 V
GM02277AR
Spring charge contact is power rated only, as shown below.
AC Ratings
DC Ratings
Voltage
Amps
Voltage
Amps
110 V-130 V
AC21-15 A
24 V
DC21-15 A
AC23-10 A
110 V-130 V
DC21-10 A
220 V -240 V
AC21-10 A
250 V
DC21-5 A
AC23-5 A - -
Spring charge time = 3 sec max.
Recommended fuse amps: contact factory.
Duty cycle = 2/min.
Envelope 1 motors: running VA ~ 300 VA; inrush = 2 to 3 times.
Envelope 2 and 3 motors: running VA ~ 450 VA; inrush = 2 to 3 times.
13 March 14 Section 6 – Accessories Description
SECTION 6 – ACCESSORIES DESCRIPTION
GENERAL INFORMATION
A wide range of optional accessories are interchangeable
across all EntelliGuard G power circuit breakers, regardless
of nominal rating or envelope/frame size. Each accessory
incorporates easy-fit design features for quick installation,
either at the factory or in the field (Fig. 6.1).
NOTE: Replacement accessories have an “R” at the end of
the catalog number as shown.
Table 6.1 Motor Operators
Figure 6.1. Accessory Mounting
INDIVIDUAL ACCESSORIES
Motorized Spring Charging Unit
The unique motor/gearbox unit is specially designed to
operate with the full range of EntelliGuard G. It is easily
fitted with three heavy-duty bolts. After a breaker close
operation, the unit automatically recharges the spring and
makes it ready for immediate open and re-close should the
need arise. High speed recharging ensures that the springs
are fully charged within approximately three seconds
following a release. All electrically operated (EO) ANSI/UL
breakers are equipped with “Spring Charged” contacts
(GSCC1R) for status indication (Table 6.1).
©2012 General Electric All Rights Reserved 27
Page 28

EntelliGuard® G Circuit Breaker DEH-41304C
Type
Power
Consumption
Nominal Control
Voltage
Catalog
Number
Closing
Coil
DC: 350 W,
20 W (sealed)
AC: 350 W
(inrush),
20 W (sealed)
24/30 Vdc
GCCN24DR
40 Vdc; 48 Vac/dc
GCCN048R
60Vdc
GCCNM060DR
70 to 72 Vac/Vdc
GCCN072R
110/130/120 Vac
GCCN120R
208 Vac
GCCN208AR
220 Vdc/240 Vac
GCCN240R
250 Vdc/277 Vac
GCCN277R
Command
Operated
Closing
Coil
DC: 350 W,
20 W (sealed)
AC: 350 W
(inrush),
20 W (sealed)
24/30 Vdc
GCCC24DR
40 Vdc; 48 Vac/dc
GCCC048R
60 Vdc
GCCCM060DR
70 to 72 Vac/Vdc
GCCC072R
110/130/120 Vac
GCCC120R
208 Vac
GCCC208AR
220 to 250 Vac/Vdc/249 Vac
GCCC240R
Nominal Control Voltage
Catalog Number
24 Vdc
GSTG024DR
48 Vac/dc
GSTG048R
70/72 Vdc
GSTG072DR
110 Vdc/120 Vac
GSTG120R
125 Vdc
GSTG125DR
208 Vac
GSTG208AR
240 Vac
GSTG240R
250 Vdc/277 Vac
GSTG277R
Type and
Configuration
Rating
Cat. No.
1 Power rated +
1 Low signal (Hi-Fi)
(1NO contact each)
AC
120 Vac
6 A
GCSP1R
250 Vac
6 A
DC
125 Vac
0.5 A
250 Vdc
0.25 A
AC
125 Vac
0.1 A
DC
30 Vdc
0.1 A
2 Low signal (Hi-Fi)
(1NO contact each)
AC
125 Vac
0.1 A
GCSP2R
Section 6 – Accessories Description 13 March 14
Circuit Breaker Closing Coils – Standard and Commanded
Two, easy-to-fit, clip-on closing coil options with simple,
plug-in connections are available. Both options offer
electrical remote release of the spring charged closing
mechanism. Both options include a standard anti-pump
safety feature ensuring that the remote signal must be
released before further close commands are allowed. The
Command Close Coil additionally provides for local
electrical command of the accessory and remote
command over communications via the EntelliGuard trip
unit (Table 6.2).
Table 6.2. Closing Coil Characteristics
Table 6.3. Extended Range Shunt Trip for UL Ground Fault
and ANSI DC Rating Applications.
Pickup range = 55%-110%.
Duty cycle = 2/min.
Inrush = 480 A (ac), 480 W (dc).
Holding = 60 VA (ac), 50 W (dc).
Status Indication Switch (Coil Signaling Contact)
A plug-in module is available to provide status indication via
the secondary disconnects and trip unit. Coil Signaling
Contacts are available for closing coils, shunt trips and under
voltage releases, see Table 6.4. Contac t is mounted on top of
the Accessory Device.
Table 6.4 Coil Signaling Contact Module
Duty cycle = 2/min.
Closing coil inrush = 350 VA.
Command Operation Module
This module energizes the closing coil to cause the breaker
to close whenever control power is applied to the
accessory and when commanded from the breaker trip
unit or breaker front panel push button (electrical closing).
Shunt Trip (ST)
Energizing the shunt trip, via local or remote input, will
instantaneously activate the circuit breaker mechanism,
ensuring a rapid open operation. The standard auxiliary switch
ensures automatic isolation whenever the circuit breaker is
open. The shunt trip release is a straightforward, field installable
accessory available in wide range of voltages (Table 6.3).
28 ©2012 General Electric All Rights Reserved
Under Voltage Release (UVR) With Fixed Time Delay
The UVR instantaneously activates the circuit breaker trip
mechanism when the source voltage drops below the low
voltage threshold. The UVR is also a simple, field installable
device. NOTE: This accessory acts as a permissive; it is a novoltage/no-close device. The circuit breaker cannot be closed
(manually or electrically) unless the under voltage release coil
is energized above the required threshold. The UVR shunt trip
with fixed time delay is specifically intended for applications
where a delay period (ride-through) is required due to
potential voltage events. The delays are 50 ms when system
voltage drops to 50% and 20 ms when system voltage drops
below 50%. See Table 6.4. (A Time Delay Module is also
available, see next page).
Page 29

DEH-41304C EntelliGuard® G Circuit Breaker
Power
Consumption
Nominal Control
Voltage
Catalog
Number
DC: 350 W,
20 W (sealed)
AC: 350 W
(inrush),
20 W (sealed)
24/30 Vdc
GUVT030DR
40 Vdc; 48 Vac/dc
GUVT048R
60 Vdc
GUVTO60DR
110/130/120 Vac
GUVT130R
208 Vac
GUVT208AR
220 Vdc/240 Vac
GUVT240R
250 Vdc/277 Vac
GUVT277R
Nominal Control Voltage
Catalog No.
48VDC
GTDM048D
48VAC
GTDM048A
60VDC
GTDM060D
120VDC
GTDM120D
120VAC
GTDM120A
208VAC
GTDM208A
240VDC
GTDM240D
240VAC
GTDM240A
250VDC
GTDM250D
277VAC
GTDM277A
Combination
Coil Position on Fascia (from left)
1 2 3 4 1
-
shunt
CC
UV 2 shunt
shunt
CC
UV 3 shunt
UV
CC
UV
Contact Configuration
Cat. No.
Power rated (3NO+3NC)
GAUX3R
Power rated (3NO+3NC) + low signal (Hi-Fi)
(2NO+2NC)
GAUX5R
Power rated (8NO+8NC)
GAUX6R
Power rated (4NO+4NC) + low signal (Hi-Fi)
(4NO+4NC)
GAUX8R
Contact Configuration
Power
Rated
Hi-Fi
Cat. No.
Power rated
(3NO+3NC)
A14 - A25
N/A
GAUX3R
Power rated (3NO+3NC) +
low signal (Hi-Fi)
(2NO+2NC)
A14 - A25
B10 - B13,
B23 - B26
GAUX5R
Power rated
(8NO+8NC)*
A14 - A25,
B4 - B13,
B17 - B26
N/A
GAUX6R
Power rated (4NO+4NC) +
low signal (Hi-Fi)
(4NO+4NC)*
A14 - A25,
B12 - B13,
B25 - B26
B4 - B11,
B17 - B24
GAUX8R
13 March 14 Section 6 – Accessories Description
Table 6.5. UVR Operating Characteristics
Duty cycle = 2/min.
Inrush = 350 VA (ac), 350 W (dc).
Holding = 60 VA (ac), 50 W (dc).
Time Delay Module (TDM) for UVR (Externally Mounted)
The de-energized operation of the Under Voltage release can
be delayed. This optional, externally mounted module has an
adjustable time delay of 0 s to 3 s. The device can be
implemented to prevent undesired breaker tripping due to
momentary voltage interruptions and is connected in series
with the Under Voltage release. The time delay is in addition
to the time delay from the breaker mounted UVR accessory.
The time delay module starts counting at 50% of rated
voltage (Fig. 6.2 and Table 6.6).
Figure 6.2. Time Delay Module
Remote Operation Coil Combination
Each breaker accepts a maximum of four coils in the
combinations shown in Table 6.7. All coils are mounted from
the front and snap onto the mechanism after the fascia is
removed.
Table 6.7. Remote Operation Coil Combination
Auxiliary Switches
Auxiliary switches indicate breaker main contact position.
They change their state in the same time sequence as the
breaker main contacts. See Tables 6.8 and 6.9 for available
combinations and ratings.
Table 6.8. Auxiliary Switches
Table 6.9. Auxiliary Switch Ratings and Secondary
Disconnect Points
Table 6.6 TDM Characteristics
©2012 General Electric All Rights Reserved 29
*Options are not available for side mounted sec disc blocks.
High Fidelity refers to gold-plated contacts. Use for signal level outputs
(10 mA min to 100 mA max., 8 Vdc to 30 Vdc, 125 Vac.
Page 30

EntelliGuard® G Circuit Breaker DEH-41304C
Description
Catalog Number
Baseplate and mechanism for Ronis locks
(breaker mounted)
GBRONR
Baseplate and mechanism for Kirk Key locks
(breaker mounted) (Question on markup.)
GBKRKR
Mechanism for Ronis key cassette interlock
(cassette mounted)
GCRONR
Mechanism for Kirk key cassette interlock
(cassette mounted)
GCKRKR
Door interlock (left side)
GLHD
Door interlock (right side)
GRHD
Switch Configuration
Catalog Number
1 NO/NC switch per position
GCPS1R
Set of 2 No/NC switches per position
GCPS2R
Ratings
AC
120 Vac
6 A
250 Vac
6 A
DC
125 Vac
0.5 A
250 Vac
0.25 A
Interlock
Type
Number of
Cables
Required
Breaker Type
Poles
Catalog
Number
2 Way –
Type A
2
withdrawable
3
GI2WADR
4
GI3WADR
fixed
3
GI2FADR
4
GI3FADR
1 from 3
Type B
6
withdrawable
3
GI2WBR
4
GI3WBR
fixed
3
GI2FBR
4
GI3FBR
2 from 3
Type C
6
withdrawable
3
GI2WCR
4
GI3WCR
fixed
3
GI2FCR
4
GI3FCR
1 from 3
Way –
Type D
4
withdrawable
3
GI2WDTR
4
GI3WDTR
fixed
3
GI2FDTR
Length
Catalog Number
Meters
Inches
1
39.4
GCB1
1.6
63
GCB2
2
78.7
GCB3
2.5
98.4
GCB4
3
118.1
GCB5
3.5
137.8
GCB6
4
157.5
GCB7
Section 6 – Accessories Description 13 March 14
Circuit Breaker - Key Interlock Facility
This option provides factory-installed interlocking devices for
installation between separate circuit breakers (baseplates and
mechanism). This safeguard ensures that a circuit breaker
cannot be closed unless the dedicated key has been inserted
and secured within the lock. Circuit breakers accept ready-to-fit
interlocking device kits such as Castell, Ronis, Kirk and Profalux
for installation between related, separate circuit breakers (Table
6.10).
NOTE: Locks and keys are not supplied by GE. Please order
separately from your local supplier.
Table 6.10. Key Interlocks and Door Interlocks
Mechanical Interlocks (Cable/Rod)
Available for fixed and drawout circuit breakers, these units
enable the direct interlocking of EntelliGuard G circuit
breakers, either mounted side-by-side or stacked. The
interlocking mechanisms are connected by a specially designed
cable or rod in a 1 from 2, 1 from 3, and 2 from 3
configuration, and any mix of current ratings/pole
configurations can be accommodated. Standard cable lengths
available: 1.0 m, 1.6 m, 2.0 m, 2.5 m, 3.0 m, 3.5 m and 4.0 m.
(Please contact our technical customer service department if
longer length is required.)
Mechanical interlocks can be fitted to electrical systems as
shown in Table 6.13 and can link 2 and/or 3 circuit
breakers. Any nominal rating, frame size, number of poles
or type (fixed pattern or draw-out) can be interlocked
(Tables 6.13 and 6.14).
Table 6.13. Mechanical Interlocks (Cable/Rod)
Carriage Position Switch (TOC)
Available as an option for mounting within the base of the
cassette/substructure, the carriage position switch provides
six single-pole changeover contacts for local or remote
electrical indication of the circuit breaker status:
CONNECTED, TEST and DISCONNECTED. The DISCONNECTED
position is indicated only when minimum isolating distances
between contacts on both the main and auxiliary circuits
have been achieved. This option is in addition to the
mechanical indicators, which are fitted as standard. When
installed, the carriage switch is IP2X protected and includes
wiring to a terminal block located on the left side of the
cassette (Tables 6.11 and 6.12).
Table 6.11. Carriage Position Switches
Table 6.12. Carriage Position Switch Ratings (Common
NO/NC Contact Configuration)
Contact factory for availability.
Cables
Standard cable lengths are shown in Table 6.14. (Cables
ordered separately. Please contact our technical customer
service department if longer length is required.)
Table 6.14. Cables for Mechanical Interlocks
30 ©2012 General Electric All Rights Reserved
Contact factory for availability.
Page 31

DEH-41304C EntelliGuard® G Circuit Breaker
Typical Circuit
Interlock Configuration
Possible Combinations
Type A
1 from 2 way interlock
2 cable configuration
Interlocking between two circuit breakers
One normal power supply
One generator (emergency) supply
B1
B2 O O 1 O O 1
B1 can close only if B2 is open.
B2 can close only if B1 is open.
Type B
1 from 3 way interlock
6 cable configuration
Interlocking among three circuit breakers
Three power supplies (generator or transformers)
feeding the same busbar but parallel operation is
prevented.
Available on request.
B1
B2
B3 O O O 1 O O O 1 O O O 1
Only 1 of 3 breakers can be closed.
Type C
1 from 3 way interlock
6 cable configuration
Interlocking among three circuit breakers
Two bus sections can be powered by single
transformer (bus coupler closed) or both
transformers (bus coupler open).
Available on request.
B1
B2
B3 O O O 1 O O O O 1 O 1 O 1 1 O O 1 1 v O
1
Any two from three breakers can be closed.
Any one from three breakers can be closed.
Two breakers must be closed to prevent the
third breaker from closing.
Type D
1 from 3 way interlock
6 cable configuration
Interlocking between three circuit breakers
Two normal power supplies not set in parallel.
One power supply may assist the priority circuit.
Available on request.
B1
B2
B3 O O O 1 O O O O 1 1 O 1 O 1
O
B1 and/or B3 can be closed only if B2 is open.
B2 can only be closed if B1 and B2 are both
open.
Switch Configuration
Cat. No.
One single pole, double throw switch
(1-Form C contact)
GBAT1R
Ratings
AC
120 Vac
6 A
250 Vac
6 A
DC
125 Vac
0.5 A
250 Vac
0.25 A
13 March 14 Section 6 – Accessories Description
Table 6.15. Interlock Configurations
Contact factory for availability
Bell Alarm with Lockout
The bell alarm provides remote indication that the circuit
breaker has opened because of an electrical fault. The
Lockout feature is integral to the trip unit. When a Bell
Alarm is supplied with the breaker, the trip unit dial is set
and locked to the manual position. In order to re-close
the breaker, the Lockout button must be pushed in/reset
on the trip unit 1-Form C contact (Tables 6.16 and 6.17).
©2012 General Electric All Rights Reserved 31
Table 6.16. Bell Alarm Switches
Table 6.17. Bell Alarm Ratings (Common NO/NC
Contact Configuration)
Page 32

EntelliGuard® G Circuit Breaker DEH-41304C
Ratings
Cat. No.
AC
120 Vac
6 A
GSCC1R
250 Vac
6 A
DC
125 Vac
0.5 A
250 Vac
0.25 A
Top Disconnect
Block B
Block A
Side
Disconnect
Block A
circuit breaker/cradle
viewed from the front
Breaker
Type
Mounting
Number of
Poles
Cat. No.
Fixed
top
39 pole set
GSDFTR1
side
top
78 pole set
GSDFTR2
78 pole set
GSDFSR
Drawout
side
78 pole set
GSDWTR
39 pole set
GSDWSR
Envelope
Current Rating
Cat. No.
1
400 A
G04HNRCE
600/630 A
G07HNRCE
800 A
G08HNRCE
1000 A
G10HNRCE
1200/1250 A
G13HNRCE
1600 A
G16HNRCE
2000 A
G20HNRCE
2
400 A
G04MNRCE
600/630 A
G07MNRCE
800 A
G08MNRCE
1000
G10MNRCE
1200/1250 A
G13MNRCE
1600 A
G16MNRCE
2000 A
G20MNRCE
2500 A
G25MNRCE
3000/3200 A
G32HNRCE
4000 A
G40HNRCE
3
3000/3200 A (1600 A x 2)
G32GNRCE
4000 A (2000 A x 2)
G40MNRCE
5000 A (2000 A x 2)
G50MNRCE
6000/6400 A (3200 A x 2)
G04MNRCE
Section 6 – Accessories Description 13 March 14
Charging Spring Status Indicator
Factory-installed on the motor, this auxiliary switch
indicates that the circuit breaker is charged and is
standard with the spring-charging motor (Table 6.18).
Table 6.18. Spring Charged Contact (1 NO)
Secondary Disconnects (Factory-installed/Field
Installable)
Inputs and outputs to the circuit breaker are wired
through secondary disconnects located on either the top
or the side (Envelope 1 only) of the breaker. The plug-style
secondary disconnects engage mating disconnects in the
breaker cubicle when the breaker is in the TEST or
CONNECT position. Up to 78 points are available so that
all breaker accessories can be wired to dedicated
disconnect points. See Table 6.19 for block location and
Table 6.20 for secondary disconnect parts.
Table. 6.19. Block Location
Neutral Rogowski CT’s
The Neutral Rogoswki CT’s are used to measure the
Neutral Current and is required when Internal Ground
Fault is selected on the trip unit. There are two types
available:
1. Encased with Terminal Screws: The Rogowski coil
is encased in a plastic mold with two terminal
screws. No additional mounting hardware is
required as the encasing is molded to the
mounting dimensions. Table 6.21
2. Loose Rogowski Coil with separate mounting
hardware: The coil and mounting hardware are
separate. The coil comes with the two wire leads
for connection to a terminal block. Table 6.21a
Table 6.21. Neutral Rogowski CTs
(Encased with Terminal Screws)
Table. 6.20. Secondary Disconnect Parts
Set contains both the male and female sides of the secondary
disconnect.
Drawout kits include the metal bracket for connections to the
cassette.
Breakers ordered with side mounted disconnects come standard
with 78 pole secondary disconnect.
Ground Fault
The EntelliGuard TU Trip Unit provides a non-core CT
input for zero sequence or residual summation current.
The expected ratio is 1A = 100%.
32 ©2012 General Electric All Rights Reserved
Page 33

DEH-41304C EntelliGuard® G Circuit Breaker
Envelope
Current Rating
Cat. No.
1
400 A
G04HNRC
600/630 A
G07HNRC
800 A
G08HNRC
1000 A
G10HNRC
1200/1250 A
G13HNRC
1600 A
G16HNRC
2000 A
G20HNRC
2
400 A
G04MNRC
600/630 A
G07MNRC
800 A
G08MNRC
1000
G10MNRC
1200/1250 A
G13MNRC
1600 A
G16MNRC
2000 A
G20MNRC
2500 A
G25MNRC
3000/3200 A
G32HNRC
4000 A
G40HNRC
3
3000/3200 A (1600 A x 2)
G32GNRC
4000 A (2000 A x 2)
G40MNRC
5000 A (2000 A x 2)
G50MNRC
6000/6400 A (3200 A x 2)
G04MNRC
Ratings
Cat. No.
AC
120 Vac
6 A
GRTC2R
250 Vac
6 A
GRTC2R
DC
125 Vac
0.5 A
GRTC1R
250 Vac
0.25 A
GRTC3R
Description
Cat. No.
IP54 Door Panel - Withdrawable Type
GF54D
IP54 Door Panel - Fixed Pattern
GW54D
Mechanical Operations Counter
GMCNR
ACB Lifting Truck
ACBLIFT
Description
Catalog
Number
Env1 800 - 2000A, Type N&H, Flat Front UL489
Fixed 3 Pole Breaker Bus Bar Terminations
(Top/Bottom)
GBB1TBF3
Env1 800 - 2000A, Type N&H, Flat Front UL489
Fixed 4 Pole Breaker Bus Bar Terminations
(Top/Bottom)
GBB1TBF4
Env2 800A - 3000A Flat Front UL489 Fixed 3
Pole Breaker Bus Bar Terminations
(Top/Bottom)
GBB2TBF3
Env2 800A - 3000A Flat Front UL489 Fixed 4
Pole Breaker Bus Bar Terminations
(Top/Bottom)
GBB2TBF4
Env3 4000-6000A Flat Front UL Fixed 3 Pole
Breaker Bus Bar Terminations (Top/Bottom)
GBB3TBF3
Env3 4000-6000A Flat Front UL Fixed 4 Pole
Breaker Bus Bar Terminations (Top/Bottom)
GBB3TBF4
13 March 14 Section 6 – Accessories Description
Table 6.21a. Neutral Rogowski CTs
(Loose Rogowski Coil and mounting hardware)
Ready to Close Contact (Table 6.22)
This contact indicates that the following conditions are
met and the circuit breaker can be closed:
The circuit breaker is open.
The closing springs are charged.
The circuit breaker in not locked/interlocked in open
position.
There is no standing closing order.
There is no standing opening order.
Table 6.22. Ready to Close Contacts (1 NO)
Table 6.23. Miscellaneous Accessories
Contact factory for availability.
Cassette/Substructure
The drawout mechanism allows the breaker to be racked
in four distinct positions:
CONNECTED
TEST
DISCONNECTED
WITHDRAWN
Position Indicators
Position indicators provide a positive mechanical
indication of CONNECTED, TEST and DISCONNECTED
positions of the breaker.
Rejection Device
A factory-installed rejection feature prevents mismatching breakers and cassettes/substructures. This
prevents:
Inserting a breaker with a lower rating into a higher
rated cassette/substructure.
Inserting a higher rated breaker into a lower rated
cassette/substructure.
Front Flat Terminations
The EntelliGuard G Fixed mounted breaker comes
standard with Back Connected Terminations. Optional
Front Flat terminations are available for front access
mounting (Table 6.24).
Table 6.24. Optional Front Flat Terminations
Sealed Door Panel Escutcheon
An optional complete IP54 front door pane is available
when a higher degree of protection is needed.
Mechanical Operations Counter
Used with either manual or motor charged circuit
breakers, the counter provides an accurate record of the
cumulative number of complete breaker closing
operations (Table 6.23).
©2012 General Electric All Rights Reserved 33
Page 34

EntelliGuard® G Circuit Breaker DEH-41304C
DANGER
ELECTROCUTION
Ensure the circuit breaker has been tripped, indicating
OFF, and the main springs are fully discharged before
installing accessories.
Failure to comply with these instructions will result
in death or serious injury.
WARNING
IMPROPER INSTALLATION, OPERATION AND
MAINTENANCE
Ensure only qualified personnel install, operate, service
and maintain all electrical equipment.
Failure to comply with these instructions could
result in death or serious injury.
WARNING
PERSONAL INJURY
Avoid risk of injury from moving parts while
handling the breaker.
If advisable, use a cable/busbar lockable
grounding device (optional accessory) to provide
additional safety during system maintenance.
Failure to comply with these instructions could
result in death or serious injury.
CAUTION
PRODUCT DAMAGE
Ensure circuit breaker and its accessories are
always used within their designated ratings.
Use the specially designed circuit breaker handling
truck (optional accessory) when removing the
circuit breaker from its cassette.
Failure to comply with these instructions may result
in product damage.
Section 7 – Accessories Installation 13 March 14
SECTION 7 – ACCESSORIES INSTALLATION
2. Pull the charging handle while easing the cover
upwards (Fig. 7.2).
Figure 7.2. Charging Handle Position for Cover Removal
MOTOR OPERATOR - SPRING CHARGING UNIT
INSTALLATION
1. Slide the coupling bushing on to the camshaft.
2. Place the gearbox bearing on to the protruding motor
drive shaft, pushing it home until flush with the
mechanism sideplate. If it does not move easily to the
flush position, pull the charging handle gently down to
ease movement.
3. Mount the device using three M5 bolts through the
holes provided in the gearbox endplate, torque to
7 N m.
4. Manually charge the closing springs and carefully locate
the plastic switch actuator over the protruding drive
shaft (Fig. 7.3), ensuring the switch operating arm is
correctly positioned (switch arm should be in the ‘cut
out’ portion of the motor switch actuator.
Figure 7.3. Motor Switch Actuator
CIRCUIT BREAKER FRONT COVER REMOVAL
Required for most accessory installation.
1. Remove the six mounting screws (Fig. 7.1).
Figure 7.1. Front Cover
34 ©2012 General Electric All Rights Reserved
Page 35

DEH-41304C EntelliGuard® G Circuit Breaker
NOTICE
The mounting positions of the four devices can be
arranged in the locations as specified in Figure 7.4.
Combination
Coil Position on Fascia
1
Network
(IEC)
Interlock
(IEC)
closing coil
under
voltage
2
shunt
shunt
closing coil
under
voltage
3
shunt
UV
closing coil
under
voltage
4
network
under
voltage
closing coil
shunt
DANGER
ELECTROCUTION
Ensure the fixed contacts on the incoming side are isolated
prior to installing the Shutter Prop Open Feature.
Failure to comply with these instructions will result in
death or serious injury.
13 March 14 Section 7 – Accessories Installation
5. Use an M8 nylock nut to mount the motor switch
actuator onto the shaft end, torque to 14.5 N m.
6. Connect the motor connector on to the motor harness.
7. Connect the remaining ground wire from the filter to
the grounding point on the rear of the motor body.
Reverse the above procedure to remove the motorized
spring charging unit
SHUNT TRIP, CLOSING COIL AND UNDER VOLTAGE
RELEASE DEVICE INSTALLATION
Figure 7.4. Device Location
Closing Coil Installation (Fig. 7.5)
1. Tilt the device forward and engage the front hooks into
the top support plate.
2. Tilt the device backwards until the rear hooks engage
in the slots
3. Press down into position.
Figure 7.5. Closing Coil Installation
Connect the wire plugs (Fig. 7.6) according to the wiring
schematic in Section 3.
Figure 7.6. Wiring
Closing Coil Removal
1. Disconnect the device and tilt it forward until the rear
hooks disengage.
2. Lift to release the front hooks.
NETWORK INTERLOCK INSTALLATION
When the network interlock is used with the EntelliGuard G,
it will use the C and D positions of the coils as shown in Fig.
7.4. The mounting procedure is same as the coils.
Trip Alarm/Bell Alarm Switch Installation
1. Remove the 40 pin harness (if installed) from the trip unit.
2. Remove the trip unit from the PMU base.
3. Assemble the trip alarm assembly as shown using four
screws.
4. Reassemble the trip unit back on to the PMU base
5. Install the connector from the trip alarm in the specified
location of the SD.
6. Reassemble the 40 pin harness.
Ready to Close Switch Installation
1. Slide the RTC switch assembly on to the mechanism side
sheet.
2. Assemble the screw and washer.
3. Assemble the snap-on connector to make the electrical
connection.
4. Using the cable tie, tie the wires to the PMU base.
SHUTTER PROP OPEN FEATURE
This feature allows the main fixed contacts to be inspected.
©2012 General Electric All Rights Reserved 35
Page 36

EntelliGuard® G Circuit Breaker DEH-41304C
A Shutter Operating Lever
Figure 7.11. Clusters
Figure 7.12. Cluster Pliers
Cluster tool
Cluster tool
Section 7 – Accessories Installation 13 March 14
1. Remove the circuit breaker from its cassette.
2. Rotate the shutter operating lever to open the shutter
(Fig. 7.7).
3. Release the shutter operating lever to close the
shutters.
Figure 7.7. Shutter Operating Lever Location
CARRIAGE POSITION SWITCH INSTALLATION
Two configurations are available:
One device for each position (Fig. 7.8).
Figure 7.8. One Switch Configuration (GCPS1R)
Two devices for each position (Fig. 7.9).
Figure 7.9. Two Switch Configuration (GCPS2R)
Each switch has a 1.5 m long wire for each switch
terminal. Each wire is identified with a ferrule.
The device will indicate DISCONNECTED even when the
circuit breaker is fully withdrawn or removed.
Mounted on the left-hand side of the cassette for all
frames.
Mounted on right hand side when used with the
optional side mounted secondary disconnect for frame
1 ANSI/UL circuit breaker. No fasteners are required. To
insert, feed the wires through the large opening on the
side of the cassette. Seat the carriage position switch in
the front side of the hole first. Then use this as a pivot
and ensure that all four tabs lock in place (Fig. 7.10).
Figure 7.10. Carriage Position Switch Location
BUSBAR/CABLE GROUNDING (OPTIONAL)
This feature is used for grounding the circuit breaker
terminals on the busbar or the cable side. The pack
contains:
Isolating contact (cluster) pliers for removal of the main
isolating contacts.
Grounding bar with spring-pressured ground contact.
The bar is reversible to fit top or bottom terminal sets.
Necessary mounting M10 bolts and washers.
Anti-trip plate.
CLUSTERS
Clusters are the main isolating contacts which are installed
on the rear terminals on the moving portion of the
withdrawable unit. Cluster contacts may be easily and
quickly removed and replaced using cluster pliers (Figs. 7.11
and 7.12).
36 ©2012 General Electric All Rights Reserved
Clusters are mounted horizontally and vertically through
cluster pads for different frame sizes. The slot is provided on
the terminals for locking the clusters. For higher current and
short circuit ratings the clusters are assembled in parallel
(Fig. 7.13).
Page 37

DEH-41304C EntelliGuard® G Circuit Breaker
13 March 14 Section 7 – Accessories Installation
Figure 7.13. Cluster Views
Upper Cluster Contact Grounding
1. Using the cluster pliers, remove the upper cluster
contacts the rear of the circuit breaker.
2. Position the grounding bar on the exposed top of the
top terminals, ensuring the spring-loaded grounding
contact is facing left when viewed from the rear.
3. Install bolts and washers using the threads in the
grounding bar, one bolt per pole. Torque to 30 N m.
4. The spring loaded grounding contact will engage with
the top fixed grounded contact block in the cassette
when the breaker is racked to the CONNECTED position
(Fig 7.14).
Figure 7.14 Cluster Contact Grounding Top Location
Lower Cluster Contact Set Grounding (Figs. 7.15 and 7.16)
1. Using the cluster pliers, remove the lower cluster
contacts at the rear of the circuit breaker.
2. Position the grounding bar on the exposed top of the
bottom terminals, ensuring the spring-loaded grounding
contact is facing left when viewed from the rear
3. Install bolts and washers using the threads in the
grounding bar, one bolt per pole. Torque to 30 N m.
4. The spring loaded grounding contact will engage with
the bottom fixed grounded contact block in cassette
when the breaker is racked to the CONNECTED position.
Figure 7.15. Cluster Contact Grounding Top Location
Figure 7.16. Fixed Grounding Contact in Cassette
MECHANICAL TRIP ALARM INSTALLATION
1. Remove the front cover.
2. Remove the trip unit.
3. Install the mechanical trip alarm as shown in Fig. 7.17.
Figure 7.17. Mechanical Trip Alarm
©2012 General Electric All Rights Reserved 37
Page 38

EntelliGuard® G Circuit Breaker DEH-41304C
A
B
C
A Mechanical operations counter
B Operating arm
C Spring charging link
A Pin block assembly
Section 7 – Accessories Installation 13 March 14
4. Connect the wires via the plug connectors to the
respective locations of the secondary isolating
contacts A33, A34 and A35 (Fig. 7.18).
Figure 7.18. Plug Connector Location
5. Replace the front cover.
6. Connect the wires via the plug connectors to the
respective locations of the secondary isolating
contacts A33, A34 and A35.
7. Replace the front cover.
MECHANICAL OPERATIONS COUNTER INSTALLATION
(OPTIONAL)
This device is mounted to the inside of the front cover. It
cannot be reset.
1. Remove the front cover.
2. Position the mechanical operations counter (Fig. 7.19)
over the two holes provided inside the cover, ensuring
the indicator face is aligned to show through the
window in the cover.
Figure 7.19. Mechanical Operations Counter Location
REJECTION FEATURE
This factory-installed, pin and gate device prevents the
insertion of a circuit breaker into a cassette if the nominal
rating of the breaker is incompatible with that of the
cassette and its ancillary equipment. Recommended
configurations are provided with the rejection feature for the
entire EntelliGuard range (Fig. 7.20).
Figure 7.20. Rejection Feature
Fig. 7.21 shows the corresponding restrainer assembly
mounted on the cassette with one M4 nut and lock washer.
There are two of these assemblies, one on each side of the
cassette.
Figure 7.21 Corresponding Restrainer
3. Ensure the operating arm on the counter rides over the
spring charging link of the circuit breaker mechanism.
4. Mount in position using the screws provided.
38 ©2012 General Electric All Rights Reserved
Page 39

DEH-41304C EntelliGuard® G Circuit Breaker
WARNING
IMPROPER INSTALLATION, OPERATION, SERVICE AND
MAINTENANCE
Ensure only qualified personnel install, operate, service
and maintain all electrical equipment.
Failure to comply with these instructions could result
in death or serious injury.
DANGER
ELECTROCUTION
Ensure the circuit breaker has been tripped, indicating
OFF, and the main springs are fully discharged when
performing circuit breaker maintenance.
Failure to comply with these instructions will result in
death or serious injury.
WARNING
PERSONAL INJURY
Avoid risk of injury from moving parts while handling
the circuit breaker.
If advisable, use a cable/busbar lockable grounding
device (optional accessory) to provide additional
safety during system maintenance.
Failure to comply with these instructions could result
in death or serious injury.
Contact
gap
Contact
gap
13 March 14 Section 8 – Maintenance, Testing and Troubleshooting
SECTION 8 – MAINTENANCE, TESTING AND
TROUBLESHOOTING
MAINTENANCE
The back edge of each contact tip should line up with the
outer edge of the marked area on the wear indicator. As the
contacts erode, the gap between the back of the contact tip
and the rear housing becomes smaller. If the back edge of
the contact tip crosses into the marked area, the tip is
heavily eroded, and it needs to be replaced (Fig. 8.1).
Figure 8.1. Contact Gap
1. Remove the arc chamber assemblies as shown in Fig.
8.2.
Figure 8.2. Arc Chamber Assembly Removal
Inspection Schedule
Normal working conditions:
- Annually, or
- Following interruption of a short circuit, or
- After repeated high value overload faults.
Dusty/polluted environments:
- Every six months, or
- Following interruption of a short circuit, or
- After repeated high value overload faults.
Cleaning Procedure
1. Inspect external surfaces for dust/dirt.
2. Clean with compressed air and dry cloth.
Contact Wear Indicator Inspection (Optional)
The contact wear indicator indicates the condition of the
contact tip when the circuit breaker is viewed in the closed
condition from the top side. It indicates the relative position
of the back edge of each contact tip with the area marked
on the wear indicator.
©2012 General Electric All Rights Reserved 39
2. Insert the wear indicator in each pole as shown in Fig 8.3.
Figure 8.3. Wear Indicator Insertion
3. View the back end of finger with the arcing contact edge
with respect to the marked area on the wear Indicator.
The marked area indicates the allowable erosion for
main tips (Fig. 8.4).
Figure 8.4. Wear Indicator in Place
Page 40

EntelliGuard® G Circuit Breaker DEH-41304C
CAUTION
PRODUCT DAMAGE
Do not lubricate Auxiliary Switch, Signaling Switches,
Coils, Motor and secondary disconnects.
Failure to comply with these instructions may result in
product damage.
Section 8 – Maintenance, Testing and Troubleshooting 13 March 14
1. Inspect the arc splitter plates and sides of the moldings
for signs of wear or damage. Replace as necessary.
2. With the circuit breaker in the ON position, check the
size of the gaps between the fixed and moving arcing
contacts.
If the gap is greater than 2.5 mm:
- No evidence of contact damage: loosen the
fixed contact screw and adjust the gap to
2.5 mm. Retighten the screw (12 N m torque).
- Evidence of excessive contact wear or damage:
Replace the fixed arcing contacts and set the
gap set to 2.5 mm.
Even if gaps are within operating tolerance (1 mm
to 2.5 mm) always check contact screws for
tightness to 12 N m torque.
3. Assemble the arc chamber. Torque to 2 N m.
Circuit Breaker Main Mechanism Inspection
Check the circuit breaker ON and OFF action both
manually and by remote means, if appropriate.
Check tripping action by means of the under voltage
release (if installed).
Check all indicators for correct function.
Check number of operations (if operations counter is
installed) to the circuit breaker’s specification.
Cassette Inspection
Ensure the base of the cassette is clear of debris.
Prop open the top and bottom shutters and inspect the
cassette’s installed contacts for excessive wear or
damage.
Check the carriage switch operation (if installed) while
racking the circuit breaker into and out of the
CONNECTED position.
Isolating Contacts (Drawout Type) Inspection
1. Remove the circuit breaker from the cassette housing
and place it on a suitable working surface.
2. Inspect the rear cluster contacts for signs of
overheating and wear.
3. Remove the cluster contacts using the special cluster
pliers.
4. Clean the isolating contacts and terminals with a soft,
clean cloth to remove any old grease or dirt.
5. Apply a thin film of white paraffin grease (grade 8802).
Power Terminals and Busbar Inspection
1. Inspect insulating parts for cracks. If found, replace
affected component.
2. Clean dust/dirt with dry cloth.
3. Tighten screws/nuts to proper torque.
4. Inspect terminal joints for signs of overheating and
oxidation. If found, clean affected component.
Lubrication
Ensure all metal-to-metal friction surfaces are kept
lubricated:
1. Remove old lubrication and dirt.
2. Apply Molecote 4700.
3. Wipe off excess lubrication.
TRIP UNIT TESTING
1. Test the circuit breaker operation against selected
protection settings (see Section 2) using a trip unit test
box (optional accessory).
2. Continuity check the mechanical trip alarm (if installed),
while test box tripping the trip unit.
3. Continuity check REF inter-trip (if installed).
40 ©2012 General Electric All Rights Reserved
Page 41

DEH-41304C EntelliGuard® G Circuit Breaker
Problem
Possible Cause
Solution
Breaker won’t close.
Breaker is between CONNECTED, TEST
and DISCONNECTED positions.
Trip unit has not been reset.
Under voltage release coil is installed
but not energized.
Interlocks installed.
Racking handle inserted.
Rack circuit breaker to CONNECTED, TEST or
DISCONNECTED remove racking handle and close
circuit breaker.
Push orange button on trip unit and close circuit
breaker.
Energize under voltage release coil and close
circuit breaker.
Remove interlocks.
Remove handle and close circuit breaker.
Check operational diagram and trip the relevant
circuit breaker.
Breaker closes then opens
instantaneously.
Breaker information module connector
is not inserted.
Trip unit settings are incorrect.
Remote Rogowski coil is incorrectly
installed.
Insert breaker information module connector to
breaker information module.
Ensure the protection limits setting matches
system loads. Ensure inputs are set to normally
closed trip without a signal applied.
Re-position coil.
Motor won’t charge.
Ensure motor actuator is installed.
Install motor actuator.
DC closing coil or under voltage
release won’t operate.
Ensure the correct polarity of the
connection to the secondary isolating
contacts.
Refer to wiring schematic (see Section 3).
Circuit breaker won’t rack into
cassette.
Ensure breaker is pushed fully from the
maintenance position to
DISCONNECTED.
Racking drive not in DISCONNECTED
position.
Push breaker into DISCONNECTED position.
Ensure racking drive is in DISCONNECTED
position.
Ground fault does not operate
below 40% setting.
Ensure trip unit is installed and energized.
Install trip unit and energize. See Section 3 for wiring
schematic.
Cannot insert racking handle.
Shutter padlocks are installed.
Key locks are installed.
Remove padlocks and/or key locks.
Circuit breaker will not go into
the DISCONNECTED position.
Rejection feature is incorrectly set.
Circuit breaker is incorrect for given
cassette.
Reset rejection feature.
Ensure circuit breaker and cassette go together.
Trip unit status not working.
Ensure trip unit, if installed, is
energized.
Insufficient primary current to power
the unit.
Install trip unit, if not installed.
Trip unit will power with 40% I
n
single phase, and
20% In 3 phase current.
Trip unit not displaying existing
fault after tripping the circuit
breaker.
Trip unit set to auto reset (fault still stored).
Check trip history for fault type.
Set trip unit reset button to manual.
MODBUS communications not
responding
Communication incorrectly configured.
Trip unit baud rate not compatible with
host.
Request configuration document.
Set trip unit baud rate to match host.
13 March 14 Section 8 – Maintenance, Testing and Troubleshooting
TROUBLESHOOTING
Table 8.1 reviews common problems, their possible cause(s) and solution(s). If problems persist please contact our After
Sales Service Department at 1-888-GERESOLVE. (1-888-437-3765).
Table 8.1. Troubleshooting
©2012 General Electric All Rights Reserved 41
Page 42

EntelliGuard® G Circuit Breaker DEH-41304C
Publications
Pub #
EntelliGuard® G Application Guide
DET-653A
Time Current Curves: EntelliGuard® TU Trip Unit for EntelliGuard® G; Ground Fault
DES-093
Time Current Curves: EntelliGuard® TU Trip Unit for EntelliGuard® G; Instantaneous,
Override (HSIOC), Reduced Energy Let-Through Instantaneous (RELT)
DES-094
Time Current Curves: EntelliGuard® TU Trip Unit for EntelliGuard® G; Long-Time Circuit
Breaker Characteristics
DES-090
Time Current Curves: EntelliGuard® TU Trip Unit for EntelliGuard® G; Long-Time FuseLike Characteristics
DES-091
Time Current Curves: EntelliGuard® TU Trip Unit for EntelliGuard® G; Short-Time Pickup
and Delay Bands
DES-092
Secondary Disconnects - Drawout
DEH-41401
CT Mounting for External Ground Fault
DEH-41402
Position Switch Kit
DEH-41403
Back Connected Terminations
DEH-41404
Front Connected Terminations
DEH-41405
Time Delay Module
DEH-41406
Key Interlock Kit - Breaker Mounted
DEH-41407
Door Interlock Kit
DEH-41408
Bell Alarm w/ Lockout
DEH-41409
Undervoltage Device
DEH-41410
Shunt Trip
DEH-41411
Remote Close Accessory Close Coil
DEH-41412
Motor Operator
DEH-41413
Pushbutton Padlock Device
DEH-41414
Aux Switch
DEH-41415
Operations Counter
DEH-41416
Secondary Disconnects - Fixed
DEH-41417
Command Close Coil
DEH-41418
Ready To Close (RTC)
DEH-41419
Coil Signaling Contacts
DEH-41420
Mechanical Interlocks (fixed and drawout)
Key Interlock Cassette Mounted
IP54 Door
Finger Assembly using Cat #GUNI
Rejection Scheme
Arc Chute Assembly
DEH-41389
Anti-Bounce Assembly
DEH-41667
Gas Channel Assembly
DEH-41668
Cluster Pad Assembly
DEH-41447
Section 8 – Maintenance, Testing and Troubleshooting 13 March 14
EntelliGuard® G Publications
To download publications like those shown below, visit www.geelectrical.com.
42 ©2012 General Electric All Rights Reserved
Page 43

DEH-41304C EntelliGuard® G Circuit Breaker
13 March 14 Section 8 – Maintenance, Testing and Troubleshooting
NOTES:
©2012 General Electric All Rights Reserved 43
 Loading...