

Page 1
g
DEH202 R02
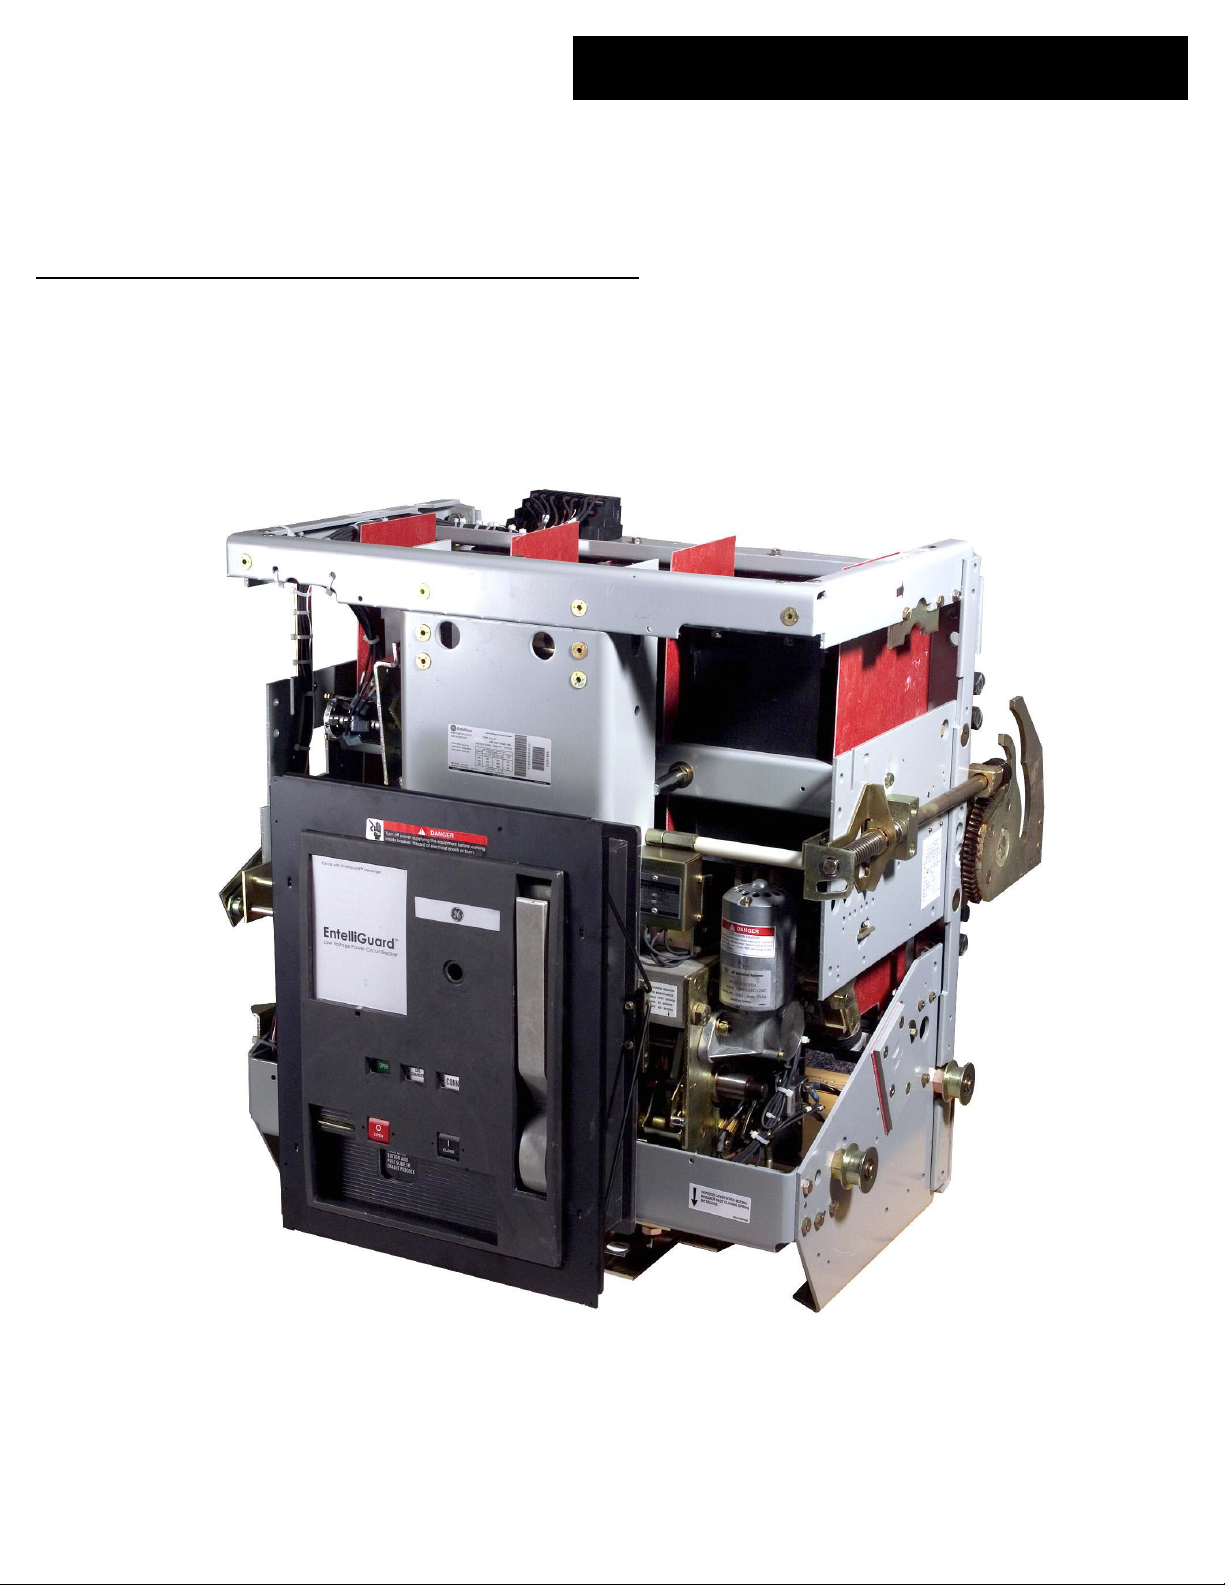
EntelliGuard™ Power Circuit Breakers
3200–5000 A Frames, 240–600 Vac
User’s Guide
Page 2

Page 3

WARNINGS
CAUTIONS
NOTES
DEH202
WARNINGS, CAUTIONS, AND NOTES
AS USED IN THIS PUBLICATION
Warning notices are used in this publication to emphasize that hazardous voltages, currents, or
other conditions that could cause personal injury are present in this equipment or may be
associated with its use.
Warning notices are also used for situations in which inattention or lack of equipment knowledge
could cause either personal injury or damage to equipment.
Caution notices are used for situations in which equipment might be damaged if care is not taken.
Notes call attention to information that is especially significant to understanding and operating the
equipment.
This document is based on information available at the time of its publication. While efforts have
been made to ensure accuracy, the information contained herein does not cover all details or
variations in hardware and software, nor does it provide for every possible contingency in
connection with installation, operation, and maintenance. Features may be described herein that
are not present in all hardware and software systems. GE Consumer & Industrial assumes no
obligation of notice to holders of this document with respect to changes subsequently made.
GE Consumer & Industrial makes no representation or warranty, expressed, implied, or statutory,
with respect to, and assumes no responsibility for the accuracy, completeness, sufficiency, or
usefulness of the information contained herein. No warrantees of merchantability or fitness for
purpose shall apply.
The following are trademarks of GE Company:
EntelliGuard™, EntelliGuard Messenger™, Entellisys™
©Copyright 2005 GE Company
All Rights Reserved
i
Page 4

EntelliGuard™ 3200–5000 Ampere Power Circuit Breakers
Table of Contents
Chapter 1. Introduction
1–1 Overview .................................................................................................................................................1
1–2 Receiving the Breaker............................................................................................................................1
Storage .............................................................................................................................................1
1–3 Preparation for Installation ................................................................................................................... 1
Accessory Installation......................................................................................................................1
1–4 Breaker Features.....................................................................................................................................1
Chapter 2. Breaker Installation and Removal
2–1 Introduction...........................................................................................................................................3
2–2 Installing the Breaker.............................................................................................................................3
2–3 Removing the Breaker............................................................................................................................3
2–4 Testing the Breaker................................................................................................................................5
Chapter 3. Breaker Operation
3–1 Operating Instructions........................................................................................................................... 6
Sequence of Operations .................................................................................................................. 6
Operation of the Breaker................................................................................................................6
Padlock Operation...........................................................................................................................7
3–2 Control Wiring.......................................................................................................................................7
3–3 Interlocks................................................................................................................................................7
Draw-Out Interlock..........................................................................................................................7
Contact Interlock.............................................................................................................................7
Spring Discharge Interlock .............................................................................................................8
3–4 Equipment Interlocks.............................................................................................................................8
Chapter 4. Accessory Operation
4–1 Shunt Trip............................................................................................................................................ 11
Operation....................................................................................................................................... 11
4–2 Motor Operator....................................................................................................................................11
Operation....................................................................................................................................... 11
4–3 Remote Close........................................................................................................................................11
Operation....................................................................................................................................... 11
4–4 Open-Fuse Lockout ..............................................................................................................................11
Operation....................................................................................................................................... 11
4–5 Bell Alarm with Lockout...................................................................................................................... 12
Operation....................................................................................................................................... 12
4–6 Network Interlock................................................................................................................................. 12
Operation....................................................................................................................................... 12
4–7 Hidden Close Button ...........................................................................................................................13
Operation....................................................................................................................................... 13
Chapter 5. Maintenance
5–1 Inspection.............................................................................................................................................14
ii
Page 5

EntelliGuard™ 3200–5000 Ampere Power Circuit Breakers
Table of Contents
5–2 Lubrication...........................................................................................................................................14
5–3 Maintenance Publications....................................................................................................................14
iii
Page 6

EntelliGuard™ 3200–5000 Ampere Power Circuit Breakers
List of Figures
1. Front of the EntelliGuard circuit breaker, showing the locations of standard and optional features... 2
2. Installing the breaker into the compartment........................................................................................... 4
3. Elementary diagram of breaker control circuits. ..................................................................................... 9
4. Location of the secondary disconnect...................................................................................................... 9
5. Shunt Trip connections to the auxiliary switch and secondary disconnect. .........................................11
6. Open-Fuse Lockout (OFLO) connections to the secondary disconnect................................................11
7. Bell Alarm with Lockout connections to the secondary disconnect.......................................................12
8. Network Interlock connections to the secondary disconnect.................................................................12
9. Operation of the Hidden Close Button...................................................................................................13
iv
Page 7

EntelliGuard™ 3200–5000 Ampere Power Circuit Breakers
List of Tables
1. Weights of various breaker frame sizes. .................................................................................................... 1
2. Sequence of operations that may be performed with the EntelliGuard circuit breaker......................... 6
3. Secondary disconnect terminals and standard connections. ................................................................ 11
4. Catalog number and electrical rating for the Shunt Trip accessory,.................................................... 11
5. Catalog number and electrical rating for the Remote Close accessory................................................. 11
6. Catalog numbers for the Bell Alarm with Lockout Module and Kit...................................................... 12
7. Catalog numbers and control voltage for the Network Interlock accessory.......................................... 12
v
Page 8

Page 9

EntelliGuard™ 3200–5000 Ampere Power Circuit Breakers
Chapter 1. Introduction
1.1 Overview
EntelliGuard™ 3200–5000 A power circuit breakers are
designed to protect low-voltage power circuits when used
with Entellisys™ Low-Voltage Switchgear.
1.2 Receiving the Breaker
Unpack the circuit breaker and inspect it for shipping
damage. Ensure that the breaker has the proper current,
voltage, and interruption ratings for the application.
The weights of the various frame sizes are listed in Table
1, for reference.
Breaker
Frame
3200 A
4000 A
5000 A
Table 1. Weights of various breaker frame sizes.
Storage
The breaker should be placed in service immediately in its
permanent location. However, if it must be stored for an
indefinite period, it should be carefully protected against
condensation, preferably by storage in a warm dry room.
The breaker should be stored in a clean location, free
from corrosive gases or fumes. In particular, protect the
breaker from moisture and cement dust, as that combination may be corrosive.
If the breaker is stored for any length of time, it should be
inspected periodically to ensure good mechanical condition.
Operation
Type
Manual
Electrical
Manual
Electrical
Manual
Electrical
Weight
lb [kg]
455 [207]
470 [214]
560 [255]
575 [261]
600 [273]
615 [280]
1.3 Preparation for Installation
Check that the primary disconnect fingers are smooth and
free of nicks and burrs. If they are dry, apply a thin coat of
GE Lubricant D6A15A1 (MobilGrease 28, catalog number
193A1751P1) to the contact surfaces.
Accessory Installation
The following accessories may be installed in the breaker
at the factory. Refer to the instruction sheet supplied with
each accessory for catalog numbers and installation
instructions.
• Shunt Trip
• Charging Motor
• Remote Close
• Open-Fuse Lockout
• Bell Alarm with Lockout
• Network Interlock
• Hidden Close Button
1.4 Breaker Features
EntelliGuard circuit breakers are equipped with the
standard and optional features illustrated in Figure 1. The
letters are keyed to the list below the figure.
1
Page 10

EntelliGuard™ 3200–5000 Ampere Power Circuit Breakers
A B C D E F G H J K L
Chapter 1. Introduction
Figure 1. Front of the EntelliGuard circuit breaker, showing the locations of standard and optional features.
A Indicator: DISC (white)
TEST (white)
CONN (white)
B Indicator: CHARGED (yellow)
DISCHARGED (white)
C Indicator: CLOSED (red)
OPEN (green)
D CLOSE button (black)
E OPEN button (red)
F Padlock provision
G Catalog number, rating, and date code nameplate
H Draw-out racking screw
J Manual charging handle
K Bell Alarm with Lockout target/RESET button
L Spring discharge mechanism
2
Page 11

EntelliGuard™ 3200–5000 Ampere Power Circuit Breakers
Chapter 2. Breaker Installation and Removal
2.1 Introduction
EntelliGuard circuit breakers are installed in GE
Entellisys™ Low-Voltage Switchgear. Draw-out
construction permits activation of a new feeder, allows
rapid replacement of a circuit breaker, and facilitates
inspection and maintenance of the breaker with no need
to de-energize the entire switchgear lineup. EntelliGuard
breakers are used exclusively with the EntelliGuard
Messenger™.
2.2 Installing the Breaker
Use the following procedure to install the draw-out
breaker into its cubicle, as illustrated in Figure 2.
1. Before lifting a breaker to its intended compartment
location, observe the following precautions:
• Check the compartment to ensure that it is free of
foreign objects.
• Verify that the breaker is the correct type for that
compartment.
• Ensure that the breaker is OPEN.
• Apply a thin coat of D6A15A1 (MobilGrease 28,
catalog number 193A1751P1) lubricant to the
breaker’s primary disconnects.
• Insert the racking handle and rotate it fully counterclockwise to ensure that the racking cams on
the breaker are correctly positioned for initial
engagement with the pins in the breaker cubicle.
The position indicator on the front of the breaker
should show DISC.
2. Attach the Lifting Bracket by locating the hooks at
the cutout notches in the top frame of the breaker.
Be careful to avoid damage to the control wiring
behind the frame.
3. Open the compartment door. With the rollout rails
positioned inside the compartment, raise the
breaker higher than the rails.
4. Pull the rails all the way out to their Withdrawn
position.
5. Slowly lower the breaker onto the rails so that the
grooves in the rollers on the side of the breaker
align with the rails.
6. Push the breaker into the compartment until the
spring discharge stop engages. This is the Disconnect position. Check to ensure that the secondary
disconnect block on the breaker is aligned and is
beginning to engage properly with the mating
disconnect block in the compartment. At this point
the racking cams are positioned to engage the fixed
racking pins in the compartment, ready to begin the
racking motion. Push the rails back into the
compartment.
7. Close the compartment door. Install the Remote
Racker accessory (WPEGRRLV) or the Racking
Handle (catalog number 0324B4721G001) through
the opening at the upper right of the door and onto
the racking screw. Rotate the screw clockwise using
either the Remote Racker or the Racking Handle
through the Test position, until the racking screw
comes to a solid stop. The breaker is now in the
Connected position, as shown by the legend CONN
on the position indicator flag. Note that a loud click
will be heard as the spring-loaded secondary
disconnect detent releases as the breaker moves
beyond the TEST position.
2.3 Removing the Breaker
Use the following procedure to remove the draw-out
breaker from its cubicle:
1. With the switchgear door closed and latched, open
the breaker.
2. Engage the Remote Racker accessory or the Racking
Handle with the racking screw. Rotate the screw
counterclockwise using either the Remote Racker or
the Racking Handle until the breaker travels from
the Connected position through the Test position
(as indicated by the legends CONN and TEST,
respectively, on the draw-out position indicator)
and comes to a solid stop in the Disconnected
position (as indicated by the legend DISC on the
position indicator). At this point, the primary and
secondary disconnects are disengaged.
3. Open the compartment door and pull out the rails.
Depress the spring discharge lever, indicated in
Figure 1, to discharge the breaker’s closing springs.
Continue to depress this lever while pulling the
breaker out to its Withdrawn position.
4. Verify that the indicators on the front of the breaker
show that the springs are DISCHARGED and the
breaker is OPEN.
5. Attach the Lifting Bracket by locating the hooks at
the cutout notches in the top frame of the breaker.
Be careful to avoid damage to the control wiring
behind the frame.
6. Lift the breaker off the rails.
7. Push the rails back into the compartment, then
move the breaker forward until the primary disconnects clear the compartment. Lower the breaker
onto a flat surface free of protrusions that could
damage the breaker’s internal parts. Close the compartment door.
8. Place the draw-out mechanism in the Connect position to deactivate the interlocks that would otherwise prevent the breaker mechanism or contacts
from closing. Engage the Racking Handle to the
racking screw and turn it clockwise until it stops, as
indicated by the legend CONN on the position indicator.
3
Page 12

EntelliGuard™ 3200–5000 A Power Circuit Breakers
Chapter 2. Breaker Installation and Removal
Figure 2. Installing the breaker into the compartment.
4
Page 13

EntelliGuard™ 3200–5000 Ampere Power Circuit Breakers
NOTE: Placing the breaker directly on a
bench or floor will engage the spring discharge
mechanism. If maintenance or breaker operation is required with the breaker removed from
the compartment, the breaker must be raised
off the surface approximately 2 inches.
2.4 Testing the Breaker
The breaker can be operated without energizing the load
when it is in the TEST position. Using the Racking Handle
or Remote Racker, move the breaker from the CONN or
DISC position to the TEST position, as shown on the draw-
out position indicator. The breaker can now be operated
manually or electrically without energizing the load.
Note: The lockout feature will only function if the circuit
breaker is racked into the CONN position.
Chapter 2. Breaker Installation and Removal
5
Page 14

EntelliGuard™ 3200–5000 A Power Circuit Breakers
Chapter 3. Breaker Operation
3.1 Operating Instructions
Sequence of Operations
The sequence of operations that may be performed on the
circuit breaker are listed in Table 2. Refer to Chapter 4 for
information about accessory operation.
Operation of the Breaker
Manually Charging the Mechanism Springs
Pull the charging handle down about 90° (until it stops)
eight times to fully charge the springs. This will not close
the breaker contacts. The charge indicator will show
CHARGED on a yellow background.
NOTE: The breaker cannot be closed unless
the springs are fully charged and the handle is
stored fully in.
NOTE: Le disjoncteur ne peut être fermé à
moins que les ressorts ne soient pleinement
chargés et que la poignée ne soit pleinement
rentrée.
Electrically Charging the Mechanism Springs
If the breaker is equipped with the (optional) Charging
Motor, the mechanism springs may also be charged with
any of the following methods:
• With the breaker in the TEST position, install the
Charging Motor fuse in the fuse holder in the upper
left corner of the breaker compartment.
• Operate the Charging Motor by applying the rated
voltage to secondary disconnect terminals 8 and 17.
Power to the motor is removed automatically by a
cutoff switch when the springs are fully charged.
• If power is lost during the charge cycle, finish
charging the springs by cycling the charging handle
until the indicator shows CHARGED on a yellow
background.
The closing springs will automatically recharge after closing if control power is maintained at terminals 8 and 17.
Open/Closed
Indicator
OPEN Open DISCHARGED Discharged Mechanism may be charged
OPEN Open CHARGED Charged Contacts may be closed
CLOSED Closed DISCHARGED Discharged
CLOSED Closed CHARGED Charged Contacts may be opened
Main Breaker
Contacts
Charge
Indicator
Table 2. Sequence of operations that may be performed with the EntelliGuard circuit breaker.
Closing the Breaker
Close the breaker contacts with any of the following
methods:
• Depress the CLOSE button on the front of the
breaker.
• Close the breaker using the Entellisys™ HMI.
• Energize the (optional) Remote Close accessory by
applying the rated voltage to secondary disconnect
terminals 9 and 18.
If the breaker is closed electrically and the closing voltage
is maintained, an antipump device prevents a second
closing operation on the breaker in the event it is tripped
OPEN. The closing impulse must be released for 1 to 2.5
seconds and reapplied before a second closing operation
can occur.
If the closing voltage is applied while the closing springs
are not fully charged, the Remote Close coil energizes, but
operation of the closing mechanism is blocked. The
closing voltage must be removed and reapplied when the
springs are fully charged to close the breaker.
A mechanical interlock prevents the closing springs from
discharging if an attempt is made to close an already
CLOSED breaker.
NOTE: The main breaker contacts cannot be
closed if any of the following conditions
applies:
• The draw-out mechanism is in any position other than TEST or CONN, as displayed on the breaker position indicator.
• The (optional) Bell Alarm with Lockout
was not reset after an overcurrent lockout
and the breaker is in the CONN position.
• The (optional) Open Fuse Lockout was
not reset after replacement of a blown fuse.
• The (optional) Network Interlock was not
reset after a set operation.
These conditions must be corrected before the
breaker can be closed. Attempts to close the
breaker before these conditions are corrected
may result in discharge of the closing springs
without closing the main contacts.
Condition of
Charging Springs
Mechanism may be recharged or
Contacts may be opened
Next Permissible
Operating Function
6
Page 15

EntelliGuard™ 3200–5000 Ampere Power Circuit Breakers
Chapter 3. Breaker Operation
NOTE: Les contacts principaux du disjoncteur
ne peuvent être fermés si l’une ou l’autre des
conditions suivantes s’appliquent:
• Le mécanisme de retrait du ressort est en
tout autre position que: TEST ou CONN, tel
que montré à la position indicatrice du disjoncteur.
• L’alarme optionnelle avec cloche n’a pas
été remise en place après un blocage par
surintensité de courant.
• Le mécanisme optionnel de déclenchement par sous voltage n’a pas été
enclenché.
• Le verrouillage réciproque optionnel de
réseaun'était pas réenclenché après une
opération d'enclenchement.
Il faut que ces situations soient corrigées avant
de procéder à la fermeture du disjoncteur.
Toute tentative de fermer le disjoncteur avant
que ces conditions ne soient corrigées pourra
résulter en une décharge des ressorts de fermeture sans fermer les contacts principaux.
Opening the Breaker
Open the breaker contacts with any of the following
methods:
• Depress the OPEN button on the front of the breaker.
• Open or trip the breaker using the Entellisys™ HMI.
• Energize the (optional) Shunt Trip accessory by
applying the rated voltage to secondary disconnect
terminals 5 and 7.
Padlock Operation
The padlock provision prevents the breaker from closing
by holding the trip latch in the tripped position. Up to
three padlocks with 1/4" to 3/8" diameter shanks, or scissor-type safety lockout hasps may be inserted at one time.
To install a padlock, use the following procedure:
WARNING: Be sure to test for proper
operation of the mechanism, as described in
step 1, before using it to secure the breaker.
AVERTISSEMENT: Assurez-vous de tester que
le mécanisme opère correctement, tel que
décrit à l'étape 1, avant de l'utiliser pour fixer le
disjoncteur.
1. To check for proper installation of the padlock
mechanism, hold in the OPEN button, pull out the
padlock slide, insert a 1/8" rod or #10 gage solid
wire, and attempt to close the breaker.
The breaker must not close.
2. While holding the OPEN button in, slide the pad-
lock plate out and hold it in place.
3. Put the padlock or safety lockout hasp into one of
the three holes in the padlock plate; this will
prevent the plate from returning to its unlocked
position and prevent the breaker from closing.
3.2 Control Wiring
Figure 3 is the wiring diagram for the breaker control circuitry. Table 3 lists the secondary disconnect terminals
and the items connected to each. The location of the
secondary disconnect is illustrated in Figure 4.
3.3 Breaker Interlocks
EntelliGuard breakers are equipped with a number of
safety interlocks to prevent improper operation of the
breaker.
Draw-Out Interlock
The Draw-Out Interlock prevents the breaker from being
closed when the breaker is between the CONN nor TEST
positions. A pin on the side of the breaker engages a
ramped cam in the switchgear cubicle. When the pin is
lifted 3/8" the breaker is held trip-free.
An additional interlock holds the breaker trip-free whenever the racking handle is engaged with the draw-out
mechanism racking screw.
Contact Interlock
The Contact Interlock prevents the racking handle from
engaging the draw-out mechanism racking screw whenever the breaker contacts are CLOSED. The Racking
Handle (catalog number 0324B4721G001) has a recess
that prevents the tool from engaging the square drive on
the racking screw when the interlock is active. This
prevents changes to the breaker’s position with the main
contacts CLOSED.
CAUTION: Use of a tool other than the GE
Racking Handle 0324B4721G001 may render
the Contact Interlock ineffective.
CAUTION: L’utilisation d’un outil autre que
le GE Racking Handle 0324B4721G001 peut
rendre le mécanisme de verrouillage des
contacts inefficace.
7
Page 16

EntelliGuard™ 3200–5000 A Power Circuit Breakers
Chapter 3. Breaker Operation
Spring Discharge Interlock
The spring discharge interlock functions in conjunction
with the circuit breaker’s draw-out interlock and a
compartment-mounted cam to discharge the closing and
opening springs before the breaker can be withdrawn
from the compartment. It includes an inverted “T” rod
beneath the circuit breaker, which has two functions.
In the DISC position, the inverted “T” rod prevents the
breaker from being further withdrawn from the
compartment until the closing and opening springs are
discharged. In the CONN position, the inverted “T” rod
aligns beneath a stop bracket in the compartment which
blocks lifting of the “T” rod and prevents the spring
discharge interlock lever from being used to close the
circuit breaker.
When the circuit breaker is racked to the DISC position,
the draw-out interlock pin is lifted by the compartment
cam. This holds the circuit breaker trip shaft & latch in a
trip-free position. The breaker cannot be closed.
Depressing the spring discharge lever releases the closing
spring energy and the mechanism crashes (closing springs
discharge but breaker does not close). Depressing the
lever also lifts the “T” rod beneath the breaker, lifting it
above the ramped interlock beneath the breaker, thus
releasing the breaker to rollout to the fully withdrawn
position.
Note: If the breaker is out of the switchgear compartment,
the spring discharge interlock will act as a closing lever
since no other interlocks will be holding the trip shaft in a
trip-free position as the closing spring energy is released.
3.4 Equipment Interlocks
Additional optional interlocks may be furnished with the
breaker enclosure. The Key Interlock prevents the breaker
from closing when the interlock is engaged and requires
one or more keys to operate. The Door Interlock prevents
opening of the enclosure door when the breaker is in the
CONN position. It can be defeated for authorized access.
The door can be opened by racking the breaker to the
TEST or DISC position.
8
Page 17

EntelliGuard™ 3200–5000 Ampere Power Circuit Breakers
Chapter 3. Breaker Operation
Figure 3. Elementary diagram of breaker control circuits.
Figure 4. Location of the secondary disconnect (top view of the breaker.)
9
Page 18

EntelliGuard™ 3200–5000 A Power Circuit Breakers
Chapter 3. Breaker Operation
10 Aux Switch (NO contact)
1 Aux Switch
2 Aux Switch
11 Aux Switch (NC contact)
13 Flux Shifter
12 Flux Shifter common
5 Shunt Trip
7 Shunt Trip common
9 Close Circuit
18 Close Circuit common
8 Closing Spring Charging Motor
17 Closing Spring Charging Motor common
3 Remote Charge Indicator
4 Remote Charge Indicator
14 Bell Alarm Trip
6 Bell Alarm Trip Common
16 Bell Alarm Status
19 Bell Alarm Status Comon
OR
15 Network Interlock SET
20 Network Interlock RESET
21 Network Interlock SET/RESET common
16 Network Interlock Status
19 Network Interlock Status common
22 OFLO (phase A)
23 OFLO (phase A)
24 OFLO (phase B)
25 OFLO (phase B)
26 OFLO (phase C)
27 OFLO (phase C)
28 Spare
29 Spare
30 Spare
31 Spare
32 Spare
33 Spare
34 Spare
35 Cooling Fan
36 Cooling Fan Common
Table 3. Secondary disconnect terminals and standard connections
10
Page 19

EntelliGuard™ 3200–5000 Ampere Power Circuit Breakers
5 7
Aux Switch
3C 321Shunt Trip
2221
23244
3
25266
5
27
Chapter 4. Accessory Operation
.This chapter contains the operation procedures for each
of the available breaker accessories.
4.1 Shunt Trip
The Shunt Trip allows the breaker to be opened remotely
by the EntelliGuard Messenger™. It is always provided on
electrically operated breakers. The catalog number and
current ratings for the Shunt Trip are given in Table 4.
For installation instructions see DEH169.
Catalog
Number
WPS1LF60120 120 Vac, 60 Hz
Table 4. Catalog number and electrical rating for the Shunt Trip
accessory.
Operation
The Shunt Trip causes the circuit breaker to trip when its
coil is energized. An “A” auxiliary switch, which is closed
when the breaker is closed, is in series with the Shunt Trip
coil, as illustrated in Figure 5. The voltage source is
connected to positions 5 and 7 on the secondary
disconnect.
Voltage
Rating
4.3 Remote Close
The Remote Close allows the breaker to be closed
remotely by the EntelliGuard Messenger™ after the
closing springs have been charged. It is always provided
on electrically operated breakers. The catalog number
and operating voltage are listed in Table 5. For
installation instructions see DEH173.
Catalog Number Voltage Rating
WPRCLF60120 120 Vac, 60 Hz
Table 5. Catalog number and electrical rating for the Remote Close
accessory.
Operation
A circuit breaker equipped with the Remote Close accessory can be closed by applying the rated control voltage to
terminals 9 and 18 of the secondary disconnect.
The Remote Close accessory is continuously rated and has
an antipump feature that prevents a motor-operated
breaker from repeatedly closing if the closing signal is
maintained. The closing control voltage must be removed
for 1–2.5 seconds and then reapplied for each breaker
closure.
4.4 Open-Fuse Lockout
Figure 5. Shunt Trip connections to the auxiliary switch and secondary
disconnect.
4.2 Charging Motor
The Charging Motor provides a means of electrically
charging the springs that close the breaker. The Charging
Motor is available only as a factory-installed option. It is
always provided on electrically operated breakers.
Operation
The circuit breaker closing springs are charged automatically when control voltage is applied to terminals 8 and 17
of the secondary disconnect. When the springs are fully
charged, a cutoff switch automatically de-energizes the
motor. The closing springs will recharge automatically
after the breaker closes.
The Open-Fuse Lockout is used in combination with a
Fuse Rollout Element. When any fuse blows, the OpenFuse Lockout trips the breaker to prevent single-phasing.
This accessory is available only as a factory-installed
option.
Operation
The Open-Fuse Lockout contains an individual trip solenoid for each pole, connected directly across the fuse in
that phase as illustrated in Figure 6. When any fuse blows,
its solenoid is energized and trips the breaker. An
indicator shows which fuse has blown. The breaker cannot
be reclosed until the blown fuse is replaced and the
RESET button is pressed on the Open-Fuse Lockout. The
Open-Fuse Lockout connects to the fuses in a Fuse Rollout
Element through the secondary disconnect.
OFLO
Phase A
Figure 6. Open-Fuse Lockout (OFLO) connections to the secondary
OFLO
Phase B
disconnect.
OFLO
Phase C
11
Page 20

EntelliGuard™ 3200–5000 A Power Circuit Breakers
1421
6 1643
19
15 NI Set
20 21 NI Reset
1 3 216 19 4 5
NI Status
Chapter 4. Accessory Operation
4.5 Bell Alarm with Lockout
The Bell Alarm with Lockout prevents closing of the
breaker after a protection trip until the Bell Alarm with
Lockout is reset. It contains a set of switch contacts to
remotely indicate that the circuit breaker has tripped
because of a protection trip. Catalog numbers for the Bell
Alarm with Lockout module and kit are given in Table 6.
For installation instructions and trouble-shooting, see
DEH239.
Kit Catalog
Number
EGBLALMLFKIT EGBLALMRPLC
Table 6. Catalog numbers for the Bell Alarm with Lockout Module and
Operation
The Bell Alarm with Lockout prevents reclosing of the
breaker after a trip until it is reset. The accessory is
activated and its status circuit changes state whenever the
breaker is tripped by an overcurrent, ground fault, or
protective relay function via the EntelliGuard
Messenger™. The EntelliGuard Messenger continuously
monitors the state of the status circuit. The connections of
the Bell Alarm with Lockout to the secondary disconnect
are illustrated in Figure 7. A trip caused by the manual
OPEN button or by the Shunt Trip does not activate the
Bell Alarm with Lockout.
The Bell Alarm with Lockout can be reset by manually
depressing the yellow target/RESET button on the
breaker escutcheon. This will return the Bell Alarm with
Lockout status contact to its normal configuration and
allow the breaker to be closed.
Note: The lockout feature will only function if the circuit
breaker is racked into the CONN position.
Figure 7. Bell
Alarm with Lockout connections to the secondary disconnect. The
Lockout
Trip Coil
contact is shown in the RESET state.
Module Catalog
Number
Kit.
Status
Contact
4.6 Network Interlock
The Network Interlock provides a means of locking out a
breaker to coordinate its operation with other breakers in
the distribution network. When activated by the
EntelliGuard Messenger™, the Network Interlock prevents
the breaker from closing. When the EntelliGuard
Messenger issues a RESET signal, the breaker is able to
close either remotely or locally. The Network Interlock
contains a set of switch contacts to remotely indicate the
state of the lockout and, thus, whether or not the breaker
can be closed. Catalog numbers and the operating voltage
for the Network Interlock are listed in Table 7. For
installation instructions and trouble-shooting, see
DEH41118. The Network Interlock accessory is only
available on electrically operated breakers.
Kit Catalog
Number
EGNTWKLFKIT EGNTWKLFRPLC 120 Vac, 60 Hz
Table 7. Catalog numbers and control voltage for the Network
Operation
The Network Interlock consists of a trip circuit, a reset
circuit, and a status circuit. The device connections to the
secondary disconnect are shown in Figure 8. Note that a
Bell Alarm with Lockout and a Network Interlock cannot
be installed concurrently in a breaker.
Figure 8. Network Interlock connections to the secondary disconnect.
Module Catalog
Number
Interlock accessory.
Coil
Voltage Rating
Coil
Contact
12
Page 21

EntelliGuard™ 3200–5000 Ampere Power Circuit Breakers
4.7 Hidden Close Button
The Hidden Close Button is an unmarked replacement
for the normal CLOSE button. A Hidden Close Button is
always provided on an EntelliGuard breaker with a
Network Interlock device. Pressing the Hidden Close
Button in the normal manner will not close the breaker.
The catalog number is WPHIDONKIT1. For installation
instructions see DEH187.
Operation
Charge the breaker closing springs, then insert the end of
a stiff rod, with maximum diameter of 0.1", through the
hole in the center of the Hidden Close Button, as illustrated in Figure 9. When the rod engages the mechanism,
light pressure on the rod will close the breaker
mechanism. The Hidden Close Button is double-insulated
from the current-carrying parts of the breaker.
Chapter 4. Accessory Operation
Figure 9. Operation of the Hidden Close Button.
13
Page 22

EntelliGuard™ 3200–5000 Ampere Power Circuit Breakers
Chapter 5. Maintenance
5.1 Inspection
The circuit breaker should be inspected at least once every
two years. More-frequent inspections are recommended
when the breaker is employed under unfavorable
conditions such as severe load, dust, moisture, a large
number of operations, or if the vital nature of the load
warrants it.
Always inspect the breaker after it has interrupted a short
circuit or ground fault.
WARNING: Before inspecting the breaker, disconnect it from all voltage sources.
AVERTISSEMENT: Débrancher le disjoncteur
de toutes sources de courant avant de
l’inspecter.
The following checks should be made, with the breaker
drawn out to the TEST position.
1. Manually operate the breaker several times, checking for obstructions or excessive friction.
• To charge the mechanism springs, pull the operating handle down until it stops (about 90°) eight
times. The charge indicator will show CHARGED
on a yellow background.
• Depress the CLOSE button on the front of the
breaker. The springs should discharge and, if the
latch is properly reset, the breaker will close.
2. Check electrical operation of all installed accessories
and the motor-charge system, if so equipped.
3. Remove the arc chutes, then inspect the arc chutes
and contacts for breakage or excessive burning. For
the proper procedure for removing and reinstalling
the arc chutes, see DEH204.
4. Check insulating parts for evidence of overheating
and for cracks that may indicate thermal aging.
5.2 Lubrication
Bearing points and sliding surfaces should be lubricated
with a thin film of GE Lubricant D6A15A1 (MobilGrease
28, catalog number 193A1751P1). Clean the surfaces to be
lubricated with an industry-approved solvent.
Note: Remove all excess lubricant with a clean, lint free cloth to avoid accumulation of dirt or dust.
The contact surfaces of the primary disconnect fingers
should be cleaned and lubricated with GE Lubricant
D6A15A1.
Note: Do not lubricate the main, intermediate, or
arcing breaker contacts or the outside diameters of
rollers. Also, do not lubricate the ground radius on
the closing prop or trip latch, as this will cause
accumulation of dirt and dust.
5.3 Maintenance Publications
See DEH204 for detailed maintenance procedures and
DEF005 for available renewal parts.
14
Page 23

Page 24

g
GE Consumer & Industrial
General Electric Company
41 Woodford Avenue, Plainville, CT 06062
DEH202 R02 1005 © 2005 General Electric Company
 Loading...