


TM
L H 1 0 0
User Guide 1
Notice 17
Benutzerhandbuch 47
Guia del Usario 51

CONTENTS
CONTENTS |
1 |
INTRODUCTION |
2 |
Unpacking the loopHEARTM |
3 |
DESCRIPTION |
4 |
INSTALLATION |
6 |
Setting Up |
6 |
Locating the loopHEARTM |
9 |
USING THE loopHEARTM |
10 |
Turn the loopHEARTM On |
10 |
Turn the loopHEARTM Off |
10 |
Using the Headset |
10 |
Using the External Microphone |
10 |
TROUBLESHOOTING |
12 |
SAFETY INFORMATION |
13 |
GUARANTEE |
14 |
RECYCLING DIRECTIVES |
16 |
INTRODUCTION
Congratulations on purchasing your GeemarcTM loopHEARTM. This is a portable induction loop system that can be used in a variety of locations, both public and private.
This tough but light unit is easily transported and an integral battery enables it to be freestanding. This battery is both replaceable and rechargeable and long usage can be expected (up to 24 hours). The loop is contained within the unit hence there are no trailing wires. The loopHEARTM will cover an area of approximately 1m2 /3.3ft2. There is an integral microphone that picks up speech and conversations. An external microphone may be added if required (supplied). This induction loop system is designed to assist hearing aid users by transmitting direct to their telecoil equipped hearing aid (which must be switched to the ‘T’ position).
Note: users of digital hearing aids must make sure their aids have been programmed for use with the ‘T’ setting.
The outer carton has been specially designed as a handy carrying case. It is recommended to retain this carrying case to enable safe transportation when transporting the loopHEARTM.
Its is important that you read the instructions below in order to use your GeemarcTM loopHEARTM to its full potential. Keep this user guide in a safe place for future reference.
|
|
|
|
|
|
|
|
|
|
|
|
|
|
|
|
|
|
|
|
1 |
|
2 |
|
INTRODUCTION |
|
DESCRIPTION |
Unpacking the loopHEARTM
When unpacking the loopHEARTM, you should find the following in the box:
•1 loopHEARTM
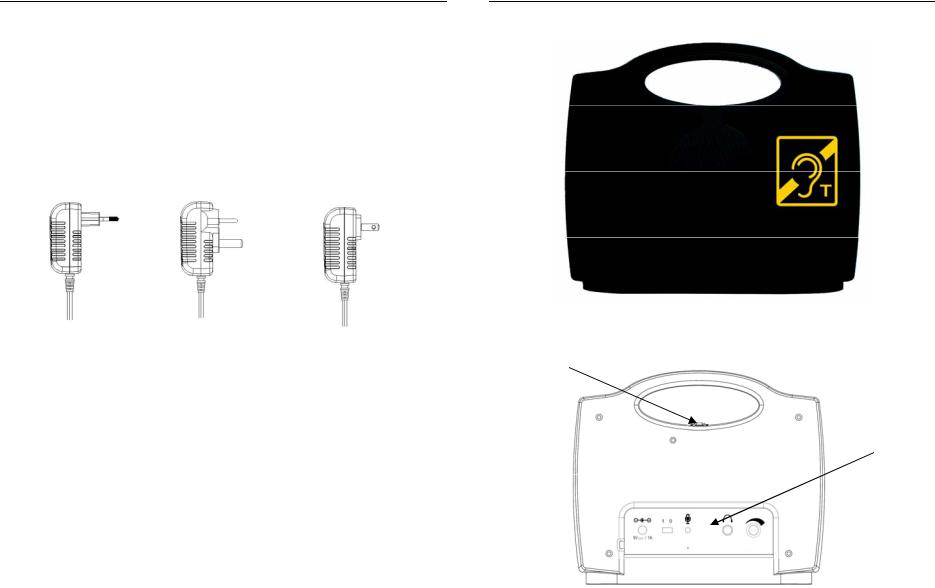
•1 power adaptor/charging Unit. There are three country specific power adaptor/charging units. The one supplied is dependant on country of purchase -
Europe version – VDE type linear power adaptor with right angled plug and 3 metre wire
UK version – UK type linear power adaptor with right angled plug and 3 metre wire
US version – cUL type line power adaptor with right angled plug and 3 metre wire
General Description
Front View
Europe |
UK |
USA |
•2 base plate mounting screws and washer
•1 headset
•1 external microphone with 3m extension lead, lapel clip and wall clip
•1 user guide
3
Rear View
Power LED Indicator
See below
Fig A
4
DESCRIPTION
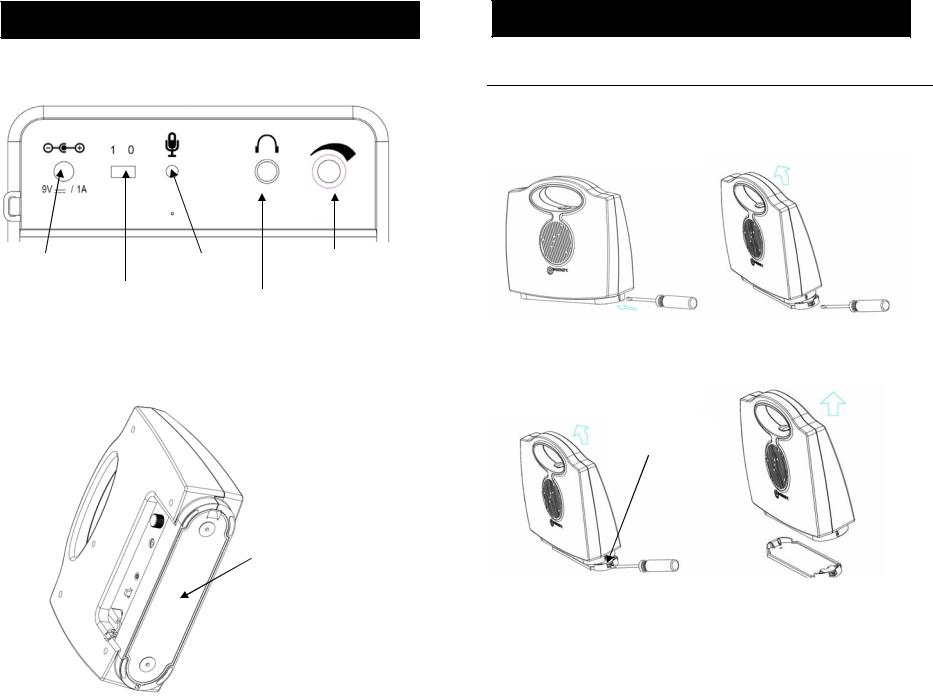
Rear View (Fig A)
INSTALLATION
Setting Up
Battery Charging
Remove the base plate from the unit as shown below:
DC Power |
EXT mic jack |
Headset jack |
|
||
|
ON/OFF switch |
Headset Volume |
Base View
See Fig. B for further detail
Removable Base Plate
Insert a screwdriver into the opening of the catch mechanism. This is found on the bottom right of the base plate. Push the catch gently with the screwdriver - this will release the base plate. Lift the loopHEARTM unit off the base plate.
15 |
6 |

INSTALLATION |
|
INSTALLATION |
|
|
|
Fig B
Opening of the catch mechanism
Remove the battery door. Insert the supplied rechargeable battery, plug the connector into the socket and replace the battery door.
Replace the base plate by placing the hook found on the bottom left of the loopHEARTM into the catch on the base plate. Press the loopHEARTM down gently until you hear a click.:
Hook
Catch
Plug the power cable into the power socket found on the rear of the unit. Plug the adaptor into the mains supply and switch the supply on.
Strain Relief
7 |
68 |
INSTALLATION
Please use the strain relief mechanism as displayed. This provides extra protection for the cable at the connection point. It will extend the life of the power cable and reinforce the connection to the equipment.
The loopHEARTM will need to charge for 4 hours before its first use. The power indicator will blink red whilst the battery is charging. When the power indicator is blinking green, the battery is fully charged.
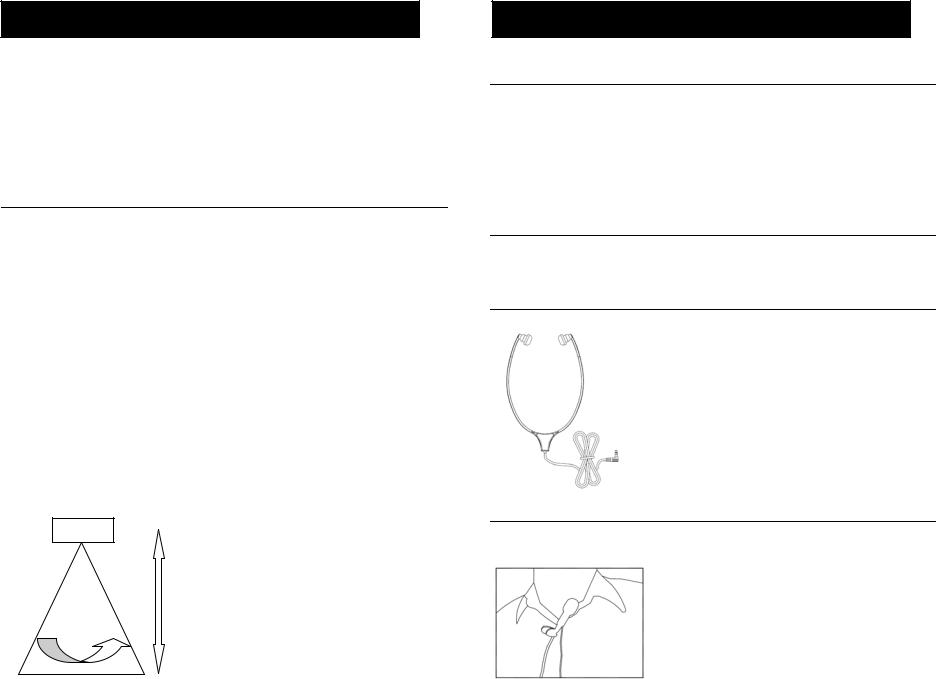
Locating the loopHEAR TM
In order to receive the optimal sound from the loopHEARTM, the ideal location is facing the user. There are two options when locating the loopHEARTM.
Fully Portable
The loopHEARTM can be used as a fully portable unit with or without the base plate attached. It can be used in a variety of locations with no setup required and can be used immediately.
Semi Fixed
If you want to ensure the loopHEARTM stays in one place then it can be used as a semi fixed unit as follows:
1)Choose the location to fix the loopHEARTM. Please bear in mind the range of coverage available (see below). Ensure you make full use of it
2)Remove the base plate – as described in Battery Charging above
3)Screw the base plate to the table or desktop with the screws provided
4)Replace the base plate – as described in Battery Charging above
LH100
1m
60°
9
USING THE loopHEARTM
Turn the loopHEARTM On
Turn the power switch found at the rear of the unit to the I position. The power indicator lights up (solid green if the power adaptor is not plugged in, blinking green if it is plugged in).
When the battery is weak, the indicator will light up red (solid red if the power adaptor is not plugged in, blinking if it is plugged in).
Plug in the power adaptor to recharge the battery.
Turn the loopHEARTM Off
After use, turn off by setting the power switch at the back of the unit to the 0 position.
Using the Headset
A headset is supplied for hearing impaired users who do not use a hearing aid or do not have a ‘T’ switch on their hearing aid. Simply, plug the headset into the HEADSET jack (3.5mm), found at the rear of the loopHEARTM unit. The volume can be adjusted by using the volume knob also found at the rear of the unit (turn knob clockwise to increase volume).
Using the External Microphone
Plug the supplied microphone into the MIC JACK at the back of unit. The external microphone will now override the built-in microphone.
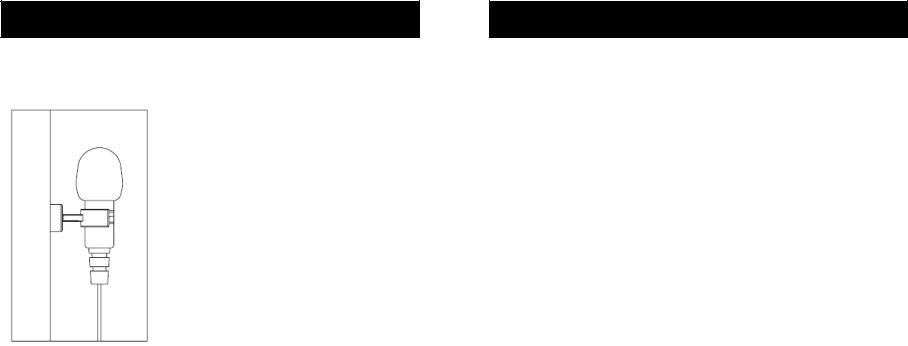
The external microphone has a clip. This is extremely useful for attaching to your lapel as illustrated. The external microphone can also be wall mounted with the wall clip supplied.
10
USING THE loopHEARTM
The external microphone can also be wall mounted with the wall clip supplied.
Simply stick the wall clip to the wall in the most convenient location. Gently push the external microphone into the microphone holder.
TROUBLESHOOTING
The RED LED is flashing
•Charge the battery
The loopHEARTM keeps on switching off
•Make sure that the batteries are fully charged
You cannot hear clearly due to interference or you cannot hear at all
•.Make sure the loopHEARTM is switched on and facing you
•.Move the loopHEARTM closer to you
BATTERY USAGE:
To ensure that your loopHear is always ready for use please follow the recommendations below:
•Always switch off when not in use
•Always recharge the batteries after continuous use for more than 6 hours or when the red LED is ON
•Recharge the batteries every four months if the unit has been switched OFF for long periods of time
As a rough guide the battery will allow the following usage depending on the volume levels and ambient noise:
• STANDBY WHEN TURNED OFF |
4 |
|
• |
MONTHS |
|
STANDBY WHEN TURNED ON BUT NOT IN USE |
2 DAYS |
|
• |
IN CONTINUOUS USE |
8 |
|
HOURS FROM FULLY CHARGED BATTERY |
|
11 |
12 |

SAFETY INFORMATION
General
Do not open the unit. Contact the helpline for all repairs.
Cleaning
Clean the loopHEARTM with a soft cloth. Never use polish or cleaning agents - they could damage the finish or the electronics inside.
Environmental
Do not expose to direct sunlight.
Always ensure there is a free flow of air over the surfaces of the loopHEARTM
Do not place any part of your product in water and do not use it in damp or humid conditions e.g. bathrooms.
Do not expose your product to fire or other hazardous conditions.
13
GUARANTEE
From the moment your GeemarcTM product is purchased, GeemarcTM guarantee it for the period of one year. During this time, all repairs or replacements (at our discretion) are free of charge. Should you experience a problem then contact our help line or visit our website at www.geemarc.com. The guarantee does not cover accidents, negligence or breakages to any parts. The product must not be tampered with or taken apart by anyone who is not an authorised GeemarcTM representative. The GeemarcTM guarantee in no way limits your legal rights.
IMPORTANT: YOUR RECEIPT IS PART OF YOUR GUARANTEE AND MUST BE RETAINED AND PRODUCED IN THE EVENT OF A WARRANTY CLAIM.
Please note: The guarantee applies to the United Kingdom only
DECLARATION: GeemarcTM Telecom SA hereby declares that this product is in compliance with the essential requirements and other relevant provisions of the Radio and Telecommunications Terminal Equipment Directive 1999/5/EEC and in particular article 3 section 1a, 1b and section 3.
1614

GUARANTEE
Electrical connection: The apparatus is designed to operate from a 230V 50Hz supply only. (Classified as ‘hazardous voltage’ according to EN60950 standard).
RECYCLING DIRECTIVES
The WEEE (Waste Electrical and Electronic Equipment) has been put in place for the products at the end of their useful life are recycled in the best way.
When this product is finished with, please do not put it in your domestic waste bin.
Please use one of the following disposal options:
-Remove the batteries and deposit them in an appropriate WEEE skip. Deposit the product in an appropriate WEEE skip.
-Or, hand the old product to the retailer. If you purchase a new one, they should accept it.
Thus if you respect these instructions you ensure human health and environmental protection.
For product support and help visit our website at www.geemarc.com Telephone 01707 384438
Or fax 01707 372529
15 |
16 |

SOMMAIRE |
|
SOMMAIRE |
17 |
INTRODUCTION |
18 |
Contenu du colis |
19 |
DESCRIPTION |
20 |
INSTALLATION |
22 |
Mise en place |
22 |
Utilisation du LoopHEARTM |
25 |
FONCTIONNEMENT |
26 |
Allummez le LoopHEARTM |
26 |
Eteindre le LoopHEARTM |
26 |
Utilisation du casque |
26 |
Utilisation du microphone externe |
26 |
PROBLEMES EVENTUELS |
28 |
RECOMMANDATIONS |
29 |
INFORMATIONS GENERALES |
30 |
INTRODUCTION
Félicitation pour l’achat de votre Geemarc LoopHEARTM. Le loopHEAR est une boucle d’induction mobile utilisable dans tous lieux publics et professionnels
Le LoopHEAR est très facile à transporter d’autant plus qu’il est doté d’une batterie intégré, remplaçable et rechargeable, avec une autonomie de 24 heures .La boucle d’induction est contenu dans le LoopHEAR et couvre une superficie de 1m2 /3.3ft2. Ce système de boucle d’induction envoie un courant qui crée un champ magnétique. Ce champ est capté par la bobine en position T. Le microphone est intégré mais un second microphone externe peut être rajouté
Note: Pour que le LoopHEAR fonctionne, vérifiez que les utilisateurs basculent leur prothèse auditives en position T.
L’emballage du colis a été spécialement conçu pour transporter le LoopHEAR en toute sécurité.
Il est important de lire entièrement la notice d’utilisation du LoopHEAR avant la première utilisation.
|
|
|
|
|
|
|
|
|
|
|
|
|
|
|
|
|
|
|
|
17 |
|
18 |
|
INTRODUCTION
Contenu du colis
Une fois le colis déballé, vérifiez que vous disposez de l’ensemble des éléments présentés ci-après :
•1 LoopHEARTM
•1 adaptateur secteur. Il existe 3 modèles spécifiques de adaptateur secteur. Un seul adaptateur secteur est livré par colis, suivant votre pays :
Europe version – adaptateur secteur type VDE avec 3 mètres de cordon.
UK version – adaptateur secteur type UK avec 3 mètres de cordon.
US version – adaptateur secteur type cUL avec 3 mètres de cordon.
DESCRIPTION
Description générale
Vue de face
Vue arrière
Voyant lumineux
Europe |
UK |
USA |
•2 vis pour la fixation murale
•1 oreillette
•1 microphone externe avec 3 mètres de cordon, lapel clip et un clip mural
•1 notice
19 |
20 |
Reportez-vous à la figure Apour plus de détail
 Loading...