


 Loading...
AmpliDECT250TM
User Guide p2
Notice d’utilisation p40
Benutzerhandbuch p89

Index
Description
Handset/ Base 4
LCD screen 6
Characters List 7
Menu 8
Installation
Connection 9
Batteries setting up 9
Batteries use 9
Using the telephone
On/Off setting 11 Key lock 11 Receiving a call 11
Making a call 12
Hands free mode 13
Last number redial 14 Recalling Recent Numbers 14 Mute function 14
Receiving volume 15 Paging the handset 15 Direct call 15
Handset settings
Ringer setting 16 Key tone setting 16 Silence mode 17
Language setting 17
Time/Date setting 18 User name 18
Personnal Identification Number 19
Emergency number (store & call) 20 Restore factory settings 21
Base settings
Base setting access 22
Tone Dialling Switch over 22 Flash setting 23
Insert pause 23
Personal Identification Number 24
Base Melody 25
Base Volume 25
2

Index
Phone book
Create an entry 26
View entries 26
Delete an entry 27
Clear all entries 27
Modify an entry 28
Caller Display (CID)
Dial from CID list 29 Voice mail and CID list 30 Waiting call indicator 30
Delete entries in CID list 31
Clear all entries 31
Transfer from CID list to phone book 32
Additional handsets /base
Add a new handset 33
Release a registered handset 33
Make an internal call 34
Call transfer between Handsets 34 Conference call 35
Add an extra base 35
Troubleshooting 36
General information
Warranty 38
Recycling instruction 39
3
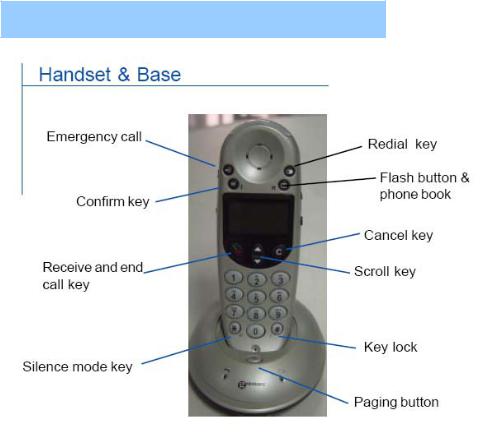
Description
4
Description
5
Description
Description
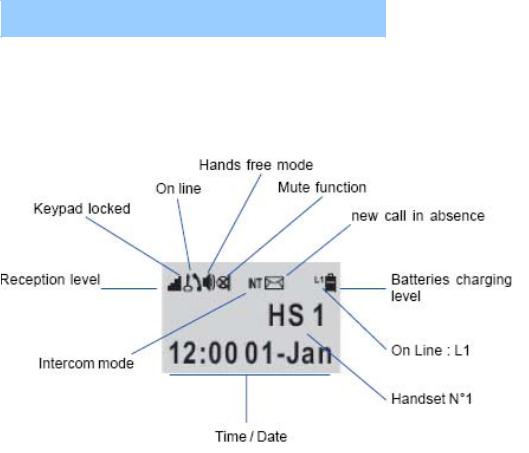
In standby mode, handset number, user name (if stored), time and date are all displayed on the LCD
6
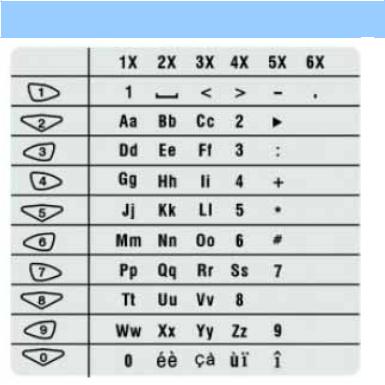
Characters List
When you want to create an entry e.g. name, phone number, you will need to use the keypad. Every key on the keypad represents a set of letters, numbers and symbols. See the table above.
Use ‘C’ to correct a mistake i.e. clear the last digit entered
Use * key to move from uppercase to lowercase
7

Menu
Note: If you are unsure what to do whilst in the menu system, stop pressing keys and simply wait 30 seconds, the telephone will automatically return to standby mode.
8

Installation
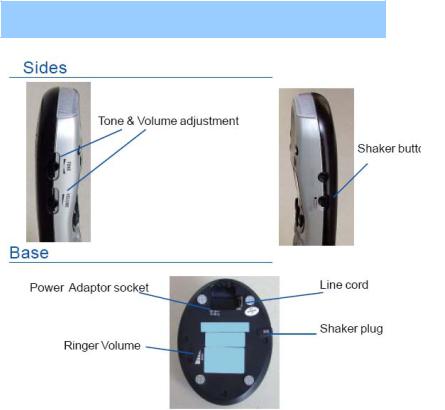
1 - Connection
Connect the line cord plug to the line socket on the base. Connect the other end of the line cord to the PTT socket. (**)
Plug the power cable into the power socket on the base. Plug the adaptor into the mains supply. (*)
2 – Battery installation
Install the rechargeable batteries in the handset. The handset requires three Nickel Metal Hydride (NiMH) AAA batteries. These are supplied with your telephone.
Check the battery polarity diagrams on the handset when inserting the batteries. Fit the battery cover by sliding the cover on to the back of the handset until it snaps shut
3- Battery status
Place the handset on the base, a short beep will be heard. The Power/Charging indicator lights up (red). The battery symbol  will be displayed on the handset. Once the handset is fully charged, the display will show a full battery symbol.
9

Installation
The telephone has an automatic charging control to avoid excessive charging.
Before the handset can be used, the handset batteries must be charged for a minimum of 15 hours on the base.
Note:
When batteries get low during a call, there will be a warning tone (beep), you will have to place the handset on the base to recharge
(*) Classified "hazardous voltage" according to EN60950 standard (**) Classified TNV-3 according to EN60950 standard.
10
Using the Phone
1- Handset On/Off
When the handset is placed on the charger it automatically switches ON. Otherwise press  key until it switches ON
To turn the handset off, press  key until 'Good Bye' appears. The LCD display will then switch off .
2- Key lock
When this feature is turned on, all buttons except for  , will be locked and will not function.
Incoming or intercom calls can be answered by using  key. However, when you complete the call and hang up, the telephone returns to lock mode.
This feature is useful to avoid pressing buttons by mistake.
Switch lock On: Press  until "locked" appears in the LCD display.
Switch lock Off: Press  until "locked" disappears from the LCD.
11
Using the Phone
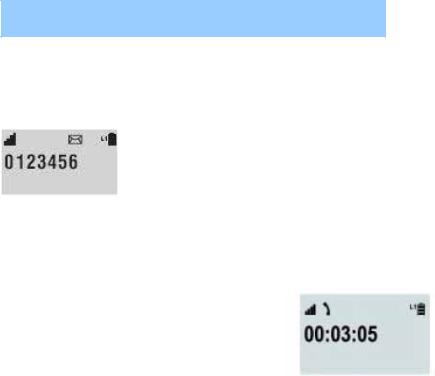
3- Receiving a call
When an incoming call is received the telephone rings and the L1 icon will flash on the LCD display. If the caller can be identified (due to subscription to a Caller Display service), the caller's telephone number will be displayed.
If the handset is in the base, lift it up and press  key otherwise just press
  key. During the conversation the LCD screen displays the connection time.
You can adjust the earpiece volume, use ▲and▼to adjust the volume 1 to 4.
Note: If you have an incoming call with the keypad locked, it is automatically unlocked
4 - Making a call
Pick up the handset, press  key. When you hear dialing tone, dial the number on the keypad.
12

Using the Phone
To end the call simply press  again or place the handset on the base
Pre-dialing: Pick up handset. Dial the number on the keypad, press  the number is automatically dialled.
To end the call simply press  again or place the handset on the base.
Note:
If you make an incorrect entry while pre-dialling the telephone number:
-Press C to clear the last digit and then enter the correct number
-Press C for longer than one second to clear all digits entered and return to standby mode.
If you wish to insert a pause when storing a number, press until P appears in the LCD display.
5 - Hands free mode
This function is used when you don't want to have the handset near your ear or when you want other people to hear at the same time.
When you are in conversation Press and hold  until
until  displays, use ▲and▼to adjust the volume 1 to 4.
To release hands free mode, do the same as above.
13

Using the Phone
6 - Last number redial
To redial the last number dialed:
Pick up handset. Press  in standby mode then press
  to dial the number (or
  first, followed by
  )
)
7 - Recalling recent numbers
You can call back any of the last 10 numbers dialled as follows: Pick up handset, press  , the last
dialled number is displayed; use  repeatedly to see the other nine dialled numbers. Press
  to dial the number.
Note: You may clear some digits or all with C key then edit your new number. To return to standby mode, Press C for longer than 1 second
8 - Mute function
If you wish, you can speak privately to someone else in the room without your caller overhearing.
You will still be able to hear the caller but they cannot hear you during the mute operation.
During a call, press C, the LCD display will show 
Press C again to resume the conversation
14

Using the Phone
9 - Receiving volume and tone
During a conversation you may adjust the volume by using the  button or the tone with
  button OR use ▲and▼to select the volume (1 to 4)
10 - Paging the handset
If you wish to locate the handset: press the button  on the base
All registered handsets will be paged and will ring for about 30 seconds. Press any button on the located handset to stop paging mode or press  again
again
11 - Direct call
You may record one number in the memory " Direct call". On pressing any key, this number will be dialled automatically
This function is useful for a young child unable to use the telephone correctly or for a disabled person living alone
To activate this function:
Use ▲and▼to select "HS setting" Press OK
Use ▲and▼to select "Direct call"
Press OK
Enter your desired number
Press OK to confirm or use C key to modify The screen will display "DIRECT CALL"
To disable the function press the "R" key twice |
15(quickly) |

Handset Settings
1 - Melodies setting for external/internal calls
There are 2 types of melodies
-9 for externals calls
-9 for internals calls
You may select one melody for external calls and a different one for internal calls.
Use ▲and▼to select "HS setting"
Press OK
Use ▲and▼to select "Melody Ext" or "Melody Int" Press OK
Use ▲and▼to select your melody and then press OK Use ▲and▼to select the level (1 to 4)
Press OK
Press C to return to the melody menu or press  to return to standby mode.
2 - Key tone setting
On: the keys beep when pressed Off: silence
To activate or de-activate:
Use ▲and▼to select "HS setting"
16

Handset Settings
Press OK
Use ▲and▼to select " Key Tone"
Press OK
Use ▲and▼to select "On" or "Off"
Press OK
Press C twice or  once to return to standby mode …
3 - Silence mode
In this mode only the shaker will work, all other sounds the telephone can emit will be disabled e.g. ringer, key beeps.
To activate this function:
Press  key until "Silence" is displayed
To cancel the function press the same key until you see the standby screen again
4 - Language setting
You can choose one of many languages language, to do this : Use ▲and▼to select "HS setting"
Press OK
Use ▲and▼to select "language"
17

Handset Settings
Press OK
Use ▲and▼to select your language
Press OK to validate
Press C twice or  once to return to standby mode …
5- Time/Date setting
The time displayed on the handset can be changed. The time format is 24 hours. Use ▲and▼to select "HS setting"
Press OK
Use ▲and▼to select "Set clock" Press OK
"Input time" is displayed
Enter the time using the numerical keypad (0-9)
Press OK to validate
You can modify the date at the same time (Day - Month - Year).
6 - User name
The given name will be displayed on the screen in "standby mode". Use ▲and▼to select "HS setting"
Press OK
Use ▲and▼to select "User name"
18

Handset Settings
Press OK
Use the keypad to enter the name, see details page 7.
Press OK to validate
Press C twice or  once to return to standby mode …
7 - Personal Identification Number (PIN)
The PIN is required for the following options:
-Registering a new handset
-Resetting a handset
-Changing settings found under the base menu
The PIN is pre-set to '1590' (factory default). This can be changed - this is recommended for confidentiality.
Use ▲and▼to select "HS setting"
Press OK
Use ▲and▼to select "Set PIN" Press OK
"HS PIN" is displayed
Enter the old code or factory code Press OK
"New PIN" is displayed
Enter your new code using the 0 to 9 keys Press OK to validate
19

Handset Settings
"Retype PIN" is displayed
Enter your new code again Press OK
Press C twice or  once to return to standby mode …
8 - Emergency number
You can store a special number in case of emergency e.g.doctor, family member Use ▲and▼ to select "HS setting"
Press OK
Use ▲and▼to select "Emergency" Press OK
Enter your chosen number Press OK
"Stored" is displayed
Press C twice or  once to return to standby mode …
To call this number simply press  button, it will be automatically dialled
20
Handset Settings
9- Restore Factory settings
The factory settings can be restored to the telephone.
All parameters you have modified will be restored back to those that have been set in the factory To restore:
Use ▲and▼to select "HS setting"
Press OK
Use ▲and▼to select "Set default" Press OK
"HS PIN" is displayed
Enter 1590 or your new code if you changed it Press OK
"Sure?" is displayed
Press OK if you are (or C if not)
Press C twice or  once to return to standby mode
21

Base Settings
1 - Base settings access
Each time you want access to the base setting , you will have to enter PIN code. Use ▲and▼to select "BS setting"
Press OK
"Base PIN" is displayed
Enter 1590 or your new code if you changed it
Press OK
Now you are in the base menu
2 - Tone dialing switchover
Your AmpliDECT200 has been set to tone dialing at the factory, but if your network requires pulse dialling, you will have to change the mode .
Use ▲and▼to select "BS setting" Press OK
"Base PIN" is displayed
Enter 1590 or your new code if you changed it Press OK
Use ▲and▼to select "Dial Mode"
Press OK
Use ▲and▼to select "Pulse" Press OK
Press C twice or  once to return to standby mode …
22

Base Settings
3 - Flash setting
Your telephone flash time is factory set for the UK (R=100ms). Do not change this.
However, if your phone is connected to a private network it might require changing. Proceed as below:
Use ▲and▼to select "BS setting"
Press OK
"Base PIN" is displayed
Enter 1590 or your new code if you changed it Press OK
Use ▲and▼to select "Flash Time" Press OK
Use ▲and▼to choice 300 or 600ms Press OK
Press C twice or  once to return to standby mode …
4 - Insert a pause
If you need to insert a pause between digits whilst dialling, you can set the duration of this pause: 2,3 or 4secs
Use ▲and▼to select "BS setting"
Press OK
"Base PIN" is displayed
23

Base Settings
Enter 1590 or your new code if you changed it
Press OK
Use ▲and▼to select "Pause Time" and then press OK
Use ▲and▼to choose the time and then press OK
Press C twice or  once to return to standby mode
5 - Personal Identification Number
The base like the handset PIN is pre-set to '1590' (from factory). This can be changed - this is recommended for confidentiality.
Use ▲and▼to select "BS setting" Press OK
"Base PIN" is displayed
Enter 1590 or your new code if you changed it , then press OK
Use ▲and▼to select "Set PIN”, and then press OK "HS PIN" is displayed
Enter the old code or factory code, and then press OK
"New PIN" is displayed
Enter your new code using the 0 to 9 keys Press OK to validate
"Retype PIN" is displayed
Enter your new code again, and then press OK Press twice C or once to return to standby mode
24

Base Settings
6 - Base melody setting
You can change the melody of the base. You have 3 choices. Use ▲and▼to select "BS setting"
Press OK
"Base PIN" is displayed
Enter 1590 or your new code if you changed it, then press OK
Use ▲and▼to select "Base Melody”, then press OK
Use ▲and▼to select your melody 1 to 3. You also can set the ringer OFF, choose 0 Press OK
Press C twice or  once to return to standby mode
6 - Base volume setting
After you have chosen the melody, you can also adjust the volume.
Use ▲and▼to select "BS setting" Press OK
"Base PIN" is displayed
Enter 1590 or your new code if you changed it, then press OK Use ▲and▼to select "Base Volume”, and then press OK Use ▲and▼to adjust the volume (1 to 9)
Press C twice or  once to return to standby mode
25

Phonebook
Telephone numbers and names can be stored in the phone book.
The phone book can contain 50 entries. Each phone number can contain up to 16 digits and names can contain up to 12 characters
1 - Create an entry
Use ▲and▼to select "Phone book"
Press OK
Use ▲and▼to select "Add" Press OK
Enter the name then Press OK
Enter the phone number then Press OK
Press C twice or  once to return to standby mode
2 - View entries / make a call
Use ▲and▼to select "Phone book" Press OK
Use ▲and▼to select "Search" Press OK
Use ▲and▼to show the stored entries (name, number)
Press C key twice
OR
Press  to dial this number
26

Phonebook
3 - Delete an entry
Use ▲and▼to select "Phone book" Press OK
Use ▲and▼to select "Delete" Press OK
Use ▲and▼to select the chosen number
"Sure?" is displayed. Press OK to confirm "Deleted" is displayed
Press C twice or  once to return to standby mode
4- Clear all entries
Use ▲and▼to select "Phone book" Press OK
Use ▲and▼to select "Delete All" Press OK
"Sure?" is displayed. Press OK to confirm
"Erase OK" is displayed. All entries have been removed Press C twice or  once to return to standby mode
27

Phonebook
5 – Modify an entry / assign a melody
Use ▲and▼to select "Phone book" Press OK
Use ▲and▼to select "Edit"
Press OK
Use ▲and▼to choose the name or number to modify Press OK
Use C to clear the characters then use the numeric keypad to correct the name Press OK in order to select the number. The number can be corrected in the same way as the name
Press OK
Now you have the possibility to assign a melody to this entry
Use and to select the melody Press OK
"stored" is displayed
Press C twice or  once to return to standby mode
When this person calls you, you will hear this melody and you will instantly realize who is calling you.
28

Caller ID
If you have subscribed to the CID service, the name and telephone number of the caller will be displayed when you receive a call
The name, phone number, calls time & date is stored in the CID list.
Whether you take a call or not, the caller's details are stored in the Call list. The call list stores the last
50 incoming calls. When the call list memory is
full, a new call will take the place of the oldest call. You can display, scroll through and dial numbers in the list.
The  will be shown on the handset display if you receive a call in your absence. The icon will stay until ALL calls on the CID list have been reviewed.
1 - Dial from the CID list
To show and call a number from the CID list:
Use ▲and▼to select "Caller ID" Press OK
Use ▲and▼to select "Read" Press OK
Use ▲and▼to select the caller’s name you want to call Press  , the number is displayed and automatically dialed
29

Caller ID
Note: If the display shows PRIVATE ID for a withheld number, you will not be able to call it
2 -Voice mail and CID list
If you have subscribed to the voice-mail service from your provider you will be able to receive messages from the caller.
The  icon is displayed together with the text "Message" found at the bottom of the screen You will be able to retrieve the details about this call from the CID list
To listen to your messages, call the voice-mail number of your provider.
3 –Call waiting indicator
If you have subscribed to this service, you will be warned during a call if somebody else is calling you
– a warning sound will be audible and the Caller Identifier will be displayed (if recognized).
Press  button then press key 2 to be in conversation with your second caller. The first caller will be put on hold.
Press  button then key 1 to return the first caller.
30
Loading...