


CONTENTS
CONTENTS |
2 |
INTRODUCTION |
|
Unpacking the Ampli500™ |
3 |
DESCRIPTION |
4-8 |
INSTALLATION |
|
Setting Up |
9 |
SETTINGS |
10 |
Ringer Volume |
10 |
Ringer Tones |
10 |
Alarm & Ringer Settings |
10 |
Dialing Mode |
11 |
Date & Time Setting |
11 |
Language Setting |
12 |
Screen Contrast Adjustment |
13 |
Auto On Hook |
13 |
Auto screen Sizing |
14 |
Area & LDS Code Setting |
15 |
USING THE TELEPHONE |
16 |
Answering a Call |
16 |
Making a Call |
16 |
Switching between Speakerphone |
|
and Handset |
17 |
Call Time Counter |
17 |
Last Number Redial |
17 |
Recalling Recent Numbers |
17 |
Deleting Recent Numbers |
18 |
Mute function |
18 |
Flash |
18 |
One Touch Memory Keys |
18 |
OPTIONAL ACCESSORIES |
20 |
Headset |
20 |
Neckloop |
20 |
Shaker |
20 |
VOLUME AND TONE |
21 |
Sending Level Adjustment |
21 |
Receiving Level Adjustment |
21 |
Handset Amplifier |
21 |
PHONEBOOK |
22 |
Create a Phonebook Entry |
22 |
Create and Entry from the |
|
Caller Display Log |
23 |
Make a Call from a Phonebook Entry 23
Delete a Phonebook entry |
24 |
Modify a Phonebook Entry |
24 |
CALLER DISPLAY |
25 |
Use a Number from the |
|
Caller Display log |
25 |
Delete a number from the |
|
Caller Display Log |
26 |
Delete all Numbers from the |
|
Caller Display Log |
26 |
Call Waiting |
26 |
NEW CALL/MESSAGE LED |
27 |
Message Waiting LED |
28 |
TROUBLESHOOTING |
29 |
SAFETY INFORMATION |
31 |
GUARANTEE |
32 |
2

INTRODUCTION
Congratulations on purchasing your Geemarc Ampli500™ telephone.
This is a multifunction telephone which offers features such as hands free use, phonebook and caller display*. It also has the added benefits of outgoing voice amplification and receiving amplification.
It is important that you read the instructions below in order to use your Geemarc Ampli500™ to its full potential. Keep this user guide in a safe place for future reference. With any questions please contact customer service at 1-888-864-2446 or RMA@sonicalert.info.
*To use the caller display facility, you must subscribe to your network provider’s caller display service.
CAUTION: THIS TELEPHONE PRODUCT IS SPECIFICALLY DESIGNED FOR PEOPLE WITH HEARING DIFFICULTIES AND IS PROVIDED WITH AN AMPLIFIED HANDSET.
Unpacking the Ampli500™
When unpacking the telephone, you should find the following in the box:
•1 Telephone base unit
•1 Telephone handset
•1 Handset curly cord
•1 8 inch short telephone line
•1 6ft telephone line cord
•1 AC Adapter
•1 Screwdriver
•1 Wall plate adapter
•1 User guide
3
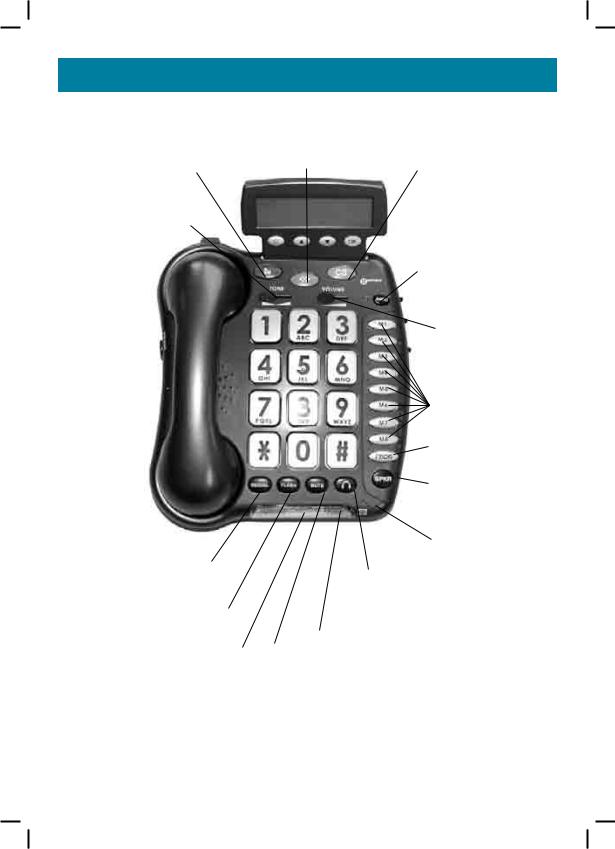
DESCRIPTION
Priority memory P1
Tone reception adjustment
Priority memory
P2
P3: CS Customer Service Key
Amplified mode key
Volume reception adjustment
Direct memory
Memory storing key
SPEAKER PHONE
Hands free microphone
Last number redial
|
|
Headset button |
|
|
|
(Compatible with Geemarc |
|
Time break recall button |
|
CLA3 headset accessory) |
|
Flashing incoming call |
|
Message waiting / new call |
|
Mute |
LED |
||
indicator (strobe light) |
|||
|
4

DESCRIPTION
Clip to return to wall mount
Tone & volume adjustment automatically activated each time you hang-up the phone
Ringer / shaker / strobe select mode
Additional amplifier button
Speaker
Handset cord
Speaker volume adjustment
Screen
tilt
Ringer level adjustment |
Sending volume adjustment |
5
DESCRIPTION
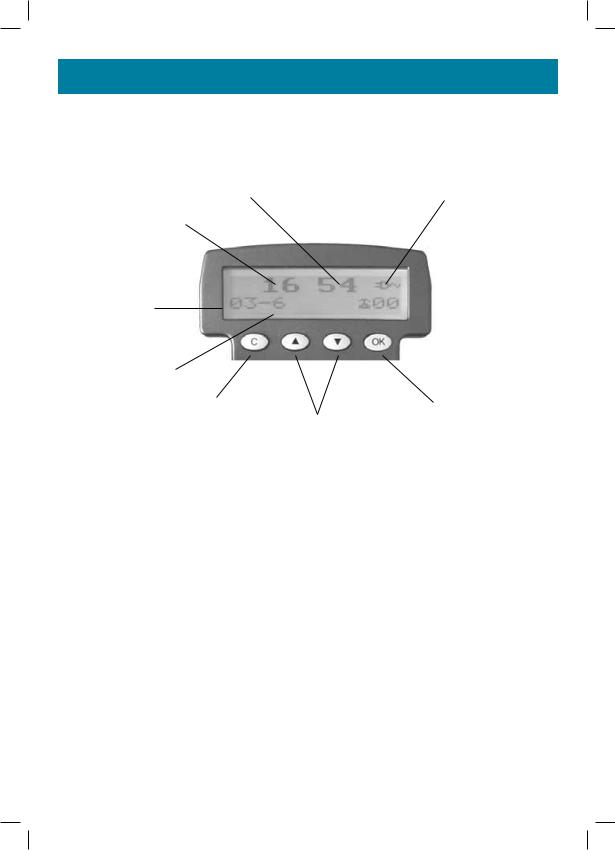
Screen example (On hook position)
Minutes |
Power network icon |
Hours
Day |
|
Month |
|
Cancel key |
Validation key |
|
Up/down keys |
OK button is used to confirm action or a choice on the screen.
▲ ▼“UP / DOWN arrow” buttons are used to highlight or scroll through the menu.
C button is used to cancel or confirm an action/entry or clear a stored Caller ID call.
6
DESCRIPTION
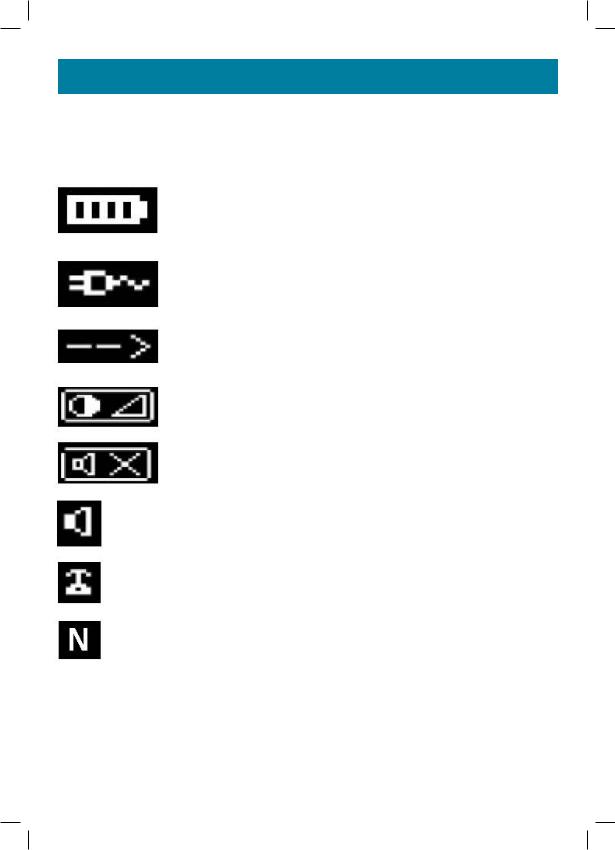
Your Ampi500™ Phone has a screen with different icons, which help you to use the telephone
The telephone is supplied by battery + battery indicator
The telephone is powered by AC adapter.
Memory storing is required.
Screen contrast level.
“Mute” is activated.
Speakerphone is activated.
Precede the CID call record number.
To show new records.
7
|
DESCRIPTION |
|
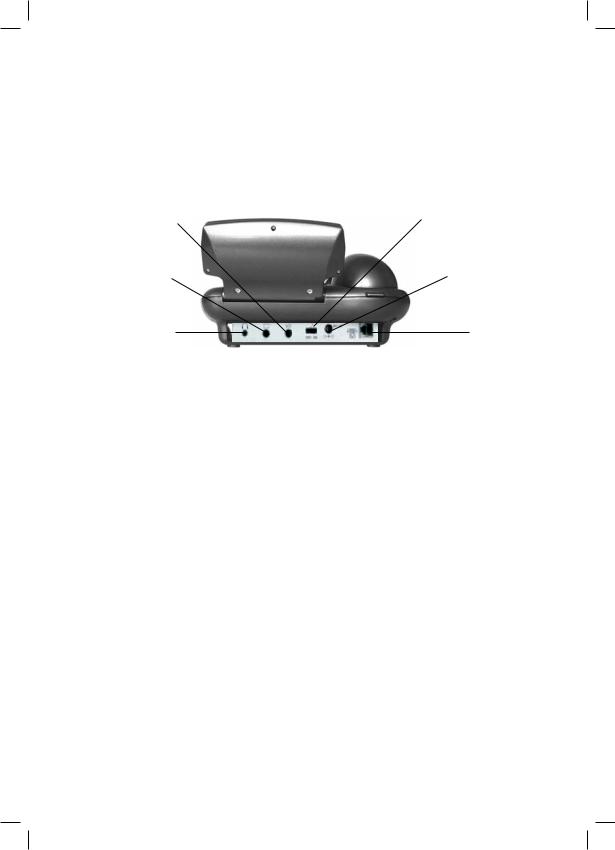
Connection |
|
|
Shaker socket |
Amplification over |
|
(Only Geemarc |
ride switch |
|
reference) |
|
|
Neckloop socket* |
Adaptor socket** |
|
(Only Geemarc |
||
(Only Geemarc |
reference) |
|
reference) |
|
|
Headset socket* |
Line cord socket* |
|
(Only Geemarc |
||
|
||
reference) |
|
(*) Classified TNV-3 according to EN60950 standard.
(**) Classified „hazardous voltage“ according to EN60950 standard.
Important: Only Shaker, Neckloop, Headset and Adaptor with Geemarc reference can be connected to the sockets.
8

INSTALLATION
Setting Up
Connect the curly cord and the handset.
Remove the screw of the battery compartment, using the screwdriver provided, and open the battery compartment. Insert 4 good quality alkaline batteries (AAA size, 1.5V type, not supplied) into the battery compartment located on the base of the telephone.
Note : Do not use rechargeable batteries. Do not put batteries into the household rubbish, pay attention to battery regulations regarding battery disposal.
Replace the battery cover.
Desk Installation
Connect the 6ft line cord to the socket located at rear of telephone then connect the plug to the telephone wall socket.
Connect the power supply to the socket located on the back of the telephone then plug into the wall socket. Please choose a socket near your telephone socket to enable you to unplug the mains power quickly in case of a problem.
Lift the handset, if there is a dial tone, the telephone is ready for use. If there is no dial tone, check that everything is plugged in as described above.
Note: Mains power is required to power the multifunction features of the telephone. Fit 4 x AAA sized batteries in order to save and use stored numbers in case of power failure. Without mains or battery power, the telephone can still be used to answer calls or to manually dial out calls but all stored numbers will be lost.
Wall Mount Installation
1.Slide the handset hanger bar out and rotate it 180 degrees. Slide it back into place. The hook will now point up. This ensures the handset will not fall out of the cradle when it is mounted on the wall.
2.Plug the 8in short phone cord into the telephone jack on the Ampli500™, run the phone cord underneath the wall plate adapter and through the opening.
3.Insert the Wall Plate adapter. Hold the wall plate adapter so that the raised mounting pins line up with the phone’s keyholes on the Ampli500™. Once the holes are lined up, push the wall plate adapter in towards the Ampli500™ and then slide the plate upwards until it is securely seated on the phone.
4.Once the Wall Plate adapter is installed, plug the 8 inch short cord into the jack on the wall.
5.Holding the phone slightly above the mounting screws on the wall jack, push the phone against the mounting screws so they are hooked into upper and lower key-hole slots on the back of the phone. Slowly slide the phone down until it snaps
into place.
6.Connect the handset curly cord to the handset and the other end to the telephone.
7.Lift the handset, if there is a dial tone, the telephone is ready for use. If there is no dial tone, check that everything is plugged in as described above.
screw
Wall mounting holes
9
SETTINGS
Ringer Volume
The ringer volume can be adjusted as high as 95 +dB.
A switch located on right side allows the ringer to be switched to OFF, LOW, HIGH. Your telephone comes with the ringer switched to ‘High’.
Ringer Tones
Press MUTE
Use ▲ or ▼ to select ‘SET PHONE’
Press OK
Use ▲ or ▼ to select ‘SET RING’
Press OK
Select desired ring tone. Use ▲ or ▼ to scroll through and listen to the 4 tones available
Press OK to select desired ring tone
Press C three times to exit or do nothing for 20 seconds and the ring type will automatically be saved ready for the
next incoming call
Alarm and Ringer Settings
A 3-position switch located on the right side of the phone allows the settings below:
Ringer and strobe flash are activated (Normal Setting)
The other two settings are only effective when an optional vibrator pad has been added.
Ringer, shaker and strobe flash are activated
Ringer and shaker are activated
10
 Loading...