


 CL330
CL330
MULTIFUNCTION TELEPHONE
User guide P2
2LMC59YY
Notice D'utilisation P38

CONTENTS
CONTENTS |
1 |
INTRODUCTION |
3 |
Unpacking the Telephone |
4 |
DESCRIPTION |
5 |
General Description |
5 |
LCD Screen Description |
7 |
Menu Navigation |
7 |
INSTALLATION |
8 |
Setting Up |
8 |
Wall Mounting |
10 |
SETTINGS |
11 |
Language Setting |
11 |
Screen Contrast Setting |
12 |
Time Setting |
13 |
Voice Function Setting |
14 |
Flash (Recall) Setting |
15 |
Dialling Mode (Tone/Pulse) Setting |
15 |
Ringer Volume Setting |
16 |
Ringer Tone Setting |
16 |
USING THE TELEPHONE |
17 |
Making a Call |
17 |
Receiving a Call |
19 |
Last Number Redial |
19 |
Mute Function |
20 |
Handset Volume Setting |
20 |
Speaker Volume Setting |
20 |
Tone Control Setting |
20 |
Call Timer |
21 |
Hearing Aid Use |
21 |
Headset use |
21 |
1

CONTENTS
CALLER DISPLAY |
22 |
View Caller Display List |
23 |
Dial a Number from the Caller Display List |
23 |
Delete an Entry from the Caller Display List |
24 |
Delete all Entries from the Caller Display List |
24 |
Copying a Number to the Phone Book |
25 |
PHONE BOOK |
26 |
Create a Phone Book Entry |
26 |
Store/Change a Name Recording |
28 |
Delete a Name Recording |
29 |
View Phone Book Entries |
29 |
Dialling using a Phone Book Entry |
30 |
Modify a Phone Book Entry |
30 |
Delete a Phone Book Entry |
31 |
Delete all Phone Book Entries |
31 |
QUICK DIAL |
|
Storing a Quick Dial Number |
32 |
Dialling a Quick Dial Number |
32 |
TROUBLE SHOOTING |
33 |
SAFETY INFORMATION |
34 |
GUARANTEE |
35 |
RECYCLING DIRECTIVES |
37 |
2

INTRODUCTION
Congratulations on purchasing your Geemarc CL330 telephone. This is a multifunction telephone which offers features such as hands free use, phone book, caller display* and voice announcing.
Its is important that you read the instructions below in order to use your Geemarc telephone to its full potential. Keep this user guide in a safe place for future reference.
This guide explains how to use the following telephone:
CL330
*To use the caller display facility, you must subscribe to your network provider’s caller display service.
3

INTRODUCTION
Unpacking the Telephone
When unpacking the telephone, you should find the following in the box:
∙1 CL330 unit
∙1 CL330 handset with curly cord
∙1 Mains power adaptor
∙1 Telephone line cord
∙1 User Guide
For product support and help visit our website at www.geemarc.com Telephone 01707 384438
Or fax 01707 372529
4

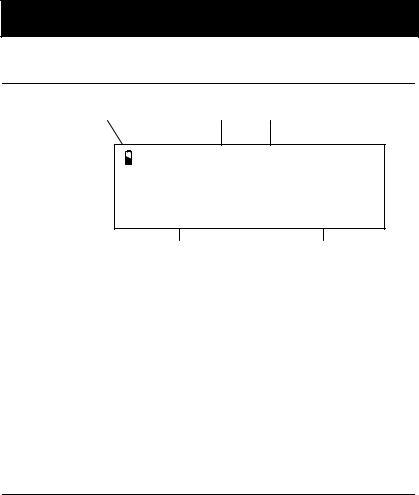
DESCRIPTION
General Description
1
|
|
|
CALL# |
|
|
|
|
CLIP |
|
2 |
|
|
|
11 |
|
|
|
|
|
|
C |
OK |
MENU |
12 |
3 |
|
|||
|
|
|
||
|
|
|
|
|
|
|
|
|
13 |
4 |
|
|
|
|
5 |
TONE |
|
VOLUME |
14 |
|
|
|||
6 |
? |
|
M1 |
15 |
|
|
|
||
|
|
|
16 |
|
|
|
|
|
|
7 |
|
|
|
|
|
|
|
M2 |
17 |
8 |
|
|
|
|
|
|
|
M3 |
18 |
|
|
|
M4 |
19 |
9
R
10 


 20
20
21
22
23
24
25
26
5

DESCRIPTION
1= |
LED (flashes when a new call has been received)* |
2= |
Delete |
3= |
Call back, confirm |
4= |
Tone slide control |
5= |
Amplify LED |
6= |
Caller ID mode button |
7= |
Amplify button |
8= |
Speakerphone volume slide control |
9= |
Handset |
10= |
Mute |
11= |
Scroll left |
12= |
Menu |
13= |
Scroll right |
14= |
Earpiece volume control |
15= |
Quick Dial M1 (emergency call number 1) |
16= |
Phone book |
17= |
Quick Dial M2 (emergency call number 2) |
18= |
Quick Dial M3 (emergency call number 3) |
19= |
Quick Dial M4 (emergency call number 4) |
20= |
LED handsfree mode |
21= |
Handsfree |
22 = |
LED headset mode |
23 = |
Headset |
24 = |
Redial, Insert a pause |
25 = |
Recall |
*: Only If you have subscribed to the "Caller Display" service from your network provider
6
DESCRIPTION
LCD Screen Description
Battery Low Icon level |
Time and Date |
9:52 9/12
TOTAL:04 NEW:02
Calls Received |
New Calls |
|
Received |
This LCD display shows the total number of calls and the number of new calls ready to be reviewed. In this example you have a total of 4 calls which includes two new calls.
|
|
|
9:52 9/12 |
call# |
||
|
|
|
|
|
|
02 |
Caller’s Number |
|
|
|
01517222277 |
|
|
|
|
|
|
|||
Caller’s Name |
|
|
ROBERT JONES |
|
||
|
|
|
||||
|
|
|
|
|
|
|
Menu Navigation
To access settings, press MENU.
To exit the menu, press  . or C
To skip back a level within the menu, press C
The telephone will automatically return to standby mode from any menu if no button is pressed for 20 seconds.
7
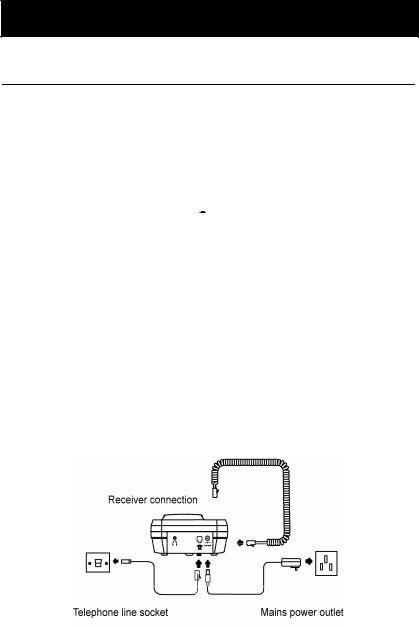
INSTALLATION
Setting Up
Connect the handset to one end of the curly cord. The connector at the end of the curly cord plugs into the socket on the left hand side of the CL330 unit.
Open the battery compartment (push the small clip backwards and then upwards). Insert 4 good quality alkaline batteries (AA size, 1.5V type, not supplied) into the battery compartment located on the base of the telephone. Replace the battery cover. If the batteries are
running low, the low battery icon  will appear on the LCD display. Ensure that the telephone is not connected to the telephone line socket and/or mains power connection when the batteries are being inserted or replaced.
Note : Do not use rechargeable batteries. Do not put batteries into the household rubbish, pay attention to battery regulations regarding battery disposal.
Connect the line cord to the socket located at rear of telephone then connect the plug into the wall socket *.
Connect the power supply to the socket located at rear of the telephone then plug into a 13amp wall socket. Please choose a socket near your telephone to enable you to unplug the mains power quickly in case of a problem.
(*) Classified “hazardous voltage” according to EN60950 standard
(**) Classified TNV-3 according to EN60950 standard.
8

INSTALLATION
Note: Mains power is required to power the multifunction features of the telephone. Fit 4 x AA sized batteries in order to save and use stored numbers in case of mains power failure. Without mains or battery power, the telephone can still be used to answer calls or to manually dial out calls but all the multifunction features will not
be available. If no batteries are inserted, the low battery icon  will be displayed on the LCD display.
9
INSTALLATION
Wall Mounting
Drill two holes vertically one above the other, 83mm apart, and leave the screws protruding from the wall by 5mm.
Caution: Ensure there are no electrical lines, water pipes etc. in the wall where the holes are drilled.
Turn the hook in the receiver cradle so that the receiver can be placed on-hook.
Then hang up the telephone directly into the screws
10

SETTINGS
Language Setting
You can choose between 5 different languages. Each language has voice announcements available in that language.
Press MENU
Use or to select LANGUAGE
Press OK to confirm
Use or to select the desired language
Press OK to confirm
Press  or C to exit
11

SETTINGS
Screen Contrast Setting
Your screen has a backlight which automatically switches off after 15 seconds of inactivity. The contrast of the backlight against the text can be increased or decreased.
Press MENU
Use or to select LCD CONTRAST
Press OK to confirm
Use or to select the desired contrast setting (3=normal)
Press OK to confirm
Press  to exit
12

SETTINGS
Time Setting
If you subscribe to a Caller Display service, the date and time will be set whenever you receive a call. However, if you do not subscribe to this service, you will need to set the date and time manually.
Press MENU
Use or to select TIME/DATE
Press OK to confirm
The HOUR digit will flash. Use or to select the correct hour
Press OK to confirm
The MINUTE digits will flash. Use or to select the correct minute
Press OK to confirm
The DAY digit will flash. Use or to select the correct day
Press OK to confirm
The MONTH digit will flash. Use or to select the correct month
Press OK to confirm
Press  to exit
13

SETTINGS
Voice Function Setting
When the VOICE function is ON, in pre-dial mode numbers 0-9, numbers held in the call log, numbers held in the phone book and a caller’s name (if recorded, see Phonebook Chapter – Storing Name Recording) will be announced in the loudspeaker.
Press MENU
Use or to select VOICE
Press OK to confirm
Use or to select ON/OFF
Press OK to confirm
Press  to exit
14

SETTINGS
Flash (Recall) Setting
Your phone works with a time break recall for United Kingdom (R=100ms). In France, flash time setting should be R=300ms. This value can be set to 100, 300 or 600.
Press MENU
Use or to select FLASH
Press OK to confirm
Use or to select 100/300/600
Press OK to confirm
Press  to exit
Dialling Mode (Tone/Pulse) Settings
In the UK, all telephone exchanges now use Tone dialing. If your phone does not dial out, it is probably being used from an older private switchboard (PBX). In this case, the Tone/Pulse setting must be changed to Pulse.
Press MENU
Use or to select TONE/PULSE
Press OK to confirm
Use or to select TONE , PULSE 33/66 or PULSE 40/60
Press OK to confirm
Press  to exit
15
SETTINGS
Ringer Volume Setting
A switch located on the right side of the CL330 unit allows the ringer to be switched to LOW, MEDIUM or HIGH.
Ringer Tone Setting
3 choices are available
Press MENU
Use or to select RINGER TONE
Press OK to confirm
Use or to select 1 , 2 or 3
Press OK to confirm
16

USING THE TELEPHONE
Making a Call
Pick up the handset.
When you hear the dialling tone, dial the number on the keypad. The number will be displayed on the LCD display
To end the call simply replace the handset in the cradle
Pre-dialling
If VOICE is activated, once you press the number keys 0-9 you will hear the number being dialled.
Key in the required number without lifting the handset..
Use C if necessary to cancel and correct a wrong digit
Lift the handset OR press OK OR press  and the number will be automatically dialed
To end the call simply replace the handset in the cradle OR press 
17

USING THE TELEPHONE
Making a Call – Hands Free
Dial the number on the keypad in the on-hook position
Use C if necessary to cancel and correct a wrong digit
Press  and the number will be dialled automatically. The handsfree function (speaker) is now activated and the LED indicator next to the button will be illuminated.
When the third party answers the call, you may speak with the telephone in the hands free mode ( handset in the cradle).
Speak towards the microphone located on the front edge of the telephone.
To end the call, press 
Note: To deactivate the Hands Free function during a call, lift the handset. To activate the Hands Free function during the call, press
 and replace the handset on the cradle at the same time.
Also, when in hands free mode, only one person may talk at a time. The switch-over between speaker and microphone is automatic. This is dependent on the sound level of the incoming call and the microphone respectively. It is therefore essential that there are no loud noises, e.g. music, in the immediate vicinity of the telephone, as this will disrupt the hands free function.
18

USING THE TELEPHONE
Receiving a Call
When an incoming call is received, the telephone rings. If the caller can be identified (due to subscription to a Caller Display service), the caller’s telephone number will be displayed. The caller’s name will also be displayed provided that the number and name stored are in the phone book. If the VOICE setting is ON and the caller can be identified and a voice recording is associated with the incoming call, the voice recording will be heard three times, followed by the ringer as standard. (Refer to Phonebook chapter, Create a Phonebook Entry to find out more about voice recording)
Lift the handset and speak
To end the call simply replace the handset in the cradle
Receiving a call – Hands Free
Press  to speak hands free
To end the call press 
Last Number Redial
Lift the handset or press  for hands free use
Press  to redial the last number dialled.
19
USING THE TELEPHONE
Mute Function
If you wish, you can speak privately to someone else in the room without your caller overhearing. You will still be able to hear the caller but they cannot hear you during the mute operation.
To switch on the mute mode during a call just press and hold 
button. Your caller will not be able to hear you anymore. Release  to resume the conversation with your caller.
Handset Volume Setting
During a call, the handset volume can be adjusted using the control
knob  on the front . Then it can be increased using the button
Note: Setting the receiver volume to maximum may under certain circumstances, cause ear damage. Therefore, it is recommend that you adjust the volume .
Speaker Volume Setting
During a call in handsfree mode, you can adjust the speaker volume to a desirable level. Simply use the slide control located on the left side of the CL330 unit
Tone Control Setting
During a call, in handsfree mode, you can adjust the tone to a desirable level. Simply use the slide control located on the front of the CL330 unit
Note: Tone adjustment is not possible when the receiver volume is set to its minimum level, and if the amplify button (5) is not ON ( Led lit)
20

USING THE TELEPHONE
Call Timer
Your handset automatically times the duration of every external call. The time is shown during the call and for a few seconds after the call has ended.
Hearing Aid Use
This telephone is hearing aid compatible. Select the T mode on your hearing aid to enable this feature.
Headset Use
A headset can be connected at the rear side of the base ( jack 2.5mm)
Press the  button then dial your number , the volume and tone can be adjusted like described P20.
At the end of the call press again the  button to release the line
21
 Loading...