


CL100
EASY-DIAL PHONE WITH VOLUME AND TONE ADJUSTMENT TELEPHONE MULTIFONCTIONS A GRANDES TOUCHES
User guide / Notice d’utilisation
E
CAUTION:THIS TELEPHONE PRODUCT IS SPECIFICALLY DESIGNED FOR PEOPLE WITH HEARING DIFFICULTIES AND IS PROVIDED WITH A HANDSET EARPIECE VOLUME CONTROL FOR INDIVIDUAL REQUIREMENTS. DUE CARE MUST BE TAKEN BY ALL USERS THAT THE HANDSET EARPIECE VOLUME CONTROL IS SET TO THE LOWEST LEVEL ACCEPTABLE BY EACH RESPECTIVE USER. CARE SHOULD THEREFORE BE EXERCISED TO ENSURE THAT ANY NAIVE USERS ARE ARE FAMILIAR WITH THIS REQUIREMENT.
F
ATTENTION: CE TELEPHONE PEUT ETRE DESTINE AUX PERSONNES AYANT DES PROBLEMES D’AUDITION. IL POSSEDE UN ECOUTEUR A VOLUME VARIABLE. A LA PREMIERE UTILISATION, ASSUREZ VOUS QUE LE BOUTON DE REGLAGE DU VOLUME SOIT POSITIONNE SUR LA POSITION VOLUME MINIMUM. LES PERSONNES MALENTENDANTES POURRONT PAR LA SUITE AUGMENTER LE VOLUME POUR L’ADAPTER A LEUR AUDITION.
e
n
o
h
p
e
l
e
T

E |
INDEX |
|
Description |
4 |
|
Setting up |
|
|
|
- Connecting the telephone |
6 |
|
- Ringer settings |
7 |
|
- Pulse/Tone switch |
8 |
|
- Time breack recall switch |
8 |
|
- Wall mounting |
8 |
Using the phone |
|
|
|
- Answering incoming call |
9 |
|
- Volume and tone receiving |
|
|
adjustment |
9 |
|
- Making a call |
11 |
|
- Sending volume adjustment |
11 |
|
- Last number redial |
12 |
|
- Recall, * & # buttons |
12 |
|
- Mute button |
12 |
|
- Storing telephone numbers |
13 |
|
- Dialling stored number |
14 |
Guarantee |
15 |
|
2

F |
SOMMAIRE |
|
Description |
16 |
|
Installation |
|
|
|
- Raccordements |
18 |
|
- Sonnerie |
19 |
|
- Fréquence décimale/vocale |
|
|
(Interrupteur Pulse/Tone) |
20 |
|
- Interrupteur 300ms / 100ms |
20 |
|
- Position murale |
20 |
Utilisation |
|
|
|
- Recevoir un appel |
21 |
|
- Réglage du volume et de la tonalité |
|
|
de réception |
21 |
|
- Appeler |
23 |
|
- Réglage du volume d’émission |
23 |
|
- Rappel du dernier numéro |
24 |
|
- Touches R, * & # |
24 |
|
- Fonction secret |
24 |
|
- Mémoriser un numéro de téléphone 25 |
|
|
- Appel d’un numéro en mémoire |
26 |
Garantie |
27 |
|
3
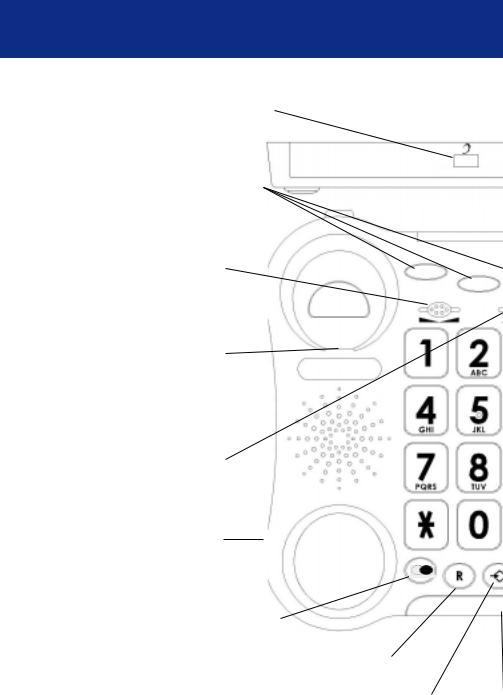
DESCRIPTION
Tone and volume adjustment automatically activated each time you hang-up the phone
OFF ON
3 emergency |
|
numbers |
|
Tone reception |
|
adjustment |
TONE |
Clip for wall mounting |
|
Volume reception adjustment
Handset cord socket
Last number redial
Time break recall button
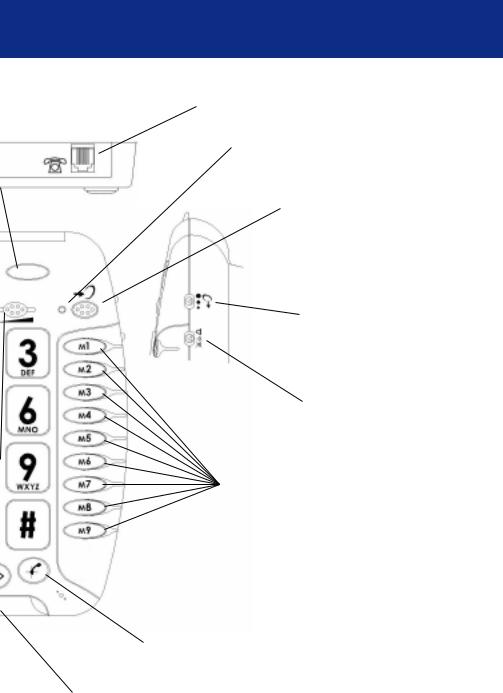
Memory storing key
4
Line socket
Red light for tone and volume activation
Key to activate tone and volume adjustment function
VOLUME
Sending volume adjustment
Ring level adjustment
Direct memory buttons
Mute button
Flashing incoming ring indicator
5
SETTING UP
Line cord |
|
Wall mounting |
|
|
screw holes |
||
PTT Plug (*) |
|
||
2 |
Tone/Pulse |
||
|
|||
|
|
switch |
|
|
|
Time break |
|
3 |
|
recall switch |
|
|
(E=100ms) |
(*) Classified TNV-3 according to EN60950 standard.
index card
Battery |
Handset cord |
compartment (*) |
1
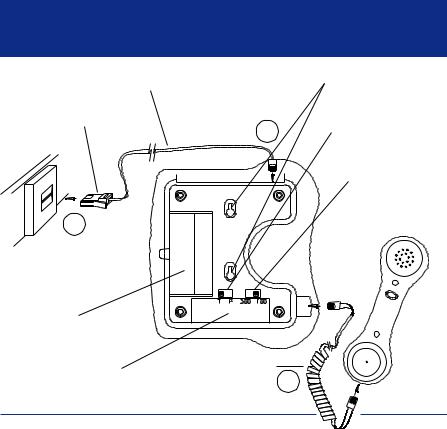
1 - CONNECTING TELEPHONE
1 - Connect the handset cord.
2 - Open the battery compartment by unscrewing the retaining screw and pulling back the latch.
3 - Insert correctly 4 x AAA 1.5V alkaline battery (not supplied) in the battery compartment (*). Batteries are required if you wish to increase the ring level of 10 dB.
4 - Snap the battery door back in place and replace the retaining screw.
5 - Connect the line cord.
6

SETTING UP
6 - Connect the PTT plug in the wall socket.
2 - RINGER SETTINGS
A switch located on right side allows the ringer to be switched HI,LOW,OFF:
 : Off,
  : Low,
  : Hi
: Hi
Your phone comes with the ringer switched to
«High» and the melody set to «6»:
|
Low |
Mid |
High |
Melody 1 |
1 |
2 |
3 |
Melody 2 |
4 |
5 |
6(by default) |
Melody 3 |
7 |
8 |
9 |
If you don’t like the ringer melody,you can choose a new one by changing the settings as follow:
-Lift the handset.
-Press  button.
-Press # button.
-Press any button 1 to 9.
Ringer will be activated on next call.
Note: The ring level will be increased of 10 dB if you insert batteries into the battery compartment.
7

SETTING UP
3 - TONE/PULSE SWITCH (T/P)
The Tone/Pulse switch is factory pre-set to Tone position.In the UK,all telephone exchanges now use Tone dialing.If your phone does not dial out it is probably being used from an older private switch board (PBX).In this case,the Tone/Pulse switch must be moved to Pulse.
4 -TIME BREAK RECALL SWITCH (300/100)
For UK, the TBR switch is factory pre-set to 100ms. It can be switched to 300ms for other locations or
PBX’s.
5 - WALL MOUNTING
To wall-mount your telephone,slide out the clip turn around and slide back into the wall mounting position (located in the base unit, just below the ear piece).This will ensure that the handset stays firmly in position.Make 2 holes in the wall 80mm apart, insert the wall plugs and the wall mounting screws.
8

USING THE PHONE
The screws should protrude from wall by 6-7 mm. Place the phone onto the screw-heads and slide down to secure.
If you are using this telephone with a hearing aid, set your hearing aid to the “T” setting.
1 - ANSWERING INCOMING CALL
-When an incoming call is received the phone will ring and flash,to answer the call lift the handset and speak.
-On completion of the call, carefully replace the handset in the cradle to release the line.
2-VOLUME AND TONE RECEIVING ADJUSTMENT
You can increase the volume and adjust the receiving tone according to your own hearing requirements.
9
 Loading...