

Page 1

Technical
Publications
Direction 5137113-100
Rev. 3
LOGIQ P5/A5/A5Pro
GE Healthcare
0459
Quick Guide
Copyright© 2008 By General Electric Co.
Operating Documentation
Page 2

Regulatory Requirement
This product complies with regulatory requirements of the following European Directive 93/42/EEC concerning medical devices.
0459
This manual is a reference for the LOGIQ P5/A5/A5Pro. It applies to all versions of the R 3.0.x software for the LOGIQ P5/A5/A5Pro ultrasound
system.
GE Healthcare
GE Healthcare: Telex 3797371
P. O. Box 414, Milwaukee, Wisconsin 53201 U.S.A.
(Asia, Pacific, Latin America, North America)
GE Ultraschall TEL: 49 212.28.02.207
Deutschland GmbH & Co. KG FAX: 49 212.28.02.431
Beethovenstraße 239
Postfach 11 05 60
D-42655 Solingen GERMANY
Page 3

LOGIQ P5/A5/A5Pro Quick Guide Direction 5137113-100 Rev. 3 A
Revision History
REV
1
2
3
PAGE REVISION
NUMBER HISTORY
Title Rev. 3
A and B Rev. 3
1-52 Rev. 3
DATE
April 18 2007
May 22 2008
Dec 10 2008
List of Effective Page
REASON FOR CHANGE
Initial Release
BT07 SW Release
BT09 SW Release
Please verify that you are using the latest revision of this document. Information pertaining to this document is maintained on GPC (GE Medical
Systems Global Product Configuration). If you need to know the latest revision, contact your distributor, local GE Sales Representative or in the
USA call the GE Ultrasound Clinical Answer Center at 1-800-682-5327 or 262-524-5698.
Page 4

LOGIQ P5/A5/A5Pro Quick Guide Direction 5137113-100 Rev. 3 B
CAUTION
FOR USA ONLY
“United Sates law restricts this device to sale or use by or on the order of a physician” if sold in the United States.
Page 5
LOGIQ P5/A5/A5Pro Quick Guide Direction 5137113-100 Rev. 3 1
System Power
Power On
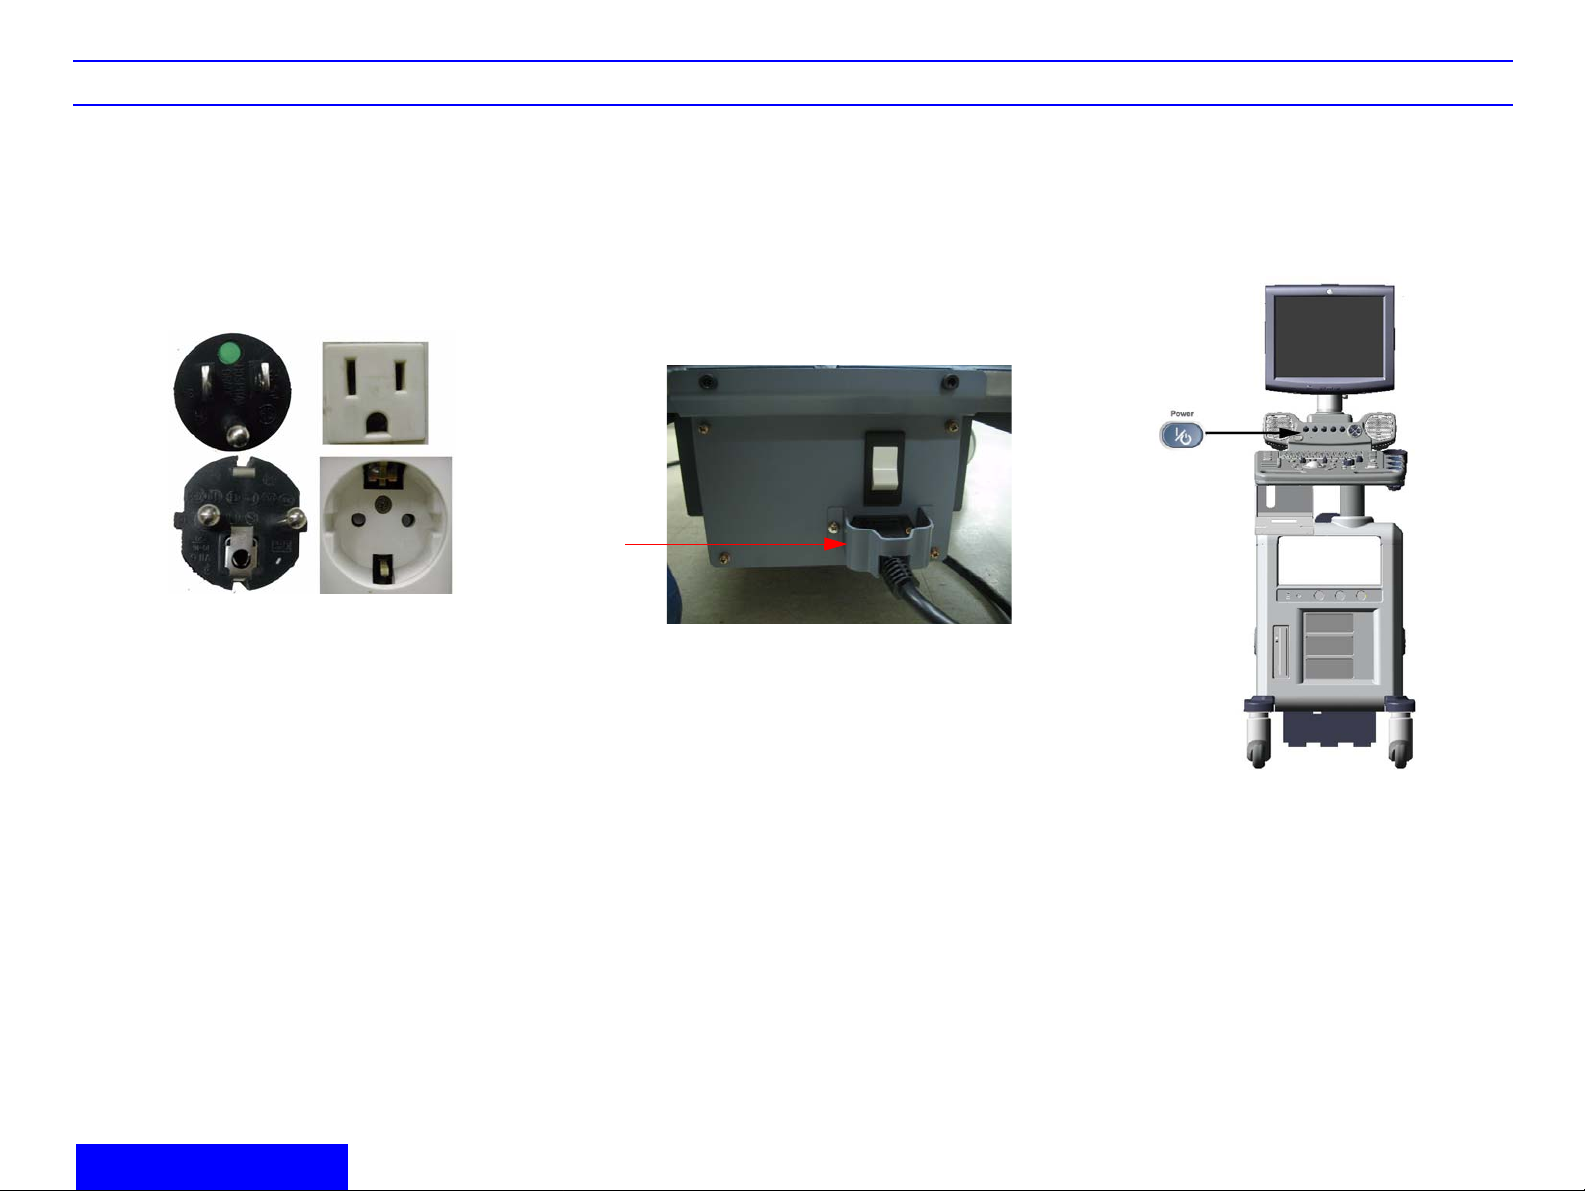
To connect the system to the electrical supply:
1. Ensure that the wall outlet is of the appropriate
type.
1)
2)
Figure 1-1. Example Plug and Outlet
Configurations
1. 100-120 VAC, 950VA
Plug and Outlet Configuration(USA)
2. 220-240 VAC, 950VA
Plug and Outlet Configuration (Europe)
2. Ensure that the power switch is turned off.
3. Unwrap the power cable. Make sure to allow
sufficient slack in the cable so that the plug is
not pulled out of the wall if the system is moved
slightly.
4. Attach the power plug to the system and secure
it in place by using the retaining clamp.
a.
a
Figure 1-2. Power Plug
a. Retaining clamp for power plug
CAUTION: Ensure that the retaining clamp for the
power plug is fixed firmly.
Use caution to ensure that the power cable does
not disconnect during system use. If the system is
accidentally unplugged, data may be lost.
Press the Power switch to turn the power on. The
circuit breaker must also be in the on position.
Figure 1-3. Power On Switch Location
Preparing for an Exam
Page 6
LOGIQ P5/A5/A5Pro Quick Guide Direction 5137113-100 Rev. 3 2
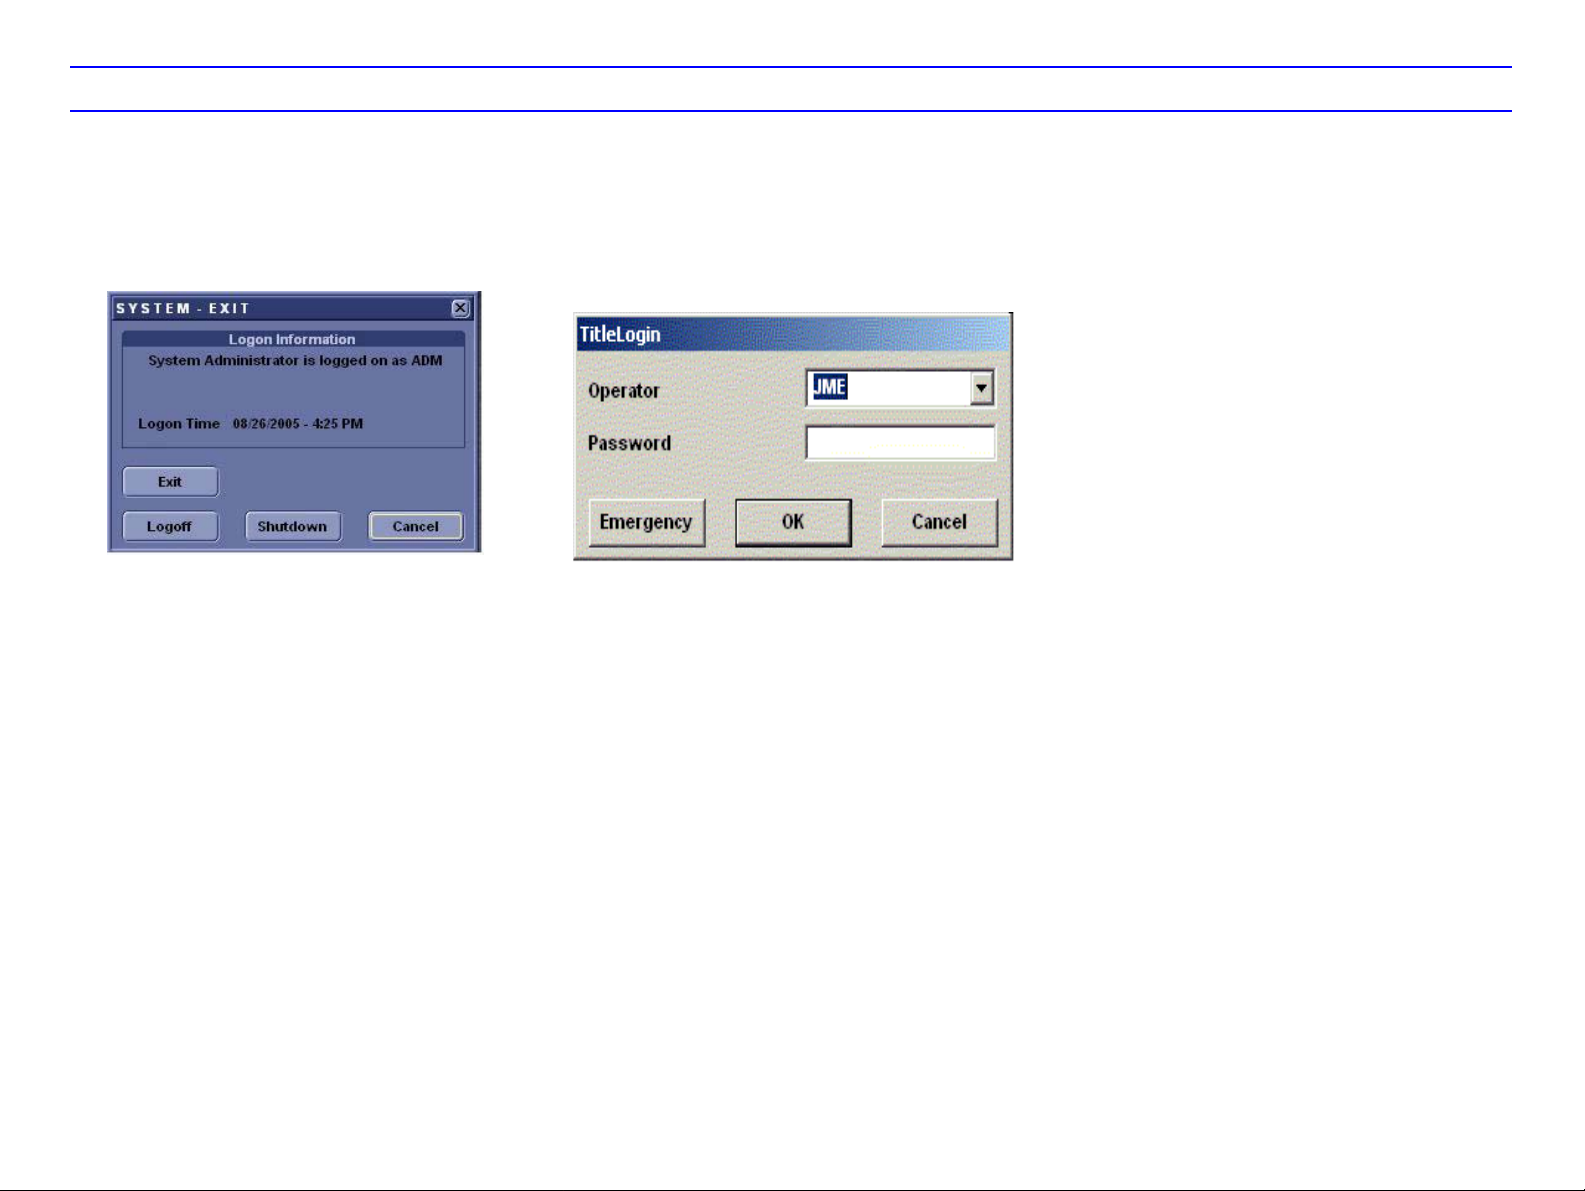
Power Off
To power down the system:
1. Press the Power On switch at the front of the
system once.
2. The System-Exit window is displayed.
3. Using the Trackball, select Shutdown.
The shutdown process takes a few seconds
and is completed when the control panel
illumination is power switch is turned off.
4. Disconnect the probes.
Clean or disinfect all probes as necessary.
Store them in their shipping cases to avoid
damage.
Starting an Exam
You need to select a pre-configured dataflow that
sets up the ultrasound system to work according to
the services associated to the dataflow.
1. Select your Operator Login and type in your
Password:
2. Press Log on.
3. Fill in the New Patient menu as described on
Page 3.
OR,
If the patient name is on the patient record list,
1. Trackball to the patient’s name to highlight the
name, (or perform a search to locate the
patient) then press Select Patient.
Page 7
LOGIQ P5/A5/A5Pro Quick Guide Direction 5137113-100 Rev. 3 3
Starting an Exam
New Patient
To start a new patient’s exam,
1. Press Patient. Press the New Patient button on the
Patient menu.
2. Select the Exam Category.
3. Type the Patient ID, Patient Name, Birthdate, etc.
4. Press the Register button on the Patient menu (DO
NOT press Register if you are automatically
generating a patient ID).
5. Press Scan, B-Mode, Esc, or Exit. Select the probe .
Probe Selection
Select a probe (the system automatically selects the lastused application for this probe).
NOTE: You can preset a probe per application or an
application per probe via Utility.
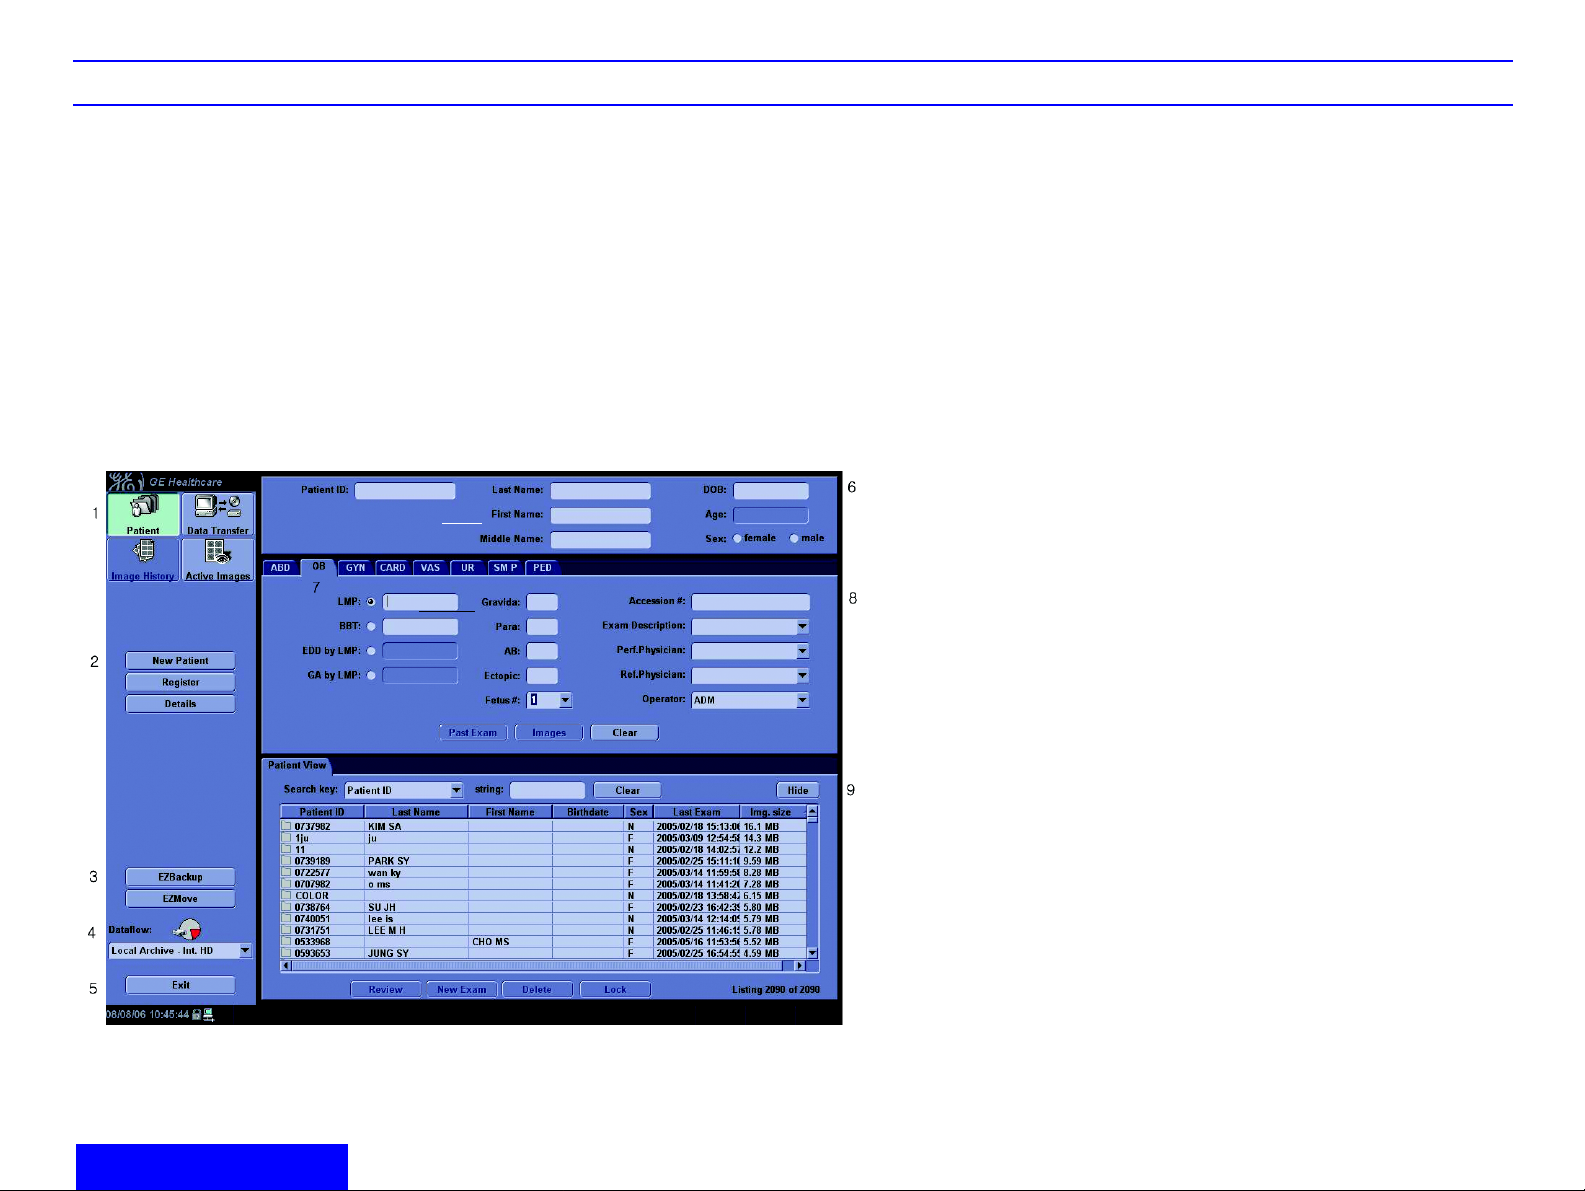
Patient Entry Menu (Refer to Illustration)
Image Management Window [1]
Access to this patient’s exam history and image
management features.
Function Selection Window [2]
Worklist displays a Worklist screen. New Patient is used
to clear the patient entry screen to input a new patient’s
data into the database. Register is used to enter new
patient information into the database prior to performing
the actual exam. Details displays exam details and
additional patient information.
EZ Backup/EZMove [3]
One-step method to backup (move and delete patient
images) to an external media.
Dataflow [4]
Selects this exam’s dataflow preference.
Exit [5]
Exits the Patient Menu and returns to scanning.
Patient Information [6]
Patient ID, Name, Birthdate, Age, and Sex.
Category Selection and Exam Information [7&8]
Select the appropriate category and enter the exam
information.
Patient View and Exam View [9]
Patient View lists the patients in the database. “Search
Key” enables searching list by Patient ID, Last Name,
First Name, Birthdate, Sex and Last Exam date. “Search
key” and “string” fields help define the search parameters.
Exam View lists the exams of the selected patient. Select
the patient or the exam in Patient View and press “Exam
View” or “Review“.
Preparing for an Exam
Page 8

LOGIQ P5/A5/A5Pro Quick Guide Direction 5137113-100 Rev. 3 4
LOGIQ P5/A5/A5Pro Control Panel Tour
1. Record. Press to activate recording devices
2. Audio On/Off and Volume
3. TGC. Move slide pots left/right to adjust TGC.
4. Reverse. Press to invert the image left/right
5. Additional Feature Keys
6. Keyboard : Use the keyboard to enter patient
information and annotations.
7. Mode Keys : M Mode, Continuous W ave (CW)
and Pulsed Wave Doppler (PW) Modes, Power
Doppler Image Mode (PDI), Color Flow (CF)
Mode, B Mode, and B Flow. CW, PW, PDI, CF
keys are for LOGIQ P5 only.
8. Imaging/Measurement Keys : Clear, Comment,
Body Pattern, Ellipse, Measure, Zoom, M/D,
Cursor, Scan Area, Set. Press or rotate these
keys, as necessary.
9. Depth : Rotate to adjust the Depth.
10. Imaging Feature Keys : Auto Optimize On/Off,
THI, Multi Image Left/Right Select.
11. Print Keys : Press P Keys to archive print or
send the image.
12. Probe and Cord Holder
13. Gel Holder
14. Patient: Enter Patient screen
15. Reports: Activates default report and
Measurement Selection Menu of report
choices.
16. End Exam: Activates Image Management and
Touch Panel with end of exam options.
17. User Assigned Utility keys: Activates the
configuration system.
18. Probe/Preset keys: Select the application to
use and Probe select.
19. Mode Paramenters: To toggle between the
Primary menus of different modes
20. Top menu Controls : Activates the changes of
functions in the Top menu.
21. Sub menu controls: Activates Sub Menu for
Modes and toggles/changes functions.
22. Gain Key
23. Utility key
24. Freeze key: Press Freeze to freeze the image.
Preparing for an Exam
Page 9
LOGIQ P5/A5/A5Pro Quick Guide Direction 5137113-100 Rev. 3 5
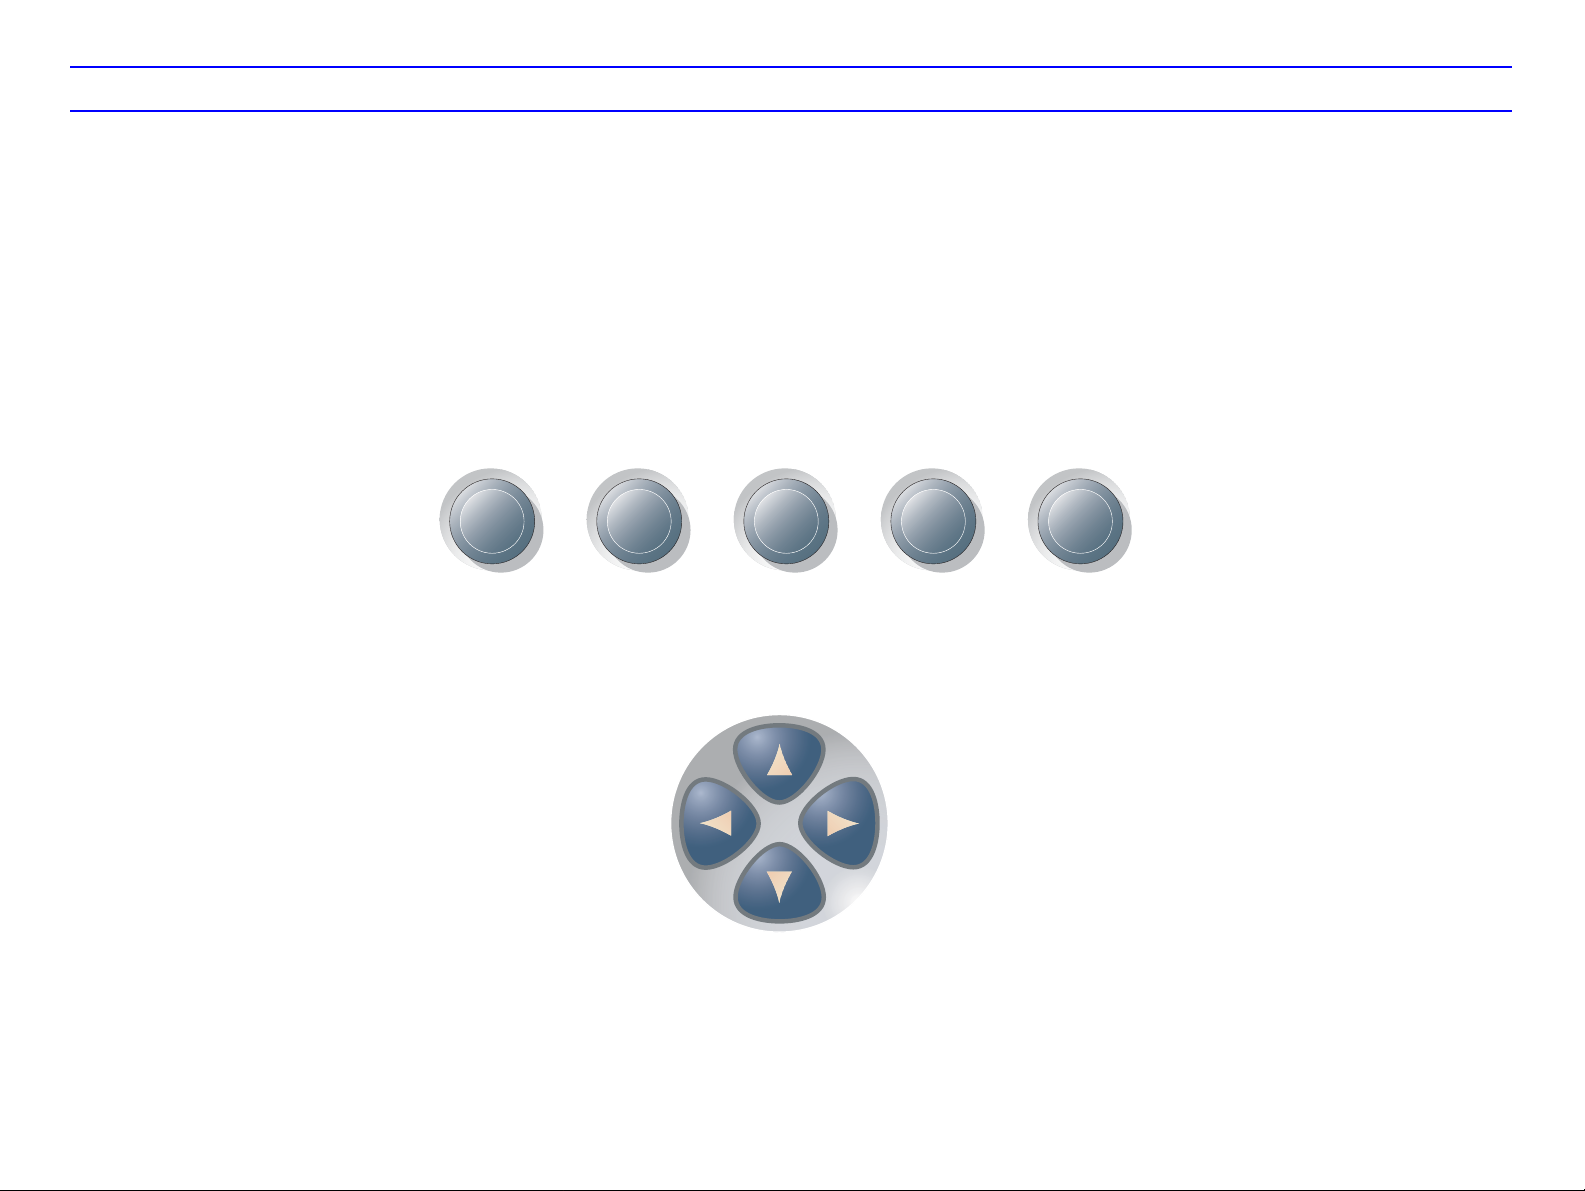
LOGIQ P5/A5/A5Pro Top and Sub Menu Controls
In general, Top Menu Controls are of two types,
they are Push & Turn Knobs, Sub Menu is of
Paddle Switch type
1. The Paddle Switch is used to select Sub Menu
Controls.
2. The Push is used to select Top Menu Controls
3. The Rotate is used to turn on/off or change the
parameter selected through Top Menu
Controls.
1
Sub Menu key functions :
1. Up.
2. Increase Value/Next Page
3. Decrease Value/Previous Page
4. Down
2
Top Menu Controls
3
1
4
5
23
4
Page 10
LOGIQ P5/A5/A5Pro Quick Guide Direction 5137113-100 Rev. 3 6
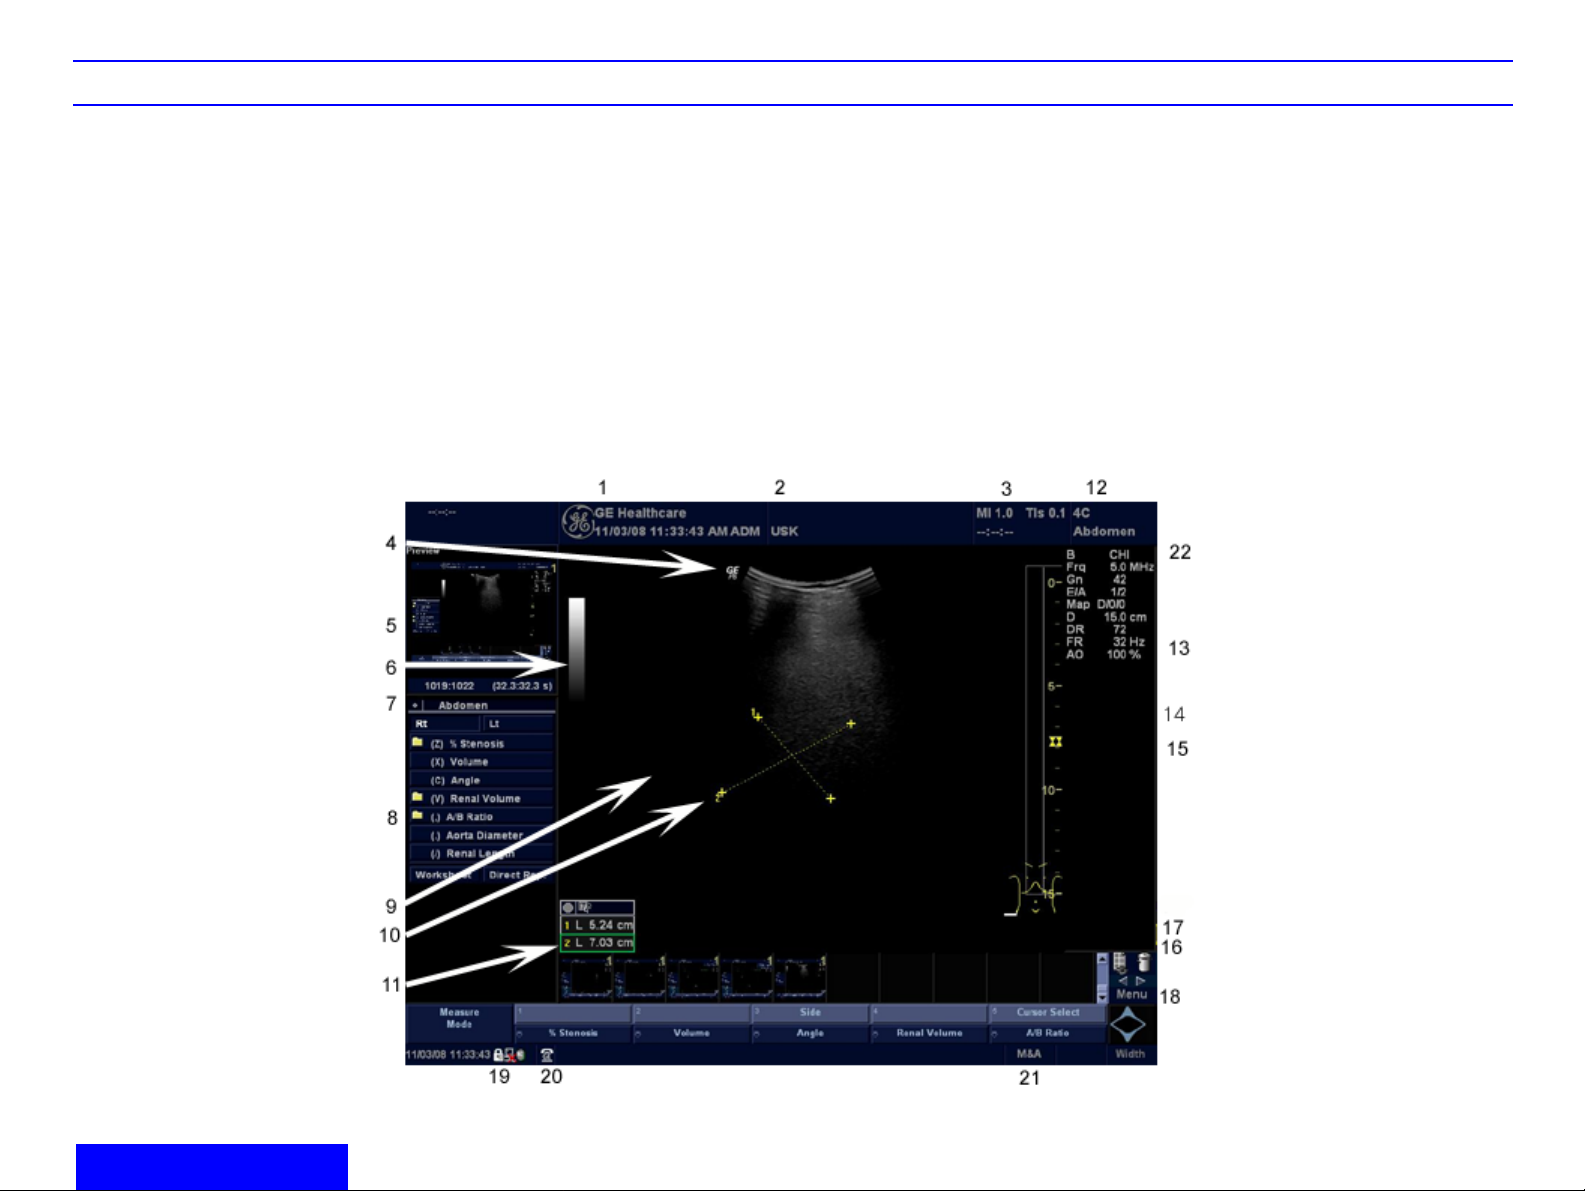
LOGIQ P5/A5/A5Pro Monitor Display Tour
1. Institution/Hospital Name, Date, Time, Operator
Identification.
2. Patient Name, Patient Identification.
3. Acoustic Output Readout, System status (realtime or frozen)
4. GE Symbol: Probe Orientation Marker.
Coincides with a probe orientation marking on
the probe.
5. Image Preview.
6. Gray/Color Bar.
7. Cine Gauge.
8. Measurement Summary Window.
9. Image.
10. Measurement.
11. Results Window.
12. Probe Identifier. Exam Study.
13. Imaging Parameters by Mode (current mode
highlighted).
14. Focus Marker.
15. TGC (not shown on the image).
16. Body Pattern.
17. Depth Scale.
18. Image Management Menu: Menu, Delete, and
Image Manager.
19. Caps Lock: On or Off.
20. iLinq icon, and system messages display.(not
shown on the image.
21. Trackball Functionality Status: Scroll,
M&A (Measurement and Analysis), Position,
Size, Scan Area Width and Tilt.
22. Sub menu
Preparing for an Exam
Page 11

LOGIQ P5/A5/A5Pro Quick Guide Direction 5137113-100 Rev. 3 7
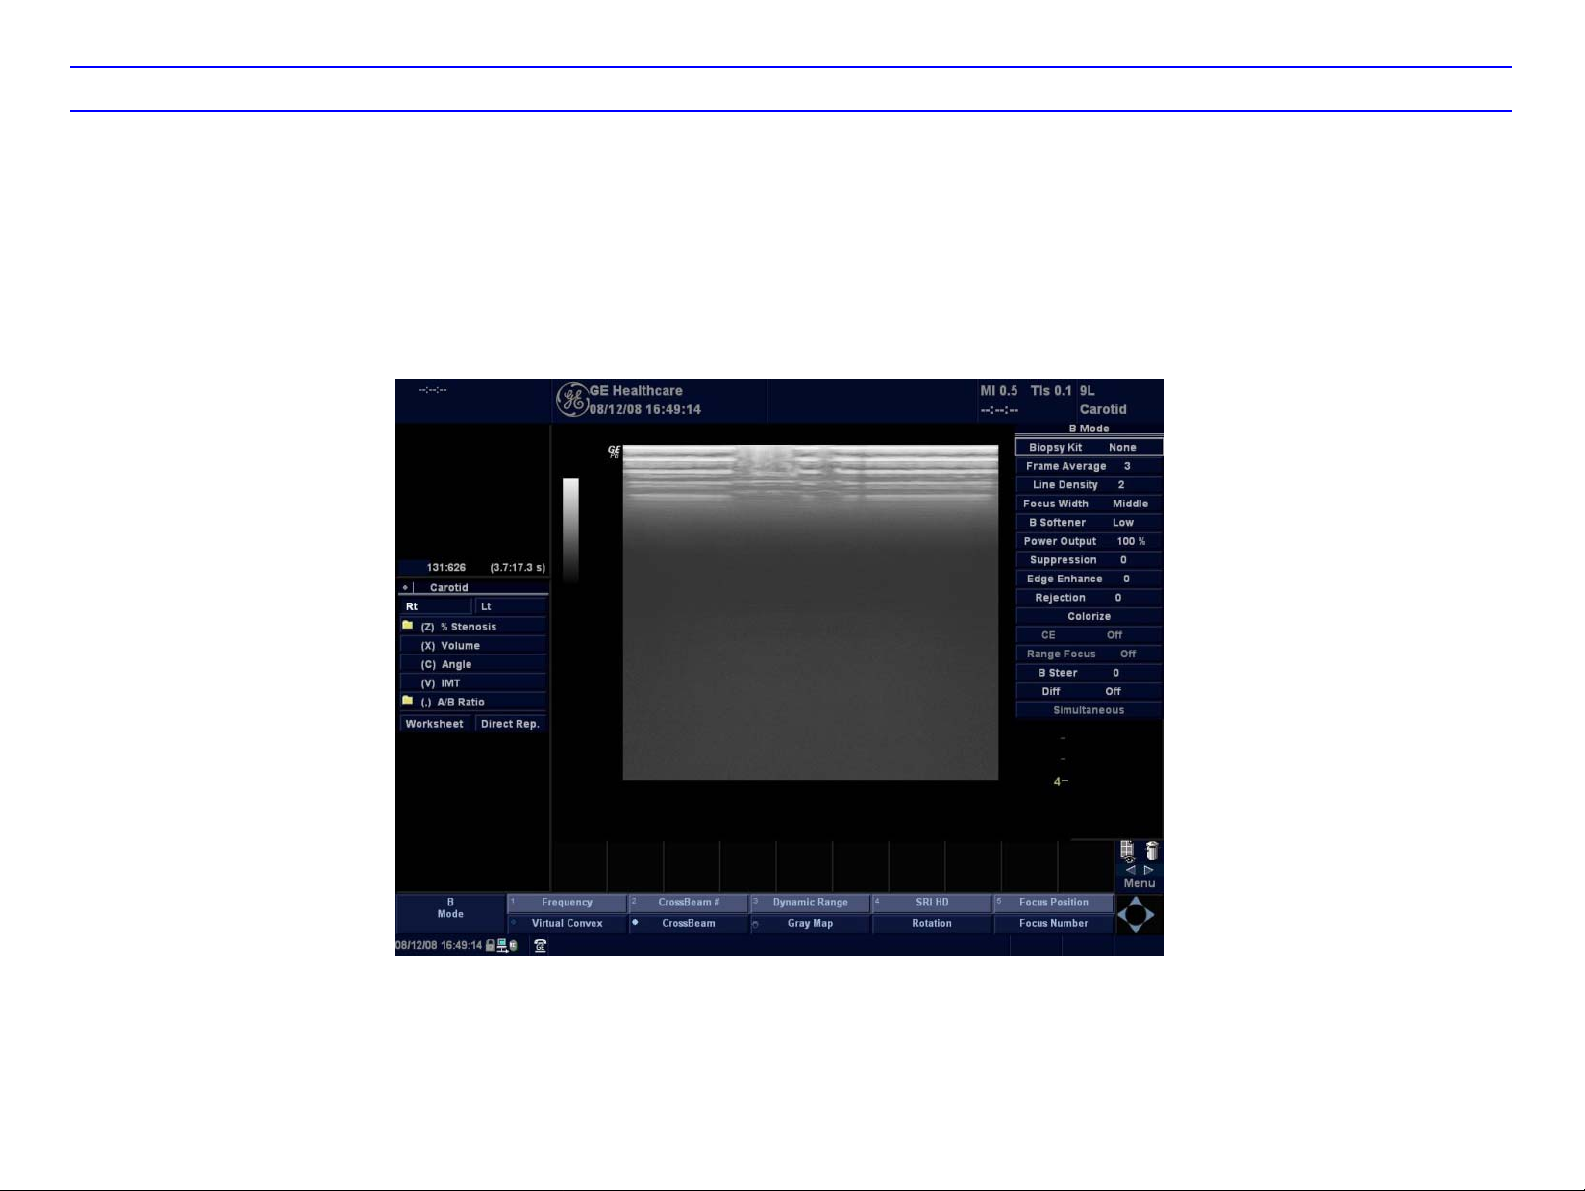
B/M Mode Image Optimize
Power Output
Optimizes image quality and allows user to reduce
beam intensity. 10% increments between 0-100%.
Values greater than 0.1 are displayed.
Dynamic Range
Dynamic Range controls how echo intensities are
converted to shades of gray, thereby increasing the
adjustable range of contrast.
Focus Number and Position
Increases the number of transmit focal zones or
moves the focal zone(s) so that you can tighten up
the beam for a specific area. A graphic caret
corresponding to the focal zone position(s) appears
on the right edge of the image.
NOTE: Push key to toggle between Focus Number
and Focus Position.
Rejection
Frame Average
Temporal filter that averages frames together. This
has the effect of presenting a smoother, softer
image.
Colorize
Enables gray scale image colorization. To
deactivate, reselect a Gray Map.
Gray Map
Determines how the echo intensity levels received
are presented as shades of gray.
Rotation (Up/Down)
Rotates the image by selecting the value from the
pop up menu.
Frequency
Multi Frequency mode lets you downshift to the
probe's next lower frequency or shift up to a higher
frequency.
B Mode Control Panel Controls
Auto Optimize
Automatic Tis sue Optimi zatio n optimizes the image
based upon a specified Region of Interest (ROI) or
anatomy within the display.
Zoom
Magnifies a zoom region of interest, which is
magnified to approximately the size of a full-sized
image. An un-zoomed reference image is displayed
adjacent to the zoom window . The system adjusts
all imaging parameters accordingly. Press Zoom
key to activate. Press right zoom key again to
deactivate. Use the Trackball to position the Zoom
ROI.
Reverse
Flips the image left/right.
Selects a level below which echoes will not be
amplified (an echo must have a certain minimum
amplitude before it will be processed).
Edge Enhance
Edge Enhance brings out subtle tissue differences
and boundaries by enhancing the gray scale
differences corresponding to the edges of
structures. Adjustments to M Mode's edge
enhancement affects the M Mode only.
Preparing for an Exam
Frame Rate/Resolution
Optimizes B Mode frame rate or spatial resolution
for the best possible image.
Anatomical M Mode
Allows you to move the M Mode trace in order to
Image difficult -to - reach anatomy.
Sweep Speed
Changes the speed at which the time line is swept.
Page 12
LOGIQ P5/A5/A5Pro Quick Guide Direction 5137113-100 Rev. 3 8
B/M Mode Image Optimize (continued)
B/M Mode Scanning Hints
Auto Optimize. Improves imaging performance
while reducing optimization time.
Frequency. Changes system parameters to best
optimize for a particular patient type.
Maps. There is an inter-dependency between gray
maps, gain, and dynamic range. If you change a
map, revisit gain and dynamic range settings.
Dynamic Range. Affects the amount of gray scale
information displayed. If you increase the gain, you
may want to decrease the dynamic range.
Edge Enhance. Better delineates the amount of
border crispness.
Frame Average. Smooths the image by averaging
frames. Affects the amount of speckle reduction.
B Mode Top Menu and Sub Menu 1
Page 13

LOGIQ P5/A5/A5Pro Quick Guide Direction 5137113-100 Rev. 3 9
Color Flow/Doppler Image Optimize
Baseline
Adjusts the baseline to accommodate faster or
slower blood flows to eliminate aliasing.
PRF/Wall Filter
Velocity scale determines pulse repetition
frequency. If the sample volume gate range
exceeds single gate PRF capability, the system
automatically switches to high PRF mode. Multiple
gates appear , and HPRF is ind icated on the d isplay.
Wall Filter insulates the Doppler signal from
excessive noise caused from vessel movement.
NOTE: Push key to toggle between PRF and Wall
Filter.
Angle Correct
Estimates the flow velocity in a direction at an angle
to the Doppler vector by computing the angle
between the Doppler vector and the flow to be
measured.
Auto Angle
Adjuste the angle to the direction of the Flow.
Angle Steer
Slants the Color Flow region of interest or the
Dopple M Line to obtain a better doppler angle.
Doppler Display Formats
Display layout can be preset to have B-Mode and
Time-motion side-by-side or over-under.
Sample Volume Gate Length
Sizes the sample volume gate.
Map
Allows a specific color map to be selected. After a
selection has been made, the color bar displays the
resultant map.
Packet Size
Controls the number of samples gathered for a
single color flow vector.
Invert
Allows blood flow to be viewed from a different
perspective, i.e. red away (negative velocities) and
blue toward (positive velocities). The real-time or
frozen image can be inverted.
Color Flow Control Panel Control
Scan Area
Toggles between the CFM window size and
position.
Controls in Common with B Mode
For more information on Focal Zone, Power Output,
FR/RES, Frame Averaging, Dynamic Range, Map,
and Colorize, refer to the B/M Mode Image
Optimize section in this Quick Guide on Page 6.
Scanning Hints
Line Density. Trades frame rate for sensitivity and
spatial resolution. If the frame rate is too slow,
reduce the size of the region of interest, select a
different line density setting, or reduce the packet
size.
Wall Filter. Affects low flow sensitivity versus
motion artifact.
To improve sensitivity.
1. Increase the Gain.
2. Decrease the PRF.
3. Increase the Power Output.
4. Adjust the Line Density.
5. Decrease the Wall Filter.
6. Increase Frame Averaging.
7. Increase the Packet Size.
8. Reduce the ROI to the smallest reasonable
size.
9. Position the Focal Zones properly.
To decrease motion artifact,
1. Increase the PRF.
2. Increase the Wall Filter.
Threshold
Threshold assigns the gray scale level at which
color information stops.
Preparing for an Exam
To eliminate aliasing,
1. Increase the PRF.
2. Lower the Baseline.
Page 14

LOGIQ P5/A5/A5Pro Quick Guide Direction 5137113-100 Rev. 3 10
Color Flow/Doppler Image Optimize (continued)
For venous imaging,
1. Ensure that you have selected the small parts
exam category.
2. Select a venous application.
3. Select the appropriate probe for very superficial
structure.
4. Select two focal zones.
5. Adjust the depth to the anatomy to be imaged.
6. Maintain a low gain setting for gray scale.
7. Activate Color Flow.
8. Maintain the PRF at a lower setting.
9. Increase Frame Averaging for more
persistence.
CFM Mode Top and Sub Menu
PWD Mode Top and Sub Menu
Page 15

LOGIQ P5/A5/A5Pro Quick Guide Direction 5137113-100 Rev. 3 11
Basic Measurements
NOTE: The following instructions assume that you
first scan the patient and then press Freeze.
Distance and Tissue Depth Measurements
1. Press Measure once; an active caliper
displays.
2. To position the active caliper at the start point
(distance) or the most anterior point (tissue
depth), move the Trackball.
3. To fix the start point, press Set. The system
fixes the first caliper and displays a second
active caliper.
4. To position the second active caliper at the end
point (distance) or the most posterior point
(tissue depth), move the Trackball.
5. To complete the measurement, press Set. The
system displays the distance or tissue depth
value in the measurement results window.
NOTE: Before you complete a measurement:
To toggle between active calipers, press
Measure.
T o erase the second caliper and the current
data measured and start the measurement
again, press Clear once.
NOTE: After you complete the measurement, to
erase all data that has been measured to this point,
but not data entered onto worksheets, press Clear.
Circumference/Area (Ellipse) Measurement
1. Press Measure once; an active caliper
displays.
2. To position the active caliper, move the
Trackball.
3. To fix the start point, press Set. The system
fixes the first caliper and displays a second
active caliper.
4. To position the second caliper, move the
Trackball.
5. Turn the Ellipse control; an ellipse with an
initial circle shape appears.
NOTE: Be careful not to press the Ellipse control
as this activates the Body Pattern.
6. To position the ellipse and to size the measured
axes (move the calipers), move the Trackball.
7. To increase the size, Turn the Ellipse control in
a clockwise direction. T o decrease the size, turn
the Ellipse control in a counterclockwise
direction.
8. To toggle between active calipers, press
Measure.
9. To complete the measurement, press Set. The
system displays the circumference and area in
the measurement results window.
NOTE: Before you complete a measurement:
To erase the ellipse and the current data
measured, press Clear once. The original
caliper is displayed to restart the
measurement.
To exit the measurement function without
completing the measurement, press Clear
a second time.
Circumference/Area (Trace) Measurement
1. Press Measure twice; a trace caliper displays.
2. To position the trace caliper at the start point,
move the Trackball.
3. To fix the trace start point, press Set. The trace
caliper changes to an active caliper.
4. To trace the measurement area, move the
Trackball around the anatomy. A dotted line
shows the traced area.
NOTE: To erase the dotted line but not the trace
caliper, press Clear once. To clear the trace caliper
and the current data measured, press Clear twice.
NOTE: To erase the line (bit by bit) back from its
current point, move the Trackball or turn the
Ellipse control counterclockwise.
5. To complete the measurement, press Set. The
system displays the circumference and the area
in the measurement results window.
NOTE: Before you complete a measurement:
To erase the line (bit by bit) back from its
current point, move the T rackball or turn the
Ellipse control counterclockwise.
To erase the dotted line but not the trace
caliper, press Clear once.
To clear the trace caliper and the current
data measured, press Clear twice.
Preparing for an Exam
Page 16

LOGIQ P5/A5/A5Pro Quick Guide Direction 5137113-100 Rev. 3 12
Volume
1. To make a volume calculation, do one of the
following:
• Make one distance measurement.
• Make two distance measurements.
• Make three distance measurements.
NOTE: Three distances should be done in the
dual format mode (side by side images). One
measurement is usually made in the sagittal
plane and two measurements in the axial pla ne.
• Make one distance and one ellipse
measurement.
• Make one ellipse measurement.
2. Select Volume.
Time Interval Measurement
1. Press Measure twice; and active caliper with a
vertical dotted line displays.
2. To position the active caliper at the start point,
move the Trackball.
3. To fix the start point, press Set. The system
fixes the first caliper and displays a second
active caliper.
4. To position the second caliper at the end point,
move the Trackball.
5. To complete the measurement, press Set. The
system displays the time interval betwee n th e
two calipers in the measurement results
window.
Velocity Measurement
1. Press Measure; an active calip er with a vertical
dotted line displays.
2. To position the caliper at the desired
measurement point, move the Trackball.
3. To complete the measurement, press Set. The
system displays the velocity measurement in
the measurement results window.
PI, RI, S/D Ratio, D/S Ratio or A/B Ratio
Select PI, RI, S/D Ratio, A/B Ratio or D/S Ratio
from the Doppler Primary & Secondary Controls.
Perform velocity measurements.
1. The first caliper is the start point on the Doppler
waveform. This would be V
velocity for RI, systole for S/D ratio, “A” velocity
for A/B ratio or diastole for D/S ratio.
2. The second caliper is the end-point caliper to
the end point of the Doppler waveform. This
would be V
diastole for S/D ratio, “B” velocity for A/B ratio
or systole for D/S ratio.
NOTE: For the PI calculation, if Trace Auto is not
selected, manually trace the waveform between
V
and Vd.
MAX
NOTE: For the PI calculation, if Trace Auto is on,
the system automatically traces the waveform when
Set is pressed to fix V
for PI, minimum velocity for RI,
d
.
d
for PI, peak
MAX
Worksheets
Measurement/Calculation worksheets are available
to display and edit measurements and calculation s.
There are generic worksheets as well as
Application specific worksheets. The worksheets
are selected from the worksheet button on the
screen.
Page 17

LOGIQ P5/A5/A5Pro Quick Guide Direction 5137113-100 Rev. 3 13
Using Probes
Connecting a probe
1. Place the probe's carrying case on a stable
surface and open the case.
2. Carefully remove the probe and unwrap the
probe cable.
3. DO NOT allow the probe head to hang free.
Impact to the probe head could result in
irreparable damage.
4. Turn the connector locking handle counter
clockwise.
5. Align the connector with the probe port and
carefully push into place.
6. Turn the connector locking handle clockwise to
secure the probe connector.
7. Carefully position the probe cable in the probe
cord holder spot so it is free to move, but not
resting on the floor .
Activating the probe
Press the Probe/Preset button on the front panel.
Move the cursor to the probe icon displayed on the
monitor screen and press SET.
The probe activates in the currently-selected
operating mode. The probe's default settings for the
mode and selected exam are used automatically.
Deactivating the probe
When deactivating the probe, the probe is
automatically placed in standby mode.
1. Press the Freeze key.
2. Gently wipe the excess gel from the face of the
probe.
3. Carefully slide the probe around the right side
of the keyboard, toward the probe holder.
Ensure that the probe is placed gently in the
probe holder.
Disconnecting the probe
Probes can be disconnected at any time. However,
the probe should not be selected as the active
probe.
1. Move the probe locking handle
counterclockwise. Pull the probe and connector
straight out of the probe port.
2. Carefully slide the probe and connector away
from the probe port and around the right side of
the keyboard. Ensure the cable is free.
3.
Be sure that the probe head is clean before
placing the probe in its storage box.
Using Probes
Page 18
LOGIQ P5/A5/A5Pro Quick Guide Direction 5137113-100 Rev. 3 14
LOGIQ P5/A5/A5Pro Probe Applications
Table 1-1: Probe Indications for Use
Probe Application 3.5C 3.5CS 4C 5CS 8C E8C E8CS 8L 9L 10L 11L 12L i739 t739 3S 5S
Abdomen XXXX XXXX XX
Small Parats XXXXXXX
Periph. Vasc. XXXX XXXXXXX
Obstetrics XXXX X X X X
Gynecology XXXX X X X X
Pediatrics X X X X X X X
Neonatal X X X X X
Urology XXXX X X
Surgery XX
Cardiac XX
Endocavitary
Transcranial X
Intraoperative XX
Neonatal Cephalic
Adult Cephalic
Musculoskeletal
Transesophageal
Transvaginal X X
Transrectal
Page 19

LOGIQ P5/A5/A5Pro Quick Guide Direction 5137113-100 Rev. 3 15
LOGIQ P5/A5/A5Pro Probe Applications (continued)
Table 1-2: Probe Indications for Use (continued)
Probe Application 7S i12L BE9CS 4D8C 3CRF 3Sp 5Sp ERB BE9C P2D P6D 4D3C-L 4DE7C UG7C
Abdomen X X X X
Small Parts X
Periph. Vasc. X X
Obstetrics X XX
Gynecology X XX
Pediatrics X X X X X X X
Neonatal X X
Urology X X X X X X
Surgery
Cardiac X X X X X
Endocavitary X
Transcranial XX
Intraoperative X
Neonatal Cephalic
Adult Cephalic
Musculoskeletal
Transesophageal X
Transvaginal X X
Transrectal X X X
Using Probes
Page 20

LOGIQ P5/A5/A5Pro Quick Guide Direction 5137113-100 Rev. 3 16
LOGIQ P5/A5/A5Pro Features
Table 1-3: Probe Features
Probe Application 3.5C 3.5CS 4C 5CS 8C E8C E8CS 8L 9L 10L 11L 12L i739 t739 3S 5S
Coded Excitation X X X X
Coded Harmonics X X XXXXXXXXXXXXXX
B-Flow XXX XXXX XX
SRI XX XXXXX XXX XXXX
Coded Contrast X X X X XX
LOGIQ View XXXXXXXXXXXXXX
Virtual Convex XXXX XXXXXXXXX
Easy 3D XX XXXXXXXXXXXXXX
Advanced 3D XX XXXXXXXXXXXXXX
Anatomical M XX XXXXXXXXXXXXXX
M Color Flow XX XXXXXXXXXXXXXX
Tru Access XX XXXXXXXXXXXXXX
Non-Imaging CW
CrossBeam XX XXXXXXXXXXXX
Biopsy XX XX XXXXXXX XXX
CW XX
4D
Page 21

LOGIQ P5/A5/A5Pro Quick Guide Direction 5137113-100 Rev. 3 17
LOGIQ P5/A5/A5Pro Features (continued)
Table 1-4: Probe Features (continued)
Probe Application 7S ERB BE9C P2D P6D 4D3C-L 4DE7C UG7C i12L BE9CS 4D8C 3CRF 3Sp 5Sp
Coded Excitation X X X
Coded Harmonics X X X X X X X X XXXX
B-Flow XX
SRI XXX X X XXX XXXX
Coded Contrast
LOGIQ View XXX X X XXX XXXX
Virtual Convex XX X X X XXXX
Easy 3D XXX XXX XXX
Advanced 3D X X X X X X X X X
Anatomical M XXX X X XXX XXXX
M Color Flow XXX X X XXX XXXX
Tru Access XXX X X XXX XXXX
Non-Imaging CW X X
CrossBeam X X X X X X X X
Biopsy XX X X X X XXXX
CW X XX
4D XX X
Using Probes
Page 22

LOGIQ P5/A5/A5Pro Quick Guide Direction 5137113-100 Rev. 3 18
Probe Cleaning and Disinfection Instructions
Probe Safety
WARNING
CAUTION
Electrical
Hazard
Ultrasound probes are highly sensitive medical instruments that can easily be damaged by improper handling. Use care when handling and protect from damage when not in
use. DO NOT use a damaged or defective probe. Failure to follow these precautions can result in serious injury and equipment damage.
Ultrasound transducers can easily be damaged by improper handling and by contact with certain chemicals. Failure to follow these precautions can result in serious injury
and equipment damage.
• Do not immerse the probe into any liquid beyond the level specified for that probe. Never immerse the transducer connector or probe adapters into any liquid.
• Avoid mechanical shock or impact to the transducer and do not apply excessive bending or pulling force to the cable.
• Transducer damage can result from contact with inappropriate coupling or cleaning agents:
• Do not soak or saturate transducers with solutions containing alcohol, bleach, ammonium chloride compounds or hydrogen peroxide
• Avoid contact with solutions or coupling gels containing mineral oil or lanolin
• Avoid temperatures above 60°C.
• Inspect the probe prior to use for damage or degeneration to the housing, strain relief, lens and seal. Do not use a damaged or defective probe.
Adequate cleaning and disinfection are necessary to prevent disease transmission. It is the responsibility of the equipment user to verify and maintain the effectiveness of the
infection control procedures in use. Always use sterile, legally marketed probe sheaths for intra-cavitary and intra-operative procedures.
For neurological intra-operative procedures, use of a legally marketed, sterile, pyrogen free probe sheath is REQUIRED. Probes for neuro surgical use must not be sterilized
with liquid chemical sterilants because of the possibility of neuro toxic residues remaining on the probe.
A defective probe or excessive force can cause patient injury or probe damage:
• Observe depth markings and do not apply excessive force when inserting or manipulating intercavity probes.
• Inspect probes for sharp edges or rough surfaces that could injure sensitive tissue.
In order for liquid chemical germicides to be effective, all visible residue must be removed during the cleaning process. Thoroughly clean the probe, as described on the
following page before attempting disinfection.
CREUTZFIELD-JACOB DISEASE
Neurological use on patients with this disease must be avoided. If a probe becomes contaminated, there is no adequate disinfecting means.
The probe is driven with electrical energy that can injure the patient or user if live internal parts are contacted by conductive solution:
• DO NOT immerse the probe into any liquid beyond the level indicated by the immersion level diagram. Never immerse the probe connector or probe adaptors into any liquid.
• DO NOT drop the probes or subject them to other types of mechanical shock or impact. Degraded performance or damage such as cracks or chips in the housing may
result.
• Inspect the probe before and after each use for damage or degradation to the housing, strain relief, lens, and seal. A thorough inspection should be conducted during the
cleaning process.
• DO NOT kink, tightly coil, or apply excessive force on the probe cable. Insulation failure may result.
• Electrical leakage checks should be performed on a routine basis by GE Service or qualified hospital personnel. Refer to the service manual for leakage check procedures.
Page 23

LOGIQ P5/A5/A5Pro Quick Guide Direction 5137113-100 Rev. 3 19
Probe Cleaning, After Each Use
1. Disconnect probe from ultrasound console and
remove all coupling gel from probe by wiping
with a soft cloth and rinsing with flowing water.
2. Wash the probe with mild soap in lukewarm
water. Scrub the probe as needed using a soft
sponge, gauze, or cloth to remove all visible
residue from the probe surface. Prolonged
soaking or scrubbing with a soft bristle brush
(such as a toothbrush) may be necessary if
material has dried onto the probe surface.
3. Rinse the probe with enough clean potable
water to remove all visible soap residue.
4. Air dry or dry with a soft cloth.
Probe Disinfection, After Each Use
1. Prepare the germicide solution according to the
manufacturer's instructions. Be sure to follow all
precautions for storage, use and disposal.
2. Place the cleaned and dried probe in contact
with the germicide for the time specified by the
germicide manufacturer. High-level disinfection
is recommended for surface probes and is
required for endocavitary and intraoperative
probes (follow the germicide manufacturer's
recommended time).
Probes for neuro surgical intra-operative use
must NOT be sterilized with liquid chemical
sterilants because of the possibility of neuro
toxic residues remaining on the probe.
Neurological procedures must be done with the
use of legally marketed, sterile, pyrogen free
probe sheaths.
3. After removing from the germicide, rinse the
probe following the germicide manufacturer's
rinsing instructions. Flush all visible germicide
residue from the probe and allow to air dry.
Probe Immersion Levels
1. Fluid Level
2. Aperture
3. Contact face within patient environment
Probe Disinfection Agents
Ultrasound probes can be disinfected using liquid
chemical germicides. The level of disinfection is
directly related to the duration of contact with the
germicide. Increased contact time produces a
higher level of disinfection.
Refer to the Probe Care Card.
http://www.gemedicalsystems.com/rad/us/
probe_care.html
Using Probes
Page 24

LOGIQ P5/A5/A5Pro Quick Guide Direction 5137113-100 Rev. 3 20
Image Management
Clipboard
As images are saved by pressing any of the print keys
(P1, P2 or Print Screen), the images appear at the bottom
of the display on the clipboard as thumbnails of the
images saved during the exam. These images remain on
the clipboard until the end of the exam.
Printing Images
Press the appropriate print key (P1, P2 or Print Screen).
For more information on programming the Print buttons,
See “Buttons” on page 22.
Browsing an Exam’s Stored Images
‘Mouse over’ the image in the clipboard, then double click
Set to view an enlarged thumbnail image.
Managing an Exam’s Stored Images
From the Display, press Active Images; from the New
Patient menu, open Active Images.
Deleting an Image
Select the image on the clipboard, then press the
onscreen Delete shortcut.
Or, go to Active Images (lower, right-hand portion of the
display). Highlight all the images that need to be deleted
and press Delete All Temp Images.
Formatting a CD/DVD
1. Insert the backup media. Format the backup media.
Go to the Utility page by pressing “Ins” Key. Select
Connectivity, then Removable Media. Label the
media appropriately. Press Format.
CAUTION
Storiage media includes: CD-R, DVD-R, NDL
256MByte 066E0690 USB Flash Drive.
2. The Ultrasound system displays a pop-up menu
when the formatting has been completed. Press Ok
to continue. Verify that the format was successful.
DO NOT use DVD-RW or
CD-RW media.
Backing Up Patient Information
Format the media prior to performing these steps.
1. Go to the Utility tab. Select System, then Backup/
Restore.
2. Select the media.
3. Select the parameter under Backup by placing
a check mark. Then press Backup.
4. Answer ‘OK’ to the Back-Up pop-up message.
NOTE: The detailed section of this menu decouples the
user defined configuration above. This allows you to
selectively restore what you want to restore across
multiple machines.
NOTE: DO NOT restore service back-ups across
systems (from one LOGIQ P5/A5/A5Pro system to
another LOGIQ P5/A5/A5Pro system).
Image/ Patient Management
and Connectivity
Page 25

LOGIQ P5/A5/A5Pro Quick Guide Direction 5137113-100 Rev. 3 21
Moving Data Between Ultrasound Systems
There are 5 options (Import, Export, Q/R, Worklist and
MPEGvue) under Data Transfer.
Import
1. At the other Ultrasound system, insert the
removable media.
2. Press Patient and select Data Transfer.
3. Select Import.
4. Select Local Archive-Int. HD from the T ransfer
To pull-down menu.
5. Select the patient(s) or exam(s) from the
Transfer From Search field for import.
6. Press Transfer.
7. Wait until the patient information is copied and
press F3 when finished to eject the media.
Export
1. Insert, format and label the removable media.
2. Press Patient and select Data Transfer.
3. Select Export.
4. Select the patient(s) or exam(s) to expo rt in the
Transfer From Search field (the top portion).
5. Select the destination at the Transfer To pulldown menu.
6. Press Transfer. The progress bar displays
during the transfer.
7. Press F3 to eject the media. Specify that you
want to finalize the media.
Query/Retrieve (Q/R)
1. Press Patient and select Data Transfer.
2. Select Q/R. The local archive is enabled for the
transfer process.
3. Select the Query/Retrieve server from the
Transfer From pull-down men u.
4. Press Query in the Transfer From section. The
server’s patient list displays.
5. Select the patient(s) or exam(s) to retrieve from
the patient list.
6. Press Transfer. The data is retrieved from the
server as the progress bar displays.
Worklist
1. Press Patient and select Worklist. The last
Worklist used displays on the monitor.
2. Press Refresh to refresh the list or select
another Worklist server from the transfer From
pull-down menu.
3. Select the patient(s) or exam(s) from the list.
4. Press Transfer. The progress bar displays
during the transfer.
MPEGvue
Save the data to CD-R to view on PC
1. Format and label the media; insert the USB
Flash / Hard Drive into the front USB Port.
2. Press Patient and select Data Transfer.
3. Select MPEGvue. The patient list in the Local
Archive-Int. HD displays in the Transfer From
section.
4. Select the media from the Transfer To pulldown menu.
5. Select the patient(s) or exam(s) from the list.
6. Press Transfer. The progress bar displays
during the transfer. Files are saved in mpeg
format.
Send To the DICOM device
1. Press Patient.
2. Search and select the patient and press Exam.
The Patient Exam screen displays.
3. Select the exam which has the images and
press Send To.
NOTE: You can only select the Local ArchiveInt. HD for Workflow.
4. The Send To dialogue box displays. Choose the
destination device and select OK.
NOTE: The destination device is configured in
the Utility screen. Multiple devices are able to
be configured.
5. The successful/unsuccessful message is displayed
at the bottom of the screen.
NOTE: If you press the Clear button in the T ransfer
From and T ransfer To section, all the search criteria
is cleared and the list is refreshed accordingly.
NOTE: ALWAYS exit to scanning after any Data
Transfer function to ensure that the ope ration
has completed.
Page 26

LOGIQ P5/A5/A5Pro Quick Guide Direction 5137113-100 Rev. 3 22
EZBackup/Move
NOTE: EZBackup/EZMove allows you to manage
hard disk space (move images off the hard drive)
while maintaining the patient database on the
scanner, as well as to back up the patie nt data base
and images.
NOTE: EZBackup/EZMove can take up to 20
minutes. Make sure to schedule this at the same
time daily, when no patients are scheduled.
1. To start the EZBackup/EZMove procedure, go
to the Patient menu and select the EZBackup/
EZMove button at the bottom of the Patient list.
The EZBackup/EZMove Wizard starts.
2. Verify the information on the first page of the
EZBackup/EZMove Wizard, then press Next.
NOTE: If the EZBackup/EZMove presets need to
be modified, those requirements are specified on
the Utility --> System --> Backup/Restore page.
3. Verify the information on the EZBackup/
EZMove Wizard, Page 2. This page tells you
how many medias you need to do this backup.
After you have gathered the media, you are
ready to begin the backup. Press Next.
4. A pop-up message appears that provides you
with the media label. Label the media, then
insert the media. Press OK.
5. The status menu appears.
NOTE: When/if you need to insert the next media,
a message appears providing you with the media
label a well. Label the media, then insert the media
and press OK.
Connectivity
Connectivity on the LOGIQ P5/A5/A5Pro is based
on the Dataflow concept.
Login as Administrator. Select Utility. Select Connectivity. Configure the menus from left to right, starting with TCP/IP first. When finished making connectivity changes to the utility menus, restart the system.
TCP/IP
Type in the Computer’s Name (better known as the AE
Title). Identify the Ultrasound system to the rest of the
network by filling in its IP Address, Subnet Mask, and
Gateway (if applicable). Press Save.
Device
Use the Device tab to add DICOM destinations.
1. Press Add.
2. Type the name of the device and it s IP address.
3. Press Ping, then Save.
.
Figure 1-1.
6. When the backup is complete, the Backup
completed page appears.
To view the media, do so via the Patient menu by
selecting the patient and loading the appropriate
media, or via Import, or via DICOM CD View.
Image/ Patient Management
and Connectivity
Page 27
LOGIQ P5/A5/A5Pro Quick Guide Direction 5137113-100 Rev. 3 23
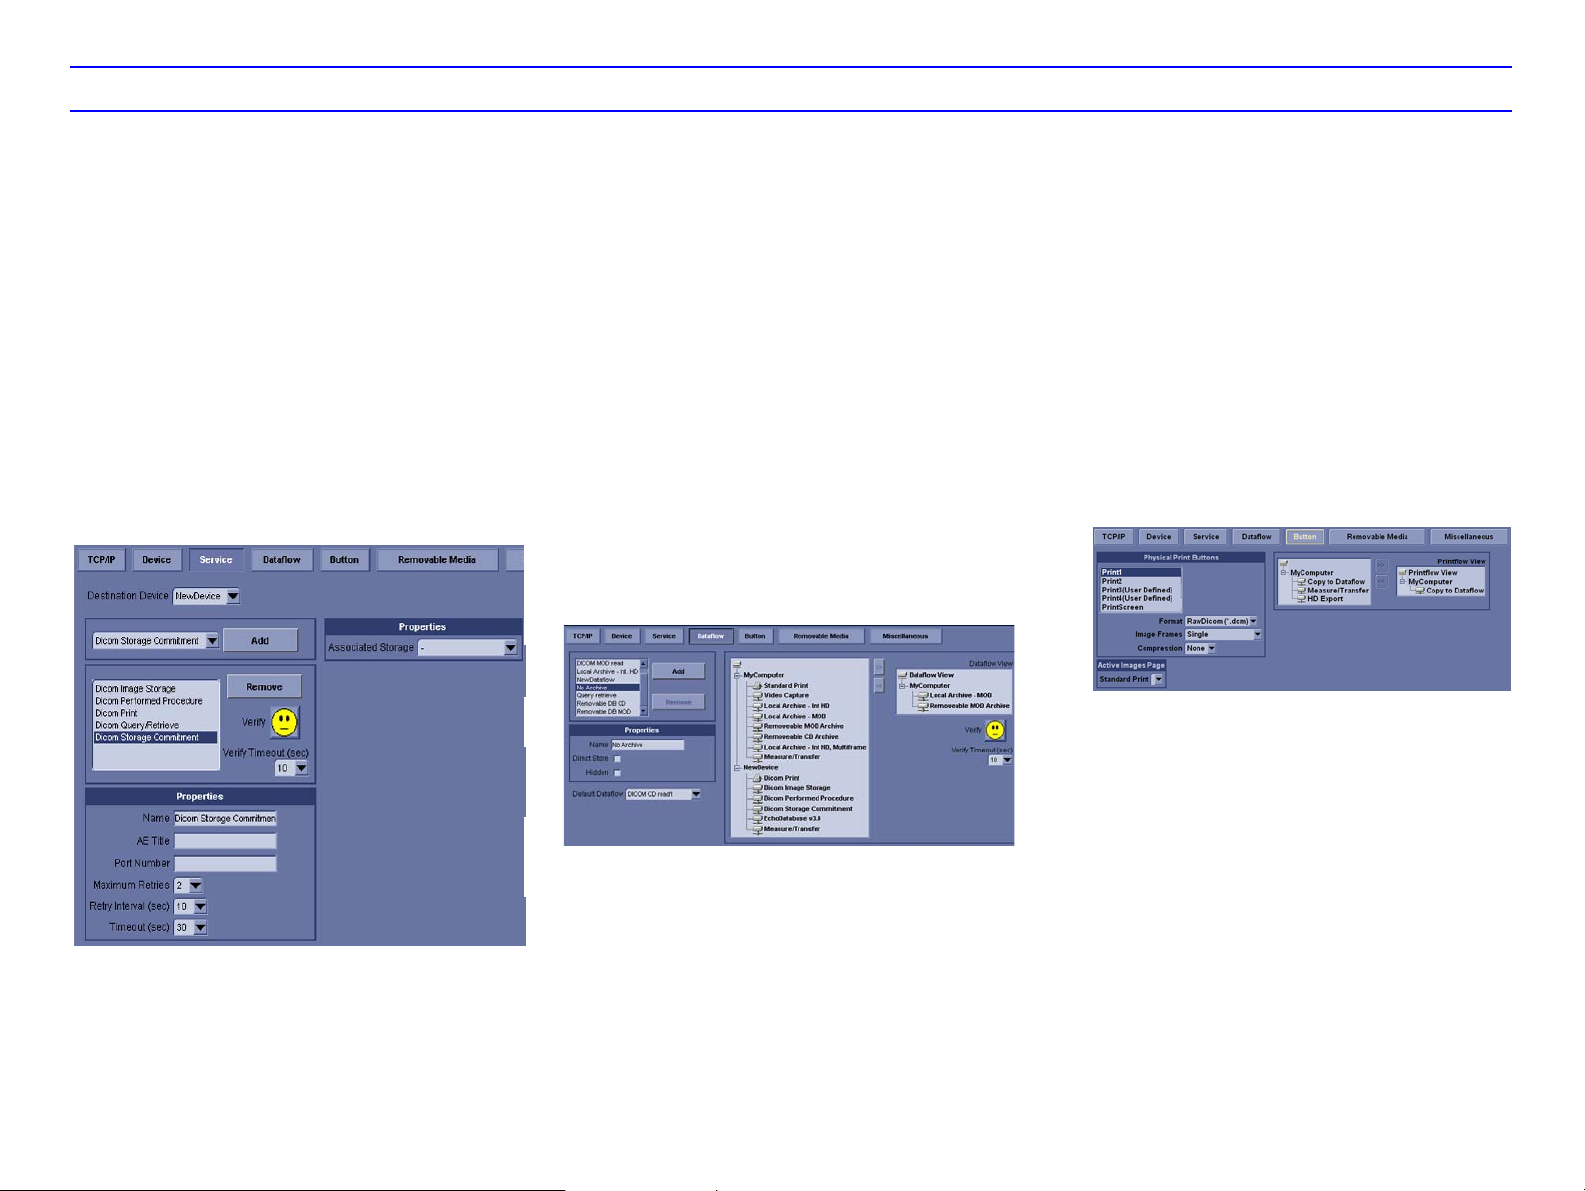
Services
To add a service,
1. Select the destination device.
2. Select the service to add and press Add.
3. Type the name in the Name Field.
4. Specify criteria in the Properties b oxes (located
in the upper right-hand side and lower lef t-hand
side).
5. Press Verify, then Save.
There are two service types that pertain to printers:
• Standard Printer is used for digital peripherals.
• Video Capture Device is used for devices that
are triggered by a contact closure, typically
analog devices.
Dataflow
The Dataflow page allows you to add services to
the selected dataflow. For example, DICOM
services may be for storage, worklist, verify, etc. In
addition, there are other service types like video
print or standard color print
Set up dataflows for the services.
1. Press Add and type the dataflow name in the
name field.
2. Select the service you want to use under My
Computer and press >> to add to Dataflow
view.
3. Press Verify, then Save.
NOTE: Query/Retrieve MUST be the only
service in a dataflow.
NOTE: Set Query/Retrieve to Hidden so that it
cannot be selected from the Patient Menu.
Buttons
You can assign print buttons to a device or to a
dataflow.
1. Select the print button to configure and the
properties on the left of the screen.
2. Select the service you want to use under My
Computer and press >> to add to Printflow
view.
NOTE: Select the Standard Print und er Active
Images Page as necessary.
3. Press Save.
NOTE: You can configure each print key to
multiple output devices/workflow.
Page 28
LOGIQ P5/A5/A5Pro Quick Guide Direction 5137113-100 Rev. 3 24
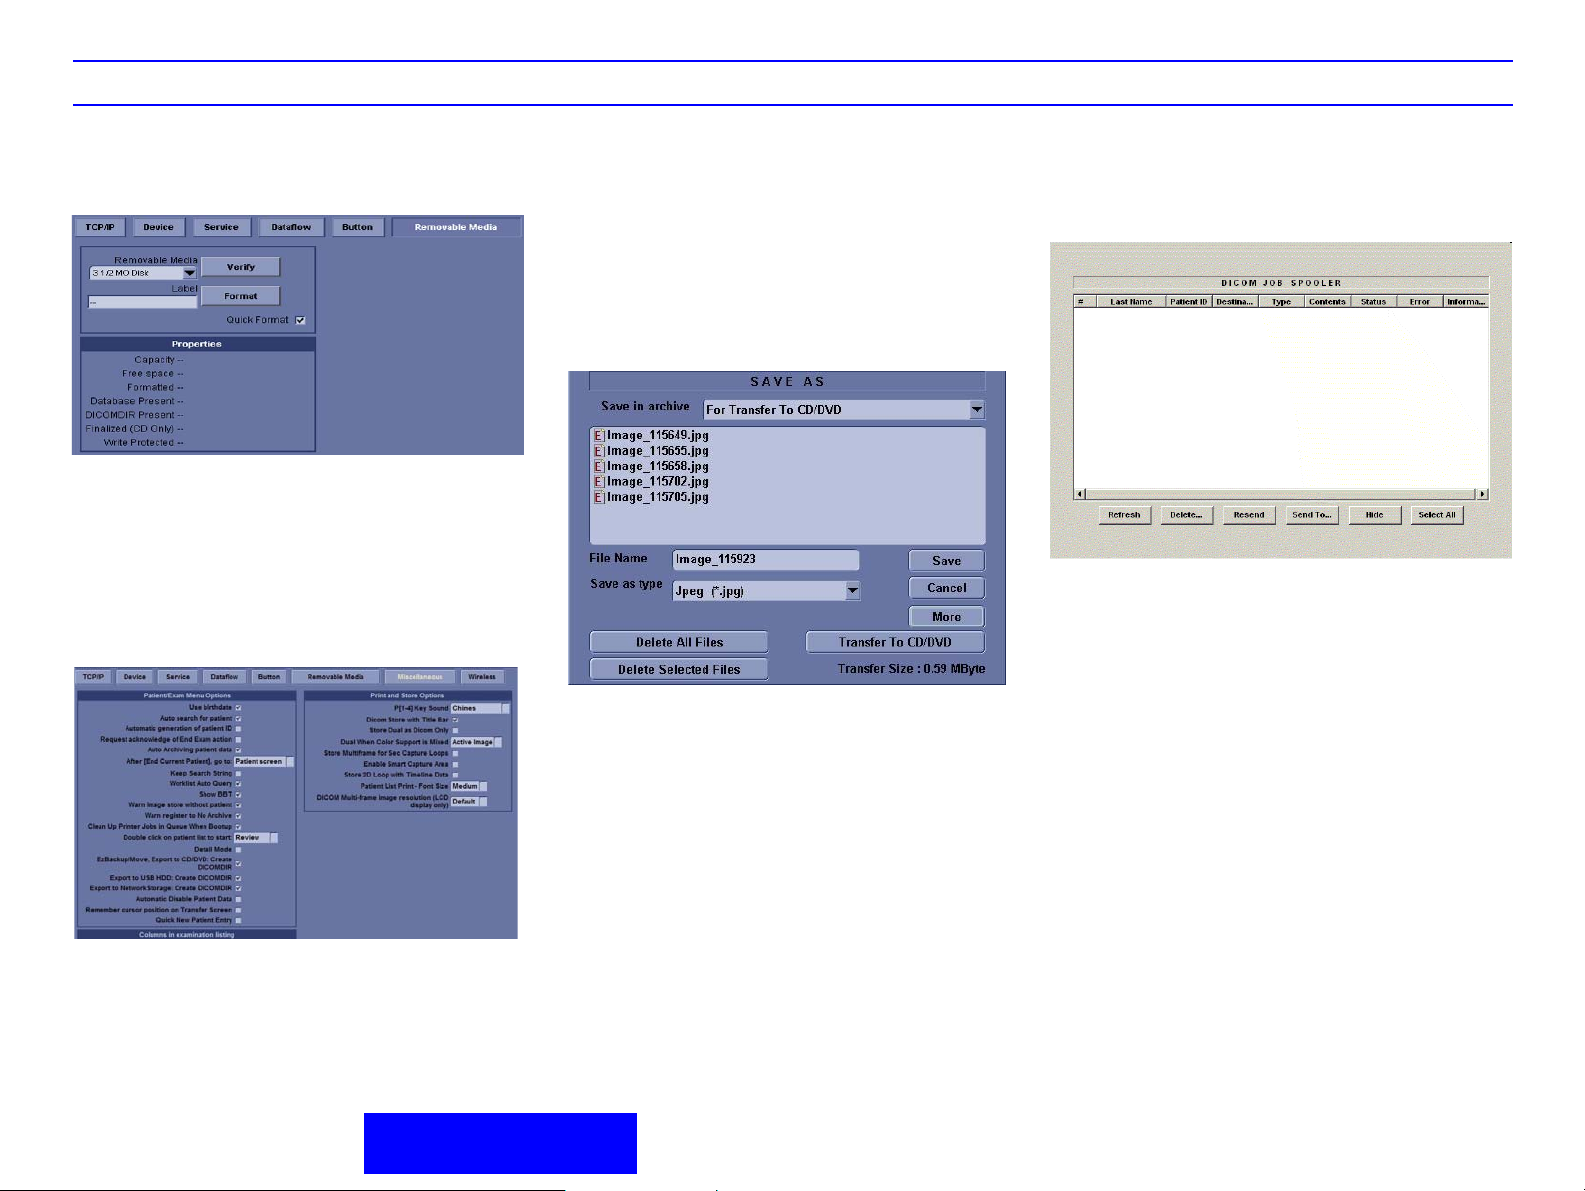
Removable Media
Format and verify media.
Miscellaneous
Set up Patient/Exam menu options and Printer and
Store Op tions
Saving Images as JPEG files and CINE Loops as AVI files
Format the media prior to following these steps.
1. Insert a media into the drive or an USB Drive
into the USB Port.
2. Press Menu (on the lower, right-hand portion of
the display) and select Save As. The SAVE AS
menu appears.
3. Specify Compression and Save As Type and
press Save. The image is saved to the media.
4. Finalize the media by selecting Yes. The media
is ejected from the system.
NOTE: If you want to add more images to the
media, select “No” and do not finalize the media.
DICOM Status
To check the status of all DICOM jobs or redirect
DICOM jobs, press F4.
Image/ Patient Management
and Connectivity
Page 29

LOGIQ P5/A5/A5Pro Quick Guide Direction 5137113-100 Rev. 3 25
Using CINE
Activating CINE
Press Freeze, then roll the Trackball to activate CINE. To
start CINE Loop playback, press Run/Stop. To stop CINE
Loop playback. press Run/Stop.
To activate Timeline CINE, press Freeze, press Scan
Area, then roll the Trackball to activate CINE.
Quickly Move to Start/End Frame
Press First to move to the first CINE frame; press Last to
move to the last CINE frame.
Start Frame/End Frame
Turn the Start Frame dial to the left to move to the
beginning of the CINE Loop. Turn the dial to the right to
move forward through the CINE Loop.
Turn the End Frame dial to the right to move to the end of
the CINE Loop. Turn the dial to the left to move backward
through the CINE Loop.
Adjusting the CINE Loop Playback Speed
Turn the Loop Speed dial clockwise/counter-clockwise to
increase/decrease the CINE Loop playback speed.
Disconnecting B-Mode CINE from Timeline CINE
To review the B-Mode CINE Loop only, press Cine Mode
Selection and select B Only.
T o review the T imeline CINE Loop only , press Cine Mode
Selection and select TL Only.
To return to linked B-Mode and Timeline CINE Loop review, press Cine Mode Selection and select B/TL.
Moving through a CINE Loop Frame By Frame
Turn Frame by Frame to move through CINE memory
one frame at a time.
Preparing for an Exam
Page 30

LOGIQ P5/A5/A5Pro Quick Guide Direction 5137113-100 Rev. 3 26
Easy 3D (option)
Acquiring a 3D Scan
1. Optimize the B-Mode image. Ensure even gel
coverage.
2. Press the 3D control panel key. Two screens
appear.
3. To start acquiring the image, press ‘L’ (the left
split screen key).
4. To perform a parallel scan, scan evenly. To
perform a sweep (fan) scan, rock the probe
once. Note the distance of the scan.
5. The 3D volume of interest is dynamically
assembled on the right side of the screen.
NOTE: If the image stops before you’re done
scanning, start acquiring the 3D volume of interest
again.
6. To complete the 3D scan, press ‘R’ (the right
split screen key).
NOTE: You can also press Freeze, but then you
need to also press the 3D key to obtain the final
render.
Manipulating the 3D Scan
Imagine you are able to manipulate the 3D volume
of interest (VOI) in your hand.
You can rotate it left to right or right to left. You can
rotate it forward/backward (white hand).
Then, imagine that you can view the volume of
interest one slice at a time through the anatomy
(red hand).
Also imagine that you are able to pull back tissue to
view specific portions of anatomy (yellow and green
hands).
The 3D volume of interest is a tangible anatomical
object that you can see and manipulate easily using
the Trackball and Set control panel keys.
Practice positioning the pointer at different places
within the 3D volume of interest. Highlight different
colors, press Set to select this volume for
manipulation. Use the hand to move the 3D vo lume.
Adjusting the 3D Volume of Interest
You can colorize the 3D volume of interest.
You can resize the VOI by adjusting the scan
distance.
Performing a Surface Render
From the 3D Top Menu press Texture to add a
photorealistic/clay-like quality to the render.
Adjust the opacity and density via Threshold/
Opacity (press the key to adjust opacity). This
adjusts what ‘grays’ the system recognizes,
allowing you to emphasize/de-emphasize grays as
necessary.
Scalpel
To scalpel away portions of the anatomy,
1. Press Scalpel. A caliper appears on the 3D
VOI.
2. Press Set to set the caliper. Trackball around
the portion to be cut away.
3. Double click and apply the scalpel.
4. Change the projection and scalpel again.
NOTE: You can undo one scalpel.
3DView Scanning Hints
Set the appropriate values for the 3D Acq Mode
and Scan Plane.
It is advisable to set the scan distance before the
scan begins.
Page 31

LOGIQ P5/A5/A5Pro Quick Guide Direction 5137113-100 Rev. 3 27
Basic 4D
1. Scan in 2D and obtain the best possible view of your
Region of Interest (ROI).
TIP: Any fluid interface provides the best results. For
example, for a 3D/4D view of the fetal face, first
obtain the best profile view.
2. Press 3D.
3. Press Real Time 4D.
4. Adjust the size and position of the ROI box using the
Scan Area button and Trackball.
Press the Scan Area button ONCE to resize the
ROI; move the Trackball left/right or up/down.
Press Scan Area AGAIN to re-position the ROI,
using the Trackball to move the ROI.
5. Select Preset.
6. To start 4D acquisition, press “SET” button.
7. Use the Tile button change the display between the
following screens:
Quad Split Full
TIP: Orientation adjustment may be needed,
depending on the anatomy being scanned. For
example, if the fetus is in the breech position, the top
of the baby’s head is facing up. However, if the fetus
is vertex, the top of the head faces down and the
orientation needs to be flipped 180 degrees.
Use the 3D Orient button to change the orientation.
Preparing for an Exam
Page 32
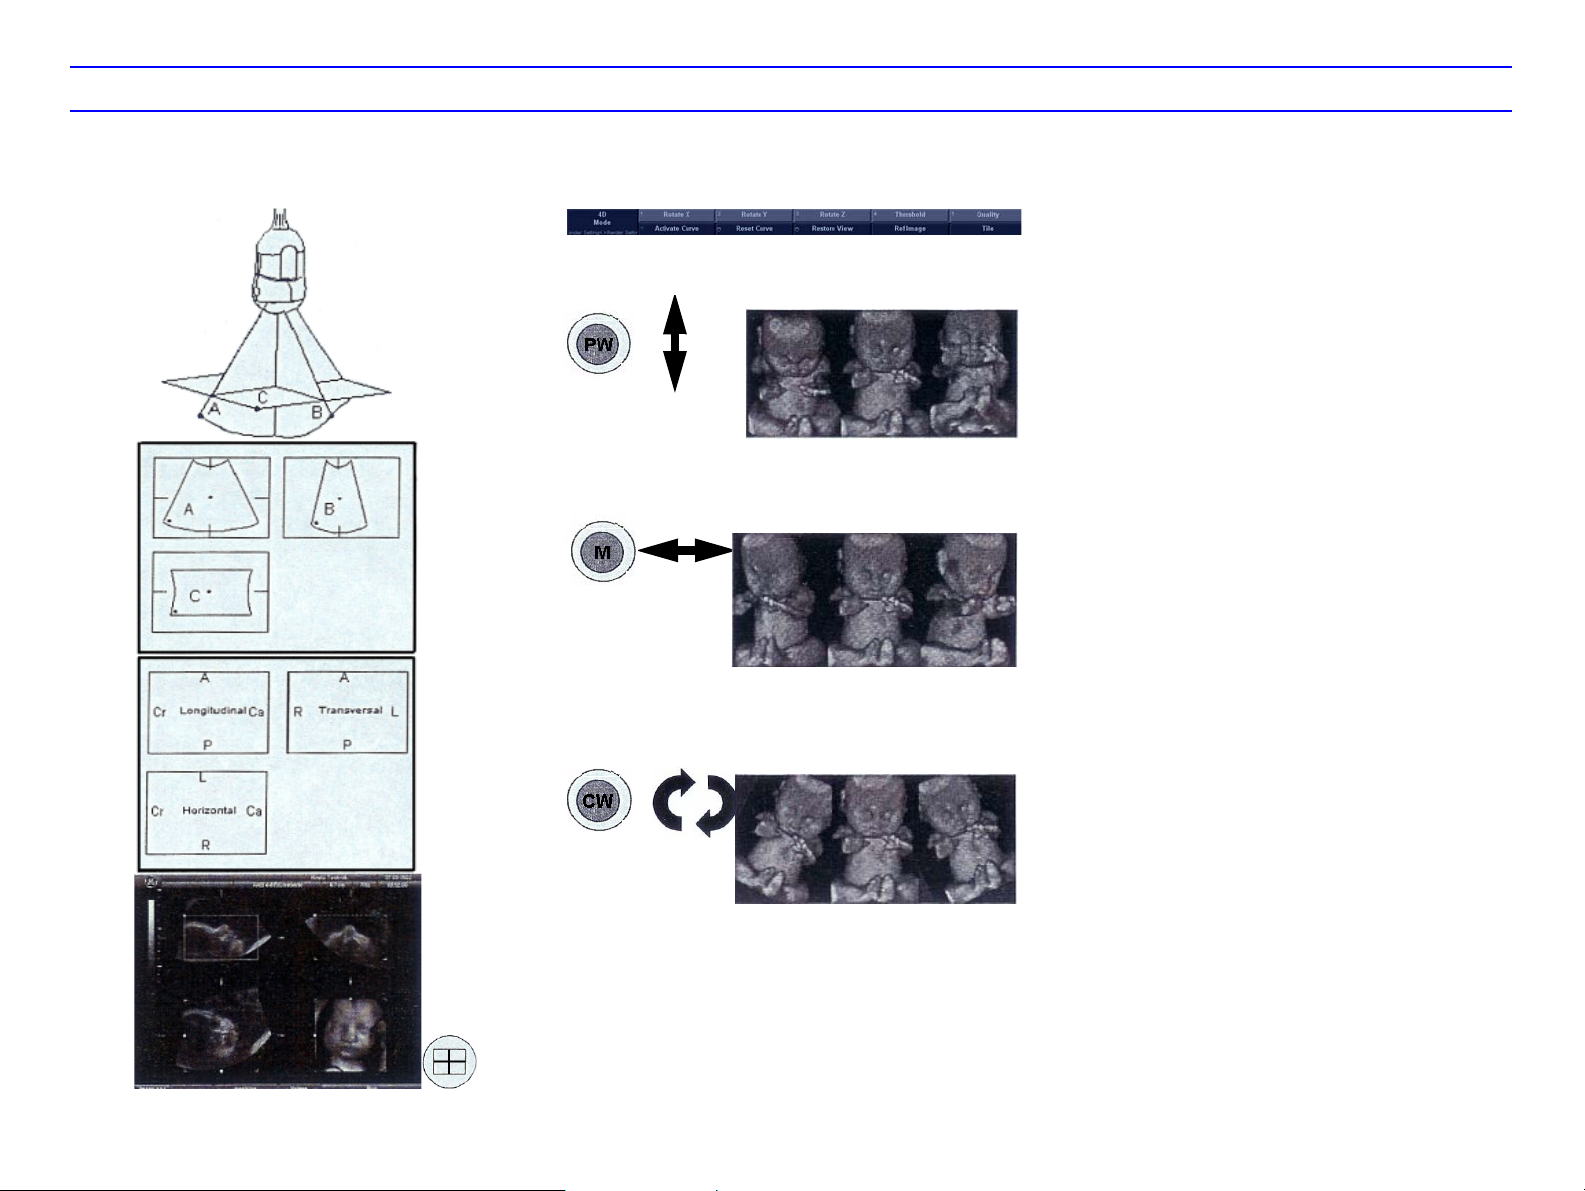
LOGIQ P5/A5/A5Pro Quick Guide Direction 5137113-100 Rev. 3 28
Optimizing the 4D Rendered Image
Orientation Rotations (when on full screen mode)
Rotates Image Up and Down
Rotate X
Rotates Image Left and Right
Rotate Y
Rotates Image Clockwise and
Counterclockwise
Rotate Z
Tools to Improve 4D Image Quality
TIP: When scanning in 4D, use slow movements to
keep the ROI in the field of view.
Select the Render Setting tab.
Quality
High Quality–best resolution but slower acquisition
rates.
Lower Quality–fastest acquisition speeds but less
resolution of 3D/4D image.
Lower Threshold
The higher numbers effectively make the image
brighter by taking away the low level echoes.
Typical range for OB: 10-45.
Render Modes
Rend Mode 1 & 2
• Surface Texture–better for older fetuses, more
detail.
• Surface Smooth–better for younger fetuses,
smoother rendered image.
• Transp MAX–highlights High Intensity echoes,
for fetal skeleton or echogenic structures.
• Transp MIN–highlights Low Intensity echoes, for
vascular structures or cystic areas.
• Transp X-RAY–used with colo r/power Doppler
to show vessels within the volume.
• Gradient Light–more shad ows, bette r de pth
perception.
• Light--brighter near field structures, darker far
field structures.
Mix
Combination of two Render Modes (=100%).
Page 33

LOGIQ P5/A5/A5Pro Quick Guide Direction 5137113-100 Rev. 3 29
Contact Information
INTERNET
http://www.gemedicalsystems.com
USA
GE Healthcare
Ultrasound Service Engineering
9900 Innovation Drive
Wauwatosa, WI 53226
TEL: (1) 800-437-1171 or FAX: (1) 414-721-3865
Clinical Questions
For information in the United States, Canada,
Mexico and parts of the Caribbean, call the
Customer Answer Center:
TEL: (1) 800-682-5327 or (1) 262-524-5698
In other locations, contact your local Applications,
Sales or Service Representative.
Service Questions
For service in the United States, call GE CARES
TEL: (1) 800-437-1171
Accessories Catalog Requests
To request the latest GE Accessories catalog or
equipment brochures in the United States, call the
Response Center: TEL: (1) 800-643-6439
In other locations, contact your local Applications,
Sales or Service Representative.
Placing an Order
To place an order , order supplies or ask an
accesory-related question in the United States, call
the GE Access Center: TEL: (1) 800-472-3666
In other locations, contact your local Applications,
Sales or Service Representative.
OTHER COUNTRIES
NO TOLL FREE
TEL: international code + 33 1 39 20 0007
CANADA
GE Healthcare
Ultrasound Svc Engineering TEL: (1) 800-664-0732
9900 Innovation Drive
Wauwatosa, WI 53226
Customer Answer Center TEL: (1) 262-524-5698
LATIN & SOUTH AMERICA
GE Healthcare
Ultrasound Svc Engineering TEL: (1) 262-524-5300
9900 Innovation Drive
Wauwatosa, WI 53226
Customer Answer Center TEL: (1) 262-524-5698
EUROPE
GE Ultraschall
Deutschland GmbH & Co. KG
Beethovenstraße 239
Postfach 11 05 60
D-42655 Solingen -- TEL: 0130 81 6370 toll free
TEL: (49) 212.28.02.207 -- FAX: (49) 212.28.02.431
ASIA
GE Medical Systems Asia
Asia Support Center
67-4 Takakura cho, Hachiouji-shi
Tokyo, 192-0033
TEL: (81) 426-48-2940 -- FAX: (81) 426-48-2905
ARGENTINA
GEME S.A.
Miranda 5237
Buenos Aires - 1407
TEL: (1) 639-1619 -- FAX: (1) 567-2678
AUSTRIA
GE GesmbH Medical Systems Austria
Prinz Eugen Strasse 8/8
A-1040 WIEN
TLX: 136314
TEL: 0660 8459 toll free -- FAX: +43 1 505 38 74
BELGIUM
GE Medical Systems Benelux
Gulkenrodestraat 3
B-2160 WOMMELGEM
TEL: 0 800 11733 toll free
FAX: +32 0 3 320 12 59
TLX: 72722
BRAZIL
GE Sistemas Médicos
Av Nove de Julho 5229
01407-907 São Paulo SP
TEL: 0800-122345 -- FAX: (011) 3067-8298
Preparing for an Exam
Page 34

LOGIQ P5/A5/A5Pro Quick Guide Direction 5137113-100 Rev. 3 30
DENMARK
GE Medical Systems
Fabriksparken 20
DK-2600 GLOSTRUP
TEL: +45 4348 5400 -- FAX: +45 4348 5399
FRANCE
GE Medical Systems
738 rue Yves Carmen
F-92658 BOULOGNE CEDEX
TEL: 05 49 33 71 toll free -- F AX: +33 1 46 10 01 20
GERMANY
GE Ultraschall
Deutschland GmbH & Co. KG
Beethovenstraße 239
Postfach 11 05 60
D-42655 Solingen
TEL: 0130 81 6370 toll free
TEL: (49) 212.28.02.207 -- F AX: (4 9) 212.28.02.431
GREECE
GE Medical Systems Hellas
41, Nikolaou Plastira Street
G-171 21 NEA SMYRNI
TEL: +30 1 93 24 582 -- FAX: +30 1 93 58 414
ITALY
GE Medical Systems Italia
Via Monte Albenza 9
I-20052 MONZA
TEL: 1678 744 73 toll free -- FAX: +39 39 73 37 86
TLX: 3333 28
LUXEMBOURG
TEL: 0800 2603 toll free
MEXICO
GE Sistemas Médicos de Mexico S.A. de C.V.
Rio Lerma #302, 1º y 2º Pisos
Colonia Cuauhtémoc
06500-México, D.F.
TEL: (5) 228-9600 -- FAX: (5) 211-4631
NETHERLANDS
GE Medical Systems Nederland B.V.
Atoomweg 512
NL-3542 AB UTRECHT
TEL: 06 022 3797 toll free -- FAX: +31 304 11702
POLAND
GE Medical Systems Polska
Krzywickiego 34
P-02-078 WARSZAWA
TEL: +48 2 625 59 62 -- FAX: +48 2 615 59 66
PORTUGAL
GE Medical Systems Portuguesa S.A.
Rua Sa da Bandeira, 585
Apartado 4094 TLX: 22804
P-4002 PORTO CODEX
TEL: 05 05 33 7313 toll free - F AX: +351 2 2084494
RUSSIA
GE VNIIEM
Mantulinskaya UI. 5A
123100 MOSCOW
TEL: +7 095 956 7037 -- FAX: +7 502 220 32 59
TLX: 613020 GEMED SU
SPAIN
GE Healthcare TEL. : +34 (91) 663 25 00
Avda. Europa, 22 FAX : +34 (91) 663 25 01
E-28108 Alcobendas, Madrid
SWEDEN
GE Medical Systems
PO-BOX 1243
S-16428 KISTA
TEL: 020 795 433 toll free -- FAX: +46 87 51 30 90
TLX: 12228 CGRSWES
SWITZERLAND
GE Medical Systems (Schweiz) AG
Sternmattweg 1
CH-6010 KRIENS
TEL: 155 5306 -- FAX: +41 41 421859
TURKEY
GE Med. Sys. Turkiye A.S.
Mevluk Pehliran Sodak
Yilmaz Han, No 24 Kat 1
Gayretteppe
ISTANBUL
TEL: +90 212 75 5552 -- FAX: +90 212 211 2571
UNITED KINGDOM
GE Medical Systems
Coolidge House
352 Buckingham Avenue
SLOUGH
Berkshire SL1 4ER
TEL: 0800 89 7905 toll free -- F AX: +44 753 696067
Page 35

LOGIQ P5/A5/A5Pro Quick Guide Direction 5137113-100 Rev. 3 31
DANGER
G
Precaution Levels
Icon description
V ario us levels of safety pre cautions may be fo und on the equ ipment and different levels of concern are identified by one of the following flag words and icons which
precede the precautionary statement.
Indicates that a specific hazard is known to exist which through inappropriate conditions or actions will cause:
• Severe or fatal personal injury
• Substantial property damage.
WARNIN
CAUTION
NOTE: Indicates precautions or recommendations that should be used in the operation of the ultrasound system, specifically:
• Maintaining an optimum system environment
• Using this Manual
• Notes to emphasize or clarify a point.
Indicates that a specific hazard is known to exist which through inappropriate conditions or actions may cause:
• Severe personal injury
• Substantial property damage.
Indicates that a potential hazard may exist which through inappropriate conditions or actions will or can cause:
• Minor injury
• Property damage.
Safety
Page 36

LOGIQ P5/A5/A5Pro Quick Guide Direction 5137113-100 Rev. 3 32
Biological
A
Explosi
Hazard Symbols - Icon Description
Potential hazards are indicated by the following icons:
Table 1-1: Potential Hazards
Icon Potential Hazard Usage Source
Hazard
Electrical
Hazard
Moving
Hazard
coustic
Output
Hazard
on
Hazard
Smoke &
Fire Hazard
• Patient/user infection due to contaminated equipment. • Cleaning and care instructions
• Sheath and glove guidelines
• Electrical micro-shock to patient, e.g., ventricular • Probes
• ECG
• Connections to back panel
• Console, accessories or optional storage devices that can fall on patient, user, or others.
• Collision with persons or objects result in injury while maneuvering or during system
transport.
• Injury to user from moving the console.
• Patient injury or tissue damage from ultrasound radiation. • ALARA, the use of power output following
• Risk of explosion if used in the presence of flammable anesthetics. • Flammable anesthetic
• Patient/user injury or adverse reaction from fire or smoke.
• Patient/use injury from explosion and fire.
• Moving
• Using brakes
• Transporting
the as low as reasonably achievable
principle
• Replacing fuses
• Outlet guidelines
ISO 7000
No. 0659
Page 37

LOGIQ P5/A5/A5Pro Quick Guide Direction 5137113-100 Rev. 3 33
G
Important Safety Considerations
The following topic headings (Patient Safety, and Equipment and Personnel Safety) are intended to make the equipment user aware of particular hazards
associated with the use of this equipment and the extent to which injury can occur if precautions are not observed. Additional precautions may be provided
throughout the manual.
CAUTION
Improper use can result in serious injury. The user must be thoroughly familiar with the instructions and potential hazards involving
ultrasound examination before attempting to use the device. Training assistance is available from GE Medical Systems if needed.
The equipment user is obligated to be familiar with these concerns and avoid conditions that could result in injury.
Patient Safety
Related Hazards
WARNIN
Patient identification
Always include proper identification with all patient data and veri fy the accuracy of the patient's name or ID numbers when entering such data. Make sure correct
patient ID is provided on all recorded data and hard copy prints. Identification errors could result in an incorrect diagnosis.
Diagnostic information
Equipment malfunction or incorrect settings can result in measurement errors or failure to detect details within the image. The equipment user must become
thoroughly familiar with the equipment operation in order to optimize its performance and recognize possible malfunctions. Applications training is available through
the local GE representative. Added confidence in the equipment operation can be gained by establishing a quality assurance program.
The concerns listed can seriously affect the safety of patients undergoing a diagnostic ultrasound examination.
CAUTION
Safety
The system’s acoustic output remains transmitting when the user controls are being used. Allowing the system to transmit acousti c output
with the probe not in use (or in its holder) can cause the probe to build up he at. Always turn off acoustic output or freeze the image when
not in use.
Page 38

LOGIQ P5/A5/A5Pro Quick Guide Direction 5137113-100 Rev. 3 34
Related Hazards (continued)
Mechanical hazards
The use of damaged probes or improper use and manipulation of intr acavity probes can result in injury or increased risk of infection. Inspect probes often for sharp,
pointed, or rough surface damage that could cause injury or tear protective barriers. Never use excessive force when manipulating intracavity probes. Become
familiar with all instructions and precautions provided with special purpose probes.
Electrical
Hazard
CAUTION
CAUTION
CAUTION
Training
It is recommended that all users receive proper training in applications before performing them in a clinical setting. Please contact the local GE representative for
training assistance.
ALARA training is provided by GE Application Specialists. The ALARA education program for the clinical end-user covers basic ultrasound pr inc iple s , possib l e
biological effects, the derivation and meaning of the indices, ALARA principles, and examples of specific applications of the ALARA principle.
A damaged probe can also increase the risk of e lectric shock if conductive solutions come in contact with internal live part s. Inspect probes
often for cracks or openings in the housing and holes in and around the acoustic le ns or other damage that could allow liquid entry.
Become familiar with the probe's use and care precautions outlined in Probes and Biopsy.
Ultrasound transducers are sensitive instruments which can easily be damaged by rough handling. Take extra care not to drop
transducers and avoid contact with sharp or abrasive surfaces. A damaged hou sing, lens or cable can result in patient injury or serious
impairment or operation.
Ultrasound can produce harmful effects in tissue and potentially result in patient injury. Always minimize exposure time and keep
ultrasound levels low when there is no medical benefit. Use the principle of ALARA (A
only when needed to obtain diagnostic image quality. Observe the acoustic output display and be familiar with all controls affecting the
output level. See the Bioeffects section of the Acoustic Output chapter in the Advanced Reference Manual for more information.
Do not use with Defibrillator.
This equipment does not have a defibrillator approved applied part.
s Low As Reasonably Achievable), increasing output
Page 39

LOGIQ P5/A5/A5Pro Quick Guide Direction 5137113-100 Rev. 3 35
G
G
DANGER
Explosi
Equipment and Personnel Safety
Related Hazards
WARNIN
WARNIN
on
Hazard
Electrical
Hazard
This equipment contains dangerous voltages that are capable of serious injury or death.
If any defects are observed or malfunctions occur, stop operating the equipment and perform the proper action for the patient. Inform a
qualified service person and contact a Service Representative for information.
There are no user serviceable comp on en ts inside the cons ole . Refer all servicing to qualified service personnel only.
Only approved and recommended peripherals and accessories should be used. All peripherals and accessories must be securely
mounted to the LOGIQ P5/A5/A5Pro.
The concerns listed below can seriously affect the safety of equipment and personnel during a diagnostic ultrasound examination.
Risk of explosion if used in the presence of flammable anesthetics.
To avoid injury:
• Do not remove protective covers. No user serviceable parts are inside. Refer servicing to qualified service personnel.
• To assure adequate grounding, connect the attachment plug to a reliable (hospital grade) grounding outlet.
• Never use any adaptor or converter of a three-prong-to-two-prong type to connect with a mains power plug. The protective earth
connection will loosen.
• Do not place liquids on or above the console. Spilled liquid may contact live parts and increase the risk of shock.
Safety
• Plug any peripherals into the LOGIQ P5/A5/A5 Pro AC powe r outle t.
Page 40

LOGIQ P5/A5/A5Pro Quick Guide Direction 5137113-100 Rev. 3 36
Biological
Related Hazards (continued)
CAUTION
Smoke &
Fire Hazard
Hazard
CAUTION
CAUTION
Do not use this equipment if a safety problem is known to exist. Have the unit repaired and performance verified by qualified service
personnel before returning to use.
The system must be supplied from an adequately rated electrical circuit. The capacity of the supply circuit must be as specified in
Chapter 3 of the Basic User Manual.
For patient and personnel safety, be aware of biological hazards while performing invasive procedures. To avoid the risk of disease
transmission:
• Use protective barriers (gloves and probe sheaths) whenever possible. Follow sterile procedures when appropriate.
• Thoroughly clean probes and reusable accessories after each patient examination and disinfect or sterilize as needed. Refer to
Probes and Biopsy in the Basic User Manual for probe use and care instructions.
• Follow all infection control policies established by your office, department or institution as they apply to personnel and equipment.
Contact with natural rubber latex may cause a severe anaphylactic reaction in persons sensitive to the natural latex protein. Sensitive
users and patients must avoid contact with these items. Refer to package labeling to determine latex content and FDA’s March 29, 1991
Medical Alert on latex products.
The system is equipped with an Auto Freeze feature which disables acou stic output and fr eeze s the image when th e system is not in use.
Take care when deactivating this feature.
CAUTION
Never put any device onto the monitor.
Page 41

LOGIQ P5/A5/A5Pro Quick Guide Direction 5137113-100 Rev. 3 37
Related Hazards (continued)
CAUTION
CAUTION
CAUTION
Archived data is managed at the individual sites. Performing data backup (to any device) is recommended on a daily basis.
Do not unpack the LOGIQ P5/A5/A5Pro. This must be performed by qualified service personnel only.
Do not use the LOGIQ P5/A5/A5Pro Ultrasound system ECG wave for diagnosis and monitorin g.
Safety
Page 42

LOGIQ P5/A5/A5Pro Quick Guide Direction 5137113-100 Rev. 3 38
Device Labels
Label Icon Description
The following table describes the purpose and location of safety labels and other important information provided on the equipment.
Table 1-2: Label Icons
Label/Icon Purpose/Meaning Location
Identification and Rating Plate Manufacture’s name and address
Date of manufacture
Model and serial numbers
Electrical ratings (Volts, Amps, phase, and frequency)
Type/Class Label Used to indicate the degree of safety or protection.
IP Code (IPX8) Indicates the degree of protection provided by the enclosure per IEC60 529. Can be used in operating room
environment.
Type CF Applied Part (heart in the box) symbol is in accordance with IEC 878-02-03. ECG marked Type CF
“ATTENTION” - Consult accompanying documents” is intended to alert the user to refer to the operator manual
or other instructions when complete information cannot be provided on the label.
!
“CAUTION” - Dangerous voltage” (the lightning flash with arrowhead) is used to indicate electric shock
hazards.
“Mains OFF” indicates the power off position of the mains power breaker. Refer to Chapter 3 in the Basic User Manual for
“Mains ON” indicates the power on position of the mains power breaker. Refer to Chapter 3 in the Basic User Manual for
See “Warning Label Locations” on page 51.
Foot Switch
Various
Inside of console
location information.
location information.
“ON” indicates the power on position of the power switch.
CAUTION: This Power Switch DOES NOT ISOLATE Mains Supply.
Refer to Chapter 3 in the Basic User Manual for
location information.
Page 43

LOGIQ P5/A5/A5Pro Quick Guide Direction 5137113-100 Rev. 3 39
Table 1-2: Label Icons
Label/Icon Purpose/Meaning Location
“Protective Earth” indicates the protective earth (grounding) terminal. Internal
“Equipotentiality” indicates the terminal to be used for connecting equipotential conductors when
interconnecting (grounding) with other equipment.
This symbol indicates that the waste of electrical and electronic equipment must not be disposed as unsorted municip al waste
and must be collected separately. Please contact an authorized representative of the manufacturer for information concerning
the decommissioning of your equipment
.
Rear of console
Rear of console.
Safety
Page 44
LOGIQ P5/A5/A5Pro Quick Guide Direction 5137113-100 Rev. 3 40
Classifications
Type of protection against electric shock
Class I Equipment (*1)
Degree of protection against electric shock
Type CF Applied part (*3)
(for ECG, Probes marked with CF symbol)
Continuous Operation
System is Ordinary Equipment (IPX0)
Footswitch is IPX8
*1. Class I EQUIPMENT
EQUIPMENT in which protection against electric shock does not rely on BASIC INSULATION only, but includes an earth ground. This additional safety precaution
prevents exposed metal parts from becoming LIVE in the event of an insulation failure.
*2. Type BF APPLIED PART
TYPE BF APPLIED PART providing a specified degree of protection against electric shock, with particular regard to allowable LEAKAGE CURRENT.
Table 1-3: Type BF Equipment
Normal Mode Single fault condition
Patient leakage current Less than 100 microA Less than 500 microA
*3. Type CF APPLIED PART
Type CF Applied Part providing a degree of protection higher than that for TYPE BF Applied Part against electric shock particularly regarding allowable LEAKAGE
CURRENTS.
Table 1-4: Type CF Equipment
Normal Mode Single fault condition
Patient leakage current Less than 10 microA Less than 50 microA
Page 45

LOGIQ P5/A5/A5Pro Quick Guide Direction 5137113-100 Rev. 3 41
EMC (Electromagnetic Compatibility)
NOTE: This equipment generates, uses and can radiate radio frequency energy. The equipment may cause radio frequency interference to other medical and nonmedical devices and radio communications. To provide reasonable protection against such interference, this product complies with emissions limits for a Group 1,
Class A Medical Devices Directive as stated in EN 60601-1-2. However, there is no guarantee that interference will not occur in a particular installation.
NOTE: If this equipment is found to cause interference (which may be determined by turning the equipment on and off), the user (or qualified service personnel)
should attempt to correct the problem by one or more of the following measure(s):
• reorient or relocate the affected device(s)
• increase the separation between the equipment and the affected device
• power the equipment from a source different from that of the affected device
• consult the point of purchase or service representative for further suggestions.
NOTE: The manufacturer is not responsible for any interference caused by using other than recommended interconnect cables or by unauthorized chang es or
modifications to this equipment. Unauthorized changes or modifications could void the users’ authority to operate the equipment.
NOTE: To comply with the regulations on electromagnetic interference for a Class A FCC Device, all interconnect cables to peripheral devices must be shielded
and properly grounded. Use of cables not properly shielded and grounded may result in the equipment causing radio frequency interference in violation of the FCC
regulations.
NOTE: Do not use devices which intentionally transmit RF Signals (cellular phones, transceivers, or radio-controlled products) in the vicinity of the equipment as it
may cause performance outside the published specifications. Keep the power to these types of devices turned off when near this equipment.
The medical staff in charge of this equipment is required to instruct technicians, patients, and other peopl e who maybe around this equipment to fully comply with the
above requirement.
EMC Performance
All types of electronic equipment may characteristically cause electromagnetic interference with other equipment, either transmitted through air or connecting
cables. The term EMC (Electromagnetic Compatibility) indicates the capability of equipment to curb electromagnetic influence from other equipment and at the same
time not affect other equipment with similar electromagnetic radiation from itself.
Proper installation following the service manual is required in order to achieve the full EMC performance of the product.
The product must be installed as stipulated in 4.2, Notice upon Installation of Product.
In case of issues related to EMC, please call your service personnel.
Safety
Page 46

LOGIQ P5/A5/A5Pro Quick Guide Direction 5137113-100 Rev. 3 42
The manufacturer is not responsible for any interference caused by using other th an recommended interconnect cables or by unauthorized changes or mod ifications
to this equipment. Unauthorized changes or modifications could void the users’ authority to operate the equipment.
CAUTION
Do not use devices which intentionally transm it RF signals (cellula r phones, transceive rs, or radio contro lled product s) in the vicinity of this
equipment as it may cause performance outside the published specifications. Keep the power to these type devices turned off when near
this equipment.
Keep power to these devices turned off when near this equipment.
Medical staff in charge of this equipment is required to instruct technicians, patients and other people who may be around this equipment
to fully comply with the above regulation.
Portable and mobile radio communications equipment (e.g. two-way radio, cellular/cordless telephones, wireless computer networks) should be used no closer to
any part of this system, including cables, than determined according to the following method:
Table 1-5: Portable and mobile radio communications equipment distance requirements
Frequency Range: 150 kHz - 80 MHz 80 MHz - 800 MHz 800 MHz - 2.5 GHz
Calculation Method: d=[3.5/V1] square root of P d = [3.5/E1] square root of P d = [7/E1] square root of P
Where: d= separation distance in meters, P = rated power of the transmitter, V
If the maximum transmitter power in
watts is rated The separation distance in meters should be
5 2.6 2.6 5.2
20 5.2 5.2 10.5
100 12.0 12.0 24.0
=compliance value for conducted RF, E1 = compliance value for radiated RF
1
Page 47

LOGIQ P5/A5/A5Pro Quick Guide Direction 5137113-100 Rev. 3 43
Notice upon Installation of Product
Separation distance and effe ct from fixed radio communicatio ns equipment: field strength s from fixed transmitters, such as base stations for radio (cellular/cordless)
telephones and land mobile radios, amateur radio, AM and FM radio broadcast, and TV broadcast transmitter cannot be predicted theoret ically with ac curacy. To
assess the electromagnetic environment due to fixed RF transmitters, an electromagnetic site survey should be considered. If the measured field strength in the
location in which the ultrasound system is used exceeds the applicable RF compliance level as stated in the immunity declaration, the ultrasound system should be
observed to verify normal operation. If abnormal operation is observed, additional measures may be necessary, such as re-orienting or relocating the ultrasound
system or using an RF shielded examination room may be necessary.
1. Use either power supply cords provided by GE Medical Systems or ones designated by GE Medical Systems. Products equipped with a power source plug
should be plugged into the fixed power socket which has the protective grounding conductor. Never use any adaptor or converter to connect with a power
source plug (i.e. three-prong-to-two-prong converter).
2. Locate the equipment as far away as possible from other electronic equipment.
3. Be sure to use only the cables provided by or designated by GE Medical Systems. Connect these cables following the installation procedures (i.e. wire power
cables separately from signal cables).
4. Lay out the main equipment and other peripherals following the installation procedures described in the Option Installation manuals.
General Notice
1. Designation of Peripheral Equipment Connectable to This Product.
The equipment indicated on Chapter 15 of the Basic User Manual can be hooked up to the product without compromising its EMC performance.
Avoid using equipment not designated in the list. Failure to comply with this instruction may result in poor EMC performance of the product.
2. Notice against User Modification
The user should never modify this product. User modifications may cause degradation in EMC performance.
Modification of the product includes changes in:
a. Cables (length, material, wiring, etc.)
b. System installation/layout
c. System configuration/components
d. Securing system parts (cover open/close, cover screwing)
3. Operate the system with all covers closed. If a cover is opened for some reason, be sure to shut it before starting/resuming operation.
4. Operating the system with any cover open may affect EMC performance.
Safety
Page 48

LOGIQ P5/A5/A5Pro Quick Guide Direction 5137113-100 Rev. 3 44
Peripheral Update for EC countries
The following is intended to provide the users in EC countries with updated information concerning the connection of the LOGIQ P5/A5/A5Pro to image recording
and other devices or communication networks.
The LOGIQ P5/A5/A5Pro has been verified for overall safety, compatibility and compliance with the following on-board image recording devices:
• Sony Color Printer UP-D23MD
• Sony B/W Printer Model UP-D897MD
• Sony Color Printer Model UP-50/51MD
• Panasonic DVD-Video, LQ-MD800/800P.800E
• Mitsubishi VCR HS-MD3000/3000E/3000U
The LOGIQ P5/A5/A5Pro has also been verified for compatibility, and compliance for connection to a local area network (LAN) via the rear panel Ethernet
connection, provided the LAN components are IEC/EN 60950 compliant.
Connection may also be made to a CE Marked and IEC/EN 60950 compliant modem using one of the serial ports at the rear panel.
The LOGIQ P5/A5/A5Pro may also be used safely while connected to devices other than those recommended above if the devices and their specifications,
installation, and interconnection with the system conform to the requirements of IEC/EN 60601-1-1.
General precautions for installing an alternate on-board device would include:
1. The added device must have appropriate safety standard conformance and CE Marking.
2. The total power consumption of the added devices, which connect to the LOGIQ P5/A5/A5Pro and are used simultaneously, must be less than or equal to the
rated supply of the LOGIQ P5/A5/A5Pro.
3. There must be adequate heat dissipation and ventilation to prevent overheating of the device.
4. There must be adequate mechanical mounting of the device and stability of the combination.
5. Risk and leakage current of the combination must comply with IEC/EN 60601-1.
6. Electromagnetic emissions and immunity of the combination must conform to IEC/EN 60601-1-2.
Page 49

LOGIQ P5/A5/A5Pro Quick Guide Direction 5137113-100 Rev. 3 45
Peripheral Update for EC countries (continued)
General precautions for installing an alternate off-board, remote device or a network would include:
1. The added device(s) must have appropriate safety standard conformance and CE Marking.
2. The added device(s) must be used for their intended purpose having a compatible interface.
3. Signal or mains isolation devices and additional protective earth may be needed to assure compliance with IEC/EN60601-1-1.
CAUTION
The connection of equipment or transmission networks other than as specified in the user instructions can result in an electric shock
hazard or equipment malfunction. Substitute or alternate equipment and connections requires verification of compatibility and conformity to
IEC/EN 60601-1-1 by the installer. Equipment modifications and possible resulting malfunctions and electromagnetic interference are the
responsibility of the owner.
Declaration of Emissions
This system is suitable for use in the following environment. The user must assure that it is used only in the electromagnetic environment as specified.
Table 1-6: Declaration of Emissions
Emission Type Compliance Electromagnetic Environment
CISPR 11
RF Emissions
IEC 61000-3-2
Harmonic
Disturbanc
Emissions
IEC 61000-3-3
Voltage
Fluctuations/Flicker
Emissions
Group 1
Class B
Class B 230V 50Hz
Complies
This system uses RF energy only for its internal function. Therefore, RF emissions are very low and are not likely to cause any interference in nearby electronic
equipment. It is suitable for use in all establishments.
Safety
Page 50

LOGIQ P5/A5/A5Pro Quick Guide Direction 5137113-100 Rev. 3 46
Declaration of Immunity
This system is suitable for use in the following environment. The user must assure that the system is used according to the specified guidance and only in the
electromagnetic environment listed.
Table 1-7: Declaration of Immunity
Immunity Type Test Level Compliance EMC Environment and Guidance
IEC 61000-4-2
Static discharge
(ESD)
IEC 61000-4-4
Electrical fast
transient/burst
IEC 61000-4-5 Surge Immunity ± 1.5 kV differential
IEC 61000-4-11
Voltage dips, short interruptions and
voltage variations on mains supply
IEC 61000-4-8
Power frequency (50/60 Hz) magnetic
field
IEC 61000-4-6
Conducted RF
IEC 61000-4-3
Radiated RF
NOTE: These guidelines may not apply in all situations. Electromagnetic propagation is affected by absorption and reflection from structures, objects, and people.
± 8 kV contact
± 8 kV air
± 1.5 kV for mains ± 2 kV for mains
± 2.5 kV common
< 5% U
TBD 3 A/m
TBD 3 V
3 V/m
80 MHz - 2.5 GHz
(> 95% dip) for 0.5 cycle; < 5% UT (> 95% dip) for 0.5 cycle;
T
± 6 kV contact
± 8 kV air
± 1 kV for SIP/SOP
± 1 kV differential
± 2 kV common
(60% dip) for 5 cycles;
40% U
T
70% U
(30% dip) for 25 cycles;
T
< 5% U
150 kHz - 80 MHz
3 V/m
80 MHz - 2.5 GHz
(>95% dip) for 5 sec
T
RMS
Floors should be wood, concrete, or ceramic tile. If floors are
covered with synthetic material, the relative humidity should
be at least 30%.
Mains power quality should be that of a typical commercial
and/or hospital environment. If the user requires continued
operation during power mains interruptions, it is
recommended that the system be powered from an
uninterruptable power source (UPS).
NOTE: UT is the a.c. mains voltage prior to application of the
test level.
Power frequency magnetic fields should be at levels
characteristic of a typical location in a typical commercial and/
or hospital environment.
Separation distance to radio communication equipment must
be maintained according to the Table 1-5 on page 42.
Interference may occur in the vicinity of equipment marked
with the symbol
Page 51

LOGIQ P5/A5/A5Pro Quick Guide Direction 5137113-100 Rev. 3 47
Patient Environmental Devices
1. Peripheral Device (Signals I/O Port, Power In)
2. Front Panel (Signal I/O Port, Power Out)
3. Non-Imaging Probes
4. Imaging Probes
5. Probe Port
6. ECG Cable
7. Physio-Signal Input Panel
8. Rear Panel
Safety
Figure 1-1. Patient Environmental Devices
9. Signals I/O Port
10. Power Out
11. Signals I/O Port
12. Footswitch Connector
13. Power In
14. Peripheral Devices
15. Signals I/O Port
16. Power In
17. Footswitch
18. Power Line (AC~)
19. Ground Line
20. Power Cable with Protective Earth
21. DVD Drive
Page 52

LOGIQ P5/A5/A5Pro Quick Guide Direction 5137113-100 Rev. 3 48
Acceptable Devices
The devices shown in “Patient Environmental Devices” on page 1-47 are specified to be suitable for use within th e PAT IEN T ENVIR ONMENT.
CAUTION
DO NOT connect any probes or accessories without approval by GE within the PATIENT ENVIRONMENT.
See “Peripheral Update for EC countries” on page 44.
Unapproved Devices
CAUTION
Unapproved devices shall not be used in the patient environment.
If devices are connected without the approval of GE, the warranty will be INVALID.
Any device connected to the LOGIQ P5/A5/A5Pro must conform to one or more of the requirements listed below:
1. IEC standard or equivalent standa rds appropriate to devices.
2. The devices shall be connected to PROTECTIVE EARTH (GROUND).
Accessories, Options, Supplies
CAUTION
Unsafe operation or malfunction may result. Use only the accessories, options and supplies approved or recommended in these
instructions for use.
Page 53

LOGIQ P5/A5/A5Pro Quick Guide Direction 5137113-100 Rev. 3 49
Acoustic Output
Located on the upper right section of the system display monitor, the acoustic output display provides the operator with real-time indication of acoustic levels being
generated by the system. See the Acoustic Output chapter in the Advanced Reference Manual for more information. This display is based on NEMA/AIUM
Standards for Real-time Display of Thermal and Mechanic Acoustic Output Indices on Diagnostic Ultrasound Equipment.
Acoustic Output Display Specifications
The display consists of three parts: Thermal Index (TI), Mechanical Index (MI), and a relative Acoustic Output (AO) value. Although not part of the NEMA/AIUM
standard, the AO value informs the user of where the system is operating within the range of available output. Depending on the examination and type of tissue
involved, the TI parameter will be one of three types:
• Soft Tissue Thermal Index (TIS). Used when imaging soft tissue only, it provides an estimate of potential temperature increase in soft tissue.
• Bone Thermal Index (TIB). Used when bone is near the focus of the image as in the third trimester OB examination, it provides an estimate of potential
temperature increase in the bone or adjacent soft tissue.
• Cranial Bone Thermal Index (TIC). Used when bone is near the skin surface as in transcranial examination, it provides an estimate of potential temperature
increase in the bone or adjacent soft tissue.
The TI and MI is displayed at all times. The MI and TI displays start at a value of 0.0 and increments in steps of 0.1. Display precision is ± 0.1, and accuracy is ±
50%.
Controls Affecting Output
The potential for producing mechanical bioeffects (MI) or thermal bioeffects (TI) can be influenced by certain controls.
The Acoustic Output control has the most significant effect on Acoustic Output.
Indirect effects may occur when adjusting other controls. Controls that ca n influence MI a nd TI are det a iled under the Bioef fect s portion of each contro l in the Modes
chapter of the Basic User Manual.
Always observe the acoustic output display for possible effects.
Safety
Page 54

LOGIQ P5/A5/A5Pro Quick Guide Direction 5137113-100 Rev. 3 50
HINTS
G
A
Best practices while scanning
Raise the Acoustic Output only after attempting image optimization with controls that have no effect on Acoustic Output, such as Gain and
TGC.
NOTE: Refer to the Optimization sections of the Modes chapter for a complete discussion of each control.
WARNIN
coustic
Output
Hazard
Be sure to have read and understood control explanations for each Mode used before attempting to adjust the Acoustic Output control or
any control that can effect Acoustic Output.
Use the minimum necessary acoustic output to get the best diagnostic image or measurement during an examination. Begin the exam with
the probe that provides an optimum focal depth and penetration.
Acoustic Output Default Levels
In order to assure that an exam may not start at a high output level, the LOGIQ P5/A5/A5Pro may initiate scanning at a reduced default output level. This reduced
level is preset programmable and depends upon the exam category and probe selected. It takes effect when the system is powered on or New Patient is selected.
Page 55

LOGIQ P5/A5/A5Pro Quick Guide Direction 5137113-100 Rev. 3 51
Warning Label Locations
Console Labels
1. Possible shock hazard. Do not remove
covers or panels. No user serviceable
parts are inside. Refer servicing to
qualified service personnel.
2. Do not use the following devices near
this equipment: cellular phone, radio
receiver, mobile radio transimitter,
radio controlled toy, etc. Use of these
devices near this equipment could
cause this equipment to perform
outside the published specifications.
Keep power to these devices turned off
when near this equipment.
3. The equipment weighs approximately
80 kg 176 lbs). T o avoid possible injury
and equipment damage when
transporting from one area of use to
another:
- Be sure the pathway is clear
- Limit movement to a slow careful
walk.
- Use two or more persons to move the
equipment on inclines or long distance.
4. Prescription Device (For U.S.A. Only)
5. The CE Mark of Conformity indicates
this equipment conforms with the
Council Directive 93/42/EEC.
6. WEEE label indicates that the waste of
electrical and electronic equipment
must not be disposed as unsorted
municipal waste and must be collected
separately. Please contact an
authorized representative of the
manufacturer for information
concerning the decommissioning of
your equipment.
7. CISPR
CAUTION: The LOGIQ P5/A5/A5Pro
conforms to the CISPR11, Group 1,
Class A of the international standard
for Electromagnetic disturbance
characteristics.
8. Grounding reliability can only be
achieved when this equipment is
connected to a receptacle marked
“Hospital Only” or “Hospital Grade”.
(For U.S.A., Canada, Japan)
9. Power (Indication label)
10. Optional Flexible LCD monitor may
rotate in transporting : bind the system
securely not to cause the damage in
transportation. there is a pinch point in
the LCD monitor. Need care for injury
on hands or fingers in flipping down
the LCD monitor.
Safety
Page 56

LOGIQ P5/A5/A5Pro Quick Guide Direction 5137113-100 Rev. 3 52
Warning Label Locations (continued)
1.Identification and Rating Plate–USA/Asia 120V Console
2.Identification and Rating Plate–Europe/Asia/Latin America 220V Console
3.Identification and Rating Plate–Japan 120V Console
4.Identification and Rating Plate-Korea 220V Console
5.Identification and Rating Plate-China 220V Console
6.IUL Label
 Loading...