

Page 1

LOGIQ 500
User Quick Guide 2193742–100
A Training in Partnership Program
TM
GE Medical Systems
Training In Partnership
Ti
P
Page 2

Page 3
Technical
Publications
Direction 2193742-100
Revision 0
GE Medical Systems
LOGIQ
CopyrightE1997 By General Electric Co.
Operating Documentation
t
500 User Quick Guide
Page 4
Regulatory Requirement
This product complies with regulatory requirements of the following European Directive 93/42/EEC concerning medical
devices
GE Medical Systems
GE Medical Systems: Telex 3797371
P.O. Box 414, Milwaukee, Wisconsin 53201 U.S.A.
(Asia, Pacific, Latin America, North America)
GE Medical Systems–Europe
283 rue de la Miniére BP34
78533 BUC Cedex
Page 5

REV
0 September 9, 1997 Initial Release
DATE REASON FOR CHANGE
LIST OF EFFECTIVE PAGES
PAGE REVISION PAGE REVISION
NUMBER NUMBER NUMBER NUMBER
TiP Cover Page N/A
Title Page 0
Revision History A and B 0
Table of Contents i thru vi 0
Safety 1 thru 6 0
Introduction 1 thru 16 0
Initial Set Up 1 thru 10 0
Scanning 1 thru 18 0
LOGIQt 500 Quick Guide
2193742–100 Rev . 0
Image Memory 1 thru 4 0
Cine Memory 1 thru 6 0
User Define Keys 1 thru 6 0
Annotation 1 thru 12 0
Body Patterns 1 thru 10 0
Measurements 1 thru 20 0
User OB Tables 1 thru 12 0
User Presets 1 thru 24 0
Revision History A
Page 6
Please verify that you are using the latest revision of this document. Information
pertaining to this document is maintained on GPC (GE Medical Systems Global
Product Configuration). If you need to know the latest revision, contact your
distributor, local GE Sales Representative or in the USA call the GE Ultrasound
Clinical Answer Center at 1-800-682-5327 or 414-524-5255.
Revision History B
LOGIQt 500 Quick Guide
2193742–100 Rev . 0
Page 7

TiP Cover Page
Title Page
Revision History A.....................................................
Table of Contents i....................................................
Safety
Prescription Device (for USA only) Safety 2.....................................
Indications for Use Safety 2...................................................
Contraindications Safety 3....................................................
Serviceable Components Safety 4..............................................
User Manual Safety 4........................................................
Troubleshooting Safety 4.....................................................
Introduction
Major Features Introduction 2......................................................
Probe Ports Introduction 4.........................................................
Password Ask Introduction 5.......................................................
Power On Introduction 6..........................................................
Power Off Introduction 8..........................................................
Keyboard Introduction 9...........................................................
Table of Contents
LOGIQt 500 Quick Guide
2193742–100 Rev . 0
Table of Contents i
Page 8
Initial Set Up
Set Up Menu Access Initial Set Up 2.................................................
Hospital Name Initial Set Up 3......................................................
Date/Time Initial Set Up 4..........................................................
System ID Number Initial Set Up 7...................................................
Language Selection Initial Set Up 8..................................................
Display Format Initial Set Up 9......................................................
Scanning
Patient ID Menus Scanning 2....................................................
Report Pages Scanning 8........................................................
Image Memory
Memory Storage Image Memory 2.....................................................
Storage Display Image Memory 3......................................................
Memory Recall Image Memory 3......................................................
Cine Memory
Cine Storage Cine Memory 2........................................................
Cine Image Display Cine Memory 3..................................................
Cine Loop Review Cine Memory 4...................................................
Exit Cine Cine Memory 6...........................................................
Table of Contents ii
LOGIQt 500 Quick Guide
2193742–100 Rev . 0
Page 9
User Define Keys
Purpose User Define Keys 2............................................................
Programming User Define Keys 2.......................................................
Special Keystrokes User Define Keys 3...................................................
Lock/Unlock User Define Keys 4........................................................
Deleting User Define Keys 5............................................................
Image Annotation
Overview Image Annotation 2...........................................................
Special Keys Image Annotation 3........................................................
Comment Presets Image Annotation 5....................................................
Language Symbols Image Annotation 7...................................................
Annotation Library Image Annotation 8..................................................
Editing Annotations Image Annotation 12..................................................
Body Patterns
Overview Body Patterns 2...........................................................
Body Patterns Available Body Patterns 3..............................................
Customizing Body Pattern Packages Body Patterns 7....................................
Selecting a Body Pattern Package Body Patterns 10.......................................
LOGIQt 500 Quick Guide
2193742–100 Rev . 0
Table of Contents iii
Page 10
Measurements
Measurement Controls Measurements 2...............................................
Measurement Key Functions Measurements 3..........................................
Measurement Cursors Measurements 4................................................
Erasing Measurements Measurements 4...............................................
Measurement Unit Format Measurements 5............................................
BĆMode Measurements Measurements 6...............................................
Doppler Mode Measurements Measurements 10.........................................
MĆMode Measurements Measurements 15..............................................
CFM BĆMode Measurements Measurements 18..........................................
Measurement Clear Measurements 20..................................................
User OB Tables
Overview User OB Tables 2...........................................................
Programming a User Table User OB Tables 3............................................
Adding a User Table to the Measurement Menu User OB Tables 8..........................
Adding a Table to the Report Page User OB Tables 8.....................................
Table of Contents iv
LOGIQt 500 Quick Guide
2193742–100 Rev . 0
Page 11
User Presets
Overview User Presets 2...........................................................
Defining a User Preset User Presets 3................................................
Deleting a User Preset/Name User Presets 6..........................................
Recall Preset User Presets 6........................................................
Archiving User Presets User Presets 7...............................................
Loading User Presets User Presets 9.................................................
Index of Preset Parameters User Presets 11............................................
LOGIQt 500 Quick Guide
2193742–100 Rev . 0
Table of Contents v
Page 12

This page left blank intentionally .
Table of Contents vi
LOGIQt 500 Quick Guide
2193742–100 Rev . 0
Page 13

Prescription Device
Indications for Use
Contraindications
Servicable Components
User Manual
Troubleshooting
Safety
This chapter emphasizes precautions to be aware of when working with the LOGIQt 500. Refer to the
Maintenance
LOGIQt 500 Quick Guide
2193742–100 Rev . 0
chapters in the LOGIQt 500 User Manual for more thorough explanations.
Safety
and
User
Safety 1
Page 14

Prescription Device (for USA only)
CAUTION: United States law restricts this device to sale or use by or on the order of a physician.
Indications for Use
General
The LOGIQt 500 is a general purpose ultrasound imaging system intended for use in the dynamic evaluation of soft
tissue and vascular diseases in the following areas:
1. Head, Neck, Chest, Abdomen & Pelvis
2. Male reproductive organs, Female reproductive organs
3. Pregnant uterus
4. Limbs/Extremities
5. Cardiac
Safety 2
LOGIQt 500 Quick Guide
2193742–100 Rev . 0
Page 15

Indications for use (cont’d)
Fetal Doppler
The LOGIQt 500 system can be used for fetal examination in Pulsed Wave Doppler, Continuous Wave Doppler, Color
Flow Doppler, and Color M-Mode for the diagnosis of:
1. Structural fetal cardiac anomalies for high-risk patients.
2. Intrauterine growth retardation (IUGR) for high-risk patients with one or more of the following known or suspected
conditions:
a. Multiple pregnancy & Maternal hypertension
b. Hydrops & Diabetes
c. Lupus & Placenta abnormality
Contraindications
The LOGIQt 500 is NOT intended for use in the following areas:
1. Ophthalmic use (or any use causing the acoustic beam to pass through the eye).
2. Pulsed Wave Doppler, Continuous Wave Doppler, Color Flow Doppler, and Color M-Mode are not intended for routine
fetal examination or screening nor are they intended for fetal examination in a low-risk population. The use of Doppler,
even at minimal output levels, in fetal examination must be adjunctive with conventional fetal echocardiography and
other clinical diagnostic methods, for high risk patients only .
LOGIQt 500 Quick Guide
2193742–100 Rev . 0
Safety 3
Page 16

Serviceable Components
DANGER
Refer to the LOGIQt 500 Service Manual (P9030T A) for additional maintenance guidance.
The LOGIQt 500 contains no user serviceable components. To avoid electrical shock hazard,
do not remove panels or covers from the console. Failure to do so could cause serious injury .
Servicing must be performed by qualified service personnel only .
User Manual
Read and understand the LOGIQt 500 User Manual prior to operating the system. Keep the User Manual with the system
for quick and easy reference.
Troubleshooting
Who to Contact
If additional information, assistance or maintenance is needed, contact the local Applications, Sales or Service
Representative.
Safety 4
LOGIQt 500 Quick Guide
2193742–100 Rev . 0
Page 17

Troubleshooting (cont’d)
Trouble Images
Should the LOGIQt 500 ever have a problem imaging, the system has the capability of saving as many as eight trouble
images on the hard disk drive. Simply freeze the trouble image. Press Ctrl, W simultaneously . The message “In progress.
Please wait.” is displayed while the image is being saved.
After the image has been saved, the message “ Input comment? ‘y’ or ‘n’ ” is displayed. Press ‘y’ to add a maximum of 42
characters as comments to the trouble image file. Press ‘n’ for no comments.
After image number eight is saved, there is a warning to indicate the disk space is full. The ninth attempt to save a trouble
image will require writing over the first image, etc. (first in, first out).
NOTE: Trouble images do not display Patient Name, ID or Hospital Name information. That portion of the image is
blanked out and will not be shown when the file is recalled for display .
LOGIQt 500 Quick Guide
2193742–100 Rev . 0
Safety 5
Page 18

This page left blank intentionally .
Safety 6
LOGIQt 500 Quick Guide
2193742–100 Rev . 0
Page 19

Introduction
Major Features
Probe Ports
Password Ask
Power On
Power Off
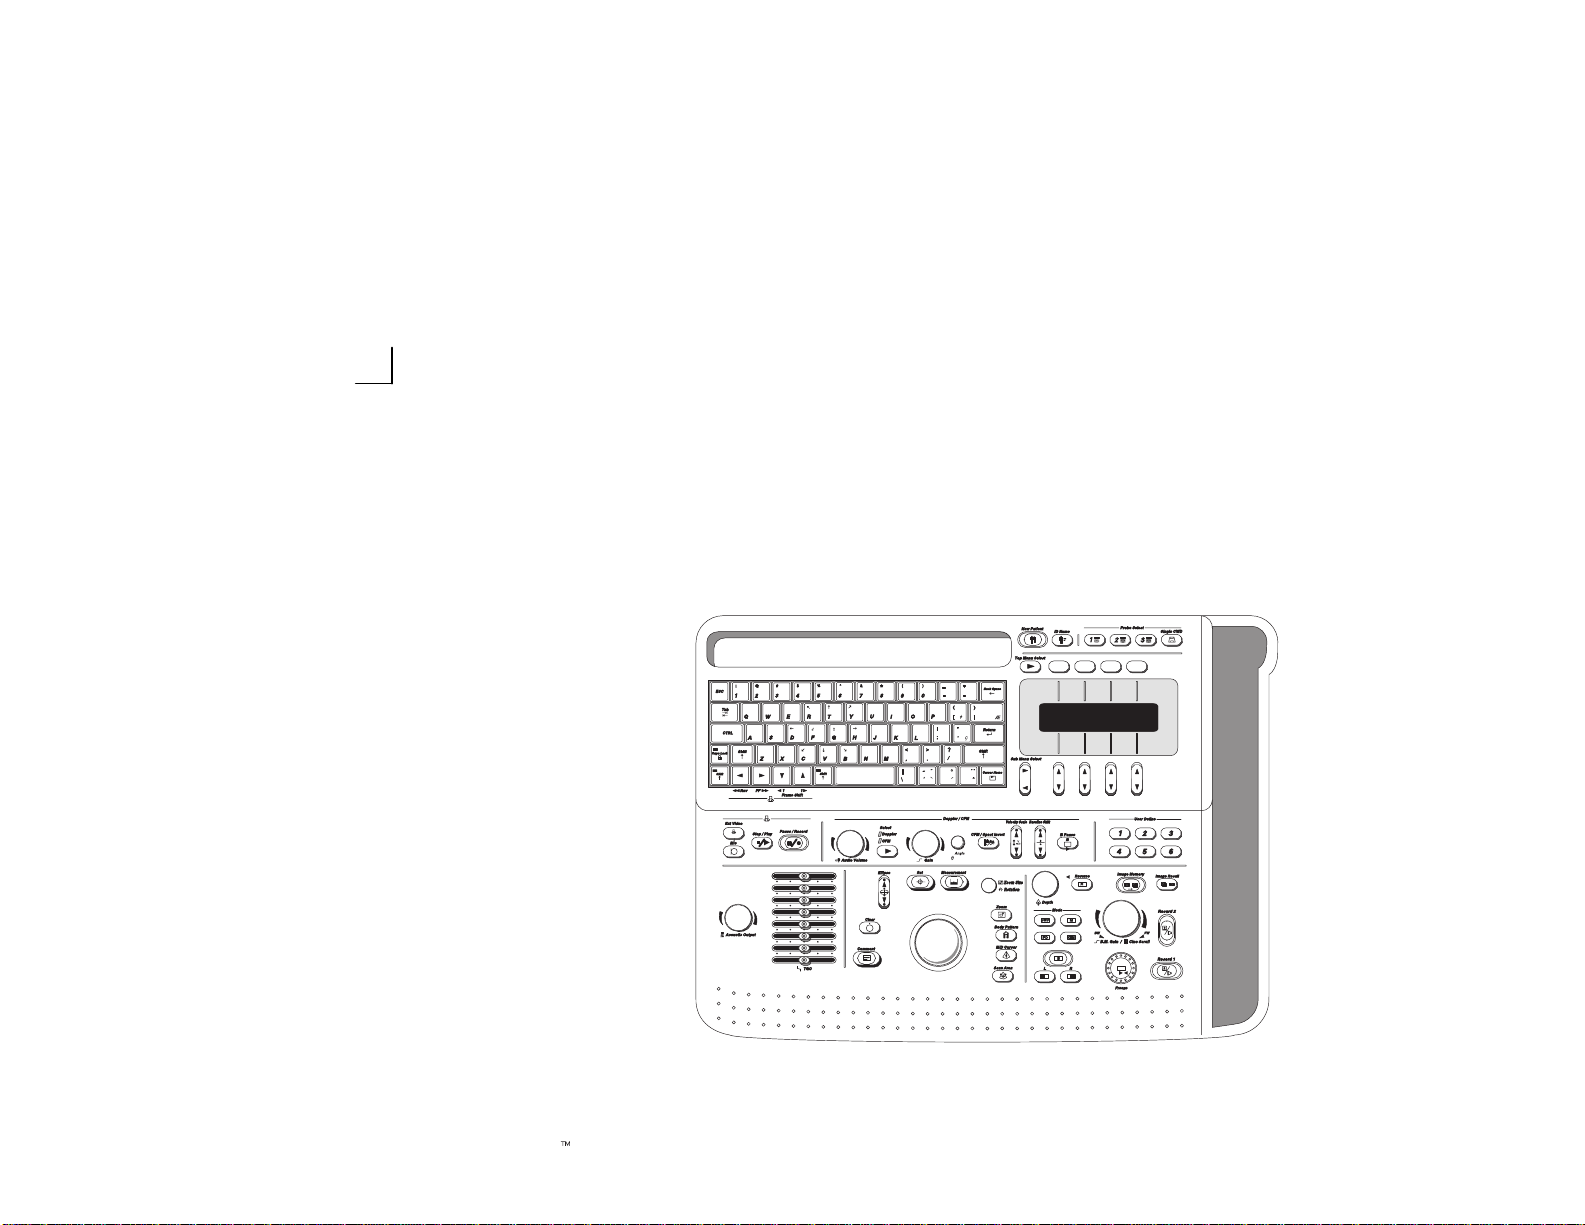
Keyboard
This chapter is an introduction to the basic features of the system console and the power up procedure of the
LOGIQt 500. Refer to the
Getting Started
chapter in the LOGIQt 500 User Manual for more thorough explanations.
LOGIQt 500 Quick Guide
2193742–100 Rev . 0
Introduction 1
Page 20
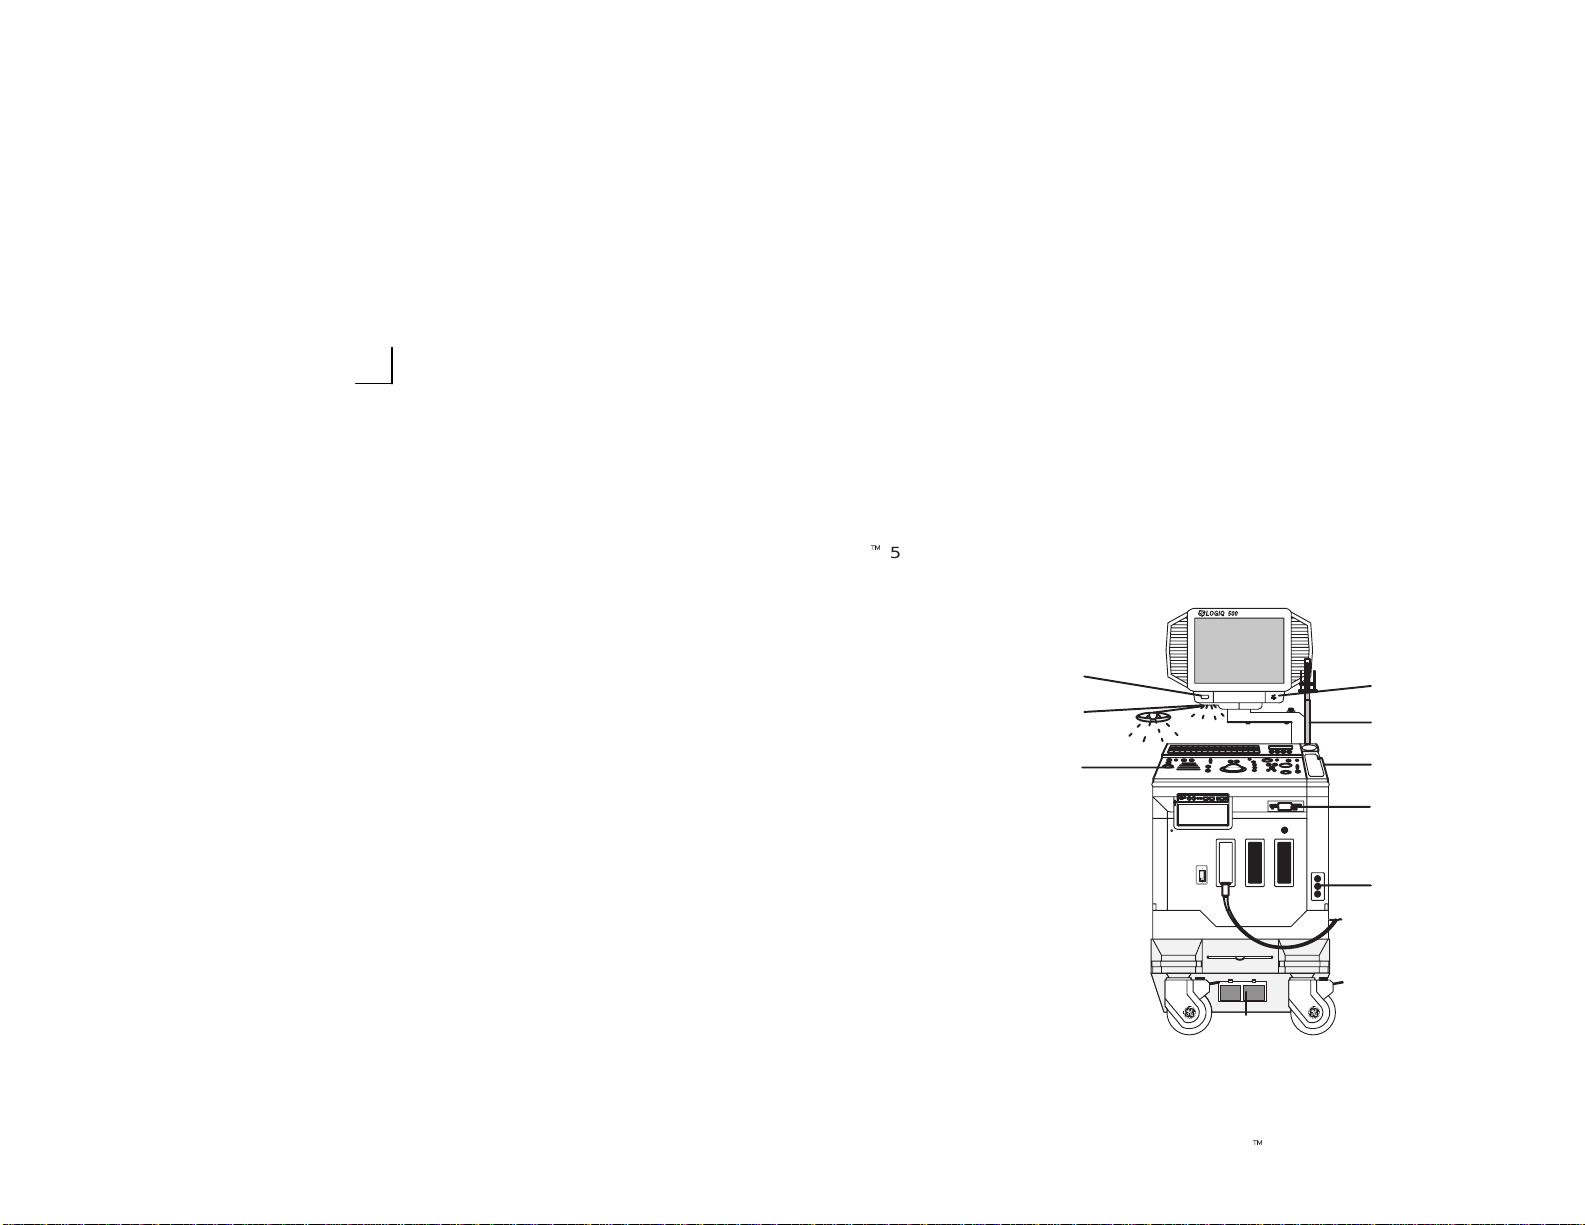
Major Features
The following are major features of the LOGIQt 500 system console. Most features come with the standard configuration,
while other features are options to the standard console.
1 – VCR Microphone 8 – B/W page Printer *
2 – Probe Cable Arm * 9 – Air Filter
3 – Probe Holder 10 – Power Supply Filter
4 – MOD Drive 11 – Keyboard
5 – Physio Panel * 12 – Keyboard Task Light
6 – Probe Connectors (3) 13 – Task Light Switch
7 – On/Off Switch
* = optional feature or accessory
13
12
11
1
2
3
8
4
Introduction 2
7
6
5
9
10
LOGIQt 500 Quick Guide
2193742–100 Rev . 0
Page 21
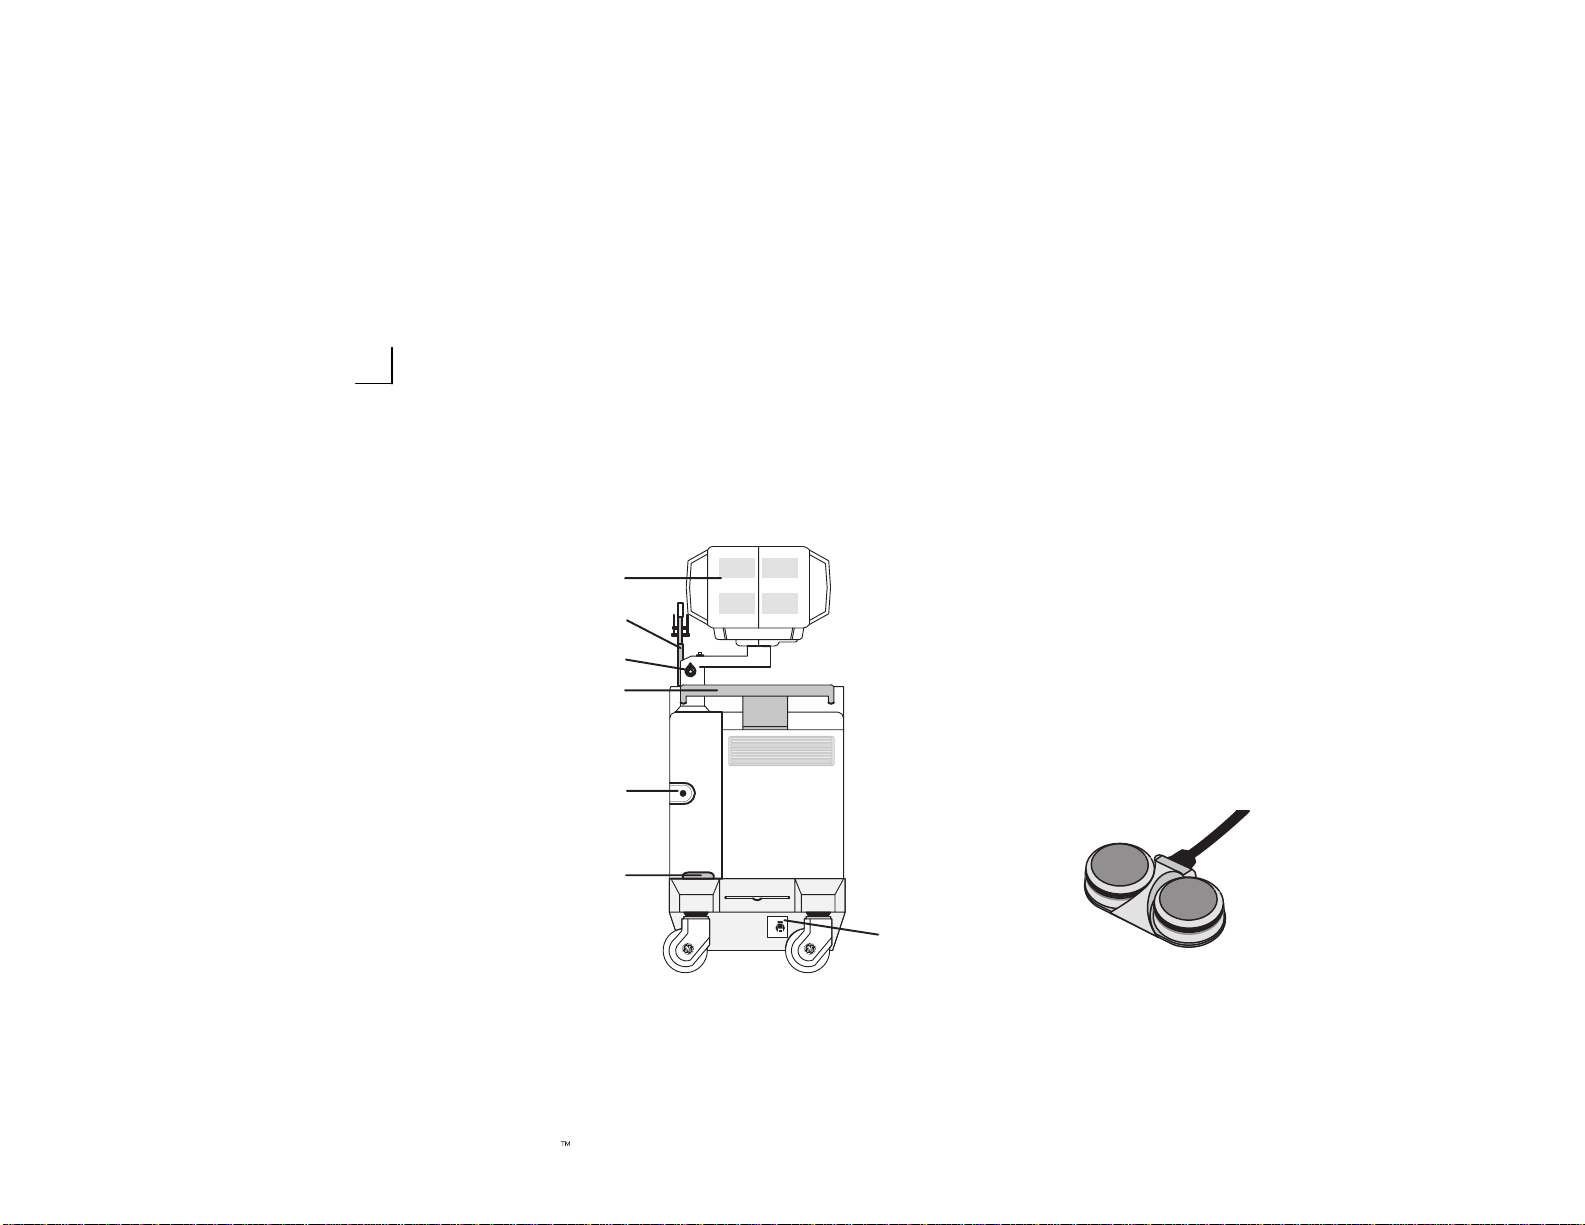
Major Features (cont’d)
8
7
6
5
4
1 – Circuit Breaker 5 – Handle for Pushing
2 – Air Filter 6 – Monitor Arm Swivel Lock
3 – Cable Access 7 – Probe Cable Arm *
4 – Peripheral Cable 8 – Color Monitor
Access Door
* = optional feature or accessory
Optional Freeze/Record Foot Switch
Freeze
3
LOGIQt 500 Quick Guide
2193742–100 Rev . 0
2
ON
ON
OFF10
1
Record
Introduction 3
Page 22
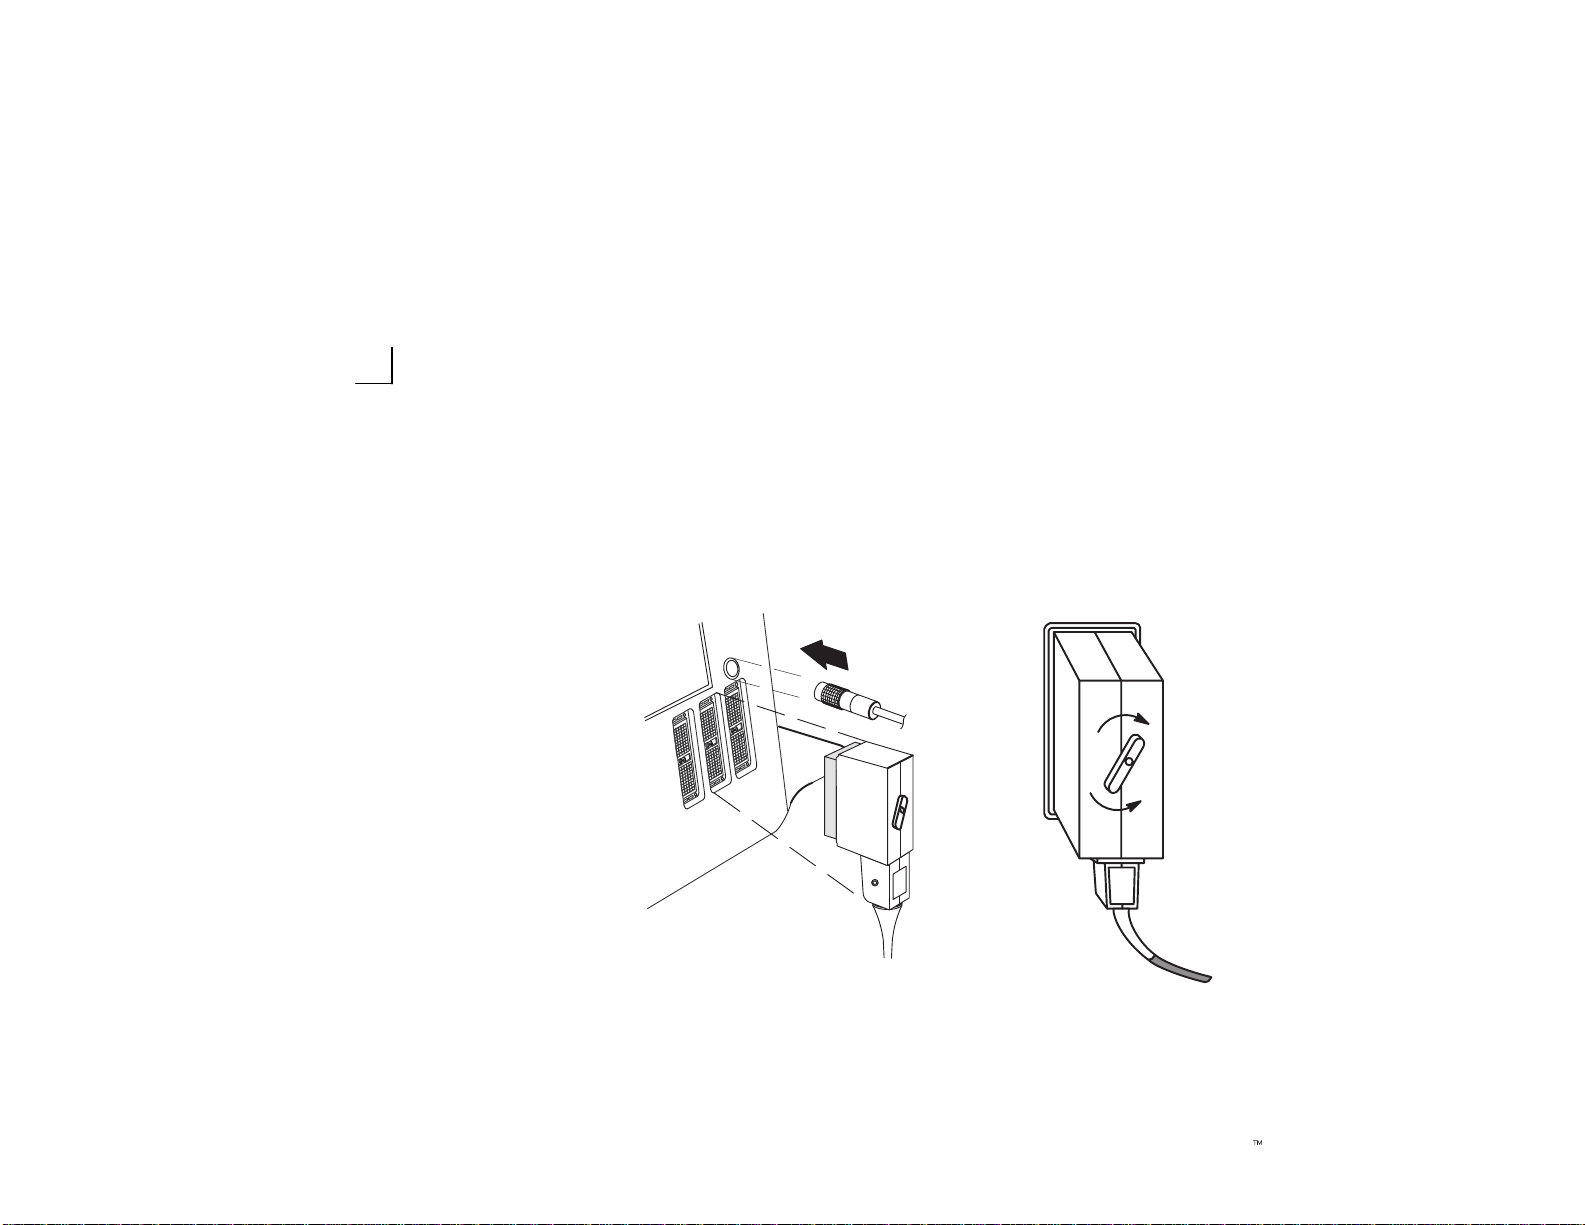
Probe Ports
All imaging probes can be plugged into any of the three probe ports. The CWD probe port is located above the three
imaging probe ports.
lock
unlock
NOTE: Ensure that the probe port is deactivated before disconnecting the probe.
Introduction 4
LOGIQt 500 Quick Guide
2193742–100 Rev . 0
Page 23

Password Ask
If User IDs and passwords have been established, enter a User ID and Password and press Return at the password ask
screen. If less than eight passwords have been entered, simply press Return twice.
NOTE: Password Ask, User ID Numbers (1-8) and Passwords (1-8) are programmed in the Set Up System Parameters
Menu page 6/6.
Version 4.00
LOGIQt 500 Quick Guide
2193742–100 Rev . 0
Introduction 5
Page 24

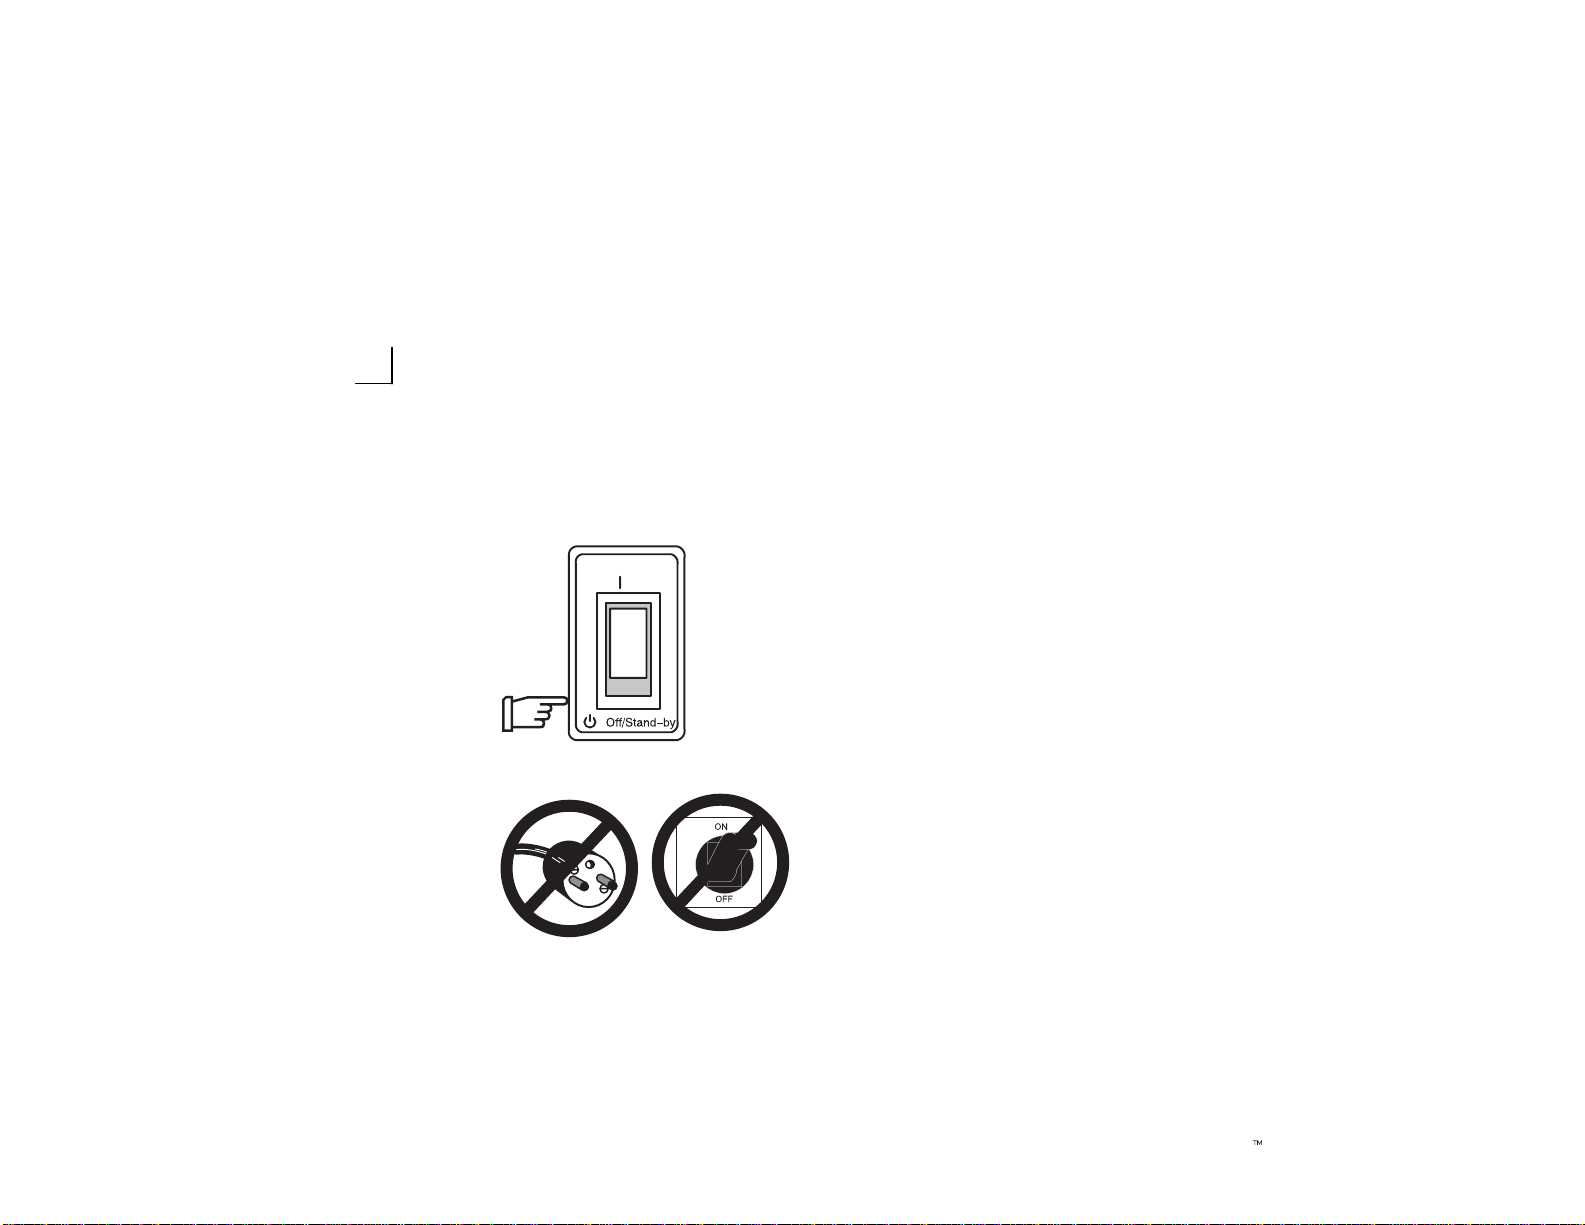
Power On
On
To power on the system, ensure that the Circuit Breaker, located on the back of the power
supply near the bottom of the unit, is turned on.
Press the Power On Power Off/Stand-by switch, located to the left of the probe connectors, to
the on position.
Introduction 6
LOGIQt 500 Quick Guide
2193742–100 Rev . 0
Page 25
Power On (cont’d)
During power up, the screen display changes as the system runs it’s self diagnostics.
Start of
diagnostic run
LOGIQt 500 Quick Guide
2193742–100 Rev . 0
21351312135131
Version 4.00 Version 4.00
Version 4.00
End of
diagnostic run
Introduction 7
Page 26
Power Off
On
.
After turning the power off, the system takes a few seconds to update certain
parameters to the hard drive before the power is disconnected.
NOTE: During this time the message
“Do not pull Power Cable.”
“Do not turn off Breaker.”
flashes on the monitor. The message “WARNING: NOW STARTING THE
POWER OFF PROCESS.” is also displayed at the bottom of the screen.
While the system is running during this power down process, do NOT turn off the
circuit breaker in the back of the machine and do NOT unplug the system from the
wall outlet.
If the system has not turned off five minutes after pressing the power switch off,
listen for hard drive activity. If there is no hard disk drive activity, the circuit
breaker on the bottom of the power supply can be used to turn off the system. Do
NOT turn off the circuit breaker while the hard disk is working.
Introduction 8
LOGIQt 500 Quick Guide
2193742–100 Rev . 0
Page 27
Keyboard
Keyboard controls have been arranged according to function and usage. This helps minimize operator movement while
scanning.
↓
"
q
"
❙
A
→
→
"❙A
LOGIQt 500 Quick Guide
2193742–100 Rev . 0
Introduction 9
Page 28
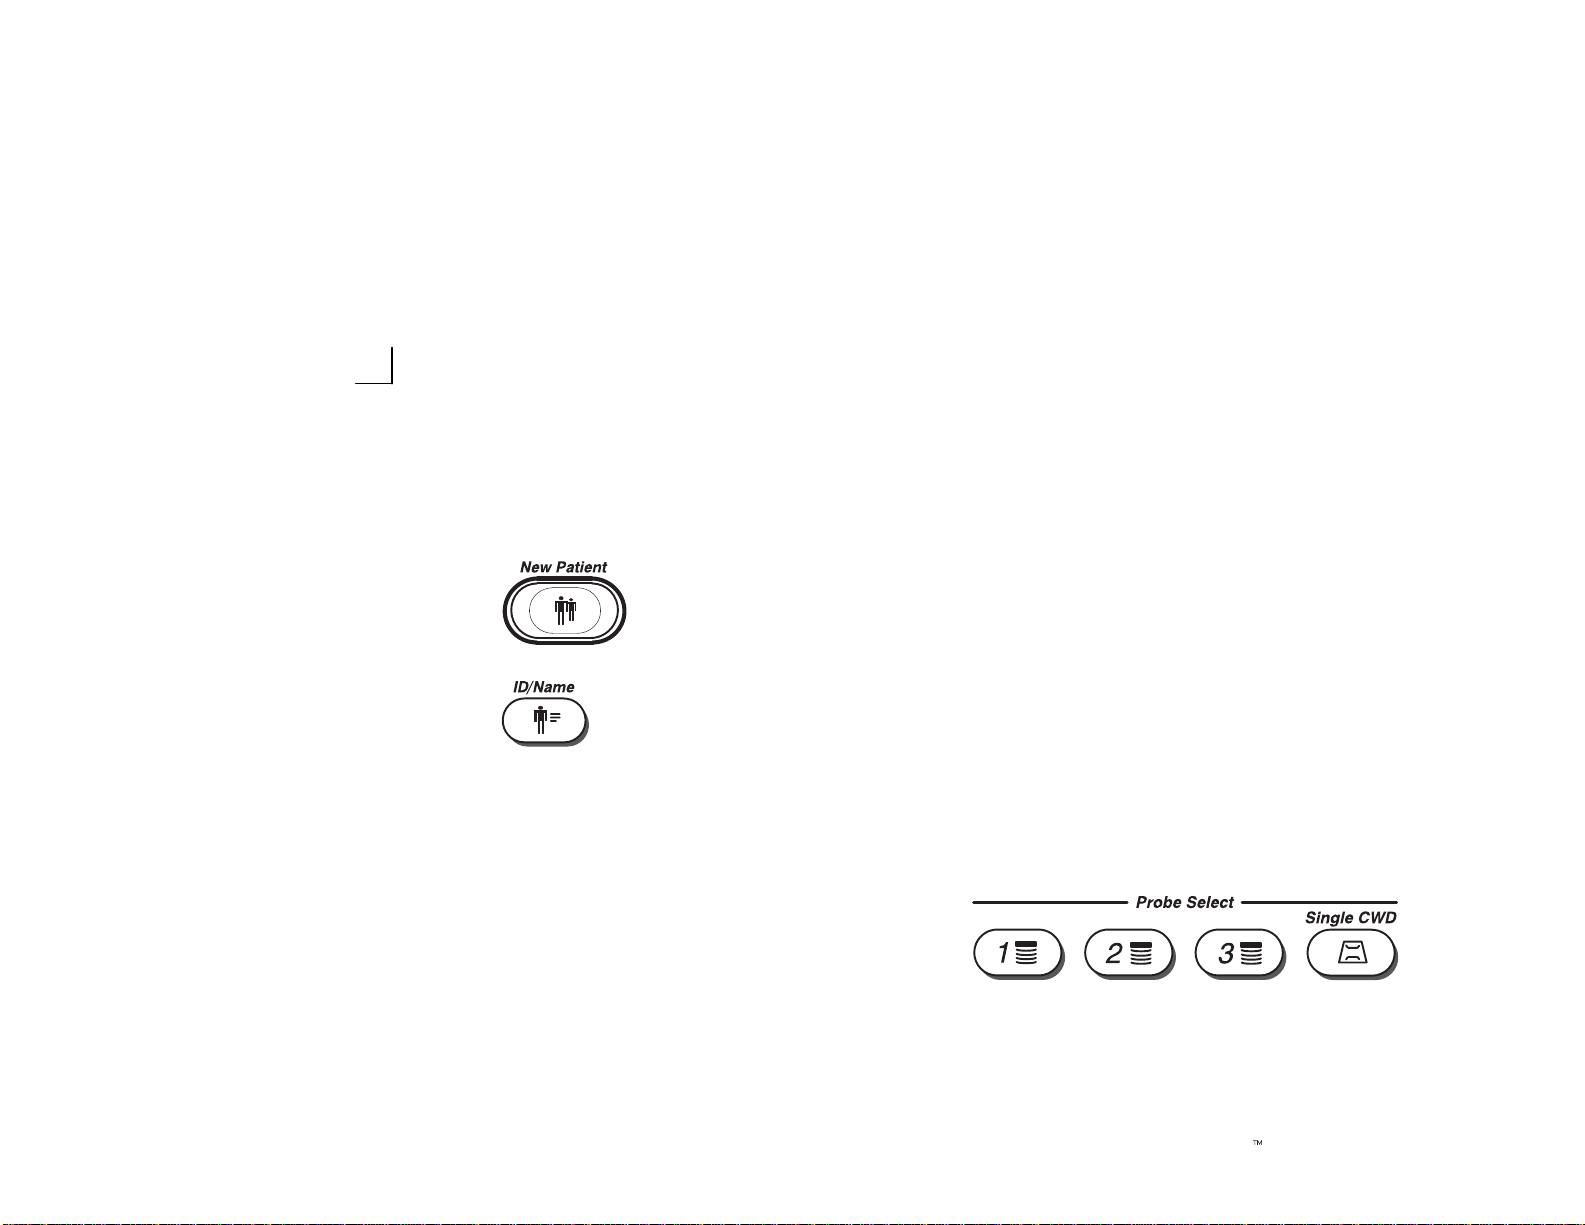
Patient Information Controls
Press the New Patient key at the beginning of each study to reset the system and enter new
patient data.
Press the ID/Name key during a study to change patient data or exam categories.
Probe Controls
Activate a probe by pressing the key corresponding
to the port to which it is attached.
Introduction 10
LOGIQt 500 Quick Guide
2193742–100 Rev . 0
Page 29
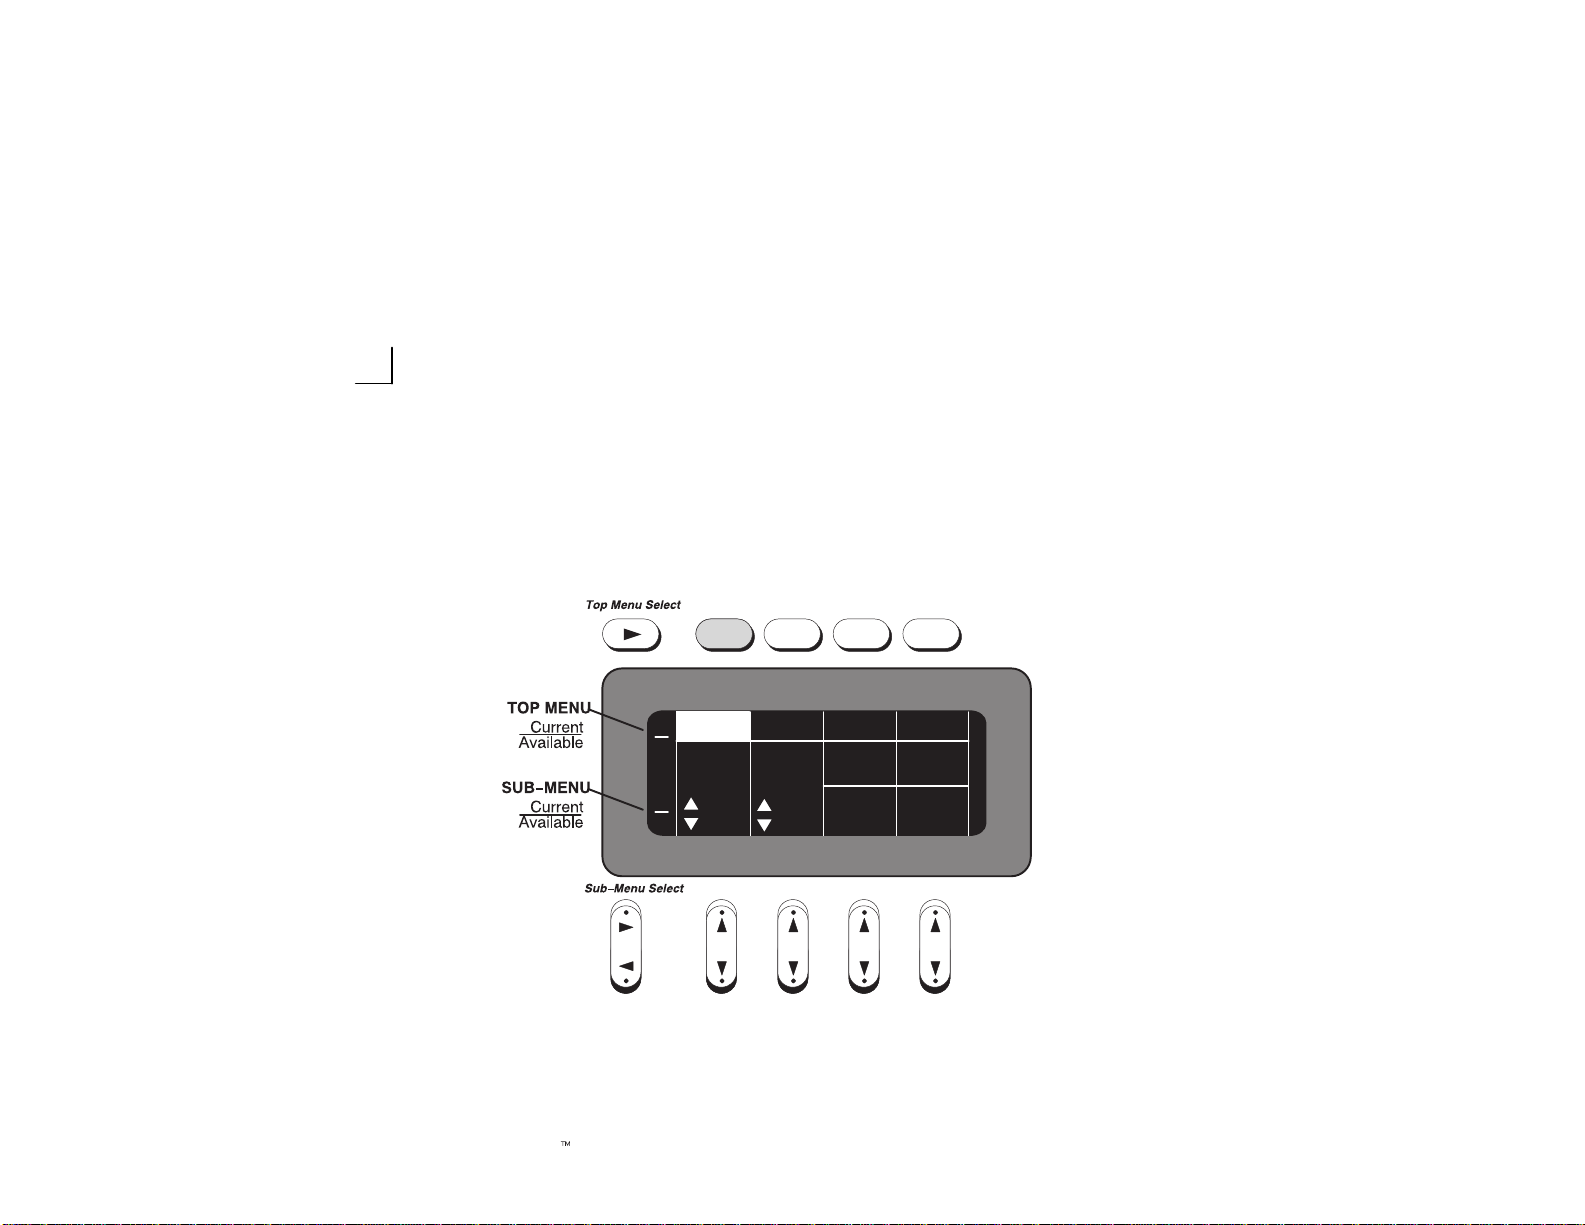
Soft Menu Control Panel
The Soft Menu Display has four Top Menu selections and eight Sub Menu selections available.
The Top Menu Select key cycles through the Top
Menu categories. The keys above the Top Menu
are used to make the desired Top Menu selection.
1
2
Frame Biopsy
Average Lines
2
4
LOGIQt 500 Quick Guide
2193742–100 Rev . 0
Preset ECG
Imaging
OFF
Freq
3 MHz
Set UpB
Image
Softener
Color
3D
Mode
The Sub-Menu Select rocker switch cycles
through the available Sub Menu pages. The
rocker switches below the Sub Menu selections
will increase/decrease, turn on/off or change the
selected parameter for that Sub Menu category .
Introduction 11
Page 30
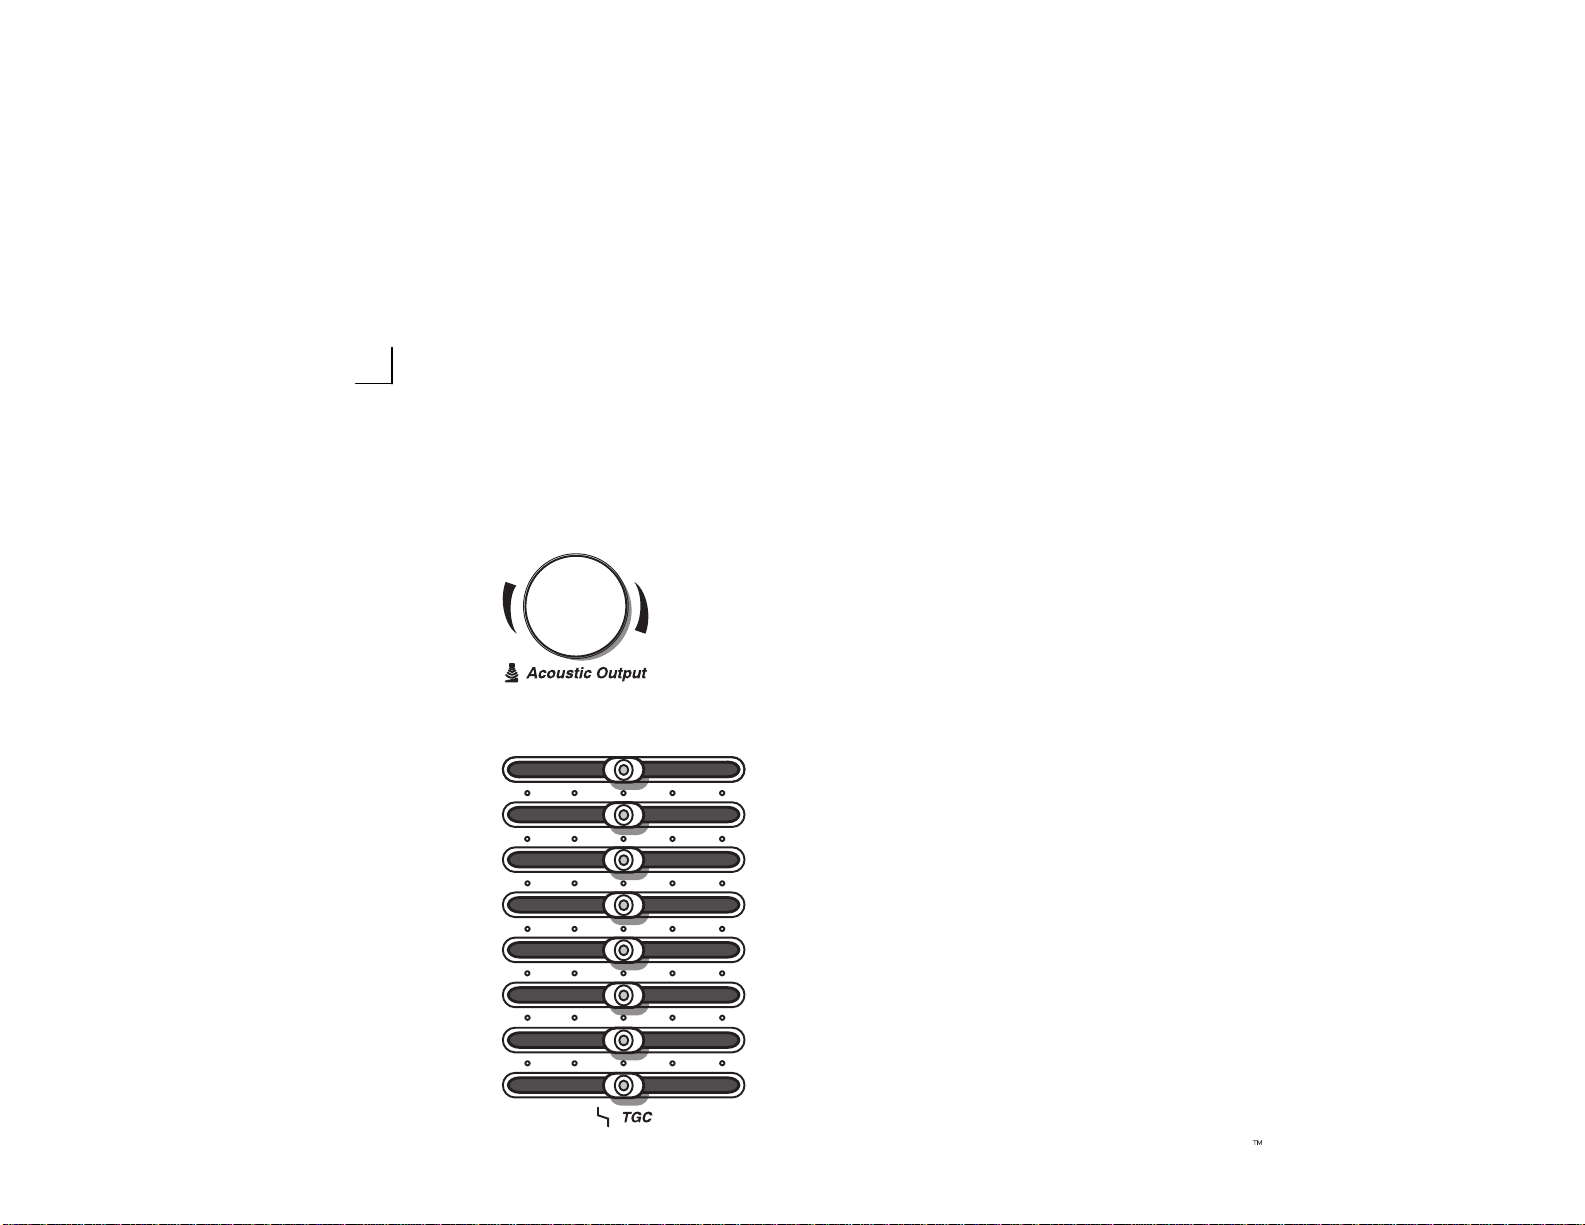
Acoustic Output and TGC
The Acoustic Output Control varies the power of the transmitted signal. It should
be adjusted As Low As Reasonably Achievable when scanning patients
(ALARA).
Always optimize B/M Gain before increasing Acoustic Output.
The TGC (Time Gain Compensation) controls vary the gain of the received
echoes at a specific depth. These controls compensate for return signal
attenuation as depth increases.
Introduction 12
LOGIQt 500 Quick Guide
2193742–100 Rev . 0
Page 31

Trackball, Measurements & Annotations
The Trackball is surrounded by all of the keys that are associated with it’s operation.
Comment: Assigns Trackball to the comment
cursor and displays the annotation library in the
soft menu.
Clear: Used to erase comments and
measurements.
Ellipse: Used to activate the ellipse function and
size the active axis.
Set: Used to fix measurement cursors, select
menu items or end a function.
Measurement: Displays the exam category
calculation package in the soft menu and enables
general measurement functions.
Zoom Size/Rotation: Adjust real-time zoom size
and rotates body pattern probe marker.
Zoom: Enables real-time or freeze zoom function.
Body Pattern: Displays body pattern selections in the soft menu.
M/D Cursor: Assigns trackball control to M-Mode cursor, Doppler cursor or CFM window in Color Mode.
Scan Area: Used to assign trackball control to adjust size/position B-Mode sector display , CFM window, and horizontal
size/position of the real-time zoom window.
↑
↓
LOGIQt 500 Quick Guide
2193742–100 Rev . 0
Introduction 13
Page 32

Mode, Display and Record Controls
This group of controls is used most often while scanning.
They control functions such as:
Mode controls: B, PD, CFM, CWD & M.
Depth: Display field of view.
Reverse: Left/right scan orientation.
Multi-Image: L/R split screen display.
B/M Gain & Cine control: Gain control while
scanning. Cine control in freeze. Refer to the
Cine Memory
Freeze: Stops image acquisition.
Image Memory: Saves frozen image to temporary
memory. Refer to the
Image Recall: Displays last image saved in Image
Memory and the available images in the soft menu.
Refer to the
Record 1 & 2: Printer/camera control.
section for details.
Image Memory
Image Memory
section for details.
section for details.
"❙A
→
→
Introduction 14
LOGIQt 500 Quick Guide
2193742–100 Rev . 0
Page 33

Doppler and CFM Controls
These dual function controls affect both Doppler and Color Flow Mapping. While in Doppler with CFM the Select switch
can toggle the affect of the controls between B/W Doppler and Color Flow .
↑
↓
q
m/s
V
"❙A
Audio Volume: Used to increase or decrease Doppler audio volume output.
Select Doppler/CFM: Assign Doppler controls to adjust B/W Doppler or CFM.
Gain: Adjusted overall received echo gain for Doppler or CFM.
q
Angle: Adjusts angle correction for flow velocity calculation.
CFM/Spect Invert: Inverts Doppler spectrum or Color Flow Map assignments.
Velocity Scale: Adjusts velocity scale to accommodate faster/slower blood flow velocities.
Baseline Shift: Minimize aliasing by assigning more of the overall displayed velocity scale to forward or reverse flow.
Changes Focus Position when in B-Mode.
B Pause: Freezes the B-Mode image while keeping the Doppler spectrum or M-Mode trace display active. Press to view
CW Doppler.
LOGIQt 500 Quick Guide
2193742–100 Rev . 0
Introduction 15
Page 34

VCR Controls
When using the approved Sony UP-9500MD VCR, these controls
affect the record and playback functions of the VCR from the
LOGIQt 500 keyboard.
When the Blue Shift key is activated, the left, right, up and down
arrows on the keyboard are assigned to control the VCR playback.
Press the Ext Video key to view an external video signal on the
scan monitor.
Turning the Mic function on will record everything spoken in the
vicinity of the console on the video tape.
NOTE: Turn the Mic function off before pressing Ext Video if no
audio recording is desired. This does not effect Doppler audio.
User Define Keys
User Define keys can be programmed by the user to perform a
series of keystrokes that are done repetitively. Each sequence can
store 64 keystrokes including pauses for toggle functions. Refer to
User Define Keys
the
section for details.
↓
"
J
/
/
F
Introduction 16
LOGIQt 500 Quick Guide
2193742–100 Rev . 0
Page 35

Set Up Menu Access
Hospital Name
Date/Time
System ID Number
Language Selection
Display Format
Initial Set Up
This chapter shows how to customize the LOGIQt 500 for patient scanning. Refer to the
Your System
LOGIQt 500 Quick Guide
2193742–100 Rev . 0
chapters in the LOGIQt 500 User Manual for more thorough explanations.
Basic Scan and Customizing
Initial Set Up 1
Page 36

Set Up Menu Access
The system has three sets of parameters
that can be preset for ease of operation
and improved productivity . Under the
Set Up Top Menu, SYSTEM PARAM
(System Parameters) has six menu
pages, PRESET PROG (Preset
Program) has ten menu pages and
CUSTOM DISP (Custom Display) has
seventeen menu pages.
To access a menu page, select the Set
Up Top Menu.
Use the Sub-Menu rocker switches to
display SYSTEM PARAM, PRESET
PROG or CUSTOM DISP menus.
Use the Set key and PRIOR/NEXT
menu selections to move through the
available pages.
Use the Trackball to select the desired
parameter and change as necessary .
Refer to the
further details.
User Preset
section for
1
2
Custom User
Display
System
1
1
Paramtr
Preset ECG
Preset
Program
Set UpB
Save
Values
Utility Diag
Define
Initial Set Up 2
LOGIQt 500 Quick Guide
2193742–100 Rev . 0
Page 37

Hospital Name
Enter the hospital, clinic or office name on
the Set Up/System Parameter page 1/6.
This hospital name appears in the upper
left corner of the monitor just below the
patient name.
The hospital name stays the same for all
patients and exam categories until it is
changed on this system parameter page.
LOGIQt 500 Quick Guide
2193742–100 Rev . 0
Initial Set Up 3
Page 38

Date/Time
Format
Select the format that will be used to
display the date and time.
The date can be displayed as:
Year/Month/Day
Month/Day/Year
Day/Month/Year.
The time can be displayed as:
24 hour (military time)
12 hour (am/pm is hard to distinguish).
Initial Set Up 4
LOGIQt 500 Quick Guide
2193742–100 Rev . 0
Page 39

Adjustment
To adjust the date and time, the system
clock must be adjusted.
In the Set Up Top Menu, select the Utility
menu. Enter number 01 (Time
Adjustment) to change the time and/or
date.
LOGIQt 500 Quick Guide
2193742–100 Rev . 0
Initial Set Up 5
Page 40

Adjustment (cont’d)
To Advance (add) the time, type in the
number of hours and minutes to add to
the currently displayed time. HH:MM is
the format to use. Maximum input can
only be 12:00.
To Retard (subtract) the time, type a
minus sign (–) then the hours and
minutes to be subtracted from the
currently displayed time. –HH:MM is the
format to use. Maximum input can only
–12:00.
be
To change the date, advance or retard
the appropriate amount of time.
NOTE: The 12 hour display format has
no am/pm indicator. The date will
change at noon if the set time is 12
hours off.
Press the Utility rocker switch to exit the
Utility menu.
Initial Set Up 6
LOGIQt 500 Quick Guide
2193742–100 Rev . 0
Page 41

System ID Number
The LOGIQt 500 system ID number is
assigned at the factory . This number is
used by the system when initializing a
video tape or MOD (image archive
option) for image storage.
If there is more than one system at a
facility , the ID numbers should be set the
same. A scanner will not write to a tape
or MOD if the media was initialized on a
different scanner (different ID number).
A system ID number can be assigned in
the range of 00000 to 16383.
To display or enter a System ID number:
1. Press the Set Up Top Menu key.
2. Select Utility from the Set Up menu.
3. Enter number 10 (System ID
Entry/Display) and press Return.
4. Enter number 1 (ID Entry) or 2 (ID
Display) and press Return.
5. Enter an ID number in the range of 00000–16383 and press Return. If the ID was displayed, make a mental note or
record the number for future reference.
6. Press the Utility rocker switch to exit the Utility menu and return to the previous scan mode.
LOGIQt 500 Quick Guide
2193742–100 Rev . 0
Initial Set Up 7
Page 42

Language Selection
There are five different language
selections to view the screen messages
and displays. The language selection is
located in the Set Up/System
Parameters page 1/6.
Select to have the display in:
English
French
German
Spanish
Italian.
Initial Set Up 8
LOGIQt 500 Quick Guide
2193742–100 Rev . 0
Page 43

Display Format
A wide variety of display formats and mode combinations can be programmed to be presented on the LOGIQt 500.
Parameters in the Set Up/Custom Display menus allow the user to turn on or off display mode combinations.
Custom Display Page 11
Timeline Format
Choose to display B-Mode and Timeline
formats side/side (B-Mode on the left half
and M-Mode or Doppler on the right half)
or Top/Bottom (B-Mode on the top half
and M-Mode or Doppler on the bottom
half).
M-Mode
Turn on or off the seven M-Mode display
format selections. Side/Side choices
apply only if Side/Side is selected in
Timeline Format. Top/Bottom choices
apply only if Top/Bottom is selected in
Timeline format.
The parameter M Format (Side/Side,
Full) sets the default M-Mode display for
full screen M-Mode.
LOGIQt 500 Quick Guide
2193742–100 Rev . 0
Initial Set Up 9
Page 44

Timeline Sweep Method
Use this parameter to select a moving bar
update method for M-Mode or Doppler
(image updates as a blue bar moves
across the screen) or Continuous Scroll
(image updates at the edge of the timeline
and scrolls across the screen).
Custom Display Page 12
Doppler
Turn on or off the seven Doppler display
format selections. Side/Side choices apply
only if Side/Side is selected in Timeline
Format. Top/Bottom choices apply only if
Top/Bottom is selected in Timeline format.
The parameter D Format (Side/Side, Full)
sets the default Doppler Mode display for
full screen Doppler Mode.
Initial Set Up 10
LOGIQt 500 Quick Guide
2193742–100 Rev . 0
Page 45

Scanning
Patient ID Menus
Report Pages
This chapter shows the Patient Data Entry Menu and exam category measurement/calculation report pages found on the
LOGIQt 500. Refer to the
Basic Scan
chapter in the LOGIQt 500 User Manual for more thorough explanations.
LOGIQt 500 Quick Guide
2193742–100 Rev . 0
Scanning 1
Page 46

Patient ID Menus
The New Patient key should be pressed at the beginning of each patient study . This clears old patient data, annotations,
measurements and calculations.
When the New Patient key is pressed,
the Patient Entry menu appears.
If the New Patient Y/N Ask preset is set
to on, the system asks:
“Do you really want to change patients? (y/n)”
This preset, found on Set Up/Preset
Program page 10/10, can be a
safeguard in case the New Patient key is
pressed by mistake during a patient
study.
This preset is exam category dependent.
Scanning 2
LOGIQt 500 Quick Guide
2193742–100 Rev . 0
Page 47

Patient ID Menus (cont’d)
For a new patient entry , choose the
appropriate exam category for the study
to be accomplished.
Use the Trackball to move the highlight
cursor to the Exam Category Selection
line.
Ensure that the Blue Shift key is not
active.
Enter the desired exam number.
This selection sets up all system
parameters for a particular type of exam.
Choose from:
1. RAD/ABDOMEN
2. OBSTETRICS
3. GYNECOLOGY
4. CARDIOLOGY
5. V ASCULAR
6. UROLOGY
7. SMALL P ARTS
LOGIQt 500 Quick Guide
2193742–100 Rev . 0
Scanning 3
Page 48

Patient ID Menus (cont’d)
Enter the patient’s name, ID number and
notes that may apply to the study .
The patient name and patient ID will
appear on the image screen. All other
information is automatically entered into
appropriate exam report pages.
The Tech ID line is optional. It may be
used to identify who performed the study .
Scanning 4
LOGIQt 500 Quick Guide
2193742–100 Rev . 0
Page 49

Patient ID Menus (cont’d)
The exam information to be filled in
depends on the exam category selected.
The example to the right is for the
Obstetrics category. (The BBT selection
does not appear in the USA OB format.)
Other typical exam information may be:
AGE : __yrs __mos __wks __days
HEIGHT : __cm __in __ft __in
WEIGHT: __._kg ___lbs
BSA : __._m
SEX
The unit prompts for age, height and
weight can be turned on/off in Set
Up/Preset Program page 10/10.
These preset parameters are exam
category dependent.
: ___
2
LOGIQt 500 Quick Guide
2193742–100 Rev . 0
Scanning 5
Page 50

Patient ID Menus (cont’d)
The Ref MD can be added to note the
referring physician.
The two lines in the comment field will
hold 50 characters. These comments
are not the same as the comment field
found on the measurement/calculation
report pages.
Highlight EXIT and press Return or
press the New Patient key when the
patient entry menu data has been
completed.
The system will take a few seconds to
load new exam category parameters and
calibrate the attached transducers before
returning to the scan mode.
Scanning 6
LOGIQt 500 Quick Guide
2193742–100 Rev . 0
Page 51

Patient ID Menus (cont’d)
If the patient information or exam category needs to be changed during a study , use the
ID/Name key.
When the changes have been completed, highlight EXIT and press Return or press the
ID/Name key again to return to the scan mode.
LOGIQt 500 Quick Guide
2193742–100 Rev . 0
Scanning 7
Page 52

Report Pages
Vascular Report Page
The Vascular Report Page comes with
the optional V ascular Calculations
software.
Scanning 8
LOGIQt 500 Quick Guide
2193742–100 Rev . 0
Page 53

GYN Report Page
The GYN Report Page comes with the
standard GYN calculation software.
LOGIQt 500 Quick Guide
2193742–100 Rev . 0
Scanning 9
Page 54

OB Report Pages
The OB Report Pages come with the optional OB Calculations software. There are two report pages for each of the four
different OB calculation formats. The first report page is different for all four formats. The second report page is different
for USA, but the European, Tokyo University and Osaka University formats share the same second report page.
Gestational Age Error Marker
Whenever three or more gestational age measurements are included in the Composite Gestational Age (CGA)/Composite
Ultrasound Age (CUA) calculation, an arrow may appear on the report page to mark the gestational age which is farthest
from the CGA/CUA. This arrow is immediately to the right of the GA display . If two or more gestational age estimates are
equal and the farthest from the CGA/CUA, the error marker will not be displayed.
OB Report Format
The OB Report Format selection is located in the Set Up/System Parameters page 2/6.
Choose to display “OB Report Format” as:
Tokyo University
Osaka University
USA
European.
Scanning 10
LOGIQt 500 Quick Guide
2193742–100 Rev . 0
Page 55

USA Format – Page 1
The report page shown is the first page
available when USA OB Report Format
is selected in Set Up System Parameters
page 2/6.
OB Report Page 1 – USA Format
LOGIQt 500 Quick Guide
2193742–100 Rev . 0
Scanning 11
Page 56

USA Format – Page 2
The report page shown is the second
page available when USA OB Report
Format is selected in Set Up System
Parameters page 2/6.
OB Report Page 2 – USA Format
Scanning 12
LOGIQt 500 Quick Guide
2193742–100 Rev . 0
Page 57

European Format – Page 1
The report page shown is the first page
available when European OB Report
Format is selected in Set Up System
Parameters page 2/6.
The report page shown on Scanning 14
is the second report page which is
available when European Format is
selected.
OB Report Page 1 – European Format
LOGIQt 500 Quick Guide
2193742–100 Rev . 0
Scanning 13
Page 58

European, Tokyo University
and Osaka University Format –
Page 2
The report page shown is the second
page available when either European,
Tokyo University or Osaka University OB
Report Format is selected in Set Up
System Parameters page 2/6.
OB Report Page 2 – European, Tokyo University and Osaka University Formats
Scanning 14
LOGIQt 500 Quick Guide
2193742–100 Rev . 0
Page 59

Tokyo University Format –
Page 1
The report page shown is the only one
available when Tokyo University OB
Report Format is selected in Set Up
System Parameters page 2/6.
The report page shown on Scanning 14
is the second report page which is
available when Tokyo University Format
is selected.
OB Report Page 1 – Tokyo Univeristy Format
LOGIQt 500 Quick Guide
2193742–100 Rev . 0
Scanning 15
Page 60

Osaka University Format –
Page 1
The report page shown is the only one
available when Osaka University OB
Report Format is selected in Set Up
System Parameters page 2/6.
The report page shown on Scanning 14
is the second report page which is
available when Osaka University Format
is selected.
OB Report Page 1 – Osaka Univeristy Format
Scanning 16
LOGIQt 500 Quick Guide
2193742–100 Rev . 0
Page 61

Cardiology Report Pages
This report page is an example of one of
many Cardiology Report pages available
with the optional cardiac calculation
packages.
LOGIQt 500 Quick Guide
2193742–100 Rev . 0
Scanning 17
Page 62

This page left blank intentionally .
Scanning 18
LOGIQt 500 Quick Guide
2193742–100 Rev . 0
Page 63

Memory Storage
Storage Display
Memory Recall
Image Memory
This chapter shows how to save and recall images in the temporary memory of the LOGIQt 500. Refer to the
chapter in the LOGIQt 500 User Manual for more thorough explanations.
LOGIQt 500 Quick Guide
2193742–100 Rev . 0
Image Memory 1
Basic Scan
Page 64

Memory Storage
The LOGIQt 500 has storage space in RAM (Random Access Memory) for eight archived images. This storage is
temporary. It is erased when the New Patient key is pressed or power is turned off.
Press the Freeze key to stop image acquisition.
"❙A
The Cine Scroll function can be used to display the desired image on the monitor. Using the
scroll function will erase any measurements/calculations made.
→
Image Memory 2
Press Image Memory to save the displayed image in the next available memory location.
LOGIQt 500 Quick Guide
2193742–100 Rev . 0
Page 65

Storage Display
Images stored in system memory can be recalled for
review or archival.
The Soft Menu contains the display mode and time the
images were stored.
Memory Recall
To recall images stored in system memory:
→
1. Press the Image Recall key. The Image Recall Sub-Menu is displayed on the Soft Menu
display .
2. The last image to be placed into Image Memory is displayed.
3. Use the appropriate Sub-Menu rocker switch to select the desired image to recall.
After the recalled image is displayed, no image post processing can be performed. Only
Comment, Measurement, Body Pattern, Clear, Ext Video and Mic functions are available.
C,B/BC,BDC,BMC,B
LOGIQt 500 Quick Guide
2193742–100 Rev . 0
Image Memory 3
Page 66

This page left blank intentionally .
Image Memory 4
LOGIQt 500 Quick Guide
2193742–100 Rev . 0
Page 67

Cine Storage
Cine Image Display
Cine Loop Review
Exit Cine
Cine Memory
This chapter shows how to use the Cine memory capabilities of the LOGIQt 500. Refer to the
LOGIQt 500 User Manual for more thorough explanations.
LOGIQt 500 Quick Guide
2193742–100 Rev . 0
Basic Scan
chapter in the
Cine Memory 1
Page 68

Cine Storage
The LOGIQt 500 has storage space for several seconds of previous image frames. An extended cine memory option is
available that provides five times the amount of storage compared to the standard cine memory . This storage is always
active while acquiring images during scanning.
Cine Memory Cine Functionality
Cine memory is erased when changing the following: Post Processing functions can be performed while in cine
such as:
S
New Patient
S
Unfreezing
S
Power is turned off
S
Probe
S
Scan mode
S
Depth
S
Display format (zoom, dual, rotate)
S
Timeline sweep speed (D/M-Modes)
S
Changing the PWD velocity scale (spectrum only)
S
Changing the Color Flow Velocity Scale.
S
Measurements and calculations
S
Color Baseline Shift
S
B Color
S
Color Flow Velocity Tag
S
Color Flow Display Threshold
S
CFM Spectrum Invert
S
Zoom
S
Rejection
S
Gray Scale Maps
S
Edit annotations.
Cine Memory 2
LOGIQt 500 Quick Guide
2193742–100 Rev . 0
Page 69

Cine Image Display
To display cine images:
Press the Freeze key to stop image acquisition.
"❙A
The Cine Scroll function is used to display the desired image on the monitor. The B/M Gain /
Cine Scroll knob allows for displaying cine memory frame by frame.
NOTE: One click of the Cine Scroll knob erases displayed measurements.
LOGIQt 500 Quick Guide
2193742–100 Rev . 0
Cine Memory 3
Page 70

Cine Image Display (cont’d)
To display the cine gauge:
Set the “Cine Gauge Auto Display”
parameter on Set Up/ Custom Display
page 9/17 to ON. This automatically
displays the cine gauge when the cine
scroll function is used.
Setting “Cine Gauge Auto Display” to
OFF will not display the Cine gauge
while reviewing cine images unless it is
turned on in the cine soft menu.
Cine Loop Review
To create a Cine Loop:
1. Press Freeze.
2. Rotate the Cine Scroll knob to the desired starting
position on the cine gauge.
3. Press START FRAME on the Cine Sub-Menu.
Cine Gauge
Current Frame
Cine Memory 4
LOGIQt 500 Quick Guide
2193742–100 Rev . 0
Page 71

Cine Loop Review (cont’d)
4. Rotate the Cine Scroll knob to the desired ending
position on the cine gauge.
5. Press END FRAME
6. Press REVIEW LOOP. Cine Review Loop playback
begins at the selected speed.
The Review Loop function is not
available for Doppler spectrum or
M-Mode.
To adjust loop playback speed:
Press the top of the LOOP SPEED
rocker switch to increase playback
speed. Press the bottom of the LOOP
SPEED rocker switch to slow down
playback speed.
Start Frame Marker
End Frame Marker
LOGIQt 500 Quick Guide
2193742–100 Rev . 0
Cine Memory 5
Page 72

Cine Loop Review (cont’d)
The Multipl Cine Soft Menu selection is
used in Dual B-Mode Cine Operation.
With Multipl Cine on (menu highlighted),
Cine review of the two B-Mode images
can be done simultaneously . With
Multipl Cine off, Cine review is done
separately using the L/R keys to
designate the active Cine image.
The Side Change menu selection is
used with B/M (D)-Mode imaging. It is
used to toggle between B image Cine
scroll and Timeline (M/D) Cine scroll.
Exit Cine
To exit Cine, press Freeze.
Cine Memory 6
LOGIQt 500 Quick Guide
2193742–100 Rev . 0
Page 73

Purpose
Programming
Special Keystrokes
Lock/Unlock
Deleting
User Define Keys
This chapter explains how to use the User Define key capabilities of the LOGIQt 500. Refer to the
System
LOGIQt 500 Quick Guide
2193742–100 Rev . 0
chapter in the LOGIQt 500 User Manual for more thorough explanations.
User Define Keys 1
Customizing Your
Page 74

Purpose
To improve productivity, a sequence of
keystrokes can be recorded and
programmed to run when a single User
Define key is pressed.
A keystroke is considered to be a press
of a key , one movement of a knob or
movement of the Trackball.
Each of the six User Define Keys can be
programmed to duplicate a sequence of
up to 64 keystrokes.
Programming
S
Access the User Define function by pressing the Set Up Top Menu Select key.
S
Select User Define from the Set Up Sub-Menu.
S
Perform the keystroke or sequence of keystrokes to be programmed.
S
When complete, press the desired User Define Key number to record the programming.
S
The system asks: “Save data? ‘Y’ or ‘N’.” Press ‘Y’ on the keyboard to save the user define sequence. Press ‘N’
to cancel the user define programming function.
The next time a programmed User Define Key is pressed, the recorded keystroke or keystroke sequence will be performed
by a single key operation.
User Define Keys 2
LOGIQt 500 Quick Guide
2193742–100 Rev . 0
Page 75

Special Keystrokes
Ctrl, 1
If selecting Set Up Top Menu with Custom Display, System Parameter or Preset Program as
part of the User Define Sequence, press Ctrl and 1 simultaneously to set the sub-menu page to
one.
Press Set the appropriate number of times to ensure proper movement to the desired
sub-menu page.
Blue Shift, S
Enable the Blue Shift key and press S to add a pause in the User Define Key programming
Blue
sequence.
With a pause in the user define sequence, the first time the User Define Key is pressed, all
steps will be executed up to the pause. The next time the key is pressed, all steps will be
executed from the pause to the end (or next pause). This is especially useful in programming
switching functions.
LOGIQt 500 Quick Guide
2193742–100 Rev . 0
User Define Keys 3
Page 76

Lock/Unlock
Parameters on the Set Up/System
Parameters menu page 3/6 allow the
user to lock a User Define key, keeping it
from being deleted or reprogrammed.
User Define Keys 4
LOGIQt 500 Quick Guide
2193742–100 Rev . 0
Page 77

Deleting
To delete a User Define Key sequence:
S
Ensure that the User Define Key to be deleted is unlocked.
S
Select Set Up Top Menu.
S
Select User Define function.
S
Press the User Define Key number to be deleted.
S
Press ‘Y’ (for Yes) to overwrite current data.
A User Define Key can also be re-programmed by writing over (replacing) the existing sequence with a new series of
keystrokes.
LOGIQt 500 Quick Guide
2193742–100 Rev . 0
User Define Keys 5
Page 78

This page left blank intentionally .
User Define Keys 6
LOGIQt 500 Quick Guide
2193742–100 Rev . 0
Page 79

Overview
Special Keys
Comment Presets
Language Symbols
Annotation Library
Editing Annotations
Image Annotation
This chapter explains how to use the annotation or comment capabilities of the LOGIQt 500. Refer to the
Customizing Your System
LOGIQt 500 Quick Guide
2193742–100 Rev . 0
chapters in the LOGIQt 500 User Manual for more thorough explanations.
Image Annotation 1
Basic Scan and
Page 80

Overview
The annotation keyboard is always active. Upon power up or starting a new patient, the underscore cursor appears in the
mode’s home position. Comments may be typed in at the non-blinking cursor.
Pressing the Comment key assigns the trackball function to controlling the cursor
and displays the annotation library in the Soft Key menu.
The Trackball and Keyboard Arrow keys are used to move the cursor to the
desired position on the image.
When the blinking cursor is in the desired position, comments may be typed in or
a selection can be made from the annotation library .
Annotations are entered in the type-over, not insert, mode. Be careful not to write over text when editing.
Image Annotation 2
LOGIQt 500 Quick Guide
2193742–100 Rev . 0
Page 81

Special Keys
+
Cursor Home: Established in Set Up/Preset Program page 1/10, it returns the
cursor to the upper left part of the screen or to the user specified position.
Changing the cursor position in Set Up/Preset Program page 1/10 only affects
User Presets (not factory presets).
Cursor Home is EC (Exam Category) dependent.
Ctrl M permanently change the cursor home “H”/“V” (Horizontal/Vertical) settings
in the Preset Program for factory and user presets.
Tab: Moves the cursor to the right every eight characters or to the next word
depending on the preset parameter.
Shift and Tab: Moves the cursor in the same manner but to the left.
LOGIQt 500 Quick Guide
2193742–100 Rev . 0
Image Annotation 3
Page 82

Special Keys (cont’d)
/
?
Blue Shift: Some special annotation symbols can be used by activating the Blue
Shift key.
Activating Blue Shift causes the arrow, female and male symbols to be printed on
the screen during the comment function when the keys shown are pressed.
Th Blue Shift key acts as a lock function (similar to Caps Lock key). Press again
to exit the Blue Shift function.
Clear: The function of the Clear key depends on the settings of preset
parameters and activated functions. Pressing Clear once will erase
measurements only or measurements with comments, depending on the preset
“Measurement Clear Operation” on Set Up/Preset Program page 3/10. Pressing
Clear a second time will erase the Doppler or M-Mode cursor and comments (if
the Comment function is active).
Set: Used to end the Comment/Library function.
Image Annotation 4
LOGIQt 500 Quick Guide
2193742–100 Rev . 0
Page 83

Comment Presets
Four presets on Set Up/Preset Program
page 1/10 affect comment operation.
“Comment Erase at Display Change” will
or will not erase all comments when a
change is made in scan mode.
“Comment Clear Key Function” erases
all comments with the Clear key or just
the line of comments the cursor is on.
“Comment Home Position Horizontal”
and “Comment Home Position Vertical”
set a point on the horizontal and vertical
axis for the comment cursor home
position.
“Trackball Function at Freeze” could be
set to assign the Trackball to the
comment function when the Freeze key
is pressed to stop image acquisition.
LOGIQt 500 Quick Guide
2193742–100 Rev . 0
Image Annotation 5
Page 84

Comment Presets (cont’d)
Set the comment cursor movement
desired when using the T ab key.
Normal = Eight character spaces.
Word = Next word (after a space).
Image Annotation 6
LOGIQt 500 Quick Guide
2193742–100 Rev . 0
Page 85

Language Symbols
The Red Shift key enables the special symbols shown in red on the keyboard.
The red symbols shown in the lower right portion of a key print when
the Red Shift is active and that key is pressed.
The red symbols shown in the upper half of a key will print if the
normal shift key and the appropriate key are pressed while the Red
Shift is active.
Red symbols can be used in any language but can only be used
with the proper designated letters.
The Red Shift key acts as a lock function (similar to Caps Lock key).
Press again to exit the Red Shift function.
LOGIQt 500 Quick Guide
2193742–100 Rev . 0
Image Annotation 7
Page 86

Annotation Library
Set Up/Preset Program page 8/10 and
9/10 contain the annotation library
scripts.
These scripts are specific to the selected
exam category and user preset. Each
user preset within each exam category
may have it’s own unique annotation
library scripts.
Image Annotation 8
LOGIQt 500 Quick Guide
2193742–100 Rev . 0
Page 87

Entering/Editing Scripts
Use the Trackball to move the arrow
cursor to the desired Annotation Library
location number.
Press Set. The 20 character space for
that library location will be in reverse
video.
Add or edit the desired script. Select the
next library location and press Set.
NOTE: To avoid saving unwanted
changes, select the RESET function and
press Set.
To save all entries and edits, Trackball
to the SAVE selection and press Set.
The system prompt
“ Overwrite existing data? ‘Y’ or ‘N’ ”
is displayed. Press ‘Y’ to rewrite and
save data for the current user preset.
Press ‘N’ to program a new user preset
with the new annotation library scripts.
LOGIQt 500 Quick Guide
2193742–100 Rev . 0
Image Annotation 9
Page 88

Entering/Editing Scripts (cont’d)
Annotation library scripts 1-8 appear in
the Sub Menu page 1, scripts 9-16
appear in Sub Menu page 2 and scripts
17-24 appear in Sub Menu page 3.
Image Annotation 10
LOGIQt 500 Quick Guide
2193742–100 Rev . 0
Page 89

Displaying Library Scripts
To review the Comment Library scripts:
Press Comment. The Library menu for
the designated exam category appears.
Use the Sub-Menu Select rocker switch
to cycle through the three pages of
scripts available.
The Library Sub-Menu display shows the
first 14 characters of each 20 character
script.
To annotate an image using the library:
Use the Trackball/Arrow keys to place the annotation cursor in the desired location before typing.
Use the Sub-Menu Select rocker switch, if necessary, to display the desired script.
Press the top/bottom of the appropriate rocker switch to write the library script starting at the position of the cursor.
LOGIQt 500 Quick Guide
2193742–100 Rev . 0
Image Annotation 11
Page 90

Editing Annotations
Back space over any error(s) made. Blank spaces take the place of the letter(s) that was there. Continue typing the
annotation after back spacing over all incorrect letters.
To delete previous character(s):
1. Press Back Space as many times as necessary to make the deletion.
2. Retype the annotation from the point where backspacing was stopped.
3. Position the cursor and type over existing text.
To move through the text eight characters at a time:
1. Press Tab to move to the right (Keyboard Tab preset = Normal).
2. Press Shift and Tab to move to the left.
To move through the text a word at a time:
1. Press Tab to move to the right (Keyboard Tab preset = Word)
2. Press Shift and Tab to move to the left.
NOTE: Annotations wrap to the next line when they are within one character of the right margin.
Image Annotation 12
LOGIQt 500 Quick Guide
2193742–100 Rev . 0
Page 91

Overview
Body Patterns Available
Customizing Body Pattern Packages
Selecting a Body Pattern Package
Body Patterns
This chapter shows how to use the body pattern annotation feature of the LOGIQt 500. Refer to the
Customizing Your System
LOGIQt 500 Quick Guide
2193742–100 Rev . 0
chapters in the LOGIQt 500 User Manual for more thorough explanations.
Basic Scan and
Body Patterns 1
Page 92

Overview
Body patterns are a simple graphic of a portion of the
anatomy that is frequently scanned.
Eight packages, of sixteen body patterns each, can by
customized in the Set Up/System Parameters page 4/6.
One of the eight body pattern packages is then designated
as the default package to be displayed. A different
package may be designated for each user application
preset within each exam category .
The body pattern is generally displayed in the lower left
corner of the screen. Its placement can vary with the
format of the display .
Probe Marker
A marker is used to illustrate the probe position. This marker can be placed with the Trackball and rotated with the Zoom
Size/Rotation control.
The body pattern and probe marker can serve as a reference for patient and probe positioning when images are archived.
Probe Orientation
Marker
Body Patterns 2
LOGIQt 500 Quick Guide
2193742–100 Rev . 0
Page 93

Body Patterns Available
The following are the body patterns available as they appear in the body pattern package selection cycle:
Left Oblique Neck
LOGIQt 500 Quick Guide
2193742–100 Rev . 0
NeckLeft DecubitusLeft ObliqueRight ObliqueSupine
Right DecubitusProneMammo
Vertex Brow DownVertex Brow UpLeft Breech
Retroflex UterusAntiverted Uterus
Right Oblique Neck
Right BreechPregnancy
Transverse Uterus
Body Patterns 3
Page 94

Body Patterns Available (cont’d)
PSAX–Mitral
V alve
4 Chamber
Body Patterns 4
Left HeadHead
Ventricle
PLAXLiverBack HeadRight Head
Aortic ArchApical 2 ChamberApical 4 ChamberPSAX–Aortic ValvePSAX–Left
Left ArmAnter LegPoster LegRight ArmSub–costal
LOGIQt 500 Quick Guide
2193742–100 Rev . 0
Prostate
Sagittal Medial
Page 95

Body Patterns Available (cont’d)
Sagittal Lateral Transverse
Breech Brow Down
LOGIQt 500 Quick Guide
2193742–100 Rev . 0
Breast Left
OvaryIntestine
Prostate
Transverse
Breast Right
Left VertexProstateProstate
Right Vertex
Breech Brow Up
LungStomachDuodenum
Dog RightDog AbdomenHand PalmHand Back
Body Patterns 5
Page 96

Body Patterns Available (cont’d)
Dog Left
Blank
Body Patterns 6
Cattle LeftCattle UterusCat LeftCat RightCat Abdomen
Horse FrontHorse RightHorse LeftHorse UterusCattle Right
LOGIQt 500 Quick Guide
2193742–100 Rev . 0
Horse Rear
Page 97

Customizing Body Pattern Packages
The 8 body pattern packages may be
customized to accommodate user
preference. The 16 individual body
patterns in the 8 packages can be
changed. This effects the contents of
the package selected for factory and
user presets.
The Body Pattern Package Number
(1–8) selected for each factory preset
cannot be changed.
Use the Trackball to move the arrow
cursor to the word “Submenu” of the
desired body pattern package number to
be customized.
Press Set. The body pattern selection
Sub-Menu appears.
LOGIQt 500 Quick Guide
2193742–100 Rev . 0
Body Patterns 7
Page 98

Customizing Body Pattern Packages (cont’d)
The rectangle in the display represents space for two
rows of body patterns (two Sub-Menu display pages) with
space for eight body patterns in each row.
Use the Trackball to move the arrow cursor to a desired
body pattern location.
Press Set. A box appears around a Body Pattern or
blank space.
Use the Ellipse rocker switch to cycle through the body
pattern choices.
When the desired body pattern is displayed, use the
Trackball and Zoom Size/Rotation knob to position the
probe orientation marker to the desired default position
on the body pattern.
Press Set to complete the selection for that menu
position. As many as sixteen selections can be made for
each body pattern package.
Body Patterns 8
LOGIQt 500 Quick Guide
2193742–100 Rev . 0
Page 99

Customizing Body Pattern Packages (cont’d)
To delete a body pattern in a package:
1. Use the Trackball to position the arrow cursor over
the pattern to be deleted.
2. Press Set. A box appears around the Body Pattern.
3. Use the Ellipse rocker switch to cycle to the blank
body pattern selection.
4. Press Set to record a blank space for that body
pattern location.
LOGIQt 500 Quick Guide
2193742–100 Rev . 0
Body Patterns 9
Page 100

Selecting a Body Pattern Package
The “Body Pattern Package” parameter
on Set Up/Preset Program page 1/10
allows for choosing one of the eight
customized body pattern packages for
each user preset in each exam category.
This package will be the default package
for the current user preset within the
selected exam category.
The “Body Pattern Probe Mark Preset”
parameter allows for the probe mark
preset to be turned on or off.
NOTE: Remember that these two preset
parameters can be different for each
user preset within each exam category.
Body Patterns 10
LOGIQt 500 Quick Guide
2193742–100 Rev . 0
 Loading...