


GE JTP14WT1WW, JTP13GT1BB Owner’s Manual
Built-InElectricOven
_ Safety instructions .................... 3, 4 __ Problem Solver .......................25, 26
Thermostat Adjustment-
DoIt}%Hmlf_............................................ 14
t,?t ................................, ....
More questions ?..,call
GE Answer Center" 800.626.2000
Consumer Services ..................27
_i@:ili:!i!_ii!:ii!iiii:i_ii:_:il;S%:_:Appliance Registration .................................2
;ii:H<:iqi$i31i%i:i:i:P:
::i!iii!!i@iiii_iil;i:i!iiiiii_;ii!:!iiiili:ii!_!i!;!ii:Important Phone Numbers ....................... 27
Model and Serial Number Location .......... 2
i_ii_i:i;ii_i!iiii_:i!i;!iiii_ii_iiiiiiiii:i;ii{!_:'Removal of Packaging Tape ........................ 2
:,i:ii:iil;:,[i:::::::::::::::::::::::::::::::::%:
Care and Cleaning ....................23, 24
BroilerPanand Rack..................................23
ililiiiiiiii!i!i!iiiiiii!!iiiii@!iiiiiii!iiii!iii!iiiiii_ Lift-OffOvenDoor.......................................24
::!i!@@]:i!_!iii%@:@@:%!!i:i!i!iii::i@iS:i
iiiii[iiiiii!ii!%!iiiii!iii!i%Self-Cleaning Instructions .................19-22
iiiiii!iiiiiii!iiiiiiiiii!iiiii!iiii!i!iiiiii_iiiiiii!iiiiiiiShelves ...........................................................23
iiiii!i!ili_;iiiiii!iiii!ii;ii!;_iii_ii;iiii_iiiiii!iii;iliiii_il
GE Appliances
Models: JTPI3
JTPI4
164D2966POIO- 1
HELP us HELP YOU...
Before using your oven,
read this guide carefully.
It is intended to help you operate and maintain
your new oven properly.
Keep it handy for answers to your questions.
If you don't understand something or need more help,
write (include your phone number):
Consumer Affairs
GE Appliances
Appliance Park
Louisville, KY 40225
How to Remove Packaging Tape
To assure no damage is done to the finish of the
product, the safest way to remove packaging tape
adhesive on new appliances is an application of a
household liquid dishwashing detergent, mineral
oil or cooking oil. Apply with a soft cloth and allow
to soak. Wipe dry and then apply an appliance polish
to thoroughly clean and protect the surface.
NOTE: The plastic tape must be removed from the
chrome trim on the oven parts. It cannot be removed
if it is baked on.
Write down the model and
serial numbers.
You'll find them on a label on the front of the
oven behind the oven door.
These numbers are also on the Consumer Product
Ownership Registration Card that came with your
oven. Before sending in this card, please write these
numbers here:
Model Number
SerialNumber
Use these numbers in any correspondence or service
calls concerning your oven.
Save time and money.
Before you request service...
Check the Problem Solver in the back of this guide.
It lists causes of minor operating problems that you
can correct yourself.
IF YOU NEED SERVICE...
To obtain service, see the Consumer Services page in
the back of this guide.
We're proud of our service and want you to be
pleased. If for some reason you are not happy with the
service you receive, here are three steps to follow for
further help.
FIRST, contact the people who serviced your
appliance. Explain why you are not pleased. In most
cases, this will solve the problem.
NEXT, if you are still not pleased, write all the
details--including your phone number--to:
Manager, Consumer Relations
GE Appliances
Appliance Park
Louisville, KY 40225
FINALLY, if your problem is still not resolved, write:
Major Appliance Consumer Action Panel
20 North Wacker Drive
Chicago, 11.60606
2
IMPORTANT SAFETY INSTRUCTIONS
Read all instructions before using this appliance.
IMPORTANT SAFETY NOTICE
•The California Safe Drinking Water and Toxic
Enforcement Act requires the Governor of
California to publish a list of substances known to
the state to cause birth defects or other reproductive
harm, and requires businesses to warn customers
of potential exposure to such substances.
• The fiberglass insulation in self-cleaning
ovens gives off a very smal!amountof carbon
monoxideduring the cleaning cycle. Exposure
can be minimized by venting with an open
window orusing a ventilation fan orhood.
When using electrical appliances, basic safety
precautions should be followed, including the
following:
• Use this appliance only for its intended use
as described in this guide.
• Have the installer show you the location of the
circuit breaker or fuse. Mark it for easy reference.
• Be sure your appliance is properly installed and
grounded by a qualified technician in accoMance
with the provided Installation Instructions.
° Do not attempt to repair or replace any part of
your oven unless it is specifically recommended
in this guide. All other servicing should be
referred to a qualified technician.
.Before performing any service, DISCONNECT
THE OVEN POWER SUPPLY AT THE
HOUSEHOLD DISTRIBUTION PANEL BY
REMOVING THE FUSE OR SWITCHING OFF
THE CIRCUIT BREAKER.
•Do not leave children alone< hildren should
not be left alone or unattended in an area where
appliance is in use. They should never be allowed
to sit or stand on any part of the appliance.
• Do not allow anyone to climb, stand or hang on
the door. They could damage the oven or cause
severe personal injury.
•CAUTION: ITEMS OF INTEREST TO
CHILDRENSHOULD NOT BE STORED IN
CABINETS ABOVE AN OVEN. CHILDREN
CLIMBINGON THE OVEN TO REACH
ITEMS COULD BE SERIOUSLY 1NJURED.
• Do not store flammable materials in an oven.
•Never leave the oven door open when you are
notwatching the oven.
Always keep combustible wall covering, curtains
or drapes a safe distancefrom your oven.
Never wear loose-fitting or hanging garments
while using the appliance. Be careful when
reaching for items stored in cabinets over the
oven. Flammable material could be ignited if
brought in contact with hot heating elements and
may cause severe 'burns.
° DO NOT STORE OR USE COMBUSTIBLE
MATERIALS, GASOLINE OR OTHER
FLAMMABLE VAPORS AND LIQUIDS IN
THE VICINITY OF THIS OR ANY OTHER
APPLIANCE.
°Use only dry pot holders--Moist
or damp potholders on hot surfaces
may result in burns from steam. Do
not let pot holders touch hot heating elements.
Donot use a towel or other bulky cloth. Such
cloths cancatch fire ona hot heating element.
.Always keep dishtowels, dishcloths, pot
holdersand other linens a safe distance from
your oven.
. Always keep wooden and plastic utensils
and cannedfood a safe distance away from
your oven.
•For your safety,neveruse your appliancefor
warmingorheatingthe room.
.Do not let cooking grease or other
flammable materials accumulate in
or near the oven.
• Be sure the oven is securely installed in a
cabinet that is firmly attached to the house
structure. Never allow anyone to climb, sit or
stand on the oven door,
• Do not use water on grease fires.
Smother fire or flameoruse a multi-
purpose dry chemical or foam-type
fire extinguisher.
Flame in the oven can be smothered completely
by closing the oven door and turning the oven off
or by using a multi-purpose dry chemical or foam-
type fire extinguisher.
(eontimted next page)
•Teach children not to play with the controls
or any other part of the oven.
3
IMPORTANT SAFETY
(continued)
INSTRUCTIONS
•Do not touch the heating elements or the
interiorsurface of the oven.These surfaces may
be hot enoughto burn even though they are dark
in color.Duringand after use, do not touch, or let
clothing or other flammable materials contact any
interior area of the oven; allowsufficient time for
cooling, first.
Potentially hot surfaces include the oven vent
openings and surfaces near the openings, crevices
around the oven door, the edges of the door
window and metal trim parts-above the door.
Remember:The inside surface of the oven may
be hot when thedooris opened.
• When cooking pork,followthe directions
exactlyand always cook the meat to an internal
temperature of at least 170°E This assures that, in
the remote possibility that trichina may be present
inthe meat,Itwill be killed and the meat will be
safe to eat.
O,en
. Stand away from the oven when opening the
oven door. Hot air or steam which escapes can
cause bm'ns to hands, face and/or eyes.
. Do not heat unopened food containers.
Pressure could buildup and the container
could burst, causing 'an injury,
•Keep theovenvent ductunobstructed.
•Keeptheovenfreefromgreasebuildup.
°Place the ovenshelf in the desired position
while the oven is cool. If the shelves must be
handled when hot, do not let the potholder
contact the heating elements in the oven.
*Never leave the oven door open when you are
notwatching the oven.
.Pulling out the shelf to the shelf stop is a
convemence in lifting heavy foods, It is also
aprecautionagainst bums from touching the
hot surfaces of the door or the oven walls.
•When using cooking or roasting bags in
theoven,follow the manufacturer'sdirections•
°Do not leave paper products, cooking,
utensils or food in the oven when not muse.
•Do not use oven for storage area,Items
stored in an oven can ignite.
*After broiling, always take the broilerpan
out of the oven and clean it. Leftover grease
in the broiler pan can catch firenext time youuse
the pan.
•Neverleavejars or cans of fat dripping on or
near your oven,
Self-Cleating Oven
•Do not clean the door gasket. The door gasket is
essential for a good seal. Care should be taken not
to rub, damage or move the gasket.
• Do not use oven cleaners. No commercial
oven cleaner or oven liner protective coating
of any kind should be used in or around any part
of the oven. Residue from oven cleaners will
damage the inside of the oven when the self-clean
cycle is used.
.Clean only parts listed in this Use and
Care Guide.
•Before se&-cleaning the oven, removethe broiler
pan and other cookware,
°Do not use aluminum foil to line oven bottoms,
except as suggested in guide. Improper
installation of these liners may resultin a risk of
electric shock or fire.
• Be sure to wipe up excess spillage before
starting the self-cleaning operation.
* If the self-cleaning mode malfunctions,turn the
oven off and disconnect the power supply. Haveit
serviced by a qualified technician•
SAVE THESE
INSTRUCTIONS
•Do not use your oven to dry newspapers.
If overheated, they can catch fire.
4
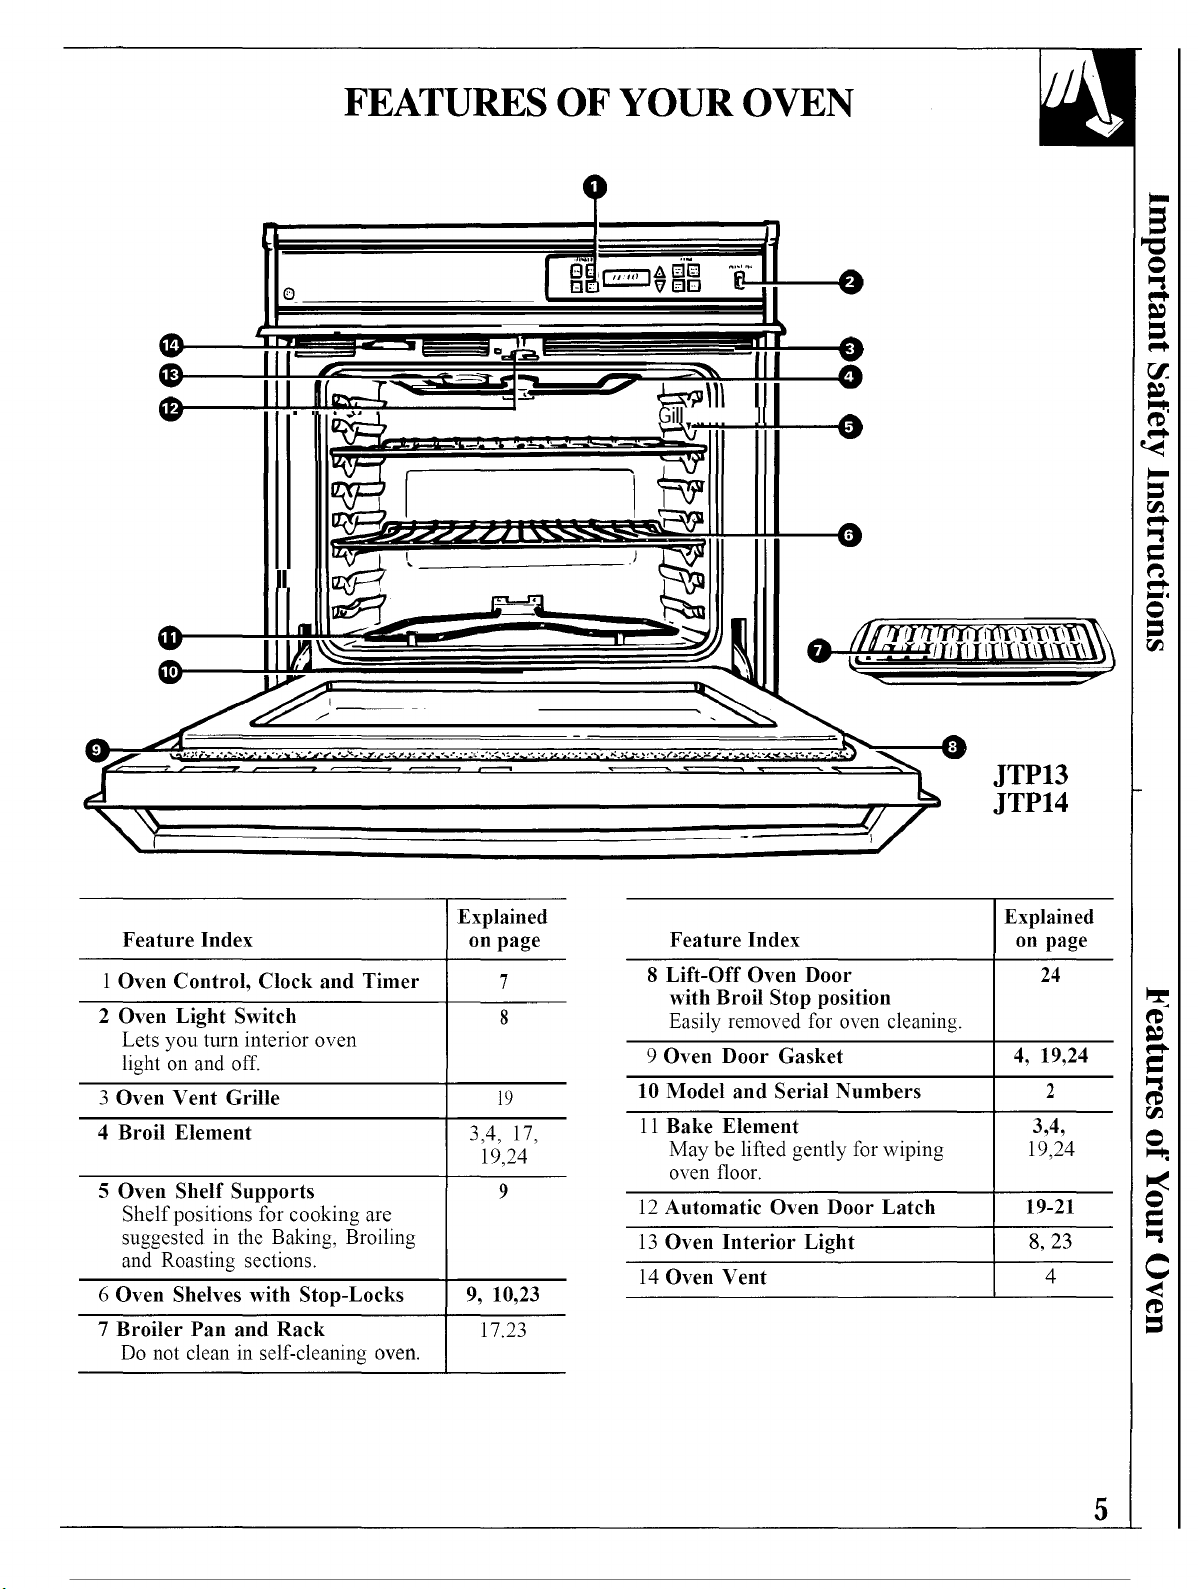
FEATURES OF YOUR OVEN
JTP13
JTP14
Explained
Feature Index on page
1 Oven Control, Clock and Timer 7
2 Oven Light Switch 8
Lets you turn interior oven
light on and off.
3 Oven Vent Grille 19
4 Broil Element 3,4, 17,
19,24
5 Oven Shelf Supports 9
Shelf positions for cooking are
suggested in the Baking, Broiling
and Roasting sections.
6 Oven Shelves with Stop-Locks 9, 10,23
7 Broiler Pan and Rack 17.23
Do not clean in self-cleaning oven.
Explained
Feature Index on page
8 Lift-Off Oven Door 24
with Broil Stop position
Easily removed for oven cleaning.
9 Oven Door Gasket 4, 19,24
10 Model and Serial Numbers 2
11 Bake Element 3,4,
May be lifted gently for wiping 19,24
oven floor.
12 Automatic Oven Door Latch 19-21
13 Oven Interior Light 8, 23
14 Oven Vent 4
5

FEATURES OF YOUR OVEN CONTROL
/
STOP [ /
TII_ CLOCK
1. BAKE. Press this pad to select the bake function.
2. CLEAR/OFF. Press this pad to cancel all
oven operations except clock and timer.
3. PROGRAM STATUS. Words light up in the
display to indicate what is in time display.
Programmed information can be displayed at
any time by pressing the pad of the operation you
want to see. For example, you can display the
current time of day while the timer is counting
down by pressing the clock pad.
4. TIME DISPLAY. Shows the time of day, the times
set for the timer or automatic oven operation.
5. OVEN TEMPERATURE AND BROIL
DISPLAY. Shows the oven temperature or the broil
setting selected.
6. FUNCTION INDICATORS. Lights up to
show whether the oven is in the bake, broil
or self-clean mode.
7. INCREASE. Short taps to this pad increase the
time or temperature by small amounts. Press and
hold the pad to increase the time or temperature
by larger amounts.
8. COOK TIME. Press this pad for Timed Bake
operations.
9. TIMER. Press this pad to select the timer function.
To set timer, first press the TIMER pad. Then
press the INCREASE or DECREASE pad to
change the time.
To cancel the timer, press and hold the TIMER
pad, until the word "TIMER" disappears from
the display.
10. CLOCK. To set clock, first press the CLOCK
pad. Then press the INCREASE or DECREASE
pad to change the time of day.
11. STOP TIME. Use this pad along with the COON
TIME or AUTO SELF CLEAN pad to set the
oven to stop automatically at a time you select.
12. DECREASE. Short taps to this pad decrease the
time or temperature by small amounts. Press and
hold the pad to decrease the time or temperature
by larger amounts.
13. AUTO SELF CLEAN. Press this pad to select
self-cleaning function. See the Operating the Self-
Cleaning Oven section.
14. BROIL. Press this pad to select the broil function.
If "F----" and a number flash in the display and '
the oven control signals this indicates function
error code. Press the CLEAR/OFF pad. Allow the
oven to cool for one hour. Put the oven back into
operation. If function error code repeats, disconnect
the power to the oven and call for service.
6
OVEN CONTROL, CLOCK AND TIMER
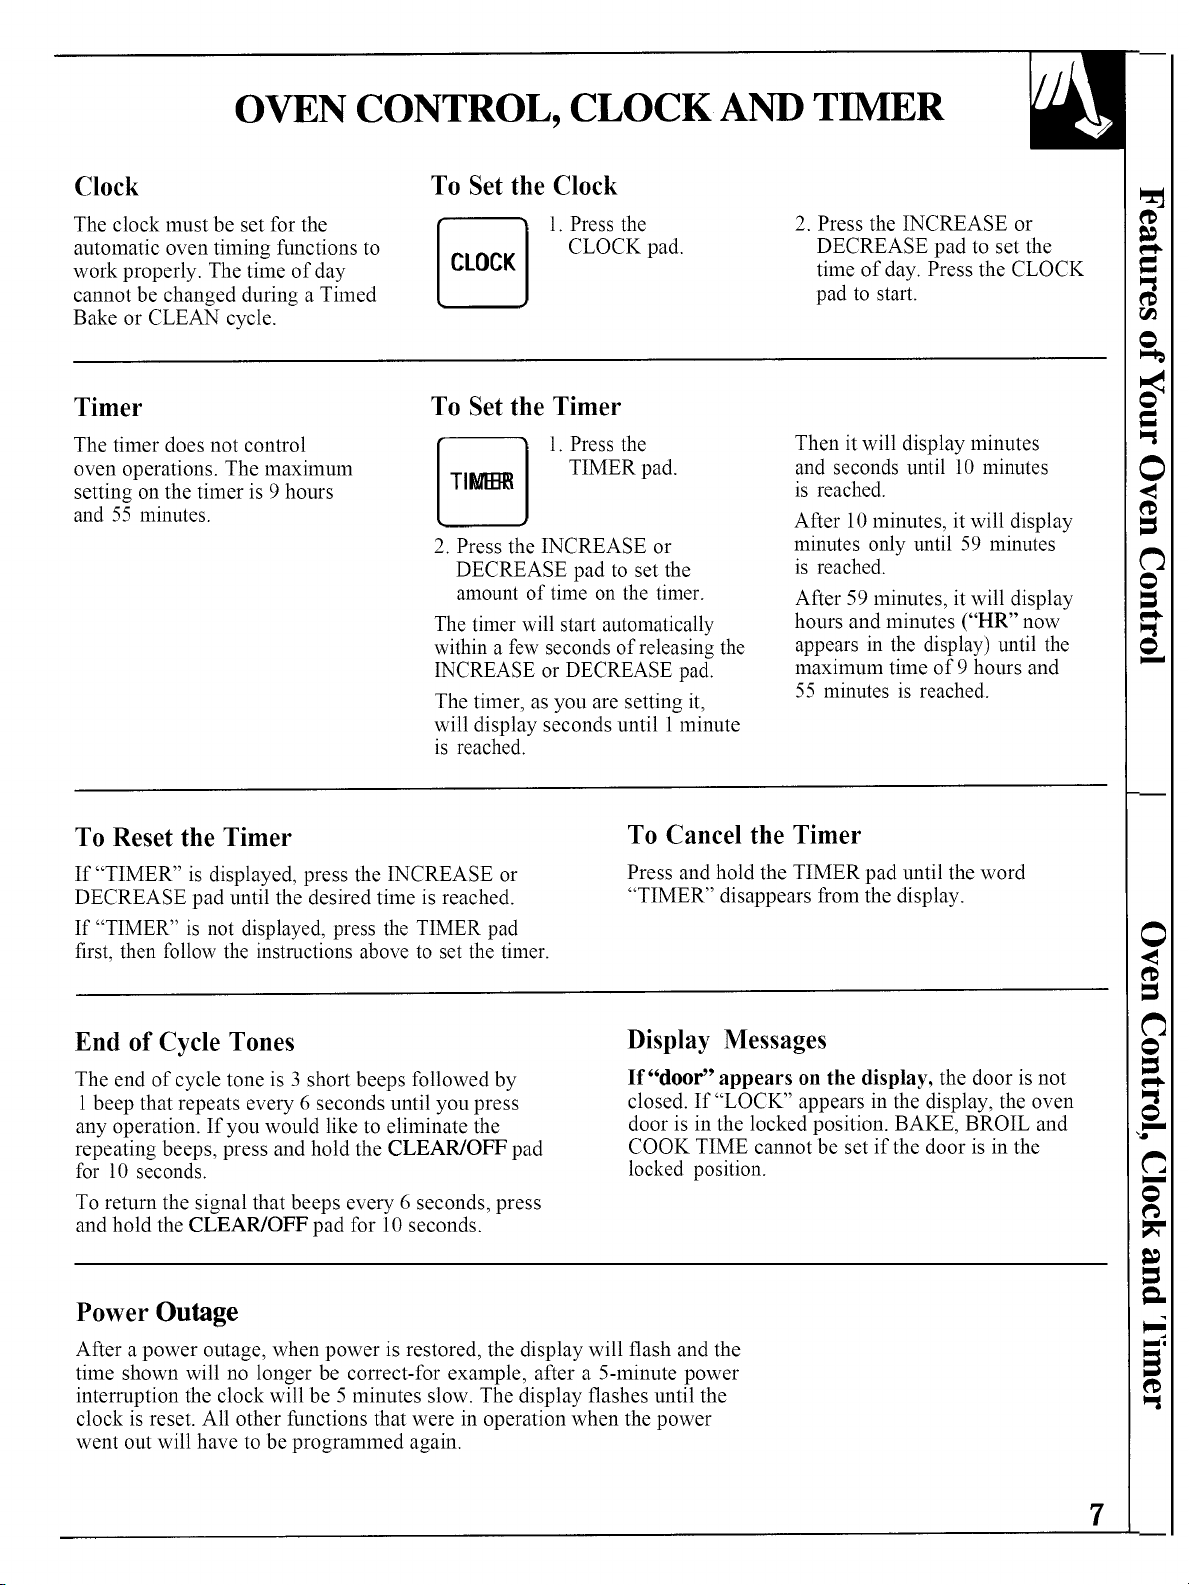
Clock
The clock must be set for the
automatic oven timing functions to
work properly. The time of day
cannot be changed during a Timed
Bake or CLEAN cycle.
To Set the Clock
1. Press the
CLOCK pad.
CL0Cg
2. Press the INCREASE or
DECREASE pad to set the
time of day. Press the CLOCK
pad to start.
Timer
The timer does not control
oven operations. The maximum
setting on the timer is 9 hours
and 55 minutes.
To Set the Timer
___ 1. Press the
TIMER pad.
2. Press the INCREASE or
DECREASE pad to set the
amount of time on the timer.
The timer will start automatically
within a few seconds of releasing the
INCREASE or DECREASE pad.
The timer, as you are setting it,
will display seconds until 1 minute
is reached.
Then it will display minutes
and seconds until 10 minutes
is reached.
After 10 minutes, it will display
minutes only until 59 minutes
is reached.
After 59 minutes, it will display
hours and minutes ("HR" now
appears in the display) until the
maximum time of 9 hours and
55 minutes is reached.
To Reset the Timer
If "TIMER" is displayed, press the INCREASE or
DECREASE pad until the desired time is reached.
If "TIMER" is not displayed, press the TIMER pad
first, then follow the instructions above to set the timer.
To Cancel the Timer
Press and hold the TIMER pad until the word
"TIMER" disappears from the display.
End of Cycle Tones
The end of cycle tone is 3 short beeps followed by
1 beep that repeats every 6 seconds until you press
any operation. If you would like to eliminate the
repeating beeps, press and hold the CLEAR/OFF pad
for 10 seconds.
To return the signal that beeps every 6 seconds, press
and hold the CLEAR/OFF pad for 10 seconds.
Display Messages
If"door" appears on the display, the door is not
closed. If "LOCK" appears in the display, the oven
door is in the locked position. BAKE, BROIL and
COOK TIME cannot be set if the door is in the
locked position.
Power Outage
After a power outage, when power is restored, the display will flash and the
time shown will no longer be correct-for example, after a 5-minute power
interruption the clock will be 5 minutes slow. The display flashes until the
clock is reset. All other functions that were in operation when the power
went out will have to be programmed again.
7
USING YOUR OVEN
Before Using Your Oven
1. Look at the controls. Be sure you understand how to
set them properly. Read over the directions for the
Oven Controls so you understand how to use them.
2. Check the oven interior. Look at the shelves.
Take a practice run at removing and replacing them
properly, to give sure, sturdy support.
3. Read over the information and tips that follow.
4. Keep this guide handy so you can refer to it,
especially during the first weeks of using your
new oven.
NOTE:
• A fan may automatically turn on and off to cool
internal parts. This is normal, and the fan may
continue to run even after the oven is turned off.
• You may notice a "burning" or "oily" smell the first
few times you turn your oven on. This is normal in
new oven and will disappear in a short time. To spee
the process, set a self-clean cycle for a minimum of
hours. See the Self-Cleaning Oven section.
Oven Light
The light comes on when the oven door is opened or when the control panel
light switch is turned on.
Oven Vent
When the oven is on, heated air moves through a vent
above the door or between door and air grille.
The vent area could get hot during oven use.
The vent is needed for proper air flow in the oven and
good baking results. Do not block this vent.
8
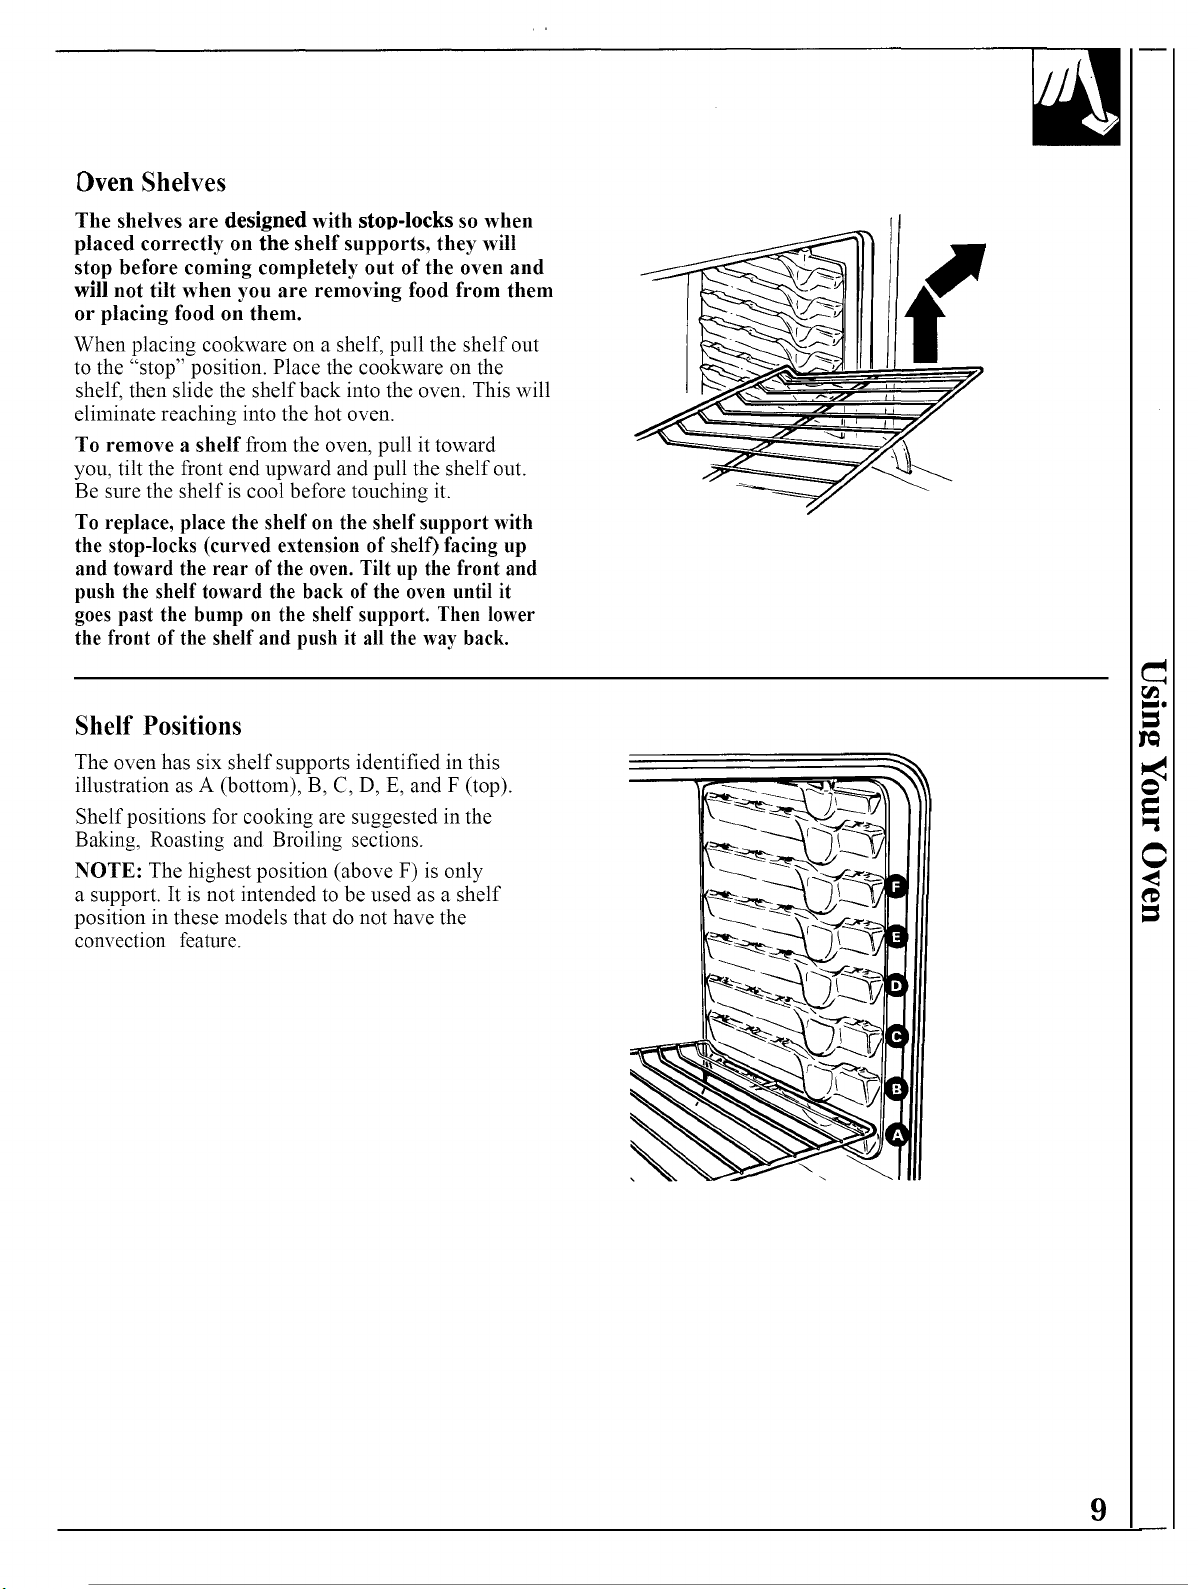
Dven Shelves
The shelves are designed with stoa-locks so when
placed correctly on the shelf supports, they will
stop before coming completely out of the oven and
will not tilt when you are removing food from them
or placing food on them.
When placing cookware on a shelf, pull the shelf out
to the "stop" position. Place the cookware on the
shelf, then slide the shelf back into the oven. This will
eliminate reaching into the hot oven.
To remove a shelf from the oven, pull it toward
you, tilt the front end upward and pull the shelf out.
Be sure the shelf is cool before touching it.
To replace, place the shelf on the shelf support with
the stop-locks (curved extension of shelf) facing up
and toward the rear of the oven. Tilt up the front and
push the shelf toward the back of the oven until it
goes past the bump on the shelf support. Then lower
the front of the shelf and push it all the way back.
Shelf Positions
The oven has six shelf supports identified in this
illustration as A (bottom), B, C, D, E, and F (top).
Shelf positions for cooking are suggested in the
Baking, Roasting and Broiling sections.
NOTE: The highest position (above F) is only
a support. It is not intended to be used as a shelf
position in these models that do not have the
convection feature.
Im_o
9
 Loading...