


GE ADKW30*, ADKW50*, ADKW65* Owner’s Manual
<![endif]>Dehumidifiers
GEAppliances.com
Safety Instructions............................ |
2, 3 |
Operating Instructions |
|
About the Controls |
|
on the Dehumidifier ................................... |
4 |
Automatic Defrost........................................ |
5 |
Choosing a Location................................... |
5 |
How the Dehumidifier Operates ........... |
5 |
Removing Collected Water ................... |
6 |
Water Level ..................................................... |
6 |
Owner’s Manual
ADKW30*
ADKW50*
ADKW65*
Care and Cleaning |
|
Déhumidificateur |
||
|
|
|
||
Grille and Case............................................... |
7 |
|
|
|
Water Bucket.................................................. |
7 |
|
|
|
Troubleshooting Tips........................... |
8 |
|
Manuel d’utilisation |
|
|
|
|
|
|
Consumer Support |
|
La section française commence à la page 15 |
||
Consumer Support..................................... |
12 |
|
|
|
Product Registration............................ |
9, 10 |
Deshumedificador |
||
Warranty |
11 |
|||
|
|
|||
*EnErgy Star® labeled product
Manual del propietario
La sección en español empieza en la página 25
As an EnErgy Star® partner, GE has determined that this product meets the EnErgy Star® guidelines for energy efficiency.
Write the model and serial numbers here:
Model # ________________________
Serial # _________________________
You can find them on a label on the back of the dehumidifier.
49-7637 01-10 GE
IMPORTANT SAFETY INFORMATION.
READ ALL INSTRUCTIONS BEFORE USING.
 WARNING!
For your safety, the information in this manual must be followed to minimize the risk of fire, electric shock or personal injury.
SAFETY PRECAUTIONS
When using this dehumidifier, always follow basic safety precautions, including the following:
nUse this appliance only for its intended purpose as described in this Owner’s Manual.
nThis dehumidifier must be properly installed and grounded as described in this manual before it is used.
nNever operate this dehumidifier in an area that is likely to accumulate standing water.
If this condition develops, for your safety disconnect the power supply before stepping into the water.
nNever unplug your dehumidifier by pulling on the power cord. Always grip plug firmly and pull straight out from the receptacle.
nReplace immediately all electric service cords that have become frayed or otherwise damaged. A damaged power supply cord must be replaced with a new power supply cord obtained from the manufacturer and not repaired. Do not use a cord that shows cracks or abrasion damage along its length or at either the plug or connector end.
nIf the receptacle does not match the plug, the receptacle must be changed out by a qualified electrician.
nTurn the dehumidifier OFF and unplug it before making any repairs or cleaning.
NOTE: We strongly recommend that any servicing be performed by a qualified individual.
nFor your safety, do not store or use combustible materials, gasoline or other flammable vapors or liquids in the vicinity of this or any other appliance.
nAll dehumidifiers contain refrigerants, which under federal law must be removed prior to product disposal. If you are getting rid of an old product with refrigerants, check with the company handling disposal about what to do.
nDo not use outdoors.
nThis dehumidifier is intended for indoor residential applications only. This dehumidifier should not be used
for commercial or industrial applications.
■These R410A Dehumidifier Systems require contractors and technicians to use tools, equipment and safety standards approved for use with this refrigerant. DO NOT use equipment certified for R22 refrigerant only.
HOW TO CONNECT ELECTRICITY
Do not, under any circumstances, cut or remove the third (ground) prong from the power cord. For personal safety, this appliance must be properly grounded.
DO NOT use an adapter plug with this appliance.
The power cord of this appliance is equipped with a 3-prong (grounding) plug which mates with a standard 3-prong (grounding) wall outlet to minimize the possibility of electric
shock hazard from this appliance.
|
Have the wall outlet and circuit checked by a |
2 |
qualified electrician to make sure the outlet is |
|
properly grounded.
Where a 2-prong wall outlet is encountered,
it is your personal responsibility and obligation to have it replaced with a properly grounded 3-prong wall outlet.
The dehumidifier should always be plugged into its own individual electrical outlet, which has a voltage rating matching the rating plate.
This provides the best performance and also prevents overloading house wiring circuits, which could cause a fire hazard from overheated wires.

USE OF EXTENSION CORDS
Because of potential safety hazards under certain conditions, we strongly recommend against the use of an extension cord.
GEAppliances.com
However, if you must use an extension cord, it is absolutely necessary that it be a UL-listed, 14 gauge, 3-wire grounding type appliance extension cord having
a grounding type plug and outlet and that the electrical rating of the cord be 15 amperes (minimum) and 125 volts.
READ AND FOLLOW THIS SAFETY INFORMATION CAREFULLY.
SAVE THESE INSTRUCTIONS
What dehumidifier do you need?
Condition without dehumidification— |
|
|
Area (in square feet) |
|
||
During warm and humid outdoor conditions |
500 |
1000 |
1500 |
2000 |
2500 |
3000 3500 |
Moderately damp—Space feels damp |
|
|
|
|
|
|
and has musty odor only in humid weather. |
ADKW30 ADKW30 ADKW30 ADKW30 |
|
|
|||
Very damp—Space always feels damp and has musty |
|
|
|
|
|
|
odor. Damp spots show on walls or floor. |
ADKW30 ADKW30 ADKW30 |
|
|
ADKW50 |
||
Wet—Space feels and smells wet. Walls or floor sweat, |
|
|
|
|
|
|
or seepage is present. |
ADKW30 ADKW30 |
|
|
|
ADKW50 ADKW50 |
|
Extremely wet—Laundry drying, wet floor, high-load conditionsADKW30 ADKW30 |
|
|
ADKW50 ADKW50 ADKW65 |
|||
Table indicates recommended GE dehumidifier models, based on the area of the space to be dehumidified and the conditions that would exist in that space when a dehumidifier is not in use. Dehumidification variables also include such other factors as climate, laundry equipment, number of family members, number of doors and windows and degree and intensity of area activity.
3
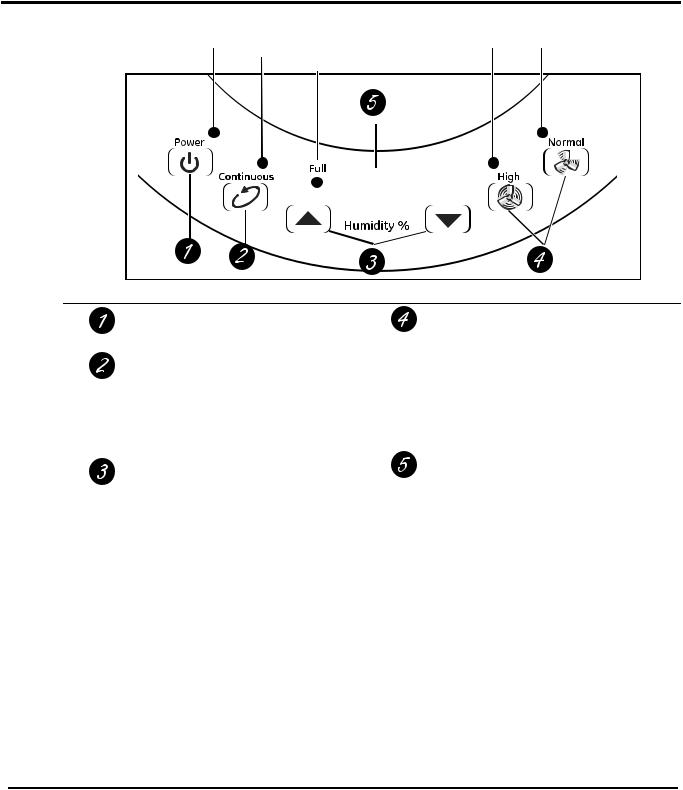
About the controls on the dehumidifier.
Power on |
Continuous |
Bucket full |
High fan |
Normal fan |
|
indicator light |
operation on |
light indicates |
indicator light |
indicator light |
|
|
indicator light |
bucket needs |
|
|
|
|
|
to be emptied |
|
|
|
|
|
|
|
|
|
|
|
|
|
|
|
Controls
Power Pad
Press to turn the dehumidifier on and off.
Continuous
Select for the dehumidifier to operate continuously at its maximum
dehumidification settings until the bucket is full. The Humidity Set Control Pads cannot be used when Continuous is on.
Humidity Set Control Pads
The humidity level can be set within a range of 35% RH (Relative Humidity) to 80% RH (Relative Humidity) in 5% increments.
For drier air, press the pad and set to a lower percent value (%).
For damper air, press the pad and set to a higher percent value (%).
When you first use the dehumidifier, set
the humidity control to 45% or 50%. Allow at least 24 hours for the dehumidifier to achieve the humidity level. If you still have damper air than desired, set the humidity level to a lower setting or select Continuous for maximum dehumidification.
Fan Speed Pads
Control the fan speed.
Press to select either High or Normal fan speed.
Set the fan control to High for maximum moisture removal. When the humidity has been reduced and quiet operation is preferred, set the fan control to Normal.
Display
Shows the set % humidity level while setting, then shows the actual (+/– 5% accuracy) room % humidity level.
Error Codes
E1 – Humidity sensor error – Unplug the unit and plug it back in. If error repeats, call for service.
E2 – Temperature sensor error – Unplug the unit and plug it back in. If error repeats, call for service.
P1 – Unit is defrosting, if any key is pressed during defrost cycle P1 will be displayed for 3 seconds and disappear. Allow the unit time to automatically defrost, The code will clear after the units defrosts.
P2 – Water bucket is full – Empty the water bucket and replace. See the Removing Collected Water section.
Other Features
BUCKET FULL Light
Glows when the bucket is ready to be emptied, or when the bucket is removed or not replaced in the proper position.
|
Auto Shut Off |
|
The Water Level Control Switch shuts off the |
|
dehumidifier when the bucket is full, or when the |
4 |
bucket is removed or not replaced in the proper |
position. |
Auto Defrost
When frost builds up on the evaporator coils, the compressor will cycle off and the fan will continue to run until the frost disappears.
Power Outage
In the case of a power outage or interruption, the unit will automatically re-start, in the settings last used, after the power is restored.

Using the dehumidifier. |
GEAppliances.com |
When first using the dehumidifier, operate the unit continuously 24 hours.
How the Dehumidifier Operates |
Automatic Defrost |
Moist, humid air is drawn over a cold refrigerated dehumidifying coil. Moisture in the air condenses on this coil and drains into a bucket (or through
a hose and drain).
Dry, clean air is drawn through the condenser where it is heated and discharged out the front grille into the room.
It is normal for the surrounding air to become slightly warmer as the dehumidifier operates.
This warming effect further reduces the relative humidity of the surrounding air.
When frost builds up on the evaporator coils, the compressor will cycle off and the fan will continue to run until the frost disappears.
When the coil is defrosted, the compressor or fan (depending on model) will automatically restart and dehumidifying will resume.
Choosing a Location
A dehumidifier operating in a basement will have little or no effect in drying an adjacent enclosed storage area, such as a closet, unless there is adequate circulation of air in and out of the area.
nDo not use outdoors.
nThis dehumidifier is intended for indoor residential applications only. This dehumidifier should not be used for commercial or industrial applications.
nPlace the dehumidifier on a smooth, level floor strong enough to support the unit with a full bucket of water.
nAllow at least 12–18 inches of air space on all sides of the unit for good air circulation.
nPlace the dehumidifier in an area where the temperature will not fall below 41°F (5°C). The coils can become covered with frost at temperatures below 41°F, which may reduce performance.
nUse the dehumidifier in cooking, laundry, bathing and dishwashing areas that have excessive moisture. NOTE: Place the dehumidifier away from the clothes dryer.
nUse the dehumidifier to prevent moisture damage anywhere books or valuables are stored.
nUse the dehumidifier in a basement to help prevent moisture damage.
nThe dehumidifier must be operated in an enclosed area to be most effective.
nClose all doors, windows and other outside openings to the room.
YES NO
12–18” min. |
12–18” min. |
NOTE: The dehumidifier has rollers to aid placement, but it should only be rolled on smooth, flat surfaces. Do not attempt to roll the dehumidifier on carpet or over objects.
5

Using the dehumidifier.
Always make sure the water bucket is locked into place on the dehumidifier.
Removing Collected Water
There are 2 ways to remove collected water:
Use the bucket. When the bucket is removed, the unit will shut off. Empty and replace the bucket.
4.Secure the nozzle to the back of the unit with the two screws provided.
NOTE: Support bucket with both hands when emptying.
IMPORTANT: Do not use the drain tube if using the bucket to collect water. When the drain tube is connected, water will flow through it onto the floor instead of into the bucket.
NOTES:
nDo not remove the bucket while the dehumidifier is operating or if it has just stopped operating. This might cause some water to drip from the drain pan.
nThe bucket must be in place and securely seated for the dehumidifier to operate.
Back of unit
5.Cut (as needed) and thread a garden hose (not supplied) onto the nozzle and lead it to the floor drain.
Back of unit
Use a hose. Water can be automatically emptied into a floor drain by attaching the unit’s drain tube with nozzle and a garden water hose (not included).
1.Remove the bucket from the front of the unit.
2.Remove the plug cover from the back of the unit and store it in a safe location.
3.Insert the tube through the hole in the back of the unit and securely press it onto the connector on the front of the unit. Push the tube around the front connector until the nozzle is flush with the back of the unit.
6. Replace the bucket in the unit.
NOTE: The bucket must be in place and securely seated for the dehumidifier to operate.
Insert tube through
hole in back of unit.
Back of unit
|
Firmly press the tube |
|
onto the front connector. Front of unit |
|
Water Level |
|
The dehumidifier will turn off automatically |
6 |
when the bucket is full, or when the bucket is |
removed or not replaced in the proper position. |
The bucket must be replaced in the proper position for the dehumidifier to work. The light will be on and the dehumidifier will not run if the bucket is not in the proper position.

Care and cleaning of the dehumidifier. |
GEAppliances.com |
Turn the dehumidifier off and remove the plug from the wall outlet before cleaning.
Grille and Case
To clean the case:
Use water and a mild detergent. Do not use bleach or abrasives.
If cabinet paint chips, you can touch it up with a good grade enamel paint to prevent rust.
To clean the front grille:
Use a vacuum attachment or brush.
Water Bucket
To clean:
Every few weeks, clean the bucket to prevent growth of mold, mildew and bacteria. Partially fill the bucket with clean water and add a little mild detergent.
Swish it around in the bucket, empty and rinse.
NOTE: Do not use a dishwasher to clean the water bucket.
To remove:
Remove the bucket and pour any water out.
To replace:
Slide the bucket into the dehumidifier.
NOTE: The bucket must be in place and securely seated for the dehumidifier to operate.
Air Filter
The air filter behind the front grille should be checked and cleaned at least every 30 days or
more often if necessary.
NOTE: DO NOT rinse or put the filter in an automatic dishwasher.
To remove:
Grasp the filter edge and pull it out the side.
Clean the filter with warm, soapy water. Rinse and let the filter dry before replacing it. Do not clean the filter in a dishwasher.
 CAUTION:DO NOT operate the dehumidifier without a filter because dirt and lint will clog it and reduce performance.
NOTE: Avoid using a dishwasher to clean the filter
7

Troubleshooting tips…Save time and money! Review the chart below first and you may not need to call for service.
Problem
Dehumidifier does not start
Dehumidifier does not dry the air as it should
Dehumidifier runs too much
Frost appears on the coils
Fan cannot be turned off and the Normal or High fan speed pads cannot be set
Fan noise
Water on floor
E1, E2, P1 or P2 appear in the display
Possible Causes |
What To Do |
The dehumidifier |
•Make sure the dehumidifier’s plug is pushed completely |
is unplugged. |
into the outlet. |
The fuse is blown/circuit |
•Check the house fuse/circuit breaker box and replace |
breaker is tripped. |
the fuse or reset the breaker. |
Dehumidifier has reached its |
•The dehumidifier automatically turns off when this |
preset level or bucket is full. |
occurs. Empty the bucket and replace properly. |
Bucket is not in the |
•The bucket must be in place and securely seated for the |
proper position. |
dehumidifier to operate. |
Power failure. |
•There is a protective time delay (up to 3 minutes) to |
|
prevent tripping of the compressor overload. For this |
|
reason, the unit may not start normal dehumidifying |
|
for 3 minutes after it is turned back on. |
Did not allow enough time |
•When first installed, allow at least 24 hours to maintain |
to remove the moisture. |
the desired dryness. |
Airflow is restricted. |
•Make sure there are no curtains, blinds or furniture |
|
blocking the front or back of the dehumidifier. See the |
|
Choosing a Location section. |
The Humidity Control may |
•For drier air, press the pad and set to a lower percent |
not be set low enough. |
value (%) or press the Continuous pad for maximum |
|
dehumidification. |
Doors and windows may not |
•Check that all doors, windows and other openings |
be closed tightly. |
are securely closed. |
Clothes dryer may be |
•Install the dehumidifier away from the dryer. |
blowing moisture-laden |
The dryer should be vented to the outside. |
air into the room. |
|
Room temperature |
•Moisture removal is best at higher room temperatures. |
is too low. |
Lower room temperatures will reduce the moisture |
|
removal rate. Models are designed to be operated at |
|
temperatures above 41°F (5°C). |
Area to be dehumidified |
•Refer to the chart below to see if the capacity of your |
is too large. |
dehumidifier is adequate. |
Doors and windows are open. |
•Close all doors and windows to the outside. |
Dehumidifier has been recently •This is normal. Frost will usually disappear |
|
turned on, or room temperature |
within 60 minutes. See the Automatic Defrost section. |
is below 41°F (5°C). |
|
The dehumidifier is in the |
•This is normal. Wait approximately 3 minutes and set the |
automatic fan mode. When |
fan to Normal or High as desired. |
the set room humidity level |
|
is reached, the compressor |
|
will turn off and the fan |
|
will automatically continue |
|
to run for approximately |
|
3 minutes at a fixed setting. |
|
Air is moving through |
•This is normal. |
the dehumidifier. |
|
Tube to connector or nozzle |
•Check the tube to connector and the nozzle to hose |
or hose connection may be |
connections. See the Removing Collected Water section. |
loose. |
|
Intend to use the bucket to |
•Disconnect the drain nozzle if using the bucket to collect |
collect water, but the drain nozzle |
water. See the Removing Collected Water section. |
is attached. |
|
These are error codes. |
•See the About the controls on the dehumidifier section. |
8

Troubleshooting tips…Save time and money! Review the chart below first and you may not need to call for service.
Problem |
Possible Causes |
What To Do |
Bucket Full LED light |
Drain hose not tight on fitting |
•Check drain hose connection. |
flashing and alarm |
|
|
sounds while drain hose |
Drain hose is kinked |
•Ensure the drain hose is pointed straight down to the floor |
is connected |
|
and is not kinked in anyway. |
9
10
GE Dehumidifier—One Year Limited Warranty.
Staple your receipt here.
Proof of the original purchase date is needed to make a warranty claim.
For The Period Of: |
We Will Replace: |
|
|
One Year |
Replacement unit for any product which fails due to a defect in materials or workmanship. |
From the date of the |
The replacement unit is warranted for the remainder of your product’s original one-year |
original purchase |
warranty period. The replacement unit may either be a new unit or a refurbished unit. |
In Order to Make a Warranty Claim During the First 30 Days from the Date of Original Purchase:
nProperly pack your unit. We recommend using the original carton and packing materials.
nReturn the product to the retail location where it was purchased.
nInclude in the package a copy of the sales receipt or other evidence of date of original purchase. Also print your name and address and a description of the defect.
In Order to Make a Warranty Claim During the Remainder of the One-Year Warranty:
nLocate your original sales receipt and make a note of your model and serial number.
nCall GE at 1.866.907.1655 to initiate the product replacement process.
nYou will be asked to provide your name, address, date of purchase, model and serial number.
nGE will arrange for a carton to be sent to your home to recover the product.
nYou must return the product (postage pre-paid by GE) to GE’s recovery center before a replacement unit will be provided. Please include a description of the defect.
nYou should receive your replacement product within 7 to 10 business days after your unit is received.
nIf you experience any problems or delays after initiating the replacement process, please call 1.256.796.6610 for assistance.
What Is Not Covered:
nCustomer instruction. This owner’s manual provides information regarding operating instructions and user controls.
nImproper installation. If you have an installation problem, or if the dehumidifier is of improper dehumidifying capacity, contact your dealer or installer. You are responsible for providing adequate electrical connecting facilities.
nFailure of the product resulting from modifications to the product or due to unreasonable use including failure to provide reasonable and necessary maintenance.
nReplacement of house fuses or resetting of circuit breakers.
nFailure due to corrosion on models not corrosionprotected.
nDamage to the product caused by improper power supply voltage, accident, fire, floods or acts of God.
nIncidental or consequential damage caused by possible defects with this dehumidifier.
nDamage caused after delivery.
EXCLUSION OF IMPLIED WARRANTIES—Your sole and exclusive remedy is product replacement as provided in this Limited Warranty. Any implied warranties, including the implied warranties of merchantability or fitness for a particular purpose, are limited to one year or the shortest period allowed by law.
This warranty is extended to the original purchaser and any succeeding owner for products purchased for home use within the USA. Some states do not allow the exclusion or limitation of incidental or consequential damages. This warranty gives you specific legal rights, and you may also have other rights which vary from state to state. To know what your legal rights are, consult your local or state consumer affairs office or your state’s Attorney General.
Exclusion of implied warranties: Except where prohibited or restricted by law, there are no warranties, whether express, oral or statutory which extend beyond the description on the face hereof, including specifically the implied warranties of merchantability or fitness for a particular purpose.
Warrantor: General Electric Company. Louisville, KY 40225 |
11 |
|
 Loading...