

Page 1
GPSMAP® 276C
chartplotting receiver
owner’s manual
Page 2

© Copyright 2004 Garmin Ltd. or its subsidiaries
Garmin International, Inc.
1200 East 151st Street, Olathe, Kansas 66062, U.S.A.
Tel. 913/397.8200 or 800/800.1020
Fax 913/397.8282
Garmin (Europe) Ltd.
Unit 5, The Quadrangle, Abbey Park Industrial Estate, Romsey, SO51 9DL, U.K.
Tel. 44/0870.8501241
Fax 44/0870.8501251
Garmin Corporation
No. 68, Jangshu 2nd Road, Shijr, Taipei County, Taiwan
Tel. 886/2.2642.9199
Fax 886/2.2642.9099
All rights reserved. Except as expressly provided herein, no part of this manual may be reproduced, copied, transmitted, disseminated, downloaded, or stored in any storage
medium, for any purpose without the express prior written consent of Garmin. Garmin hereby grants permission to download a single copy of this manual onto a hard drive
or other electronic storage medium to be viewed and to print one copy of this manual or of any revision hereto, provided that such electronic or printed copy of this manual
must contain the complete text of this copyright notice and provided further that any unauthorized commercial distribution of this manual or any revision hereto is strictly
prohibited.
Information in this document is subject to change without notice. Garmin reserves the right to change or improve its products and to make changes in the content without
obligation to notify any person or organization of such changes or improvements. Visit the Garmin Web site (
information concerning the use and operation of this and other Garmin products.
Garmin®, GPSMAP®, AutoLocate®, TracBack®, BlueChart®, City Select®, and MapSource® are registered trademarks of Garmin Ltd. or its subsidiaries and may not be
used without the express permission of Garmin.
December 2004 Part Number 190-00335-00 Rev. B Printed in Taiwan
www.garmin.com
) for current updates and supplemental
Page 3

INTRODUCTION > PREFACE
INTRODUCTION
Preface
Thank you for choosing the Garmin® GPSMAP® 276C, which
utilizes the proven performance of Garmin GPS and full-featured
mapping to create an unsurpassed portable marine navigation
chartplotter and automobile navigation device. Take a moment to
compare the contents of this package with the packing list on the
outside of the box; if any pieces are missing, contact your Garmin
dealer immediately.
About This Manual
To get the most out of your new navigation system, take time to read
this manual and learn the operating procedures for your unit. This
manual is organized into the following eleven sections:
The Introduction contains the Table of Contents. The Getting
Started section provides an overview of the unit, how to turn the
unit on, and how to simulate navigation.
The Basic Operation in Marine Mode section provides you with
information about navigating with the GPSMAP 276C in Marine
Mode. The Marine Mode Pages and Features section reviews the
main pages and features in Marine Mode, such as using DSC and
Man OverBoard.
The Basic Operation in Automotive Mode section provides you
with information about navigating with the GPSMAP 276C in
Automotive Mode. The Automotive Mode Pages and Features
section reviews, in detail, the main pages and features in Automotive
Mode, such as the Trip Data page and creating waypoints.
The Additional Page and Features section describes pages and
features found in the Main Menu.
To learn how to change the settings of the GPSMAP 276C, read the
Customizing Your GPSMAP 276C
If you have a Garmin Sounder Module connected to you GPSMAP
276C, refer to the Setting Up and Using Sonar section.
The Appendix contains specifications, optional accessories,
maintenance information, and other product information. Read the
Safety Information for information about installing and using
your GPSMAP 276C safely and responsibly.
An Index is provided at the end of the manual for reference.
section.
GPSMAP 276C Owner’s Manual i
Page 4

INTRODUCTION > TABLE OF CONTENTS
Table of Contents
Introduction ...........................................................................i
Preface ...................................................................................... i
About This Manual ..........................................................................i
Care Information .................................................................... vi
Cleaning the Unit ........................................................................... vi
Storing the GPSMAP 276C ........................................................... vi
Immersing the Unit in Water .........................................................vi
Getting Started .....................................................................1
Unit Overview .......................................................................... 1
Charging the GPSMAP 276C .................................................. 2
Information about Charge Mode ....................................................2
Turning On the GPSMAP 276C ............................................... 3
Adjusting the Backlight and Volume .............................................. 3
Getting Satellite Signals ......................................................... 4
Viewing GPS Status with the GPS page ......................................... 4
Receiver Status ............................................................................... 5
GPS Options ................................................................................... 6
GPS Tips ......................................................................................... 6
Learning about the Keypad .................................................... 7
Using the GPSMAP 276C ........................................................ 8
Understanding Features .................................................................. 8
Selecting Options and Entering Data .............................................. 9
Using the Databases ......................................................................10
Simulated Basic Navigation ................................................. 11
Activating Simulator Mode .......................................................... 11
ii GPSMAP 276C Owner’s Manual
Entering a New Location .............................................................. 11
Simulating Navigation .................................................................. 12
Basic Operation In Marine Mode ......................................14
Marine Mode Page Sequence ............................................... 14
Navigating in Marine Mode ................................................... 15
Initiating Navigation ..................................................................... 15
Man OverBoard (MOB) ...............................................................17
Finding an Item ...................................................................... 18
Using the Find From Feature ........................................................ 18
Recently Found Items ................................................................... 19
Viewing the Information Page ...................................................... 20
Find Menu Options ....................................................................... 20
Creating and Using Routes .................................................. 21
Creating a Route ........................................................................... 21
Navigating a Saved Route ............................................................22
Editing a Route ............................................................................. 23
Using the Route Tab Options ........................................................ 25
Manually Transitioning to the Next Waypoint ............................. 25
Creating and Using Waypoints ............................................ 26
Marking Your Present Position ..................................................... 26
Creating Waypoints Using the Map .............................................. 27
Creating a Waypoint by Entering Coordinates ............................. 28
Reviewing a Waypoint .................................................................. 29
Adding a Waypoint to a Route ......................................................30
Averaging the Waypoint’s Location .............................................30
Projecting a Waypoint ...................................................................31
Editing a Waypoint .......................................................................32
Page 5

INTRODUCTION > TABLE OF CONTENTS
Organizing Waypoints into Categories ......................................... 33
Deleting Waypoints ...................................................................... 34
Proximity Points ........................................................................... 35
Managing Your Tracks .......................................................... 37
Setting up and Saving your Tracks ............................................... 37
Saved Tracks ................................................................................. 39
Navigating a Saved Track .............................................................40
TracBack Tips ............................................................................... 40
Following a Marine Route ..................................................... 41
See Your Route on the Map Page ................................................. 41
View Your Heading with the Compass Page ................................ 41
View Your Path on the Highway Page .......................................... 41
See Your Progress on the Active Route Page ..............................42
Watch Your Trip Data on the Position Data Page ......................... 42
Marine Mode Pages and Features ...................................43
Map Page ................................................................................ 43
Map Orientation ............................................................................ 43
Zooming In and Out of the Map ................................................... 44
Panning the Map ........................................................................... 45
Clearing Unwanted Details from the Map .................................... 46
Measuring Distance ...................................................................... 47
Compass Page ....................................................................... 48
Turning On the Compass Page ..................................................... 48
Compass Page Options ................................................................. 48
Using the Marine Timer ................................................................ 49
Highway Page ........................................................................ 50
Using the Highway Page ..............................................................50
GPSMAP 276C Owner’s Manual iii
Highway Page Options ................................................................. 51
Active Route Page ................................................................. 52
Active Route Page Options ........................................................... 52
Position Data Page ................................................................ 53
Position Data Page Options .......................................................... 53
DSC ......................................................................................... 54
Understanding Distress Calls ........................................................ 54
Understanding Position Reports ................................................... 54
Receiving DSC Calls .................................................................... 55
DSC Call List .......................................................................... 55
DSC Log .................................................................................56
Receiving a Position Report or Distress Call ...............................56
DSC Directory ........................................................................ 56
Making a Distress Call ................................................................. 57
Setting up DSC ............................................................................. 57
Basic Operation In Automotive Mode ..............................58
Automotive Mode Page Sequence ....................................... 58
Navigating in Automotive Mode ........................................... 59
Initiating Navigation ..................................................................... 59
Following a Saved Route .............................................................. 61
Stopping and Resuming Navigation ............................................. 61
Editing Your Route ................................................................ 62
Entering Custom Avoids ............................................................... 62
Creating a Detour .......................................................................... 63
Adding and Editing Stops (Via Points) ......................................... 63
Following an Automotive Route ........................................... 64
Track your Progress with the Map Page ....................................... 64
Page 6

INTRODUCTION > TABLE OF CONTENTS
Watch your Trip Data .................................................................... 64
See your Next Turn with the Current Route Page ........................ 64
Automotive Mode Pages and Features ...........................65
Map Page ................................................................................ 65
Current Route Page ............................................................... 66
Saving the Current Route ............................................................. 66
Trip Computer Page .............................................................. 67
Trip Computer Page Options Menu .............................................. 67
Additional Pages and Features ........................................68
Setting Alarms ....................................................................... 68
Navigation (Nav) Alarms ............................................................. 68
System Alarms .............................................................................. 69
Sonar Alarms ................................................................................ 69
Using the Calendar ................................................................ 70
Day View ......................................................................................70
Week View ....................................................................................70
Month View ..................................................................................70
Calendar Options .......................................................................... 70
Viewing Celestial Information .............................................. 71
Tide Tab ........................................................................................ 71
Sun & Moon Tab .......................................................................... 73
Hunt & Fish Tab ........................................................................... 74
Viewing Messages ................................................................. 75
Viewing the Temperature ...................................................... 76
Changing the Temperature Display ..............................................76
Reset the Temperature Graph ....................................................... 76
Customizing Your GPSMAP 276C ....................................77
Setting up the System ........................................................... 77
Adding a Welcome Message ......................................................... 77
Changing the Page Layout and Data Fields .................................. 78
Setting up the Map Page ............................................................... 78
Additional Map Data Displayed ................................................... 79
Changing the Display ...................................................................80
Changing the Sounds .................................................................... 81
Changing the System Settings ...................................................... 82
Setting the Timers ......................................................................... 83
Changing the Time ........................................................................ 83
Customizing the Units .................................................................. 84
Restoring Defaults ........................................................................ 84
Customizing the Routing and Guidance Settings .............. 85
Road Routing Settings .................................................................. 85
Guidance Settings ......................................................................... 86
Changing the Location Settings .......................................... 87
Changing the Location Format ..................................................... 87
Selecting a Different Map Datum ................................................. 87
Selecting a Different Heading Reference ..................................... 87
Changing the Data Format ................................................... 88
Advanced NMEA Output Setup ................................................... 90
Setting up and Using Sonar .............................................91
Showing Sonar on the Map Page ......................................... 91
Using the Sonar Page ........................................................... 92
Adjusting the Sonar Page ............................................................. 93
iv GPSMAP 276C Owner’s Manual
Page 7

INTRODUCTION > TABLE OF CONTENTS
Adjustment Options ................................................................ 93
Resizing the Split Screen .............................................................. 95
Using the Pointer on the Sonar Page ............................................ 95
Setting up the Sonar ............................................................. 96
Calibrating the Water Speed ......................................................... 97
Setting up the Sonar Display ........................................................ 98
Understanding Sonar ............................................................ 99
Understanding the Sonar Display ................................................. 99
Transducer Coverage .................................................................. 100
Whiteline .................................................................................... 101
Thermoclines .............................................................................. 101
Appendix ..........................................................................102
Specifications ...................................................................... 102
Physical Specifications ............................................................... 102
Power .......................................................................................... 102
Performance ................................................................................ 102
Accuracy ...............................................................................102
Optional Accessories .......................................................... 103
Installation Information ....................................................... 104
Connecting the Power/Data Cable .............................................. 104
Connecting Your GPSMAP 276C to a Computer ....................... 105
Information about USB Drivers ............................................ 105
Using xImage for Customized Waypoint Icons .......................... 106
Installing and Removing Data Cards .......................................... 106
Interfacing ................................................................................... 107
Removing the Antenna ............................................................... 107
Learning about GPS ............................................................ 108
Common GPS Terms .................................................................. 108
What is Differential GPS (DGPS)? ............................................ 108
Differential Field ........................................................................108
What is WAAS? .......................................................................... 109
LORAN TD Setup ................................................................. 110
LORAN TD Feature ................................................................... 110
Using the LORAN TD Format ................................................... 110
Map Datums and Location Formats .................................. 112
What are a Map Datum and which should I use? ....................... 112
What is a Location Format and which should I use? .................. 112
Digital Selective Calling (DSC) ........................................... 113
What is a Maritime Mobile Service Identity (MMSI) number? . 113
How are MMSI assignments obtained? ...................................... 114
Non-Federal Users in the United States ............................... 114
Federal Users in the United States ....................................... 114
Users Outside the United States ............................................ 114
Users In Canada .................................................................... 114
How can Garmin help you with DSC? ....................................... 114
Messages ............................................................................. 115
Data Field Options ............................................................... 116
Safety and Product Information ......................................... 118
Index .................................................................................123
GPSMAP 276C Owner’s Manual v
Page 8

INTRODUCTION > CARE INFORMATION
Care Information
To resolve problems that cannot be remedied using this guide,
contact Garmin Product Support in the U.S.A. at 800/800.1020 or
Garmin Europe at 44/0870.8501241.
Immersing the Unit in Water
The GPSMAP 276C is waterproof to IEC Standard 60529 IPX7.
It can withstand immersion in 1 meter of water for 30 minutes.
Prolonged submersion can cause damage to the unit. After
submersion, wipe and air dry the unit before reuse or charging.
Cleaning the Unit
The GPSMAP 276C is constructed of high quality materials and
does not require user maintenance other than cleaning. Clean the
unit using a cloth dampened with a mild detergent solution. Avoid
chemical cleaners and solvents that may damage plastic components.
Wipe the unit dry with a dry cloth.
Storing the GPSMAP 276C
Do not store the GPSMAP 276C where prolonged exposure to
temperature extremes may occur (such as in the trunk of a car), as
permanent damage may result. User information, such as waypoints
and routes, is retained in the unit’s memory without the need for
external power. It is always a good practice to back up important
user data by manually recording it or downloading it to a PC
(transferring it to MapSource).
vi GPSMAP 276C Owner’s Manual
Page 9

GETTING STARTED > UNIT OVERVIEW
GETTING STARTED
Unit Overview
The GPSMAP 276C is an all-in-one, versatile color chartplotter and automobile navigator—perfect for land or water. This portable GPS
navigator features a 256-color TFT display that is easy to read in bright sun, a built-in basemap, and auto routing to provide you with
automatically generated turn-by-turn directions.
Antenna
256-Color TFT display
with backlighting
Backlit keypad for easy nighttime operation
GPSMAP 276C Owner’s Manual 1
Detachable antenna
collapses for storage.
Be sure the antenna
is up (as shown here)
to receive satellite
signals. Refer to
the Appendix,
page 107, for
instructions on
removing the
antenna.
External power
connector under
weather cap
USB connector
under weather cap Slot for optional data card
Battery pack. Press tab down to
remove battery pack for replacement,
if necessary. See the
Information” on page 120 for more
information about the lithium-ion
battery pack.
“Safety
Serial number
Page 10

2 GPSMAP 276C Owner’s Manual
GETTING STARTED > CHARGING THE GPSMAP 276C
Charging the GPSMAP 276C
Before using the unit, you may need to charge the battery in the
GPSMAP 276C. Simply plug the unit into an external power source
to charge. You can use the unit while it is charging.
If you do not want to use the unit, but you would like to charge the
battery, you can put the unit into Charge Mode. Connect the unit
to an external power supply. Press and hold the red POWER key.
Instead of completely turning off, the unit now goes into Charge
Mode, as shown below.
To charge the unit’s battery:
1. Lift the rubber weather cap to expose the power connector
on the back of the unit. Refer to the image on page 1 for
connector location.
2. Align the notches and push the plug into the connector until
fully seated.
3. Plug the 12 Volt adapter into an available AC outlet, or
cigarette lighter receptacle if you have a Cigarette Lighter
Adapter. Use care when routing the cable; be certain that it
does not interfere with vehicle operation.
The unit begins charging as soon as external power is applied.
NOTE: While in Charge Mode, the unit draws a small amount of
Placing the unit in Charge Mode, as discussed below, charges the
unit more quickly than when the unit is turned on and reduces draw
on the vessel/vehicle battery.
After using the unit a lot, you may notice that the lithium-ion battery
Information about Charge Mode
Applying external power to the GPSMAP 276C automatically turns
on the unit for full operation. If the battery is present and needs to be
charged, the external power source charges the battery while the unit
in the unit is not holding a charge any more. This is common for
lithium-ion batteries. Contact Garmin or your Garmin Dealer to
order a Battery Pack replacement if you are experiencing charging
issues with your battery.
is in use.
Charge Mode
current from the vessel/vehicle battery. To avoid discharging the
vehicle’s battery, disconnect the external power cable from the
GPSMAP 276C when not in use for several days.
Page 11
GPSMAP 276C Owner’s Manual 3
GETTING STARTED > TURNING ON THE GPSMAP 276C
Turning On the GPSMAP 276C
The first time you turn on your new GPSMAP 276C, the receiver
must collect satellite data and establish its present position. To
ensure proper initialization, the GPSMAP 276C is shipped from
the factory in AutoLocate mode, which allows the receiver to “find
itself” anywhere in the world. Before you turn on the unit to start
initialization, be sure that the antenna is rotated up as shown on
3. To turn off the GPSMAP 276C, press and hold the red
POWER key again.
Adjusting the Backlight and Volume
You may want to adjust the backlight to see the display better. If
you are using the optional External Speaker with 12/24-Volt Adapter
Cable with the GPSMAP 276C, you may want to adjust the volume
level of the speaker.
page 1, and it has a clear and unobstructed view of the sky to receive
satellite signals.
To turn on and off the GPSMAP 276C:
1. Press and hold the red POWER key. When the unit powers
on, a tone sounds and the Warning page displays.
Warning Page
2. Read and be sure you understand the warning. If you have
external devices connected, they are listed here. Press
ENTER to continue.
To adjust the backlight level or volume:
1. Press and quickly release the POWER key.
2. Press the Rocker key Up to increase the brightness or Down
to decrease. Press Right to raise the volume or left to lower.
3. Press ENTER or QUIT to close the Backlight/Volume
adjustment window. Press MENU to view the options menu.
Battery Time Remaining and Power Source Indicator
Backlight
Adjustment Slider
Volume
Adjustment Slider
Page 12

4 GPSMAP 276C Owner’s Manual
GETTING STARTED > GETTING SATELLITE SIGNALS
Getting Satellite Signals
After you turn on the GPSMAP 276C, the unit automatically begins
searching for satellites. The GPS page is displayed while the unit
is gathering satellite signals and acquiring a fix, which should take
only a few minutes. While the GPSMAP 276C is getting satellite
signals, the GPS page displays the status as “Acquiring Satellites.”
It may take a few minutes to acquire satellites and display your
current location on the map. Be patient as the unit acquires satellite
data. To get signals more quickly, be sure the antenna is raised to the
up position shown in the image on page 1.
Viewing GPS Status with the GPS page
The GPS page provides a visual reference of satellite acquisition,
receiver status, and accuracy. The sky view and signal strength bars
give an indication of what satellites are visible to the receiver and
whether they are being tracked.
As the receiver locks onto satellites, a signal strength bar appears
for each satellite in view, with the appropriate satellite number
underneath each bar. The numbers displayed below each bar
represent the particular satellite that is being received. Numbers
above 33 indicate WAAS satellites.
The sky view shows a birds-eye view of the position of each satellite
relative to the receiver’s last known position. The outer circle
represents the horizon (north up), the inner circle represents 45º
above the horizon, and the center point represents a position directly
overhead. You can also set the sky view to a Track Up configuration,
causing the top of the sky view to align along your current track
heading. Press MENU to change the configuration of the sky view.
GPS Page
A power source indicator shows the unit is operating off
power ( ), that the unit is charging ( ), or that an
NOTE: While acquiring satellites, the Map page may display the
wrong location, such as China. This does not mean your unit has
the wrong data loaded; it simply means you need to wait a few
more minutes to acquire satellites and find your current location.
external power source is in use ( ).
battery
Page 13

GETTING STARTED > GETTING SATELLITE SIGNALS
Signal
Strength
Bars
Receiver
Status
Field
• Searching the Sky—the receiver is looking for satellites.
• AutoLocate—the receiver is looking for any satellite whose
almanac has been collected, which can take up to 5 minutes.
Sky view
Power
Source
Indicator
GPS Page
• Acquiring Satellites—the receiver is looking for and
collecting data from satellites visible at its last known or
initialized position, but has not acquired a fix.
• 2D GPS Location: At least three satellites have been acquired
and a two-dimensional position fix has been calculated.
“2D Differential” appears when you are receiving DGPS
The progress of satellite acquisition is shown in three stages:
• No signal strength bars—the receiver is looking for the
satellites indicated.
• White signal strength bars—the receiver has found the
satellite and is collecting data.
• Green signal strength bars—the receiver has collected the
necessary data from this satellite.
As soon as the GPSMAP 276C has collected the necessary data from
the best satellites in view to calculate a fix, the status field indicates
the status of the receiver. The unit then updates the position, date
and time.
corrections in 2D mode and a “D” appears on the strength bar
of satellites being corrected.
• 3D GPS Location: At least four satellites have been
acquired and a three-dimensional fix has been calculated.
“3D Differential” appears when you are receiving DGPS
corrections in 3D mode and a “D” appears on the strength bar
of satellites being corrected.
• Lost Satellite Reception—the receiver is no longer tracking
enough satellites for a 2D or 3D fix.
• Receiver Not Usable—the receiver is unusable, possibly due
to interference or abnormal satellite conditions. Turn the unit
off and back on to reset.
Receiver Status
The Receiver Status field displays one of the following conditions:
GPSMAP 276C Owner’s Manual 5
• Simulating GPS—the receiver is in simulator mode.
• GPS Off—the GPS receiver is turned off.
Page 14
GETTING STARTED > GETTING SATELLITE SIGNALS
GPS Options
Press MENU two times to open the Main Menu. Use the Rocker
key to highlight GPS. Press MENU to open the options menu.
GPS Tips
While the receiver is gathering information, your location on
the map may display as different from where you actually are
located. Be patient; as soon as the receiver gathers enough satellite
information, your proper location is displayed on the map.
Any time you have traveled more than 600 miles with the GPS
receiver turned off, the receiver may take longer than normal to
initialize and find your location.
The GPS receiver can lose satellite signals due to interference from
such items as buildings, tunnels, and heavy tree cover. Monitoring
GPS Page Options Menu
Start/Stop Simulator—activates and deactivates simulator mode,
the GPS status is recommended.
To learn about GPS, refer to
which is particularly helpful when learning how to use your unit.
WAAS On—enables WAAS capability. Refer to page
109 of the
“Appendix” for more information about WAAS.
Track/
North Up—orients the sky view display on the GPS page to
north up or track up.
New Altitude
—allows you to manually enter your altitude.
New Location—allows you to enter a new location automatically or
using the map.
“Learning about GPS” on page 108.
6 GPSMAP 276C Owner’s Manual
Page 15
GETTING STARTED > LEARNING ABOUT THE KEYPAD
Learning about the Keypad
Press the IN key to adjust the map scale to show a smaller
area with more detail (zoom in).
Press the OUT key to adjust the map scale to show a larger
area with less detail (zoom out).
Press the PAGE key to cycle through the main pages
in sequence and exit a submenu page. Press and hold to
switch between Marine and Automotive Modes.
Press QUIT to cycle the unit through the main pages in
reverse sequence, revert to the previous value in a data
entry field, or cancel an unintended function.
Press ENTER to select a highlighted option. When
entering data, it allows you to initiate entry and to accept
the selected value. Press and hold for more than one
second to mark your current location as a waypoint.
Press MENU to display a menu of available options for
the current page. Press MENU twice to display the Main
Menu.
Press the NAV/MOB (Navigate/Man OverBoard) key
to display the Navigation Menu. While in Marine Mode,
press and hold for more than one second to activate the
Man Overboard (MOB) function.
While in Automotive Mode, press and hold to display the
Next Turn page and announce the next turn when using the
external speaker.
Press the FIND key to quickly search for and access user
waypoints, cities, points of interest, services and other
items used for navigation.
Press and hold the POWER key for more than one second
to turn the unit on and off. Briefly press and release to
adjust the backlighting and external speaker volume.
Use the Rocker key to highlight options and to enter
data. Also use to pan the arrow on the Map page.
GPSMAP 276C Owner’s Manual 7
Page 16
8 GPSMAP 276C Owner’s Manual
GETTING STARTED > USING THE GPSMAP 276C
Using the GPSMAP 276C
This section explains how to enter and select information with the
GPSMAP 276C.
Understanding Features
The GPSMAP 276C advanced keypad system is designed to allow
quick, convenient selection of navigation options and data entry.
As you progress through this Owner’s Manual, you will be directed
to press a specific key or highlight a field on the screen. When you
are directed to press a key, you should press and quickly release the
key. If the key needs to be held down for a period of time to activate
On-Screen Button—similar to “field.” Use the Rocker
highlight a button and press ENTER to select the button.
Scroll Bar
the screen, a scroll bar appears along the right side of the list.
The position of the scroll bar indicates which portion of the list is
currently displayed. To scroll through a list, press Up or Down on
the Rocker key.
Default—the factory setting saved in the unit’s memory. You can
change the settings as you like, but you can also revert to the factory
(default) settings when you select Restore Defaults.
a secondary function, the instructions will tell you to do so. When
a field is selected on the screen, it is highlighted in yellow. The
position of the highlight is controlled by the Rocker key.
The following terms are used throughout this manual:
Highlight—move the highlighted area on the screen Up, Down,
Left, or Right with the Rocker key to select individual fields.
Moving the highlight to a given location allows you to make a
selection, begin data entry, or scroll through a list.
Field—the location on a page where data or an option may be
entered and displayed. Select (highlight) a field using the Rocker
key to begin entering data or selecting options.
key to
—when viewing a list of items too long to display on
Field
Highlighted Field
On-screen buttons
Page 17

GPSMAP 276C Owner’s Manual 9
GETTING STARTED > USING THE GPSMAP 276C
Selecting Options and Entering Data
To enter data and select options, use the Rocker key to highlight,
select, or choose an item in a list or a field on the screen. Use the
ENTER key and the Rocker key to select options, enter names and
numbers in data fields, and activate your selections.
To select and activate an option:
1. With any page displayed, press MENU. An options menu
appears with a list of optional features for that page.
2. Use the Rocker key to move the highlight Up, Down, Right,
or Left on the menu to your desired selection.
3. Press ENTER to activate the feature. Another window may
then appear with more options. If so, select the desired
option and press ENTER again.
To practice entering data, try marking a waypoint and customizing
one of the waypoint properties, such as the waypoint name.
To
ENTER/MARK until the New Waypoint page appears.
Selecting an option from an options menu
To exit a menu or return to the previous setting:
Press QUIT. The QUIT key moves backwards through your
steps. Press QUIT repeatedly to return to the starting page.
To select and activate an on-screen button:
1. On a page with on-screen buttons, use the Rocker key to
highlight the desired on-screen button.
2. Press ENTER.
On-Screen Button
mark your current location as a waypoint, press and hold
Page 18

10 GPSMAP 276C Owner’s Manual
GETTING STARTED > USING THE GPSMAP 276C
To enter data in a data field:
1. Use the Rocker key to highlight the desired data field and
press ENTER to activate the field.
2. Press Up or Down on the Rocker key to select characters.
Press Right to move to the next character or press Left to
move back to the previous character. If there are two lines of
data, keep pressing Right to drop to the next line.
Entering data
TIP: To clear the entire data field, highlight the left-most
character field and press Left once more on the Rocker key.
3. After entering the desired data, press ENTER.
Not all fields are programmable. When you are on a page with fields
that are not selectable, the highlight skips over them.
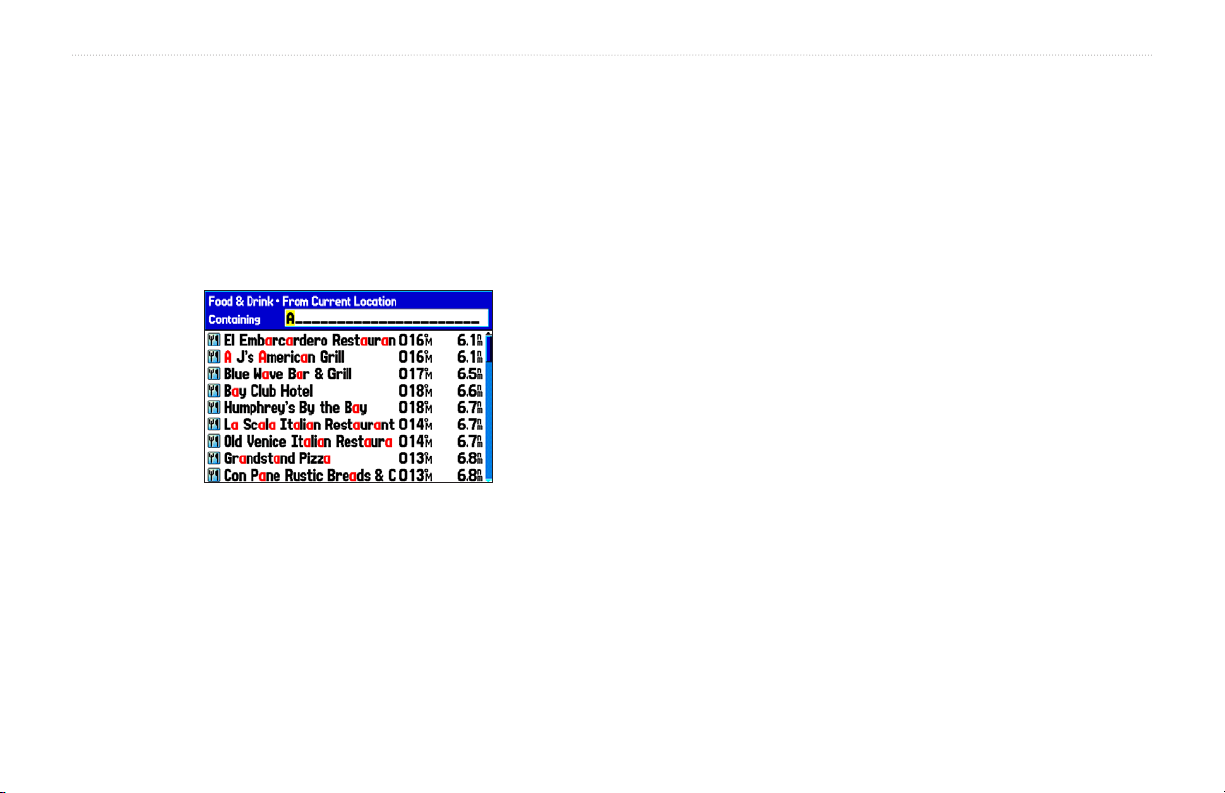
Using the Databases
Optional Garmin Data Cards and MapSource CD-ROMs enhance
the versatility of your GPSMAP 276C. With optional MapSource
City Select data, you can view listings of nearby restaurants,
lodging, shopping centers, attractions and entertainment, and even
retrieve addresses and phone numbers for any listed location.
The included USB Interface Cable or an optional PC Interface Cable
(with a serial connector) is used to transfer MapSource CD-ROM
data to the optional Data Card.
Refer to the Garmin Web site at
cartography/ for compatible MapSource products.
http://www.garmin.com/
Page 19

GPSMAP 276C Owner’s Manual 11
GETTING STARTED > SIMULATED BASIC NAVIGATION
Simulated Basic Navigation
To help you get to know your GPSMAP 276C, you can use the unit
in Simulator Mode. Simulator Mode is also helpful for practicing
with the unit indoors or when no satellite signals are available. All
waypoints and routes created in Simulator Mode are retained in
memory for future use. The following section describes how to use
simulator mode and walks you through some basic navigation using
the simulator.
Activating Simulator Mode
You can activate Simulator Mode from the Setup tab or the GPS tab
of the Main Menu.
Setup tab of Main Menu
System tab
To put the unit into Simulator Mode using the GPS tab:
1. Press MENU twice to display the Main Menu.
2. Highlight GPS from the vertical menu.
3. Press MENU to open the GPS tab options menu.
4. Highlight Start Simulator and press ENTER.
Entering a New Location
From the GPS options menu you can also enter a New Location to
simulate from.
To enter a New Location using the map:
1. Press MENU twice and highlight GPS from the vertical menu.
2. Press MENU to open the options menu.
3. Highlight New Location and press ENTER.
4. Highlight Use Map and press ENTER.
5. Use the Rocker key to move the panning arrow to the
NOTE: Do not attempt to navigate using Simulator Mode. When
the unit is set to Simulator Mode, the GPS receiver is turned off.
Any Satellite Signal Strength Bars displayed are only simulations
and do not represent the strength of actual satellite signals.
desired location on the map and press ENTER.
Page 20

12 GPSMAP 276C Owner’s Manual
GETTING STARTED > SIMULATED BASIC NAVIGATION
Simulating Navigation
The main purpose of using a GPS receiver is for navigating to a
known position. To get a feel for navigating with the GPSMAP
276C, it is a good idea to practice navigation in Simulator Mode. For
this simulation we have set our location to the San Diego coast.
To find a marine destination:
1. Be sure the GPSMAP 276C is set to Simulator Mode (see
“Activating Simulator Mode” on the previous page).
2. Press the FIND key.
3. Highlight Tide Stations and press ENTER.
4. Use the Rocker key to select a nearby Tide Station and
press ENTER. For our example, we selected Point Loma.
5. With Go To highlighted on the Tide Station Information Page,
press ENTER.
To simulate navigation to the marine destination:
1. Follow the previous steps to find a destination. The GPSMAP
276C switches to the Map page. A magenta line shows the
direct route from your current location to your destination. If
desired, press IN or OUT to adjust the zoom level.
2. Press the PAGE key twice to display the Compass page.
3. Press Up on the
(which is the desired speed setting). Press the Rocker key
Right or Left to simulate steering.
4. Press QUIT to return to the Map Page. Press IN to adjust the
zoom level. Observe the movement of the position marker
(triangle) as the unit simulates navigation.
5. If desired, press PAGE or QUIT to view the simulated
navigation on the other main pages.
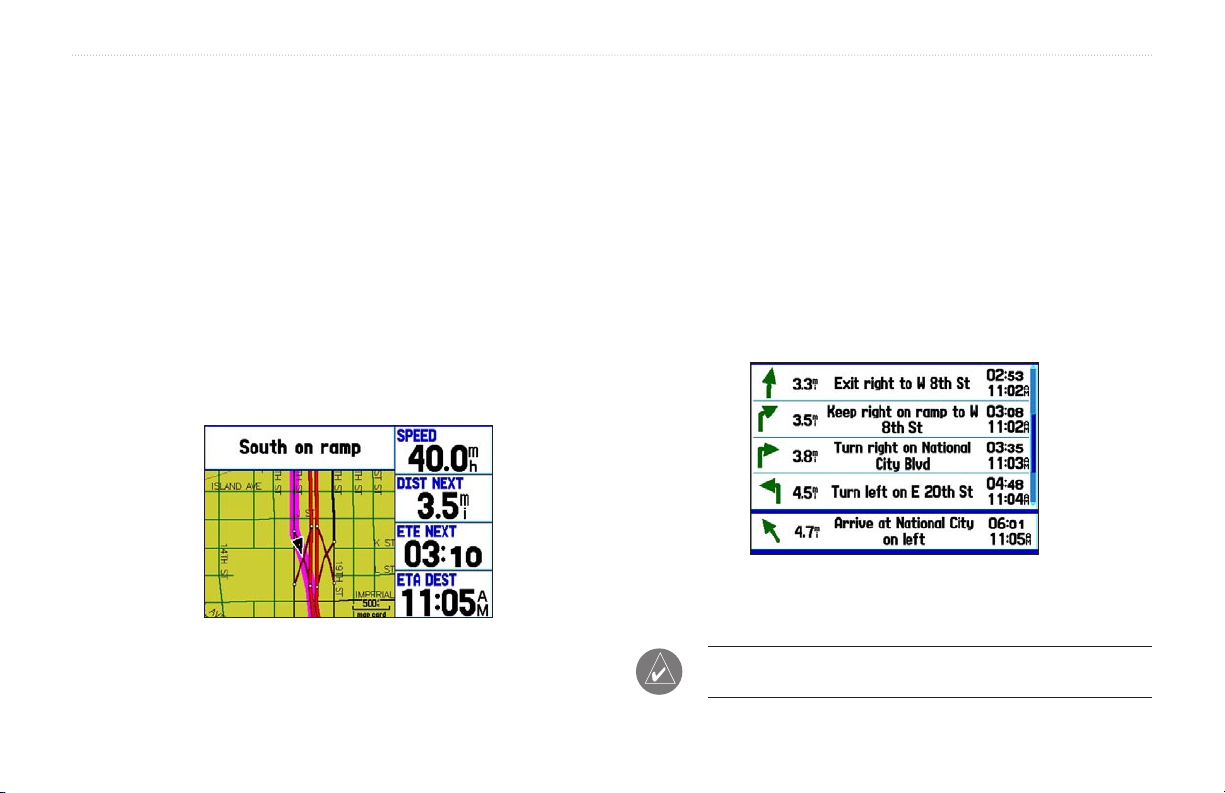
Simulated navigation displayed on the Map Page (Marine Mode)
Rocker key to increase the speed to 40 kt.
Page 21
GPSMAP 276C Owner’s Manual 13
GETTING STARTED > SIMULATED BASIC NAVIGATION
Now we will simulate navigation in the Automotive Mode. To
switch between Marine and Automotive Mode, press and hold the
PAGE key. Use the Rocker key to select Automotive and press
ENTER.
To find a land destination:
1. Be sure the GPSMAP 276C is set to Simulator Mode (see
“Activating Simulator Mode”).
2. Press the FIND key.
3. Highlight Cities and press ENTER.
4. Use the Rocker key to select a nearby city and press
ENTER. For our example, we selected National City, CA.
5. With Go To highlighted, press ENTER.
Simulated navigation displayed on the Map Page (Automotive Mode)
To simulate navigation to the Automotive destination:
1. Follow the previous steps to find a destination city. The
GPSMAP 276C switches to the Map page. A magenta line
shows the turn-by-turn route from your current location to
your destination.
2. The GPSMAP 276C automatically adjusts your speed to
“move” you along your route. Observe the movement of the
position marker (triangle) as the unit simulates navigation. If
desired, press IN or OUT to zoom.
3. If desired, press PAGE or QUIT to view the simulated
navigation on the other main pages.
Simulated Current Route Page (Automotive Mode)
When you are ready to navigate on your own, turn the Simulator off.
TIP: You can activate and deactivate the Simulator through the
Setup tab or GPS tab options menu of the Main Menu.
Page 22

14 GPSMAP 276C Owner’s Manual
BASIC OPERATION IN MARINE MODE > MARINE MODE PAGE SEQUENCE
BASIC OPERATION IN MARINE MODE
This section explains some of the more common operations you will perform with your GPSMAP 276C, such as navigating to a destination.
To
switch usage modes:
1. Press and hold the PAGE button.
2. Use the Rocker key to select either Automotive or Marine and press ENTER.
Marine Mode Page Sequence
The GPSMAP 276C offers two usage modes, Marine Mode (default) and Automotive Mode. The main pages are linked together in a series
that you can cycle through by pressing the PAGE key to move forward and the QUIT key to reverse. Each page also has an options menu
that allows you to customize each page to your preferences and/or select features. To view the options menu, press the MENU key.
Marine Mode features five main pages: the Map, Compass, Highway, Active Route, and Position Data pages. The following examples show
the main pages in Marine Mode with optional MapSource BlueChart detailed maps. The Marine Mode is the default mode for the GPSMAP
276C. This manual first addresses the page, such as the Map Page, as displayed in the Marine Mode. The manual then describes the page as
shown in Automotive Mode.
Map Page
Compass Page
Highway Page
Active Route Page
Position Data Page
Page 23

Navigating in Marine Mode
GPSMAP 276C Owner’s Manual 15
BASIC OPERATION IN MARINE MODE > NAVIGATING IN MARINE MODE
There are several ways to begin navigating to a point:
• Select a point on the map and press the NAV key.
• Press the NAV
Menu, or activate a saved route or track.
• Press the
a route to it.
Marine Mode and Automotive Mode are very similar. Most of the
features discussed here also apply to Automotive Mode.
Once you are actively navigating, you will see a magenta line that
always runs from your current location to the destination on the Map
page. You can use the Map page, Compass page, Highway page, and
Position Data page to help navigate to your destination.
Initiating Navigation
There are several different ways to initiate navigation. Press the
NAV key to open the Navigate Menu. Using one of the navigation
options, you can quickly create a route to your destination. In
Marine Mode, you can initiate Man OverBoard (MOB) navigation,
which places a waypoint in the location and then navigates you back
to that location. You can also initiate navigation through the Find
Menu.
key to activate a new route using the Find
FIND key to search for a particular item and create
Press the NAV key to open the Navigate Menu:
Go To Point—
from the Find Menu to navigate to.
Navigate Route—allows you to select a route to navigate. You can
also activate a saved route through the Routes tab of the Main Menu.
For information about routes, refer to page 21.
Navigate Track (TracBack)—
navigate. You can also activate a saved track through the Track tab
of the Main Menu. For information about tracks, refer to page 37.
MOB (Man OverBoard)—creates a Man OverBoard waypoint and
navigates to that location.
Navigate Menu in Marine Mode
Accessed by pressing NAV/MOB key
allows you to select a waypoint or point of interest
allows you to select a saved track to
Page 24

16 GPSMAP 276C Owner’s Manual
BASIC OPERATION IN MARINE MODE > NAVIGATING IN MARINE MODE
To go to a highlighted map item:
1. Use the Rocker key to highlight the item you would like to
navigate to on the Map page.
2. Press NAV. Go To <point name> appears in the list of
options and is automatically highlighted. If you have selected
an area of the map that is not a map feature, Go To MAP
Point is listed. Select Go To <point name> or Go To MAP
Point and press ENTER.
Navigate Menu
with Map Feature highlighted
3. Follow the magenta route created on the Map page. Follow
the turn-by-turn route (auto-route) by using the Next Turns
page and Current Route page. If you are using the external
speaker, follow the voice prompts.
To activate new route using the Find Menu:
1. Press the NAV key to open the Navigate Menu.
2. Highlight New Route (or Go To Point when in Marine Mode)
and press ENTER to open the Find Menu.
3. From the Find Menu, highlight Waypoints and press ENTER.
(You may also choose to go to other points, such as Cities or
Tide Stations from this list. The steps vary only slightly from
those listed for Waypoints.)
4. Select a waypoint from the list then press ENTER to display
the Waypoint page.
Waypoint Review Page
Activating a Go To using the Find Menu
5. The Waypoint page automatically opens. With the Go To
button highlighted, press ENTER to begin navigation.
Page 25
GPSMAP 276C Owner’s Manual 17
BASIC OPERATION IN MARINE MODE > NAVIGATING IN MARINE MODE
To search for an item and route to it:
1. Press FIND to open the Find Menu.
2. Using the Rocker key, highlight the desired category, such
as Cities, and press ENTER.
3. Press ENTER and use the Rocker key to begin entering the
letters contained in the item name. The list begins to sort by
the items which contain the letters you are entering. Press
ENTER when finished.
Man OverBoard (MOB)
The Man OverBoard function (MOB) lets you simultaneously mark
your present position and create a direct route back to that position
for quick response to emergency situations.
Once an MOB has been activated, an MOB waypoint with an
international MOB symbol is created, and the unit begins actively
navigating to that point. Use any of the Navigation Pages to guide
you back to the MOB point. The MOB waypoint is stored in the
waypoint list and may be deleted like any other waypoint.
Finding an item using the Containing field: The unit searches for items
containing the letter combination you enter and displays them in the list.
3. Highlight the desired item from the list and press
4. Press ENTER when the Go To button is highlighted.
ENTER.
For complete information about finding an item, refer to the
“Finding an Item” section.
To activate the MOB function:
1. Press and hold the NAV/MOB key, or press the NAV/MOB
key twice.
2. Press ENTER to confirm and begin navigating to the MOB
position.
Page 26

18 GPSMAP 276C Owner’s Manual
BASIC OPERATION IN MARINE MODE > FINDING AN ITEM
Finding an Item
The Find Menu allows you to easily search the stored waypoints and
points of interest. To open the Find Menu, press the FIND key.
The Find Menu is comprised of several default categories:
Waypoints, Cities, Exits, Transportation, and Tide Stations.
Additional categories are displayed depending on the optional
BlueChart or MapSource data card in the unit.
Using the Find From Feature
The Find option also supports a “find from” feature that allows you
to center your search around an item that you have just found. For
example, you search for Restricted Areas and the search shows an
“Anchoring Prohibited” search result. If you press FIND again, you
will see “From Anchoring Prohibited” as the new search from point.
You may also use the Find feature to center your search from any
waypoint, route list entry, map item, or tide station. Highlight the
item you want to find from and press the FIND key.
To find an item from another
1 Open the Map page. Use the Rocker key to pan the arrow
2. The Find Menu opens, displaying “From Map Pointer.” The
Find Menu
Shown without additional BlueChart or MapSource maps installed
3. Using the Rocker key, highlight the desired item from the list
Follow the directions on page 17 to search for an item near your
current location and then route to it.
location on the map:
(pointer) to the desired location and press FIND.
list of items is sorted to display items nearest the selected
location. Using the Rocker key, highlight the desired
category from the list and press ENTER.
and press ENTER. The item’s information page automatically
opens, allowing you to save the item as a waypoint, show the
item on the map, or automatically create a route to (Go To)
the item.
Page 27

GPSMAP 276C Owner’s Manual 19
BASIC OPERATION IN MARINE MODE > FINDING AN ITEM
To find an item from another location:
1. From any page, press the FIND key.
2. Using the Rocker key, highlight the desired category from
the list and press ENTER.
3. Press the MENU key to open the options menu.
Find From Options Menu
4. Highlight Near Other and press ENTER. If you are actively
following a route, you may also choose one of the other
options listed in the Find From list, as shown below.
5. Select a reference position on the map and press ENTER.
The list displays items nearest to the new map position.
To find an item near another item:
1. Press the FIND key.
2. From the Find Menu, highlight the item you want to Find
From. For this example, we chose Coronado, CA.
3. Press the FIND key with the item highlighted. The Find Menu
opens again with items near the previously-selected item,
Coronado, CA in this example. Search for the desired item.
Recently Found Items
The Recently Found page displays a list of the items you have
searched for or gone to recently.
To view recently found items:
1. Press the FIND key. The Find Menu opens.
2. Use the Rocker key to highlight Recently Found. Press
ENTER. The Recently Found page opens.
Press MENU to display the options menu:
Show Find History—allows you to toggle between displaying the
items you have searched for recently (Find History) and the items
you have recently created a Go To for (Go To History).
Remove Point—removes the point that is highlighted in the list.
Page 28
20 GPSMAP 276C Owner’s Manual
BASIC OPERATION IN MARINE MODE > FINDING AN ITEM
Viewing the Information Page
Each item on the map and each item listed in the Find Menu results
list has an information page.
To view
1. Highlight the desired point on the map or in the search
An Information page appears with details about the item in
details about an item:
results list and press ENTER.
a tabbed format. Depending on the type of item, additional
options are available for viewing the item on the Map,
viewing a tide chart, viewing the list of maps on your data
card, and viewing the next item in the search results list.
Find Menu Options
To view additional options for the Find Menu, press the FIND key
and then press MENU. The following options are displayed:
Enable Auto Arrange—automatically arranges the Find Menu.
Disable Auto Arrange and Restore Default options appear when
you select Enable Auto Arrange.
Near Other
compile the Find items lists. Using the Rocker key, move the map
arrow to the desired location and press ENTER.
Map Information—shows information about the detailed map data
—allows you to select a new location from which to
stored on the data card and allows you to select which maps are
displayed on the Map page.
Additional selections are included in the options menu when you are
navigating:
Near Next
—compiles the Find items lists based upon the next turn
in the route.
Map Feature Information Page
Select Save to save feature as a waypoint
Near Destination
route destination.
Near Current Route
2. Press PAGE
also highlight one of the on-screen buttons and press ENTER
to perform that operation.
or QUIT to exit the information page. You can
active route.
—compiles the Find items lists based upon the
—compiles the Find items lists based upon the
Page 29
GPSMAP 276C Owner’s Manual 21
BASIC OPERATION IN MARINE MODE > CREATING AND USING ROUTES
Creating and Using Routes
The GPSMAP 276C lets you create and store up to 50 reversible
routes, with up to 300 points each.
To create a route using the Find Menu:
1. Press MENU twice to display the Main Menu.
2. Use the Rocker key to highlight the Route tab.
3. Press MENU to display the Route options menu. Select New
Creating a Route
Use the Route tab of the Main Menu to create routes. Routes can
be created in two ways. The first way is to select waypoints from
the Find Menu, allowing you to see a list of the route points as you
create the route. The second way is by selecting waypoints or map
items from the Map page, allowing you to see each route point
graphically on-screen as you create the route.
Route Tab Displaying the Route List
4. The Route Review page automatically opens, displaying a
5. The Find Menu opens. Using the methods discussed in the
Route and press ENTER. Or, highlight the first available
blank route slot and press ENTER.
blank route. Press ENTER to find items to add to the route.
“Finding an Item” section beginning on page 18, select a
point to add to your route. When you find an item, highlight
OK and press ENTER to add the point to the route. Repeat
until you have added all of the points to the route.
Creating a new route on Route Review page
Page 30

22 GPSMAP 276C Owner’s Manual
BASIC OPERATION IN MARINE MODE > CREATING AND USING ROUTES
To create a route graphically:
1. Press MENU twice to display the Main Menu. Use the
Rocker key to highlight the Route tab.
2. Press MENU to display the Route options menu. Select New
Route and press ENTER.
3. Highlight the first blank slot in the Route List page and press
MENU. Use the Rocker key to highlight Edit on Map and
press ENTER.
4. Use the Rocker key to highlight the location you want to add
and press ENTER.
If you have selected an area of the map that is not a feature
or waypoint, a new waypoint is created for that location.
Press ENTER on the New Waypoint page to save the
location as a waypoint and continue adding points to your
route. You can edit the properties of this waypoint as you can
with any waypoint.
5. Repeat until you have added all points to the route.
6. When finished, press
Navigating a Saved Route
The Navigate Route option allows you to easily select and activate a
saved route.
To navigate a saved route:
1. In Automotive Mode, press the NAV key.
2. Use the Rocker key to highlight Navigate Route and press
3. Highlight the desired route and press ENTER.
Select desired
route from list
QUIT twice to return to the Route
Review page. Or, press MENU, highlight Edit as Text, and
press ENTER to view the Route Review page.
ENTER.
Select the route you want to take
Creating a new route on the map
Page 31

GPSMAP 276C Owner’s Manual 23
BASIC OPERATION IN MARINE MODE > CREATING AND USING ROUTES
Editing a Route
Once you have created a route, the Route Review page allows you to
To review individual route points:
1. Press MENU twice to open the Main Menu. Highlight the
edit, change the name, and review route points of a selected route.
2. From the Route List page, use the Rocker key to highlight
To change the name of the route:
1. Press MENU twice to open the Main Menu. Highlight the
Route tab.
2. Use the Rocker key to highlight the name of the desired
route and press ENTER.
3. With the Route Review page displayed, use the Rocker key
to highlight the route name field at the top of the page and
press ENTER.
3. From the Route Review page, highlight the desired point and
4. On the Point Review page, choose Next (highlight the next
Once you are back on the Route Review page, the next point in the
Enter a new
Route name
here
Route Review Page
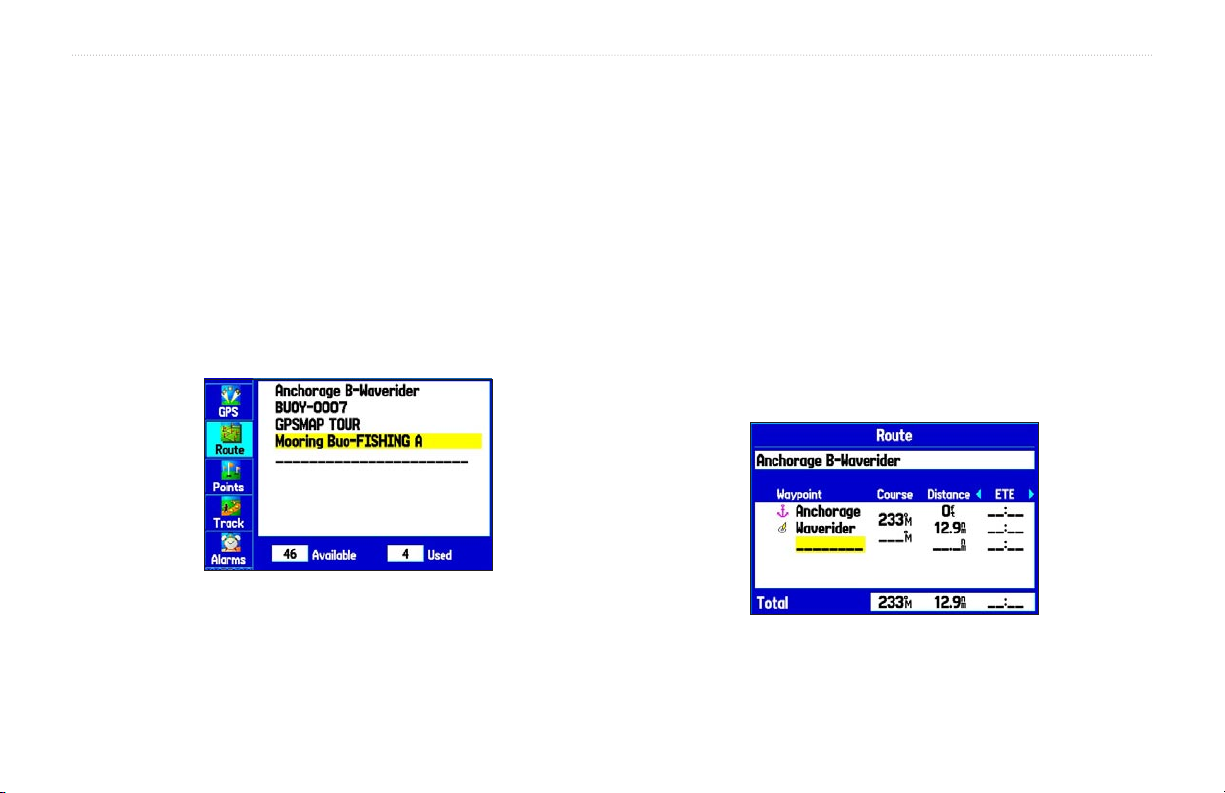
4. Use the Rocker key to enter the desired route name. Then
press ENTER.
route is automatically highlighted. This allows you to review each
point on the route by pressing ENTER repeatedly.
Route tab.
the name of the desired route and press ENTER.
press ENTER.
point on the route list), Show Map (show the point on a map
window), or Save (save the point as a waypoint) and press
ENTER. If the route point is a user waypoint, you may edit
any of the waypoint properties on the Waypoint page (see
the “Creating and Using Waypoints” section beginning on
page 26 for details).
Page 32

24 GPSMAP 276C Owner’s Manual
BASIC OPERATION IN MARINE MODE > CREATING AND USING ROUTES
To add points to the route:
1. Press MENU twice to open the Main Menu. Use the Rocker
key to select the Route tab.
2. Use the Rocker key to select the desired route and press
ENTER.
3. Use the Rocker key to highlight the spot in the route that you
want to add the new point. (The new point is added before
the highlighted route point.) Press MENU.
4. Highlight Insert Waypoint and press ENTER. The Find
Menu automatically opens for you to search for and select
the point you want to add to the route.
Route Review Page
5. In the point review page, highlight OK and press ENTER to
add the new point to the route.
To edit the route on the map:
1. Press MENU twice to open the Main Menu. Use the Rocker
key to select the Route tab from the vertical menu of tabs.
2. Select the desired route and press ENTER. Press MENU to
open the Route Review page options menu.
3. Highlight Edit on Map and press ENTER.
4. Use the Rocker key to select a location on the route (the
route turns white when the arrow is over the route). Press
ENTER.
5. Use the Rocker key to drag the route to the new point
location and press ENTER.
Editing the route on the map
6. If the New Waypoint page opens, edit the waypoint as
desired, highlight OK, and press ENTER.
7. Repeat steps 4 through 6 until all desired points are added to
the route. Press Quit when finished.
Page 33

GPSMAP 276C Owner’s Manual 25
BASIC OPERATION IN MARINE MODE > CREATING AND USING ROUTES
You can enter information about your trip so the GPSMAP 276C can
estimate information about your trip, such as ETA and ETE.
To
plan your route:
1. Open the Route Review page options menu.
2. Highlight Plan Route and press ENTER.
Entering Speed and Fuel Flow for trip planning
3. Enter the desired data for Speed and Fuel Flow. You also
can enter the date and time of your departure. Press QUIT to
return to the Route Review page.
NOTE: Fuel flow rates are measured in “units per hour.”
System setting changes for units of measure (statute, nautical or
metric) do not affect the fuel flow measure. You should enter fuel
flow rates based upon information for your vehicle (such as the
operator’s manual or performance specifications) and make note
of the desired units of measure (gallons or liters).
Using the Route Tab Options
The Route tab in the Main Menu displays all the routes currently
stored in memory, along with a descriptive name for each route.
Highlight a route and press MENU to open the options menu. From
here you can activate the route, copy it, delete it, delete all routes,
and create a new route. You can also set up the routes to manually
transition to the next waypoint.
Manually Transitioning to the Next Waypoint
From the Route tab Option Menu, highlight Set Up Routes and
press ENTER to set the route leg transition (or waypoint transition).
Select Distance to enter a radius so that when you are within the
entered distance, the GPSMAP 276C will lead you to the next point
on your route.
When you select Manual, you can transition to the next waypoint
when you want while navigating a route. While you are navigating
the route, open the Active Route page. Press MENU. Highlight Next
Route Waypoint and press ENTER to have the GPSMAP 276C
start routing you to the next point in your route.
Page 34

26 GPSMAP 276C Owner’s Manual
BASIC OPERATION IN MARINE MODE > CREATING AND USING WAYPOINTS
Creating and Using Waypoints
Waypoints are locations or landmarks you record and store in your
GPS. They are locations you may later want to return to, such as
checkpoints on a route or significant ground features. You can add
waypoints to routes and even create a Go To directly to the selected
waypoint.
Save your current location as a waypoint by pressing and holding
ENTER/MARK. You can also find waypoints using the map or the
Find Menu and then store them in the unit before ever leaving home.
Marking Your Present Position
The ENTER/MARK key lets you quickly capture your present
position to create a new waypoint. You must have a valid position
(2D or 3D) fix to mark your present position. You can determine the
satellite fix by looking at the GPS tab on the Main Menu.
To mark your present position:
1. Press and hold the ENTER/MARK key until the New
Waypoint page appears, then release it. A default four-digit
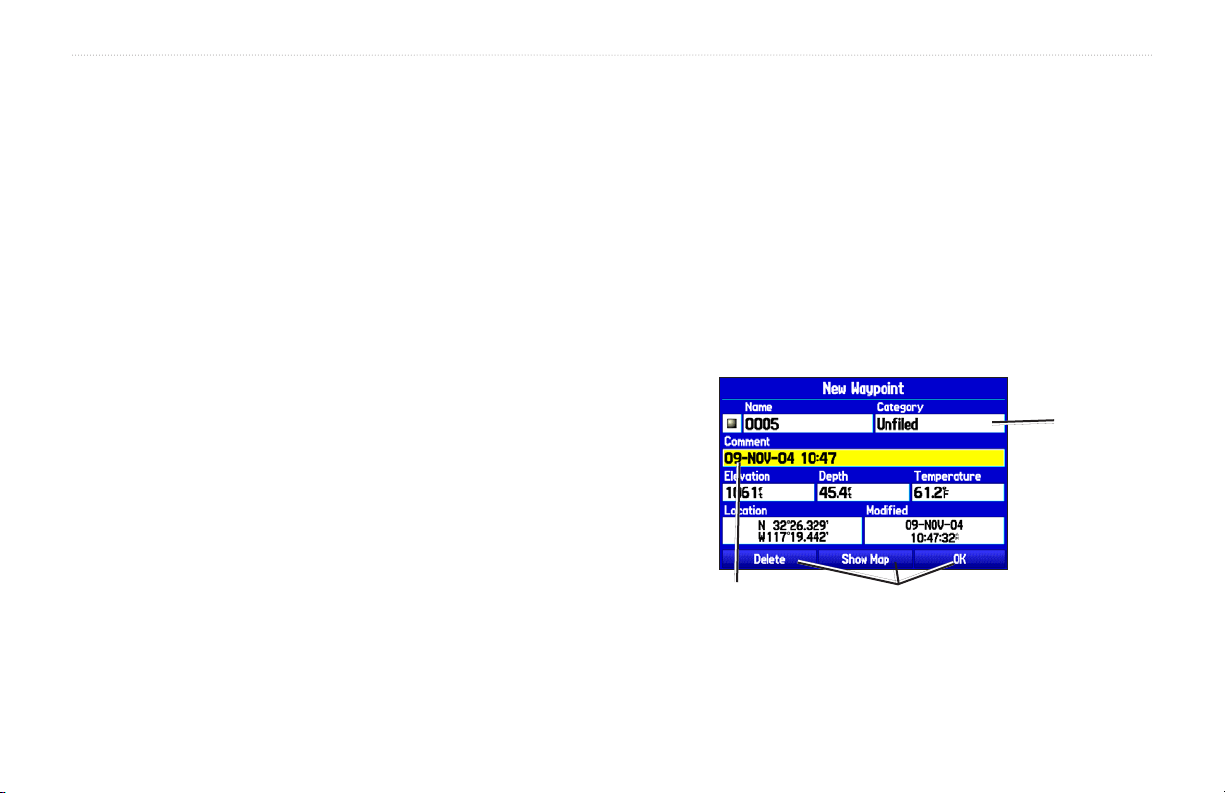
name and symbol are assigned for the new waypoint.
The GPSMAP 276C stores up to 3000 alphanumeric waypoints
with a user-defined icon, comment, altitude, depth, and temperature
available for each waypoint. Waypoints can be created using three
basic methods:
• ENTER/MARK—allows you to quickly mark your present
position.
• Graphically—allows you to define a new waypoint position
from the map display using the Rocker key.
• Text Entry—allows you to enter a new waypoint’s position
coordinates manually.
2. To accept the waypoint with the default information, use the
Rocker key to highlight OK and press ENTER.
To change any information on the New Waypoint page,
highlight the appropriate field and press ENTER. After
entering and confirming your changes, highlight OK and
press ENTER.
New Waypoint Page
Page 35

GPSMAP 276C Owner’s Manual 27
BASIC OPERATION IN MARINE MODE > CREATING AND USING WAYPOINTS
Creating Waypoints Using the Map
You can quickly create a waypoint using the Map page. When you
pan the map and move the arrow over a map item, you will see a
highlighted description of that item. The GPSMAP 276C uses the
map item text shown on the map as the default name and symbol for
the new waypoint.
To create a new waypoint using the Map page:
1. Press PAGE until the Map page is displayed.
2. Use the Rocker key to move the arrow to the desired map
position or map feature.
3. Press and quickly release ENTER/MARK to capture the
arrow position. Pressing and holding ENTER/MARK marks
your present position, not the arrow’s location.
If you have highlighted a map feature, an information page
appears after you press ENTER. Use the Rocker key to
highlight Save and press ENTER to save the item as a
waypoint.
4. The New Map Waypoint page appears. To accept the
waypoint with the default information, highlight OK and press
ENTER.
To change the any information on the New Map Waypoint
page, highlight the appropriate field and press ENTER. After
entering your changes, highlight OK and press ENTER.
Map Feature Information Page
Select Save to save feature as a waypoint
Page 36

28 GPSMAP 276C Owner’s Manual
BASIC OPERATION IN MARINE MODE > CREATING AND USING WAYPOINTS
Creating a Waypoint by Entering Coordinates
You can manually enter location coordinates to create a waypoint.
This method can be useful for creating a waypoint at a specific
latitude/longitude position from a chart. You can manually change
the location coordinates in the New Waypoint page to create a new
waypoint or use the Create Waypoint selection in the User Points
tab options menu.
To create a
new waypoint by entering location
coordinates:
1. Press ENTER/MARK to create a waypoint (or use your
favorite method discussed in previous sections). The new
waypoint is created with the next available waypoint number
and the receiver’s last know position as the default position.
2. On the New Waypoint page, use the Rocker key to highlight
the Location field and press ENTER. Use the Rocker key
to enter the desired position coordinates and press ENTER
when finished.
To change the location of a waypoint, highlight the character you want to
change in the Location field. Press Up or Down on the Rocker key to change
the character. Repeat until the new location is entered.
To change any of the other information on the New Waypoint
page, highlight the appropriate field and press
entering your changes, highlight OK and press ENTER.
ENTER. After
Page 37

GPSMAP 276C Owner’s Manual 29
BASIC OPERATION IN MARINE MODE > CREATING AND USING WAYPOINTS
Reviewing a Waypoint
Once you have created and stored a waypoint, you can modify,
review, rename, move, or delete it at any time through the Waypoint
To access the Waypoint Edit page:
1. Press MENU twice to view the Main Menu.
2. Use the Rocker key to highlight Points from the vertical list
Review and Waypoint Edit Pages. These pages provide virtually
the same information. For practical purposes, we will refer to these
pages as the “Waypoint pages,” unless it is necessary to discuss
them individually.
To access the Waypoint Review page:
1. Use the Rocker key to highlight the desired waypoint on the
Map page.
2. Press ENTER to display the Waypoint Review page. If the
waypoint is located on a map feature or MapSource or
BlueChart feature, the Waypoint Review page may include
additional tabs containing information about the other
features at that location.
3. Press ENTER to display the Waypoint Edit page.
If the waypoint is located on a map feature or MapSource or
Use either of these methods to access the Waypoint page so you can
edit the waypoint. Press MENU when the Waypoint page is open to
access the Waypoint options menu.
of tabs, then highlight the desired waypoint from the list.
Points Tab in the Main Menu
BlueChart feature, the Waypoint Edit page will NOT display
the details of the other map features.
Waypoint Review Page
Page 38

30 GPSMAP 276C Owner’s Manual
BASIC OPERATION IN MARINE MODE > CREATING AND USING WAYPOINTS
Adding a Waypoint to a Route
Append to Route adds the selected waypoint to the end of a route.
This option is displayed when you are not navigating. When you
are navigating to a destination, Add to Current Route is displayed.
Averaging the Waypoint’s Location
Average Location makes the unit take several sample location
measurements for the waypoint and recalculate for a more accurate
position reading.
The selected waypoint is added to the current route before the route
destination.
To
add a waypoint to the end of the route:
1. Open the Waypoint page and press MENU to open the
options menu.
Waypoint Options Menu
2. Select Append To Route from the options menu. The Select
Route window appears.
3. Highlight the desired route or select New Route and press
ENTER.
4. With OK highlighted, press ENTER to save the waypoint.
To calculate the average location:
1. Open the Waypoint page and press MENU to open the
2. Select Average Location from the menu and press ENTER.
3. The Average Location window appears. Watch the fields
options menu.
Average Location Page
change as the unit calculates the average position of the
waypoint. Press ENTER to save the position.
NOTE: You must have a GPS satellite fix before you can average
a waypoint’s location.
Page 39

GPSMAP 276C Owner’s Manual 31
BASIC OPERATION IN MARINE MODE > CREATING AND USING WAYPOINTS
Projecting a Waypoint
You can also create a new waypoint by “projecting” the distance and
bearing from a specific location to a new location.
To create a
1. Create a waypoint using your favorite method (discussed in
previous sections). The new waypoint is created with the next
available waypoint number and the receiver’s last known
position as the default position.
2. Press MENU twice to open the Main Menu.
3. Highlight Points from the vertical list of tabs using the
Rocker key.
4. Press MENU to open the New Waypoint page options menu.
5. Highlight Project Location and press ENTER.
Enter the desired distance, bearing, and location to project from.
new waypoint by projecting its location:
Project Location Menu
6. To change the location from which you are projecting the new
waypoint, highlight the From field and press ENTER. The
Find Menu opens.
Select the point that you will project your new waypoint from
just as you would select a waypoint or point of interest. For
more information see the “Finding an Item” section.
7. To adjust the distance that the new waypoint will be projected
beyond the original waypoint, highlight the Distance field
and press ENTER. Enter the projection distance and press
ENTER.
To adjust the bearing that the new waypoint will be projected
from the original waypoint, highlight the Bearing field and
press ENTER. Enter the bearing and press ENTER.
8. When you have adjusted all elements of the projected
location, highlight Save and press ENTER.
9. Make any other desired changes to the new waypoint data
(such as the name or symbol), then highlight OK and press
ENTER.
Page 40

32 GPSMAP 276C Owner’s Manual
BASIC OPERATION IN MARINE MODE > CREATING AND USING WAYPOINTS
Editing a Waypoint
The User Points tab displays a master list of all waypoints currently
stored in memory. From the User list, you may review, edit, rename,
To edit the waypoint:
1. Open the Waypoint Review or Waypoint Edit page.
2. Highlight the waypoint name, symbol, or another field you
or delete individual waypoints or delete all user waypoints.
User Points Tab
3. Use the Rocker key to select the desired symbol or enter
The total number of stored and available waypoints is displayed
at the bottom of the User Points tab, with the stored waypoints
arranged in numerical/alphabetical order.
To edit the next waypoint in the list:
1. After you have edited the waypoint on the Waypoint Edit
To activate a Go To from the User Points tab:
1. Press MENU twice to open the Main Menu.
2. Select Points from the Main Menu, then highlight User.
3. Highlight the desired waypoint in the list.
4. Press NAV to open the Navigate Menu. Highlight Go To
<Point Name> and press ENTER.
2. The Waypoint list is displayed with the next waypoint
want to change, and press ENTER.
Name fieldSymbol field
Waypoint Page
data and press ENTER when done.
page (shown above), highlight Next and press ENTER.
highlighted. Press ENTER to edit that waypoint.
Page 41

GPSMAP 276C Owner’s Manual 33
BASIC OPERATION IN MARINE MODE > CREATING AND USING WAYPOINTS
Organizing Waypoints into Categories
You can organize your waypoints into categories, which can help
when managing and using your waypoints. For example, you can
create a “Vacation” category that stores all of the waypoints you will
use for your upcoming vacation. When the vacation is over, you can
simply delete all the waypoints in that category by pushing a few
buttons. You can create up to 15 categories.
To
create a waypoint category:
1. From any of the waypoint pages or the Points Tab, press
MENU to open the options menu.
2. Select Edit Categories and press ENTER.
3. Use the Rocker key to highlight Add and press ENTER.
Enter the name of the category, select Save, and press ENTER
Now, when you create or edit a waypoint, you can select the
category from the Category list on the Waypoint page.
To assign a category to a waypoint:
1. Open the Waypoint page. (You can also change the category
2. Select the Category field and press ENTER.
3. From the list, select the category you want to assign the
on the New Waypoint page.)
Select the
category to
which you want
to assign this
waypoint
Waypoint Page
waypoint to and press ENTER.
4. Use the
5. Highlight Save and press ENTER.
Rocker key to enter a name for the category.
Page 42

34 GPSMAP 276C Owner’s Manual
BASIC OPERATION IN MARINE MODE > CREATING AND USING WAYPOINTS
To delete a category:
1. With the Waypoint Categories window open, highlight the
category to delete. Press MENU.
Waypoint Categories Options Menu
2. Select Delete Category and press ENTER.
3. Press ENTER again to finish deleting the category.
To delete a waypoint from the User Points tab:
1. From the User Points tab, use the Rocker key to highlight
2. Press MENU, highlight Delete Waypoint, and press ENTER.
You can delete waypoints using a variety of methods. Press MENU to open
3. Press
Deleting Waypoints
You can delete waypoints from the waypoint list in the Points tab or
from the Waypoint pages. To delete a waypoint from the Waypoint
page, use the Rocker key to highlight the on-screen Delete button
and press ENTER.
NOTE: Once a waypoint is deleted from the list, it cannot be
recovered from the unit. Back up important waypoints to a
computer using the optional PC cable and interface software,
such as MapSource, or write them down by hand.
To delete waypoints by symbol or category:
1. From the User Points tab, highlight the waypoint you want to
2. Highlight Delete by Symbol or Delete by Category and
the waypoint you want to delete.
the User Points options menu.
ENTER to confirm.
delete and press MENU.
press ENTER.
Page 43

GPSMAP 276C Owner’s Manual 35
BASIC OPERATION IN MARINE MODE > CREATING AND USING WAYPOINTS
3. When deleting by symbol, highlight the symbol of the
waypoint you want to delete and press ENTER. When
deleting by category, select the category you want to delete
from the list and press ENTER.
4. Highlight OK and press ENTER to confirm. Choose Cancel
or press QUIT to exit without deleting.
To delete waypoints by distance:
1. From the User Points tab, highlight the waypoint to be
deleted and press MENU.
2. Highlight Delete By Distance and press ENTER.
3. Select Less Than or More Than and enter the desired
distance using the Rocker key.
4. If desired, you can select a waypoint or point of interest
as the From location. Highlight the From field and press
ENTER. From the Find Menu, select the desired location and
press ENTER. When OK is highlighted, press ENTER.
5. Highlight Delete and press ENTER to delete all waypoints
within the set location. Choose Cancel or press QUIT to exit
without deleting the waypoints.
Proximity Points
Use the Proximity Points tab to define an alarm circle around a
stored waypoint position. The alarm circle can help you avoid reefs,
rocks, or restricted waters. Up to ten waypoints may be listed with
a maximum alarm radius of 99.99 nautical miles, statute miles, or
kilometers.
Proximity Points Tab
If a proximity alarm circle overlaps an existing alarm circle, a
“Proximity Overlaps Another Proximity Waypoint” message
appears. Because the unit only alerts for one of the overlap points,
use caution when navigating in these areas. If you enter an alarm
circle overlap, you are only alerted to the closest proximity
waypoint.
Page 44

36 GPSMAP 276C Owner’s Manual
BASIC OPERATION IN MARINE MODE > CREATING AND USING WAYPOINTS
To turn proximity alarms on or off:
1. Press MENU twice to open the Main Menu.
2. Highlight Points from the vertical list of tabs. Highlight
Proximity from the row of tabs along the top of the screen.
3. Use the Rocker key to highlight the field below Proximity
Alarm and press ENTER.
4. Select the desired On or Off setting and press ENTER.
To clear one or all proximity waypoints from the list:
1. Press MENU twice to open the Main Menu.
2. Highlight Points from the vertical list of tabs. Highlight
3. Use the Rocker key to highlight the proximity waypoint to
To add a proximity waypoint:
1. From the Proximity Points tab, use the Rocker key to
highlight an empty line on the Proximity List and press
ENTER. The Find Menu appears.
2. Select the desired waypoint or point of interest from the Find
Menu. With OK highlighted, press ENTER to select that
point. (For complete information about selecting waypoints or
points of interest from the Find Menu, see “Finding an Item”
on page 18).
3. The distance field is now highlighted. Press ENTER to begin
entering the proximity radius.
4. Use the Rocker key to enter a distance value (up to 99.99
units) and press ENTER.
4. To clear a single alarm, highlight Remove Point and press
5. Use the Rocker key to highlight OK and press ENTER to
Proximity from the row of tabs along the top of the screen.
clear and press MENU.
Proximity Points Tab Options Menu
ENTER. To clear all proximity waypoints, select Remove All
and press ENTER.
confirm.
Page 45

GPSMAP 276C Owner’s Manual 37
BASIC OPERATION IN MARINE MODE > MANAGING YOUR TRACKS
Managing Your Tracks
Setting up and Saving your Tracks
The GPSMAP 276C draws an electronic breadcrumb trail or “track
log” on the Map page as you travel. The track log contains points
along its path, including time, and position for each point.
The track log starts recording as soon as the GPSMAP 276C gets
a location fix. For the best results, clear the track log before you
start traveling because when the track log is full, new track points
overwrite the oldest track points.
The percentage of memory used by the current track log appears at
the top of the Active tab. After the track log is cleared, it displays
zero percent. When the display reaches 100%, the most recent track
points start to overwrite the least recent track points (if Wrap is
selected for Record Mode). To avoid losing track points, save the
track log when it approaches the 99% mark.
You must first save the track log before you can use the
Navigate
Track feature. The Save feature allows you to store up to 15 track
logs from certain times and dates.
To access the Track tab:
1. Press Menu twice to open the Main Menu.
2. Highlight Track from the vertical list of tabs.
Record Mode—Wrap records over the oldest tracks when the track
log reaches 100%. Fill records a track log until the track log is full
(100%). When Off is selected, the unit does not record tracks.
Interval—Distance records track points after a specified distance
has been traveled. Time creates track points after a specified
time has elapsed. Resolution records track points based upon the
resolution. The higher the resolution entered, the more points the
unit creates to make the track.
Value
specific distance, time, or resolution.
Color—select a color for the track when it is displayed on the map.
Active Track Tab
—records a track according to the Interval and Value. Enter a
Page 46

38 GPSMAP 276C Owner’s Manual
BASIC OPERATION IN MARINE MODE > MANAGING YOUR TRACKS
To clear the track log:
1. Press MENU twice to display the Main Menu.
2. Highlight Track, then highlight the Active tab to the right.
3. Select the Clear button and press ENTER.
Clearing the track log
4. Highlight
OK and press ENTER. Press QUIT to exit.
To save a portion of the track log:
1. Press MENU twice to open the Main Menu.
2. Highlight the Track tab, then highlight the Active tab.
3. Use the Rocker key to select Save and press ENTER.
4. To save only a portion of the track, highlight No and press
5. Select a beginning point and press ENTER. Select an ending
To save the entire track log:
1. Press MENU twice to open the Main Menu.
2. Highlight Track, then highlight the Active tab to the right.
3. Use the Rocker key to select Save and press ENTER.
4. A window pops up asking if you want to save the entire track
log. To save the entire track, highlight Yes and press ENTER.
6. The Track Review page automatically opens. Highlight
ENTER when the pop-up window appears.
point and press ENTER.
Saving a portion of the track log
OK
and press ENTER to save the track. Press QUIT to exit.
Page 47

GPSMAP 276C Owner’s Manual 39
BASIC OPERATION IN MARINE MODE > MANAGING YOUR TRACKS
Saved Tracks
The Saved tab lists all of the saved tracks in your unit.
Saved Tab
Press MENU to open the Saved tab options menu:
Review on Map—displays the highlighted track on the Map page.
TracBack—navigates the track. You can either navigate the track as
it is saved, or you can navigate the track in reverse.
Delete Track—erases the highlighted track from the unit’s memory.
Delete All—erases all tracks from the unit’s memory.
To edit a track:
1. Press MENU twice to open the Main Menu.
2. Highlight the Track tab. Press the Rocker key right to
highlight the Saved tab.
3. Highlight the track you want to edit and press
Track Review page opens. Make changes as desired.
Track Review Page
4. Highlight the Name field and press ENTER. Use the Rocker
key to change the name and press ENTER.
5. Select a different display color when the track is displayed on
the map.
6. To display this track on the map, highlight the box next to
Show on Map and press ENTER.
7. To begin a TracBack, highlight TracBack and press ENTER.
For more information about the TracBack feature, refer to the
next page.
8. To view the track on the map, highlight Map and press
ENTER. Press QUIT to return to the Track tab.
9. Highlight OK and press ENTER to save the track. Press
QUIT to exit.
ENTER. The
Page 48

40 GPSMAP 276C Owner’s Manual
BASIC OPERATION IN MARINE MODE > MANAGING YOUR TRACKS
Navigating a Saved Track
You can save your track log to use later as a TracBack, which
reduces your track log into a route with up to 300 turns. Once
activated, a TracBack route leads you back to the oldest stored track
log point. It is a good idea to clear the existing track log before you
start your current trip. Also, you must save an active track log before
you can navigate it as a TracBack.
To activate a TracBack using the NAV
1. Press NAV, highlight Navigate Track, and press ENTER.
2. Highlight the track you want to navigate and press ENTER.
key:
TracBack Tips
Once a TracBack has been activated, the GPSMAP 276C divides
the track into segments called legs. Up to 300 temporary turns are
created to mark the most significant features of the track in order to
duplicate your exact path as closely as possible. To get the most out
of the TracBack feature, remember these tips:
• Always clear the
• The
• If the track log
• If the receiver is turned off or satellite coverage is lost during
• If the changes in distance and direction of your track are too
Selecting a Saved Track
3. Use the
to (TracBack to) and press ENTER.
Rocker key to select the point you want to navigate
track log at the point that you want to go
back to (such as a dock or campsite).
Record Mode option on the Active Track tab must be set
to Fill or Wrap.
Interval option on the Active tab is set to
the Time option, the route may not navigate your exact path
(keep the interval set to Resolution for best performance).
your trip, TracBack draws a straight line between any point
where coverage was lost and where it resumed.
complex, 300 waypoints may not mark your path accurately.
The receiver then uses the most significant points of your
track so there will be fewer changes in direction.
Page 49

Following a Marine Route
GPSMAP 276C Owner’s Manual 41
BASIC OPERATION IN MARINE MODE > FOLLOWING A MARINE ROUTE
After you activate a route, the GPSMAP 276C automatically starts
guiding you to the destination using a variety of tools and pages.
See Your Route on the Map Page
You can track the progress of your route on the Map page. Your
route is shown with a magenta line. For more information see the
“Map Page” section beginning on page 43.
View Your Path on the Highway Page
Whenever a route has been activated, the Highway page provides
digital and graphic steering guidance to the destination. A compass
ribbon is displayed at the top of the page to show your current
heading, represented by the violet bar. The red vertical bar represents
the bearing to your course. To stay on course, steer towards the
Map Page
View Your Heading with the Compass Page
During active navigation, the Compass page guides you to your
destination with digital data fields and a graphic compass display
with a bearing pointer. When the pointer is pointing straight up, you
are heading directly to your destination. For more information see
“Compass Page” beginning on page 48.
red vertical indicator (or arrows) until it lines up with the violet
bar in the middle. The bottom section of the screen provides visual
guidance to the waypoint on a graphic highway display. The line
down the center of the highway represents your desired track line.
For more information see “Highway Page” beginning on page 50.
Compass Page
Page 50

BASIC OPERATION IN MARINE MODE > FOLLOWING A MARINE ROUTE
See Your Progress on the Active Route Page
Whenever you have activated a route in Marine Mode, the Active
Route page shows each point (waypoint or map item) of the active
route, as well as the point name, Course, Distance, and several other
fields of information. The active point is marked with an arrow icon.
As you navigate a route, the list automatically updates to indicate the
next active point.
For more information see the
“Active Route Page” section beginning
Watch Your Trip Data on the Position Data Page
The Position Data page provides a quick view of the important
data you want to see while navigating a route in Marine Mode. The
compass ribbon is displayed at the top of the page to show your
current heading with a red, vertical bar. To stay on course, steer
towards the violet bar (or arrows) until it is aligned with the red bar.
For more information see the “Position Data Page” section
beginning on page 53.
on page 52.
Active Goto (Route) Page
Position Data Page
42 GPSMAP 276C Owner’s Manual
Page 51

GPSMAP 276C Owner’s Manual 43
MARINE MODE PAGES AND FEATURES > MAP PAGE
MARINE MODE PAGES AND FEATURES
In Marine Mode, by default, four user-selectable data fields appear
on the right side of the screen that can be configured to display any
This section discusses the major pages in Marine Mode, such as
the Map and Compass pages, as well as some additional marine
one of the possible data options. You can also add additional data
fields to the page or select a full screen map without data fields.
features, such as DSC and the marine timer.
Map Page
The GPSMAP 276C features a real-time moving map that can do
much more than just plot your course. The Map page displays map
information (digital cartography) that includes navaids, lakes, rivers,
coastlines, cities, and highways. Use the dedicated zoom keys (IN
and OUT) to adjust the Map page scale.
Two basic map operating modes,
position mode and pan mode,
determine what cartography is shown on the map display. Position
mode pans the map to keep your present position in the display area.
The position marker shows your travel on the Map page. The
GPSMAP 276C always powers up in position mode, with the last
known location centered on the map. When you press the Rocker
key, the GPSMAP 276C enters pan mode, which moves the map to
keep the white arrow (map pointer) within the display area.
Current
Location
Map Orientation
There are two map orientation options: North Up orients the map
like a paper map, while Track Up orients the map in the direction
of travel. When using Track Up, the North arrow indicates the
orientation. To change the map orientation, press MENU to open
the Map page. Press MENU again. Select Set Up Map and press
ENTER. Refer to page 78 for information.
Data Fields
Map Scale
Map Page
Page 52

MARINE MODE PAGES AND FEATURES > MAP PAGE
Zooming In and Out of the Map
The map display has 28 available zoom scales ranging from 20 ft
Map coverage conforms to the following conditions:
• Cartography is displayed when the selected zoom scale is
to 800 nm (20 ft to 800 mi or 5 m to 1200 km). The map scale is
controlled by the IN and OUT keys, with the current scale displayed
at the bottom right of the data window.
NOTE: The scale value represents the distance from one end of
the scale bar ( ) to the other.
To select a map scale (zoom in and out):
• Press the OUT key to zoom out.
• Press the IN key to zoom in.
• When the selected zoom scale is covered by both the internal
• When the selected zoom scale exceeds the resolution of the
The system has a built-in worldwide database, with more detailed
coverage available through the use of the BlueChart or MapSource
data. The GPSMAP 276C displays cartography as long as there is
chart information available for the zoom scale you have selected.
• When external data (such as MapSource data) is used, “map
covered by either the internal basemap or other MapSource
data loaded onto a data card.
database and data card map information, the cartography with
the best resolution is displayed.
data in use, “overzoom” appears below the map scale.
No additional data is available
card” appears below the map scale.
Using detailed maps loaded on the data card
44 GPSMAP 276C Owner’s Manual
Page 53

GPSMAP 276C Owner’s Manual 45
MARINE MODE PAGES AND FEATURES > MAP PAGE
Panning the Map
The panning arrow allows you to pan the map to view other
map areas. As you pan past the edge of the current map display, the
screen moves to provide continuous map coverage. The position
icon stays in your present location and may not be visible on the
display screen when you pan the map.
To pan the map:
Press Up, Down, Right, or Left on the Rocker key.
The panning arrow moves the map so you can view different
parts of the map.
Panning Arrow
data window:
Shows the
distance and
bearing from
Map feature
highlighted
Panning the Map
your present
location
and arrow’s
position
coordinates.
As you move the arrow, the distance and bearing from your present
position to the arrow appears in the data window, along with the
arrow’s position coordinates. When you zoom in pan mode, the
arrow stays centered on the screen. When the arrow is stationary,
fixed coordinates appear in the position field, and the distance and
bearing from your present position update as you move.
To re-center your position on the screen:
When you are finished panning the Map, press QUIT.
The map automatically moves to show your present location,
The arrow may also be used to select on-screen map items, allowing
you to review a selected item directly from the map display.
and the unit returns to position mode.
Page 54

46 GPSMAP 276C Owner’s Manual
MARINE MODE PAGES AND FEATURES > MAP PAGE
To view details about an on-screen point:
1. Use the Rocker key to move the arrow to the desired
waypoint or map item. If there are several items grouped
closely together, zoom in closer for a better view.
When a waypoint or map item is selected, it is highlighted on
screen with the name and position displayed at the top of the
screen, along with the distance and bearing from your current
location, as shown in the image to the left.
2. Press ENTER to view more information about the point. The
information and on-screen buttons displayed vary depending
on the type of item selected. In some cases, additional
information tabs appear at the top of the Information page or
Waypoint page.
3. If desired, use the Rocker key to highlight the extra tabs and
view the information.
4. Select an on-screen button and press ENTER. Press QUIT to
exit the information page.
Map Feature Information Page
Clearing Unwanted Details from the Map
You can remove items from the Map page display (declutter the
display) to remove unwanted items, such as highways. To quickly
declutter the map, press ENTER.
To
declutter the Map page:
1. From the Map page, press MENU to open the options menu.
2. Use the Rocker key to highlight Declutter and press
ENTER.
3. Press ENTER again to return the detail to the map display.
You can also press MENU, highlight Declutter On/Declutter Off,
and press ENTER.
Page 55

GPSMAP 276C Owner’s Manual 47
MARINE MODE PAGES AND FEATURES > MAP PAGE
Measuring Distance
You can measure the distance and bearing between two map items.
To measure the bearing/distance between two points:
1. From the Map page, press MENU to open the options menu.
2. Highlight Measure Distance and press ENTER. An onscreen arrow appears on the map display at your present
position with ENT REF below it.
3. Move the arrow to the desired reference point (the starting
point that you want to measure from) and press ENTER. A
push-pin icon marks the starting point on the map display.
Push pin
indicating
the beginning
point of the
measurement
4. Move the arrow to the point want to measure to. The bearing
5. Press QUIT to finish.
End point of
measurement,
labeled “ENT
REF”
Measure Distance
and distance from the reference point and arrow coordinates
are displayed in the data window at the top of the display.
Page 56

48 GPSMAP 276C Owner’s Manual
MARINE MODE PAGES AND FEATURES > COMPASS PAGE
Compass Page
During active navigation, the Compass page guides you to your
destination with a graphic compass display and a bearing pointer.
Press PAGE repeatedly to display the Compass page.
Rotating
Compass Ring
Compass Arrow
Compass Page in Marine Mode
Bug Indicator
Data Fields
The middle of the page features a rotating “compass ring” that
shows your course over ground (track) while you are moving. Your
present course over ground is indicated at the top of the compass
ring. The direction of the destination (bearing) relative to the course
over ground is indicated by an arrow in the middle of the compass
ring and a bearing “bug” on the outside of the compass ring.
If the arrow points up, you are going directly to the waypoint. If the
arrow points any direction other than up, turn toward the arrow until
it points up, then continue in that direction.
Turning On the Compass Page
The Compass page is on by default in Marine Mode but off by
default in Automotive Mode.
To show the Compass page in Automotive Mode:
1. Press MENU twice to display the Main Menu.
2. Use the Rocker key to highlight the Display tab.
3. Highlight the Compass page field and press ENTER. Select
Compass Page Options
The options menu on the Compass page allows you to customize the
Compass page to your preferences. Like the Map page, the Compass
page features user-selectable data fields. For definitions of data field
options, refer to page 116. When the Compass page is open, press
MENU to open the options menu.
Show Course Pointer—displays the Course Pointer that shows how
to get back on course.
Show Bug Indicator—displays the bearing bug indicator (the
purple tick mark on the compass ring).
NOTE: You must be moving for the compass to accurately
update and display your heading.
On and press ENTER.
Page 57

MARINE MODE PAGES AND FEATURES > COMPASS PAGE
Using the Marine Timer
The Marine Timer, specifically designed for sail boat racing, allows
you to easily count up or down by specified time increments. As
is common in sail boat racing, there is often a 5-minute warning
countdown, followed by a 4-minute preparation countdown, and
finally a one-minute final countdown. Then during the race, mariners
may want to count up to keep track of their time. By default, all of
these different count downs and count ups can easily be performed
with the GPSMAP 276C by pressing a few buttons.
You must change the Compass page layout to use the Marine Timer.
As discussed previously, the timer is set to count down five minutes.
If you want to change the length of time and the behavior or the
To open the Marine Timer:
1. Press PAGE repeatedly until the Compass page is displayed.
2. Press MENU.
3. Use the Rocker key to highlight Set Up Page Layout and
press ENTER.
4. Highlight 2 Columns With Timer and press ENTER. The
Marine Timer is displayed in the lower right corner.
To use the Marine Timer:
1. Press the Rocker key Up or Down to select the time you
want to count. Five (5) minutes is the default.
2. Press ENTER to start the timer. Use the Rocker key during
the timing to quickly select a different length of time.
3. Press ENTER to stop timing.
GPSMAP 276C Owner’s Manual 49
timer, open the Timers Setup tab in the Main Menu.
To set the Marine Timer:
1. Press MENU twice to open the Main Menu.
2. Press the Rocker key down to select Setup and then left to
3. Highlight Stop next to Marine to change the timer’s behavior.
4. Highlight the time field, press ENTER, and then use the
Marine Timer on the Compass Page
select the Timers tab.
rocker key to enter a new time.
Page 58

50 GPSMAP 276C Owner’s Manual
MARINE MODE PAGES AND FEATURES > HIGHWAY PAGE
Highway Page
The Highway page is available in both Marine Mode and
Automotive Mode, though it is not displayed by default in
Automotive Mode. See the directions to the right to display the
Highway page. Press PAGE repeatedly to open the Highway page.
To hide/show the Highway page:
1. Press MENU twice to display the Main Menu.
2. Use the Rocker key to highlight the Display tab.
3. Highlight the Highway page field and press ENTER.
4. Select Off to hide or On to show and press ENTER.
Using the Highway Page
To stay on course, steer towards the violet bar (or arrows) until
it lines up with the red bar in the middle. The bottom section of
the screen provides visual guidance to the waypoint on a graphic
highway display. The line down the center of the highway represents
your desired track line.
As you head toward your destination, the highway perspective
Highway Page
When you are navigating, the Highway page provides digital and
graphic steering guidance to the destination. The right side of the
Highway page features user-selectable data fields displaying useful
navigation information. A compass ribbon is displayed at the top
of the page to show your current heading. The violet bar and the
red vertical bar on the compass ribbon indicates the bearing to your
course.
moves to indicate your progress to the waypoint and which direction
you should steer to stay on course. If you are navigating a route, the
Highway page shows each route waypoint in sequence connected
by a black “road” with a white line down the middle, which is your
desired track line. Nearby waypoints not in the active route can also
be displayed. You can zoom in or out to display a larger or smaller
view of the highway.
To change the highway perspective scale:
• Press IN to zoom in.
• Press OUT to zoom out.
Page 59

GPSMAP 276C Owner’s Manual 51
MARINE MODE PAGES AND FEATURES > HIGHWAY PAGE
Highway Page Options
The Highway page options menu allows you to define the data fields
and select which waypoints and track are displayed on the screen.
The following options are available from the Highway page menu:
Set Up Page Layout—allows you to choose the number of data
fields that appear on the Highway page.
The data fields, located along the right side of the page, provide a
user-selectable layout of various types of useful data. The layout
may also be changed to display additional data fields.
Change Data Fields—allows you to specify the type of data
displayed in each data field on the Highway page. This option
is available from any of the main pages. See page 116 of the
To display and select the Highway page Options:
1. Press PAGE repeatedly until the Highway page is displayed.
2. Press MENU.
3. Use the Rocker key to highlight the desired option.
4. Press ENTER.
Highway Page Options Menu
“Appendix” for a listing of the data fields.
Set Up Highway—displays an options menu with two tabs: Line
and Waypoint. Each tab has On/Off settings for several options, such
as enabling the line for the Active Leg and Track Log.
Set Up Highway
Page 60

52 GPSMAP 276C Owner’s Manual
MARINE MODE PAGES AND FEATURES > ACTIVE ROUTE PAGE
Active Route Page
Whenever you have activated a route in the GPSMAP 276C, the
Active Route Page Options
The following route options are available by pressing MENU:
Active Route Page shows each point (waypoint or map item) of the
active route, with the point name, Course, Distance, and several
other fields of information. The current destination point, the active
point, is marked with an arrow icon. As you navigate a route, the list
automatically updates to indicate the next active point. The Active
Route and Route Review Pages share many of the same features and
options.
Press PAGE repeatedly to display the Active Route page.
Deactivate—stops route navigation.
Edit on Map—allows you to edit the route on the map. See page 24.
Add Waypoint—
add a point(s) to the end of the route.
Remove Waypoint—
Active Route Page
Invert—reverses the order of the route.
Plan Route—allows you to enter information about your route to
more accurately provide you with arrival times.
Active Route Page Options Menu
inserts a point before the highlighted waypoint or
deletes the selected waypoint from the route.
Change Data Fields—allows you to customize the data fields
displayed on the Active Route Page.
Page 61

GPSMAP 276C Owner’s Manual 53
MARINE MODE PAGES AND FEATURES > POSITION DATA PAGE
Position Data Page
“Appendix.” You can also select one of the following options:
The Position Data page displays important navigation data while
navigating a route in Marine Mode. By default, the page displays
a compass ribbon, your current latitude and longitude, the current
date and time, the location you are traveling from, and eight userselectable data fields. The compass ribbon is displayed at the top
of the page to show your current heading with a red, vertical bar.
To stay on course, steer towards the violet bar (or arrows) until it is
aligned with the red bar.
Press PAGE repeatedly to open the Position Data page.
Waypoint is
selected as the
Nearest Type.
Coronado, CA
is the nearest
waypoint.
Change Nearest Type—allows you to specify the type of item to be
used as the nearest item (displayed in the lower-left data field). The
choices change based upon the Usage Mode you are currently using.
Reset Trip
the odometer.
Position Data Page Options Menu
—clears trip information, except the maximum speed and
Reset Max Speed—clears the maximum speed.
Position Data Page
Position Data Page Options
With the Position Data page open, press MENU to open the options
Reset Odometer—clears the running total of the distance traveled
since the odometer was last reset.
Reset All
—clears all trip information including the maximum speed
and odometer.
menu. You can set up the layout of the page and change the data
fields. For an explanation of the data fields, refer to page 116 in the
Page 62

54 GPSMAP 276C Owner’s Manual
MARINE MODE PAGES AND FEATURES > DSC
DSC
The DSC page of the Main Menu (Marine Mode only) allows you
to control and set up the Digital Selective Calling (DSC) features on
the GPSMAP 276C. Digital Selective Calling (DSC) uses marine
VHF radio and Global Positioning System (GPS) technologies to
transmit and receive location information. DSC is used by mariners
for two major operations: Distress Calls and Position Reporting.
For more information about Digital Selective Calling and Maritime
Mobile Service Identity (MMSI) numbers, refer to pages 113–114 in
the “Appendix.”
Understanding Distress Calls
With your GPSMAP 276C properly connected to a VHF radio with
DSC output, you may receive any DSC Distress Call within range.
An alert message appears and a tone sounds when a Distress Call is
received. The alarm only sounds on a Distress Call; Position Reports
do not sound the alarm. Distress Calls are broadcast to all DSC users
in radio range and appear with a blue and white checkered icon on
the DSC Call List and Log tabs.
You can enter a caller’s name, if it is known. The caller’s name
replaces the MMSI number as a reference once entered.
Understanding Position Reports
The Position Report operates similarly to the Distress Call. This
type of contact is like a phone call; no emergency alarms are set off.
Position Reports are not broadcast to all DSC users and appear with
a gold boat icon.
DSC Page
Page 63

GPSMAP 276C Owner’s Manual 55
MARINE MODE PAGES AND FEATURES > DSC
Receiving DSC Calls
Each time you receive a Distress Call or Position Report, a review
page opens—either a DSC Position Report page or a Distress Call
page. Both pages contain identical fields to the DSC Entry Review
page shown below.
DSC Call List
The Call List displays the 50 most recent calls, even if the unit is left
unattended. The Call List only displays the most recent call from a
vessel. If a second call is received, it replaces the first call in the Call
List. Press MENU to sort the list and delete entries.
Each entry in the Call List and Log has a corresponding DSC Entry
Review page. This page operates similarly to the Distress Page and
Position Report Page. From the DSC Entry Review, you can Delete
the entry, Save it as a waypoint, or show the location on the map.
To review a call or log entry:
1. Open the Call List or Log from the DSC tab.
2. Press Up or Down on the Rocker keypad to highlight the call
you want to review.
3. Press ENTER to open the DSC Entry Review page.
DSC Call List
DSC Entry Review Page
Page 64

56 GPSMAP 276C Owner’s Manual
MARINE MODE PAGES AND FEATURES > DSC
DSC Log
When DSC calls are received, they are automatically stored in the
Log, with the latest call at the top. The unit may store up to 100
calls; after 100 calls are received, the oldest log file is removed
DSC Directory
The DSC Directory acts much like a phone book and can hold up to
50 entries. Pressing MENU from this page allows you to add a New
Item, Delete a highlighted entry, or Delete All entries.
when a new call is received. Press MENU to sort the list and delete
entries.
DSC
Directory
entries. Press
ENTER to
open the entry
review page.
DSC Log
Receiving a Position Report or Distress Call
To add a new Directory entry:
1. Open the DSC Directory in the Main Menu.
2. Use the Rocker key to highlight the first blank space in the
After you have received a Position Report or a Distress Call, you
can quickly navigate to the location. Highlight the desired call from
the Call List or Log and press Direct To. The top selection in the
Navigate Menu is highlighted. Press ENTER to go to the location.
Or, press MENU, highlight New Item, and press ENTER.
3. Enter the MMSI number, the Name, and any comments.
4. When finished, highlight OK and press ENTER.
Blank entry.
Press ENTER
to add a
Directory entry.
DSC Directory list
directory list and press ENTER.
Page 65

GPSMAP 276C Owner’s Manual 57
MARINE MODE PAGES AND FEATURES > DSC
Enter the
MMSI number,
Name, and a
Comment (if
desired) in the
fields.
Highlight
OK and press
ENTER to save
the Directory
Entry.
Setting up DSC
The DSC Setup tab allows you to turn DSC On and Off. If you have
more than one chartplotter and only want DSC to display on another
chartplotter, turn DSC off on this unit.
This Setup tab also allows you to simulate Distress Calls and
Position Reports while the unit is in Simulator mode (see page 11).
Simulating calls is helpful for practice before connecting to the real
New Directory Item Page
system. The Distress Call simulator also helps to check if alarms are
working properly.
After creating a New Directory Item, the name created is attached
to that particular MMSI number. If you return to the Log, the new
name is displayed under the corresponding MMSI number.
Another way to input a name is from the Entry Review page or the
DSC Distress Call or DSC Position Report pages. The Name and
MMSI are sent to other Garmin GPS units: Only the MMSI numbers
are sent to other non-Garmin DSC users.
Making a Distress Call
To make a Distress Call, press the MayDay button on your VHF
radio. The call transmits on an emergency channel with the MMSI
number attached to the call, if you have DSC support. Any DSCequipped mariner (on sea or land) within range can receive the call.
DSC Setup
Page 66

58 GPSMAP 276C Owner’s Manual
BASIC OPERATION IN AUTOMOTIVE MODE > AUTOMOTIVE MODE PAGE SEQUENCE
BASIC OPERATION IN AUTOMOTIVE MODE
This section discusses some of the more common Automotive operations you will perform with your GPSMAP 276C in Automotive Mode.
Please note that many common operations, such as marking a waypoint and creating a route, are performed the same way as in Marine Mode.
Refer to the Marine Mode sections for operations and information not found in this section.
Automotive Mode Page Sequence
Automotive Mode features two main pages: the Map and Trip Computer pages. Optional Highway and Compass pages may be enabled in
Automotive Mode. Two additional pages appear during active navigation while in Automotive Mode—a Current Route page appears if you
are navigating a turn-by-turn route and an Active Route page appears if you are navigating “Off Road.” See “Navigating in Automotive
Mode” on the next page for more information.
Map Page
Optional Compass
Page (see page 48)
Optional Highway
Page (see page 50)
Current Route Page
Trip Computer Page
To switch usage modes:
1. Press and hold the PAGE button.
2. Use the Rocker key to select either Automotive or Marine and press ENTER.
Page 67

GPSMAP 276C Owner’s Manual 59
BASIC OPERATION IN AUTOMOTIVE MODE > NAVIGATING IN AUTOMOTIVE MODE
Navigating in Automotive Mode
When you initiate navigation in Automotive Mode, the GPSMAP
To go to a highlighted map item:
1. Use the Rocker key to highlight the item you would like to
276C automatically generates a turn-by-turn route. In some
instances, you may need to select the Follow Roads option to
2. Press NAV. Go To <point name> is added to the list of
generate a turn-by-turn route.
Once you are actively navigating, you will see a magenta line that
always runs from your current location to your destination on the
Map page. You can use the Map page, Compass page, Highway
page, and Position Data page to help navigate to your destination.
Initiating Navigation
There are several ways to begin navigating to a point:
• Select a point on the map and press the NAV key.
• Press the NAV
Menu, or activate a saved route or track.
• Press the
a route to it.
key to activate a new route using the Find
FIND key to search for a particular item and create
3. Follow the magenta route created on the Map page. Follow
navigate to on the Map page.
options and automatically highlighted. If you have selected
an area of the map that is not a map feature Go To MAP
Point is listed. Select Go To <point name> or Go To MAP
Point and press ENTER.
Navigate Menu
with Map Feature highlighted
the turn-by-turn route (auto-route) by using the Next Turns
page and Current Route page. If you are using the external
speaker, follow the voice prompts.
Page 68

60 GPSMAP 276C Owner’s Manual
BASIC OPERATION IN AUTOMOTIVE MODE > NAVIGATING IN AUTOMOTIVE MODE
To create a new route:
1. Press the NAV key to open the Navigate Menu.
2. Highlight New Route and press ENTER.
3. From the Find Menu, highlight Waypoints and press ENTER.
(You may also choose to go to other points, such as Cities or
Tide Stations from this list. The steps vary only slightly from
those listed for Waypoints.)
4. Select a waypoint from the list and press ENTER to display
the Waypoint page.
Waypoint Review Page
Activating a Go To using the Find Menu
5. The Waypoint page automatically opens. With the Go To
button highlighted, press ENTER to begin navigation.
To go to a destination using the Find Menu:
1. Press FIND to open the Find Menu.
2. Using the Rocker key, highlight the desired category, such
as Cities, and press ENTER.
3. Press ENTER and use the Rocker key to begin entering the
letters contained in the item name. The list begins to sort by
the items which contain the letters you are entering. Press
ENTER when finished.
Finding an item using the Containing field: The unit searches for items
containing the letter combination you enter and displays them in the list.
3. Highlight the desired item from the list and press
4. Press ENTER when the Go To button is highlighted.
ENTER.
For complete information about finding an item, refer to the
“Finding an Item” section on page 18.
Page 69

BASIC OPERATION IN AUTOMOTIVE MODE > NAVIGATING IN AUTOMOTIVE MODE
Following a Saved Route
The Navigate Menu also allows you to follow a saved track or route.
If you want to follow roads on your route, be sure that you press
MENU and select Follow Roads on the Active Route page.
To follow a saved route in Automotive Mode:
1. Press the NAV key to open the Navigate Menu.
2. Highlight Navigate Route and press ENTER.
3. Highlight the route you want to activate and press ENTER.
4. The Active Route page automatically opens with the route
activated. Press MENU to open the options menu.
5. Highlight Follow Roads and press ENTER to create a turnby-turn route (auto-route), which is displayed in the Current
Route page.
Stopping and Resuming Navigation
At any time when you are navigating to a point, you can stop
navigation. For example, if you are on a long car trip, but you want
to stop for dinner, you can stop navigation and resume after dinner.
To stop navigation:
1. While navigating to a point, press the NAV key.
You can also activate a Saved Route from the Saved Route tab in the
Main Menu.
2. Use the Rocker key to highlight Stop Navigation and press
To resume navigation:
1. After you have stopped navigation, press the NAV key.
2. Use the Rocker key to highlight Resume Navigation and
Navigate Menu in Automotive Mode
ENTER.
press ENTER.
GPSMAP 276C Owner’s Manual 61
Page 70

62 GPSMAP 276C Owner’s Manual
BASIC OPERATION IN AUTOMOTIVE MODE > EDITING YOUR ROUTE
Editing Your Route
Once you are navigating a route, you can edit that route. You can
add areas and roads to avoid as well as temporary detours to your
current route. You can also add stops along your trip, called via
points.
While navigating, press the NAV key to open the Navigate Menu,
Entering Custom Avoids
Custom Avoids allows you to enter specific areas and roads that
you would like to avoid in your navigation. Custom Avoids apply
to all routes, but Detours apply to only the active route. Custom
Avoids can be added while you are navigating a route or before you
navigate.
shown below.
Navigate Menu in Automotive Mode
While navigating a course
To enter a custom avoid:
1. Press the NAV key while navigating to a destination in
Automotive Mode. Or, open the Map page and press MENU.
2. Select Custom Avoids. Press ENTER.
3. Press ENTER when the Add Avoid button is highlighted.
4. Select Avoid Road or Avoid Area and press ENTER.
5. Use the Rocker key to move the arrow to the first point in the
avoidance area. Press ENTER to select the first point.
6. Move the arrow to the end point and press ENTER. During
route calculation and navigation, the GPSMAP 276C will
avoid the area within the box or the selected area of the road.
7. When finished, highlight the OK button and press ENTER.
Page 71

GPSMAP 276C Owner’s Manual 63
BASIC OPERATION IN AUTOMOTIVE MODE > EDITING YOUR ROUTE
Creating a Detour
3. The Add/Edit Vias window opens. Highlight Add Via Point
If, while navigating a route, there is road construction or some other
and press ENTER.
form of a detour, you can have your GPSMAP 276C create a detour
route for you.
To create a Detour:
1. While navigating a course, press the NAV key.
2. Select Detour from the Navigate Menu.
3. Select the desired distance and press ENTER. The GPSMAP
276C will recalculate your course based upon your detour
distance.
4. To end the detour manually, press NAV again and select
Cancel Detour.
4. From the pop-up window, highlight either
Adding and Editing Stops (Via Points)
You can add via points—points through which you would like to
travel—to your route using the Edit Vias option. Via points are great
for adding a stop at the gas station or bank to your route and are
really helpful when planning a long trip.
To add via points to your route:
1. While navigating your route, press the NAV key to open the
Navigate Menu.
2. Use the Rocker key to select Edit Vias and press ENTER.
5. If you selected Use Map, use the Rocker key to select the
If you selected Use Find Menu, select an item from the Find
6. The new point is added to the route as displayed in the Add/
Showing the original route without via points
Find Menu and press ENTER.
desired item on the map and press ENTER.
Menu as discussed in the “Finding an Item” beginning on
page 18. Remember you can press MENU while the Find
Menu is open to find an item near another location, such as
the destination.
Edit Vias page. Continue steps 3 through 5 until you have
added all of the via points that you want. Highlight Done and
press ENTER to apply the new via points to the route.
Add/Edit Vias Page
Use Map or Use
Page 72

64 GPSMAP 276C Owner’s Manual
BASIC OPERATION IN AUTOMOTIVE MODE > FOLLOWING AN AUTOMOTIVE ROUTE
Following an Automotive Route
The GPSMAP 276C guides you to your destination using many
tools, such as the Map page and Current Route page.
Track your Progress with the Map Page
You can track the progress of your route on the Map page. Your
route is shown with a magenta line. The next turn is displayed in the
top bar on the Map page.
Map Page Displaying Your Route
Watch your Trip Data
Use the Trip Computer page to view your trip data. You can track
your speed here, as well as other information related to your trip.
See your Next Turn with the Current Route Page
Whenever you have activated a turn-by-turn route in the GPSMAP
276C set in Automotive Mode, the Current Route page shows each
turn of the active route. Fore more information see page 66.
Current Route Page
Page 73

GPSMAP 276C Owner’s Manual 65
AUTOMOTIVE MODE PAGES AND FEATURES > MAP PAGE
AUTOMOTIVE MODE PAGES AND FEATURES
Press the zoom keys (IN and OUT) to change the map scale. Some
items on the map are only displayed if the map is zoomed in to a
This section discusses the major pages in Automotive Mode, such
certain level.
as the Map page, as well as some additional features, such as Routes
and Points. For information about pages and features not discussed
here, refer to the “Marine Mode Pages and Features” section.
Press ENTER to quickly declutter (remove unwanted items) from
the Map page.
Press MENU to open the options menu for the Map page.
Map Page
Refer to page 43 in Marine Mode Pages and Features section for
more details about the Map page.
In Automotive Mode, by default, four user-selectable data fields
appear on the right side of the screen that can be configured to
display any one of the possible data options. The top of the screen
Show and hide the heading line from the options menu.
Use the Rocker key to measure the distance between two objects on
the map.
Change the page layout and data fields to customize the Map page.
See page 78 for instructions.
displays the GPS status or the route leg. You can also add additional
data fields to the page or select a full screen map without data fields.
Data Fields
Current
Location
Map Scale
Map Page
Page 74

66 GPSMAP 276C Owner’s Manual
AUTOMOTIVE MODE PAGES AND FEATURES > CURRENT ROUTE PAGE
Current Route Page
Whenever you have activated a route in the GPSMAP 276C in
Automotive Mode, the Active Route Page shows each turn of the
active route, with the distance to the turn, the street name, and
estimated time to arrival and time of arrival. As you navigate a route,
the turn list automatically updates to indicate the next turn at the top
of the list.
Saving the Current Route
You can save the current route from the Current Route page. Press
MENU to save the route. Press ENTER when Save Route is
highlighted. Your route is automatically saved, using the starting
point and destination as the route name. Press ENTER when OK is
highlighted to complete saving the route.
Current Route Page
You can scroll through the entire list by moving the scroll bar up or
down. Highlight any of the turns on the list and press ENTER to
view the Next Turn page for that turn. The Current Route and Next
Turn page display similar information, just in a different layout. The
Next Turn page displays your next turn on a map.
Next Turn Page
Page 75

Trip Computer Page
GPSMAP 276C Owner’s Manual 67
AUTOMOTIVE MODE PAGES AND FEATURES > TRIP COMPUTER PAGE
The Trip Computer page displays important data while navigating a
route in Automotive Mode. It indicates your current speed and other
helpful data about your trip, such as average speed and moving time.
Set Up Page Layout—allows you to choose the layout and number
of data fields. You can change the layout of the Trip Computer to the
Trip Computer Page
Reset the Trip Computer before beginning a trip. If you make
frequent stops, leave the GPSMAP 276C powered on in order to
receive satellites. This allows the unit to accurately measure elapsed
time during the trip.
Trip Computer Page Options Menu
The following options are available from the Trip Computer options
menu. Some options are only available if you have changed the
page layout. Press MENU to open the options menu. Highlight the
desired option and press ENTER.
Position Data Page layout while still in Automotive Mode. You can
also then change the data fields on the Position Data Page to be more
useful while in Automotive Mode.
Change Nearest Type
used as the nearest item (displayed in the lower-left data field of the
Position Data (2 Columns) layout). The choices change based upon
the Usage Mode you are currently using.
Select the Reset options to reset the maximum speed, the odometer,
everything but the max speed and odometer, or reset everything in
the trip computer.
Trip Computer Page Options Menu
—allows you to specify the type of item to be
Page 76

68 GPSMAP 276C Owner’s Manual
ADDITIONAL FEATURES > SETTING ALARMS
ADDITIONAL PAGES AND FEATURES
The Main Menu features some additional pages that will be useful
to you as you plan trips and use your GPSMAP 276C. Some of these
pages have already been discussed in-depth in previous sections.
This section only contains the additional pages and features found in
the Main Menu that have not been discussed yet.
Press the MENU key twice to open the Main Menu.
Setting Alarms
The Alarms tab of the Main Menu allows you to define alarm
settings. When an alarm goes off, the alarm message appears on the
display and the unit emits five (5) beeps. When you set an alarm to
be persistent, the alarm message appears on the display and the unit
beeps until you press ENTER to acknowledge the alarm.
To
set an alarm:
1. Press MENU twice to open the Main Menu.
2. Use the Rocker key to open the Alarms tab.
3. Highlight the alarm name to activate and press ENTER.
4. Change the mode to On (or the desired mode, where
available) and press ENTER. If necessary, highlight the
next field to the right and press ENTER, enter the desired
settings, and press ENTER to finish.
To set a persistent alarm:
1. Press MENU twice to open the Main Menu.
2. Use the Rocker key to open the Alarms tab.
3. Highlight the box next to the alarm you would like to make
persistent (for example, Restricted Areas).
4. Press ENTER to place a check mark in the Persist box.
When an alarm goes off, it sounds until you acknowledge the
alarm message by pressing ENTER.
Navigation (Nav) Alarms
Next Turn—sets an alarm to indicate the next turn in a route. Select
Dist to enter a specific distance before you reach the next turn to
sound the alarm. Select Time to enter a specific time before the turn
for the alarm to go off. Select Auto for the unit to provide a Next
Turn alarm at its discretion.
Navigation Alarms Tab
Page 77

GPSMAP 276C Owner’s Manual 69
ADDITIONAL FEATURES > SETTING ALARMS
Arrival—sets an alarm to sound when you are a specified distance
Sonar Alarms
or time away from a destination waypoint. Select Auto for the unit
to provide an Arrival alarm at its discretion.
Off Course—sets an alarm to sound when off your desired course.
Select On, then enter a distance.
Anchor Drag
—sets an alarm to sound when you have exceeded a
specified drift distance. Select On and then enter a distance.
System Alarms
Clock—sets an alarm based on the unit’s clock. Select On and then
enter a specific time that you want the alarm to sound. The unit must
be on for the clock alarm to work.
Ext. (External) Voltage—sets an alarm to sound when the external
voltage drops below a specified amount. Select On and then enter a
specific voltage.
DGPS—sets an alarm to sound when the unit loses a differential fix.
Accuracy—sets an alarm to sound when GPS accuracy falls outside
of the user-set value. Select On and then enter a specific distance.
Shallow Water/Deep Water—sets an alarm to sound when you
enter an area of water that is too shallow or deep. Select On and
then enter a specific distance. You must be receiving sonar NMEA
data for this function to work.
Water Temp
exceeded or dropped below a specific temperature, or fallen outside/
inside a specific temperature range. Select Above or Below and then
enter a specific temperature, or select Inside or Outside and enter a
range of temperatures. You must be receiving sonar NMEA data for
this function to work.
Drift—sets an alarm to sound when you have exceeded a specified
drift distance. Select On and then enter a specific distance.
Sonar Alarms Tab
—sets an alarm to indicate if the water temperature has
Fish—sets an alarm to sound when fish are detected with sonar.
Page 78

70 GPSMAP 276C Owner’s Manual
ADDITIONAL FEATURES > USING THE CALENDAR
Using the Calendar
The Calendar allows you to plan trips while also displaying sun and
moon and hunting and fishing information for the day.
Day View
The Day View displays sunrise and sunset times for your current
date and location. A list of points and routes for the day are
displayed in a list, as shown to the left. You can select a different
To add a
1. Press MENU twice to open the Main Menu.
2. Highlight Calendar from the vertical list of tabs. The current
Highlight an arrow and press ENTER to change the date in the view.
route (or point) to the calendar:
day is displayed in Day View.
date by highlighting an arrow and pressing ENTER. Press MENU
to display an options menu.
Week View
The Week View provides many of the same elements as Day view,
but the entire week is visible. Days with points or routes added to
them are shown highlighted in green. Icons for the points and routes
assigned to the date are shown along the bottom of the screen.
List of Points
and Routes
added to this
date.
Sunrise and set
times for the
current location
and date.
Month View
The Month View provides many of the same elements as Day view,
but the entire month is visible. Days with points or routes added to
them are shown highlighted in green. Icons for the points and routes
assigned to the date are shown along the bottom of the screen.
Calendar Tab in Day View
Calendar Options
3. Press the
Add Route (or Add Point) and press ENTER.
4. From the pop-up route list (or the Find Menu if Add Point was
selected), select the route you want to add to the calendar
and press ENTER.
MENU key to display the options menu. Highlight
The options menu is available in all three calendar views. Press
MENU on any of the calendar views to open the options menu. To
jump to the Sun & Moon Information or Hunt & Fish tab, highlight
View Sun and Moon or View Hunt and Fish and press ENTER.
Page 79

GPSMAP 276C Owner’s Manual 71
ADDITIONAL FEATURES > VIEWING CELESTIAL INFORMATION
Viewing Celestial Information
Enter the Date for which you want to
The Celestial tab of the Main Menu displays tide information, sun
and moon information, and hunting and fishing information. You
Height of tide
may display this data for your current position, a position from the
map, or a waypoint location. Also, you may select a different date
and time, or use the current data.
To access the Celestial Tabs of the Main Menu:
1. Press MENU twice to open the Main Menu.
2. Highlight Celestial from the vertical list of tabs.
3. Use the Rocker key to display the desired tab, such as Sun
& Moon.
Tide Tab
The Tide tab contains a graphical chart that displays tide station
information in a 24-hour span starting at midnight station time. You
can choose from different dates and over 3000 tide stations.
Smallest and
Largest tides
for the AM
hours
The top of the page displays the tide station and date being
referenced. The chart shows a 24-hour block of time, with the time
progressing from left to right. The solid vertical lines represent
4-hour increments; the dotted vertical lines represent 1-hour
increments.
The tide curve appears as a shaded area; higher tides are taller and
lower tides are shorter. The bottom of the page indicates the times
with the highest and lowest tides.
view the tide information.
Tide Tab
Select the Tide Station for which you
want to view the information.
Time
Smallest and
Largest tides
for the PM
hours
Page 80

ADDITIONAL FEATURES > VIEWING CELESTIAL INFORMATION
To view a tide chart for a different tide station:
1. From the Tide tab, highlight the At field and press ENTER.
The Find Menu opens showing the Tide Stations.
2. Press MENU and select Near Current Location, Near
Current Route, Near Other (select another location using
the map), or Near Destination if desired. The list is then
updated with your search requirements.
3. Select the desired station from the list and press ENTER.
4. The Tide Station Information page opens. Highlight OK and
press ENTER.
5. The Tide tab displays again showing the tide chart for the
selected tide station.
To view the tide chart for another date:
1. From the Tide tab with the desired chart displayed, highlight
the On field and press ENTER.
2. ENTER the desired date with the Rocker key and press
ENTER. You can also use the Zoom IN and OUT keys to
view information for another date. Press and hold IN or OUT
to scroll quickly through dates.
3. Press ENTER when finished. The unit displays the chart for
the date you entered or selected.
To use the current date again, highlight the Date field. Press MENU,
highlight Use Current Date, and press ENTER.
To view a chart’s details for another time during the
day (other than current time):
1. From the Tide tab with the desired chart displayed, press
MENU and select Move Cursor.
2. Press the Rocker key Right or Left to view the chart at
another time.
3. To return to the current time, press MENU and select Stop
Moving Cursor.
To automatically start cursor mode to scroll the chart:
1. Use the Rocker key to highlight the Date field. Then press
Down to activate the cursor (pan) mode.
2. Scroll the chart right to view the next day or left to view the
previous day.
72 GPSMAP 276C Owner’s Manual
Page 81

GPSMAP 276C Owner’s Manual 73
ADDITIONAL FEATURES > VIEWING CELESTIAL INFORMATION
Sun & Moon Tab
The Sun & Moon tab provides you with sun rise/set and moon
Select the
desired date
and location
rise/set times. A graphic display of the moon phase is also displayed.
You may view Sun & Moon information for any date or location.
You can also use the play, fast forward, and stop buttons to view an
animation of the Sun & Moon tab.
Animation
controls for the
sky view
To view Sun & Moon information for a different date:
1. Use the Rocker key to highlight the Date field and press
ENTER.
2. Use the Rocker key to change the digits of the date to the
desired date. You can also use the Zoom IN and OUT keys to
view information for another date. Press and hold IN or OUT
to scroll quickly through dates.
3. Press ENTER when finished. The unit displays the sun and
moon information for the date you entered or selected.
To use the current date again, highlight the Date field. Press MENU,
highlight Use Current Date, and press ENTER.
To view Sun & Moon information for a different
location:
1. Use the Rocker key to highlight the From field and
2. Highlight Use Find Menu and press ENTER. The Find Menu
3. Select a waypoint or point of interest and press ENTER.
4. On the waypoint information page, press ENTER. The unit
To use the current location, highlight the From field. Press ENTER,
highlight Current Location, and press ENTER.
Moon Phase
Location of the
Sun and Moon
in the sky view
Sun & Moon Tab
press ENTER.
automatically opens.
displays the sun and moon information for the location you
selected.
Page 82

74 GPSMAP 276C Owner’s Manual
ADDITIONAL FEATURES > VIEWING CELESTIAL INFORMATION
Hunt & Fish Tab
The Hunt & Fish tab provides you with predictions of the good and
best times to hunt and fish in a selected location on a specific date.
To view Hunt & Fish information for a different date:
1. Highlight the Date field and press ENTER.
2. Use the Rocker key to change the digits of the date to the
To display the Hunt & Fish information:
1. Press MENU twice to open the Main Menu.
2. Highlight Celestial from the vertical list of tabs using the
Rocker key.
3. Use the Rocker key to display the Hunt & Fish tab.
3. Press ENTER when finished. The unit displays the
To use the current date again, highlight the Date field. Press MENU,
highlight Use Current Date, and press ENTER.
To view Hunt & Fish information for a different
location:
1. Use the Rocker key to highlight the From field and
2. Highlight Use Find Menu and press ENTER. The Find Menu
Hunt & Fish Tab
3. Select a point and press ENTER.
4. On the information page, press ENTER. The unit displays the
To use the current location, highlight the From field. Press ENTER,
highlight Current Location, and press ENTER.
desired date. You can also use the Zoom IN and OUT keys to
view information for another date. Press and hold IN or OUT
to scroll quickly through dates.
information for the date you entered.
press ENTER.
automatically opens.
Hunt & Fish information for the selected location.
Page 83

GPSMAP 276C Owner’s Manual 75
ADDITIONAL FEATURES > VIEWING MESSAGES
Viewing Messages
The Message tab of the Main Menu displays a list of messages
generated by your GPSMAP 276C. Use the Rocker key to scroll
through the entire list of messages on the Log tab. Use the Log Filter
To show/hide messages using the Log Filter:
1. Press MENU twice to open the Main Menu.
2. Highlight Message from the vertical list of tabs.
3. Use the Rocker key to highlight the Log Filter tab. By
tab to display only the message types that you want to view.
To view the messages:
1. Press MENU twice to open the Main Menu.
2. Highlight Message from the vertical list of tabs.
4. Use the Rocker key to highlight the message you want to
Message Log Tab
3. Use the Rocker key to highlight the desired message. Press
ENTER to view detailed information about that message.
5. The message name then appears in the Hide window.
default all messages are displayed.
Message Log Filter Tab
hide and press ENTER.
Highlight the message and press ENTER to show it again.
Page 84

76 GPSMAP 276C Owner’s Manual
ADDITIONAL FEATURES > VIEWING THE TEMPERATURE
Viewing the Temperature
NOTE: You must be receiving proper sonar data from another
device, such as a Garmin GSD 20 Sounder Module, to view
temperature information.
The Temperature tab provides a visual graph of water temperature
changes over a period of time. The graph reads from right to left so
Changing the Temperature Display
The graph will adjust and display the temperatures changes
according to the Temperature Scale and Time Duration settings.
Temperature Scale
Select Auto to have the unit automatically determine the best range,
or select a span of 2, 4, 6, 8 or 10 degrees.
that the most recent temperature measured is displayed on the far
right side of the graph. The dotted lines within the graph indicate
intervals in the temperature scale and the duration of time.
Time Duration
shorter time duration means a faster temperature log scroll. Select a
duration from 1 minute to 2.5 hours.
NOTE: Select Temp for the Transducer type in the Sonar Setup.
See “Setting up the Sonar” on page 96 for more information.
Press MENU two times to open the Main Menu. Select Setup from
the vertical row of tabs on the left, then select Temperature from
the row of tabs along the top of the screen.
Reset the Temperature Graph
To reset the scale range for the temperature graph, press MENU,
highlight Reset Auto Scale, and press ENTER. This is useful
when the scale spans a large range due to extreme temperature
changes. You can only reset the scale when you select Auto for the
Temperature Scale.
To restore the temperature graph to defaults, press
Restore Default, and press ENTER.
—select the desired degree span from the list.
—set how fast or slow the temperature log scrolls; a
MENU, highlight
Temperature Tab
Page 85

CUSTOMIZING YOUR GPSMAP 276C
GPSMAP 276C Owner’s Manual 77
The Main Menu provides access to various waypoint, system,
navigation and interface management, and setup menus.
Setting up the System
To customize how your GPSMAP 276C looks and sounds, adjust
certain system settings in the Main Menu.
CUSTOMIZING YOUR GPSMAP 276C > SETTING UP THE SYSTEM
Welcome Tab of the Setup Tab
Adding a Welcome Message
The Welcome tab allows you to enter information, such as your
name and address, that the unit can display when it is turned on.
This feature can be helpful if your unit is ever misplaced.
To open the Welcome tab, press
Menu. Select Setup from the vertical tab list. Then select Welcome
from the row of tabs along the top of the page.
MENU twice to open the Main
Enter the desired information in the fields. You do not need to enter
information in every field.
To display this information at power up, highlight the box next to
Show at Power-up
To hide the welcome information at power-up, remove the check
mark from the box.
. Press ENTER to place a check mark in the box.
Page 86

78 GPSMAP 276C Owner’s Manual
CUSTOMIZING YOUR GPSMAP 276C > SETTING UP THE SYSTEM
Changing the Page Layout and Data Fields
You can adjust how the following pages look on the screen: Map,
Compass, Highway, Position Data, Trip Computer, and optional
Sonar page. You can adjust the data fields on all of those pages too.
To set up the
1. Press PAGE to display the page you want to change.
2. Press MENU to open the options menu.
3. Highlight Set Up Page Layout and press ENTER.
4. Select the desired option and press ENTER. The options
vary between the three usage modes and the page you are
setting up.
page layout:
Changing a Data Field
Setting up the Map Page
The Map page Setup allows you to adjust the way items are
displayed on the Map page.
To change a data field display:
1. Press PAGE to display the page you want to change.
2. Press MENU to open the options menu.
3. Highlight Change Data Fields and press ENTER
4. Highlight the data field you want to change and press
ENTER.
5. Press Up or Down on the Rocker key to highlight the type of
data you want to display and press ENTER.
6. Press QUIT to exit.
To change a map setup option:
1. From the Map page, press MENU to open the options menu.
2. Highlight Set Up Map and press ENTER.
3. Press Left or Right on the Rocker key to highlight the desired
file tab, then Up or Down on the Rocker key to highlight to
the field you want to change and press ENTER.
4. Press Up or Down on the Rocker key to highlight the desired
setting and press ENTER.
5. Press PAGE or QUIT to exit.
Page 87

Additional Map Data Displayed
GPSMAP 276C Owner’s Manual 79
CUSTOMIZING YOUR GPSMAP 276C > SETTING UP THE SYSTEM
You can view the data that is currently loaded on your GPSMAP
276C unit and data card.
To review/change
1. Access the Map page and press MENU.
2. From the options menu, highlight Map Information and
press ENTER.
Map Family
highlighted.
Press ENTER
to view the
individual maps
in the family.
3. The first page shows the Map Families stored on the data
card and unit and whether they are shown on the Map page.
To change the setting for a Map Family, highlight the box next
to the Map Family name and press ENTER to select (check
mark) or deselect (no check mark) the Show setting.
4. To view the list of maps within a Map Family, highlight the
name of the Map Family and press ENTER.
map information:
Data Card Information Page
Individual Map Information Page
Showing the individual maps that are in the selected Map Family
5. To view detailed information about an individual map,
highlight the Map Name and press ENTER. Highlight OK and
press ENTER to exit the map information page.
6. To select/deselect individual maps for display on the Map
page, highlight the box next to the desired map and press
ENTER to check/uncheck the Show box. Or, press MENU,
select one of the options (Show All, Hide All, or Show
Defaults), and press ENTER.
7. Press QUIT to exit the Map Information page.
Page 88

80 GPSMAP 276C Owner’s Manual
CUSTOMIZING YOUR GPSMAP 276C > SETTING UP THE SYSTEM
Changing the Display
The Display tab of the Main Menu allows you to set several features
of the display, such as what pages to display in the Main page
sequence and how long the backlight stays on.
To view the Display tab:
1. Press MENU twice to open the Main Menu.
2. Highlight Display from the vertical list of tabs.
Backlight Timeout—sets the backlight to stay on once it is turned
on, or to time out after a selected period of time has elapsed when
using the battery. The backlight stays on regardless of this setting
when external power is used.
Twilight Adjustment
optimum viewing during twilight times.
Highway Page—enables the page and places it in the Main page
sequence.
Compass Page—enables the page and places it in the Main page
sequence.
Backlight Intensity—turns the backlight up or down. Press the
Rocker key Right to increase the intensity or Left to decrease.
Display Tab
Color Mode—sets the display to Day, Night, or Auto color mode.
Select Auto to automatically switch from day to night at sunset and
change back at sunrise.
Main Menu—enables the main menu tabs to contain text and icons
(default) or text tabs only.
—allows the unit to adjust the backlight for
Page 89

GPSMAP 276C Owner’s Manual 81
CUSTOMIZING YOUR GPSMAP 276C > SETTING UP THE SYSTEM
Changing the Sounds
The Sound tab of the Main Menu allows you to customize the
sounds your GPSMAP 276C makes to suit your needs.
To view the
1. Press MENU twice to open the Main Menu.
2. Highlight Sound from the vertical list of tabs.
Beeper—sets the beeper to chime during keypresses and alarms
(Key and Alarm) or on Alarms Only.
Sound tab:
Sound Tab
Attention Tone—turns on and off the attention tone that sounds
before the vocal prompts.
Voice Prompt
—sets the vocal prompt to operate for Guidance and
Status, Route Guidance Only, or No Voice Prompts.
Voice
Language—sets the language for vocal prompts.
Speaker Volume
—sets the external speaker volume (when used).
Press the Rocker key Right to increase the volume or Left to
decrease.
Page 90

82 GPSMAP 276C Owner’s Manual
CUSTOMIZING YOUR GPSMAP 276C > SETTING UP THE SYSTEM
Changing the System Settings
To open the System tab, press MENU twice to open the Main Menu.
Select Setup from the vertical tab list. Then select System from the
row of tabs along the top of the page.
System Setup Tab
System Mode—sets the unit to operate in Normal mode, Battery
Saver mode, or Simulator mode (for practice ONLY).
Usage Mode—sets the unit to the desired mode.
Speed Filter—allows the unit to average speed readings. Choose
from Off, Auto (automatically controls filtering), or On (allows you
to enter a value in seconds).
Text
Language—allows you to select from various languages for
the unit’s on-screen display.
WAAS—disable and enable WAAS from this field.
External Power Off—allows you to select whether the GPSMAP
276C remains on (Stay On) or the unit turns off (Turn Off) when
external power is removed from the unit.
External Power On—allows you to turn the GPSMAP 276C on
(Turn On) or charge the battery (Charge Battery) when external
power is applied to the unit.
Page 91

GPSMAP 276C Owner’s Manual 83
CUSTOMIZING YOUR GPSMAP 276C > SETTING UP THE SYSTEM
Setting the Timers
To open the Timers tab, press MENU twice, select Setup from the
vertical tab list, and Timers from the row of tabs along the top.
Timers Tab of the Setup Tab
User—allows you to set the timer to Count Up or Count Down.
You can also Reset the timer and turn it Off. Enter a time to use
when counting up or down to the right.
Marine—displayed on the Compass page. See page 49.
Since Midnight—the time the unit has been turned on since
midnight. This will reset if you restore All Unit Defaults from the
System tab.
Changing the Time
The Time tab allows you to set the time format and zone. You can
also set the unit to conform to Daylight Saving Time. The current
time and date are displayed at the bottom of the page.
To open the Time tab, press
vertical tab list, and Time from the row of tabs along the top.
Time Tab of the Setup Tab
Time Zone—allows you to choose a city in your correct time zone
so the GPSMAP 276C will show the correct local time. Select
Other to enter a UTC Offset.
If the incorrect date is displayed, press MENU, highlight Set Date,
and press ENTER. You will then be prompted to enter the current
year. The GPSMAP 276C will use this information when gathering
satellite data to display the correct date.
MENU twice, select Setup from the
Page 92

CUSTOMIZING YOUR GPSMAP 276C > SETTING UP THE SYSTEM
Customizing the Units
The Units tab allows you to customize measurement units for the
entire system. To open the Units tab, press MENU twice to open
Restoring Defaults
The following tabs in the Main Menu allow you to restore their
defaults: Track, Alarms, Display, Sound, and Setup.
the Main Menu. Select Setup from the vertical tab list. Then select
Units from the row of tabs along the top of the page.
Units Tab
Distance and Speed—select the unit to display your speed and
distance traveled.
Direction Display
—select the unit to display your direction. Mils
is a unit of angle measurement used in military settings, in which
17.78 mils equal one degree.
Temperature
—select the unit to display the temperature.
To restore all of unit’s settings to the factory defaults at once, select
All Unit Defaults from the options menu of the Setup tab.
To restore
1. Press MENU twice to open the Main Menu.
2. Use the Rocker key to highlight the desired tab.
3. Press Menu to open the options menu.
4. Highlight Restore Default.
5. Press ENTER to restore the tab to the defaults.
defaults:
Setup Tab Options Menu
Elevation—select the unit to display your altitude.
Depth—select the unit to display the depth.
84 GPSMAP 276C Owner’s Manual
Page 93

GPSMAP 276C Owner’s Manual 85
CUSTOMIZING YOUR GPSMAP 276C > CUSTOMIZING THE ROUTING AND GUIDANCE SETTINGS
Customizing the Routing and Guidance
Settings
You can change the way the GPSMAP 276C generates routes in
Automotive Mode. You can also change the way the GPSMAP 276C
guides you during navigation.
Road Routing Settings
To open the Road Routing tab, press MENU twice to open the Main
Menu. Select Setup from the vertical tab list. Then select Road
Routing from the row of tabs along the top of the page.
Road Routing Setup Tab
Route Preference—allows the unit to calculates routes based on:
• Faster Time—routes calculated are faster to drive but may be
longer in distance.
• Shorter Distance—routes calculated are shorter in distance
but may take more time to drive.
• Off Road—creates a direct line from your current location
to your destination. This is useful when you are travelling
outside of the detailed map coverage area or where no roads
exist.
Ask Me My Preference
select a Route Preference before route calculations.
Calculation Method—sets how the unit searches for the route.
• Quickest Calculation—calculates the route the quickest, but
it might not produce the best route.
• Quick Calculation—takes a bit more time to calculate but
generates a better quality route.
• Better Route—generates an even better quality route but uses
a longer calculation time.
• Best Route—generates the most optimal route but takes the
longest time to calculate.
—determines whether you will be asked to
Page 94

86 GPSMAP 276C Owner’s Manual
CUSTOMIZING YOUR GPSMAP 276C > CUSTOMIZING THE ROUTING AND GUIDANCE SETTINGS
Calculate Routes for—sets route calculation for the particular
vehicle you are operating to optimize the route for your vehicle type,
as some roads have vehicle-based restrictions.
Avoid
—allows you to avoid certain road types and maneuvers on
your route. The unit uses these road types only if alternative routes
take you too far out of your way or if no other road is available.
Custom Avoids—allows you to enter specific areas and roads that
you would like to avoid in your navigation. Refer to page 62 for
information on creating custom avoids.
Custom Road Prefs
—allows you to avoid or use Major, Medium,
and Minor roads using a slider scale. This is especially nice if you
want to avoid major highways, for example. Select Auto Set to use
preset values.
Off-Route Recalculation—allows you to set whether the unit
prompts you when it is recalculating your route (Prompted),
or whether the unit recalculates automatically. Set whether the
unit announces the recalculation (Automatic - Announced) or
recalculates silently (Automatic - Silent). You can also turn the off-
Guidance Tab of the Setup Tab
route recalculation Off.
Guidance Settings
To open the Guidance tab, press MENU twice to open the Main
Menu. Select Setup from the vertical tab list. Then select Guidance
from the row of tabs along the top of the page.
Next Turn Pop-up—turns the Next Turn pop-up window
Off, or
opens the window when you hold the NAV key (Held NAV Key
Only), opens automatically (Automatically Only), or Both.
Page 95

CUSTOMIZING YOUR GPSMAP 276C > CHANGING THE LOCATION SETTINGS
Changing the Location Settings
To open the Location tab, press MENU twice to open the Main
Menu. Select Setup from the vertical tab list. Then select Location
from the row of tabs along the top of the page.
The default setting is WGS 84. The unit automatically chooses the
best datum depending upon your chosen position format.
WARNING: Selecting the wrong map datum can result in
Refer to the “Appendix” of this guide for more information about
location formats and map datums. Also visit the National Imagery
and Mapping Agency at http://www.nima.mil for more information
on grids and datums.
Changing the Location Format
When you change the Location Format, you change the coordinate
system in which a given position reading is displayed. The default
format is latitude and longitude in degrees, minutes, and thousandths
of a minute (hddd°mm.mmm).
You should only change the position format if you are using a map
or chart that specifies a different position format or want to use a
format you are familiar with.
Selecting a Different Map Datum
Selecting a Different Heading Reference
You can select from Auto Mag Var, True, Grid, and User Mag
Var. Auto Mag Var provides magnetic north heading references
that are automatically determined from your current position. True
provides headings based upon a true north reference. Grid provides
headings based on a grid north reference (and is used in conjunction
with the grid position formats).
User Mag Var
current position and provides magnetic north heading references
based upon the variation you enter. Enter the magnetic variation of
your current position in the Magnetic Variation field if you have
selected User Mag Var for the heading.
WARNING: If User Mag Var is selected, the unit does not
Datums are used to describe geographic positions for surveying,
mapping, and navigation and are not actual maps built in the unit.
You should only change the datum if you are using a map or chart
that specifies a different datum.
substantial position errors. When in doubt, use the default WGS
84 datum for best overall performance.
allows you to specify the magnetic variation at your
automatically calculate and update the magnetic variation at
your present position. You must update the magnetic variation as
your position changes. Failure to update this setting may result
in substantial differences between the information displayed on
your unit and external references, such as a magnetic compass.
GPSMAP 276C Owner’s Manual 87
Page 96

88 GPSMAP 276C Owner’s Manual
CUSTOMIZING YOUR GPSMAP 276C > CHANGING THE DATA FORMAT
Changing the Data Format
• GARMIN DGPS—used to connect the GPSMAP 276C with
The COM 1 and COM 2 tabs allow you to control the input/output
format used when connecting your unit to external devices. To open
• NMEA In/NMEA Out—supports the input/output of
the COM 1 or COM 2 tab, press MENU twice to open the Main
Menu. Select Setup from the vertical tab list. Then select COM 1 or
COM 2 from the row of tabs along the top of the page.
• Text Out—allows the unit to output simple text data that
• RTCM In—allows Differential GPS (DGPS) input using a
• RTCM In/NMEA Out—allows Differential GPS (DGPS)
COM 1 Tab of the Setup Tab
• RTCM In/Text Out—allows Differential GPS (DGPS) input
Serial Data Format—sets the data format to one of the following:
• Garmin Data Transfer—the proprietary format used to
• None—provides no interfacing capabilities.
exchange data with a PC or another Garmin GPSMAP 276C.
Garmin Data Transfer is disabled when the USB is connected,
and the unit automatically switches to USB format. When
the USB is disconnected, the USB field changes to Transfer
Mode, as shown above.
a Garmin DGPS beacon receiver.
standard NMEA 0183 version 3.01 data and sonar NMEA
input support for the DPT, MTW, and VHW sentences.
includes, data, time, position, and velocity. The Baud can be
set to 1200, 2400, 4800, or 9600.
standard RTCM format.
input using a standard RTCM format and also provides
NMEA 0183 version 3.01 output.
using a standard RTCM format and also outputs simple text
data that includes, data, time, position, and velocity.
Page 97

GPSMAP 276C Owner’s Manual 89
CUSTOMIZING YOUR GPSMAP 276C > CHANGING THE DATA FORMAT
If you select GARMIN DGPS or RTCM In/NMEA Out format,
you can control a differential beacon receiver directly from
your GPSMAP 276C using the COM tab. You can have the unit
The Status field displays one of the following:
• Tuning—the unit is attempting to tune to the specified
automatically scan for the DGPS beacon signal, or you can enter the
beacon frequency and bit rate on the unit, and the information will
• Scanning—the unit is automatically scanning through the
be used to tune the beacon receiver. If you use a DGPS receiver,
WAAS capability is automatically turned off.
To have the unit automatically
1. Set the unit to GARMIN DGPS or RTCM In/NMEA Out.
2. Highlight the Beacon field and press ENTER.
3. Highlight Scan and press ENTER. The numbers in the
Frequency field change as the unit scans from 284 kHz to
325 kHz, 200 bit rate, then 100, at 6-second intervals.
Highlight
Scan and press
ENTER.
COM 1 tab of the Setup tab with GARMIN DGPS selected
scan for a frequency:
Displays the
status of the
scan
• Receiving—the unit is receiving DGPS signal and ready for
• Check Wiring—the unit is not making connection with
To restart the scan:
1. Press MENU.
2. Highlight Restart Scan and press ENTER.
To manually enter a frequency and bit rate:
1. With the unit set to GARMIN DGPS or RTCM In/NMEA Out,
2. Highlight User and press ENTER.
3. Highlight the Frequency or Bit Rate field, press ENTER, and
frequency and bit rate.
frequencies and bit rates.
operation.
DGPS receiver.
use the Rocker key to highlight the Beacon field and press
ENTER.
enter a frequency or bit rate. Press ENTER when done.
Page 98

90 GPSMAP 276C Owner’s Manual
CUSTOMIZING YOUR GPSMAP 276C > CHANGING THE DATA FORMAT
When the unit is receiving a DGPS signal, the SNR (Signal to Noise
Ratio) and Distance fields show data. The SNR range is 0 dB to 30
5. Select NMEA In/NMEA Out
6. Press MENU to open the options menu. Select Advanced
dB, with 30 being the best. The Distance may or may not show data,
NMEA Setup and press ENTER.
. Press ENTER.
depending upon the signal being broadcast from the DGPS site.
The DGPS beacon transmitters are operated by the United States
Coast Guard (or similar government agency in other countries),
which is responsible for their accuracy and maintenance. For DGPS
transmitter problems or to find the most updated list of frequencies
and coverage areas, contact your local USCG or see their Web site at
http://www.navcen.uscg.mil/.
Advanced NMEA Output Setup
If you are going to interface the GPSMAP 276C with another
piece of equipment (such as a radar or autopilot), the unit needs
to be set to output NMEA data. The NMEA data transmission can
be customized to keep the output rate at two seconds. If too many
NMEA sentences are activated, the unit may take longer than two
The Advanced NMEA Output Setup page allows you to set the
output rate, change the precision of the Lat/Lon minutes, set
Waypoint IDs to names or numbers, and turn on and off the GPS
status, the GARMIN Proprietary sentences, and Waypoint/Route
(WPL, RTE).
Advanced NMEA Output Setup
seconds to update.
GPSMAP 276C NMEA Sentence Output (NMEA version 3.01
To access the Advanced NMEA Output Setup:
1. Press MENU twice to open the Main Menu.
2. Use the Rocker key to select Setup from the vertical tab list.
3. Select COM 1 or COM 2 from the row of tabs along the top.
4. Highlight the field below Serial Data Format. Press ENTER.
compliant):
• Always transmitted: GPRMC, GPGGA, GPGLL, GPBWC,
GPVTG, GPXTE, GPRMB
• Switchable sentences: GPGSA, GPGSV, GPWPL, GPRTE
• GARMIN proprietary: PGRME, PGRMZ, PGRMM
Page 99

SETTING UP AND USING SONAR
This section covers the additional sonar options for the GPSMAP
276C when used in conjunction with a GSD 20 Sounder Module.
Read the GSD 20 Sounder Module Installation Instructions to
properly install the sounder module. When you turn on your
GPSMAP 276C, the Sounder Module automatically turns on.
SETTING UP AND USING SONAR > SHOWING SONAR ON THE MAP PAGE
NOTE: You MUST have a GSD 20 installed and connected to
your GPSMAP 276C to use the sonar features.
The Sonar page is added to the end of the page sequence when you
are in Marine Mode. To view the Sonar page, press PAGE or QUIT
repeatedly until it is displayed.
Showing Sonar on the Map Page
You can change the layout of the Map page to display a split screen
to show the sonar on the Map page. You must be in Marine Mode to
use the sonar feature.
To display the Sonar page on the Map page:
1. Press and hold PAGE. Highlight Marine and press ENTER.
2. Press PAGE or QUIT to display the Map page.
3. Press MENU. Use the Rocker key to highlight Set Up Page
Layout and press ENTER.
4. Highlight Map with Sonar and press ENTER.
GPSMAP 276C Owner’s Manual 91
To resize the Map page sonar split screen:
1. After displaying the Sonar and Map page together in the split
screen, as described in the previous steps, press MENU.
2. Highlight Size Split and press ENTER.
3. Use the Rocker key to move the vertical double-arrow Right
or Left until the screen is divided how you want it.
4. Press ENTER to complete the size split.
5. To stop resizing the screen, simply press QUIT. You can also
press MENU, highlight Stop Resizing, and press ENTER to
stop resizing the screen and retain the previous split setting.
Map Page with Split Screen
Page 100

SETTING UP AND USING SONAR > USING THE SONAR PAGE
Using the Sonar Page
When combined with a GSD 20 Sounder Module, your GPSMAP
276C becomes a powerful fishfinder/flasher with the Sonar page.
If a GSD 20 is attached, but the unit does not detect a transducer,
a “Sonar Turned Off” message appears across the Sonar page. If a
GSD 20 is not attached, the Sonar page only appears when the unit
is in Simulator Mode.
The sonar returns show as red (strongest), then oranges (strong),
yellows (medium), greens (weaker), and blues (weakest). The Fish
Symbols option allows you to view the actual sonar data, a fish
symbol or a combination of both. When the unit is set to Dual, the
appearance of the fish symbols changes. Fish symbols from the
center of the beam (200 kHz) are solid (or narrow arches), but the
returns from the edges of the beam (50 kHz) are hollow (or wide
arches).
The middle of the page contains a right-to-left moving sonar image
of the water beneath your boat. Items appear as they pass under your
transducer. Those items on the right side of the screen are closer to
you than those on the left. Along the right side of the screen is an
adjustable scale that reflects the depth of the area being displayed.
The top left corner displays the Adjustment Option, the depth, and
the water temperature.
The sonar display may also be set to show a split screen view of a
zoomed portion of the sonar, bottom lock (display scaled from the
bottom up), or a combination of these options. For example, you
may choose to show dual frequency at a 2X zoom (Dual 2X) on
one half and normal range dual frequency (Dual) on the other half.
The current display mode is displayed at the bottom of each sonar
display.
Read the “Understanding Sonar” section beginning on page 99 for
more on information about sonar.
Sonar Page
92 GPSMAP 276C Owner’s Manual
 Loading...