

Garmin GMX 200 Reference Guide
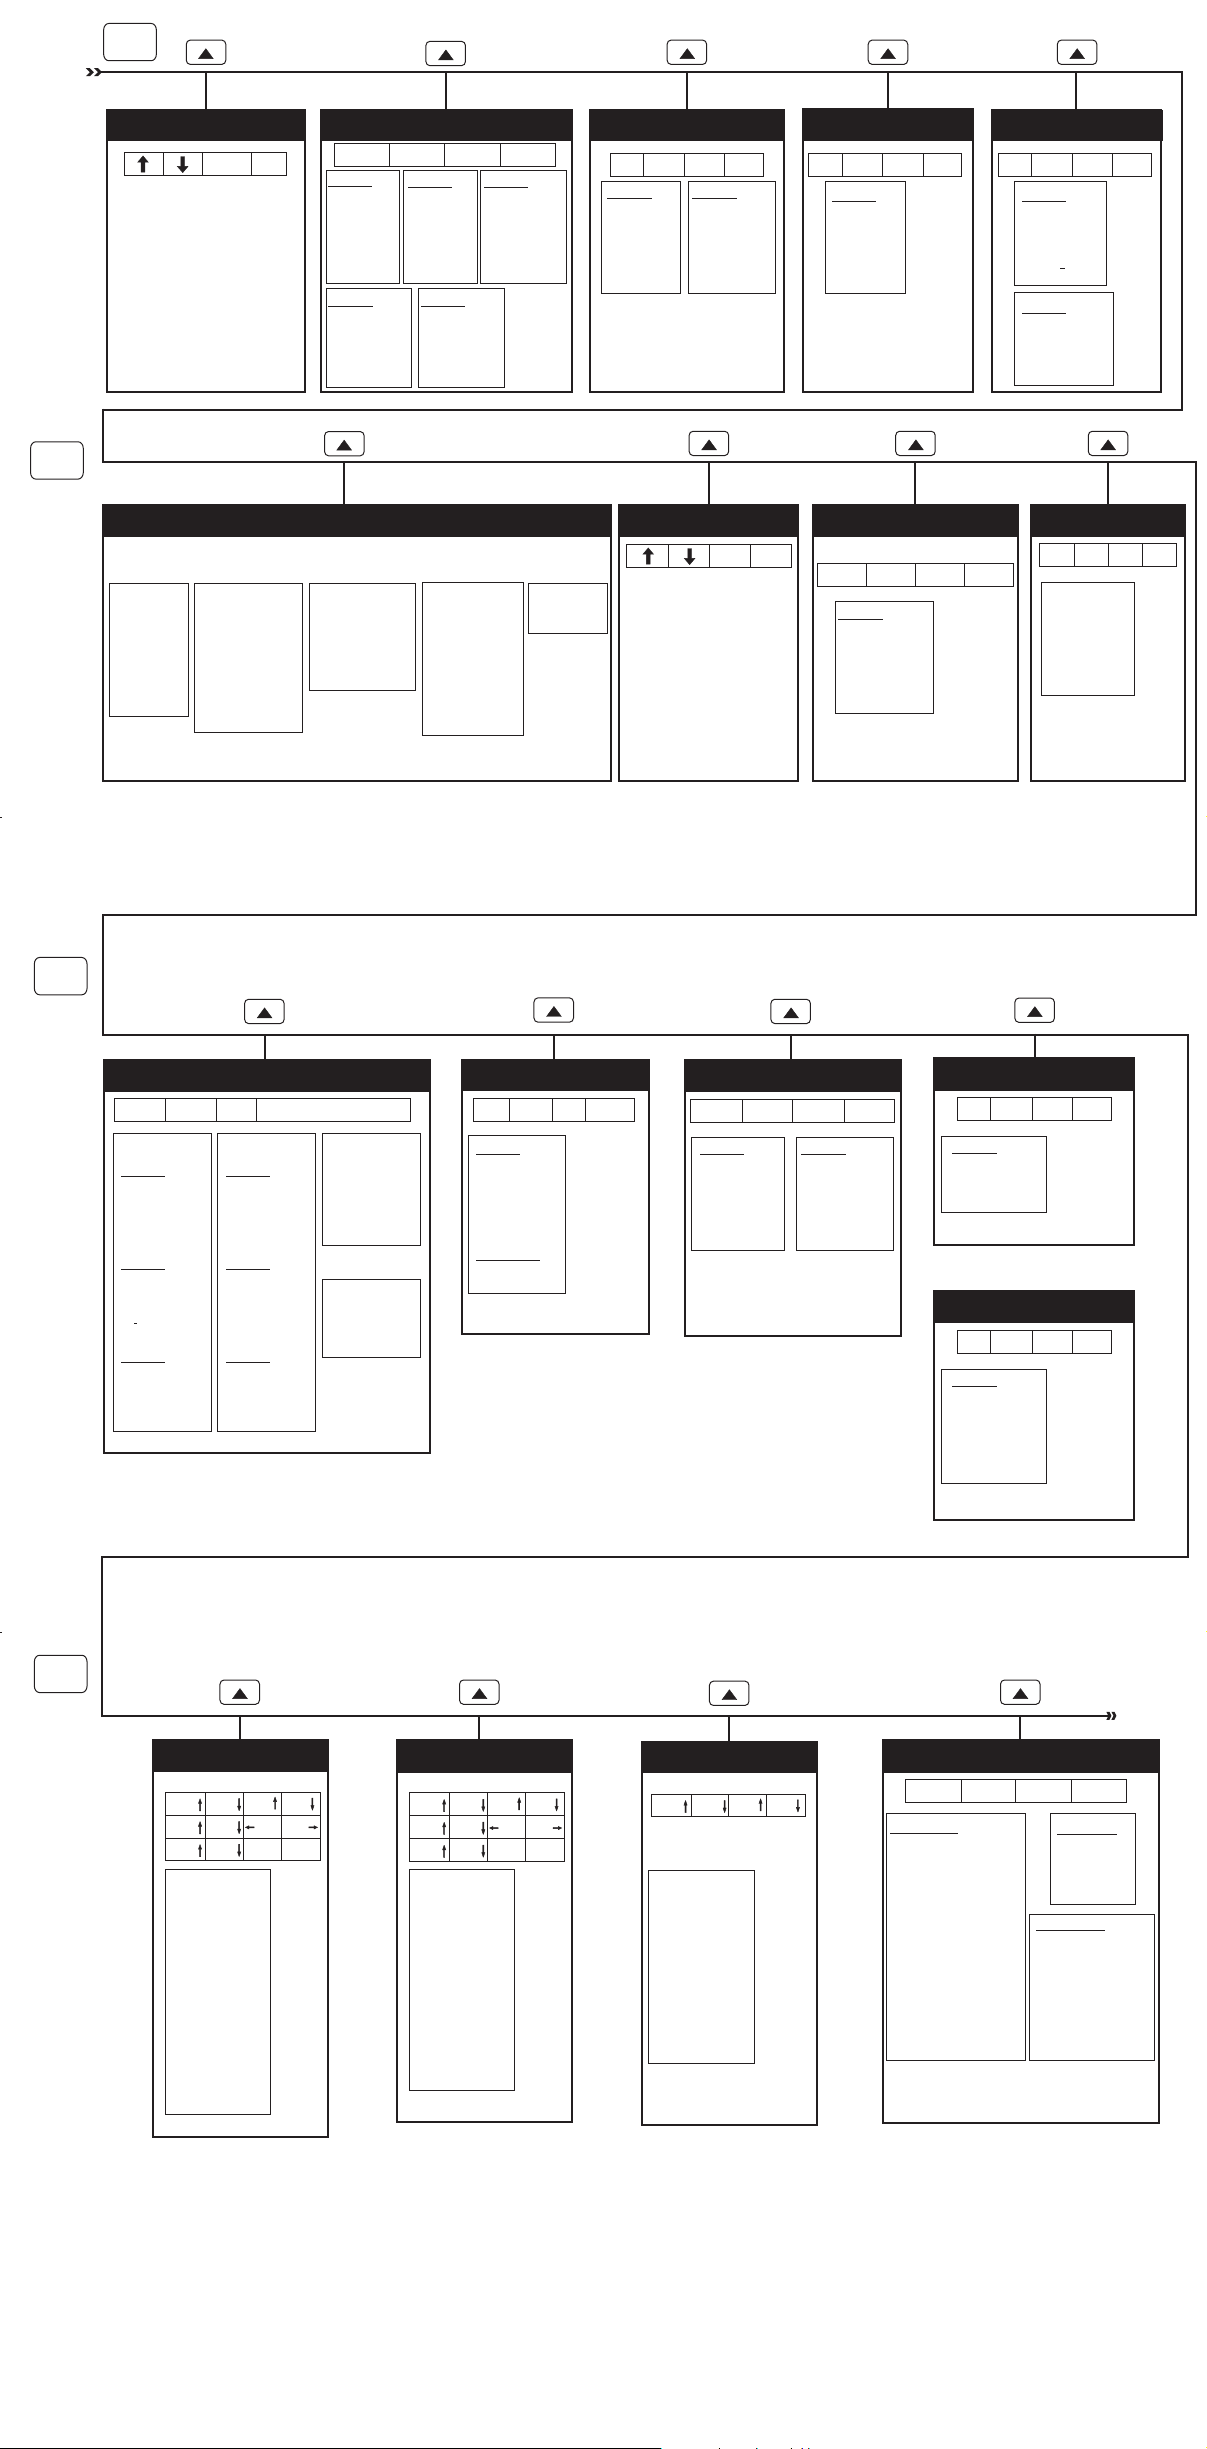
From
SYS
FN
FN
MSG - Message Log
Clear
TRAF - Traffic
TAS
Alert Mode
Operate
Mode
Vert
ABV
NRM
BLW
UNR
TCAD 9900B ADS-BTCAD 9900BX
Alert Mode
Altitude Option
Altitude Filter
Volume
Approach Mode
Mute Duration
Shield
Shield Heights
Shield Ranges
Map - Custom Map
In
Page 1
Flight Plan
Map Orient
Invert
Nav Data
Load Chart
Next Page
Page 4
Boundaries
Nexrad
Metars
Lightning
Cell Move
Next Page
(varies by installation)
Altitude Option
Altitude Filter
Volume
Approach Mode
Gnd/Flt Mode
Alert Mode
(if installed)
Out
Page 2
Airports
VORs
NDBs
Intersect
Airspace
Next Page
Page 5
Airport Chart
Terrain
Obstructions
Traffic
Strikes
Main Menu
Time
Transmit Alt
Altitude Option
Flight Plan
Map Orient
Display Mode
Enter FID
Label
Diagnostic
Pan
Page 3
Low Airways
High Airways
Water
Roads
Cities
Next Page
Info
(Menu item
order
depends on
available
features)
TIS-A
Alert Mode
Operate
Mode
IFR - IFR Chart
Out
Pan
Page 2
Low Airways
High Airways
Airport Chart
Load Chart
Main Menu
In
Page 1
Flight Plan
Map Orient
Invert
Nav Data
Label
Next Page
(Menu item order may
change depending on
your available features)
FPL - Flight Plan
Info
VFR - VFR Chart
In
Page 1
Flight Plan
Map Orient
Invert
Nav Data
Label
InfoWx
In
Page 1
Flight Plan
Map Orient
Set Barometer
Pan
Out
Info
TER - Terrain
(varies by installation)
Out Baro-Baro+
Split
In
Out
Page 1
Custom Map
IFR Map
VFR Map
*
Traffic
Flight Plan
Page 2
Terrain*
FIS Data Link*
Lightning*
Profile
FIS-UAT
In
Graphic Wx
Text
Clear
Sort
View
Pan
Pan
Out
(If installed)
Info
* If installed
FN
FIS - GDL 69/69A
In
Out
Current
Page 1
NexRad
Coverage
METARs
Lightning
Cell Move
Page 2
Cloud Tops
Echo Tops
Winds Aloft
i
W nds Aloft Alt
TFR Lbl
Page 3
Label
Flight Plan
Legend
Map Detail
Map Orient
Crnt/Fcst/Text/Status
Pan
Forecast
Page 1
Surface
City
Current
SIGMET
AIRMET
Page 2
Freezing Lvl
County
Cyclone
TFR Lbl
Label
Page 3
Flight Plan
Legend
Map Detail
Map Orient
(If installed)
Text
Sort Type
View
Status
Products
Diagnostics
Activation
XM Satellite Radio
Cat
(If installed)
>
Direct
<
Page 1
Radio ID
Save Preset
Last Channel
Preset 1-2
Next Page
Pages 2-4
Presets 3-15
LT - Lightning
In
Out
Page 1
Flight Plan
360/120
Strike/Cell
Hdg Stab
System Data
Next Page
(If installed)
Clear
Page 2
Demo
Self Test
Noise Monitor
Strike Test
Main Menu
CHART - FliteChart
In
Page 1
Search ID
Select Airport
Select Chart
Pan
Out
(If installed)
Info
OR
CHART - Chart View
In
Page 1
Search ID
Select Airport
Select Chart
View Loaded
Load to Map
Pan
Out
(If installed)
Info
FN
RADAR - Radar
GWX 68
Rng
Rng
Rng
Stby/On
Wx/Map
Sctr/Scan
Horiz/Vert
Tilt/Brg
Gain/Hold
Test
Stby
Sctr/Scan
Horiz/Vert
Tilt/Brg
Off
Setup (Menu)
Stabilization
Trgt Alert
Tilt
Gain-
Rng
(If installed)
Brg
TiltRng
BrgRng
Gain+
RADAR - Radar
ART 2000
Rng
Rng
Rng
Stby/On
Wx/Map
Horiz/Vert
Tilt/Brg
Gain/Hold
Test
Stby
Horiz/Vert
Tilt/Brg
Gain/Hold
Off
Setup (Menu)
Stabilization
Tilt
Gain-
Rng
(If installed)
Brg
TiltRng
BrgRng
Gain+
RADAR - Radar
RS-181 / RS-811A
Rng
Stby/On
Wx/Map
Tilt
Gain/Hold
Test
Stby
Tilt
Gain
Off
Setup (Menu)
Stabilization
Tilt
(If installed)
TiltRng
SYS - System
Nav
Info
Nav Pages
Ownship Symbol
Lat/Lon Format
Set Baro Corr. Units
Set Baro Correction
Display Lat/Lon Lines
Initial En Route Zoom
Initial Ground Zoom
Transition Speed
Slave Zoom to GPS
Zoom
Autoload Charts
Map Detail
Altitude Units
Test
Info Page
System
Feature
Hardware
Test Pages
Test Pattern 1
Red Test Pattern
Green Test Pattern
Blue Test Pattern
White Test Pattern
Black Test Pattern
Test Pattern 2
To MSG
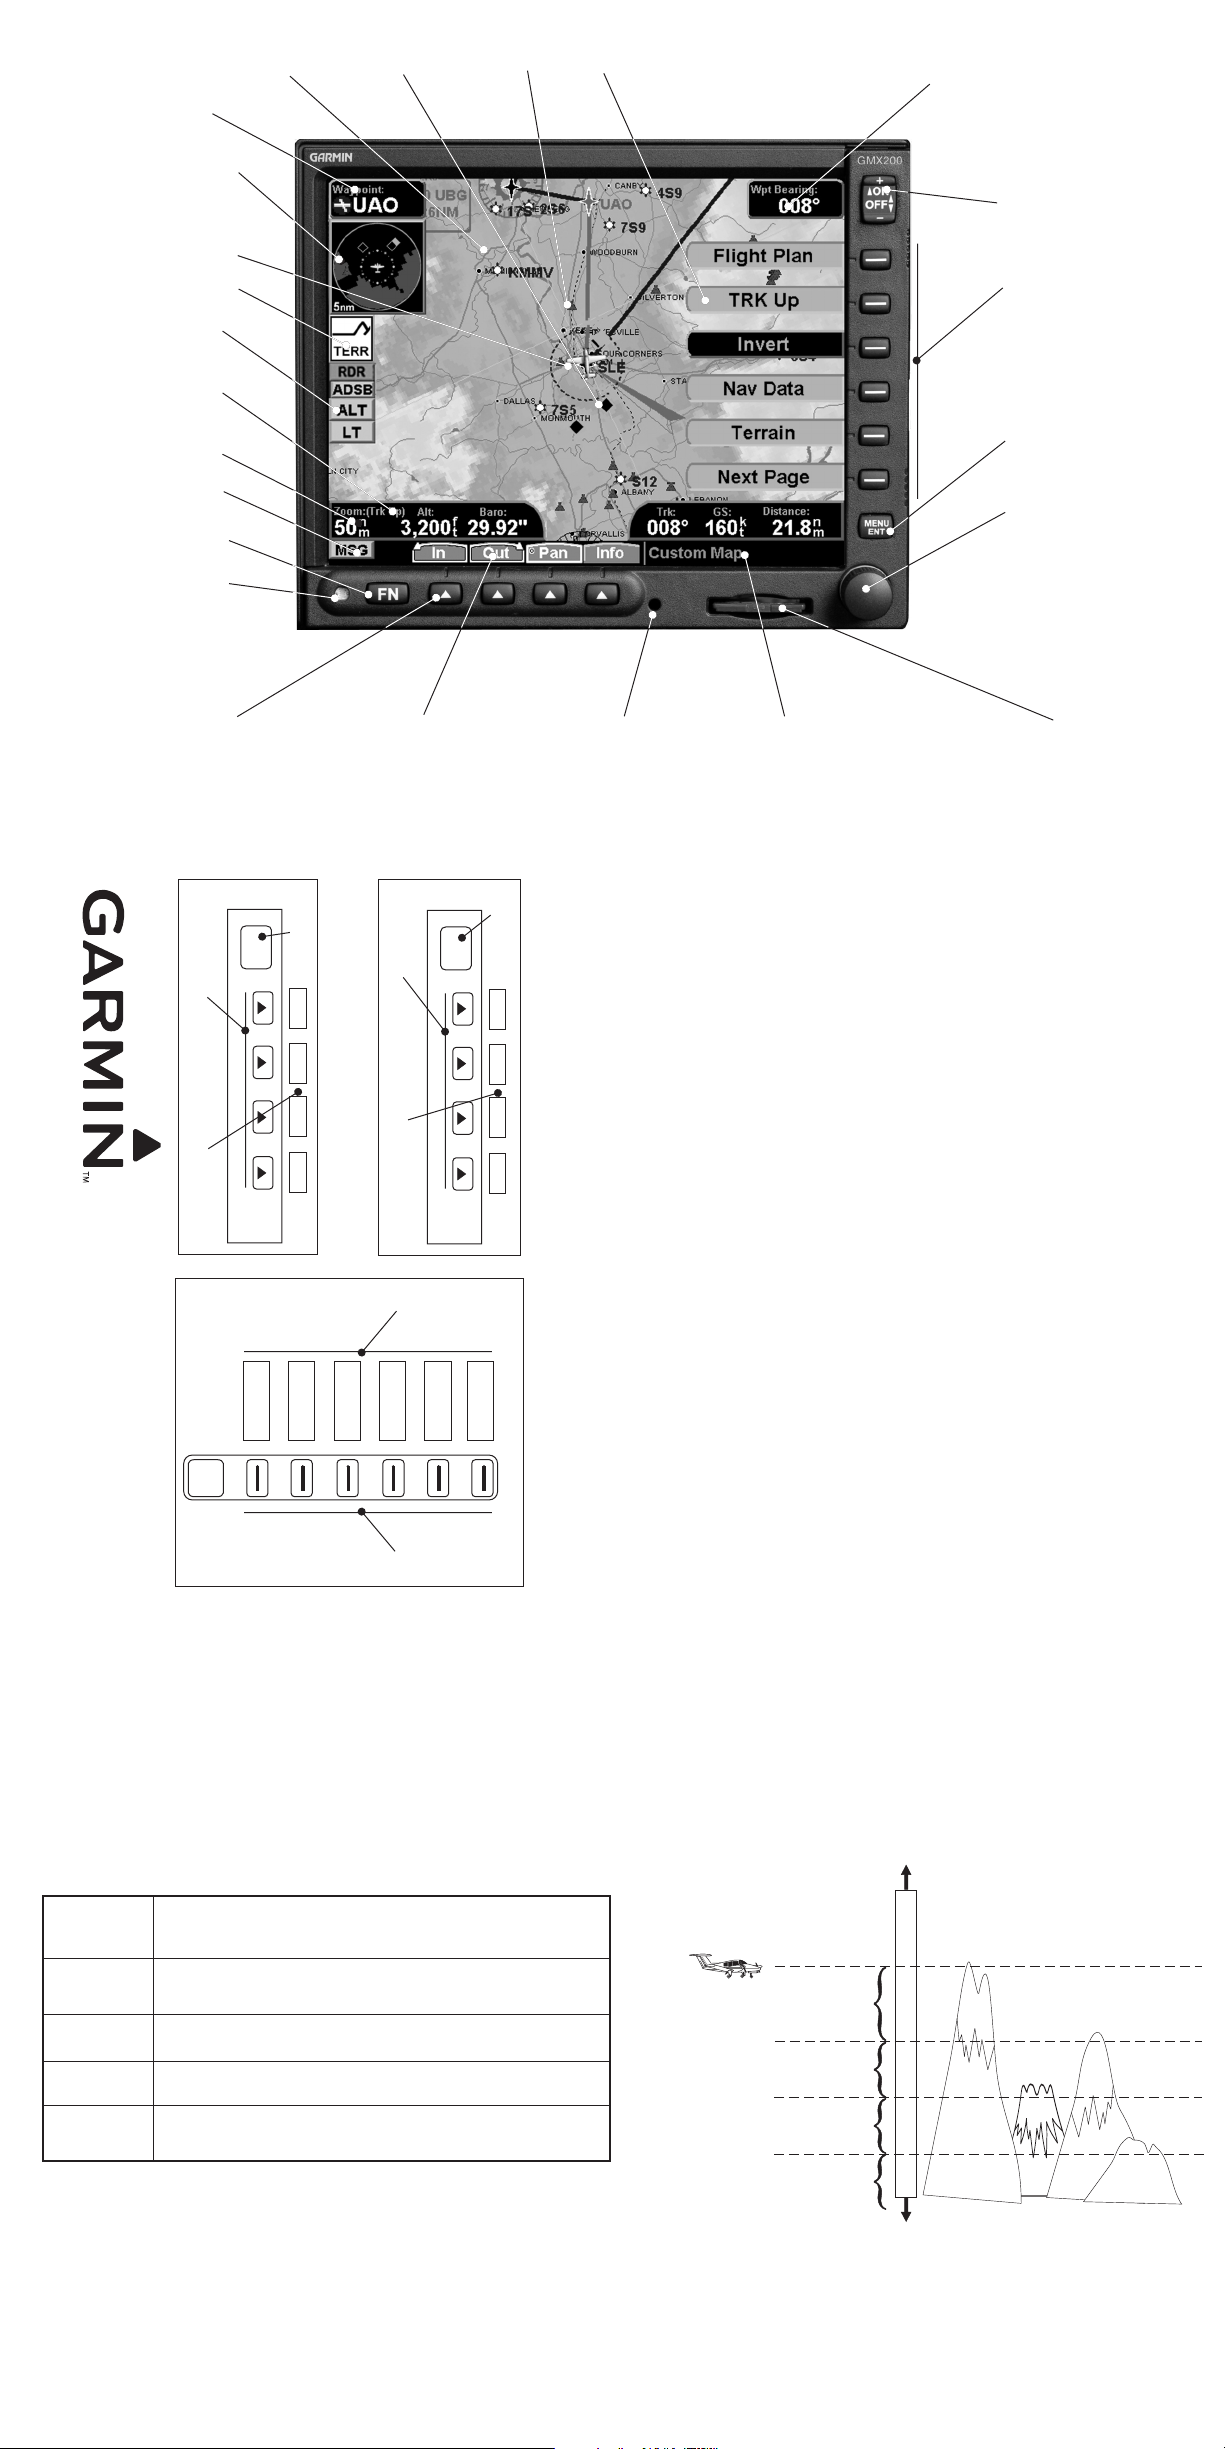
Graphic Display
TO Waypoint
Identifier
Traffic and Terrain
Thumbnail
Ownship
Advisory Flags
Data Flags
Map Orientation
Traffic
Obstruction
Menu Item Labels
Bearing to
Destination (TO) Wpt
Power/Dimming
Menu Item Keys
(Map Scale)
Message Flag
Function Key
P/N 190-00607-03 Rev B
June 2007
Zoom
Photosensor
Smart Function Keys
FN
Function Key
In Out Pan Info
Smart
(
Function)
Key Labels
Smart Function Keys
FN
Function Key
MSG MAP IFR VFR
Menu/Enter Key
Rotary Knob and
Push Button
Currently Selected FunctionMounting Screw
3. Check that all tests pass on the Start Up screen.
4. Press the key to view available functions. Each press of the key will step through the lists of
5. Press the “smart” key below the function label to select the desired function. Press the key again
7. Once a function is selected, the key is used to provide additional options. See Figure C.
use multiple key presses for different states for the option. Press the key again to
extinguish the option display or it will extinguish automatically in 20 seconds. See Figure C.
8. Press the key next to the displayed option to choose desired capabilities. Some options
10. Refer to the Detailed Operation section of the Pilot’s Guide for more details on each function.
when the rotary knob is depressed.
9. The rotary knob complements the action of the function keys in some functions by pressing and
turning the knob.Arrows will appear above the function keys indicating the direction to turn the
rotary knob for the same effect. An accent mark in the function label indicates the function affected
Menu Item
6. Once a function is selected, the function labels change to provide options for that function. Press
Press to decrease brightness.To return to automatic brightness control press and hold both the
available functions.
to view functions. See Figure A.
the “smart” keys below the labels to choose options.
See Figure B.
+-
and keys for one second.
-
FN FN
Data CardSmart ( KeysFunction)
1. Turn the power on (press key).The screen will remain dark for a short time while the GMX 200
2. Adjust the brightness, if necessary. Press to increase brightness.
GMX 200 Cockpit Reference Guide
performs start-up and self-test operations. Press and hold key to turn power off .
Olathe, KS 66062-3426
1200 east 151st Street.
http://www.garmin.com
USA (913) 397-8200
FAX (913) 397-8282
© 2007 by Garmin, Inc.
Printed in the U.S.A.
All Rights Reserved
Smart Key Labels
B
ENTER
C
MENU
On
Function Labels
Menu/Enter
+
A
Menu
Item
Labels
Option 1
Option 2
Option 3
Option 4
Option 5
Option 6
Menu/Enter
FN
Menu
Item
Smart
Keys
On/Off .
Red
Yellow
Green
Black
Light Blue
Terrain Color Key
Terrain that is within 100 feet, at, or above, your current
altitude.
Terrain that is within 1000 ft of your current altitude.
Terrain that is within 2000 ft of your current altitude.
Terrain that is more than 2000 ft below your current altitude.
No terrain data is available.
Above your current altitude
Current Altitude
1 below or at
00 feet
your current altitude
1000 feet below your
current altitude
2000 feet below your
current altitude
More than 2000 feet below
your current altitude
Red
Red
Yellow
Green
Black
Highest Terrain
 Loading...