

Page 1

RCT Wild manual 9/16/05 1:01 PM Page 1
PC MANUAL FRONT COVER
Page 2

RCT Wild manual 9/16/05 1:01 PM Page 2
TABLE OF CONTENTS
Setup and Installation . . . . . . . . . . . . . . . . . . . . . . . . . . . . . .2
Get Ready to Go Wild! . . . . . . . . . . . . . . . . . . . . . . . . . . . . . .5
Menus and Loading Boxes . . . . . . . . . . . . . . . . . . . . . . . . . .5
Changes to the In-game Interface . . . . . . . . . . . . . . . . . . . .6
Animals . . . . . . . . . . . . . . . . . . . . . . . . . . . . . . . . . . . . . . . . .11
Rides with Extra Features . . . . . . . . . . . . . . . . . . . . . . . . . .16
Other Wild Features . . . . . . . . . . . . . . . . . . . . . . . . . . . . . . .18
Other Surprises . . . . . . . . . . . . . . . . . . . . . . . . . . . . . . . . . . .19
Credits . . . . . . . . . . . . . . . . . . . . . . . . . . . . . . . . . . . . . . . . . .20
Atari Web Pages . . . . . . . . . . . . . . . . . . . . . . . . . . . . . . . . . .23
Technical Support . . . . . . . . . . . . . . . . . . . . . . . . . . . . . . . .23
End-User License Agreement . . . . . . . . . . . . . . . . . . . . . . .25
Legal Notices . . . . . . . . . . . . . . . . . . . . . . . . . . . . . . . . . . . .29
2
2
1
j
Page 3

RCT Wild manual 9/16/05 1:01 PM Page 2
SETUP AND INSTALLATION
Warning: If you install the RollerCoaster Tycoon®3: Soaked!®expansion pack after you
have installed this product, you must re-install
your save games or files will be lost.
THE README FILE
RollerCoaster Tycoon 3: Wild! has a ReadMe file where you can view both the License
Agreement and updated information about the game. We strongly encourage you to read
this file in order to benefit from changes made after this manual went to print.
README.TXT is located in the root directory of the game CD-ROM disc. .
SYSTEM REQUIREMENTS
Software RollerCoaster Tycoon®3 must be installed.
Operating System Windows®98/Me/2000/XP (Windows®XP recommended)
Processor Pentium®III 933 MHz or compatible (Pentium®4 1.3 GHz or
Memory 256 MB RAM (512 MB recommended) (512 MB for XP)
Hard Disk Space 600 MB Free (assumes RollerCoaster Tycoon®3 is installed)
CD–ROM Drive 8X Speed or faster
Video 64 MB or greater Hardware T&L-compatible video card*
Sound Windows®98/Me/2000/XP-compatible 16-bit sound card (PC
®
DirectX
* Hardware T&L video cards that do not support shaders, such as the Geforce 4 MX or
Intel Extreme Graphics family, are not supported.
If your PC does not meet the video hardware requirements above, this game will not run.
compatible recommended)
(128 MB Hardware T&L-compatible video card* recommended)
audio solution containing Dolby Digital Live required for Dolby
Digital audio)
DirectX®version 9.0c (included) or higher
RollerCoaster Tycoon®3: Wild!™None of
Note: An internet connection is required for using the Check For Updates feature and for
using ad-serving technology that updates billboards and the brands for certain shops
that may be added to RollerCoaster Tycoon 3 amusement parks.
If a software firewall is installed on your computer, you may be notified that
RollerCoaster Tycoon 3 is trying to communicate to the internet. We recommend you
allow the game to make this connection.
INSTALLATION
Note: You must have the original RollerCoaster Tycoon 3 CD-ROM game installed on your
computer in order to install RollerCoaster Tycoon 3: Wild! We also recommend you install
all updates for RollerCoaster Tycoon 3 before starting the installation of this expansion
pack. Consult the RollerCoaster Tycoon®3 manual for instructions on how to install
updates.
1. Start Windows
2. Insert the RollerCoaster Tycoon 3: Wild! CD–ROM game disc into your CD–ROM
3. If AutoPlay is enabled, the
4. Follow the on–screen instructions to finish installing
5. After RollerCoaster Tycoon 3: Wild! is installed, you may check for updates.
drive.
begin. If AutoPlay is not enabled, or the installation does not start automatically, click on the Start button on your Windows®taskbar, then on Run. Type
D:\Autorun.exe in the space provided and click on OK. Note: If your CD-ROM
drive is assigned to a letter other than D, substitute that letter.
Wild!.
This short process requires an Internet connection. Click the
Updates
installed. If you do not have access to an internet connection from the PC on
which your game is installed, use an alternative means of internet access to
visit
atari.com/rollercoastertycoon regularly to keep informed of the latest
developments and to access any updates as downloadable files.
®
98/Me/2000/XP.
RollerCoaster Tycoon 3: Wild! installer should
RollerCoaster Tycoon 3:
icon located in the Start menu where RollerCoaster Tycoon 3 is
Check For
2
j
3
j
Page 4

RCT Wild manual 9/16/05 1:01 PM Page 4
6. After RollerCoaster Tycoon 3: Wild! is installed, you may launch the game by
Visit
Note: You must have the RollerCoaster Tycoon 3 game disc in your CD-ROM drive to play.
Installation of DirectX
RollerCoaster Tycoon 3: Wild! requires DirectX®9.0c or higher in order to run. If you do
not have DirectX®9.0c or higher installed on your computer, click “Yes” to accept the
DirectX
clicking on the Start button, then Programs > Atari > RollerCoaster Tycoon
3> Play RollerCoaster Tycoon 3.
atari.com/rollercoastertycoon for the latest information about the game.
®
®
9.0c License Agreement. This will then launch the DirectX®9.0c Installer.
PLAYING ROLLERCOASTER TYCOON®3: WILD!
RollerCoaster Tycoon 3: Wild! uses the same controls as those for RollerCoaster Tycoon 3.
Please refer to the RollerCoaster Tycoon 3 player’s guide for instructions on how to use
the features of the core game.
FIREWALL SOFTWARE
Billboards and some shops use textures that change when you are playing RCT3: Wild!
while connected to the internet. If you have a software firewall running, you may see a
notice from time to time indicating RollerCoaster Tycoon 3 is trying to connect to the
internet. We recommend you
allow the game to make this connection.
GET READY TO GO
RollerCoaster Tycoon 3: Wild! gives you the ability to add animal exhibitions, enclosures
and animal viewing galleries to your
lions and tigers to perform in choreographed shows. Pamper your animal pairs and they
might breed! Be sure to maintain your animal enclosures to prevent escapes, and whatever you do, please don’t mix the predators with the prey!
RollerCoaster Tycoon 3: Wild! also contains twelve Wild!-themed scenarios, two new wild
design themes, dozens of additional rides and coasters, and the ability to create safari
expeditions to make your guests roar with delight. In addition, we have added challenges
to the scenarios and several novel scenery elements to give you more ways to play
RollerCoaster Tycoon 3.
WILD!
RollerCoaster Tycoon 3 amusement parks. Train your
MENUS AND LOADING BOXES
After you’ve installed RollerCoaster Tycoon 3: Wild!, the game’s menu
screens will also include a tiger icon in the lower-right corner of the menu
screens.
When you select Career Mode, the game will
display a menu allowing you to choose to play
scenarios from either
RollerCoaster Tycoon 3: Wild!
Finally, anytime you open a load screen, saved
games from RollerCoaster Tycoon 3: Wild! will be
marked by the same “Wild” tiger icon, indicating
that the expansion pack is required in order to play
that saved game.
RollerCoaster Tycoon 3, or
4
j
5
j
Page 5
RCT Wild manual 9/16/05 1:01 PM Page 6
CHANGES TO THE IN-GAME INTERFACE
This section describes the changes to the game interface where new features may be
accessed or adjusted.
MOUSE WHEEL SUPPORT
All menus, lists and dialog boxes that also include a vertical slider that can now be
scrolled using the mouse wheel.
CONTROL KEY SUPPORT FOR BUILDING STRUCTURES
Players who build structures will now be able to use the Control key to construct
elevated elements. See “Using the Control key to Build Elevated Scenery and Structures”
on page 18.
GAME OPTIONS
Warning: Only make adjustments to game options if you know your
computer is capable of running optimally with the settings you have selected. If, after adjusting some of the settings, your computer begins to show
performance degradation, open Game Options > Graphic Settings and click
the Graphics Detail Level icon to reset the game back to its default settings
for your PC.
Game Settings
Enable Live Content – This check box tells the game to connect to the internet and get
updated ads for billboards and brands for custom stalls.
Graphic Settings
The following new options have been added:
Refraction – When checked, all views through water will be affected by light refraction.
Laser Occlusion by Terrain and Scenery – When checked, laser shows will allow terrain
and scenery to block light beams. (To build laser shows, you must have the RollerCoaster
Tycoon 3: Soaked®! expansion pack installed.)
Anti-Aliasing Quality – This drop-down list allows you to select the amount of anti-aliasing that will be performed on the in-game scenes. Level 3 provides the highest degree of
anti-aliasing.
Use Environment Map On Flowing Water – When checked, adds additional properties to
bodies of flowing water, including the reflection of the environment on the surface.
PARK MANAGEMENT
Staff
After you place an entertainer in your park, one of the uniforms
available is a Tiger costume. In addition, you can hire an
Animal Keeper to look after the animals you’ve added to your
amusement park. Note: Animal Keepers are not required for
Lion Show, Tiger Show or the Elephant Transport Ride.
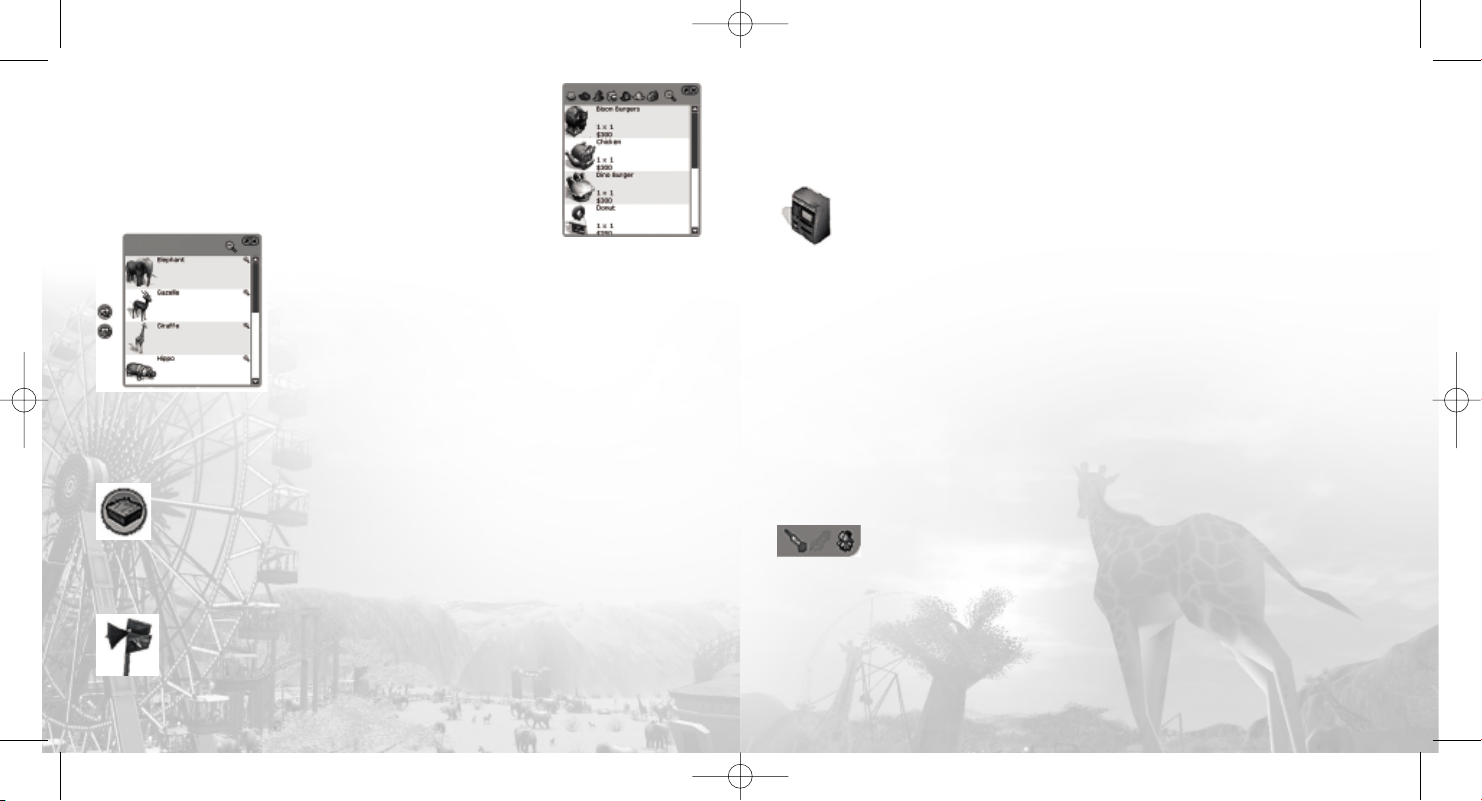
Attractions
Within the Attractions window, two additional options are
available: Viewing Galleries and Animals. Click on these icons
to display the list of each, giving you easier access to managing these attractions.
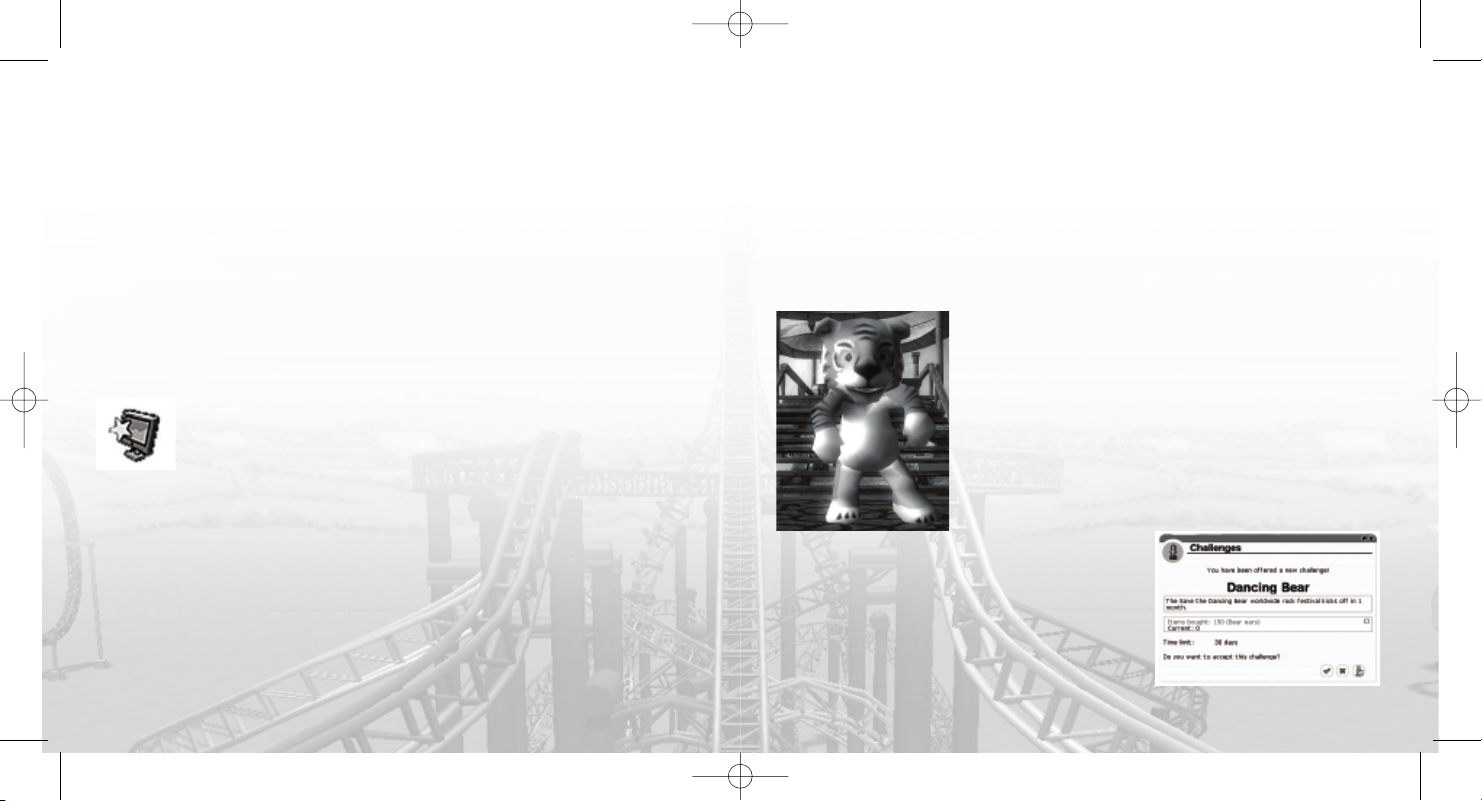
Challenges
Among the buttons under Park Management, is a button for displaying Challenges. The challenges window
displays a special opportunity to take advantage of a
temporary condition that affects your park and its
guests. If you meet the challenge, you’ll receive a
special bonus.
6
j
7
j
Page 6
RCT Wild manual 9/16/05 1:01 PM Page 8
ADDITIONAL THEMES
Some of the object placement windows (such as rides, shops, and
scenery) now include selections for two added themes, Prehistoric
and Safari.
ADDITIONAL RIDES
Animals and Enclosures
Several rides have been added to the various categories under
the Rides button. In addition, two buttons have been added to
the Rides menu, one for purchasing animals and another for
building animal enclosures. Animal enclosures should be built
before purchasing any animals. See the tutorials for Building
Animal Enclosures and for Performing Animal Care for more
information.
ADDITIONAL SCENERY
Four scenery options have been added to the scenery buttons.
Terrain Surfaces
The Terrain Surfaces button allows you to add raised terrain in blocks, as well as
larger structures for marking the entrance to a new themed area. This allows you
to quickly add blocks of terrain to create terraced landscapes and elevated
Note: Tunnels and waterfalls may only be created using actual terrain and not
scenery.
these terrain surfaces.
Speaker Objects
Loud speakers have been added to both the selection of Path Extras, and to the
selection of Scenery Items. Speaker objects can be used just like any other
scenery element, except you may also assign a sound file to the object, adjust
the volume of the speaker, and turn it off or on. Adding speakers throughout the length
of a track ride, or along the path of a themed area allows you to give your park a more
immersive feel, and a higher park rating.
Passport Stations
Listed among the Path Extras is an element called Passport Stations. Peeps are
given a passport booklet as they enter the park. If peeps have their passport
specify how many stations are required by clicking on a Passport Station and using the
Passport Station control panel. The ideal strategy for using Passport Stations is to place
them far apart at the far reaches of your park, giving peeps a reason to visit all areas of
your amusement park.
booklet stamped by the required number of stations, they win a prize! You can
Billboards
Real-world sponsors may now advertise in your amusement parks! Within the list of
Scenery buttons is a button for adding billboards. These billboards may be updated with
new advertisers while connected to the Internet. Income for your amusement park can be
generated by adding these billboards. You may also add your own images to billboards,
by using the “Custom Images” option.
ADDITIONS TO THE DASHBOARD
Escaped Animal Indicator
From time to time, an animal may escape from its enclosure causing some
the DartCam and right-click to toggle Sniper mode. After shooting and hitting an animal
with a tranquilizer dart, it will lay down and a crate will appear around it indicating it may
be picked up and placed in an animal enclosure.
until they have been recaptured and placed in an animal enclosure.
park guests to flee and stop spending money. Click the indicator to enter
Note: Escaped animals may not be sold
8
j
9
j
Page 7

RCT Wild manual 9/16/05 1:01 PM Page 10
ADDITIONAL TERRAIN TOOLS
Waterfalls
Added to the terrain tools buttons is a new selection for creating waterfalls. See
“Creating Waterfalls” on page 19.
TUNNEL ENHANCEMENT
You can now tunnel coasters into any angle of terrain including vertical, rather than just
through horizontal surfaces.
CUSTOMIZABLE SHOPS
The selection of stalls now includes Custom Stalls. After placing one of these shops, you
can choose the type of item which will be sold from them. For example, if you want your
Custom Stall to sell the same set of items that are normally sold at the Wild Toys shop,
just select “Wild Toys” from the drop-down list in the shop’s Sold Items window. Also
available are Custom Stalls with various types of billboards attached, which can have
custom images or real-world ads assigned to them.
PLACING ASSETS UNDERGROUND
You can now place scenery items, rides and shops underground by holding the Shift key
and dragging the mouse down. This is useful for adding elements to the underground
tunnels you’ve constructed
ANIMALS
One of the most exciting new features in RollerCoaster Tycoon 3: Wild! is the ability to
add animal exhibits and safaris to your amusement parks. To add an animal exhibit, you
must first build a fenced enclosure to keep the animals (and your guests!) safe.
CREATE ENCLOSURES
Click on the Rides button and then click on the
Enclosures button to open the Enclosure construction panel. This changes your cursor to a
ghosted 1x1 enclosure square. Click on an open
space, hold the mouse button and drag to create an enclosure. Release the mouse button
once you’ve dragged an appropriately sized
enclosure.
To add to an existing enclosure, just click inside
or adjacent to it, hold the mouse button, drag to expand the area, and release.
You can select different types of enclosure fencing by selecting an enclosure fence type
in the Enclosure construction panel.
To delete an enclosure fence, click on the Trash button in the Enclosure construction
menu, hold the mouse button and drag over the part of the enclosure you want to erase.
For best results, flatten the terrain for your animal enclosures before constructing any
enclosure fences. This will allow you to add Animal Houses where both animals and animal keepers may more easily use them.
PURCHASE ANIMALS
Once you’ve built an enclosure, you can add animals. To do this, click on the Rides button
and then click on the Purchase an Animal button. This displays a selection of available
10
j
11
j
Page 8

RCT Wild manual 9/16/05 1:01 PM Page 12
animal types. Click on the small “plus” sign next to an animal type to display male and
female, adult and infant purchase prices.
Click on an animal and an animal crate will be attached to your pointer. Move the crate
over the spot where you want the animal delivered and click to drop the crate and deliver
the animal.
ANIMAL HOUSES
In order to keep your animals happy, you need to build
them an animal house, where they can feed and find a
bit of privacy away from the adoring park guests. To
add an animal house, click the Animal House button
on the Enclosure panel. This will display icons for different types of animal houses. Hover your mouse over
each icon in the Animal House construction panel to
see a list of all the animals for which each animal
house may be used. Click on the appropriate type
attach an Animal House to your cursor. Click inside of
any existing enclosure to place it there.
VIEWING GALLERIES
Viewing galleries are structures where you can charge
your park guests to get a close-up view of the animal
exhibits in your parks. To create a viewing gallery,
select the Viewing Gallery button in the Enclosure
construction panel, and then select the desired size of
the viewing gallery you want to add. A ghost image of
the viewing gallery will appear. Move the pointer over
the fence of the enclosure and click the mouse button
to place it there.
You can add as many viewing galleries as will fit on the fences of an enclosure. Viewing
galleries must be connected to the main path and opened like other attractions and
shops.
ANIMAL WINDOW
Click on an animal to bring up the Animal control panel associated with it. Click on the Animal Details button to rename the animal, center the camera on it, activate the AnimalCam, sell the
animal, release it, or pick it up.
Click on the Animal Stats button to see important information
about the animal, including the animal’s current health level, its
satisfaction with its habitat, hunger and thirst levels, its current
social satisfaction levels, and the animal’s level of cleanliness.
Keep hunger and thirst low and all the other levels as high as
possible to keep park guest enjoyment high and to prevent the Animal Protection League
from confiscating the animal.
To affect these levels, add enough animal houses to allow all the animals in the enclosure to feed at will, and add enough highly trained Animal Keepers to refill the food
troughs and clean up after the animals.
Click on the Thoughts button to see what the park guests think about this particular animal.
Click the Animal Info button to display a panel with details that will help you decide what
scenery, terrain types, enclosure size and vegetation to add to the animal’s enclosure. In
this panel you’ll also find information indicating gestation period and average size of litter, as well as the animal’s rarity factor (which will determine the sale price of the animal
or its offspring).
Animals have an Adoption Fee button, which allows you to raise funds from park guests
for food and healthcare of that animal. Each time a guest sees an animal, there is a
chance that they will decide to adopt it. Make sure you take very good care of an animal
that has adopters – if the animal’s health decreases too much or you raise the adoption
12
j
13
j
Page 9

RCT Wild manual 9/16/05 1:01 PM Page 14
fee too high, the guest may stop his or her payments. Income obtained through adoption
fees is added to your cash amount. Park guests who adopt animals will also experience
an increase in their happiness levels.
ANIMALCAM
Once you have animals in the park, you can see the world from their perspective using the
AnimalCam. The AnimalCam works just like the CoasterCam. To activate it, double-click an
animal to bring up its Animal control panel and then double-click on the mini-view of the
animal to open the AnimalCam. To turn off the animal’s camera, or switch to another camera, move the cursor to the bottom right of the screen and click on that option.
ENRICHMENT
You can purchase enrichment objects from the
Enclosure construction panel that will help your animals have a happier, healthier existence. Select an
enrichment object and drop it into the enclosure. The
animal will play with the object and become happier.
The enrichment object will slowly degrade as the animals use it, so you’ll need to replace
the objects periodically.
PREDATOR/PREY
Predators will attack prey. For example, if you drop a lion in an enclosure with several
zebras, it may get hungry and decide to have one of the zebras for a snack. You will lose
any investment in animals that fall victim to a predator, including all adoption income.
It’s best to keep carnivores of the same species in an animal enclosure reserved just for
them. Herbivores may be mixed together in the same enclosure provided you have
enough room and enough of the appropriate types of animal houses for each animal.
BREEDING
To allow breeding,
an adult male and
same species must be in the same enclosure, must be very healthy and must have not
recently bred. The enclosure must also have space for another animal. When one of your
animal pairs breeds, you will be notified via the dashboard.
female animal of the
DART CAM
If an animal escapes – either through fence breakdown
or deliberate placement, you must use DartCam to capture it. Click on the escaped animal and then click on the
Dart button, or click on the flashing icon in the dashboard. This enters the DartCam. Move the camera by
holding down the left mouse button, cycle through
escaped animals, or exit DartCam, by dragging the cursor over the panel in the bottom-right of the screen.
Toggle the crosshair by pressing the right mouse button.
When the crosshair is displayed, fire the rifle by clicking
the left mouse button. Once the animal is tranquilized it will be crated up. Exit DartCam
and click the crated animal to attach it to your pointer and drop it back into its enclosure
by clicking there.
Prevent further escapes by clicking on a viewing gallery for the animal enclosure with the
damaged fence, clicking the Maintenance button, and then clicking the Call For Repairs
Note: A damaged fence for an animal enclosure cannot be repaired until at least
button.
one viewing gallery has been added to it.
14
j
15
j
Page 10

RCT Wild manual 9/16/05 1:01 PM Page 16
CREATING LION AND TIGER SHOWS
When you add a lion or tiger show, it will come with a default
show. You may customize the show by clicking on the attraction, and clicking the MixMaster button (found in the lowerright corner of the attraction control panel). You may also add
music and other show elements (such as fireworks) to a lion
and tiger show.
Finally, add an entrance and exit, connect a path to exit and entrance and ‘open’the
show just like other attractions.
After you’ve placed the show, you can customize the show by clicking the RCT3
MixMaster button found in the Show control panel.
The RCT3 MixMaster sequencer interface allows you to choreograph moves in any order
you want by clicking in the timeline. To preview the show, move the mouse backwards
and forwards to ‘scrub’through the sequence you’ve created or click the Play button.
Save your show just like you save a firework shows.
RIDES WITH EXTRA FEATURES
The following are some of the coasters included in RollerCoaster Tycoon: Wild! that
include extra features:
SPLITTING COASTER
The Splitting Coaster is designed as two sets of connected track, each of which supports
its own independent vehicle or train of vehicles. The track is designed to split and reconnect throughout the ride, and the seats can be fixed or rotating. See the Tutorials for
instructions on how to build a Splitting Coaster.
TOWERING COASTER
The Tower Coaster track is based around a main tower structure, which incorporates a
vertical lift hill and overhanging drop. The drop itself is so extreme that magnetic break-
ing systems in the tower are used to prevent the car from inducing forces of more than 6
Gs in its passengers.
ROBOTIC COASTER
This coaster uses a robotic arm with seats on the end,
modified to run along a heavy Wild Mouse-style track. The
robotic arm’s parameters may be set for each track piece.
After building the track, select a track piece, and then click
the Edit Robot Arm Angles button to show the settings
selections panel of the Coaster construction panel.
Tick the Enable box and then choose the values for each of
the four settings. The four settings are:
1. Seating Compartment Roll
2. Forearm Pitch
3. Upper-arm Pitch
4. Coaster Car Yaw
Modify the arm’s settings by clicking on the various spinners.
The Robotic Arm will change position to reflect the settings.
Along the right edge of the panel are buttons that allow you to copy the values from the
previous track piece, the next track piece or the reset the values to zero.
A blue ghost version of the arm will appear on the track pieces where the roll, pitch and
yaw values are enabled and whose settings are different from the previous track piece.
As the arm travels along the track, it will move smoothly between the settings of one
track piece and the next.
DIZZY DROPPER COASTER
The Dizzy Dropper coaster runs on a specially constructed ‘sideways’ track, giving the
riders an unobstructed view out over the park. The cars are flown by autopilot.
16
j
17
j
Page 11

RCT Wild manual 9/16/05 1:01 PM Page 18
OTHER
WILD!
FEATURES
TUTORIALS
RollerCoaster Tycoon 3: Wild! includes tutorials for several of the new features, including
how to construct Animal Enclosures, Wild Coasters, and Safari Transports; how to conduct Animal Care; and how to customize Lion and Tiger Shows. The tutorials can be
found in the main menus of the game.
HIRING THE ANIMAL KEEPER
The Animal Keeper is an employee added to the list of staff members available in Wild!
and has employee options similar to other staff members and is needed for looking after
the care and feeding of animals in your park. When an animal house is added, one keeper is automatically hired. But as the population for an animal enclosure grows, additional
animal keepers may be required to keep the animals healthy.
Note: Animal Keepers are not required for the lion show, the tiger show, the elephant
transport ride, the insect, reptile, or nocturnal animal houses or any animals appearing
in your park from other expansion packs.
USING THE CONTROL KEY TO BUILD ELEVATED SCENERY AND STRUCTURES
A new and improved method for building elevated portions buildings and scenery (such
as roofs) can now be accomplished using the Control key. Use the following steps to
learn how to do this.
After you’ve built the walls of a structure, build the roofline attached to the top of the
wall. This is accomplished in the same way as with
first select a roof piece from the scenery structures menu, and then position the pointer
where you want to place the roof piece, hold the Shift key and nudge the mouse up until
the piece is positioned correctly. Now click to place it there. To add another roof piece at
same height, move the pointer so it touches the previously placed roof-piece, and
the
then press the Control key. This action assigns that height to the Control key so when
RollerCoaster Tycoon 3, where you
you are placing any additional scenery items in your park and hold down the Control key,
it will be placed at that height. This is particularly useful for building large expanses of
roof and platforms.
CREATING WATERFALLS
Waterfalls can only be constructed between
two adjacent bodies of water where one is
higher than the other.
First, modify the terrain to create a raised area
— for best results, use the “Multi-tile freeform
terrain shaping” tool. Next, create a pit on the
raised area and then add water (consult the
RollerCoaster Tycoon®3 manual for instructions
on adding water bodies). This higher water
body must have a flat / straight edge over
which you want the water to flow. Then, create
a pit at the base of the raised area and add water there, too, ensuring that there is at
least some water in the lower body that is roughly underneath the flat / straight edge
over which you want the water to flow.
Finally, click the Waterfalls button to activate the waterfall function, then first click the
raised water body to select it, and then click the lower water body to select it. If the terrain has been formed properly, a waterfall will be created automatically. The width of the
waterfall is selected based on the narrower of a) the length of the flat / straight edge on
the raised water body; and b) the width of the lower water body underneath this edge
into which the waterfall will discharge. Use this information to create waterfalls of whatever height and width you choose.
18 19
jj
Page 12

RCT Wild manual 9/16/05 1:01 PM Page 20
CREDITS
ATARI
PRODUCT DEVELOPMENT
Ken Allen
Senior Producer
Hudson Piehl
Executive Producer
Tim Perry
Directors of Technology
Sara Hasson
Project Planning Coordinator
SALES, MARKETING AND
COMMUNICATIONS
Eric Horowitz
Brand Manager
Matt Collins
Director of Global Brand Management
Nique Fajors
Vice President of Global
Brand Management
Marc Metis
Senior Vice President Marketing
Andrea Schneider
Director of Public Relations
Martin Currie
Vice President of Marketing,
Creative Services
Maleea Barnett
Vice President, North American Sales
Wim Stocks
Executive Vice President, North
American Sales
Ryan Barr
Vice President, Corporate
Communication
Christine Fromm
National Channel Marketing Manager
David Leitner
Director of Media
Don Vu
Senior Web and CRM Manager
Jason Hartnell
Internet Development Group
Ken Ford
Director of IT and Web Strategy
OPERATIONS
Todd Curtis
Vice President, Operations
Eddie Pritchard
Director of Manufacturing
Gardnor Wong
Senior Buyer
Venus Francois
Senior Buyer
Lisa Leon
Lead Senior Buyer
Tara Moretti
Manufacturing Buyer
Veronica Franklin-Smith
Traffic Manager
20
j
Kurt Carlson, RedSheet, LLP, Essex, MA
Documentation Specialist and
Copywriter
Morgan Tomaiolo, RedSheet, LLP
Graphic Design and Layout
QUALITY ASSURANCE AND SUPPORT
Ezequiel “Chuck” Nunez
Manager of Publishing Support
Ken Ford
I.T. Manager/Western Region
Michael Vetsch
Manager of Technical Support
Michael O’Shea
Q.A. Testing Supervisor
Kevin Hogan
Lead Tester
Brian Lerias
Assistant Lead Tester
Anu Anthony
Marshall Clevesy
Devin Dinardo
John Fernandes
Evans Kwok
Quang Nguyen
Daniel Olmos
Brian Salwasser
Jason Shields
Joe Taylor
Robert Tibbetts
Testers
Dave Strang
Manager, Engineering Services and
Compatibility Lab
21
j
Ken Edwards
Engineering Services Specialist
Dan Burkhead
Eugene Lai
Engineering Services Technicians
Piers Sutton
Beta Testing Administrator
Chris McQuinn
Senior Compatibility Analyst
Patricia-Jean Cody
Compatibility Test Lead
Randy Buchholz
Mark Florentino
Scotte Kramer
Cuong Vu
Compatibility Analysts
Joy Schneer
Director, Strategic Relations
Arthur Long
Strategic Relations Specialist
Cecelia Hernandez
Senior Manager Strategic Relations
Special Thanks
Bob Welch, Paul Hellier, Lisa Vogel,
John Hurlbut, David Pucik, Matt
Labunka, Ann Mangold, Highwater
Group of New York, Brett Cooper, Tyler
Rowe, Gene Rasmussen
Page 13

RCT Wild manual 9/16/05 1:02 PM Page 22
FRONTIER DEVELOPMENTS
Chris Sawyer, David Braben
Executive Producers
Jonny Watts
Producer
Oscar Cooper
Lead Programmer
Sam Denney
Simon Brewer
Lead Artists
John Bichard
Ian Collinson
Andrew Fray
Andrew Gillett
Elizabeth Gordon
Rick Griffiths
Matthew Halpin
Harpreet Nanra
Programming Team
Gary Bickmore
Simon Brewer
Marc Cox
Dariusz Drobnica
Stefan Scheffers
Dean Searle
Hayden Scott-Baron
Martin Squires
Art Team
Zafer Coban
Felix Ilsley
Gerard Huke
Milan Medvec
Animation Team
David Scantlebury
Patrick Byrne
Tim Hughes
Jon Lewis
Peter Halpin
Game Engine Team
Stephen Duncan
Felix Isley
Andrew Thomas
Alex Smyth
Track Design Team
Charlie Bewsher
Stuart Fraser
James Taylor
Level Design Team
Michael Brookes
QA Supervisor
Colin Davis
Michael Michael
Testers
Alistair Lindsay
Music
Alistair Lindsay
Sound Effects
David Walsh
Managing Director
Marjacq Micro Ltd.
Representation
ATARI WEB SITES
To get the most out of your new game, visit us at:
atari.com/rollercoastertycoon
If you would like to chat with other gamers, as well as developers, visit our Community Forum area at:
ataricommunity.com
Kids, check with your parent or guardian before visiting any web site.
Chat Messages: Atari does not monitor, control, endorse, or accept responsibility for the content of chat mes-
sages. You are strongly encouraged not to give out identity or other personal information through chat message
transmissions. Kids, check with your parent or guardian if you are concerned about any chat you receive.
Use of Atari web sites is subject to terms and conditions, which you can access at:
atari.com/us/tos
TECHNICAL SUPPORT (U.S. & CANADA)
HELP VIA THE INTERNET
Up-to-the-minute technical information about Atari products is generally available 24 hours a day, 7
days a week via the Internet at:
atarisupport.com
Through this site you’ll have access to our FAQ (Frequently Asked Questions) documents, our FTP (File
Transfer Protocol) area where you can download patches if needed, our Hints/Cheat Codes if they’re
available, and an
answers within the FAQ.
Note: In the event we must send you a Hint Sheet, FAQ document, patch or update disc via Email, we
may require verifiable consent from a parent or guardian in order to protect children’s privacy and
safety online. Consent Forms are available at the web site listed above.
HELP VIA TELEPHONE IN THE UNITED STATES & CANADA
For phone assistance, call Atari Technical Support at (425) 951-7108. Our Interactive Voice Response
system is generally available 24/7, providing automated support solutions immediately.
Email area where you can get help and ask questions if you do not find your
22
j
23
j
Page 14

RCT Wild manual 9/16/05 1:02 PM Page 24
Great News! We’ve improved our Automated Systems so that you can get product-specific
Troubleshooting help more quickly. All you need to do is enter the product’s Part # when prompted to
do so. This will take you directly to all of our known issues and solutions for this title. The product’s
Part # is located in several places (on the CD label, package and/or plastic disc case) and is usually
identified by a number such as
five digits of your product’s Part #. (For example, Part # 04-12345 would require that you enter the
“12345” portion of the number for that product.) Note: Some products simply feature a five-digit Part
# without an “04-” prefix.
Live support is generally available Monday through Friday, 8:00 AM until 6:00 PM (Pacific Time).
Note: We may be closed on major holidays.
Before making your call, we ask that you be at your computer, have the following information available, and be ready to take notes:
• System Make and Model
• Processor Type
• Operating System, including version number if possible (such as Windows
• RAM (Memory)
• Video and sound card data and drivers
• Any screen or error messages you’ve encountered (and where)
04-12345. When prompted by the Automated System, enter the last
®
98; Windows®Me)
PRODUCT RETURN PROCEDURES IN THE UNITED STATES & CANADA
In the event our technicians at (425) 951-7108 determine that you need to forward materials directly
to us, please include a brief letter explaining what is enclosed and why. Make sure you include the
Return Merchandise Authorization Number (RMA#) supplied to you by the technician, and your telephone number in case we need to call you. You will receive the mailing address when the technician
gives you the RMA#. Any materials not containing this RMA# will be returned to you unprocessed.
WARRANTY POLICY IN THE UNITED STATES & CANADA
If our technicians determine that the product storage medium is found to be defective within ninety
(90) days of original purchase, (unless otherwise provided by applicable law), Atari will replace the
item free of charge, to the original purchaser, if the item is accompanied b
and packaging.
y the original dated receipt
END-USER LICENSE AGREEMENT
IMPORTANT — READ CAREFULLY: Please be sure to carefully read and understand all of
the rights and restrictions described in this End-User License Agreement (“EULA”).
AGREEMENT
This document is an agreement between you and Atari, Inc. and its affiliated companies
(“Company”). The enclosed software game disc(s), cartridge or Game Pak (“Software”)
and any accompanying printed materials are licensed to you only on the condition that
you accept all of the terms contained in this EULA.
By opening this package and installing or otherwise using the Software you agree to be
bound by the terms of this EULA. If you do not agree to the terms of this EULA you may
not install or use the Software and within 15 days of purchase you must call the Tech
Support telephone number listed in the manual accompanying the Software (the
“Manual”). Select the Automated Phone System’s Main Menu option for Consumer
Services and follow the prompts.
You will be given a Return Merchandise Authorization number (RMA #) by the technician.
You then have 15 days from the date of this contact to return the Software in its protective
covering, the Manual and the original sales invoice to the address supplied to you.
If this is a PC product, when you install the Software you will be asked to review and
either accept or not accept the terms of the EULA by clicking the “I Accept” button. By
clicking the “I Accept” button you acknowledge that you have read the EULA, understand
it and agree to be bound by its terms and conditions.
COPYRIGHT
The Software is protected by copyright laws and international copyright treaties, as well
as other intellectual property laws and treaties. All title and copyrights in and to the
Software (including but not limited to any images, photographs, animations, video, music,
text and “applets” incorporated into the Software) and any printed materials accompanying the Software are owned by the Company or its Licensors.
24
j
25
Page 15

RCT Wild manual 9/16/05 1:02 PM Page 26
GRANT OF LICENSE
The Software is licensed and not sold to you and its use is subject to this EULA. The
Company grants you a limited, personal, non-exclusive license to use the Software in the
manner described in the user documentation. The Company reserves all rights not
expressly granted to you in this EULA.
PERMITTED USES
1. If the Software is configured for loading on a hard drive, you may install and use the
Software on a single computer.
2. You may make and maintain one copy of the Software for backup and archival purposes, provided that the original and copy of the Software are kept in your possession.
3. You may permanently transfer all your rights under this EULA, provided you retain no
copies, you transfer all of the Software (including all component parts, the media and
printed materials and any upgrades) and the recipient reads and accepts this EULA.
RESTRICTIONS
1. You may not delete or obscure any copyright, trademark or other proprietary notice on
the Software or accompanying printed materials.
2. You may not decompile, modify, reverse engineer, disassemble or otherwise reproduce
the Software.
3. You may not copy, rent, lease, sublicense, distribute, publicly display the Software, create derivative works based on the Software (except to the extent expressly permitted in
the Editor and End-User Variation section of this Agreement or other documentation
accompanying the Software) or otherwise commercially exploit the Software.
4. You may not electronically transmit the Software from one computer, console or other
platform to another or over a network.
5. You may not use any backup or archival copy of the Software for any purpose other
than to replace the original copy in the event it’s destroyed or becomes defective.
EDITOR AND END-USER VARIATIONS
If the Software includes a feature that allows you to modify the Software or to construct
new variations (an “Editor”), you may use such Editor to create modifications or enhance-
26
ments to the Software, including the construction of new levels (collectively the
“Variations”), subject to the following restrictions. Your Variations: (i) must only work with
the full, registered copy of the Software; (ii) must not contain modifications to any executable file; (iii) must not contain any libelous, defamatory or other illegal material, material that is scandalous or invades the rights of privacy or publicity of any third party; (iv)
must not contain any trademarks, copyright-protected work or other property of third parties; and (v) may not be commercially exploited by you, including but not limited to making such Variations available for sale or as part of a pay-per-play or timesharing service.
TERMINATION
This EULA is effective until terminated. You may terminate this EULA at any time by
destroying the Software. This EULA will terminate automatically without notice from the
Company if you fail to comply with any provisions of this EULA. All provisions of this EULA
as to warranties, limitation of liability, remedies and damages will survive termination.
LIMITED WARRANTY AND DISCLAIMER OF WARRANTIES
You are aware and agree that use of the Software and the media on which is recorded is at
your sole risk. The Software and media are supplied “AS IS.” Unless otherwise provided
by applicable law, the Company warrants to the original purchaser of this product that the
Software storage medium will be free from defects in materials and workmanship under
normal use for ninety (90) days from the date of purchase. The warranty is void if the
defect has arisen through accident, abuse, neglect or misapplication. If the Software fails
to conform to this warranty, you may at your sole and exclusive remedy, obtain a replacement free of charge if you return the defective Software. Follow the Product Return
Procedures described in the Manual. The Company does not warrant that the Software or
its operations or functions will meet your requirements, or that the use of the Software
will be without interruption or error.
TO THE FULLEST EXTENT PERMISSIBLE UNDER APPLICABLE LAW, EXCEPT FOR THE
EXPRESS WARRANTY SET FORTH ABOVE,THE COMPANY DISCLAIMS ALL WARRANTIES,
EXPRESS OR IMPLIED, INCLUDING AND WITHOUT LIMITATION, THE IMPLIED WARRANTIES OF MERCHANTABILITY AND FITNESS FOR A PARTICULAR PURPOSE AND NON-
27
Page 16

RCT Wild manual 9/16/05 1:02 PM Page 28
INFRINGEMENT. EXCEPT FOR THE EXPRESS WARRANTY SET FORTH ABOVE,THE COMPANY DOES NOT WARRANT, GUARANTEE OR MAKE ANY REPRESENTATION REGARDING
THE USE OR THE RESULTS OF THE USE OF THE SOFTWARE IN TERMS OF ITS CORRECTNESS, ACCURACY, RELIABILITY, CURRENTNESS OR OTHERWISE. SOME JURISDICTIONS
DO NOT ALLOW THE EXCLUSION OF OR LIMITATIONS ON IMPLIED WARRANTIES, SO THE
ABOVE EXCLUSIONS AND LIMITATIONS MAY NOT APPLY TO YOU.
LIMITATION OF LIABILITY
IN NO EVENT WILL THE COMPANY OR ITS EMPLOYEES OR LICENSORS BE LIABLE FOR
ANY INCIDENTAL, INDIRECT, SPECIAL, CONSEQUENTIAL OR PUNITIVE DAMAGES, OR
ANY DAMAGES WHATSOEVER (INCLUDING,WITHOUT LIMITATION, DAMAGES FOR
INJURY TO PERSON OR PROPERTY, FOR LOSS OF PROFITS, BUSINESS INTERRUPTION,
LOSS OF BUSINESS INFORMATION, LOSS OF PRIVACY, FAILURE TO MEET ANY DUTY
AND NEGLIGENCE) ARISING OUT OF OR IN ANY WAY RELATED TO THE USE OR INABILITY TO USE THE SOFTWARE, EVEN IF THE COMPANY OR AN AUTHORIZED REPRESENTATIVE OF THE COMPANY HAS BEEN ADVISED OF THE POSSIBILITY OF SUCH DAMAGES.
SOME JURISDICTIONS DO NOT ALLOW THE EXCLUSION OF LIABILITY FOR INCIDENTAL
OR CONSEQUENTIAL DAMAGES, SO THE ABOVE EXCLUSION MAY NOT APPLY TO YOU.
IN NO EVENT WILL THE LIABILITY OF THE COMPANY FOR DAMAGES WITH RESPECT TO
THE SOFTWARE EXCEED THE AMOUNTS ACTUALLY PAID BY YOU FOR THE SOFTWARE.
CHOICE OF LAW AND VENUE
This EULA is governed by the laws of the United States of America and the State of New
York, exclusive of its conflicts of law provisions. The exclusive venue for litigation regarding or arising from this EULA is New York County, New York and you agree to submit to
the Jurisdiction of the courts of New York County, New York for any such litigation.
MISCELLANEOUS
If any provision or portion of this EULA is found to be unlawful, void, or for any reason
unenforceable, it will be severed from and in no way affect the validity or enforceability of
the remaining provisions of the EULA.
This EULA constitutes the entire agreement between you and the Company regarding the
Software and its use.
28
LEGAL NOTICES
© 2005 Atari Interactive, Inc. All Rights Reserved.
RollerCoaster Tycoon
Programming © 2005 Frontier Developments Ltd. All Rights Reserved. All trademarks are
the property of their respective owners. Developed by Frontier Developments Ltd.
Pentium is a trademark or registered trademark of Intel Corporation or its subsidiaries in
the United States and other countries.
Manufactured under license from Dolby Laboratories.
Portions utilize Microsoft Windows Media Technologies. Copyright ©1999-2002 Microsoft
Corporation. All Rights Reserved.
ATI and RADEON are trademarks and/or registered trademarks of ATI Technologies Inc.
Portions use Massive ad-serving technologies. Copyright ©2005 Massive Incorporated. All
rights reserved.
This game incorporates technology of Massive Incorporated ("Massive") that enables
certain in-game objects (e.g., advertising) to be temporarily uploaded to your pc and
replaced in-game while connected online. As part of that process, no personally identifiable information about you is collected and only select non-personally identifiable
information is temporarily logged. No logged information is used to determine any personally identifiable information about you. For full details see
http://www.massiveincorporated.com/privacy.htm.
®
3: Wild! game © 2005 Chris Sawyer.
09165
29
Page 17

RCT Wild manual 9/16/05 1:02 PM Page 30
PC MANUAL BACK COVER
 Loading...