

Page 1
MIGHT AND MAGIC™IX
3DO Europe Ltd
21-23 Mossop Street
London SW3 2LY
The Might and Magic™ IX computer game is a fictional work. Any similarity or resemblance
of any in-game characters to any real persons, living or deceased, is purely coincidental.
© 2002 The 3DO Company. All Rights Reserved. 3DO, Might and Magic, New World
Computing, and their respective logos, are trademarks or registered trademarks of
The 3DO Company in the U.S. and other countries. All other trademarks belong to their
respective owners. New World Computing is a division of The 3DO Company.
The software and related manual for this 3DO product are copyrighted. No portion of this
product may be photocopied, scanned, translated, reproduced, copied or reduced to any
tangible or electronic medium or machine–readable form, or publicly performed or displayed,
without the prior written consent of The 3DO Company. The owner of this product is entitled
to use the software and related manual for his or her own use, but is not entitled to reproduce
and distribute any copies of the software or manual to any other individual or entity; nor to rent
or lease this product or any copy thereof to any third party.
This product contains the LITHTECH™ Development System licensed from LithTech, Inc.
LITHTECH Development System © 1997–2002 LithTech, Inc. All Rights Reserved.
LITHTECH and the LithTech logo are trademarks of LithTech, Inc.
Uses Bink Video. ©1997–2002 by RAD Game Tools, Inc.
Uses Miles Sound System by RAD Game Tools, Inc. © 1991 – 2002
Windows 95, Windows 98, XP, DirectPlay, and DirectX are trademarks of the Microsoft Corporation.
Page 2

3 ✦ Table of Contents
Table of Contents ✦ 4
TABLE OF CONTENTS
WELCOME LETTER FROM JVC......................................10
WHAT’S NEW ABOUT
MIGHT AND MAGIC
™
IX ........................................................11
INTRODUCTION ..........................................................................12
The History of Chedian ................................................................12
A Brief Note About Time ........................................................12
Dia Clan Era (~500–0 BC)..................................................12
The Great Cataclysm (0 BC)..................................................12
The New Settlers (0 BC–Present) ..........................................13
Modern Chedian (521 AC) ....................................................13
The Thjoradric Wars ......................................................................14
About Elemental Thjorad ........................................................14
The Early Wars (112–200 AC) ............................................14
The Middle Wars (240–310 AC) ..........................................14
The Late Wars (350–400 AC) ..............................................15
The Final War (404–418 AC) ..............................................16
Elvish History ....................................................................................17
Elvish Names..............................................................................17
The Elvish Clans........................................................................17
GETTING STARTED....................................................................19
Manual Conventions ......................................................................19
Installation ..........................................................................................19
QUICK START..................................................................................20
Character Creation ..........................................................................20
Keyboard Commands ....................................................................23
Experience and Leveling ..............................................................25
Objectives and Quests ....................................................................25
Page 3

5 ✦ Table of Contents
Table of Contents ✦ 6
Combat ................................................................................................25
Real Time Combat ....................................................................26
Turn–based Combat ..................................................................26
Attack and Cast Spells..............................................................26
GAME MENUS ................................................................................27
Main Menu ........................................................................................27
Game Options ............................................................................27
Video Options..............................................................................28
Sound Options ............................................................................28
Keyboard ....................................................................................28
CREATING CHARACTERS....................................................29
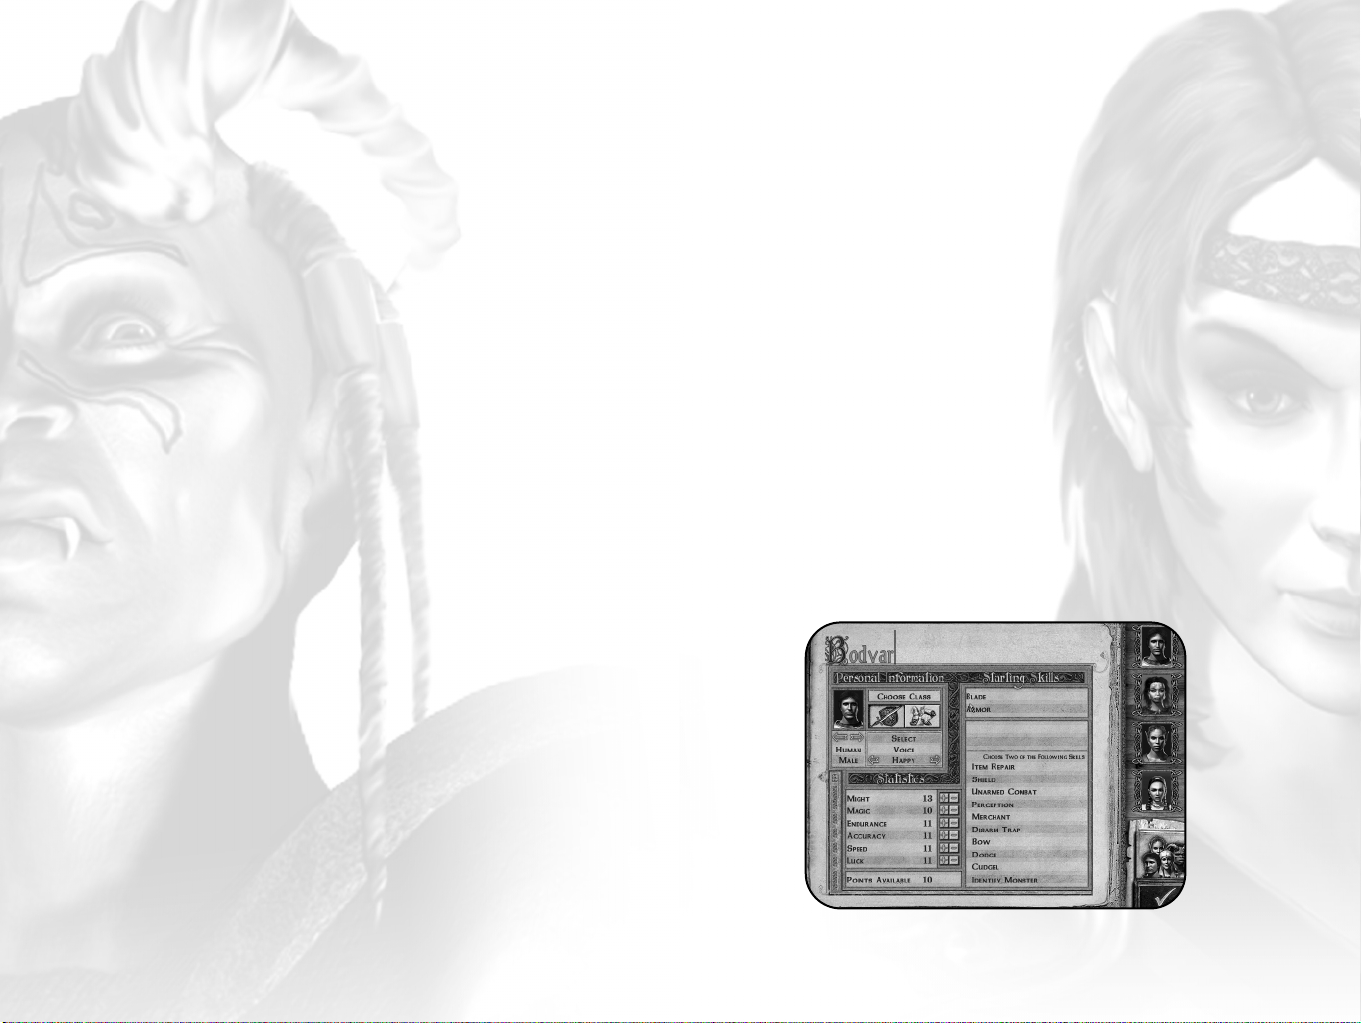
Character Creation Screen............................................................29
Character Name ........................................................................30
Race/Gender ..............................................................................30
Class ............................................................................................30
Voice..............................................................................................30
Statistics ......................................................................................30
Points Available ........................................................................30
Starting Skills..............................................................................30
Compare ......................................................................................30
Accept Party................................................................................30
Attributes ............................................................................................31
Races ....................................................................................................34
Human ........................................................................................34
Elf ................................................................................................34
Dwarf ..........................................................................................34
Half–Orc .....................................................................................35
Classes (The Paths of Might and Magic) ................................35
The Path of Might (Fighter) ........................................................36
Mercenary....................................................................................36
Crusader ......................................................................................36
The Path of Magic (Initiate) ........................................................37
Scholar..........................................................................................37
Healer ..........................................................................................37
Stats ......................................................................................................38
Basic Stats ..................................................................................39
Derived Stats ..............................................................................40
Other Combat Stats ..................................................................41
Skills......................................................................................................41
Weapons Skills ............................................................................41
Armour Skills..............................................................................42
Magic Skills ................................................................................43
Specialty Skills............................................................................43
Spells ....................................................................................................45
Arms of Earth ............................................................................45
Bless..............................................................................................45
Chain Lightning ........................................................................45
Column–of–Fire..........................................................................45
Curse ............................................................................................45
Dark Grasp ................................................................................45
Death's Touch ............................................................................46
Disease ........................................................................................46
Divine Intervention ..................................................................46
Elemental Aura..........................................................................46
Elemental Blast..........................................................................46
Elemental Bolt............................................................................46
Elemental Protection ................................................................46
Enchant Item..............................................................................46
Enrage..........................................................................................46
Eye of Leggib..............................................................................46
Eye of the Storm ........................................................................46
Faith ............................................................................................47
Fear ..............................................................................................47
Feather Fall ................................................................................47
Fleet Foot ....................................................................................47
Page 4

7 ✦ Table of Contents
Table of Contents ✦ 8
Haste ............................................................................................47
Heal ..............................................................................................47
Lloyd's Beacon............................................................................47
Magic Mine ................................................................................47
Meteor Shower............................................................................47
Natural Armour ........................................................................47
Pain Reflection............................................................................47
Paralyse........................................................................................47
Phantom Fighter ........................................................................48
Poison ..........................................................................................48
Poison Cloud ..............................................................................48
Power Draw ..............................................................................48
Purify ..........................................................................................48
Regeneration................................................................................48
Resist Death................................................................................48
Resurrection ................................................................................48
Shared Life ................................................................................48
Souldrinker..................................................................................48
Sparks ..........................................................................................48
Spell Reaver ................................................................................48
Torchlight ....................................................................................49
Town Portal ................................................................................49
Transfusion..................................................................................49
Turn Undead ..............................................................................49
Wizard Eye ................................................................................49
Wound ..........................................................................................49
Wrath of Bugs! ..........................................................................49
MENUS AND GAME SCREENS........................................50
Adventure Screen ............................................................................50
Compass ......................................................................................51
Character Portraits....................................................................51
Health, Magic, Conditions and Spell Effects........................51
Ready Light................................................................................51
Action Text..................................................................................52
Character Info Screens ..................................................................52
Statistics Screen (First Tab) ....................................................53
Skills Screen (Second Tab) ......................................................54
Inventory Screen (Third Tab)..................................................55
Spells (Fourth Tab)....................................................................56
Map Screen..................................................................................57
Notes Screen ................................................................................58
Buy/Sell Screen ..........................................................................59
Rest Screen ..................................................................................61
Save/Restore Screen ..................................................................62
EXPLORATION ..............................................................................63
Movement and Interaction ..........................................................63
Ground Movement ....................................................................63
Swimming....................................................................................63
Ships ............................................................................................64
Rest ..............................................................................................64
Dealing with Objects ......................................................................64
Loose Items..................................................................................64
Chests, Crates and Drawers ....................................................64
Buttons and Switches ................................................................65
Doors....................................................................................................65
Dungeon Entrances....................................................................65
Interior Doors..............................................................................65
Town Doors ................................................................................65
Interaction with NPCs (Non–Player Characters)..................66
Talking ........................................................................................66
Receiving a Quest ......................................................................66
Promotion Quests ......................................................................66
Secondary Quests........................................................................66
Hiring and Firing NPCs ..........................................................67
Towns ..................................................................................................67
Page 5

9 ✦ Table of Contents
Shops ....................................................................................................67
Buy Standard or Special Items ................................................67
Display Inventory ......................................................................68
Sell ................................................................................................68
Repair ..........................................................................................68
Identify ........................................................................................68
Learn Skills ................................................................................68
Types of Shops ............................................................................68
COMBAT................................................................................................70
Real Time vs. Turn–based Combat ............................................71
Damage................................................................................................71
EXPERIENCE AND ADVANCEMENT ........................73
Experience Points and Leveling ..................................................73
Class Ranking ....................................................................................74
MAGIC SYSTEM ............................................................................75
Scrolls and Wands............................................................................75
Potions ................................................................................................75
CUSTOMER SUPPORT............................................................76
TROUBLESHOOTING..............................................................76
Letter from JVC ✦ 10
WELCOME LETTER FROM JVC
Dear Might and Magic fans,
If you’re an old-time fan of the Might and Magic series, then you’re in
for a real treat. We’ve taken your excellent suggestions and used them to
make what we think is the best Might and Magic game ever. If you’re new
to Might and Magic, you are about to take your first step into a world
that is filled with fantastical monsters, foreboding dungeons, and
legendary heroes.
We’ve made a lot of new changes that will make this experience as fun
a game experience as you’ve had. We’ve enhanced the skill system, made
the dungeons better, and the monsters smarter. Due to your
suggestions, the NPCs you hire will once again be able to fight
alongside you in your quests.
We had a great time making Might and Magic, and hope you will have
as much fun playing it as we did making it.
Have fun!
Sincerely,
Jon Van Caneghem
Creator and Designer
Might and Magic I–IX
NOTES ....................................................................................................77
THE 3DO EUROPE LTD, LIMITED
90-DAY WARRANTY
....................................................................80
Page 6

11 ✦ What’s New
Introduction ✦ 12
WHAT’S NEW ABOUT MIGHT
AND MAGIC IX
Might and Magic veterans are going to immediately notice the amazing
improvements and innovative features in this new installment of the
award–winning series.
• For the first time ever, players will be presented with a breathtaking truly
3D environment. Might and Magic IX utilises a brand new 3D engine,
completely immersing you in the most realistic Might and Magic
world yet!
• The new conversation system in Might and Magic IX causes the
conversations to adjust to events that you have taken part in. NPCs
now react accordingly, and the storyline evolves as your party
progresses.
• While the new engine is 3D, players should not try to just blaze
through the game as if it were a first–person shooter. This is because,
while there are fewer enemies and wandering creatures than before,
they are now much smarter. Moreover, this time they know you’re
coming and they won’t let you just run by. What's the secret to
making a difference? Remember, Turn–based Combat was invented
for a reason, and in Might and Magic IX, it has a purpose.
• Players are going to enjoy the all–new spellcasting system, which uses
spells much like other skills. In previous versions, spells belonged to
one specific spell school. Now, casting a Heal spell requires an
Elemental skill and Light skill. All magic users can learn the basics of
healing. Only the higher level Light Masters and Grandmasters are
the ones who wield it with the best results.
INTRODUCTION
Excerpt from "The Encyclopedia Historica" by Isaec Norton
THE HISTORY OF CHEDIAN
The history of Chedian is rough at best, especially prior to the Great
Cataclysm. Its original settlers were the Half–Orcs, who did not keep
many records because most of their traditions were oral. Unfortunately,
after the Great Cataclysm, most of their oral traditions were forgotten.
With the introduction of new races, much has changed.
A Brief Note About Time
Time is measured in years After Cataclysm (AC) or years Before
Cataclysm (BC), which is the number of years before or since Verhoffin
cast the spell that destroyed the old Ursanian Empire.
Dia Clan Era (~500–0 BC)
An Ursanian Empire expeditionary force first discovered Cheh’dian
around 500 BC. There are a few brief records from this time
documenting some skirmishes with a group of Half–Orcs in a northerly
region known as Chadianne. Presumably, this was a misspelling of the
Half–Orcish word "Cheh’dian" meaning "Land of the Dia Clan". This
misspelling took, however, and evolved to the name we know today as
Chedian. Sadly, the traditions and histories of the Chedian Half–Orc
settlers have been lost in time due to the deaths of the storytellers in the
Great Cataclysm.
The Great Cataclysm (0 BC)
Before 0 BC, Rysh, the continent Chedian lies upon, was a very
different place. The Ursanian Empire’s hold on the continent was
nearly complete. Their area of influence was large, and their
ambitions larger. During this period in the Ursanian Empire, its
emperors were plagued by suspicion and mistrust. Immediately prior to
200 BC, in a remote province near the centre of the Ursanian Empire,
a previously unknown sorcerer appeared and constructed a large tower.
He used the name Verhoffin, and claimed the tower as a sovereign
province independent of the Ursanian Empire. Emperor Ralfor and his
successors mounted several unsuccessful campaigns against Verhoffin.
Page 7
13 ✦ Introduction
Introduction ✦ 14
Somewhere near 10 BC, Emperor Trandis assigned an assassin named
Nazrim to assassinate Verhoffin. After 10 years and the commissioning
of several magical artifacts, Nazrim attempted to end Verhoffin’s life.
Nazrim failed, and in response to this attempt, Verhoffin climbed to the
top of his tower and cast a spell that laid waste to half the Ursanian
Empire. For thousands of miles, he wreaked havoc and destroyed land.
Earthquakes ripped the surviving cities apart. A giant section of the land
surrounding Verhoffin’s Tower was torn asunder, forming what is now
known as the Verhoffin Sea. Most of the citizens of the Ursanian Empire
were left without homes or families. Although the Ursanian Empire
would last another 13 years, this event is generally associated with the
fall of the Ursanian Empire.
The New Settlers (0 BC–Present)
Of all the regions that were affected by the Great Cataclysm (sometimes
called Verhoffin’s Cataclysm), Chedian was affected the least. Although
its climate and landscape changed, Chedian suffered very little. In other
areas, survival was a struggle. Those who were able to followed the
sparse food supplies. Eventually those food supplies led to the fertile
lands of Chedian. Since the Great Cataclysm, the population of this
region grew enormously. At first, the dominant population of Half–Orcs
was reluctant to accept the new settlers, but times were rough and any
able hand became a welcome hand.
Modern Chedian (521 AC)
Modern Chedian is divided into six major clans, each ruled by their own
leader. Known as a Jarl, this leader is autonomous from the other clans,
though trade between clans is frequent. Much of the economy of
modern Chedian (particularly in Thjorgard) is centred on the trade,
refining, and use of a new metal known as Elemental Thjorad.
Elemental Thjorad is a metal that is easy to work, and takes well to
powerful enchantments. Some of the strongest magical items made in the
last 500 years have been made from Elemental Thjorad.
Given the amazing properties of Elemental Thjorad, it is surprising that so
few wars have been fought over the possession of it. There have been
only a dozen wars in the last 500 years (collectively known as the
Thjoradric Wars), and the last one was fought nearly a century ago.
With the exception of the Sturmford and Drangheim clans, the Jarls speak
often to each other, and work out their disagreements every summer at a
festival known as "The Thing".
Most of the daily life in Chedian now centres on the planting seasons and the
raiding seasons. There are wealthy towns along the Coast of the Verhoffin
Sea, and it is not uncommon to see raiding ships full of soldiers heading
toward the rich lands to the south.
THE THJORADRIC WARS
Since the discovery of Elemental Thjorad (somewhere around 100 AC), there
have been a number of wars over who controls this valuable resource. The
last one was fought in 418 AC between Thjorgard and Thronheim.
About Elemental Thjorad
Elemental Thjorad is a metallic substance that takes to enchantment easily. It
is also by nature very heavy. It is only found in the Miner’s Gulch region of
Thjorgard. It is possible that it might be found elsewhere in the Fenn Mountains
(the mountain range encircling the Verhoffin Sea), although the expense it
would incur to prospectors makes the concept nearly unfathomable.
The Early Wars (112–200 AC)
The first four Thjoradric wars were fought between rival village chiefs in
the region now known as Thjorgard. During this time, a single chief came
to prominence. He became known as Bjarnus the Mighty, and in addition
to uniting the Thjorgardian clans, he founded the city of Thjorgard (named
for the ore that is mined there). His army conquered the last of the
Thjorgardian clans, and became known as The Thjorgard Clan. Thjorgard
enjoyed peace even after Bjarnus’ death…until 238 AC.
The Middle Wars (240–310 AC)
In 238 AC, Hridmir Strawhands, the Jarl of Thjorgard, travelled to
Thronheim to meet his prospective bride for the first time. During a game
of stones that Hridmir was playing with her older brother Hafgrim, the
two began arguing. Hridmir strangled Hafgrim over the game board and
promptly left for home. Hafgrim’s father, Dain Fasoltssen, was outraged.
He demanded Hridmir pay a wergild of 2000 pounds of Elemental
Thjorad. Hridmir refused, and Dain invaded Thjorgard.
Thjorgard was under siege for thirty days, until Dain broke through the
walls and Hridmir fled. Under Dain’s leadership, his army looted the city of
Thjorgard. Houses were burned, shops were looted, and its citizens were
held in the grip of fear. Dain held the city for exactly two days until Hridmir’s
sister Oda arrived and chased his army from Thjorgard. She chased them
all the way to Thronheim and laid siege to his city. Dain eventually paid
Oda off, and she raised her siege.
Page 8
15 ✦ Introduction
Introduction ✦ 16
Thjorgard and Thronheim had three more wars, and during that time
Thronheim was razed at least twice. Eventually, Dain’s grandson Leip
forced Thjorgard to sign a peace treaty that lasted until 404 AC.
The Late Wars (350–400 AC)
Thronheim was not the only clan interested in the valuable ore known
as Elemental Thjorad. Thjorgard was invaded by Frosgard in 350 AC,
under the leadership of the Jarl Olaf the Fat. He was bent on conquering
all of Chedian under his iron fist. He commissioned a special sword,
believing that no one could stop him while he carried a magical weapon
known as Jorhgamesh. While his army marched toward battle with the
Thjorgardian army, Olaf the Fat wandered off alone. He was beset by
highwaymen. They killed him and stole his sword. Without their Jarl,
the Frosgardian army was decimated the following day. Most of the
survivors were taken as prisoners. The ancestors of those survivors live
in Thjorgard to this day.
Several years after the death of Olaf the Fat, a warrior from Sturmford
raised an army with the intention of taking Thjorgard by force. He
claimed to be the grandson of Sven Bloodaxe, the legendary warrior who
was ever victorious in combat. After several attempts to take Thjorgard
by sea, he was caught in a storm and drowned when his boat sank.
Not all wars were fought on the battlefield. A rich Thjorgardian
merchant tried to buy for himself the Jarlship of Thjorgard. The Jarl at
the time, Roderik the Stout, was, by all accounts, a fat slob. He was
more interested in enjoying the wealth of his position than in providing
for his people. Ragnar used the money he had made from trading in
Elemental Thjorad to influence some of the people close to Jarl Roderik.
Unfortunately for Ragnar, one of Roderik’s confidants exposed the plot,
and instead of being the new Jarl, Ragnar found himself on the end of a
noose.
The Final War (404–418 AC)
When Thjorgard was forced to sign the peace treaty with Thronheim,
Leip required a yearly donation of 1000 pounds of Elemental Thjorad
to be paid to the Thronish Jarl. By 400 AC, the Thjoradric industry was
in a slump. The Thjoradric miners were barely mining enough
Elemental Thjorad to pay off Thronheim. By 404 AC, the people had
had enough.
The people of Thjorgard, led by a man named Geitlif Strongpick,
deposed their Jarl. They quickly named Geitlif the new Jarl, and he
promptly sent a message to Thronheim. They would no longer pay.
Thronheim responded by sending an army to lay siege to Thjorgard.
Geitlif was prepared for this and used the tunnels that snaked through
the mountains of Thjorgard to ambush the Thronish army. After a year
of enduring the hit and fade strategies of Geitlif, the Thronish army
finally left Thjorgard.
Thjorgard and Thronheim did not stop fighting. They fought off and on
for another fourteen years, until they mysteriously stopped in 418 AC.
Rumour has it, and this author believes, it was the closure of the
mountain pass between Thronheim and Thjorgard that prevented
more fighting. Since the end of the last Thjoradric War, nearly a century
ago, Thronheim and Thjorgard have become close allies. Several
Thronish Jarls have married into the Thjorgardian Jarls’ families and
vice versa. They have forged a peace that looks to last forever.
Page 9
17 ✦ Introduction
Introduction ✦ 18
ELVISH HISTORY
Elvish Names
Before the Great Cataclysm, all the Elves in Chedian were part of one of
thirteen clans. Each clan also had several sub–clans known as Sils. When
naming children, the Elves of this era adhered to the following rule:
Given Name de Mother’s Name A’Clan Name a’sil
So, an elven female named Ete, who is the daughter of Forbhlaith, who
is part of the Dorad clan and the Blackclaw Sil, has a full name of:
Ete de Forbhlaith A’Dorad a’blackclaw
Note the lower case a’ for the Sil. Since the Sil is a sub–clan, it is not
capitalised. In elvish society, this is known as the Regal Name or Proper
Name. It is used only in formal ceremonies and in formal introductions to
Elves of other clans. For most everyday introductions, the Elves use the
Common Name, composed of the Given Name and the Clan Name.
Therefore, the preceding example would be:
Given Name A’Clan or: Ete A’Dorad
Despite the dissolution of the clans and Sils, most Elves still try to
follow this paradigm to the best of their ability. There are a few
"modern" Elves who have begun to follow the naming conventions of
the humans. These Elves usually live in major towns, and often interact
with Humans and Dwarves who rarely understand the concept of clans
and Sils.
The Elvish Clans
Before the Great Cataclysm, the Elves were separated from other races,
and retained their sovereignty as long as they paid their tributes to the
Ursanian Empire. The Elves were one of the few groups that did not
resist being absorbed into the Ursanian Empire. In fact, there is some
evidence that the Elves actually asked to be part of the Ursanian
Empire.
Most of the records were written on a special paper known as Cuni.
This paper was made from the now extinct Cundis tree. Most of the
records themselves were kept in a central location in the elvish lands
known as At’rann, the word for "utopia" (literally "Place of Bliss" or
"Place of Light", both words being synonymous in elvish tongue).
According to the ancient maps, the town known as At’rann was four
hundred leagues south of Verhoffin’s Tower. Today, this would place it
squarely at the bottom of the Verhoffin Sea.
Since At’rann was buried underneath the sea, it is assumed that all of
the Historical Cuni have been destroyed. There is some debate,
however. Some claim since At’rann was the elvish utopia that it was
protected from destruction during the Great Cataclysm, and now currently
resides in its entirety under the Verhoffin Sea.
There are those who believe in the existence of the complete written
history of the Elves called the Cunic Records. These followers believe
they include the fate of all the clans, including a mysterious lost
fourteenth clan known as A’Rikdun. Many historians have gone on
expeditions to the area believed to be the location of At’rann, and have
tried to find evidence of its existence. To date, all these expeditions have
returned empty–handed.
Without these records, virtually nothing is known about elvish history,
except where their history intersects with the histories of other cultures.
Thus, it is known that the elvish clan leader Thrata A’Dorad invited the
Ursanian Imperial Guard to set up a garrison in the elvish town of
Etendar. It is not known who he was or why he did so. Most of what is
known of elvish history is what is spoken on the tongues of the Elves
themselves. Much of that is myth related to elvish heroes. Perhaps one
of these days, one of the expeditions to the probable location of At’rann
will return with pieces of the Cunic Records.
Page 10
19 ✦ Getting Started
Quick Start ✦ 20
GETTING STARTED
MANUAL CONVENTIONS
This manual assumes that you are using a standard keyboard and
two–button mouse and have an understanding of their use. If you do not
understand any of the following terms, you might want to take a few
moments to review them in your Microsoft Windows tutorial materials.
Click Right–click Double–click Drag Crosshair
Note that Might and Magic IX was designed to be easy to use, so just
about every detail of the game is available if you right–click on any
object or button.
INSTALLATION
Refer user to the Installation Card and/or to the Read Me file on the
CD. To install your copy of Might and Magic IX onto your hard drive,
please see the enclosed Installation Card and read over the Read Me file
on the Install CD.
After the installation is complete, double–click on the Might and Magic
IX icon on your desktop or select the Play Might and Magic IX menu
option under 3DO/Might and Magic, accessed from the START menu
in Windows. After the initial logo screens, you will arrive at the Might
and Magic IX Main Menu.
QUICK START
The following is a brief summary of the essentials you’ll need in order
to start playing Might and Magic IX. The rest of the manual beyond this
chapter goes into more detail on creating characters, Menus, Spells, and
other pertinent game information.
CHARACTER CREATION
Your first course of action will be to create the four characters in your
party. If you would like to just jump right in and start playing, click on
Page 11

21 ✦ Quick Start
Quick Start ✦ 22
the Accept Party button (the green checkmark) and your party’s
Statistics and Skills will be chosen for you. Otherwise, you can proceed
with the following steps:
1. Select a Character – Begin by selecting your first character’s Race
and Gender. Click on the left and right arrows beneath the Character
Portrait to scroll through your female and male character choices:
Human, Half–Orc, Elf, and Dwarf. Keep in mind that certain races
are biologically better in certain Classes; for example, a Half–Orc is
built to be a Fighter due to its innate strength and power, whereas
an Elf would make a better Initiate considering its smaller stature
and natural Magic ability.
2. Name – Each character comes with a name, but you can change it
simply by clicking on it and typing in your character’s new name.
3. Class – Go to the "Choose a Class" box and select either "Fighter"
or "Initiate". A Fighter relies on brute force and a weapon, and an
Initiate relies on spellcasting to attack enemies or to aid party
members. As your characters gain experience and the opportunity
to advance their Class, they can become a more specialised Class. A
Fighter may choose to become a Crusader, and then potentially
either a Ranger or Paladin. An Initiate may advance to Scholar, and
then perhaps become either a Mage or Lich. (For more information,
go to the "Creating Characters" chapter and see "Classes".) It is
suggested that, on your first time through Might and Magic IX, you
create a party featuring two Fighters and two Initiates.
4. Voice – When your character speaks, what will he or she sound
like? Click the right and left arrows underneath "Voice" to give your
character’s voice a recognisable persona.
5. Stats – Each character has a list of statistics that you can adjust.
Changing these Stats will affect how the character performs in
combat. (For more detailed information on each statistic, see "Stats"
in the "Creating Characters" chapter.) Some Races are naturally
better or worse in certain Stats. For instance, a Half–Orc’s Might is
very high because the Half–Orc is a big, strong creature. However,
due to its large size, its Speed is very slow. Every character gets 10
extra Points to distribute amongst their Stats, so you can
compensate for the Half–Orc’s slow gait by increasing its Speed
Stat. However, keep in mind that some Races have bonuses and
penalties for certain Stats, so the Point cost for increasing or
decreasing that Stat will be doubled. For example, Dwarves are poor
Magic users. Therefore, to increase a Dwarf’s Magic Stat by 1 Point,
it will cost you 2 Points. Elves, on the other hand, are very accurate,
so putting 1 Point into their Accuracy Stat will increase it by 2
Points. If you accept the party as it appears without spending the
ability points, these Points will be distributed automatically for you.
6. Starting Skills – Choose two Skills from the list of Starting Skills.
To find out more about any Skill, right–click on it.
7. Compare – When you have chosen all four party members, click on
the "Compare" (a picture of four party members) button in the
lower–right corner. Use the Compare Screen to see how each party
member balances out, then return to each character’s screen and make
any necessary adjustments.
8. Accept Party – Once you’ve created your party, you’re ready to
begin! Select the Accept Party button (green check mark) in the
lower–right corner.
9. Equip – When gameplay begins, press the ‘I’ key to bring up your
Inventory Screen. Select each character’s portrait, click on the
Inventory Navigation Tab (second tab from the bottom), and drag
any weapons or armour each character is carrying onto their body
to equip them. You can also simply double–click each item to
automatically equip it.
10. Quick Spells – Once your Initiates have learned their basic spells, by
double-clicking on the Spell Book in the Inventory, select the Spell
you would like to have loaded and ready to go for quick casting by
clicking on the spell to highlight it, then clicking on "Set Quick" to
load it. Whenever you would like to cast the spell, highlight your
spellcaster and right–click your mouse.
Page 12
23 ✦ Quick Start
KEYBOARD COMMANDS
The following Keyboard Commands are the default settings. If you wish
to remap any of the following commands, you can do so in the Options
Menu under "Keyboard" or press the ‘F1’ key while on the Adventure
Screen.
Mouse Look with Keyboard
Quick Start ✦ 24
W move forward
Up Arw move forward
S move backward
Dwn Arw move backward
A sidestep left
D sidestep right
Rt Arrow turn right
Lt Arrow turn left
Left-Shift run/walk (momentary)
F1 keyboard remap
F5 quick save
F8 screenshot
F9 quick load
1–4 select character
5–7 converse with NPC
X jump
I inventory screen
J journal book
M map book
B spell book
Q quest book
N notes
R rest
G ID monster (momentary)
F party formation screen
C crouch
Y yell
Z quick reference (momentary)
Tab cycle through characters
ESC main menu/return to game
Enter turn-based mode toggle
Shift D/Delete delete item from inventory
Shift 1-4 move item in inventory to PC#
Spacebar activate/use/open
D L–Click (inventory) equip item
D L–Click (spell book) cast spell immediately
R–Click (on a menu) quick info (momentary)
L–Click range/melee/attack
R–Click (on the
Adventure Screen) spell/range/melee/attack
Shift S quick sell of inventory in stores
Shift D delete item in inventory screen
\ toggle the display
Page Up look up
Page Down look down
*D L–Click = double left-click
Page 13

25 ✦ Quick Start
Quick Start ✦ 26
EXPERIENCE AND LEVELING
As your party members encounter and defeat creatures, each character
earns Experience Points. When the character is ready to advance to the
next level (check the character's Experience Points in the Inventory
Screen to find out if they're ready), bring them into one of the six major
cities and find a trainer. This costs gold but increases your character’s
level and earns you valuable skill points!
The character’s experience between levels is also represented on the
Adventure Screen to the right of the Character Portrait. A vertical yellow
line represents the experience earned since the last level trained. When the
bar is full, the character can advance to the next level.
OBJECTIVES AND QUESTS
While your party’s primary objective is to stop the Beldonian Hordes
from conquering Chedian, you can also perform what are known as
Promotion and Secondary Quests.
Promotion Quests – These are the quests you need to accomplish in
order to promote your characters to their next Class. For example, if you
would like to promote a Fighter in your party to the level of Mercenary,
you will need to complete a simple quest. It may involve escorting an
official’s daughter from one city to the next, or perhaps ridding a forest
of bandits to protect the innocent.
Secondary Quests – These are small quests that you can go on in order
to collect experience and money. These quests are not required to
complete the game.
COMBAT
Key/Mouse Effect
Left–Click Active Character Attacks Nearby Enemy with
Range or Melee Weapon
Right–Click Cast Quick Spell or use Ranged Weapon, then
Melee Weapon
B Open Spellbook
Enter Toggles Real Time and Turn–based Modes
Combat is your party’s bread and butter; this is where they get the most
experience. Might and Magic offers two ways to take on your foes.
Real Time Combat
As your characters move through the environment, the game is being
played in Real Time mode. This means that the game operates very much
like any other first–person adventure; if you face an opponent, it moves
and attacks your party as your party attempts to move and attack back.
Every action your characters perform takes time to execute; each
Character Portrait along the left side of the Adventure Screen has
"ready lights" at the lower right of the portrait which darken as the
character recovers and prepares to attack again. This means that, during
that recovery time, any other enemies within the vicinity may try to join
the brawl, or you may find that your foe(s) can attack your party
members much more quickly and for more damage than your party has
time to react to. If you would prefer to slow combat down and play it
with more of an RPG style, try Turn–based Combat.
Turn–based Combat
To activate Turn–based Combat, get as close to the enemy as you dare
and press the ‘Enter’ key. The Turn–based Combat Icon (a hand) appears
in the lower–right corner to indicate that you are currently in
Turn–based Combat mode. At this point, your party members and the
opponent(s) get to act one at a time and in order per round, depending
on their Speed and Recovery stats. Party member and opponents that are
particularly fast can perform multiple actions in each round. Press the
‘TAB’ key to skip a character’s turn.
Attack and Cast Spells
There are two ways to attack an enemy, with Might or with Magic.
Might
To attack an enemy, place the crosshair over the enemy and left–click the
mouse. Each time you left–click and attack, the highlighted party
member attacks once.
Magic
If you’ve used the "Set Quick" option to preload a spell into each
spellcaster’s inventory, simply right–click the mouse to cast the spell.
Page 14

27 ✦ Game Menus
Game Menus ✦ 28
Head Bob: Toggle On and Off the head bob motion while moving in
the game. With this option set to On, your party’s view of the world will
bob and sway slightly as you move.
Choice of Targeting Crosshairs: Select the appearance of the mouse’s
targeting crosshair. Choose one of seven different crosshairs.
GAME MENUS
MAIN MENU
Start Game: Create a new party and begin playing Might and Magic IX.
Load Game: Load previously saved games.
Options: Change your Game, Video, Sound or Keyboard Options.
View Intro: View the Might and Magic IX Introductory Video.
Credits: Peruse the names of the folks who worked so hard to bring
you this fun adventure.
Game Options
Turn Speed: The slider adjusts the speed in which you can turn your
party’s view when using the keyboard.
Mouse Sensitivity: This slider adjusts the speed of the mouse. Setting
this to the right will increase your mouse pointer and mouselook speed.
Always Run: Toggle On and Off the "always running" mode for your
party. When set to On, your party’s movement will default to the "run"
speed. Press the ‘SHIFT’ key if you want them to walk. Conversely, if it
is set to Off, hold down the ‘SHIFT’ key to make your party run.
Blood Splats: Toggle the blood splats within the game On and Off.
Invert Mouse: Turns the inverted/reversed mouse functions. Use this
to flip the mouselook Y–axis.
Video Options
Use this screen to modify any of your display settings, or change the
graphic detail levels in the game.
Select Display Adapter: Systems Primary display adapter is always the
default.
Force 1 Pass: This enables single pass lightmapping vs. dual–pass light
mapping. Single pass is faster at the cost of video quality.
Detailed Textures: Increase the look of surface textures at the cost of
performance.
Light Map: Turn off the light mapping if you’d like to increase
performance, but keep in mind that it will drop the game’s video quality.
Shadows: Toggle shadows On and Off to provide a performance increase.
Trilinear Buffering: Increases the look of objects close–up.
Weapon Impacts: Turn off the effects for weapon impacts in order to
increase video performance.
Optimise Surfaces: This enables highly-detailed object surfaces at the
cost of computer performance.
Environment Map: This enables reflective objects, but can cause the
frame rate to drop. This feature is not recommend for low–end systems.
Sound Options
Individually adjust the Sound Effects, Music and Voice volumes. You can
also toggle On and Off the EAX Environment Audio option.
Keyboard
Use this menu to re-map any of the keyboard or mouse commands, or
to restore the default settings. For the complete list of the default
keyboard commands, see "Keyboard Commands” in the Quick Start
chapter.
Page 15

29 ✦ Creating Characters
CREATING
Creating Characters ✦ 30
Character Name
Each character comes with a name, but you can change it simply by
clicking on it and typing in your character’s new name.
Race/Gender
Select a Character Portrait. This not only chooses your character’s
appearance, but also their race and gender. Click on the left and right
arrows beneath the Character Portrait to scroll through your female and
male character choices: Human, Half–Orc, Elf, and Dwarf.
CHARACTERS
Once you select "Start Game" from the Main Menu, the Character
Creation Screen appears. It is on this screen that you will create your
four party members. Each character within the party is a unique
individual with different strengths and weaknesses, vocation and skills.
You may either click on the check mark at the bottom right to accept
the default party or create your own characters.
CHARACTER CREATION SCREEN
Class
Choose a Class. Select either "Fighter" (warrior) or "Initiate" (spellcaster). A
Fighter relies on brute force and a weapon, and an Initiate relies on
spellcasting to attack enemies or to aid party members.
Voice
When your character speaks, what will he or she sound like? Click the
right and left arrows underneath "Voice" to give your character’s voice a
recognisable persona.
Statistics
Each character has a list of statistics that you can adjust. Changing these
Stats will affect how the character performs in combat. (For more detailed
information on each statistic, see "Stats" in this chapter.)
Points Available
The Points Available "pool" grants each character an additional 10 points with
which to adjust their Stats. As you take points away from a Stat, those
points are put back into the Points Available to use on other Stats.
Starting Skills
Choose two Skills from the list of Starting Skills. To find out more about
any Skill, right–click on it.
Compare
Compare each character with the other three characters to ensure you
have created the best possible party. Return to each character’s screen
and make any necessary adjustments.
Accept Party
Once you’ve created your party, you’re ready to begin!
Page 16

31 ✦ Creating Characters
Creating Characters ✦ 32
ATTRIBUTES
Might
Might is the statistic that represents a character's overall strength, and
his or her ability to put that strength where it counts. Characters with a
high Might statistic do more damage in combat.
Magic
Magic represents a character's ability to reason and understand complex,
abstract concepts. Maximum Spell Points for all spellcasters are based on
Magic.
Endurance
Endurance is a measure of a character's physical toughness and
durability. A high Endurance gives the character more Hit Points.
Accuracy
Accuracy represents a character's precision and hand–eye coordination.
High Accuracy will allow a character to hit monsters more frequently
in combat.
Speed
Speed is a measure of how quick a character is and the rate at which the
character recovers from attacks.
Luck
Luck has a subtle influence throughout the game, but is most visible in
the ability of a character to resist magical attacks and avoid taking (as
much) damage from traps.
Hit Points
Hit Points indicate how much damage your character can sustain before
falling unconscious or dying. A character is unconscious at 0 Hit Points
or less, and dies when his or her Hit Points are reduced to a negative value
equal to his or her Endurance stat. All Hit Points are restored after 8 hours of
uninterrupted rest.
Armour Class
Armour Class is a measure of how difficult it is for a monster to hit a
character. The higher the Armour Class, the better the chance of
avoiding an attack.
Spell Points
Spell Points are needed to cast spells. Every spell has a Spell Point cost
that is deducted from this statistic when it's cast. Spell Points are
restored after 8 hours of uninterrupted rest. Spell Points are also
restored by using mana potions.
Condition
Condition shows the worst "effect" your character is suffering, such as
poisoned, diseased, or dead. Many conditions can seriously hurt your
character's ability to fight or perform other actions. Conditions should
be cured as soon as possible.
Quick Spell
The Quick Spell is the spell that will be cast when you right-click
during combat. You can set the Quick Spell by opening your spell book
and clicking on the spell you want to set, then clicking on the "Set
Spell" button.
Level
Level is a measure of the training your character has gone through. A
high level contributes to an increase to Hit Points and Spell Points.
Experience
Experience is a simple indicator of your character's overall
understanding of the world. With enough Experience Points (and a
little gold), you can train your characters in training grounds
throughout the land to increase their level and gain skill points to spend
on skills.
Melee Bonus
Melee Bonus is the sum of all factors (skills, spells, accuracy, etc.) that
influence your character's chance to hit monsters with an equipped
hand-to-hand weapon.
Melee Damage
Melee Damage is the sum of all factors (Might, spells, certain weapon
skills at expert or master, etc.) that influence the damage your character
does with an equipped weapon.
Ranged Bonus
Ranged Bonus is the sum of all factors (skill, spells, accuracy, etc.) that
influence your character's chance to hit monsters with any ranged
weapon.
Page 17

33 ✦ Creating Characters
Creating Characters ✦ 34
Ranged Damage
Ranged Damage is the sum of all factors (spells, weapon bonuses, etc.)
that influence the damage your character does with any ranged weapon.
Elemental
Elemental Resistance represents your character's ability to minimise
damage taken from Elemental-based attacks. Though a high resistance
can greatly reduce Elemental amage, it does not make your character
immune.
Light
Light Resistance represents your character's ability to minimise damage
taken from Light–based attacks. Though a high resistance can greatly
reduce Light damage, it does not make your character immune.
Dark
Dark Resistance represents your character's ability to minimise damage
taken from Dark–based attacks. Though a high resistance can greatly
reduce Dark damage, it does not make your character immune.
Spirit
Spirit Resistance represents your character's ability to minimise damage
taken from Spirit–based attacks. Though a high resistance can greatly
reduce Spirit damage, it does not make your character immune.
Physical
Physical Resistance represents your character's ability to minimise
damage taken from magically–caused Physical–based attacks. Though a
high resistance can greatly reduce physical damage, it does not make your
character immune.
Skill Points
Skill Points are awarded whenever your character trains for a new level.
You can spend Skill Points on your skills at any time.
RACES
Human
The Humans were the first group of the four major races to nurture an
expansionist philosophy. Prior to this, all races pretty much kept to
themselves. They were also the first to devote a great deal of time to
creating weapons and other technology to destroy things. Their
resourcefulness immediately after the Great Cataclysm helped them to
become the most prominent race in Chedian.
Humans are equally adept as Fighters or Initiates, and are fairly average
across every Stat.
Elf
Before the Great Cataclysm, all the Elves in Chedian were members of
one of 13 clans, who usually kept to themselves. Each of these clans had
sub–clans known as Sils. Sometime before or during the Great
Cataclysm, the 13 clans were scattered to the winds. After the
Cataclysm, the clans began intermingling with each other, and other
races. The strong clan loyalties they used to have are breaking down. It is
not uncommon to see Elves drop their clan or Sil names. There is
rumour of another group of Elves who live to the south who belong to
a lost 14th clan known as A'Rikdun.
Elves are smaller in stature than Humans or Half–Orcs, and thus have
poor Endurance (the cost to raise the Endurance Stat is 2 points per 1
point raised). However, Elves are very skilled in Accuracy (cost to raise
Accuracy Stat by 2 points is only 1 point from the Points Available
pool).
Dwarf
Dwarves are the second most common race seen in Chedian. After the
Great Cataclysm, most of the Dwarves’ indigenous culture was destroyed.
It has since been assimilated into Human culture. Much of their
traditions and skills are still handed down orally, and they still have a
predisposition for living and working underground.
Dwarves are stout and strong, and therefore have excellent Endurance
(the cost to raise the Endurance Stat by 2 points is 1 point from the Points
Available pool). However, they are poor Magic users (the cost to raise
the Magic Stat is 2 points per 1 point raised).
Page 18

35 ✦ Creating Characters
Creating Characters ✦ 36
Half–Orc
After the Great Cataclysm, all that existed of Half–Orc culture was lost
or destroyed. They were led out of the Great Cataclysm by Ekan'dia, of
a clan of Half–Orcs known as the Dia clan. Most of the Half–Orcs today
have no memories of Ekan'dia, or of any sort of Half–Orc clan
distinction.
Half–Orcs are strong in Might, so they make excellent Fighters (the cost
to raise the Might Stat by 2 points is 1 point from the Points Available
pool). Unfortunately, their sheer size causes them to be fairly slow in
Speed (the cost to raise the Speed Stat is 2 points per 1 point raised).
CLASSES (THE PATHS OF MIGHT AND MAGIC)
Each character must begin the game as either a Fighter (a warrior) or
an Initiate (a spellcaster). In order to move onto the next Class, talk to
various NPCs (non–player characters or computer-controlled characters)
around town. Some will tell you about "Promotion Quests". When you
accept Promotion Quest, you will be choosing between two Classes that
are more specialised. For example, a Fighter may choose to become a
Crusader. After completing his first-level Promotion Quest, he can then
potentially become either a Ranger or Paladin. An Initiate may advance
to Scholar, and then perhaps become either a Mage or Lich.
Remember: Once you have chosen a class, you cannot go back to another!
FIGHTER INITIATE
(Path of Might) (Path of Magic)
THE PATH OF MIGHT (FIGHTER)
Should you choose the path of Might, you will begin life as a Fighter.
Fighters are on the front lines of combat. They employ a variety of
weapons to eradicate a foe. As Fighters grow in experience, they will come
to their first crossroads, whether to fight for themselves, as Mercenaries,
or fight for the good of all as a Crusader.
Mercenary
Mercenaries are professional fighters. They rarely do anything without
financial reward tied to the end of it. Do not underestimate them,
however, for they have dedicated themselves to studying the art of
melee. They have foregone the use of magic in favour of greater skill in
arms and armour. As Mercenaries grow in experience, they will again
face a choice – whether to specialise as an Assassin, the paid killer of
men, or as a Gladiator, for whom fighting is an art.
Gladiator: Gladiators, like Mercenaries, are paid fighters. They are the
ultimate evolution of the true warrior. Their skill with weapons is
unmatched, and their ability to vanquish foes with single blows heroic.
Many legendary sagas have been written about Gladiators.
Assassin: Assassins are men who live in the shadows, always prepared
to take the life of any who are doomed to become their target. They are
the ghost fighters, who with special skills can strike without being
detected, and leave without a trace. Their skill with weapons is second
only to the Gladiator. With the addition of the skills only they can use,
the Assassin is a formidable opponent.
Mercenary Crusader Scholar Healer
Assassin Gladiator Ranger Paladin Mage Lich Priest Druid
"…As an adventurer, you will face many obstacles, challenges, and quite
often, death. As a student of the world, you must make the decision of
what your ultimate goal will be. Pay heed, young one, and remember the
path, for it is the doom of men that they forget…"
– General Halfdan Bloodaxe
Crusader
Crusaders are noble fighters who have devoted their lives fighting for
justice. As such, they have been granted limited skill in the magical arts.
While not as powerful as a trained Scholar or Healer, the magic is a
welcome addition to their weapon–bearing abilities. As Crusaders
become more skilled, they must eventually face a choice between
fighting for the good of mankind as a Paladin, or for the good of nature
as a Ranger.
Paladin: Paladins are the defenders of truth and justice for all of
mankind. Their bravery and unwavering dedication to what is right and
good separates them from the "unworthy". They are experts in the
schools of Light and Spirit Magic. Once Paladins find a cause, they are
prepared to fight for it to their deaths.
Page 19

37 ✦ Creating Characters
Creating Characters ✦ 38
Ranger: Rangers are very similar to Paladins in their thoughts and
actions. They believe, however, that mankind can fend for itself; it is
nature that requires a champion. Rangers will fight to the death to
destroy those who would cause harm to nature. They are experts in
Elemental and Spirit Magic.
THE PATH OF MAGIC (INITIATE)
Should you choose the path of Magic, you will begin life as an Initiate.
Initiates are poor fighters, but can learn all the schools of magic. Unable
to employ the weapons of the Fighter, they rely on magic to vanquish
foes. As Initiates grow in experience, they will have to make a choice to
specialise as a studious Scholar or a devout Healer.
Scholar
Scholars have devoted much of their time to the study of things past,
giving them much insight into events to come. They are experts in
Elemental, Light, and Dark Magic. At some point during their studies,
Scholars will face a final choice: to continue on and become a Mage or
to follow the dark path and discover how to become a Lich.
Mage: The Mage is the ultimate spellcaster. Upon reaching the height
of their abilities, they are unequaled in the arts of magic. It is believed the
man known as Verhoffin, who caused the Great Cataclysm, was one such
mage. While skilled in all schools of magic, their specialties are Elemental and
Light Magic.
Lich: Should your choice lead you down the darker path, your goal will
be the ultimate transformation that a magical being may pursue – The
Lich. Shrouded in mystery, Liches have sacrificed their mortality in exchange
for legendary magical skills. As such, they are exceptional users of Elemental
and Dark Magic.
Healer
Healers are devoted to caring for the sick and diseased. They are often
found in hospitals tending to the ill, or in temples healing worshippers.
They are experts in Light, Dark, and Spirit Magic. As Healers develop
their magical skills, they will eventually be faced with the choice to
become Druids, who serve nature, or Priests, who serve mankind.
Priest: Priests take every opportunity to practice the healing of those who
share their devotion. They often travel alongside Crusaders and Paladins,
healing the wounds their companions have taken in battle. As such, Priests
are known to excel in Light and Spirit Magic.
Druid: Druids concern themselves mainly with the preservation and
healing of nature. They are often found in the company of Rangers, or
anyone else who will fight to uphold their beliefs. Being intimately
connected to their environment, Druids are especially proficient in
Elemental and Spirit Magic.
STATS
"Stats" is a role–playing game term short for the word "statistics". These
are the features of each character that determine how they will fare
during gameplay. Basic Stats are the Stats you create each of the four
characters in your party with. These point totals can be adjusted to suit
each character’s personality, build, and Class needs. Derived Stats are
the characteristics that are created from your final Basic Stats.
When you first create each character in your party, the Basic Stats are
already filled in with default point totals that suit that character’s Race.
Then, in addition to each character’s Basic Statistics, you have a Points
Available pool that grants each character an additional 10 points with which
to adjust their Stats. As you adjust each Stat, unassigned points are
added back into the Points Available pool.
Some Races have bonuses and penalties for certain Stats, so the point
cost for increasing or decreasing that Stat will be doubled. For example,
Dwarves are poor Magic users. Therefore, to increase a Dwarf’s Magic
Stat by 1 point, it will cost you 2 points. Elves, on the other hand, are
excellent marksmen, so putting 1 point into their Accuracy will increase
it by 2 points.
Let’s imagine you are creating a Half–Orc Fighter. A Half–Orc’s Basic
Stats begin thusly:
Might 15
Magic 10
Endurance 14
Accuracy 10
Speed 9
Luck 10
Points Available: 10
Page 20

39 ✦ Creating Characters
Creating Characters ✦ 40
Things to consider as you adjust the Half–Orc’s Stats:
• It is to the Half–Orc’s advantage to be strongest in Might, Endurance,
and Accuracy.
• Half–Orcs are naturally strong and have an advantage with the Might
Stat, so for every point you put into Might, the Might Stat will
increase by 2 points.
• The Half–Orc’s Speed is naturally slow due to his large size, so it
would be a good idea to increase his Speed so he can keep up with
the smaller, faster members of the party. Unfortunately, it will cost 2
points from the Points Available pool to increase the Speed Stat by 1
point.
TIP: Because the Half–Orc is a poor magic user and will most likely not be
casting any spells, you can take the Half–Orc’s Magic Stat, which starts
out at 10, down as low as it will go, in this case, 7. This adds 3 more
points to Points Available pool.
Putting these facts into consideration, here is a sample Half–Orc whose
Magic Stat was reduced to 7, thus adding 3 additional points to the
Points Available pool for a total of 13 extra points:
Might 17 Added 1 extra point. The Half–Orc
has a Might bonus of +2.
Magic 7 Removed 3 points.
Endurance 15 Added 1 extra point.
Accuracy 12 Added 2 extra points.
Speed 13 Added 8 extra points. The Half–Orc
has a Speed penalty of –2.
Luck 11 Added 1 extra point.
Basic Stats
Might: Might is the statistic that represents a character's overall
strength, and his or her ability to put that strength where it counts.
Characters with a high Might statistic do more damage in combat.
Magic: Magic is the character’s ability to cast spells successfully and
affects how many spells the character may cast in a day’s time.
Endurance: Endurance determines the amount of Hit Points the
character has and his or her resistance to certain physical conditions. It is
also a measure of the character's physical toughness and durability. A
high Endurance gives a character more Hit Points.
Accuracy: Accuracy represents the character's precision and hand–eye
coordination. A high Accuracy Stat allows the character to hit monsters
more frequently in combat.
Speed: The higher the character’s Speed Stat, the better his or her rate
at which the character recovers from attacks.
Luck: Luck has a subtle influence throughout the game, but is most
visible in the ability of a character to resist magical attacks and avoid
taking (as much) damage from traps.
Derived Stats
Hit Points: Hit Points indicate how much damage your character can
sustain before falling unconscious or dying. A character is unconscious
at 0 Hit Points or less, and dies when his or her Hit Points are reduced
to a negative value equal to his or her Endurance Stat. All Hit Points are
restored after 8 hours of uninterrupted rest. Hit points recover very
slowly over time, but much more quickly if the character rests. Derived
from: Endurance
Spell Points: Spell Points are needed to cast spells. Every spell has a Spell
Point cost that is deducted from this statistic when it's cast. Spell Points are
restored after 8 hours of uninterrupted rest. Derived from: Magic
Armour Class: Armour Class is a measure of how difficult it is for an
enemy to hit a character. The higher the Armour Class, the better the
chance of avoiding an attack. Derived from: Speed
Resistances: Resistances represents your character's ability to minimise
damage taken from spell attacks. Though a high resistance can greatly
reduce Elemental damage, it does not make your character immune.
Derived from: Awards and quest items earned during gameplay
Experience: Experience is a simple indicator of your character's overall
understanding of the world. With enough Experience Points (and a
little gold), you can train your characters in training grounds
throughout the land to increase their level and gain Skill Points to
spend on skills. Derived from: Successful Combat or Successful Quest
Competition
Level: Level is a measure of the training your character has gone
through. A high level contributes to Hit Points and Spell Points.
Derived from: Experience
Skill Points: Skill Points are awarded whenever your character trains
for a new level. You can spend Skill Points on your skills at any time.
Derived from: Reaching a new level
Page 21

41 ✦ Creating Characters
Creating Characters ✦ 42
Other Combat Stats
Attack Bonus: A character’s Attack Bonus is the sum of all factors (skills,
spells, Accuracy, etc.) that influence your character's chance to hit
monsters with a hand-to-hand equipped weapon.
Attack Damage: Attack Damage is the sum of all factors (Might, spells,
certain weapon skills at expert or master, etc.) that influence the
damage your character does with an equipped weapon.
Ranged Bonus: Ranged Bonus is the sum of all factors (skill, spells,
Accuracy, etc.) that influence your character's chance to hit monsters with
an equipped bow.
Ranged Damage: Ranged Damage is the sum of all factors (spells,
weapon bonuses, etc.) that influence the damage your character does
with an equipped bow.
SKILLS
Weapons Skills
Blade: The Blade skill covers all types of blades shorter than 4 feet in
length. At Normal level, the skill level is added to the character’s Attack
Bonus. At Expert level, the recovery penalty for the weapon is halved.
At Master level, the skill permits the use of a sword in the shield hand
for the purpose of two–weapon fighting (dual–wielding). At Grandmaster
level for the Paladin class, the skill provides an additional +1 bonus to the
character’s combat total per skill level and a +1 bonus per skill level to
the damage the character inflicts upon its target (this bonus only applies to
bladed weapons). At Grandmaster level for the Gladiator class, the skill
provides a +1 bonus per skill point to the character’s Armour Class, and
an additional +1 bonus per skill point to the characters combat total
(Bonus applies to only bladed weapons). At Grandmaster level for the
Assassin class the skill provides a +1 bonus to the character’s attack skill
for every 3 points of skill when wielding daggers.
Bow: The Bow skill covers both the use of bows and crossbows. At
Normal level, the skill level is added to the character’s Attack Bonus. At
Expert level, the skill level is added to the character’s Damage Bonus.
At Master skill level, the character’s bow fires two arrows during every
attack. The Grandmaster skill level allows the character to fire three
shots with one attack.
Cudgel: The Cudgel skill covers all kinds of blunt trauma weapons
ranging from large clubs to flails. At Normal level, the skill level is
added to the character’s Attack Bonus. At Expert level, the skill level is
added to the character’s Damage Bonus. At Master level, the skill stuns
the target. The Grandmaster skill level doubles the Attack and Damage
Bonus of the character.
Spear: The Spear skill allows the use of bladed pole weapons. At Normal level,
the skill level is added to the character’s Attack Bonus. At Expert level,
the skill level is added to the character’s Damage Bonus. At Master
level, the skill permits the use of a spear in the left hand for the purpose
of two–weapon fighting. At Grandmaster level, the skill provides an
additional attack with spears.
Thrown: The Thrown weapons skill covers the use of throwing daggers
and axes which are specially balanced to become deadly projectiles. At
Normal level, the skill level is added to the character’s Attack Bonus. At
Expert level, the skill level is added to the character’s Damage Bonus.
At Master level, the character’s recovery time is reduced by half. At
Grandmaster level, the character is allowed to attack twice in one turn
with their thrown weapon.
Unarmed Combat: Unarmed skill is your ability to use only your hands
and feet in combat, no weapons. This skill only works with your hands
empty. At Normal level, the skill level is added to the character’s Attack
Bonus and Damage Bonus. At Expert level, double the skill level is added
to the character’s Attack Bonus and Damage Bonus. At Master level,
triple the skill level is added to the character’s Attack and Damage, and
the skill level is added to the character’s Armour Class. The Grandmaster
skill adds an additional attack plus one more attack for every 3 skill points
over 10 in Unarmed Combat.
Armour Skills
Armour: The Armour skill covers the use of all kinds of armour. All
character classes may wear some type of armour. At Normal level, the skill
level is added to the character’s Armour Class. At Expert level, the
recovery penalty for the armour is halved and some classes may wear
Chain or leather armour. At Master level, double the skill level is added to
the character’s Armour Class and some classes may wear Plate armour. At
Grandmaster level, triple the skill level is added to the character’s Armour
Class and the recovery penalty for armour is eliminated.
Page 22

43 ✦ Creating Characters
Creating Characters ✦ 44
Dodge: The Dodge skill can be used only when you are not wearing
armour or using a shield. At Normal level, the skill is added to the
character’s Armour Class. At Expert level, the effect is doubled. At
Master level, the effect is tripled. At Grandmaster level, the effect is
quintupled.
Shield: The Shield skill directly improves a character’s Armour Class
while a shield is employed. At Normal level, the skill is added to the
character’s Armour Class. At Expert level, the Class recovery penalty for
using a shield is eliminated. At Master level, double the skill points are
added to the character’s Armour Class. The Grandmaster skill level
allows a shield bash attack that does damage at three times the level of
Shield skill.
Magic Skills
Dark: Dark Magic has the most spectacular damaging and creature-
controlling spells available. The effects for the four levels of mastery vary
from Class to Class.
Light: Light Magic includes some of the most powerful defensive spells,
including Healing. The effects for the four levels of mastery vary from
Class to Class.
Elemental: Using the powers of the four elements – air, earth, fire, and
water, the school of Elemental Magic teaches some of the strongest
direct damage spells.
Spirit: Spirit Magic focuses on the soul, mind and spirit of all things;
many defensive and healing spells are found in Spirit.
Meditation: The Meditation skill adds Spell Points directly to your
character’s spell point totals. At Normal level, the skill adds Spell Points.
At Expert level, the effect of the skill is doubled. At Master level, the
effect of the skill is tripled. The Grandmaster skill level effects vary per
Class.
Specialty Skills
Armsmaster: The Armsmaster skill represents the warrior’s tricks of the
trade in using melee weapons. At Normal level, the skill level is added to
the character’s Attack Bonus with all melee weapons. At Expert level, the
skill level is added to the character’s Damage Bonus with all melee
weapons. At Master level, the skill reduces the character’s recovery time
with all melee weapons. At Grandmaster level, the skill allows a second
attack with all melee weapons.
Disarm Trap: The Disarm Trap skill is checked automatically when
you open a trapped chest or other container. At Normal level, the skill
increases your chance to disarm traps on chests. At Expert level, the
effect of the skill is doubled. At Master level, the effect of the skill is
tripled. At Grandmaster level, the skill effect is 100% success.
Identify Item: The Identify Item skill is automatically applied when you
right–click on an unidentified inventory item. If your character's skill is
high enough, the item is identified. At Normal level, there is a chance
you will be able to identify the item. At Expert level, the effect is
doubled. At Master level, the effect is tripled. At Grandmaster level, the
skill effect is 100% success.
Identify Monster: The Identify Monster skill is applied when you
right–click on a monster. At Normal level, you learn the monster’s Hit
Points and Armour Class. At Expert level, you learn the monster’s attack
type and ability to do damage. At Master level, you learn what spells the
monster can cast. At Grandmaster level, you learn the monster’s
resistances.
Item Repair: The Item Repair skill allows your characters to repair
broken equipment. The skill is automatically applied when you
right–click on a broken item in your inventory. At Normal level, the
skill increases your chances of avoiding traps and noticing treasures. At
Expert level, the effect is doubled. At Master level, the effect is tripled.
At Grandmaster level, the skill effect is 100% success.
Learning: The Learning skill directly increases the number of
Experience Points (EP) a character receives for completing quests or
killing monsters. The rate of increase is calculated as follows:
Normal Skill level – Total EP = (EP x Skill level x 10%) + EP
Expert Skill level – Total EP = (EP x Skill level x 20%) + EP
Master Skill level – Total EP = (EP x Skill level x 30%) + EP
Grandmaster Skill level – Total EP = (EP x Skill level x 50%) + EP
Merchant: The Merchant skill helps adjust prices in your favour,
whether you are buying or selling. The Normal skill adjusts shop prices
in your favour. At Expert level, the character receives double the effect
of the skill. At Master level, the character receives triple the effect of
skill level. At Grandmaster level, the character buys and sells items at
cost.
Page 23

45 ✦ Creating Characters
Creating Characters ✦ 46
Perception: The Perception skill gives your characters a chance to
notice hidden doors and traps, and to avoid damage from traps when
they are triggered. At Normal level, the skill increases your chance to
avoid traps and notice treasures. At Expert level, the effect is doubled.
At Master level, the effect is tripled. At Grandmaster level, the skill
effect is 100% success.
SPELLS
One of the many new features in Might and Magic IX is the spellcasting
system. In prior versions of the Might and Magic series, spells for each
individual school of magic were kept in a spell book. Now, the new
dynamic system uses spells much like skills. Spellcasters now gain spells
by learning skills. For example, in order to cast a Heal spell, the
spellcaster must first obtain the magic skill of Light. All spellcasters can
learn the basics of healing, but only Light Masters and Grandmasters
can wield it with the best results. In this new spell system, all
spellcasters have access to all schools of magic and their spells (except
for Crusaders and Rangers, who cannot learn the school of Dark Magic).
Therefore, a Lich now has the ability to cast Bless, but with nowhere near
the level and ability that a Priest can.
Arms of Earth (Elemental, Spirit): Arms rise up from the earth to entangle
the adversary. The higher level the spell, the larger the area covered by it. Be
careful! The unwary caster can catch himself in his own trap!
Bless (Light, Spirit): Bless can be used to increase a character's chance to
hit his or her target. It also negates an equal–level Curse spell.
Chain Lightning (Elemental, Light): The first lightning bolt
discharges electricity from the caster’s hand to a single target. It always
hits and does 1–8 points of damage per point of skill in Elemental Magic.
If there are any monsters within a certain range of the target, they will
be hit by an equal amount of electricity.
Column–of–Fire (Elemental, Light): This hugely destructive Column-of-
Fire falls from the sky, wreaking great amounts of damage upon the target.
The column is usually only large enough to strike one target.
Curse (Dark, Light): Curse is used to decrease the enemy’s chance to hit
its target.
Dark Grasp (Dark, Spirit): This spell surrounds its target with the power of
raw darkness, rendering it unable to fire missile attacks or cast spells.
Furthermore, the target's movement is slowed, its Armour Class is reduced
and it does reduced damage when striking in melee combat.
Death's Touch (Dark, Spirit): The spellcaster uses his own Spell
Points in order to drain the enemy’s Hit Points.
Disease (Dark, Elemental): Disease inflicts a condition upon the target,
causing continuous damage until cured by a Potion or a spell.
Divine Intervention (Light, Spirit): Once per day, you may call upon
the heavens to heal your characters of all damage, restore their Spell
Points and remove all adverse conditions. The caster's Spell Points will
be nearly drained by this spell.
Elemental Aura (Elemental, Spirit): A field of protection surrounds
the party. Any enemies that attack your characters still deal out damage,
but receive the same amount of damage they dish out via an elemental
force.
Elemental Blast (Elemental, Light): This spell launches a magical
attack outward from a targeted enemy.
Elemental Bolt (Elemental, Spirit): Elemental Bolt launches a
magical bolt of one of the four elements at the target. The bolt always
hits the target.
Elemental Protection (Spirit, Light): Increases your party’s resistance
to damage inflicted by Elemental Magic by an amount equal to your
skill in Spirit Magic. The effect lasts one hour per point of Light skill.
Enchant Item (Elemental, Spirit): When cast, this spell has a chance of
imbuing a normal item with magical powers. The chance of success is
10% per point of skill in Spirit Magic.
Enrage (Spirit, Elemental): Enrage causes a single monster to go mad with battle
lust, attacking the nearest living creature until the spell wears off or the creature
dies.
Eye of Leggib (Dark, Spirit): This is similar to the Wizard Eye spell,
except the spellcaster sends a duplicate of himself out into the world to
survey the area near him.
Eye of the Storm (Elemental, Spirit, Light): Centred from the party,
this spell has an atom bomb concussive effect that could stun or kill
everything in the immediate area. Damage is 20 points plus 1 per point
of skill in Elemental Magic PER ENEMY! Eye of the Storm can only
be cast once per day.
Faith (Light, Spirit): Faith maximises the damage skills of the
character the spellcaster selects.
Page 24

47 ✦ Creating Characters
Creating Characters ✦ 48
Fear (Dark, Spirit): When struck by Fear, the targeted enemy is
overcome with fright of the spellcaster and must flee. If a creature takes
damage while under the influence of this spell, the spell will be broken.
Fear will not work on undead creatures.
Feather Fall (Elemental, Light): Feather Fall eases great falls by
drastically reducing the weight of the party.
Fleet Foot (Elemental, Spirit): This spell accelerates your party's travel
speed, depending upon the level of skill.
Haste (Spirit, Light): Once cast, this spell decreases recovery time of
the character it is cast upon, allowing him or her to cast spells and
attack faster than ever before. However, the character will be weak once
the spell wears off.
Heal (Spirit, Light): Heal cures Hit Points on a single character when
cast.
Lloyd's Beacon (Elemental, Light, Spirit): This ultimate teleportation spell
requires some planning to use. You must set a beacon before you can use this
spell to teleport.
Magic Mine (Elemental, Dark): Magic Mine enables the spellcaster to
drop a magically enchanted mine on the ground. The next "being" that
walks within 15" of the mine will suffer from the mine’s blast once the
party has left its radius.
Meteor Shower (Elemental, Light): This spell summons flaming rocks
from the sky that fall in a large radius surrounding your chosen foe. Try
not to be near the victim when you use this spell. A single meteor does
8 points of damage plus 1 per point of skill in Elemental Magic. This
spell only works outdoors.
Natural Armour (Spirit, Elemental): Natural Armour uses the forces
of nature to provide additional armour to the character it is cast on,
mainly for the use of the Druid. The spellcaster cannot be wearing metal
armour.
Pain Reflection (Dark, Spirit): When an enemy hits a character upon
which Pain Reflection has been cast, the enemy takes damage as well.
Paralyse (Dark, Elemental): Paralyse temporarily prevents a foe from
moving or attacking for the duration of this spell, which is 3 minutes per
point of skill in Dark Magic. You are free to attack your helpless target to
your heart's content; paralysed monsters cannot retaliate.
Phantom Fighter (Spirit, Elemental): This spell calls forth a Blade
expert in phantom form. When the spell dies out, the phantom takes your
weapon as payment for his services. It can only be cast on one–handed,
unenchanted blade weapons.
Poison (Elemental, Dark): Once cast, your foe is blasted with poison that
does immediate and continual damage until the poison has run its course.
Poison Cloud (Elemental, Dark): A poisonous cloud of noxious gases
is formed in front of the spellcaster and moves slowly away from your
party.
Power Draw (Spirit, Light): The spellcaster uses Power Draw to
"push" Spell Points into a character’s damage rating. The number of
Spell Points pushed affects the amount of damage modified.
Purify (Light, Elemental): This spell purifies the life forces of the
character it is cast upon, removing conditions such as poison, disease,
drunk, insane, fear, paralyse, etc.
Regeneration (Light, Elemental): Regeneration enables the character
to naturally heal at a faster rate of recovery than normal.
Resist Death (Light, elemental): Resist Death provides the character
with extra resistance to Dark Magic.
Resurrection (Light, Elemental): This spell resurrects a character whose
body has been destroyed. However, the recovery rate is very slow.
Shared Life (Spirit, Light): Shared Life combines the life force of
your characters and redistributes it amongst the entire party as evenly
as possible. No individual character is allowed to have more points than
his or her maximum total Hit Points.
Souldrinker (Dark, Spirit, Elemental): This horrible spell sucks the life
from all creatures in sight, friend or enemy. Souldrinker then transfers that
life to your party in much the same fashion as Shared Life.
Sparks (Elemental, Light): Sparks fires small balls of lightning into the
world that bounce around until they hit something or dissipate. It is
hard to tell where they will go, so this spell is best used in a room
crowded with small monsters. Each spark does 2 points plus 1 per point
of skill in Elemental Magic.
Spell Reaver (Light, Spirit): This spell dispels magic cast upon living
creatures in an area around the party, dependent on the caster’s level of
skill mastery. Unfortunately, the spell does not remove magic traps from
unguarded chests or doors.
Torchlight (Elemental, Light): Torchlight gives the party an aura of
light to aid them in dark areas.
Page 25

49 ✦ Creating Characters
Town Portal (Elemental, Light): Linking to the magical properties of
ancient altars that can be found in each major city, a spellcaster can call
to the altar to bring the caster and his party close to the altar. An
inexperienced spellcaster can only call to the nearest altar, but one more
experienced can call to the altar of his choosing. There is only one
requirement; the altars have been neglected and must be cleansed or
repaired in order to work again.
Transfusion (Dark, Spirit): The spellcaster transfers any positive or negative
conditions into his or her target, so this spell can be used against a party
member OR enemy. The spellcaster must be within melee range.
Turn Undead (Spirit, Light): Turn Undead calls upon the power of
heaven to undo the evil magic that extends the lives of the undead. It
begins by causing Undead to flee, but at high levels it can cause them
great damage. This spell only works on the Undead.
Wizard Eye (Light, Spirit): Wizard Eye brings up the scrying sphere
that allows the party to see monsters or treasure in a large area around
them. What they see depends upon the mastery of the spellcaster.
Wound (Dark, Spirit): Wound inflicts damage upon an enemy within
melee range.
Wrath of Bugs! (Elemental, Spirit): This spell calls forth swarms of
attacking insects that confuse the enemy. The target’s recovery is
slowed. At higher levels of mastery, the target cannot attack efficiently
for the duration of the Spell.
Menus and Game Screens ✦ 50
MENUS AND
GAME SCREENS
ADVENTURE SCREEN
This is the view where all the action takes place! You’ll face enemies,
explore, and see everything as it is occurring in the game. This is what
is meant by "real–time"; time passes in the world around you whether
you choose to interact with it or not. To move around the world, use
the arrow keys on your keyboard or the ‘W’, ‘S’, ‘A’ and ‘D’ keys. To
look around, move your mouse.
Page 26

51 ✦ Menus and Game Screens
Menus and Game Screens ✦ 52
Compass
The compass aids in direction–finding, as well as indicating any active
party spells. The gem associated with the compass will change colour
to yellow when monsters are in the area and red when they are aware
of you. It also gives you the time of day.
Character Portraits
The maximum possible number of characters in the party at any time is
seven. The first four characters are your party members, and their
portraits appear on the left side of the screen. You may also have up to
three NPCs that can join or leave the party. Their portraits will always
appear along the right side of the Adventure Screen.
Although you have four party members, only one character is active at
a time. The active character’s Character Portrait is highlighted. You can
switch between characters by pressing the ‘Tab’ key, or press the
Number key associated with the character (pressing the ‘Number 1’ key
will highlight the upper–left character and so on). The active character
is important because it will be that character’s skills and abilities which
will be applied to any action performed. Therefore, it is important to
remember to highlight the appropriate character before performing an
action. If your Dwarf is an Expert in the Merchant skill and you forget
to highlight her as the active character before making that purchase in
town, it could cost you a pretty penny!
NOTE: You can also press the ‘Z’ key to see a quick reference of all the
characters in your party on one screen (the Quick Info screen).
Health, Magic, Conditions and Spell Effects
Around each portrait is a bar indicating the character's Hit Points (red)
and Spell Points (blue). If the character has an active spell or trap
affecting him or her, it will be indicated on the character's portrait or in the
screen shown by pressing the ‘Z’ key. To the right of the Character
Portrait is a yellow bar that represents the character’s progress from one
level of experience to the next.
Ready Light
As each character casts a spell or attacks a foe, he or she will need a
moment or two to recover before taking another action. This is
indicated by the character’s Ready Light, which appears in the
lower–right corner of his or her Character Portrait. The Ready Light
goes red while the character recovers, and green when they are ready
to perform another action.
Action Text
Each time something happens to a member of your party, or a
character in the party performs an action, a line of Action Text appears
at the bottom of the screen.
CHARACTER INFO SCREENS
You can press the ‘I’ key or click on any Character Portrait in your party
to see specific character information. Press the ‘Page Up’ or ‘Page
Down’ keys to toggle between the tabs, or simply select any of the four
tabs to the left of the Character Portraits to switch between information
screens. Select any of the four Character Portraits or press the ‘Tab’ key
to switch between characters.
Level, Class, Experience Points: Just above the character name is his
or her current Level, Class, and the total amount of Experience Points
earned so far. Whenever the character is ready to advance to the next
level, the "X/X" text colour will change from black to green.
Hit Points, Spell Points: To the right of the character’s name are his or
her Hit Points (the first–aid icon) and Spell Points (the flask icon). When
the character’s Hit Points reach 0, they fall unconscious. If his or her Hit
Points are reduced to a negative value equal to his or her Endurance
Stat, the character is dead. If the Spell Points reach 0, the character
must rest or use an Inventory Item before he or she can cast spells
again.
Armour Class: The character’s Armour Class is indicated on the shield
to the upper–left of the Character Body. The Armour Class is a statistic
indicating how well protected he or she is. The higher the Armour
Class, the harder the character is to damage.
Character Body: Whenever you need to equip your character with
armour, weapons or items, place them on the Character Body.
Gold: At the Character Body’s feet is the total amount of Gold your
party currently carries.
Map: Select this icon in the lower–right corner to open the Map Screen.
Return to Game: When you’re ready to resume gameplay, select this
icon (a check mark) in the lower–right corner of the screen or press the
‘Esc’ key.
Page 27

53 ✦ Menus and Game Screens
Menus and Game Screens ✦ 54
Statistics Screen (First Tab)
Statistics: These are the basic statistics of the character. Spells, Potions,
armour, weapons, etc. can affect them. Stats that are affected by a worn
item appear in a different colour to indicate that the stat is not
permanent.
Attack Stats: The Melee Attack and Damage stats represent the attack
rating and amount of damage the character’s currently wielded melee
weapon (bladed weapon, cudgel, spear or their bare hands) will deal out
on any enemy. The Ranged Attack and Damage stat indicates the attack
rating and the damage amount of the bow currently wielded by the
character.
Magic Resistance: This is the list of spell schools and the amount of
resistance the character has to each of them. If a Magic Resistance stat
is particularly high, the character is less likely to be affected by any spell
of that school.
Skills Screen (Second Tab)
This screen simply breaks down each of the character’s skills and his or
her current ability to perform each skill. Skills are broken down into
four categories: Defensive, Weapon, Magical, and Specialty. Use the
extra points in the "Skill Points" box to increase the skill of your choice.
To use Skill Points, click on the skill you want to spend the points on.
Remember, you gain Skill Points every time your character trains up to
another level.
Page 28

55 ✦ Menus and Game Screens
Menus and Game Screens ✦ 56
Inventory Screen (Third Tab)
Inventory: This is a list of every item the character carries but is not
equipped. Click on each of the icons above if you wish to break down
the Inventory list by that icon’s category (weapons, armour, treasure,
etc.). To equip an item, double–click the item to automatically place it on
the Character Body.
Item Details: Select any item in your inventory to see specific information
about it in this window. If the item is currently unidentified, the text for
the item name will be scrambled and the text itself will be in a different
colour.
Spells (Fourth Tab)
This screen is only accessible if the selected character is a spellcaster.
Character Spells: This is the character’s spellbook. Any spells that he
or she has learned automatically appear here. As with the Inventory
Screen, you can choose to view only the spells that fall into the category of the
icon you select (Offensive, Defensive and Healing). Use the right and
left arrows at the centre of the screen to scroll through each page of the
spellbook.
Set Quick, Quick Spell: The spellcaster can load one spell for quick
casting (right–click the mouse) in combat. To set a Quick Spell,
highlight the spell in the spellbook and select the "Set Quick" button. The
selected spell is loaded when its name appears in the Quick Spell
window.
Page 29

57 ✦ Menus and Game Screens
Menus and Game Screens ✦ 58
Map Screen
The Map Screen appears when you press the ‘M’ key, or by selecting the
Map button on the Inventory Screen. Your position is indicated by a red
dot. All outdoor maps are oriented with north at the bottom of the
screen.
Character Information Screen: Select the picture of your party in the
lower–right corner to jump to the Character Information Screen.
Return to Game: When you’re done with this screen, return to the
Adventure Screen by clicking here, or by pressing the ‘Esc’ key.
Notes Screen Tab: Select this tab on the upper–right side of the Map
Screen to jump to the Notes Screen.
Notes Screen
This screen appears when you press the ‘N’ key, or by clicking on the
"Notes" tab of the Map Screen. Large amounts of text can be scrolled
through using the arrows or by using the ‘Page Up’ and ‘Page Down’
keys.
Quests: Also accessible by pressing the ‘Q’ key, this is the list of current,
unfinished quests.
Auto–notes: Anytime you glean useful information from an NPC, these
notes are automatically taken for you. This includes items of interest to
the party, hints about where to find things/people, how to complete a
quest, who to visit for Promotion leveling, etc.
Journal: These thoughts represent the "story so far".
Awards: Whenever a character has been promoted or has completed a
special deed, it is penned here.
Character Information Screen: Select the picture of your party in the
lower–right corner to jump to the Character Information Screen.
Return to Game: When you are done with this screen, you can return to the
Adventure screen by clicking here, or by hitting the ‘Esc’ key.
Map Screen Tab: Select this tab on the upper–right side of the Notes
Screen to jump to the Map Screen.
Page 30

59 ✦ Menus and Game Screens
Menus and Game Screens ✦ 60
Buy/Sell Screen
This screen appears when you select the "Purchase Something" option
when speaking with a Merchant.
Merchant’s Name: The shopkeeper’s name appears above the left
column.
Shop: The Merchant’s column, otherwise known as the "Shop", lists the
entire inventory he or she has for sale. You can also view only the items
of specific categories if you wish by selecting any of the category icons
at the top of the column (weapons, armour, spells, etc.). For more
information on any item, right–click it.
Character Portraits: In the centre of the screen are your individual
party members. Select each character individually to buy or sell items
for them. (TIP: If a character has the Merchant skill, give any items you
want to sell to that character first before beginning the transaction.)
Character Inventory: The column on the right represents the current
inventory of the active character. This includes everything but items
that he or she is wearing.
Party Gold: Beneath the Inventory title bar is your party’s gold total.
Buy, Sell: The "shaking hands" icon at the bottom of each column
represents your agreement with the Merchant to Buy or Sell the
highlighted item in either category. You may also simply double–click
any item to automatically Buy or Sell it. Remember, press the ‘Shift’ and
‘S’ keys simultaneously to quick sell your inventory.
Buy, Sell Cost: At the bottom of both columns next to the Buy, Sell
icon is a gold total. In the Shop column, the amount of gold shown
represents how much the Merchant will pay you for the highlighted item
in the Character Inventory column. In the Character Inventory column,
the amount of gold shown represents how much it will cost your party
to buy the item highlighted in the Shop column.
Item Repair: For a price, you can have the Merchant repair a broken
item. Click this to toggle the Repair negotiation. Then, click the View
Inventory Items icon to find out how much a broken item will cost to
repair.
Identify Item: You can also pay the Merchant to identify any unidentified
items for you. Click this to toggle the Identify negotiation. Then click
the view inventory items icon to find out how much an unidentified
item will cost to identify.
Done: When you are done, select this check mark icon to leave the
Shop Screen.
Page 31

61 ✦ Menus and Game Screens
Menus and Game Screens ✦ 62
Rest Screen
This screen appears when you press the ‘R’ key.
Rest is very important to the weary adventurer. Without it, Hit Points
and Spell Points will regenerate very slowly. Simply select any of the
various rest increments and your party will do so accordingly. Remember,
if there are hostile creatures in the area, you may be attacked.
Save/Restore Screen
This screen can be accessed through the Main Menu.
Autosave: An Autosave is made when your party moves from one area
to another (during the load).
Quicksave: You may quickly save the game at any time by pressing the
‘F5’ key. You can then also load the last Quicksave by pressing the ‘F9’
key. Remember, each time you Quicksave, you write over the previous
Quicksave.
Empty Slot: These are non–Quicksave slots that you may choose to
save in. Simply type the name of your save into the Empty Slot and
select Save. Whenever a game is saved, the Game Date, Time, and
Location will also be stored to help you remember where you were in
the game at the time of the save.
Save, Load, Delete: Use these buttons to save or load the game. You
can save at any time by clicking on a used space or Empty Slot. If you
choose to overwrite a slot, the game asks if you are sure you want to do
that. You can change the name of the slot and hit Save again. If you
choose a save slot, and select Load, you will load the game from the
selected save point. Delete removes the selected saved game from the
list (but not Quicksaves or Autosaves).
Page 32

63 ✦ Exploration
EXPLORATION
MOVEMENT AND INTERACTION
Ground Movement
Throughout most of the game, your party will travel on land. You must
be careful where you lead your party. Walking off a cliff or into a pit can
result in dangerously long falls from which your whole party will likely
sustain massive damage. Running jumps can help you across small pits
and ledges, and careful movement can help you climb up and down
steep hills safely.
Swimming
In the beginning of your adventure, you will find that you’re going to
have to get a little wet to get from point A to point B. Just jump on in,
the water’s…well, wet. Swim the same as you move on land: use the
mouse to navigate and the arrow keys to move forward, backward, left
and right. To get to the surface for air, roll the mouse upward until you
see the water surface and the sky, and continue to press and hold the
‘Up Arrow’ key. You can stay underwater for about 15 seconds before
you need to come up for more air, otherwise the entire party will begin
to lose Hit Points. Also, keep in mind that water can harbor just as
many hostile creatures as land, but you’ll be the one at a disadvantage
because you need air. If you have to swim, do it quickly!
Exploration ✦ 64
Ships
Travelling by ship is the only way to reach some areas in the game. Travel
destinations vary from day to day, and from port to port.
Rest
Rest is very important to the weary adventurer. Without it, Hit Points
and Spell Points will regenerate very slowly. You can rest in varying
increments, from five minutes to resting until dawn (eight hours is the
minimum required to heal your party). Obviously, the longer you rest,
the better your party will feel. However, try to go very long without rest
and your characters will suffer the consequences by becoming weary
and possibly going insane.
Be sure to have your party rest for at least eight hours a day, and in as
safe a place as possible. Wandering creatures have no problem setting
their sights on your party for their next meal as you lay sleeping. Your
characters know this and will refuse to set up camp when there are
hostile creatures nearby.
DEALING WITH OBJECTS
Loose Items
Keep your eyes open as you travel! Adventurers and travelers that have
travelled before you have been known to drop various items such as
pieces of armour, weapons, equipment, and scrolls! Also, you’ll find that
vanquished enemies will leave behind whatever they were carrying,
such as Potions, scrolls or gold. To pick them up, place the crosshair
over the item and press the ‘Space’ key. They will be automatically
added to the active character’s inventory.
Chests, Crates and Drawers
You will also come across larger items such as treasure chests, crates
and drawers that can frequently be opened. They are also, however,
frequently booby-trapped, so it’s a good idea to make a character with
the Disarm Trap skill the active character before opening one. If a trap
is triggered, characters with the Perception skill may avoid some or all
of the damage, as may those with the Luck attribute. Once a large item
is successfully opened, anything inside is yours.
Page 33

65 ✦ Exploration
Exploration ✦ 66
Buttons and Switches
Regardless of where you travel in Chedian, you will never find a
shortage of buttons, switches, levers, and other triggering apparatus. To
operate a lever, switch or button, place the crosshair over it and press
the ‘Space’ key.
DOORS
Dungeon Entrances
To enter a cave, fortress, dungeon, or any other form of evil lair,
simply walk through the entrance. You will be asked about the
certainty of your decision. An affirmative answer will escort your party
into the lair, whereas a negative answer will leave your party
remaining safely outside.
Interior Doors
A dungeon just wouldn’t be a dungeon without some creepy doors
placed strategically throughout to impede travel, sight, and to conceal
dangerous foes. Placing the crosshair on the door and pressing the
‘Space’ key causes the active character to attempt to open it. Some
doors will be locked, requiring you to find a key or switch to open them.
Others may require you to puzzle out the means to operate their
locking mechanism.
Town Doors
Doors inside a town are generally safe. These usually represent the
entrances to shops, taverns, houses, and other small buildings that can
be entered by your party. Open the door by placing the crosshair over
it and pressing the ‘Space’ key. If a door in town is locked, it is probably
because the occupant wants to be left alone or the shop is closed. The
Perception skill will help show doors that are usable entrances by
highlighting them in green.
INTERACTION WITH NPCS
(NON–PLAYER CHARACTERS)
Your mission to unite the peoples of Chedian will lead you to meet
many people far and wide. Due to the troubled times in Chedian, you
may find that many of those you meet will be suspicious, wary, or even
downright hostile. Others, however, will be quite friendly and more
than willing to help. Some will even offer to help your cause and join
your party. Of all the personality types you are likely to encounter, the
hostile are the most easily distinguished from a distance; they will attack
you on sight (and will be dealt with in the combat section).
Talking
For those creatures that do not attack you first, talking is a good
alternative to slaying them. To talk to a creature, move near it, place the
crosshair over it, and press the ‘Space’ key. If they are willing to do so,
they will converse with the active character. When you click on a
conversation topic, the creature’s response will be displayed.
Receiving a Quest
Some of the NPCs you speak with may have information for you;
others may even present you with a new quest. Quests are heroic
actions to perform, the completion of which often brings rewards of
money and/or Experience Points. Typically you complete a quest by
finishing the assigned task, and then returning to the person that
presented you with the task for your reward. This is not always the
case, however, so you would be wise to read the details of each quest
carefully, and discussing what must be done to complete it.
Promotion Quests
These are the quests you need to accomplish in order to promote your
characters to their next Class. For example, if you would like to
promote a Fighter in your party to the level of Mercenary, you will need
to complete a simple quest. It may involve escorting an official’s
daughter from one city to the next, or perhaps ridding a forest of
bandits to protect the innocent.
Secondary Quests
These are small quests that you can go on in order to collect experience and
money.
Page 34

67 ✦ Exploration
Exploration ✦ 68
Hiring and Firing NPCs
In your travels you will come across NPCs that are interested in fighting
alongside you. You may choose to take them up on their offer
depending on their strengths, weaknesses, and cost per day. You may
hire up to three NPCs in your party.
You can dismiss an NPC from your party by pressing the key relative to
his position to bring up his dialog (i.e. pressing the ‘5’ key opens the
dialog for the first NPC in your party) and then click on the topic that
says "we don't need you anymore".
TOWNS
Towns in Chedian consist of a collection of houses, shops, services, and
inhabitants. They typically act as places where your party can learn new
skills, buy and sell equipment, obtain quests, receive training and rest.
While no place in Chedian is completely safe, towns are usually safe
enough to afford a good night’s sleep. Additionally, they are a good
source of information, services, and shops. To talk to the occupants of
homes or use shops and other services, you must enter the building in
which they are housed. To enter a building, walk up to it and click on
the door.
SHOPS
When you enter a shop, initiate a conversation with the shopkeeper by
pressing the ‘Space’ key. This is usually the person standing behind the
counter. Ask him or her to "show you their wares" (or some variation
of this topic), and the Shop Screen appears. From here, you can buy or
sell items, as well as have the Merchant attempt to identify unknown
items and repair broken ones.
Buy Standard or Special Items
Each shop specialises in different items as well as carrying a general
inventory of standard items. The items which are available for purchase are
shown on the left side of the screen. You can display the items by
category using the buttons above the inventory list. When you click on
an item on the left, the Merchant will tell you how much it costs. If your
active character has the Merchant skill, your party will get a better price.
To purchase an item, click the "OK" button. The cost will be automatically
deducted from your party’s gold. The item will then appear in the active
character’s inventory.
Display Inventory
You can switch between characters by clicking on their individual
Character Portraits (shown in the centre of the shop screen) or by
pressing the 1 through 4 keys across the top of the keyboard. The active
character’s current inventory is displayed on the right side of the screen.
Sell
To sell an item to the Merchant, click on it and he or she will tell you
how much they are willing to pay for the item. Press the "shaking hands"
icon and the item will be taken from your inventory. Its value will
automatically be added to your party’s gold.
Repair
Any broken items in your inventory appear in red text. To see how
much the Merchant will charge to fix the item, click the "Repair Item"
button (directly below the Character Portraits) and then click the item.
If you agree to the price, press the "shaking hands" icon and the
Merchant will fix it for you.
Identify
Any unidentified items in your inventory will appear as scrambled green
text. To see how much the Merchant will charge you to identify the item,
click the "Identify Item" button (below the Repair button), then click
the item. To complete the transaction, click the "shaking hands" button
and the Merchant will charge you and identify the item in question.
Learn Skills
You can learn skills by buying the "books of knowledge" in a library or
by finding "books of knowledge" as treasure during your adventure.
Types of Shops
Here are the Shop Types you’ll find:
Weapon Smith
This is where you purchase all the swords, axes and fighting weapons
(with the notable exception of wands).
Armour Smith
This is where you purchase all the helms, armour, boots, and Armour
Class enhancing items in the game.
Page 35

69 ✦ Exploration
Magic Shop
This is the "spell general store" for smaller sized towns and villages.
They usually have a few lower level spells from every school of spells.
Bank
This is where you can store gold and items you don't want to carry
around with you. These items will be available at any bank in the game
after a quest has been completed. When your party dies, gold is taken
from the party’s "pouch" but not the bank account.
Tavern
This is where you can go to have a drink, pick up on the latest gossip,
get a quest or hire an NPC. They have a tendency to be rowdy places
after dark.
Apothecary
This is where you can buy Potions, wands, and other magic items.
Usually these will be lower-level items.
Temple
This is where you take injured and dead characters to be healed for a
price. You can also donate gold to the temple in exchange for the Bless
spell.
General Store
This store has a little of everything. It usually only appears in the
smaller villages and towns, and contains low-level items, and
occasionally, skillbooks.
Dock
This is where you purchase passage to other oceanside towns in Chedian.
Combat ✦ 70
COMBAT
Combat takes place on the Adventure Screen. Characters equipped
with bows, throwing weapons or wands may make ranged attacks
(attacks with weapons that reach farther than hand–to–hand weapons).
Other weapons and bare hands are good for hand–to–hand combat
with nearby enemies. To have the active character attack a specific
creature, left–click on the creature with the crosshair. Characters may
not use bows to make ranged attacks if there are creatures directly in
front of the party.
Characters with magical abilities may, of course, cast spells during
combat. To cast a character’s chosen Quick Spell, right–click with the
crosshair on your target. If you don’t target a hostile creature with the
crosshair, a nearby creature will be targeted automatically. You can also
access the active character’s spell book by pressing the ‘B’ key.
Town Hall
This is where you can go to find your way if you are lost.
Library
This is where you go to buy "books of knowledge".
Key/Mouse Effect
Left–Click Active Character Attacks Nearby Enemy with
Range or Melee Weapon
Right–Click Cast Quick Spell or use Ranged Weapon, then
Melee Weapon
B Open Spellbook
Enter Toggles Real Time and Turn–based Modes
Page 36

71 ✦ Combat
Combat ✦ 72
REAL TIME VS. TURN–BASED COMBAT
Game time moves without pause, or in real time. Each action your
characters perform, like casting spells or swinging a sword, takes a
certain amount of time to accomplish; this fact is reflected by their
Ready Lights (see Adventure Screen), which darken while the characters
recover. While a character is recovering, he or she cannot do anything
else. Normally, this is not really noticeable, but during combat the effect
can be quite pronounced. Attacking creatures may be able to attack
more efficiently than the party due to the time it takes you to think,
select characters and target attacks.
The game can be put in Turn–based Combat mode by pressing the
‘Enter’ key. The ‘Enter’ key toggles between Real Time mode and
Turn–based mode. In Turn–based mode, combatants act one at a time
and in order, depending on their Speed and Recovery. Combat is
divided into rounds lasting a few seconds. Characters and creatures that
are particularly fast can perform multiple actions in a round. The game
pauses before each character’s turn so you can calmly execute its action.
Press the ‘TAB’ key to skip a character’s action turn.
At the end of each round, action pauses and you can move your party a
short distance using the movement keys. After that, creatures move and
then the next round begins. Attack, or press the ‘TAB’ key to skip the
character’s turn.
When you are in Turn–based mode, a hand icon appears in the
lower–right corner of the screen. The icon changes to reflect the
different round phases.
characters. Death results when a character’s Hit Points are reduced too far
below zero. Dead characters may only be revived using the
Resurrection spell or by paying a temple healer to perform the service.
Weakness: Characters become weak from fatigue or hunger. Some
attacks and spells can also cause this effect. Weak characters have
lowered maximum Hit Points and are less able to perform actions and
fight. Weakness can be cured by resting or by the Purify spell.
Poison and Disease: These very similar effects can be caused by traps
or certain spell and creature attacks. Both reduce character attributes,
reduce their combat efficiency and lower Hit Points over time. They
can only be cured at temples with potions, or by casting the Purify spell.
Insanity/Afraid: Some attacks make characters Insane or Afraid. Both
of these conditions affect character attributes and may be cured at
temples with potions, or by casting the Purify spell.
Cursed: Some spell attacks can curse characters. Cursed character
actions fail 50% of the time. The Purify spell takes care of this condition.
Paralysed: Characters can become frozen by being Paralysed. If this
happens, they cannot perform any actions. These conditions can be
cured using the Purify spell.
DAMAGE
Your characters receive damage from many sources: combat, spell effects,
traps going off, or falling, just to name a few. They may also be affected by
other conditions like fatigue or weakness. Ill effects can always be removed
by various healing spells or, for a price, at temples.
Physical Wounds: Weapon strikes, explosions, falls and most offensive
spells wound characters directly by taking away Hit Points. Physical
damage may be healed using various curative spells, potions, or by resting.
Unconsciousness/Death: If a character’s Hit Points fall to or below zero,
the character becomes unconscious or dies. Unconscious characters are
knocked out of action and cannot perform any actions until their Hit
Points heal to a positive value. Resting and healing revive unconscious
Page 37

73 ✦ Experience and Advancement
Experience and Advancement ✦ 74
When a character gains a new level, he or she also receives an increase
to maximum Hit Points and Spell Points. What each specific character
gains depends on Class, Rank and attribute scores. At early levels (1–9),
characters receive 5 Skill Points to spend on advancing the levels of
skills they possess. This number increases by 1 every 5 levels thereafter
(6 at levels 10–19, 7 at levels 20–29, etc.).
EXPERIENCE AND
ADVANCEMENT
EXPERIENCE POINTS AND LEVELING
As the game progresses, your characters gain more Spell Points and Hit
Points, and become better at the skills they possess through level
advancement. Characters gain Experience Points for overcoming
challenges, notably for killing enemies and for completing quests. When
your characters earn enough Experience Points, they qualify to train for
the next level at a Training Hall. You can see each character’s current
level and Experience Points on their Stats Screens. If the character is
ready to level, his or her Experience Points appear in a different colour
and the Experience bar to the right of the characters portrait will be full.
A character needs (Experience Points for Current Level) + (Current
Level x 1000) to move from one level to the next. For example, a
character needs the 3000 experience points for achieving level 3 plus
3000 more experience points for a total experience point value of 6000
to achieve level 4.
A character eligible to train must do so at a Training Hall. Training
Halls are located in towns throughout Chedian. They charge a fee for
their services, and most have a limit to how far they can train a character.
CLASS RANKING
The party can receive special quests in the game called Promotion
Quests. Certain people that the party meets will be empowered to grant
Class Rank on characters of a particular character Class. Before they do
this, they will ask the party to prove its worth by completing a
Promotion Quest. Gaining the new Rank increases the number of Spell
Points and Hit Points a character receives per level. This will also allow
the character to learn new skills and to learn other skills at higher levels
of expertise.
Page 38

75 ✦ Magic System
MAGIC SYSTEM
SCROLLS AND WANDS
Spells may also be cast from scrolls and wands. Each scroll has one spell
written on it and can be used once. To cast a scroll spell, double-click
it, or pick it up out of a character’s inventory and place it on the
Character Body. Wands are loaded with multiple spell charges. A
character must equip a wand as his weapon in order to use it. Each time
a character attacks with a wand, one of its charges is expended. When
a wand’s charges are exhausted, it disappears. Scrolls and wands require
no particular skill to use.
Customer Support ✦ 76
CUSTOMER SUPPORT
PHONE
U.K MAIL
3DO Europe Limited
21-23 Mossop Street
London SW3 2LY
UK
See www.3doeurope.com for more information on this and other great
3DO titles!
POTIONS
Characters can drink Potions in order to gain a wide variety of benefits.
Potions can be purchased, found, or created. To have a character drink
a Potion, pick up a Potion out of a character’s inventory and place it on
the Character Body or Character Portrait. If it is identified, right–clicking
on a Potion will display information about its effects.
TROUBLESHOOTING
For general troubleshooting tips, see the ReadMe.txt file located on the
CD-ROM or in the Start Menu after you have installed the game.
Page 39

77 ✦ Notes
Notes ✦ 78
NOTES
__________________
__________________
__________________
__________________
__________________
__________________
__________________
__________________
__________________
__________________
NOTES
__________________
__________________
__________________
__________________
__________________
__________________
__________________
__________________
__________________
__________________
__________________
__________________
__________________
__________________
__________________
__________________
__________________
__________________
__________________
__________________
Page 40

79 ✦ Notes
WARRANTY AND SERVICE INFORMATION
NOTES
__________________
__________________
__________________
__________________
__________________
__________________
__________________
__________________
__________________
__________________
__________________
The 3DO Europe Ltd, Limited 90-Day Warranty
3DO Europe Ltd. ("3DO") warrants to the original purchaser of this 3DO software product that the
physical media within which the underlying computer program is recorded will be free from defects in
materials and workmanship under normal recommended use for ninety (90) days from the date of
purchase. The 3DO software program recorded within such medium is provided on an "as is" basis,
without any express or implied warranty of any kind, and 3DO shall not be liable for any losses or
damages resulting from any use or inability to use this 3DO software program. 3DO’s entire liability and
the original purchaser’s exclusive remedy for breach of any express or implied warranty shall be, at 3DO’s
option, either to replace or repair, free of charge, any defective media provided that this 3DO software
product is returned in its original condition within the 90-day warranty period to the place of original
purchase with a copy of the dated receipt or other proof of purchase. The preceding warranty is not
applicable and shall be void if any defect in this 3DO software product arises through accident, negligence,
unreasonable use or abuse, or results from any cause unrelated to defective materials or workmanship.
3DO’S LIMITED 90-DAYWARRANTY IS EXPRESSLY IN LIEU OF ALL OTHER WARRANTIES
AND NO OTHER REPRESENTATIONS OR CLAIMS OF ANY NATURE SHALLOBLIGATE OR BE
BINDING UPON 3DO. ALL IMPLIED WARRANTIES WHICH CANNOT BE EFFECTIVELY
DISCLAIMED, INCLUDING, BUT NOT LIMITED TO, ANY IMPLIED WARRANTIES OF
MERCHANTABILITY, FITNESS FOR ANY PARTICULAR PURPOSE AND/OR NONINFRINGEMENT, ARE LIMITED TO THE 90-DAYPERIOD REFERENCED ABOVE. IN NO EVENT
SHALL 3DO BE LIABLE FOR ANY INCIDENTAL, CONSEQUENTIAL, SPECIAL AND/OR OTHER
DAMAGES OF ANY KIND OR NATURE RESULTING FROM THE PURCHASE, POSSESSION, USE
OR INABILITY TO USE THIS 3DO SOFTWARE PRODUCT. THE PRECEDING WARRANTY GIVES
YOU SPECIFIC LEGAL RIGHTS AND YOU MAYALSO HAVE OTHER RIGHTS WHICH VARY
FROM JURISDICTION TO JURISDICTION.
This 3DO computer program and its documentation and other related materials are protected by U.K. and
other National and International copyright laws and treaties, as well as by other such intellectual property
laws and treaties. Reproduction, translation, modification, storage in a retrieval system, hiring, renting,
leasing, lending, broadcasting, transmission, and/or public performance is a violation of applicable laws
and is strictly prohibited without the prior written consent of 3DO Europe Ltd. or its parent, The 3DO
Company. All rights reserved.
3DO has endeavoured to ensure that the end-user manual and promotional materials regarding this 3DO
product accurately reference the product. However, because of ongoing improvements and updating of
3DO products, 3DO cannot guarantee the accuracy of printed materials after the date of publication. 3DO
disclaims any loss, liability and/or damages, whether in contract, tort or otherwise, arising from any
inaccuracies or other information contained within the manual and/or promotional materials, including, but
not limited to, any loss or liability resulting from changes, errors or omissions regarding any of such items.
__________________
__________________
__________________
__________________
 Loading...