


Gaggenau Instruction Manual
Steam Oven
BS 270/271 1.1
BS 274/275 1.1
BS 280/281 1.1


Table of Contents
Safety Notes 4
Operating for the First Time 6
Avoiding Damage to the Appliance and the
Cabinet 6
Steam Oven and Cabinet Fronts 6
Avoiding Damage to the Oven Interior 6
Door Panel 6
Features of your New Steam Oven 7
Steam Oven 7
Display and Controls 8
Keys 8
Accessories 9
Heating Modes 10
First Setting s after Installation 11
Choosing the Time Format 11
Setting the Language 11
Setting the Clock 11
Setting the Date 12
Temperature Unit °C or °F 12
Setting the Water Hardness 12
Exiting Menu and Saving Settings 12
Calibration 13
Calibrating the Steam Oven 13
Activating the Steam Oven 14
Standby 14
Activating the Steam Oven 14
Timer 33
Calling up the T imer Menu 33
Timer 33
Stopwatch 34
Cooking Time Duration 35
Cooking Time End 36
Extended Timer 37
Setting the Program 37
Memor y Recipes 38
Calling up the Memory Menu 38
Storing the Settings 38
Starting a Memory Recipe 39
Child Lock 40
Activating the Child Lock 40
Deactivating the Child Lock 40
Safety Deactivation 41
Changing the Basic Settings 42
Example: Changing the Standby Screen 42
Basic Settings 43
Care and Manual Cleaning 46
Cleaning Function 48
How to Proceed 48
Dr ying Function 49
How to Proceed 49
Changing the Filter Cartri dge 50
Descaling 51
How to Proceed 51
Setting the Steam Oven 15
Setting the Temperature and Heating Mode 15
Grilling 16
Operation Noises 16
Temperature Setting Not Shown on Display 16
Current Oven Temperature Display 16
Af ter Every Use 16
Misting 17
Steam Removal 17
Meat Probe 1 8
Programming the Meat Probe 18
Cleaning 19
Recommended Temperature Values 19
Cooking Table 20
Trouble Shooting 52
Error Messages 52
Power Cut 53
Exhibition Mode 53
No Water Available 53
Troubleshooting 54
3

m Important safety information
Read these instructions carefully. Only then
will you be able to operate your appliance
safely and correctly. Retain the instruction
manual and installation instructions for future
use or for subsequent owners.
This appliance is only intended to be fully fitted
in a kitchen. Observe the special installation
instructions.
Check the appliance for damage after
unpacking it. Do not connect the appliance if it
has been damaged in transport.
Only a licensed professional may connect
appliances without plugs. Damage caused by
incorrect connection is not covered under
warranty.
This appliance is intended for domestic use
only. The appliance must only be used for the
preparation of food and drink. The appliance
must be supervised during operation. Only use
this appliance indoors.
This appliance may be used by children over
the age of 8 years old and by persons with
reduced physical, sensory or mental capacity
or by persons with a lack of experience or
knowledge if they are supervised or are
instructed by a person responsible for their
safety how to use the appliance safely and
have understood the associated hazards.
Children must not play with the appliance.
Children must not clean the appliance or carry
out general maintenance unless they are at
least 8 years old and are being supervised.
Keep children below the age of 8 years old at a
safe distance from the appliance and power
cable.
Risk of fire!
▯ Combustible items stored in the cooking
compartment may catch fire. Never store
combustible items in the cooking
compartment. Never open the appliance
door if there is smoke inside. Switch off
the appliance and unplug it from the mains
or switch off the circuit breaker in the fuse
box.
Risk of fire!
▯ A draught is created when the appliance
door is opened. Greaseproof paper may
come into contact with the heating element
and catch fire. Do not place greaseproof
paper loosely over accessories during
preheating. Always weight down the
greaseproof paper with a dish or a baking
tin. Only cover the surface required with
greaseproof paper. Greaseproof paper
must not protrude over the accessories.
Risk of burns!
▯ The appliance becomes very hot. Never
touch the interior surfaces of the cooking
compartment or the heating elements.
Always allow the appliance to cool down.
Keep children at a safe distance.
Risk of burns!
▯ Accessories and ovenware become very
hot. Always use oven gloves to remove
accessories or ovenware from the cooking
compartment.
Risk of burns!
▯ Alcoholic vapours may catch fire in the hot
cooking compartment. Never prepare food
containing large quantities of drinks with a
high alcohol content. Only use small
quantities of drinks with a high alcohol
content. Open the appliance door with
care.
Risk of burns!
▯ Hot steam may escape during operation.
Do not touch the ventilation openings.
Keep children away.
4

Risk of scalding!
▯ When you open the appliance door, hot
steam can escape. Steam may not be
visible, depending on its temperature.
When opening, do not stand too close to
the appliance. Open the appliance door
carefully. Keep children away.
Risk of scalding!
▯ Hot liquid may spill over the sides of
cooking containers when they are removed
from the cooking compartment. Remove
hot cooking containers with care and
always wear oven gloves.
Risk of electric shock!
▯ Incorrect repairs are dangerous. Repairs
may only be carried out by one of our
trained after-sales engineers. If the
appliance is faulty, unplug the mains plug
or switch off the fuse in the fuse box.
Contact the after-sales service.
Risk of electric shock!
▯ The cable insulation on electrical
appliances may melt when touching hot
parts of the appliance. Never bring
electrical appliance cables into contact
with hot parts of the appliance.
Risk of electric shock.!
▯ Penetrating moisture may cause an electric
shock. Do not use any high-pressure
cleaners or steam cleaners.
Risk of electric shock!
▯ A defective appliance may cause electric
shock. Never switch on a defective
appliance. Unplug the appliance from the
mains or switch off the circuit breaker in
the fuse box. Contact the after-sales
service.
Risk of electric shock!
▯ The insulation of an incompatible meat
probe may be damaged. Only use the meat
probe which is recommended for this
appliance.
5

Operating for the First Time
Remove the packaging from the appliance and
dispose of it according to local regulations.
Be careful to remove all accessories from the
packaging. Keep packaging elements and plastic
bags away from children.
Check the appliance for transport damage after
unpacking it. Do not connect the appliance if it has
been damaged.
The appliance must be connected by an authorised
specialist. No warranty claims can be lodged for
any damage resulting from incorrect connection.
Obser ve the installation instructions.
Thoroughly clean the appliance before using it for
the first time. This will eliminate any ‘newness’
smells and soiling.
Before operating the appliance fit the included
grease filter to the inside left wall. First remove the
left shelf:
– undo the knurled nut on the front side
– pull out the lef t shelf towards the front
This appliance is labelled in accordance
with the European Directive 2002/96/EG
concerning used electrical and electronic
appliances (waste electrical and electronic
equipment – WEEE). The guideline
determines the framework for the return and
recycling of used appliances as applicable.
Avoiding Damage to the Oven
Interior
Obser ve the following tips to avoid corrosion in the
oven. No warranty claims can be lodged for any
damage resulting from non compliance with these
notes.
Clean the oven interior after it has cooled
•
down. After cleaning, use the drying function to
dr y the oven interior.
Aggressive cleaners may cause corrosion. Only
•
use hot soapy water to clean the oven interior.
Use the cleaning function.
Do not use oven cleaner or caustic cleaners.
•
Do not use cleaners containing chloride.
For regular care of the stainless steel interior
•
we recommend the Gaggenau oven care
product. Please observe the notes in the
cleaning chapter.
Salt in the oven reacts aggressively. Salt
•
residues on the oven interior may cause spots
of corrosion. Always remove residues
immediately.
Spicy sauces (e.g. ketchup, mustard) and
•
salted food (e.g. salted roasts) contain chloride
and acids. These act aggressively on stainless
steel. Always clean the oven interior after use.
Avoiding Damage to the Appliance
and the Cabinet
Steam Oven and Cabinet Fronts
Do not cover the ventilation openings of the steam
oven.
Do not take off the door seal. A damaged door seal
must be changed immediately.
Af ter taking the food out of the oven, allow the oven
to cool down with the door closed. Do not leave the
oven door half open, the hot air can cause damage
to adjacent cabinets. The cooling fan will continue
to run for a while and will then switch off
automatically.
Only use original accessories in the oven
•
interior. Rusting materials (e.g. serving plates,
cutlery) may cause corrosion of the oven
interior.
Only use original small par ts (e.g. knurled
•
nuts). Order small par ts from our after-sales
service, should you loose any.
Door Panel
Using aluminium foil in the oven compartment:
aluminium foil in the oven compar tment should not
touch the glass panel of the oven door. This could
cause permanent marks on the glass panel.
6
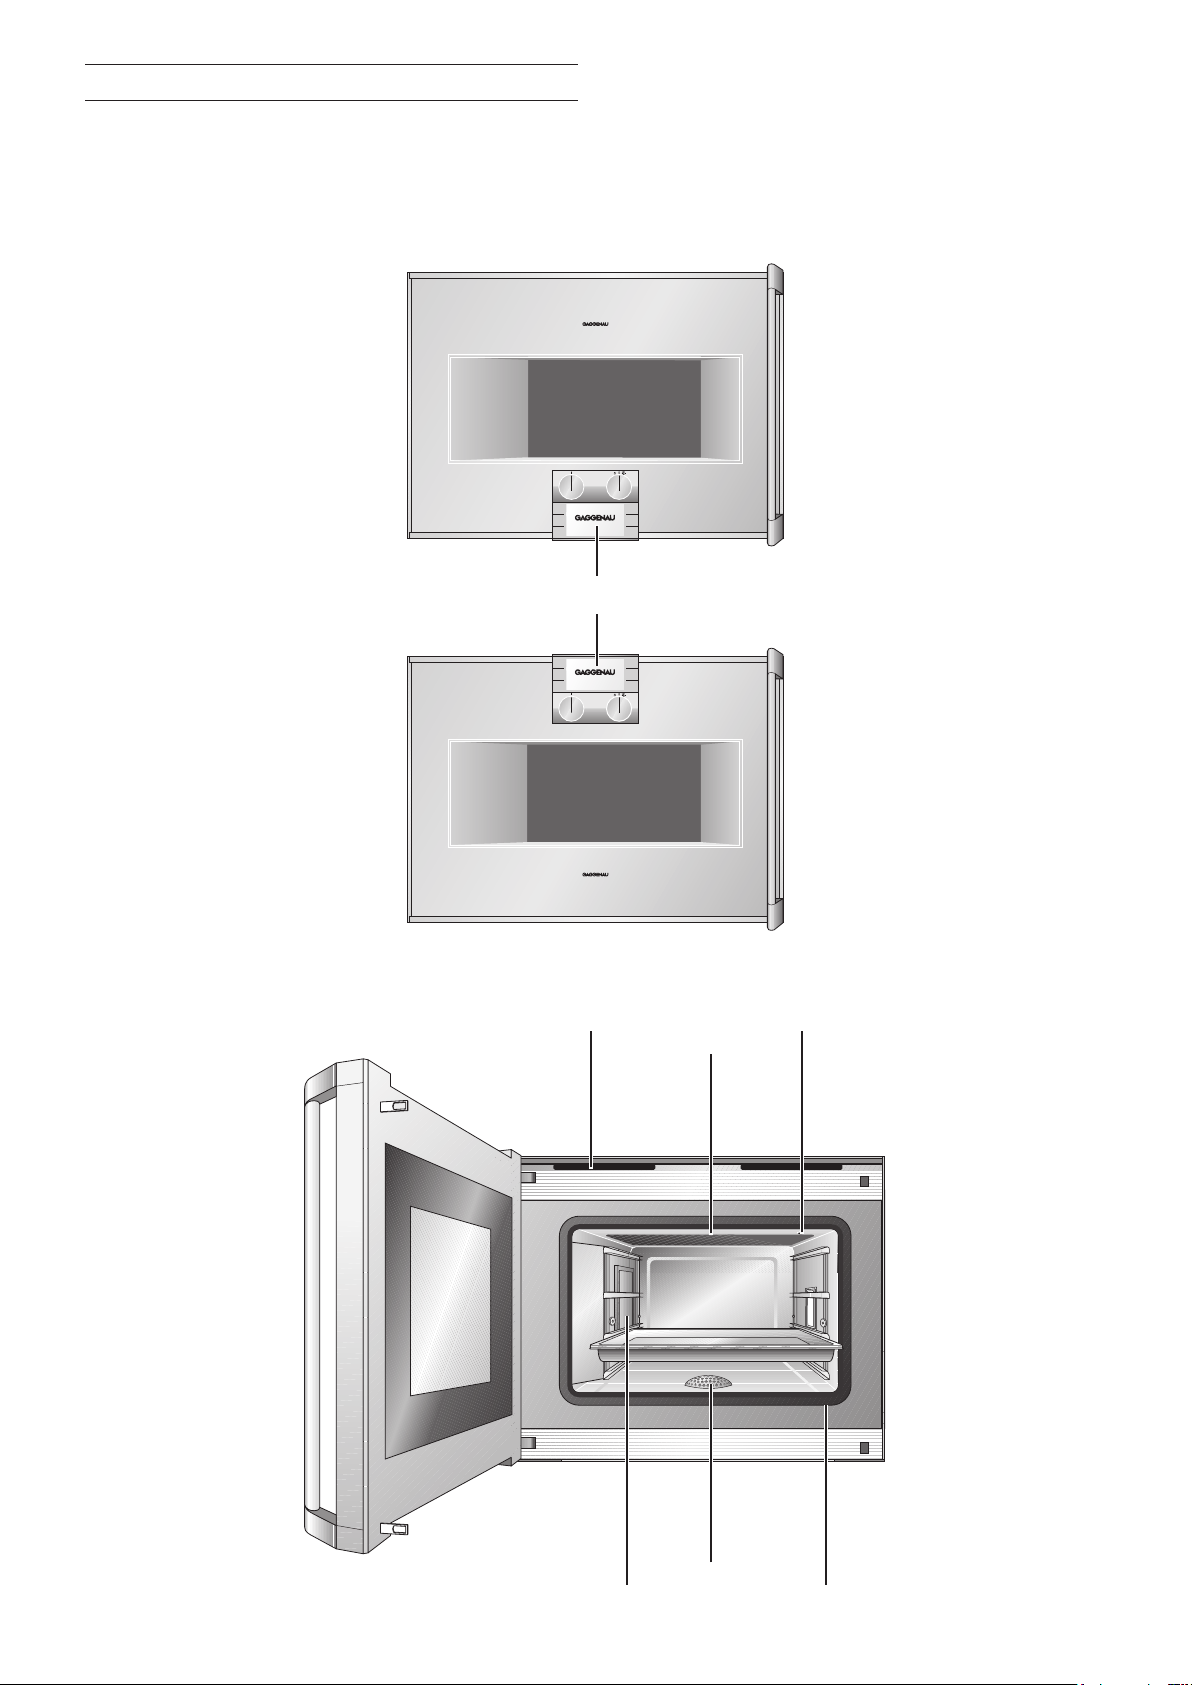
Features of your New Steam Oven
Steam Oven
This manual applies to
different models.
The pictures of this manual
show the model BS 274/275.
The operation is identical for
all models.
The models BS 270/271/280/281
feature display and controls on
the bottom front.
These models are especially
suitable for installation above
an oven.
Display and controls
The models BS 274/275
feature display and controls
on the top front.
These models are especially
suitable for single installation.
Ventilation openings Glass ceramic grill
Grease filter
Strainer Door seal
Socket for meat probe
7
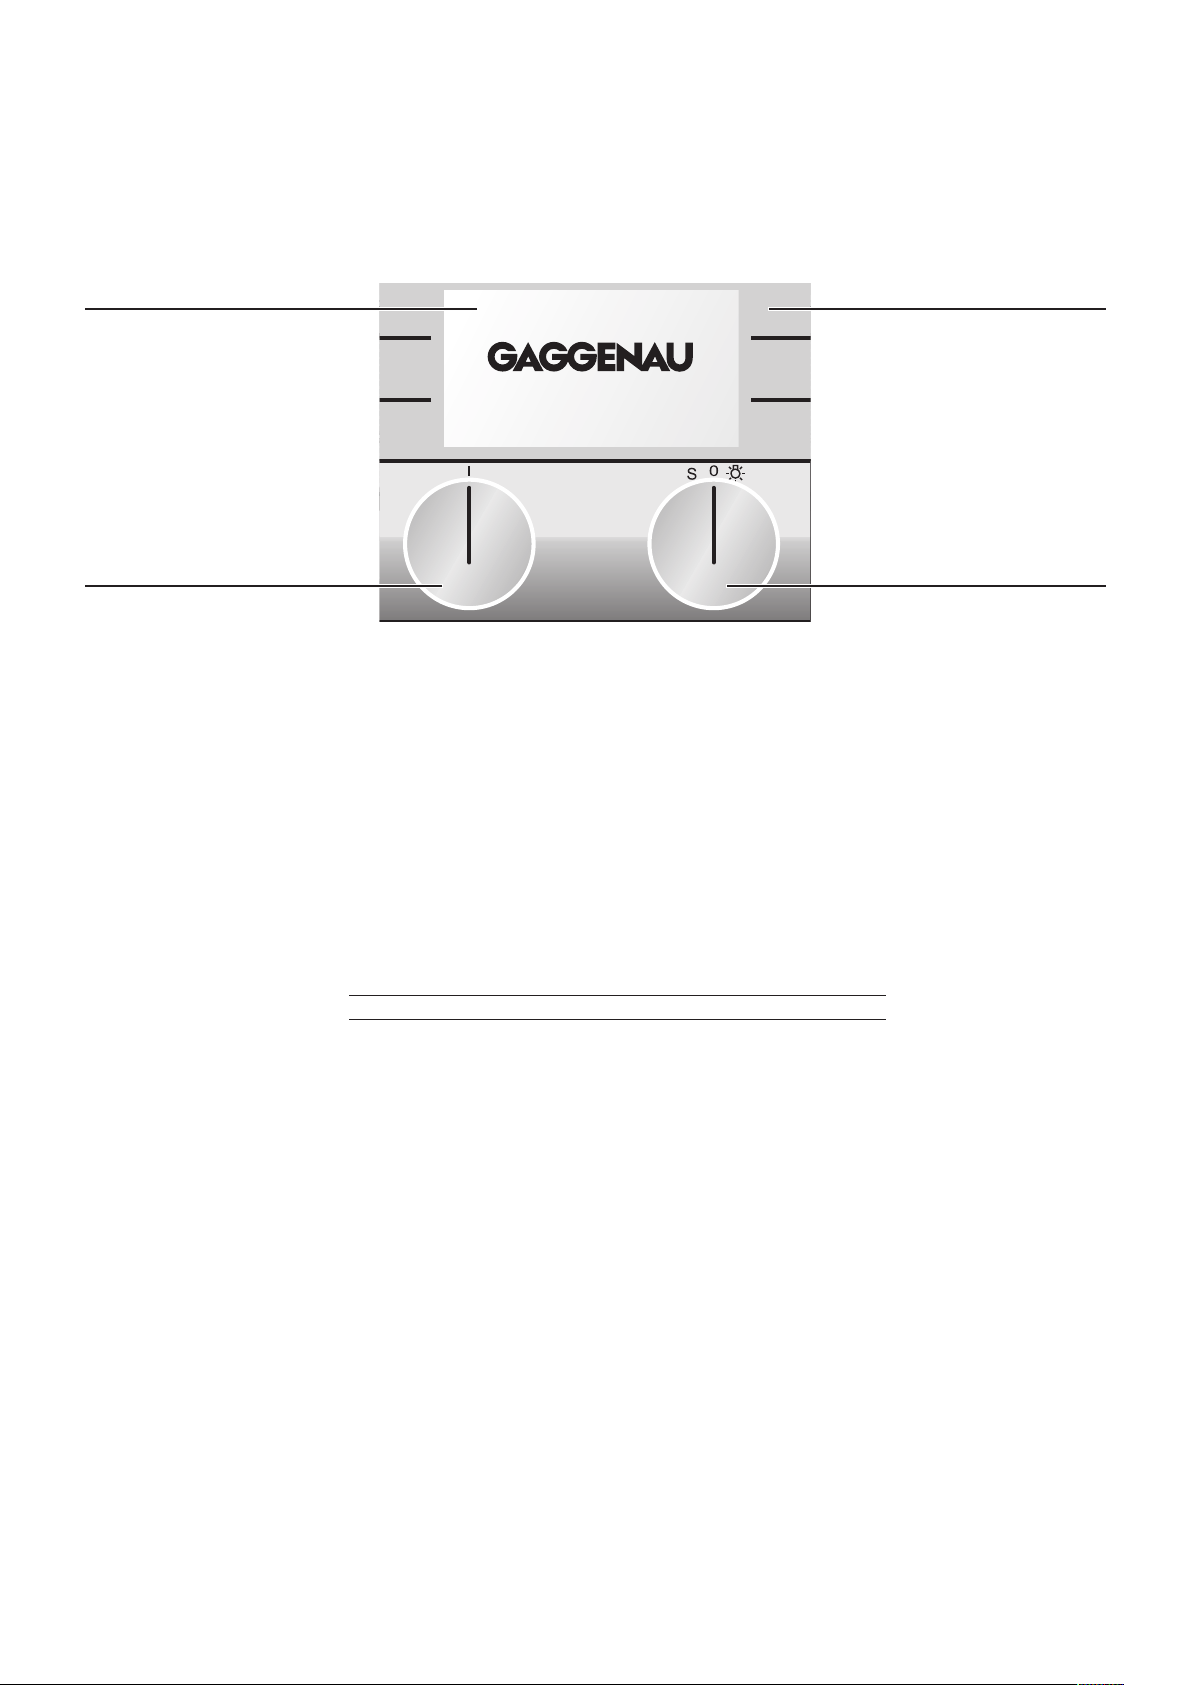
Display and Controls
Display
In the top part of the display
is the status bar or a call up
menu. The lower part shows
the dif ferent settings.
Function selector
Use the left knob to select
the cooking mode and
moisture level you will use
to prepare your meal.
You can turn the knob to
the right or lef t.
Touch keys
The keys on the lef t and
right beside the display
are touch sensitive. The
function of the keys
depends on the chosen
setting. The icon beside
the key shows the function
of the key.
Temperatu re selector
You can turn the
temperature selector to
the right or lef t.
Temperature range is
between 30 and 230 °C.
First position to the right:
switches on light
First position to the left:
operates special functions
(cleaning function, drying
function, memory recipes)
Keys
Symbol Function
g move right
f move left
b save selected values / start
j cancel
d increase values
e decrease values
q timer menu
c basic settings menu
a call up current oven temperature
o child lock activate
p child lock deactivate
V extended timer
l timer stop
m timer start
k store memory recipe
C misting
D steam removal
8
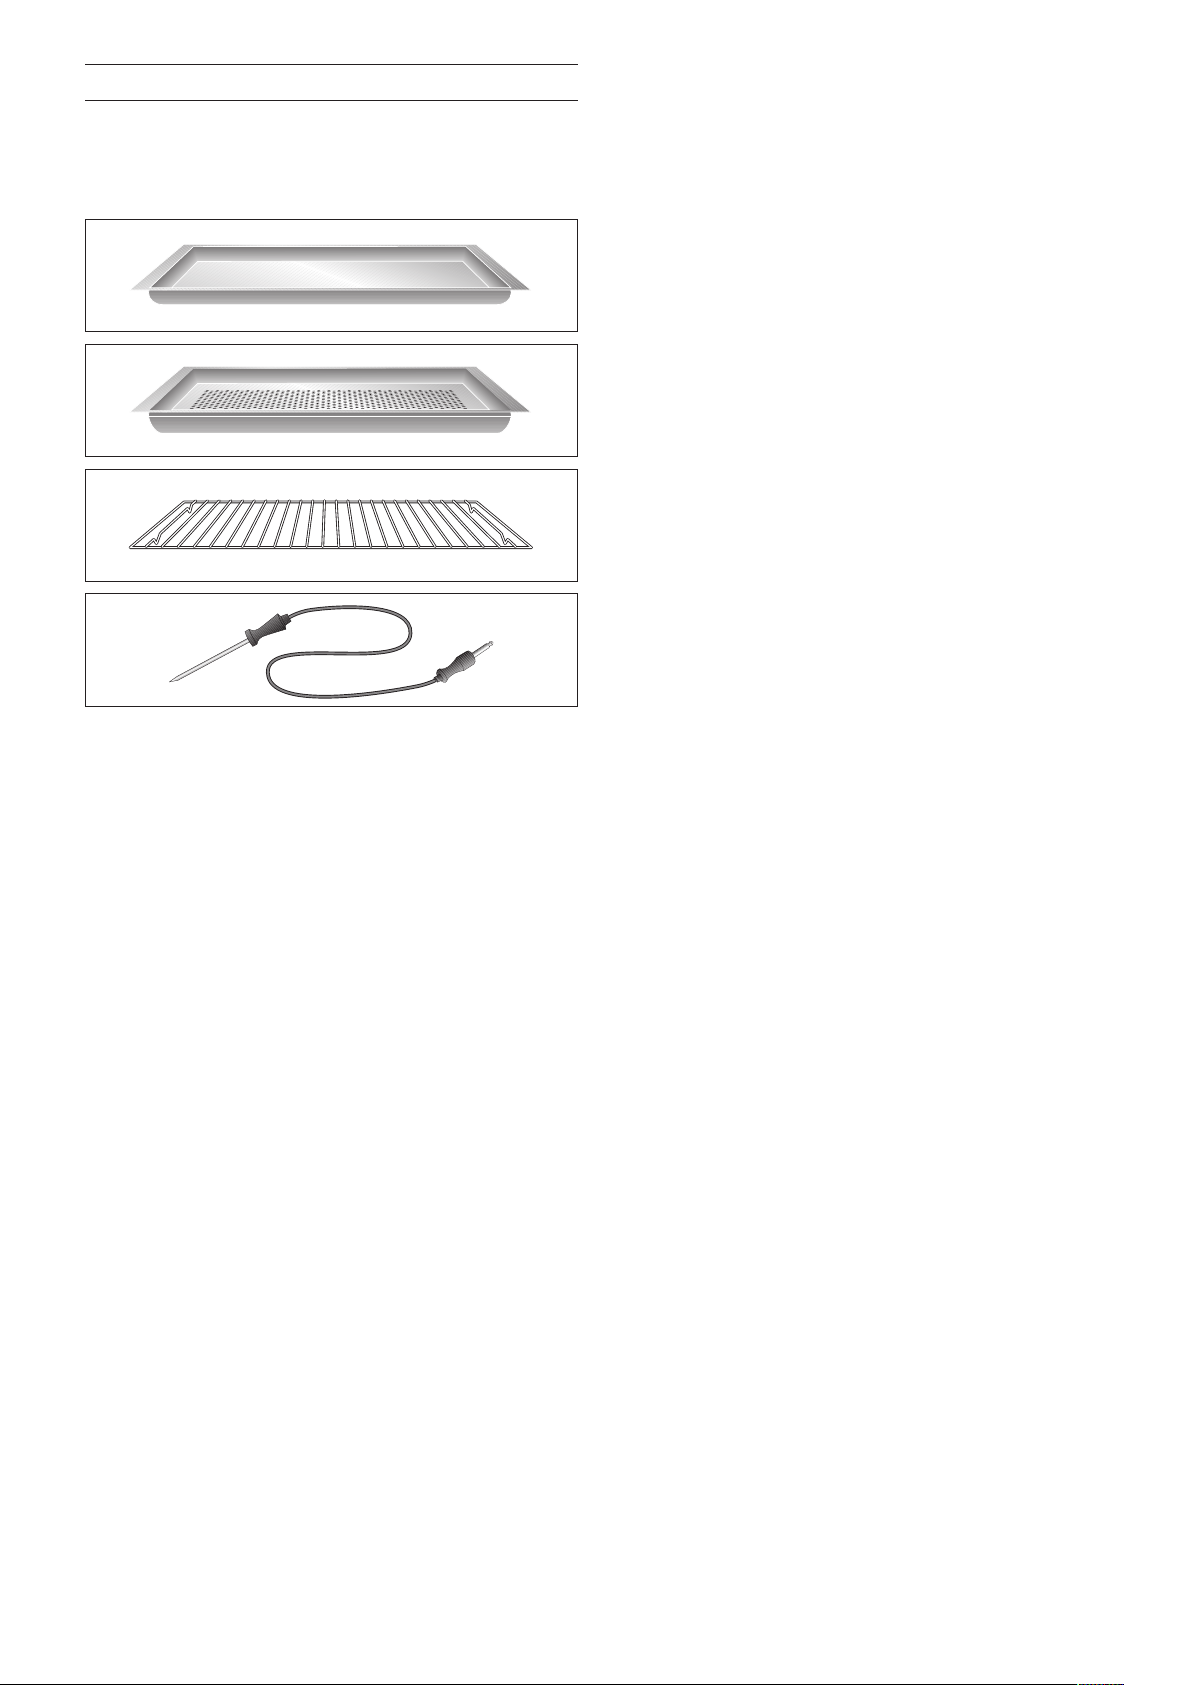
Accessories
As standard, your appliance comes with the
following accessories:
Stainless steel cooking insert GN 2/3,
•
40 mm deep
Stainless steel cooking insert GN 2/3,
•
perforated, 40 mm deep
Wire rack
•
Meat probe
•
You can order the following special accessories:
GN 114 130: Stainless steel cooking insert,
•
GN 1/3, unper forated, 40 mm deep, 1,5l
GN 114 230: Stainless steel cooking insert,
•
GN 2/3, unper forated, 40 mm deep, 3l
GN 124 130: Stainless steel cooking
•
inser t, GN 1/3, per forated, 40 mm deep, 1,5l
GN 124 230: Stainless steel cooking insert,
•
GN 2/3, perforated, 40 mm deep, 3l
GN 340 230: Roaster in cast aluminium,
•
GN 2/3, height 165 mm
GN 410 130: Stainless steel lid, GN 1/3
•
GN 410 230: Stainless steel lid, GN 2/3
•
GR 220 046: W ire rack, chromium plated
•
Water supply hose (3 m)
•
Drain hose (3 m)
•
You can order the following accessories for
installation:
GZ 010 011: Inlet / outlet extension
•
WF 040 020: Descaling and neutralising filter.
•
Must be installed when connecting the
appliance if water hardness exceeds 7 °dH.
Set of three filter car tridges
•
9
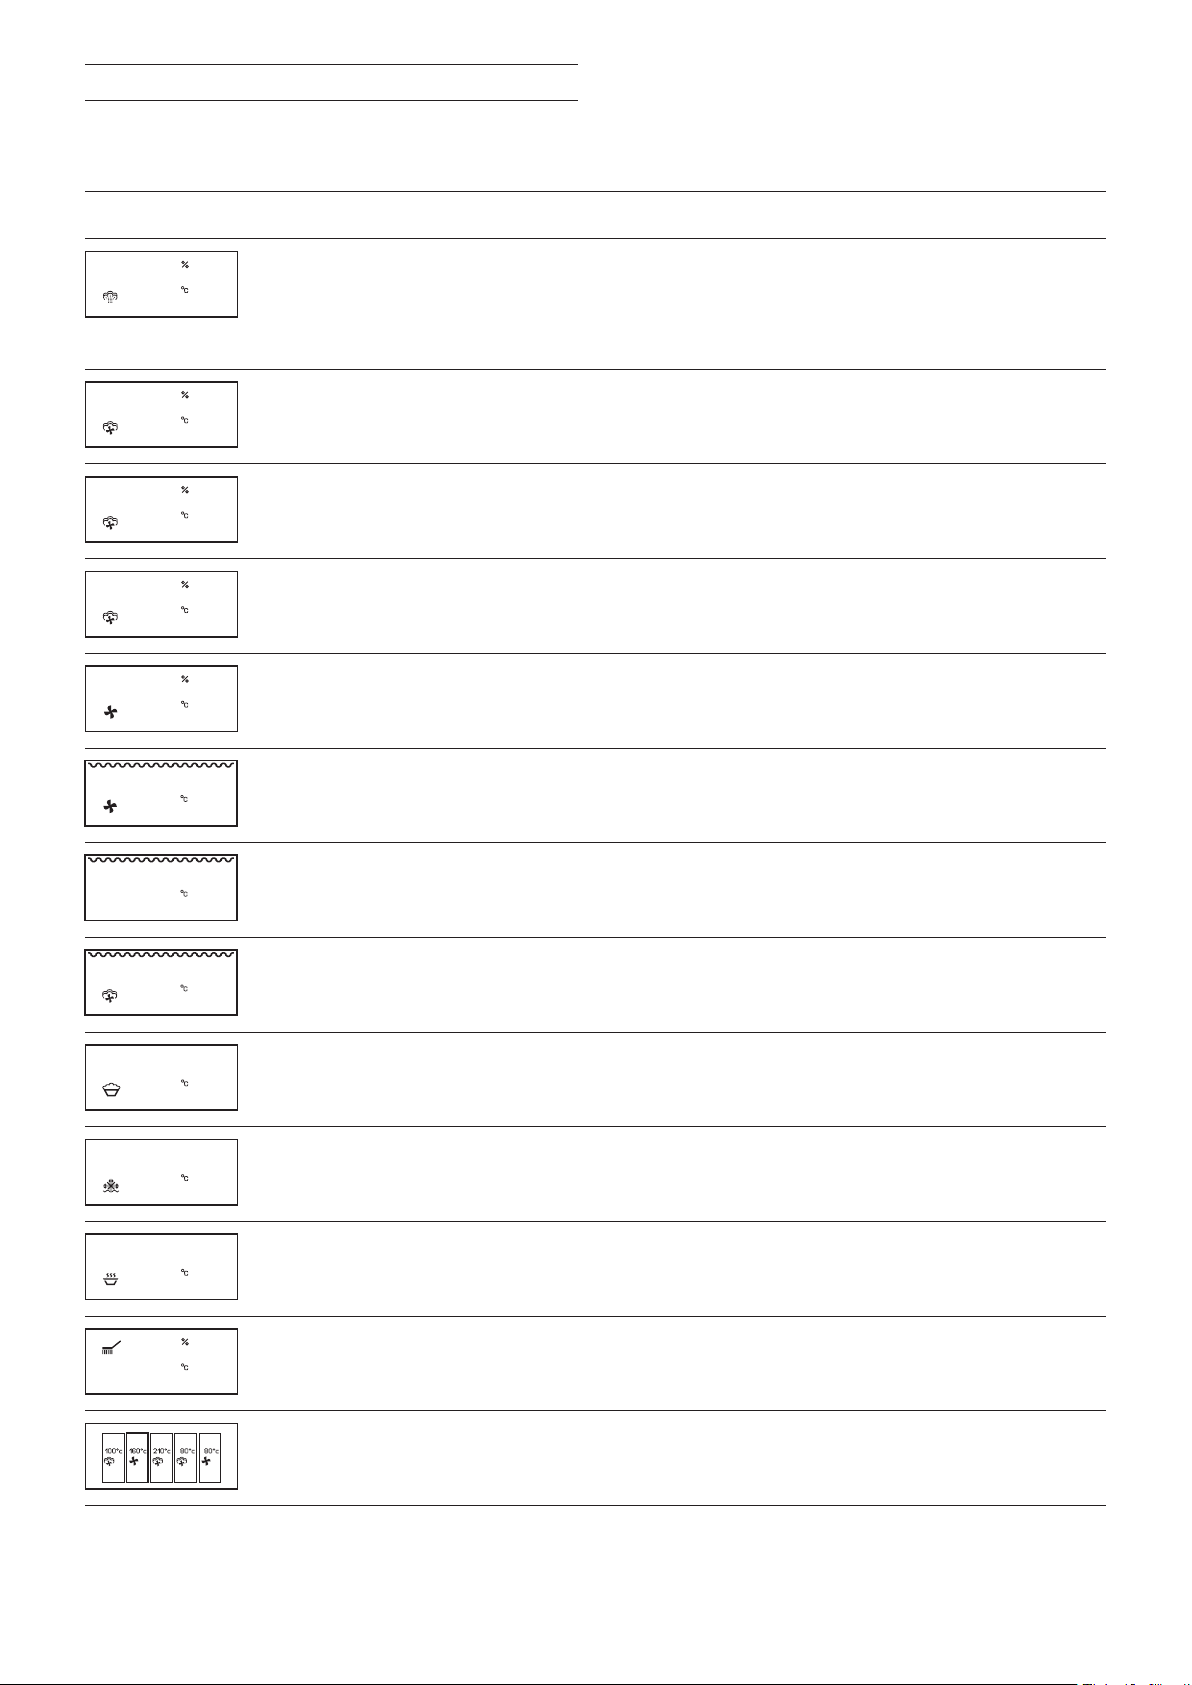
Heating Modes
100
100
170801606018030180
0
180
180
180
38
50
120
60
100
00:05 00:50 00:30 00:20
100% 60% 0% 60%
00:30
0%
Display Heating mode Use
Moisture 100 %
temperature 30 - 230 °C dishes. The food is completely surrounded by steam.
C Steaming at 100 °C - 120 °C: fish, vegetables, side
B Steam baking at 120 - 230 °C: puff pastr y, bread,
bread rolls.
Moisture 80 % Combination steaming: puff pastry, meat, poultry.
temperature 30 - 230 °C
Moisture 60 % Combination steaming: yeast dough cakes, bread.
temperature 30 - 230 °C
Moisture 30 % Cooking in own moisture: pastries.
temperature 30 - 230 °C Low-temperature cooking: meat.
Moisture 0 % Hot air: cakes, biscuits, gratin.
temperature 30 - 230 °C
Grilling with hot air Vegetable skewers, scampi skewers
temperature 30 - 230 °C
Grilling Grilled vegetables, cook ‘au gratin’ (e.g. baiser on a cake),
temperature 30 - 230 °C grilled toast
Grilling with humidity Casserole dishes, gratin
temperature 30 - 230 °C
Dough proofing Raising yeast dough, the perfect temperature setting is
temperature 30 - 50 °C 38 °C. The moisture distributes the heat evenly and avoids
the sur face of the dough drying out.
Defrosting Even and gentle defrosting of vegetables, meat,
temperature 40 - 60 °C fish and fruit. The food will not dry out and will
keep its shape.
Regenerating Gently refresh previously prepared dishes. The moisture
temperature 60 - 140 °C keeps the food from drying out. Refresh dishes on plates
at 120°C, pastries at 140°C.
Cleaning aid, The cleaning function loosens soiling with steam.
dr ying aid
Memor y recipes Store and recall the settings for meals that you
of ten prepare
10
First Settings after Installation
English
Deutsch
Francais
Italiano
07 0926
When your new steam oven has been connected,
the first settings menu appears on the display.
You can set the
time format,
•
language,
•
clock,
•
date,
•
temperature unit,
•
water hardness.
•
Note
The first settings menu appears only after the
appliance has been connected or if the appliance is
without electricity for several days.
Refer to the chapter basic settings if you wish to
change these parameters at any time.
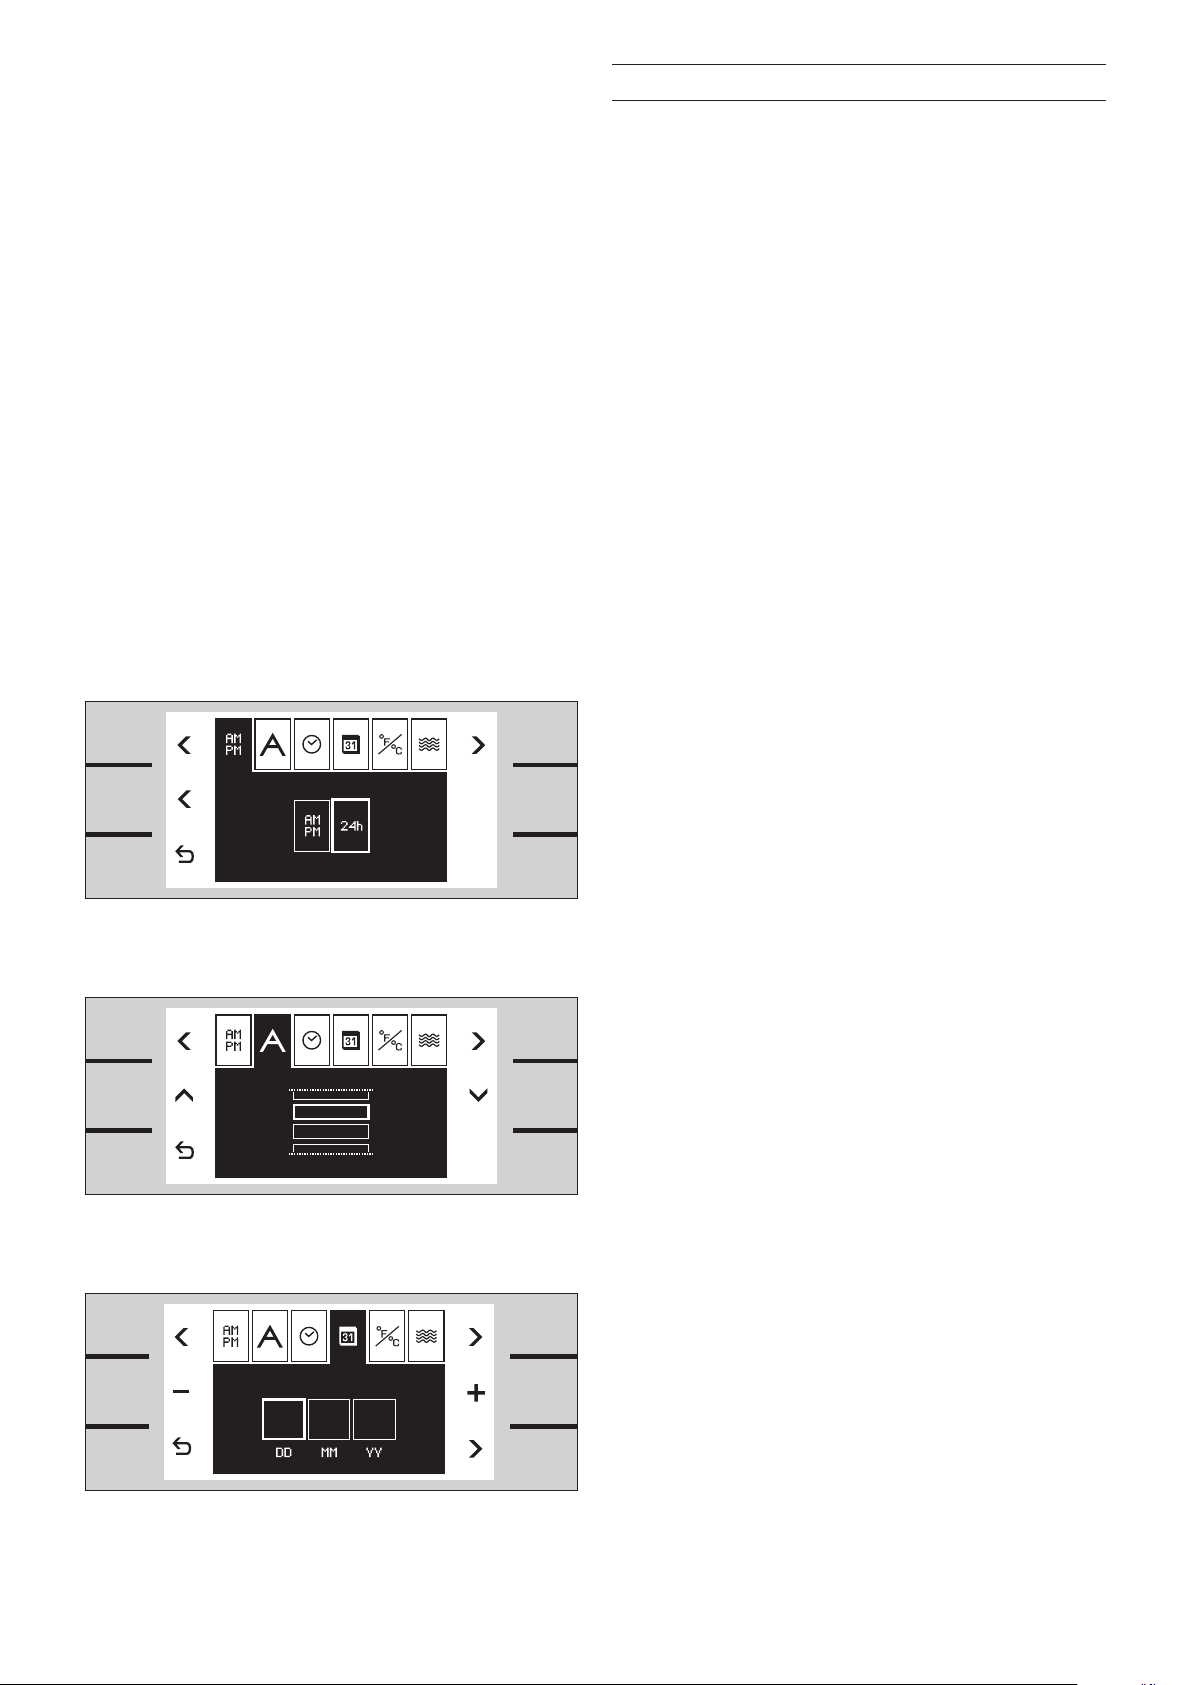
Choosing the Time Format
1 The time fomat setup menu appears on the
screen.
The time fomat can be either 12 hour format
(AM/PM) or 24 hour format. The 24 hour format
is pre-selected.
2 You can change the time format using the
centre
f key.
Setting the Language
1 Using the menu key g select the language
setup menu. The available languages for the
display messages appear on the screen.
German is pre-selected.
2 You can change the language using the
keys or switch the display messages off.
h or i
Setting the Clock
1 Using the menu key g select the clock
function Q.
2 Using the
Use the arrow key
hours to minutes.
d / e keys set the correct time.
g bottom right to change from
11
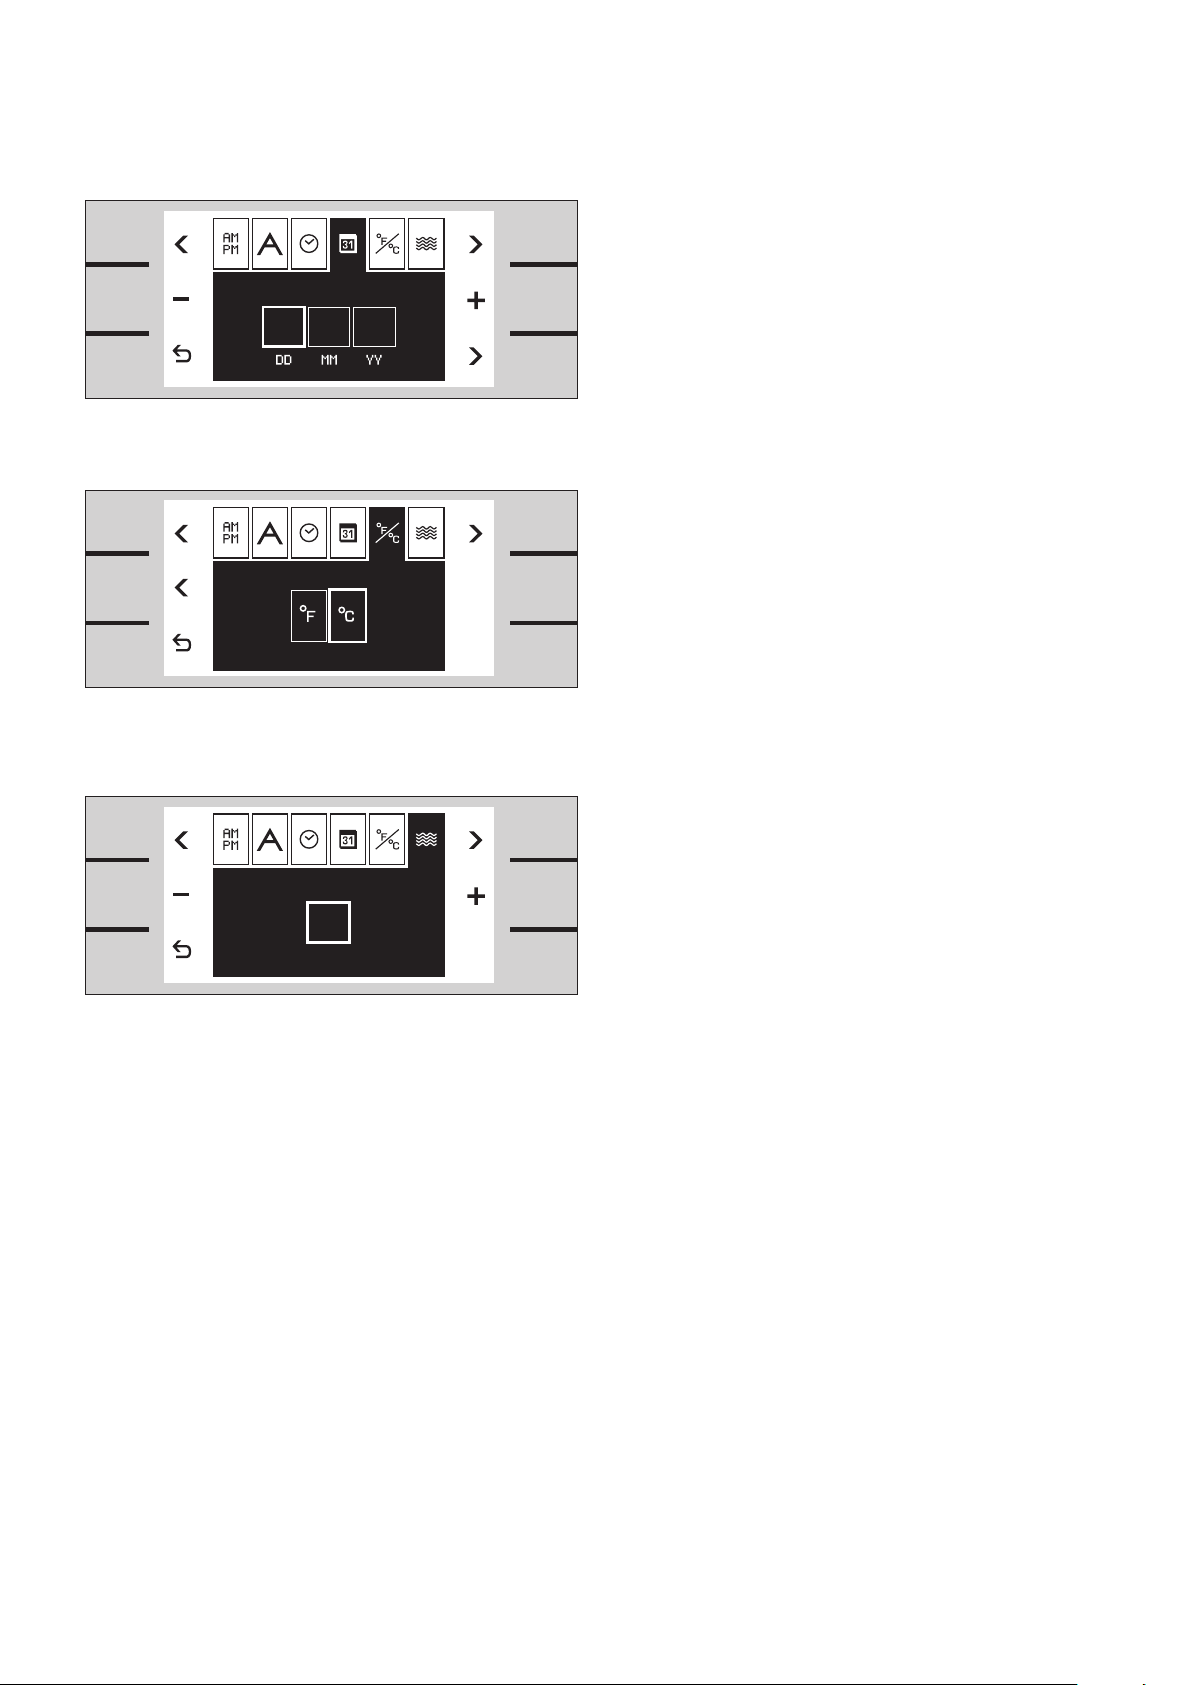
Setting the Date
12
07 0926
1 Using the menu key g select the date
function a.
2 Using the
Use the arrow key
day/month/year.
d / e keys enter day, month, year.
g bottom right to change from
Temperature Unit °C or °F
1 Using the menu key g select the temperature
unit function l . °C is pre-selected.
2 You can change the temperature unit using the
centre
f key.
Setting the Water Hardness
1 Use the test kit included to test the water
hardness of your tap water. Fill the phial with
mains water up to the 5 ml marker.
2 Add indicator solution drop by drop until the
colour changes from purple to yellow.
Carbonate hardness content :
1 drop = 1°KH = 1.25°e = 1.8°f
Please note: count the number of drops that
are necessary and gently shake the phial after
each drop.
3 Use the
1 and 18. Pre-set value is 12. Depending on the
value entered the appliance will calculate the
intervals for descaling.
d / e keys to enter the value between
Exiting Menu and Saving Settings
Touch the b key to exit the menu. All settings are
saved.
The appliance is on standby. The standby screen
appears.
12
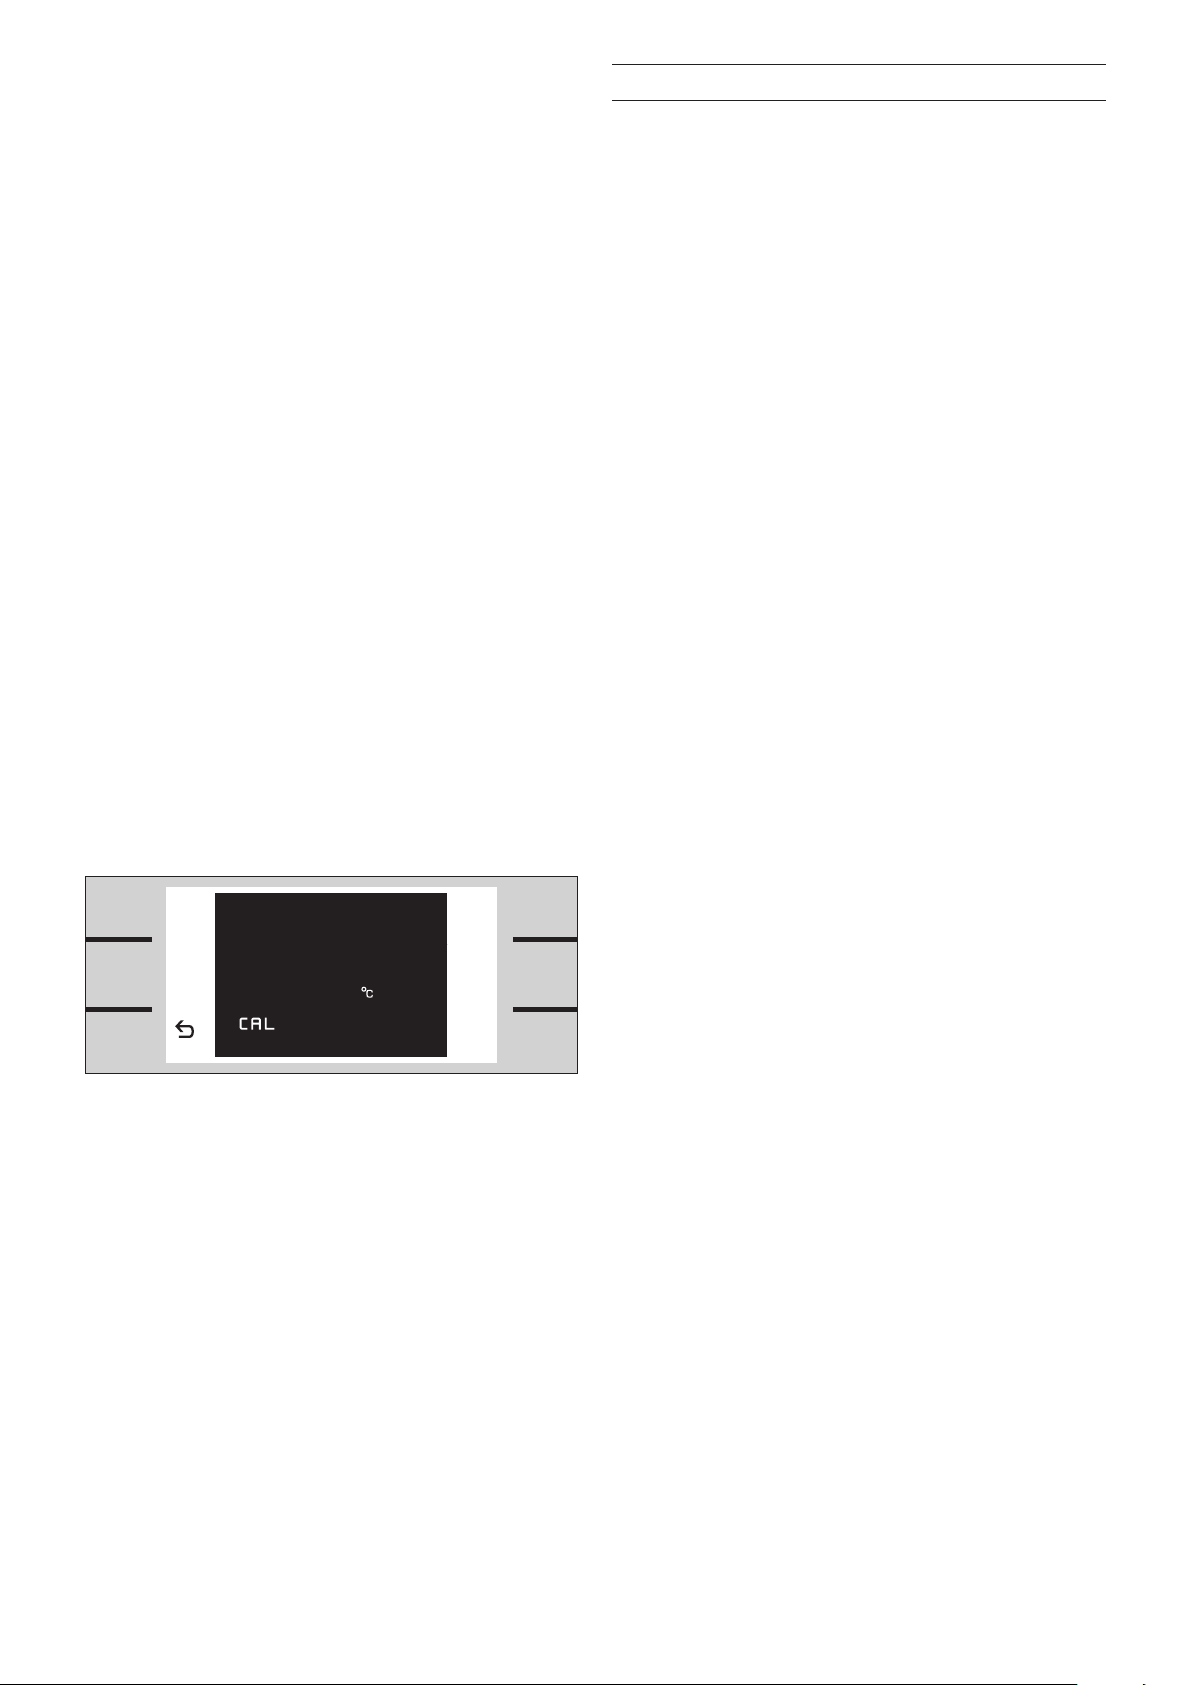
Calibration
100
The boiling point depends on the air pressure. The
higher the altitude, the lower the air pressure, and
also the boiling point.
During the first steaming after installation, the
appliance calibrates the boiling point. During
calibration, the appliance is adjusted to the
pressure of the altitude where the appliance is
installed.
Calibrating the Steam Oven
1 Remove all accessories from the oven (cooking
inser ts, wire rack). The oven must be empty
and cold.
2 Turn the temperature knob to 100 °C and the
function knob to the top position, steaming at
100% moisture.
The steam oven starts to calibrate.
During calibration more steam might escape from
the oven than during normal use. Calibration takes
about 15 minutes.
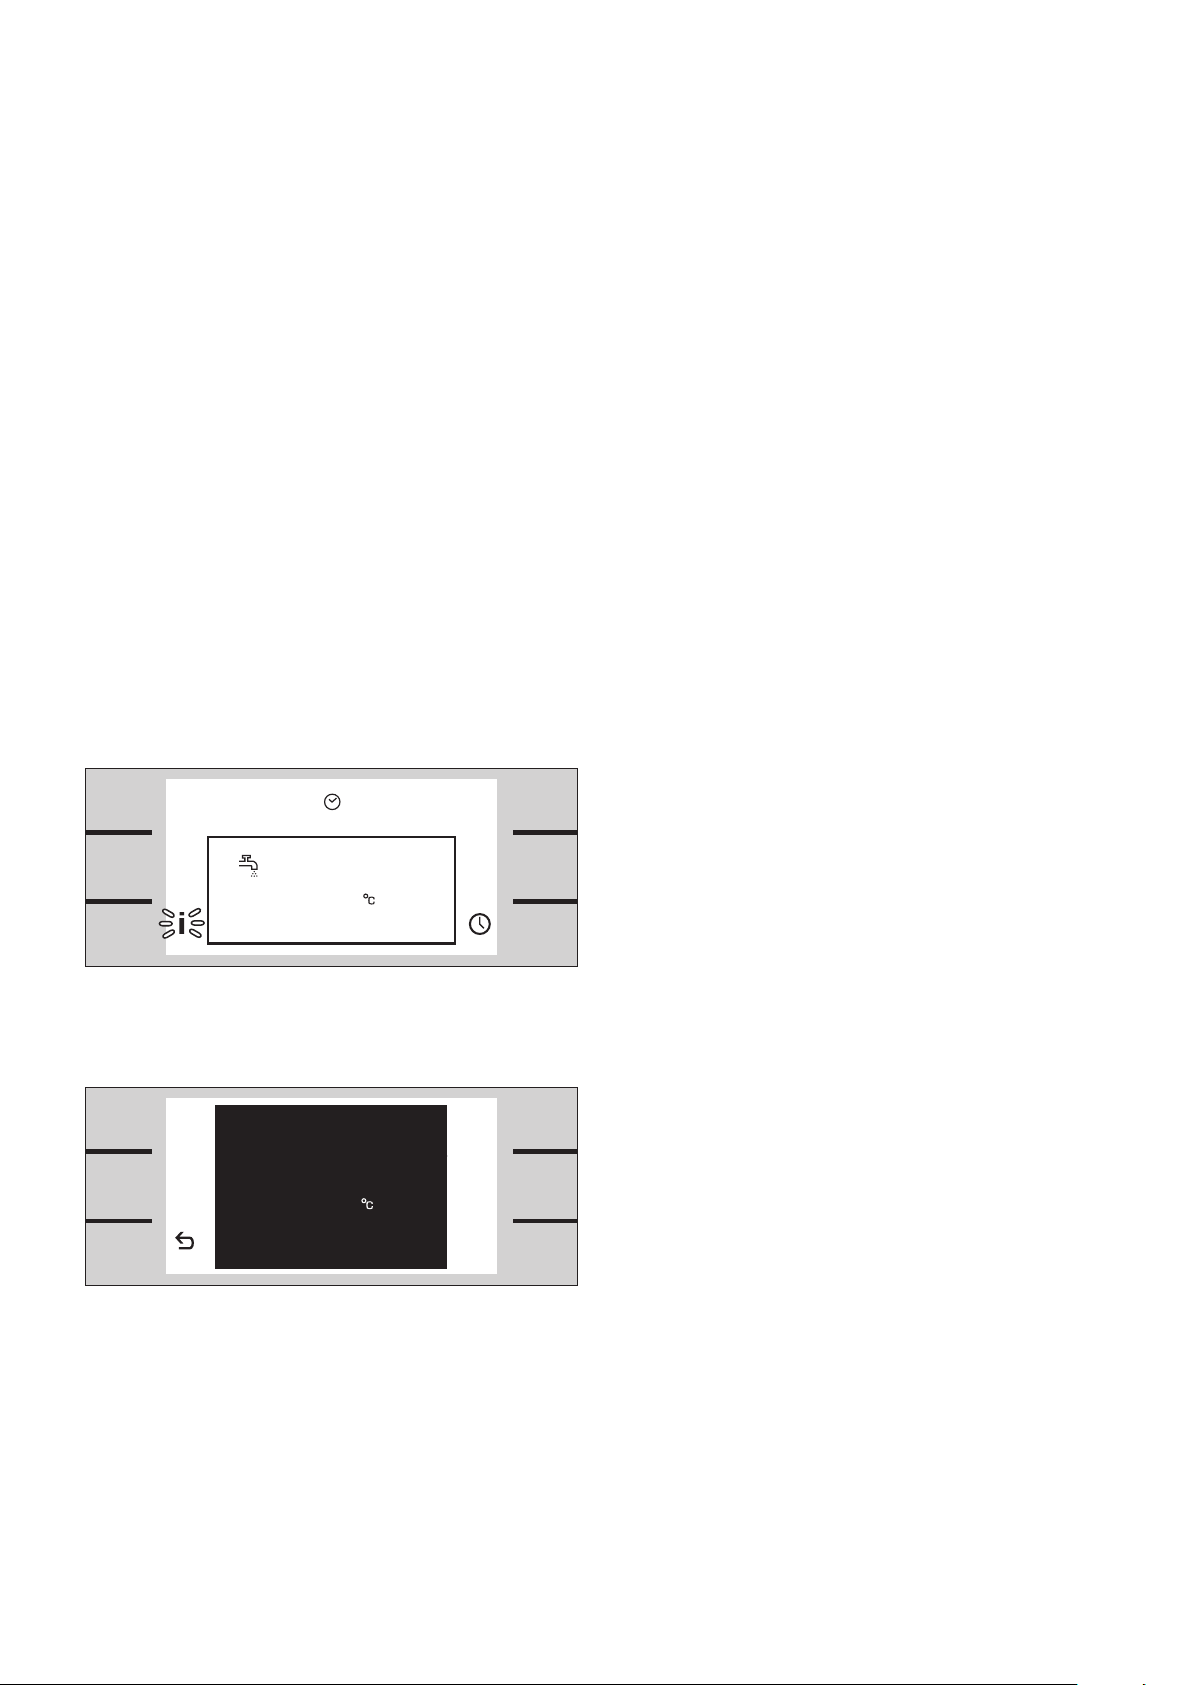
Note
If the oven has not yet been calibrated, s is
shown beside the current oven temperature when
you press the a info key.
Do not interrupt the calibration cycle. Do not open
the oven door during calibration.
Should the calibration process be interrupted by
opening the door or switching of f the appliance, the
steaming function will not operate properly.
Switching on the appliance will automatically restart
calibration until the operation has been completed.
Recalibration is not necessary af ter a power failure.
Recalibrate the appliance manually if you should
move home to a different altitude.
First reset all parameters to the factory setting.
•
Refer to the chapter basic settings.
Now it is possible to recalibrate the appliance.
•
13

13:30
Activating the Steam Oven
Standby
The steam oven remains on standby when no
operating mode is selected or the child lock is
activated.
The keys are not activated. The display is not lit.
Notes:
You can choose between different standby
•
screens. GAGGENAU and the clock is preselected. Refer to the chapter basic settings if
you want to change the standby screen.
To protect the display, GAGGENAU will not be
•
shown on the screen between 23.00 and 6.00
o’clock if the oven is on standby.
The display contrast depends on the vertical
•
viewing angle. You can adjust the contrast of the
display in the basic settings.
Activating the Steam Oven
To leave standby do one of the following:
touch a key
•
open or close the oven door
•
turn the temperature knob
•
turn the function knob
•
Now you are able to set the required function. Read
the relevant chapter on how to activate the required
function.
Note:
The standby screen reappear s after one minute if
no further function is chosen. The display light goes
of f.
14
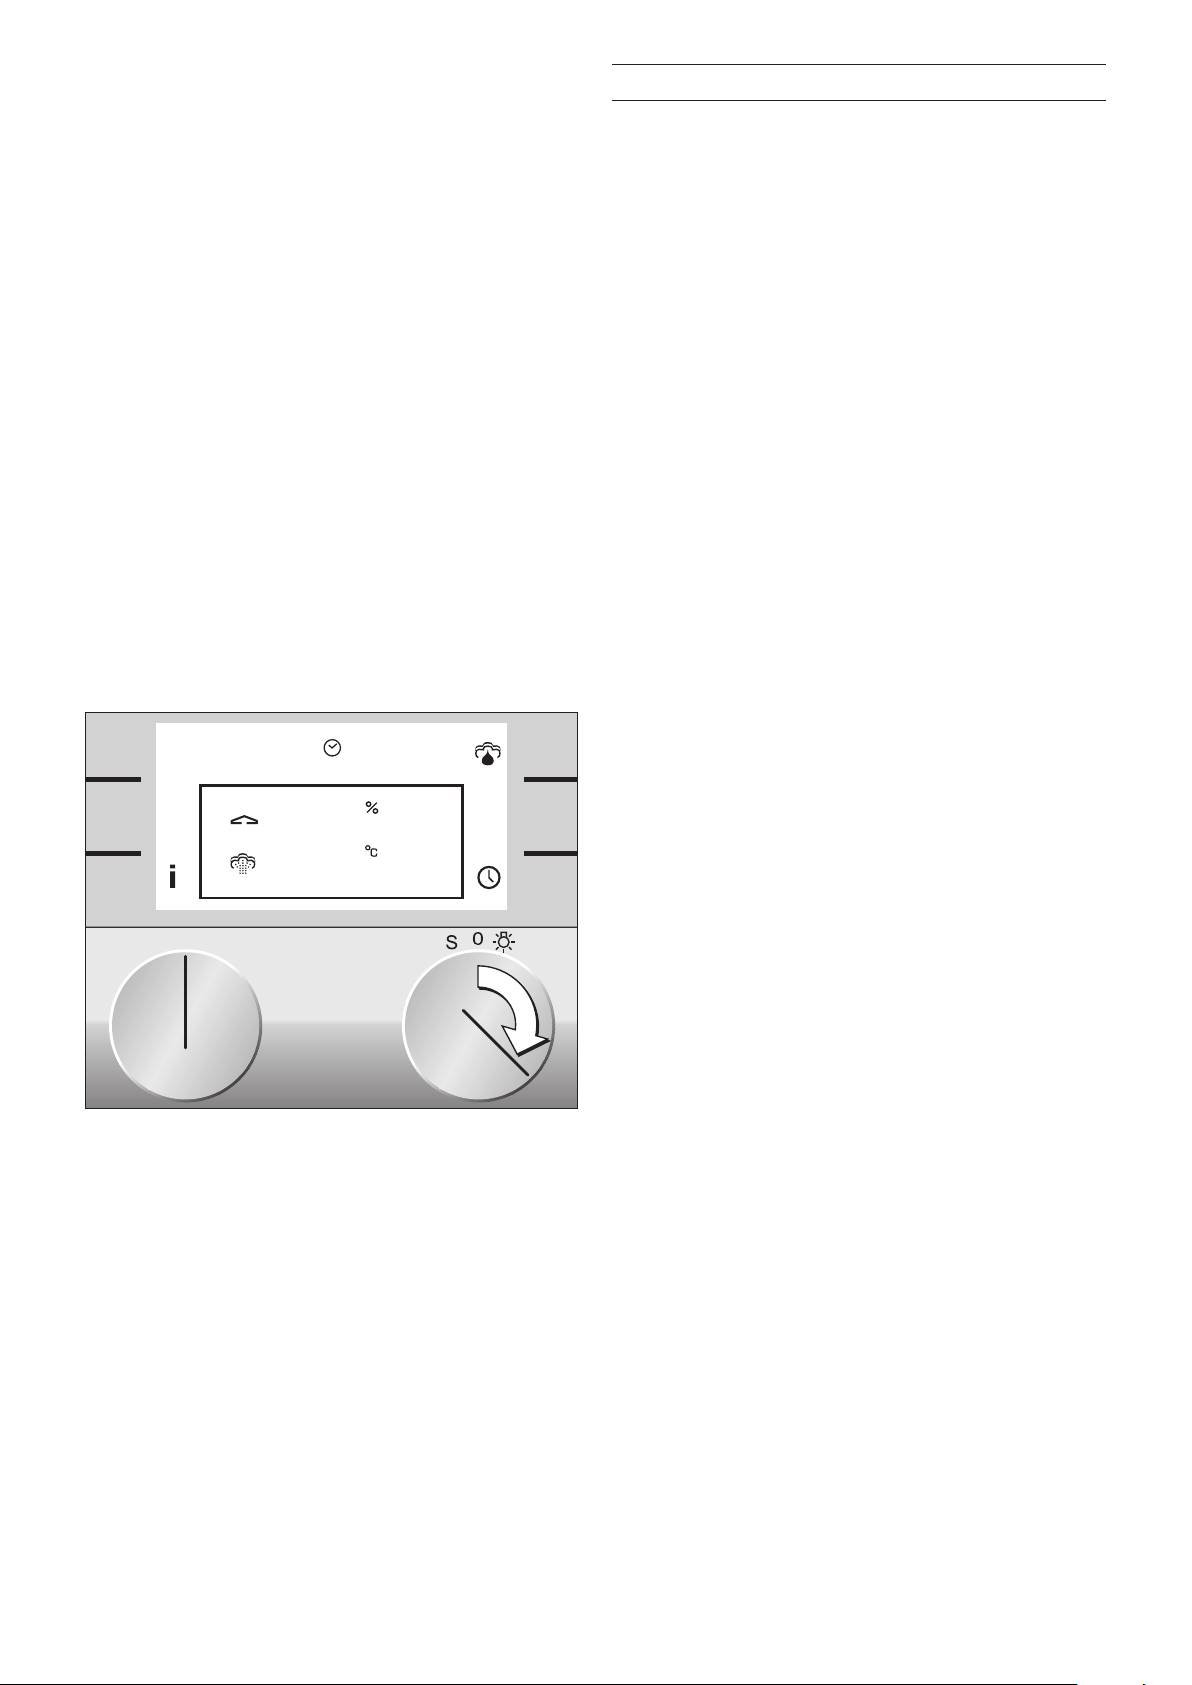
Setting the Steam Oven
100
100
13.30
The main operations of your steam oven are easily
set using the knobs.
Using the right knob you can set the temperature.
To switch on the light in the oven, turn the
temperature knob one position to the right.
Temperature range:
Steaming, hot air, grilling, grilling with hot air,
grilling with humidity 30 - 230 °C
Dough proofing 30 - 50 °C
Defrosting 40 - 60 °C
Regenerating 60 - 140 °C
The light in the oven remains of f if the temperature
is set below 70 °C.
Using the left knob you can set the heating mode.
The top position is steaming at 100% moisture.
Setting the Temperature and
Heating Mode
1 Turn the function knob until the required
heating mode appears on the screen.
2 Set the temperature knob to the required
temperature.
Temperature, moisture level and cooking mode
symbol appear on the display. The light in the
oven goes on.
The heating up symbol
temperature is reached. The symbol appears again
when the oven heats during operation.
A signal sounds when the selected temperature is
reached. Press any key to switch off the signal.
Note: You can deactivate the heating up signal in
the basic settings.
The temperature and heating mode can be changed
at any time.
When the meal is ready switch the steam oven off
using the temperature knob. The oven light goes
of f. The standby screen appears.
f appears until the required
15
Grilling
166
---
13.30
Operation Noises
The grilling temperature is controlled by switching
the grill heater on and off at regular intervals. This
means that the red, glowing heat is not constantly
on. Only the side of the glass ceramic surface is
heated to allow for better heat distribution. This is
not a malfunction.
Do not use the core temperature probe when
grilling, grilling with hot air and grilling with
humidity. The core temperature probe will be
damaged if the cable touches the hot grilling
surface.
Please observe the following notes when using the
cast roaster (GN 340 230) to avoid damage to the
roaster:
Only use the cast roaster without the lid for
•
grilling.
Inser t the cast roaster on the third level from
•
below or lower in the oven.
The appliance rinses when you switch it on.
For technical reasons the fan may be louder
depending on the temperature and heating mode.
The higher fan setting is necessar y to cool the
electronics of the appliance.
The fan may temporarily switch to the higher setting
even if you have not changed the temperature and
heating mode setting.
During steam operation the following noises may be
heard: injection, noises during steam generation,
drain pump.
Af ter switching of f the appliance the fan will
continue to operate in order to cool down the oven.
Temperature Setting not Shown on
Display
If the L symbol appears on the left top side of the
display and three dashes instead of the
temperature, there is no water available. Check the
water supply.
If three dashes appear on the display instead of the
temperature, the knobs have not been set to the
correct position. Check the position of the
temperature and function selector s.
Current Oven Temperature Display
The current oven temperature is briefly shown when
you press the a info key. Using the b key you can
return to the standard screen.
Note:
Depending on the heating mode, a slight temperature
variation af ter heating up during use is normal.
After Ever y Use
Dr y the oven interior with a sof t cloth or use the
dr ying aid.
16
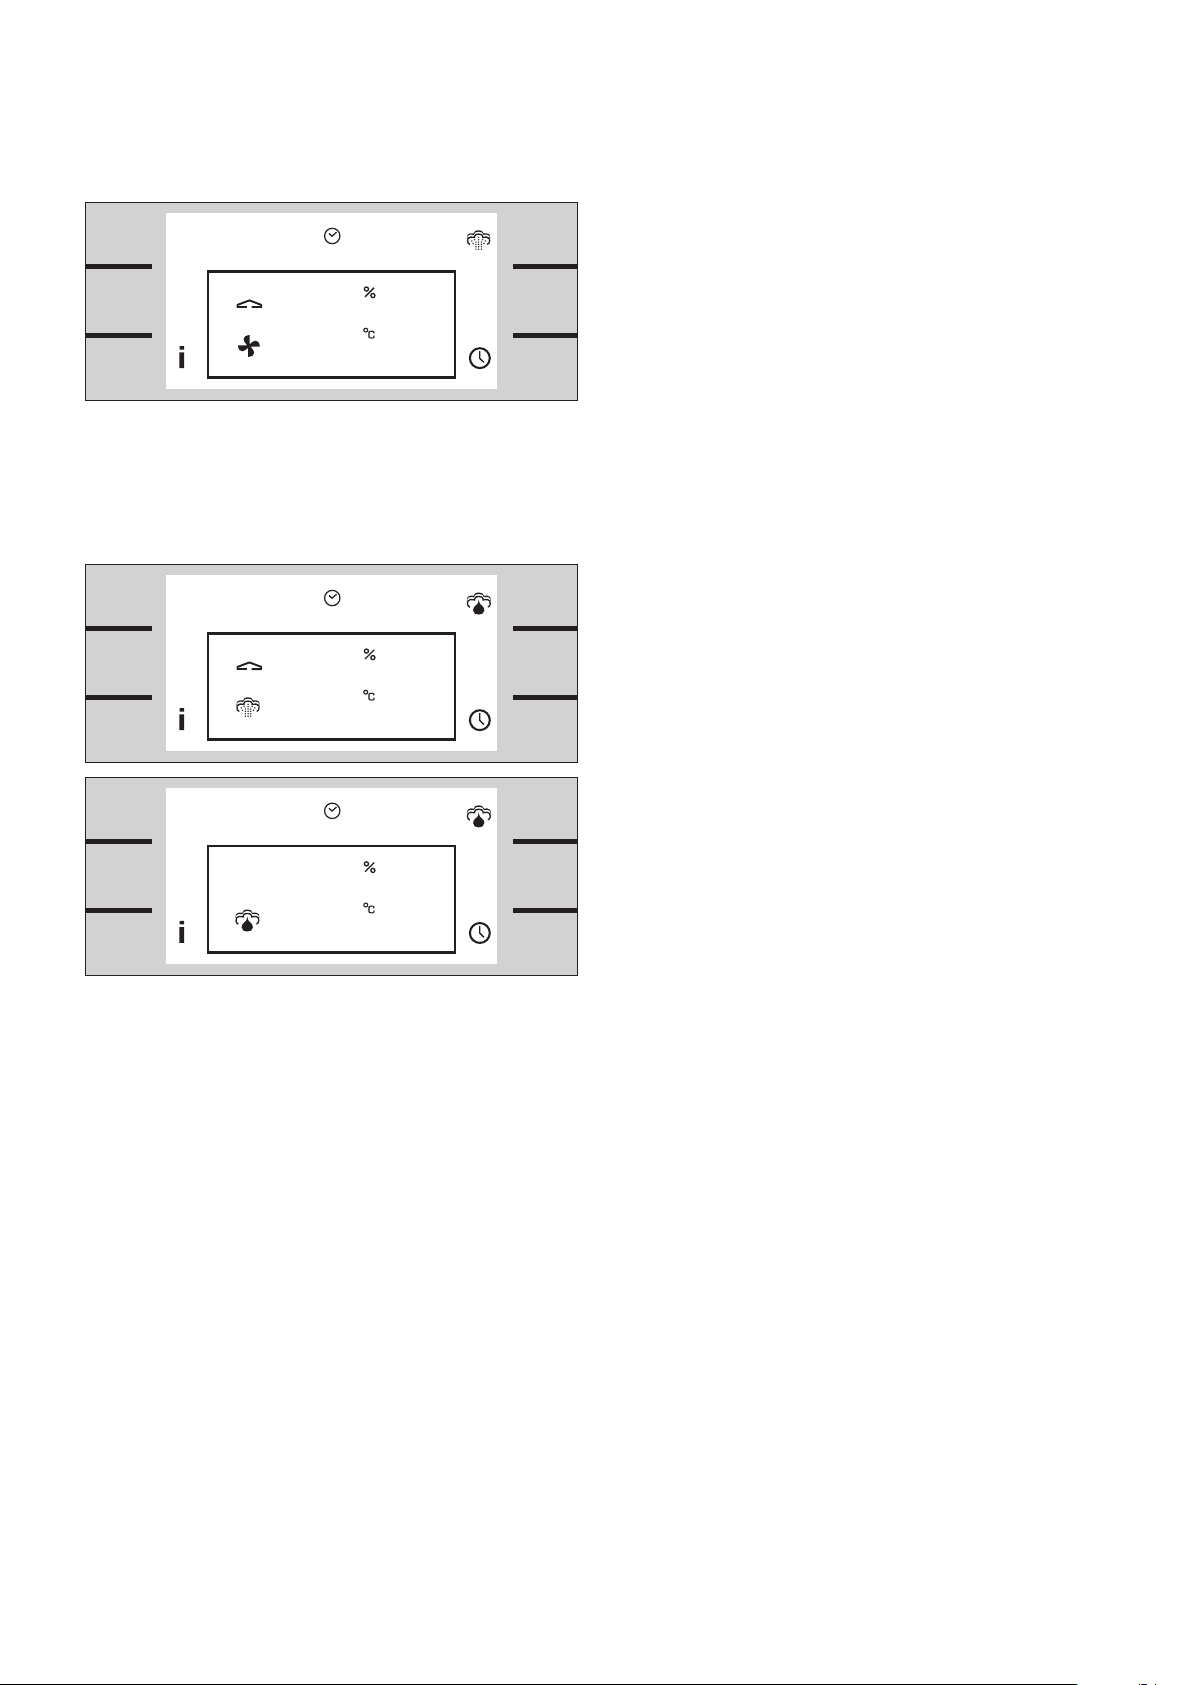
Misting C
180
0
13.30
100
100
13.30
100
100
13.30
Misting brings additional steam to the oven interior.
You can add moisture to food while cooking (e.g.
bread, bread rolls).
Misting is only possible with the “Hot air” function
(0% moisture) or with 30% moisture.
Touch the key
up to 8 seconds. After waiting at least one second,
you can trigger misting again by pressing the
misting key C.
C as long as you want to add steam,
Steam Removal D
Steam removal brings cold water to the oven
interior. This cools down the oven interior, the
steam condenses. This reduces the steam escaping
when opening the door.
$ Caution! Hot water may drip from the door when
opened.
You can use the steam removal function only up to a
temperature of 130 °C and at the moisture levels
100 %, 80 % and 60 %.
Touch the steam removal key
second. Steam removal star ts. The symbol D
appears on the display.
Steam removal lasts about 20 seconds. The heating
remains switched off during steam removal.
D for at least one
To stop steam removal:
Open the oven door or touch the steam removal key
D again.
17
 Loading...