

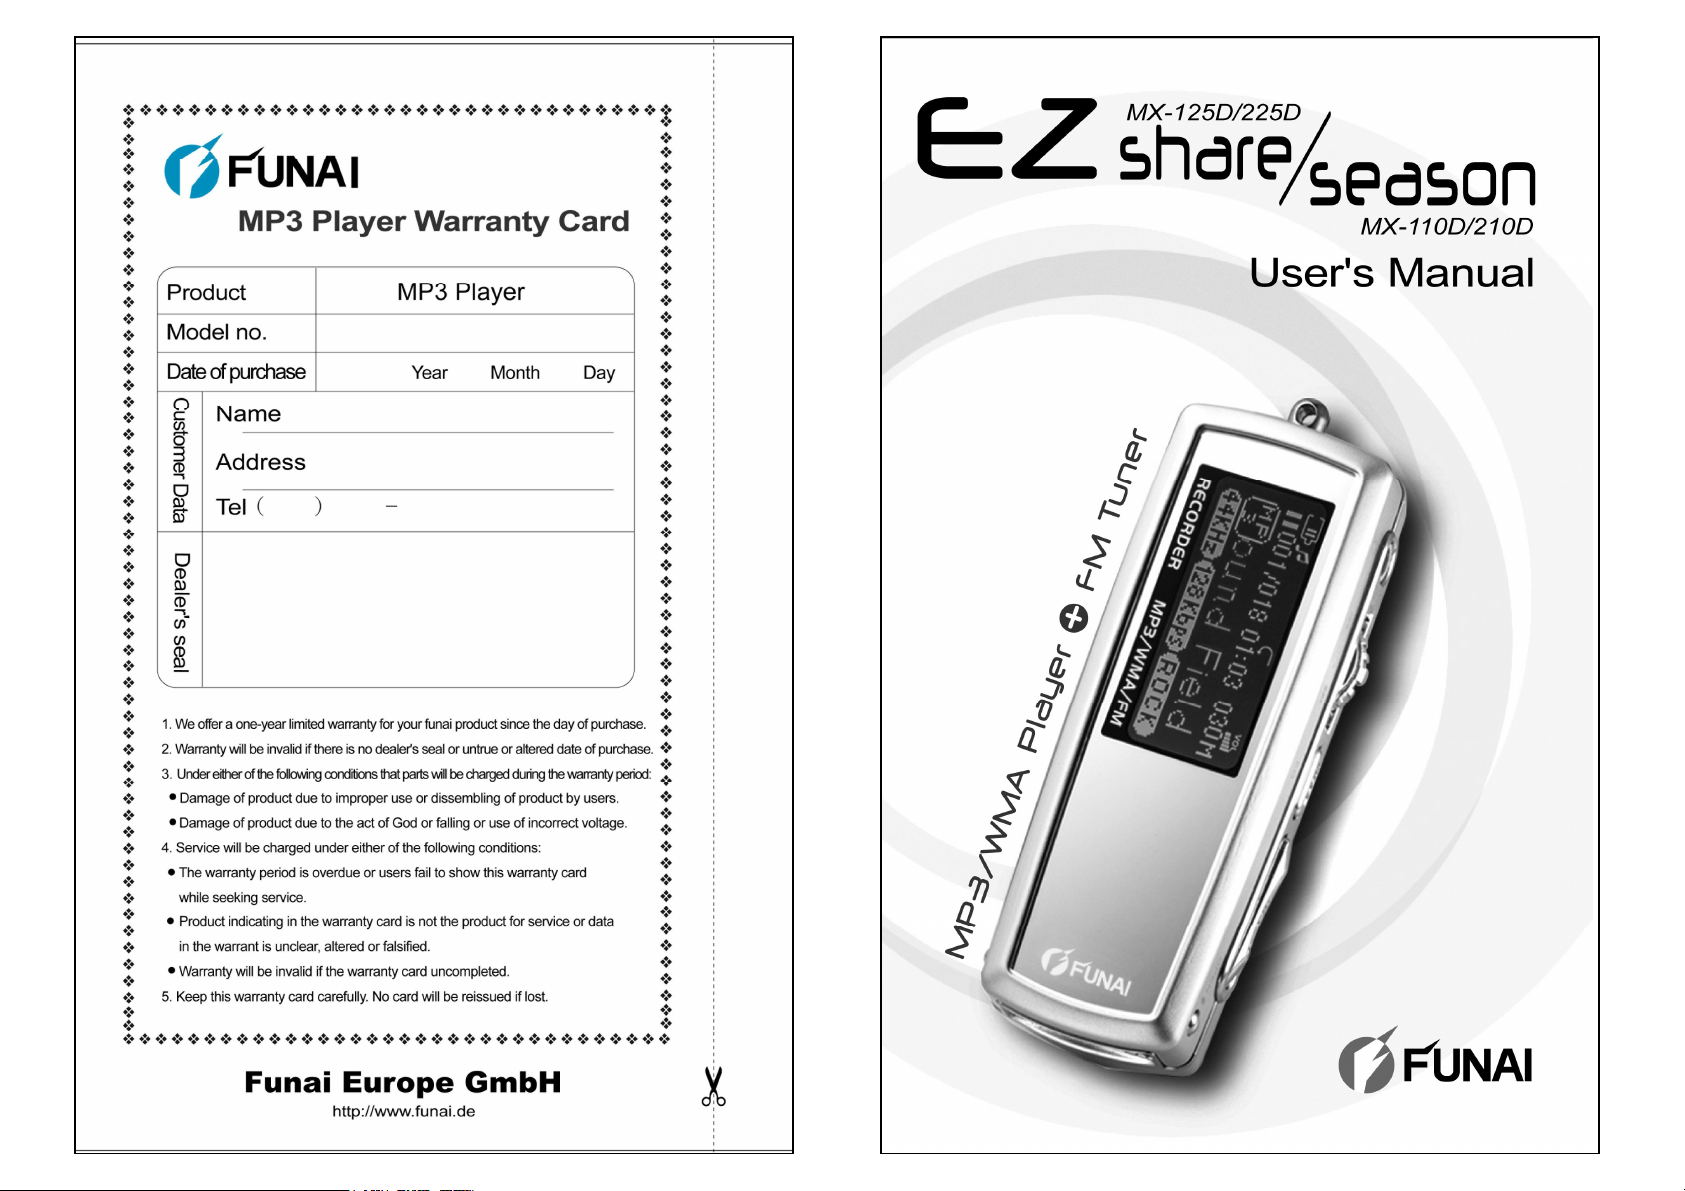
V2.12F

About FUNAI website
Product features
z URL: http://www.funai.de
z From the FUNAI website, you can learn more about
our company, keep informed of the latest news about
FUNAI, read more about our products, download
related software and receive technical support.
z You can download the latest version of firmware to
keep the player in optimal condition at all times.
FUNAI makes no representation for the errors, omissions
or updates of this document. FUNAI also makes no
representation for the data or music files lost of the player.
Users should download the latest version of the user's
manual from our website.
FUNAI is a registered trademark of Funai Europe GmbH.
Trademarks of Microsoft Windows Media and Windows
are owned by Microsoft Corporation.Trademarks of other
products mentioned in this user's manual are owned by
respective companies or organizations.
C 2004 Funai Europe GmbH. All rights reserved.
○
z Unique design
Mirror surface design; special grid-structure for
thumbnail pictures; changeable panels; and unique blue and
white backlight.
z World-premiered player-to-player data
transfer function
Exclusive data transfer kit to allow player-to-player data
transfer for sharing of music, voice and file data.
z Changeable cabinets to match your
moods (MX-125D / 225D series)
High-quality aluminum alloy cabinets in a wide variety of
colors allow you to change the appearance of the player to
match your moods everyday.
z Multilingual display support
Supports over 40 languages and offers user interface in 10
different languages.
z Multiple audio file format support
Supports MP3, WMA and ADPCM (WAVE) formats.
z Super energy saving
Supports continuous playing for 18 hours for one alkaline
battery.
1
2

Product features
Contents
z Firmware update
With the free online firmware download, you can update
new firmware to the player via USB easily.
z Listening to FM channels
You can listen to any FM channel loud and clear with the
Player. You can also search and store your favorite FM
channels, and even record a program on the player
if you feel like it.
z 19 EQ options
The Player comes with 19 different equalizer options:
Normal, Rock, Jazz, Classic, Pop, Ultra-Bass, Blues, Club,
Dance, Full Bass & Treble, Full Treble, Large Hall, Live,
Party, Reggae, Ska, Soft Music, Soft Rock, and Techno.
z High quality sound effects
The Player has an S/N ratio greater than 95dB.
z Portable storage device
The Player is also a portable storage device allowing high
speed data transfer to and from a PC with USB
1.1 / 2.0 full-speed interface.
About FUNAI website ........................................1
Product features................................................2
Appearance.......................................................5
Installing batteries .............................................7
Changing panel ...............................................12
Turning the player on.......................................14
Turning the player off.......................................15
LCD display description...................................16
Basic operation ...............................................18
Installing software............................................20
Connecting the player to a PC.........................26
Copy files into the player .................................28
Firmware update .............................................29
Main menu ......................................................33
Connecting your player with another player.....34
Playing back music..........................................36
Recording and playing back voice files............41
Listening to FM channels.................................43
Recording an FM program...............................45
Setup...............................................................48
Changing cabinets...........................................58
Troubleshooting...............................................59
Cautions..........................................................61
List of accessories........................................... 62
Firmware update failure...................................66
Certification information...................................67
3
4
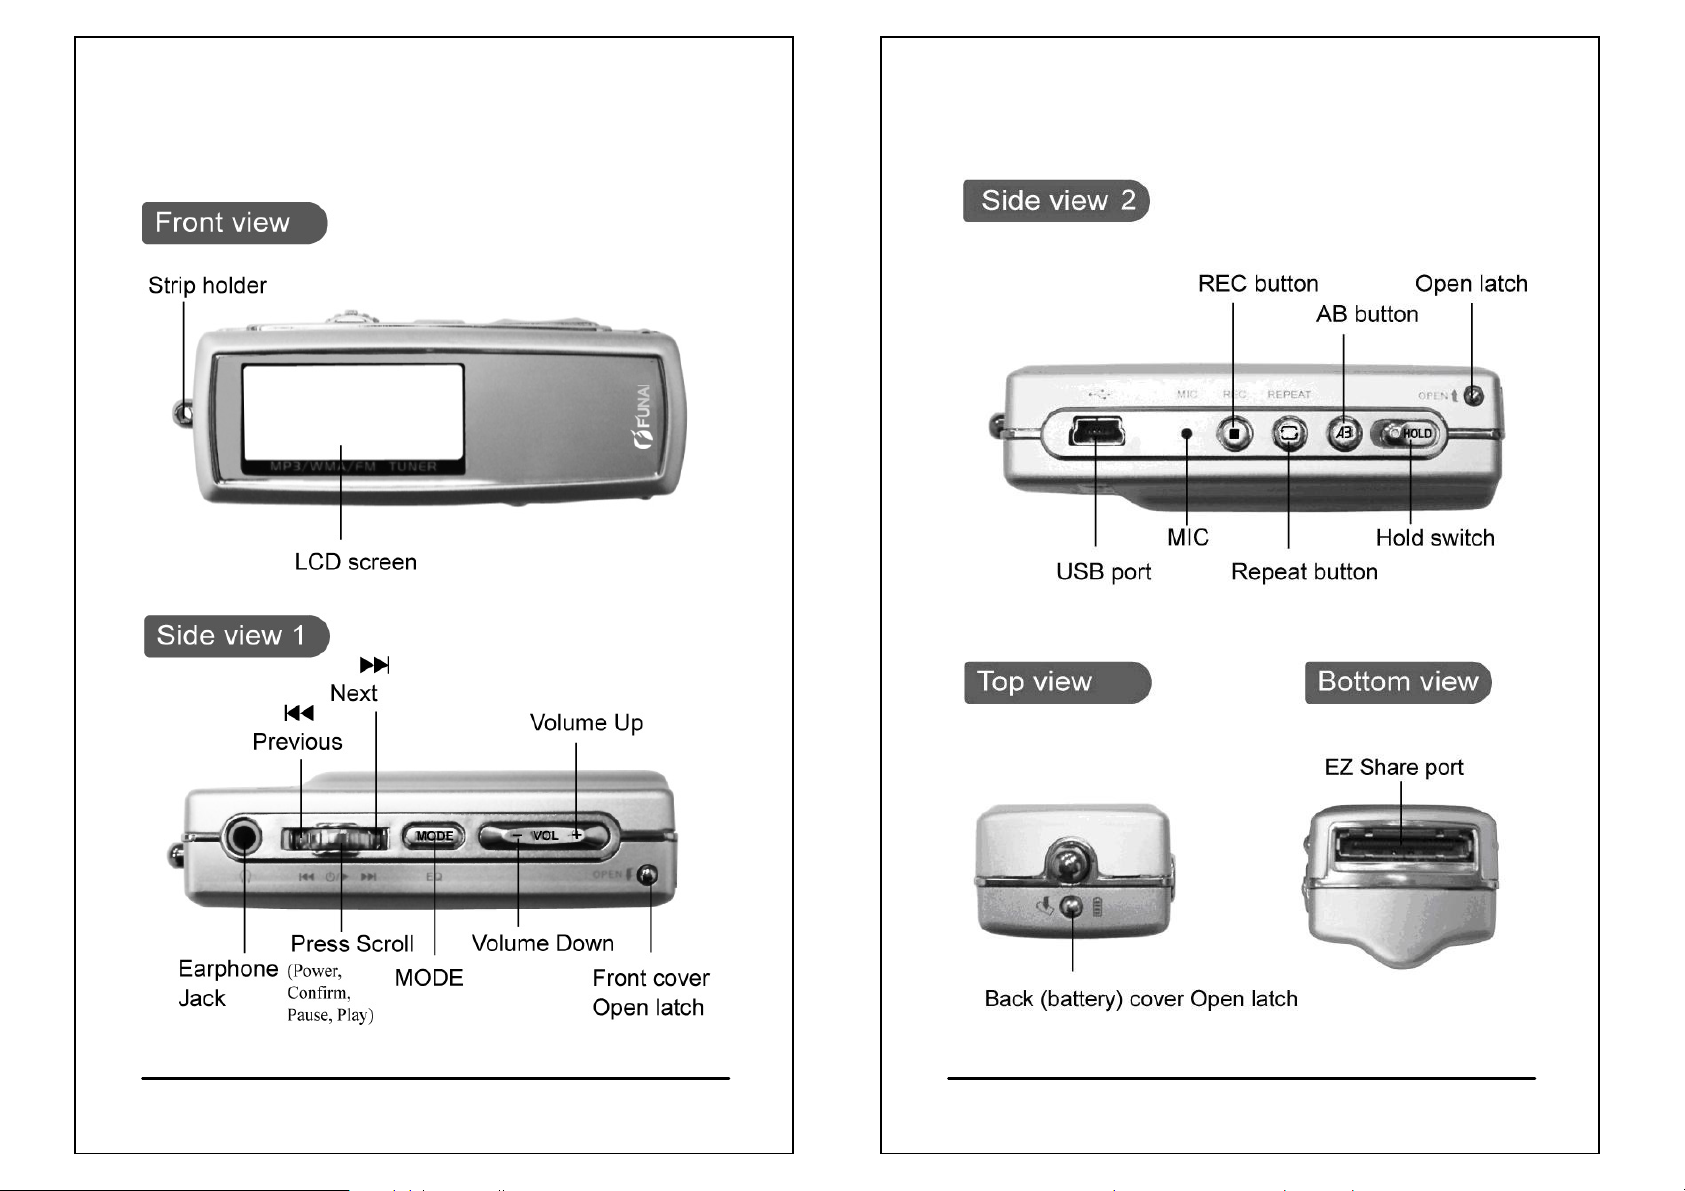
Appearance
Appearance
(MX-125D/225D)
(MX-125D/225D)
(MX-125D/225D)
5
(MX-125D/225D)
6
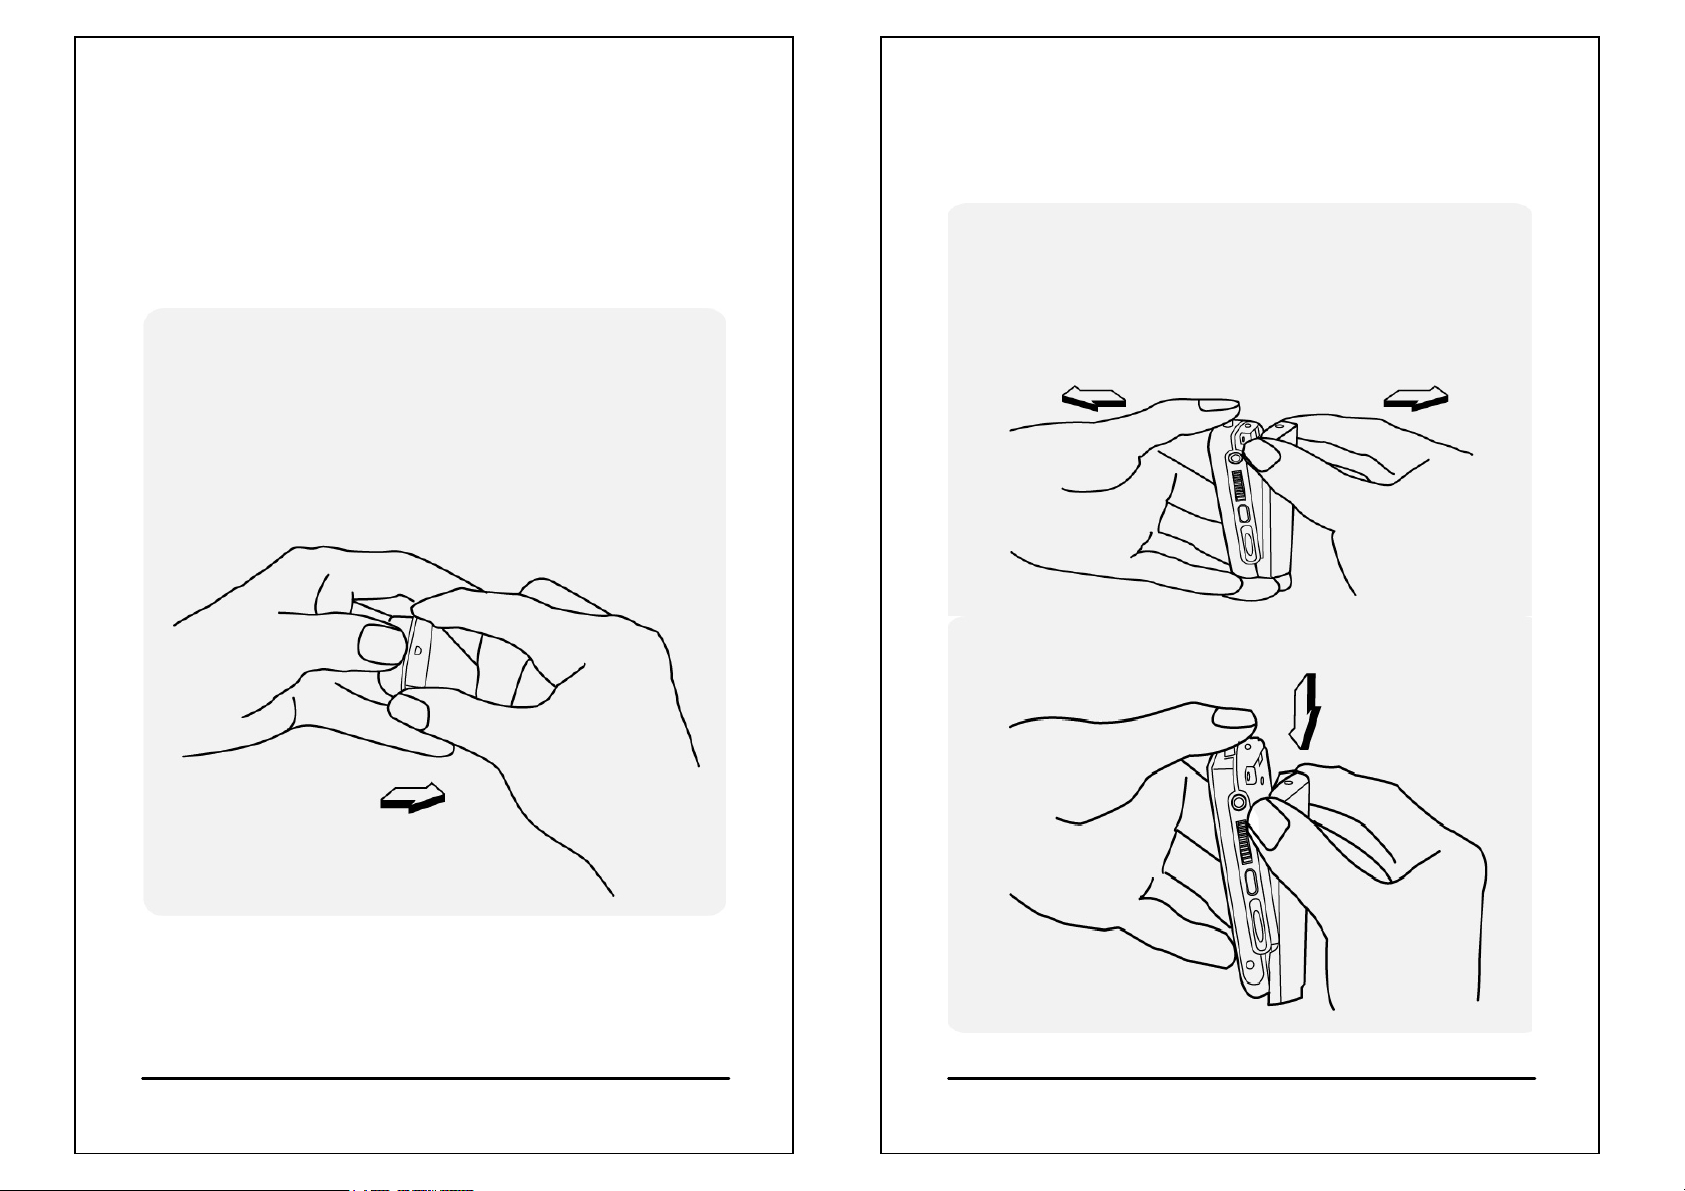
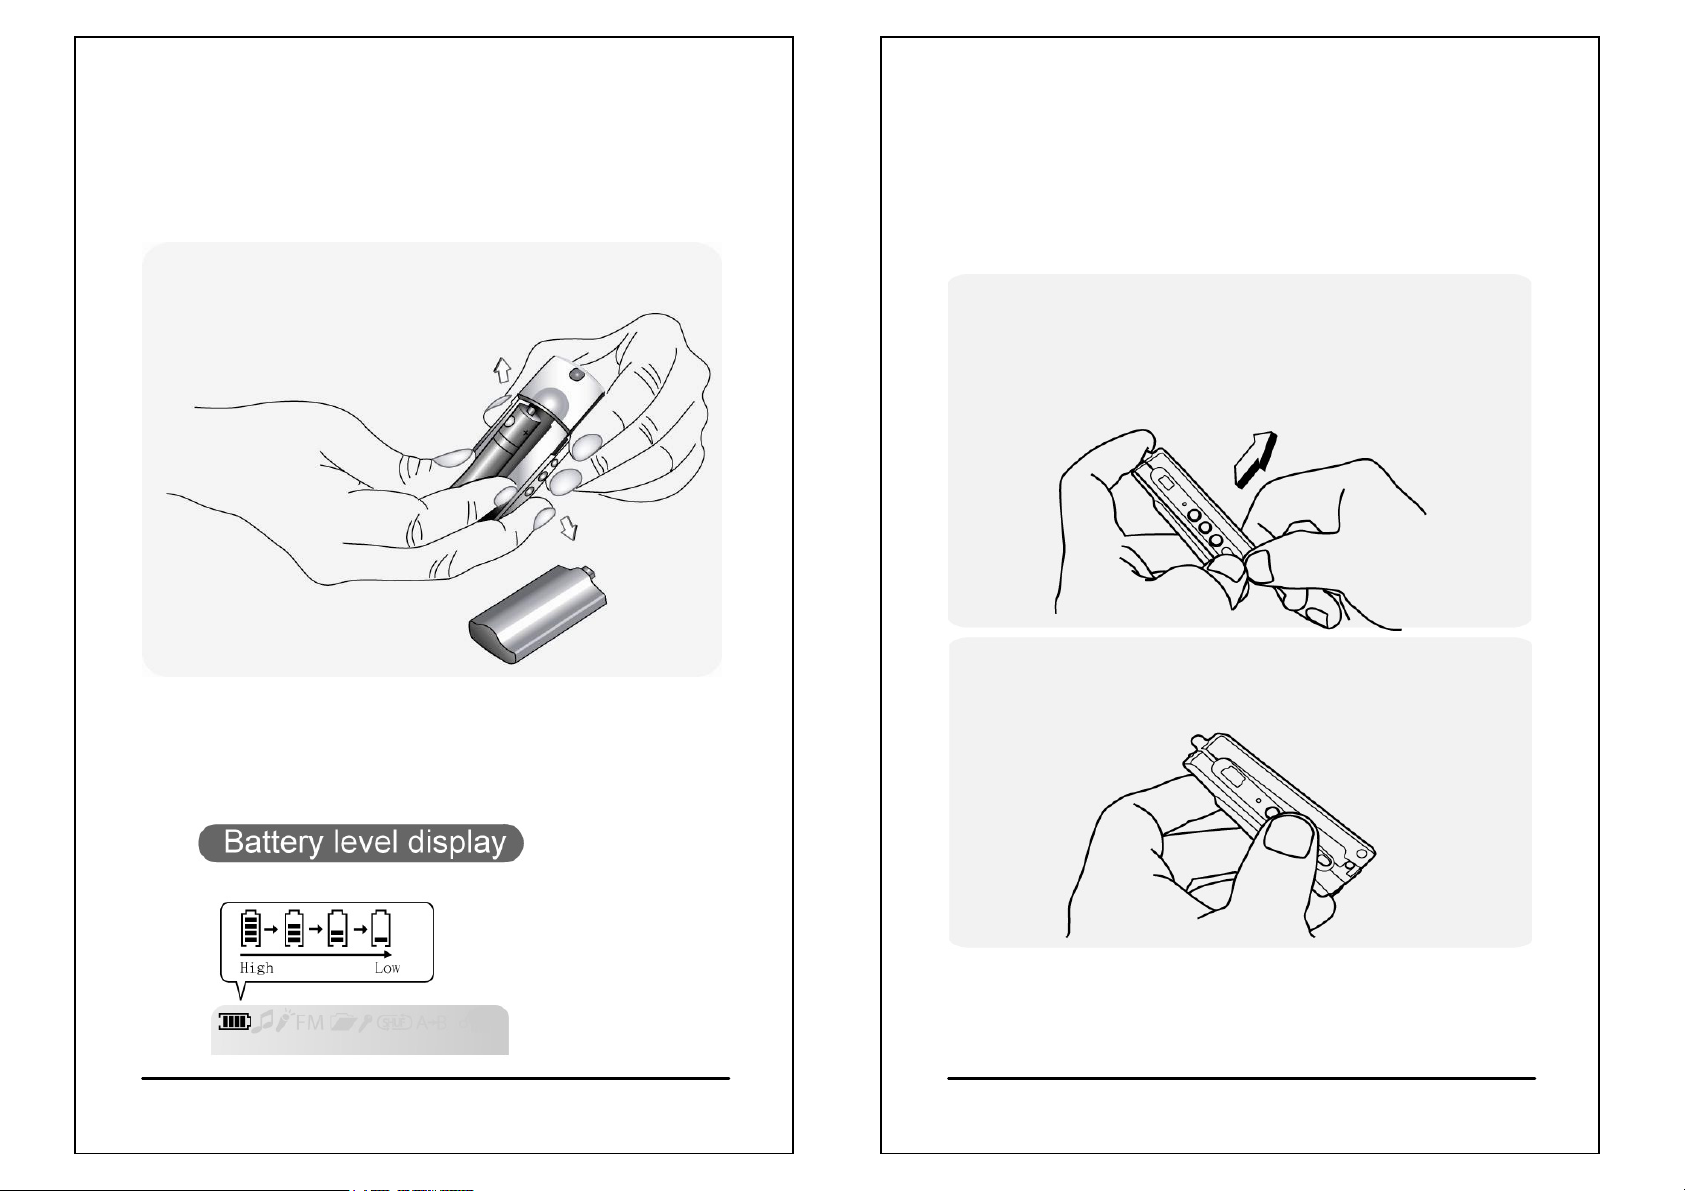
Installing batteries
Installing batteries
Turn the player off before installing batteries. Open the back
(battery) cabinet.
z Installing batteries for MX-125D / 225D
1. Press and hold the strip holder (p. 5) with
one thumb and press and hold the back
cabinet Open latch (p. 6) with alternate thumb.
Hold the player with other fingers
at the same time.
(For MX-125D and MX-225D only)
2. Open the back cabinet by pressing and holding
the two sides of Open latch as shown in the
picture below. Do not press the Open latch
directly to avoid damaging.
3. Move the back cabinet downward to detach
it from the player.
7
8
Installing batteries
Installing batteries
(For MX-125D and MX-225D only)
4. Install new batteries in the battery compartment. Make
sure that the poles of batteries are installed correctly.
Wrong battery installation will cause the player damage.
5. Install the back cabinet by aligning it to the player and
then the latch.
z
Installing batteries for MX-110D / 210D
1. Press and hold the two sides of the player body
with one hand, and press and push down
the battery cabinet with alternate thumb.
Hold the player with other fingers
at the same time.
9
10
Installing batteries
Changing panel
(For MX-110D and MX-210D only)
2. Install new batteries in the battery compartment. Make
sure that the poles of batteries are installed correctly.
Wrong battery installation will cause
the player damage.
3. Install the back cabinet by aligning it to the player and
then the latch.
(For MX-125D and MX-225D only)
Please power off the player and tear off the protective
membrane before changing the front panel.
1. Hold the player with one hand and press and
hold the front cabinet Open latch (p.5) with the
thumb of another hand. Slowly lift the front cabinet
near the bottom of the player.
2. Lift the front cabinet near the bottom of
the player about 1cm, as shown in the picture below.
11
12
Changing panel
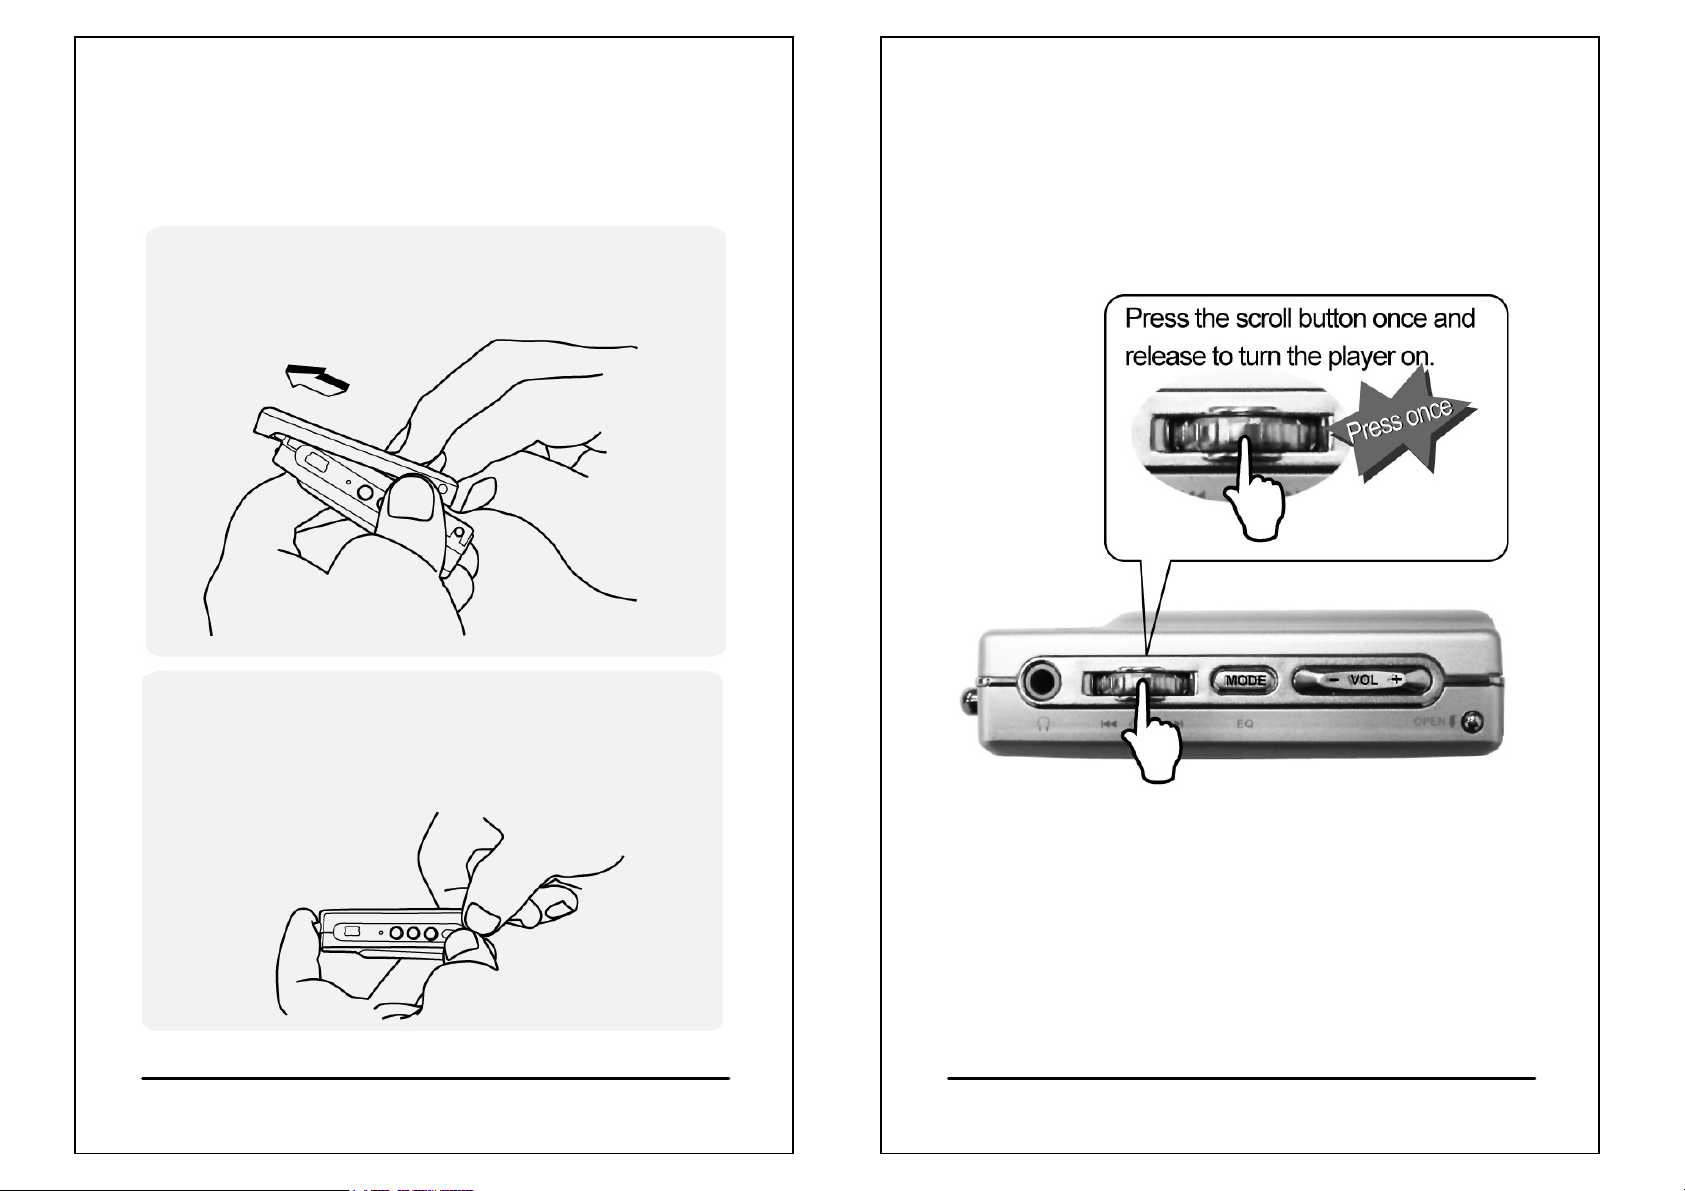
Turning the player on
(For MX-125D and MX-225D only)
1. Push the front cabinet toward the direction of the strip
holder (p. 5) to detach it from the player.
2. Place the panel you want to replace with in the slot and
install back the front cabinet according to the reverse
order of opening the front cabinet.
z
Press the Scroll button to turn the player
on.
z If the player turns on the backlight and show nothing on the
screen, please try to exchange a new battery. If the status is
still the same after exchanging a battery, try to install the
firmware driver from your CDROM and update the firmware
of the player, follow the procedure as p. 29.
13
14
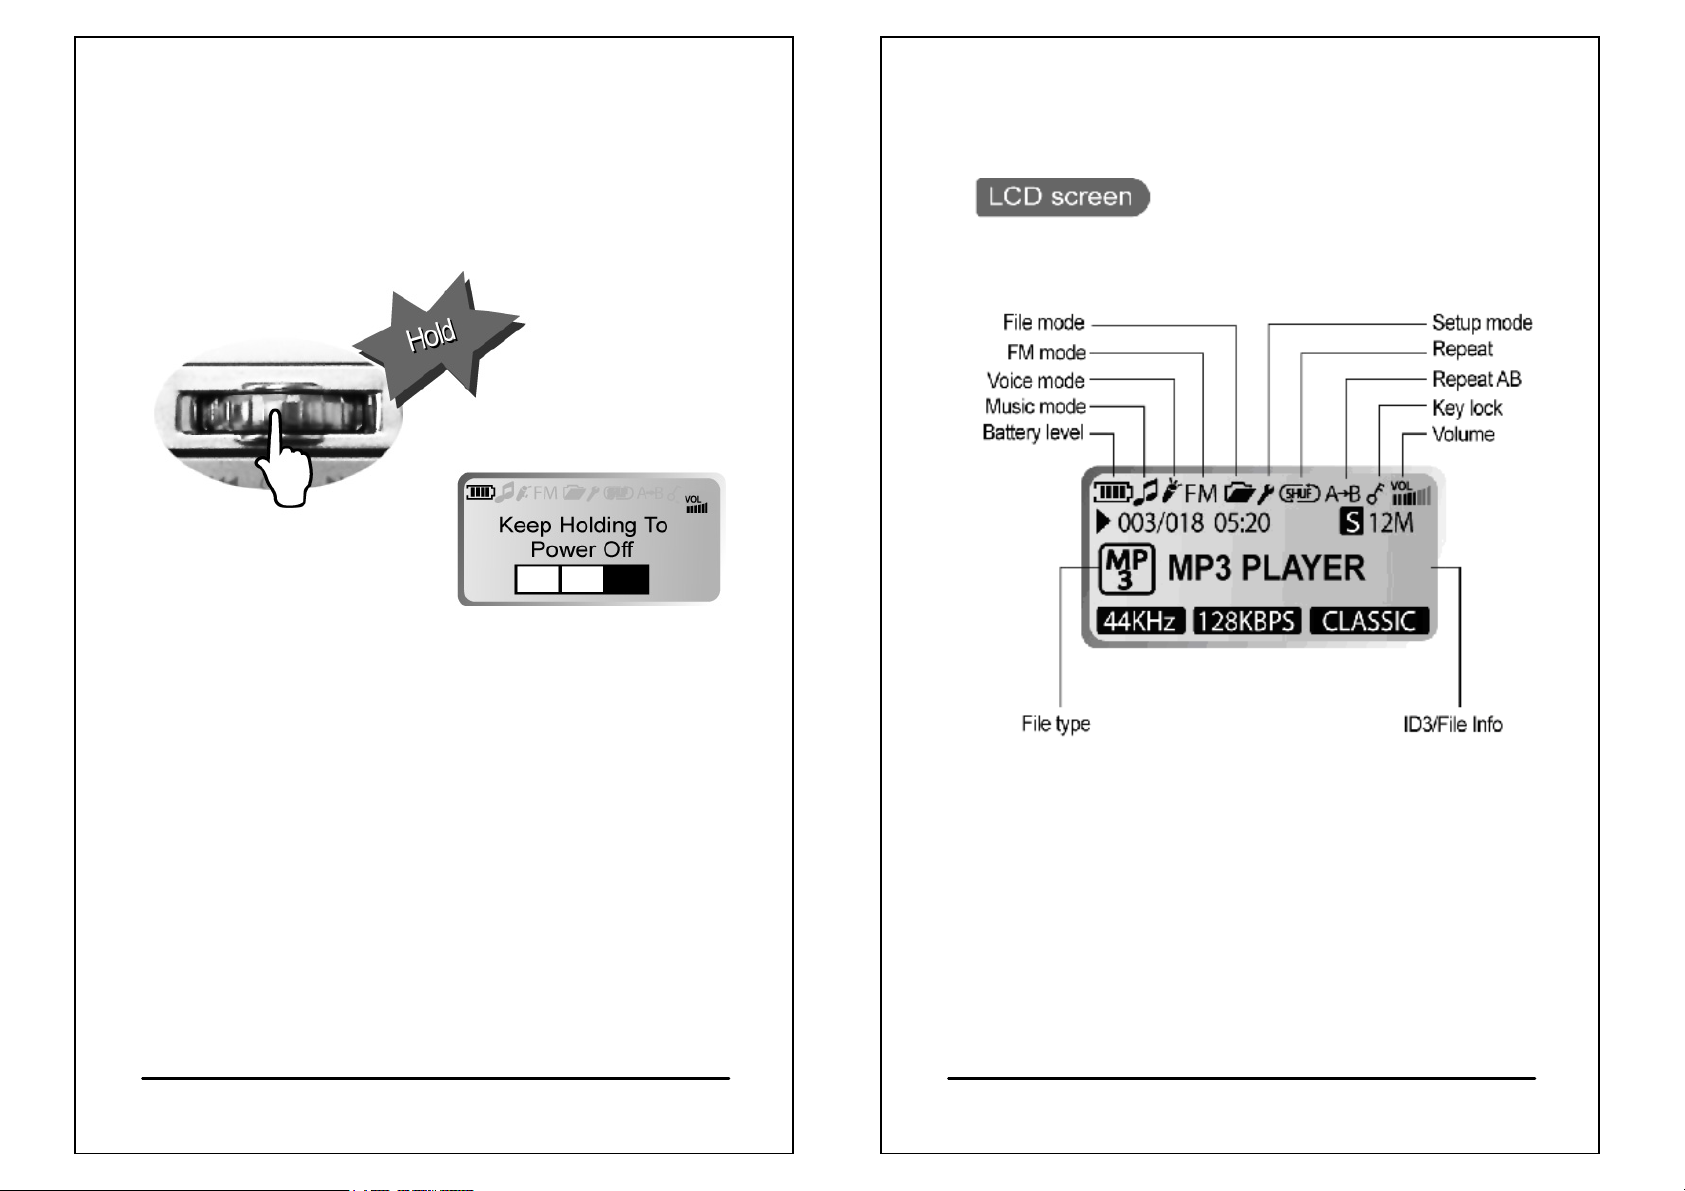
Turning the player off
z
Press and hold the Scroll button for about
3 seconds to turn the player off.
LCD display description
z Timer off
The player will turn off automatically when being idle or
operating for a period of time. You can set the timer from
Setup to adjust the duration of idling or operating.
(Default is 5 minutes) (See p. 54 and p. 55 for details)
15
16
LCD display description
Basic operation
* The free memory size will be less than the internal memory
size (128MB or 256MB) when the player is empty because
the firmware of player stored in the player to occupy some
free space.
1. Select previous track/channel/file/item
2. Play/Pause/Confirm/Power
3. Select next track/channel/file/item
4. Enter Main Menu to select other mode / select EQ
5. Reduce volume
6. Increase volume
7. Start/Stop recording
8. Repeat/Shuffle
9. Repeat AB for language learning
10. Key lock / Hold switch
17
18
Basic operation
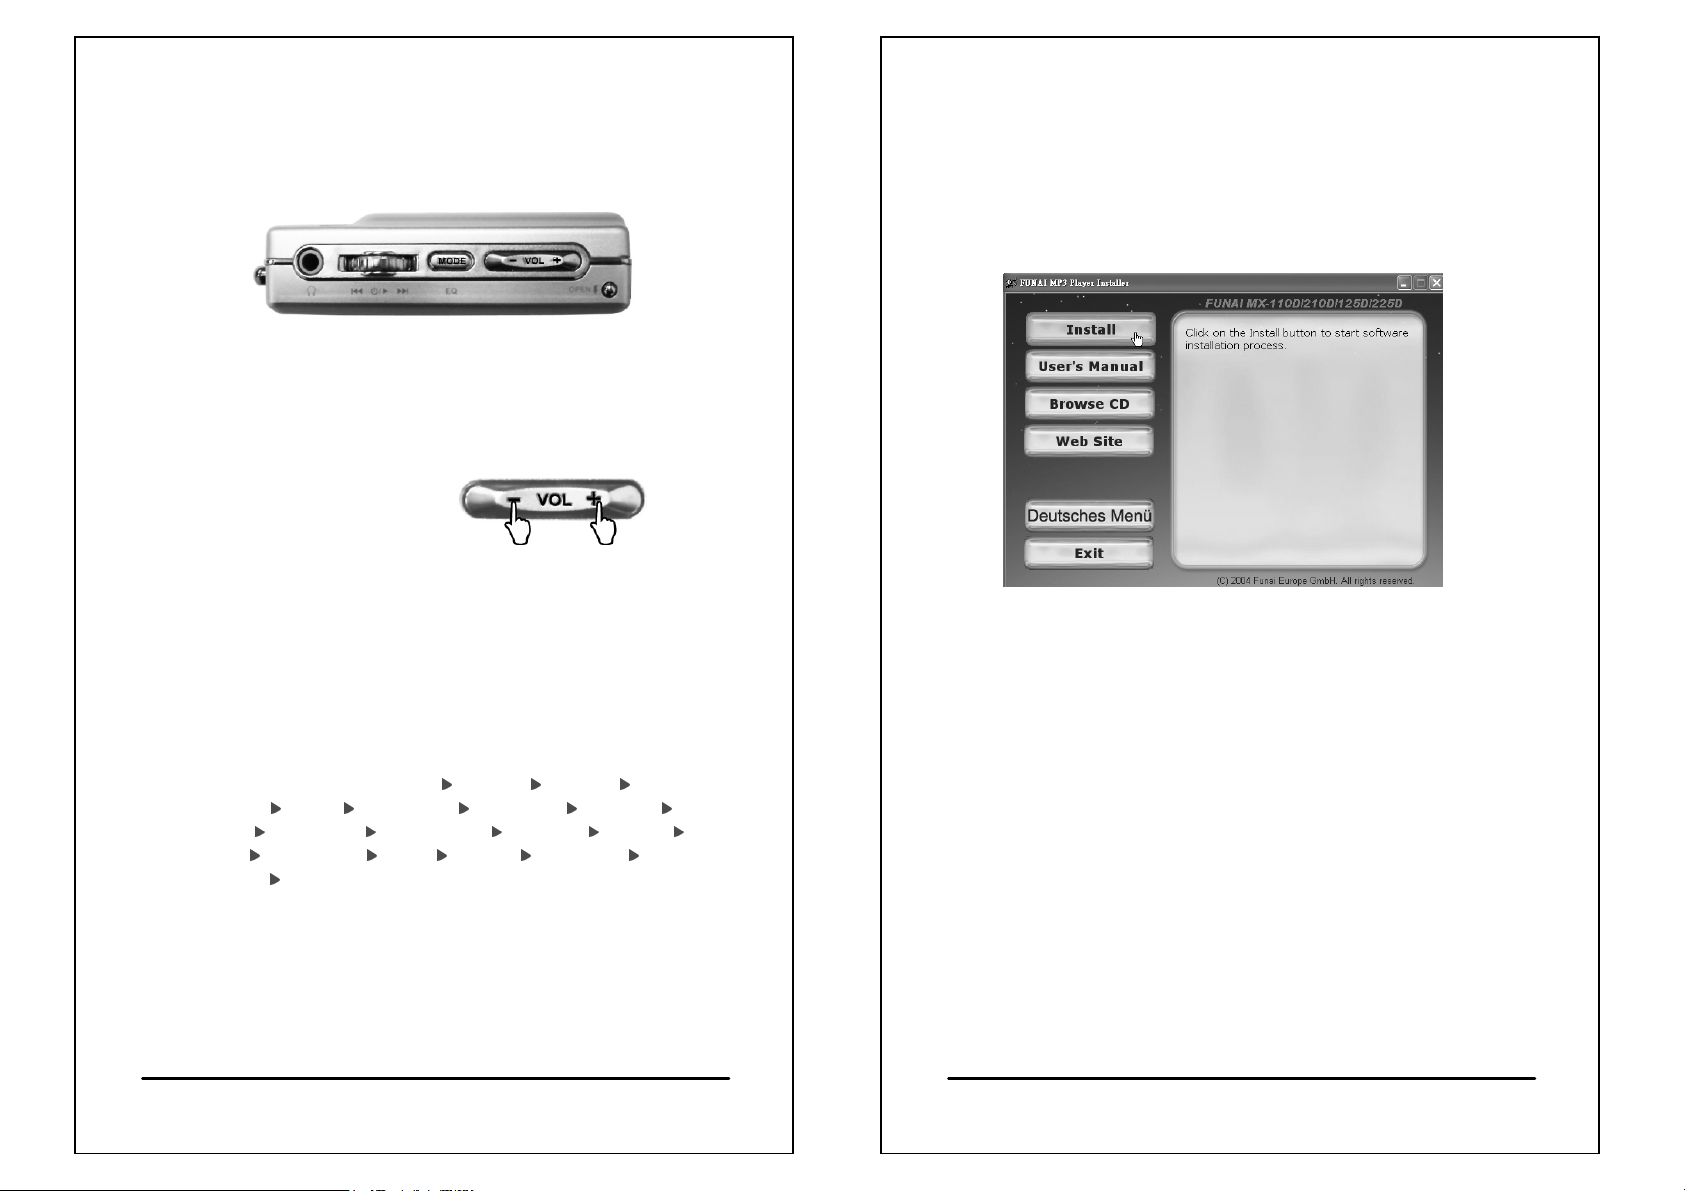
z Press + on the volume button to increase volume.
Press - on the volume button to reduce volume.
z While playing back an audio file, press and hold
MODE for about 3 seconds, the EQ indicator on
the lower right corner of the LCD screen will blink.
Scroll the Scroll button to select an EQ type and
press Scroll button to confirm selection.
(Default EQ: ROCK)
EQ options cycle : NORMAL ROCK JAZZ
CLASSIC
DANCE
PARTY
TECHNO
Where “U.BASS” means Ultra-Bass; “FULL BT” means
Full Bass & Treble; “FULL TRE” means Full Treble;
“L.HALL” means Large Hall; “S.ROCK” means Soft Rock.
POP U.BASS BLUES CLUB
FULL BT FULL TRE L.HALL LIVE
REGGAE SKA SOFT S.ROCK
NORMAL
Installing software
z
Put the Installation CD in the CD-ROM, and the following
screen will pop up on your PC monitor automatically.
(Screen is subject to change due to different versions of software.)
z If the installation program does not run automatically, run
the autorun.exe program on the Installation CD manually.
z The Installation CD contains the driver installation
(Firmware Download) program and the user's manual.
z Click Install to start software installation.
19
20

Installing software
System requirements
z
- CPU: Pentium 133MHz or faster
- Device: CD-ROM
- Interface: USB port (1.1 or 2,0)
- OS: Windows 98SE/ME/2000/XP
- Disk space: 5MB
z The Firmware Download program that comes with the software
installation program will install the latest version of firmware to
your player.
Installing software
z
Program installation
Click Install to install drivers and
the latest firmware download program.
1.
2. Click [Next].
21
22

Installing software
Installing software
3. Click [Yes]
4. Click [Next]
5. Click [Next]
6. Installation progress screen
23
24

Installing software
Connecting the player to a PC
7. Click [Finish] when finish the installation.
z
If you want to update the player firmware or duplicate
music files to the player, connect it to a PC with a
USB cable as shown in the picture below.
z Connectors on the USB cable
25
26
Connecting the player to a PC
z
After connected the player and PC, the OS will automatically
generate a Removable Disk in My Computer. You can enter
the disk to access the data In the player.
z You can access to the player from the Window Explorer
(Windows 2000/XP)/File Manager (Windows 98SE/ME) or
My Computer and add audio files or other files to and erase
files on the player.
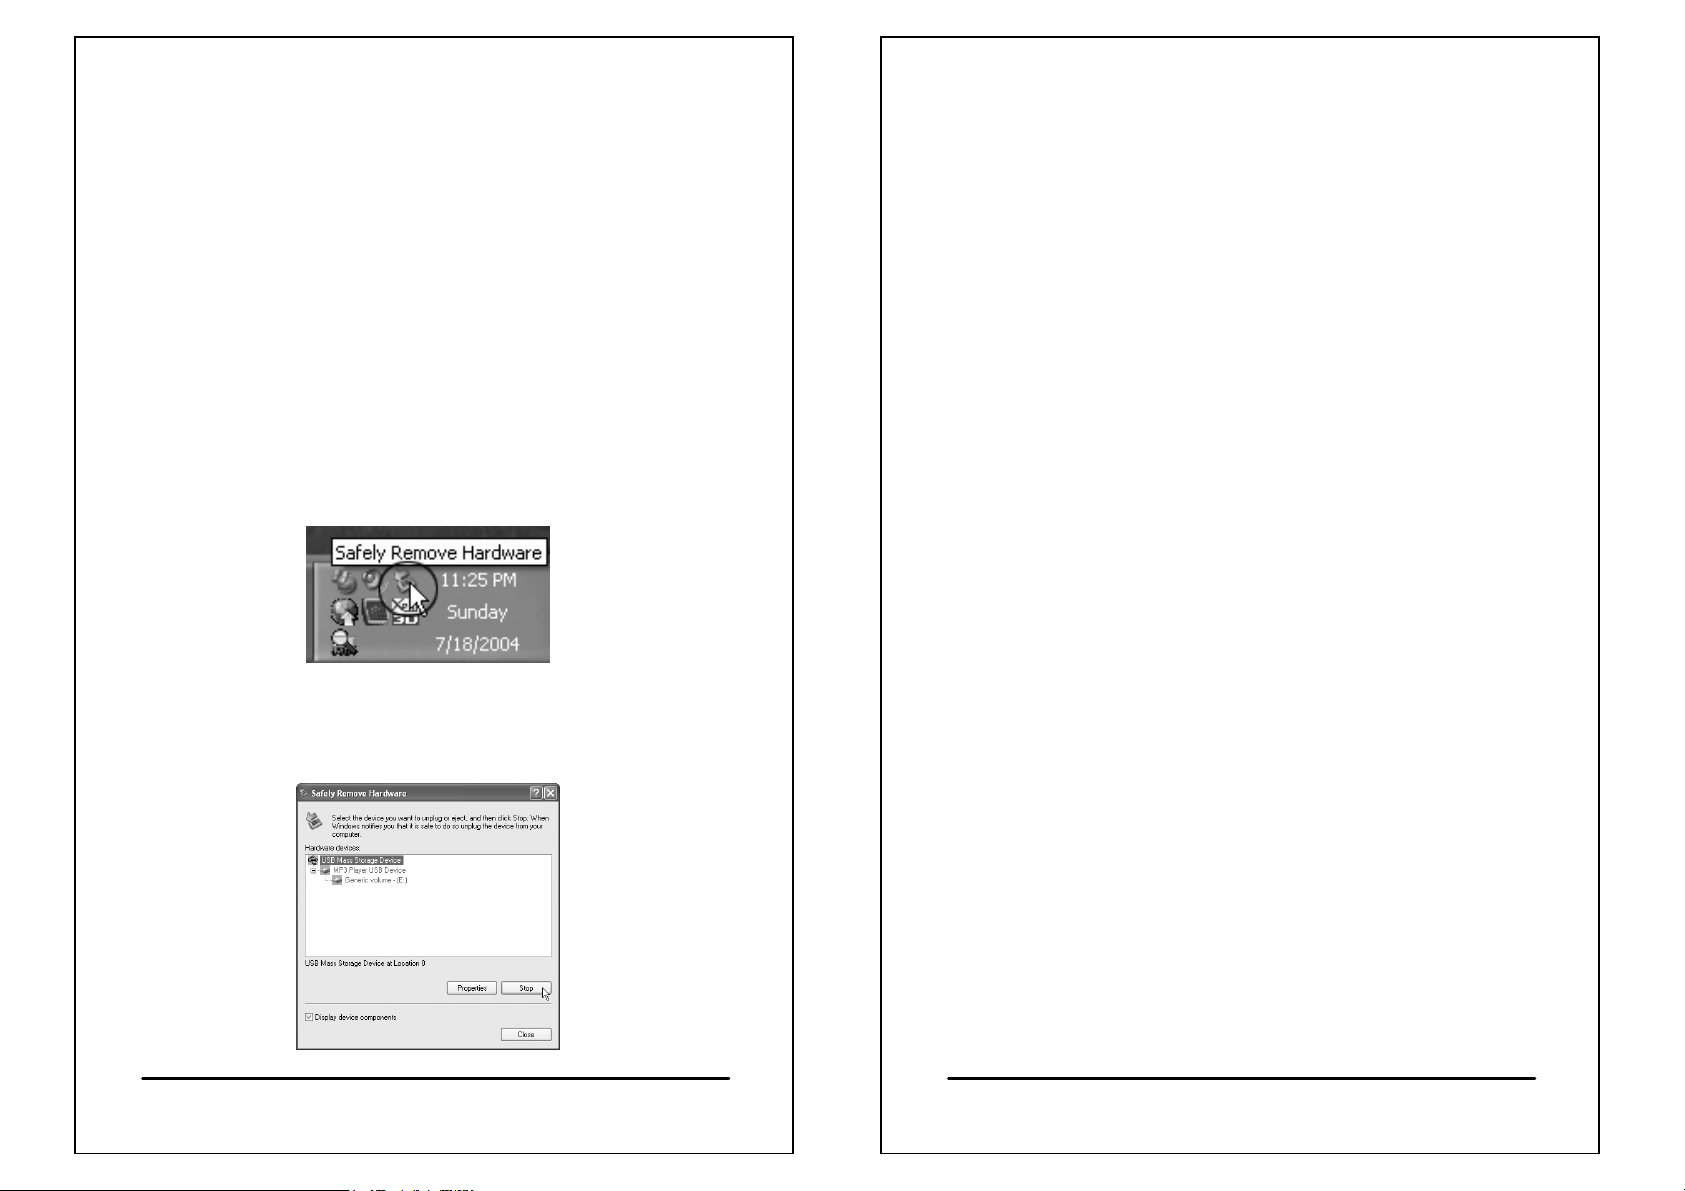
z If you want to remove the USB cable from the player after
adding or erasing files, follow the instructions below to avoid
damaging files on the player.
1. Double click the Remove Hardware icon in the taskbar
tray as shown in the picture below
2. Click Stop when the following window pops up. When
the message "You can remove hardware now"
appears on the screen, remove the player.
Copy files into the player
z Please refer to the last section about “Connecting the player
to a PC”. Connect the player and
the PC with a USB cable.
z After connecting the player to a PC successfully, there will
be a new disk “Removable Disk” in My Computer.
z Enter the directory stored your music files (mp3 or wma)
and select them thru your mouse. After selection, you’re
your mouse on the selected files and click right button of
your mouse to select “Copy”, enter the Removable Disk
from My Computer, and click right button of your mouse to
select “Paste”, then the music files will be copied into the
player.
z After copying files into the player, please follow the
procedure of the last page p. 27 to remove the hardware.
27
28

Firmware update
z The firmware of the player can be upgradeable to keep the
player in optimal condition at all times and expand the file
format and language supports.
z Get the latest firmware from our website or New Firmware
CD disc. Confirm the model of your player before updating
the firmware.
z If you use New Firmware CD disc to update the firmware,
put the CD disc into CDROM, and it will pop-up a installation
menu automatically, please refer to p.20.
z If you get the new firmware from our website, extract the
downloaded file to a directory, e.g. C:\temp. Open the
directory from My Computer or Window Explorer (Windows
2000/XP)/File Manager (Windows 98SE/ME) and run
Setup.exe (double click the ).
z If you have already installed a previous version of Firmware
Download program, remove it first by clicking Yes in the
following dialog box.
Firmware update
Click Finish to complete software remove.
z
z Run autorun.exe in the root directory of CD drive again
in windows explorer in p.20.
29
30
Firmware update
Firmware update
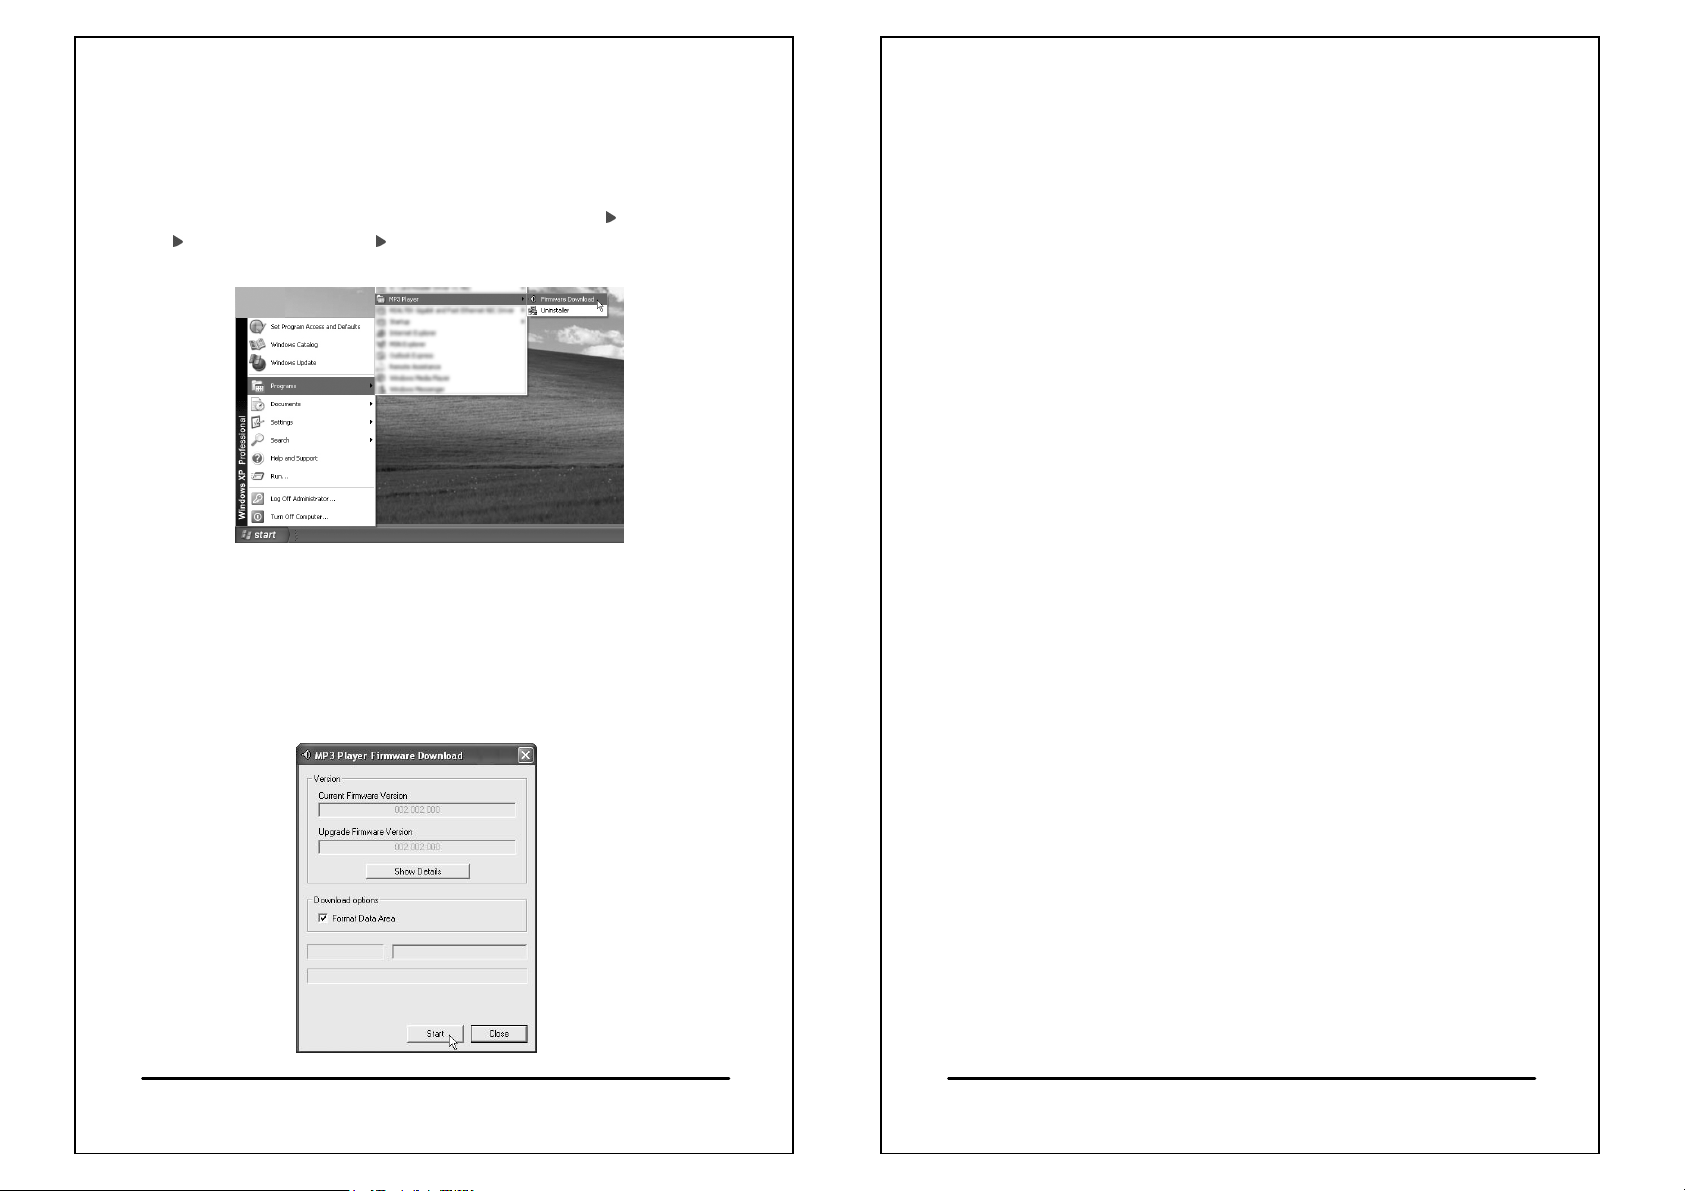
z Select Firmware Download program from Start Programs
FUNAI MP3 Player Firmware Download
as shown in the picture below.
z After running the firmware update, click Start to update
firmware. (Caution! All data including audio and personal
files on the player will be deleted, and default settings will be
restored when Format Data Area option is checked.
You will need to Format Data Area when updating most
firmware versions.)
Click Close to complete firmware update and disconnect
z
the player from your PC as shown in p. 27.
z Do not disconnect the USB cable while updating firmware.
You will be unable to turn your the player on if firmware
update fails or is interrupted.
z If you cannot turn on your player due to firmware update
failure, see Firmware Update Failure in p. 66 for details.
31
32

Main menu
z When you press MODE button to switch the mode, you will
see 5 icons in a main menu as below. Push the Scroll button
to select the mode and press the Scroll button to enter the
mode.
Music mode
Voice mode
FM radio mode
File mode
Setup mode
Connecting your player with
another player
Please contact your agent for purchasing the connector.
z Connect your player (A) and another player (B)
to the exclusive data transfer kit as shown in the
picture below. (Face the side of the data transfer kit
with a screw hole upward.)
z If you want to transfer files from A to B, we recommend
you to set A to File Send mode and B to Receive mode
before connecting them to the data transfer kit. Then
select files on A and press the Scroll button to start
transferring files to B. (No file menu will be found on A
if it is incorrectly connected.)
Select File Send mode
Turn on A and press Mode to launch to File mode (p. 33).
Select File Send mode as shown in the picture below.
33
34

Connecting your player with
Playing back music
another player
Select Receive mode
Turn on B and press Mode to launch to File mode (p. 33).
Select Receive mode as shown in the picture below.
Sending files
Scroll the Scroll button to select files displayed on player A
and press Scroll button to starting sending files as shown in
the picture below.
z Do not touch any buttons or unplug the player while
transferring files; otherwise the player will freeze and data
sent will be damaged.
35
36

Playing back music
z Switch mode:Press Mode once to launch main menu to
select other mode. (See p. 33)
z Interrupting playback:Press Scroll button once to interrupt
(Pause) playback and press again to resume playback.
z Selecting previous track:Push Scroll button backward
(to the left) to start playing the audio file from the beginning
and push again to skip to the previous track.
Playing back music
z Selecting next track:Push Scroll button forward (to the right)
to skip to the next track.
z Fast forward:Push and hold Scroll button forward (to the
right) to run forward and release button to resume normal
playback.
z Fast rewind:Push and hold Scroll button backward (to the
left) to run rewind and release button to resume normal
playback.
* Fast forward and fast rewind functions will not work
properly on MP3 files in VBR format.
37
38

Playing back music
z Selecting EQ type:Press and hold Mode for about 3
seconds, the EQ indicator (see p.17) right corner of the LCD
on the lower screen will blink. Scroll the Scroll button in either
direction to select an EQ type. Press Scroll button to confirm
selection or leave it for about 5 seconds to let the player to
save the setting automatically.
EQ options cycle: NORMAL
CLASSIC
BLUES
FULL BT
LIVE
SKA
TECHNO
Where “U.BASS” means Ultra Bass;
“FULL BT” means Full Bass & Treble;
“FULL TRE” means Full Treble;
“L.HALL” means Large Hall;
“S.ROCK” means Soft Rock.
ROCK JAZZ
POP U.BASS
CLUB DANCE
FULL TRE L.HALL
PARTY REGGAE
SOFT S.ROCK
NORMAL
Playing back music
Repeat and Shuffle Play:While playing an audio file,
z
every time you press Repeat
will change the repeat mode or
Shuffle mode.
z Repeat sequence A → B:Press AB button once to mark
the start of sequence, and the symbol A → will appear on
the LCD screen. Press A → B button again to mark the end
of sequence, and the symbol if A → B will appear on the
LCD screen.
The player will start playing the selected sequence
repeatedly.
Press AB button again to cancel repeat AB.
39
40

Recording and playing back voice
Recording and playing back voice
files
Switch mode:Press Mode once to launch main menu to
z
select other mode. (See p. 33)
z The player will start recording whenever you press
the REC button, except in File or Setup mode.
z Press Scroll button to pause recording and press again to
resume recording.
z Press REC button again to stop recording.
The player will automatically save the recording file in the
VOICE directory. The name of recording files will be
assigned in numerical order, e.g. V001, V002, V003, etc.
files
z Playing back a voice file:Select the file and press the
Scroll button once to start playing.
z Selecting the previous voice file:Push the Scroll button
backward (to the left) to start playing the voice file from the
beginning and push again to skip to the previous voice file.
z Selecting next voice file:Push Scroll button forward
(to the right) to skip.
41
42

Listening to FM channels
z The earphone is the antenna of FM radio in the player,
thus insert the earphone previously otherwise FM channels
will not be found/searched.
z There are two kinds of FM band, one is US/Europe Band
(87MHz~108MHz) and the other is Japanese Band
(76MHz~91MHz). Just press and hold the MODE button
in FM mode to switch the two modes. When the player is
in Japanese Band, the display on the player will show “JPN”,
if it’s in US/Europe Band, “JPN” will be disappeared.
Listening to FM channels
z
Auto search: When you push once Scroll button forward
(to the right) or backward (to the left), the player will
automatically search the next or previous FM frequency
with stronger signal.
or
z Frequency adjustment: Press and hold Scroll button
forward (to the right) or backward (to the left), you can adjust
the FM frequency rapidly.
z There are 20 FM channels can be stored in the player.
Press the Scroll button once will skip to next FM channel
(CH01~CH20). Press AB button once will skip to previous
FM channel. The player will automatically save the
frequency to the current FM channel before skip to other
channel.
or
43
or
z Frequency fine tuning: If you want to increase the
frequency with 0.1MHz, push and hold Scroll button forward
(to the right) or backward (to the left), and release Scroll
button, push once Scroll button forward (to the right); If you
want to decrease 0.1MHz, push once Scroll button
backward (to the left).
44

Recording an FM program
Recording an FM program:
If you like the FM program you are listening to, you can
record it on the player. Press REC button (p. 6) to starting
recording. It will record the program instead of the voice
from the MIC.
Press REC button again to stop recording as shown in the
picture below.
After recording:
When the recording is completed, the player will stay in
FM mode. If you want to listen to the recorded program,
press Mode button to switch to Music mode. Select the file
you have just recorded, i.e. F###.WAV, to start playing it
back
File management
z Selecting a function:After entering the File mode,
select a function with the Scroll button: DELETE, FILE SEND
and RECEIVE. Press Scroll button to confirm selection as
shown in the picture below.
z DELETE:Select DELETE to launch to the delete
screen.Scroll the Scroll button up (left) and down (right) to
select the file you want to delete. Press Scroll button to
confirm deletion. If you want to abort deletion, wait for a while,
the player will return to the menu automatically as shown in
the picture below or press MODE button to exit.
45
46

File management
Setup
z Refer to Connecting your player with another
player (p.34) for details about FILE SEND and
RECEIVE.
You can personalize your player from Setup.
Items in the Setup may vary from one firmware version
to another.
z Setup Items:
47
48

Setup
Setup
Setting up the player
z
z In Setup mode, scroll the Scroll button up (left) and down
(right) to select an item. Press Scroll button to confirm
selection and launch to the submenu of the selected
item.
z After launching to the submenu of the selected item,
personalize the settings. Press Scroll button once to
save changes.
z LANGUAGE
The player supports file names and ID3 tag information in
over 40 languages and offers user interface in 10 different
languages, including English, Traditional Chinese, Simplified
Chinese, Japanese, Korean, Russian, Spanish, Germany,
French and Italian. The number of languages is increasing.
(Language options vary from one firmware version to
another.)
EQ
z
Includes NORMAL, ROCK, JAZZ, CLASSICAL,
POP, U.BASS, BLUES, CLUB, DANCE, FULL BT,
FULL TRE, L.HALL, LIVE, PARTY, REGGAE,
SKA, SOFT, S.ROCK, and TECHNO.
z REC.TYPE
You can select different sampling rates to suit your demands.
The greater the sampling rate, the better the recording
quality. Yet, the recording time will be shorter. The lower the
sampling rate, the poorer the recording quality, but the
recording time is longer. The player offers the following 7
sampling rates: 48KHz (192Kbps), 44KHz (176Kbps),
32KHz (128Kbps), 22KHz (88Kbps), 16KHz (64Kbps),
11KHz (44Kbps), and 8KHz (32Kbps).
49
50

Setup
Setup
DISPLAY
z
You can change the display settings here, including B.LIGHT
OFF, CONTRAST, TAG INFO and TIME
DISPLAY
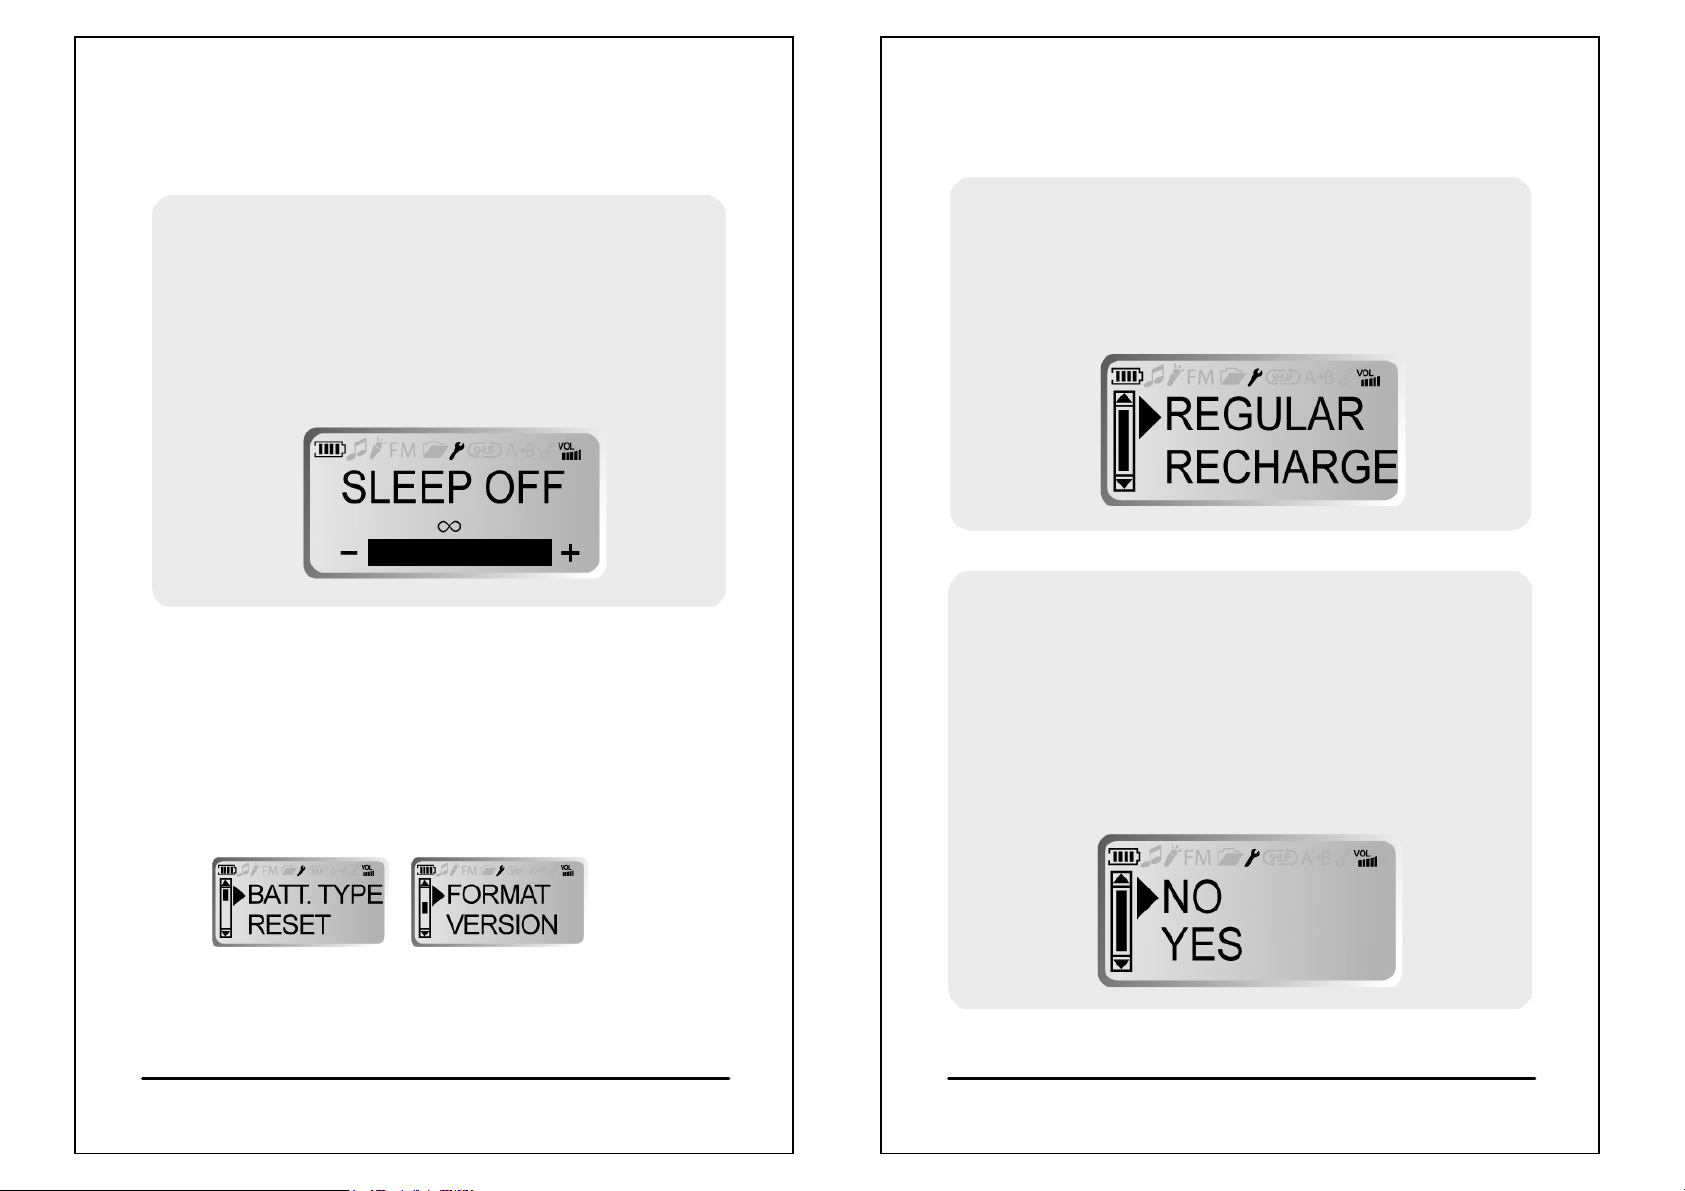
Backlight off (B.LIGHT OFF):
You can adjust the backlight off time from 0 to 60 seconds .
Please be reminded that backlight consumes energy and
will affect the total playing time of the player and ∞
(always on). The default setting is 30 seconds.
If you select "0", it means the backlight is turned off at all
times (energy saving); and if you select "∞" (always on),
it means the backlight is turned on at all times (energy
consuming)
.
CONTRAST:
You can adjust the contrast of the LCD screen here.
TAG INF O :
You can turn TAG INFO on and off. If you turn TAG INFO
on, The player will display the ID3 tag information of the
track. If you turn TAG INFO off, the player will display
the track filename.
51
52

Setup
Setup
TIME DISP:
You can select the time display of the player between
NORMAL or REMAIN. NORMAL refers to the lapsed
playing time and REMAIN refers to the remaining playing
time.
TIMER OFF
z
You can adjust when the player turns itself off, including
STOP OFF and SLEEP OFF.
STOP OFF:
Set the time to the player turns itself off from idling
(including Pause and Stop) to save energy.
The default setting is 5 minutes.
53
54
Setup
SLEEP OFF:
Set the time to the player turns itself off any situation;
i.e. the player will turn itself off automatically when
time is out. The default setting is ∞; i.e. disabled.
z After the player powered off, SLEEP OFF will be disabled
automatically.
z GENERAL
You can change the general settings and view
the firmware version here. Items include:
BATT. TYPE, RESET, FORMAT and VERSION.
Setup
BATT.TYPE:
You can select the type of batteries on the player here,
including REGULAR and RECHARGE.
RESET:
You can reset all changes to their default values here,
including function items and preset FM channels.
RESET will not delete audio and personal files or
data on the player.
55
56

Setup
Changing cabinets
FORMAT:
You can remove all data on the player with FORMAT,
including personal audio and files. All changes will be
reset to their default values.
VERSION:
You can view the firmware version of your player with this
function.
Please contact your agent for purchasing the extra cabinet.
Only for MX-125D and MX-225D.
z Changing front cabinet:
Open the front cabinet - Refer to p.12 for changing panel.
z Changing back cabinet:
Open the back cabinet - Refer to p. 7 for battery installing.
57
58

Troubleshooting
Troubleshooting
If you have problems in operating your player, please check the
troubleshooting guide below before sending it to service.
Problem Check Items PAGE
Unable to
turn it on
Wrong text
display on
LCD screen
No sound
from the
earphone
z Check if batteries are properly
installed and check battery
level.
z Release key lock by pushing
the HOLD switch.
z Check the language options in
LANGUAGE under SETUP.
z Check if the earphone is
completely inserted into
the jack.
z Check the volume level. P.16
z The audio file you are
playing back may be
damaged. Connect the player
to a PC and play the file back
from the PC to see if it works.
P. 7
P. 1 8
P. 4 9
P. 5
P. 2 6
Problem Check Items PAGE
z Check free memory on the
Unable to
download
audio files
Weak
signals for
FM channels
connect my
player to
another
player
player
z Check connection between the
PC and the player, and check
the USB cable.
z Remove or turn off interference
sources from the player.
Interference sources may
include a PC and other
electronic devices.
z Adjust the angle of earphone
cord and the player, for the
earphone cord is the antenna
of the player.
z Check connection of both
players.
z Check one player is staying in
FILE SEND mode and the
other is in RECEIVE mode.
P. 1 7
P. 2 6
P. 3 4 Unable to
P. 3 4
Poor
recording
quality
z Select a higher sampling rate
from REC. TYPE under
SETUP.
59
P. 5 0
My player is
not
responding
when I press
any button
z Release key lock by pushing
the HOLD switch.
z Open the back cabinet and
reinstall the battery.
60
P. 1 8
P. 7

Cautions
List of accessories
z
Shock from walking or actions will not affect the
performance of the player. However, do not drop the player
from high altitude and prevent impact or squeeze in order to
avoid damaging the player.
z Keep the player away from high temperatures, humidity or
dust.
z Do not put the player under heavy objects.
z Do not spray or pour water or other liquids on the player.
z Do not use the player while driving or riding.
Accidents may occur if you are distracted by the music or FM
programs. In some countries, states or regions, it is a
violation of traffic regulations.
z The player has a high output power. Choose a suitable
volume to prevent damage to hearing.
z Opening or modifying any part of the player will void the
warranty.
61
(For MX-125D / 225D only)
62

List of accessories
Technical specification
Item Specification
Memory size
Dimensions (mm) 30 (W) x 79 (H) x 19 (D)
Weight 30g (without battery)
DSP 24 bits
Battery
FM frequency range 76~108MHz full frequency
FM antenna
Earphone output
Frequency response 20~20KHz
S/N ratio
Tot al
Harmonic Distortion
File formats
Bit rate 8Kbps~320Kbps, VBR supported
Digital
volume control
63
MX-110D / MX-125D: 128MB
MP-210D / MX-225D: 256MB
One AAA LR03 type Alkaline
/ NiMH rechargeable battery
Earphone / Headphone
cord antenna
One 3.5mm jack.
(L) 50mW + (R) 50mW
16Ω, at max. volume.
MP3:>95dB FM:77dB
< 1%
MPEG 1/2/2.5 Layer 3
WMA,WAVE (ADPCM)
32 levels
64

Technical specification
Item Specification
ID3 Tag Supported
Sampling rate
EQ
LCD LCD with LED backlight module
Language support
Recording time
Continuous
playing time
USB interface USB 2.0 Full Speed / USB 1.1
Working
temperature
48KHz / 44KHz / 32KHz / 22KHz /
16KHz / 11KHz / 8KHz
Normal / Rock / Jazz / Classic /
POP / Ultra Bass / Blues / Club /
Dance / Full Bass & Treble /
Full Treble / Large Hall / Live /
Party / Reggae / Ska / Soft music
Soft Rock / Techno
Over 40 languages, subject to
firmware version.
MX-110D / MX-125D:
9 hours (8KHz, 32Kbps), max.
MX-210D / MX-225D:
18 hours (8KHz, 32Kbps), max.
18 hours (128Kbps, MP3), max.
One Alkaline battery.
-5℃~45℃
Firmware update failure
z Firmware update failure
If your player is not responding after a firmware update
failure, follow the instructions below to recover it.
1. Close the firmware update program (Firmware
Download).
2. Do not connect your player to a PC.
3. Remove the battery on your player.
4. Press and hold Scroll button (Power button)
for 5 seconds and connect the USB cable to your player.
5. Release it after in 5 seconds and run the firmware
update program (p. 29).
6. The firmware update program will detect your player
again. Make sure the FORMAT DATA AREA box is
selected. Then click START to update firmware again.
If the firmware update program cannot detect
your player, repeat steps 1 to 5.
7. After firmware update is completed, disconnect your
player are from the PC according to the standard
hardware removal procedure (p. 27), reinstall the
battery to your player, and turn it on again.
65
66

Certification information
Certification information
Federal Communications Commission (FCC)
This device has been tested and found to comply with the
limits for a Class B digital device, Pursuant to Part 15 of the
FCC Rules.
Operation is subject to the following three conditions:
1. This device may not cause harmful interference, and
2. This device must accept any interference received,
including interference that my cause undesired
operation.
3. If your device needs repairs, you must arrange for the
manufacturer to make them if you are to keep the
device’s FCC registration valid.
This equipment, like other electronic equipment, generates
and uses radio frequency energy. If not installed and used
according to the instructions in this manual, this equipment
cause interference with your radio and television reception.
If you think this equipment is causing interference with your
radio or television reception, try turning the equipment off and
on. If the interference problems stop when the equipment is
switched off, then equipment is probably causing the
interference. You may be able to correct the problem by
doing one or more of the following:
- Adjust the position of the radio or TV antenna
- Move the device away from the radio or TV
If necessary, consult your dealer or an experiences radio or
television.
You may find this booklet helpful: how to identity and resolve
radio and TV interference problems” prepared by the FCC and
available from the U.S. government printing office, Washington,
dc 20420. see.
For the customers in Europe
The CE mark on the MP3 Player is valid only for
the products marketed in the European Union.
Note: All specification and design are
subject to change without
further notice or obligation.
67
68
 Loading...