

Page 1

LED40-H9825M
Telewizor LED LCD HD
Instrukcja obsługi
Polski
LED LCD HD Fernseher
Bedienungsanleitung
Deutsch
LED LCD HD tévé
Használati Utasítás
Magyar
Televizor LED LCD HD
Manualul utilizatorului
Român
LED LCD HD televizor
Uživatelská příručka
Čeština
LED LCD HD televízia
Príručka používateľa
Slovenčina
Téléviseur LED LCD HD
Manuel du propriétaire
Français
LED LCD HD teler
Kasutusjuhend
Eesti keel
LED LCD HD televizors
Lietotāja rokasgrāmata
Latviešu
LED LCD HD televizorius
Instrukcija
Lietuviškai
LED LCD HD Television
Owner’s Manual
English
Светодиодный ЖК телевизор HD
Руководство для пользователя
Русский
LED LCD HD телевизия
Упътване на потребителя
Бъларскиг
HD РК-телевізор зі світодіодним
Інструкція для власника пристрою
Українська
Page 2
EN
2
PRECAUTIONS
To aid reporting in case of loss or theft, please record the unit’s model and serial numbers in the space provided. The numbers
are located at the rear of the unit.
Model number:_________________ Serial number:_________________
PRECAUTIONS
WARNING:
TO REDUCE THE RISK OF FIRE OR ELECTRIC SHOCK, DO NOT
EXPOSE THIS APPARATUS TO RAIN OR MOISTURE.
CAUTION
RISK OF ELECTRIC SHOCK
DO NOT OPEN
CAUTION:
TO REDUCE THE RISK OF ELECTRIC SHOCK,
DO NOT REMOVE COVER (OR BACK).
NO USER SERVICEABLE PARTS INSIDE. REFER
SERVICING TO QUALIFIED SERVICE PERSONNEL.
The lightning flash with arrowhead symbol,
within an equilateral triangle, is intended to
alert the user to the presence of uninsulated
“dangerous voltage” within the apparatus’s
enclosure that may be of sufficient magnitude
to constitute a risk of electric shock to persons.
The exclamation point within an equilateral
triangle is intended to alert the user to the
presence of important operating and
maintenance (ser
literature accompanying the apparatus.
vicing) instructions in the
CAUTION
1. Do not attempt to open the cabinet. There are no user
serviceable parts inside. Refer all servicing to qualified service
personnel.
2. Slots and openings in the cabinet and the sides or bottom
are provided for ventilation. To ensure reliable operation
and to protect the unit from overheating, these openings
must not be blocked or covered. Avoid installation in
enclosed spaces such as bookcases unless proper
ventilation is provided.
3. Keep the unit away from radiators and other heat sources.
4. Do not push objects of any kind into the unit through the
cabinet slots or openings as they could touch electrically
live parts or short circuit parts resulting in a fire or electric
shock.
5. To prevent fire or shock hazard, do not expose this unit to
dripping or splashing, no objects filled with liquids, such as
vases, should be placed on the unit.
6. Use the unit on a horizontal (flat) surface only.
7. Do not place any combustible objects on the unit
(candles, etc.).
Do not place the unit on the furniture that is capable of being tilted by a child or an adult leaning, pulling, standing or
climbing on it. A falling unit can cause serious injury or even death.
POWER SUPPLY
The main power supply is engaged when the main plug is plugged in a 220-240 V
press Q
(power) to tu
WARNING: LIVE PARTS INSIDE. DO
WHEN CARRYING THIS UNIT
• At least 2 people are required when carrying this unit.
• Make sure to hold the upper and bottom frames of the unit firmly as illustrated.
rn on the unit.
NOT REMOVE ANY SCREWS.
8.
The LCD panel used in this unit is made of glass. Therefore,
it can break when the unit is dropped or applied with
impact. Be careful not to be injured by broken glass pieces
in case the LCD panel breaks. The LCD panel is a very high
technology product with 921,600 thin film transistors,
giving you fine picture details. Occasionally, a few non-active
pixels may appear on the TV screen as a fixed point of
blue, green or red. Please note that this does not affect the
performance of your unit.
9. Disconnect the mains plug to switch off when the unit
becomes faulty or not in use.
10. The mains plug shall remain readily operable.
11. Read the manual instructions to ensure correct and safe
installation and interconnection of the unit in multimedia
systems.
12. Keep a distance of 20cm around the ventilation openings
of the unit.
13.
Batteries (battery pack or batteries installed) shall not be
exposed to excessive heat such as sunshine, fire or the like.
~, 50 Hz AC outlet. To operate the unit,
WARNING: To prevent the spread of fire, keep candles
or other open flames away from this
product at all times
Page 3
EN
3
INTRODUCTION
Pb, Hg, Cd
Contents
PRECAUTIONS ......................................................................2
INTRODUCTION..................................................................3
Supplied Accessories ................................................................................4
Symbols Used in this Manual ...............................................................4
Attaching the Base.....................................................................................4
Adjusting the Swivel Angles..................................................................4
Installing the Batteries...............................................................................4
Remote Control..........................................................................................4
Your TV ........................................................................................................... 5
PREPARATION FOR USE ....................................................6
Antenna Connection................................................................................ 6
External Connection.................................................................................6
Plug In the AC Power Cord................................................................. 7
Initial Setup..................................................................................................... 7
OPERATIONS .........................................................................8
Watching a TV Programme.................................................................. 8
Channel List ...................................................................................................8
Sleep Timer....................................................................................................8
ECO Mode.....................................................................................................8
Sound Select..................................................................................................8
TV Screen Information ............................................................................9
EPG (Electronic Programme Guide)............................................... 9
Switching the Input Mode...................................................................... 9
Photo / Music / Video Playback.......................................................10
Changing the TV Screen Display Mode .....................................14
OTHER SETTINGS ............................................................. 15
Picture Adjustment................................................................................. 15
Advanced Picture Adjustment......................................................... 15
PC Settings .................................................................................................. 16
Sound Adjustment..................................................................................16
TV Settings .................................................................................................. 17
Channel Settings.......................................................................................17
Setup Adjustment....................................................................................19
Subtitle Settings ........................................................................................ 19
Teletext......................................................................................................... 20
Common Interface (CI)....................................................................... 20
DivX® VOD.............................................................................................. 20
Software Download............................................................................... 21
Demo ............................................................................................................. 21
Reset Default ............................................................................................. 21
Parental Lock.............................................................................................. 21
fun-Link..........................................................................................................22
TROUBLESHOOTING GUIDE........................................ 23
OTHER INFORMATIONS ................................................ 24
Specifications..............................................................................................24
Trademark Information........................................................................24
Declaration of Conformity................................................................. 25
Servicing ........................................................................................................ 25
Cabinet Cleaning......................................................................................25
Panel Cleaning...........................................................................................25
License ........................................................................................................... 25
License Statement.............................................. end of book
Page 4
EN
4
Supplied Accessories
DTV
ATV
Top of the unit
approx.
15°
approx.
15°
approx.
15°
approx.
15°
1
2
3
4
6
7
8
9
5
10
11
17
18
19
20
21
22
16
15
12
13
14
• Remote Control
• Batteries (R03 / AAA, 1.5 V x 2)
• Owner's Manual
• Screw kit for attaching the base
• AC power cord
Symbols Used in this Manual
The followings are the description for the symbols used in
this manual.
If neither symbol appears, the operation is applicable to
both.
Digital TV operation
Analogue TV operation
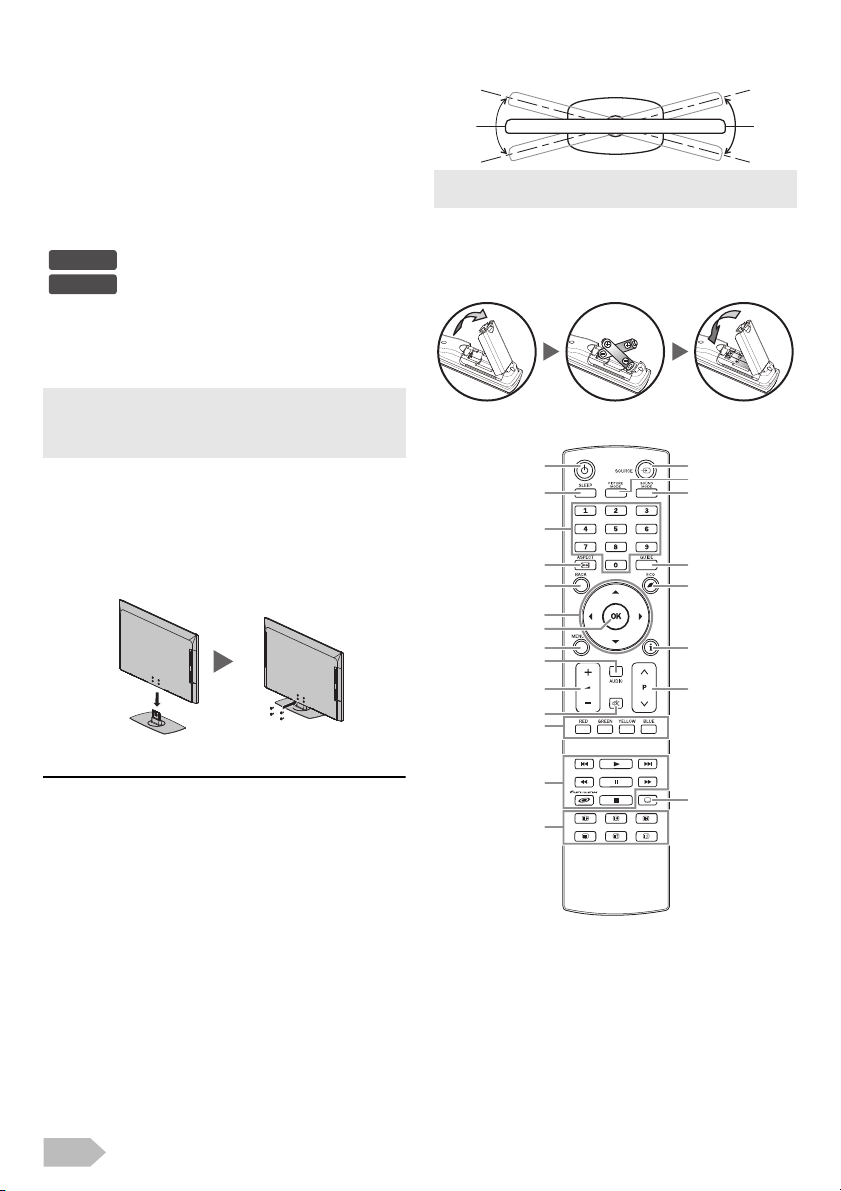
Attaching the Base
You must attach the base to the unit to have it as a table
top unit. Be sure the front and rear of the base match the
proper direction.
• When attaching the base, ensure that all screws are tightly
fastened. If the base is not properly attached, it could cause the
unit to fall, resulting in injuries as well as damage to the unit.
• Make sure the table is in a stable location.
1 Insert the main unit into metal neck of the base.
Make sure not to put the AC power cord between
the base and the unit.
At least 2 people are required for this step.
2 Drive Phillips head screws into the 4 threaded holes
at the rear of this unit until they are tight.
Adjusting the Swivel Angles
You can adjust the viewing angle of your TV.
• While adjusting the swivel angle of your TV, hold the base firmly
to prevent the TV from tipping over and falling down.
Installing the Batteries
Install the batteries (R03 / AAA, 1.5 V x 2) matching the
polarity indicated inside battery compartment of the
remote control.
Remote Control
To remove the base from this unit
Unscrew the Phillips head screws on step 2. After the
screws are removed, move the unit up from the base.
Be careful not to drop the unit when you remove it.
Page 5
EN
5
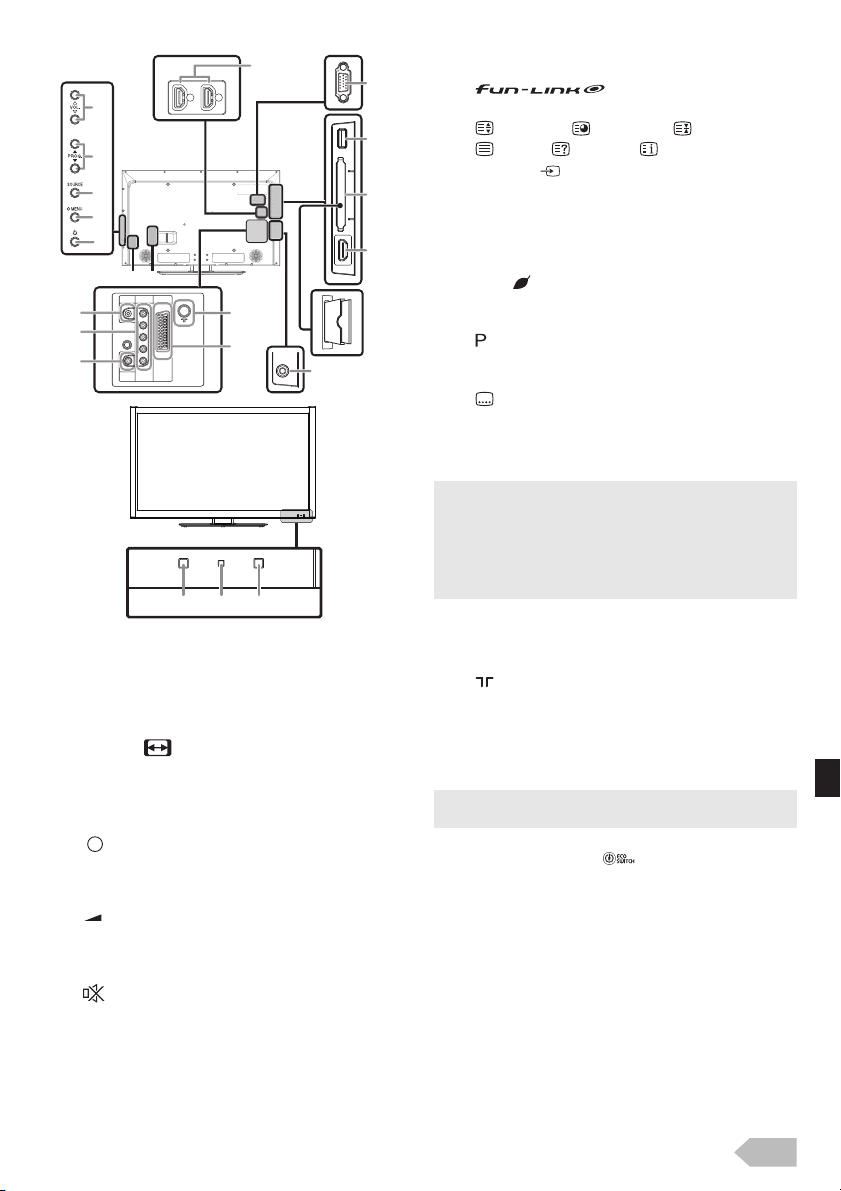
Your TV
26
10
21
15
8
1
34 33
29
31
30
1. Q (power) (p. 6, 7)
Turns the unit on and go into the standby mode.
2. SLEEP (p. 8)
3. Number buttons (p. 8)
Selects the desired channel in TV mode and enters
the password in the PIN code input field.
4. ASPECT (p. 14)
5. BACK (p. 8)
Returns to the previous display.
6. Î/ï/Í/Æ (cursor) (p. 7)
7. OK
8. MENU (control panel) / MENU (remote
control) (p. 15)
9. AUDIO (p. 8)
10. VOL. X / Y (control panel) /
+/– (remote control) (p. 8)
VOL. X works same function as Æ (cursor) and
VOL. Y works same function as Í (cursor) on the
menu.
11. (mute) (p. 8)
28
32
27
3735 36
23
24
25
26
12. RED / GREEN / YELLOW / BLUE (p. 8, 9, 10, 11,
20, 22)
Uses for EPG / teletext / fun-Link.
13. buttons (p. 22)
Functionally useful for fun-Link.
14. (expand) / (subpage) / (hold) /
(text) / (reveal) / (index) (p. 20)
15. SOURCE (p. 9)
SOURCE (control panel) works same function as
OK to determine the setting menu.
16. PICTURE MODE (p. 15)
17. SOUND MODE (p. 16)
18. GUIDE (p. 9)
19. ECO (p. 8)
20. I (information) (p. 9)
21. PROG. Î/ï (co ntrol p ane l) /
J / K (remote control) (p. 8)
PROG. Î/ï (control panel) works same function
as Î/ï (cursor) on the menu.
22. (subtitle) (p. 19)
Terminals
23. PC (VGA) Input jack (p. 7)
24. USB terminal (p. 10)
• Data input from USB flash memory only.
• User should not connect any devices to the USB terminal such
as digital camera, keyboard, mouse, etc. (because these will not
work.)
• The software update is, in most cases, handled by an authorized
service person or in some circumstances the user may be asked
to do the software update themselves.
25. CI slot (p. 20)
26. HDMI (HDMI 1 / HDMI 2 / HDMI 3) Input jack
(p. 6)
27. Headphone Audio Output jack
28. (aerial) Input jack (p. 6)
29. Audio Input jack for PC connection (p. 7)
30. Coaxial Digital Audio Output jack (p. 6)
31. Component Video, Composite Video and Audio
(L/R) Input jacks (p. 6)
32. SCART jack (p. 6)
• The Audio (L) jack is for monaural input. The sound is heard
from both speakers. Use this jack for a monaural audio devices.
33. AC power cord Inlet
34. Main power switch
Turns this unit's main power on and off.
35. Illuminance sensor window
Alter the brightness of the TV screen automatically
by detecting your room lighting level. Do not block
anything in front of its window to work properly.
36. Standby / Power indicator
Lights up red when the unit goes into standby
mode.
Light off when power is on.
37. Infrared sensor window
Receives the infrared rays transmitted from the
remote control.
Page 6

EN
6
PREPARATION FOR USE
RF cable
VHF/UHF
MIXER
VHFUHF
HDMI cable
SCART cable
Input Output
S-Video
Audio
(L/R)
CVBS RGB Video and Audio (L/R)
Yes Yes Yes Yes
Outputs the RF input
signal converted as CVBS
signal.
audio
cable
component video cable
COMPONENT
/ VIDEO
AUDIO
OUT
VIDEO OUT
AUDIO
L
R
Y
/ VIDEO
Pb
Pr
Your TV
Your device
composite video
cable
audio cable
digital audio
coaxial cable
Read this first
• No supplied cables are used with these connection. Please
purchase the necessary cables at your local store.
• Illustration in the following connection are example. Read the
manual accompanying your device for more detail.
• Before you connect, be sure your antenna or other device is
connected properly before plugging in the AC power cord.
Antenna Connection
You r TV
1
Connect an RF cable to (aerial) Input jack at the
rear of this unit.
2 Plug this unit into an AC outlet.
3 Turns on the main power switch.
4 When the Standby / Power indicator on the front
panel lights red, then press Q to turn on the unit.
• If you like to connect an active DVB-T antenna, the antenna
must have its own power supply.
• It is not possible to power the antenna from the TV.
External Connection
HDMI Connection (HDMI 1 / HDMI 2 / HDMI 3 )
SCART Connection
You r devi ce
You r TV
Component / Composite video Connection
Your device
COMPONENT
VIDEO OUT
AUDIO
OUT
• This unit accepts 480i / 480p / 576i / 576p / 720p / 1080i video
signals for component connection.
AUDIO
COMPONENT
L
R
Your TV
/ VIDEO IN
Y
/ VIDEO
Pb
Pr
Your device
• This unit accepts 480i / 480p / 576i / 576p / 720p / 1080i /
1080p video signals and 32 kHz / 44.1 kHz / 48 kHz only 2
channel audio signals (LPCM).
• You need to select “PCM” for the digital audio output of the
device you connect. Make sure the device outputs the digital
audio. Audio sometimes makes no sound if you select
“Bitstream”, etc.
Dear Customer,
By connecting an HDMI cable to your Funai LCD TV,
you have to use only a certified HDMI cable to guarantee
a sufficient immunity against parasitic frequency radiation.
A certified HDMI cable can be identified by the HDMI
logo on the cable or the cable package.
Your TV
• Make sure the rest of Component Video jacks (Pb/Pr) are
unplugged completely when you plug the Composite Video
jack to Y / VIDEO terminal.
Audio Output connection
DTV
For digital broadcasting only
Your device
DIGITAL
AUDIO
COAXIAL IN
DIGITAL
AUDIO
OUT
COAXIAL
Your TV
Page 7
EN
7
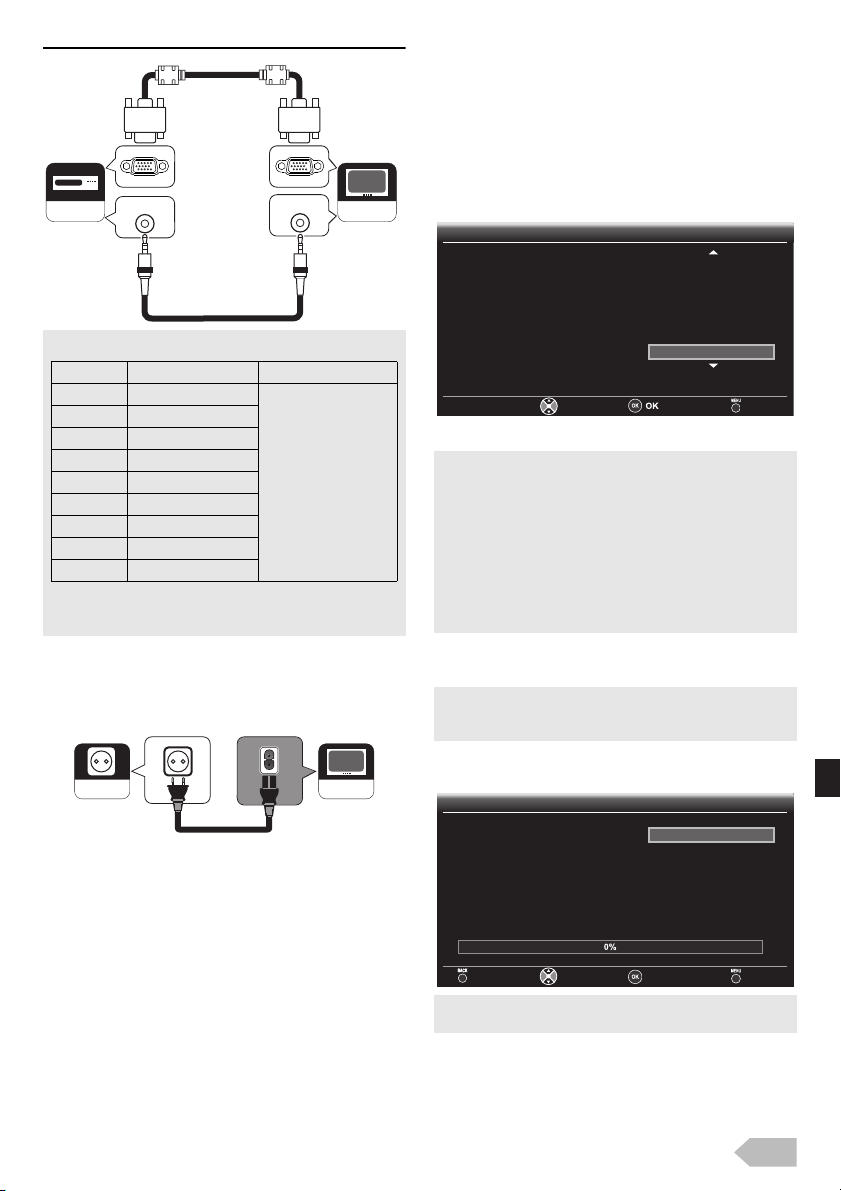
PC Connection
VGA cable with
ferrite core
Mini-plug audio cable
Format Resolution Refresh rate
VGA 640 x 480
60 Hz
SVGA 800 x 600
XGA 1,024 x 768
WXGA 1,360 x 768
WXGA+ 1,440 x 900
SXGA 1,280 x 1,024
SXGA+ 1,400 x 1,050
WSXGA+ 1,680 x 1,050
HDTV 1,920 x 1,080
English
Ελληνικά
Eesti
Deutsch
Dansk
Česky
Български
Please select your language.
Select Exit
Initial Setup
Initial Setup
Language
Language
PC-INRGB
You r devi ce
AUDIO
LINE OUT
AUDIO
PC-IN
You r TV
The following signals can be displayed.
• Other formats or non-standard signals will not be displayed
correctly.
• Please use the VGA cable that has a ferrite core.
Plug In the AC Power Cord
Make sure that the AC power cord must be plugged to an
AC outlet after all the necessary connections are
completed.
AC outlet
Your TV
Initial Setup
This section will guide you through the unit's initial setting
which includes selecting a language for your on-screen
menu and auto scan, which automatically scans and
memorises viewable channels.
1 After making all the necessary connections, turns on
the unit using the main power switch, then press Q.
2 Use Î/ï repeatedly to select the menu language,
then press OK.
3 Use Î/ï to select the location, then press OK.
• Select [at Home], this unit is set to maximise the energy
efficiency for home setting and it can be adjusted through a
choice of picture and sound quality according to your
preference.
• Select [Retailstore], this unit will be set up with predefined
setting for retail displays. If you select [Retailstore], the settings
of picture and sound quality you adjusted will not be
memorised after the unit goes to the standby mode.
• When “Initial Setup” (p. 7) is completed, you cannot change the
location setting unless you restore this unit to “Factory Reset”
(p. 22) and that restarts all over again such as channel scanning.
4 Use Î/ï repeatedly to select the country, then
press OK.
• Scan confirmation menu will appear.
• You can also set regions at “Region” (p. 19), when you select
[Spain] or [Portugal].
5 When below display appear, then use Î/ï to
select [Scan] and press OK to start scanning.
Initial Setup
Initial Setup
First, please connect antenna.
Start channel scan now?
If you skip this step, the channel
scan could be performed in Menu.
Scan
Skip
Auto Scan
Auto Scan
ExitSelectBack OK Exit
• If you press MENU during channel scanning, this operation will
be paused, then press MENU again to exit the initial setup.
Page 8
EN
8
OPERATIONS
Nicam
Dual1
Nicam
Dual2
Mono
Read this first
These operations are accessible by remote control. Some
may also be accessible by controls on the main unit.
Watching a TV Programme
To select a channel
Use J / K repeatedly to select your desired channel,
or use the Number buttons to enter a channel number,
then press OK for quicker access.
(e.g.) If you want to select the channel 24 without pressing
OK, press 2 first, then press 4 within 3 seconds.
To adjust the volume
Use +/– to adjust the audio volume.
Press to turn on or off the sound right away.
• You can recover the original volume by pressing again or
+/–.
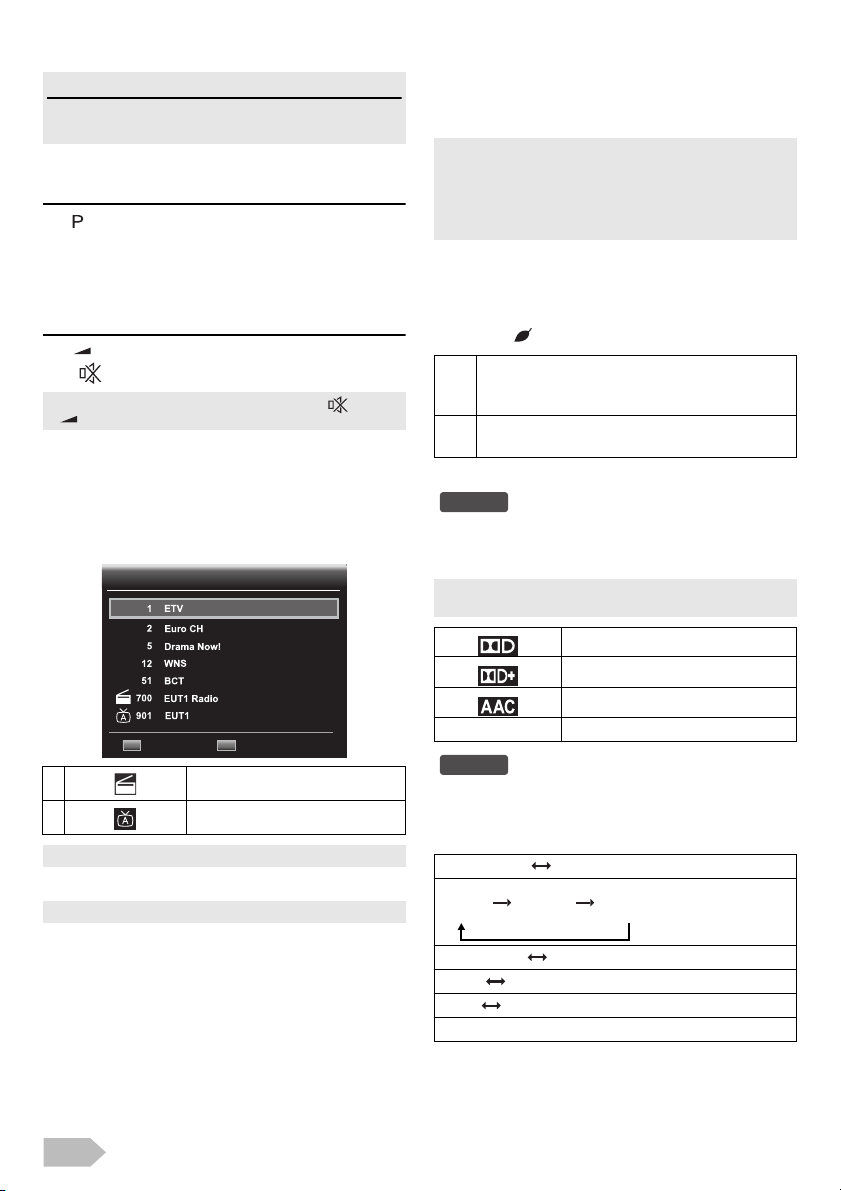
Channel List
You can easily find a channel you want.
1 Press OK while watching a programme.
2 Use Î/ï to select the channel you want to watch,
then press OK.
Channel List
Channel List
Sleep Timer
The sleep timer can be set the unit to go to the standby
mode after an incremental period of time.
1 Press SLEEP repeatedly to change the sleep time
period.
• Each time you press SLEEP, the timer increases from
10 minutes up to 120 minutes.
• Press SLEEP repeatedly until [Off] appears to cancel the sleep
timer.
• If the unit goes into standby mode, the sleep timer will be
cancelled.
ECO Mode
When you set [ECO Mode] to [On], backlight brightness
will be reduced automatically which may save on power
consumption.
Press
ECO repeatedly to select [On] or [Off].
On The illuminance sensor senses the brightness of
the environment and, darkens the backlight
automatically when the room gets dark.
Off The illuminance sensor is not effect, and the
backlight level gets back the value you adjusted.
Sound Select
DTV
Press AUDIO to display currently selected audio language
with the number of available ones and press repeatedly to
cycle through them.
• The display image can be found on the “TV Screen Information”
(p. 9).
Prev Page Next Page
1
2
• Use RED / GREEN to move to the previous or next page.
Radio Channel
Analogue Channel
3 Press BACK to exit.
• You can edit the channel list at “Channel Settings” (p. 17).
Dolby Digital sound
Dolby Digital Plus sound
HE-AAC sound
no icon MPEG sound
ATV
Press AUDIO to display currently selected audio mode
and press repeatedly to cycle through the available audio
mode.
(e.g.)
Nicam Stereo Mono
Nicam Mono Mono
Stereo Mono
Dual1 Dual2
Mono
Page 9

EN
9
TV Screen Information
DTV
You can see the broadcasting information.
1 Press I to display fewer information and press again
more information will appear.
English
Dual 1
English
1 Channel name
2
Present programme name /
time
3 Current time
4 Channel number
5 Resolution / Format / TV aspect ratio
6 Audio language (DTV) / Audio Mode (ATV)
7 Audio mode (DTV)
8 Subtitle (p. 19)
9 Programme information When the programme
10 Audio Description (p. 17)
11 Teletext (p. 20)
12 Scrambled programme
13 Parental rating (p. 21)
14 Lock status (p. 21)
15 ATV broadcast
DTV broadcast
Radio service
Use Í/Æ to switch the present
and next programme. (if
available)
is displayed if the subtitle of
the TV programme is available.
is displayed if the subtitle of
the TV programme is for hearing
impaired.
information consists of more
than 3 lines, use Î/ï to scroll.
is displayed when the TV
programme provides additional
audio description for visually
impaired.
is displayed if the teletext of
TV programme is available.
is displayed, when you are
watching the scrambled
programme.
is displayed if the parental
rating of TV programme is
available.
* The icon may differ depending
on the ratings.
is displayed when you are
watching the TV programme
which you set the parental lock
or channel lock.
is displayed when it receives
analogue TV broadcast.
is displayed when it receives
digital TV broadcast.
is displayed when it receives
digital audio broadcast.
2 Press BACK to exit.
EPG (Electronic Programme Guide)
You can easily find a channel or see the detailed channel
information. EPG gives you scheduled information of the
TV programmes.
1 Press GUIDE and use Î/ï to select a channel.
Programme Guide
Programme Guide
Viewing date:
Tue TueFeb Feb
Prev Page Next Page
• Press RED or GREEN to move the channel list to the
previous or next page.
• Press OK to watch the selected channel.
Current time:
Music
2 Press Æ (cursor), then use Î/ï to select a
programme.
• Press RED or GREEN to move the programme list to the
previous or next day.
• Press OK to watch the selected programme if it is
currently available.
3 Press YELLOW to display more detailed
programme information.
• When the programme information consists of more than
2 pages, use RED or GREEN to move to the previous or
next page.
4 Press GUIDE to exit.
Switching the Input Mode
You can switch the input mode to
TV mode or external input mode.
1 Press SOURCE .
2 Use Î/ï to select the input
mode you want, then press
OK.
• [COMPONENT] will be displayed if you connected
component video cables to this unit.
Select Input
Select Input
TV
SCART
VIDEO
HDMI 1
HDMI 2
HDMI 3
PC
USB
Page 10

EN
10
Photo / Music / Video Playback
Media Type
Sort
Thumbnail Size
Display all files
Photo
Select Menu BackPlay/Enter
This unit can play JPEG picture and MP3 / WAVE music
and DivX® video files. Use the USB flash memory contains
those files.
Before you begin: You must insert the USB flash memory to
USB terminal of this unit (shown below) and select [USB] at
[Select Input]. Refer to “Switching the Input Mode” (p. 9).
Your TV
• The USB flash memory is not supplied with this unit.
• The unit recognise a USB flash memory only.
Do not use a USB hub and an extension cord between the USB
flash memory and the unit.
Always insert the USB flash memory to this unit directly.
• We do not guarantee the all USB flash memory can be
supported on this unit.
1 Press SOURCE to appear the select input mode
and use Î/ï to select [USB], and then press OK.
2 Use Í/Æ to select [Photo], [Music] or [Video],
and then press OK.
3 Press GUIDE to toggle between the play list and the
thumbnail to select the desired display method.
4 In the play list, use Î/ï to select the desired file,
then press OK or Æ (cursor).
In the thumbnail, use Î/ï/Í/Æ to select the
desired file, then press OK.
Operation in List and Thumbnail view
Before adjust each setting, press MENU to display the
menu.
Sort :
Use Î/ï to select [Sort], and then press OK, then use
Î/ï to select the sort order.
Media Type :
Use Î/ï to select [Media Type], and then press OK,
then use Î/ï to select the media type; [Photo] or
[Music].
Thumbnail Size :
Use Î/ï to select [Thumbnail Size], and then press
OK, then use Î/ï to select the thumbnail size; [Small],
[Middle] or [Large].
Display all files :
Use Î/ï to select [Display all files], then press OK to
display all files.
• All files may not be displayed even if you select [Display
all files] due to the amount of files / folders, the length
of their file / folder name or the capacities.
When you want to display each folder or file, select
[Display current folder files], and then press OK.
Photo
• The sort order: [Date] or [Name].
Operation in Slideshow
B (PLAY) / F
Press to play or pause the slideshow.
J / K
Press J to skip forward the file.
Press K to skip backward the file.
BACK
Press to go back to the previous screen.
Show details (I) :
Press MENU and then use Î/ï to select [Show
details], and press OK.
• [Name], [Date], [Resolution], [Size] and [Next].
While the menu is not displayed, the first press I to show
toolbar. The second press I to show details.
The third press I to remove the details.
Repeat (RED) :
Press MENU and then use Î/ï to select [Repeat], and
press OK, then use Î/ï to select the repeat mode;
none or all repeat, and then press OK.
While the menu is not displayed, press RED to change
the repeat mode in order.
Shuffle (BLUE) :
Press MENU and then use Î/ï to select [Shuffle], and
press OK then use Î/ï to select the shuffle mode; on
or off, and then press OK.
While the menu is not displayed, press BLUE to playback
the slideshow randomly. To return to the normal
playback, press BLUE again.
Page 11

EN
11
Playing Operation
Transition (GREEN) :
Press MENU and then use Î/ï to select [Transition],
and press OK, then use Î/ï to select the way of
transition mode below, and then press OK.
• [None], [Dissolve], [Wipe right], [Wipe left], [Wipe
up], [Wipe down], [Box in], [Box out] and [Random].
While the menu is not displayed, press GREEN
repeatedly to change transition of the slideshow in order.
Slide time (YELLOW) :
Press MENU and then use Î/ï to select [Slide time],
and press OK, then use Î/ï to select the display time
below, and then press OK.
• [7 seconds], [12 seconds] and [16 seconds].
While the menu is not displayed, press YELLOW to
change the slide time in order.
Pausing Operation
Rotate (GREEN) :
Press MENU and then use Î/ï to select [Rotate], and
then press OK. And then every press on OK will turn the
picture clockwise by 90 degrees.
While the menu is not displayed, every press on GREEN
will turn the picture clockwise by 90 degrees.
Zoom (YELLOW) :
Press MENU and then use Î/ï to select [Zoom], and
then press OK, then use Î/ï to select the zoom factor:
1x, 2x and 4x, and then press OK.
While the menu is not displayed, press YELLOW to
change the zoom factor in order.
Music
Title:
Artist:
Album:
Genre:
Year:
Duration:
Next:
Music
Select Menu BackPlay/Pause
Operation in Playback
B (PLAY) / F
Press to play or pause the playback.
H / G
Press to skip backward or forward the file.
J / K
J works same function as G.
K works same function as H.
Í/Æ (cursor)
While holding Æ, fast-forward the file.
While holding Í, rewind the file.
E / D
Press to rewind or fast-forward the file.
Every press on E / D will rewind or fast-forward
faster up to five.
Repeat (GREEN) :
Press MENU and use Î/ï to select [Repeat], then
press OK. Use Î/ï to select the following repeat
mode; [None], [Single] or [All], and press OK.
You can also set those repeat mode or none by pressing
GREEN while the menu is not displayed.
Shuffle (YELLOW) :
Press MENU and use Î/ï to select [Shuffle On] or
[Shuffle Off] then, press OK to determine the shuffle
mode on or off.
You can also set the shuffle mode on or off by pressing
YELLOW while the menu is not displayed.
Show details (I) :
Press MENU and use Î/
ï to select [Show details],
then press OK.
• [Title], [Artist], [Album], [Genre], [Year], [Duration]
and [Next].
You can also call up or turn off the details by pressing I
while the menu is not displayed.
Audio only :
Press MENU and use Î/ï to select [Audio only], to be
undisplayed all informations.
• Press any button (except Q) to return the normal
display.
• The sort order: [Name], [Genre], [Artist] or [Album].
Page 12

EN
12
Video
Off
Video
Select Menu BackPlay/Pause
Title:
Director:
Copyright:
Date:
Genre:
Duration:
Next:
• The sort order: [Type], [Date] or [Name].
Operation in Playback
B (PLAY) / F
Press to play or pause the playback.
C
Press to stop the playback, and then press B to resume
from the point at which playback was stopped, or press
again to finish the playback.
H / G
Press to skip backward or forward the file.
J / K
J works same function as G.
K works same function as H.
E / D
Press to rewind or fast-forward the file.
Every press on E / D will rewind or fast-forward
faster up to five.
(subtitle)
Press to change the subtitle track.
• This operation is available, if the file contains subtitle
track.
AUDIO
Press to change the audio track.
• This operation is available, if the file contains more than
one audio track.
Repeat :
Press MENU and use Î/ï to select [Repeat], then
press OK. Use Î/ï to select the following repeat
mode; [None], [Single] or [All], and press OK.
Show details (I) :
Press MENU and use Î/ï to select [Show details],
then press OK.
• [Title], [Director], [Copyright], [Date], [Genre],
[Duration] and [Next].
You can also call up or turn off the details by pressing I
while the menu is not displayed.
Picture Mode :
Press MENU and use Î/ï to select [Picture Mode]
then press OK. Use Î/ï to select the following picture
mode, and press OK.
• [Standard], [Dynamic], [Movie] and [Game]
.
• PICTURE MODE on the remote control does not
work in this mode.
Screen Mode :
Press MENU and use Î/ï to select [Screen Mode],
then press OK. Use Î/ï to select the following screen
mode; [Normal] or [Dot by Dot], and press OK.
• These screen mode are described as PC input signal at
“Changing the TV Screen Display Mode” (p. 14).
• ASPECT on the remote control does not work in
this mode.
5 Press SOURCE and select input mode you want
to exit this mode.
Page 13

EN
13
• Funai can not be held responsible if your USB flash memory is
<JPEG>
Baseline 17,000 x 10,000
Progressive 4,000 x 4,000
<MP3>
Sampling frequency 32 kHz, 44.1 kHz or 48 kHz
16 kHz, 22.05 kHz or 24 kHz
8 kHz, 11.025 kHz or 12 kHz
Constant bit rate 32 kbps - 320 kbps
<WAVE>
Sampling frequency 32 kHz, 44.1 kHz or 48 kHz
Constant bit rate
16 bit PCM (big / little endian),
24 bit PCM (big endian)
<DivX®>
Resolution Up to 1,920 x 1,080
Constant bit rate 16 kbps - 320 kbps
(MPEG audio)
32 kbps - 448 kbps
(AC3 audio)
Sampling frequency 16 kHz - 48 kHz
Channel type 1-channel / mono
2-channel / stereo
6-channel / surround
Internal subtitle type XSUB, XSUB+
not supported, nor will Funai accept any liability for damage or
loss of stored data.
• A USB flash memory that required its own driver or the device
with a special system such as fingerprint recognition are not
supported.
• Be sure to keep a backup copy of the original files on your
device before you play them back on this unit. We have no
responsibilities for damage or loss of your stored data.
• To avoid damaging the USB flash memory and the unit always
turn off the unit before you remove the USB flash memory.
• This unit is not allowed to use the USB flash memory which
requires external power supply (500 mA or more).
• This unit can be recognised up to 3,000 files in the USB flash
memory.
• This unit may not be recognised if the length of the file names
is too long. Only English characters can be recognised.
• This unit does not support MTP(Media Transfer Protocol) or
the file other than FAT, FAT32 and NTFS file system. If the file
is not supported, error message appears.
• When the unit does not recognise the USB flash memory, try
reconnecting it.
• When playing back the files recorded in high bit rates, the
images can be interrupted in some occasions.
• The resume information will be kept until finish the playback
definitely.
• This unit does not support external subtitle.
• This unit cannot play back a file which go over the limit of file
restriction.
• This unit can play back the bought-out file with the registration
code of this unit only.
• A DivX® file with an extension of “.avi” and “.divx” is only
supported.
• Although DivX® logo has been obtained for this unit, it may
not be able to play back some data, depending on the
characteristics, bit rates, or audio format settings, etc.
• If a large-sized DivX® file is selected, it may take a while to start
the playback (over 20 seconds sometimes).
• For more information for DivX®, please visit
http://www.divx.com.
• ABOUT DIVX VIDEO: DivX® is a digital video format created
by DivX, LLC. This is an official DivX Certified® device that
plays DivX video. Visit divx.com for more information and
software tools to convert your files into DivX video.
• ABOUT DIVX VIDEO-ON-DEMAND: This DivX Certified®
device must be registered in order to play purchased DivX
Video on-Demand (VOD) movies. To obtain your registration
code, locate the DivX VOD section in your device setup menu.
Go to vod.divx.com for more information on how to complete
your registration.
• Official DivX® Certified product; Plays only DivX® 3, 4, 5 and
6 versions with standard playback of DivX® media files.
• USB flash memory containing the DivX® files with the DivX®
GMC (Global Motion Compensation) playback feature, which
is DivX® supplemental function, cannot be played back on this
unit.
It is supported that files to be played back in this unit are
recorded under the following specifications:
Page 14

EN
14
Changing the TV Screen Display Mode
Auto
Full
Cinema
Unscaled
4:3
Zoom
Expand
Auto
14:9
Zoom
Wide
4:3
Full
Cinema
Normal
Dot by Dot
Full
You can select your favourite TV screen size. Press ASPECT repeatedly to switch the TV screen display mode.
For 16:9 video signal
[Auto] Selects the TV screen display mode automatically.
[4:3] Displays a 16:9 picture at a 4:3 size; the picture is shortened
[Full] Displays a 16:9 picture that is stretched horizontally and
[Zoom] Displays a 16:9 picture at its enlarged size without changing its
[Cinema] Displays a 16:9 picture that is vertically stretched. This only
[Expand] Displays a horizontally stretched picture. This crops out the left
[Unscaled] Displays a 16:9 picture at its original size.
For 4:3 video signal
[Auto] Selects the TV screen display mode automatically.
[4:3] Displays a 4:3 picture at its original size. Sidebars appear on both
[14:9] Displays a 4:3 picture at a 14:9 size. Sidebars appear on both
[Full] Displays a 4:3 picture at a 16:9 size; the picture is stretched
[Zoom] Displays a 4:3 picture at a 16:9 size; at its enlarged size without
[Cinema] Displays a 4:3 picture at a 16:9 size; the picture is stretched
[Wide] Displays the picture with its centre at the original size and the
horizontally. Sidebars appear on both edge of the TV screen.
vertically.
horizontal and vertical ratio.
crops out the top of the picture.
and right sides of the picture.
• You can set [Unscaled] in HD picture mode. (720p / 1080i / 1080p)
edge of the TV screen.
edge of the TV screen. This crops out the top and bottom of
the picture.
horizontally to fill the TV screen.
changing its horizontal and vertical ratio. This crops out the top
and bottom of the picture.
more vertically at the top of the TV screen. This crops out the
top of the picture.
edges stretched horizontally to fill the screen.
For PC input signal
[Normal] Displays a proportionally stretched picture. Mainly sidebars
[Full] Displays the picture with its centre at the original size and the
[Dot by Dot] Displays a picture at its original size.
appear on both edges of the TV screen.
edges stretched horizontally to fill the screen.
Page 15

EN
15
OTHER SETTINGS
Read this first
Before adjust each setting, press MENU to display the
menu.
To exit the menu, press MENU.
Press MENU and no input for 1 minute, then the menu
disappears automatically.
Picture Adjustment
You can adjust the picture settings according to your
personal preference. These settings are automatically
stored after exiting the picture menu.
1 Use Î/ï to select [Picture], then press OK.
Picture
Sound
TV
Others
Parental
Picture Select Back
Picture Mode
2 Use Î/ï to select [Picture Mode], then select
[Standard], [Dynamic], [Movie], [Game] or
[Personal] using Í/Æ.
• You can change picture mode easily using PICTURE MODE.
Press PICTURE MODE repeatedly to select picture mode you
want. In this function, you can set also assign the picture mode
individually to each input mode.
Brightness / Contrast / Colour / Hue / Sharpness
2 Use Î/ï to select the item you want, and then or
after Press OK to appear the setting display, adjust
the setting using Í/Æ.
• If you adjust the settings in other than [Personal] mode,
[Picture Mode] will be changed to [Personal].
100Hz
When the picture is blurred while viewing fast moving
scenes may be corrected using the 100Hz (100 frames per
second) resolution feature.
2 Use Î/ï to select [100Hz] and then select [On]
or [Off] using Í/Æ.
• When you set [Game] in [Picture Mode], the function will not
effect.
Picture Mode Dynamic
Brightness
Contrast
Colour
Hue
Sharpness
100Hz
Colour Temperature
Features
On
Cool
Colour Temperature
You can change the colour tone of the picture.
2 Use Î/ï to select [Colour Temperature] and
then select [Warm], [Normal] or [Cool] using Í/
Æ.
Advanced Picture Adjustment
You can adjust the detailed picture settings according to
your personal preference.
1 Use Î/ï to select [Picture], then press OK.
2 Use Î/ï to select [Features], then press OK.
Picture
Sound
TV
Others
Parental
Features Select Back
DNR
CTI
Flesh Tone
Adaptive Luma Control
Backlight
DNR (Digital Noise Reduction)
You can adjust to reduce the appearance of digitizing error
caused by the compression.
Mid
Mid
On
On
3 Use Î/ï to select [DNR] and then select [Mid],
[High] or [Low] using Í/Æ.
CTI (Colour Transient Intensity)
You can adjust the picture for colour errors.
3 Use Î/ï to select [CTI] and then select [Mid],
[High] or [Low] using Í/Æ.
Flesh Tone
You can set to activate the flesh colour or not.
3 Use Î/ï to select [Flesh Tone] and then select
[On] or [Off] using Í/Æ.
Adaptive Luma Control
You can adjust changes in the luminance of the picture.
3 Use Î/ï to select [Adaptive Luma Control] and
then select [On] or [Off] using Í/Æ.
Backlight
You can adjust backlight brightness.
3 Use Î/ï to select [Backlight] and then adjust the
setting using Í/Æ.
• After press OK and appear the setting display, you can adjust it.
• When you set [ECO Mode] to [On] at “ECO Mode” (p. 8),
this function will not work even if you adjust the setting due to
the ECO Mode has priority.
Page 16

EN
16
PC Settings
You can adjust the PC screen position, clock and phase.
Before you begin: You must connect your PC to this unit
and select [PC] at [Select Input].
Refer to “Switching the Input Mode” (p. 9).
1 Use Î/ï to select [Picture], then press OK.
2 Use Î/ï to select [PC Settings], then press OK.
Picture
Sound
Others
Parental
PC Settings
Auto Adjustment
Auto Adjustment
Horizontal Position
Vertical Position
Phase
Clock
SelectOKBack
3 Use Î/ï to select [Auto Adjustment], then press
OK.
• Each setting will be adjusted automatically.
Horizontal Position / Vertical Position / Phase / Clock
3 Use Î/ï to select the item you want, then adjust
the settings according to your personal preference.
• After press OK and appear the settings display, you can adjust
them.
• You can select your favourite PC screen size at “Changing the
TV Screen Display Mode” (p. 14).
Sound Adjustment
You can adjust the sound settings according to your
personal preferences.
1 Use Î/ï to select [Sound], then press OK.
Picture
Sound
TV
Others
Parental
Sound
Balance / Bass / Treble
You can set left / right speaker setting.
Balance
Bass
Treble
SRS TruSurround HD
Sound Mode
Digital Audio Output
Auto Volume Control
TV Speakers
Audio Type
Audio Description
Adjust
Off
Standard
PCM
Off
On
Select
Back
2 Use Î/ï to select the item you want, and then
adjust the setting using Í/Æ.
SRS TruSurround HD
You can set to the sound modes for more spatial or
surround sound reproduction.
2 Use Î/ï to select [SRS TruSurround HD] and
then select [On] or [Off] using Í/Æ.
Sound Mode
2 Use Î/ï to select [Sound Mode] and then select
[Standard], [Movie], [Music] or [Game] using Í/Æ.
• You can change sound mode easily using SOUND MODE.
• Press SOUND MODE repeatedly to select sound mode you
want.
Digital Audio Output
2 Use Î/ï to select [Digital Audio Output] and
then select [Auto] or [PCM] using Í/Æ.
Auto Dolby Digital (if available)
PCM PCM
Auto Volume Control
If set to [On], sudden changes in volume will be reduced
automatically, for example, during commercials or when
switching channels.
2 Use Î/ï to select [Auto Volume Control], and
then select [On] or [Off] using Í/Æ.
TV Speakers
Select the audio output from the unit’s speakers, or not. If
your amplifier is HDMI link function compatible and
connected by an HDMI cable to this unit, some sound
operations such as volume up can be changed by using this
unit’s remote control. Make sure [fun-Link Control] is set
to [On] (p. 22).
2 Use Î/ï to select [TV Speakers], then select
[On], [Off] or [Ext.Amp] using Í/Æ.
On The sound will be output from the unit’s
Off The sound will not be output from the unit’s
Ext.Amp You can control audio output from your
speakers.
speakers.
connected HDMI link devices by using this
unit’s remote control.
Page 17

EN
17
Audio Type
You can adjust the audio type.
2 Use Î/ï to select [Audio Type], and then select
[-], [Hearing Impaired] or [Visually Impaired] using
Í/Æ.
Hearing Impaired:
Provides audio service for hearing impaired.
Visually Impaired:
Provides additional audio description for visually impaired.
Audio Description
You can adjust audio output setting and volume for
[Visually Impaired].
2 After select [Visually Impaired], use Î/ï to select
[Audio Description], and then select adjust the
setting using Í/Æ.
• After OK and appear the mixing level display, you can adjust it.
• Only MPEG sound is available for this function.
TV Settings
You can select the country and audio language.
1 Use Î/ï to select [TV], then press OK.
Picture
Sound
TV
Others
Parental
TV
Country
Main Audio Language
Sub Audio Language
Channel
Country
You can set the country you want.
France
English
English
Select Back
2 Use Î/ï to select [Country], and then select the
country you want using Í/Æ.
Main Audio Language / Sub Audio Language
DTV
You can select the main or sub audio language.
2 Use Î/ï to select [Main Audio Language] or [Sub
Audio Language], and then select each language you
want using Í/Æ.
Audio Channel
ATV
You can select the audio mode.
2 Use Î/ï to select [Audio Channel], and then
select [Stereo], [Mono], [Dual 1] or [Dual 2] using
Í/Æ.
• While watching a programme, you can change the audio
language easily using AUDIO when it is available.
Channel Settings
You can edit the channels.
1 Use Î/ï to select [TV], then press OK.
2 Use Î/ï to select [Channel], then press OK.
Picture
Sound
TV
Others
Parental
Channel
Auto Scan
You can scan the DTV and ATV channel in your area
automatically.
• When the scanning is completed, the lowest memorised digital
or analogue channel will be displayed.
• If you press MENU during the scanning, this operation will be
stopped and the lowest memorised channel will be displayed.
• Please note that after tuning, the analogue channels will be
stored in the order that they are broadcast by your local
transmitter. This may not be in the same order in which you
would like them to be stored. If this is the case, you can change
the order according to your preference at “Channel Settings”
(p. 17).
Auto Scan
Manual Scan (ATV)
Manual Scan (DTV)
Update Scan
Channel Skip
Channel Sort
Channel Edit
Channel Decode
Fine Tune
Search
Select
Back
3 Use Î/ï to select [Auto Scan] and then press OK
to start scanning.
Manual Scan (ATV)
You can search ATV channel manually in your area.
3 Use Î/ï to select [Manual Scan (ATV)], then
press OK.
4 Use Î/ï to select [Start Frequency (MHz)] for
section of the 3-digit frequency using the Number
buttons.
5 Use Î/ï to select [Scan Up] or [Scan Down],
then press OK to start scanning greater than or less
than the adjusted frequency.
Page 18

EN
18
Manual Scan (DTV)
You can search DTV channel manually in your area.
3 Use Î/ï to select [Manual Scan (DTV)], then
press OK.
4 Use Í/Æ to select [Channel Number], and then
press OK to start scanning.
Update Scan
Search and register unreceived ATV and DTV channels.
3 Use Î/ï to select [Update Scan], then press OK.
Channel Skip
When using / , the channel you selected will be
skipped.
3 Use Î/ï to select [Channel Skip], then press OK.
4 Use Î/ï to select channel you want, then press
OK.
• will appear on the right of the channel.
• Press OK again to cancel, and will disappear.
Channel Sort
3 Use Î/ï to select [Channel Sort], then press OK.
4 Use Î/ï to select channel you want and press OK
to determine, then select another one and press
OK to change the order.
Channel Edit
You can set the channel number and name.
3 Use Î/ï to select [Channel Edit], then press OK.
4 Use Î/ï to select channel you want, then press
OK.
5 Use Î/ï to select [Channel Number] and enter
the number you want using the Number buttons,
then press OK.
6 Use Î/ï to select [Name] and enter the character
using the Number buttons, then press OK.
• Using alphabet by the Number buttons, correspondence table
shown below.
• Using Í to erase 1 character.
ATV
7 Use Î/ï to select [Frequency(MHz)] and enter
frequency you want using the Number buttons,
then press OK.
8 Use Î/ï to select [Colour System] or [Sound
System], and then select the system you want using
Í/Æ.
Channel Decode
ATV
Some TV stations transmit encoded TV signals which can
only be viewed with a purchased or hired decoder. You
can connect such a decoder to SCART jack of the unit.
This function will automatically activate the connected
decoder for the channel.
3 Use Î/ï to select [Channel Decode], then press
OK.
4 Use Î/ï to select channel you want, then press
OK.
• Press OK again to cancel, and will disappear.
Fine Tune
ATV
3 Use Î/ï to select [Fine Tune], then press OK.
4 Use Î/ï to select the channel you want, then
press OK.
5 Use Í/Æ to adjust the setting you want, then press
OK.
Page 19

EN
19
Setup Adjustment
Menu Language English
Time Setup
Subtitle
Teletext
Common Interface
DivX(R) VOD
Software
Demo
Reset
Sound
TV
Parental
Picture
Others
Others
Select Back
You can change other setting.
Menu Language
1 Use Î/ï to select [Others], then press OK.
2 Use Î/ï to select [Menu Language], then press
OK.
Time Setup
1 Use Î/ï to select [Others], then press OK.
2 Use Î/ï to select [Time Setup], then press OK.
Time Zone
You can set the time zone according to the resident area.
3 Use Î/ï to select [Time Zone], and then select
[Auto] or the time you want using Í/Æ.
Auto : Automatically selects the time zone of your
area to ensure the proper performance of the
time.
• Although you select [Auto], the correct time may not be
displayed on the “TV Screen Information” (p. 9) depending on
DTV broadcasting.
Region
In Spain or Portugal, you can select region where you live.
3 Use Î/ï to select [Region], and choose the
region you want using Í/Æ.
Auto Power Off
You can set the unit to go into standby mode automatically
if no activity is detected after the power is turned on for 4
hours.
In spite of this setting, the unit goes into standby mode
automatically if there is no signal input from the antenna
terminal and no user operation for 15 minutes.
3 Use Î/ï to select [Auto Power Off], and then
select [On] or [Off] using Í/Æ.
Subtitle Settings
You can change the subtitle settings used for TV
programmes.
1 Use Î/ï to select [Others], then press OK.
2 Use Î/ï to select [Subtitle], then press OK.
Subtitle (ATV)
3 Use Î/ï to select [Subtitle (ATV)], and then
select [Muting], [On] or [Off] using Í/Æ.
Subtitle
Picture
Sound
TV
Others
Parental
Subtitle (ATV)
1st Subtitle Language
2nd Subtitle Language
Subtitle Type
Off
English
English
Select Back
1st Subtitle Language / 2nd Subtitle Language
You can set 1st and 2nd subtitle language.
3 Use Î/ï to select [1st Subtitle Language] or [2nd
Subtitle Language], and then select the language you
want using Í/Æ.
• While watching a programme, you can change the subtitle
language easily using when it is available.
• To hide the subtitle, select [Off] in [1st Subtitle Language].
Subtitle Type
You can select the preferred subtitle type.
3 Use Î/ï to select [Subtitle Type], and choose [-]
or [Hearing Impaired] using Í/Æ.
Hearing Impaired : Provides subtitle commentary for
hearing impaired.
Page 20

EN
20
Teletext
Sound
TV
Parental
Picture
Others
Teletext
Select Back
Teletext Language
Decoding Page Language
Presentation Level
English
WEST EUR
Level 2.5
DTV
You can change the teletext settings.
1 Use Î/ï to select [Others], then press OK.
2 Use Î/ï to select [Teletext], then press OK.
Teletext Language
You can select the preferred teletext language.
3 Use Î/ï to select [Teletext Language], then select
the language you want using Í/Æ.
Decoding Page Language
You can switch to the appropriate language group.
• You must select [RUSSIA] if you select the countries that use
the Cyrillic alphabet at “Country” (p. 17).
3 Use Î/ï to select [Decoding Page Language],
then select the language area you want using Í/Æ.
Presentation Level
You can adjust the teletext presentation level. Level 2.5
offers more colours and better graphics than Level 1.5.
3 Use Î/ï to select [Presentation Level], then
select [Level 1.5] or [Level 2.5] using Í/Æ.
To show the teletext
1 Press to turn on the teletext decoder.
• [Teletext] information will appear.
2 Press repeatedly to show the teletext in
transparent mode or picture and teletext mode.
• If you want to select other pages, use the Number buttons or
Î/ï.
• To enlarge fonts, press .
• To select the teletext subpages, press .
• To directly select the page numbers shown at the bottom of
the TV screen, use RED / GREEN / YELLOW / BLUE.
• To call up the hidden information, press .
• To hold the current page, press .
• To go back to the start page, press .
• To hide the teletext, press SLEEP.
3 Press BACK to turn off the teletext decoder.
Common Interface (CI)
This unit is equipped with a CI slot. You can enjoy
additional services with this function, for example Pay TV.
The access restrictions menu will appear on the TV screen
when a CI module is installed.
1 Go into standby mode and unplug from an AC
outlet.
2 Insert the CI module straight to the CI slot of this
unit.
• Some CI modules may be a two-piece design consisting of a
card reader with the viewing card. When using this kind of card,
insert the card reader firmly into the CI slot on the unit first.
Then, insert the viewing card into the reader.
3 Plug this unit into an AC outlet and press Q to turn
on the unit.
4 Press MENU to display the menu.
5 Use Î/ï to select [Others], then press OK.
6 Use Î/ï to select [Common Interface], then
press OK.
7 Follow the instructions on the TV screen.
• CI may not available in some countries or region.
• In case of failure, you need to call your CI service provider.
• Menu operations may vary depending on the viewing card.
Refer to the manual accompanying the viewing card.
DivX® VOD
When you purchase or rent a DivX® file through the
official site of DivX® video which is called DivX® VOD
(Video-On-Demand) services, a registration code is
required every time you get the new file from the DivX®
VOD services.
1 Use Î/ï to select [Others], then press OK.
2 Use Î/ï to select [DivX(R) VOD], then press
OK.
DivX(R) Registration
You can set the registration of DivX® VOD code to this
unit.
3 Use Î/ï to select [DivX(R) Registration], then
press OK.
DivX(R) Deactivation
You can deactivate registration code of this unit and get
new registration code and deactivation code in order to
download the DivX® VOD files from the Internet.
3 Use Î/ï to select [DivX(R) Deactivation], then
press OK and, if a confirmation message appears,
select and press OK.
• During the DivX® playback, you can not enter this setting.
Page 21

EN
21
Software Download
Software download complies in specified countries only.
You may not use this function depending on where you
live.
1 Use Î/ï to select [Others], then press OK.
2 Use Î/ï to select [Software], then press OK.
Auto Update Search
When you set to [On], this unit into standby mode detects
and update a new version of software automatically.
3 Use Î/ï to select [Auto Update Search], and
then select [On] or [Off] then using Í/Æ.
• Power indicator lights up while the unit searches or updates the
software.
• Software updating will start automatically.
Search for new software
You can search for new version of software in TV mode
only.
3 Use Î/ï to select [Search for new software],
then press OK.
• When this unit found a new version of software, software
update confirmation menu will appear.
• This process may take up to 60 minutes.
4 After the software update is completed, press Q to
restart this unit.
Reset Default
Reset
You can restore the all settings except channel setting and
parental lock settings.
1 Use Î/ï to select [Others] by pressing OK, and
select [Reset], then press OK.
2 Use Í/Æ to select [OK], then press OK.
Parental Lock
You can proceed Parental setting, if you enter your PIN
code.
1 Use Î/ï to select [Parental], then press OK.
2 Use the N umber buttons to e nt er t he 4- d ig it
PIN Code you set.
• If you have not set up your PIN code, enter 1234.
• When you enter correct PIN Code, settings display will appear
automatically.
Picture
Sound
TV
Others
Parental
Channel Lock
Maturity Rating
Change PIN Code
Factory Reset
Demo
When you select [Location] to [Retailstore], you can
check and change demonstration settings.
E-pop
E-pop can be set to off or position you want in this
function.
1 Use Î/ï to select [Others] by pressing OK, and
select [Demo], then press OK.
2 Use Î/ï to select [E-pop], and then select [Top],
[Bottom] or [Off] using Í/Æ.
100Hz Demo
You can check differences of between 50Hz and 100Hz
refresh rate with this demonstration mode.
1 Use Î/ï to select [Others] by pressing OK, and
select [Demo], then press OK.
2 Use Î/ï to select [100Hz Demo], and then press
OK.
Parental
Select BackOK
Channel Lock
You can set particular channels to be invisible.
• When you select the locked channel, you need to enter the PIN
Code to watch.
• If you want to unlock the locked channel, select [OK] by using
Î/ï, then the PIN Code again.
3 Use Î/ï to select [Channel Lock], then press
OK.
4 Use Î/ï to select the channel you want, then
press OK.
• will appear on the right of the channel.
• Press OK again to cancel, and will disappear.
Maturity Rating
You can set the parental rating to avoid watching an
inappropriate programme for your children.
3 Use Î/ï to select [Maturity Rating], then press
OK.
4 Use Í/Æ to select the age restriction.
Page 22

EN
22
Change PIN Code
You can set your own PIN Code.
3 Use Î/ï to select [Change PIN Code], then press
OK.
4 Use the Number buttons to enter the new 4-digit
number.
5 Use the Number buttons to enter the same 4-digit
number again.
Factory Reset
You can restore this unit to factory settings.
3 Use Î/ï to select [Factory Reset], then press
OK.
4 Use Í/Æ to select [OK], then press OK.
• All the settings are restored to the default even memorised
channels, picture settings, and sound settings.
fun-Link
This function allows you to operate the linked functions
between our brand devices with a fun-Link feature and this
unit connecting through an HDMI cable.
• The set with fun-Link will interoperate without any problems
with other Funai devices which comply with fun-Link.
1 Press to display the menu.
2 Use Î/ï to select [Setup], then press OK.
fun-Link Control
You can set the fun-Link function On or Off.
3 Use Î/ï to select [fun-Link Control], then select
[On] or [Off] by pressing OK.
On : Selects if you have connected an external device
that is compatible with the fun-Link function.
Off : Disables all fun-Link functions.
• The following additional settings will be greyed out when you
set to [Off].
Auto Device Off
You can set your device to turn off by interlocking from
this unit’s power.
3 Use Î/ï to select [Auto Device Off], then select
[On] or [Off] by pressing OK.
On : Your connected fun-Link device turns off
automatically when the unit goes into the
standby mode.
Off : Your connected fun-Link device stays on even if
the unit goes into the standby mode.
Auto TV On
This unit will turn on detected when the power on signal
is sent from your connected fun-Link device.
3 Use Î/ï to select [Auto TV On], then select
[On] or [Off] by pressing OK.
On : This unit turns on automatically when you turn on
your connected fun-Link device.
Off : This unit stays the standby mode even if you turn
on your connected fun-Link device.
Device Control
You can operate some functions such as disc playback or
call up the menu of the connected devices, by using this
unit’s remote control.
3 Use Î/ï to select [Device Control], then select
[On] or [Off] by pressing OK.
On : B / C / H / G / F / E / D /
BACK / the Number buttons / RED / GREEN /
YELLOW / BLUE can be used to control your
connected fun-Link devices by this unit’s remote
control.
Off : Disables the device control.
/ Î/ï/Í/Æ / OK /
Device List Update
This function lets you see the product model number or
name of connected devices.
3 Use Î/ï to select [Device List Update], then
press OK.
To show the menu of connected your devices
Make sure [fun-Link Control] and [Device Control] is set
to [On].
1 Press to display the menu.
2 Use Î/ï to select device you want, then press
OK.
3 Use Î/ï to select the item you want, then press
OK.
Device - Menu : This function allows you to control
Device Contents
Device Favourite
• Some of fun-Link functions may not be available depending on
your fun-Link devices or discs.
• We do not guarantee 100 % interoperability with other brands
of HDMI link compliant devices.
the menu of your connected funLink device.
: This function allows you to control
the top menu of your DVD or Bluray™ discs.
: This function allows you to control
the pop-up menu of your Blu-ray™
discs.
4 Use Î/ï/Í/Æ / OK on this unit’s remote
control to operate the desired functions for your
devices or discs.
Page 23

EN
23
TROUBLESHOOTING GUIDE
Sometimes a performance problem can be easily solved by checking seemingly apparent but often
overlooked possibilities.
Before arranging for service, check these items. It could save you time and money.
Problem
Remote Control Doesn’t Work
Bars On TV Screen
Picture Distorted
Picture Rolls Vertically
No Colour
Poor Reception on Some Channels
Weak Picture
Lines or Streaks in Picture
Ghosts in picture
Picture Blurred
Sound OK, Picture Poor
Picture OK, Sound Poor
No Picture or Sound
Different colour marks on TV screen
Black or Luminous point on TV screen
Forget the PIN Code
Possible Remedy
• Is unit plugged in?
• Power at outlet?
• Check batteries in remote control.
• If outside antenna is being used, check for broken wire.
• Check for local interference.
• Try a new channel, if OK, then possibly due to poor channel reception.
• If outside antenna is being used, check for broken wire.
• Surrounding temperature is too low.
• Try a new channel, if OK, then possibly due to poor channel reception.
• If outside antenna is being used, check for broken wire.
• Check for local interference.
• Try a new channel, if OK, then possibly due to poor channel reception.
• Is antenna connected to terminal on the back of the unit?
• If outside antenna is being used, check for broken wire.
[Colour] control.
• Adjust
• Try a new channel, if OK, then possibly due to poor channel reception.
• Is antenna connected to terminal on the back of the unit?
• If outside antenna is being used, check for broken wire.
• Check for local interference.
• Try a new channel, if OK, then possibly due to poor channel reception.
• Is antenna connected to terminal on the back of the unit?
• If outside antenna is being used, check for broken wire.
• Adjust
[Contrast] and [Brightness] control.
• Surrounding temperature is too low.
• Try a new channel, if OK, then possibly due to poor channel reception.
• If outside antenna is being used, check for broken wire.
• Check for local interference.
• Try a new channel, if OK, then possibly due to poor channel reception.
• Is antenna connected to terminal on the back of the unit?
• If outside antenna is being used, check for broken wire.
• Check for local interference.
• Try a new channel, if OK, then possibly due to poor channel reception.
• If outside antenna is being used, check for broken wire.
• Try a new channel, if OK, then possibly due to poor channel reception.
• Is antenna connected to terminal on the back of the unit?
• If outside antenna is being used, check for broken wire.
• Check for local interference.
• Adjust [Contrast] and [Brightness] control.
• Try a new channel, if OK, then possibly due to poor channel reception.
• Check for local interference.
• Try a new channel, if OK, then possibly due to poor channel reception.
• Is unit plugged in?
• Power at outlet?
• Is unit’s power on?
• Is antenna connected to terminal on the back of the unit?
• If outside antenna is being used, check for broken wire.
• Unplug the AC power cord and wait for about 1 minute, then plug the AC power
cord and turn on the unit again.
• Try a new channel, if OK, then possibly due to poor channel reception.
• It is quality of the LCD Panel.
• Enter 4737, then set your desired password again.
Page 24

EN
24
OTHER INFORMATIONS
Specifications
Model LED40-H9825M
LCD
Television system
Terminals Antenna
Audio Input
Composite Video Input
Component Video
Input
HDMI Input
PC Input
SCART
Headphone Audio
Output
Coaxial digital audio
Output
USB Input
Common Interface
Sound Output
Remote control
Operating temperature range
Power requirements
Power consumption
Dimensions
*Protruding parts
excluded.
Weight without base
without base
with base
with base
Trademark Information
• Manufactured under license from Dolby Laboratories.
Dolby and the double-D symbol are trademarks of
Dolby Laboratories.
• HDMI, the HDMI Logo, and High-Definition Multimedia
Interface are trademarks or registered trademarks of
HDMI Licensing LLC in the United States and other
countries.
DVB-T(MPEG2/H.264), PAL-B/G, D/K, SECAM-B/G, D/K, L
D-Sub 15pin x 1 (RGB) / Mini jack Ø3.5 mm x 1 (Audio)
40 inches
UHF/VHF 75 ohm
RCA jack (L/R) x 2
RCA jack (shared terminal with Y of components) ×1
RCA jack (Y/Pb/Pr) ×3
HDMI 19pin x 3
SCART x 1
Mini jack Ø3.5 mm x 1
RCA jack × 1
USB × 1
CI Slot × 1
10 W, 8 ohm × 2
Digital encoded infrared light system
5 °C to 40 °C
AC 220-240 V ~ , 50 Hz
105 W (standby: less than 0.5 W)
H:577.0 / W:961.0 / D:42.0
H:621.0 / W:961.0 / D:236.0
13.4 kg
16.1 kg
• DVB is a registered trademark of the DVB Project.
• The “HD TV 1080p” qualifier Logo is a trademark of
DIGITALEUROPE.
• DivX®, DivX Certified® and associated logos are
trademarks of DivX, LLC. and are used under license.
SRS TruSurround HD™ creates an immersive, feature-rich surround sound experience
from two speakers, complete with rich bass, high frequency detail and clear dialog.
is a trademark of SRS Labs, Inc. TruSurround HD technology is incorporated under
license from SRS Labs, Inc.
“Tuxera NTFS Interoperability”
Used for licensee products which include Tuxera NTFS
Page 25

EN
25
Declaration of Conformity
This product complies with the requirement of the related
directives.
We: FUNAI ELECTRIC EUROPE Sp. z o.o.
ul. Inżynierska 1, 67-100 Nowa Sól, Poland
declare that the following product:
LCD Television
Model LED40-H9825M
Trade Name: Funai
is in compliance with the related regulations.
Servicing
• Should your unit become inoperative, do not try to
correct the problem by yourself. There are no userserviceable parts inside. Take the unit to a Service Centre
for servicing.
Cabinet Cleaning
• Wipe the front panel and other exterior surfaces of the
unit with a soft cloth.
• Never use a solvent or alcohol. Do not spray insecticide
liquid near the unit. Such chemicals may cause damage
and discoloration to the exposed surfaces.
Panel Cleaning
• If the LCD panel should require cleaning, wipe it with a
cotton or soft cloth. Before cleaning the panel,
disconnect the power cord.
License
This product uses some open source software:
• FreeType
• ICU License
“License Statement” is written at the end of book.
If you are interested in obtaining GPL source code used in
this product, please contact FUNAI ELECTRIC EUROPE
Sp. z o.o. ul. Inżynierska 1, 67-100 Nowa Sól, Poland.
Printed in EU
Page 26

I
License Statement
FreeType
Portions of this software are copyright (C) 1996-2002 The Free Type Project (www.freetype.org). All rights reserved.
ICU
ICU License - ICU 1.8.1 and later
COPYRIGHT AND PERMISSION NOTICE
Copyright (c) 1995-2003 International Business Machines Corporation and others All rights reserved.
Permission is hereby granted, free of charge, to any person obtaining a copy of this software and associated documentation
files (the "Software"), to deal in the Software without restriction, including without limitation the rights to use, copy, modify,
merge, publish, distribute, and/or sell copies of the Software, and to permit persons to whom the Software is furnished to do
so, provided that the above copyright notice(s) and this permission notice appear in all copies of the Software and that both
the above copyright notice(s) and this permission notice appear in supporting documentation.
THE SOFTWARE IS PROVIDED "AS IS", WITHOUT WARRANTY OF ANY KIND, EXPRESS OR IMPLIED, INCLUDING
BUT NOT LIMITED TO THE WARRANTIES OF MERCHANTABILITY, FITNESS FOR A PARTICULAR PURPOSE AND
NONINFRINGEMENT OF THIRD PARTY RIGHTS. IN NO EVENT SHALL THE COPYRIGHT HOLDER OR HOLDERS
INCLUDED IN THIS NOTICE BE LIABLE FOR ANY CLAIM, OR ANY SPECIAL INDIRECT OR CONSEQUENTIAL
DAMAGES, OR ANY DAMAGES WHATSOEVER RESULTING FROM LOSS OF USE, DATA OR PROFITS, WHETHER IN
AN ACTION OF CONTRACT, NEGLIGENCE OR OTHER TORTIOUS ACTION, ARISING OUT OF OR IN
CONNECTION WITH THE USE OR PERFORMANCE OF THIS SOFTWARE.
Except as contained in this notice, the name of a copyright holder shall not be used in advertising or otherwise to promote the
sale, use or other dealings in this Software without prior written authorization of the copyright holder.
Page 27

Web Site: http://www.funai.eu
1EMN28420
A13P1EP ★★★★★
 Loading...