

Page 1
Get
t
u
c
v
v
C
P3PC-1142-01XA
Color Image Scanner
TM
fi-5110EOX2
ing Started
Instr
tions préliminaires
Los Gehts
A
io Rapido
omenzando
Page 2

Page 3
P3PC-1142-02EN
Color Image Scanner
TM
fi-5110EOX2
GGeettttiinngg SSttaarrtteedd
Please read this guide before connecting the scanner to your PC.
Page 4

Contents
Introduction ........................................................................................................................................................... 1
1. Preparation ........................................................................................................................................................ 5
1.1. Checking the Contents of the Package...............................................................................................................................................5
1.2. Names and Functions of Parts.............................................................................................................................................................5
2. Connecting ScanSnap...................................................................................................................................... 6
2.1. Installing the Supplied Software ..........................................................................................................................................................6
2.1.1. Installing Adobe Acrobat 6.0 .............................................................................................................................................................6
2.1.2. Installing ScanSnap Manager, ScanSnap Organizer, CardMinder and PDF Thumbnail View .........................................................7
2.2. Connecting the Scanner .......................................................................................................................................................................7
2.2.1. Connecting the AC cable..................................................................................................................................................................7
2.2.2. Connecting the USB cable ...............................................................................................................................................................8
3. How to Use ScanSnap ...................................................................................................................................... 9
3.1. Scanning Documents ............................................................................................................................................................................9
3.2. About the Scan Settings .......................................................................................................................................................................9
3.3. Scanning Office Documents.................................................................................................................................................................9
3.4. Scanning with the Carrier Sheet ........................................................................................................................................................10
3.5. Scanning Business Cards ..................................................................................................................................................................10
3.6. About PDF Thumbnail View ................................................................................................................................................................11
3.7. ScanSnap Organizer ...........................................................................................................................................................................11
4. Troubleshooting.............................................................................................................................................. 12
4.1. Troubleshooting Checklist .................................................................................................................................................................12
4.2. Clearing Paper Jams ...........................................................................................................................................................................15
5. Daily Care ........................................................................................................................................................ 16
5.1. Cleaning Materials ...............................................................................................................................................................................16
5.2. Cleaning the Scanner Exterior ...........................................................................................................................................................16
5.3. Cleaning Inside of the scanner ..........................................................................................................................................................16
5.4. Cleaning the Carrier Sheet .................................................................................................................................................................17
6. Consumables/Carrier Sheet........................................................................................................................... 18
6.1. Part Numbers and Replacement Cycle of Consumables ................................................................................................................18
6.2. Replacing the Pad ASSY.....................................................................................................................................................................18
6.3. Replacing the Pick Roller ...................................................................................................................................................................19
6.4. Purchasing the Carrier Sheet .............................................................................................................................................................21
All Rights Reserved, Copyright © PFU LIMITED 2005.
The contents of this manual are subject to change without notice.
This manual may not be reproduced, adapted or translated without prior written permission.
READ THIS ENTIRE MANUAL CAREFULLY BEFORE USING THIS PRODUCT. IF THIS PRODUCT IS NOT USED CORRECTLY,
UNEXPECTED INJURY MAY BE CAUSED TO USERS OR BYSTANDERS.
While all efforts have been made to ensure the accuracy of all information in this manual, PFU LIMITED assumes no liability to any party for
any damage caused by errors or omissions or by statements of any kind in this manual, its updates or supplements, whether such errors are
omissions or statements resulting from negligence, accidents, or any other cause.
PFU LIMITED further assumes no liability arising from the application or use of any product or system described herein; nor any liability for
incidental or consequential damages arising from the use of this manual.
PFU LIMITED disclaims all warranties regarding the information contained herein, whether expressed, implied, or statutory.
PFU LIMITED assumes no liability for incidental or consequential damages arising from the use of this product, and any claims by a third
party.
Page 5

Introduction
Thank you for purchasing the
Image Scanner product.
ScanSnap fi-5110EOX2 comes with a color image scanner
and office applications. It is a complete Office Solution
designed to improve your productivity and to solve
scanning problems in your office. ScanSnap product has
the following features.
● Just pressing the Scanner button allows you
to turn images on paper into PDFs!
You can turn the documents that clutter up your
desktop into PDFs, and manage and archive them on
your computer. You can use the Adobe
software packaged with this scanner to display and
these PDF documents.
ScanSnap product can also automatically recognize
the type of document, color or black & white, so
scanned image files can be made smaller when
scanning documents containing a mixture of color
and black & white pages. You can also have the
scanner automatically remove blank pages in
documents in order to reduce the size of files even
more.
● Effortless scanning!
Double-sided color documents A4 or letter in size
can be scanned at a speed of about 15 sheets/minute
(when used with a computer with Intel
1.8GHz or higher that runs Windows
Me, Windows
Scan mode Normal, Color mode Auto, and
Compression rate 3).
● Small desktop footprint!
Smaller than a sheet of A4 or letter paper in size,
ScanSnap scanner can be left on your desk all the
time.
● Business cards easily filed!
Business cards can be easily filed and searched for
using the OCR function by using the
"CardMinder
with the scanner.
(*ScanSnap fi-5110EOX2 Scanner does NOT
comply with TWAIN or ISIS standards.)
Manufacturer
PFU LIMITED
International Sales Dept., Imaging Business
Division, Products Group
Solid Square East Tower, 580 Horikawa-cho,
Saiwai-ku, Kawasaki-shi Kanagawa 212-8563,
Japan
Phone : +81 (44) 540-4538
Trademarks
Microsoft, and Windows are registered trademarks
of Microsoft Corporation in the United States
and/or other countries.
ScanSnap fi-5110EOX2
®
Acrobat®
®
Pentium® 4
®
®
2000 or Windows® XP, and with
TM
for ScanSnap" application supplied
98, Windows®
Color
Adobe, the Adobe logo, and Acrobat are either
registered trademarks of Adobe Systems
Incorporated in the United States and/or other
countries.
ScanSnap, the ScanSnap logo, and CardMinder are
the trademarks of PFU LIMITED.
Other product names are the trademarks or
registered trademarks of the respective companies.
How Trademarks and Product Names Are
Indicated In This Manual
ScanSnap: ScanSnap fi-5110EOX2
CardMinder: CardMinder
References to operating systems (OS) are indicated
as follows:
Windows 98: Microsoft® Windows® 98 operating
system.
Windows Me: Microsoft
Edition operating system.
Windows 2000: Microsoft
Professional operating system.
Windows XP: Microsoft
Professional operating system,
Microsoft
Where there is no distinction between the different versions of
the above operating system, the general term "Windows" is
used.
Adobe Acrobat 6.0: Adobe® Acrobat® 6.0 Standard
Where there is no distinction between the different versions
of the above application, the general term "Adobe Acrobat" is
used.
ScanSnap and the Manuals
Edition operating system.
ScanSnap fi-5110EOX2 consists of:
1) fi-5110EOX2: Color image scanner.
2) Carrier Sheet: A document is inserted into the sheet
which is then used for scanning. You can scan large
documents such as A3/B4/11x17 documents, and
documents of irregular shapes such as clippings of
newspaper.
3) ScanSnap Manager: ScanSnap's driver to scan and
save documents.
4) CardMinder application: Software with OCR engine
to capture and manage business card data for Personal
Information Manager software such as Microsoft
Outlook
5) Adobe
®
.
®
Acrobat®: De facto standard software for
generating and manipulating PDF format electronic
document.
Following manuals are prepared for you:
ScanSnap fi-5110EOX2 Getting Started
(This manual):
provides basic information to install and use
ScanSnap solution.
TM
2.0
®
Windows® Millennium
®
Windows® 2000
®
Windows® XP
®
Windows® XP Home
®
ScanSnap fi-5110EOX2 Getting Started | 1
Page 6
ScanSnap fi-5110EOX2 Operator’s Guide
(PDF manual included in ScanSnap Setup CD-ROM):
provides detailed information about the installation of
the ScanSnap software and hardware, operation of the
scanner hardware and ScanSnap Manager.
CardMinder User’s Guide
(PDF manual included in ScanSnap Setup CD-ROM):
provides detailed information on how to use CardMinder.
ScanSnap Organizer User’s Guide
(PDF manual included in ScanSnap Setup CD-ROM):
provides detailed information on how to use ScanSnap
Organizer.
For information on how to use Adobe Acrobat, please
refer to “Adobe Acrobat Help.”
Regulatory Information
FCC declaration
Canadian DOC Regulations
This digital apparatus does not exceed the Class B
limit for radio noise emissions from digital
apparatus set out in the Radio interference
Regulations of the Canadian Department of
Communications.
This Class B digital apparatus complies with
Canadian ICES-003.
Le pésent appareil numérique n’ément pas de bruits
radioélectriques dépassant les limites applicables
aux appareils numériques de la classe B prescridtes
dans le Réglesment sur le brouillage radioélectrique
dicté par le ministere des Communications du
Canada.
Cet appareil numérique de la classe B est
conformme à la norme NMB-003 du Canada.
This equipment has been tested and found to
comply with the limits for a Class B digital device,
pursuant to Part 15 of the FCC Rules. These limits
are designed to provide reasonable protection
against harmful interference in a residential
installation. This equipment generates, uses, and can
radiate radio frequency energy and, if not installed
and used in accordance with the instruction manual,
may cause harmful interference to radio
communications. However, there is no guarantee
that interference will not occur in a particular
installation. If this equipment does cause harmful
interference to radio or television reception, which
can be determined by turning the equipment off and
on, the user is encouraged to try to correct the
interference by one or more of the following
measures:
- Reorient or relocate the receiving antenna.
- Increase separation between equipment and
receiver.
- Connect equipment to an outlet on a circuit
different from that to which the receiver is
located.
- Consult your dealer or an experienced radio/TV
technician.
Changes or modifications not expressly
approved by the party responsible for
compliance could void the user’s authority to
operate the equipment.
The use of a USB interface cable and AC
cable supplied with this product is required to
comply with the Class B limits of Part 15 of
FCC rules.
Bescheinigung des Herstellers /
Importeurs
Für den fi-5110EOX2 wid folgendes bescheinigt:
• In Übereinsstimmung mit den Bestimmungen der
EN45014(CE) funkentstört
Maschinenlärminformationsverordnung 3.
•
GPSGV, 06.01.2004: Der höchste
Schalldruckpegel beträgt 70 dB (A) oder weniger,
gemäß EN ISO 7779.
International ENERGY STAR® Program
As an ENERGY STAR® Partner,
PFU LIMITED has determined
that this product meets the
ENERGY STAR
energy efficiency.
The International
Equipment Program is an international program that
promotes energy saving through the penetration of
energy efficient computers and other office
equipment. The program backs the development and
dissemination of products with functions that
effectively reduce energy consumption. It is an open
system in which business proprietors can participate
voluntarily. The targeted products are office
equipment such as computers, monitors, printers,
facsimiles, copiers, scanners, and multifunction
devices. Their standards and logos (
uniform among participating nations.
®
guidelines for
ENERGY STAR
®
Office
) are
2 |
Page 7

Use in High-safety Applications
g
Symbols Used In This Manual
This product has been designed and manufactured
on the assumption that it will be used in office,
personal, domestic, regular industrial, and
general-purpose applications. It has not been
designed and manufactured for use in applications
(simply called "high-safety applications" from here
on) that directly involve danger to life and health
when a high degree of safety is required, for
example, in the control of nuclear reactions at
nuclear power facilities, automatic flight control of
aircraft, air traffic control, operation control in
mass-transport systems, medical equipment for
sustaining life, and missile firing control in weapons
systems, and when provisionally the safety in
question is not ensured. The user should use this
product with adopting measures for ensuring safety
in such high-safety applications. PFU LIMITED
assumes no liability whatsoever for damages arising
from use of this product by the user in high-safety
applications, and for any claims or compensation for
damages by the user or a third party.
About the use of mercury
Lamp(s) inside this product contain mercury and
H
must be recycled or disposed of according to local,
state, or federal laws.
This manual uses the following symbols in
explanations in addition to warning indications
This symbol alerts operators to particularly
important information. Be sure to read this
information.
HINT
This symbol alerts operators to helpful advice
regarding operation.
A TRIANGLE symbol indicates that special care
and attention is required.
The drawing inside the triangle shows the specific
caution.
A CIRCLE with a diagonal line inside shows action
which users may not perform.
The drawing inside or under the circle shows the
specific action that is not allowed.
Outline characters on a colored background show
R
instructions users should follow.
It may also include the drawing that shows the
specific instruction.
To avoid unexpected injury, read the following
carefully.
Doing the following actions may result in serious
personal injuries:
• Do not put the substance in the lamp in your
mouth as it contains mercury.
• Do not incinerate, crush, or shred the scanner.
• Do not breathe the chemical liquid contained in
the scanner parts.
Conventions
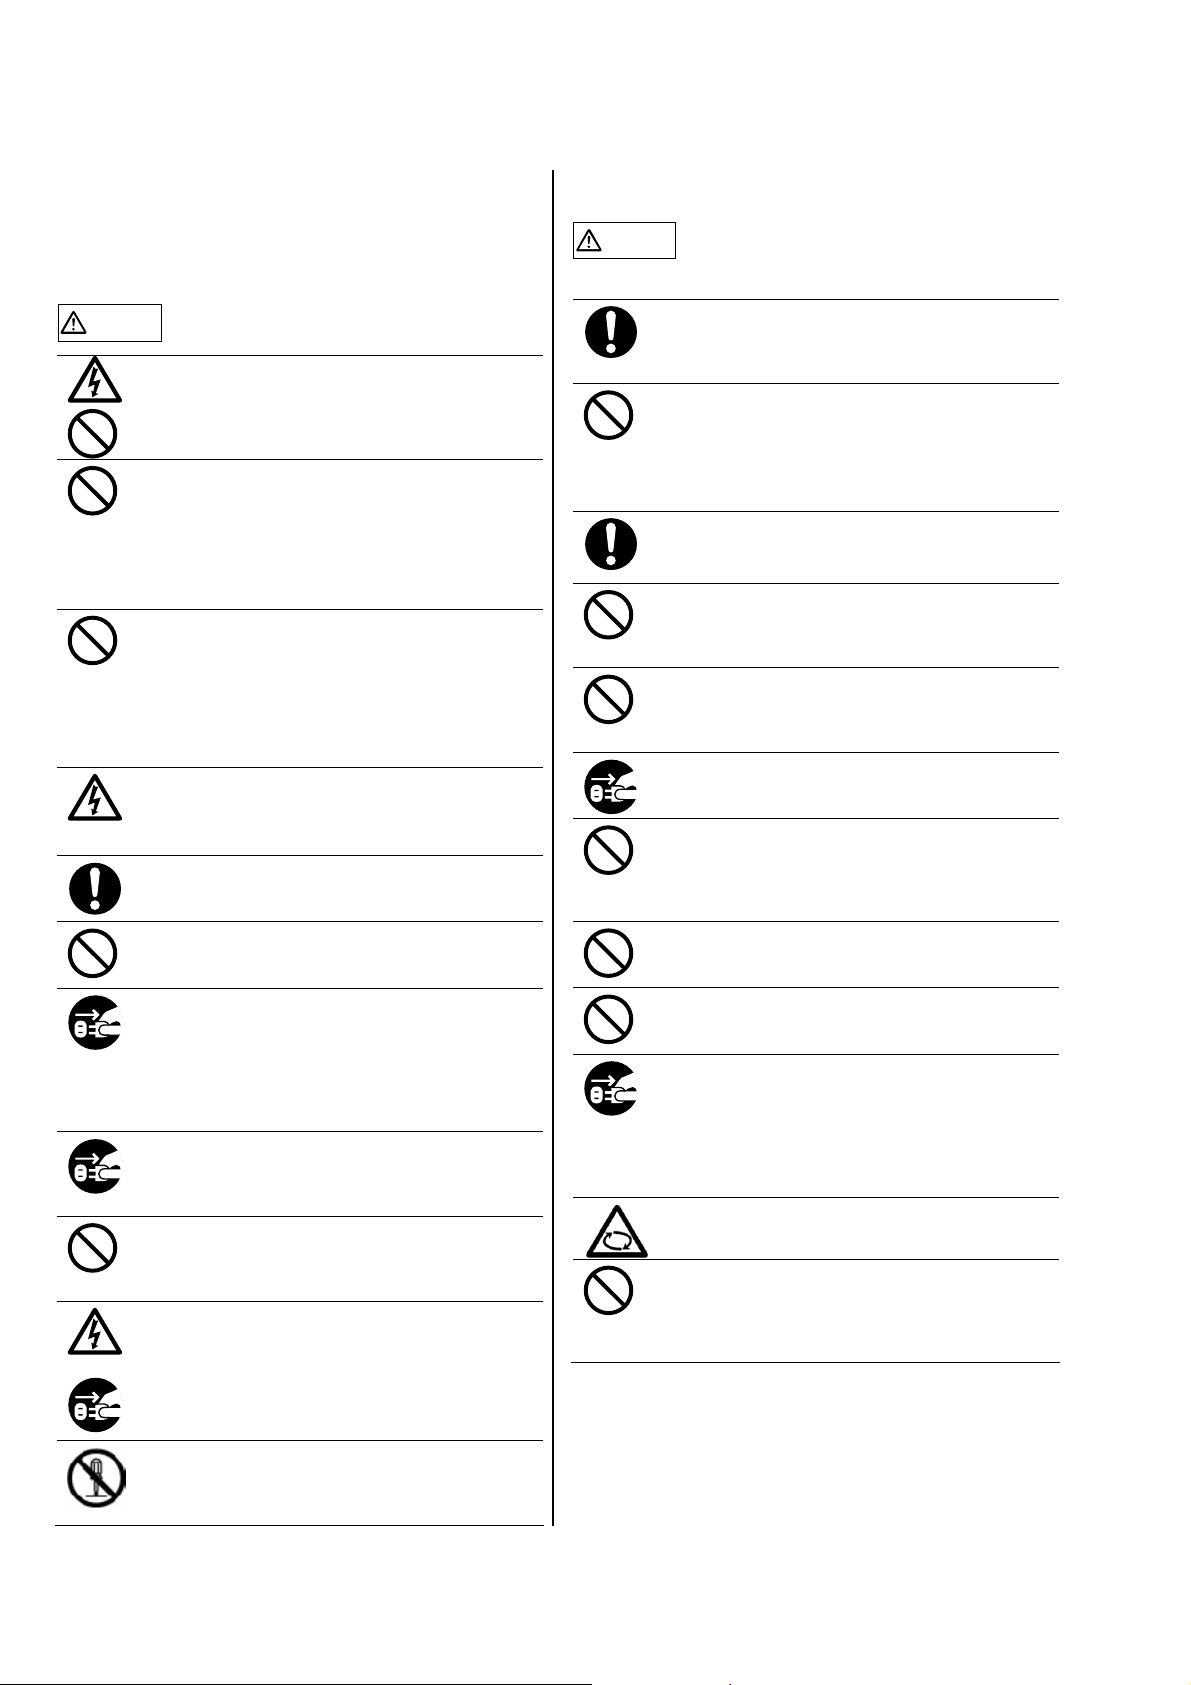
Warning Indications Used In This Manual
This indication alerts operators to an
WARNING
operation that, if not strictly observed, may
result in severe injury or death.
This indication alerts operators to an operation
CAUTION
that, if not strictly observed, may result in
safety hazards to personnel or damage to
equipment.
About the Warning Label
This product carries the following label warning.
The surrounding area where this warning label is
affixed can become very hot. Please take serious
caution as the heat can cause burns.
Do NOT remove from the scanner, stain or scratch
the warning labels.
Screen Examples In This Manual
The screen examples in this manual are subject to
change without notice in the interest of product
improvement.
If the actual displayed screen differs from the screen
examples in this manual, operate by following the
actual displayed screen while referring to the User's
Manual of the scanner application you are using.
Furthermore, the screenshots in this manual are for
the ScanSnap Manager, CardMinder, PDF
Thumbnail View, ScanSnap Organizer and Adobe
Acrobat.
About Maintenance
The user must not perform repairs on this scanner.
Contact the store where you purchased the scanner
or an authorized FUJITSU Image Scanner service
provider to make repairs to this product.
ScanSnap fi-5110EOX2 Getting Started | 3
Page 8
Safety Precautions
FOLLOW THESE INSTRUCTIONS AND BE SURE TO
HEED ALL WARNINGS AND CAUTIONS
DESCRIBED BELOW.
WARNING
Do not touch the power plug with wet hands. Doing
so might cause electric shock.
A damaged AC cable may cause fire or electric
shock.
Do not place heavy objects on AC cables, or pull,
bend, twist, heat, damage or modify AC cables.
Also, do not use damaged AC cables or power
plugs, and AC cables or power plugs when the wall
socket is loose.
Do not use cables other than the ones supplied with
this product. Use only specified AC cables and
connector cables. Failure to use the correct cables
might cause electric shock and equipment failure.
Do not use AC cable, AC adapter and other cables
provided with this product for other devices, since
this might cause equipment failure and other
troubles or an electric shock.
Use this scanner only at the indicated power voltage
and current. Improper power voltage and current
might cause fire or electric shock.
Also, do not connect to multiple-power strips.
Wipe off any dust from metal parts on the power
plug or metal fittings with a soft, dry cloth.
Accumulated dust might cause fire or electric shock.
Do not install the scanner in locations subject to oil
smoke, steam, humidity, and dust. Doing so might
cause a fire or electric shock.
If you detect heat coming from the device or detect
other problems such as smoke, strange smells or
noises, immediately turn off the scanner and then
disconnect its power plug.
Make sure that the smoking has stopped, and then
contact the store where you bought the scanner or
an authorized FUJITSU scanner service provider.
If the scanner is damaged for any reason, turn off
the scanner and unplug the power cable before
contacting the store where you purchased the
scanner.
Do not insert or drop metal objects into the scanner.
Do not scan wet documents or documents with
paper clips or staples.
Do not splash or allow the scanner to get wet.
If foreign objects (water, small metal objects, liquids,
etc.) get inside the scanner, immediately turn off the
scanner and disconnect the power plug from the
power outlet, then contact the store where you
bought the scanner or the Maintenance Service
Center. Pay particular attention to this warning in
households where there are small children.
Do not take apart or modify the scanner. The inside
of the scanner contains high-voltage components.
Touching these components might cause fire or
electric shock.
CAUTION
The following describes important cautions.
Install the scanner on a desk so that none of its
parts protrude outside of the desktop. Also, make
sure that the scanner is installed on a flat, level
surface
Do not install the scanner on unstable surfaces.
Install the scanner on a level surface that is free of
vibration to prevent it from falling.
Install the scanner on a strong surface that will
support the weight of the scanner and other
devices.
Firmly insert the power plug into the power outlet as
far it can go.
Install the scanner away from strong magnetic fields
and other sources of electronic noise. Also, protect
the scanner from static electricity as this might
cause the scanner to malfunction.
Do not use aerosol sprays to clean the scanner.
Aerosol sprays cause dirt and dust to enter the
scanner, resulting in scanner failure and
malfunction.
When the scanner is not used for a long period, be
sure to disconnect the power plug from the power
outlet for safety.
Do not install the scanner in the direct sunlight or
near heating apparatus. Doing so might cause
excessive heat to build up inside the scanner,
causing fire or scanner trouble. Install the scanner in
a well-ventilated location.
Do not block the ventilation ports. Blocking the
ventilation ports generates heat inside of scanner,
which may result in fire or scanner failure.
Do not place heavy objects on the scanner or use
the scanner's top surface for performing other work.
Improper installation might cause injuries.
Do not move the scanner with the power and
interface cables connected as this might damage
the cables, causing fire, electric shock or injuries.
Before moving the scanner, be sure to disconnect
the power plug from the power outlet, and
disconnect data cables. Also, make sure that the
floor is free of obstructions.
Avoid touching any scanner mechanism when
scanning as this may cause injuries.
Do not use the device immediately after moving it
from a cold place to a warm room. This may cause
condensation, which might lead to scanning errors.
Let the device dry about one or two hours before
you use it.
4 |
Page 9
1. Preparation
(
This chapter describes necessary preparations before using
ScanSnap.
Buttons
Do not connect the scanner to your PC
before installing “ScanSnap Manager”.
If the scanner is connected before installing
ScanSnap Manager, it will not operate
correctly.
Refer to Chapter 2 for the installation of
ScanSnap Manager.
1.1. Checking the Contents of the
Package
When you unpack the scanner package, make sure that all
parts are included.
Refer to the package contents list included the scanner
package box.
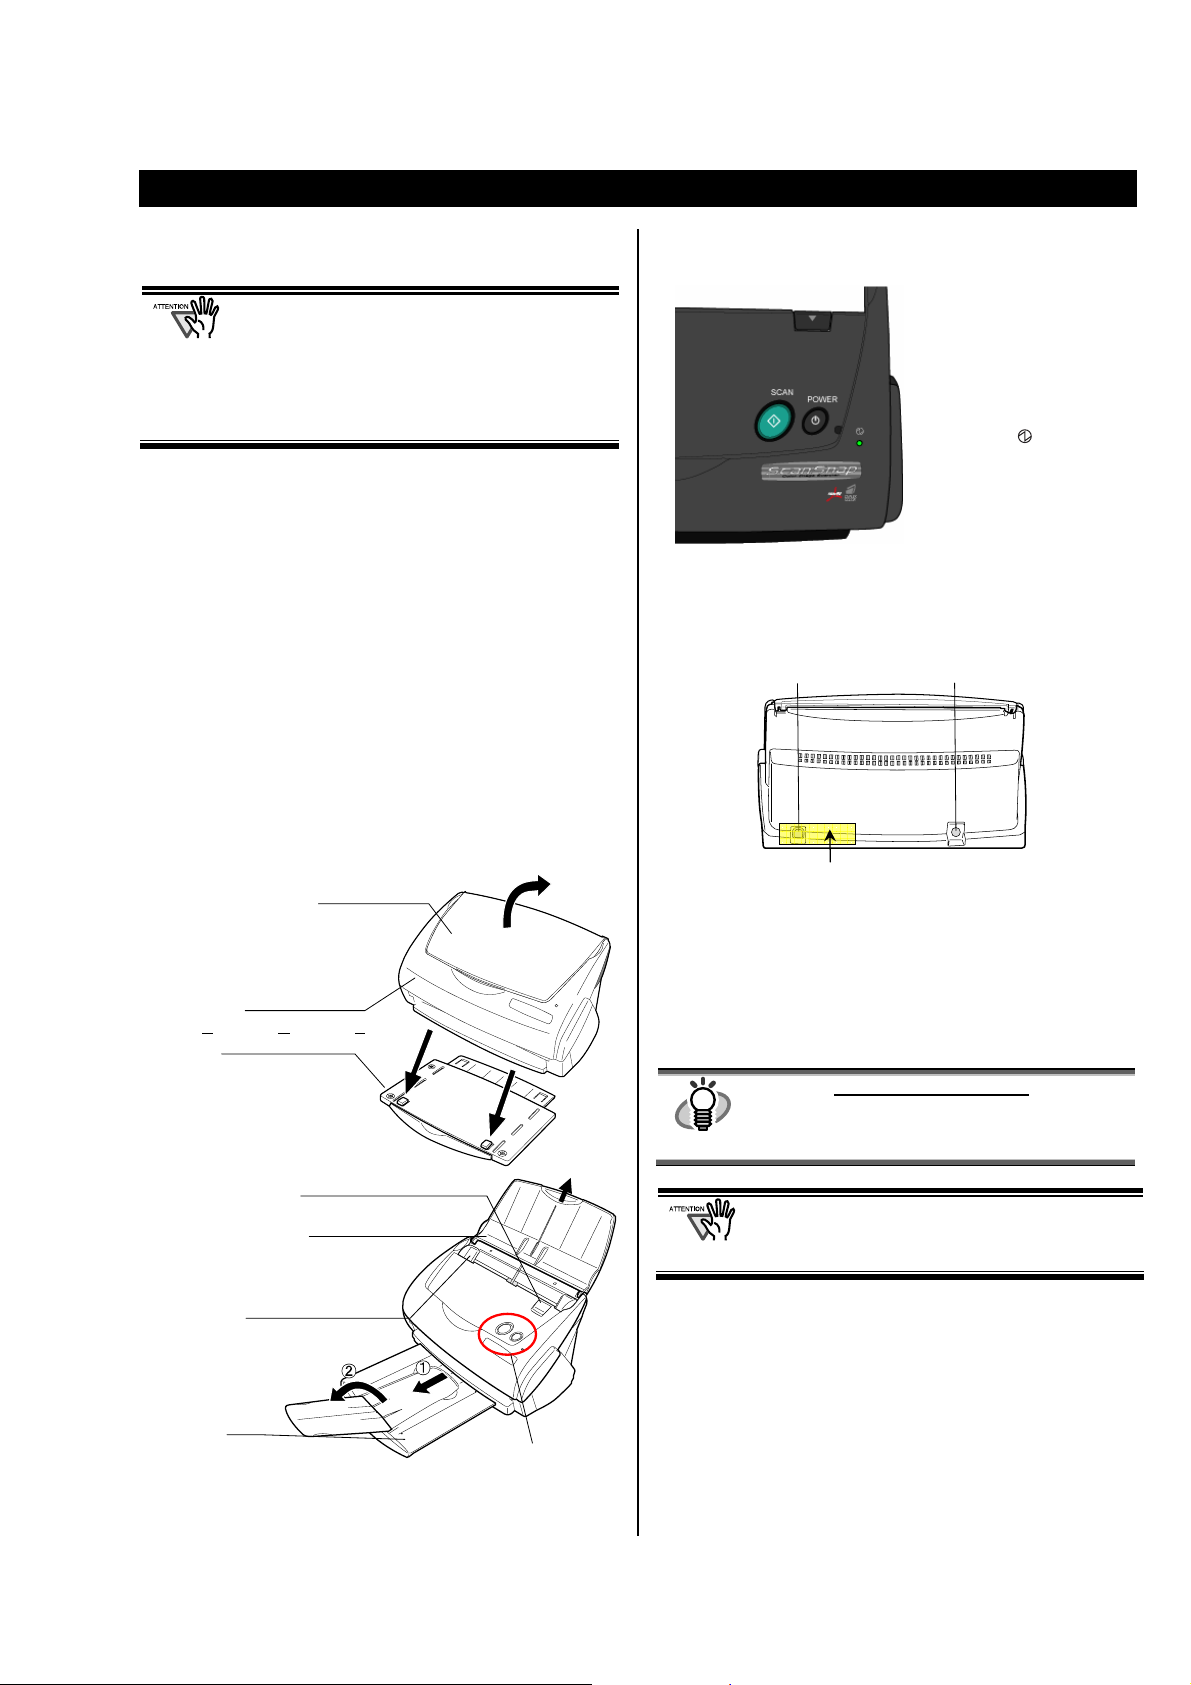
1.2. Names and Functions of Parts
This section describes the names and functions of parts.
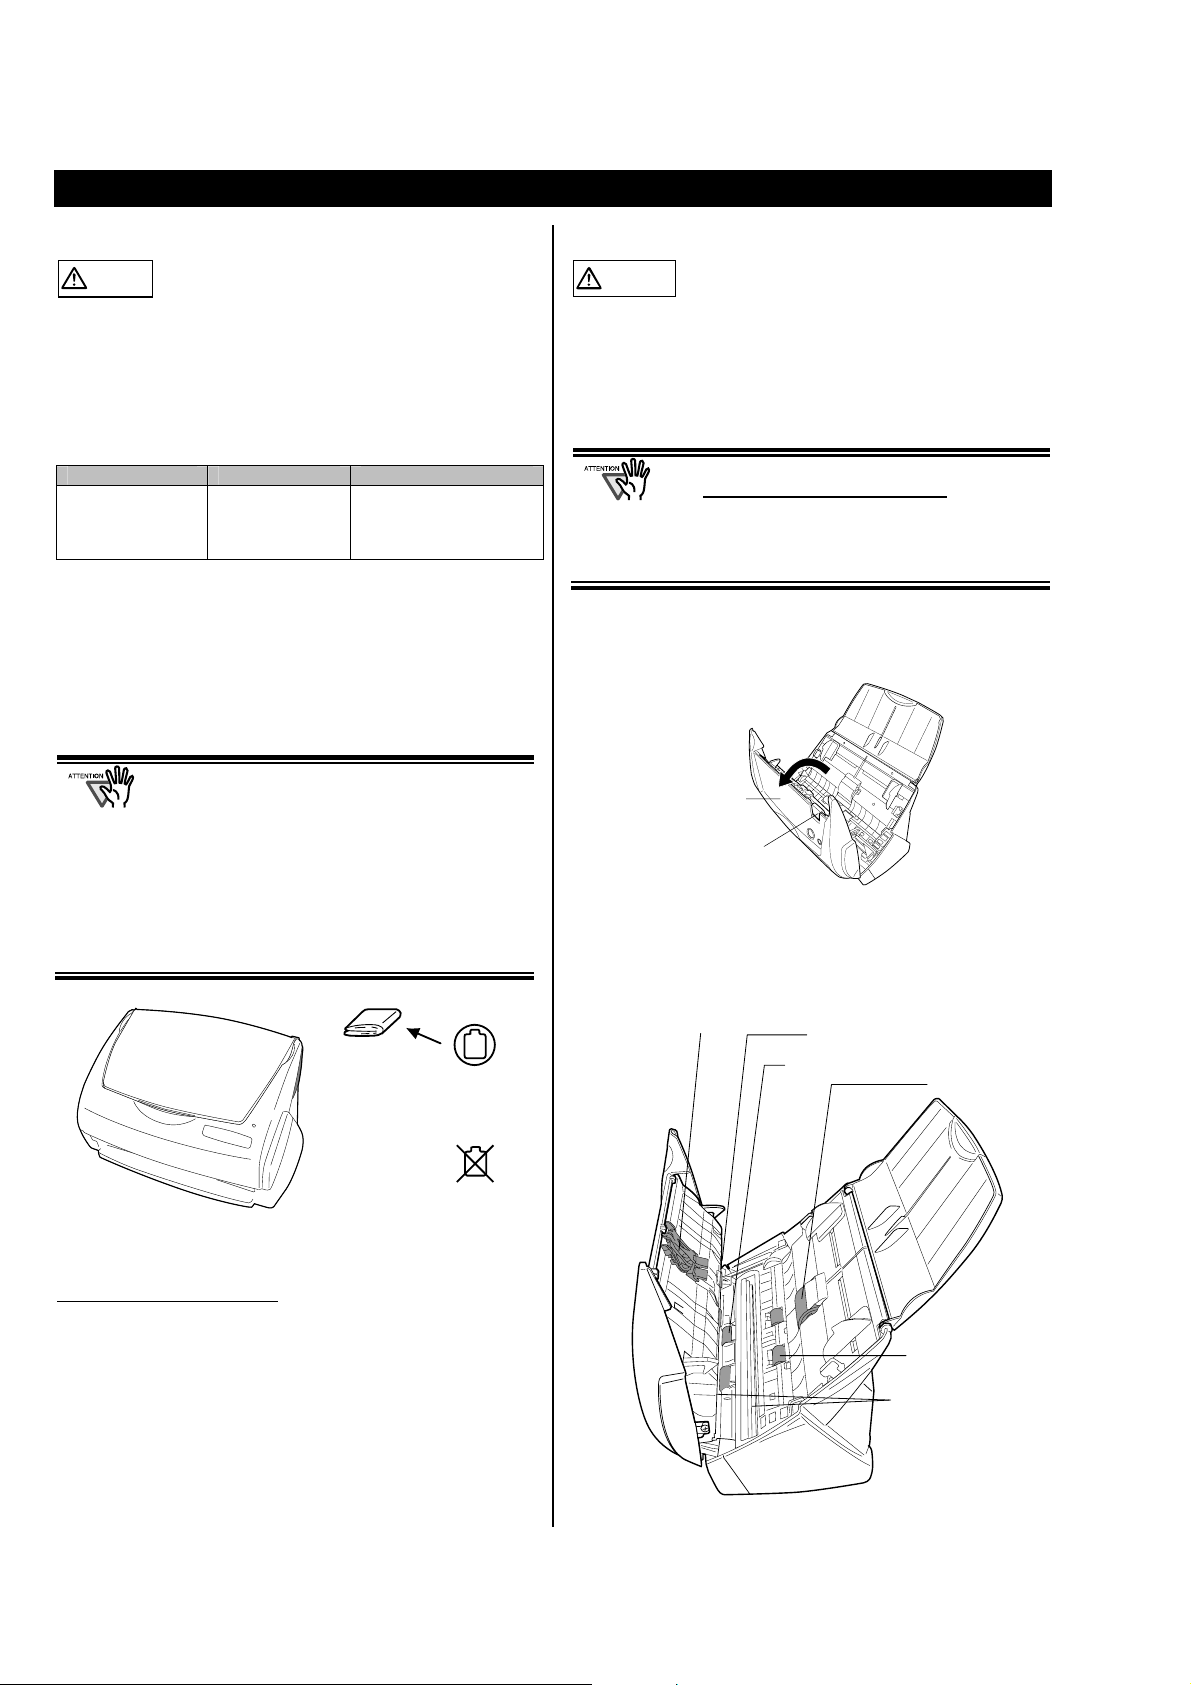
Front Side
Paper chute cover
Open this cover when using
the scanner.
→ Opening the cover turns
ON the scanner.
ADF cover
ADF: Automatic Document Feeder)
Stacker
Place the scanner aligning
the two front projection to
the hollows on the bottom
of the scanner.
Cover open lever
Pull this lever to open the ADF
Paper chute cover
Open this cover and load the
documents onto this part when
scanning documents.
Side guide
Adjust these guides to the
documents width for
preventing skewed
images.
cover.
Rear Side
USB connector
Seal: After installing ScanSnap Manager onto
your computer, remove this seal to connect the
scanner to the PC.
HINT
For the Document Specification, refer to the
“ScanSnap fi-5110EOX2 Operator’s
Guide” stored in ScanSnap Setup
CD-ROM.
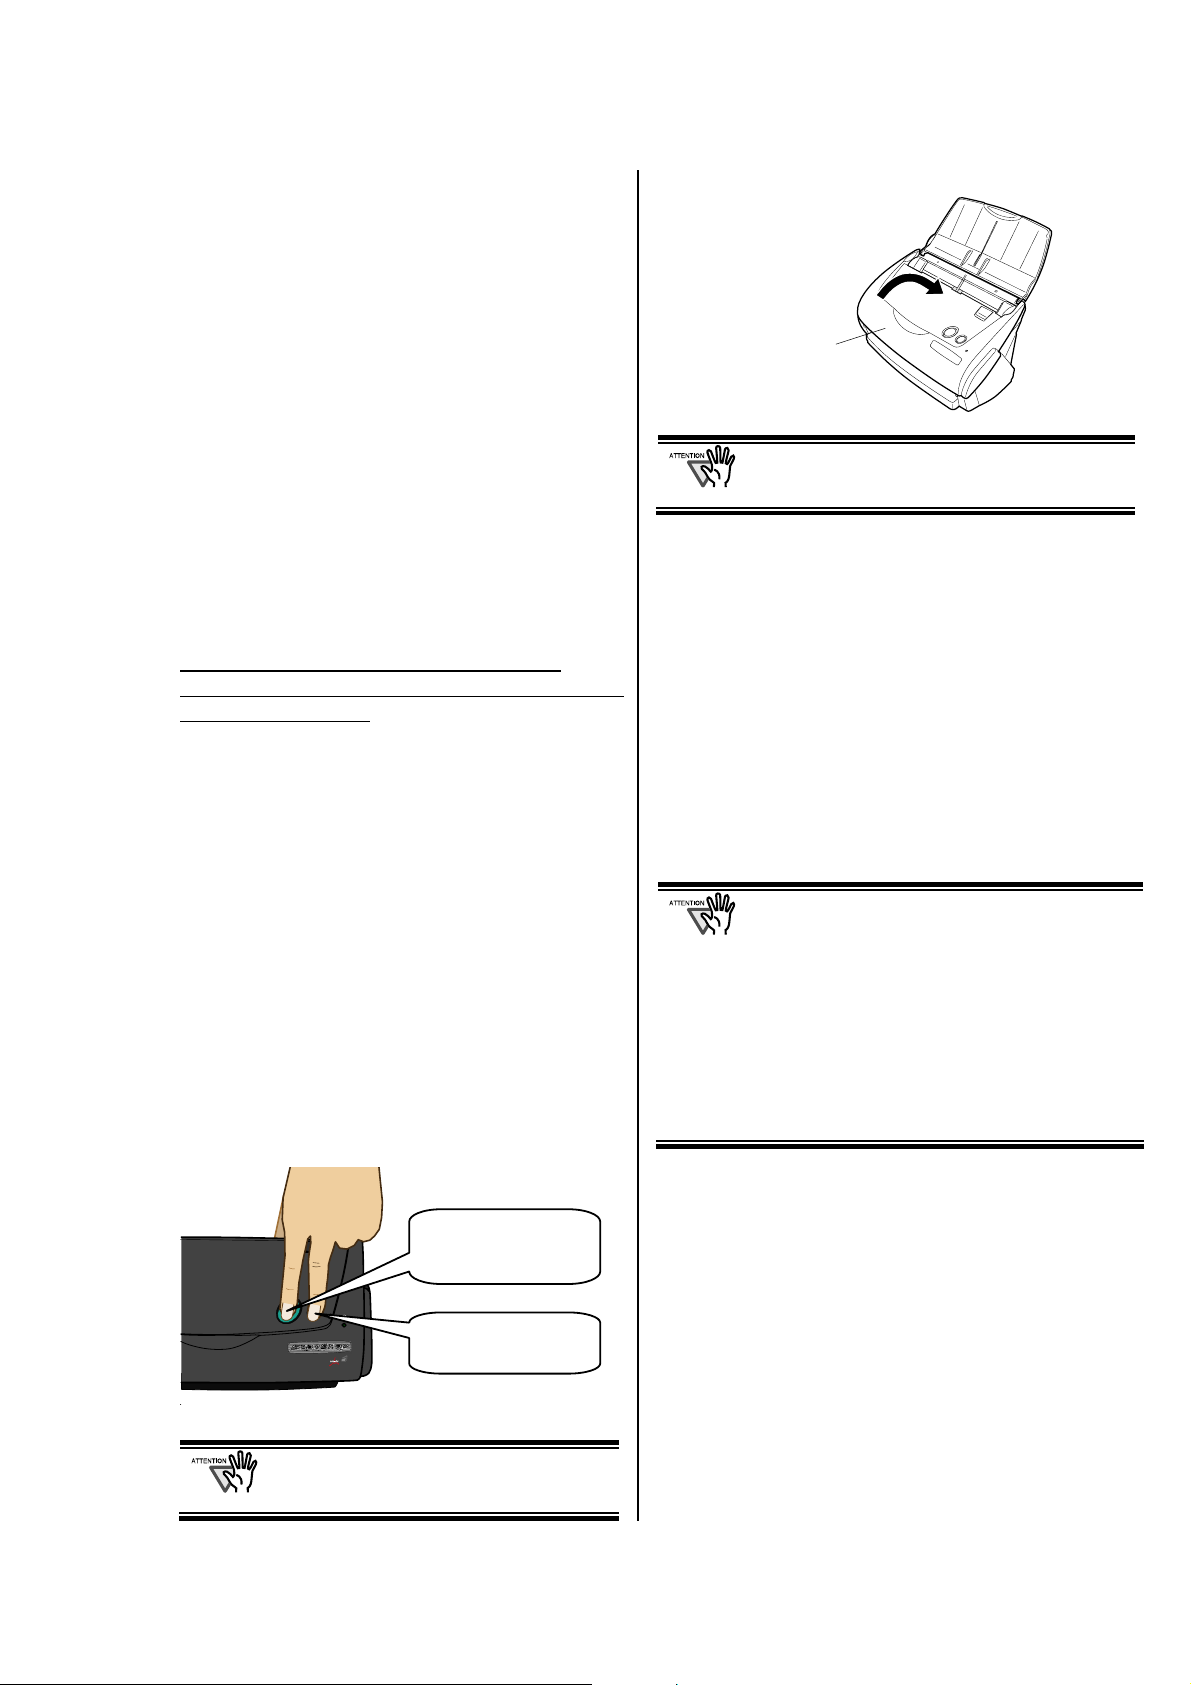
The scanner is turned on/off automatically, when
you open/close the Paper chute cover.
To turn off the scanner when the cover is opened,
press the [POWER] button.
[SCAN] button
Starts scanning.
[POWER] button
Turns on/off the power supply.
Power lamp
Indicates the scanner status.
Green :Ready
Green (Blinking) :Scanning
Orange :Error
Light off :Power off
AC adapter connector
Stacker
For using this part, pull it out
as shown in the figure.
→ Documents are ejected from the ADF onto this tray.
* You can also use the scanner without the Stacker.
Buttons
ScanSnap fi-5110EOX2 Getting Started | 5
Page 10
2. Connecting ScanSnap
This chapter describes how to connect ScanSnap to your
PC.
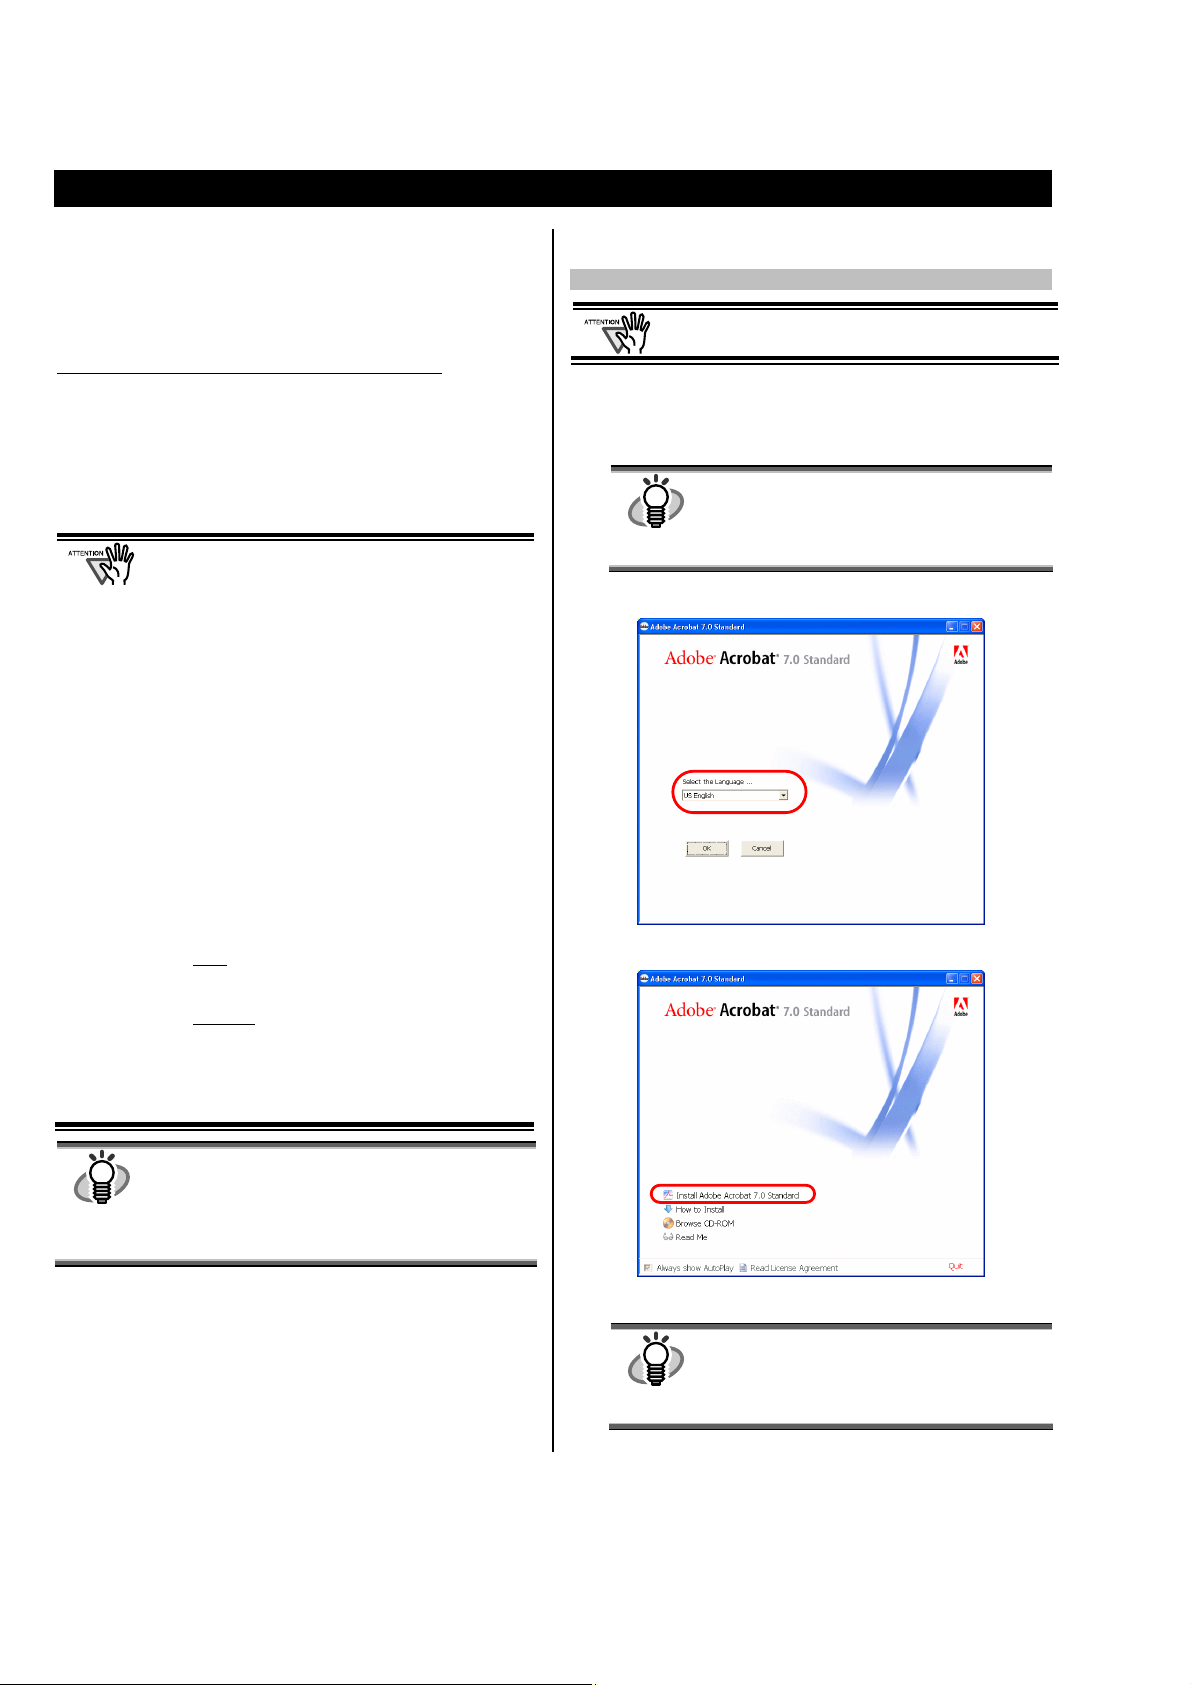
2.1.1. Installing Adobe Acrobat 7.0
Please prepare the Adobe Acrobat 7.0 CD-ROM.
2.1. Installing the Supplied Software
Before connecting the scanner to your computer, please
install the following software on your PC.
c Adobe Acrobat 7.0 (Application)
d ScanSnap Manager (Driver)
e ScanSnap Organizer (Application)
f CardMinder (Application)
g PDF Thumbnail View (Application)
• Be sure to install “ScanSnap Manager”
before connecting the scanner to your
PC.
If the scanner is connected before installing
ScanSnap Manager, the “Found New Hardware
Wizard” appears (This screen may differ
depending on the used OS). In this case, click
the [Cancel] button to close the wizard.
• It is not possible to simultaneously connect both
ScanSnap fi-5110EOX and fi-4110EOX series
scanners (or two or more fi-5110EOX
scanners) to one computer.
• If any driver of the ScanSnap fi-4110EOX or
ScanSnap fi-5110EOX series has already been
installed on your computer, uninstall it before
starting the installation.
• When using Windows 2000 or Windows XP, log
on as a user with administrator privileges.
• ScanSnap fi-5110EOX2 system requirements
are:
: Intel® Pentium® III 600MHz or higher
CPU
(recommended: Intel
1.8GHz or higher)*
Memory:
* If the CPU and the memory do not meet the
recommended requirements or the USB
version is 1.1, the scanning speed will slow
down.
128MB or more
(recommended: 256MB or more)*
HINT
ScanSnap Manager includes the driver software for
ScanSnap fi-4110EOX2 and ScanSnap
fi-5110EOX. If you already have any of these:
ScanSnap fi-5110EOX2 (this product), ScanSnap
fi-4110EOX2, or ScanSnap fi-5110EOX, you can
connect any one to your PC and use it.
®
Pentium® 4
Adobe Acrobat 7.0 is not supported by Windows 98
and Windows Me.
1. Insert the “Adobe Acrobat 7.0 CD-ROM” into the
CD-ROM drive.
ÖThe “Adobe Acrobat 7.0 Standard” window appears.
HINT
This window is not displayed automatically
when the "Auto play" setting of your computer is
deactivated. In this case, please run
“AutoPlay.exe” of this CD-ROM directly using
the “Explore” or “My computer”.
2. Select the language and click [OK] button.
3. Select “Install Adobe Acrobat 7.0 Standard”.
4. Follow the instructions to install the software.
HINT
Select “How to install” on the “Adobe Acrobat
7.0 Standard” window to learn more about the
Adobe Acrobat 7.0 installation.
Refer to “Adobe Acrobat Help” about how to
use Adobe Acrobat 7.0.
6 |
Page 11
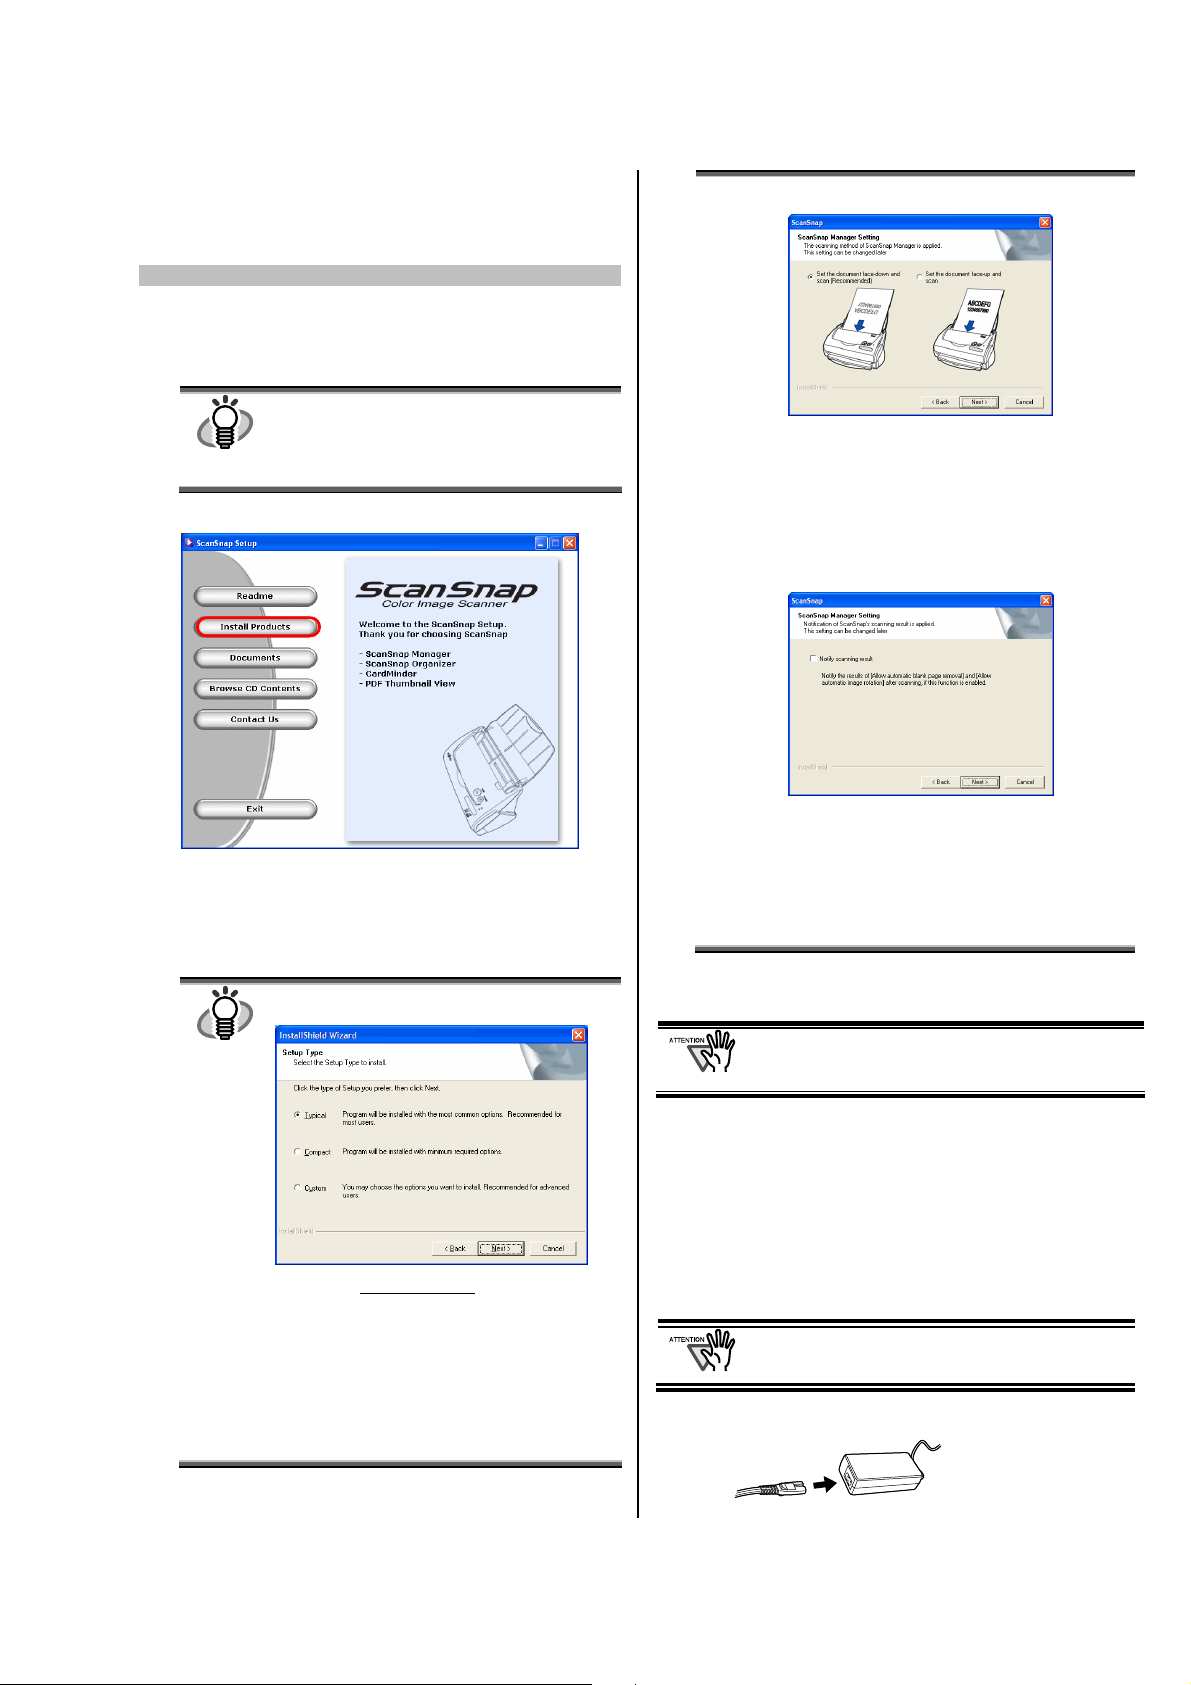
2.1.2. Installing ScanSnap Manager,
ScanSnap Organizer, CardMinder and
PDF Thumbnail View
Please prepare the ScanSnap Setup CD-ROM.
1. Insert the “ScanSnap Setup CD-ROM” into the
CD-ROM drive.
Ö The “ScanSnap Setup” window appears.
(When reinstalling the programs, the following 2
windows will not appear.)
HINT
This window is not displayed automatically
when the "Auto play" setting of your computer is
disabled. In this case, run “Setup.exe” of this
CD-ROM directly using the “Explore” or “My
computer”.
2. Click the [Install Products] button.
Ö The installation of ScanSnap Manager, ScanSnap
Organizer, CardMinder and PDF Thumbnail View starts
up, and the wizard window appears.
3. The setup window appears. Follow the instructions on
the window to install the application.
HINT
The following window appears during the
installation.
[Set the document face-down and scan
(Recommended)]
Selects loading the document face-down and
upside-down on the scanner.
[Set the document face-up and scan]
Selects loading the document face-up and
upside up.
(Note: You can change this after installation.)
Specifies whether to carry out “Notify scanning
result” after scanning.
If the check box is selected, the notification
screen showing whether the following
functions were carried out or not appears.
Allow automatic blank page removal
Allow automatic image rotation
4. After the installation is completed, please restart your
computer.
Refer to the “ScanSnap Operator’s Guide”
to learn more about ScanSnap Manager or
the installation of CardMinder.
2.2. Connecting the Scanner
After the computer has been restarted, please connect the
[Typical] <Recommended
“ScanSnap Manager”, “ScanSnap Organizer”,
“CardMinder” and “PDF Thumbnail View” are
installed including their manuals.
[Compact]
“ScanSnap Manager” is installed including its
manual.
[Custom]
You can select the software and the manuals
to install.
>
scanner.
2.2.1. Connecting the AC cable
Do not use cables other than the ones supplied
with this product. Use only the specified AC cables
and AC adapter.
1. Connect the AC cable to the AC adapter.
ScanSnap fi-5110EOX2 Getting Started | 7
Page 12
2. Insert the connectors of the AC adapter to the scanner
inlet and a power outlet.
Outlet
Inlet
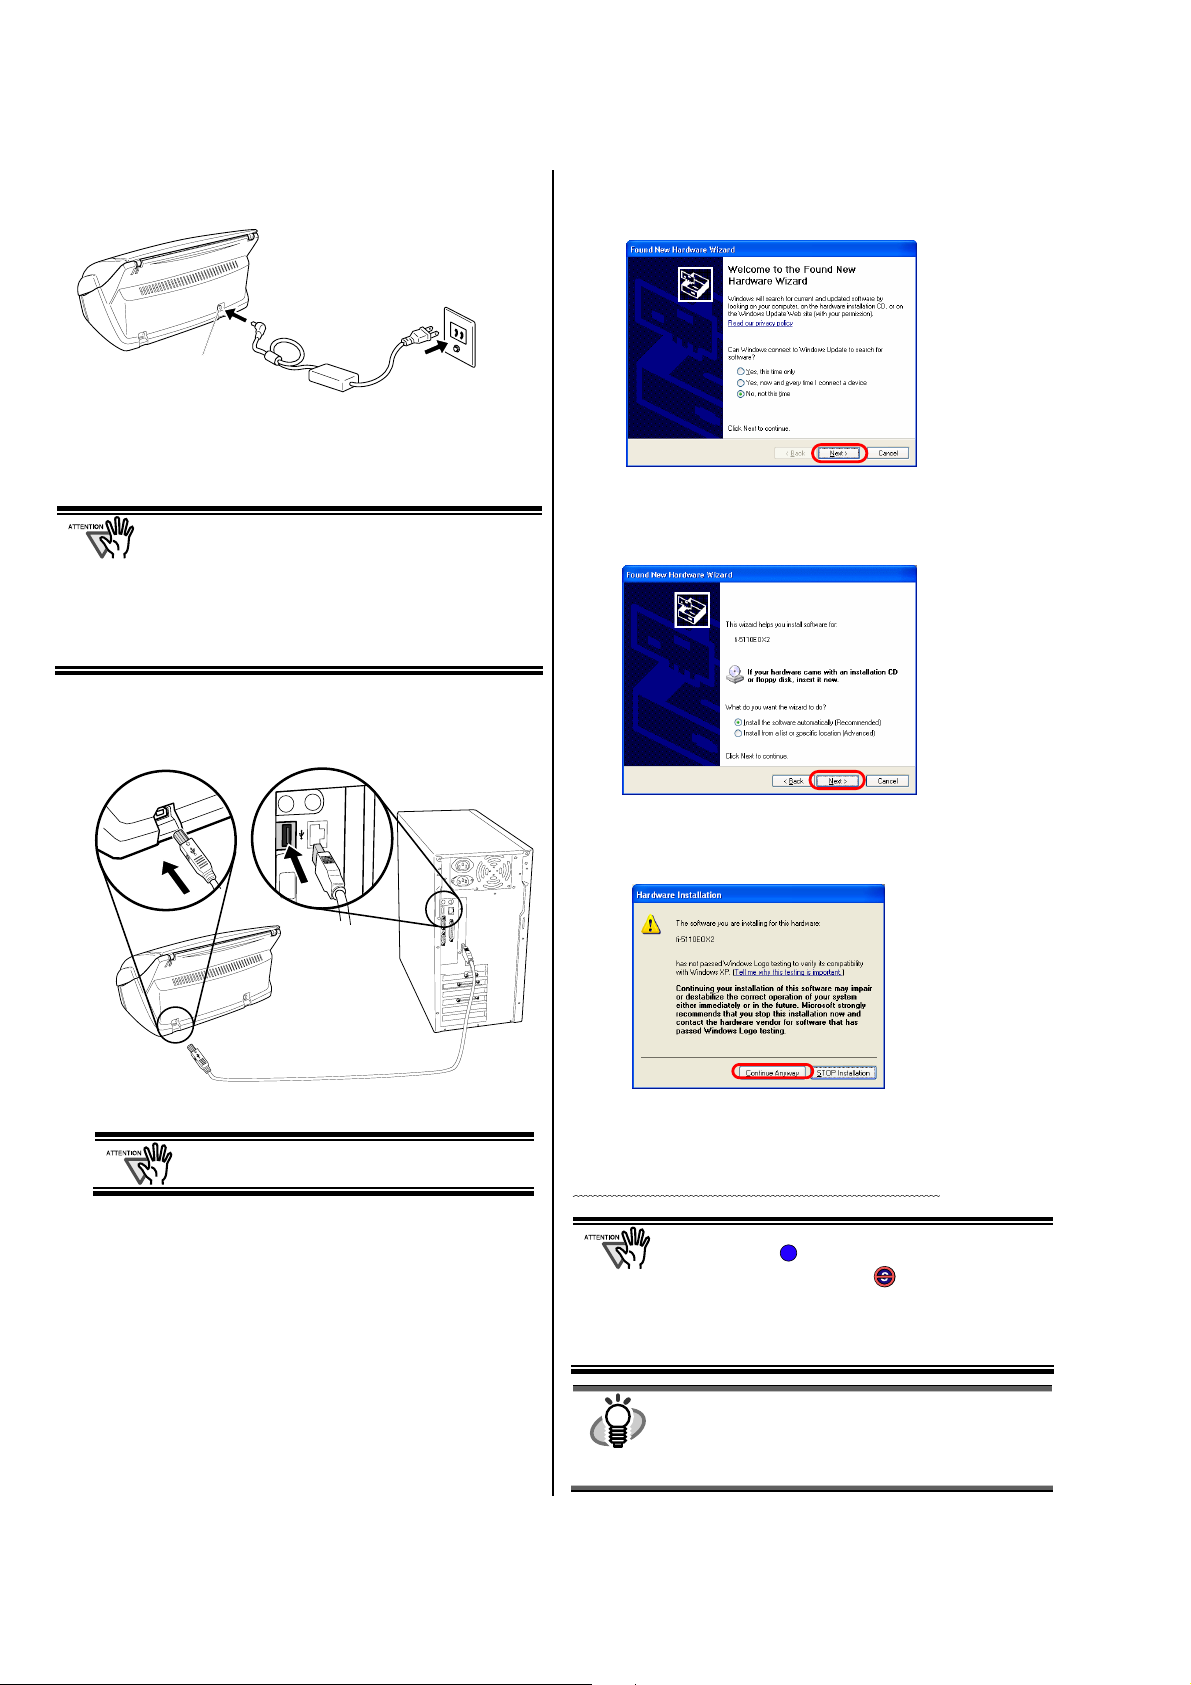
2.2.2. Connecting the USB cable
Follow the procedure below to connect the USB cable.
● Use the USB cable supplied with this scanner.
The operation with a commercially available USB
cable is not guaranteed.
● When connecting to a USB hub, be sure to
connect the scanner to the hub nearest to your
computer (first stage). If you connect it to a USB
hub from the second stage onwards, ScanSnap
may not operate correctly.
1. Remove the seal from the USB connector.
2. Connect the scanner and your computer with the USB
cable.
For Windows XP
1) When [Found New Hardware Wizard] window appears,
select “No, not this time” and click the [Next >] button.
(The above window only appears when the Service Pack 2
is installed.)
2) Click the [Next >] button in the following window.
3) When [Hardware Installation] appears,
click the [Continue Anyway] button.
USB cable
3. Open the Paper chute cover of scanner.
If the scanner is not automatically turned on,
press the [POWER] button on the scanner.
Ö Your computer will automatically detect the scanner.
For Windows 98
There is a request to insert a disk. When such a message
appeared, insert the Windows 98 CD-ROM into the
CD-ROM drive.
Then click the [OK] button.
For Windows Me
The new hardware is detected and the installation will be
completed automatically.
For Windows 2000
When [Digital Signature not Found] appears,
click the [Yes] button.
8 |
The window to notify completion of installation appears.
4) Click the [Finish] button when the installation is
completed.
The installation of ScanSnap is complete!
The "ScanSnap Manager" icon in the task tray is
displayed as .
When the icon remains as , press the [POWER]
button to turn off the scanner and then press the
[POWER] button again to restart the scanner.
(Allow at least 5 seconds when you turn on/off the
scanner.
HINT
When you turn off/on the scanner, press the
[POWER] button for longer than one second.
*For preventing mis-operation, the [POWER] button
does not work unless it is pressed for longer than
one second.
S
Page 13
3. How to Use ScanSnap
This chapter describes basic operation of ScanSnap.
3.1. Scanning Documents
With “ScanSnap” you can turn paper office documents on
your desk into digital files and save them just by pressing a
single button. The scanned image can be viewed on the
screen using the supplied applications (Adobe Acrobat,
CardMinder).
Two typical usages are:
c Create digital backups of general office documents in PDF
format.
You can edit them later using Adobe Acrobat. Adobe
Acrobat allows you to make full use of the scanned
information by using the OCR (Recognize Text Using OCR)
function to recognize the image of the text portion, the
security function to set passwords, etc.
(Note: For information on using Adobe Acrobat, please refer
to [Adobe Acrobat Help].)
d Scan and manage business cards. With “CardMinder”, scan,
recognize and edit business cards, and export the data to a
popular personal information manager application such as
Outlook.
3.2. About the Scan Settings
You can change ScanSnap settings by using “ScanSnap
Manager”.
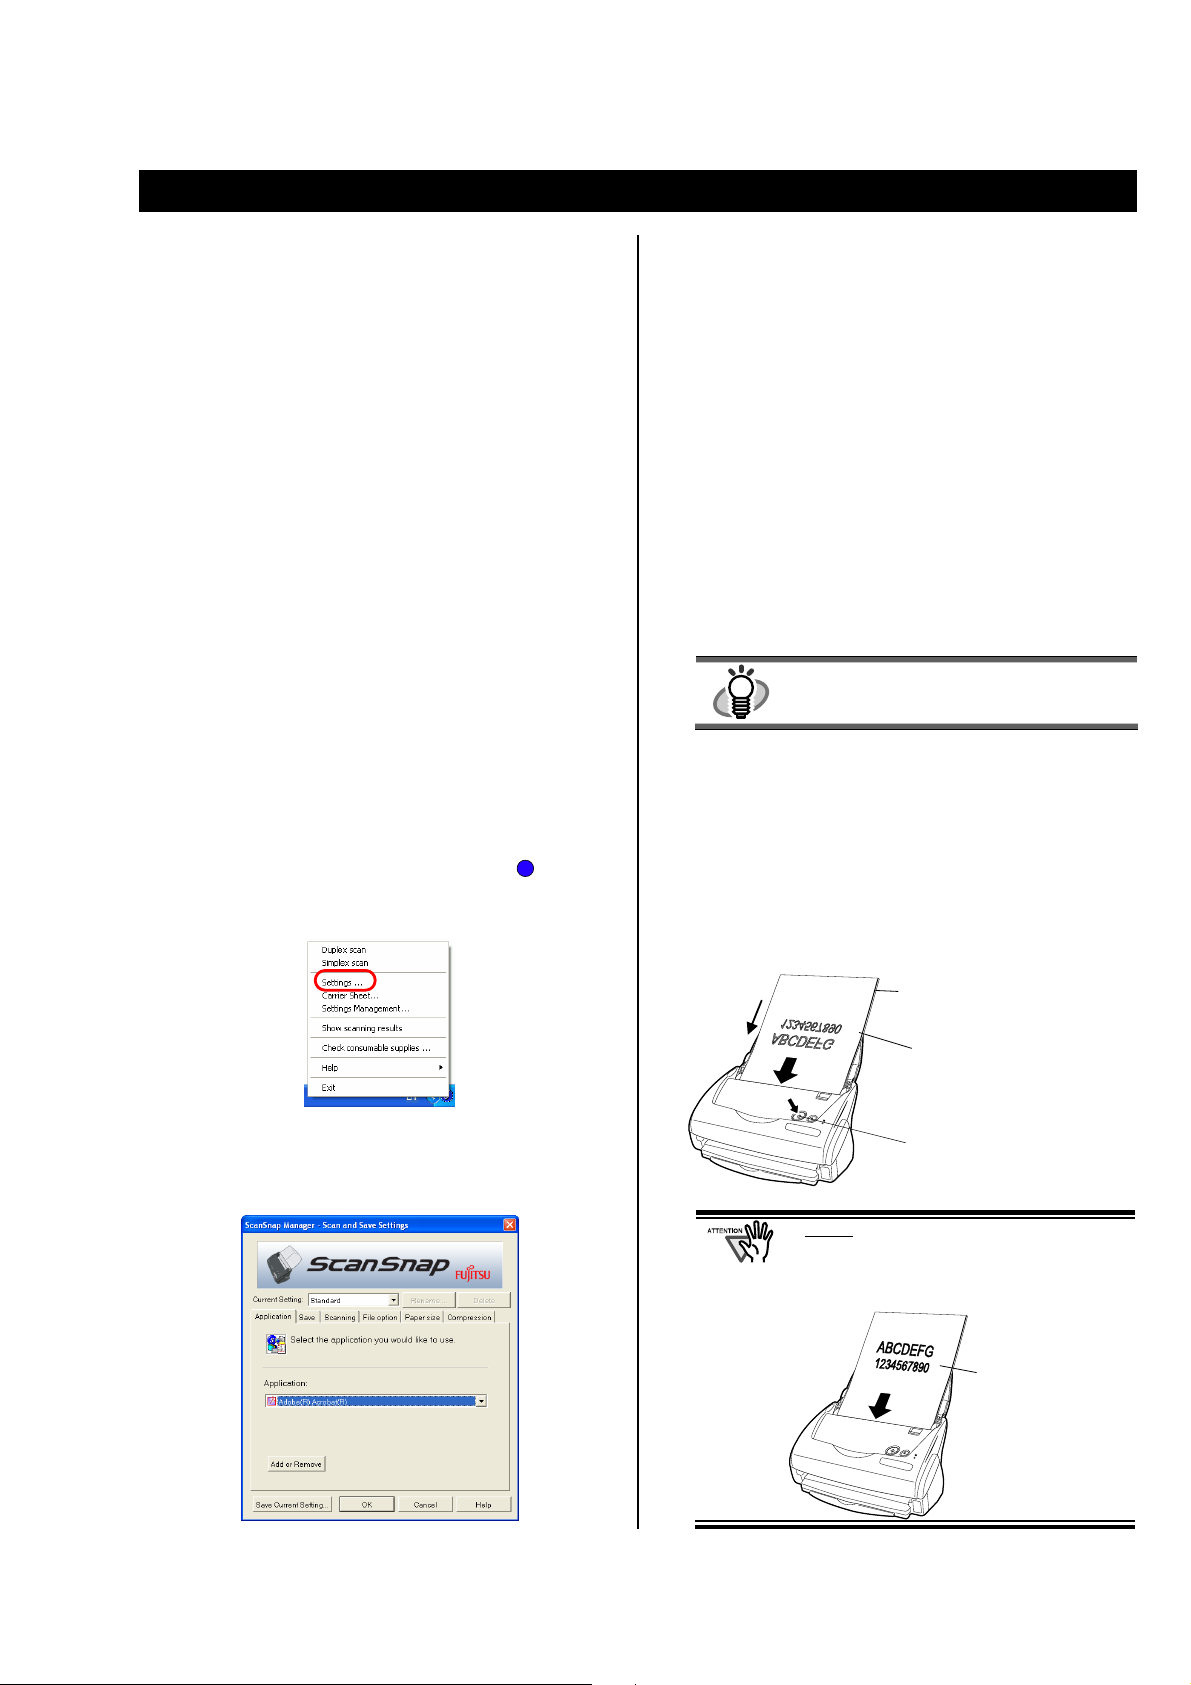
1. Right-click the “ScanSnap Manager icon” on the
task tray and select [Setting ...] from the following
menu.
S
There are six tabs used to configure the scan options:
[Application]
Select the application for viewing/editing the scanned
images.
[Save]
Specify the folder and file name to save the scanned
images.
[Scanning]
Specify the quality of the scanned image.
[File option]
Select the file format (PDF, JPEG) for saving the scanned
images.
[Paper size]
Select the size of the document to be scanned.
[Compression]
Select the compression rate of a file.
HINT
Refer to the “ScanSnap Operator’s Guide” in
the “ScanSnap Setup CD-ROM” to learn more
about these settings.
3. Click the [OK] button to finish the configuration.
Ö The new settings are enabled.
3.3. Scanning Office Documents
1. Select “Adobe Acrobat” at “Application:” under the
[Application] tab of “Scan and Save Settings”.
2. Load the documents onto the scanner.
Ö The “Scan and Save Settings” window opens.
2. Change the scan settings on the “Scan and Save
Settings” window.
Scanning
direction
Set the paper face-down
on the Paper chute cover.
Set the back side of the
paper to the front.
[SCAN] button
In step 3 of “2.1.2 Installing ScanSnap
Manager, ScanSnap Organizer, CardMinder
and PDF Thumbnail View”, if you select “Allow
documents to be scanned face up through
the ADF”, set the document as follows.
Set the paper
face-up
ScanSnap fi-5110EOX2 Getting Started | 9
Page 14
3. Press the [SCAN] button.
Ö Scanning starts.
Ö When the scanning is completed, Adobe Acrobat starts
and displays the scanned images.
HINT
● You can also use another application to display
scanned images.
● Pressing [SCAN] button, the documents are
scanned in the “Duplex” mode.
To scan the document in the Simplex” mode,
change this setting using the ScanSnap Manager
S
.
● The ScanSnap scanner is able to scan
documents using various settings. Refer to the
“ScanSnap Operator’s Guide” on the
“ScanSnap Setup CD-ROM” to learn more
about scanning documents.
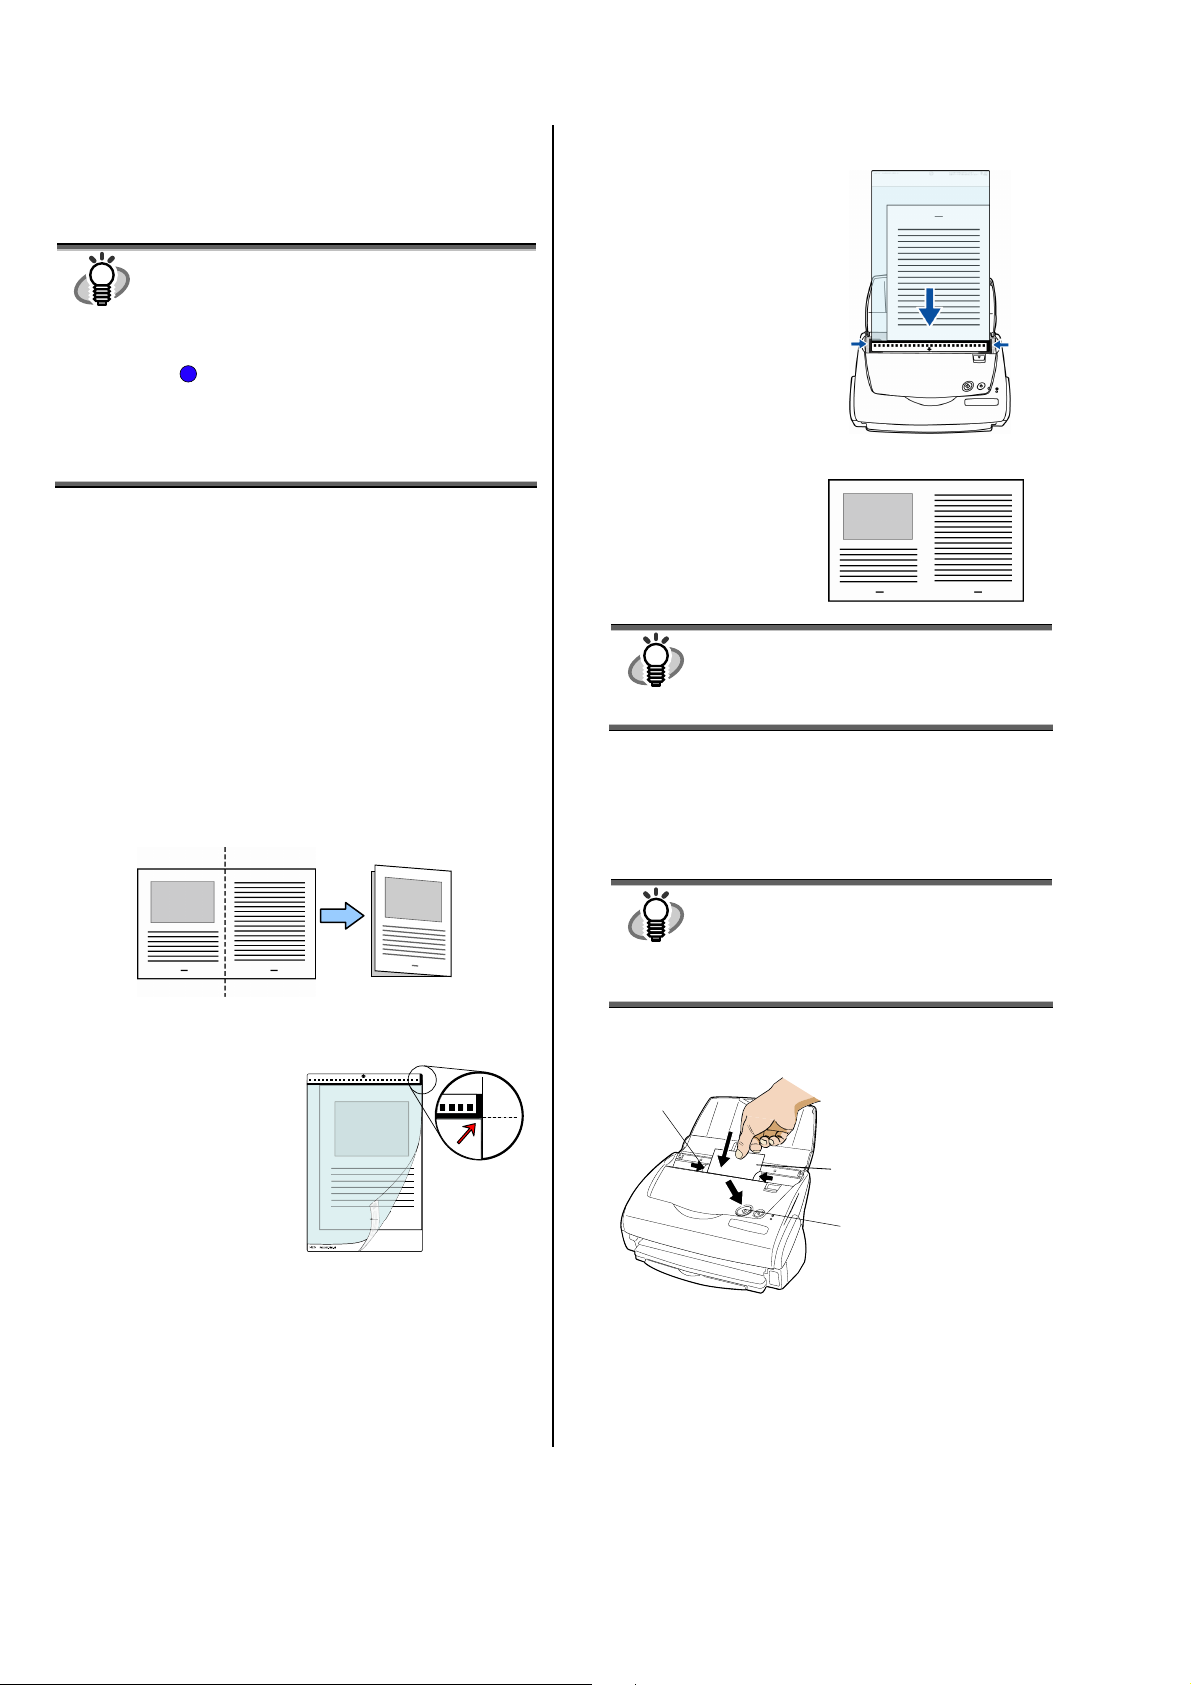
3.4. Scanning with the Carrier Sheet
If you use the Carrier Sheet, you can scan large documents
such as A3/B4/11x17 size documents, and documents of
irregular shapes such as clippings of newspaper.
Here, as an example, this section explains how to scan an
A3-size document.
If you are scanning an A3 document, it is not possible to
load it onto the scanner as it is. Fold the document in half
and scan it following the procedure below.
3. Set the Carrier Sheet onto the scanner.
Place the top of the sheet
with the black & white
printed pattern
downwards, and load the
document in the direction
of the arrow.
If you are using the
Carrier Sheet for
scanning, it is not possible
to scan several sheets
continuously. Please load
the sheets one by one and
scan.
4. Press the [SCAN] button.
Ö
The front and back
image data are set in a
facing-page state and
is output side by side.
HINT
The loading method and ScanSnap Manager’s
settings differ according to the documents to be
scanned. Refer to “ScanSnap Operator’s
Guide” on the “ScanSnap Setup CD-ROM” for
details.
1. Spread the page to be scanned facing outwards and
fold it in half from the center.
Please fold it neatly so that the folded portion does not
appear puffed.
2. Open the Carrier Sheet and place the folded
document inside.
Align the top of the
document to the top of the
Carrier Sheet, and the
folded portion to the
top-right corner closely.
3.5. Scanning Business Cards
1. Select “CardMinder” at [Application:] under the
[Application] tab of the “Scan and Save Settings”
window.
HINT
2. Load the business cards onto the scanner. Adjust the
side guides to the business card width.
Side guide
3. Press the [SCAN] button.
Ö Scanning starts.
Ö The “CardMinder” window appears and displays the
● When “CardMinder” is selected, only the
[Application] and [Scanning] tabs are
enabled.
● Refer to the “ScanSnap Operator’s
Guide” on the “ScanSnap Setup
CD-ROM” to learn more about the settings.
Business card
(Set it face down)
[SCAN] button
recognized character data, name, company, and e-mail
address.
10 |
Page 15

4. The following window appears.
p-up
Select a business card from the Data list. Check the
data in the Recognition result field of this window.
Correct the data if there is any recognition mistake.
[Microsoft Outlook] button
Scanned
image
Data list
Recognition result
5. For Outlook, confirm the business card data and
select the cards you wish to export to Outlook. Click
the [Microsoft Outlook] button on the Toolbar. Then
the data is exported to Outlook.
HINT
You can export the data (recognition results) to
the following applications:
● Microsoft
● Outlook Express
● ACT!
● GoldMine
Or you can also save the data in CSV format to
export them to other applications, such as
Excel. Refer to the “CardMinder User’s
Guide” for details.
TM
®
Outlook®
®
HINT
Refer to the “ScanSnap Operator’s Guide”
on the “ScanSnap Setup CD-ROM” for
details.
3.7. ScanSnap Organizer
ScanSnap Organizer is an application that manages the
thumbnail display of image files such as PDF and JPEG
files.
Files scanned in ScanSnap can be viewed without opening
them. You can also create folders, and arrange files for
these folders for different purposes.
Also, for files with multiple pages, you can check the
images by turning the pages on the thumbnail displayed.
From the [Start] menu, when you select [All Programs] –
[ScanSnap Organizer] – [ScanSnap Organizer], the screen
below appears.
Folder View
Folders selected in ScanSnap Organizer are displayed.
6. Start Outlook to confirm the imported business card
data.
7. To close “CardMinder”, select [Exit] in the [File]
menu.
HINT
“CardMinder” provides also various other
functions.
Refer to “CardMinder User’s Guide” on the
“ScanSnap Setup CD-ROM” for details.
3.6. About PDF Thumbnail View
“PDF Thumbnail View” is a program that allows you to
use Windows Explorer for viewing PDF file thumbnails.
It is disabled by default.
(*This program can be installed only in
Windows XP.)
Enabling PDF Thumbnail View
1. On the [Start] menu, select [All Programs] – [PDF
Thumbnail View] – [Configuration Tool].
2. Select “Enable” and click the [OK] button on the “PDF
Thumbnail View Function Settings” window.
Ö You can see the thumbnail images of PDF files with the
Windows Explorer just like bitmap or JPEG images.
Windows 2000
or
File View
PDF or JPEG files in the selected folder
are displayed as thumbnails.
Pop-up Thumbnail Window
The selected page is displayed in a pop-up window.
Thumbnail Image
Displays a miniature image of the file.
Page Number
Shows (current page
number/total page number).
“Zoom-in/Zoom-out”
Button
Magnifies or reduces the
“Po
Page Forward button
If a file has multiple pages, you
can page forward to any page to
file name
HINT
Refer to “ScanSnap Operator’s Guide” on the
“ScanSnap Setup CD-ROM” for details.
see the thumbnail.
Thumbnail Image”.
ScanSnap fi-5110EOX2 Getting Started | 11
Page 16
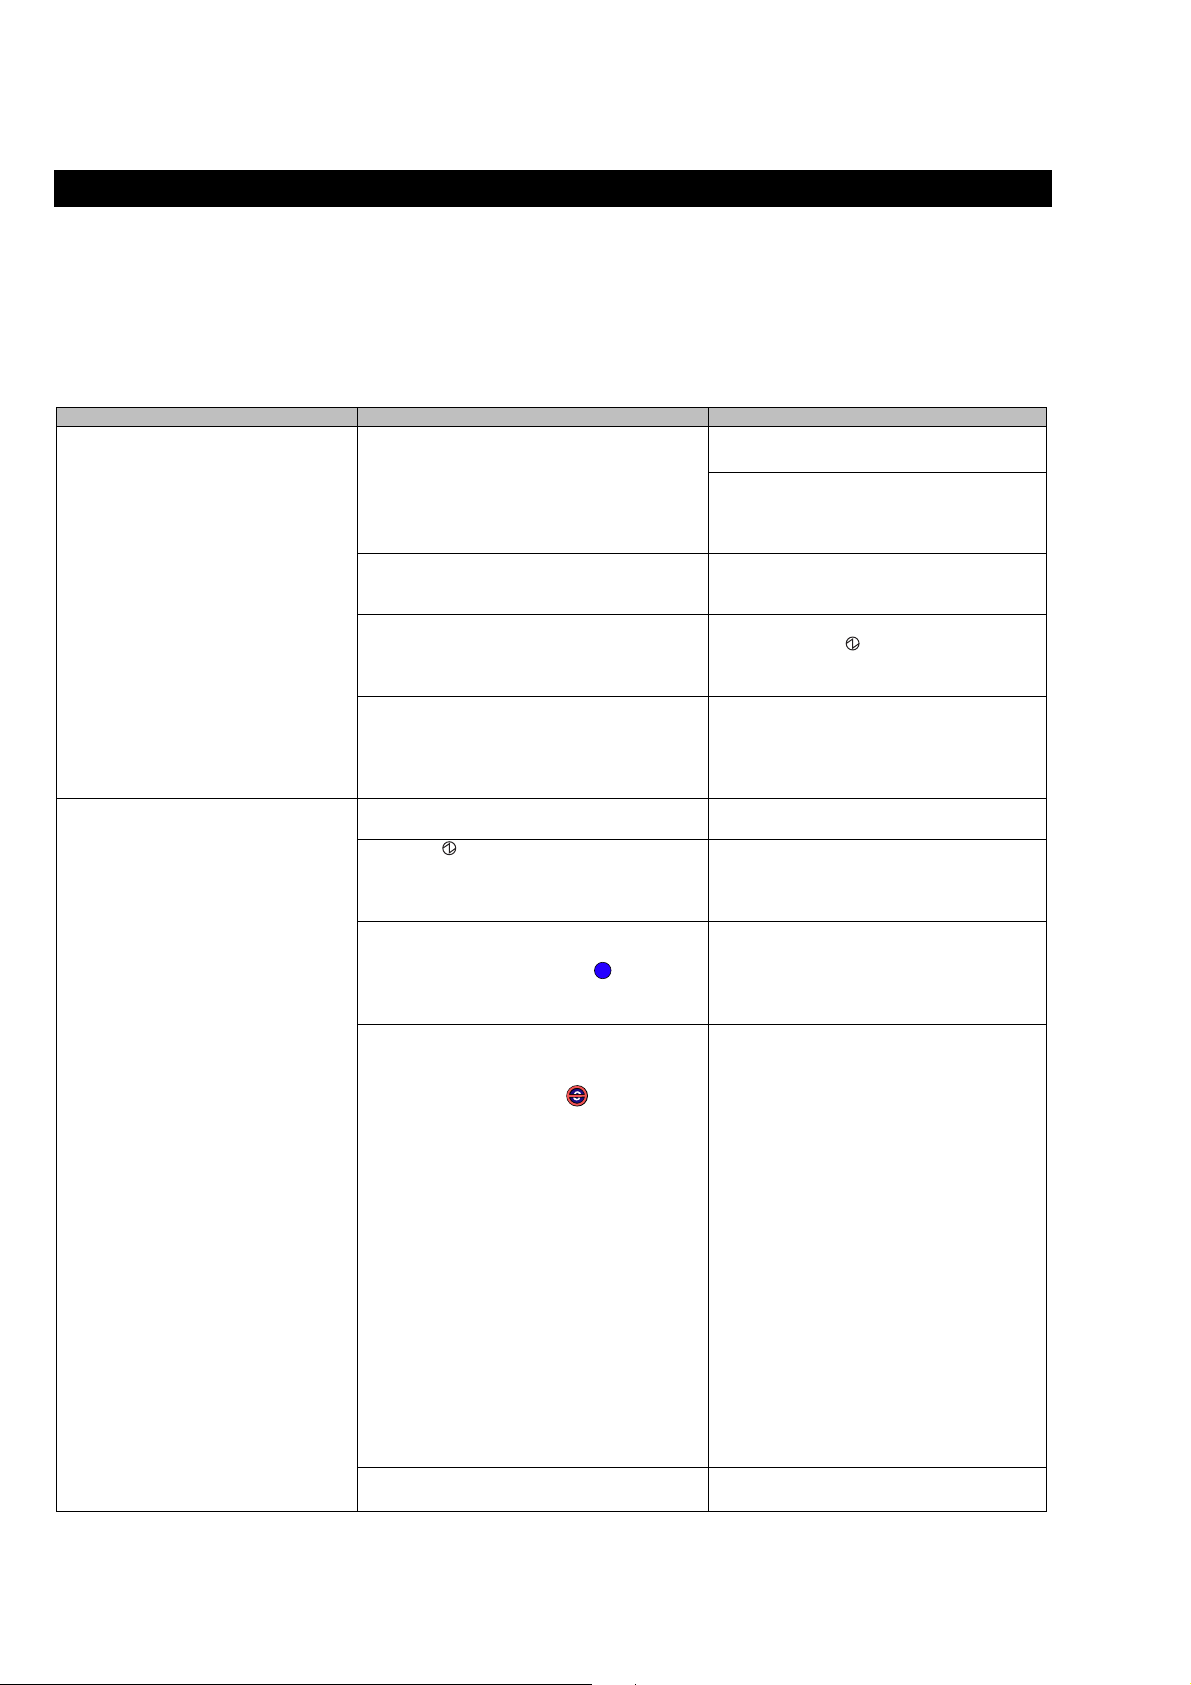
4. Troubleshooting
This chapter describes common problems during the usage of ScanSnap and how to remedy them.
4.1. Troubleshooting Checklist
Before you ask for repair service, please check the following items.
If you cannot solve the problem even after checking the following items, contact the store where you purchased the
scanner, or contact an authorized FUJITSU scanner service provider.
Symptom Check This Item Remedy
The scanner cannot be turned on.
Are the AC/USB cable and AC adapter
connected correctly?
Is the Paper chute cover closed? (The
scanner’s power supply is controlled by
closing/opening the Paper chute cover.)`
Is Windows normally started up?
(This scanner’s power is controlled by
turning on/off the computer.)
Did you push the [POWER] button to turn
off the scanner? (The scanner can be turned
off by pressing [POWER] button when the
paper chute cover is opened.)
Correctly connect the AC/USB cable and
AC adapter.
Disconnect the AC adaptor/cable and
reconnect them again.
(Note: Please wait at least 5 seconds before
reconnecting the AC cable.)
Open the Paper chute cover.
Please wait until Windows has started up
completely. The
when Windows is starting up or the scanner
is in low power mode.
Press the [POWER] button on the scanner.
LED may turn off
Scanning does not start.
Is the USB cable properly connected? Correctly connect the USB cable. (When a
hub is used, check the hub's power supply.)
Does the LED light blink repeatedly? Disconnect the AC adaptor/cable and
reconnect them again.
(Note: Please wait at least 5 seconds before
reconnecting the AC or USB cable.)
Is ScanSnap Manager started?
(If ScanSnap Manager is started successfully,
the "ScanSnap Manager" icon appears
on the task tray.)
Is ScanSnap Manager running normally?
(If ScanSnap Manager is not running
normally, the "ScanSnap Manager" icon in
the task tray is displayed as .)
Is the "Scan and Save Settings" window still
displayed?
S
If the "ScanSnap Manager" icon is not
displayed, on the [Start] menu, select
[Programs] - [ScanSnap Manager] -
[ScanSnap Manager] to start up ScanSnap
Manager.
Perform the following procedure:
1. Perform “Scan for hardware changes”
or “Refresh” from Device Manager.
(*1) If the situation does not improve,
perform step 2.
2. Disconnect and re-connect the AC
cable and the AC adapter (Please wait
at least 5 seconds before turning on the
power again.). If this does not change
the state, please perform step 3.
3. If an USB hub is used, directly connect
ScanSnap to your PC. If this does not
change the state, please perform step 4.
4. If your PC has multiple USB ports,
connect ScanSnap with other port(s). If
this does not change the state, perform
step 5.
5. .Restart your PC.
If none of the above operations resolve the
problem, uninstall and re-install ScanSnap
Manager following the procedure given at
(*2)
Close the "Scan and Save Settings"
window, and scan the document.
12 |
Page 17

Symptom Check This Item Remedy
Vertical lines appear in the scanned
image.
The generated image shifts or is
distorted.
The image scanned is too light or too
dark.
Lines on the document are blurred.
(Example: Ruled lines on a table
cannot be seen.)
Scanning speed is very slow.
Multi-feeds (*4) occur frequently.
Paper is not fed (stops midway).
The scanner is not recognized even if
ScanSnap Manager is installed.
The file size of a scanned black &
white image is the same as for a color
document.
Is the inside of the ADF dirty? Clean the inside of the ADF following the
instructions in “5. Daily Care”.
Is the document loaded correctly? Load the document correctly.
Is the "Brightness (Black and White
scanning only)" setting on [Option...] of the
[Scanning] tab set to extremely Light or
Dark?
Are you scanning in color mode, documents
including handwritten or typed text, tables
or frames with ruled lines?
Does your PC satisfy the recommended
system requirements?
Is the USB 1.1 connected?
Note: When using an USB1.1 interface, the
data transfer rate may be slower due to large
data sizes.
Is the Pad ASSY dirty? Clean the Pad ASSY following the
Is the Pad ASSY worn out? Replace the Pad ASSY following the
Is the document stack thicker than 5 mm? Reduce the number of sheets of the
Is the Pick roller dirty? Clean the Pick roller following the
Is the Pick roller worn out? Clean the Pick roller following the
Are there any debris on the document
feeding path?
Do the loaded documents satisfy the
conditions described in section 3.2 on the
Operator’s Guide?
If not, they might not pass smoothly through
the ADF.
Did you connect the scanner to your PC
before installing ScanSnap Manager?
Is the scanner registered as "Other device"
in the "Device Manager"?
Is the B&W document scanned in the color
mode?
Adjust "Brightness" at [Scanning] [Option...] in the "Scan and Save Settings"
window.
The color mode is used for capturing
colored images like photos in high quality.
For other documents including textual
content, select the check box for [Setting for
text only document] at [Scanning] –
[Option] in the “Scan and Save Settings”
window.
Check the system requirements in section
2.1, “Before Installing”, of the Operator’s
Manual.
Scanning speed will be slower whenever the
CPU and memory requirements are not met.
If this is the case, at [Scanning] - [Option...]
in the "Scan and Save Settings" window,
clear the check boxes of the following to
increase the scanning speed.
- Allow automatic image deskew
- Allow automatic image rotation
If your PC has an USB 2.0 port, connect the
scanner to this port. (If using a USB hub, it
must also support USB 2.0 interfaces.) (*3)
instructions in “5.3. Cleaning Inside of the
scanner".
instructions in “6.2. Replacing the Pad
ASSY”.
document stack to 5 mm thickness or less.
“
instructions in
scanner
instructions in “6.3. Replacing the Pick
Roller”.
Remove any debris from the document
feeding path.
Try the following:
・ Slightly push through with your finger the
first sheet of the documents at the start of
scanning.
・ Change the insertion direction of the
document.
On the [Start] menu, select [Control panel] [System] - [Hardware] - [Device Manager].
Delete the device name (such as USB
device, differs with the OS) under "Other
Device" selection in the [Device Manager]
and restart your PC.
Select “B&W” at [Color mode:] on the
[Scanning] tab in the “Scan and Save
Settings” window.
5.3. Cleaning Inside of the
”
.
ScanSnap fi-5110EOX2 Getting Started | 13
Page 18

The rear side of the document appears
in the scanned image when scanning a
double-sided document (noise of back
side image).
Scanned images are not displayed on
the screen (when “Allow automatic
blank page removal" is enabled).
Scanned images are skewed (when
"Allow automatic image deskew" is
enabled).
The orientation of scanned documents
is not displayed correctly (when
“Allow automatic image rotation” is
enabled).
*1) For Windows XP, From "Device Manager", right click on computer name an perform “Scan for hardware changes".
*2) Confirm that PC and ScanSnap are powered on and connected properly.
- From Device Manager, check if ScanSnap is recognized as unknown device. If so, delete it from [Control Panel] - [System].
- Close ScanSnap Manager
- Go to [Control Panel] - select [Add or remove Programs] and uninstall ScanSnap Manager and ScanSnap Organizer. (Refer to
Operator’s Guide section 4.1.)
- Before restarting your PC, remove the following folders and files.
When you delete the following folders and files, pay extra attention not to remove any other folders or files, since this
will affect your system environment.
Is the "Setting for text only document."
check box cleared at [Option...] on the
[Scanning] tab in the "Scan and Save
Settings" window?
When "Allow automatic blank page
removal" is enabled, almost blank
documents with only a few characters may
be accidentally recognized as blank pages
and removed from scanned image data.
Are the documents fed into the ADF skewed
more than +-5 degrees?
Depending on the contents of document, the
automatic image deskew may not work
properly.
Depending on the contents of document, the
automatic image rotation may not work
properly.
Select the "Setting for text only document."
check box. (Available only in color mode)
which makes characters, lines and contrasts
appear sharp and clear, and the noise of the
backside image is eliminated. Please note
that you can use this mode also for
documents including photos and
illustrations. However the contrasts and
colors might be affected.
Right click "ScanSnap Manager" icon on
the task bar, select [Setting...] - [Scanning]
tab and click the [Option...] button. Then
clear the "Allow automatic blank page
removal" check box.
The "Allow automatic image deskew"
function can correct skewed images up to
+-5 degrees. Load the document onto the
scanner so that the document skew does not
exceed this limit.
If it does not improve even after you have
tried this method, clear the check box for
"Allow automatic image deskew" on
[Option] of the [Scanning] tab of [Scan and
Save Settings].
Refer to Operator’s Guide section 3.4.
Refer to Operator’s Guide section 3.4
For Windows 2000, Windows XP:
Delete the folder ScanSnap under:
c:\Documents and Settings\<User name>\Application Data\PFU\
Delete the folder Driver under:
c:\Program Files\PFU\ScanSnap\
For Windows 98, ME:
Delete the folder Driver under:
c:\Program Files\PFU\ScanSnap\
After you have removed the above given folders, please confirm if the files
- fi5110e.INT
- fi5110e.PNF
14 |
Page 19
In the folder C:\Windows\Inf have been deleted. If this is not the case, please remove also these two files.
HINT
- After removing the above given folders (files), restart your computer with ScanSnap disconnected.
- Reinstall ScanSnap Manager and restart.
*3) To confirm whether the scanner is connected with USB1.1 or USB2.0, right-click ScanSnap icon on the task and select [Help] -
[About ScanSnap Manager], then click [Detail] button on [Version Information] window. [USB type] is displayed in [Scanner
information].
*4) "Multi-feed" is a phenomenon when two or more sheets of paper are fed simultaneously into the scanner.
Please note, that the folder C:\Windows\Inf may be hidden. To confirm the above given two files and
remove them, please select from the menu bar of the [Explorer] - [Tools] - [Folder Options...] and select
then the [View] tab. In this tab, please check if the checkbox of [Show hidden files and folders] under
[Hidden files and folders] is marked. After marking this checkbox and applying the setting, the hidden
C:\Windows\Inf folder becomes visible and you can check if the fi5110e.INT and fi5110e.PNF files are
existing. If they do, please remove them.
* Visit our Web site for your reference. Other useful information will be posted on the FAQ corner at the following Web
site.
http://scansnap.fujitsu.com
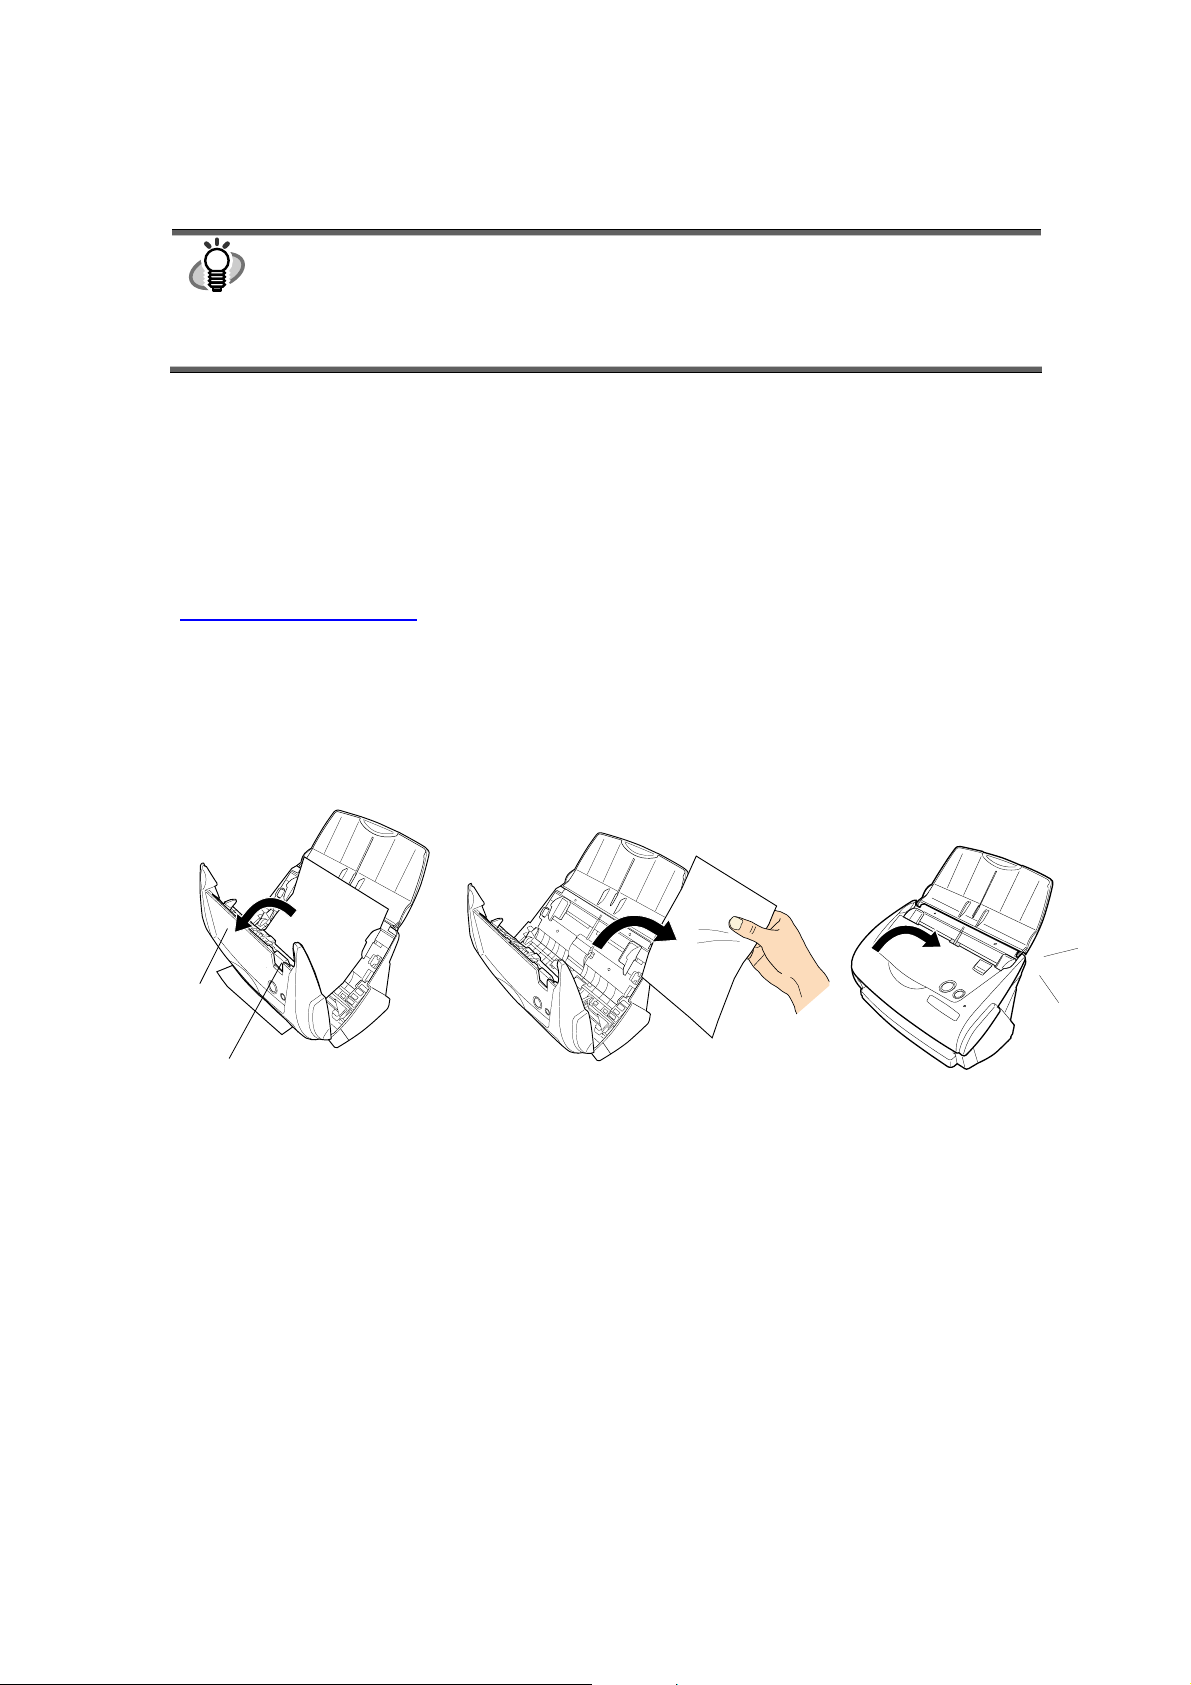
4.2. Clearing Paper Jams
1. Open the ADF while pulling the Cover open lever.
2. Remove the jammed document.
3. Close the ADF cover.
ADF cover
Cover open lever
Ö You should hear the ADF cover click into position when it returns to its original position.
Click!
ScanSnap fi-5110EOX2 Getting Started | 15
Page 20
5. Daily Care
Y
This chapter describes how to clean the ScanSnap scanner.
referring to the illustrations.
WARNING
Fire/Electric Shock
Before cleaning the scanner, disconnect the AC
adapter from the power outlet.
5.1. Cleaning Materials
Cleaning Materials
Cleaner F1
*1) To purchase the cleaning material, contact the FUJITSU
scanner dealer where you purchased the scanner.
Parts No. Remarks
CA99501-0013
1 bottle (100ml)
Moisten cloth with this fluid
and wipe the scanner clean.
(*1)
5.2. Cleaning the Scanner Exterior
Clean the scanner exterior and the Paper chute cover with a
dry cloth or a cloth moistened with a small amount of
neutral detergent or Cleaner F1 (sold separately).
● Never use paint thinner or other organic
solvents.
● During the cleaning, take care not to let
water or other moistures getting into the
inside of the scanner.
● Do not use aerosol sprays to clean the
scanner. Aerosol sprays cause dirt and
dust to enter the scanner, resulting in
scanner failure, scanner malfunction and
image error.
CAUTION
The glass surface inside the ADF becomes hot during
the scanner operation.
Before you start cleaning the inside of the scanner,
disconnect the AC adapter from the outlet, and wait at
least 15 minutes to let the scanner cool down.
● Never use water or neutral detergent to
clean the inside of the scanner
● Do not use aerosol sprays to clean the
scanner. Aerosol sprays cause dirt and
dust to enter the scanner, resulting
scanner failure and malfunction.
.
1. Open the ADF cover while pulling the Cover open
lever.
ADF cover
Cover open lever
2. Clean the following locations with a cloth moistened
with the Cleaner F1.
Cloth
Neutral detergent
or Cleaner F1
Paint thinner
5.3. Cleaning Inside of the scanner
Clean inside of the scanner with a cloth moistened with
cleaner F1.
In an alternating succession of scanning documents, the
accumulated paper-powder and dust inside the scanner
causes a scanning error.
As a guideline, clean the ADF every 1,000 scans. Note that
this guideline varies according to the type of document you
are scanning. For example, the ADF has to be cleaned
more frequently when scanning photocopied documents on
that the toner has not been sufficiently fixed on.
Clean the ADF according to the following procedure
16 |
Pad ASS
Plastic rollers (x4)
Eject rollers (x2)
Pick roller
Feed rollers (x2)
Glass (x2)
(Located on the ADF
cover and opposite
side.)
Page 21
Pad ASSY (x1)
Clean the Pad ASSY downward. When cleaning the
Pad ASSY, take care to prevent the cloth from
catching on the pick spring.
Glass (x2 on the ADF cover and the opposite side)
Clean lightly.
Pick roller (x1)
Clean lightly taking care not to scratch and damage
the surface of the roller. Take particular care when
cleaning the Pick roller as black debris on the roller
adversely affects the pickup performance.
Plastic rollers (x4 on the ADF cover)
Clean them lightly while rotating the rollers with
your fingers. Take care not to roughen the surface of
the rollers. Take particular care when cleaning the
plastic rollers, as black debris on the rollers
adversely affects the pickup performance.
Turn on the scanner before cleaning the
following locations. Clean the following rollers,
while rotating them.
Feed rollers (x2)
Clean the rollers lightly taking care not to roughen
the surface of the rollers. Take particular care when
cleaning the feed rollers, as black debris on the
rollers adversely affects the pickup performance.
Eject rollers (x2)
Clean the rollers lightly taking care not to roughen
the surface of the rollers.
Take particular care when cleaning the exit rollers,
as black debris on the rollers adversely affects the
pickup performance.
To rotate the feed rollers and the eject rollers, press
the [POWER] button while holding down the [SCAN]
button.
As a guideline, six presses of the [POWER] button
make the rollers to rotate one full turn.
3. Close the ADF cover.
ADF cover
When you closed the ADF, make sure that it
is completely closed. Otherwise, paper jams
or other feeding troubles may occur.
5.4. Cleaning the Carrier Sheet
While using the Carrier Sheet continuously, dirt and dust
may stick onto the surface or the interior.
When you use the Carrier Sheet continuously, please clean
it regularly, as that may be the cause of scanning error.
<Cleaning method>
Use a dry, soft cloth, or a soft cloth slightly moistened with
Cleaner F1 or a mild detergent to lightly clean off the dirt
and dust from the surface and the interior of the Carrier
Sheet.
● Never use paint thinner or other organic
solvents.
● Do not rub too hard. Otherwise, the Carrier
Sheet may be scratched or be deformed.
● After cleaning the interior of the Carrier
Sheet with Cleaner F1 or a mild detergent,
close the Carrier Sheet after it has
completely dried.
● As a guideline, it is recommended to replace
the Carrier Sheet every 500 scans.
Refer to “6.4 Purchasing Carrier Sheet” for
details on purchasing the Carrier Sheet.
cWhile holding
down the [SCAN]
button…
SCA
POWE
N
d…press the
[POWER] button.
Connect the AC adapter and AC cable
only when cleaning the Feed rollers and
the Eject rollers.
ScanSnap fi-5110EOX2 Getting Started | 17
Page 22
6. Consumables/Carrier Sheet
This chapter describes how to replace and purchase
consumables and regular replacement parts.
6.2. Replacing the Pad ASSY
WARNING
Fire/Electric Shock
Before you replace the consumables of this scanner,
disconnect the AC adapter from the outlet to turn off the
scanner.
6.1. Part Numbers and Replacement
Cycle of Consumables
The following table lists the part numbers of consumables
and shows rough guidelines for replacing these parts.
No.
Description P/N Replacement Cycle
fi-5110EOX
1
Pad ASSY
fi-5110EOX
2
Pick roller
These replacement cycles are rough guidelines when
A4/Letter wood-free paper 64 g/m
PA03360-0002
PA03360-0001
2
actual cycle may differ depending on the scanned paper.
Use only the consumables specified by PFU LIMITED.
HINT
To estimate when the consumables will have
to be replaced and to get an overlook of the
already scanned pages, please refer to the
following:
50,000 scan or one
year
100,000 scans or
one year
(17 lb) is used. The
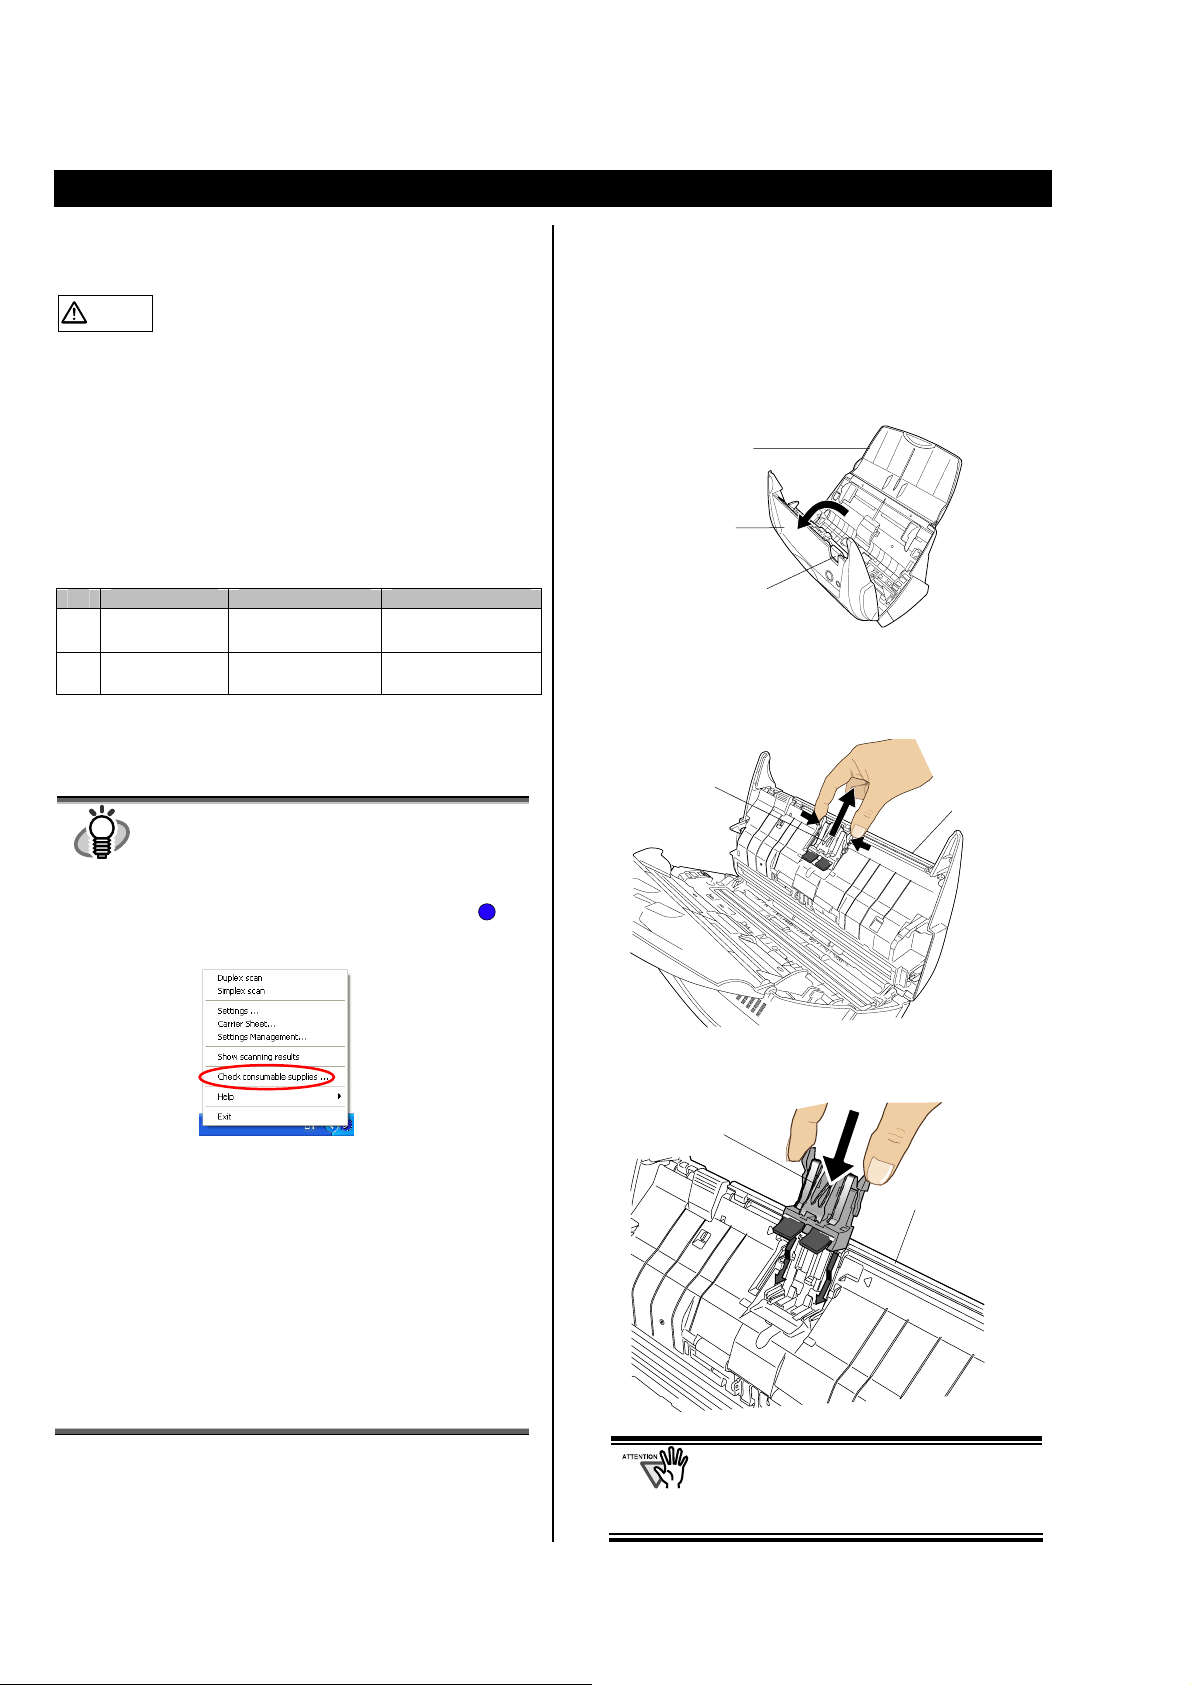
Replace the Pad ASSY following the procedure below.
1. Remove the documents on the Paper chute cover.
2. Open the ADF cover while pulling the Cover open
lever.
Paper chute
cover
ADF cover
Cover open lever
3. Remove the Pad ASSY.
Pull out the Pad ASSY in the direction of the arrow
while holding both ends of the Pad ASSY.
Pad ASSY
ADF cover
1. Right click the "ScanSnap Manager" icon
on the task tray.
2. Click [Check consumable supplies] at the menu.
S
4. Attach the new Pad ASSY.
Pad ASSY
( The screen ("Check consumable status"
window) that indicates how many times
consumables have been used will be
ADF cover
displayed.
Replace the consumables referring to "Target
to change supplies" as a rough guideline.
For details about consumables and where to
purchase them, visit the following Website or
contact the store where you purchased your
scanner.
[Website] http://scansnap.fujitsu.com/
Make sure that the Pad ASSY is
completely attached. Otherwise,
document jams or other feeding errors
may occur.
18 |
Page 23
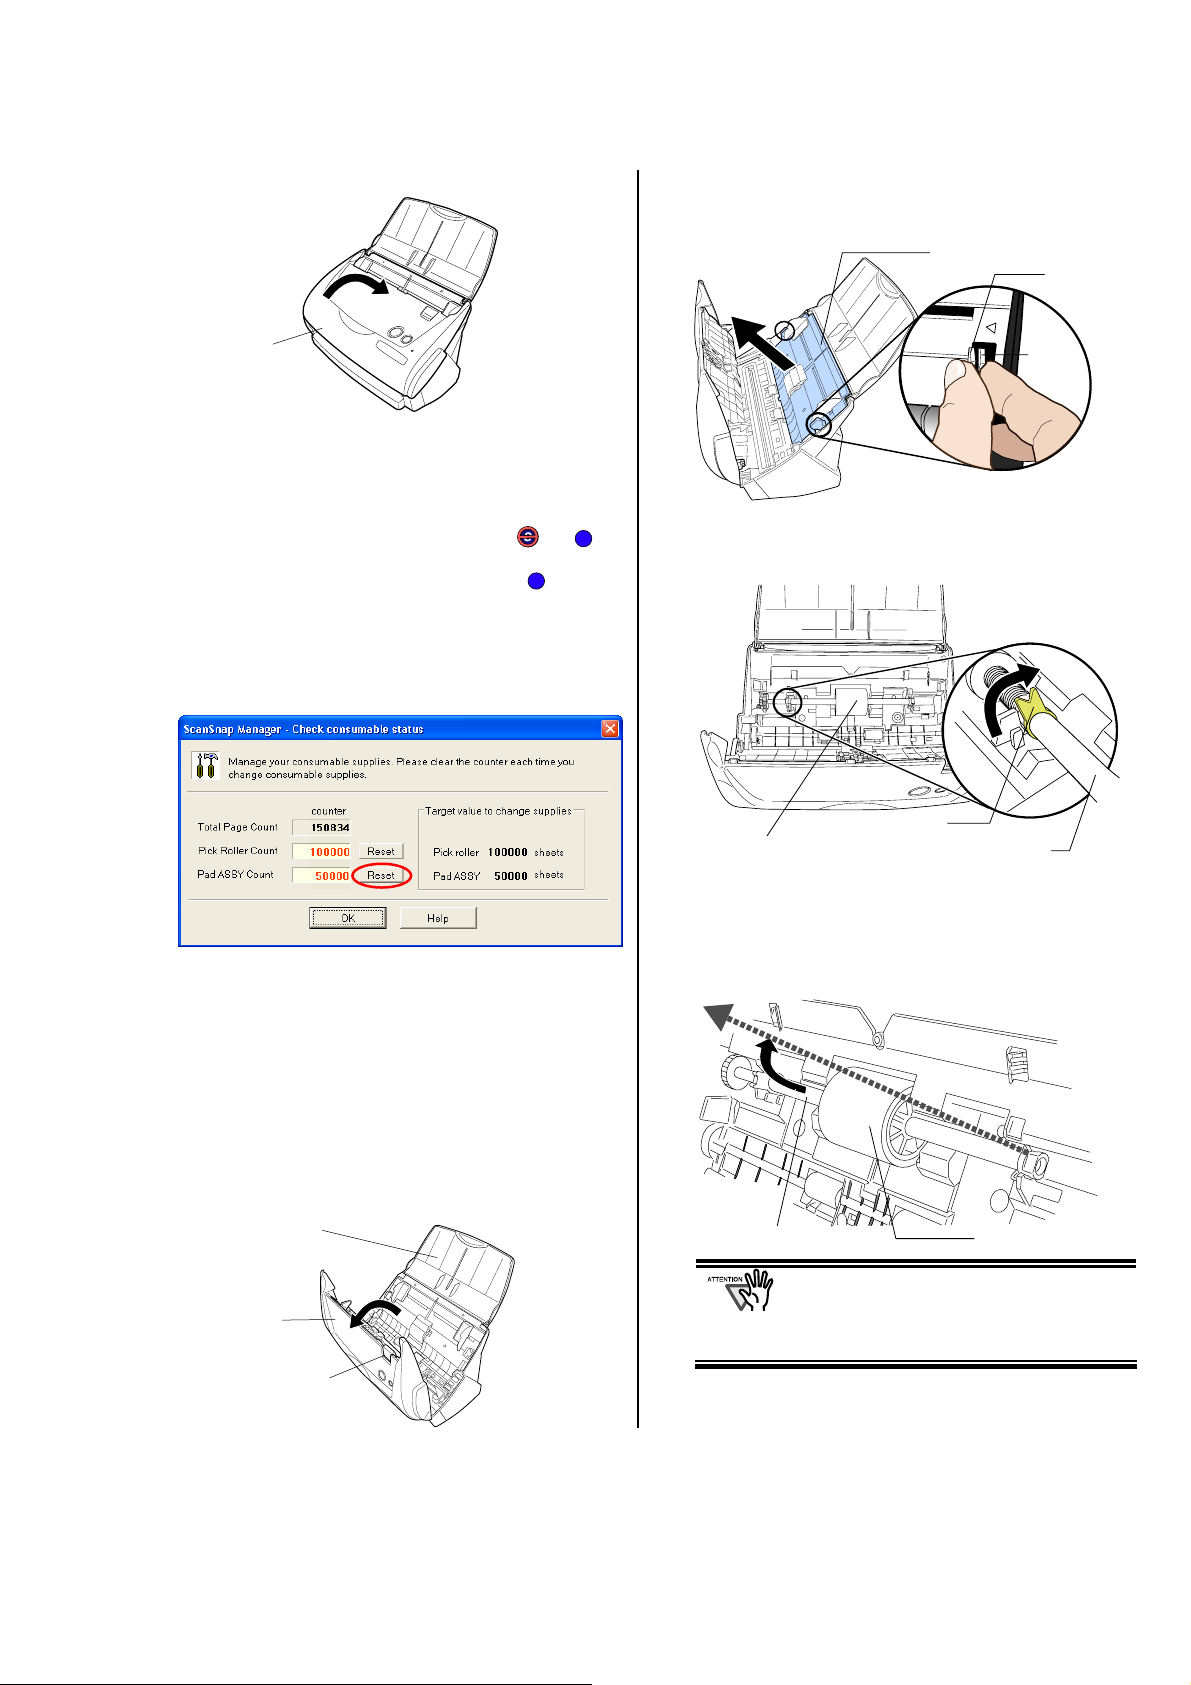
5. Close the ADF cover
3. Remove the Sheet guide.
Pinch the handle on the Sheet guide to remove it.
Sheet guide
Handle
ADF cover
ÖYou should hear the ADF cover click into position
when it returns to its original position.
6. Turn on the scanner.
Ö ScanSnap Manager icon changes from to .
7. Right click the "ScanSnap Manager" icon on the
S
S
task tray, and select [Check consumable supplies]
from the menu.
8. In the “Check consumable status” window, click the
[Reset] button of Pad ASSY Count.
Ö The counter is reset to “0”.
4. Rotate the Pick roller bushing (Left) in the direction
of the arrow.
Pick roller
Pick roller bushing
Pick roller shaft
5. Remove the Pick roller with its shaft.
Hold the left part of the shaft, and raise it to remove
the shaft from the scanner while pulling the shaft to
the left.
Claw
6.3. Replacing the Pick Roller
Replace the Pick roller following the procedure below.
1. Remove the document on the Paper chute cover.
2. Open the ADF cover while pulling the Cover open
lever.
Paper chute
cover
ADF cover
Cover open lever
Pick roller shaft
If the around the pick roller is dirty by paper
-powder, it may cause a scanning error.
Please remove the dirt using a dry cloth with
dollop of Cleaner F1.
* Don't use water, mild detergent or air-spray.
Pick roller
ScanSnap fi-5110EOX2 Getting Started | 19
Page 24
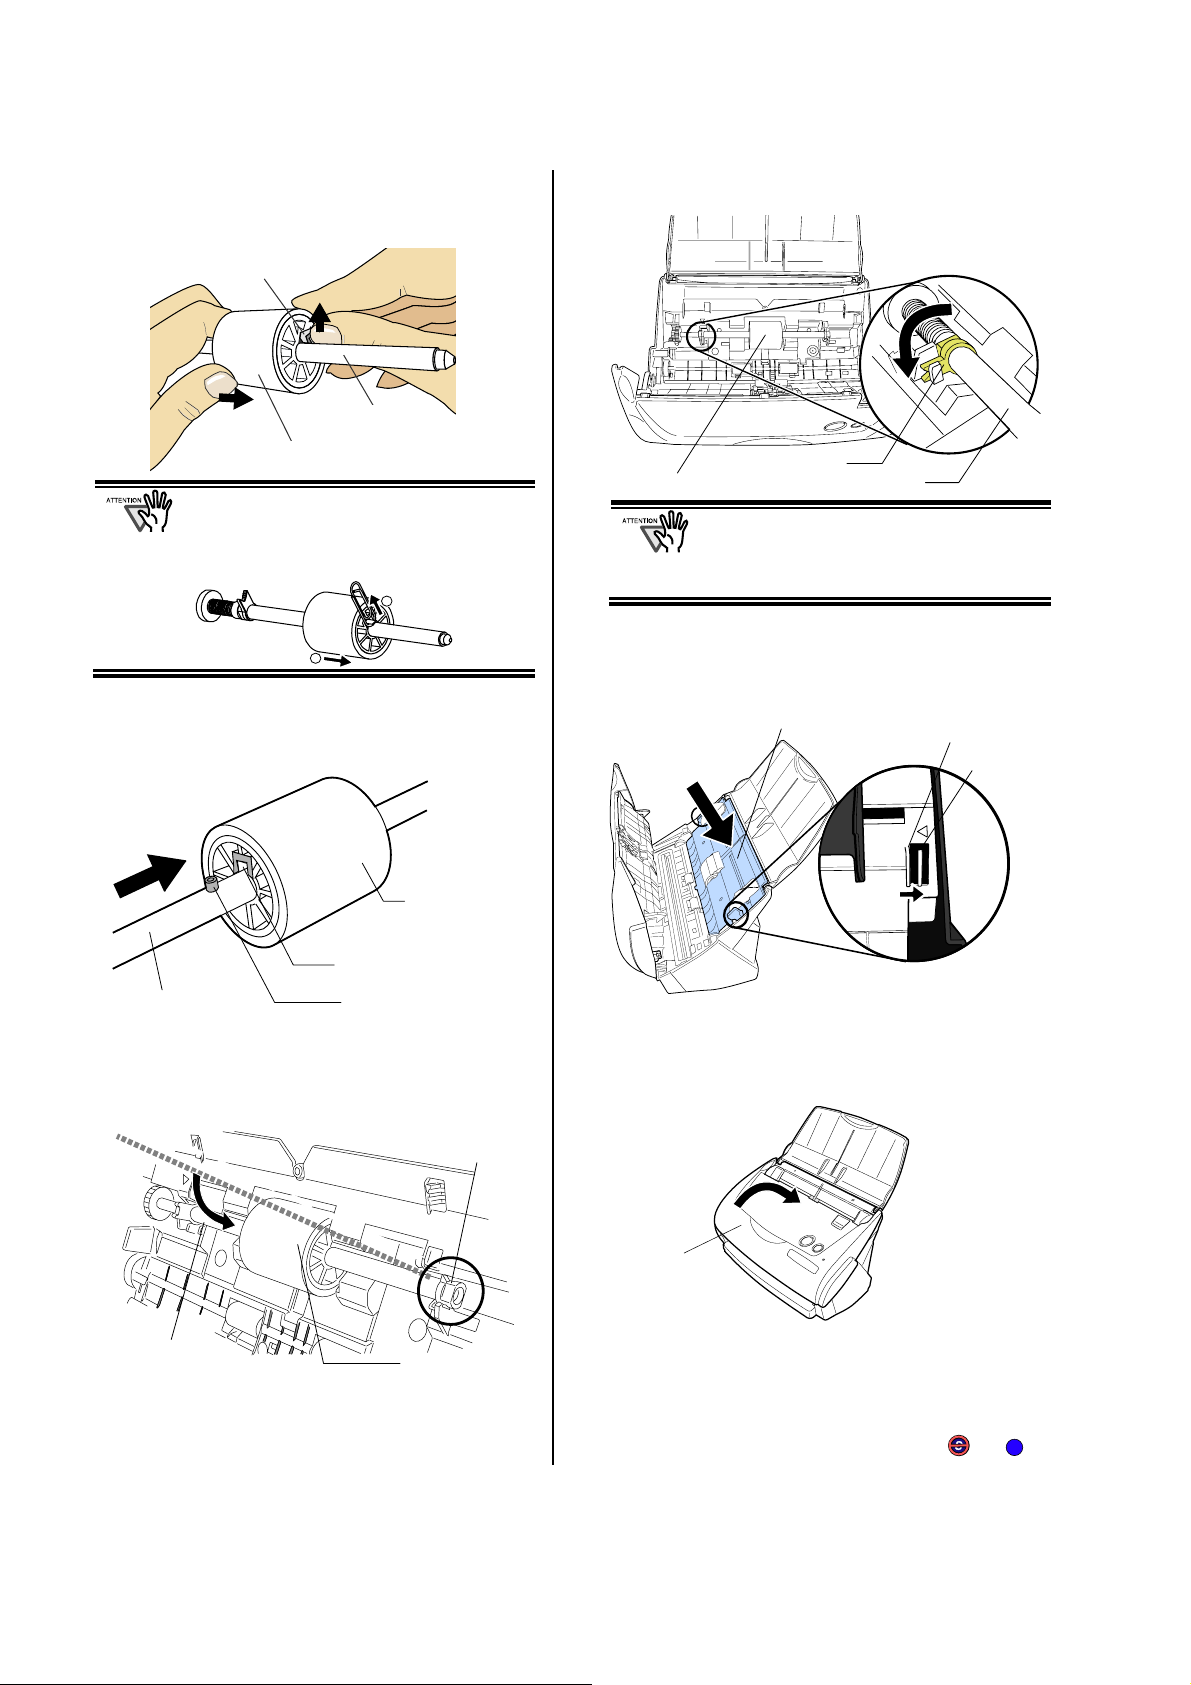
6. Remove the Pick roller from the shaft.
Pull out the shaft from the Pick roller while lifting up
its tab.
Tab
Shaft
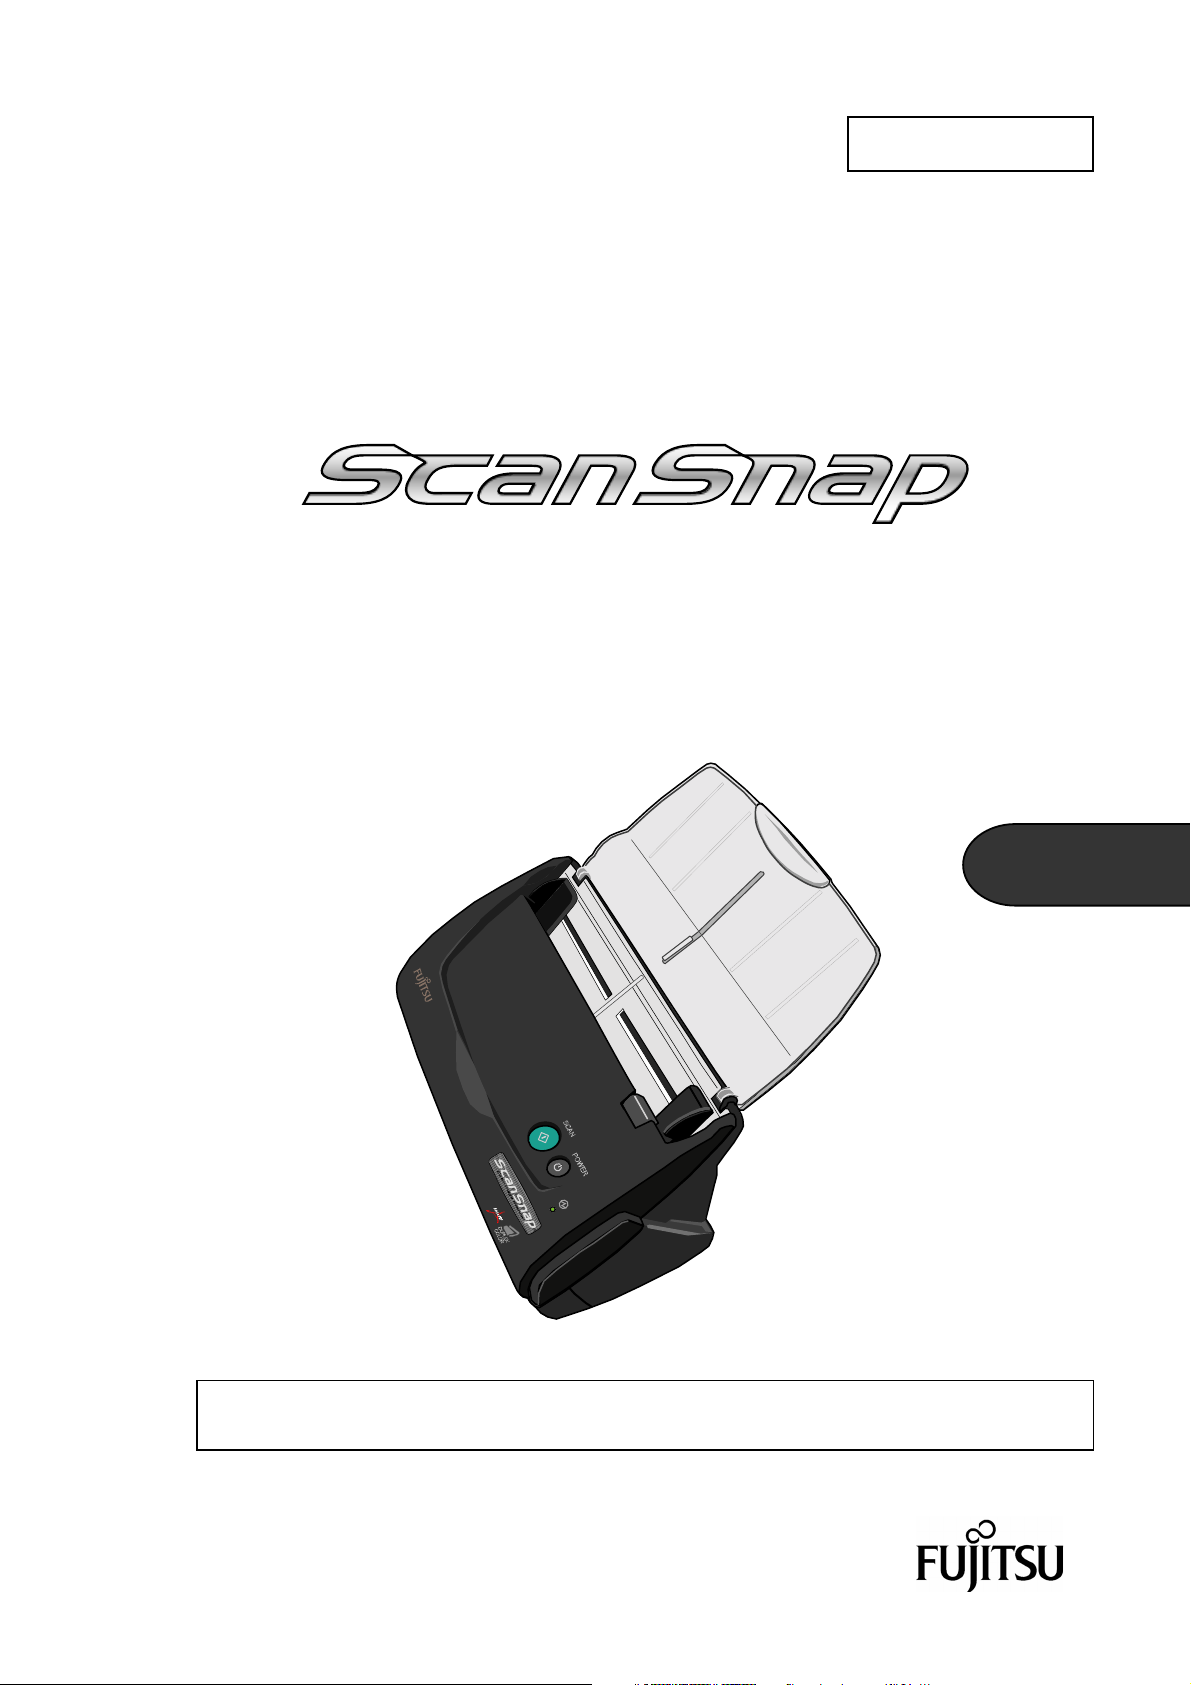
9. Fix the Pick roller bushing (left) by rotating it in the
direction of the arrow.
Pick roller
If you push up the pick roller tab using your
fingernail, your fingernail may be hurt or get
chipped. If you cannot push it up successfully
with your fingernail, use a paper clip to push
up the pick roller tab.
1
2
7. Attach the new Pick roller to the shaft.
Insert the shaft aligning the protrusion with the slot
on the new Pick roller.
Pick roller
Slot
Shaft
Protrusion
8. Install the Pick roller with its shaft into the bushing
and set the shaft to the slot while lowering it.
Pick roller bushing
Pick roller
Make sure that the Pick roller is
completely attached and correctly
installed. Otherwise, document jams or
other feeding errors may occur.
10. Attach the sheet guide to the scanner.
While holding the handle on the sheet guide, set the sheet
guide into the scanner.
Sheet guide
ÖYou should hear the sheet guide click when it
returns to its original position.
11. Close the ADF.
Shaft
Handle
Craw
20 |
Shaft
Bushing
Pick roller
ADF cover
ÖYou should hear the ADF cover click when it
returns to its original position.
12. Turn on the scanner.
Ö ScanSnap Manager icon changes from to .
S
Page 25

13. Right click the "ScanSnap Manager" icon on the
S
task tray, and select [Check consumable supplies]
from the menu.
14. In the “Check consumable status” window, click the
[Reset] button of the Pick Roller Count.
6.4. Purchasing the Carrier Sheet
If the “Carrier Sheet” bundled in this product cannot be
used for scanning due to damage or wear-and-tear, you can
purchase just the Carrier Sheet separately.
As a guideline, it is recommended to replace the Carrier
Sheet every 500 scans.
However, it differs according to usage. If scratches and dirt
are conspicuous, please replace the Carrier Sheet
accordingly.
The description of the Carrier Sheet (also sold separately)
and part number are as follows:
Description Qty P/N
ScanSnap Carrier Sheet 5 pcs FI-511ES-WW
ScanSnap fi-5110EOX2 Getting Started | 21
Page 26

Page 27
P3PC-1142-02FR
Scanneur d'image couleur
MC
fi-5110EOX2
IInnssttrruuccttiioonnss pprréélliim
miinnaaiirreess
Veuillez lire ce guide avec soin avant de relier le scanneur à votre ordinateur.
Page 28

Table des matières
Introduction ........................................................................................................................................................... 1
1. Préparation ........................................................................................................................................................ 5
1.1 Vérifier le contenu de l'emballage .............................................................................................................................................................5
1.2 Noms et fonctions des composants ..............................................................................................................................................................5
2. Branchement de ScanSnap ............................................................................................................................. 6
2.1 Installation des logiciels fournis...........................................................................................................................................................6
2.1.1 Installation d'Adobe Acrobat 7.0....................................................................................................................................................6
2.1.2 Installer ScanSnap Manager, ScanSnap Organizer, CardMinder et PDF Thumbnail View .......................................................6
2.2 Branchement du scanneur ....................................................................................................................................................................8
2.2.1 Brancher le câble d'alimentation c.a. ............................................................................................................................................8
2.2.2 Branchement du câble USB ...........................................................................................................................................................8
3. Utilisation de ScanSnap................................................................................................................................. 10
3.1 Numérisation des documents .............................................................................................................................................................10
3.2 À propos des paramètres de numérisation .......................................................................................................................................10
3.3 Numérisation des documents de bureau...........................................................................................................................................11
3.4 Utilisation du Transparent ...................................................................................................................................................................11
3.5 Numérisation de cartes de visite ................................................................................................................................................................12
3.6 À propos de PDF Thumbnail View ..........................................................................................................................................................12
3.7 À propos de ScanSnap Organizer...........................................................................................................................................................13
4. Dépannage....................................................................................................................................................... 14
4.1 Liste de points à vérifier ......................................................................................................................................................................14
4.2 Dégagement des bourrages papier ....................................................................................................................................................18
5. Entretien .......................................................................................................................................................... 19
5.1 Produits de nettoyage..........................................................................................................................................................................19
5.2 Nettoyage des éléments externes du scanneur................................................................................................................................19
5.3 Nettoyage des éléments internes du scanneur.......................................................................................................................................19
5.4. Nettoyage du Transparent ..................................................................................................................................................................20
6. Remplacement des consommables/du transparent.................................................................................... 21
6.1 Numéro des éléments et fréquence de remplacement.....................................................................................................................21
6.2 Remplacement du séparateur .............................................................................................................................................................21
6.3 Remplacement du rouleau de sélection/prise...................................................................................................................................22
6.4 Pour vous procurer un Transparent ...................................................................................................................................................24
© PFU LIMITED, 2005.
Le contenu de ce manuel est sujet à modification sans préavis.
Aucune partie de ce manuel ne peut être reproduite sous quelque forme que ce soit sans autorisation préalable.
LISEZ SOIGNEUSEMENT TOUT CE MANUEL AVANT D'UTILISER VOTRE APPAREIL. AFIN D’ÉVITER TOUTE BLESSURE
INVOLONTAIRE À VOUS OU À TOUTE AUTRE PERSONNE PRÉSENTE, VEUILLEZ RESPECTER LES INSTRUCTIONS QUI VOUS SONT
FOURNIES AINSI QUE LEUR ORDRE.
Bien que tous les efforts possibles aient été fournis pour garantir l'exactitude de toutes les informations contenues dans ce manuel, PFU
LIMITED n'assume aucune responsabilité envers quelque partie que ce soit pour tout dommage résultant d’erreur, d’oubli ou de déclaration de
quelque sorte que ce soit dans ce manuel, ses mises à jour ou suppléments, que de telles erreurs soient des oublis ou des déclarations
résultant de négligence, d'accident ou de toute autre cause.
De plus, PFU LIMITED n'assume aucune responsabilité découlant de l'application ou de l'utilisation de tout produit ou système décrits dans la
présente, ni aucune responsabilité pour des dommages indirects ou consécutifs résultant de l'utilisation de ce manuel.
PFU LIMITED décline toutes les garanties concernant les informations contenues dans les présentes, qu'elles soient explicites, implicites ou
légales. PFU LIMITED décline toute responsabilité concernant les dommages résultant de l'utilisation de ce scanneur et de l'exécution des
manipulations décrites dans le présent guide ou concernant la perte de profits causée par des défauts et toute réclamation de tiers.
Page 29

Introduction
Nous vous remercions d'avoir choisi le Scanneur d’Image
Couleur ScanSnap fi-5110EOX2.
Le ScanSnap fi-5110EOX2 comprend un scanneur d'image
couleur et des applications de bureau. C'est une solution de
bureau complète conçue pour améliorer votre productivité
et résoudre vos problèmes de numérisation au bureau. Les
caractéristiques du ScanSnap sont les suivantes :
Appuyez simplement sur un bouton du
scanneur et vos images sur papier sont
transformées en documents PDF !
Vous pouvez convertir au format PDF tous les documents
qui encombrent votre bureau pour ensuite pouvoir les gérer
et les archiver dans votre ordinateur. Vous pouvez utiliser le
logiciel Adobe
afficher ces documents PDF.
Par ailleurs, le ScanSnap peut automatiquement reconnaître
le type de document à numériser, qu'il soit en couleurs ou en
noir et blanc. Ainsi, les fichiers des images numérisées
peuvent être réduits, même si les documents forment un
mélange de pages couleurs/noir & blanc au moment de la
numérisation. Vous pouvez également régler le scanneur
pour qu’il ignore automatiquement les pages vierges
éventuelles. Ainsi, la taille de vos fichiers s’en trouve encore
plus réduite.
MD
AcrobatMD fourni avec ce scanneur pour
Une numérisation sans effort !
Avec une moyenne de 15 pages par minute, vous pouvez
numériser des documents couleur A4 recto- verso.
(À condition que votre ordinateur soit doté d’IntelMD
Pentium
d’exploitation suivants : Windows
Windows
numérisation doit être réglé sur Normal, le mode couleur sur
Auto et le taux de compression sur 3.)
MD
4 1.8GHz ou plus, et d’un des systèmes
MD
2000 ou WindowsMD XP. En outre, le mode de
Prend peu de place sur votre bureau !
Peu encombrant (plus petit qu'une feuille de papier au format
A4/Lettre), vous pouvez installer le ScanSnap sur votre
bureau.
Vos cartes de visite sont soigneusement
classées !
Vous pouvez facilement classer et rechercher vos cartes de
visite en utilisant la fonction ROC (Reconnaissance Optique
de Caractères) disponible dans le logiciel "CardMinder
pour ScanSnap" fourni avec le scanneur.
(*Le scanneur ScanSnap fi-5110EOX2 N'EST PAS
compatible avec les normes TWAIN ou ISIS.)
Fabricant
PFU LIMITED
International Sales Dept., Imaging Business Division,
Products Group
Solid Square East Tower, 580 Horikawa-chô,
Saiwai-ku, Kawasaki-shi Kanagawa 212-8563, JAPON
Téléphone : +81 (44) 540-4538
Marques de commerce
Microsoft et Windows sont des marques déposées de
Microsoft Corporation aux Etats-Unis et/ou dans d'autres
pays.
Adobe, le logo Adobe et Acrobat sont des marques déposées
MD
98, WindowsMD Me,
MC
d'Adobe Systems Incorporated aux Etats-Unis et/ou dans
d'autres pays.
ScanSnap, le logo ScanSnap et CardMinder sont des
marques de PFU LIMITED.
Les autres noms de produits cités dans ce manuel sont des
marques de commerce ou des marques déposées de leurs
sociétés respectives.
Indication des marques et des produits
cités dans ce manuel
ScanSnap : ScanSnap fi-5110EOX2
CardMinder : CardMinder
Les références aux systèmes d'exploitation sont effectuées
de la manière suivante:
Windows 98 : fait référence au système d'exploitation
MicrosoftMD WindowsMD 98
Windows Me : fait référence au système d'exploitation
MicrosoftMD WindowsMD Édition Millennium
Windows 2000 : fait référence au système d'exploitation
MicrosoftMD WindowsMD 2000 Édition
Professionnelle
Windows XP : fait référence aux systèmes d'exploitation
Microsoft
Professionnelle et Microsoft
Édition Familiale
Si aucune distinction n'est établie entre ces différentes
versions, le terme général "Windows" est alors employé.
Adobe Acrobat 7.0 : AdobeMD AcrobatMD 7.0 version
Standard
Si aucune distinction n'est établie entre les différentes
versions du programme, le terme général "Adobe Acrobat"
est alors employé.
ScanSnap et les manuels
Le ScanSnap fi-5110EOX2 comprend :
1) Le scanneur d'image couleur
2) Un Transparent dans lequel vous pourrez insérer des
documents de grand format (tels que A3/B4/11x17 po) ou
encore des documents de forme irrégulière (tels que des
coupures de journaux ou notes) pour pouvoir les numériser.
3) ScanSnap Manager : c’est grâce à ce pilote que vous
pourrez numériser vos documents et enregistrer les images
numérisées.
4) CardMinder : logiciel doté d’un moteur ROC pour capturer
et gérer les données des cartes de visite à l’aide de logiciels
de Gestionnaire d'Informations Personnelles tels que
Microsoft Outlook
5) Adobe
Par ailleurs, les manuels suivants ont été rédigés à votre
intention :
Acrobat : logiciel standard de facto pour la création
et le traitement des documents électroniques au format PDF
ScanSnap fi-5110 EOX2 - Instructions préliminaires
(le présent manuel) Vous y trouverez des informations
relatives à l’installation et à l’utilisation de base de la
solution ScanSnap.
ScanSnap fi-5110EOX2 - Guide de l’utilisateur
Disponible également sur le Setup CD-ROM au format PDF,
MC
2.0
MD
WindowsMD XP Édition
MD
WindowsMD XP
ScanSnap fi-5110EOX2 – Instructions Préliminaires 1
Page 30
ce guide vous fournit des informations détaillées sur
l'installation du logiciel et du matériel ScanSnap, l'utilisation
du matériel du scanneur et sur ScanSnap Manager.
CardMinder – Instructions préliminaires
Disponible également sur le Setup CD-ROM au format PDF,
ce guide vous fournit des informations détaillées sur les
principales fonctions de CardMinder.
ScanSnap Organizer - Guide de l'utilisateur
Disponible également sur le Setup CD-ROM au format PDF,
vous saurez tout sur l’utilisation de ScanSnap Organizer.
Pour en savoir plus sur l'utilisation d'Adobe Acrobat,
veuillez consulter la rubrique Aide pour Adobe Acrobat.
Informations sur la réglementation
Règlement sur le brouillage radioélectrique dicté par le
ministère des Communications du Canada.
Cet appareil numérique de la classe B est conforme à la
norme canadienne NMB-003.
Bescheinigung des Herstellers / Importeurs
Für den fi-5110EOX2 wid folgendes bescheinigt:
• In Übereinsstimmung mit den Bestimmungen der
EN45014(CE) funkentstört
•
Maschinenlärminformationsverordnung 3.
GPSGV, 06.01.2004: Der höchste
Schalldruckpegel beträgt 70 dB (A) oder weniger,
gemäß EN ISO 7779.
Déclaration de conformité à la norme FCC
Après contrôle, cet équipement a été déclaré conforme aux
normes imposées aux appareils numériques de classe B,
conformément à l’alinéa 15 de la réglementation du FCC.
Ces normes sont destinées à assurer une protection légitime
des installations résidentielles contre tout brouillage
préjudiciable. Cet équipement génère et utilise de l’énergie
haute fréquence, ainsi, s’il n’est pas installé et utilisé
conformément à son manuel d’instructions, il peut nuire
aux radiocommunications. Cependant, l’absence
d’interférences dans une installation particulière n’est pas
garantie. Si vous constatez des interférences lors de la
réception d’émissions de radio ou de télévision (il suffit,
pour le constater, d’éteindre puis de rallumer l’appareil),
vous pouvez effectuer les opérations suivantes pour tenter
de les éliminer :
réorienter ou déplacer l’antenne réceptrice,
accroître la distance séparant l’équipement du récepteur,
brancher l’équipement sur un circuit différent de celui
du récepteur,
consulter votre distributeur ou un technicien de
radio/télévision qualifié.
Toute modification n'ayant pas été expressément
approuvée par la partie responsable des règles de
conformité, peut priver l'utilisateur de son droit
d'exploiter cet appareil.
IMPORTANT
Vous devez utiliser le câble d'interface USB et le
câble c.a. fournis avec ce produit afin de rester en
conformité avec les normes de la Classe B section
15 des règles de la FCC.
Réglementations du Canadian DOC
This digital apparatus does not exceed the Class B limit for
radio noise emission from digital apparatus set out in the
Radio interference Regulations of the Canadian Department
of Communications.
This Class B digital apparatus complies with Canadian
ICES-003.
Le pésent appareil numérique n'émet pas de parasites
radioélectriques dépassant les limites applicables aux
appareils numériques de la classe B prescrites dans le
Programme international Energy StarMD
En tant que partenaire d'ENERGY
MD
STAR
produit conforme aux normes de
rendement énergétique énoncées par
ENERGY STAR
Le Programme International du Matériel de Bureau
ENERGY STAR
économie d’énergie par l'introduction d'ordinateurs et autres
matériels de bureau à meilleur rendement énergétique. Ce
programme supporte le développement et la diffusion de
produits pourvus de fonctions permettant la réduction réelle
de la consommation d'énergie. C'est un système ouvert à tous
les propriétaires d'entreprises désireux d'y participer. Les
produits visés sont les matériels de bureau (ordinateurs,
moniteurs, imprimantes, télécopieurs, photocopieurs,
scanneurs et appareils à fonctions multiples). Leurs normes
et logos
, PFU Limited déclare ce
MD
.
MD
est un programme promouvant une
sont uniformes au sein des pays participants.
Utilisation dans des environnements à
risque élevé
Ce produit a été conçu et fabriqué en vue d'un usage
bureautique, personnel, domestique, industriel ou général.
Il n'a pas été conçu ni fabriqué pour être utilisé dans des
environnements présentant des risques extrêmement élevés,
mettant sérieusement et directement la vie ou la santé de
toute personne en danger, et où des mesures de sécurité
extrêmement rigoureuses s'imposent, comme dans les
environnements de contrôle des réactions nucléaires, dans
les centrales nucléaires, de commande automatique de vol,
de contrôle du trafic aérien, de contrôle des systèmes de
transport public, d'équipements médicaux de maintien de la
vie et de contrôle de tir de missiles dans des systèmes
d'armes, mais ne sont pas appliquées. N'utilisez jamais ce
produit sans vous assurez que toutes les mesures
nécessaires ont été prises afin d'assurer la sécurité dans de
tels environnements. PFU LIMITED n'est aucunement
responsable des dommages résultant de l'utilisation de ce
produit dans un environnement à risque élevé, et ne
répondra à aucune réclamation ou demande
d'indemnisation de l'utilisateur ou d'un tiers.
2 |
Page 31

À propos de l'utilisation du mercure
Les lampes contenues dans cet appareil
contiennent du mercure. Ainsi, lors de la mise au
g
H
Pour éviter toute blessure involontaire, lisez soigneusement
ce qui suit. Effectuer l'une des actions suivantes peut
entraîner des blessures graves :
rebut du scanneur, respectez les ordonnances ou
réglementations locales pour des questions de
sécurité et de recyclage.
Ne mettez pas la substance de la lampe dans votre
bouche car elle contient du mercure.
N'incinérez pas, n'écrasez pas, ne broyez pas le
scanneur.
N'inhalez pas le liquide chimique contenu dans les
pièces de scanneur.
Remarques importantes
Messages d'alerte utilisés dans ce manuel
AVERTISSEMENT
ATTENTION
Cette indication signale à l'utilisateur que si
l'opération à effectuer n'est pas
scrupuleusement respectée, elle peut
provoquer des blessures graves ou entraîner
la mort.
Cette indication signale à l'utilisateur une
opération qui peut mettre en danger la sécurité
des personnes ou abîmer le matériel si elle
n'est pas scrupuleusement respectée.
À propos de la vignette d’Alerte
Vous trouverez à l’intérieur du scanneur, cette vignette
d’alerte :
IMPORTANT
Cette partie du scanneur se réchauffant au fur et à
mesure de vos travaux de numérisation, attention à
ne pas vous brûler.
Vous ne devez pas retirer cette vignette, ni la salir
ou l’altérer.
Les captures d'écran de ce manuel
Dans l'intérêt des utilisateurs et en vue d'une amélioration du
produit, les captures d'écran de ce manuel sont sujettes à des
modifications sans préavis.
Si les informations affichées sur votre écran diffèrent de
celles données dans ce manuel, suivez les instructions
affichées sur votre écran tout en vous reportant au Guide de
l'utilisateur.
De plus, les captures d'écran de ce manuel concernent
ScanSnap Manager, le programme CardMinder, PDF
Thumbnail View, ScanSnap Organizer et Adobe Acrobat.
À propos de l'entretien
Vous ne devez pas effectuer de réparations sur ce scanneur.
Contactez votre distributeur ou un fournisseur de services
agréé par FUJITSU pour effectuer des réparations sur ce
produit.
Symboles utilisés dans ce manuel
Ce manuel utilise les symboles suivants dans les
explications en plus des messages d'alerte.
IMPORTANT
Ce symbole indique à l'utilisateur une information
particulièrement importante. Lisez
soigneusement cette information.
CONSEIL
Ce symbole indique à l'utilisateur un conseil utile
concernant l'utilisation du produit.
Un TRIANGLE indique qu'une attention et un soin
particuliers sont nécessaires.
Le dessin à l'intérieur du triangle indique la nature
particulière de l'avertissement.
Un CERCLE barré d’une ligne en diagonale
indique une action que les utilisateurs ne doivent
pas effectuer.
Le dessin à l'intérieur du cercle indique l'action
particulière qui ne doit pas être effectuée.
Un contour de lettre sur un fond de couleur indique
R
des instructions que les utilisateurs doivent suivre.
Ces éléments peuvent s'accompagner d'un dessin
représentant l'action à effectuer.
ScanSnap fi-5110EOX2 – Instructions Préliminaires 3
Page 32

Consignes de sécurité
SUIVEZ CES INSTRUCTIONS ET RESPECTEZ TOUS LES
AVERTISSEMENTS ET MISES EN GARDE DÉCRITS.
Ne démontez pas et ne transformez pas le scanneur.
L'intérieur du scanneur contient des composants sous
haute tension. Vous risqueriez de vous électrocuter ou de
provoquer un incendie si vous touchez ces éléments.
AVERTISSEMENT
Si vos mains sont humides, ne touchez pas la prise
électrique. Vous risqueriez de vous électrocuter.
Un câble c.a. abîmé peut provoquer un incendie ou une
électrocution.
Ne placez pas d'objets lourds sur le câble c.a., ne tirez
pas, ni ne pliez, tordez, chauffez, abîmez ou modifiez le
câble c.a.
N'utilisez pas non plus de câbles c.a. ou de prises
électriques abîmés et prenez garde aux prises de
courant mal vissées.
N'utilisez pas de câbles autres que ceux fournis avec le
produit. Utilisez uniquement les câbles c.a.,
l’adaptateur c.a. et les câbles de connexion spécifiés.
Vous risqueriez de vous électrocuter et d'endommager
le matériel si vous n'utilisez pas les câbles adéquats.
Par ailleurs, pour des raisons identiques, n’utilisez pas
ces accessoires avec un autre appareil.
Utilisez uniquement ce scanneur à la tension et à
l'intensité indiquées. Une tension ou une intensité
incorrecte peut provoquer un incendie ou une
électrocution.
Ne branchez pas non plus le scanneur sur une prise
multiple.
Avec un chiffon doux et sec, époussetez les parties
métalliques de la prise électrique ou du réceptacle. Une
accumulation de poussière peut provoquer un incendie
ou une électrocution.
N'installez pas le scanneur dans un endroit exposé à la
fumée (d'essence), à la vapeur, à l'humidité ou à la
poussière. De tels environnements peuvent être à
l’origine d’incendie ou d’électrocution.
Si l'appareil dégage de la chaleur ou si vous décelez
d'autres problèmes (fumée, odeur et bruit étranges),
éteignez immédiatement le scanneur puis débranchez
la prise de courant.
Assurez-vous qu'il n'y a plus de fumée puis contactez le
magasin où vous avez acheté le scanneur ou un
fournisseur de services agréé par FUJITSU.
Si le scanneur est abîmé pour une raison quelconque,
éteignez le scanneur et débranchez le câble
d'alimentation avant de contacter votre distributeur.
N'insérez pas et ne laissez pas tomber d'objets
métalliques dans le scanneur.
Ne numériser pas des documents humides et n'oubliez
pas d'ôter les éventuels trombones et agrafes reliant
les documents.
N'arrosez pas et ne mouillez pas le scanneur.
Si des corps étrangers (objets métalliques, liquides
etc.) pénètrent dans le scanneur, éteignez-le
immédiatement et débranchez la prise électrique de la
prise de courant murale. Contactez ensuite votre
distributeur ou le centre de services entretien. Faites
particulièrement attention à cet avertissement pour les
foyers avec jeunes enfants.
ATTENTION
Vous trouverez ci-dessous d'importantes mises en garde.
Installez le scanneur sur votre bureau de façon à ce
qu'aucune de ses parties ne dépasse le bord de la
table. Assurez-vous également que le scanneur est
installé sur une surface plate et régulière.
N'installez pas le scanneur sur une surface instable. Pour
éviter toute chute, installez le scanneur sur une surface
plate non soumise à des vibrations.
Installez le scanneur sur une surface résistante qui peut
supporter son poids ainsi que celui d'autres appareils.
Insérez fermement, aussi profondément que possible,
la fiche électrique dans la prise de courant.
Installez le scanneur à l'écart de champs magnétiques
importants et d'autres sources de parasites
électroniques. Protégez également le scanneur de
l'électricité statique qui peut occasionner un mauvais
fonctionnement du scanneur.
N'utilisez pas de bombe aérosol pour nettoyer le
scanneur. Les bombes aérosol peuvent faire entrer de
la poussière et des saletés dans le scanneur,
entraînant une panne ou un mauvais fonctionnement
de celui-ci.
Pour des raisons de sécurité, lorsque le scanneur n'est
pas utilisé pendant une période prolongée,
assurez-vous de débrancher la fiche électrique de la
prise murale
N'installez pas le scanneur directement sous la lumière
du soleil ou près d'un appareil de chauffage. Cela
risque de provoquer un réchauffement excessif des
éléments internes du scanneur, d'où risque d'incendie
ou problème de fonctionnement. Installez le scanneur
dans un endroit bien aéré.
N’obstruez pas les trous prévus pour la ventilation. En
bloquant ces orifices, la température interne du
scanneur augmente, risquant de provoquer un incendie
ou une panne du matériel.
Ne placez pas d'objets lourds sur le scanneur et
n'utilisez pas le dessus du scanneur pour effectuer
d'autres travaux. Une mauvaise installation peut être à
l’origine de blessures.
Ne déplacez pas le scanneur lorsque les câbles
d'alimentation et d'interface sont connectés. Vous
risquez de les abîmer et de provoquer un incendie, une
électrocution ou des blessures involontaires.
Avant de déplacer le scanneur, assurez-vous de
débrancher la fiche électrique de la prise murale et de
débrancher les câbles de données. Assurez-vous
également que le sol est dépourvu d'obstacles.
Évitez de toucher le mécanisme du scanneur lorsqu'il
est en cours de numérisation car vous pourriez vous
blesser.
N’utilisez pas le matériel immédiatement après l’avoir
déplacé d’un endroit frais à un endroit chaud. Afin
d’éviter toute condensation qui pourrait donner lieu à
des problèmes de numérisation, laissez le scanneur
sécher pendant deux ou trois heures.
4 |
Page 33

1. Préparation
j
V
r
Ce chapitre vous indique les étapes préliminaires à respecter
avant de commencer à utiliser le ScanSnap.
Boutons
IMPORTANT
Ne reliez pas le scanneur à votre ordinateur
avant d'avoir installé ScanSnap Manager.
Le scanneur ne fonctionnera pas correctement
si vous le branchez avant l'installation du pilote
ScanSnap,
Consultez le Chapitre 2 pour l'installation du
pilote.
1.1 Vérifier le contenu de l'emballage
Quand vous déballez le scanneur, vérifiez que tous les
éléments suivants sont inclus dans la boîte.
Consultez la liste des éléments incluse dans la boîte du
scanneur.
1.2 Noms et fonctions des composants
Cette section indique les nom et fonction des composants.
Vue de face
Plateau d’alimentation
En le soulevant, le scanneur
est mis sous tension
Capot de l’AAD
limentateur Automatique
(A
ocument)
de D
Plateau de réception
2 trous situés sous le
scanneur sont destinés à
s’encastrer dans les 2 saillies
du plateau
Vue arrière
ignette : après avoir installé ScanSnap
Manager dans votre système, enlevez cette
vignette afin de pouvoir relier le scanneur à votre
ordinateur.
Bouton [SCAN]
Lance la numérisation
Bouton [POWER]
Mise sous tension/arrêt du
scanneu
Lampe de l’indicateur de
marche
du scanneur :
Vert : Prêt
Vert (clignotant) : Numérisation
Orange : Erreur
Connecteur Adaptateur CA Connecteur USB
indiquant l’état
en cours
Bouton d’ouverture du couvercle
Tirez ce levier pour soulever le
couvercle de l’AAD
Plateau d’alimentation
Soulevez ce couvercle puis
chargez les documents que vous
souhaitez numériser dans cet
élément
Guides latéraux
Réglez ces guides à la
largeur des documents
pour éviter tout
désalignement
des images
Plateau de réception
Pour pouvoir utiliser cet élément,
tirez-le comme indiqué dans le schéma ci-dessus.
→Les documents sont é
ectés depuis l’AAD dans ce bac
CONSEIL
IMPORTANT
Boutons
Pour en savoir plus sur les documents pouvant
être numérisés, veuillez vous reporter au Guide de
l’Utilisateur ScanSnap fi-5110EOX2 disponible
dans le Setup CD-ROM.
Ce scanneur s’allume/s’éteint automatiquement
uniquement en soulevant/rabaissant le couvercle
du bac d’alimentation.
Pour éteindre le scanneur lorsque le couvercle
n’est pas rabattu, appuyez sur le bouton
[POWER].
* Vous pouvez éventuellement utiliser le scanneur sans le
bac de réception.
ScanSnap fi-5110EOX2 – Instructions Préliminaires 5
Page 34

2. Branchement de ScanSnap
Ce chapitre vous explique comment relier le ScanSnap à
votre ordinateur.
2.1.1 Installation d'Adobe Acrobat 7.0
Préparez le CD-ROM Adobe Acrobat 7.0.
2.1 Installation des logiciels fournis
Avant de relier le scanneur à votre ordinateur, installez
d'abord les programmes suivants :
c Adobe Acrobat 7.0 (Application)
d ScanSnap Manager (Pilote)
e ScanSnap Organizer (Application)
f CardMinder (Application)
g PDF Thumbnail View (Application)
IMPORTANT
CONSEIL
• Assurez-vous d'avoir bien installé le pilote
ScanSnap avant de procéder à la
connexion du scanneur à votre ordinateur.
Si vous ne respectez pas l’ordre des opérations
à effectuer, la boîte de dialogue "Assistant
Matériel détecté" (le titre du dialogue varie
légèrement selon le système d'exploitation
utilisé par votre ordinateur) s’ouvrira. Dans ce
cas, cliquez sur le bouton [Annuler] pour fermer
la boîte de dialogue de l'Assistant.
• Vous ne pouvez pas relier simultanément les
scanneurs ScanSnap fi-5110EOX2 et
fi-4110EOX (ou deux fi-5110EOX2 ou plus) à
un seul ordinateur.
• Si un pilote des séries ScanSnap fi-4110EOX
ou ScanSnap fi-5110EOX est déjà installé
dans votre ordinateur, veuillez le désinstaller.
• Si vous utilisez Windows 2000 ou Windows XP,
ouvrez une session en tant qu'utilisateur avec
des privilèges d’administrateur.
• Plateforme nécessaire pour l’exploitation de
ScanSnap fi-5110EOX2 :
Unité Centrale :
600MHz au minimum (* Intel
1.8GHz au minimum est vivement
recommandé)
Mémoire :
de mémoire supérieure à 256 Mo est vivement
recommandée)
* Si votre ordinateur ne répond pas à ces deux
recommandations et s’il est équipé d’un bus
USB version 1.1, la numérisation de vos
documents prendra plus de temps.
ScanSnap Manager est un pilote accessible pour
ScanSnap fi-4110EOX2 et ScanSnap
fi-5110EOX. Ainsi, vous pouvez exploiter ce pilote
avec ScanSnap fi-5110EOX2 (ce produit) ou
ScanSnap fi-4110EOX2 ou encore ScanSnap
fi-5110EOX.
équipée d’Intel® Pentium® III
128 Mo au minimum (* une capacité
®
Pentium® 4
IMPORTANT
Adobe Acrobat 7.0 est ineffectif sous Windows 98
et Windows Me.
1. Insérez le CD-ROM "Adobe Acrobat 7.0" dans le
lecteur de CD-ROM.
ÖLa boîte de dialogue "Adobe Acrobat 7.0 Standard"
s’ouvre.
CONSEIL
Cette boîte ne s'affiche pas automatiquement
si la fonction d'exécution automatique des
CD-ROM est désactivée. Dans ce cas, lancez
directement "AutoPlay.exe"dans le CD-ROM
avec l'Explorer ou à partir du Poste de travail.
2. Choisissez une langue et cliquez sur le bouton [OK].
3. Sélectionnez "Installer Adobe Acrobat 7.0 Standard".
4. Suivez les instructions indiquées dans la boîte.
CONSEIL
Sélectionnez "Procéder d'installation" dans la
fenêtre [Adobe Acrobat 7.0 Standard] pour en
savoir plus sur l'installation.
Consultez l’"Aide pour Adobe Acrobat" si
vous souhaitez obtenir plus d’informations
quant à l'utilisation d'Adobe Acrobat 7.0.
6 |
Page 35

2.1.2 Installer ScanSnap Manager,
ScanSnap Organizer, CardMinder et
PDF Thumbnail View
Préparez le ScanSnap Setup CD-ROM.
1. Insérez le CD-ROM "ScanSnap Setup" dans le lecteur
de CD-ROM.
Ö La boîte de dialogue relative à l’installation s’ouvre.
(Au moment de réinstaller les programmes les
deux boîtes ne s’ouvriront pas.)
CONSEIL
Cette boîte ne s'ouvre pas automatiquement si la
fonction d'exécution automatique des CD-ROM
est désactivée. Dans ce cas, lancez directement
"Setup.exe"dans le CD-ROM avec l'Explorer
Windows ou à partir du Poste de travail.
2. Cliquez sur le bouton [Installer les produits].
Ö L'installation de ScanSnap Manager, de CardMinder
et de PDF Thumbnail View est lancée.
3. La boîte de dialogue de l’Assistant relative à
l’installation s'ouvre : suivez les instructions qui y sont
indiquées.
CONSEIL
La boîte de dialogue suivante s’affiche :
[Poser le côté à numériser contre le plateau
puis lancer la numérisation (Recommandé)]
Insérez d’abord le haut du document dans le
scanneur, le côté imprimé contre le plateau,
comme si vous envoyez une télécopie.
[Orienter le côté à numériser vers l’extérieur,
la partie supérieure vers le haut et lancer la
numérisation]
Pour un chargement selon la disposition de
documents dans le scanneur.
(Remarque : vous pouvez modifier cette option
après l’installation.)
Cette boîte de dialogue vous permet de décider
de recevoir une “Notification des résultats de
numérisation” à la fin de la numérisation.
Si la case d’option est cochée, la notification
vous informant de l’utilisation ou non des
functions suivantes s’affiche :
Activer la suppression de pages blanches
Activer la correction de désalignement
4. Lorsque l'installation est terminée, redémarrez votre
ordinateur.
[Par défaut] <Recommandé>
ScanSnap Manager, ScanSnap Organizer,
CardMinder et PDF Thumbnail View ainsi que
leur manuel d’instruction seront installés.
[Compact]
ScanSnap Manager est installé avec son
manuel.
[Personnalisée]
Vous pouvez choisir le logiciel que vous
souhaitez installer avec son manuel.
IMPORTANT
Pour en savoir plus sur ScanSnap Manager ou sur
l’installation de CardMinder, veuillez consulter le
Guide de l’Utilisateur.
ScanSnap fi-5110EOX2 – Instructions Préliminaires 7
Page 36

2.2 Branchement du scanneur
Après avoir redémarré votre ordinateur, procédez à la
connexion du scanneur.
2.2.1 Brancher le câble d'alimentation c.a.
IMPORTANT
1. Branchez le câble c.a.dans l’adaptateur c.a.
2. Reliez les connecteurs de l’adapteur c.a. : l’un dans la
prise de courant, l’autre dans la prise d’entrée du
scanneur.
N'utilisez pas de câbles autres que ceux fournis
avec le produit. Utilisez uniquement les câbles c.a.
et les câbles de connexion spécifiés.
Prise de courant
Prise d’entrée
3. Soulevez le couvercle du plateau d’alimentation du
scanneur.
IMPORTANT
Ö Votre ordinateur détecte automatiquement le
Si le scanneur ne s’allume pas
automatiquement, appuyez sur le bouton
[POWER] du scanneur.
scanneur
Sous Windows
98
On vous demande d'insérer un disque. Le cas échéant,
insérez le CD-ROM Windows 98 dans le lecteur de
CD-ROM et cliquez sur le bouton [OK].
Sous Windows
Me
Le nouveau matériel est détecté automatiquement et
l'installation se terminera automatiquement.
Sous Windows
2000
Lorsque la boîte de dialogue [Signature numérique
non trouvée] s’ouvre, cliquez sur le bouton [Oui].
Sous Windows XP
1) Lorsque la boîte de dialogue [Assistant Matériel
détecté] s’ouvre, cochez la case « Non, pas pour
cette fois » puis cliquez sur le bouton [Suivant>].
2.2.2 Branchement du câble USB
Branchez le câble USB comme indiqué ci-dessous.
IMPORTANT
1. Enlevez la vignette recouvrant le connecteur USB.
2. Reliez le câble USB à votre ordinateur et au scanneur.
● Utilisez le cable USB fourni avec le scanneur.
L'utilisation d'un câble USB distribué dans le
commerce ne garantit pas le bon
fonctionnement de l'appareil. Assurez-vous de
brancher le câble dans le concentrateur USB le
plus proche de votre ordinateur (premier
niveau).
● Si vous le branchez dans un concentrateur
USB de second niveau ou à une distance plus
éloignée, le ScanSnap peut ne pas fonctionner.
(Cette boîte de dialogue ne s’ouvrira si votre système
est doté de la version Service Pack 2.)
2) Cliquez sur le bouton [Suivant>] dans la boîte de
dialogue suivante.
Câble USB
8 |
Page 37

3) Lorsque la boîte de dialogue [Installation du
matériel] s’ouvre, cliquez sur le bouton [Continuer].
La boîte de dialogue "Assistant Matériel détecté"
vous informant que l'Assistant va se terminer,
s’ouvre.
4) Cliquez sur le bouton [Terminer] quand l'installation
est terminée.
Vous venez d’installer ScanSnap.
IMPORTANT
CONSEIL
L'icône du "ScanSnap Manager" apparaît dans la
barre des tâches sous la forme
apparaît sous la forme
pour éteindre le scanneur puis appuyez à nouveau
sur [POWER] pour le mettre sous tension.
Lorsque vous allumez ou éteignez le scanneur,
veuillez compter cinq secondes environ pour
obtenir une réponse.
Au moment d’allumer/éteindre le scanneur, gardez
le doigt appuyé sur [POWER] pendant une seconde
au moins.
*Pour éviter toute mauvaise manipulation, le bouton
[POWER] ne répondra pas si vous ne gadez pas le
doigt appuyé au delà d’une seconde.
, appuyez sur [POWER]
. Si elle
ScanSnap fi-5110EOX2 – Instructions Préliminaires 9
Page 38

3. Utilisation de ScanSnap
Ce chapitre décrit les fonctions de base du ScanSnap.
3.1 Numérisation des documents
Grâce à “ScanSnap”, vous pouvez transformer vos
documents au support papier en documents numériques et
les sauvegarder, uniquement en appuyant sur un bouton.
L'image numérisée pourra être affichée à l'écran grâce à
l’installation des applications fournies (Adobe Acrobat,
CardMinder entre autres).
Voici les deux utilisations typiques :
c Création et sauvegardes numériques de documents de
bureau communs sous le format PDF.
Grâce à Adobe Acrobat, vous pourrez les afficher puis
les éditer au moment choisi. Adobe Acrobat est idéal
pour le traitement des informations des images
numérisées : par exemple, la fonction OCR
(Reconnaître du texte par OCR) vous permettra
d’accéder facilement aux données recherchées ou
encore, la création d’un mot de passe vous permettra de
sécuriser vos documents etc. (Remarque : pour en
savoir plus, veuillez consulter la rubrique [Aide pour
Adobe Acrobat].)
d Numérisation et gestion des cartes de visite.
"CardMinder" est idéal pour la numérisation, la
reconnaissance et l’édition des cartes de visite. Ensuite,
vous pourrez en exporter les données vers un
Gestionnaire d'Informations Personnelles tel que
Microsoft Outlook.
3.2 À propos des paramètres de
numérisation
Vous pouvez changer la configuration du ScanSnap en
utilisant le "ScanSnap Manager".
1. Cliquez avec le bouton droit de la souris sur l'icône
"ScanSnap Manager"
tâches et choisissez [Paramètres...] dans le menu qui
s’ouvre.
qui se trouve dans la barre des
Six onglets vous permettent de configurer les options de
numérisation :
[Application]
Sélection de l’application qui vous permettra
d’afficher/éditer les images numérisées.
[Dossier d’enregistrement]
Pour spécifier le dossier et le nom de fichier sous lesquels
enregistrer les images numérisées.
[Mode de numérisation]
Pour spécifier la qualité des images numérisées.
[Type de fichier]
Sélection du type de fichier (PDF, JPEG) des images
enregistrées.
[Taille du papier]
Sélection du format des documents qui seront numérisés.
[Taille du fichier]
Sélection du taux de compression du fichier.
CONSEIL
3. Cliquez sur le bouton [OK] pour terminer la
configuration
Ö La nouvelle configuration est effective.
Pour en savoir plus sur ces paramètres,
consultez le "Guide de l'utilisateur
ScanSnap" disponible sur le "CD-ROM
ScanSnap Setup".
ÖLa boîte de dialogue "Paramètres de numérisation et
d'enregistrement" s'ouvre.
2. Changez les paramètres de numérisation dans la fenêtre
"Paramètres de numérisation et d'enregistrement".
10 |
Page 39

3.3 Numérisation des documents de
bureau
1. Choisissez "Adobe Acrobat" dans l'onglet
[Application] de "Paramètres de numérisation et
d'enregistrement".
2. Chargez les documents dans le scanneur.
Sens de la
numérisation
Orientez la partie
supérieure du document
vers le bas, le côté à
numériser contre le plateau
3.4 Utilisation du Transparent
Grâce au transparent, vous pouvez numériser des
documents au grand format (A3/B4/11x17 po) ou des
documents de forme irrégulière (coupures de journaux,
notes).
Dans l’exemple ci-dessous, vous trouverez des explications
quant à la numérisation de document A3.
1. Pliez le document en son centre tout en veillant à
orienter le côté que vous souhaitez numériser vers
l’extérieur.
Par ailleurs, veillez à ce qu’il n’y ait aucun gonflement
lorsque vous procédez au pliage.
Bouton [SCAN]
IMPORTANT
À l’étape 3 de la section 2.1.2 Installation de
ScanSnap Manager, ScanSnap Organizer,
CardMinder et PDF Thumbnail View], vous
pouvez choisir [Page positionnée à
l'endroit et orientée vers l'extérieur à
numériser en priorité], ensuite placez le
document comme indiqué ci-dessous.
Orientez la
page vers
l’extérieur
3. Appuyez sur le bouton [SCAN] :
Ö La numérisation commence.
Ö Quand la numérisation est terminée, Adobe Acrobat
est lancé et les images numérisées sont affichées.
CONSEIL
● Vous pouvez également utiliser une autre
application afin d'afficher les images numérisées
après leur numérisation.
● En appuyant sur le bouton [SCAN], les
documents sont numérisés des deux côtés. Si
vous ne souhaitez numériser qu’un seul côté
vos documents, vous pouvez modifier les
réglages depuis ScanSnap Manager
● Le ScanSnap peut numériser les documents en
utilisant divers paramètres. Pour en savoir plus
sur la numérisation, consultez le "Guide de
l'Utilisateur ScanSnap" du "CD-ROM ScanSnap
Setup".
2. Ouvrez le transparent A3 puis insérez le document
plié.
Calez le haut du document
dans la partie supérieure du
transparent puis alignez le
côté plié contre la partie
droite du transparent.
3. Chargez le transparent dans le scanneur.
Orientez la partie
supérieure pointillée du
transparent vers le bas
comme indiqué dans le
schéma ci-contre.
Si vous utilisez le
.
transparent, il vous est
impossible de numériser
plusieurs documents à la
suite. Veuillez effectuer
vos travaux de
numérisation l’un après
l’autre.
4. Appuyez sur le bouton [SCAN].
Ö La page au format A3
ayant été transformée en
un document recto
verso, les données de
l’image numérisée sont
présentées en double
page.
CONSEIL
La méthode de chargement ainsi que les
paramètres de ScanSnap Manager diffèrent
selon le document que vous numérisez. Pour
en savoir plus, veuillez consulter le “Guide
d’utilisation pour ScanSnap“ disponible
dans le “ScanSnap Setup CD-ROM”.
ScanSnap fi-5110EOX2 – Instructions Préliminaires 11
Page 40

3.5 Numérisation de cartes de visite
1. Dans "Paramètres de numérisation et
d'enregistrement", choisissez "CardMinder" dans
l'onglet [Application].
CONSEIL
● Si vous choisissez "CardMinder", seuls
● Pour en savoir plus sur les paramètres,
2. Chargez les cartes de visite dans le scanneur. Réglez
les guides latéraux à la taille des cartes.
Guides latéraux
[Application] et [Mode de numérisation]
seront disponibles.
consultez le "Guide de l'utilisateur
ScanSnap" dans le CD-ROM "ScanSnap
Setup".
cartes de visite
(face contre le plateau)
Bouton [SCAN]
5. Prenant Outlook comme exemple, choisissez les cartes
de visite que vous voulez y exporter, après avoir
confirmé les données de ces cartes, puis cliquez sur le
bouton [Microsoft Outlook] dans la barre d'outils. Les
données sont alors exportées vers Outlook.
CONSEIL
Vous pouvez envoyez les données (résultats
de la reconnaissance) vers les applications
suivantes :
● Microsoft
● Outlook Express
● ACT!
● GoldMine
Vous pouvez également enregistrer les
données au format CSV afin de les importer
vers une autre application telle qu'Excel.
Consultez le "Guide de l'utilisateur
CardMinder" pour plus de détails.
TM
®
Outlook®
®
6. Lancez Outlook pour confirmer l'importation des
données des cartes de visite.
7. Quand vous voulez fermer "CardMinder", choisissez
[Quitter] dans le menu [Fichier].
3. Appuyez sur le bouton [SCAN] :
Ö La numérisation commence.
Ö La fenêtre "CardMinder" s'ouvre et les caractères
reconnus, nom d'un particulier, raison sociale et
adresse électronique apparaissent dans la fenêtre.
4. La fenêtre suivante apparaît :
Choisissez une carte de visite dans la liste des données.
Vérifiez les données dans les champs de résultat de
reconnaissance dans cette fenêtre. Corrigez les données
si vous décelez une erreur.
Liste des données
Bouton [Microsoft Outlook]
Résultat de la reconnaissance
Images
numéri
sées
CONSEIL
“CardMinder” possède de nombreuses autres
fonctions. Pour en savoir plus, consultez le "Guide
de l'utilisateur CardMinder" dans le "ScanSnap
Setup CD-ROM" pour plus de détails.
3.6 À propos de PDF Thumbnail View
PDF Thumbnail View est un programme qui vous permet de
voir les fichiers PDF sous la forme de vignette à l’aide
d'Explorateur Windows.
Le programme est installé pendant l'installation du "Pilote
ScanSnap" et est désactivé par défaut.
(*Ce programme peut être installé sous
Windows XP.)
Pour activer les vignettes PDF
1. Dans le menu [Démarrer], choisissez [Programmes] -
[Pilote PDF] - [Affichage miniature des PDF] - [Outil
de configuration].
Cochez la case "Activer" et cliquez sur le bouton [OK]
2.
de la fenêtre "Paramètres des fonctions de PDF
Thumbnail".
Ö Vous pouvez visualiser les vignettes des fichiers PDF avec
l'Explorateur Windows comme si vous visualisiez des
images bitmap ou JPEG.
CONSEIL
Pour en savoir plus, consultez le "Guide de
l'Utilisateur ScanSnap" dans le "CD-ROM
ScanSnap Setup".
Windows 2000
ou
12 |
Page 41

3.7 À propos de ScanSnap Organizer
g
ScanSnap Organizer est une application vous permettant de
gérer l’affichage des fichiers des images PDF ou JPEG.
Même fermés, les fichiers numérisés avec ScanSnap
peuvent être visualisés. Vous pouvez également créer ou
trier vos dossiers et fichiers entre autres.
De plus, pour ce qui est des fichiers composes de plusieurs
pages, vous pouvez également consulter les images en les
faisant défiler.
Depuis le menu [Démarrer], pointez sur [Tous les
programmes] – [ScanSnap Organizer] – [ScanSnap
Organizer] : la fenêtre suivante s’ouvre :
Fenêtre de visualisation
Les dossiers sélectionnés dans ScanSnap Organizer sont indiqués
Fenêtre de visualisation des
fichiers
Les fichiers PDF ou JPEG dans le dossier
Vignette Pop-up
La page sélectionnée est affichée sous la forme d’une fenêtre
Pop-up.
Vignette
Affichage d’une image miniature d’un fichier.
Nom du fichier
CONSEIL
Pour en savoir plus, veuillez consulter le “Guide
pour ScanSnap Operator” disponible dans le
“ScanSnap Setup CD-ROM”.
sélectionné sont affichés sous forme de
Numéro de page
Indique le numéro de la page
actuellement affichée/le nombre
total de pages.
Bouton “Zoom
avant/Zoom arrière”
Pour agrandir ou réduire la
taille de la vi
Bouton Page suivante
Pour éventuellement accéder à
la page suivante.
nette Pop-up.
ScanSnap fi-5110EOX2 – Instructions Préliminaires 13
Page 42

4. Dépannage
Ce chapitre dresse la liste des problèmes courants pouvant apparaître lors de l'utilisation de l'appareil et vous propose une
série de solutions pouvant les résoudre.
4.1 Liste de points à vérifier
Avant de faire appel au service après-vente, vérifiez les points suivants.
Si vous n'arrivez pas à résoudre le problème malgré les instructions proposées, contactez votre distributeur ou un technicien
pour scanneurs agréé par FUJITSU.
Problème rencontré Vérifiez cet élément Solution
Le scanneur ne s’allume pas.
La numérisation ne commence pas.
Le câble ca/USB et l’adaptateur ca sont-ils
correctement branchés ?
Le plateau d’alimentation est-il rabattu ? (La
mise sous tension et l’arrêt du scanneur
dépendent, entre autres, de la position du
plateau d’alimentation.)`
Windows a-t-il été correctement lancé ?
(L‘exploitation du scanneur dépend, entre
autres, de la mise sous tension et de l’arrêt de
votre ordinateur.)
Avez-vous appuyé sur le bouton [POWER]
pour éteindre le scanneur ? (Vous pouvez
éteindre le scanneur en appuyant sur
[POWER] même si le couvercle du plateau
d’alimentation est relevé.)
Est-ce que le câble USB est correctement
branché ?
Est-ce que le voyant de la DEL
manière répétée ?
Le ScanSnap Manager est-il correctement
lancé ? (Si le ScanSnap Manager a bien
démarré, l'icône ScanSnap Manager
affichée dans la barre des tâches.)
clignote de
sera
Corrigez les branchements du câble ca/USB
et de l’adaptateur ca.
Débranchez puis rebranchez le câble et
l’adaptateur ca.
(Remarque : patientez cinq secondes entre le
débranchement et le branchement.)
Installez le Plateau d'alimentation de l'AAD.
Attendez jusqu'à ce que Windows ait
complètement démarré. Le voyant de la DEL
peut s’éteindre lors du démarrage de
Windows ou encore, le scanneur peut
afficher une faible intensité.
Appuyez sur le bouton [POWER].
Branchez correctement le câble USB. (Si un
concentrateur USB est utilisé, vérifiez
l'alimentation du concentrateur.)
Débranchez puis rebranchez le câble c.a.et
l’adaptateur c.a.
(Remarque : patientez cinq secondes entre le
débranchement et le branchement.)
Si l'icône ScanSnap Manager n'est pas
affichée, cliquez sur le menu [Démarrer] et
choisissez [Programmes] - [Pilote ScanSnap]
- [ScanSnap Manager] pour lancer le
ScanSnap Manager.
14 |
Page 43

Problème rencontré Vérifiez cet élément Solution
Est-ce que le ScanSnap Manager fonctionne
normalement ?
(Si le ScanSnap Manager ne fonctionne pas
normalement, l'icône ScanSnap Manager
dans la barre des tâches est affichée sous la
forme .)
La numérisation ne commence pas. Est-ce que la boîte de dialogue "Paramètres
de numérisation et d'enregistrement" est
toujours affichée ?
Des lignes verticales apparaissent sur
l'image générée.
L’image générée est déformée ou
désalignée.
Les lignes de l’image numérisée sont
floues.
(Exemple : les lignes d’un tableau
sont invisibles.)
L'image générée est trop sombre ou
trop claire.
L’AAD est–il sale ? Veuillez nettoyer l’AAD en consultant le
Le document a-t-il été correctement chargé ? Chargez correctement le document.
Avez-vous numérisé sous le mode
« Couleur » un document manuscrit ou
composé de caractères d’imprimerie, de
tableaux ou de cadres pré-imprimés ?
Dans le cas d'une numérisation d'un
document en noir et blanc (N&B), est-ce que
l'[Option...] - "Luminosité" dans l'onglet
[Mode de numérisation] est réglée sur le
mode très clair ? Très foncée ?
Effectuez les manipulations suivantes :
1. Depuis Propriétés, cliquez sur le bouton
“Gestionnaire de périphériques” puis sur
“Rechercher les modifications sur le
matériel” (*1).
Si la situation reste inchangée, passez à
l'étape 2.
2. Débranchez puis rebranchez le câble
c.a.et l’adaptateur c.a. (Patientez cinq
secondes entre le débranchement et le
branchement.)
Si la situation reste inchangée, passez à
l'étape 3.
3. Si vous utilisez un concentrateur USB,
reliez directement votre ordinateur au
ScanSnap.
Si la situation reste inchangée, passez à
l'étape 4.
4. Si votre ordinateur est pourvu de ports
USB supplémentaires, veuillez essayer
de brancher le ScanSnap sur l’un d’eux.
Si la situation reste inchangée, passez à
l'étape 5.
5. Redémarrez votre ordinateur.
Si toutes les manipulations précitées
s’avèrent inefficaces, désinstallez et
réinstallez ScanSnap Manager selon les
instructions fournies dans la note (
Fermez la boîte de dialogue "Paramètres de
numérisation et d'enregistrement" puis
numérisez votre document.
chapitre 5. Entretien.
Le mode Couleur est idéal pour la
numérisation d’images couleur telles que
des photographies. C’est pourquoi, dans le
cas d’une numérisation de document
composé d’un texte, veuillez cocher la case
d’option [Paramètres pour texte seulement]
dans [Numérisation] – [Option] dans la
boîte de dialogue Paramètres de
numérisation et d’enregistrement.
Réglez la "Luminosité" dans [Mode de
numérisation] - [Option...] dans "Paramètres
de numérisation et d'enregistrement".
*2).
ScanSnap fi-5110EOX2 – Instructions Préliminaires 15
Page 44

Problème rencontré Vérifiez cet élément Solution
La vitesse de numérisation est lente.
Le chargement multiple se produit
fréquemment. (
*4)
Aucun document n'est chargé
(chargement interrompu en cours).
Le scanneur n'est pas reconnu malgré
l'installation de ScanSnap Manager.
La taille du fichier de l'image
numérisée est la même que celle d’un
document couleur, bien que vous ayez
numérisé un document en noir et
blanc (N&B).
Votre ordinateur est-il équipé d’un système
d’exploitation compatible avec ScanSnap ?
Vérifiez votre système d’exploitation en
vous reportant au chapitre 2 “Avant
d’installer ScanSnap” du Guide de
l’Utilisateur.
La numérisation des documents prendra plus
de temps si les recommandations relatives à
l'unité centrale et à la mémoire vive ne sont
pas respectées.
Le cas échéant, depuis la fenêtre "Paramètres
de numérisation et d'enregistrement ",
cliquez sur [Mode de numérisation] puis sur
[Option...], puis démarquez les cases des
options suivantes afin d'augmenter la vitesse
de numérisation :
- Détection automatique des images
désalignées
- Rotation automatique des images
Le ScanSnap est-il relié à votre ordinateur à
l’aide d’une interface USB 1.1 ? L’utilisation
d’une telle interface peut avoir des
conséquences sur la vitesse de transfert des
données. Ainsi, le taux de transfert peut être
Si votre ordinateur est équipé d’une interface
USB 2.0, reliez le scanneur à votre
ordinateur avec cette interface. (Si vous
utilisez un concentrateur USB, il doit
pouvoir supporter l’interface USB 2.0.) (
*3)
très faible lorsque le scanneur transmet des
données de forte densité vers votre
ordinateur.
Est-ce que le séparateur est sale ? Nettoyez-le en suivant les instructions de la
section « 5.3 Nettoyage des éléments internes
du scanneur ».
Est-ce que le séparateur est défectueux ? Remplacez le séparateur en suivant les
instructions données dans la section « 6.2
Remplacement du séparateur ».
L’épaisseur de la pile de documents est-elle
supérieure à 4 mm ?
Diminuez le nombre de feuilles de la pile de
documents afin d’avoir une épaisseur
inférieure à 4 mm.
Est-ce que le rouleau de sélection est sale ? Nettoyez-le en suivant les instructions de la
section « 5.3 Nettoyage des éléments internes
du scanneur ».
Est-ce que le rouleau de sélection est
défectueux ?
Remplacez-le en suivant les instructions de
la section « 6.3 Remplacement du rouleau
de sélection ».
Y a-t-il des débris sur le chemin du
chargement des documents ?
Avez-vous chargé des documents
conformément aux directives de chargement
décrites dans la section 3.2 Numérisation de
divers types de documents du Guide
d’utilisation ?
Retirez tous les débris se trouvant sur la
trajectoire du chargement des documents.
De tels documents peuvent présenter des
difficultés lors de leur chargement dans
l’AAD. Essayez les opérations suivantes :
• Du bout des doigts, poussez légèrement le
document dans l’AAD au moment du
chargement.
• Modifiez le sens de chargement du
document.
Avez-vous relié le scanneur à votre
ordinateur avant d’avoir installé ScanSnap
Manager ?
Est-ce que le scanneur est enregistré en tant
qu'"Autres périphériques" dans le
"Gestionnaire de périphériques" ?
Est-ce que le document N&B a été numérisé
en mode couleur ?
Depuis le menu [Démarrer], pointez sur
[Panneau de configuration] - [Système] [Matériel] - [Gestionnaire de périphériques].
Supprimez le nom du périphérique indiqué
sous "Autres périphériques" et redémarrez
votre ordinateur.
Dans "Paramètres de numérisation et
d'enregistrement", cliquez sur l’onglet
[Mode de numérisation] puis réglez [Mode
couleur :] sur "N&B".
16 |
Page 45

Problème rencontré Vérifiez cet élément Solution
Une image apparaît être la
superposition du recto et du verso
d’un document. (parasites du verso de
l'image)
Dans "Paramètres de numérisation et
d'enregistrement", pointez sur l’onglet
[Mode de numérisation] : dans [Option...],
est-ce que la case "Configuration pour
document avec texte seulement" est
désactivée?
Cochez la case "Configuration pour
document avec texte seulement".
(Disponible uniquement en mode couleur)
En effet, cette option permet d’obtenir des
caractères et lignes plus marquées et
d’éliminer les parasites du verso du
document. Cette option est également idéale
pour des documents composés de
photographies et d’illustrations. Toutefois, le
contraste et les couleurs risquent d’être
altérés.
Les images numérisées
n’apparaissent pas sur l’écran.
(L’option “Saut de pages blanches” a
été activée.)
Si vous cochez la case d’option “Saut de
pages blanches”, les documents contenant
quelques caractères seront reconnus comme
étant des pages vierges et leurs données sont
accidentellement effacés.
Cliquez à droite de la souris sur l’icône
“ScanSnap Manager” puis pointez sur
[Paramètres…] – l’onglet [Numérisation]
Puis cliquez sur [Option…]. Enfin,
démarquez la case “Saut automatique de
pages blanches”.
Les images numérisées sont
désalignées (L’option “Détection
automatique des images désalignées”
a été activée.)
L’écart du désalignement des documents
est-il de +-5 ° ?
L’option “ Détection automatique des images
désalignées” peut corriger les
désalignements jusqu’à +-5 °. Chargez les
documents dans le scanneur de façon à ce
que le désalignement n’excède pas cette
tranche. Si le problème persiste, cliquez à
droite de la souris sur l’icône “ScanSnap
Manager” puis pointez sur [Paramètres…] –
l’onglet [Numérisation] Puis cliquez sur
[Option…]. Enfin, démarquez la case
d’option “ Détection automatique des images
désalignées”.
L'orientation des images générées
n’est pas correcte (L’option “Rotation
automatique des images” a été
Selon le contenu du document, la fonction
“Détection automatique des images
désalignées” peut ne pas être effective.
Selon le contenu du document, la fonction
“Rotation automatique des images” peut ne
pas être effective.
Consultez la section 3.4 Modification des
paramètres de numérisation du Guide
d’utilisation.
Consultez la section 3.4 Modification des
paramètres de numérisation du Guide
d’utilisation.
activée.)
*1) Si vous exploitez Windows XP, depuis "Propriétés", cliquez avec le bouton droit de la souris sur le nom de l’ordinateur puis sur “Rechercher
les modifications sur le matériel”.
*2) Vérifiez que le scanneur et l’ordinateur sont sous tension et correctement reliés.
- Fermez ScanSnap Manager.
- Depuis Device Manager, vérifiez si ScanSnap est bien considéré comme un périphérique connu. Dans le cas contraire,
supprimez-le depuis [Panneau de configuration] - [Système].
- Pointez sur [Panneau de configuration], cliquez sur [Ajouter ou supprimer des programmes] puis désinstallez ScanSnap
Manager et ScanSnap Organizer. (Consultez le chapitre 4. Désinstallation de ScanSnap (page 123) du Guide d’utilisation".)
- Avant de redémarrer votre ordinateur, supprimez les dossiers suivants :
IMPORTANT
Soyez extrêmement vigilant lors de la suppression des dossiers. Attention à ne pas vous tromper. Toute
erreur pourrait grandement nuire à votre ordinateur.
Si vous exploitez Windows 2000/Windows XP
Supprimez le dossier ScanSnap contenu dans :
c:/Documents and Settings/<User name>/Application Data/PFU/
Supprimez le dossier Pilote (Driver) contenu dans :
c:Program Files/PFU/ScanSnap/
Si vous exploitez Windows 98/ME
Supprimez le dossier Pilote (Driver) contenu dans :
c:Program Files/PFU/ScanSnap/
Après la suppression de ces dossiers, veuillez également confirmer la suppression des fichiers contenus dans le dossier
C:/Windows/Inf
- fi5110e.INT
- fi5110e.PNF
Si ces fichiers sont toujours disponibles, veuillez les supprimer.
ScanSnap fi-5110EOX2 – Instructions Préliminaires 17
Page 46

CONSEIL
p
Le dossier C:/Windows/Inf peut être cache. Pour pouvoir accéder à ces deux fichiers, ouvrez le menu
[Explorateur]puis pointez sur [Outils], [Options Dossiers...] puis sur l’onglet [Affichage]. Vérifiez si la case
d’option [Afficher les fichiers et dossiers cachés] en-dessous de [Fichiers et dossiers cachés] est bien cochée.
Le dossier C:/Windows/Inf ainsi visible, il vous sera possible de confirmer la présence ou non des fichiers
fi5110e.INT et fi5110e.PNF.
Après avoir supprimé les dossiers et fichiers indiqués, débranchez le ScanSnap puis redémarrez votre ordinateur.
Ensuite, réinstallez ScanSnap Manager.
*3) Pour vérifier si le scanneur est connecté avec une interface USB1.1 ou USB2.0, à l’aide d’un clic-droit de la souris sur l’icône de ScanSnap,
pointez sur [Aide] dans le menu qui s’affiche puis sur [À propos de ScanSnap Manager] puis sur [Détails] de la boîte de dialogue [Informations
sur la Version]. Dans [Informations sur le scanneur], le [type d’USB] vous sera indiqué.
*4) Le "chargement multiple" signifie que plusieurs documents ont simultanément été chargés dans le scanneur.
* Si vous souhaitez en savoir plus, n’hésitez pas à visiter notre site Web. De plus amples informations seront postées dans la
FAQ dans le site suivant :
http://scansnap.fujitsu.com
4.2 Dégagement des bourrages papier
1. Ouvrez l'AAD en levant le levier d'ouverture du capot.
2. Retirez le document resté coincé dans l’AAD.
3. Rabaissez le capot de l’AAD.
Ca
ot de l’AAD
Levier d’ouverture du capot
ÖVous devez entendre un déclic lorsque l'AAD retrouve sa position initiale.
Clic !
18 |
Page 47

5. Entretien
j
Ce chapitre explique comment nettoyer le scanneur.
AVERTISSEMENT
Risque d'incendie ou d'électrocution
Avant de nettoyer le scanneur, débranchez d'abord
l’adaptateur c.a. puis éteignez-le.
5.1 Produits de nettoyage
Produit de
Nettoyant F1
*1)Pour acheter le produit de nettoyage, contactez votre
distributeur FUJITSU.
5.2 Nettoyage des éléments
Numéro de
nettoyage
l’élément
CA99501-0013
1 flacon (100ml)
Imbibez un chiffon de
ce liquide et essuyez le
scanneur.
externes du scanneur
Remarques
(*1)
numérisations. Notez que cette valeur varie selon le type de
documents numérisés. Par exemple, l'AAD devra être
fréquemment nettoyé si la fréquence de numérisation de
documents photocopiés est importante (au cas où l'encre
des documents n'aurait pas été suffisamment fixée).
Nettoyez l'AAD en vous reportant aux illustrations
indiquées ci-dessous.
ATTENTION
La surface vitrée se trouvant à l'intérieur de l'AAD se
réchauffe pendant le fonctionnement du scanneur.
Avant de commencer à nettoyer l'intérieur du scanneur,
débranchez l’adaptateur c.a. de la prise de courant et
attendez au moins 15 minutes, le temps que le scanneur
refroidisse.
IMPORTANT
● N’utilisez jamais d’eau ou de produit
détergent neutre pour le nettoyage des
éléments internes du scanneur.
● N'utilisez pas de bombe aérosol pour nettoyer
le scanneur. Les bombes aérosol peuvent
faire entrer de la poussière et des saletés
dans le scanneur, entraînant une panne ou un
mauvais fonctionnement de celui-ci.
Nettoyez l'extérieur du scanneur et le plateau d'alimentation
de l'AAD avec un chiffon doux imbibé d'une petite quantité
de détergent neutre ou de nettoyant F1.
IMPORTANT
● N'utilisez jamais de diluant à peinture ou autre
solvant organique.
● Lors du nettoyage, veillez à ne laisser pénétrer
aucun liquide dans.
● N'utilisez pas de bombe aérosol pour nettoyer le
scanneur. Les bombes aérosol peuvent faire
entrer de la poussière et des saletés dans le
scanneur, entraînant une panne ou un mauvais
fonctionnement de celui-ci ou encore une
numérisation de mauvaise qualité de l’image.
Chiffon
Détergent neutre
ou nettoyant F1
diluant à peinture
5.3 Nettoyage des éléments internes
du scanneur
Nettoyez les éléments internes avec un chiffon imbibé du
nettoyant F1.
L’accumulation de poussière de papier due au chargement
continu des documents peut être à l’origine de problèmes
de numérisation.
À titre indicatif, nettoyez l'AAD toutes les 1 000
1. Ouvrez l'AAD en levant le levier d'ouverture du
capot.
Capot de
l’AAD
Levier d’ouverture
du capot
2. Nettoyez les endroits suivants avec un chiffon sec
imbibé du nettoyant F1
Rouleaux en plastique (x4)
Séparateur
Rouleaux
ection (x2)
d’é
Rouleaux
d’alimentation
Rouleau de
sélection (x2)
Parties vitrées (x2)
(parties supérieure et
inférieure de l’AAD)
ScanSnap fi-5110EOX2 – Instructions Préliminaires 19
Page 48

Séparateur (x 1)
[
Nettoyez le séparateur du haut vers le bas. Lors du
nettoyage du séparateur, veillez à ce que le chiffon ne
s’accroche pas aux parties du séparateur.
Parties vitrées (x 2)
Situées dans les parties supérieure et inférieure de
l’AAD.
Nettoyez sans forcer.
Rouleau de prise (x 1)
Nettoyez délicatement, en veillant à ne pas
endommager sa surface. Faites particulièrement
attention au nettoyage du rouleau de sélection car des
débris noirs déposés sur le rouleau peuvent
grandement affecter les performances du chargement
des documents.
Rouleaux en plastique (x 4)
Situées dans la partie supérieure de l’AAD. Nettoyez
délicatement tout en les faisant tourner entre vos
doigts et en veillant à ne pas rayer leur surface. Faites
particulièrement attention au nettoyage des rouleaux
en plastique car des débris noirs déposés sur les
rouleaux peuvent grandement affecter les
performances du chargement de documents.
Allumez le scanneur pour nettoyer les parties
suivantes. Nettoyant les rouleaux suivants en
les faisant tourner.
SCA
POWE
N
DUPLEX
IMPORTANT
Branchez l’adaptateur c.a. et le câble c.a.
uniquement lors du nettoyage des rouleaux
d’alimentation et d'éjection.
3. Rabaissez le capot de l’AAD.
Capot AAD
IMPORTANT
Assurez-vous que l'AAD est revenu à sa position
initiale et qu’il est correctement fermé. Si vous ne
le faîtes pas, des bourrages papier ou autres
problèmes d’alimentation seraient à prévoir.
cTout en gardant le
doigt pressé sur le
SCAN]…
bouton
d…appuyez sur le
bouton [POWER].
Rouleaux de chargement (x 2)
Nettoyez délicatement, en veillant à ne pas rayer leur
surface. Faites particulièrement attention au nettoyage
des rouleaux de chargement car des débris noirs
déposés sur les rouleaux peuvent grandement affecter
les performances du chargement de documents.
Rouleaux d’éjection (x2)
Nettoyez délicatement, en veillant à ne pas rayer leur
surface. Faites particulièrement attention au nettoyage
des rouleaux d'éjection car des substances noires
déposées sur les rouleaux peuvent grandement affecter
les performances du chargement de documents.
Pour faire tourner les rouleaux d’alimentation et
d’éjection, appuyez d’abord sur le bouton [SCAN]puis
tout en y gardant le doigt pressé, appuyez sur le bouton
[POWER]. Sachez que si vous appuyez six fois sur
[POWER], les rouleaux effectueront un tour complet.
5.4. Nettoyage du Transparent
Si le transparent est sale ou en mauvais état, des erreurs de
numérisation peuvent survenir.
N’oubliez pas de nettoyer régulièrement le transparent A3.
< Méthode de nettoyage>
Imbibez un chiffon sec et doux de quelques gouttes du
produit F1 (vendu séparément) ou d’un solvant doux puis
nettoyez délicatement la surface ou l’intérieur du
transparent.
● N’utilisez pas de diluant peinture ou autres
solvants organiques.
● Ne frottez pas excessivement le transparent,
vous risqueriez de le rayer ou de le déformer.
● Après avoir nettoyé l’intérieur du transparent à
l’aide du produit F1 ou d’un solvant doux, laissez
sécher avant de le replier.
● À titre indicatif, veuillez remplacer le transparent
après avoir effectué une moyenne de 500
numérisations.
Pour savoir où vous procurer un transparent, veuillez
consulter la section "6.4 Pour se procurer des
transparents"
20 |
Page 49

6. Remplacement des consommables/du transparent
Ce chapitre explique comment obtenir et remplacer les
pièces de rechange.
AVERTISSEMENT
Risque d'incendie ou d'électrocution
Avant de remplacer les consommables du scanneur,
débranchez d'abord l’adaptateur c.a. pour éteindre le
scanneur.
6.1 Numéro des éléments et
fréquence de remplacement
Le tableau suivant donne la liste des numéros des pièce de
rechange et une indication approximative du cycle de
remplacement de ces pièces.
N°
Description N° de la pièce
fi-5110EOX2
1
2
Séparateur
fi-5110EOX2
Rouleau de sélection
PA03360-0002
PA03360-0001
Ces cycles de remplacement sont donnés à titre indicatif dans le
cas d'une utilisation de papier sans bois A4/Lettre à 64 g/m2 (17
lb). Le cycle de remplacement varie selon le papier utilisé.
Utilisez uniquement les consommables spécifiés par PFU
LIMITED.
Cycle de
remplacement
50 000 feuilles ou
une fois par an
100 000 feuilles ou
une fois par an
6.2 Remplacement du séparateur
Remplacez le séparateur comme indiqué ci-dessous.
1. Enlevez les documents se trouvant dans le plateau
d’alimentation.
2. Ouvrez l'AAD en levant le levier d'ouverture du capot.
Couvercle du
plateau
d’alimentation
Capot de
l’AAD
Levier d'ouverture du
capot
3. Retirez le séparateur.
Tirez le séparateur dans le sens de la flèche tout en le
tenant par ses extrémités.
Séparateur
Capot de
l’AAD
CONSEIL
Afin d’avoir une estimation sur le remplacement des
consommables mais aussi, sur le nombre de pages
numérisées, procédez de la manière suivante :
1. Dans la barre des tâhces, effectuez un clic droit
sur l’icône "ScanSnap Manager"
d’état système.
2. Cliquez sur [Vérification des fournitures de
consommables...] dans le menu qui s'affiche.
Ö La boîte de dialogue "Vérification de l’état des
consommables" indiquant le nombre de pages
numérisées sera alors affichée.
Remplacez les consommables en utilisant "Valeur
cible pour le changement de fournitures" comme
indication approximative.
Pour en savoir plus sur les pièces de rechange et
savoir où se les procurer, contactez votre
distributeur ou visitez le site web suivant :
[Website]
: http://scansnap.fujitsu.com
de la barre
4. Fixez le nouveau séparateur.
Séparateur
IMPORTANT
Vérifiez que le séparateur est correctement
installé. Si vous ne le faîtes pas, des
bourrages papier ou autres problèmes
d’alimentation seraient à prévoir.
Capot de l’AAD
ScanSnap fi-5110EOX2 – Instructions Préliminaires 21
Page 50

5. Rabaissez le capot de l’AAD
3. Ôtez les guides latéraux. Pour cela, veuillez les pincer
pour libérer leur prise.
Guides
latéraux
Pince
Capot de l’AAD
ÖVous devez entendre un déclic lorsque l'AAD retrouve sa
position initiale.
6. Allumez le scanneur.
Ö L’icône de ScanSnap Manager passe de à .
7. Effectuez un clic droit sur l’icône "ScanSnap
Manager"
dans la barre des tâches puis
sélectionnez [Vérification des consommables] dans le
menu.
8. Dans la boîte de dialogue “Vérifier l’état des
consommables”, cliquez sur le bouton [Réinitialiser]
du séparateur que vous venez de remplacer.
Ö Vous venez de réinitialiser le compteur.
6.3 Remplacement du rouleau de
sélection/prise
Bouton
4. Faîtes tourner le coussinet du rouleau de sélection
(gauche) dans le sens de la flèche.
Coussinet du
Rouleau de
sélection
rouleau de sélection
Axe du rouleau
de sélection
5. Retirez le rouleau de sélection avec son axe.
Retirez le rouleau tout en effectuant le mouvement
indiqué par la flèche.
Remplacez le rouleau de sélection comme indiqué
ci-dessous.
1. Enlevez les documents se trouvant dans le plateau
d’alimentation.
2. Soulevez le capot de l'AAD en levant le levier
d'ouverture.
Couvercle du
plateau
d’alimentation
Capot de l’AAD
Levier d’ouverture du
capot
22 |
Axe du rouleau
IMPORTANT
Rouleau de
sélection
Si de la poussière de papier se trouve dans la
loge du rouleau de sélection, des problèmes
de numérisation peuvent se produire.
Veuillez donc épousseter à l’aide d’un chiffon
imbibé de quelques gouttes de produit F1.
* N’utilisez pas d’eau, de détergent neutre ou
de bombe aérosol.
Page 51

6. Retirez le rouleau de son axe.
Retirez l’axe du rouleau tout en soulevant l’onglet.
Onglet
Axe
Rouleau de sélection
IMPORTANT
Plutôt que d’utiliser votre ongle pour pouvoir
manipuler l’onglet (vous pourriez vous faire
mal ou vous casser un ongle), n’hésitez pas
à utiliser un trombone.
1
.
2
7. Insérez le nouveau rouleau de sélection dans l’axe.
Insérez le nouveau rouleau de sélection dans l’axe en
prenant garde à la saillie.
9. Fixez le coussinet du rouleau de sélection (gauche) en
le faisant tourner dans le sens de la flèche comme
indiqué dans le shéma ci-dessous.
Rouleau de sélection
Rouleau de sélection
IMPORTANT
Vérifiez que le rouleau de sélection est
installé correctement. Si vous ne le faîtes
pas, des bourrages papier ou autres
problèmes d’alimentation seraient à prévoir.
Axe
10. Réinstallez les guides latéraux du scanneur.
Tout en maintenant le chemin du document, refixez les
guides latéraux dans le scanneur.
Chemin papier
Bouton
Rouleau de
prise
Cavité
Axe
Saillie
8. Installez le rouleau de sélection dans son axe puis dans
son emplacement d’origine
Axe
.
Coussinet
Rouleau de
sélection
Pince
ÖVous devez entendre un déclic lorsque le chemin
papier retrouve sa position initiale.
11. Nettoyer l'AAD
Capot AAD
ÖVous devez entendre un déclic lorsque l'AAD retrouve
sa position initiale.
12. Allumez le scanneur.
Ö L’icône ScanSnap Manager passe de à .
ScanSnap fi-5110EOX2 – Instructions Préliminaires 23
Page 52

13. Faîtes un clic-droit sur l’icône "ScanSnap Manager"
dans la barre des tâches puis pointez sur [Vérifier
les consommables] dans le menu.
14. Dans la boîte de dialogue “Vérifier l’état des
consommables”, cliquez sur le bouton [Réinitialiser]
du consommable que vous venez de remplacer.
6.4 Pour vous procurer un
Transparent
Cet accessoire peut être obtenu séparément.
À titre indicatif, nous vous conseillons de remplacer le
transparent au bout de 500 utilisations.
Cependant, selon l’usage que vous pourrez en faire,
n’hésitez pas à le remplacer dès que vous constatez une
dégradation de ce matériel.
Veuillez trouver ci-dessous la description et la référence du
Transparent (vendu séparément) :
Description Qté Réf.
Transparent
5 FI-511ES-WW
24 |
Page 53

P3PC-1142-02DE
Farbbild-Scanner
TM
fi-5110EOX2
LLooss GGeehhtt’’ss
Bitte lesen Sie dieses Handbuch vor dem Anschluss des Scanners an Ihren PC.
Page 54

Inhalt
Einführung............................................................................................................................................................. 1
1. Vorbereitungen.................................................................................................................................................. 6
1.1. Kontrolle des Lieferumfangs................................................................................................................................................................6
1.2. Bezeichnung und Funktionen der Teile
2. ScanSnap anschließen..................................................................................................................................... 7
2.1. Installation der mitgelieferten Software ..............................................................................................................................................7
2.1.1. Installation von Adobe Acrobat 7.0 ...................................................................................................................................................7
2.1.2. Installation von ScanSnap Manager, ScanSnap Organizer, CardMinder und PDF Thumbnail View ...............................................8
2.2. Anschluss des Scanners ......................................................................................................................................................................9
2.2.1. Anschluss des Netzkabels ................................................................................................................................................................9
2.2.2. Anschluss des USB-Kabels ..............................................................................................................................................................9
3. Grundlegende Bedienverfahren von ScanSnap ...........................................................................................11
3.1. Dokumente scannen ...........................................................................................................................................................................11
3.2. Die Scaneinstellungen ........................................................................................................................................................................11
3.3. Dokumente scannen ...........................................................................................................................................................................11
3.4. Mit dem Trägerblatt scannen..............................................................................................................................................................12
3.5. Visitenkarten scannen ........................................................................................................................................................................12
3.6. Über PDF Thumbnail View..................................................................................................................................................................13
3.7. ScanSnap Organizer ...........................................................................................................................................................................13
4. Problembehebungen ...................................................................................................................................... 14
4.1. Liste der möglichen Probleme...........................................................................................................................................................14
4.2. Beheben eines Papierstaus................................................................................................................................................................18
5. Tägliche Pflege................................................................................................................................................ 19
5.1. Reinigungsmaterialen .........................................................................................................................................................................19
5.2. Reingen des Scanneräußeren............................................................................................................................................................19
5.3. Reinigen des Scannerinneren............................................................................................................................................................19
5.4. Reinigen des Trägerblattes ................................................................................................................................................................20
6. Verbrauchsmaterialien/Trägerblatt................................................................................................................ 21
6.1. Teile-Nr und Ersetzungs-Zyklen der Verbrauchsmaterialien..........................................................................................................21
6.2. Austausch der Papierseparations-Einheit ........................................................................................................................................21
6.3. Austausch der Einzugsrolle ...............................................................................................................................................................22
6.4. Erwerben des Trägerblattes ...............................................................................................................................................................24
Alle Rechte Vorbehalten, Copyright© PFU LIMITED 2005.
Der Inhalt dieses Handbuchs kann ohne vorherige Ankündigung geändert werden.
Kein Teil dieses Handbuchs darf ohne Genehmigung in irgendeiner Form reproduziert werden.
LESEN SIE DIESES HANDBUCH SORGFÄLTIG UND VOLLSTÄNDIG DURCH, BEVOR SIE DIESES PRODUKT VERWENDEN. BEI
UNSACHGEMÄßER VERWENDUNG KÖNNEN DER BENUTZER ODER ANWESENDE ZU SCHADEN KOMMEN.
Bei derZusammenstellung des Handbuchs wurden alle Anstrengungen unternommen, um für die Richtigkeit und Vollständigkeit der darin
enthaltenen Informationen zu sorgen. PFU LIMITED übernimmt jedoch keine Haftung für Schäden, die einer Partei aufgrund etwaiger Fehler
und Auslassungen oder aufgrund von Anweisungen beliebiger Art in diesem Handbuch, dessen Aktualisierungen oder Ergänzungen
entstehen, unabhängig davon, ob diese Fehler, Auslassungen oder Anweisungen auf Fahrlässigkeit, Zufall oder andere Ursachen
zurückzuführen sind.
PFU LIMITED übernimmt ferner keine Haftung für Schäden, die aus der Anwendung oder dem Gebrauch eines hier beschriebenen Produktes
oder Systems entstehen; sowie keine Haftung für zufällige Schäden oder Folgeschäden, die aus der Verwendung dieses Handbuchs
entstehen.
PFU LIMITED schließt für die hier enthaltenen Informationen alle ausdrücklichen, konkludenten und gesetzlichen Gewährleistungen aus.
PFU LIMITED übernimmt keine Haftung für Ansprüche gegenüber dritten Parteien für zufällige Schäden oder Folgeschäden, die aus der
Verwendung dieses Produktes entstehen.
......................................................................................................................................................6
Page 55

Einführung
Vielen Dank, dass Sie sich für den ScanSnap fi-5110EOX2
Duplex-Farbscanner entschieden haben.
Der ScanSnap fi-5110EOX2 Farbbild-Scanner beinhaltet
außerdem noch nützliche Büroanwendungen. Es ist als
komplettes Bürosystem konzipiert und hilft Ihnen, Ihre
Produktivität zu verbessern und Scannprobleme im Büro zu
lösen. ScanSnap bietet folgende Leistungsmerkmale.
● Per Knopfdruck am Scanner können Bilder auf
Papier in PDF-Dateien verwandelt werden!
Sie können den Dokumentenberg auf Ihrem
Schreibtisch in PDFs verwandeln, und diese Dateien
im Computer speichern und verwalten. Die
beigefügte Adobe® Acrobat® Software hilft Ihnen,
die PDF-Dokumente anzuzeigen.
ScanSnap erkennt automatisch den Dokumententyp,
Farbe oder schwarzweiß, und ist somit in der Lage,
die Größe der gescannten Bilddateien mit einer
Mischung aus Farb & Schwarzweißseiten zu
verkleinern. Der Scanner entfernt automatisch leere
Seiten und hilft so die Größe der Dateien noch
weiter zu reduzieren.
● Müheloses Scannen!
Doppelseitige A4 Farbdokumente oder Briefgrößen
(Letter) werden mit einer Geschwindigkeit von bis
zu 15 Blatt/Minute gescannt
(Systemvoraussetzungen: Intel® Pentium® 4
1.8GHz oder schneller, mit Windows® 98,
Windows® Me, Windows® 2000 oder Windows®
XP. Scanmodus: Normal, Farbmodus: Auto und
Kompressionsrate: 3).
● Kleines, praktisches Grundmaß!
Mit einer Stellfläche etwa in der Größe von einem
DIN A4 Blatt, ist ScanSnap ideal für Ihren
Schreibtisch.
Vereinigten Staaten und/oder anderen Ländern.
Adobe, das Adobe Logo, und Acrobat sind
eingetragene Warenzeichen der Adobe Systems
Incorporated in den Vereinigten Staaten und/oder
anderen Ländern.
ScanSnap, das ScanSnap Logo und CardMinder sind
Warenzeichen von PFU LIMITED.
Andere Firmennamen und Produktnamen sind
Herstellerzeichen und eingetragene Warenzeichen
der jeweiligen Firmen.
Warenzeichen und Produktbezeichnungen in diesem Handbuch
ScanSnap: ScanSnap fi-5110EOX2
CardMinder: CardMinderTM 2.0
Betriebssysteme (BS) werden wie folgt bezeichnet:
Windows 98: Microsoft® Windows® 98
Betriebssystem.
Windows Me: Microsoft® Windows® Millennium
Edition Betriebssystem.
Windows 2000: Microsoft® Windows® 2000
Professional Betriebssystem.
Windows XP: Microsoft
Professional Betriebssysstem,
Microsoft® Windows® XP
Heimausgabe Betriebssystem.
Wenn es zwischen den verschiedenen oben aufgelisteten
Versionen keinen Unterschied gibt, wird der allgemeine
Begriff „Windows“ verwendet.
Adobe Acrobat 7.0: Adobe® Acrobat® 7.0 Standard
Wenn es zwischen den verschiedenen Versionen
keinen Unterschied gibt, wird der allgemeine
Begriff „Acrobat“ verwendet.
®
Windows® XP
● Visitenkarten einfach archiviert!
Die beigefügte OCR-Funktion, Teil der
“CardMinderTM für ScanSnap” Software, hilft
Visitenkarten einfach digital zu verwalten und zu
bearbeiten.
(*Der ScanSnap fi-5110EOX2 Scanner entspricht
nicht dem TWAIN- oder ISIS-Standard.)
Hersteller
PFU LIMITED
International Sales Dept., Imaging Business
Division, Products Group
Solid Square East Tower, 580 Horikawa-cho,
Saiwai-ku, Kawasaki-shi Kanagawa 212-8563,
Japan
Tel.: +81 (44) 540-4538
Warenzeichen
Microsoft und Windows sind eingetragene
Warenzeichen der Microsoft Corporation in den
ScanSnap und die Handbücher
ScanSnap fi-5110EOX2 besteht aus:
1) fi-5110EOX2: Farbbild-Scanner
2) Trägerblatt: DIN A3 Dokumente können für das
Scannen in das Trägerblatt eingelegt werden. Sie
können das Trägerblatt ebenso für B4 Dokumente mit
Überlänge, oder für Dokumente mit einer
unregelmäßigen Form verwenden. Auch geheftete
Dokumente können so problemlos gescannt werden.
3) ScanSnap Manager (auch ScanSnap Treiber):
Bilderfassungs-Software für den ScanSnap zum
Scannen von Dokumenten und Erstellen von PDFDateien.
4) CardMinder: Software mit OCR-Funktion zur
Erfassung und Verarbeitung von Visitenkartendaten
für eine „Personal Information Manager
Software“ wie z.B. Microsoft® Outlook®.
5) Adobe® Acrobat®: De Facto Standardsoftware zur
Erstellung und Bearbeitung von PDF-Dokumenten.
ScanSnap fi-5110EOX2 Los Geht’s 1
Page 56

Folgende Handbücher stehen Ihnen zu Verfügung:
ScanSnap fi-5110EOX2 Los Geht’s
(Dieses Handbuch):
Enthält Informationen zur Installation und zum
grundlegenden Betrieb von ScanSnap.
ScanSnap fi-5110EOX2 Bedienungshandbuch
(Das Bedienungshandbuch befindet sich im PDF-Format
auf der ScanSnap Setup CD-ROM):
Das Bedienungshandbuch informiert detailliert über die
Installation der ScanSnap Software und Hardware, den
Betrieb der Scanner-Hardware und Operationen des
ScanSnap Managers.
CardMinder Benutzerhandbuch
(Das Benutzerhandbuch befindet sich im PDF-Format
auf der ScanSnap Setup CD-ROM):
Informiert detailliert über die Benutzung von
CardMinder.
ScanSnap Organizer Benutzerhandbuch
(Im PDF-Format auf der ScanSnap Setup CD-ROM):
Dieses Handbuch beschreibt die Handhabung von
ScanSnap Organizer.
Informationen über die Benutzung von Adobe Acrobat
finden Sie unter “Adobe Acrobat Hilfe”.
Behördliche Bestimmungen
Änderungen oder Modifikationen am Gerät,
welche nicht ausdrücklich von der für die
Vertragserfüllung verantwortlichen Partei
erprobt und bestätigt worden sind, führen zum
Erlöschen der Betriebsberechtigung.
ACHTUNG
Benutzen Sie ausschließlich die dem Scanner
beigefügten USB- und Netzkabel, um so die
Beachtung der Klasse B Beschränkungen
gemäß Teil 15 der FCC-Richtlinien
sicherzustellen.
Kanadische DOC Regulierungen
Dieser digitale Apparat überschreitet nicht die Klasse
B Radioemissions-Beschränkungen, wie in den
„Radio-Störungs-Regulierungen“ des Canadian
Department of Communications festgelegt wurden.
Dieser digitale Klasse B Apparat entspricht den
Kanadischen ICES-003 Normen.
Le pésent appareil numérique n’ément pas de bruits
radioélectriques dépassant les limites applicables aux
appareils numériques de la classe B prescridtes dans
le Réglesment sur le brouillage radioélectrique dicté
par le ministere des Communications du Canada.
Cet appareil numérique de la classe B est conformme
à la norme NMB-003 du Canada.
FCC Erklärung
Dieses Gerät wurde getestet und gemäß den Kriterien
eines digitalen Klasse B Gerätes (laut Abschnitt 15
der FCC Regeln) für konform befunden. Diese
Bestimmungen wurden erlassen, um einen
wirksamen Schutz gegen schädliche Einflüsse in
bewohnter Umgebung zu gewährleisten. Dieses Gerät
generiert, gebraucht und kann Hochfrequenzenergie
ausstrahlen, und wenn es nicht gemäß den
Anweisungen des Bedienungshandbuches installiert
und betrieben wird, eventuell einen schädlichen
Einfluss auf Radiokommunikation ausüben. Es kann
jedoch keine Garantie übernommen werden, dass
keine Interferenzen auf den Radio- oder TV-Empfang
in einer bestimmten Installation auftreten können.
Wenn dieses Gerät einen schädlichen Einfluss auf den
Radio- oder TV-Empfang ausüben sollte (was durch
das Aus- und wieder Einschalten des Scanners
festgestellt werden kann), wird der Benutzer
angehalten diese Interferenzen durch eine oder
mehrere der folgenden Maßnahmen zu beseitigen:
- Richten Sie die Empfangsantenne neu aus oder
platzieren Sie diese neu.
- Vergrößern Sie den Abstand zwischen Gerät
und Empfänger.
- Schließen Sie das Gerät an einen anderen
Stromkreis als den des Empfängers an.
- Kontaktieren Sie Ihren Fachhändler oder einen
ausgebildeten Radio/TV-Techniker.
Bescheinigung des Herstellers /
Importeurs
Hiermit wird für den fi-5110EOX2 folgendes
bescheinigt:
• In Übereinsstimmung mit den Bestimmungen der
EN45014(CE) funkentstört
•
Laut MaschinenlärminformationsVerordnung 3. GPSGV; 06.01.2004 beträgt
der höchste Schalldruckpegel 70 dB (A) oder
weniger (gemäß EN ISO 7779).
Internationales ENERGY STAR®
Programm
Als ENERGY STAR® Partner
hat PFU LIMITED bestimmt,
dass dieses Produkt die ENERGY
STAR® Richtlinien für einen
effizienten Umgang mit Energie erfüllt.
Das Internationale ENERGY STAR®
Büroausstattungsprogramm ist ein internationales
Programm, welches einen sparsamen Umgang mit
Energie durch den Vertrieb von energiesparenden
Computern und anderen Büroausstattungen,
2 |
Page 57

gewährleistet. Dieses Programm unterstützt die
Entwicklung und Verbreitung von Produkten mit
Funktionen, die den Energieverbrauch sichtlich
reduzieren. Es ist ein offenes System, in welchem
Unternehmer freiwillig teilnehmen können. Die
Zielgruppenprodukte sind Büroausstattungen wie
Computer, Bildschirme, Drucker, Bildfunkgeräte
(Fax), Kopierer, Scanner und Multifunktions-Geräte.
Diese Normen und Logos (
) sind für die
entspechende Produktgruppe, vereinheitlicht unter
den teilnehmenden Nationen.
Nutzung in Hochsicherheits-Anwendungen
Dieses Produkt wurde zur allgemeinen Verwendung
entworfen, entwickelt und hergestellt, insbesondere für
folgende Bereiche: in allgemeinen Büroeinrichtungen,
zum persönlichen Gebrauch und im Haushalt.
Das Produkt wurde NICHT für den Einsatz in
Umgebungen entworfen, entwickelt und hergestellt, in
denen besonders hohe Sicherheitsrisiken bestehen, wie
Gefahr für Leib und Leben oder andere Gefahren, für
die extrem hohe Sicherheitsvorkehrungen erforderlich
sind und die andernfalls zu Todesfolge,
Personenschäden, schwerwiegenden Sachschäden
oder sonstigen Verlusten führen könnten (im
Folgenden „Verwendung in
Hochsicherheitsbereichen“ genannt). Zu diesen
Umgebungen gehören u. a. (aber nicht darauf
beschränkt):Kontrollsysteme für Kernreaktoren,
Flugzeugsteuerungen, Steuerungen für den Betrieb
von öffentlichen Verkehrsmitteln, Lebenserhaltende
Systeme, Waffensteuerungssysteme.
Verwenden Sie dieses Produkt NIEMALS, ohne
sichergestellt zu haben, dass alle
Sicherheitsvorkehrungen in ausreichendem Maße
getroffen wurden, so dass sie den Anforderungen für
die Verwendung in Hochsicherheitsbereichen
entsprechen. Sollten Sie dieses Produkt in
Hochsicherheitsbereichen verwenden wollen, setzen
Sie sich bitte vor dem Gebrauch mit unserem
zuständigen Vertriebsmitarbeiter in Verbindung. PFU
LIMITED übernimmt keine Haftung für Verluste oder
Ansprüche von Kunden oder dritten Parteien, die aus
der Benutzung des Produktes oder in Zusammenhang
mit der Benutzung in einem Umfeld mit erhöhten
Sicherheitsanforderungen resultieren.
Über den Umgang mit Quecksilber
Die Lampen des Scanners enthält Quecksilber und
müssen gemäß den örtlich geltenden gesetzlichen
g
H
Um unerwartete Verletzungen zu vermeiden, lesen Sie
das Folgende gründlich durch.
Folgende Handlungen können zu ernsthaften
Verletzungen führen:
• Nehmen Sie die Substanz der Lampen nicht in den
Vorschriften entsorgt oder recycelt werden.
Mund, da diese Quecksilber enthalten.
• Verbrennen, zerstoßen oder zerlegen Sie weder den
Scanner, noch dessen Lampen.
• Atmen Sie die chemische Flüssigkeit der Lampen
nicht ein.
Konventionen
Warnhinweise in diesem Handbuch
WARNUNG weist darauf hin, dass eine
WARNUNG
Verletzungsgefahr gegeben ist (z. B.
Einklemmen der Finger oder Hände), wenn
eine Prozedur nicht richtig ausgeführt wird
ACHTUNG weist darauf hin, dass der Scanner
ACHTUNG
beschädigt werden kann, wenn eine Prozedur
nicht richtig ausgeführt wird.
Symbole, die in diesem Handbuch
benutzt werden.
Dieses Handbuch enthält folgende Symbole
zusätzlich zu den „WARNUNG“ Symbolen.
ACHTUNG
Dieses Symbol ist ein Hinweis auf besonders
wichtige Informationen. Lesen Sie diese
unbedingt.
TIP
Dieses Symbol kennzeichnet Vorschläge, die
Ihnen bei der richtigen Ausführung einer Prozedur
helfen.
Das mit einem DREIECK gekennzeichnete Symbol
steht für eine Warnung oder einen
Vorsichtshinweis.
Die konkrete Bedeutung wird durch ein
zusätzliches Symbol angezeigt.
Ein KREIS mit diagonaler Linie steht für Dinge, die
Sie nicht tun dürfen (verbotene Aktion).
Die konkrete Bedeutung wird durch ein
zusätzliches Symbol angezeigt.
Zeichen auf bunten Hintergrund zeigen zu
R
befolgende Hinweise an.
Die konkrete Bedeutung wird durch ein
zusätzliches Symbol angezeigt.
Über Warnungsetiketten
Dieses Produkt ist mit den folgenden
Warnungsetiketten versehen.
Der Bereich um dieses Etikett wird sehr heiß. Geben
Sie Acht diese nicht zu berühren, da dies sonst
ACHTUNG
ernste Verbrennungen zur Folge haben kann.
Machen Sie die Etiketten weder unkenntlich, noch
entfernen Sie sie vom Scanner.
ScanSnap fi-5110EOX2 Los Geht’s 3
Page 58

Beispiele für Bildschirmbilder in diesem
Handbuch
Die Bildschirmbeispiele in diesem Handbuch
können im Sinne der Produktverbesserung ohne
vorherige Ankündigung überarbeitet werden.
Wenn die eigentlichen Bildschirmbilder von denen
in diesem Handbuch abweichen, nehmen Sie Bezug
auf auf das Handbuch für die Scanner-Anwendung,
die Sie benutzen und verfahren Sie, wie dort
beschrieben.
Screenshots in diesem Handbuch stammen von
ScanSnap Manager, CardMinder (Anwendung),
PDF Thumbnail View, ScanSnap Organizer und
Adobe Acrobat.
Über Wartung und Reparaturen
Reparaturen sind nicht von Benutzer durchzuführen.
Kontaktieren Sie bitte Ihren Fachhändler, bei dem
Sie den Scanner erworben haben oder einen
autorisierten FUJITSU Scanner Servicepartner.
4 |
Page 59

Sicherheitsvorkehrungen
BEACHTEN SIE DIESE HINWEISEN, WARNUNGEN
UND SICHERHEITSVORKEHRUNGEN.
WARNUNG
Berühren Sie das Netzkabel nicht mit nassen Händen.
Dies kann einen elektrischen Schlag verursachen.
Wenn Metallobjekte, Flüssigkeit, etc. in den Scanner
gelangt sein sollten, schalten Sie diesen bitte sofort aus,
ziehen Sie den Netzstecker aus der Steckdose und
kontaktieren dann Ihren Händler oder einen autorisierten
Serviceanbieter.
Achten Sie auf die Sicherheit kleiner Kinder.
Öffnen oder verändern Sie den Scanner nicht. Das Innere
des Scanners enthält Starkstromkomponenten. Ein
Berühren der Hochspannungskomponenten im Innern kann
einen Brand oder elektrischen Schlag verursachen.
Ein beschädigtes Netzkabel kann einen Brand oder
elektrischen Schlag verursachen.
Stellen Sie keine schweren Gegenstände auf das
Netzkabel, ziehen Sie nicht daran und biegen Sie es nicht
gewaltsam.
Verwenden Sie das Netzkabel bzw den Netzstecker nicht,
wenn dieser beschädigt ist oder zu locker in der Steckdose
sitzt.
Verwenden Sie ausschließlich das mit dem Scanner
gelieferte Netzkabel (Netzteil). Benutzen Sie nur die
spezifizierten Netzkabel und Anschlüsse.
Andere Netzkabel können zu einer übermäßige
Wärmeentwicklung führen und so einen Brand oder
elektrischen Schlag verursachen.
Benutzen Sie das Netzkabel und Netzteil nicht für andere
Geräte, da dies zu Fehlfunktionen, Schäden und
elektrischen Schlägen führen kann.
Achten Sie auf korrekte Netzspannung und
Stromversorgung. Stecken Sie den Netzstecker nur in eine
Steckdose, die 16 A bei 230 V Wechselspannung liefert.
Ansonsten könnte dies einen Brand oder elektrischen
Schlag verursachen.
Verwenden Sie keine Verlängerungskabel oder
Mehrfachsteckleisten.
Wenn sich auf dem Netzstecker oder Steckdose Staub
befindet, entfernen Sie diesen mit einem trockenen Tuch.
Schalten Sie vor der Reinigung die Sicherung aus und
vergewissern Sie, dass die Steckdose nicht mehr unter
Strom steht!
Abgelagerter Staub kann einen Brad oder elektrischen
Schlag verursachen.
Stellen Sie den Scanner nicht in einem Raum mit hoher
Umgebungstemperatur, hoher Luftfeuchtigkeit oder an
einem schlecht belüfteten, verrauchten oder staubigen Ort
auf. Dies könnte einen Brand oder elektrischen Schlag
verursachen.
Falls der Scanner Hitze oder Rauch abgibt, oder Sie einen
Geruch ausströmt oder Geräusche verursacht, schalten Sie
den Scanner sofort aus und entfernen Sie das Netzkabel.
Vergewissern Sie sich, dass kein Rauch mehr austritt, dann
kontaktieren Sie Ihren Fachhändler oder autorisiertes
FUJITSU Servicepartner.
Wenn der Scanner zu Boden gefallen ist oder die
Abdeckung beschädigt wurde, ziehen Sie bitte sofort den
Netzstecker aus der Steckdose. Setzen Sie sich
anschließend mit Ihrer Verkaufsniederlassung oder einem
autorisierten Servicepartner in Verbindung.
Lassen Sie keine metallenen Gegenstände in den Scanner
fallen.
Scannen Sie keine Dokumente die nass sind oder mit
Büroklammern o.ä. geheftet sind.
Schützen Sie den Scanner vor Feuchtigkeit.
ACHTUNG
Im folgenden werden wichtige Warnhinweise beschrieben.
Platzieren Sie den Scanner sicher auf Ihrer Arbeitsfläche.
Stellen Sie den Scanner auf eine flache, ebene Fläche.
Wählen Sie keinen instabilen Standort. Installieren Sie den
Scanner auf einer ebenen Fläche die nicht vibriert, um ein
Umfallen des Gerätes zu vermeiden.
Vergewissern Sie sich, dass die Arbeitsfläche das Gewicht
des Scanners und anderer dort platzierten Geräte sicher
tragen kann.
Stecken Sie den Netzstecker fest und sicher in die
Steckdose.
Halten Sie den Scanner von starken magnetischen Feldern
und elektromagnetischen Quellen fern. Schützen Sie den
Scanner vor statischer Elektrizität, da diese Fehlfunktionen
verursacht.
Benutzen Sie keine Reinigungssprays. Beim Sprayen
gelangt Schmutz und Staub in den Scanner, wodurch
Fehlfunktionen verursacht werden.
Wird der Scanner längere Zeit nicht benutzt, ziehen Sie aus
Sicherheitsgründen den Netzstecker aus der Steckdose.
Setzen Sie den Scanner nicht direktem Sonnenlicht oder
Hitzeinwirkung aus. Dies kann zu einem Hitzstau im
Inneren des Scanners führen und einen Brand oder andere
Probleme verursachen. Arbeiten Sie an einem gut
belüfteten Ort.
Blockieren Sie die Lüftungsöffnungen nicht. Dies kann zu
einem Hitzestau im Inneren des Scanners führen, was eine
Fehlfunktion verursachen kann.
Stellen Sie keine schweren Objekte auf den Scanner und
führen Sie keine Arbeiten auf seiner Oberfläche aus. Eine
falsche Installation kann Verletzungen zur Folge haben.
Bewegen Sie den Scanner nicht mit angeschlossenen
Netz- und Schnittstellenkabel, dies kann die Kabel
beschädigen, einen Brand oder einen elektrischen Schlag
oder eine Verletzung verursachen.
Entfernen Sie das Netzkabel von der Steckdose und ziehen
Sie das Datenkabel, bevor Sie den Scanner bewegen.
Achten Sie auf Hindernisse am Boden.
Berühren Sie während des Scannens keine mechanischen
Teile des Scanners, es besteht Verletzungsgefahr.
Benutzen Sie den Scanner nicht sofort wenn Sie diesen von
einem kalten Ort in eine warme Umgebung transportiert
haben. Der Temperaturunterschied verursacht die Bildung
von Kondensationswasser, was Fehlfunktionen des
Scanners verursachen kann. Lassen Sie daher das Gerät
für ein oder zwei Stunden vor der Benutzung trocknen.
ScanSnap fi-5110EOX2 Los Geht’s 5
Page 60

1. Vorbereitungen
Dieses Kapitel beschreibt Vorbereitungen, die vor der
Benutzung von ScanSnap durchgeführt werden müssen.
Tasten
ACHTUNG
Schließen Sie den Scanner nicht vor der
Installation der „PC Treiber“ an den Computer an.
Wurde der Scanner vor der Installation des
ScanSnap Treibers angeschlossen, kann der
Scanner eventuell nicht korrekt funktionieren.
Weitere Informationen zur Treiberinstallation bietet
das Kapitel 2.
1.1. Kontrolle des Lieferumfangs
Kontrollieren Sie beim Auspacken des Scanners ob alle
Zubehörteile vorhanden sind.
Die Zubehörliste in der Scannerverpackung hilft Ihnen
dabei.
1.2. Bezeichnung und Funktionen der Teile
Im folgenden werden die Bauteile und Funktionen
beschrieben
Vorderseite
Papierschach-Abdeckung
Öffnen Sie zum Benutzen des
Scanners diese Abdeckung.
→ Mit dem Öffnen der Abdeckung
wird der Scanner eingeschaltet.
ADF-Abdeckung
utomatic Document
(ADF: A
Feeder)
Ausgabefach
Platzieren Sie den Scanner auf
dem Ausgabefach, indem Sie die
beiden Hervorstehungen an
dessen Vorderseite mit den
entsprechenden Gegenstücken
des Ausgabefaches ausrichten.
[SCAN] Taste
Startet das Scannen.
[POWER] Taste
Schaltet den Scanner ein/aus.
Power Lampe
Zeigt den Scannerstatus an
Grün :Bereit
Grün (Blinkt) :Scannt
Orange :Fehler
Kein Licht :Power aus
Rückseite
USB-Anschluss Netzteilanschluss
Siegel: Entfernen Sie dieses Siegel nach der
Installation des ScanSnap Manager auf Ihrem PC.
Abdeckungs-Hebel
Ziehen Sie zum Öffnen der
ADF-Abdeckung diesen Hebel.
Papierschacht-Abdeckung
Öffnen Sie die Abdeckung und
legen die zu scannenden
Dokumente in diese Einheit einn.
Papierführung
Passen Sie die Papeirführung
an die Dokumentenbreite an
um Fehlwinkeleinzüge zu
vermeiden.
Ausgabefach
Ziehen Sie es zur Benutzung wie in der Abbildung
gezeigt heraus.
→ Dokumente werden vom ADF in das Ausgabefach
transportiert.
Tasten
* Sie können den Scanner auch ohne das Ausgabefach
verwenden.
6 |
TIP
Für die Dockumentenspezifikationen, siehe das
ScanSnap fi-5110EOX2 Bedienungshandbuch
auf der Setup CD-ROM.
ACHTUNG
Der Scanner wird automatisch ein/ausgeschalten,
wenn Sie die Papierfach-Abdeckung
öffnen/schließen.
Zum Ausschalten des Scanners bei geöffneter
Papierfach-Abdeckung, drücken Sie bitte die
[POWER] Taste.
Page 61

2. ScanSnap anschließen
Dieses Kapitel beschreibt den Anschluss von ScanSnap an
Ihren Computer.
2.1.1. Installation von Adobe Acrobat 7.0
Halten Sie die Adobe Acrobat 7.0 CD-ROM bereit.
2.1. Installation der mitgelieferten
Software
Vor dem Anschluss des Scanners an den Computer,
installieren Sie bitte folgende Software.
c Adobe Acrobat 7.0 (Anwendung)
d ScanSnap Manager (Treiber)
e ScanSnap Organizer (Anwendung)
f CardMinder (Anwendung)
f PDF Thumbnail View (Anwendung)
ACHTUNG
TIP
• Der ScanSnap Manager muss installiert
werden, bevor der Scanner an den Computer
geschlossen wird.
Wird der Scanner vor der Installation des
ScanSnap Manager angeschlossen, erscheint
der “Assistent für das Suchen neuer Hardware”
(dieses Fenster kann sich je nach
Betriebssystem unterscheiden). Klicken Sie auf
[Abbrechen], um das Programm zu schließen.
• ScanSnap Manager beinhaltet ebenso die
Treiber Software für ScanSnap! fi-4110X2.
Es ist nich möglich, sowohl den ScanSnap
fi-5110EOX2 und den fi-4110EOX Scanner
gleichzeitig (oder zwei oder mehrere
fi-5110EOX2 Scanner) an einen PC
anzuschließen.
• Ist bereits ein ScanSnap fi-4110EOX2 oder
ScanSnap fi-5110EOX Treiber auf Ihrem PC
installiert, deinstallieren Sie diesen bitte vor der
Installation.
• Melden Sie sich unter Windows 2000 oder
Windows XP als Administrator an.
• Die Systemvoraussetzungen fürScanSnap
fi-5110EOX2 sind:
Rechner:
schneller (Intel
schneller wird empfohlen)
Speicher:
wird empfohlen)
*Wenn der Rechner oder Speicher nicht die
empfohlenen Anforderungen erfüllt und USB
1.1 verwendet wird, setzt dies die
Scangeschwindigkeit herab.
ScanSnap Manager enthält die Treiber Software
für ScanSnap fi-4110EOX2 und ScanSnap
fi-5110EOX. Besitzen Sie bereits ein (ScanSnap
fi-5110EOX2 (dieses Produkt), ScanSnap
fi-4110EOX2, oder ScanSnap fi-5110EOX Gerät,
können Sie dieses an Ihren PC anschließen und
benutzen.
Intel® Pentium® III 600MHz oder
®
Pentium® 4 1.8GHz oder
128MB oder mehr (256MB oder mehr
ACHTUNG
Adobe Acrobat 7.0 wird nicht von Windows 98 und
Windows Me unterstützt.
1. Legen Sie die „Adobe Acrobat 7.0 CD-ROM“ in das
CD-ROM-Laufwerk ein.
Ö„Adobe Acrobat 7.0 Standard“ erscheint.
TIP
Dieses Fenster erscheint nicht, wenn die „Auto
Play" Einstellung des Computers deaktiviert ist.
Führen Sie in diesem Fall bitte „AutoPlay.exe”
der CD-ROM mit Hilfe von „Explorer” oder dem
“Arbeitsplatz” aus.
2. Sprache auswählen und klicken Sie auf [OK] Taste.
3. Klicken Sie auf „Willkommen bei Adobe Acrobat 7.0
Standard“.
4. Folgen Sie den Bildschirmanweisungen im
Setup-Fenster.
TIP
Klicken Sie auf „Installation“ im „Adobe Acrobat
7.0 Standard“ Fenster, um Informationen über
die Installation von Adobe Acrobat 7.0 zu
erhalten.
„Adobe Acrobat Hilfe“ bietet Infos zu Adobe
Acrobat 7.0.
ScanSnap fi-5110EOX2 Los Geht’s 7
Page 62

2.1.2. Installation von ScanSnap Manager,
ScanSnap Organizer, CardMinder und
PDF Thumbnail View
Halten Sie die ScanSnap Setup CD-ROM breit.
1. Legen Sie die “ScanSnap Setup CD-ROM” in das
CD-ROM Laufwerk ein.
Ö Das Einstellungs-Fenster wird angezeigt.
(Bei einer erneuten Installation der Programme,
werden die folgenden Bildschirme nicht
angezeigt.)
TIP
Dieses Fenster erscheint nicht, wenn die „Auto
Play" Einstellung des Computers deaktiviert ist.
Führen Sie in diesem Fall bitte „AutoPlay.exe”
der CD-ROM mit Hilfe von „Explorer” oder dem
“Arbeitsplatz” aus.
2. Klicken Sie auf [Software installieren].
Ö Beim Start der Installation des ScanSnap Treibers
und ScanSnap erscheint das Installationsfenster.
3. Wenn das Einstellungs-Fenster erscheint, folgen Sie
bitte den Bildschirmanweisungen.
TIP
Das unten gezeigte Fenster erscheint.
[Legen Sie die Dokumente zum Scannen mit
der zu scannenden Seite nach unten ein
(empfohlen)]
Zum Einlegen der Dokumente mit der zu
scannenden Seite nach unten und „auf dem
Kopf gesellt“.
[Legen Sie die Dokumente zum Scannen mit
der zu scannenden Seite nach oben ein]
Zum Einlegen der Dokumente, wie Sie diese
zum Lesen in der Hand halten. Also mit der
beschrifteten Seite auf sich zu zeigend.
(Hinweis: Sie können diese Einstellung nach
im Nachhinein ändern.)
Zum Anzeigen oder Nicht-Anzeigen der
“Scan-Ergebnis” Benachrichtigung nach dem
Scannen.
Ist das Kontrollkästchen markiert, werden Sie
über das Ergebnis der folgenden Funktionen
informiert.
Automatisches Löschen leerer
Seiten zulassen
Automatische Bilddrehung
zulassen
8 |
[Standard] <Empfohlen>
"ScanSnap Manager", "ScanSnap Organizer",
"CardMinder" und "PDF Thumbnail View "
werden mit ihren jeweiligen Handbüchern
installiert.
[Minimal]
Der ScanSnap Treiber wird mit Handbuch
installiert.
[Benutzer]
Sie können die mit Handbuch installierte
Software auswählen.
4. Starten Sie nach dem Abschluss der Installation den
Computer neu.
ACHTUNG
Siehe das “ScanSnap Bedienungshandbuch” für
weitere Informationen über den ScanSnap Manager
oder die Installation von CardMinder.
Page 63

2.2. Anschluss des Scanners
Schließen Sie bitte den Scanner nach dem Neustart des PCs
an Ihren Computer an.
2.2.1. Anschluss des Netzkabels
ACHTUNG
1. Schließen Sie das Netzkabel an das Netzteil an.
2. Stecken Sie den Netzstecker in eine Steckdose und
schließen das Netzteils an den Netzteilanschluss am
Scanner an.
Verwenden Sie ausschließlich das mit dem
Scanner gelieferte Netzkabel (Netzteil). Benutzen
Sie nur die spezifizierten Netzkabel und
Anschlüsse.
Steckdose
3. Öffnen Sie die Papierschacht-Abdeckung des
Scanners.
ACHTUNG
Ö Ihr Computer erkennt den Scanner (ScanSnap)
Wenn der Scanner nicht automatisch
eingeschalten wird, drücken Sie bitte die
[POWER] Taste auf dem Scanner.
automatisch.
Für Windows
98
Sie werden aufgefordert, eine CD einzulegen. Legen
Sie die Windows 98 CD-ROM in das CD-ROM-Laufwerk
ein.
Klicken Sie anschließend auf [OK].
Für Windows
Die neue Hardware wird erkannt und die Installation
Me
automatisch zu Ende geführt.
Für Windows
2000
Klicken Sie auf [Ja], wenn die Meldung [Digitale
Signatur nicht gefunden] erscheint.
Für Windows XP
1) Wenn [Assistent für das Suchen neuer Hardware]
erscheint, klicken Sie bitte auf [Nein, diesmal nicht]
Anschluss
2.2.2. Anschluss des USB-Kabels
Es folgen Hinweise zum Anschluss des USB-Kabels.
ACHTUNG
1. Entfernen Sie das Schutzetikett vom USB Anschluss.
2. Verbinden Sie Scanner und PC über das USB-Kabel
● Benutzen Sie nur das mit dem Scanner gelieferte
USB-Kabel. Der Betrieb mitt anderen
USB-Kabeln wird nicht garantiert. Nutzen Sie den
USB-Hub, der dem Computer am nächsten ist
(erste Stufe).
● Ab einem USB-Hub der zweiten Stufe,
funktioniert ScanSnap eventuell nicht.
(Dieser Bildschirm erscheint nur, wenn das Service Pack2
Installiert ist.)
2) Klicken Sie auf [Weiter >] Taste im folgenden
Fenster.
USB Kabel
ScanSnap fi-5110EOX2 Los Geht’s 9
Page 64

3) Wenn [HardwareInstallation] erscheint, klicken Sie
bitte auf [Installation fortsetzen].
Der "Assistent für das Suchen neuer Hardware"
wird angezeigt. Klicken Sie auf die [Fertigstellen]
Taste.
4) Klicken Sie auf [Fertig stellen] nachdem die
Installation beendet ist.
Die ScanSnap Installation ist somit abgeschlossen.
ACHTUNG
TIP
Das "ScanSnap Manager" Symbol wird in der
Arbeitsleiste angezeigt als: .
Wird das Symbol weiterhin als
drücken Sie die [POWER] Taste zum Auschalten
des Scanners. Drücken Sie dann erneut die
[POWER] Taste um den ScanSnap wieder
einzuschalten. (Warten Sie bitte vor dem
Ein-/Ausschalten des Scanners mindestens 5
Sekunden.)
Drücken Sie zum Ein/Ausschalten des Scanners
die [POWER] Taste für mindestens eine Sekunde.
*Um ein unbeabsichtigtes Ein/ausschalten des
Scanners zu vermeiden, funktioniert die [POWER]
Taste nur, wenn diese für mindestens eine Sekunde
gerdrückt wird.
S
angezeigt,
10 |
Page 65

3. Grundlegende Bedienverfahren von ScanSnap
Dieses Kapitel beschreibt die grundlegenden
Bedienverfahren von ScanSnap.
3.1. Dokumente scannen
Mit “ScanSnap” können Sie einfach per Knopfdruck die
sich auf Ihrem Schreibtisch stapelnden Bürodokumente
scannen und in digitaler Form speichern. Das gescannte
Bild kann mit der mitgelieferten Anwendung (Adobe
Acrobat, CardMinder) auf dem Bildschirm angezeigt
werden.
Zwei Beispiele typische Anwendungen:
c Erstellen digitaler Sicherungskopien von
Bürodokumenten in Form von PDF-Dateien.
Betrachten und modifizieren Sie diese später mit “Adobe
Acrobat”. Sie können weiterhin mit der OCR Funktion (Text
mit OCR erkennen) Texte auf dem Bild erkennen und
bearbeiten. Mit der Sicherheitsfunktion können Sie Ihre
Dokumente durch die Vergabe eines Passwortes schützen.
(Hinweis: Für Information über die HAndhabung vonAdobe
Acrobat, siehe die[Adobe Acrobat Hilfe].)
Scannen und verwalten Sie Visitenkarten. Mit
d
“CardMinder” geht alles. Es scannt, modifiziert und
verwaltet Visitenkarten und exportiert Daten zu Outlook oder
anderen gängigen E-Mail Programmen.
Sechs Registerkarten stehen zur Auswahl:
[Anwendung]
Wählen Sie die Anwendung zum Anzeigen/Bearbeiten der
gescannten Bilder.
[Speichern unter]
Wahl des Ordners und Dateinamens zum Speichern des
Bildes.
[Scanmodus]
Einstellung der Scanqualität.
[Dateiart]
Wahl des Dateityps (PDF, JPEG) des zu speichernden
Bildes.
3.2. Die Scaneinstellungen
ScanSnap Einstellungen werden mit “ScanSnap Manager”
geändert.
1. Rechtsklicken Sie das “ScanSnap Manager Symbol”
in der Taskleiste und wählen dann im folgenden Menü
[Einstellungen ...].
ÖDas „Scannen und Einstellungen speichern” Fenster
wird angezeigt.
2. Modifizieren Sie Scaneinstellungen im “Scannen und
Einstellungen speichern” Fenster.
S
[Papiergröße]
Wählen Sie die Dokumentengröße des zu scannenden
Dokumentes.
[Dateigröße]
Bestimmung der Komprimierungsrate der Datei.
TIP
Das “ScanSnap Bedienungshandbuch” auf
der “ScanSnap Setup CD-ROM” enthält
weitere Informationen über die Einstellungen.
3. Klicken Sie auf [OK] um den Vorgang zu beenden.
Ö Die neuen Einstellungen werden aktiviert.
3.3. Dokumente scannen
1. Wählen Sie “Adobe Acrobat” unter [Anwendung] in
“Scannen und Einstellungen Speichern”.
2. Legen Sie die Dokumente in den Scanner ein.
[Scanmodus]
Richtung
Legen Sie das Dokument
mit der zu scannenden
Seite nach unten in den
ADF-Papierschacht ein.
Rückseite zeigt nach
vorne.
[SCAN] Taste
ScanSnap fi-5110EOX2 Los Geht’s 11
Page 66

ACHTUNG
Wenn Sie in Schritt 3 von [2.1.2 Installation
von ScanSnap Manager, ScanSnap
Organizer, CardMinder und PDF Thumbnail
View] [Dokumente mit der zu scannenden
Seite nach oben zeigend über den ADF
scannen] ausgewählt haben, legen Sie die
Dokumente bitte wie unten gezeigt ein.
Vorderseite
nach oben
3. Drücken Sie die [Scan] Taste.
Ö Der Scanvorgang beginnt.
Ö Nachdem der Scanvorgang abeschlossen wurde,
wird das gescannte Bild mit Adobe Acrobat
angezeigt.
TIP
● Sie können gescannte Bilder auch mit
anderen Anwendungen anzeigen.
● Wenn Sie die [SCAN] Taste drücken,
werden Dokumente im „Duplex” Modus
gescannt.
Um die Dokumente im „Simplex” Modus zu
scannen, ändern Sie bitte die Einstellungen
im ScanSnap Manager
bietet mehrere Einstellungen für das
Scannen.
S
. ScanSnap
● Das “ScanSnap Bedienungshandbuch” auf
der ScanSnap Setup CD-ROM” enthält
weitere Informationen über das Scannen
von Dokumenten.
3.4. Mit dem Trägerblatt scannen
Passen Sie die Oberkante
des Dokumentes an die
Oberkante des
Trägerblattes an. Die
Faltkante liegt hierbei
bündig an der Ecke
oben-rechts an.
3. Legen Sie das Trägerblatt in den Scanner ein.
Legen Sie das Trägerblatt
in Pfeilrichtung
„kopfüber“ (schwarzweiße
Muster nach unten) in den
Scanner ein.
Wenn Sie zum Scannen
das Trägerblatt
verwenden, können Sie
nicht mehrere Dokumente
gleichzeitig oder
fortlaufend einscannen.
Scannen Sie jedes
Dokument einzeln,
eingelegt in das
Trägerblatt ein.
4. Drücken Sie die [SCAN] Taste.
Das Dokument wird
Ö
gescannt und wie in
der Abbildung gezeigt
ausgegeben.
TIP
Die Einlegemethode und die ScanSnap
Manager Einstellungen unterscheiden sich je
nach zu scannendem Dokument. Siehe das
“ScanSnap Bedienungshandbuch” auf der
“ScanSnap Setup CD-ROM” für Details.
Wenn Sie das Trägerblatt verwenden, können Sie auch
große Dokumente oder Dokumente mit Überlängen
problemlos scannen (DIN A3, B4, 11 x 17 inch). Weiterhin
wird auch das Scannen von gehefteten Blättern oder von
Dokumenten mit unregelmäßigen Formen möglich.
In diesem Handbuch wird das Scannen eines DIN A3
Dokumentes beschrieben.
Ein DIN A3 Dokument kann nicht direkt in den Scanner
eingelegt werden. Falten Sie das Dokument und scannen
dieses dann wie im Folgenden beschrieben ein.
1. Falten Sie das Dokument an der Mittelache so, dass
die zu scannenden Seiten nach außen zeigen.
Falten Sie das Dokument bitte so exakt wie möglich.
2. Öffnen Sie das Trägerblatt und legend das Dokument
ein.
3.5. Visitenkarten scannen
1. Wählen Sie “CardMinder” unter [Anwendung] in
“Scannen und Einstellungen speichern”.
Wenn “CardMinder” ausgewählt wurde,
TIP
●
werden nur die [Anwendung] und
[Scanmodus] Registerkarten angezeigt.
● Das “ScanSnap Bedienungshandbuch” auf
der ScanSnap Setup ScanSnap”enthält
weitere Informationen bezüglich der
Einstellungen.
2. Legen Sie die Visitenkarten in den Scanner ein. Passen
Sie die Papierführung an die Breite der Visitenkarte
an.
Papierführung
Visitenkarte
(mit der zu scannenden
Seite nach unten)
[SCAN] Taste
12 |
Page 67

3. Drücken Sie die [Scan] Taste.
g
Ö Der Scanvorgang beginnt.
Das “CardMinder” Fenster öffnet sich und die
Ö
erkannten Zeichendaten, Name, Firma und
Emailadresse erscheinen im Fenster.
4. Das unten gezeigte Fenster erscheint.
Wählen Sie eine Visitenkarte aus der Datenliste.
Prüfen Sie die Daten im Ergebnisfeld des Fensters und
korrigieren falls erforderlich vorhandene Fehler.
[Microsoft Outlook] Taste
Ergebnisfeld
Gescanntes
Bild
5. Für Outlook, bestätigen Sie die Daten der Visitenkarte
und wählen dann die entsprechenden Karten für den
Export nach Outlook. Klicken Sie auf [Microsoft
Outlook] in der Symbolleiste. Die Daten werden
exportiert und in Outlook geladen.
1. Wählen Sie im [Start] Menü [Programme] –
[ScanSnap- Treiber] – [PDF Thumbnail View] –
[Konfigurations-Tool].
Klicken Sie im Fenster “PDF Thumbnail View
2.
Funktionseinstell...” auf “Akivieren” und dann auf
[OK].
Ö Man kann die Miniaturansichten der PDF-Dateien mit dem
Windows Explorer betrachten (wie Bitmaps oder JPEGs.)
TIP
Das „ScanSnap Benutzerhandbuch” der „Scan
Snap Setup CD-ROM” enthält weitere Details.
3.7. ScanSnap Organizer
ScanSnap Organizer ist eine Anwendung zur Verwaltung
der Miniaturansichten von Bilddateien (PDF oder JPEG).
Über ScanSnap gescannte Bilder können so angezeigt
werden, ohne dass diese Dateien geöffnet werden müssen.
Sie können ebenso Ordner erstellen und Dateien so für
verschiedene Zwecke verwalten.
Wenn Dateien aus mehreren Seiten bestehen, können dies
mit Hilfe der Miniaturansicht „durchgeblättert“ werden.
Wählen Sie aus dem [Start] Menü [Alle Programme] –
[ScanSnap Organizer] – [ScanSnap Organizer]. Folgender
Bildschirm erscheint.
Ordneransicht
In ScanSnap Organizer ausgewählte Ordner werden angezeigt.
TIP
Sie können Daten (im Ergebnisfeld) an folgende
Anwendungen schicken:
● Microsoft
● Outlook Express
● ACT!
● GoldMine
Die Daten können auch in CSV-Format
gespeichert werden, um Sie in Anwendungen,
wie etwa Excel zu importieren. Informieren Sie
sich im “CardMinder Benutzerhandbuch”.
TM
®
Outlook®
®
6. Starten Sie Outlook, um die importierten Daten der
Visitenkarten zu bestätigen.
7. Wollen Sie “CardMinder” schließen, wählen Sie
[Beenden] im [Datei] Menü.
TIP
“CardMinder” bietet ebenso noch viele andere
nützliche Funktionen.
Das “CardMinder Benutzerhandbuch” der “Scan
Snap Setup CD-ROM” enthält weitere
Informationen.
3.6. Über PDF Thumbnail View
“PDF Thumbnail View” ermöglicht das Betrachten von
PDF-Miniaturansichten mit dem Windows Explorer.
Das Programm wird zusammen mit dem ScanSnap Treiber
installiert, ist aber in der Grundeinstellung deaktiviert.
(*Dieses Programm kann nur installiert werden, wenn Sie
Windows 2000
PDF Thumbnail View aktivieren
oder
Windows XP
verwenden.)
Dateiansicht
Ausgewählte PDF- oder JPEG-Dateien warden
als Miniaturansicht an
Pop-up Miniaturansichtsfenster
Die ausgewählte Seite wird als Pop-up angezeigt.
Miniaturansicht
Zeigt die Miniaturansicht einer Datei an.
Seitenzahl
(Aktuelle
Seite/Gesamtseitenanzahl).
“Vergrößern/Verkleinern
…des Pop-ups.
Weiterblättern Taste
Zum Weiterblättern (sollte das
Dokument aus mehreren Seiten
bestehen.)
TIP
Dateiname
Siehe das “ScanSnap Bedienungshandbuch” auf
der “ScanSnap Setup CD-ROM” für Details.
ezeigt.
ScanSnap fi-5110EOX2 Los Geht’s 13
Page 68

4. Problembehebungen
Dieses Kapitel bietet Lösungshilfen von Problemem, die beim Arbeiten mit ScanSnap auftreten können.
4.1. Liste der möglichen Probleme
Versuchen Sie bitte Probleme mit Hilfe der hier gesammelten Vorschläge zu lösen bevor Sie den Kundenservice in Anspruch
nehmen.
Sollte dies nicht möglich sein, wenden Sie sich bitte an Ihren Verkäufer oder einen autorisierten FUJITSU Scanner
Servicepartner.
Symptom Prüfen Sie Abhilfe
Der Scanner kann nicht eingeschalten
werden.
Der Scanvorgang startet nicht.
Ist das Netz/USB-Kabel und Netzteil
korrekt angeschlossen?
Ist die Papierschacht-Abdeckung
geschlossen? (Die Stromversorgung des
Scanners wird durch das Öffnen und
Schließen der Papieschacht-Abdeckung
kontrolliert)`
Ist Windows korrekt gestartet?
(Die Stromversorgung des Scanners wird
durch das Ein- und Ausschalten des PCs
kontrolliert)
Haben Sie zum Ausschalten die [POWR]
Taste auf dem Scanner gedrückt? (Der
Scanner kann mit der [POWER] Taste
ausgeschalten warden wenn die
Papierschacht-Abdeckung geöffnet ist.
Ist das USB-Kabel korrekt angeschlossen? Schließen Sie das USB-Kabel korrekt an.
Blinkt die LED Betriebsanzeige
wiederholt auf?
Ist der ScanSnap Manager aktiviert?
(Bei aktiviertem ScanSnap Manager
erscheint das "ScanSnap Manager"
Symbol in der Arbeitsleiste )
S
Schließen Sie das Netz/USB-Kabel
korrekt an.
Entfernen Sie das Netzkabel und das
Netzteil und schließen Sie beide erneut an.
(Hinweis: Warten Sie bitte mindestens 5
Sekunden bis zum Wiederanschluss des
Netzkabels.)
Öffnen Sie die Papierschachtabdeckung.
Sorgen Sie für einen normalen und
vollständigen Start von Windows. Die
LED-Anzeige kann erlöschen, wenn
Windows hochgefahren wird oder sich der
Scanner im Energiesparmodus befindet.
Drücken Sie die [POWER] Taste auf dem
Scanner.
(Wenn ein USB Hub benutzt wird, prüfen
Sie gegebenenfalls die Netzversorgung des
Hubs.)
Entfernen Sie das Netzkabel und das
Netzteil und schließen Sie beide erneut an.
(Hinweis: Warten Sie bitte mindestens 5
Sekunden bis zum Wiederanschluss des
Netzkabels.)
Wird das "ScanSnap Manager" Symbol
nicht angezeigt, starten Sie ScanSnap
Manager im [Start] Menü mit
[Programme] - [ScanSnap Treiber] [ScanSnap Manager].
14 |
Page 69

Symptom Prüfen Sie Abhilfe
Der Scanvorgang startet nicht.
Auf dem gescannten Bild erscheinen
vertikale Linien.
Das erstellte Bild erscheint schief oder verzerrt.
Das Bild wird zu hell oder zu dunkel
wiedergegeben.
Linien auf dem Dokument werden verzerrt
wiedergegeben (Bsp.: Umrandundungen
einer Tabelle sind unkenntlich)
Arbeitet ScanSnap Manager normal?
(Bei nicht korrekt funktionierendem
ScanSnap Manager erscheint das
„ScanSnap Manager“ Symbol in der
Arbeitsleiste als .)
Wird der „Scannen und Einstellungen
speichern“ Bildschirm noch angezeigt?
Ist die Innenseite des Papiereinzugs
verschmutzt?
Wurde das Dokument korrekt eingelegt? Legen Sie das Dokument korrekt ein.
Ist beim Schwarzweiß Scannen die
[Option…] – “Helligkeit” in [Scanmodus]
sehr hell oder dunkel gesetzt?
Haben Sie ein Doument mit Tabellen,
Linien und Text (gesdruckt sowie
handschriftlich) im Farbmodus gescannt?
Führen Sie bitte folgendes aus:
1. Führen Sie „Scan für Hardware
Änderungen“ oder „Aktualisieren“ vom
Geräte-Manager aus. (*1) Wird das
Problem damit nicht behoben, führen
Sie bitte Schritt 2. aus.
2. Entfernen Sie das Netzkabel und das
Netzteil und schließen diese dann
wieder an (Warten Sie bitte mindestens
5 Sekunden vor dem erneuten
Einschalten). Wird das Problem damit
nicht behoben, führen Sie bitte Schritt 3.
aus.
3. Wenn Sie einen USB-Hub verwenden,
schließen Sie bitte ScanSnap direkt an
Ihren PC an.Wird das Problem damit
nicht behoben, führen Sie bitte Schritt 4.
aus.
4. Ist Ihr PC mit mehreren
USB/Anschl[ssen ausgestattet,
schließen Sie ScanSnap bitte an einen
anderen Anschluss an. Wird das
Problem damit nicht behoben, führen
Sie bitte Schritt 5. aus.
5. Starten Sie bitte Ihren PC erneut.
Hilft keiner der oben angegebenen Schritte
das Problem zu beheben, deinstallieren Sie
bitte ScanSnap Manager und installieren
diesen dann erneut (*2).
Schließen Sie den „Scannen und
Einstellungen speichern“ Bildschirm und
scannen Sie das Dokument.
Reinigen Sie den Innenraum des ADFs.
Siehe „5. Tägliche Pflege“.
Regeln Sie die „Helligkeit“ mit
[Scanmodus] – [Option…] im „Scannen
und Einstellungen speichern“ Fenster.
Der Farb-Modus wird zum qualitativ
hochwertigen Scannen von farbigen
Bildern, wie Photos, verwendet. Für andere
Dokumente, die überwiegend aus Text
bestehen, aktivieren Sie bitte das
Kontrollkästchen [Einstellung für
Textdokumente] in [Scannen] – [Option] im
“Scannen und Einstellungen speichern”
Fenster.
ScanSnap fi-5110EOX2 Los Geht’s 15
Page 70

Symptom Prüfen Sie Abhilfe
Die Scangeschwindigkeit ist sehr langsam.
Mehrfacheinzüge (*4) kommen vermehrt
vor.
Das Papier wird nicht eingezogen (stoppt
auf halben Weg).
Erfüllt Ihr PC die nötigen
Systemvoraussetzungen?
Ist der ScanSnap Scanner über eine USB 1.1
Schnittstelle an Ihren PC angeschlossen?
Wenn Sie diese Schnittstelle benutzen, kann
es vorkommen dass die
Datenübertragungsrate rehr niedrig ausfällt
wenn der Scanner große Datenmengen an
den PC überträgt.
Ist die Papierseparations-Einheit
verschmutzt?
Ist die Papierseparations-Einheit abgenutzt? Ersetzen Sie die Papierseparations-Einheit.
Ist der Dokumentenstapel dicker als 5 mm? Reduzieren Sie die Anzahl der Blätter auf
Ist die Einzugsrolle verschmutzt? Reinigen Sie die Einzugsrolle entsprechend
Ist die Einzugsrolle abgenutzt? Ersetzen Sie die Einzugsrolle entsprechend
Befinden sich im Dokumenteneinzug
Verschmutzungen?
Entsprechen die Dokumente den im
Bedienungshandbuch (Kapitel 3.2)
beschriebenen Spezifikationen?
Falls dies nicht, können solche Dokumente
nicht problemfrei in den ADF eingezogen
werden.
Bestätigen Sie die Systemvoraussetzungen
in “Vor der Installation von ScanSnap” im
Kapitel 2 des “fi-5110EOX2
Bedienungshandbuches”.
Die Scangeschwindigkeit kann langsamer
ausfallen, wenn die empfohlenen
Systembedingungen des Rechners und
Speichers nicht erfüllt werden.
Sollte dies der Fall sein, öffnen Sie bitte
[Option] unter [Scanmodus] in [Scannen
und Einstellungen speichern] Fenster und
entfernen dann die Markierungen der
folgenden Funktionen, um die
Scangeschwindigkeit zu erhöhen.
- Die Ausrichtung des Dokumentes wird
automatisch korrigiert
- Automatische Bilddrehung zulassen
Wenn Ihr PC mit einer USB 2.0
Schnittstelle ausgesstattet ist, schließen Sie
bitte den Scanner über diese Schnittstelle
an. (Wenn Sie einen USB-Hub verwenden,
muss dieser ebenso USB 2.0 unterstützen.)
(*3)
Reinigen Sie die Papierseparations-Einheit
entsprechend den Hinweisen in „5.3.
Reinigen des Scannerinneren“.
Siehe den Abschnitt „6.2. Austausch der
Papierseparations-Einheit“.
eine Dicke von höchstens 5 mm.
den Hinweise in „5.3. Reinigen des
Scannerinneren“.
den Hinweise in „6.3. Austausch der
Einzugsrolle“.
Entfernen Sie die Verschmutzungen im
Dokumenteneinzug.
Versuchen Sie folgendes:
・ Drücken Sie das Dokument vorsichtig mit
Ihrem Finger zu Beginn des
Scanvorganges in den ADF.
・ Drehen Sie das Dokument und versuchen
es erneut zu scannen.
16 |
Page 71

Symptom Prüfen Sie Abhilfe
Der Scanner wird nicht erkannt, auch
nachdem der ScanSnap Treiber installiert
wurde.
Die Größe der gescannten Bilddatei
entspricht der eines Farbdokumentes auch
bei einem Schwarz & Weiß (S&W)
Dokument.
Beim Scannen eines doppelseitigen
Dokumentes scheint die Rückseite durch
(Störung des Rückseitenbildes).
Gescannte Bilder werden nicht im
Bildschirm angezeigt (wenn
“Automatisches Löschen leerer Seiten
zulassen” aktiviert ist).
Die gescannten Bilder sind schräg und
verzerrt (wenn “Die Ausrichtung des
Dokumentes wird automatisch korrigiert”
aktiviert ist).
Die Ausrichutng des gescannten Bildes
wird nicht korrekt angezeigt (wenn
“Automatische Bilddrehung
zulassen“ aktiviert ist).
*1) Für Windows XP, rechtsklicken Sie im "Geräte-Manager"auf den Computer Namen und führen "Scan für Hardware Änderungen" aus.
*2) Überprüfen Sie ob Ihr PC und ScanSnap eingeschalten und korrekt angeschlossen sind.
- Überprüfen Sie im Gerätemanager, ob ScanSnap als "unbekanntes Gerät" geführt wird. Ist dies der Fall, löschen Sie es bitte über
[Systemsteuerung]-[System].
- Schließen Sie ScanSnap Manager.
- In der [Systemsteuerung] - wählen Sie bitte [Hinzufügen oder entfernen von Programmen] und deinstallieren dann ScanSnap Manager
und ScanSnap Organizer. Siehe 4.1 "Deinstallation der beigefügten Programme" im Bedienungshandbuch.
- Bevor Sie den Neustart des PCs nach der Deinstallation ausführen, entfernen Sie bitte folgende Ordner.
Haben Sie die Scanner an Ihren PC
angeschlossen bevor Sie den ScanSnap
Manager installiert haben?
Ist der Scanner als "Andere Geräte" im
"Geräte-Manager" installiert?
Wird das S&W Dokument im Farbmodus
gescannt?
Ist das Kontrolkästchen "Einstellung nur für
Textdokumente." unter [Option...] in
[Scanmodus] des "Scannen und Einstellung
speichern“ Bildschirm deaktiviert (keine
Markierung)?
Wenn “Automatisches Löschen leerer
Seiten” aktiviert ist, kann es vorkommen
das Dokumente, die nur wenige Zeichen
enthalten irrtümlich als “leer“ erkannt und
von der Ausgabe entfernt werden.
Wurden die Dokumente mit einem
Fehlwinkel größer als 5 Grad in den ADF
eingezogen?
Je nach Inhalt des Dokumentes, kann die
automatische Ausrichtungskorrektion
(Fehleinzugskorrektion) nicht korrekt
ausgeführt werden.
Je nach Inhalt des Dokumentes, kann die
automatische Bilddrehung nicht korrekt
ausgeführt werden.
Wählen Sie im [Start] Menü
[Systemsteuerung] - [System] - [Hardware]
– [Gerätemanager].
Löschen Sie den Gerätenamen (wie z.B.
vom USB-Gerät, jedoch je nach
Betriebssystem unterschiedlich) unter
"Andere Geräte" in [Gerätemanager] und
starten dann Ihren PC neu.
Setzen Sie den [Farbmodus:] in
[Scanmodus] des "Scannen und
Einstellungen speichern" Bildschirm auf
"Schwarzweiß".
Markieren Sie das Kontrollkästchen
"Einstellung nur für Textdokumente." (Nur
im Farb-Modus verfügbar). Dies Funktion
hat den Effekt, dass Buchstaben, Zeichen,
Linien und Kontraste auf dem Dokument
schärfer und klarer hervorgehoben werden.
Dadurch werden auch eventuelle Störungen
des Rückseitenbildes beseitigt. Bitte
beachten Sie, dass Sie diese Funktion auch
für Dokumente anwenden können, die
Photos und Bilder enthalten. Allerdings
werden deren Schattierungen und Kontraste
durch diese Funktion beeinflusst.
Rechtsklicken Sie das “ScanSnap Manager”
Symbol in der Arbeitsleiste, dann wählen
Sie [Einstellungen…] – [Scanmodus]
Registerkarte un klicken auf die [Option…]
Taste. Entfernen Sie dann die Markierung
des “Automatisches Löschen leerer Seiten
zuslassen” Kontrollkästchens.
Die Funktion “Die Ausrichtung des
Dokumentes wird automatisch korrigiert”
kann einen Fehlwinkeleinzug von +-5 Grad
korrigieren. Legen Sie die Dokumente
daher so in den ADF ein, dass ein
Fehlwinkeleinzug dieses Limit nicht
überschreitet.
Wird das Problem damit nicht behoben,
entfernen Sie bitte die Markierung vom
Kontrollkästchen “ Die Ausrichtung des
Dokumentes wird automatisch korrigiert” in
[Option] der [Scanmodus] Registerkarte
von [Scannen und Einstellungen speichern].
Siehe Kapitel 3.4 im Bedienungshandbuch.
Siehe Kapitel 3.4 im Bedienungshandbuch.
ScanSnap fi-5110EOX2 Los Geht’s 17
Page 72

ACHTUNG
Geben Sie beim Löschen dieser Ordner und Dateien besonders Acht, nicht versehentlich andere Ordner oder Dateien
zu entfernen, da sich dies auf Ihr System auswirken kann.
Für Windows 2000, Windows XP:
Löschen Sie den Ordner ScanSnap unter: c:/Documents and Settings/<User name>/Application Data/PFU/
Löschen Sie den Ordner Driver unter: c:Program Files/PFU/ScanSnap/
Für Windows 98, ME:
Löschen Sie den Ordner Driver unter: c:Program Files/PFU/ScanSnap/
Nachdem Sie die oben angegebenen Ordner entfernt haben, überprüfen Sie bitte, ob die Dateien
- fi5110e.INT
- fi5110e.PNF
Im Ordner C:/Windows/Inf gelöscht wurden. Sind diese beiden Dateien noch vorhanden, entfernen Sie diese bitte.
TIP
Bitte beachten Sie, dass der Ordner C:/Windows/Inf unter Umständen nicht angezeigt wird. Um daher die Existenz der
oben angegebenen Dateien überprüfen zu können, wählen Sie bitte aus der Menüleiste des [Explorer] [Extras]-[Ordneroptionenptionen...] und wählen dann die [Ansicht] Registerkarte. Überprüfen Sie bitte, ob das
Kontrollkästchen von [Alle Dateien und Ordner anzeigen] unter [Versteckte Dateien und Ordner] markiert ist. Ist dies
nicht der Fall, markieren Sie bitte diese Kontrollkästchen und übernehmen die Einstellung. Somit wird der versteckte
C:/Windows/Inf Ordner sichtbar und Sie können die fi5110e.INT und fi5110e.PNF Datei entfernen, sollten diese noch
vorhanden sein.
- Nach dem Entfernen der oben angegebenen Ordner (Dateien), starten Sie bitte Ihren Computer
erneut, ohne dass ScanSnap angeschlossen ist.
- Installieren Sie ScanSnap Manager und starten diesen dann erneut.
*3) Um zu überprüfen ob der Scanner über eine USB1.1 oder USB2.0 Schnittstelle angeschlossen ist, rechtsklicken Sie auf das ScanSnap
Symbol in der Arbeitsleiste und wählen [Hilfe] - [Über ScanSnap Manager], dann klicken Sie auf die [Details] Taste im
[Versionsinformationen] Fenster. [USB Typ] wird unter [Scannerinformationen] angezeigt.
*4) Mit "Mehrfacheinzug" wird das fehlerhafte, gleichzeitige Einziehen von zwei oder mehreren Blätter in den Scanner bezeichnet.
* Besuchen Sie unsere Website für weitere Referenzen und Details. Weitere nützliche Information finden Sie unter der FAQ Rubrik der
folgenden URL:
http://scansnap.fujitsu.com
4.2. Beheben eines Papierstaus
1. Öffnen Sie den ADF indem Sie den Abdeckungshebel nach oben ziehen.
2. Entfernen Sie das eingeklemmte Dokument.
3. Schließen Sie die ADF-Abdeckung.
ADF-Abdeckung
Abdeckungshebel
ÖSie können normalerweise hören, wie der ADF in seine Position einklickt.
Klick!
18 |
Page 73

5. Tägliche Pflege
g
Dieses Kapitel behandelt die Reinigung von ScanSnap.
Abbildungen der folgenden Seite.
WARNUNG
Brand/Elektrischer Schlag
Bevor Sie den Scanner reinigen, entfernen Sie bitte den
Netzstecker, um den Scanner auszuschalten.
5.1. Reinigungsmaterialen
Reinigungsmaterialen
Reiniger F1
*1) Um Reinigungsmaterial zu erwerben, kontaktieren Sie
bitte Ihren FUJITSU Scanner Fachhändler, bei dem Sie den
Scanner erworben haben.
Teile-Nr. Bemerkungen
CA99501-0013
1 Flasche (100 ml)
Befeuchten Sie ein Tuch
mit dieser Flüsskeit und
wischen damit den
Scanner sauber.
(*1)
5.2. Reingen des Scanneräußeren
Säubern Sie das Äußere des Scanners und den
ADF-Papiereinzug mit einem weichen, leicht mit neutraler
Reinigungslösung oder dem Reiniger F1 (separat
vertrieben) angefeuchtetem Tuch.
ACHTUNG
● Benutzen Sie niemals Verdünner oder andere
organische Lösungsmittel.
● Geben Sie während der Reinigung acht, dass
kein Wasser oder andere Flüssigkeiten in das
Innere des Scanners gelangen.
● Benutzen Sie keine Reinigungssprays. Diese
verursachen, dass Schmutz und Staub in das
Innere des Scanners gelangen, was
Fehlfunktionen und Bildstörungen verursachen
kann.
Tuch
ACHTUNG
Die Glasoberfläche im ADF wird während des Betriebes
heiss.
Bevor Sie das Innere des Scanners säubern, ziehen Sie
den Netzstecker aus der Steckdose und lassen Sie den
Scanner mindestens 15 Minuten abkühlen.
ACHTUNG
● Benutzen Sie niemals Wasser oder neutrale
Lösungen um das Innere des Scanners zu
reinigen.
● Benutzen Sie keine Reinigungssprays. Diese
verursachen das Schmutz und Staub in das
Innere des Scanners gelangen, wodurch
Fehlfunktionen verursacht werden können.
1. Öffnen Sie den ADF indem Sie den Abdeckungshebel
nach oben ziehen.
ADF-Abdeckung
Abdeckungshebel
2. Säubern Sie die folgenden Teile mit einem trockenen,
mit dem Reiniger F1 befeuchtem Tuch.
Papierseparations-Einheit
Plastikrollen (x4)
Ausgaberollen (x2)
Zuführungsrollen (x2)
Neutrale
Reinigungslösung oder
er F1
Reini
Lackverdünner
5.3. Reinigen des Scannerinneren
Säubern Sie die folgenden Teile mit einem trockenen, mit
dem Reiniger F1 befeuchtetem Tuch.
Als grobe Richtlinie, säubern Sie den ADF alle 1.000
Scansvorgänge Diese Richtlinie hängt allerding vom
verwendeten Papiertyp ab. Säubern Sie daher den ADF
öfter wenn Sie fotokopierte Dokumente scannen, bei denen
der Toner nicht korrekt auf das Papier fixiert ist.
Säubern Sie den ADF entsprechend den Hinweisen und
ScanSnap fi-5110EOX2 Los Geht’s 19
Einzugsrolle
Glas (x2) auf dem
ADF und der
gegenüberliegenden Seite)
Page 74

Papierseparations-Einheit (x1)
R
gedrückt halte
Säubern Sie die Papierseparations-Einheit von oben
nach unten. Vermeiden Sie, dass sich beim Reinigen
der Papierseparations-Einheit das Tuch in der
Einzugsfeder verfängt.
Glas (x2 auf der ADF-Abdeckung und der
gegenüberliegenden Seite)
Reinigen Sie vorsichtig.
Einzugsrolle (x1)
Seien Sie beim Säubern vorsichtigen und zerkratzen
Sie die Oberfläche der Rolle nicht. Reinigen Sie die
Rolle gründlich, da sich schwarze Ablagerungen
(Tonerpartikel) auf der Rollenoberfläche negativ auf
die Einzugszuverlässigkeit auswirken.
Plastikrollen (x4 an der ADF-Abdeckung)
Reinigen Sie die Rollen leicht während Sie dies mit
Ihren Fingern drehen. Seien Sie beim Säubern
vorsichtig, rauen Sie die Oberfläche der Rollen nicht
auf. Reinigen Sie die Rolle gründlich, da sich
schwarze Ablagerungen (Tonerpartikel) auf der
Rollenoberfläche negativ auf die
Einzugszuverlässigkeit auswirken.
Schalten Sie den Scanner vor der Reinigung
der folgenden Bereiche ein. Reinigen Sie die
folgenden Rollen, währen Sie diese drehen.
Zuführungsrollen (x2)
Seien Sie beim Säubern vorsichtig, beschädigen Sie
nicht die Oberfläche der Rollen. Reinigen Sie die
Rolle gründlich, da sich schwarze Ablagerungen
(Tonerpartikel) auf der Rollenoberfläche negativ auf
die Einzugszuverlässigkeit auswirken.
Ausgaberollen (x2)
Seien Sie beim Säubern vorsichtig, beschädigen Sie
nicht die Oberfläche der Rollen.
Reinigen Sie die Rolle gründlich, da sich schwarze
Ablagerungen (Tonerpartikel) auf der
Rollenoberfläche negativ auf die
Einzugszuverlässigkeit auswirken.
Um die Zuführungs- und Ausgaberollen zu drehen,
drücken bitte Sie die [POWER] Taste, während Sie die
[SCAN] Taste gedrückt halten. Als eine Richtlinie:
wenn Sie die Tasten sechs mal drücken, führen die
Rollen eine volle Drehung aus.
ACHTUNG
Schließen Sie das Netzteil und das Netzkabel
nur zur Reinigung der Entladungsrollen an.
3. Schließen Sie die ADF-Abdeckung.
ADF-Abdeckung
ACHTUNG
Befindet sich der ADF in der ursprünglichen
Position, überprüfen Sie ob dieser korrekt
geschlossen ist. Ansonsten kann dies Papierstaus
oder andere Einzugsfehler zur Folge haben.
5.4. Reinigen des Trägerblattes
Wenn Sie das Trägerblatt häufig verwenden, lagert sich
Staub, Taonerpartikel und andere Verschmutzungen an der
Innen- und Außenseite ab.
Reinigen Sie bitte daher das Trägerblatt regelmäßig um
eine Beeinträchtigung der Scanqualität zu vermeiden.
<Reinigungsmethode>
Benutzen Sie ein trockenes Tuch, befeuchtet mit dem
Reiniger F1 (ersatzweise auch ein anderer, milder
Reiniger) um Verschmutzungen an der Außen- und
Innenseite des Trägerblattes zu entfernen.
ACHTUNG
● Benutzen Sie niemals Lackverdünner
oder andere organische Lösungen.
● Reinigen Sie bitte vorsichtig. Ein hartes
Bürsten oder Ähnliches kann das
Trägerblatt verkratzen oder verformen.
● Nach der Reinigung der Innenseite mit
dem Reiniger F1, lassen Sie das
Trägerblatt erst vollständig trocknen,
bevor Sie dieses wieder zuklappen.
● Ersetzen Sie das Trägerblatt bitte als
Richtlinie alle 500 Scans.
Siehe “6.4 Erwerben des Trägerblattes”
für Details über den Erwerb des
Trägerblattes.
20 |
SCAN
cWährend Sie die
[SCAN] Taste
POWE
d…drücken Sie die
DUPLEX
COLOR
[POWER] Taste.
n…
Page 75

6. Verbrauchsmaterialien/Trägerblatt
Dieses Kapitel beschreibt das Ersetzen und Erwerben von
Verbrauchsmaterialen und des Trägerblattes.
WARNUNG
Brand/Elektrischer Schlag
Bevor Sie Verbrauchsmaterial ersetzen, stecken Sie bitte
das Netzkabel aus um den Scanner auszuschalten.
6.2. Austausch der
Ersetzen Sie die Papierseparations-Einheit wie folgt:
1. Entfernen Sie alle Dokumente aus dem
Papierseparations-Einheit
Dokumentenpfad und dem ADF-Papierschacht.
6.1. Teile-Nr und Ersetzungs-Zyklen
der Verbrauchsmaterialien
Die folgende Tabelle listet die Teilenummern der
Verbrauchsmaterialien auf und macht eine ungefähre
Angabe über den Austausch dieser Teile.
Nr.
Beschreibung Teile-Nr. Ersetzungs-Zyklus
fi-5110EOX2
1
2
Papier-
separations-
Einheit
fi-5110EOX2
Einzugsrolle
PA03360-0002
PA03360-0001
Die Angabe über den Austausch ist nur eine grobe
Richtlinie für die angenommene Benutzung von DIN
A4/Letter Papier ohne Holzanteile (64 g/m
eines Austausches hängt vom gescannten Papier ab.
Benutzen Sie nur die von PFU LIMITED spezifizierten
Verbrauchsmaterialien.
TIP
Um zu bestimmen wan nein Austausch von
Verbrauchsmaterialien nötig ist und um einen Überblick
über die Anzahl der bereits gescannten Seiten zu
gewinnen, siehe folgendes:
1. Rechtsklicken Sie das "ScanSnap Manager"
Symbol in der Arbeitsleiste.
2. Klicken Sie auf [Verbrauchsmaterial überprüfen ...]
im angezeigten Menü.
S
50.000 Blätter oder
ein Jahr
100.000 Blätter oder
ein Jahr
2
). Der Zeitpunkt
2. Öffnen Sie den ADF indem Sie den Abdeckungshebel
nach oben ziehen.
Papierschacht-Abdeckung
ADF-Abdeckung
Abdeckungshebel
3. Ziehen Sie die Papierseparations-Einheit in
Pfeilrichtung heraus, während Sie diese an beiden
Enden festhalten.
PapierseparationsEinheit
ADF-Abdeckung
ÖDer Bildschirm ("Status des Verbrauchsmaterials
prüfen“) zeigt die Anzahl der gescannten Blätter an.
Ersetzen Sie Verbrauchsmaterial mit "Zielwert bis
Materialwechsel" als grobe Richtlinie.
Für Details über Verbrauchsmaterialien und wo Sie
diese erwerben können, besuchen Sie bitte folgende
Website oder kontaktieren Sie den Fachhändler, bei
dem Sie den Scanner erworben haben.
[Website] http://image scanner. Fujitsu.com/scansnap/
4. Installieren Sie die neue Papierseparations-Einheit.
Papierseparations-
Einheit
ADFAbdeckung
ScanSnap fi-5110EOX2 Los Geht’s 21
Page 76

ACHTUNG
Versichern Sie sich, dass die
Papierseparations-Einheit korrekt sitzt.
Anderenfalls kann dies Papierstaus oder
andere Einzugsfehler zur Folge haben.
5. Schließen Sie die ADF-Abdeckung.
ADF-Abdeckung
ÖSie können normalerweise hören, wie der ADF in
seine Position einklickt.
6. Schalten Sie den Scanner ein.
ÖDas ScanSnap Manager Symbol ändert sich von
S
zu .
7. Rechtsklicken Sie das "ScanSnap Manager" Symbol
S
in der Arbeitsleiste und wählen Sie
[Verbrauchsmaterial überpräfen] aus dem Menü.
8. Klicken Sie im “Status des Verbrauchsmaterials
prüfen” Fenster auf die [Zurücksetzen] Taste neben
[...Papierseparations-Einheit].
3. Entfernen Sie die Blattführung.
Drücken Sie den Griff auf der Blattführung um diese
zu entnehmen.
Blattführung
4. Drehen Sie die Einzugsrollen-Halterung (Links) in
Pfeilrichtung.
Einzugsrollen-
Halterung
Einzugsrolle
Einzugsrollenachse
Griff
Klammer
Ö Der Zähler wird auf “0” zurückgesetzt.
6.3. Austausch der Einzugsrolle
Ersetzen Sie die Einzugsrolle wie folgt:
1. Entnehmen Sie alle Dokumente aus dem ADF.
2. Öffnen Sie den ADF indem Sie den Abdeckungshebel
nach oben ziehen.
Papierschacht-Abdeckung
ADF-Abdeckung
Abdeckungshebel
5. Entfernen Sie die Einzugsrolle mit der Achse während
Sie diesen in Pfeilrichtung anheben.
Einzugsrolle
ACHTUNG
Wenn die Umgebung der Einzugsrolle mit
Papierstaub verschmutzt ist, kann dies
Scan-Fehler zur Folge haben. Säubern Sie die
verschmutzten Bereiche mit einem trockenen
Tuch, welches mit dem Reiniger F1 befeuchtet
ist.
* Verwenden Sie kein Wasser, neutrale
Lösungen oder Sprays.
Einzugsrollenachse
22 |
Page 77

6. Entfernen Sie die Einzugsrolle von der Achse.
Ziehen Sie die Rolle von der Achse während Sie die
Halterung nach oben drücken.
Halterung
Achse
9. Fixieren Sie die Einzugsrollen-Halterung (links),
indem Sie diese in Pfeilrichtung drehen.
Einzugsrolle
ACHTUNG
Geben Sie Acht, nicht Ihren Fingernagel
abzubrechen. Um dies zu vermeiden, können
Sie auch wie in der Abbildung gezeigt eine
Büroklammer zum Anheben der Halterung
verwenden.
1
2
7. Stecken Sie die neue Einzugsrolle auf die Achse auf.
Installieren Sie die neue aufgesteckte Einzugsrolle,
indem Sie die Hervorstehung an dem entsprechenden
Gegenstück der neuen Einzugsrolle ausrichten.
Einzugsrolle
Gegenstück
Achse
Hervorstehung
8. Installieren Sie die neue Einzugsrolle aufgesteckt auf
der Achse,
Halterung einsetzen.
indem Sie die Achse in die entsprechende
Halterung
Einzugsrolle
ACHTUNG
Einzugsrollen
-Halterung
Versichern Sie sich, dass die Einzugsrolle
korrekt sitzt. Anderenfalls kann dies
Papierstaus oder andere Einzugsfehler zur
Folge haben.
10. Bringen Sie die Blattführung an den Scanner an.
Setzen Sie die Blattführung in den Scanner ein,
während Sie deren Griff fassen
Blattführung
.
Ö Sie können normalerweise hören, wie der ADF in
seine Position einklickt.
11. Schließen Sie die ADF-Abdeckung.
Achse
Griff
Klammer
Achse
Einzugsrolle
ADF-Abdeckung
Ö Sie können normalerweise hören, wie der ADF in
seine Position einklickt.
ScanSnap fi-5110EOX2 Los Geht’s 23
Page 78

12. Schalten Sie den Scanner ein.
Ö Das ScanSnap Manager Symbol ändert sich von
S
zu .
13. Rechtsklicken Sie das "ScanSnap Manager" Symbol
S
in der Arbeitsleiste und wählen dann
[Verbrauchsmaterial überprüfen] aus dem Menü.
14. Im “Status des Verbrauchsmaterials prüfen” Fenster,
klick Sie die [Zurücksetzen] Taste des ersetzten
Verbrauchsmaterials.
6.4. Erwerben des Trägerblattes
Wenn das mit dem Scanner gelieferte “Trägerblatt” nicht
mehr für das Scannen verwendet werden kann (wegen
Abnutzung oder Beschädigung), können Sie ein neues
Trägerblatt separat erstehen.
Es wird empfohlen, dass Trägerblatt alle 500 Scans zu
ersetzen.
Diese Richtlinie hängt aber vom Umgang mit dem
Trägerblatt ab. Sollte das Trägerblatt verkratzt oder
beschädigt sein, tauschen Sie dieses bitte entsprechend aus.
Die Beschreibung und Produktnummer des Trägerblattes
(separat vertrieben) können Sie aus folgender Tabelle
entnehmen:
Beschreibung Stück P/N
ScanSnap A3Trägerblatt
5
FI-511ES-WW
Blatt
24 |
Page 79

P3PC-1142-01AL
Scanner di Immagini a Colori
TM
fi-5110EOX2
AAvvvviioo RRaappiiddoo
.
Leggere questa guida prima di collegare lo scanner al computer.
Page 80

Contenuti
Introduzione .......................................................................................................................................................... 1
1. Preparazione...................................................................................................................................................... 5
1.1. Controllare i contenuti della confezione.............................................................................................................................................5
1.2. Nomi e funzioni delle parti ....................................................................................................................................................................5
2. Collegare ScanSnap ......................................................................................................................................... 6
2.1. Installare il Software fornito .................................................................................................................................................................6
2.1.1. Installare Adobe Acrobat 6.0 .........................................................................................................................................................6
2.1.2. Installare ScanSnap Manager, ScanSnap Organizer, CardMinder e PDF Thumbnail View .....................................................7
2.2. Collegare lo scanner .............................................................................................................................................................................7
2.2.1. Collegare il cavo di alimentazione ................................................................................................................................................7
2.2.2. Collegare il cavo USB. ...................................................................................................................................................................8
3. Come usare ScanSnap................................................................................................................................... 10
3.1. Scansione di documenti di ufficio .....................................................................................................................................................10
3.2. Impostazioni di scansione..................................................................................................................................................................10
3.3 Scansione di documenti di ufficio ......................................................................................................................................................10
3.4. Scansione con il Trasporto Fogli. ......................................................................................................................................................11
3.5. Scansione dei biglietti da visita .........................................................................................................................................................11
3.6. Riguardo PDF Thumbnail View ..........................................................................................................................................................12
3.7. ScanSnap Organizer ...........................................................................................................................................................................12
4. Soluzione dei problemi................................................................................................................................... 13
4.1. Lista di controllo della Soluzione dei problemi................................................................................................................................13
4.2. Rimuovere inceppamenti della carta.................................................................................................................................................16
5. Manutenzione giornaliera............................................................................................................................... 17
5.1. Materiali per la Pulizia .........................................................................................................................................................................17
5.2. Pulire lo Scanner Esteriormente........................................................................................................................................................17
5.3. Pulire all’interno dello scanner ..........................................................................................................................................................17
5.4. Pulire il Trasporto Fogli ......................................................................................................................................................................18
6. Sostituire i materiali di consumo e alcune Parti regolari ........................................................................... 19
6.1.
Numeri delle parti e Ciclo di sostituzione dei materiali di consumo
6.2. Sostituire il separatore fogli ...............................................................................................................................................................19
6.3. Sostituire il rullo di pescaggio ...........................................................................................................................................................20
6.4. Acquistare il Trasporto Fogli ..............................................................................................................................................................22
Tutti i diritti riservati, diritti d’autore © PFU LIMITED 2005.
I contenuti di questo manuale sono soggetti a modifiche senza preavviso.
Nessuna parte di questo manuale può essere riprodotta, adattata o tradotta senza alcuna autorizzazione.
LEGGERE ATTENTAMENTE QUESTO MANUALE PRIMA DI USARE QUESTO PRODOTTO SE QUESTO PRODOTTO NON VIENE
USATO CORRETTAMENTE, POTREBBERO ESSERE CAUSATE ALL’UTENTE O ALLE PERSONE ACCANTO LESIONI INASPETTATE.
Mentre tutti gli sforzi possibili sono stati fatti per assicurare l’accuratezza di tutte le informazioni di questo manuale, PFU LIMITED non si assume alcuna
responsabilità verso alcuna parte per qualsiasi danno causato da errori o omissioni o da dichiarazioni di qualsiasi tipo in questo manuale, i suoi aggiornamenti
o supplementi, sia che questi errori siano omissioni o dichiarazioni risultanti da negligenza, incidenti, o qualsiasi altra causa.
PFU LIMITED inoltre non assume alcuna responsabilità derivante dall’applicazione o l’ uso di qualsiasi prodotto o sistema qui descritto; né alcuna
responsabilità per danni incidentali o consequenziali derivanti dall’uso di questo manuale
PFU LIMITED non riconosce nessuna garanzia riguardo alle informazioni qui contenute, siano esse espresse, implicite o statutarie.
PFU LIMITED non si assume alcuna responsabilità per danni fortuiti o conseguenti in seguito all'uso di questo prodotto e per qualsiasi
reclamo di terze parti.
...................................................................................................19
Page 81

Introduzione
Grazie per l’acquisto del prodotto ScanSnap fi-5110EOX 2
Scanner a Colori fronte retro.
ScanSnap fi-5110EOX2 viene fornito come uno Scanner a
Colori per immagini ed applicazioni per l'ufficio. Si tratta di
una completa Soluzione per Ufficio volta a migliorare la
produttività e risolvere i problemi di scansione d'ufficio.
ScanSnap presenta le seguenti caratteristiche.
● Semplicemente premendo il tasto Scanner
permette di convertire immagini su carta in
file PDF !
Potete modificare i documenti che si accumulano sul
desktop in file PDF, gestirli e archiviarli nel
computer. Potete usare il software Adobe
fornito con lo scanner per visualizzare questi
documenti PDF.
ScanSnap riconosce automaticamente il tipo di
documento, a colori o in bianco e nero, in modo che
file d’immagini scansite sono resi più piccoli durante
la scansione di documenti che contengono un misto
di pagine a colori e in bianco e nero. Lo scanner può
inoltre rimuovere automaticamente pagine bianche
nei documenti per ridurre ulteriormente la
dimensione dei file.
● Scansione senza sforzo!
Documenti a colori su due lati in formato A4 o
Lettera possono essere scansionati ad una velocità di
15 fogli il minuto (alle seguenti condizioni: Intel
Pentium
Windows
®
4 1.8GHz o più veloce, Windows® 98,
®
Me, Windows® 2000 o Windows® XP, la
modalità Scan: Normale, la modalità Colore: Auto, e
il tasso di compressione è su 3).
● Piccolo spazio sul desktop!
Di dimensioni più piccole di un foglio formato A4 o
Lettera, ScanSnap può essere lasciato sempre sul
tavolo.
● Biglietti da visita archiviati facilmente!
Biglietti da visita possono essere archiviati e ricercati
facilmente usando la funzione OCR con il software
"CardMinder per ScanSnap" applicazione fornita
con lo scanner.
(*Lo scanner ScanSnap fi-5110EOX NON
aderisce allo standard TWAIN o ISIS
Produttore
PFU LIMITED
International Sales Dept., Image Business Division,
Products Group
Solid Square East Tower, 580 Horikawa-cho, Saiwai-ku,
Kawasaki-shi Kanagawa 212-8563, Japan
Phone: +81 (44) 540-4538
Marchi
Microsoft e Windows sono marchi registrati di
Microsoft Corporation negli Stati Uniti e/o in altri
paesi.
Adobe, il logo Adobe, e Acrobat sono marchi
registrati di Adobe Systems Incorporated negli Stati
®
Acrobat
.)
®
®
Uniti e/o altri paesi.
ScanSnap, il logo ScanSnap, e CardMinder sono i
marchi di PFU LIMITED.
Altri nomi di prodotti sono marchi o marchi
registrati delle rispettive compagnie.
Come sono indicati i marchi e i prodotti
dei nomi in questa guida.
ScanSnap: ScanSnap fi-5110EOX2
CardMinder: CardMinderTM 2.0
Referenze a sistemi operativi (OS) sono indicati
come seguono:
Windows 98: Sistema operativo Microsoft®
Windows
Windows Me: Sistema operativo Microsoft
Windows
Windows 2000: Sistema operativo Microsoft
Windows
Windows XP: Microsoft
operating system,
Microsoft® Windows® XP Home
Edition operating system.
Dove non ci sia distinzione tra le differenti versioni del
sistema operativo citate sopra , è usato il termine generale
"Windows
Adobe Acrobat 6.0: Adobe® Acrobat® 6.0 Standard
Dove non ci sia distinzione tra le differenti versioni delle
applicazioni citate sopra , è usato il termine generale
"Adobe Acrobat"
ScanSnap e i Manuali
"
ScanSnap fi-5110EOX consiste di:
1) Scanner d’Immagini a Colori
2) Il Trasporto Fogli: Un documento è inserito nel
trasporto fogli usato per la scansione. Si possono
scansionare documenti grandi di misura come A3/B4 e
11 x 17, documenti di forma irregolare come anche
ritagli di articoli.
3) ScanSnap Manager: software driver di ScanSnap per la
scansione e per salvare i documenti.
4) CardMinder: software con motore OCR per catturare
e gestire dati di biglietti da visita da esportare a
software di gestione informazioni personali come
Microsoft
5) Adobe
®
Outlook®.
®
Acrobat®: standard software per generare e
manipolare documenti elettronici in formato PDF.
Questi manuali sono stati preparati per voi:
ScanSnap fi-5110EOX2 Avvio Rapido
(Questo manuale):
provvede di informazioni di base per installare e usare la
risoluzione dello ScanSnap.
®
98
®
Millennium Edition
®
2000 Professional
®
Windows® XP Professional
®
®
ScanSnap fi-5110EOX2 Avvio Rapido 1
Page 82

Guida dell’operatore ScanSnap fi-5110EOX2
(Manuale PDF incluso in ScanSnap Setup CD-ROM):
Fornisce informazioni dettagliate riguardo
all’installazione del software e dell’hardware di
ScanSnap, le operazioni dell’hardware dello scanner e
del monitor di ScanSnap.
Guida dell’operatore di CardMinder
(Manuale PDF incluso in ScanSnap Setup CD-ROM):
provvede dettagliate informazioni sull’uso di
CardMinder.
ScanSnap Organizer Guida dell’operatore
(Nel Setup CD-ROM è inclusa la Guida in formato PDF):
fornisce informazioni dettagliate su come usare
ScanSnap.
Per informazioni sull’uso d’Adobe Acrobat, fare
riferimento a “Adobe Acrobat Help”.
Informazioni sulle normative
Dichiarazione FCC
This equipment has been tested and found to comply
with the limits for a Class B digital device, pursuant
to Part 15 of the FCC Rules. These limits are
designed to provide reasonable protection against
harmful interference in a residential installation. This
equipment generates, uses, and can radiate radio
frequency energy and, if not installed and used in
accordance with the instruction manual, may cause
harmful interference to radio communications.
However, there is no guarantee that interference will
not occur in a particular installation. If this
equipment does cause harmful interference to radio
or television reception, which can be determined by
turning the equipment off and on, the user is
encouraged to try to correct the interference by one
or more of the following measures:
- Reorient or relocate the receiving antenna.
- Increase separation between equipment and
receiver.
- Connect equipment to an outlet on a circuit
different from that to which the receiver is
located.
- Consult your dealer or an experienced radio/TV
technician.
Cambiamenti o modifiche non espressamente
approvati dalla parte responsabile della
conformità possono invalidare l’autorità
ATTENZIONE
dell’utente di operare l’apparecchio.
L’uso di un cavo di interfaccia USB e del cavo
alimentazione fornito con questo prodotto è
richiesto per la conformità ai limiti di classe B
della Parte 15 delle regole FCC
Regole DOC Canadesi
This digital apparatus does not exceed the Class B
limit for radio noise emissions from digital apparatus
set out in the Radio interference Regulations of the
Canadian Department of Communications.
This Class B digital apparatus complies with
Canadian ICES-003.
Le pèsent appareil numérique n’ément pas de bruits
radioélectriques dépassant les limites applicables aux
appareils numériques de la classe B prescridtes dans
le Réglesment sur le brouillage radioélectrique dicté
par le ministère des Communications du Canada.
Cet appareil numérique de la classe B est conforme à
la norme NMB-003 du Canada.
Bescheinigung des Herstellers /
Importeurs
Für den fi-5110EOX2 wid folgendes bescheinigt:
• In Übereinsstimmung mit den Bestimmungen der
EN45014(CE) funkentstört.
Maschinenlärminformationsverordnung 3.
•
GPSGV, 06.01.2004: Der höchste
Schalldruckpegel beträgt 70 dB (A) oder weniger,
gemäß EN ISO 7779.
Programma Internazionale ENERGY STAR®
Come partner d’ENERGY
STAR®, PFU LIMITED
conferma che questo prodotto è
conforme alle linee direttive di
ENERGY STAR® sull’efficienza energetica
Il Programma International ENERGY STAR® sulle
apparecchiature per ufficio è un programma
internazionale che promuove il risparmio energetico
attraverso la diffusione di computer energicamente
efficienti e altre apparecchiature da ufficio. Il
programma supporta lo sviluppo e la disseminazione
di prodotti con funzioni che riducono effettivamente
i consumi d’energia. E’ un sistema aperto in cui i
proprietari d’imprese possono partecipare
volontariamente. I prodotti in oggetto sono
apparecchiature per ufficio come computer, monitor,
stampanti, fax, copiatrici, scanner, e dispositivi
multifunzionali. Gli standard e il logo (
) sono
uniformi tra le nazioni partecipanti.
Uso in applicazioni di alta sicurezza
Questo apparecchio è stato progettato e prodotto di
modo che sia usato in applicazioni per ufficio,
personali, domestiche, industria regolare e per scopi
generali. Non è stato progettato e prodotto per uso in
applicazioni (di seguito chiamate "applicazioni d’alta
sicurezza) che comportano direttamente rischi alla
2 |
Page 83

vita e alla salute quando siano richiesti livelli di
sicurezza molto alti, ad esempio, nel controllo di
reazioni nucleari in impianti nucleari, il volo
automatico d’aerei, il controllo del traffico aereo, il
controllo operativo di sistemi di trasporto di massa, le
apparecchiature mediche di sostegno alla vita, e il
lancio di missili in sistemi bellici, e quando
temporaneamente, la sicurezza in questione non è
assicurata. L’utente dovrà usare questo prodotto
senza adottare accorgimenti per assicurare la
sicurezza in tali applicazioni ad alta sicurezza. PFU
LIMITED non assume alcuna responsabilità per
danni creati dall’uso di questo prodotto da parte
dell’utente in applicazioni ad alta sicurezza, e per
qualsiasi richiesta o compensazione per danni
avanzata dall’utente o da terzi.
Sull’ uso del mercurio
La lampada (le lampade) dentro questo prodotto
H
g
contiene mercurio e deve essere riciclato o trattato
in conformità alle ordinanze o alle norme di
smaltimento locali.
Per evitare lesioni inaspettate, leggere con attenzione
la parte seguente
Queste azioni potrebbero procurare lesioni personali:
• Non inghiottire la sostanza contenuta nella
lampada poiché contiene mercurio.
• Non bruciare, frantumare o rompere lo scanner.
• Non respirare il liquido chimico contenuto nelle
parti dello scanner.
Convenzioni
Indicazioni d’Avvertimento usate in
questo manuale
AVVISO
Questa indicazione allerta l’operatore riguardo
ad un’operazione che, se non strettamente
osservata, potrebbe causare gravi lesioni o
morte.
PRUDENZA
Questa indicazione allerta l’operatore riguardo
ad un’operazione che, se non strettamente
osservata, potrebbe risultare in rischi alla
sicurezza del personale o danneggiare
l’apparecchio.
Simboli usati in questo manuale
Il simbolo TRIANGOLO TRIANGLE indica che è
necessaria particolare cura e attenzione.
Il disegno all’interno del triangolo indica la specifica
precauzione.
Un CERCHIO con una linea diagonale interna,
indica le azioni che l’utente non dovrebbe
compiere.
Il disegno interno o sotto il cerchio, indica
R
l’azione specifica che non è permessa.
Caratteri sottolineati su sfondo a colori indicano
azioni che l’utente deve seguire.
Potrebbe anche includere il disegno che
indica l’istruzione specifica.
Riguardo all’etichetta d’Avvertimento
Questo prodotto usa la seguente etichetta
d’Avvertimento.
L’area attorno a cui è attaccata quest’etichetta può
diventare molto calda. Stare seriamente attenti
poiché il calore può causare bruciature.
ATTENZIONE
Non rimuovere dallo scanner, sporcare o graffiare
l’etichetta d’Avvertimento.
Schermate d’esempio in questo manuale
Le schermate di esempio in questo manuale sono
soggette a modifiche senza preavviso nell’interesse
del miglioramento del prodotto.
Se l’attuale schermata visualizzata fosse differente
dalle schermate d’esempio in questo manuale,
seguite la schermata ora visualizzata, mentre fate
riferimento al Manuale dell’utente dell’applicazione
dello scanner che state usando.
Inoltre, le finestre di dialgo in questa guida sono per
ScanSnap Manager, l’applicazione CardMinder,
PDF Thumbnail View, ScanSnap Organizer e Adobe
Acrobat.
Informazioni sulla manutenzione
L’utente non deve eseguire riparazioni a questo
scanner.
Contattare il negozio dove avete acquistato lo
scanner o un fornitore d’assistenza autorizzato
FUJITSU Scanner d’immagini per le riparazioni a
questo prodotto.
Questo manuale adotta i seguenti simboli per spiegazioni
in addizione alle indicazioni d’avvertimento.
ATTENZIONE
Questo simbolo allerta l’operatore riguardo a
particolari importanti informazioni. Assicurarsi di
leggere le informazioni.
AVVI SO
Questo simbolo allerta l’operatore su avvisi utili
riguardo alle operazioni.
ScanSnap fi-5110EOX2 Avvio Rapido 3
Page 84

Precauzioni di sicurezza
SEGUIRE QUESTE ISTRUZIONI E ASSICURARSI
DI SEGUIRE TUTTE LE AVVERTENZE E
PRECAUZIONI DESCRITTE DI SEGUITO.
AVVISO
Non toccare la presa di corrente con le mani
bagnate. Può causare scosse elettriche.
Un cavo AC danneggiato può causare incendi o
scosse elettriche.
Non mettere oggetti pesanti sui cavi AC, tirare,
piegare, arrotolare, riscaldare, danneggiare e
modificare i cavi AC.
Inoltre, non usare cavi AC o prese di corrente
danneggiate, e cavi AC o prese di corrente quando
la presa a muro è allentata. Inoltre, non utilizzare
cavi AC o spine di alimentazione danneggiati o le
prese a muro di alimentazione allentate.
Non usare altri cavi al di fuori di quelli forniti con
questo prodotto. Usare solo cavi AC e cavi
connettori. Il mancato uso di cavi di corrente corretti
può causare scosse elettriche e guasti
all’apparecchio.
Usare questo scanner solo con il voltaggio e la
corrente indicati. I Voltaggi e la corrente impropri
possono causare incendi o scosse elettriche.
Inoltre, non collegarlo a prese multiple di corrente.
Togliere la polvere dalle parti metalliche sulla presa
di corrente con un panno soffice e asciutto.
L’accumulo di polvere può causare fuochi o shock
elettrico.
Non installare lo scanner in posti esposti a fumi di oli,
vapore, umidità e polvere. Facendo questo, si può
causare incendi o scosse elettriche.
Se rilevate calore proveniente dal dispositivo,
oppure rilevate altri problemi come fumo, strani odori
o rumori, spegnete immediatamente lo scanner e
scollegate la presa di corrente.
Assicurarsi che il fumo sia cessato, e quindi
contattare il negozio dove lo avete acquistato o un
fornitore d’assistenza autorizzato FUJITSU.
Se lo scanner è danneggiato per qualsiasi ragione,
spegnerlo e staccare il cavo di corrente prima di
contattare il negozio dove lo avete acquistato.
Non inserire o lasciar cadere oggetti metallici nello
scanner.
Non scansionare documenti bagnati o con graffette.
Non versare liquidi e non permettere che lo scanner
si bagni.
Se oggetti estranei (acqua, piccoli oggetti metallici,
liquidi etc.) entrano nello scanner, spegnetelo
immediatamente e scollegate il cavo di corrente
dalla presa, quindi contattare il negozio dove lo
avete acquistato o il Centro d’Assistenza Tecnica.
Fare particolare attenzione a quest’avvertenza nel
caso vi fossero bambini piccoli nelle vicinanze.
Non aprire o modificare lo scanner. L’interno dello
scanner contiene componenti ad alto voltaggio
Toccare questi componenti, può causare incendi o
scosse elettriche.
PRUDENZA
La parte seguente descrive importanti precauzioni.
Installare lo scanner su un tavolo in modo che
nessuna parte sporga da esso. Inoltre assicurarsi
che lo scanner sia installato su una superficie piana
e regolare.
Non installare lo scanner su superfici instabili.
Installare lo scanner su una superficie piatta libera
da vibrazioni per prevenirne la caduta.
Installare lo scanner su una superficie robusta che
sopporti il peso dello scanner e di altri dispositivi.
Inserire fermamente il cavo della corrente nella
presa.
Installare lo scanner lontano da forti campi magnetici
e altre fonti di disturbo elettrico. Inoltre, proteggere lo
scanner da elettricità statica che può provocare
malfunzionamenti dello scanner.
Non usare spray aerosol per pulire lo scanner.
Spray aerosol causano l’entrata di sporco e polvere
nello scanner, causandone guasti e
malfunzionamento.
Quando lo scanner non è usato per lunghi periodi,
assicurarsi di scollegare il cavo della corrente dalla
presa per sicurezza.
Non installare lo scanner alla luce diretta del sole o
vicino ad apparecchi di riscaldamento. Questo può
creare un eccessivo riscaldamento all’interno dello
scanner, causando incendi o problemi. Installare lo
scanner in un luogo ben ventilato.
Non bloccare le porte di ventilazione. Bloccando le
porte di ventilazione, si genera calore all’interno
dello scanner, che può provocare incendi o scosse
elettriche.
Non mettere oggetti pesanti sullo scanner o usare la
parte superiore dello scanner per altri lavori.
Un’installazione impropria può provocare lesioni.
Non muovere lo scanner quando il cavo della
corrente e i cavi di interfaccia sono collegati perchè
potrebbero danneggiarsi, provocando incendi,
schock elettrico o lesioni.
Prima di muovere lo scanner, assicurarsi di
scollegare il cavo di corrente dalla spina, e di
scollegare il cavo dei dati. Assicurarsi inoltre che
non ci siano ostacoli sul suolo.
Evitare di toccare qualsiasi meccanismo dello
scanner durante la scansione perchè potrebbe
provocare lesioni
Non usare l’apparecchiatura immediatamente dopo
averla spostata da un luogo freddo ad un luogo
caldo. Questo può causare una condensazione, che
porta ad errori di scansione. Lasciare
l’apparecchiatura raffreddare una o due ore prima di
usarla.
.
4 |
Page 85

1. Preparazione
p
r
(
)
Questo capitolo descrive la preparazione necessaria prima
di iniziare ad usare ScanSnap.
Tasti
ATT EN Z IO N E
Non collegare lo scanner al computer prima di
avere installato “PC Driver”.
Se lo scanner viene collegato prima di installare
ScanSnap Manager, non opererà normalmente.
Fare riferimento al Capitolo 2 per l’installazione
del driver.
1.1. Controllare i contenuti della
confezione
Quando aprite la confezione dello scanner, assicurarsi che
tutte le parti siano incluse.
Fare riferimento alla lista del contenuto della confezione
inclusa nella scatola di confezione.
1.2. Nomi e funzioni delle parti
Questa sezione descrive i nomi delle parti e le loro
funzioni.
Parte frontale
Coperchio dello scivolo
Aprire questo coperchio
quando si usa lo scsanner.
→ Aprire il coperchio e
accendere lo scanne
Coperchio dell’ADF
ADF: Automatic Document Feeder
Cassetta di raccolta
Intsallarlo allo scanner
allineando le due linguette ai
fori alle estremità dello scanner.
Leva di apertura del coperchio
Questa leva serve per aprire il
coperchio dell’ADF.
Coperchio dello scivolo
Aprire questo coperchio e caricare i
documenti in questa parte quando si
scansionano documenti.
Guide laterali
Aggiustare queste guide
laterali alla larghezza dei
documenti per evitare
immagini scansionate
storte
.
Parte posteriore
Sigillo: Dopo l’installazione di ScanSnap
Manager nel computer, rimuovere questo sigillo
er connettere lo scanner al computer.
AVVI SO
Per la Specificazione dei Documenti, fare
riferimento alla “Guida dell’operatore
ScanSnap fi-5110EOX” che si trova nel
Setup CD-ROM di ScanSnap.
ATT EN Z IO N E
Lo scanner viene acceso e spento
automaticamente, quando si apre e si chiude il
coperchio dello scivolo.
Per spegnere lo scanner quando il coperchio è
aperto, premere il tasto [POWER].
Tasto [SCAN]
Comincia la scansione.
Tasto [POWER]
Accende o spegne la linea
di alimentazione.
Spia di energia
Indica lo stato dello scanner.
Verde; :Pronto
Verde
(Lampeggiante)
Arancione :Errore
Luce spenta :Spento
Connettore riduttore AC Connettore USB
:Scansione
Cassetta di raccolta
Per usare questa parte, tirarla fuori come si vede nella figura.
→ Documenti sono gettati dall’ADF in questa cassetta.
Tasti
* Si può usare lo scanner anche senza cassetta di raccolta.
ScanSnap fi-5110EOX2 Avvio Rapido 5
Page 86

2. Collegare ScanSnap
Questo capitolo descrive come collegare ScanSnap al
computer.
2.1.1. Installare Adobe Acrobat 6.0
Preparare il CD-ROM di Adobe Acrobat 6.0.
2.1. Installare il Software fornito
Prima di collegare lo scanner al computer, installare il
seguente software.
c Adobe Acrobat 6.0 (Applicazione)
d ScanSnap Manager (Driver)
e ScanSnap Organizer (Applicazione)
f CardMinder (Applicazione)
g Abilitare PDF Thumbnail View (Applicazione)
ATT EN Z IO N E
AVVI SO
• Assicurarsi di installare “ScanSnap
Manager” prima di collegare lo scanner
computer.
Se lo scanner viene collegato prima di installare
ScanSnap Manager, appare “Installazione
guidata nuovo hardware.” (la dicitura esatta
dipende dal tipo di sistema operativo). In questo
caso, fare click sul tasto [Annulla] per chiudere
la Guida.
• Non è possibile connettere istantaneamente gli
scanner ScanSnap fi-5110EOX e il fi-4110EOX
(o due o più fi-5110EOX scanner) in un
computer.
• Se qualsiasi driver dello ScanSnap serie
fi-4110EOX2 o fi-5110EOX è stato già installato
sul computer, disinstallarlo prima di iniziare una
nuova intsallazione.
• Quando usate Windows 2000 or Windows XP,
eseguire il log on come amministratore.
• I seguenti ambienti operativi sono richiesti per
ScanSnap fi-5110EOX2:
Intel® Pentium® III 600MHz o versione più
CPU:
avanzata (Raccomandata: Intel
1.8GHz o la versione più avanzata)
Memoria:
o più)
*Se il CPU e la memoria non conciliano con le
specifiche richieste o la versione USB è 1.1, la
velocità di scansione potrebbe rallentare
ScanSnap Manager include il driver software per
ScanSnap fi-4110EOX2 e ScanSnap fi-5110EOX2.
Se si hanno già questi software: ScanSnap
fi-5110EOX2, ScanSnap fi-4110EOX2 o ScanSnap
fi-5110EOX, si può connettere lo scanner al PC.
128MB o più (Raccomandata: 256MB
®
Pentium® 4
ATT EN Z IO N E
Adobe Acrobat 6.0 non è sostenuto da Windows 98
e Windows Me
(Windows 98 Second Edition è supportato)
1. Inserire “Adobe Acrobat 6.0 CD-ROM” nell’unità
CD-ROM.
ÖAppare la finestra “Adobe Acrobat 6.0 AutoPlay”.
AVVI SO
Questa finestra non è visualizzata
automaticamente, quando l’impostazione "Auto
play" del computer è spenta. In questo caso,
eseguire “AutoPlay.exe” nel CD-ROM
direttamente usando “Esplora” o “Risorse del
computer”.
2. Selezionare [Installa] e fare click sul tasto [Installa
Acrobat 6.0 Standard].
3. Fare click sul tasto [Avanti>].
ÖL’installazione parte, e appare la finestra di impostazione.
4. Seguire le istruzioni nella finestra di impostazione.
AVVI SO
Fare click sul tasto [Prima di installare] nella
finestra [Adobe Acrobat 6.0 AutoPlay] per altre
informazioni sull’installazione di Adobe Acrobat
6.0. Fare riferimento a “Adobe Acrobat Help”
sull’uso di Adobe Acrobat 6.0.
6 |
Page 87

2.1.2. Installare ScanSnap Manager,
ScanSnap Organizer, CardMinder e
PDF Thumbnail View
Preparare il CD-ROM di ScanSnap Setup.
1. Inserire “ScanSnap Setup CD-ROM” nell’unità
CD-ROM.
Ö Appare la finestra di impostazione “ScanSnap Setup”.
(Quando si reinstallano i programmi, le
seguenti due finestre non appariranno.)
AVVI SO
Questa finestra non è visualizzata
automaticamente, quando l’impostazione "Auto
play" del computer è spenta. In questo caso,
eseguire “Setup.exe” in questo CD-ROM
direttamente usando “Esplora” o “Risorse del
computer”.
2. Fare click sul tasto [Installa Prodotti].
Ö L’installazione di Scansnap Manager, CardMinder e
visualizzazioni d’immagini in miniatura PDF parte, appare
la finestra di Guida.
3. Appare la finestra d’impostazione.
Seguire le istruzioni sulla finestra.
AVVI SO
Durante l’installazione appare la seguente
finestra
[Posizionare il documento a faccia in giù e
scansionare (Raccomandato)]
Selezionare caricare il documento a faccia in
giù al contrario sullo scanner.
[Posizionare il documento a faccia in sù e
scansionare]
Selezionare caricare il documento cosi come è
sullo scanner.
(Nota: Si può cambiare questa impostazione
dopo l’installazione.)
Specificare se compiere o no “Notificare il
risultato della scansione” dopo la scansione.
Se la casella è segnata, la finestra di notifica
appare mostrando se le seguenti funzioni sono
state eseguite o no.
• Abilitare la rimozione automatica
delle pagine vuote
• Abilitare raddirizzamento automatico di
immagini
4. Quando l’installazione è completata riavviare il
computer.
[Tipica] <Raccomandato
“ScanSnap Manager”, “ScanSnap Organizer”,
“CardMinder” e “PDF Thumbnail View” sono
installati inclusi i loro manuali.
[Compatta]
“ScanSnap Manager” è installato con il suo
manuale.
[Personalizzata]
Potete selezionare il software da installare con
il suo manuale.
>
ATT EN Z IO N E
Fare riferimento alla “Guida dell’operatore
ScanSnap” per saperne di può su ScanSnap
Manager o l’installazione di CardMinder
.
2.2. Collegare lo scanner
Dopo che il computer è riavviato, connettere lo scanner.
2.2.1. Collegare il cavo di alimentazione
ATT EN Z IO N E
1. Collegare il cavo d’alimentazione con l’alimentatore.
Non usare altri cavi al di fuori di quelli forniti con
questo prodotto. Usare solo cavi AC e cavi
connettori
.
ScanSnap fi-5110EOX2 Avvio Rapido 7
Page 88

2. Inserire il connettore dalla parte dell’alimentatore alla
presa AC dello scanner.
Presa
Entrata
2.2.2. Collegare il cavo USB.
Usare la seguente procedura per collegare il cavo USB.
Per Windows XP
1) Quando appare [Installazione guidata nuovo hardware],
scegliere “No. non ora” e fare click su [Avanti >].
ATT EN Z IO N E
● Usare il cavo USB fornito con questo scanner.
L’operatività con un cavo USB disponibile in
commercio non è garantita.
● Quando collegate il cavo ad un hub USB,
assicurarsi di collegare l’hub (prima fase) più
vicino al computer. Se lo collegate ad un hub
USB nella seconda fase, ScanSnap potrebbe
non funzionare correttamente..
1. Rimuovere l’etichetta sul connettore USB.
2. Collegare il connettore cavo USB allo scanner ed al
computer .
Cavo USB
3. Aprire il coperchio dello scivolo dello scanner.
(La seguente finestra appare quando il Service Pack 2 è
installato.)
2) Fare click sul tasto [Avanti >], quando appare questa
finestra.
3) Quando appare [Installazione hardware], fare click
sul tasto [Continua].
ATT EN Z IO N E
Ö Il computer rileva automaticamente lo scanner.
Se lo scanner non è acceso
automaticamente, premere il tasto [POWER]
sullo scanner.
Per Windows 98
Viene richiesto di inserire un disco. Alla richiesta, inserire
il CD-ROM di Windows 98 nell’unità CD-ROM.
Fare click sul tasto [OK].
Per Windows Me
Il nuovo hardware viene rilevato e l’installazione è
completata automaticamente.
Per Windows
Quando appare [Firma digitale non trovata], fare click sul
tasto [Sì].
2000
8 |
Appare la finestra di completamento
dell’installazione.
4) Fare click sul tasto [Fine] quando l’installazione è
finita.
L’installazione di ScanSnap è completata!
Page 89

ATT EN Z IO N E
AVVI SO
L'icona "Schermo ScanSnap" viene visualizzata
sulla barra degli strumenti.
Quando l’icona rimane come
[POWER] per spegnere lo scanner e premere il
tasto [POWER] per accenderlo di nuovo.
(Abilita un intervallo di tempo di 5 secondi quando
si accende o si spegne lo scanner)
Quando si accende e si spegne lo scanner,
premere il tasto [POWER] per più di un secondo.
*Per prevenire disfunzioni operative, il tasto
[POWER] non funziona almeno che non si premi
per più di un secondo.
S
.
, premere il tasto
ScanSnap fi-5110EOX2 Avvio Rapido 9
Page 90

3. Come usare ScanSnap
Questo capitolo descrive operazioni di base di ScanSnap.
3.1. Scansione di documenti di
ufficio
Con “ScanSnap” si possono trasformare i documenti in
carta di ufficio sul proprio tavolo in file digitali e salvarli
premendo soltanto un singolo tasto. L’immagine acquisita
può essere visualizzata sullo schermo tramite delle
applicazioni fornite (Adobe Acrobat, CardMinder).
Ci sono due tipi di uso:
c
Creare un backup digitale di documenti di ufficio come file
PDF. Visualizzateli e modificateli in seguito usando “Adobe
Acrobat”. Adobe Acrobat permette di usare le informazioni
scansionate usando la funzione OCR (Riconoscimento ottico
di caratteri) (Cattura della carta) per estrarre il testo e la
sicurezza di funzione inserendo una parola chiave.
(Nota: Per informazioni sull’uso di Adobe Acrobat, fare
riferimento a [Adobe Acrobat Help].)
d Scansire ed archiviare biglietti da visita. Con “CardMinder”,
potete scansire, riconoscere e modificare biglietti da visita, ed
esportare i dati ad una applicazione di gestione di
informazioni personali tra le più diffuse come Outlook.
3.2. Impostazioni di scansione
Potete cambiare le impostazioni di scansione di ScanSnap
usando “ScanSnap Manager”.
1. Fare click destro sull’icona “ScanSnap Manager”
sulla barra degli strumenti, e selezionare
[Impostazione...] dal seguente menu.
S
Ci sono sei targhette usate per configurare le opzioni di
scansione:
[Applicazione di avvio]
Selezionare l’applicazione per vedere/aggiustare le
immagini scansionate.
[Cartella salvataggio]
Specifica la cartella e il nome del file dove si salvano le
immagine acquisite.
[Modalità scansione]
Specifica la qualità dell’immagine scansionata.
[Tipo file]
Seleziona il tipo di formato file (PDF, JPEG) delle
immagini salvate.
[Dimensione carta]
Select the size of the document to be scanned.
[Compressione]
Seleziona il rapporto di compressione del file.
AVVI SO
Per saperne di più riguardo a queste
installazioni fare riferimento alla “Guida
dell’operatore di ScanSnap” nel ”Setup
CD-ROM di ScanSnap”
3. Fare click sul tasto [OK] per completare le
impostazioni.
Ö Le nuove impostazioni sono abilitate.
3.3 Scansione di documenti di ufficio
1. Selezionare “Adobe Acrobat” sulla targhetta
[Applicazione di avvio] di “Scansione e Salvataggio
delle impostazioni”.
ÖSi apre la finestra “Scansione e salvataggio delle
impostazioni”.
2. Cambiare le impostazioni di scansione nella finestra
“Scansione e salvataggio delle impostazioni”.
2. Caricare I documenti sullo scanner.
Direzione
[Modalità
scansione]
Impostare la carta a faccia in
giù rivolta verso il coperchio
dello scivolo.
Disporre il retro dei
documenti
frontalmente
Tasto [SCAN]
ATT EN Z IO N E
Al passo 3 di [2.1.2 Installare ScanSnap
Manager, ScanSnap Organizer, CardMinder e
PDF Thumbnail View], se si seleziona
[Permettere ai documenti da scansionare di
stare a faccia in su attraverso l'ADF],
posizionare il documento come segue.
Posizionare
la carta a
faccia in su
10 |
Page 91

3. Premere il tasto [SCAN].
Ö La scansione parte.
Ö Quando la scansione è completata, Adobe Acrobat avvia e
visualizza le immagini acquisite.
AVVI SO
● Potete anche usare un’altra applicazione per
visualizzare immagini acquisite dopo la
scansione.
● Premere il tasto [SCAN], i documenti vengono
scansionati nella modalità “Fronte/retro”.
Per scansionare i documenti nella modalità
”Semplice”, cambiare le impostazioni usando
ScanSnap Manager .
S
● ScanSnap può scansire documenti usando varie
impostazioni Fare riferimento alla “Guida
dell’operatore ScanSnap” nel “Setup CD-ROM
ScanSnap” per ulteriori informazioni riguardo la
scansione di documenti.
4. Premere il tasto [SCAN].
La pagina di fronte e
Ö
quella retro sono
visualizzate a Pagine
affiancate e disposte
una accanto all’altra.
HINT
Il metodo di caricamento e le impostazioni di
ScanSnap Manager differiscono in accordo ai
documenti da scansionare. Per i dettagli fare
riferimento a “ScanSnap Guida
dell’operatore” sul “ScanSnap Setup
CD-ROM” .
3.5. Scansione dei biglietti da visita
3.4. Scansione con il Trasporto
Fogli.
Se si usa il Trasporto Fogli , si possono scansionare
documenti grandi come A3/B4/11x17 -misura di documenti,
e anche documenti con una misura irregolare come ritagli di
articoli.
Qui, come esempio, questa sezione spiega come
scansionare documenti di misura A3.
Se si scansiona un documento A3, non è possibile caricarlo
sullo scanner cosi come è. Piegare il documento a metà e
scansionarlo seguendo le procedure in basso.
1. Stendere la pagina a faccia in su e piegarla a metà
precisa.
Piegarla in modo chiaro in modo che la parte piegata
non appaia gonfia.
2. Aprire il Trasporto Fogli e posizionare il documento
piegato.
Allineare la parte
superiore del documento
alla parte superiore del
Trasporto fogli, e mettere
la parte piegata del
documento allineata in
alto a destra.
3. Posizionare il Trasporto Fogli sullo scanner.
● Posizionare la parte superiore del
Trasporto con i disegni in bianco e
nero stampati, e caricarlo nella
direzione della fraccia.
● Se si sta usando il Trasporto Fogli
per la scansione, non è possibile
scansionare diversi fogli
ininterrottamente.Caricare i fogli
uno dopo l’altro e scansionarli.
1. Selezionare “CardMinder” sulla targhetta
[Applicazione] di “Impostazioni di Scansione e
Salvataggio”.
AVVI SO
● Quando “CardMinder” è selezionato, solo
[Applicazione di avvio] e [Modalità
scansione] sono abilitati.
● Fare riferimento alla “Guida dell’operatore
ScanSnap” nel “Setup CD-ROM
ScanSnap” per altre informazioni riguardo
alle impostazioni.
2. Caricare i biglietti da visita sullo scanner. Aggiustare
le guide laterali alla larghezza dei biglietti da visita.
Guide laterali
Biglietti da visita
(Impostarli a faccia in giù)
Tasto [SCAN]
3. Premere il tasto di scansione.
Ö La scansione parte.
La finestra di “CardMinder”si apre, e i dati
Ö
riconosciuti, nome, compagnia, indirizzo di e-mail
appaiono nella finestra.
4. Appare questa finestra
Selezionare un biglietto da visita dalla lista Dati.
Controllare i dati nel campo Risultato Riconoscimento
in questa finestra Correggere i dati se riconoscete
qualche sbaglio.
Lista dati
Tasto [Microsoft Outlook]
Risultato
riconosciuto
Immagine
scansionata
ScanSnap fi-5110EOX2 Avvio Rapido 11
Page 92

pag
5. Usando Outlook come esempio, dopo aver confermato
i dati del biglietto da visita, selezionare i biglietti che
volete esportare in Outlook. Fare click sul tasto
[Microsoft Outlook] sulla Barra degli strumenti. I dati
sono esportati in Outlook.
AVVI SO
Potete inviare i dati (risultato riconoscimento)
alle seguenti applicazioni:
● Microsoft
● Outlook Express
● ACT!™
● GoldMine
Oppure potete salvare i dati in formato CSV da
importare in altre applicazioni come Excel.
Fare riferimento per dettagli alla “Guida
dell’operatore CardMinder”.
®
Outlook®
®
6. Avviare Outlook per confermare i dati del biglietto da
visita importato.
Dal menu [Start], quando si sieleziona [Tutti i programmi] –
[ScanSnap Organizer] – [ScanSnap Organizer], le seguenti
finestre appaiono.
Lista Cartelle
Mostra la cartella che è stata scelta da ScanSnap Organizer.
7. Quando volete chiudere “CardMinder”, selezionare
[Esci] nel menu [File].
AVVI SO
“CardMinder” provides also various other functions.
Fare riferimento alla “Guida dell’operatore
CardMinder” nel “Setup CD-ROM ScanSnap” per
ulteriori informazioni.
3.6. Riguardo PDF Thumbnail View
“PDF Thumbnail View” è un programma che permette di
usare Windows Esplora per visualizzare iimagini in
miniatura PDF.
E’ disabilitato per preimpostazione.
(*Questo programma è installato quando il Sistema Operativo è
Windows 2000
Abilitare PDF Thumbnail View
1. Sul menu [start], selezionare [Programmi] – [PDF
Thumbnail View] – [Strumento di configurazione].
Fare click sul box di controllo “Attiva” e fare click sul
2.
tasto [OK] nella finestra “Impostazioni della funzione
Visualizza miniatura PDF”.
Ö Potete vedere le immagini in miniatura di file PDF con
Windows Explorer esattamente come bitmap o immagini
JPEG.
o
Windows XP.)
Lista file
I file PDF/JPEG che sono scelte sono
mostrate in miniatura (Thumbnail).
Finestra in miniature dei Pop-up
Mostra le pagine selezionate in una finestra pop-up.
Immagine Miniatura (Thumbnail)
Visualizza un imagine in miniature del file
Numero Pagina
Mostra (l’attuale numero di
pagina /numero totale di
pagine).
Tasto“Zoom-in/Zoom-o
ut”
Ingrandire o rimpicciolire
l’“Immagine Pop-up
Thumbnail” attuale.
Tasto per avanzare di
pagina
Se un file contiene diverse
pagine, si può avanzare di
ina per vedere la miniatura
HINT
Nome file
Per i dettagli fare riferimento a “ScanSnap guida
dell’operatore” sul “ScanSnap Setup CD-ROM”.
AVVI SO
Fare riferimento alla “Guida dell’operatore
ScanSnap” nel “Setup CD-ROM ScanSnap” per
dettagli.
3.7. ScanSnap Organizer
ScanSnap Organizer è un’applicazione che ordina la
visualizzazione delle immagini file in immagini in
miniatura (thumbnail) come PDF e JPEG file.
I file scansionati in ScanSnap possono essere visualizzati
senza aprirli. Si possono creare cartelle, e ordinare file per
queste cartelle per scopi differenti.
Inoltre, per file con pagine multiple, si possono controllare
le pagine visualizzate in immagini in miniatura.
12 |
Page 93

4. Soluzione dei problemi
Questo capitolo descrive i problemi comuni durante l’uso di ScanSnap e come risolverli.
4.1. Lista di controllo della Soluzione dei problemi
Prima di chiamare l'assistenza, controllare le seguenti voci.
Se non riuscite a risolvere il problema dopo avere controllato le seguenti voci, contattate il negozio dove avete
acquistato questo prodotto oppure contattare un fornitore di assitenza scanner autorizzato FUJITSU.
Sintomi Controllare questa voce Rimedi
Lo scanner non si accende.
Il cavo di alimentazione/il cavo USB sono
connessi correttamente?.
Il coperchio dello scivolo è chiuso ?
(L’alimentatore dello scanner è controllato
dalla chiusura/aperture del coperchio dello
scivolo.)`
Windows si è inizializzato normalmente?
(L’alimentatore dello scanner è controllato
accendendo e spegnendo il computer).
Avete premuto il tasto [POWER] per
spegnere lo scanner? (Lo scanner può essere
spento premendo il tasto [POWER] quando
il coperchio dello scivolo è aperto.)
Collegare correttamente il cavo di
alimentazione/il cavo USB e l’alimentatore.
Scollegare e quindi ricollegare il cavo di
alimentazione e l’alimentatore.
(Nota: Abilita un lasso di tempo di circa 5
secondi quando si connette e riconnette il
cavo AC)
Aprire lo scivolo dell’ ADF.
Permettere allo scanner di inizializzare
normalmente. Il
quando Windows è inizializzato o lo scanner
è in modalità di bassa energia.
Premere il tasto [POWER] sullo scanner.
LED può spegnersi
La scansione non parte.
Il cavo USB è propriamente collegato? Collegare correttamente il cavo USB.
(Quando viene usato un hub, controllare
l’alimentatore dello hub.)
La luce del LED lampeggia
ripetutamente?
ScanSnap Manager è avviato?
(Se ScanSnap Manager è avviato con
successo, l’icona di "ScanSnap Manager"
S
appare sulla barra degli strumenti.)
ScanSnap Manager parte normalmente?
(Se ScanSnap Manager non parte
normalmente, l’icona "ScanSnap Manager"
sulla barra degli strumenti è visualizzata
come
.)
Scollegare e quindi ricollegare il cavo di
alimentazione e l’alimentatore.
(Nota: Abilita un lasso di tempo di circa 5
secondi quando si connette e riconnette il
cavo AC)
Se l’icona "ScanSnap Manager" non è
visualizzata, nel menu [start], selezionare
[Programmi] - [ScanSnap Manager] [ScanSnap Manager] per avviare ScanSnap
Manager.
Eseguire le seguenti procedure:
1. Eseguire da “Gestione periferiche”
“Rileva modifiche hardware” (*1). Se la
situazione non migliora, eseguire dal
passo 2.
2. Scollegare e quindi ricollegare il cavo di
alimentazione e l’alimentatore.
(Nota: Abilita un lasso di tempo di circa
5 secondi quando si connette e
riconnette il cavo AC).
Se questo non ne modifica lo stato,
eseguire il passo 2.
3. Se un USB hub è in uso, collegare
direttamente il computer a ScanSnap
Se questo non ne modifica lo stato,
eseguire il passo 3.
4. Riavviare il computer.
Se nessuno dei rimedi indicati risolve il
problema, disinstallare e reinstallare
ScanSnap Manager (*2).
ScanSnap fi-5110EOX2 Avvio Rapido 13
Page 94

Sintomi Controllare questa voce Rimedi
La finestra "Impostazioni di Scansione e
Salvataggio " è tuttora visualizzata?
Linee verticali appaiono sull’immagine
scansionata.
L’immagine
distorta.
L’immagine scansionata è bianca o
scura.
Le linee dei documenti sono confuse.
(Esempio:le linee in una tavola non
possono essere visualizzate)
La velocità di scansione è lenta.
L’"Alimentazione multipla" avviene
frequentemente.(*4)
Non viene alimentata la carta (si ferma
a mezza strada).
scansionata
è slittata o
L’interno dello scanner è sporco? Pulire l’interno dell’ADF seguendo le
Il documento è stato caricato correttamente? Caricare il documento correttamente.
In scansione Bianco e Nero, l’[Opzioni...] “Luminosità” nella targhetta [Modalità
scansione] è impostata molto chiara o scura?
Si sta scansionando in modalità colore
documenti che includono ti pi di caratteri,
tavole rigate, o caratteri scritti a mano?
Il computer soddisfa i requisiti raccomandati
dal sistema?
Lo ScanSnap scanner è connesso al
computer con l’interfaccia USB 1.1? Quando
si usa questa interfaccia, il tasso dei dati
trasferiti può abbassarsi mentre lo scanner
trasmette dati grandi al computer.
Il separatore fogli è sporco? Pulire il separatore fogli seguendo le
Il separatore fogli è usurato? Sostituire il separatore fogli seguendo le
La pila di documenti è più spessa di 4 mm? Ridurre il numero di fogli nella pila di
Il rullo di pescaggio è sporco? Pulire il rullo di pescaggio seguendo le
Il rullo di pescaggio è usurato? Pulire il rullo di pescaggio seguendo le
Ci sono corpi estranei sul percorso di
alimentazione dei documenti?
I documenti scansionati non soddisfano le
condizioni elencate in “3.2” della guida
dell’operatore?
Se fosse cosi, non possono passare
scorrevolmente attraverso l’ADF.
Chiudere la schermata "Scansione e
Salvataggio delle impostazioni" e scansire il
documento.
istruzioni nel “5. Manutenzione
giornaliera”.
Adjust "Regolare " Luminosità " in
[Modalità scansione] - [Opzioni...] nella
finestra "Scansione e Salvataggio delle
impostazioni".
Se questo fosse il caso, selezionare la casella
per “Impostare documento solo per testo” in
“Scansione”- “Opzione” nella finestra
“Scansione e Salvataggio delle
impostazioni”.
Verificare i requisiti del sistema nel “Prima
di installare ScanSnap” nel Capitolo 2 della
“Guida dell’operatore fi-5110EOX”.
La velocità di scansione rallenterà ogni volta
che i sistemi richiesti di CPU e della
memoria non conciliano.
In questo caso dalla finestra “ScanSnap
Manager”selezionare [Modalità scansione] [Opzioni...] e non marcare le finestre di
impostazioni delle seguenti funzioni per
aumentare la velocità di scansione.
• Abilitare la non traslazione delle
immagini automatica
• Abilitare la rotazione automatica delle
immagini
Quando il computer è provvisto di
un’interfaccia USB 2.0, connettere lo
scanner al computer con questa interfaccia.
(Quando si usa un hub USB, è necessario
usare quello che supporta un’interfaccia
USB 2.0.) (*3)
istruzioni in ”5.3. Pulire all’interno dello
scanner”.
istruzioni in “6.2. Sostituire il separatore
fogli”.
documenti a 4mm di altezza o meno.
istruzioni in ”5.3. Pulire all’interno dello
scanner”.
istruzioni in ”6.3. Sostituire il rullo di
pescaggio”.
Rimuovere qualsiasi corpo estraneo dal
percorso di alimentazione dei documenti.
Provare i seguenti modi:
• Premere leggermente con le dita il foglio
del documento all’inizio della scansione.
• Cambiare la direzione del documento
caricato.
14 |
Page 95

Sintomi Controllare questa voce Rimedi
Lo scanner non viene riconosciuto
anche se ScanSnap Manager è
installato.
La dimensione del file dell’immagine
scansionata è la stessa di un documento
a colori anche se viene scansionato un
documento in bianco e nero (B&W).
Il retro del documento appare
nell’immagine scansionata durante la
scansione di un documento a due facce
(rumore di immagine su retro).
Le immagini scansionate non sono
visualizzate sullo schermo (Quando è
abilitato “rimozione automatica di
pagine bianche” ).
Le immagini scansionate sono storte
(Quando “Abilitare la rotazione
automatica ” è abilitata).
Questa orientazione del documento
scansionato non è disposta
correttamente (Quando “Abilitare la
rotazione automatica ” è abilitata).
Lo scanner è connesso al computer prima di
installare ScanSnap Manager?
Lo scanner è registrato come "Altro " nel
"Gestore dispositivi?"
Il documento in bianco e nero è scansionato
in modalità colore?
La casella non segnata di "Impostazione per
documenti testo." Non è selezionato in
[Opzioni...] della targhetta [Modalità
scansione] nella schermata di "Scansione e
Salvataggio delle impostazioni".
Quando la “rimozione automatica di pagine
bianche” è abilitata, documenti che
contengono solo pochi caratteri sono
riconosciuti come pagine bianche e sono
rimosse dai dati delle immagini scansionate
accidentalmente.
I documenti sono alimentati nell’ADF a più
di +-5 gradi?
A seconda dei contenuti del documento, la
rotazione automatica può non funzionare
correttamente.
A seconda dei contenuti del documento, la
rotazione automatica può non funzionare
correttamente.
Nel menu [start] menu, selezionare [Pannello
di controllo] - [Sistema] - [Hardware] [
Gestione periferiche].
Annullare il nome dispositivo (come
dispositivo USB, differisce con il sistema
operativo) sotto "Altre periferiche" nel
[Impostazione Dispositivo] e riavviare il
computer.
Impostare [Modalità colore] della targhetta
[Modalità scansione] nella schermata di
"Scansione e Salvataggio delle
impostazioni" su "Bianco e Nero".
Selezionare la casella "Impostazione per
documenti testo.". (Abilitato solo nella
modalità di colore)
Fare click sull’icona “ScanSnap Manager”
sulla barra degli strumenti, poi selezionare
[Impostazioni…] – [Scanning] e fare click
sul tasto [Opzioni…]. Poi non marcare la
finestra “rimozione automatica di pagine
bianche”.
La funzione “Abilitare la rotazione
automatica” può correggere immagini
distorte sopra i 5 gradi. Caricare i documenti
sullo scanner cosi che i documenti storti non
superino questo limite. Se la situazione non
migliora anche dopo aver provato questo
metodo, disabilitare “Abilitare la rotazione
automatica ” su “Opzione” [Impostazioni…]
– [Scanning].
Fare riferimento alla “Guida dell’operatore”
sezione 3.4.
Fare riferimento alla “Guida dell’operatore”
sezione 3.4.
*1)Per Windows XP, da Gestione periferiche, fare click destro sul nome del computer e apparirà “Rileva modifiche hardware
*2)Confermare che il PC e lo scanner siano accesi e connessi correttamente.
- Dalle Gestione periferiche, controllare se ScanSnap è riconosciuto come un apparecchio sconosciuto. Se cosi fosse,
cancellarlo dal [Pannello di Controllo] - [Sistema].
- Chiudere ScanSnap Manager
- Andare su [Pannello di Controllo] - selezionare [Aggiungere o Rimuovere i Programmi] e disinstallare ScanSnap
Manager e ScanSnap Organizer. (Fare riferimento a "4.1 Uninstalling Supplied Programs" (page 118)")
- Prima di riavviare il PC, rimuovere le cartelle seguenti.
ATT EN Z IO N E
Stare attenti a non rimuovere nessuna cartella o file, poiché ciò può influenzare il sistema ambientale del PC.
Per Windows 2000, Windows XP:
Annullare la cartella ScanSnap di seguito:
c:/Documents and Settings/<User name>/Dati Applicazioni/PFU/
Cancellare la cartella Driver di seguito:
c:Program Files/PFU/ScanSnap/
ScanSnap fi-5110EOX2 Avvio Rapido 15
Page 96

Per Windows 98,ME:
Cancellare la cartella Driver di seguito:
c:Program Files/PFU/ScanSnap/
Dopo aver rimosso le cartelle elencate sopra, confermare se i file sono stati cancellati dalla cartella
- fi5110e.INT
- fi5110e.PNF
Nella cartella C:/Windows/Inf siano stati cancellati. Se non fossero stati cancellati, rimuovere anche questi due file.
HINT
- Dopo aver rimosso le cartelle sopra (file), riavviare il computer con lo ScanSnap disconnesso.
- Reinstallare ScanSnap Manager e riavviarlo.
*3) Per confermare se lo scanner sia connesso con USB 1.1 o USB 2.0, fare click destro sull’icona di ScanSnap nella barra
degli strumenti e selezionare [Aiuto] - [riguardo a ScanSnap Manager], poi fare click sul tasto [Dettaglio] sulla finestra
[Version Information]. Il [tipo USB] è visualizzato in [Informazioni sullo Scanner].
*4)L’alimentazione Multipla è un fenomeno per cui due o più fogli di carta sono alimentati insieme nello scanner.
* Visitate il nostro sito Web per riferimento. Altre utili informazioni saranno poste nell’angolo Domande e risposte frequenti
FAQ qui di seguito l’indirizzo del nostro Web.
http://scansnap.fujitsu.com
4.2. Rimuovere inceppamenti della carta
1. Aprire l’ADF mentre sollevate la leva di apertura della copertura
2. Rimuovere il documento inceppato.
3. Chiudere il coperchio dell’ADF.
Click!
Coperchio
ADF
Leva del coperchio
Ö Dovreste sentire il click dell’ADF quando ritorna nella sua posizione originale.
16 |
Page 97

5. Manutenzione giornaliera
g
Questo capitolo descrive come pulire ScanSnap
AVVISO
Incendio/Shock elettrico
Prima di pulire lo scanner, scollegare l’Alimentatore per
spegnere lo scanner.
5.1. Materiali per la Pulizia
Materiali per la Pulizia
Detergente F1 CA99501-0013
*1) Per comprare il prodotto per la pulizia, mettersi in contatto con il
rivenditore dello scanner FUJITSU presso cui avete comprato lo
scanner.
Nr delle Parti Nota
1 flacone (100ml)
Inumidire un panno con
questo liquido poi
pulire lo scanner.
(*1)
Pulire l’ADF in accordo alla seguente procedura riferendosi
alle figure della pagina seguente.
PRUDENZA
La superficie di vetro dentro l’ADF diventa calda durante
l’uso dello scanner.
Prima di iniziare a pulire dentro lo scanner, scollegare
l’Alimentatore dalla presa e attendere almeno 15 minuti
che lo scanner si raffreddi.
ATT EN Z IO N E
● Non usare mai acqua o detergente neutro
per pulire l’interno dello scanner
● Non usare spray aerosol per pulire lo
scanner.
di sporco e polvere nello scanner,
causandone guasti e malfunzionamento.
Spray aerosol causano l’entrata
.
5.2. Pulire lo Scanner Esteriormente
Pulire l’esterno dello scanner e lo scivolo di alimentazione
F1 con un panno soffice imbevuto di un pò di detergente
neutro o Detergente F1.
ATT EN Z IO N E
● Non usare mai diluenti o altri solventi
organici.
● Durante la pulizia, stare attenti a non
versare acqua o altri liquidi nello scanner.
Non usare spray aerosol per pulire lo
scanner.
● Spray aerosol provoca l’entrata di sporco
e polvere nello scanner, causandone
guasti e malfunzionamento e errori di
immagine
Panno
Detergente
Neutrale o
ente F1
Deter
Diluente per vernice
1. Aprire l’ADF mentre sollevate la leva di apertura della
copertura
Coperchio
ADF
Leva del coperchio
2. Pulire le parti indicate con un panno asciutto o con un
panno imbevuto del detergente F1.
Separatore fogli
Rulli di plastica (x4)
Rulli di uscita (x2)
Rullo di
pescaggio
5.3. Pulire all’interno dello scanner
Pulire le parti all’interno dello scanner con un panno
asciutto o con un panno imbevuto di poco alcol isopropilico.
Dopo una successione di documenti scansionati, l’accumulo
di polvere di carta e polvere dentro lo scanner causa errori di
scansione.
Come indicato, pulire l’ADF dopo ogni 1,000 scansioni.
Notare che questa indicazione varia a seconda del tipo di
documento in scansione. Per esempio, l’ADF deve essere
pulito più spesso quando vengono scansionati documenti
fotocopiati dove il toner non è stato sufficientemente fissato
sulla carta.
Coperchio dell’ADF.
ScanSnap fi-5110EOX2 Avvio Rapido 17
Rulli di
alimentazione (x2)
Vetro (x2)
Uno si trova nel
coperchio
dell’ADF.
Page 98

Separatore fogli (x1)
X
R
Pulire il separatore fogli dall’alto in basso. Quando
pulite il separatore fogli, fare attenzione a non
incastrare il panno sull’ammortizzatore di metallo.
Vetro (x2 uno sul coperchio dell’ADF e un altro sul lato
opposto)
Pulire con delicatezza.
Rullo di pescaggio (x1)
Pulire con delicatezza facendo attenzione a non
graffiare la superficie del rullo. Fare particolare
attenzione nel pulire il rullo di pescaggio, in quanto
rimasugli neri sul rullo influenzano negativamente le
prestazioni di pickup.
Rulli di plastica (x4 sul coperchio ADF)
Pulirli con delicatezza facendoli ruotare con le dita.
Pulirli con delicatezza facendo attenzione a non
indurirne la superficie. Fare particolare attenzione
nella pulizia dei rulli di plastica, in quanto rimasugli
neri sul rullo influenzano negativamente le
prestazioni di pescaggio.
Accendere lo scanner prima di pulire le
seguenti parti . Pulire i rulli, mentre si ruotano.
ATT EN Z IO N E
Connettere l'adattatore AC e il cavo AC
solo quando si puliscono i rulli di uscita.
3. Chiudere il coperchio dell’ADF.
Coperchio
ADF
ATT EN Z IO N E
Quando l’ADF è ritornato nella sua posizione
originale, assicurarsi che sia completamente
chiuso. Altrimenti, l’inceppamento della carta
o problemi di alimentazione possono
accadere.
5.4. Pulire il Trasporto Fogli
Rulli di alimentazione (x2)
Pulirli con delicatezza facendo attenzione a non
indurirne la superficie. Fare particolare attenzione
nella pulizia dei rulli di alimentazione, in quanto
rimasugli neri sul rullo influenzano negativamente le
prestazioni di pescaggio.
Rulli di uscita (x2)
Pulirli con delicatezza facendo attenzione a non
indurirne la superficie.
Fare particolare attenzione nella pulizia dei rulli di
uscita, in quanto rimasugli neri sul rullo influenzano
negativamente le prestazioni di presa.
Per ruotare i l rullo di alimentazione e i rulli di uscita,
continuare a premere il tasto [POWER] mentre si tiene
premuto il tasto [SCAN]. I rulli ruotano fino a che si
tengono premuti i due tasti. (Se si preme il tasto
[POWER] per sei volte, i rulli fanno un solo giro.)
cMentre si preme il
tasto [SCAN]…
SCAN
POWER
d…premere il tasto
DUPLE
COLO
[POWER].
Quando si usa continuamente il Trasporto Fogli, sporco e
polvere possono intaccare la sua superficie esterna ed
interna.
Pulirla regolarmente, in quanto potrebbe provocare errori di
scansione.
<Metodo di pulizia>
Usare un panno asciutto e pulito, o un panno morbido
inumidito con il detergente F1 o un detergente leggero per
poi pulirlo delicatamente la superficie da sporcizia o
polvere.
ATT EN Z IO N E
● Non usare mai il solvente per la vernice o
solventi organici.
● Non strusciare il panno troppo forte sulla
superficie, altrimenti il trasporto si può
rovinare o deformare.
● Dopo aver pulito anche la parte interna del
Trasporto Fogli con il detergente F1 o un
detergente leggero, chiudere il Trasporto
fogli una volta asciutto.
● guida, è raccomandato
cambiare il Trasporto fogli ogni 500
scansioni.
Per i dettagli su dove acquistare il
Trasporto fogli fare riferimento a “6.4
Acquistare il Trasporto Fogli”
18 |
Page 99

6. Sostituire i materiali di consumo e alcune Parti regolari
Questo capitolo descrive come sostituire e acquistare i
materiali di consumo e alcune parti regolari.
AVVISO
Incendio/Shock elettrico
Prima di sostituire i materiali di consumo nello scanner,
scollegare l’alimentatore e spegnere lo scanner.
6.1.
Numeri delle parti e Ciclo di
sostituzione dei materiali di consumo
La tabella seguente riporta i codici delle parti dei materiali
consumo con una indicazione di massima per la sostituzione
di queste parti.
No.
Descrizione P/N
fi-5110EOX
1
Separatore fogli
fi-5110EOX
2
Rullo di
pescaggio
PA03360-0002
PA03360-0001
Questi cicli di sostituzione sono indicazioni di massima quando
viene scansionata carta formato A4/libera da legno, 64 g/m2 (17
lb). I cicli attuali possono essere diversi a seconda della carta
scansionato.
Usare solo materiali di consumo specificati da PFU LIMITED.
AVVI SO
Per valutare quando i materiali di consumo devono
essere sostituiti e per dare uno sguardo generale
sulle pagine scansionate fino adesso fare riferimento
ai seguenti punti:
1. Fare click destro sull’icona "ScanSnap Manager"
S
sulla barra degli strumenti.
2. Fare click sul menu [Controlla materiali di
consumo...] che viene visualizzato.
Ciclo di
sostituzione
50,000 fogli o un
anno
100,000 fogli o un
anno
6.2. Sostituire il separatore fogli
Sostituire il separatore fogli seguendo questa procedura.
1. Quindi rimuovere i documenti incagliati dal percorso
della carta.
2. Aprire l’ADF mentre sollevate la leva di apertura della
copertura.
Coperchio
dello scivolo
Coperchio
ADF
Leva del
coperchio
3. Rimuovere il separatore fogli Tirare fuori il separatore
fogli nella direzione della freccia mentre si tiene
l’estremità del separatore fogli.
Separatore
fogli
Coperchio
ADF
ÖLa schermata [Verifica stato materiali di consumo]
indica quante volte i materiali di consumo sono
stati sostituiti.
Sostituire i materiali di consumo usando "Valore
obiettivo per la sostituzione dei materiali" come
indicazione.
Per i dettagli sui materiali di consumo e come
ottenerli, visitare il seguente sito Web o contattare il
negozio dove avete comprato lo scanner.
[Website] http://scansnap.fujitsu.com
4. Attaccare un nuovo separatore fogli.
Separatore
fogli
ATT EN Z IO N E
Assicurarsi che il separatore fogli sia
completamente attaccato. Altrimenti,
inceppamenti della carta o errori di
alimentazione possono accadere.
ScanSnap fi-5110EOX2 Avvio Rapido 19
Coperchio
ADF
Page 100

5. Chiudere il coperchio dell’ADF
3. Rimuovere il foglio di guida.
Afferrare la maniglia sul foglio di guida e rimuoverla.
Foglio di guida
Maniglia
Coperchio ADF
ÖDovreste sentire il click dell’ADF quando ritorna
nella sua posizione originale.
6. Accendere lo scanner.
Ö L’icona ScanSnap Manager cambia da a .
7. Fare click destro sull’icona "ScanSnap Manager"
S
S
sulla barra degli strumenti, e selezionare dal menu
[Controlla materiale di consumo].
8. Nella finestra “Controlla materiale di consumo”, fare
click sul tasto [Reimposta] del “Separatore fogli”.
Ö Il contatore è ripristinato a “0”.
6.3. Sostituire il rullo di pescaggio
4. Ruotare la bussola del rullo di pescaggio girando
(sinistra) nella direzione della freccia.
Bussola del Rullo di pescaggio
Rullo di pescaggio
Asse del Rullo di pescaggio
5. Rimuovere il rullo di pescaggio con la sua asse.
Rimuovere il rullo di pescaggio mentre si solleva su
nella direzione della freccia.
gancio
Sostituire il rullo di pescaggio con la seguente procedura.
1. Rimuovere qualsiasi documento che si trovi sullo
scivolo di alimentazione ADF.
2. Aprire l’ADF mentre sollevate la leva di apertura della
copertura
Coperchio dello scivolo
Coperchio ADF
Leva del coperchio
20 |
Rullo di pescaggio Asse del Rullo di pescaggio
ATT EN Z IO N E
Se la superficie del rullo di pescaggio è
sporca di polvere di carta, può accadere un
errore di scansione. Rimuovere lo sporco
usando un panno asciutto con un pò di
Detergente F1.
* Non usare acqua, né latte detergente o
spray
 Loading...