

Page 1
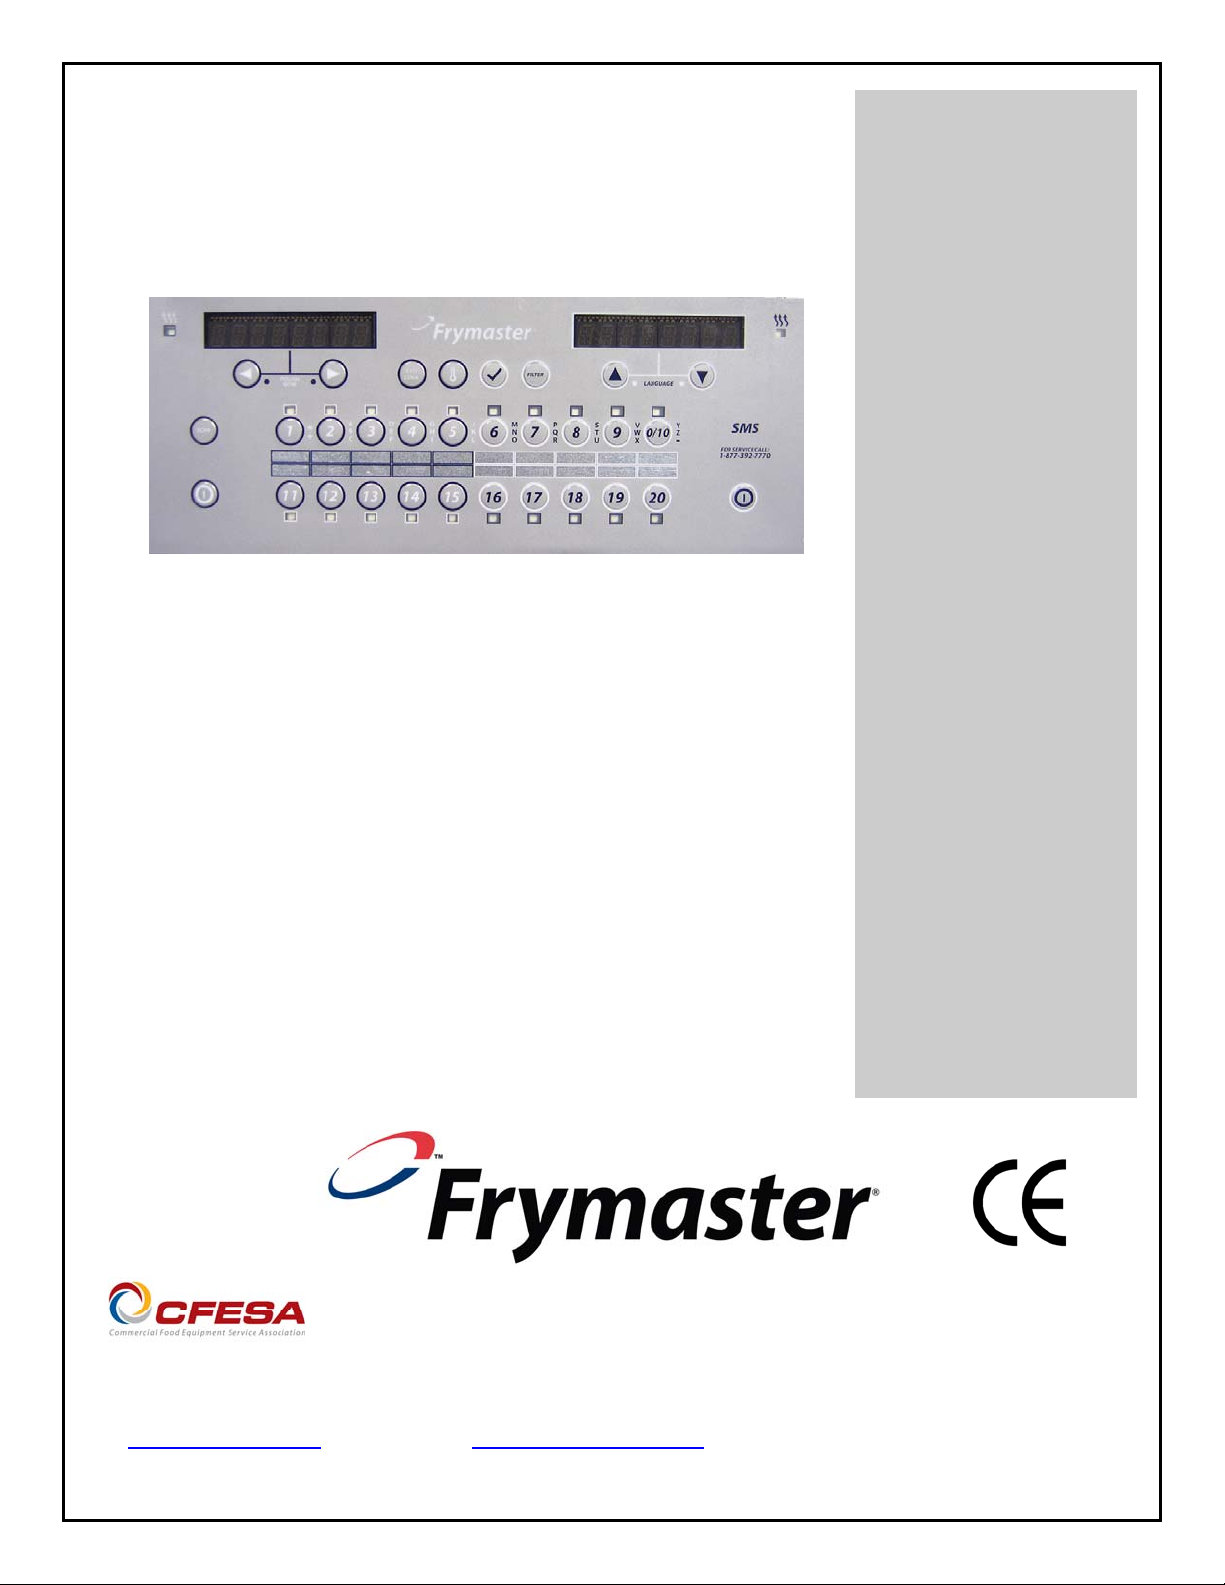
CONTROLLER
YUM K3000
Operation Manual
Frymaster, a member of the Commercial Food Equipment Service Association, recommends using
CFESA Certified Technicians.
www.frymaster.com E-mail: service@frymaster.com
24-Hour Service Hotline 1-800-551-8633
*8196647*
06/2015
Page 2
NOTICE
IF, DURING THE WARRANTY PERIOD, THE CUSTOMER USES A PART FOR THIS MANITOWOC
FOOD SERVICE EQUIPMENT OTHER THAN AN UNMODIFIED NEW OR RECYCLED PART
PURCHASED DIRECTLY FROM FRYMASTER DEAN, OR ANY OF ITS AUTHORIZED SERVICE
CENTERS, AND/OR THE PART BEING USED IS MODIFIED FROM ITS ORIGINAL
CONFIGURATION, THIS WARRANTY WILL BE VOID. FURTHER, FRYMASTER DEAN AND ITS
AFFILIATES WILL NOT BE LIABLE FOR ANY CLAIMS, DAMAGES OR EXP ENSES INCUR RED B Y
THE CUSTOMER WHICH ARISE DIRECTLY OR INDIRECTLY, IN WHOLE OR IN PART, DUE TO
THE INSTALLATION OF ANY MODIFIED PART AND/OR PART RECEIVED FROM AN
UNAUTHORIZED SERVICE CENTER.
NOTICE
This appliance is intended for professional use only and is to be operated by qualified
personnel only. A Frymaster Dean Authorized Servicer (FAS) or other qualified professional
should perform installation, maintenance, and repairs. Installation, maintenance, or repairs by
unqualified personnel may void the manufacturer’s warranty.
NOTICE
This equipment must be installed in accordance with the appropriate national and local codes of
the country and/or region in which the appliance is installed.
NOTICE TO OWNERS OF UNITS EQUIPPED WITH COMPUTERS
U.S.
This device complies with Part 15 of the FCC rules. Operation is subject to the following two
conditions: 1) This device may not cause harmful interference, and 2) This device must accept
any interference received, including interference that may cause undesired operation. While
this device is a verified Class A device, it has been shown to meet the Class B limits.
CANADA
This digital apparatus does not exceed the Class A or B limits for radio noise emissions as set
out by the ICES-003 standard of the Canadian Department of Communications.
Cet appareil numerique n’emet pas de bruits radioelectriques depassany les limites de classe A
et B prescrites dans la norme NMB-003 edictee par le Ministre des Communcations du Canada.
DANGER
Prior to movement, testing, maintenance and any repair on your Frymaster fryer, disconnect
ALL electrical power from the fryer.
NOTICE
The instructions in this manual for using a bulk oil system for filling and discarding oil are for a
Frontline or RTI systems. These instructions may not be applicable to other bulk oil systems.
Page 3
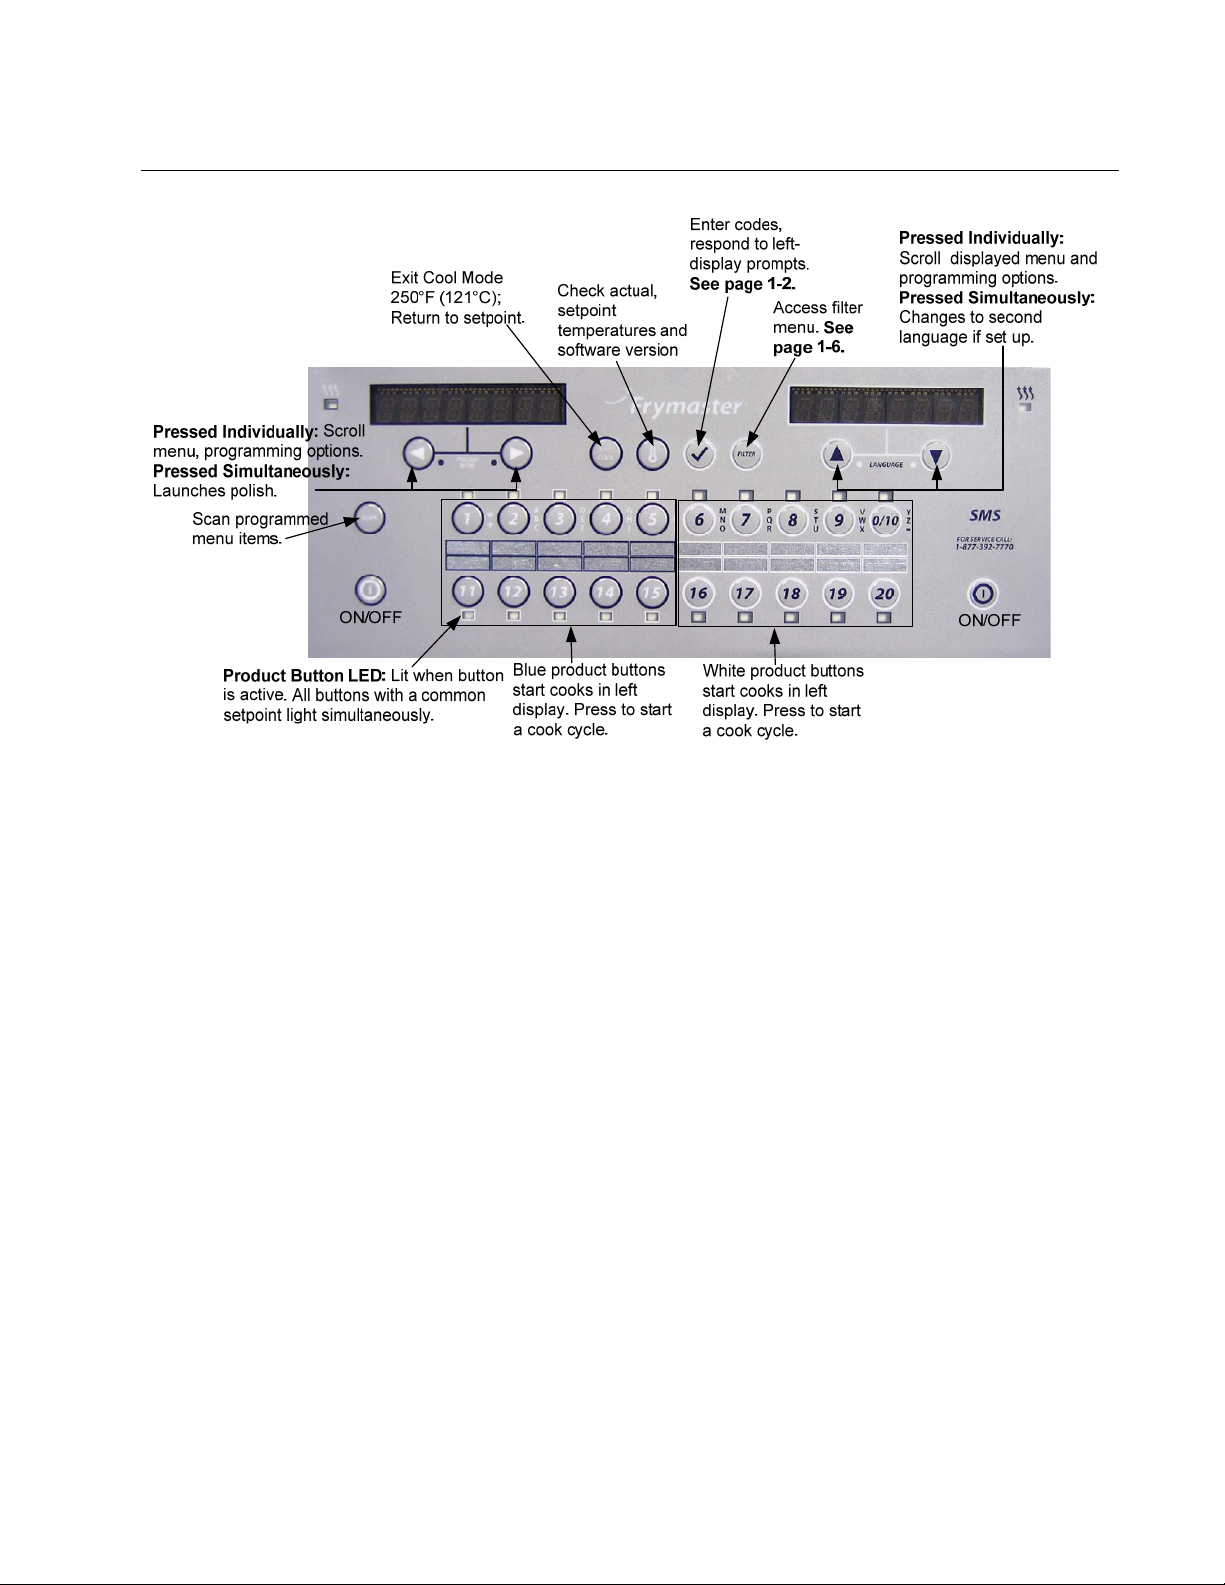
CHAPTER 1: K3000 CONTROLLER INSTRUCTIONS
1.1 Using the K3000
ON/OFF
Press ON/OFF button fryer heats to setpoint or idle temperature and displays: COOL or DROP.
Cooking
Fryer displays COOL or DROP
COOL display: Press product button; fryer heats to setpoint and displays DROP.
Press product button and drop product.
DROP display: Press product button and drop product. (Product buttons 1-5 and 11-15 start cooks on the left
display. Products 6-10 and 16-20 start cooks on the right display.)
DONE display: Press product button to cancel alarm.
Press and hold product button to cancel cook cycle.
Responding to Polish Prompt
Controller displays Polish Now, alternating with Yes No.
Press Yes (button under Yes display) and the polish cycle launches.
Controller displays Cool after polish cycle.
Controller Button Navigation
Product: Active when adjacent LED is lit. Press to launch cook cycle. Press and hold to stop a launched cook
cycle. Press at end of cook cycle to halt alarm.
Scan: Press once, all product buttons are lit; Select Product displayed. Press product button to view product
name. Press Scan again to repeat. Press Scan twice to return to normal operation.
Left/Right Arrows: Navigate options in left display.
Up/Down Arrows: Navigate options in right display. Press the up/down arrow simultaneously to change to a
second language if one is selected in setup.
Exit Cool: Set fryer’s cook cycle exit temperature to 250°F (121°C) or setpoint.
Thermometer: Fryer ON: Press and release for setpoint/left; vat temp/right.
Thermometer: Fryer OFF: Press to display temperature, time, date, system version, K3000 version and circuit
board versions.
Checkmark: Fryer OFF: Press and hold 3 seconds: Scroll filter usage; Press and hold 10 seconds: Product
setup.
Checkmark: Fryer ON: Respond to prompts.
Filter: Press and release: Cooks remaining to filter cycle. Press and hold: Filter options: Filter and Dispose.
1-1
Page 4
1.2 Navigating Controller
Press and hold the checkmark button for 10 seconds produces the setup mode, which first displays Product Setup. Follow
the steps below to navigate the options
Left Display Right Display Action
OFF OFF
Product Setup
Product Setup
vat setup
Tech Mode
Exit Exit
Blank Press to scroll: Vat Setup, Tech Mode, and Exit. With the desired selection
Blank Product setup (entering and editing menu items) is described on page 1-10 through
Blank Vat Setup is described on page 1-4.
Blank Tech Mode is described on page 1-6.
Press and hold until Product Setup is displayed.
displayed, press .
1-13.
Press Scan button three times to return the Controller to OFF.
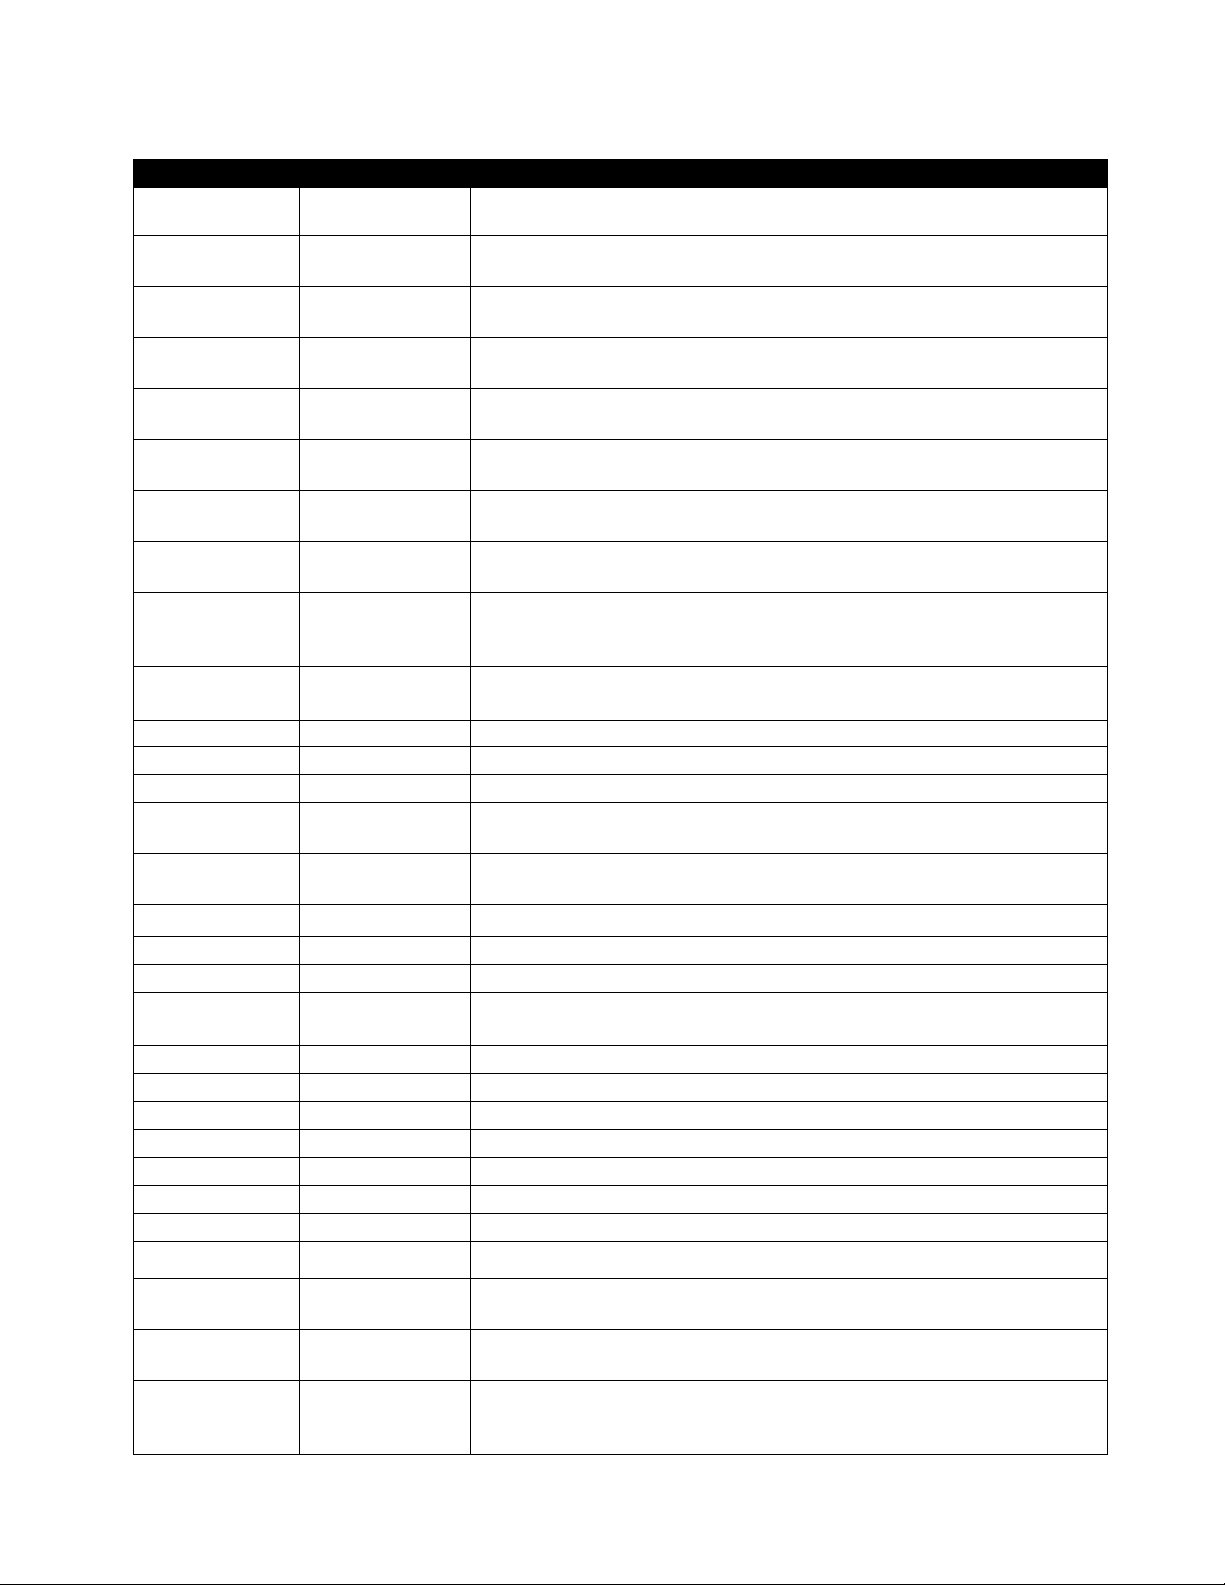
1.3 Viewing Operational Stats
The K3000 collects and stores information on the cook cycles and filter cycles. This data is accessed in the info mode,
which is accessed by pressing the checkmark button. The steps to view the data are detailed below:
Left Display Right Display Action
OFF OFF
Press and hold until INFO MODE is displayed. Release and press .
Oil stats
Total cooks last dispose
Total heads—last
dispose
Last dispose date
TEMP > 300F—
TODAY
TEMP > 300f–
Since dispose
TEMP > 300F—1
back
TEMP > 300f—2
baCK
FILTERS—since
dispose
Filters—1 back
Filters—2 back
Polishes—since
dispose
Polishes—1 back
Polishes—2 back
Reset oil stats Yes no
Reset oil stats Enter code
Continued on the following page
Blank Press to scroll: Oil Stats, Filter Stats, Review Usage, Last Load. With the
Number Press . (This is the number of cooks since the last dispose.)
Number Press . (This is the number of heads cooked since the last dispose.)
Number Hrs Press . (This is the number of hours the temperature of the oil rose above 300°F
Number Hrs Press . (This is the number of hours the oil temperature was above 300°F since
Number Hrs Press . (This is the number of hours the oil temperature was above 300°F since
Number Hrs Press . (This is the number of hours the oil temperature was above 300°F since
Number Press . (This is the number of filters since oil disposal.)
Number Press . (This is the number of filters that have occurred since the previous oil
Number Press . (This is the number of filters that have occurred since two oil disposals
Number Press . (This is the number of polishes since oil disposal.)
Number Press . (This is the number of polishes that have occurred since the previous oil
Number Press . (This is the number of polishes that have occurred since two oil
desired stats displayed, press .
Press . (This is the date of the last dispose.)
during operation today.)
oil disposal.)
the previous oil disposal.)
two oil disposals ago.)
disposal.)
ago.)
disposal.)
disposals ago.)
Press to scroll or to reset oil stats.
Enter 3228.
1-2
Page 5
1.3 Viewing Operational Stats cont.
Left Display Right Display Action
complete
Blank
Exit Exit
Filter Stats
MON date
Filtered Number and day
Flt bpsd Number and day
Cooks Number and day
Heads Number and day
FLT AVG Number and day
REVIEW USAGE
USAGE SINCE
DATE TIME
TOTAL COOKS
QUIT COOKS
On HOURS
Reset usage Yes no
Reset usage Enter code
Complete
Exit Exit
Last load
Product Product name
Started
Actual time
Progtime
Max temp
Min temp
Avg temp
Heat on
Ready Yes or no
Exit Exit
Blank
Blank
Blank
Number
Number
Number
Blank
Blank
Time
Number Minutes
Number Minutes
Number
Number
Number
Number
Press button once to return to menu, or Scan button once to return the
Controller to OFF.
Press to scroll: Filter Stats, Review Usage, Last Load. With the desired
stats displayed, press .
Press to scroll seven days of data. With the desired date displayed,
press .
Press to scroll number of times the vat was filtered in the seven -day
period. Press .
Press to scroll number of times the filter prompt was bypassed in the
seven-day period. Press .
Press to scroll number of cook cycles that occurred in the seven-day
period. Press .
Press to scroll number of heads that were cooked in the seven-day
period. Press .
Press to scroll average number of daily filter cycles that occurred in
the seven-day period. Press . Press button once to return to menu, or
Scan button once to return the Controller to OFF.
Press to scroll: Filter Stats, Review Usage, Last Load. With the desired
stats displayed, press .
Press . (This is the date and time of the last usage reset.)
Press . (This is the total number of cooks since the last usage reset.)
Press . (This is the total amount of cooks that were cancelled since the last
reset usage.)
Press . (This is the total amount of hours the fryer was on since the last
reset.)
Press to scroll or to reset oil stats usage.
Enter 3228.
Press to scroll: Filter Stats, Review Usage, Last Load. With the desired
stats displayed, press or press Scan to return the Controller to OFF.
Press .
Press . (This is the product last cooked.)
Press . (This is the time the last cook started.)
Press . (This is the actual cook time including flex time.)
Press . (This is the actual programmed cook time.)
Press . (This is the maximum temperature of the oil during the last cook.)
Press . (This is the minimum temperature of the oil during the last cook.)
Press . (This is the average temperature of the oil during the last cook.)
Press . (This is the percentage of the cook time the heat source was on
during the last cook.)
Press . (If the fryer was back to proper temperature before the cook cycle
was started.)
Press to scroll: Filter Stats, Review Usage, Last Load. With the desired
stats displayed, press or press Scan button to return the Controller to
OFF.
1-3
Page 6
1.4 K3000 Setup Mode
Setup mode allows the Controller to be set for language displays, vat sizes, and temperature range displays. Follow the
steps below to enter and navigate Vat Setup.
Vat Set Up
Left Display Right Display Action
OFF OFF
Product Setup
Blank
Vat setup Enter code
System
Blank
Language English
2nd language English
Locale Non-ce
ENERGY Gas
type KJ3 Full
System volume 9
Tempr format F
Exit Melt Tempr 100F
Setback tempr 250F
Fresh oil None
waste NONE
DRAIN SWITCH NO
RECOVERY
DISABLED
ALARM
Exit Exit
OFF OFF
Time/date
Blank
Time entry time
Date format Mm/dd/yy
Enter date date
Exit Exit
Continued on the following page
Press and hold until Product Setup is displayed.
Press to scroll to Vat setup and press . Product setup is described on pages 1-10
through 1-13.
Enter 3228.
Press button or press to scroll to Time/Date, Filter, E-Log, Change Password or Edit
Alarm Names. With desired choice displayed, press . If SYSTEM is not chosen skip to
the relevant selection.
Press to scroll to choice and press .
Press to scroll to choice and press . (This option allows another language to be
toggled easily from the front panel (ex. Spanish as a second language.)).
Press to scroll to choice Non-CE or CE and press .
Press to scroll to choice Gas or Electric and press .
Press to scroll choices: the choices are: Gas-KJ3/CF-FULL, 118G/D63 FULL, H55
FULL, H55 SPLIT, MJ45 FULL, MJ45 SPLIT, HV75 FULL, HV105 FULL, 114/HD 50
FULL, HD60 FULL, HD65 FULL D80 FULL, 11814 FULL and MJ35 FULL, . Electric-
118E/RE80 FULL, FPRE117 FULL, FPRE117 SPLIT, FPRE114 FULL and FPRE114
SPLIT, 11817 FULL, FPRE122 FULL, FPRE122 SPLIT FPC128 FULL, FPC128 SPLIT
and FPC136 FULL. With the vat size of the fryer controlled by the Controller displayed,
press .
Sets sound level for Controller. Enter level, 1-9 (0=Lowest/ 9=Loudest). Press .
Press to scroll choices: F for Fahrenheit; C for Celsius. Press .
Use numbered buttons to change default setting (use 10 for 0). Press . (This is the
temperature for the fryer to exit the melt cycle.) Default is 100F (38C).
Use numbered buttons to change default setting (use 10 for 0). Press . (This is the
temperature during setback or idle mode.) Default is 250F (121C).
Press to scroll choices JIB, Bulk-RTI, Bulk-F (Frontline) or None. Press .
All fryers except OCF should be set to NONE.
Press to scroll choices JIB, Bulk-RTI, Bulk-F (Frontline) or None. Press .
All fryers except OCF should be set to NONE.
NOTE:
NOTE:
Press to scroll choices YES and NO. (This is if a drain switch is installed.) Press .
Press to scroll choices DISABLED and ENABLED. (This is a recovery alarm that
locks out the fryer if the fryer does not heat properly. The default is disabled). Press .
Press button.
None required.
Press .
Use numbered buttons to change time (use 10 for 0). Press .
Press to scroll choices. With the date format displayed, press .
Use numbered buttons to change date (use 10 for 0 ). Press .
Press button once and press to scroll to System, Time/Date, Filter, E-Log, Change
Password or Edit Alarm Names. With desired choice displayed, press or press the
Scan button once to return the Controller to OFF.
1-4
Page 7
1.4 K3000 Setup Mode cont.
Left Display Right Display Action
DST SETUP
OFF OFF
Product Setup
Vat setup Enter code
DST ENABLED
DST START
MONTH
DST START
SUNDAY
DST END MONTH
DST END
SUNDAY
EXIT Exit
filter
Global filter
count
Eod filter time 21:00
This is daylight savings time setup. In the United States, daylight savings time begins each year at 2:00 A.M.
on the second Sunday in March, with clocks moving ahead one hour. Daylight savings time ends each year at
2:00 A.M. on the first Sunday in November, with clocks moving back one hour. For the two states and
international locations, which do not use DST, set to disabled.
Blank
3
2
11
1
Blank
20
Press and hold until Product Setup is displayed.
Press to scroll to Vat setup and press .
Enter 3228.
Press to scroll choices DISABLED and ENABLED. Press . (This enables or
disabled daylight savings time. Default is enabled.) If disabled is chosen, pressing the
button, displays exit. Press the exit scan button three times to exit.
Enter the daylight savings time starting month using the 1-10 keys. (Default is US
government starting month “3”.) Press .
Enter the daylight savings time starting Sunday using the 1-10 keys. (Default is US
government starting Sunday “2”.) Press .
Enter the daylight savings time ending month using the 1-10 keys. (Default is US
government ending month “11”.) Press .
Enter the daylight savings time ending Sunday using the 1-10 keys. (Default is US
government ending Sunday “1”.) Press .
Press button once and press to scroll to System, Time/Date, Filter, E-Log or Change
Password. With desired choice displayed, press or press the Exit/Scan button three
times to return the controller to OFF.
Press .
Press . (Changes the total number of cooks that occur before a filter prompt. The default
is 20.)
Use numbered buttons to change end of day filter alert time. Press .
1 polish timer EnableD
1 polish time 08:00
1 polish
duration
1 polish delay
time
1 polish start
tempr
2 polish timer enabled
2 polish time 14:00
2 polish
duration
2 polish delay
time
Continued on the following page
30
00:00
300F
30
01:00
Press to scroll to choice and press . (This enables or disables the polish timer.)
Use numbered buttons to change time (use 10 for 0). (This is the time the first polish
prompt will occur each day. The default is 8:00 AM.) Press .
Use numbered buttons to change (use 10 for 0). (This is the duration, in minutes for a
polish. The default if 30 minutes.) Press .
Use numbered buttons to change time (use 10 for 0). (This is the amount of time which an
operator can delay the start of a polish.) Press . After the delay the operator must
polish.
Use numbered buttons to change temperature (use 10 for 0). (This is the temperature
required for a polish to begin.) Press .
Press to scroll to choice and press . (This enables or disables the second polish
timer.)
Use numbered buttons to change time (use 10 for 0). (This is the time the second polish
prompt will occur each day.) Press .
Use numbered buttons to change (use 10 for 0). (This is the duration, in minutes for a
polish. The default if 30 minutes.) Press .
Use numbered buttons to change time (use 10 for 0). (This is the amount of time which an
operator can delay the start of the second polish. The default is one hour.) Press . After
the delay the operator must polish.
1-5
Page 8
1.4 K3000 Setup Mode cont.
Left Display Right Display Action
2 polish start tempr 300F
Use numbered buttons to change temperature (use 10 for 0). (This is the
required temperature for the second polish to begin.) Press .
Exit Exit
Press button once and press to scroll to System, Time/Date, Filter, ELog, Change Password or Edit Alarm Names. Wit h desired choice displayed,
press or press the Scan button once to return the Controller to OFF.
E-Log
NOW Time/date
A E# Time/date
Blank
Press . (This is a log of the ten most recent error codes.)
Press . (Current time and date)
Errors listed A-J. Press to scroll through errors. If no errors exist, pressing
will display No Errors.
Exit Exit
Press button once and press to scroll to System, Time/Date, Filter, ELog, Change Password or Edit Alarm Names. Wit h desired choice displayed,
press or press the Scan button once to return the Controller to OFF.
C-Log
Blank
Press . (This is a reserved internal data collection feature that only exists in
pressure fryers.)
Exit Exit
Press button once and press to scroll to System, Time/Date, Filter, ELog, Change Password or Edit Alarm Names. Wit h desired choice displayed,
press or press the Scan button once to return the Controller to OFF.
Change password
Product setup
Blank
Current code
Press .
Use numbered buttons to change code (use 1 0 for 0) . P ress .
(1724)
Vat setup
Current code
Use numbered buttons to change code (use 1 0 for 0) . P ress .
(3228)
Exit Exit
Press button once and press to scroll to System, Time/Date, Filter, ELog, Change Password or Edit Alarm Names. Wit h desired choice displayed,
press or press the Scan button once to return the Controller to OFF.
Edit alarm names
Alarm 1 NUM1
Blank
Press .
Enter or edit alarm name with letter buttons. Press . Continue scrolling
through names up to alarm 10. (Ex. Shake, Stir, etc.)
Exit Exit
Press button once and press to scroll to System, Time/Date, Filter, ELog, Change Password or Edit Alarm Names. Wit h desired choice displayed,
press or press the Scan button once to return the Controller to OFF.
1.5 Navigating Filter Menu
The K3000 has five functions in the Filter Menu: Filter, Clean, Dispose, Fill Vat from Pan and Drain to Pan. They are
accessed by pressing and holding the Filter button until FILTER is displayed. The first matrix below steps through the
initial navigation. Navigation of the functions are covered in separate matrices. The Controller must be on and at
setpoint to use all the functions of the filter menu. If the fryer is not at setpoint the Controller displays WAIT FOR
FILTER.
Entering Filter Mode
Left Display Right Display Action
DROP DROP
Press and hold the filter button until Filter is displayed.
filter
Blank Press to scroll to choices: Filter, Dispose and Exit. With the desired choice
displayed press . Follow the instructions below to navigate the modes.
1-6
Page 9

Filter
Left Display Right Display Action
Blank
Filter Now? alternating
with yes/no
OPEN DRAIN VALVE
Draining
OPEN RETURN VALVE
POLISHING COUNTDOWN TIMER
CLOSE DRAIN VALVE CONFIRM
Filling
CLOSE RETURN VALVE when
full and press confirm
COOL COOL
filter
Blank
Blank
Blank
Blank
Blank
CONFIRM
Press .
Press YES.
Open drain valve.
None required.
Open return valve.
None required.
Close drain valve and press CONFIRM.
None required.
Press CONFIRM.
Clean
Left Display Right Display Action
Blank
Clean now? Yes NO
Open drain valve
Draining
Scrub vat complete? Yes
CLEAN
Press .
Press YES.
Open drain valve
None required.
Clean the vat with a scrub brush. Clean the sediment from
around the ATO sensors with a screwdriver or similar
object to remove any sediment from around the sensors
and press the YES button to continue when complete.
OPEN RETURN VALVE
Polishing 5-minute
countdown timer
Fill vat? YES
CLOSE DRAIN VALVE CONFIRM
filling
CLOSE RETURN VALVE WHEN
FULL AND PRESS CONFIRM
off off
CONFIRM
Open return valve.
None required.
Press YES.
Close drain valve and press CONFIRM.
None required.
Press CONFIRM.
Dispose
Left Display Right Display Action
Blank
Dispose now? Yes NO
REMOVE PAN CONFIRM
Insert disposal unit Confirm
OPEN DRAIN VALVE
DISPOSING
VAT EMPTY? CONFIRM
Clean vat complete? Confirm
CLOSE DRAIN VALVE
REMOVE DISPOSAL UNIT CONFIRM
INSERT PAN CONFIRM
Manually fill vat Confirm
off off
dispose
Press .
Press YES.
Remove the filter pan and press CONFIRM.
Insert disposal unit under the drain and press CON FIR M .
Open the drain valve.
None required.
Press CONFIRM once the vat is empty.
Press CONFIRM once the vat is clean.
Close drain valve and press CONFIRM.
Remove disposal unit from the fryer and press CONFIRM.
Insert the filter pan and press CONFIRM.
Fill vat with oil to the bottom fill line and press CONFIRM when full.
1-7
Page 10

Drain to Pan
Left Display Right Display Action
Blank
DRAIN TO PAN? Yes NO
OPEN DRAIN VALVE
draining
VAT EMPTY? CONFIRM
CLOSE DRAIN VALVE
OIL IN DRAIN PAN CONFIRM
FILL VAT FROM DRAIN PAN? YES NO
OPEN RETURN VALVE OPEN RETURN VALVE
FILLING
CLOSE RETURN VALVE WHEN
FULL AND PRESS CONFIRM
off off
Drain to pan
CONFIRM
Press
Press YES.
Open the drain valve.
None required.
Press CONFIRM.
Close the drain valve.
Press CONFIRM.
Press YES.
Open the return valve.
None required.
Press CONFIRM.
Fill Vat from Pan
Left Display Right Display Action
Blank
FILL VAT FROM PAN? YES NO
OPEN RETURN VALVE
FILLING FILLING
CLOSE RETURN VALVE WHEN
FULL AND PRESS CONFIRM
off off
FILL VAT FROM PAN
CONFIRM
Press
Press YES.
Open the return valve.
None required.
Press CONFIRM.
1.6 Polishing
The K3000 displays a series of prompts when a polish filter cycle is under way. The steps are detailed below.
Left Display Right Display Explanation/Action
Polish Now? Yes NO
Add FILTER POWDER CONFIRM
**
INSERT PAN CONFIRM
**
CHANGE FILTER PAPER CONFIRM
*
*
Add filter powder Confirm
Insert pan confirm
*
*
OPEN DRAIN VALVE
Draining
OPEN RETURN VALVE
POLISHING 30-MINUTE COUNTDOWN
TIMER
Close drain valve
FILLING
CLOSE RETURN valve when
full and press confirm
COOL COOL
CONFIRM
Respond to prompt with button push. Press YES or NO. Yes produces a
filter, detailed below. No delays filter and cooking continues.
Add filter powder and press CONFIRM.
Insert filter pan and press CONFIRM.
Remove the filter pan and change the filter paper.
Add filter powder and press CONFIRM.
Insert filter pan into fryer.
Open the drain valve.
None required. The oil drains from the frypot to the filter pan.
Open the return valve.
None required. The oil flows from the filter pan to the frypot and back to
the filter pan for 30 minutes.
Close the drain valve.
None required. The oil returns from the filter pan to the frypot.
Close the return valve and press CONFIRM.
*NOTE: Only occurs on first polish of the day.
**NOTE: Only occurs on first polish after lunch and subsequent polishes during the day.
1-8
Page 11

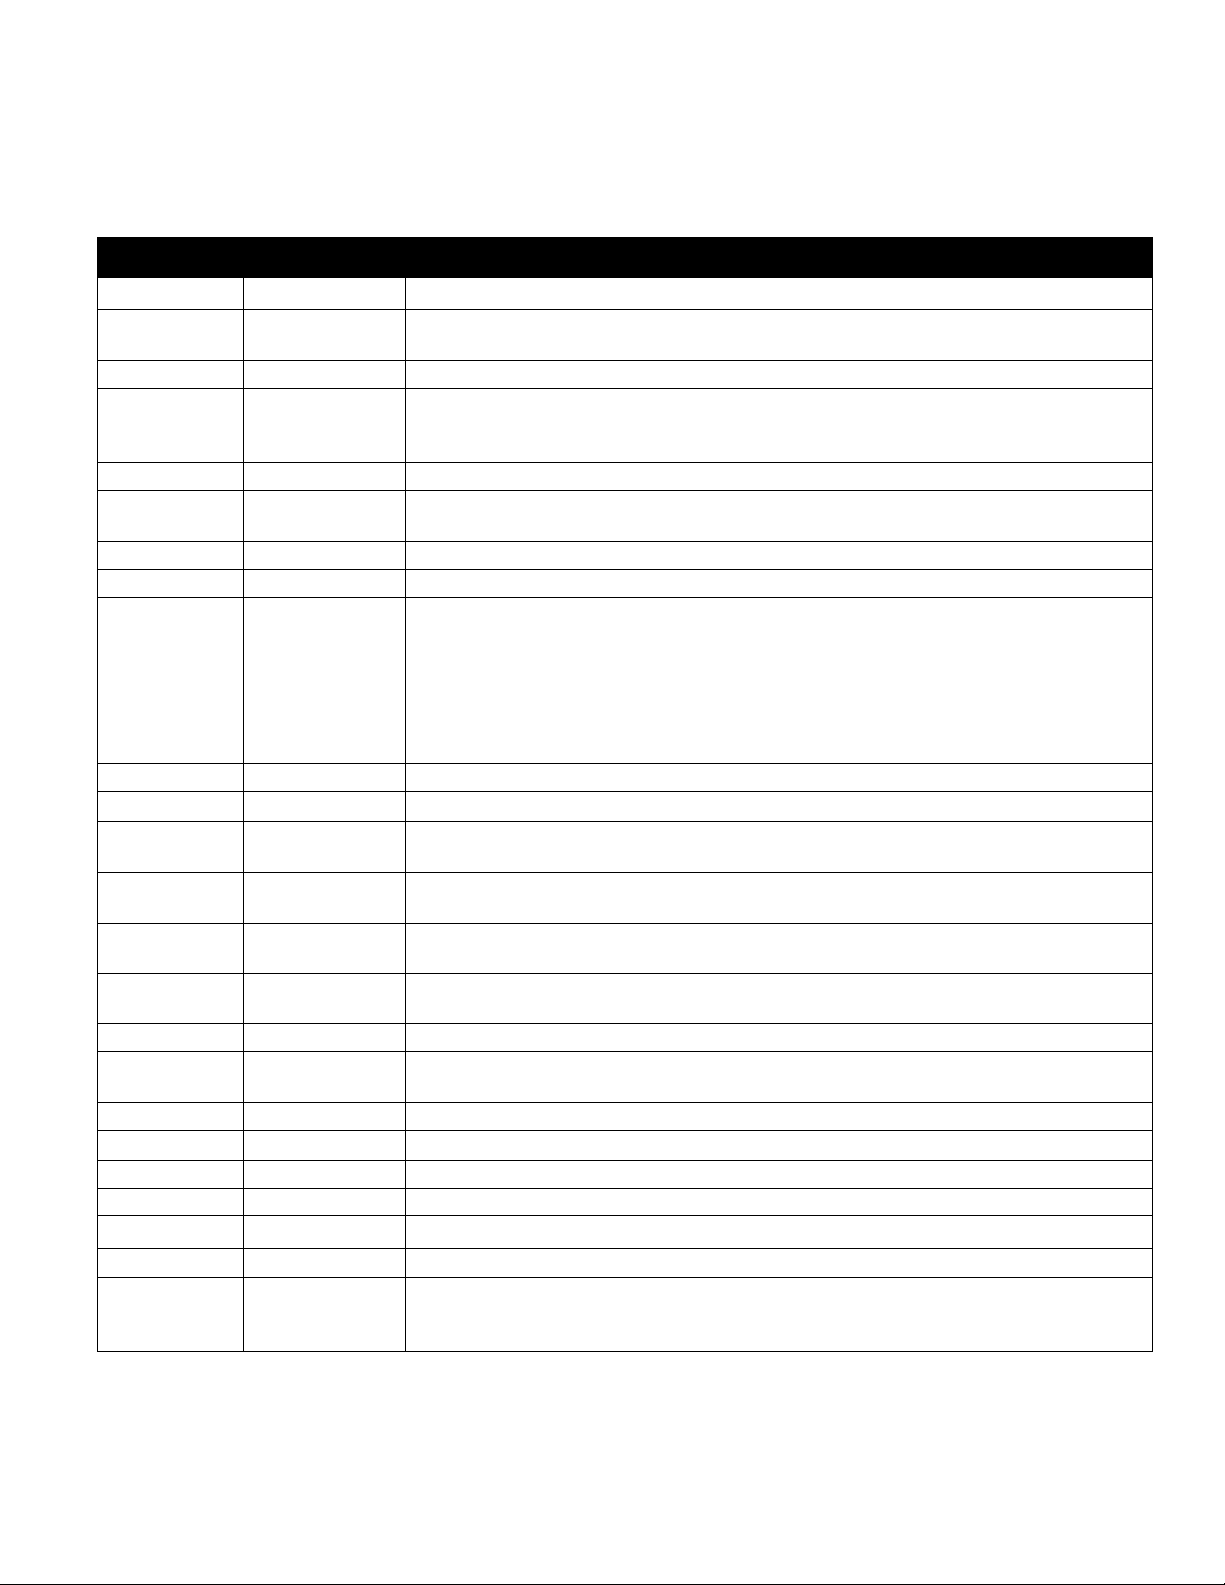
1.7 Prompts Encountered While Programming
The K3000 can be programmed for single-segmented cooking, which is used for most products and segmented cooking,
which is used for bone-in chicken. When pro gram ming for either product, the time prompts encountered are sequentially
numbered. For non-segmented products, enter 0:00 for the second time prompt (2 Time) and the additional programming
steps associated with segmented programming don’t appear .
For segmented products, the process is longer. As many as 10 segments can be introduced during the cook cycle of one
product. The complete cook cycle can be thought of as a timeline, with temperatures changes introduced at time-specific
points on the timeline.
As Time 2, Time 3, Time 4 appear in the programming steps, the time entered is NOT the duration of the specific cycle,
but the point a temperature change occurs on the timeline. For example, a Time 2 change that is to change a temperature
in a 13 minute cycle after 2 minutes is entered as 11. The first temperature change will occur with 11 minutes remaining
on the time line. See graphic on page 1-12.
Below is a explanation of the prompts presented in the sequence they occur. Programming is detailed on pages 1-12
thorough 1-15.
Left Display Right Display Explanation/Action
Long name Name or button
number
Short Name Name or button
number
COOKING MODE SINGLE SETPOINT
1 Time 0:00 or Previously
entered #
1 Tempr Temperature
1 Flex number
1 PRESSURE
OPEN
SOLENOID
2 Time Time
2 Tempr Temperature
Enter the full name of the product
Enter the four character abbreviated name of the product
Segmented: If multiple setpoint or segmented cooking is desired press
MULTIPLE SETPOINT and go to 1.9 and follow the instructions.
Non-Segmented: Leave at default of SINGLE SETPOINT.
In segmented and non-segmented programming, the total cook time is entered
here.
This is the setpoint for non-segmented products; the initial setpoint for
segmented products.
Flex is the feature in the Controller that allows the fryer to react to large and
small loads with the same cooking curve. It is generally not used with bone-in
chicken. The default value is 5. The range is 0-9.
This option is only present on pressure fryers. During cooks it determines if the
pressure solenoid should be open or closed. For segmented or multi-setpoint
cooking it may be closed and open during different cycles during the cook.
Segmented: Enter time remaining in the cook cycle after the first temperature
change occurs. Non-Segmented: Enter 0:00
Segmented: This is the first temperature change, which occurs at the point
entered at the 2 Time prompt. Non-Segmented: Doesn’t appear
2 Flex On or Off
2 PRESSURE
OPEN
SOLENOID
3 Time Time
3 Tempr Temperature
3 Flex On or OFF
See 1 Flex.
See 1 Pressure Solenoid.
Segmented: Enter time remaining in the cook cycle after the second temperature
change occurs. Non-Segmented: Doesn’t appear.
Segmented: This is the second temperature change, which occurs at the point
entered at the 3 Time prompt. Non-Segmented: Doesn’t appear
See 1 Flex.
1-9
Page 12

1.7 Prompts Encountered While Programming cont.
Left Display Right Display Explanation/Action
3 PRESSURE
OPEN
SOLENOID
4 Time Time
4 Tempr Temperature
4 Flex On or Off
4 PRESSURE
OPEN
SOLENOID
5 Time Time
1 Alarm Time Time
1 Alarm Name Shake, stir, numbered alarm
1 Alarm Mode Manual or Auto
1 Alarm Tone Short, Medium, Long, double
or long short, none
See 1 Pressure Solenoid.
Segmented: Enter time remaining in the cook cycle after the third
temperature change occurs. Non-Segmented: Doesn’t appear.
Segmented: This is the third temperature change, which occurs at the point
entered at the 3 Time prompt. Non-Segmented: Doesn’t appear
See 1 Flex.
See 1 Pressure Solenoid.
Segmented: Enter 0:00 if no more segments are needed.
Non-Segmented: Doesn’t appear.
An audible alarm in the cook cycle, indicating a need to shake or stir the
product.
Navigate choice with arrow buttons under display.
The alarm can be self cancelling (Auto) or manually canceled (Manual),
which requires a button push. Navigate choice with arrow buttons under
display.
The duration of the audible alarm is optional. Navigate choice with arrow
buttons under display.
2 Alarm Time Time
2 Alarm Name Shake, stir, numbered alarm
2 Alarm Mode Manual or Auto
2 Alarm Tone Short, Medium, Long, double
or long short, none
3 Alarm Time Time
3 Alarm Name Shake, stir, numbered alarm
3 Alarm Mode Manual or Auto
3 Alarm Tone Short, Medium, Long, double
or long short, none
After Cooking Set Point or COOL
Filter Lockout Number
Head Count 0
Instant On 0
Exit Exit
The second point in the cook cycle an alarm sounds.
Navigate choice with arrow buttons under display.
Navigate choice with arrow buttons under display.
Navigate choice with arrow buttons under display.
The third point in the cook cycle an alarm sounds.
Navigate choice with arrow buttons under display.
Navigate choice with arrow buttons under display.
Navigate choice with arrow buttons under display.
Setpoint: Fryer remains at setpoint; Cool: Fryer holds at 250°F (121°C).
Number of cook cycles for the product before a filter prompt.
Number of heads of chicken or the equivalent number for a non-chicken
product.
This is the time, in seconds, the fryer heats before the Controller checks the
temperature.
Press or Scan button to exit programming.
1-10
Page 13

1.8 Programming for Single Setpoint (Non-Segmented) Items
Programming for non-segmented food items is shown below. The right column has the action necessary to continue. Exit
from a programming step at any time by pressing the Scan button until the display returns to its pre-programming statu s .
Left Display Right Display Action
OFF OFF
Product Setup
Product Setup Enter Code
Select Product
Blank
Blank
Press and hold until Product Setup is displayed.
Press .
Enter 1724.
Press desired product button 1-20 that is not currently used to program
new product otherwise press a product button that is not lit.
Long Name Product name or button
number
Short Name Abbreviated Product name or
button number
COOKING MODE SINGLE SETPOINT
1 Time 0:00 or previously entered time
1 TempR Temp
1 Flex
1 PRESSURE
SOLENOID
2 Time 0:00 or previously entered time
1 Alarm TIME 0:00 or previously entered time
1 alarm name shake
1 ALARM MODE AUTO OR MANUAL
1 alarm tone Short, medium, long double or
2 alarm time 0:00
After Cooking Cool or Setpt
Number
OPEN
long short, none
Enter product name with letter buttons. Advance cursor with .
Press .
Enter abbreviated four character product name with letter buttons.
Press .
Press . If multiple setpoint or segmented cooking is desired press
MULTIPLE SETPOINT and go to 1.9 and follow the instructions.
(Default is SINGLE SETPOINT)
Enter total cook time with numbered buttons. Press .
Enter cooking temperature. Press .
Enter the level of flex, 0-9, for the product. Press .
Set to desired position with the buttons. Press the button to
change to CLOSED. (Option only for pressure fryers.)
Enter 0:00. Press .
Subtract the time from the starting cook time when the alarm should
sound. (Example: If a cook time is 5:00 and the shake time should be
30 seconds into the cook time enter 4:30 as the alarm time). Enter that
time for shaking, stirring, etc. Press . (Note: If alarm time is set to
0:00 skip to After Cooking below.)
Press to scroll through the alarm names (ex. Shake). Press .
Press to scroll to Auto or Manual alarm mode. Press .
Press to scroll to choice of alarm tones. Press .
Press . Leave at 0:00 for non-segmented cooking.
Press to scroll to Cool or Setpoint mode the fryer should exit to
after cook cycle: cool = 250; Setpoint = cooking temp. Press .
Filter Lockout 0
QUANTITY? No
Head Count 0 or previously set number
Instant On 0
Exit Exit
Select Product
Product Setup
OFF OFF
Blank
Blank
Enter number of cook cycles before a filter prompt and press .
Press to scroll to YES if a quantity per load is required, otherwise
leave to default NO.
Enter number of head or the equivalent value for the product . Press .
This is the time, in seconds, the fryer heats before the Controller
checks the temperature. Enter value and press .
Press Scan button to exit or the button for additional programming.
More Programming? Press product button a nd fol l o w inst r uct i ons
above. Exit Programming? Press Scan Button.
Press Scan button to exit or the button for additional programming.
1-11
Page 14

1.9 Multi-Setpoint (Segmented)
1.9.1 Cooking Programming Overview
The K3000 is capable of segmented cooking, a feature which allows a cooking cycle to be broken into a
number of parts, each with its own cooking temperature and time.
An abbreviated version of the programming for a 13-minute cook cycle with four cooking
temperatures is shown below. Steps are compressed for clarity. The cook times represent when on
the timeline of the total cook cycle the segment occurs. In this example, the first temperature
change occurs with 11 minutes remaining in the total cook time; 11 is entered at the prompt for the
second cook time. Two minutes into the total cook cycle, the temperature will change;11 minutes
will remain. Cook times for the remaining segments are arrived at by subtracting the segment length
from the remaining cook time. The complete programming steps are shown on pages 15 and 16.
Step 1 sets total cook time and initial setpoint.
Step 2 sets the duration of the first cooking segment, 2 minutes, and the setpoint of the first
temperature change.
Step 3 sets the duration of the second cooking segment, 4 minutes, and the setpoint of the
second temperature change.
Step 4 sets the duration of the third cooking segment, 3 minutes, and the setpoint of the third
temperature change.
The four remaining minutes in the cook time elapse at the final temperature. No entry is required to
use the final minutes
1-12
Page 15

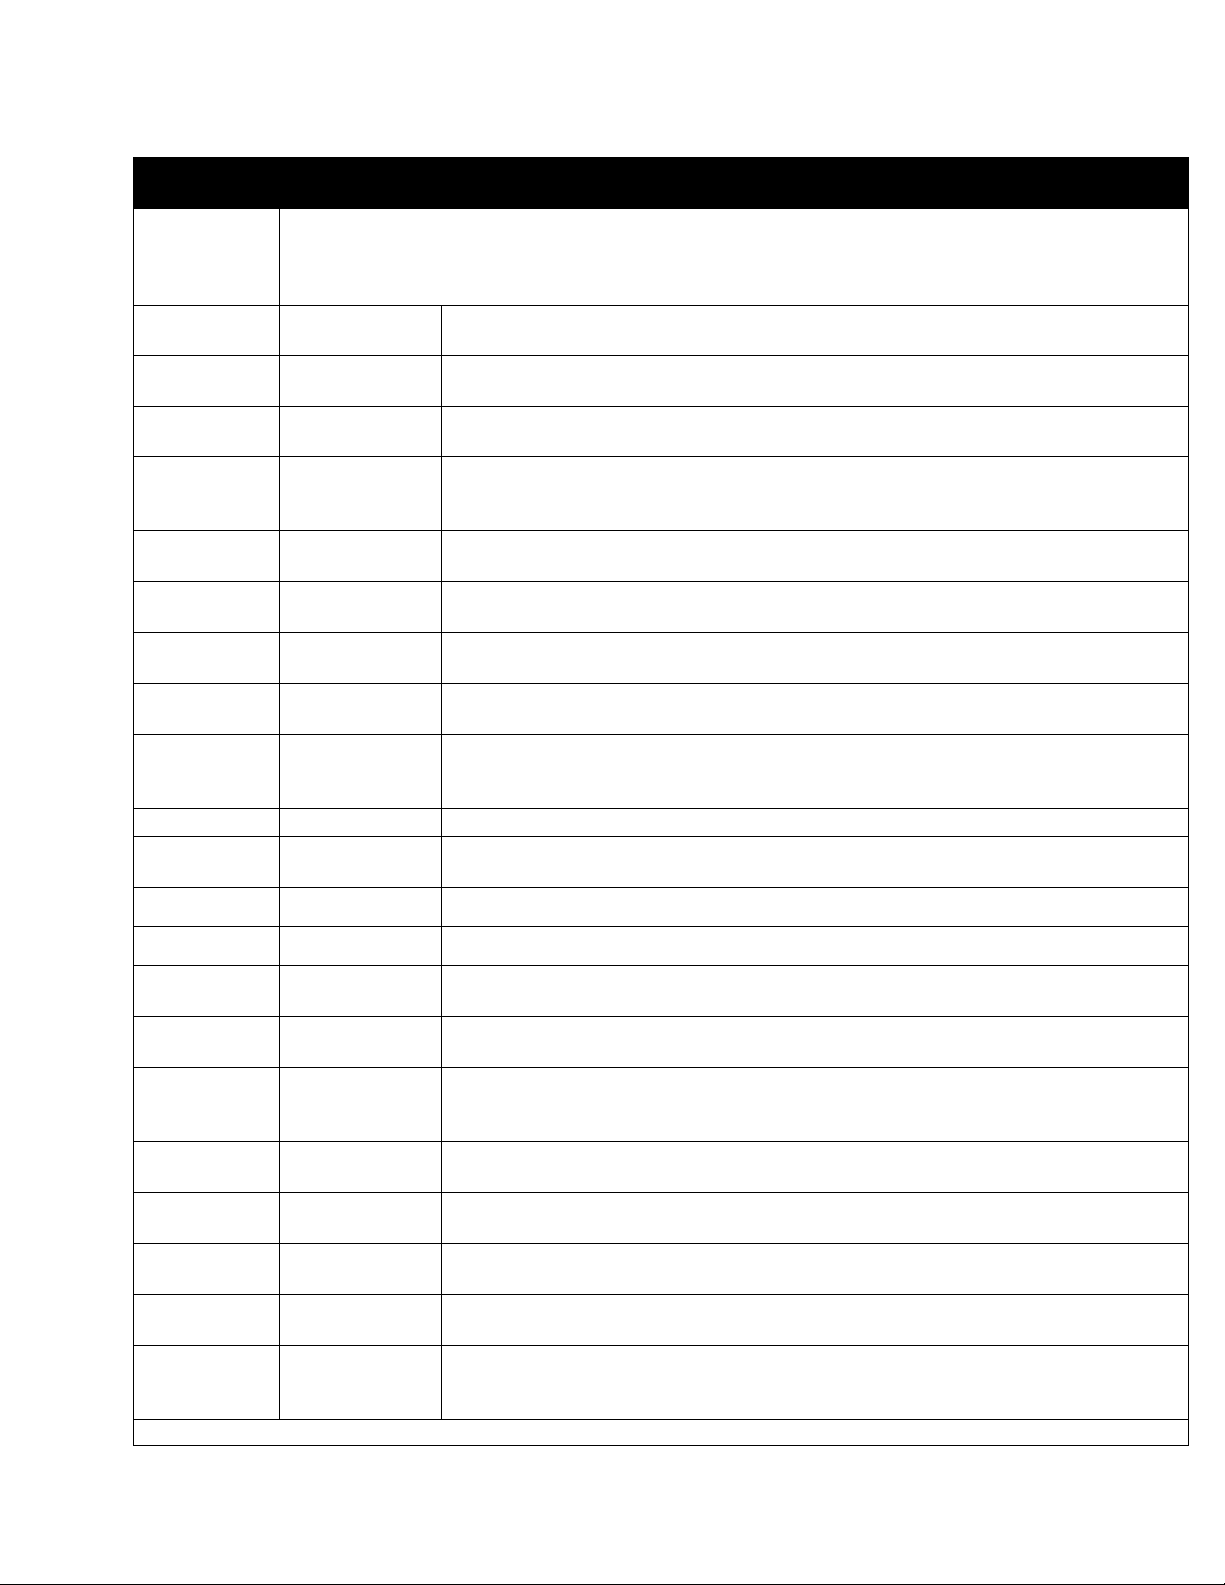
1.9.2 Alarm Programming Overview
Alarms are set to remind operators to shake fry baskets or tend to the product in some other way at
points during the cook cycle. The instructions below detail setting three alarms in a 13-minute cook
cycle. To enter a single alarm, exit the sequence after setting the first alarm.
Three alarms can be programmed for a cook cycle. The K3000 counts down cook times from
the total time to zero. Alarms are entered at the point in the countdown they are desired. The
example below is for alarms at 11:00, 6:00 and 2:00 on the countdown clock; the alarms will
occur two, seven and 11 minutes into the 13-minute cook cycle.
11:00
1:
At the Alarm 1
prompt, enter
11:00. The alarm
will occur with 11
minutes remaining
in the cook cycle;
two minutes have
passed.
2:
At the Alarm 2 prompt,
enter 6:00, The alarm will
occur with 6:00 remaining
in the cook cycle; seven
minutes have passed.
6:00
3:
At the Alarm 3
prompt, enter 2:00.
The alarm will
occur with 2:00
remaining in the
cook cycle; 11
minutes have
passed.
2:00
Cook
cycle
ends
13:00
2:00 7:00 11:00
Points in the cook cycle the alarms occur
1-13
Page 16

1.10 Programming for Multi-Setpoint (Segmented) Items
Left Display Right Display Action
OFF OFF
Press and hold until Product Setup is displayed.
Product Setup
Product Setup Enter Code
Select Product
Long Name Product name or button number
Short Name Abbreviated Product name or
COOKING MODE SINGLE SETPOINT
1 Time 0:00 or previously entered time
1 Tempr temperature
1 Flex 0 or previously entered value
1 PRESSURE SOLENOID OPEN
2 Time 0:00 or previously entered time
2 Tempr 0:00 or previously entered
2 Flex 0 or previously entered value
2 PRESSURE SOLENOID OPEN
3 Time O:00 or previously programmed
3 Tempr
3 Flex 0 or previously entered value
3 PRESSURE SOLENOID OPEN
4 Time 00 or previously entered time
4 tempr 0:00 or previously programmed
4 Flex 0 or previously entered value
4 PRESSURE SOLENOID OPEN
Blank
Blank Press desired product button
button number
temperature
time
0:00 or previously programmed
temperature
temperature
Press .
Enter 1724
Enter product name with letter buttons. Advance
cursor with . With name entered, press
Enter abbreviated four character prod uct nam e with
letter buttons. Press .
Press . If multiple setpoint or segmented cooking
is desired press Multiple Setpoint (Segmented)
and follow the instructions in the next section.
(Default is SINGLE SETPOINT)
Enter total cook time for segmented item and press
.
Enter initial cooking temperature and press .
Enter the flex value, 0-9, for the product and press
.
Set to desired position with the buttons. Press
the button to change to CLOSED. (Option only
for pressure fryers.)
Enter time remaining after first temperature change
(see page 1-11) and press .
Enter first temperature change and press .
Enter the flex value, 0-9, for the product and press
.
Set to desired position with the buttons. Press
the button to change to CLOSED. (Option only
for pressure fryers.)
Enter time remaining after second temperature
change and press .
Enter temperature of the second segment and press
.
Enter the flex value, 0-9, for the product and press
.
Set to desired position with the buttons. Press
the button to change to CLOSED. (Option only
for pressure fryers.)
Enter time remaining after third temperature change
and press .
Enter temperature of the third segment and press .
Enter the flex value, 0-9, for the product and press
.
Set to desired position with the buttons. Press
the button to change to CLOSED. (Option only
for pressure fryers.)
1-14
Page 17

1.10 Programming for Multi-Setpoint (Segmented) Items cont.
Left Display Right Display Action
5 Time :00 or previously entered time
1 Alarm time :00 or previously entered time
1 Alarm Name SHAKE
1 alarm mode Manual or auto
1 Alarm Tone Short, medium, long double or
long short, none
2 Alarm time Time
2 Alarm name name
2 alarm mode Manual or auto
2 Alarm Tone Short, medium, long double or
long short, none
3 Alarm time name
3 alarm Mode Manual or auto
Leave at zero if no more segments are needed and
press . If more segments are needed, 5 is the limit,
continue programming as shown above.
Subtract the time from the starting cook time when the
alarm should sound. (Example: If a cook time is 5:00
and the shake time should be 30 seconds into the cook
time enter 4:30 as the alarm time). Enter that time for
shaking, stirring, etc. Press .
Press to scroll through choices: Shake, Stir, Num1.
With NUM 1 displayed, scroll through number
choices with . Display name and press .
Choose mode with and press .
Choose tone with and press .
Subtract the time from the starting cook time when the
second alarm should sound. (Example: If a cook time
is 5:00 and the shake time should be 30 seconds into
the cook time enter 4:30 as the alarm time). Enter that
time for shaking, stirring, etc. Press .
Press to scroll through choices and press .
Choose mode with and press .
Choose tone with and press .
Subtract the time from the starting cook time when the
third alarm should sound. (Example: If a cook time is
5:00 and the shake time should be 30 seconds into the
cook time enter 4:30 as the alarm time). Enter that
time for shaking, stirring, etc. Press .
Choose mode with and press .
3 Alarm Tone Short, medium, long double or
long short, none
After cooking Set Point or cool
Filter Lockout 0
QUANTITY? No
Head count User prompt 00
Instant ON 0
Exit Exit
Select Product
OFF OFF
Blank
Choose tone with and press .
Choose fryer status after cook cycle with and
press .
Enter number of cook cycles before a filter prompt
and press .
Press to scroll to YES if a quantity per load is
required, otherwise leave to default NO.
Enter chicken head count or equivalent number for
non-chicken item and press .
This is the time, in seconds, the fryer heats before the
Controller checks the temperature. Enter value and
press .
Press .
Press Scan twice. Display goes to OFF.
1-15
Page 18

1.11 K3000 Menu Summary Tree
1-16
Page 19

CHAPTER 2: OPERATOR TROUBLESHOOTING
2.1 Introduction
This chapter provides an easy reference guide to some of the common problems that may occur
during the operation of your equipment. The troubleshooting guides that follow are intended to help
you correct, or at least accurately diagnose, problems with your equipment. Although the chapter
covers the most common problems reported, you may encounter problems that are not covered. In
such instances, the Frymaster Technical Services staff will make every effort to help you identify
and resolve the problem.
When troubleshooting a problem, always use a process of elimination starting with the simplest
solution and working through to the most complex. Most importantly, always try to establish a clear
idea of why a problem has occurred. Part of your corrective action involves taking steps to ensure
that it doesn’t happen again. If a controller malfunctions because of a poor connection, check all
other connections while you’re at it. If a fuse continues to blow, find out why. Always keep in mind
that failure of a small component may often be indicative of potential failure or incorrect functioning
of a more important component or system.
If you are in doubt as to the proper action to take, do not hesitate to call the Frymaster Technical
Service Department or your local Frymaster Authorized Servicer for assistance.
Before calling a servicer or the Frymaster HOTLINE (1-800-551-8633):
Verify that electrical cords are plugged in and that circuit breakers are on.
Verify that gas line quick-disconnects are properly connected.
Verify that any gas line cutoff valves are open.
Verify that frypot drain valves are fully closed.
Have your fryer’s model and serial numbers ready to give to the technician assisting
you.
DANGER
Hot oil will cause severe burns. Never attempt to move this appliance when filled
with hot cooking oil or to transfer hot cooking oil from one container to another.
DANGER
This equipment should be unplugged when servicing, except when electrical circuit
tests are required. Use extreme care when performing such tests.
This appliance may have more than one electrical power supply connection point.
Disconnect all power cords before servicing.
Inspection, testing, and repair of electrical components should be performed by an
factory authorized servicer only.
2-1
Page 20

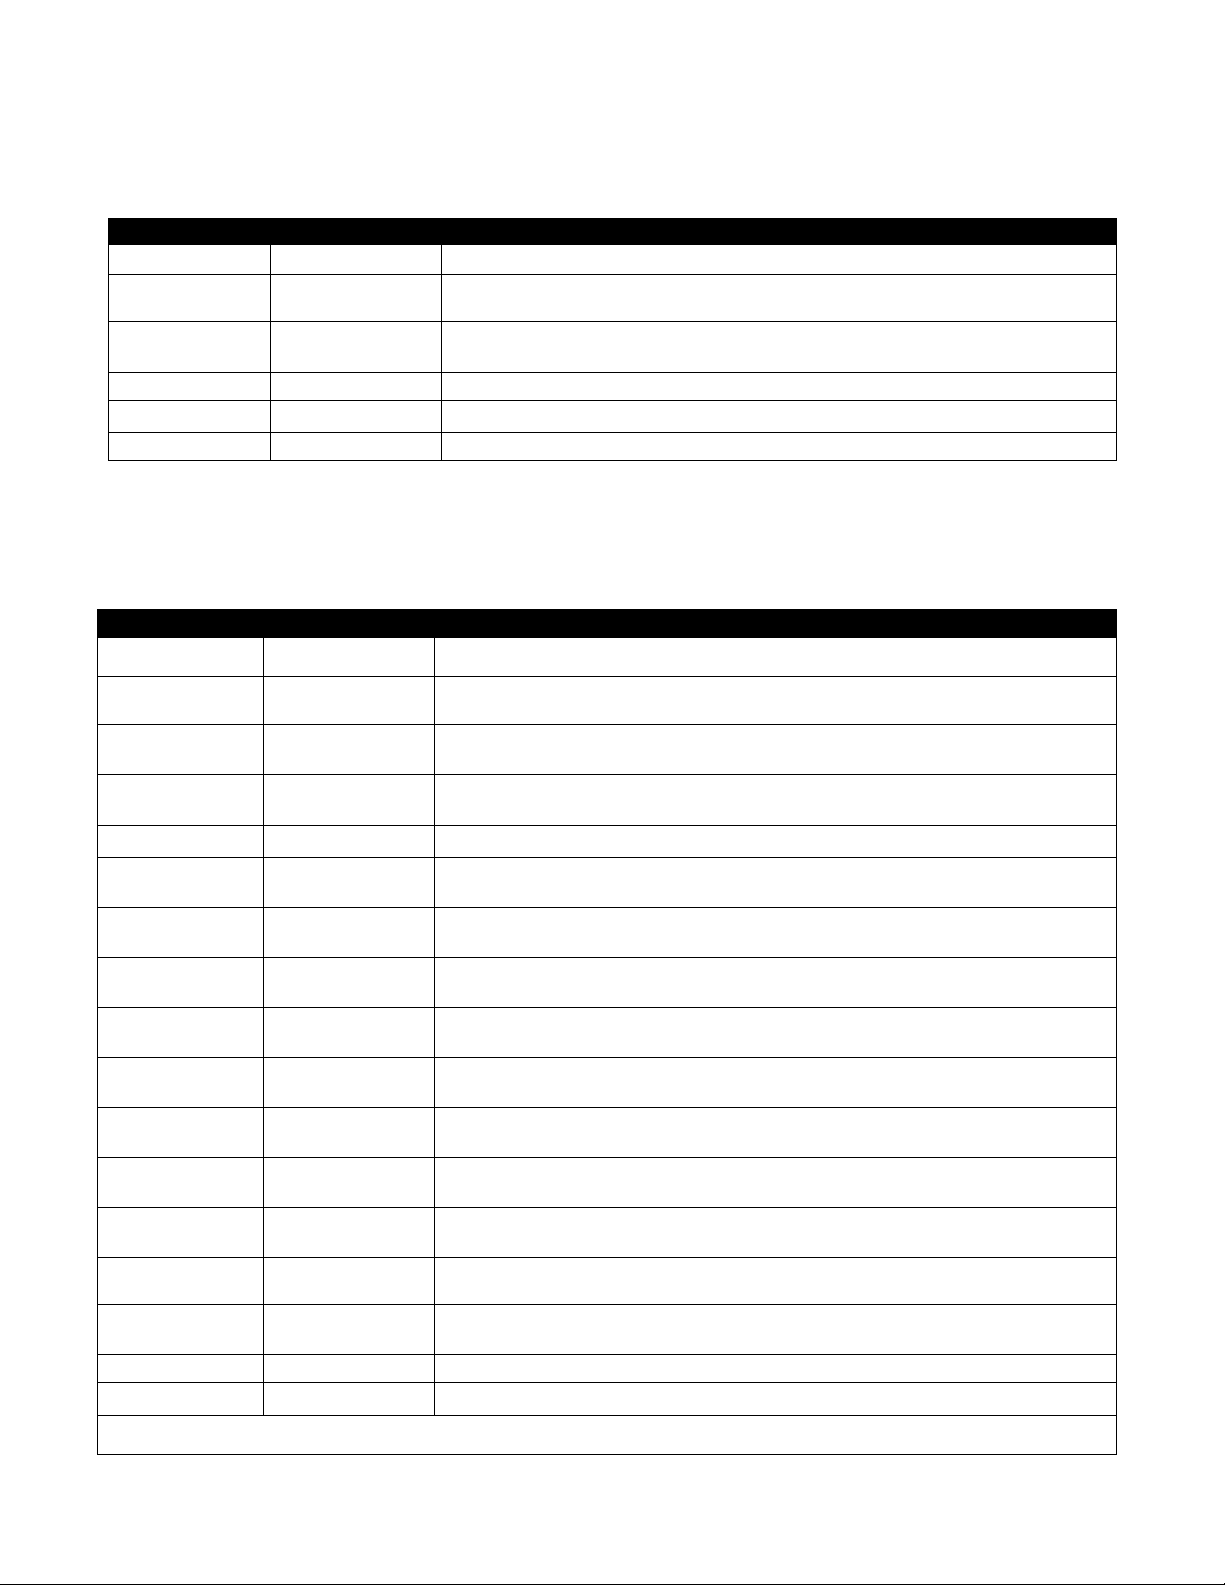
2.2 Troubleshooting Fryers
2.2.1 Error Messages and Display Problems
PROBLEM PROBABLE CAUSES CORRECTIVE ACTION
No display on the
controller.
Fryer repeatedly cycles
on and off when first
started with MLT
CYCL displayed.
Heat indicator is on
and blower is running,
but burner will not
ignite.
Fryer does not heat
after filtering.
Controller displays
Hot hi-1.
Controller displays Hi
temp.
A. Controller not turned on.
B. No power to fryer.
C. Failed Controller or other
component
Fryer is in melt-cycle mode.
Blown fuse on interface board
or ignition module.
Drain valve is open. Verify that the drain valve is fully closed.
Frypot temperature is more than
410ºF (210ºC) or, in CE countries,
395ºF (202ºC).
Frypot temperature is more than
40 ºF (4ºC).
A. Press the ON/OFF switch to turn the
Controller on.
B. Verify that the fryer is plugged in and that the
circuit breaker is not tripped.
C. Call your FAS for assistance.
This is normal when fryer is turned on with oil
temperature below 100 F° (38C°).
Contact your FAS for service.
Shut the fryer down immediately and call your
FAS for assistance.
Press the power button to turn off fryer and let
cool before returning power to fryer. If issue
continues call your FAS for assistance.
Controller displays
RECOVERY
FAULT/ YES and
alarm sounds.
Controller display is in
wrong temperature
scale (Fahrenheit or
Celsius).
Controller displays
High limit
failure
disconnect
power.
Controller displays
TEMPR PROBE
FAILURE.
Recovery time exceeded maximum
time limit.
Incorrect display option
programmed.
Failed high limit
Problem with the temperature
measuring circuitry including the
probe or damaged Controller
wiring harness or connector.
Clear error and silence the alarm by pressing the
(YES) button. If the error continues call your FAS
for assistance.
Toggle between F° to C° by pressing the button
until Product setup is displayed. Press to scroll
to Tech Mode and press . Enter 1658. Press the
scan button. The Controller displays OFF. Turn
the Controller on to check temperature. If the
desired scale is not displayed, repeat.
Shut the fryer down immediately and call your
FAS for assistance.
Shut the fryer down and call your FAS for
assistance.
2-2
Page 21

PROBLEM PROBABLE CAUSES CORRECTIVE ACTION
Controller displays
HEATING
FAILURE.
Controller displays
SERVICE
REQUIRED followed
by an error message.
Controller heat LED
illuminated but fryer is
not heating. (HP
Pressure fryers only)
Controller displays
HEATING
FAILURE, CHECK
HI-LIMIT, DRAIN
VALVE, VACUUM
SWITCH, BLOWER
MOTOR.
(HP Pressure
fryers only)
Contactor issue, gas valve off,
failed Controller, failed
transformer, open high-limit
thermostat.
An error has occurred which
requires a service technician.
Main power switch is off.
Open high-limit, open drain valve,
faulty drain valve switch, plugged
vacuum pressure switch, failed
blower motor.
It is normal for this message to appear during
startup if a gas fryer’s lines have air in them.
Check that the gas valve is on. If it continues,
shut the fryer down and call your FAS for
assistance.
(NO) to continue cooking and call
Press
your FAS for assistance. In some cases,
cooking may not be allowed.
Turn on main power switch and ensure
heating lamp is illuminated.
Check drain valve, high-limit, vacuum
pressure switch, blower motor.
If it continues, shut the fryer down and call
your FAS for assistance.
2.2.2 Filtration Problems
PROBLEM PROBABLE CAUSES CORRECTIVE ACTION
Controller
displays IS VAT
FULL? YES
NO after a
filtration.
CLEAN, POLISH,
FILTER OR
DISPOSE won’t
start.
Controller displays
WAIT FOR
Filter.
Controller displays
CHANGE FILTER
PAPER?
A. Normal after filtering or filling. A. Press (YES) if the vat is full, otherwise
press (NO) and follow prompts.
Temperature too low or Controller
displays OFF.
A. Another function is still in
process.
B. MIB has not cleared checking
system.
Daily filter paper change prompt
has occurred.
Ensure fryer is at 250°F(121°C) or setpoint
before starting; ensure the Controller is ON.
A. Wait until the previous function ends to
start another filtration cycle.
B. Wait one minute and try again.
Press (YES), follow prompts and change
the filter paper. Do NOT
FILTER PAPER prompts.
ignore CHANGE
Controller displays
INSERT pan.
A. Normal during Change Filter
Paper routine.
2-3
A. Insert pan and press (CONFIRM)
button.
Page 22

PROBLEM PROBABLE CAUSES CORRECTIVE ACTION
Controller displays
OIL IN DRAIN
PAN / CONFIRM
Controller displays
FLT DYLD
Controller displays
POL DYLD
Drain valve open or possibility that
oil is in drain pan.
A filter cycle has been delayed.
A polish cycle has been delayed.
Press (CONFIRM) and follow directions for
FILL VAT FROM DRAIN PAN.
This is a normal display when a filter has been
delayed. After the next filter prompt press
YES to filter.
This is a normal display when a polish has
been delayed. After the next polish prompt
press YES.
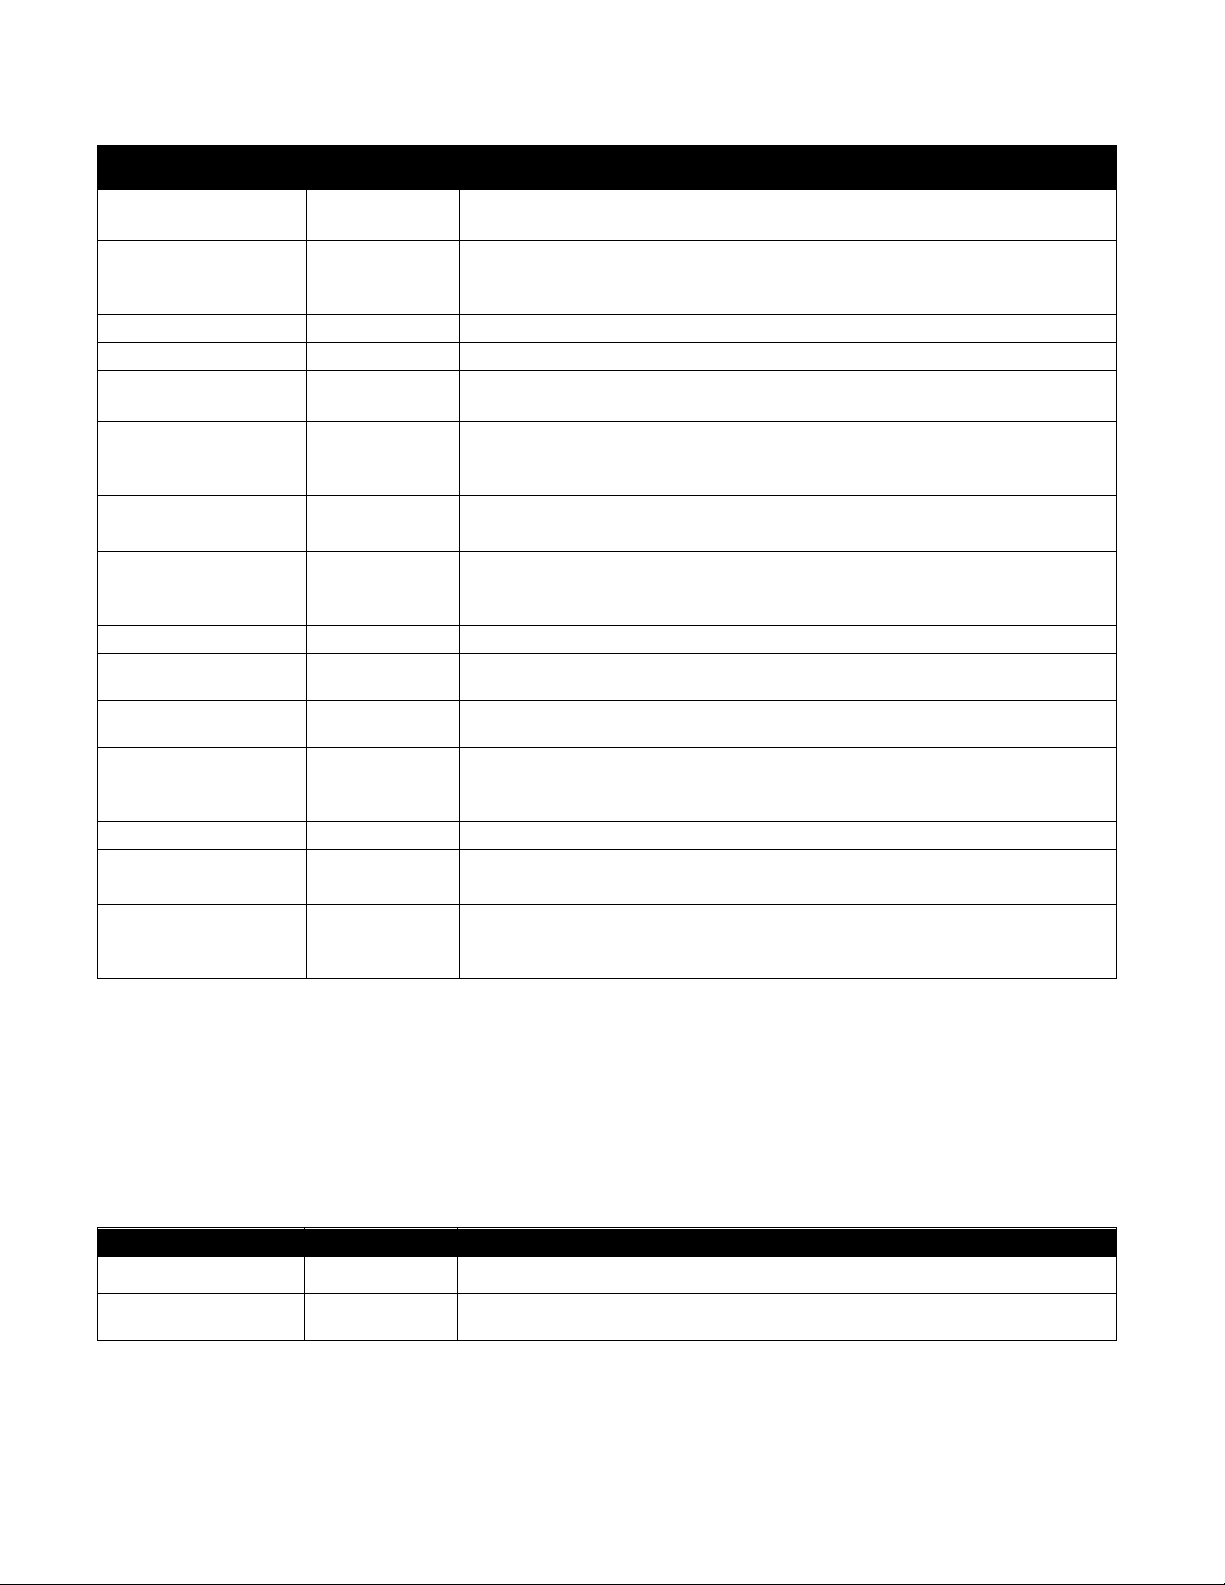
2.2.3 Error Log Codes
Code ERROR MESSAGE EXPLANATION
E03 ERROR TEMP PROBE FAILURE Temp probe reading out of range
E04 HI 2 BAD High limit reading is out of range.
E05 HOT HI 1 High limit temperature is past more than 410°F
(210°C), or in CE countries, 395°F (202°C)
E06 HEATING FAILURE A component has failed such as controller, interface
board, contactor, gas valve, ignition module or
open-high limit.
E20 INVALID CODE LOCATION SD card removed during update
E21 FILTER PAPER PROCEDURE ERROR
(Change Filter Paper)
E22 OIL IN PAN ERROR Oil may be present in the filter pan.
E25 RECOVERY FAULT Recovery time exceeded maximum time limit.
E28 HIGH TEMP ALARM Oil has exceeded 40 ºF (4ºC) over setpoint.
24 hour timer has expired
2.2.4 HP Pressure Fryer Specific
The HP pressure fryer has a STRATIFY mode that turns the pump on for various times to mix the
oil so that excess water can escape from the oil.
It enters STRATIFY mode when:
-The fryer reaches 300F (149C) after initially heating.
-Every 30 minutes after cooks.
-After an EXIT COOL.
2-4
Page 23

Page 24

Frymaster, L.L.C., 8700 Line Avenue, Shreveport, Louisiana 71106
TEL 1-318-865-1711 FAX (Parts) 1-318-688-2200 (Tech Support Fax) 1-3 18-219-7135
PRINTED IN THE UNITED STATES
SERVICE HOTLINE
1-800-551-8633
819-6647
06/2015
 Loading...