


All about the
Use&Care
of your Wine Cooler
TA B L E O F C O N T E N T S
Important Safety Instructions...................... |
2 |
Installation................................................. |
4 |
Door Reversal Instructions........................... |
5 |
Energy Saving Tips..................................... |
7 |
Temperature Controls.................................. |
8 |
www.frigidaire.com USA 1-800-944-9044
Features................................................... |
10 |
Proper Use of Wine Cooler......................... |
11 |
Care and Cleaning..................................... |
12 |
Before you Call......................................... |
13 |
Major Appliance Warranty.......................... |
16 |
www.frigidaire.ca Canada 1-800-265-8352
2017) (July A10092202
SERIAL/MODEL #’S - IMPORTANT SAFETY INSTRUCTIONS
Read and Save These Instructions
This Owner’s Guide provides specific operating instructions for your model. Use your Wine Cooler only as instructed in this guide. These instructions are not meant to cover every possible condition and situation that may occur. Common sense and caution must be practiced when installing, operating, and maintaining any appliance.
Record Your Model and Serial Numbers
Record the model and serial numbers in the space provided below. The serial plate is located on the upper left of the interior liner or on the back of the unit.
Model Number:
Serial Number:
Purchase Date:

 CAUTION
CAUTION indicates a potentially hazardous situation which, if not avoided, may result in minor or moderate injury.

 IMPORTANT
IMPORTANT indicates installation, operation or maintenance information which is important but not hazard-related.

 WARNING
For Your Safety
Do not store or use gasoline, or other flammable vapors and liquids in the vicinity of this or any other appliance. Read product labels for flammability and other warnings.

 WARNING
Please read all instructions before using this wine cooler.
Definitions
 This is the safety alert symbol. It is used to alert you to potential personal injury hazards. Obey all safety messages that follow this symbol to avoid possible injury or death.

 DANGER
DANGER Risk of fire or explosion.
Flammable refrigerant used. Do not use mechanical devices to defrost refrigerator. Do not puncture refrigerant tubing.
DANGER Risk of fire or explosion.
Flammable refrigerant used. To be repaired only by trained service personnel. Do not puncture refrigerant tubing.

 DANGER
DANGER indicates an imminently hazardous situation which, if not avoided, will result in death or serious injury.

 WARNING
WARNING indicates a potentially hazardous situation which, if not avoided, could result in death or serious injury.

 CAUTION
CAUTION Risk of fire or explosion.
Flammable refrigerant used. Consult repair manual/owner’s guide before attempting to service this product. All safety precautions must be followed.
CAUTION Risk of fire or explosion. Dispose of property in accordance with federal or local regulations. Flammable refrigerant used.
CAUTION Risk of fire or explosion due to puncture of refrigerant tubing. Follow handling instructions carefully. Flammable refrigerant used.
2
IMPORTANT SAFETY INSTRUCTIONS

 WARNING
Electrical Information
•The wine cooler must be plugged into its own dedicated 115 Volt, 60 Hz., 15 Amp, AC only electrical outlet. The power cord of the appliance is equipped with a threeprong grounding plug for your protection against electrical shock hazards. It
must be plugged directly into a properly grounded three prong receptacle. The receptacle must be installed in accordance with local codes and ordinances. Consult a qualified electrician. Avoid connecting refrigerator to a Ground Fault Interruptor
(GFI) circuit. Do not use an extension cord or adapter plug.
•If the power cord is damaged, it should be replaced by an authorized service technician to prevent any risk.
•Never unplug the wine cooler by pulling on the power cord. Always grip the plug firmly, and pull straight out from the receptacle to prevent damaging the power cord.
•Unplug the wine cooler before cleaning and before replacing a light bulb to avoid electrical shock.
•Performance may be affected if the voltage varies by 10% or more. Operating the wine cooler with insufficient power can damage the compressor. Such damage is not covered under your warranty.
•Do not plug the unit into an electrical outlet controlled by a wall switch or pull cord to prevent the wine cooler from being turned off accidentally.
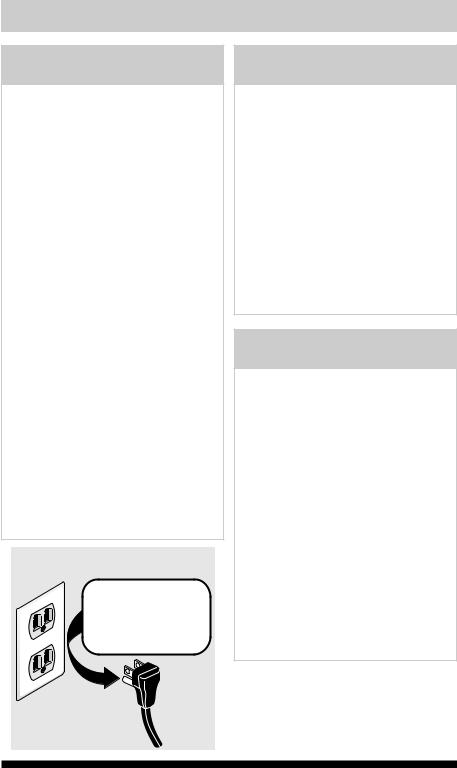
Grounding type wall receptacle
Do not, under
any circumstances, cut, remove,
or bypass the grounding prong.

 WARNING
Child Safety
•Destroy carton, plastic bags, and any exterior wrapping material immediately after the wine cooler is unpacked. Children should never use these items to play. Cartons covered with rugs,
bedspreads, plastic sheets or stretch wrap may become airtight chambers, and can quickly cause suffocation.
•Remove all staples from the carton. Staples can cause severe cuts, and destroy finishes if they come in contact with other appliances or furniture.
•An empty, discarded wine cooler is a very dangerous attraction to children.
•Remove the door(s) of any appliance that is not in use, even if it is being discarded.

 WARNING
Proper Disposal of your Wine Cooler Risk of child entrapment
Child entrapment and suffocation are not problems of the past. Junked or abandoned wine coolers are still dangerous – even if they will sit for “just a few days”. If you are getting rid of your old wine cooler, please follow the instructions below to help prevent accidents.
We strongly encourage responsible appliance recycling/disposal methods. Check with your utility company or visit www.recyclemyoldfridge.com for more information on recycling your old wine cooler.
Before you throw away your old wine cooler:
•Remove doors.
•Leave shelves in place so children may not easily climb inside.
•Have refrigerant removed by a qualified service technician.
Power cord with 3-prong grounded plug
3
INSTALLATION
This Use & Care Guide provides general operating instructions for your model. Use the appliance only as instructed in this Use & Care Guide. Before starting the wine cooler, follow these important first steps.
Location
•Choose a place that is near a grounded electrical outlet. Do Not use an extension cord or an adapter plug.
•For optimal performance, it is recommended that you install the wine cooler where the ambient temperature is between 70 and 78 degrees Fahrenheit. Do not install your Wine Cooler in any location not properly insulated or heated, such as in a garage, or poor cooling performance and/or external condensation on the glass may occur.
•Leave a 2 inch space at the back of the wine cooler for adequate air circulation.
•Be sure the wine cooler stays in the upright position during transport.
•Keep the wine cooler from any hazardous or combustible agents.
Leveling
The wine cooler must have all bottom corners resting firmly on solid floor. The floor must be strong enough to support a fully loaded wine cooler. NOTE: It is Very Important for your wine cooler to be level in order to function properly. If the wine cooler is not leveled during installation, the door may be misaligned and not close or seal properly, causing cooling, frost, or moisture problems.
To Level Your Wine Cooler:
After removing all interior and exterior packaging materials, use a carpenter’s level to level the wine cooler from front-to-back. Adjust the leveling legs in front, ½ bubble higher, so that the door closes easily when left halfway open.
Cleaning
•Wash any removable parts of the wine cooler interior, and exterior with mild detergent and warm water. Wipe dry. Do not use harsh cleaners on these surfaces.
•Do not use razor blades or other sharp instruments, which can scratch the appliance surface when removing adhesive labels. Any glue left from the tape can be removed with a mixture of warm water and mild detergent, or touch the residue with the sticky side of tape already removed. Do not remove the serial plate.
Important Safeguards: Do not store food in your wine cooler as interior temperature may not get cool enough to prevent spoilage. In summer months or areas of high humidity, the glass door may build up moisture. To remove the moisture, wipe it away.
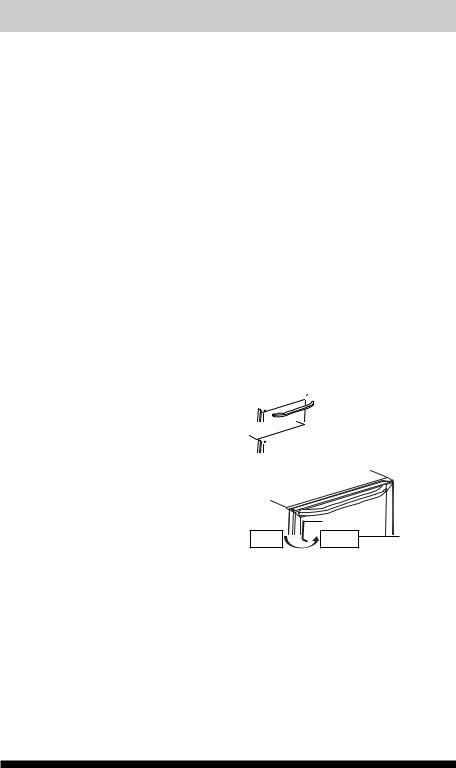
Handle Installation
1.Place the handle over the two mounting screws at top of door.
2.Tighten the two set screws in bottom of handle using Allen wrench.

 Handle Mounting Screws
 Set Handle
|
Wrench |
Turn |
|
|
clockwise |
||
Loose |
Tighten |
to |
|
tighten |
|||
|
|
4

DOOR REVERSAL INSTRUCTIONS
Reversing the door swing
The glass door can be opened from left to right and vice versa. Should you desire to change the opening direction, please follow these instructions.
NOTE
Door reversal is not available for a unit with control panel on door. The following operation is only for a unit with control panel inside the cabinet.
Remarks: These instructions are based on a unit with right hinge installed already.
To reverse the door from right hinge to left hinge, you will need the extra hinge kit that comes packed inside the unit.
Save all removed parts in case of door re-reversal.
1.Using a Phillips screwdriver, remove the top hinge pin at the top right corner of door. (See Figure 1.)
Hinge Pin Top Hinge
Figure 1
2.Carefully grasp top of door, tilt it forward slightly to clear hinge, then lift the door up off of bottom hinge and place it on a padded surface to prevent scratching it. (See Figure 2.)
3.Remove the three screws that hold the upper right hinge to the top of the cabinet. (See Figure 3.)
Upper Right |
Hinge |
Figure 3
4.Remove the three button plugs from the upper left corner of the cabinet and
transfer them to the holes on the opposite side. Be sure to press the button plugs firmly into the holes. Remove screws from each side of toe grille and lay toe grille flat on floor in front of unit. (See Figure 4.)
Button Plugs (3 pcs)
Remove toe grille
Figure 4
5.Install new left hand top hinge (prepackaged inside unit) at the left hand cabinet corner. (See Figure 5.)
Upper Left Hinge |
Figure 5
Figure 2
5
 Loading...