

Page 1

TSA Upgrade
Installation Instructions
These instructions are for upgrading or adding software
options to a T5 Series or Colibri console using the TSA
Upgrade Tool.
Important: Before attempting any upgrade, download
and save the most recent setup le to your
computer.
Note: Do not upgrade EMS consoles used with balance
systems (see Tech bulletin TB0110-02).
Download Upgrade Firmware
The upgrade rmware can be downloaded from our
website OR can be ordered from Franklin Fueling Systems
on a USB memory stick. Part # TSA-UPGMS for T5 Series
(EVO not included), Part # CL-UPGMS for Colibri. There is
no USB memory stick option available for the TS-550 evo.
The TS-550 evo must use the website download option.
• To download from the website, go to www.
franklinfueling.com. Select Service \ Software
Downloads.
• The Software Downloads are separated into
Colbri, T5 Series, and TS-550 evo Software
Downloads. Click on the appropriate version. Fill
in the Contact Information and click Download
Software.
• To download from the USB memory stick.
Insert the USB memory stick into the USB port of the
computer that will be used to perform the Software
Upgrade. Browse to the le to select it.
After the connection parameters are entered correctly, click
the QUERY button. This will connect the TSA Upgrade
Tool to the T5 series console and retrieve the registration,
rmware and database information from the console.
The identication information will be entered automatically
from the console. No information has to be manually
entered in here.
The downloaded le will be named by the version
(example T5S1545341.exe). After downloading,
the user will be prompted to run the le and
this will open the extraction utility and the user
must select the destination for the les or accept
the default destination. Once the extraction is
complete then TSAUpgradeTool.exe will start.
Connection parameters
Default settings for the connection parameters are as
follows:
• Address: 192.168.168.168 is the default for a tank
gauge console and is what will be used as a IP address
when connecting with the Ethernet crossover cable.
If you are upgrading the console remotely, enter the
correct IP address of the console here.
•
Port: port 80 is the default port setting for the consoles
• Password: the default password for the tank gauge
console is admin and is entered as a default on the TSA
Upgrade Tool. If the password on the console has been
changed, enter the correct password here.
Registration Tab
Under the registration tab you will see all available options
for the tank gauge console.
“Current” will either have a yes or no. If there is a yes, the
console has that specic option already installed. If no,
then the option is not installed on the console.
If the TSA Upgrade Tool was received in response to an
order for a new Software Option, the “Available” column
will list the purchased option as yes. For example, if your
console does not have SCALD Testing, the “Current” entry
for SCALD testing will have NO and the “Available” column
will state YES (If the SCALD option has been purchased).
1
Page 2
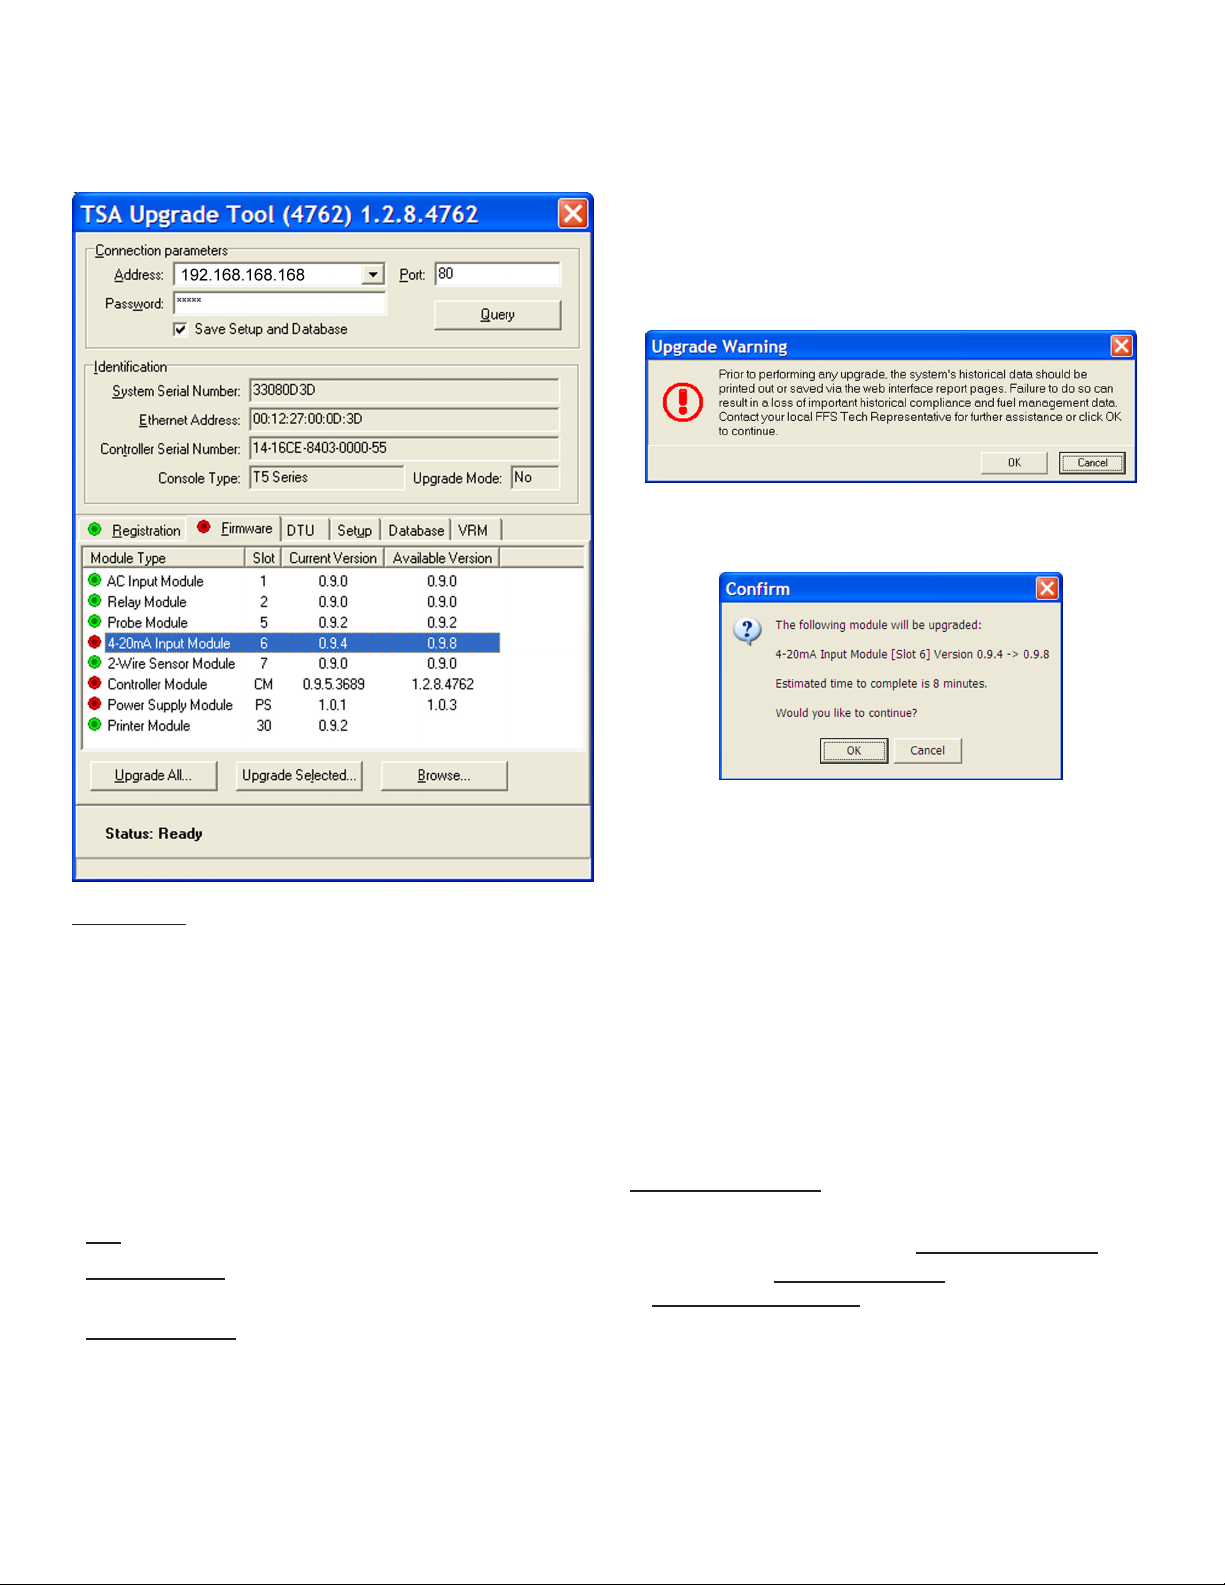
Firmware Tab
Upgrading Firmware Steps
The Firmware Tab is where software revision upgrades
will be located. Clicking on the Firmware Tab will show the
following information:
Assume as an example we want to upgrade the 4-20mA
Input Module. The console currently shows version 0.9.4
installed and version 0.9.8 is available.
Select the Upgrade Selected button after highlighting the
specic module to be upgraded.
For the example we would highlight the 4-20mA Input
Module and click the upgrade selected button. You will be
prompted with this warning.
Make sure historical data is saved. Then click OK. This will
bring up the conrmation screen.
Module Type: Shows the modules located in the console
that you are connected to. The information here will differ
depending on the conguration of the particular console
you are connected to (The Colibri console will only show
the Controller Module).
• A green button next to Module Type indicates that this
module currently has the latest version of software
installed.
• A red button next to the Module Type indicates that this
module does NOT currently have the latest version of
software installed. This can be veried by comparing the
Current Version with the Available Version numbers.
Slot: Is the physical location of the module in the console.
Current Version: Shows the version that is currently on
the module in the console that you are connected to.
Available Version: Lists the latest released versions of
software available to upgrade the software on the console.
Notice the Estimated time to complete, do not restart your
computer or console without allowing enough time for the
upgrade to complete.
Click OK to continue the upgrade process.
The bottom of the TSA Upgrade tool will show the status of
the upgrade process. There are three steps in the upgrade
process:
• “Upgrading (module name) Module” is the rst step and
will take the most time
• “Rebooting” is the second step in the upgrade process.
This step is rebooting the console.
• “Ready” is an indication that the console has been
upgraded and rebooted and has returned to normal
operation.
Important Notes:
• We recommend that each module be upgraded
individually. Do not use the Upgrade All Button.
• Upgrade the Controller Module rst and then the
Power Supply Module second, followed by the
remaining modules.
DTU Tab
The DTU tab is used for logging DTU signal quality only.
The output for the data log will be posted in a different
folder for each specic Controller Serial Number
under \ My Document \ TSA Upgrade
Tool with a lename of DTU Status Log.
2
Page 3

Refresh will display the last DTU signal quality status data.
VRM Tab
The VRM tab is used to log A / L data for a site. The output
for the data log will be posted in a different folder for each
specic Controller Serial Number under \ My Document \
TSA Upgrade Tool with a le name of VRM Status Log.
Start Continuous will stream the data.
Append to Log will begin logging the data.
Setup Tab
The setup tab is used to manually and automatically
download the system setup. The TSA Upgrade Tool will
download the setup automatically when you query a
specic Controller Serial Number. The setup is saved to a
different folder for each serial number in \My Documents\
TSA Upgrade Tool. The upgrade tool will only automatically
download the setup le if the folder and le does not
already exist. You can manually save the setup at any
time you are connected to a console and make a comment
about that setup le. It will also be saved in the same
folder as the automatically saved setup using a date and
time stamp for the le name.
Save will manually save the setup information.
Restore will upload the highlighted setup into the console.
Edit will allow you to edit the comment for the highlighted
setup.
Delete will remove the highlighted setup.
Refresh will display the last A/L data.
Start Continuous will stream the data.
Log Transactions will begin logging the data.
Upgrade Notes
- When the T5 console 4-20 mA module is upgraded the
lines MUST be relearned if the current version is less
than 0.5.3. Lines and SCM containments do not need to
be relearned if it is 0.5.3 or greater.
- If you choose to upgrade all of the modules that are
available for upgrade allow yourself enough time.
- Do not attempt to cycle power to the gauge or your
computer until you see the status ready indication on
the TSA Upgrade program.
3
Page 4

Recovering a Module (T5 Series Gauge Only)
If one or more of the modules indicates a ashing “run” light during an upgrade the recovery steps below should be used
to recover the module.
IMPORTANT NOTE:
If more than one module has the ashing “green” run light, power down the console and remove all but one of the modules.
Power the console back up and recover them one at a time. Modules should not be re-inserted with power supplied, power
down the unit each time modules are added. The recover program will not nd multiple modules to recover.
If there are multiple modules ashing green, then all of the offending modules, with the exclusion of one, need to be
removed. The one remaining offending module can then be recovered via the following methods. Afterwards reinstall each
module one by one recovering each in turn.
You will need to type in “recover” in the address bar after the 2nd forward slash
Ex. hp://ip address/recover
This will recover the module that has been lost during an upgrade. Recover screen is shown below.
1. Click the browse button.
2. Open the software version folder labeled T5Sxx (xx = software version).
3. Open up the Firmware folder
4
Page 5

4. Open up the lavina-ppc folder
5. Upload the appropriate le that corresponds with the module that needs to be recovered.
5
Page 6

NOTE: Depending on what software version you downloaded, some software versions referenced below may change.
The latest version of software is always available online at www.franklinfueling.com
anaau-0.9.8.s19 = 4-20ma Module ( both intrinsically safe and explosion proof)
cm-1.4.1.5174.bin = Controller Module
dhiau-0.9.0.s19 = AC Input Module
gioau-0.9.0.s19 = Input/Output Module
plcau-0.9.8.s19 = Display Module
prtau-0.9.3.s19 = Printer Module
pwrau-0.9.8.s19 = Power Supply Module
rlyau-0.9.0.s19 = Relay Module
sn2au-0.9.0.s19 = 2 Wire Sensor Module
sn3au-0.9.0.s19 = 3 Wire Sensor Module
vrmau-0.9.2.s19 = Probe Module
Select the corresponding le and then click recover in the upper right hand side on the screen next to reboot.
This will recover the module and the run light will stop blinking and return to solid once complete. Recover process per
module will take the same amount of time as an upgrade so be patient and do not stop communication prior to recovering.
If you have questions about this procedure, contact Franklin Fueling Systems Technical Support at 800-984-6266.
6
Page 7

Page intentionally blank
7
Page 8

©2013 FFS 000-0075 Rev F
 Loading...