

Page 1

®
Chain Sharpener FSG 85 B1
Chain Sharpener
Translation of the original instructions
IAN 109774
KettenSChärFGerät
Originalbetriebsanleitung
Page 2

Before reading, unfold the page containing the illustrations and familiarise yourself with all functions of the
device.
Klappen Sie vor dem Lesen die Seite mit den Abbildungen aus und machen Sie sich anschließend mit allen
Funktionen des Gerätes vertraut.
GB / IE Translation of the original instructions Page 4
DE / AT / CH Originalbetriebsanleitung Seite 17
Page 3

1 3
2
4
5
6
7
8
9
9
8
4
6
8
10
12
2
25
26
22
16
17
24b
23
24a
13
12
11
10
14
15
16
17
18
20
19
21
1a
1b
Page 4

4
GB IE
Introduction
Congratulations on the purchase of your
new device. With it, you have chosen a
high quality product.
During production, this equipment has
been checked for quality and subjected
to a nal inspection. The functionality of
your equipment is therefore guaranteed. It
cannot be ruled out that residual quantities
of water or lubricants will remain on or in
the equipment/hose lines in isolated cases.
This is not a fault or defect and it represents no cause for concern.
The operating instructions constitute
part of this product. They contain
important information on safety, use
and disposal.
Before using the product, familiarise
yourself with all of the operating
and safety instructions. Use the
product only as described and for
the applications specied.
Keep this manual safely and in the
event that the product is passed on,
hand over all documents to the third
party.
Intended use
The chain sharpener is suitable for sharpening the standard saw chain types.
The equipment is not designed for any other type of application (e.g. grinding with a
coolant liquid, grinding other work pieces
or materials such as asbestos, which are
hazardous to health).
The equipment is intended for use in the
eld of DIY. It is not designed for commer-
cial use.
The equipment is designed for use by
adults. Young people under the age of 16
Content
Introduction .................................4
Intended use ................................ 4
General description ...................... 5
Scope of delivery ............................. 5
Function description..........................5
Summary ........................................ 5
Technical specications .................6
Safety Instructions........................6
Safety instructions/symbols on the
equipment ....................................... 7
Symbols in the manual ...................... 7
General safety instructions ................ 7
Further Safety Instructions .................. 9
Installation .................................10
Operation .................................. 10
Working with the equipment ............ 10
Switching on and off ...................... 11
Sharpening the saw chain ................ 11
Maintenance and cleaning .........13
Cleaning ....................................... 13
Changing the grinding disk ............. 13
Storage ......................................14
Waste disposal and
environmental protection ...........14
Replacement parts/accessories ...14
Guarantee .................................15
Repair Service ............................ 16
Service-Center ............................ 16
Importer .................................... 16
Translation of the original
EC declaration of conformity ......32
Exploded Drawing .....................33
Page 5
5
GB IE
are permitted to use the equipment only
under supervision.
The manufacturer shall not be liable for
damages caused by use other than for the
intended purpose or by incorrect operation.
General description
The illustrations can be found
on the front and rear fold-out
pages.
Scope of delivery
Unpack the equipment and check that it is
complete. Dispose of the packaging material correctly.
- Chain sharpener with grinding disk
installed
- Handle
- Chain clamping unit and locking screw
- Adjusting screw and washer
- Two screws, nuts and washers for
mounting on the worktop
- Instruction Manual
Function description
Prior to rst starting the appliance, rmly
mount it on a worktop. It is driven by an
electric motor with protection against overheating and restart for added safety.
The rake angle is easily adjustable between -35° and +35° using a rotary
disk. The chain guide rail has a variably
adjustable stopper. To sharpen, swivel the
grinding head. The equipment is tted with
a protective screen in order to protect the
user.
For the function of the operating parts,
please refer to the descriptions below.
Summary
1 On / off switch
1a On switch
1b Off switch
2 Grinding head
3 Grinding disk cover
4 Handle
5 Fixing screws for grinding disk
cover
6 Adjusting screw and adjusting nut
for depth stopper
7 Guide rail
8 Grinding plinth
9 Stop notches
10 Locking screw for chain clamping
unit
11 Scale for rake angle (+35° to -35°)
12 Chain clamping unit and rotary
disk
13 Chain tensioning and clamping
lever
14 Chain feed adjusting screw and
adjusting nut
15 Stopper
16 Cable hook (not shown)
17 Mains cable
18 Grinding disk and grinding disk
nut (not shown)
19 LED-lamp (not shown)
20 Protective screen
21 Ventilation openings (not shown)
22 Worktop
23 2 screws (for mounting on the
worktop)
24a
2 washers (for mounting on the
worktop)
24b 2 nuts (for mounting on the worktop)
25 Washer (for adjusting screw)
26 Mounting nut (for adjusting screw)
27 Cutting tooth (chain saw)
28 Depth limiter lug (chain saw)
Page 6
6
GB IE
Technical specications
Chain sharpener ............FSG 85 B1
Nominal input voltage ........ 230 V~, 50 Hz
Power consumption ............... max. 85 W
(S2: 15 min)**
Rated resting period ...........approx. 5 min
Safety class .....................................
II
Mechanical rating .......................... IP 20
Idle-running speed n
0
................5000 min
-1
Disk speed .................... max. 27.8 m/s*
Adjustment angle .............. 35° left / right
For saw chains
with link sizes ... 6.35 / 8.255 / 9.52 mm
(1/4“ / 0.325“ / 3/8“)
Dimensions grinding disk
external diameter ...................Ø 104 mm
diameter of bore ......................Ø 22 mm
thickness .................................3.2 mm
Weight (incl. accessories) .. approx. 2.6 kg
Sound pressure level
(L
PA
) .........................83 dB(A); KPA=3 dB
Sound power level (L
WA
)
measured ............... 96 dB(A); K
WA
=3 dB
guaranteed ...........................99 dB(A)
Vibration (a
h
) ......... 3.05 m/s
2,
K=1.5 m/s
2
* The grinding disk must be able to withstand
a circulation speed of minimum 27.8 m/s.
Is the max. rotation speed on the grinding
disk too small in contrast to the appliance the
grinding disk can break.
** Do not operate the equipment for longer
than 15 minutes without interruption; then
take a rest break of 5 minutes.
Technical and optical changes may be
undertaken in the course of further development without notice. All dimensions,
references and information in this instruction manual are therefore not guaranteed.
Legal claims made on the basis of the
instruction manual can therefore not be
considered as valid.
The stated vibration emission value was
measured in accordance with a standard
testing procedure and may be used to compare one power tool to another.
The stated vibration emission value may
also be used for a preliminary exposure
assessment.
Warning:
The vibration emission value may
differ during actual use of the
power tool from the stated value
depending on the manner in which
the power tool is used.
Safety precautions aimed at protecting the user should be based on
estimated exposure under actual
usage conditions (all parts of the
operating cycle are to be considered, including, for example, times
during which the power tool is
turned off and times when the tool
is turned on but is running idle).
Safety Instructions
WARNING!
When using power tools, observe
the following basic safety measures
for the prevention of electric shocks
and the risk of injury and re.
Page 7

7
GB IE
Safety instructions/symbols
on the equipment
Warning!
Risk of injury from the rotating tool!
Keep hands away.
Risk of electric shock!
Disconnect from the mains before
carrying out maintenance and repair work.
Do not expose the unit to rain.
Read and observe the operating
instructions pertaining to the equipment.
Also observe the safety instructions
for your chainsaw and replacement
saw chain.
Risk of injury!
Wear ear, eye and hand protection!
Wear breathing protection.
Risk of cuts!
Wear cut-resistant gloves.
Never use faulty grinding disks.
Safety class II
Do not dispose of electrical equip-
ment in household waste.
Dimensions grinding disk
Symbols in the manual
Warning symbols with in-
formation on damage and
injury prevention.
Instruction symbols (the instruction is
explained at the place of the exclamation mark) with information on
preventing damage.
Help symbols with information on
improving tool handling.
General safety instructions
• This device can be used by individuals
with reduced physical, sensory or mental capabilities or a lack of experience
or knowledge if they are supervised or
have been instructed in how to use the
device safely and understand the associated dangers. Children must not play
with the device.
Safe operation:
• Keep work area clear.
Cluttered areas and benches invite in-
juries.
• Consider work area environ-
ment.
- Do not expose tools to rain. Do not
use tools in damp or wet locations.
Water entering a power tool will increase the risk of electric shock.
- Keep work area well lit.
- Do not use tools in the presence of
ammable liquids or gases.
Power tools create sparks which may
ignite the dust or fumes.
• Guard against electric shock.
Avoid body contact with earthed or
grounded surfaces (e.g. pipes, radiators, ranges, refrigerators).
Page 8

8
GB IE
• Keep other persons away.
Do not let persons, especially children,
not involved in the work touch the tool
or the extension cord and keep them
away from the work area.
• Store idle tools. When not in use,
tools should be stored in a dry lockedup place, out of reach of children.
• Do not force the tool. It will do
the job better and safer at the rate for
which it was intended.
• Use the right tool.
- Do not force small tools to do the job
of a heavy duty tool.
- Do not use tools for purposes not
intended; for example do not use circular saws to cut tree limbs or logs.
Use of the power tool for operations dif-
ferent from those intended could result in
a hazardous situation.
• Dress properly.
- Do not wear loose clothing or jewellery, they can be caught in moving
parts.
- Anti-slip footwear is recommended
when working outdoors.
- Wear protective hair covering to contain long hair.
• Use protective equipment.
- Use safety glasses.
- Use face or dust mask if working operations create dust.
• Connect dust extraction equip-
ment. If the tool is provided for the
connection of dust extraction and collecting equipment, ensure these are
connected and properly used.
• Do not abuse the cord. Never
yank the cord do disconnect it from the
socket. Keep the cord away from heat,
oil and sham edges.
• Secure work. Where possible use
clamps or a vice to hold the work. It is
safer than using your hand.
• Do not overreach. Keep proper
footing and balance at all times.
This enables better control of the power
tool in unexpected situations.
• Maintain tools with care.
Many accidents are caused by poorly
maintained power tools.
- Keep cutting tools sharp and clean
for better and safer performance.
- Follow instruction for lubricating and
changing accessories.
- Inspect tool cords periodically and if
damaged have them repaired by an
authorized service facility.
- Inspect extension cords periodically
and replace if damaged.
- Keep handles dry, clean and free
from oil and grease.
• Disconnect tools. When not in use,
before servicing and when changing
accessories disconnect tools from the
power supply. Such preventive safety
measures reduce the risk of starting the
power tool accidentaIly.
• Remove adjusting keys and
wrenches. Form the habit of checking to see that keys and adjusting
wrenches are removed from the tool
before turning it on. A wrench or a key
left attached to a rotating part of the
power tool may result in personal injury.
• Avoid unintentional starting.
Ensure switch is in “off” position when
plugging in.
• Use outdoor extension leads.
When the tool is used outdoors, use
only extension cords intended for outdoor use and so marked.
• Stay alert, watch what you are
doing and use common sense
when operating a power tool.
Do not use a power tool while you are
tired or under the inuence of drugs,
alcohol or medication. A moment of
Page 9

9
GB IE
inattention white operating power tools
may result in serious personal injury.
• Check damaged parts. This will
ensure that the safety of the power tool
is maintained.
- Before further use of tool, it should be
carefully checked to determine that it
will operate properly and perform its
intended function.
- Check for alignment of moving parts,
binding of moving parts, breakage of
parts, mounting and any other conditions that may affect its operation.
- A guard or other part that is damaged should be properly repaired or
replaced by an authorized service
centre unless otherwise indicated in
this instruction manual.
- Have defective switches replaced by
an authorized service centre.
- Do not use the tool if the switch does
not turn it on and off.
There is a risk of injury.
• Warning.
The use of any accessory or attach-
ment other than one recommended in
this instruction manual may present a
risk of personal injury.
• Have your tool repaired by a
qualied person. This electric tool
complies with the relevant safety rules.
Repairs should only be carried out by
qualied persons using original spare
parts, otherwise this may result in considerable danger to the user.
• If the supply cord of this power tool
is damaged, it must be replaced by
a specially prepared cord available
through the service organization.
Further Safety Instructions
• Connect the device only to a power
point with a residual current protective
device (RCD) with a measured residual
current of not more than 30 mA.
• Keep the mains cable and extension
cable away from the grinding disk and
saw chain. In the event that it is damaged or severed, immediately disconnect the plug from the socket.
Do not touch the cable before it has
been disconnected from the mains.
Risk of electric shock.
• Before use, carry out a visual inspection of the grinding disk. Do not
use grinding disks that are spalled,
cracked or otherwise damaged. Replace a worn grinding disk.
• Never operate the device without the
visual protection disk.
• Do not work with the device if you
are tired or after the consumption of
alcohol or tablets. Always take a break
from the work in good time.
• Do not use the device in an explosive
atmosphere or where sparks could
cause re, explosion etc. Failure to observe this will result in a risk of re or
explosion.
• Keep your hands away from the grinding disk and chain teeth when the
device is in use. Do not move the chain
by hand. This will cause a risk of injury.
• Never place your ngers between the
grinding disk and rotary disk or between the grinding disk and protection
disk. This will cause a risk of crushing.
• The chain becomes hot during grind-
ing. Do not touch the machined location, as there is a risk of being burnt.
• Use only grinding disks recommended
by the manufacturer. Do not use saw
blades.
• Switch off the device and disconnect at
the plug
- to release a jammed insertion tool,
Page 10
10
GB IE
from the chain clamping unit (12).
7. Place the chain clamping unit
(12) on the grinding plinth (8)
and x it using the locking screw
(10).
8. Snap the mains lead (17) into the
cable hook (16).
Screwing on the adjusting
screw:
9. Place the enclosed washer (25)
on the adjusting screw (6).
10. Screw the adjusting screw (6)
onto the securing nut (26) xed
into the grinding head (2).
Operation
Working with the equipment
Caution! Risk of injury!
- Use only grinding disks and accessories recommended by the manu-
facturer. The use of other insertion
tools and other accessories may
cause risk of injury.
- Never operate the device without
the visual protection disk.
- Do not use saw blades.
- Check the grinding disk before
use: check the distance between
the protective screen and the
grinding disk.
- Do not use broken, cracked or oth-
erwise damaged grinding disks.
- Switch on the equipment only
when it is safely installed on the
work surface.
Risk of injury!
Wear ear, eye and hand protection!
When working with the saw chain,
wear cut resistant gloves and an
- if the connecting cable is damaged
or tangled,
- in the case of unusual noises.
Installation
Always use the M10x70 screws
from the package to mount the unit.
Make sure to leave enough
room for working and that
nobody else is put at risk.
Always use screws of suf-
cient length and thickness
to mount the device on the
work surface, in order to
prevent loss of control of the
device.
Installing the appliance:
- Thickness of the table edge: 15 - 30 mm.
- Drill diameter: 10.5 mm.
- Size of screw: M10
1. Use the stop notches (9) to cor-
rectly place the appliance on the
worktop (22). Make sure that the
grinding plinth (8) protrudes beyond the edge of the table.
2. Use a pen to mark the drill holes
and remove the appliance.
3. Drill two holes into the worktop
(22).
4. Using the enclosed screws (23),
washers (24a) and nuts (24b),
screw the grinding plinth in place
on the worktop.
Assembling the grinder:
5. Screw the handle (4) into the
grinding head (2).
6. Remove the locking screw (10)
Page 11
11
GB IE
apron if necessary, to avoid incision injuries.
Keep hands away from the grinding
disk and chain teeth when the equipment is in use. Do not move the chain
by hand. There is a risk of injury.
Switching on and off
Ensure that the mains voltage
matches the specications on the
rating plate.
Connect the equipment to the mains.
1. To switch on, press the “I” On switch
(green) and the device starts up (see
1a).
2. To switch off, press the “0” Off switch
(red) and the device switches off (see
1b).
The disk will continue to
run after the equipment is
switched off. There is a risk
of injury.
Protection against overheating and
restart:
The unit will not automatically restart following an automatic cutout due to overload.
To restart the grinder, press the “I” On switch
(green) and the device starts up (see
1a).
Test run:
Before starting work and after each
change of grinding disk, carry out a test
run of at least 30 seconds with no load.
Switch off the equipment immediately if the
disk runs lumpy, substantial vibrations occur, or abnormal noises are generated.
Sharpening the saw chain
When working with the saw chain,
keep clean the ventilation openings
(see “Maintenance and cleaning”).
In case of a blockage, switch off
the equipment and disconnect from
the mains. Only then should the
blockage be removed.
An incorrectly sharpened
saw chain may damage the
chain the increase the risk of
the saw jumping back.
Ensure that the chain is
aligned accurately.
Observe the correct rake angle and minimum dimensions
of the saw chain. Remove as
little material as possible.
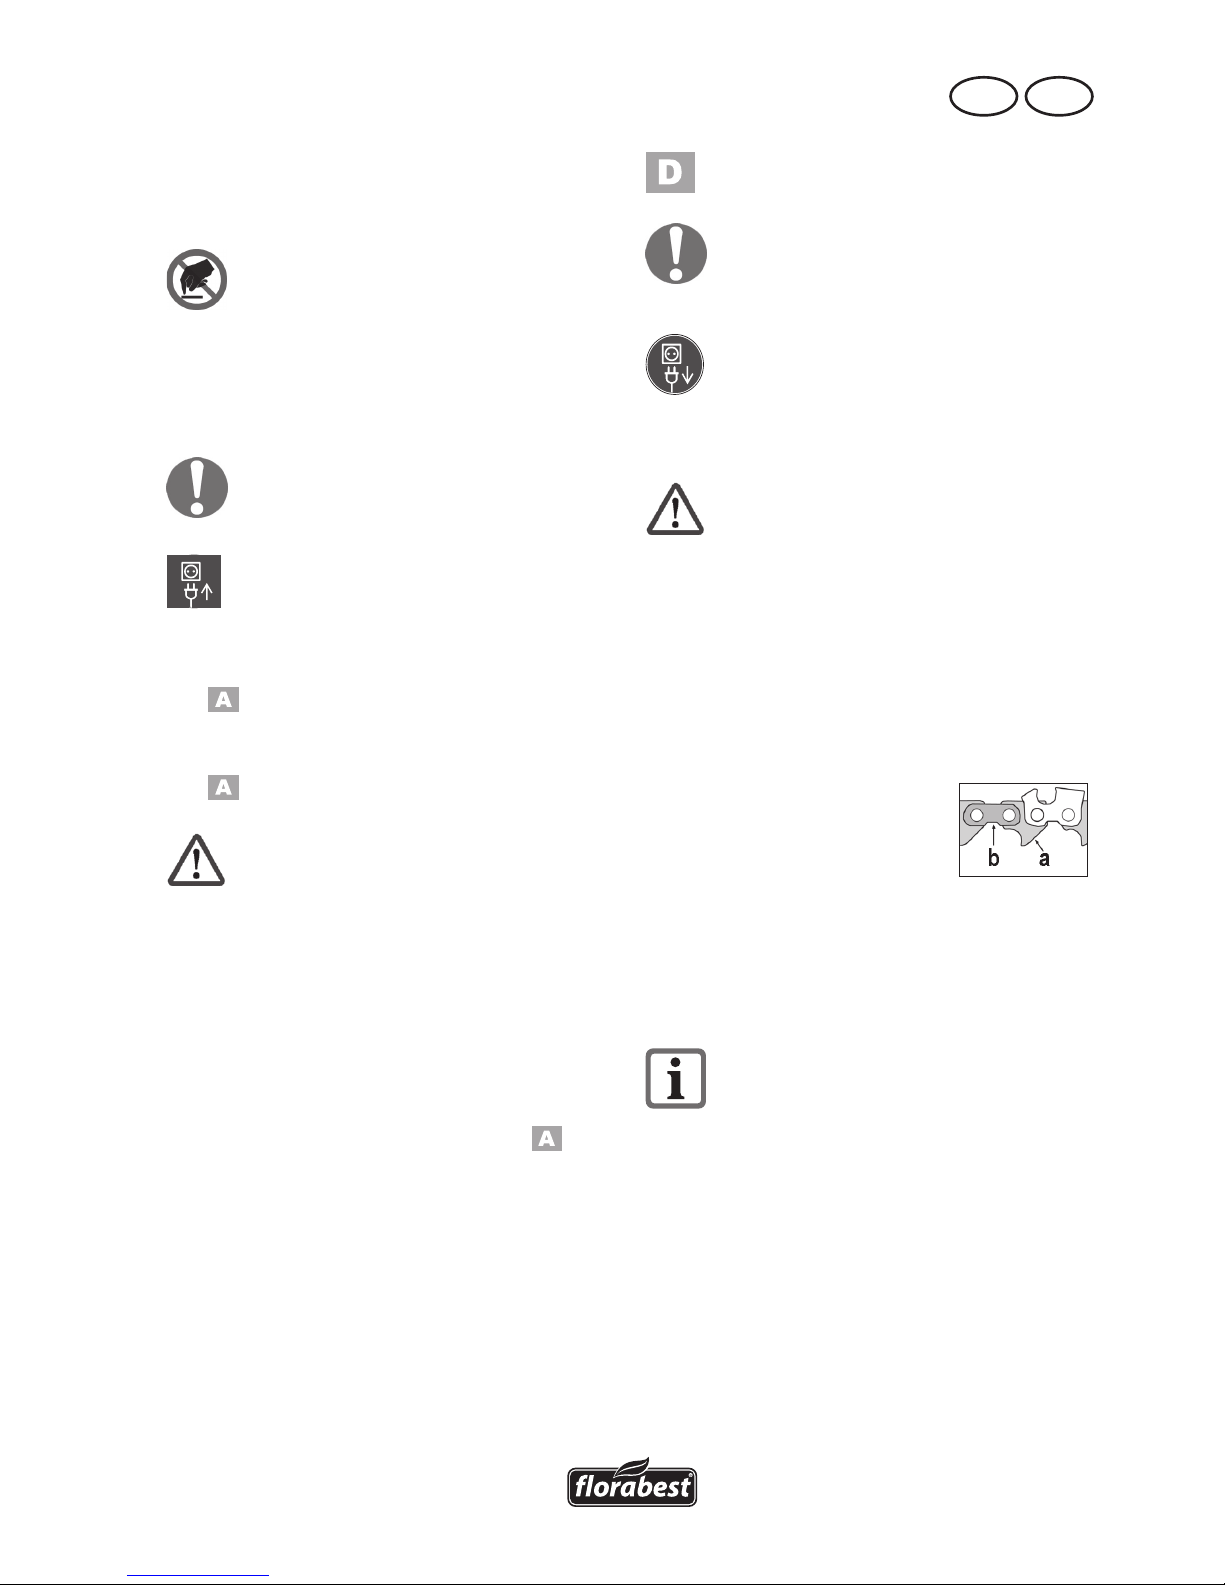
Do not grind in
drive (a) or connecting (b) links,
otherwise the saw
chain may rupture.
In the event of non-observance, there is a risk of accidents when handling the
chainsaw.
Instructions for sharpening
• Clean the saw chain before you sharpen it. Use a brush or cloth to remove
oily wood chips or residual oil.
• After sharpening, all cutting links must
be of equal length and width.
• The chain is worn and must be replaced with a new saw chain if only
approx. 4 mm of cutting tooth remain.
Inserting the saw chain:
1. To open the chain guide, turn the
Page 12

12
GB IE
clamping lever (13) anticlockwise. You
must rst return the clamping lever to
its home position several times.
The clamping lever unlocks by pulling
it outward, returning it to the home position and allowing it to snap back in.
2. Place the saw chain in the chain guide
(7). Ensure that the cutting edges face
the grinding disk (18).
3. Flap down the chain stop (15) and pull
the saw chain back until the cutting
tooth (27) to be sharpened contacts the
stop (see gure
).
Adjusting the sharpening angle:
4. Loosen the locking
screw (10) and use the
scale (11) on the rotary
disk of the chain clamping
unit (12) to set the correct
sharpening angle α.
Tighten the locking screw.
Adjust the sharpening angle ac-
cording to the manufacturer’s speci-
cations.
Adjusting the stop:
5. Turn off the motor and pull down the
grinding head (2) by the handle (4).
6. Turn the chain feed adjusting screw
(14a) to move the cutting tooth (27)
towards the grinding disk (18) until
they make contact (see gure
).
Tighten the adjusting nut (14b) to lock
the adjusting screw (14a).
7. Turn the clamping lever (13) clockwise
to tighten the chain links in the chain
guide (7) (see 1.).
8. Turn the adjusting screw (6a) to set the
depth stopper such that the grinding
disk (18) contacts the tooth root (see
gure
). Tighten the adjusting
nut (6b) to set the grinding depth.
Sharpen:
9. Switch on the equipment (see “switching on and off “).
10. By putting gentle pressure on the han-
dle (4), move the grinding head (2)
upwards and sharpen the cutting tooth.
Do not allow the grinding disk (18)
to slow down to standstill. This is pre-
vented by reducing the pressing force
early enough.
11. Switch off the equipment to move the
chain onwards.
Loosen the clamping lever (13) and
tighten the next chain link to be sharpened in the chain guide (7) using
the adjusted chain stop (15) and the
clamping lever.
Start by sharpening the teeth on
one side of the chain. Then adjust
the rake angle and sharpen the
teeth on the other side.
Check the depth limiter distance
(see image
):
The cutting links, which comprise a cutting
tooth (27) and a depth limiter lug (28), are
the sawing parts of the chain. The height
distance between these two is determined
by depth limiter distance A.
1. After every third sharpening process,
check depth limiter distance A against
the saw chain manufacturer’s specications.
2. Use a at le to le down the height of
the depth limiter lug (28) and, after resetting, round off the depth limiter lug
a little. The original shape must remain
intact.
Page 13

13
GB IE
Maintenance and
cleaning
Disconnect the plug before adjust-
ment, maintenance or repair.
Have any work not described
in these instructions carried
out by a specialist workshop.
Use only original components.
Allow the equipment to cool
before carrying out any maintenance and cleaning work.
There is a risk of burns.
Before each use, check the equipment for
obvious defects such as loose, worn or damaged components and check that screws or
other parts are sitting correctly. In particular,
check the grinding disk (
18). Replace
damaged parts.
Cleaning
Do not use cleaning agents or sol-
vents. Chemical substances may
attack plastic parts of the equipment.
Never clean the equipment under
running water.
• Clean the equipment thoroughly after
each use.
Clean the ventilation openings (
21)
and the surface of the equipment with
a brush or cloth.
• Clean the guide rail (
7) with a brush.
• In case of heavy dirt, loosen the locking screw for the chain clamping unit
(
10) and remove the chain clamp-
ing unit and rotary disk (
12) for
better access.
We recommended removing the side
plates for cleaning.
Changing the grinding disk
Instructions for changing:
• Never operate the equipment without the protective screen (
20).
• Ensure that the rotation speed
specied on the grinding disk
(
18) is equal to or greater than
the idle-running speed of the appliance. If the max. rotation speed
on the grinding disk is too small
in contrast to the appliance the
grinding disk can break.
Ensure that the disk dimensions t
the equipment.
• Use only fault-free grinding disks
(ring test).
• If the locator hole in a grinding
disk is too small, do not subsequently redrill in order to increase
the size.
• Do not use separated reduction
bushes or adapters in order to
make a grinding disk t where the
hole is too large.
• Do not use saw blades.
• Reassemble the equipment fully
after changing the grinding disk.
Switch off the equipment and dis-
connect from the mains.
Allow the equipment to cool.
1. Loose the 3 xing screws (5) and
take off the grinding disk cover (3).
2. Remove the grinding disk nut
(18b) by hand.
3. Take the grinding disk (18a) off
the adapter.
4. Place a new grinding disk on the
adapter and tighten the grinding
disk nut by hand.
5. Put the grinding disk cover (3)
back on.
Page 14

14
GB IE
Do not tighten the grinding disk nut
too much because this may cause
the grinding disk and nut to break.
6. Test run: Before starting work and af-
ter each change of grinding disk, carry
out a test run of at least 30 seconds
with no load. Switch off the equipment
immediately if the disk runs lumpy, substantial vibrations occur or abnormal
noises are generated.
Storage
• Store the appliance in a dry place well
out of reach of children.
Grinding disks must be stored dry
and upright and are not to be
stacked.
Waste disposal and environmental protection
Be environmentally friendly. Return the
tool, accessories and packaging to a recy-
cling centre when you have nished with
them.
Machines are not to be place with
domestic waste.
Hand over the device at an utilization loca-
tion. The plastic and metal parts employed
can be separated out into pure materials
and recycling can be implemented. Ask
your Service Center about this. Defective
units returned to us will be disposed of for
free.
Replacement parts/accessories
Spare parts and accessories can be obtained at www.grizzly-service.eu
If you do not have internet access, please contact the Service Centre via telephone
(see “Service-Center” page 16). Please have the order number mentioned below ready.
Position Position Description Order
Instruction Exploded number
manual drawing
3 Set 3 Grinding disk cover 91102832
4 Set 4 Handle with screw 91102833
12 Set 1 Chain clamping unit and rotary disk 91102830
18a 33 Grinding disk 30211030
18b/18c Set 2 Grinding disk nut and hub 91102831
Page 15

15
GB IE
Guarantee
Dear Customer, this equipment is provided
with a 3-year guarantee from the date of
purchase. In case of defects, you have statutory rights against the seller of the prod-
uct. These statutory rights are not restricted
by our guarantee presented below.
Terms of Guarantee
The term of the guarantee begins on the
date of purchase. Please retain the original
receipt. This document is required as proof
of purchase.
If a material or manufacturing defect occurs
within three years of the date of purchase
of this product, we will repair or replace –
at our choice – the product for you free of
charge. This guarantee requires the defective equipment and proof of purchase to be
presented within the three-year period with
a brief written description of what constitutes the defect and when it occurred.
If the defect is covered by our guarantee, you
will receive either the repaired product or a
new product. No new guarantee period begins on repair or replacement of the product.
Guarantee Period and Statutory
Claims for Defects
The guarantee period is not extended by
the guarantee service. This also applies for
replaced or repaired parts. Any damages
and defects already present at the time of
purchase must be reported immediately after unpacking. Repairs arising after expiry
of the guarantee period are chargeable.
Guarantee Cover
The equipment has been carefully produced
in accordance with strict quality guidelines
and conscientiously checked prior to delivery.
The guarantee applies for all material and
manufacturing defects. This guarantee
does not extend to cover product parts that
are subject to normal wear and may therefore be considered as wearing parts (e.g.
grinding disks, carbon brushes, stopper,
protective screen.) or to cover damage to
breakable parts (e.g. switches, batteries,
or parts made of glass).
This guarantee shall be invalid if the product has been damaged, used incorrectly or
not maintained. Precise adherence to all of
the instructions specied in the operating
manual is required for proper use of the
product. Intended uses and actions against
which the operating manual advises or
warns must be categorically avoided.
The product is designed only for private and
not commercial use. The guarantee will be
invalidated in case of misuse or improper handling, use of force, or interventions not undertaken by our authorised service branch.
Processing in Case of Guarantee
To ensure quick handling of you issue,
please follow the following directions:
• Please have the receipt and identication number (IAN 109774) ready as
proof of purchase for all enquiries.
• Please nd the item number on the rating plate.
• Should functional errors or other defects occur, please initially contact the
service department specied below by
telephone or by e-mail. You will then
receive further information on the processing of your complaint.
• After consultation with our customer
service, a product recorded as defective
can be sent postage paid to the service
address communicated to you, with the
proof of purchase (receipt) and speci-
cation of what constitutes the defect
and when it occurred. In order to avoid
Page 16

16
GB IE
acceptance problems and additional
costs, please be sure to use only the ad-
dress communicated to you. Ensure that
the consignment is not sent carriage
forward or by bulky goods, express or
other special freight. Please send the
equipment inc. all accessories supplied
at the time of purchase and ensure adequate, safe transport packaging.
Repair Service
For a charge, repairs not covered by the
guarantee can be carried out by our service branch, which will be happy to issue
a cost estimate for you. We can handle
only equipment that has been sent with adequate packaging and postage.
Attention: Please send your equipment to
our service branch in clean condition and
with an indication of the defect.
Equipment sent carriage forward or by
bulky goods, express or other special
freight will not be accepted.
We will dispose of your defective devices
free of charge when you send them to us.
Service-Center
Service Great Britain
Tel.: 0871 5000 720 (£ 0.10/
Min.)
E-Mail: grizzly@lidl.co.uk
IAN 109774
Service Ireland
Tel.: 1890 930 034
(0,08 EUR/Min., (peak))
(0,06 EUR/Min., (off peak))
E-Mail: grizzly@lidl.ie
IAN 109774
Importer
Please note that the following address is
not a service address. Please initially con-
tact the service centre specied above.
Grizzly Tools GmbH & Co. KG
Stockstädter Straße 20
63762 Großostheim
Germany
www.grizzly-service.eu
GB
IE
Page 17

17
DE AT CH
Einleitung
Herzlichen Glückwunsch zum Kauf Ihres
neuen Gerätes. Sie haben sich damit für
ein hochwertiges Gerät entschieden.
Dieses Gerät wurde während der Produktion
auf Qualität geprüft und einer Endkontrolle
unterzogen. Die Funktionsfähigkeit Ihres
Gerätes ist somit sichergestellt. Es ist nicht
auszuschließen, dass sich in Einzelfällen am
oder im Gerät, bzw. in Schlauchleitungen
Restmengen von Wasser oder Schmierstoffen
benden. Dies ist kein Mangel oder Defekt
und kein Grund zur Besorgnis.
Die Betriebsanleitung ist Bestandteil
dieses Gerätes. Sie enthält wichtige
Hinweise für Sicherheit, Gebrauch
und Entsorgung. Machen Sie sich
vor der Benutzung des Gerätes mit
allen Bedien- und Sicherheitshinweisen vertraut. Benutzen Sie das Gerät
nur wie beschrieben und für die
angegebenen Einsatzbereiche.
Bewahren Sie die Betriebsanleitung
gut auf und händigen Sie alle Unterlagen bei Weitergabe des Gerätes
an Dritte mit aus.
Bestimmungsgemäße
Verwendung
Das Kettenschärfgerät ist zum Schärfen der
gängigen Sägekettentypen geeignet.
Für alle anderen Anwendungsarten (z.B.
Schleifen mit einer Kühlüssigkeit, Schleifen
anderer Werkstücke oder gesundheitsgefährdender Materialien wie Asbest) ist das
Gerät nicht vorgesehen.
Das Gerät ist für den Einsatz im Heimwerkerbereich bestimmt. Es wurde nicht für
den gewerblichen Dauereinsatz konzipiert.
Das Gerät ist zum Gebrauch durch Erwachsene bestimmt. Jugendliche über
Inhalt
Einleitung ...................................17
Bestimmungsgemäße
Verwendung ..............................17
Allgemeine Beschreibung ...........18
Lieferumfang..................................18
Funktionsbeschreibung ....................18
Übersicht ......................................18
Technische Daten ........................19
Sicherheitshinweise ....................20
Sicherheitshinweise/
Symbole auf dem Gerät ................... 20
Bildzeichen in der Betriebsanleitung ..20
Allgemeine Sicherheitshinweise .......20
Weiterführende Sicherheitshinweise ...23
Montage ....................................24
Bedienung .................................24
Arbeiten mit dem Gerät ..................24
Ein- und Ausschalten ....................... 25
Sägekette schärfen ......................... 25
Wartung und Reinigung .............27
Reinigung .....................................27
Schleifscheibe wechseln .................. 28
Lagerung ...................................28
Entsorgung/Umweltschutz ..........29
Ersatzteile/Zubehör ...................29
Garantie ....................................30
Reparatur-Service ......................31
Service-Center ............................31
Importeur ..................................31
Original EG-Konformitäts-
erklärung ..................................32
Explosionszeichnung ..................33
Page 18

18
DE AT CH
16Jahre dürfen das Gerät nur unter Aufsicht benutzen. Der Hersteller haftet nicht
für Schäden, die durch bestimmungswidrigen Gebrauch oder falsche Bedienung
verursacht wurden.
Allgemeine Beschreibung
Die Abbildungen nden Sie auf
der vorderen und hinteren Ausklappseite.
Lieferumfang
Packen Sie das Gerät aus und kontrollieren
Sie, ob es vollständig ist. Entsorgen Sie
das Verpackungsmaterial ordnungsgemäß.
- Kettenschärfgerät mit montierter Schleifscheibe
- Handgriff
- Kettenspanneinheit mit Feststellschraube
- Stellschraube + Unterlegscheibe
- Zwei Schrauben mit Muttern und Unter-
legscheiben zur Tischbefestigung
- Originalbetriebsanleitung
Funktionsbeschreibung
Das Gerät wird vor der Erstinbetriebnahme
fest auf einer Arbeitsäche montiert. Es
besitzt als Antrieb einen Elektromotor mit
Thermoschutz und Wiederanlaufschutz für
zusätzliche Sicherheit.
Der Schärfwinkel ist bequem von -35° bis
+35° einstellbar. Die Kettenführungsschie-
ne besitzt einen variabel verstellbaren
Anschlag. Das Schärfen erfolgt durch
Schwenken des Schleifkopfes. Zum Schutz
des Anwenders ist das Gerät mit einer
Sichtschutzscheibe versehen.
Die Funktion der Bedienteile entnehmen Sie
bitte den nachfolgenden Beschreibungen.
Übersicht
1 Ein-/Ausschalter
1a Einschalter
1b Ausschalter
2 Schleifkopf
3 Schleifscheiben-Abdeckung
4 Handgriff
5 Befestigungsschrauben für Schleif-
scheiben-Abdeckung
6 Stellschraube und Stellmutter für
den Tiefenanschlag
7 Kettenführungsschiene
8 Schleifsockel
9 Anschlagkerben
10 Feststellschraube für die Ketten-
spanneinheit
11 Skala für Schärfwinkel
(+35° bis -35°)
12 Kettenspanneinheit mit Drehteller
13 Spannhebel zur Kettenxierung
14 Stellschraube und Stellmutter für
den Kettenvorschub
15 Anschlag
16 Kabelhalter (nicht abgebildet)
17 Netzkabel
18 Schleifscheibe mit Schleifscheiben-
Mutter (nicht abgebildet)
19 LED-Lampe (nicht abgebildet)
20 Sichtschutzscheibe
21 Lüftungsöffnungen (nicht abgebil-
det)
22 Arbeitsäche
23 2 Schrauben (zur Tischbefestigung)
24a
2 Unterlegscheiben (zur Tischbe-
festigung)
24b 2 Muttern (zur Tischbefestigung)
25 Unterlegscheibe (für Stellschraube)
26 Befestigungsmutter (für Stellschrau-
be)
27 Schneidezahn (Sägekette)
28 Tiefenbegrenzernase (Sägekette)
Page 19

19
DE AT CH
Technische Daten
Kettenschärfgerät ........... FSG 85 B1
Nenneingangsspannung ...230 V~, 50 Hz
Leistungsaufnahme ................ max. 85 W
(S2: 15 min)**
Bemessungsruhedauer .............. ca. 5 min
Schutzklasse ....................................
II
Schutzart....................................... IP 20
Bemessungs-Leerlaufdrehzahl n
0
.. 5000 min
-1
Scheibengeschwindigkeit .. max. 27,8 m/s*
Einstellwinkel .................. 35° links/rechts
Für Sägeketten mit
Gliedermaß ...... 6,35 / 8,255 / 9,52 mm
(1/4“ / 0,325“ / 3/8“)
Abmessungen Schleifscheibe
Außendurchmesser .............. Ø 104 mm
Lochdurchmesser ................... Ø 22 mm
Stärke ..................................... 3,2 mm
Gewicht (incl. Zubehör) ...........ca. 2,6 kg
Schalldruckpegel
(L
PA
) ..................... 83 dB (A); KPA= 3 dB
Schallleistungspegel (L
WA
)
gemessen ............. 96 dB(A); K
WA
= 3 dB
garantiert .............................. 99 dB(A)
Vibration (a
h
) ........3,05 m/s2; K=1,5 m/s
2
* Die Schleifscheibe muss einer Umlaufge-
schwindigkeit von mind. 27,8 m/s standhalten. Ist die max. Umlaufgeschwindigkeit der
Scheibe im Gegensatz zum Gerät zu klein,
kann diese zerbrechen!
**Kurzzeitbetrieb:Gerätnichtlängerals15Mi-
nuten ununterbrochen betreiben; danach eine
Ruhedauervon5Minuteneinlegen.
Technische und optische Veränderungen
können im Zuge der Weiterentwicklung
ohne Ankündigung vorgenommen werden.
Alle Maße, Hinweise und Angaben dieser
Betriebsanleitung sind deshalb ohne Gewähr. Rechtsansprüche, die aufgrund der
Betriebsanleitung gestellt werden, können
daher nicht geltend gemacht werden.
Der angegebene Schwingungsemissionswert ist nach einem genormten Prüfverfah-
ren gemessen worden und kann zum Vergleich eines Elektrowerkzeugs mit einem
anderen verwendet werden.
Der angegebene Schwingungsemissionswert kann auch zu einer einleitenden
Einschätzung der Aussetzung verwendet
werden.
Warnung: Der Schwingungs-
emissionswert kann sich während
der tatsächlichen Benutzung des
Elektrowerkzeugs von dem Angabewert unterscheiden, abhängig
von der Art und Weise, in der das
Elektrowerkzeug verwendet wird.
Es besteht die Notwendigkeit, Si-
cherheitsmaßnahmen zum Schutz
des Anwenders festzulegen, die
auf einer Abschätzung der Aussetzung während der tatsächlichen
Benutzungsbedingungen beruhen
(hierbei sind alle Anteile des Betriebszyklus zu berücksichtigen,
beispielsweise Zeiten, in denen das
Elektrowerkzeug abgeschaltet ist,
und solche, in denen es zwar eingeschaltet ist, aber ohne Belastung
läuft).
Page 20

20
DE AT CH
Sicherheitshinweise
ACHTUNG!
Beim Gebrauch von Elektrowerk-
zeugen sind zum Schutz gegen
elektrischen Schlag, Verletzungs- und
Brandgefahr folgende grundsätzliche
Sicherheitsmaßnahmen zu beachten.
Sicherheitshinweise/
Symbole auf dem Gerät
Achtung!
Verletzungsgefahr durch sich dre-
hendes Werkzeug! Halten Sie Hände fern.
Gefahr durch elektrischen Schlag!
Ziehen Sie vor Wartungs- und Reparaturarbeiten den Netzstecker
aus der Steckdose.
Gerät nicht dem Regen aussetzen.
Lesen und beachten Sie die zum
Gerät gehörende Betriebsanleitung!
Beachten Sie auch die Sicherheitshinweise Ihrer Kettensäge und
Ersatz-Sägekette.
Verletzungsgefahr!
Tragen Sie Augen- und Gehör-
schutz!
Tragen Sie einen Atemschutz.
Gefahr durch Schnittverletzungen!
Tragen Sie schnittsichere Handschuhe.
Keine defekte Schleifscheibe einset-
zen.
Schutzklasse II
Elektrische Geräte gehören nicht
in den Hausmüll.
Abmessungen Schleifscheibe
Bildzeichen in der Betriebsanleitung
Gefahrenzeichen mit Anga-
ben zur Verhütung von Personen- oder Sachschäden.
Gebotszeichen (anstelle des Aus-
rufungszeichens ist das Gebot
erläutert) mit Angaben zur Verhütung von Schäden.
Hinweiszeichen mit Informationen
zum besseren Umgang mit dem
Gerät.
Allgemeine
Sicherheitshinweise
• Dieses Gerät kann von Personen mit
verringerten physischen, sensorischen
oder mentalen Fähigkeiten oder Man-
gel an Erfahrung und Wissen benutzt
werden, wenn sie beaufsichtigt oder
bezüglich des sicheren Gebrauchs
des Gerätes unterwiesen wurden und
die daraus resultierenden Gefahren
verstehen. Kinder dürfen nicht mit
dem Gerät spielen.
Sicheres Arbeiten:
• Halten Sie Ihren Arbeitsbereich
in Ordnung. Unordnung im Ar-
beitsbereich kann Unfälle zur Folge
haben.
Page 21

21
DE AT CH
• Berücksichtigen Sie Umgebungs-
einüsse.
- Setzen Sie Elektrowerkzeuge nicht
dem Regen aus. Benutzen Sie Elek-
trowerkzeuge nicht in feuchter oder
nasser Umgebung. Das Eindringen
von Wasser in ein Elektrowerkzeug
erhöht das Risiko eines elektrischen
Schlages.
- Sorgen Sie für gute Beleuchtung des
Arbeitsplatzes.
- Benutzen Sie Elektrowerkzeuge nicht,
wo Brand- oder Explosionsgefahr besteht. Elektrowerkzeuge erzeugen Fun-
ken, die den Staub oder die Dämpfe
entzünden können.
• Schützen Sie sich vor elektrischem Schlag. Vermeiden Sie Kör-
perberührung mit geerdeten Teilen (z.B.
Rohren, Radiatoren, Elektroherden,
Kühlgeräten).
• Halten Sie andere Personen fern.
Lassen Sie andere Personen, insbesondere Kinder, nicht das Elektrowerkzeug
oder das Kabel berühren. Halten Sie sie
von Ihrem Arbeitsbereich fern.
• Bewahren Sie unbenutzte Elektrowerkzeuge sicher auf.
Unbenutzte Elektrowerkzeuge sind an
einem trockenen, hochgelegenen oder
abgeschlossenen Ort, außerhalb der
Reichweite von Kindern, abzulegen. Es
besteht Verletzungsgefahr.
• Überlasten Sie Ihr Elektrowerkzeug nicht. Sie arbeiten besser und
sicherer im angegebenen Leistungsbereich.
• Benutzen Sie das richtige Elektrowerkzeug.
- Verwenden Sie keine leistungsschwachen Maschinen für schwere Arbeiten.
- Benutzen Sie das Elektrowerkzeug
nicht für solche Zwecke, für die es
nicht vorgesehen ist. Benutzen Sie
zum Beispiel keine Handkreissäge
zum Schneiden von Baumästen oder
Holzscheiten.
Der Gebrauch von Elektrowerkzeugen
für andere als die vorgesehenen Anwendungen kann zu gefährlichen Situationen führen.
• Tragen Sie geeignete Kleidung.
- Tragen Sie keine weite Kleidung oder
Schmuck, sie können von beweglichen Teilen erfasst werden.
- Bei Arbeiten im Freien ist rutschfestes
Schuhwerk empfehlenswert.
- Tragen Sie bei langen Haaren ein
Haarnetz.
• Benutzen Sie Schutzausrüstung.
- Tragen Sie eine Schutzbrille. Bei
Nichtbeachtung können Augenverlet-
zungen durch Funken oder Schleifpartikel entstehen.
- Verwenden Sie bei stauberzeugenden
Arbeiten eine Atemmaske.
• Schließen Sie die StaubabsaugEinrichtung an. Falls Anschlüsse zur
Staubabsaugung und Auffangeinrichtung vorhanden sind, überzeugen Sie
sich, dass diese angeschlossen und
richtig benutzt werden.
• Verwenden Sie das Kabel nicht
für Zwecke, für die es nicht bestimmt ist. Benutzen Sie das Kabel
nicht, um den Netzstecker aus der
Steckdose zu ziehen. Schützen Sie das
Kabel vor Hitze, Öl und scharfen Kanten.
Beschädigte oder verwickelte Kabel
erhöhen das Risiko eines elektrischen
Schlages.
• Sichern Sie das Werkstück. Benutzen Sie Spannvorrichtungen oder einen
Schraubstock, um das Werkstück festzu-
halten. Es ist damit sicherer gehalten als
Page 22

22
DE AT CH
mit Ihrer Hand.
• Vermeiden Sie abnormale Körperhaltung. Sorgen Sie für sicheren
Stand und halten Sie jederzeit das
Gleichgewicht.
Dadurch können Sie das Elektrowerk-
zeug in unerwarteten Situationen besser
kontrollieren.
• Pegen Sie Ihre Werkzeuge mit
Sorgfalt. Viele Unfälle haben ihre
Ursache in schlecht gewarteten Elektro-
werkzeugen.
- Halten Sie die Schneidwerkzeuge
scharf und sauber, um besser und si-
cherer arbeiten zu können.
- Befolgen Sie die Hinweise zur Schmierung und zum Werkzeugwechsel.
- Kontrollieren Sie regelmäßig das
Netzkabel des Elektrowerkzeugs und
lassen Sie dieses bei Beschädigung
von einem anerkannten Fachmann
erneuern.
- Kontrollieren Sie Verlängerungsleitungen regelmäßig und ersetzen Sie
diese, wenn sie beschädigt sind.
- Halten Sie die Handgriffe trocken,
sauber und frei von Öl und Fett.
• Ziehen Sie den Netzstecker aus
der Steckdose bei Nichtgebrauch
des Elektrowerkzeugs, vor der Wartung
und beim Wechsel von Werkzeugen.
Diese Vorsichtsmaßnahme verhindert
den unbeabsichtigten Start des Elektro-
werkzeuges.
• Lassen Sie keine Werkzeugschlüssel stecken. Überprüfen Sie
vor dem Einschalten, dass Schlüssel und
Einstellwerkzeuge entfernt sind.
• Vermeiden Sie unbeabsichtigten
Anlauf. Vergewissern Sie sich, dass
der Schalter beim Einstecken des Steckers in die Steckdose ausgeschaltet ist.
Ein Werkzeug oder Schlüssel, der sich
in einem drehenden Geräteteil bendet,
kann zu Verletzungen führen.
• Benutzen Sie Verlängerungskabel für den Außenbereich.
Verwenden Sie im Freien nur dafür
zugelassene und entsprechend gekenn-
zeichnete Verlängerungskabel.
• Seien Sie aufmerksam, achten
Sie darauf, was Sie tun, und gehen Sie mit Vernunft an die Arbeit mit einem Elektrowerkzeug.
Benutzen Sie kein Elektrowerkzeug, wenn Sie müde sind oder
unter Einuss von Drogen, Alkohol oder Medikamenten stehen.
Ein Moment der Unachtsamkeit beim
Gebrauch des Elektrowerkzeuges kann
zu ernsthaften Verletzungen führen.
• Überprüfen Sie das Elektrowerkzeug auf eventuelle Beschädigungen. Damit wird sichergestellt,
dass die Sicherheit des Elektrowerkzeuges erhalten bleibt.
- Vor weiterem Gebrauch des Elektrowerkzeugs müssen Schutzvorrich-
tungen oder leicht beschädigte Teile
sorgfältig auf ihre einwandfreie und
bestimmungsgemäße Funktion untersucht werden.
- Überprüfen Sie, ob die beweglichen
Teile einwandfrei funktionieren und
nicht klemmen oder ob Teile beschädigt sind. Sämtliche Teile müssen rich-
tig montiert sein und alle Bedingungen
erfüllen, um den einwandfreien Betrieb sicherzustellen.
- Beschädigte Schutzvorrichtungen
und Teile müssen bestimmungsgemäß
durch eine anerkannte Fachwerkstatt
repariert oder ausgewechselt werden,
soweit nichts anderes in der Betriebsanleitung angegeben ist.
- Benutzen Sie keine Elektrowerkzeuge,
Page 23

23
DE AT CH
dem Gebrauch einer Sichtprüfung.
Verwenden Sie keine Schleifscheiben
mit Abplatzungen, Rissen oder anderen
Beschädigungen. Wechseln Sie eine
abgenutzte Schleifscheibe aus.
• Betreiben Sie das Gerät niemals ohne
Sichtschutzscheibe.
• Arbeiten Sie mit dem Gerät nicht, wenn
Sie müde sind oder nach der Einnahme
von Alkohol oder Tabletten. Legen Sie
immer rechtzeitig eine Arbeitspause ein.
• Benutzen Sie das Gerät nicht in explo-
sionsfähiger Atmosphäre oder dort,
wo Funken Feuer, Explosion, usw. verursachen könnten. Bei Nichtbeachtung
besteht Brand- oder Explosionsgefahr.
• Halten Sie Ihre Hände von der Schleif-
scheibe und den Kettenzähnen fern,
wenn das Gerät in Betrieb ist. Bewegen
Sie die Sägekette nicht mit der Hand. Es
besteht Verletzungsgefahr.
• Halten Sie nie die Finger zwischen
Schleifscheibe und Drehteller oder zwischen Schleifscheibe und Schutzschei-
be. Es besteht Gefahr durch Quetschen.
• Die Sägekette wird beim Schleifen heiß.
Nicht an der bearbeiteten Stelle anfas-
sen, es besteht Verbrennungsgefahr.
• Verwenden Sie nur vom Hersteller emp-
fohlene Schleifscheiben. Verwenden Sie
keine Sägeblätter.
• Schalten Sie das Gerät aus und ziehen
Sie den Netzstecker
- zum Lösen eines blockierten Einsatzwerkzeuges,
- wenn die Anschlussleitung beschädigt
oder verheddert ist,
- bei ungewöhnlichen Geräuschen.
bei denen sich der Schalter nicht einund ausschalten lässt. Beschädigte
Schalter müssen bei einer Kundendienstwerkstatt ersetzt werden.
• Achtung! Der Gebrauch anderer Ein-
satzwerkzeuge und anderen Zubehörs
kann eine Verletzungsgefahr für Sie
bedeuten.
• Lassen Sie Ihr Elektrowerkzeug
durch eine Elektrofachkraft reparieren. Dieses Elektrowerkzeug
entspricht den einschlägigen Sicherheitsbestimmungen. Reparaturen dürfen nur
von einer Fachwerkstatt ausgeführt wer-
den, indem Originalersatzteile verwendet werden; andernfalls können Unfälle
für den Benutzer entstehen.
• Wenn die Anschlussleitung dieses Gerätes beschädigt wird,
muss sie durch eine besondere
Anschlussleitung ersetzt werden,
die vom Hersteller oder seinem
Kundendienst erhältlich ist.
Weiterführende Sicherheitshinweise
• Schließen Sie das Gerät nur an eine
Steckdose mit Fehlerstrom-Schutzeinrichtung (FI-Schalter) mit einem Bemessungs-
fehlerstrom von nicht mehr als 30mA
an.
• Halten Sie Netzkabel und Verlängerungskabel von der Schleifscheibe und
der Sägekette fern. Ziehen Sie bei Beschädigung oder Durchschneiden sofort
den Netzstecker aus der Steckdose.
Berühren Sie die Leitung nicht, bevor sie
vom Netz getrennt ist.
Es besteht Gefahr durch elektrischen
Schlag.
• Unterziehen Sie die Schleifscheibe vor
Page 24

24
DE AT CH
Montage
Befestigen Sie das Gerät immer
mit den mitgelieferten Schrauben
(M10x70).
Achten Sie darauf, zum Ar-
beiten genügend Platz zu
haben und andere Personen
nicht zu gefährden.
Befestigen Sie das Gerät im-
mer mittels Schrauben ausreichender Länge und Stärke
auf der Arbeitsäche, um
nicht die Kontrolle über das
Gerät zu verlieren.
Gerät aufstellen:
- Stärke der Tischkante: 15-30mm
- Bohrerdurchmesser: 10,5 mm
- Schraubenstärke: M10
1. Positionieren Sie das Gerät mit
Hilfe der Anschlagkerben (9)
auf der Arbeitsäche (22). Der
Schleifsockel (8) muss dabei über
die Tischkante herausragen.
2. Markieren Sie die Bohrlöcher mit
einem Stift und entfernen Sie das
Gerät wieder.
3. Bohren Sie zwei Bohrlöcher in
die Arbeitsäche (22).
4. Schrauben Sie den Schleifsockel mit Hilfe der beiliegenden
Schrauben (23), Unterlegscheiben (24a) und Muttern (24b) auf
der Arbeitsäche fest.
Kettenschärfgerät
montieren:
5. Schrauben Sie den Handgriff (4)
an den Schleifkopf (2) an.
6. Lösen Sie die Feststellschraube
(10) von der Kettenspanneinheit
(12).
7. Setzen Sie die Kettenspanneinheit
(12) auf den Schleifsockel (8) auf
und schrauben diese mit der Fest-
stellschraube (10) fest.
8. Befestigen Sie ggf. das Netzka-
bel (17) im Kabelhalter (16).
Stellschraube montieren:
9. Platzieren Sie die beiliegende
Unterlegscheibe (25) auf der
Stellschraube (6).
10. Schrauben Sie die Stellschraube
(6) auf die im Schleifkopf fest
montierte Befestigungsmutter (26)
auf.
Bedienung
Arbeiten mit dem Gerät
Achtung! Verletzungsgefahr!
- Verwenden Sie nur vom Hersteller empfohlene Schleifscheiben
und Zubehörteile. Der Gebrauch
anderer Einsatzwerkzeuge und
anderen Zubehörs kann eine Ver-
letzungsgefahr für Sie bedeuten.
- Betreiben Sie das Gerät niemals
ohne Sichtschutzscheibe.
- Verwenden Sie keine Sägeblätter.
- Ziehen Sie vor allen Arbeiten an
dem Gerät den Netzstecker.
- Kontrollieren Sie die Schleifscheibe vor ihrer Verwendung:
Prüfen Sie den Abstand zwischen
Sichtschutzscheibe und Schleifscheibe.
- Verwenden Sie keine abgebrochenen, gesprungenen oder
anderweitig beschädigten Schleifscheiben.
Page 25

25
DE AT CH
- Schalten Sie das Gerät erst ein,
wenn es sicher auf der Arbeitsäche montiert ist.
Achtung Verletzungsgefahr!
Tragen Sie Augen- und Gehör-
schutz!
Tragen Sie bei der Arbeit mit der
Sägekette schnittsichere Schutz-
handschuhe und wenn nötig eine
Schürze, um Schnittverletzungen zu
vermeiden.
Halten Sie Ihre Hände von der
Schleifscheibe und den Kettenzähnen fern, wenn das Gerät in Betrieb
ist. Bewegen Sie die Sägekette
nicht mit der Hand. Es besteht Verletzungsgefahr.
Ein- und Ausschalten
Achten Sie darauf, dass die Span-
nung des Netzanschlusses mit
dem Typenschild am Gerät über-
einstimmt.
Schließen Sie das Gerät an die
Netzspannung an.
1. Zum Einschalten drücken Sie den Ein-
schalter „I“ (grün), das Gerät läuft an
(siehe
1a).
2. Zum Ausschalten drücken Sie den Aus-
schalter „0“ (rot), das Gerät schaltet
ab (siehe
1b).
Die Schleifscheibe läuft nach,
nachdem das Gerät abgeschaltet wurde. Es besteht
Verletzungsgefahr.
Thermoschutz mit Wiederanlaufschutz:
Nach einer automatischen Abschaltung
durch Überlastung läuft das Gerät nicht
selbsttätig wieder an.
Zum erneuten Einschalten drücken Sie den
Einschalter „I“ (grün), das Gerät läuft an
(siehe
1a).
Probelauf:
Führen Sie vor dem ersten Arbeiten und nach
jedem Schleifscheibenwechsel einen Probelauf von mindestens 30 Sekunden ohne Belastung durch. Schalten Sie das Gerät sofort
aus, wenn die Schleifscheibe unrund läuft,
beträchtliche Schwingungen auftreten oder
abnorme Geräusche zu hören sind.
Sägekette schärfen
Sorgen Sie beim Arbeiten unter
staubigen Bedingungen für freie
Lüftungsöffnungen (siehe „Wartung
und Reinigung“).
Schalten Sie bei Blockierung das
Gerät ab und ziehen Sie den Netzstecker. Beseitigen Sie erst dann die
Blockierung.
Eine falsch geschärfte Säge-
kette kann zu einer Beschädigung führen und die Rückschlaggefahr der Säge
erhöhen!
Achten Sie auf eine genaue
Justage der Sägekette.
Beachten Sie die richtigen
Schärfwinkel und Mindestmaße der Sägekette. Entfernen
Sie so wenig Material wie
möglich.
Page 26

26
DE AT CH
Schleifen Sie nicht
in Treibglieder (a)
oder Verbindungsglieder (b), die Sägekette kann sonst reißen.
Bei Nichtbeachtung besteht
Unfallgefahr beim Umgang
mit der Kettensäge.
Hinweise zum Schärfen
• Reinigen Sie die Sägekette vor dem
Schärfen. Beseitigen Sie ölhaltige
Holzreste bzw. Ölrückstände mit einem
Pinsel oder Putzlappen.
• Nach dem Schärfen müssen alle
Schneidglieder gleich lang und breit
sein.
• Die Sägekette ist abgenutzt und muss
gegen eine neue Sägekette ersetzt
werden, wenn nur noch ca. 4 mm des
Schneidezahns übrig ist.
Sägekette einlegen:
1. Zum Öffnen der Kettenführungsschiene
drehen Sie den Spannhebel (13) ge-
gen den Uhrzeigersinn. Dazu müssen
Sie den Spannhebel mehrmals in die
Ausgangsposition zurückführen.
Zur Entriegelung des Spannhebels ziehen Sie den Spannhebel nach außen
und lassen ihn nach Zurückführen in
die Ausgangsstellung wieder einrasten.
2. Legen Sie die Sägekette in die Kettenführungsschiene (7) ein. Die Schneid-
kanten müssen zur Schleifscheibe (18)
zeigen.
3. Klappen Sie den Anschlag (15) nach
unten und ziehen Sie die Sägekette
soweit nach hinten, bis der zu schärfende Schneidezahn (27) am Anschlag
anliegt (siehe Bild
).
Schärfwinkel einstellen:
4. Lockern Sie die Feststellschraube (10) und
stellen Sie am Drehteller
der Kettenspanneinheit
(12) den erforderlichen
Schärfwinkel α anhand der Skala (11)
ein. Ziehen Sie die Feststellschraube
wieder an.
Den Schärfwinkel stellen sie nach
Herstellerangaben ein.
Anschlag justieren:
5. Bewegen Sie den Schleifkopf (2) am
Handgriff (4) bei ausgeschaltetem Motor abwärts.
6. Führen Sie mit Hilfe der Stellschraube
für den Kettenvorschub (14a) den
Schneidezahn (27) an die Schleifscheibe (18) heran, bis der Schneidezahn an der Schleifscheibe anliegt
(siehe Bild
). Sichern Sie die
Stellschraube (14a) mit der Stellmutter
(14b).
7. Fixieren Sie die Kettenglieder in der
Kettenführungsschiene (7) durch Dre-
hen des Spannhebels (13) im Uhrzeigersinn (siehe 1.).
8. Stellen Sie den Tiefenanschlag mit Hilfe
der Stellschraube (6a) so ein, dass die
Schleifscheibe (18) den Zahngrund
berührt (siehe Bild
). Sichern Sie
die Schleiftiefe mit der Stellmutter (6b).
Schärfen:
9. Schalten Sie das Gerät ein (siehe „Einund Ausschalten“).
10. Schärfen Sie den Schneidezahn (27),
indem Sie den Schleifkopf (2) durch
sanften Druck auf den Handgriff (4)
abwärts bewegen.
Die Schleifscheibe (18) darf nicht bis
Page 27

27
DE AT CH
zum Stillstand abgebremst werden. Zur
Vermeidung verringern Sie rechtzeitig
den Anpressdruck.
11. Zum Weitertransport der Sägekette
schalten Sie das Gerät aus.
Lösen Sie den Spannhebel (13) und
xieren Sie das nächste zu schärfende
Kettenglied mit Hilfe des justierten An-
schlags (15) und des Spannhebels in
der Kettenführungsschiene (7).
Schärfen Sie zuerst die Zähne einer
Kettenseite. Verstellen Sie dann den
Schärfwinkel und schärfen Sie die
Zähne der anderen Seite.
Tiefenbegrenzer-Abstand prüfen
(siehe Bild
):
Die sägenden Teile der Sägekette sind die
Schneidglieder, die aus einem Schneide-
zahn (27) und einer Tiefenbegrenzernase
(28) bestehen. Der Höhenabstand zwischen diesen beiden bestimmt den Tiefen-
begrenzer-Abstand A.
1. Prüfen Sie nach jedem dritten Schärfen den Tiefenbegrenzer-Abstand A
gemäß den Angaben des SägekettenHerstellers.
2. Feilen Sie die Höhe der Tiefenbegrenzernase (28) mit einer Flachfeile nach
und runden Sie nach dem Zurückset-
zen die Tiefenbegrenzernase etwas
ab. Die ursprüngliche Form muss erhalten bleiben.
Wartung und Reinigung
Ziehen Sie vor jeglicher Einstellung,
Instandhaltung oder Instandsetzung
den Netzstecker.
Lassen Sie Arbeiten, die nicht
in dieser Betriebsanleitung beschrieben sind, von einer Fachwerkstatt durchführen. Verwenden Sie nur Originalteile.
Lassen Sie das Gerät vor allen
Wartungs- und Reinigungsarbeiten abkühlen. Es besteht
Verbrennungsgefahr!
Kontrollieren Sie das Gerät vor jedem
Gebrauch auf offensichtliche Mängel wie
lose, abgenutzte oder beschädigte Teile,
korrekten Sitz von Schrauben oder anderer
Teile. Prüfen Sie insbesondere die Schleifscheibe (
18). Tauschen Sie beschädigte
Teile aus.
Reinigung
Verwenden Sie keine Reinigungs-
bzw. Lösungsmittel. Chemische Substanzen können die Kunststoffteile
des Gerätes angreifen. Reinigen Sie
das Gerät niemals unter ießendem
Wasser.
• Reinigen Sie das Gerät nach jedem Gebrauch gründlich.
Reinigen Sie die Lüftungsöffnungen
(
21) und die Oberäche des Ge-
rätes mit einer weichen Bürste, einem
Pinsel oder einem Tuch.
• Reinigen Sie die Kettenführungsschiene
(
7) mit einer Bürste.
• Bei starken Verunreinigungen lösen Sie
Feststellschraube für die Kettenspan-
Page 28

28
DE AT CH
neinheit ( 10) und entnehmen Sie
die Kettenspanneinheit mit Drehteller
(
12) zwecks besserer Zugänglichkeit.
Wir empfehlen die seitlichen Bleche für
die Reinigung abzunehmen.
Schleifscheibe wechseln
Hinweise zum Wechseln:
• Betreiben Sie das Gerät niemals
ohne Sichtschutzscheibe (
20).
• Vergewissern Sie sich, dass die
auf der Schleifscheibe (
18)
angegebene Drehzahl gleich
oder größer als die BemessungsLeerlaufdrehzahl des Gerätes ist.
Vergewissern Sie sich, dass die
Maße der Schleifscheibe zum
Gerät passen. Ist die max. Umlaufgeschwindigkeit der Scheibe
im Gegensatz zum Gerät zu
klein, kann diese zerbrechen!
• Benutzen Sie nur einwandfreie
Schleifscheiben (Klangprobe).
• Bohren Sie eine zu kleine Aufnahmebohrung der Schleifscheibe
nicht nachträglich auf.
• Verwenden Sie keine getrennten
Reduzierbuchsen oder Adapter,
um Schleifscheiben mit großem
Loch passend zu machen.
• Verwenden Sie keine Sägeblätter.
• Montieren Sie das Gerät nach
dem Schleifscheibenwechsel wieder vollständig.
Schalten Sie das Gerät aus und zie-
hen Sie den Netzstecker.
Lassen Sie das Gerät abkühlen.
1. Lösen Sie die 3 Befestigungs-
schrauben (5) und nehmen Sie
die Schleifscheiben-Abdeckung
(3) ab.
2. Schrauben Sie die Schleifschei-
ben-Mutter (18b) von Hand ab.
3. Nehmen Sie die Schleifscheibe
(18a) von der Aufnahme ab.
4. Setzen Sie die neue Schleifscheibe auf die Aufnahme auf und
schrauben Sie von Hand die
Schleifscheiben-Mutter auf.
5. Schrauben Sie die Schleifschei-
ben-Abdeckung (3) wieder an.
Die Schleifscheiben-Mutter darf
nicht zu fest angezogen werden,
um ein Brechen von Schleifscheibe
und Mutter zu vermeiden
6. Probelauf: Führen Sie vor dem ers-
ten Arbeiten und nach jedem Schleifscheibenwechsel einen Probelauf von
mindestens 30 Sekunden ohne Belastung durch. Schalten Sie das Gerät
sofort aus, wenn die Schleifscheibe
unrund läuft, beträchtliche Schwingungen auftreten oder abnorme Geräu-
sche zu hören sind.
Lagerung
• Bewahren Sie das Gerät an einem
trockenen und staubgeschützten Ort
auf, und außerhalb der Reichweite von
Kindern.
Schleifscheiben müssen trocken und
hochkant aufbewahrt und dürfen
nicht gestapelt werden.
Page 29

29
DE AT CH
Entsorgung/
Umweltschutz
Führen Sie Gerät, Zubehör und Verpackung einer umweltgerechten Wiederverwertung zu.
Elektrische Geräte gehören nicht in
den Hausmüll.
Geben Sie das Gerät an einer Verwertungsstelle ab. Die verwendeten Kunststoff-
und Metallteile können sortenrein getrennt
werden und so einer Wiederverwertung
zugeführt werden. Fragen Sie hierzu unser
Service-Center.
Die Entsorgung Ihrer defekten eingesendeten Geräte führen wir kostenlos durch.
Ersatzteile/Zubehör
Ersatzteile und Zubehör erhalten Sie unter
www.grizzly-shop.de oder www.grizzly-service.eu
Sollten Sie kein Internet haben, so wenden Sie sich bitte telefonisch an das Service-
Center (siehe „Service-Center“ Seite 31). Halten Sie die unten genannte Bestellnummer
bereit.
Position Position Bezeichnung Bestell-Nr.
Betriebs- Explosionsanleitung zeichnung
3 Set 3 Schleifscheiben-Abdeckung 91102832
4 Set 4 Handgriff mit Schraube 91102833
12 Set 1 Kettenspanneinheit mit Drehteller 91102830
18a 33 Schleifscheibe 30211030
18b/18c Set 2 Schleifscheibenmutter und -nabe 91102831
Page 30

30
DE AT CH
Garantie
Sehr geehrte Kundin, sehr geehrter Kunde,
Sie erhalten auf dieses Gerät 3 Jahre Garantie ab Kaufdatum.
Im Falle von Mängeln dieses Gerätes
stehen Ihnen gegen den Verkäufer des
Gerätes gesetzliche Rechte zu. Diese
gesetzlichen Rechte werden durch unsere
im Folgenden dargestellte Garantie nicht
eingeschränkt.
Garantiebedingungen
Die Garantiefrist beginnt mit dem Kauf-
datum. Bitte bewahren Sie den Original-
Kassenbon gut auf. Diese Unterlage wird
als Nachweis für den Kauf benötigt.
Tritt innerhalb von drei Jahren ab dem Kauf-
datum dieses Gerätes ein Material- oder
Fabrikationsfehler auf, wird das Gerät von
uns – nach unserer Wahl – für Sie kostenlos
repariert oder ersetzt. Diese Garantieleistung setzt voraus, dass innerhalb der DreiJahres-Frist das defekte Gerät und der Kaufbeleg (Kassenbon) vorgelegt und schriftlich
kurz beschrieben wird, worin der Mangel
besteht und wann er aufgetreten ist.
Wenn der Defekt von unserer Garantie
gedeckt ist, erhalten Sie das reparierte oder
ein neues Gerät zurück. Mit Reparatur oder
Austausch des Gerätes beginnt kein neuer
Garantiezeitraum.
Garantiezeit und gesetzliche
Mängelansprüche
Die Garantiezeit wird durch die Gewährleistung nicht verlängert. Dies gilt auch
für ersetzte und reparierte Teile. Eventuell
schon beim Kauf vorhandene Schäden und
Mängel müssen sofort nach dem Auspacken gemeldet werden. Nach Ablauf der
Garantiezeit anfallende Reparaturen sind
kostenpichtig.
Garantieumfang
Das Gerät wurde nach strengen Qualitätsrichtlinien sorgfältig produziert und vor
Anlieferung gewissenhaft geprüft.
Die Garantieleistung gilt für Material- oder
Fabrikationsfehler. Diese Garantie erstreckt
sich nicht auf Geräteteile, die normaler Ab-
nutzung ausgesetzt sind und daher als Verschleißteile angesehen werden können (z.B.
Schleifscheiben, Kohlebürsten, Anschlag,
Sichtschutzscheibe) oder für Beschädigungen
an zerbrechlichen Teilen (z.B. Schalter, Akkus oder die aus Glas gefertigt sind).
Diese Garantie verfällt, wenn das Gerät
beschädigt, nicht sachgemäß benutzt oder
nicht gewartet wurde. Für eine sachgemäße
Benutzung des Gerätes sind alle in der Betriebsanleitung aufgeführten Anweisungen
genau einzuhalten. Verwendungszwecke
und Handlungen, von denen in der Betriebsanleitung abgeraten oder vor denen gewarnt wird, sind unbedingt zu vermeiden.
Das Gerät ist lediglich für den privaten
und nicht für den gewerblichen Gebrauch
bestimmt. Bei missbräuchlicher und unsachgemäßer Behandlung, Gewaltanwendung
und bei Eingriffen, die nicht von unserer
autorisierten Service-Niederlassung vorgenommen wurden, erlischt die Garantie.
Abwicklung im Garantiefall
Um eine schnelle Bearbeitung Ihres Anliegens zu gewährleisten, folgen Sie bitte den
folgenden Hinweisen:
• Bitte halten Sie für alle Anfragen den
Kassenbon und die Identikationsnummer (IAN109774) als Nachweis für
den Kauf bereit.
• Die Artikelnummer entnehmen Sie bitte
dem Typenschild.
• Sollten Funktionsfehler oder sonstige
Mängel auftreten, kontaktieren Sie
Page 31

31
DE AT CH
zunächst die nachfolgend benannte
Serviceabteilung telefonisch oder per
E-Mail. Sie erhalten dann weitere Informationen über die Abwicklung Ihrer
Reklamation.
• Ein als defekt erfasstes Gerät können
Sie, nach Rücksprache mit unserem
Kundenservice, unter Beifügung des
Kaufbelegs (Kassenbons) und der
Angabe, worin der Mangel besteht
und wann er aufgetreten ist, für Sie
portofrei an die Ihnen mitgeteilte
Service-Anschrift übersenden. Um Annahmeprobleme und Zusatzkosten zu
vermeiden, benutzen Sie unbedingt nur
die Adresse, die Ihnen mitgeteilt wird.
Stellen Sie sicher, dass der Versand
nicht unfrei, per Sperrgut, Express oder
sonstiger Sonderfracht erfolgt. Senden
Sie das Gerät bitte inkl. aller beim
Kauf mitgelieferten Zubehörteile ein
und sorgen Sie für eine ausreichend
sichere Transportverpackung.
Reparatur-Service
Sie können Reparaturen, die nicht der Garantie unterliegen, gegen Berechnung von
unserer Service-Niederlassung durchführen
lassen. Sie erstellt Ihnen gerne einen Kostenvoranschlag.
Wir können nur Geräte bearbeiten, die
ausreichend verpackt und frankiert eingesandt wurden.
Achtung: Bitte senden Sie Ihr Gerät gereinigt und mit Hinweis auf den Defekt an
unsere Service-Niederlassung.
Unfrei - per Sperrgut, Express oder mit
sonstiger Sonderfracht - eingeschickte Geräte werden nicht angenommen.
Die Entsorgung Ihrer defekten eingesendeten Geräte führen wir kostenlos durch.
Service-Center
Service Deutschland
Tel.: 0800 54 35 111
E-Mail: grizzly@lidl.de
IAN 109774
Service Österreich
Tel.: 0820 201 222
(0,15 EUR/Min.)
E-Mail: grizzly@lidl.at
IAN 109774
Service Schweiz
Tel.: 0842 665566
(0,08 CHF/Min.,
Mobilfunk max. 0,40 CHF/Min.)
E-Mail: grizzly@lidl.ch
IAN 109774
Importeur
Bitte beachten Sie, dass die folgende
Anschrift keine Serviceanschrift ist. Kontaktieren Sie zunächst das oben genannte
Service-Center.
Grizzly Tools GmbH & Co. KG
Stockstädter Straße 20
D-63762 Großostheim
www.grizzly-service.eu
DE
AT
CH
Page 32

32
DE
AT
Original
EG Konformitäts-
erklärung
Translation of the
original EC declara-
tion of conformity
Hiermit bestätigen wir, dass das
Kettenschärfgerät
Baureihe FSG 85 B1
Seriennummer
201505000001-201505114606
We hereby conrm that the
FSG 85 B1 series
Chain sharpener
serial number
201505000001-201505114606
folgenden einschlägigen EU-Richtlinien in
ihrer jeweils gültigen Fassung entspricht:
conforms with the following applicable re-
levant version of the EU guidelines:
2006/42/EG • 2004/108/EG • 2011/65/EU* 2006/42/EC • 2004/108/EC • 2011/65/EU*
Um die Übereinstimmung zu gewährleisten, wurden folgende harmonisierte
Normen sowie nationale Normen und
Bestimmungen angewendet:
In order to guarantee consistency, the following harmonised standards as well as
national standards and stipulations have
been applied:
EN 61029-2-10/A11:2013 • EN 61029-1/A11:2010
EN 55014-1/A2:2011 • EN 55014-2/A2:2008
EN 61000-3-2/A2:2009 • EN 61000-3-3:2013 • EN 62471:2008
Die alleinige Verantwortung für die Ausstellung dieser Konformitätserklärung trägt
der Hersteller:
This declaration of conformity is issued
under the sole responsibility of the manufacturer:
Grizzly Tools GmbH & Co. KG
Stockstädter Straße 20
D-63762 Großostheim, GERMANY
15.05.2015
* Der oben beschriebene Gegenstand der
Erklärung erfüllt die Vorschriften der Richtlinie
2011/65/EU des Europäischen Parlaments und
des Rates vom 8. Juni 2011 zur Beschränkung der
Verwendung bestimmter gefährlicher Stoffe in Elektro- und Elektronikgeräten.
* The object of the declaration described above sa-
tisestheprovisionsofDirective2011/65/EUofthe
European Parliament and the Council of 8 June 2011
on limiting the use of certain harmful substances in
electrical and electronic appliances.
Volker Lappas
(Dokumentationsbevollmächtigter,
Documentation Representative)
CH
GB
Page 33

33
Explosionszeichnung • Exploded Drawing
informativ, informative
2015-03-30_rev02-gs
33
Set 1
Set 2
Set4
Set3
FSG 85 B1
Page 34

13
12
18a
18b
18c
3
5
6a
6b
11
10
10
11
12
15
14a 14b
15
272718
28
27
7
2
4
18
14
Page 35

Page 36

GRIZZLY TOOLS GMBH & CO. KG
Stockstädter Straße 20
D-63762 Großostheim
Last Information Update · Stand
der Informationen: 02 / 2015
Ident.-No.: 75019755022015-GB / IE
IAN 109774
 Loading...