

Page 1

sensor de humedad
Instrucciones de utilización y de seguridad
rilevatore di umidità
Indicazioni per l’uso e per la sicurezza
sensor de humidade
Instruções de utilização e de segurança
humidity sensor
Operation and Safety Notes
feuchtigkeitssensor
Bedienungs- und Sicherheitshinweise
H14335
5
Page 2

ES Instrucciones de utilización y
IT / MT Indicazioni per l’uso e per
PT Instruções de utilização e
GB / MT Operation and Safety Notes Page 48
DE / AT / CH Bedienungs- und Sicherheitshinweise Seite 62
de seguridad Página 5
la sicurezza Pagina 19
de segurança Página 34
Page 3
1
2
11
10
3
4
1
5
5
AL
C/F ON/OFF
9
6
7
8
®
3
Page 4
A
B
C
16
18
WET
DRY
SOIL
12
13
14
15
17
19
D
4
21
WETSOIL
DRYAIR
20
®
Page 5

Índice
Introducción
Uso adecuado ............................Página 6
Descripción de las piezas ..........Página 7
Datos técnicos .............................Página 8
Volumen de suministro ................Página 8
Seguridad
Indicaciones generales
de seguridad ............................... Página 9
Indicaciones de seguridad
referentes a las baterías .............Página 10
Manejo ......................................Página 12
Colocar el sensor de humedad ... Pág ina 13
Conectar/desconectar la
función de alarma ......................Página 14
Cambiar la unidad
de temperatura ...........................Página 15
Colocar/cambiar las pilas .........Página 15
Solución de fallos .............Página 16
Limpieza y
conservación ........................Pá g i na 17
Eliminación ............................Página 17
®
5 ES
Page 6

Sensor de humedad
Q
Introducción
Familiarícese con el artefacto antes
de la primera puesta en funciona-
miento. Lea detenidamente para
esto el siguiente manual de instrucciones y las
indicaciones de seguridad. Utilice el artefacto
únicamente como esta descrito y para las
aplicaciones indicadas. Conserve adecuadamente estas instrucciones. Adjunte igualmente
toda la documentación en caso de entregar
el artefacto a un tercero.
Q
Uso adecuado
El sensor de humedad sirve para controlar las
condiciones del suelo y del aire en bancales
y macetas de flores. Mide la temperatura del
suelo y del aire así como la humedad del
suelo. El medidor de humedad dispone de una
función de alarma para suelos demasiado
secos. El aparato está diseñado tanto para
espacios interiores como exteriores. Cualquier
uso o modificación del aparato distinto a lo
indicado se considerará como no adecuado y
podrá conllevar riesgos de lesiones y / o daños
en el aparato. El fabricante no se hace responsable de los daños que puedan derivarse
del uso indebido del aparato. Este aparato
no está diseñado para uso industrial.
6 ES
®
Page 7

Introducción
Q
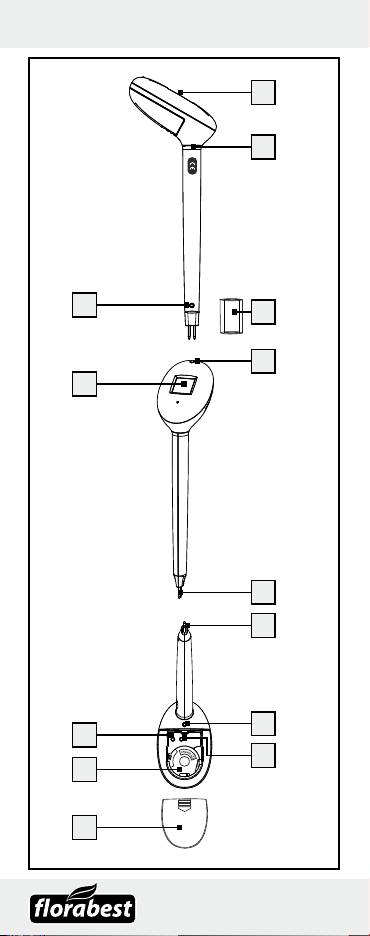
Descripción de las piezas
Sensor de humedad:
1
Pantalla LCD
2
Límite de inserción
3
Funda protectora
4
Indicador LED
5
Sensor de suelo (humedad)
6
Sensor de aire (temperatura)
7
Tecla de alarma ON / OFF
8
Tapa del compartimento de las pilas
9
Compartimento de las pilas
10
Tecla “C / F”
11
Sensor de suelo (temperatura)
Indicador de humedad del suelo
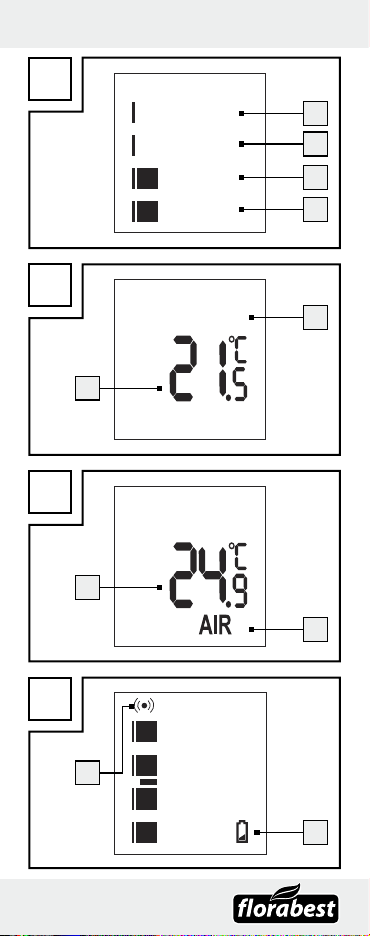
(fig. A):
12
Mojado
13
Húmedo
14
Ligeramente seco
15
Seco
Indicador de temperatura del suelo
(fig. B):
16
Indicador de temperatura
17
Indicador de modo suelo
Indicador de temperatura del aire
(fig. C):
18
Indicador de temperatura
19
Indicador de modo aire
Indicador pila / alarma (fig. D):
20
Indicador de pilas con poca carga
21
Indicador de alarma ON / OFF
®
7 ES
Page 8

Q
Datos técnicos
Pilas: pila CR2450
(3 V
, litio)
Tensión: 3 V
Rango de medición:
Temperatura del suelo: 0–50 °C
(+32–+122 F)
Temperatura del aire: 0–50 °C
(+32–+122 F)
Humedad del suelo: 4 niveles (véase
fig. A)
Actualización de los valores de
medición:
Temperatura del suelo: 1 por minuto
Humedad del suelo: 1 por minuto
Temperatura del aire: 1 por minuto
El producto está protegido contra salpicaduras
de agua.
Q
Volumen de suministro
1 sensor de humedad
1 pila CR2450 (3 V
, litio)
1 funda protectora
1 manual de instrucciones
8 ES
®
Page 9
Seguridad
Seguridad
¡CONSERVE TODAS LAS INDICACIONES
DE SEGURIDAD Y ADVERTENCIAS POR SI
NECESITA CONSULTARLAS MÁS ADELANTE!
Indicaciones generales
de seguridad
J
¡ADVERTENCIA!
¡PELIGRO DE MUERTE O
ACCIDENTE PARA BEBÉS Y
NIÑOS! No deje nunca a los niños sin
vigilancia con el material de embalaje.
Podrían asfixiarse con el material de embalaje. Los niños a menudo subestiman
los peligros. Mantenga siempre el aparato
fuera del alcance de los niños. El producto
no es un juguete.
¡ADVERTENCIA!
¡PELIGRO DE
MUERTE! Podrían tragarse las baterías,
lo cual puede suponer un peligro mortal.
Si se ha tragado una batería, debe buscar
asistencia médica inmediatamente.
J No ponga el aparato en funcionamiento
si está dañado. Los aparatos dañados
conllevan peligro de muerte por descarga
eléctrica.
J No exponga el aparato a
– temperaturas extremas,
– vibraciones fuertes,
– o grandes esfuerzos mecánicos.
De hacerlo, el aparato podría dañarse.
®
9 ES
Page 10

Seguridad
J Observe que los daños producidos por
manejo incorrecto, no seguimiento del
manual de instrucciones o manipulación
por parte de personas no autorizadas,
están excluidos de la garantía.
J Nunca desarme el aparato. A causa de
trabajos de reparación no apropiados
pueden producirse peligros para el usuario.
Encargue las reparaciones únicamente a
personal técnico cualificado.
J Los niños o las personas que carezcan
de los conocimientos o la experiencia
necesarios para manipular el aparato o
aquellas cuyas capacidades físicas, sensoriales o psicológicas estén limitadas no
deben utilizar el aparato sin la supervisión
o la dirección de una persona responsable
de su seguridad.
Indicaciones de
seguridad referentes
a las baterías
J Retire las baterías del aparato si no va a
utilizar el mismo durante un período de
tiempo prolongado.
J
J Cuando coloque las baterías observe la
J Si es necesario, antes de introducir las
¡CUIDADO! ¡PELIGRO DE
EXPLOSIÓN! ¡Nunca cargue
las baterías nuevamente!
polaridad correcta. Éste se indica en el
compartimento de las baterías.
baterías limpie los contactos de las baterías
y del aparato.
10 ES
®
Page 11

Seguridad
J Retire inmediatamente las pilas agotadas
del aparato. Existe riesgo de sulfatación.
J La inobservancia de estas indicaciones
puede provocar la descarga de las pilas
por encima de su tensión final. En este caso,
existe el riesgo de que se sulfaten. En
caso de que las pilas se sulfaten, retírelas
inmediatamente para evitar daños en el
aparato.
J ¡Las baterías no deben desecharse en la
basura doméstica!
J ¡Todos los usuarios están obligados a
desechar las baterías de forma adecuada!
J Mantenga las baterías fuera del alcance
de los niños. No las arroje al fuego, no las
ponga en cortocircuito ni las desmonte.
J Evite el contacto con la piel, ojos y muco-
sas. Si se entra en contacto con el ácido
de las baterías, lave la parte afectada con
abundante agua y / o procure atención
médica.
J No ponga en cortocircuito los contactos
de la pila.
J
recargables del tipo indicado (CR2450,
J
piel. Utilice, por tanto, guantes de protec-
¡ATENCIÓN! ¡PELIGRO
DE EXPLOSIÓN! Utilice
exclusivamente pilas de litio no
3 V
).
Las pilas gastadas o dañadas
pueden provocar causticaciones
al entrar en contacto con la
ción adecuados en todo momento.
®
11 ES
Page 12

Q
Manejo
Nota: El producto se entrega con las pilas
colocadas. Antes del primer uso, retire el
aislamiento de plástico del compartimento de
las pilas
9
.
j Abra la tapa del compartimento de las
8
pilas
deslizándola en la dirección de
la flecha. Retire el aislamiento y vuelva a
cerrar la tapa del compartimento de las
8
pilas
.
Nota: La pantalla LC
1
del sensor de
humedad cambia automáticamente entre
la indicación humedad-suelo (fig. A), la
indicación temperatura-suelo (fig. B) y la
indicación temperatura-aire (fig. C).
Nota: La indicación de la humedad del
suelo está influida por la composición
del suelo y la cantidad de fertilizante,
por lo que puede variar. Por ello, esta
indicación sólo es útil para obtener una
idea general, y no datos exactos.
Nota: Si la tierra no es fina o es muy
porosa, no se visualizará correctamente
la humedad del suelo, ya que el sensor
de suelo
5
podría entrar en contacto
con el aire. En este caso, se indicará una
humedad menor que la esperada.
Nota: La indicación de la humedad del
suelo se actualiza cada minuto. Por ese
motivo, espere un minuto después de
regar y lea entonces el valor actualizado.
Si el medidor de humedad se ha insertado
más profundamente en el suelo, espere
10 minutos más para darle tiempo al agua
a filtrarse hasta el sensor de suelo
5
.
Manejo Manejo
12 ES
®
Page 13

Nota: El rango de medición de tempe-
ratura del sensor de humedad abarca de
0-50 °C. Más allá de este rango, el sensor
de suelo (temperatura)
11
podría no
trabajar correctamente.
Q
Colocar el sensor
de humedad
j Retire la funda protectora 3 del sensor
de suelo
j Inserte el sensor de humedad en la tierra
cerca de la planta, con el sensor de suelo
para no dañar el sensor de suelo
Procure insertar el sensor de humedad en
la tierra lo más vertical posible.
j Si emplea el sensor de humedad en una
maceta, colóquelo centrado entre el
borde de la maceta y la planta. Para
recipientes con un diámetro superior a
30,5 cm, sepárese aprox. 2 / 3 del borde
de la maceta.
j Presione el sensor de humedad en la
tierra hasta que alcance las raíces de la
planta/del semillero o 2 / 3 de la profundidad de la maceta. El sensor de humedad
se puede introducir en la tierra como máximo hasta el límite de inserción
Nota: Si emplea el sensor de humedad
en otro suelo, limpie antes las varillas de
metal del sensor de suelo
falsear el resultado.
5
.
5
por delante. Extreme la precaución
5
2
.
5
para no
.
®
13 ES
Page 14
Q
Conectar/desconectar la
función de alarma
Nota: el tono de alarma indica cuándo la
humedad del suelo es demasiado escasa
(indicación seco (DRY)
1 vez por minuto.
j Retire el sensor de humedad del suelo.
j Retire la tapa del compartimento de
las pilas
8
j Presione la tecla ON / OFF de la alarma
7
en el compartimento de las pilas 9
durante aprox. 3 segundos para conectar
o desconectar la alarma. En la pantalla
1
LC
aparecerá la indicación alarma
ON/ OFF
21
j Conectar la alarma: el indicador LED
parpadea y se emite un tono de aviso.
j Si se activa la alarma, el indicador LED
parpadea dos veces. A continuación emitirá durante 5 minutos un tono de aviso
cada 30 segundos como señal recordatoria. Luego, el tono de aviso enmudece
durante 5 minutos. La señal acústica
recordatoria se repite a intervalos de
5 minutos.
j La indicación de alarma ON / OFF
parpadea a intervalos de 0,5 segundos
en la pantalla LC
Para parar la alarma, presione y mantenga
pulsada la tecla de alarma ON / OFF
durante 3 segundos. El tono de aviso se
detiene y la indicación de alarma
ON / OFF
4
LED
parpadea durante 5 minutos
cada 30 segundos. A continuación, el
15
) y emite un sonido
.
.
1
.
21
desaparece. El indicador
4
4
21
7
Manejo Manejo
14 ES
®
Page 15
indicador LED 4 se apaga durante 5
minutos. El recuerdo óptico se repite a
intervalos de 5 minutos hasta que la tierra
haya recibido suficiente agua.
j Vuelva a colocar la tapa del comparti-
mento de las pilas
Q
Cambiar la unidad
8
.
de temperatura
j Retire la tapa del compartimento de las
8
pilas
.
j Presione la tecla C / F
entre Celsius y Fahrenheit.
j Vuelva a colocar la tapa del comparti-
mento de las pilas
Q
Colocar/cambiar las pilas
Nota: la pantalla LC 1 indica si las pilas
se están agotando (pilas agotadas
fig. D).
j Retire el medidor de humedad del suelo.
j Retire la tapa del compartimento de las
8
pilas
.
j Si fuera necesario, retire la pila agotada.
j Coloque una pila nueva de tipo CR2450
(3 V
, litio) en el compartimento de las
9
pilas
.
Nota: Durante este proceso tenga en
cuenta la polaridad correcta. Ésta se
indica en el compartimento de las pilas.
j Vuelva a colocar la tapa del comparti-
mento de las pilas
10
para cambiar
8
.
8
.
20
, véase
®
15 ES
Page 16
Solución de fallos
Q
Solución de fallos
= Fallo
= Motivo
= Solución
= El sensor de suelo 5 no indica
un aumento de la humedad de
la tierra después de haber
regado.
= La indicación de la humedad del suelo
se actualiza cada minuto.
= Espere un minuto y lea luego el valor
actualizado. Si el medidor de humedad
se ha insertado profundamente en el
suelo, espere algo más para darle
tiempo al agua a infiltrarse hasta el
sensor de suelo
= El valor de humedad del suelo
es menor que el esperado.
= La composición del suelo puede alterar
el resultado de la medición.
= No ponga el medidor de humedad en
terrenos muy pesados o poco finos
(por ej. arcilla o arena).
= Hay cavidades en el suelo.
= Retire el medidor de humedad y coló-
quelo en otro punto.
= El sensor de suelo 5 no está lo sufi-
cientemente introducido en el terreno.
= Introduzca el medidor de humedad a
más profundidad (en maceta: 2 / 3 de
la profundidad de la maceta), como
máximo hasta el límite de inserción
5
.
2
.
16 ES
®
Page 17

... / Limpieza y ... / Eliminación
= Las varillas de metal del sensor de sue-
5
lo
están sucias.
= Limpie cuidadosamente las varillas de
metal.
Q
Limpieza y conservación
j Limpie el producto con un paño seco y sin
pelusa. En caso necesario, utilice un pincel.
j Para la suciedad más persistente, utilice
un paño suave humedecido y, en caso
necesario, un detergente suave.
j No utilice en ningún caso productos de
limpieza abrasivos o corrosivos. De lo
contrario, el producto podría dañarse.
Q
Eliminación
El embalaje está compuesto por
materiales no contaminantes que
pueden ser eliminados en el centro
de reciclaje local.
Puede averiguar las posibilidades de eliminación del producto estropeado en la administración de su comunidad o ciudad.
No elimine el producto estropeado
con los desechos domésticos, sino
hágalo de manera correcta. Proteja
así el medio ambiente. Se puede
informar en la oficina competente
de su administración sobre los
puestos de recogida y sus horarios
de atención al público.
®
17 ES
Page 18

Eliminación
Las pilas defectuosas o usadas deben ser
recicladas según lo indicado en la directiva
2006 / 66 / EC. Para ello devuelva las pilas
y / o el aparato en los puntos de recogida
indicados.
Daño medioambiental debi-
do a un reciclaje incorrecto
Pb
de las pilas
Las pilas no deben eliminarse junto a los residuos domésticos. Las pilas pueden contener
metales pesados tóxicos que debe tratarse
conforme a la normativa aplicable a los
residuos especiales. Los símbolo químicos de
los metales pesados son: Cd = Cadmio,
Hg = Mercurio, Pb = Plomo. Las pilas deben
reciclarse en el punto de recolección específico
para ello.
EMC
Denominación del producto:
Sensor de humedad
Modelo Nº: H14335
Versión: 11 / 2010
18 ES
®
Page 19

Indice
Introduzione
Utilizzo secondo
la destinazione d’uso ..............Pagina 20
Descrizione dei componenti .....Pa gina 21
Dati tecnici ...............................Pagina 22
Ambito di fornitura ...................Pagina 22
Sicurezza
Avvisi di sicurezza
generali ....................................Pagina 23
Indicazioni di sicurezza
per le batterie .......................... Pagina 24
Funzionamento ................Pagina 26
Installazione dell’igrometro ......Pagina 27
Inserimento / disinserimento
della funzione di allarme ........ Pagina 28
Commutazione dell’unità di
misura della temperatura .......... Pagina 29
Inserimento / sostituzione
delle batterie ............................ Pagina 29
Rimozione dei guasti ...Pagina 30
Pulizia e
manutenzione ...................Pagina 31
Smaltimento........................Pagina 32
®
19 IT/MT
Page 20

Introduzione
Rilevatore di umidità
Q
Introduzione
Familiarizzate con il prodotto
prima della messa in funzione.
Leggete attentamente quindi le
seguenti istruzioni d‘uso e le misure di sicurezza. Utilizzate l‘apparecchio solo come
descritto e per gli ambiti di funzione indicati.
Conservate per bene queste istruzioni. Consegnate anche tutti i documenti di questo
prodotto quando lo date a terzi.
Q
Utilizzo secondo
la destinazione d’uso
L’igrometro viene utilizzato per sorvegliare le
condizioni del terreno e dell’aria in aiuole e
vasi da fiori. Esso misura la temperatura del
terreno e dell’aria nonché l’umidità del terreno.
L’igrometro dispone di una funzione di allarme
che segnala che il terreno è troppo secco.
L’apparecchio è adatto a un utilizzo in ambienti
interni ed esterni. Altri utilizzi o modifiche
dell’apparecchio si intendono non conformi
alle modalità d’uso previste e determinano
rischi di lesioni a persone e / o di danni
all’apparecchio. Il produttore declina ogni
responsabilità per eventuali danni derivanti da
un utilizzo non conforme alle modalità d’uso.
L’apparecchio non è destinato all’utilizzo
commerciale.
20 IT/MT
®
Page 21

Introduzione
Q
Descrizione dei componenti
Igrometro:
1
Display a cristalli liquidi
2
Tacca di inserimento
3
Involucro protettivo
4
Visualizzazione a LED
5
Sensore per il terreno (umidità)
6
Sensore per l’aria (temperatura)
7
Tasto di allarme ON / OFF
8
Coperchio del vano portabatterie
9
Vano portabatterie
10
Tasto di commutazione °C / °F
11
Sensore per il terreno (temperatura)
Visualizzazione dell’umidità del
terreno (vedi fig. A):
12
Bagnato
13
Umido
14
Leggermente asciutto
15
Asciutto
Display della temperatura del
terreno (vedi fig. B):
16
Visualizzazione della temperatura
17
Visualizzazione modalità “terreno”
Visualizzazione della temperatura
dell’aria (vedi fig. C):
18
Visualizzazione della temperatura
19
Visualizzazione della modalità “aria”
®
21 IT/MT
Page 22

Introduzione
Visualizzazione Batteria / Allarme
(vedi fig. D):
20
Visualizzazione di batteria debole
21
Visualizzazione dell’allarme ON / OFF
Q
Dati tecnici
Batteria: 1 batteria CR2450
(3 V
, al litio)
Tensione: 3 V
Gamme di misurazione:
Temperatura del terreno: 0–50°C
(+32–+122F)
Temperatura dell’aria: 0–50°C
(+32–+122F)
Umidità del terreno: 4 livelli (vedi fig. A)
Aggiornamento dei valori di
misurazione:
Temperatura del terreno: 1 volta al minuto
Umidità del terreno: 1 volta al minuto
Temperatura dell’aria: 1 volta al minuto
Il prodotto è resistente agli spruzzi d’acqua.
Q
Ambito di fornitura
1 igrometro
1 batteria da CR2450 (3 V
, al litio)
1 involucro protettivo
1 libretto d’istruzioni d’uso
22 IT/MT
®
Page 23
Sicurezza
Sicurezza
CONSERVI TUTTE LE ISTRUZIONI E GLI
AVVISI DI SICUREZZA PER CONSULTARLI IN FUTURO!
Avvisi di sicurezza
generali
J
ATTENZIONE!
PERICOLO PER L’INCOLUMITÀ DEI BAMBINI! Vietare
l’accesso al materiale d’imballaggio ai
bambini, se non sotto sorveglianza di un
adulto. Sussiste il pericolo di soffocamento
dei bambini con il materiale d’imballaggio.
I bambini non sono in grado di valutare
l’entità dei pericoli. Tenere i bambini
lontani dall’apparecchio. Il prodotto non
è un giocattolo.
ATTENZIONE!
Le batterie possono essere ingoiate con
PERICOLO DI VITA!
conseguente pericolo di vita. Se è stata
ingoiata la batteria, rivolgersi immediatamente alle cure di un medico.
J Non metta in funzione l’apparecchiatura
se è danneggiata. Apparecchiature danneggiate possono mettere a repentaglio
la Sua vita a causa di una scossa elettrica!
J Non esporre l’apparecchio
- a temperature estreme,
- a forti vibrazioni,
- a forti sollecitazioni meccaniche,
- all’irraggiamento diretto del sole.
®
23 IT/MT
Page 24

Sicurezza
In caso contrario sussiste il pericolo di
danneggiare l’apparecchio.
J Prenda in considerazione il fatto che i
danneggiamenti ad opera di maneggio
scorretto, violazione delle istruzioni d’uso
e causati da interventi di personale non
autorizzato sono esclusi dalla garanzia.
J Non smonti assolutamente l’apparec-
chiatura. A causa di riparazioni scorrette
l’utente può essere esposto a gravi pericoli.
Faccia eseguire le riparazioni da personale qualificato.
J Bambini o persone, cui mancano cono-
scenza o esperienza nel maneggiare
l’apparecchio, o le cui capacità fisiche,
sensoriali o psichiche sono limitate, non
devono utilizzare l’apparecchio senza
essere sorvegliati o guidati di una persona
responsabile della loro sicurezza.
Indicazioni di sicurezza
per le batterie
J Rimuovere dall’apparecchio le batterie
non utilizzate per parecchio tempo.
J
J Prestare attenzione alla polarità corretta
J Se necessario, pulire i contatti della bat-
ATTENZIONE! PERICOLO
DI ESPLOSIONI! Non rica-
ricare mai le batterie!
quando vengono inserite le batterie! La
polarità è riportata nel vano batteria.
teria e dell’apparecchio prima di inserire
le batterie.
24 IT/MT
®
Page 25

Sicurezza
J Rimuovere subito la batteria esaurita
dall’apparecchio. Sussiste un notevole
pericolo di perdita!
J
In caso di mancata osservanza di tali
avvertenze,
attraverso la sua tensione finale. Sussiste
inoltre il pericolo di perdite. In caso di
perdite dalla batteria mentre questa si
trova nell’apparecchio, estrarla subito
per evitare danni all‘apparecchio medesimo!
J Non smaltire le batteria con i rifiuti
domestici!
J Ogni consumatore è obbligato ai termini
di legge a smaltire la batteria secondo
le regole vigenti!
J Tenere le batterie lontano dalla portata
dei bambini, non gettarle nel fuoco, non
cortocircuitarle e non smontarle.
J Evitare il contatto con pelle, occhi e
mucose. In caso di contatto con l’acido
della batteria sciacquare abbondantemente il punto interessato e / o rivolgersi
alle cure mediche!
J Non cortocircuitare i contatti della batteria.
J
non ricaricabili del tipo indicato in prece-
denza (CR2450, 3 V
J
In questo caso indossare sempre guanti
di protezione adatti!
la batteria può scaricarsi
ATTENZIONE! PERICOLO
DI ESPLOSIONE! Utilizzare
esclusivamente batterie al litio
).
Batterie scariche o danneggiate
possono causare corrosioni in
caso di contatto con la pelle.
®
25 IT/MT
Page 26

Funzionamento
Q
Funzionamento
Nota: L’apparecchio viene fornito con la
batteria inserita. Prima di utilizzare l’apparecchio per la prima volta rimuovere l’isolamento
di plastica dal vano portabatterie
j Aprire il coperchio del vano portabatterie
8
spingendolo nella direzione indicata
dalla freccia. Rimuovere l’isolamento e
chiudere nuovamente il coperchio del
vano portabatterie
8
Nota: Il display a cristalli liquidi
dell’igrometro si commuta automaticamente
tra visualizzazione dell’umidità del terreno
(vedi fig. A), visualizzazione della temperatura del terreno (vedi fig. B) e visualizzazione della temperatura dell’aria (vedi
fig. C).
Nota: La visualizzazione dell’umidità
del terreno è influenzata dalla natura del
terreno e dal contenuto di concime e può
quindi essere soggetta a oscillazioni. La
visualizzazione serve quindi solamente
per fornire un’indicazione di carattere
generale e non dati esatti.
Nota: Qualora il terreno fosse molto
ruvido o poroso, l’umidità del terreno può
non essere visualizzata in modo corretto,
in quanto è possibile che il sensore per il
5
terreno
entri in contatto con l’aria.
In tal caso viene visualizzata un’umidità
inferiore a quella attesa.
Nota: La visualizzazione relativa all’umi-
dità del terreno si aggiorna ogni minuto.
Dopo avere versato dell’acqua attendere
un minuto e in seguito leggere il valore
9
.
.
1
26 IT/MT
®
Page 27

Funzionamento
aggiornato. Qualora l’igrometro fosse
stato inserito profondamente nel terreno,
attendere altri dieci minuti per permettere
all’acqua di penetrare nel terreno fino al
sensore per il terreno
Nota: La gamma di misurazione della
temperatura dell’igrometro è tra 0 °C e
50 °C. Al di fuori di tale gamma di misurazione il sensore per il terreno (tempera-
11
tura)
può non funzionare correttamente.
Q
Installazione dell’igrometro
j Rimuovere l’involucro protettivo 3 dal
sensore per il terreno
j Inserire l’igrometro nei pressi della pianta
con il sensore per il terreno
medesimo. Eseguendo questa operazione
fare attenzione a non danneggiare il sensore per il terreno
per quanto possibile l’igrometro nel terreno
in posizione verticale.
j Qualora si utilizzasse l’igrometro in un
vaso di fiori, porlo a metà tra bordo del
vaso e pianta. Per contenitori superiore a
30,5 cm di diametro lasciare circa 2 / 3
di terra liberi fino al bordo del vaso.
j Premere l’igrometro nel terreno fino a
quando esso raggiunge le radici della
pianta / del semenzaio o 2 / 3 della profondità del vaso. L’igrometro può essere
inserito nel terreno al massimo fino alla
tacca di inserimento
Nota: Per non falsare il risultato della
misurazione, qualora si desiderasse inserire
5
.
5
.
5
nel terreno
5
. Cercare di inserire
2
.
®
27 IT/MT
Page 28

Funzionamento
l’igrometro in un altro terreno, pulire le
aste metalliche del sensore per il terreno
Q
Inserimento / disinserimento
della funzione di allarme
Nota: Il risuonare dell’allarme segnala
quando l’umidità del terreno è troppo bassa
(messaggio “Asciutto” (DRY)
risuona una volta al minuto.
j Estrarre l’igrometro dal terreno.
j Rimuovere il coperchio del vano porta-
batterie
8
.
j Per inserire o disinserire l’allarme premere
il tasto di allarme ON / OFF
portabatterie
9
display a cristalli liquidi
visualizzazione Allarme ON / OFF
j Inserimento dell’allarme: La visualizzazione
4
a LED
lampeggia e risuona un segnale
acustico.
j In caso di attivazione dell’allarme la
visualizzazione a LED
due volte. Successivamente risuona ogni
30 secondi per cinque minuti un segnale
acustico quale promemoria. In seguito il
segnale acustico rimane inattivo per cinque
minuti. Il segnale acustico si ripete a intervalli di cinque minuti.
j La visualizzazione Allarme ON / OFF
lampeggia sul display a cristalli liquidi
a intervalli di 0,5 secondi.
Per interrompere l’allarme, premere e
mantenere premuto il tasto di allarme
ON / OFF
7
per 3 secondi. Il segnale
15
) e in seguito
7
per circa 3 secondi. Sul
1
appare la
4
lampeggia
5
nel vano
21
.
21
1
.
28 IT/MT
®
Page 29

Funzionamento
acustico si interrompe e la visualizzazione
Allarme ON / OFF
lizzazione a LED
minuti ogni 30 secondi. In seguito la visualizzazione a LED
La visualizzazione ottica si ripete a intervalli di cinque minuti fino a quando il
terreno è stato annaffiato a sufficienza.
j Inserire nuovamente il coperchio del
vano portabatterie
Q
Commutazione dell’unità
di misura della temperatura
j Rimuovere il coperchio del vano porta-
batterie
8
j Per commutare tra gradi Celsius e Fahren-
heit premere il tasto C / F
j Inserire nuovamente il coperchio del
vano portabatterie
Q
Inserimento / sostituzione
delle batterie
21
si spegne. La visua-
4
lampeggia per cinque
4
si spegne per 5 minuti.
8
.
.
8
.
10
.
Nota: Il quasi esaurimento della batteria viene
visualizzato sul display a cristalli liquidi
(batteria debole
20
, vedi fig. D).
1
j Rimuovere il misuratore di umidità dal
terreno.
j Rimuovere il coperchio del vano porta-
batterie
8
.
j Se necessario, rimuovere la batteria
scarica.
®
29 IT/MT
Page 30

j Inserire nel vano portabatterie 9 una
nuova batteria di modello CR2450 da
3 V
al litio.
Nota: Assicurarsi che la polarità sia
corretta. Essa viene mostrata nel vano
portabatterie.
j Inserire nuovamente il coperchio del
vano portabatterie
Q
Rimozione dei guasti
8
.
= Errore
= Causa
= Soluzione
= Dopo l’innaffiamento Il sensore
per il terreno
5
non mostra
alcun aumento dell’umidità del
terreno.
= La visualizzazione relativa all’umidità
del terreno si aggiorna ogni minuto.
= Attendere un minuto e in seguito leggere
il valore aggiornato. Qualora l’igrometro
fosse stato inserito profondamente nel
terreno, attendere un poco più a lungo
per permettere all’acqua di penetrare nel
terreno fino al sensore per il terreno
5
.
30 IT/MT
®
Page 31

... / Pulizia e manutenzione
= Il valore di umidità rilevato nel
terreno è inferiore a quello
atteso.
= La natura del terreno può influenzare il
risultato della misurazione.
= Non porre l’igrometro in terreni duri o
ruvidi, quali ad esempio di argilla o
sabbia.
= Nel terreno vi sono cavità.
= Rimuovere l’igrometro e inserirlo in un
altro punto del terreno.
= Il sensore per il terreno 5 non è inserito
nel terreno in modo sufficientemente
profondo.
= Inserire l’igrometro più profondamente
nel terreno (in un vaso di fiori a 2 / 3
della profondità del vaso), al massimo
fino alla tacca di inserimento
= Le aste di metallo del sensore per il
5
terreno
sono sudice.
= Pulire con attenzione le aste di metallo.
Q
Pulizia e manutenzione
2
.
j Pulire il prodotto con un panno asciutto e
privo di peli. Se necessario fare uso di un
pennello.
j In caso di sporco più marcato utilizzare
un panno umido oppure, se necessario,
un detergente blando.
j Non utilizzare mai detergenti corrosivi o
abrasivi. In caso contrario si potrebbero
provocare danni al prodotto.
®
31 IT/MT
Page 32

Q
Smaltimento
La confezione è prodotta in mate-
riale riciclabile e biodegradabile,
smaltibile nei luoghi di raccolta
differenziati.
Potete informarvi sulle possibilità di smaltimento
del prodotto consumato dall‘amministrazione
comunale e cittadina.
Per la salvaguardia della tutela
ambientale, quando il vostro
prodotto non funziona più, non
gettatelo nei rifiuti domestici bensì
nei luoghi adatti di raccolta. Potete
informarvi sui luoghi di raccolta e
i loro orari di apertura dall‘amministrazione competente.
Batterie difettose o usate devono essere riciclat e ai sensi della Diret tiva 2006 / 66 / EC .
Smaltire le batterie e / o l’apparecchio presso i
punti di raccolta indicati.
Vi possono essere conseguenze negative
Pb
biente a seguito di uno
per l’am-
smaltimento non corretto
delle batterie!
Le batterie non devono essere smaltite nella
spazzatura domestica. Esse possono contenere
metalli pesanti velenosi e devono essere trattate quali rifiuti speciali. I simboli chimici dei
metalli pesanti sono i seguenti: Cd = Cadmio,
32 IT/MT
®
Page 33

Smaltimento
Hg = mercurio, Pb = piombo. Consegnare
quindi le batterie usate ad un punto di
raccolta comunale.
EMC
Definizione del prodotto:
Rilevatore di umidità
N°. modello: H14335
Versione: 11 / 2010
®
33 IT/MT
Page 34

Índice
Introdução
Utilização correcta .....................Pagina 35
Descrição das peças ...............Pagina 36
Dados técnicos ............................Pagina 37
Material fornecido ..................Pagina 37
Segurança ........................... Pagina 37
Indicações gerais
de segurança ...........................Pagina 38
Indicações de segurança
relativas às pilhas .................... Pagina 39
Utilização ............................. Pagina 40
Colocar o sensor
de humidade ............................ Pagina 42
Ligar/desligar a função
de alarme ................................. Pagina 42
Substituir a unidade de
temperatura .............................. Pagina 44
Colocar / substituir as pilhas .... Pagina 44
Eliminação
de avarias ........................... Pagina 44
Limpeza e
conservação ...................... Pagina 46
Eliminação ........................... Pagina 46
34 PT
®
Page 35

Sensor de humidade
Q
Introdução
Familiarize-se com o aparelho
antes da primeira colocação em
funcionamento. Para tal, leia atentamente o seguinte manual de instruções e as
indicações de segurança. Utilize o aparelho
apenas da forma descrita e para a finalidade
indicada. Guarde cuidadosamente este manual
de instruções. Se entregar este aparelho a
terceiros, entregue também todos os respectivos
documentos.
Q
Utilização correcta
O sensor de humidade destina-se ao controlo
das condições do solo e do ar em canteiros
e vasos. Este mede a temperatura do solo e
do ar, bem como a humidade do solo. O
medidor de humidade dispõe de uma função
de alarme em caso de solo demasiado seco.
O aparelho destina-se ao uso no interior e no
exterior. Quaisquer outras utilizações ou alterações do aparelho são consideradas indevidas e podem provocar ferimentos e / ou
danificação do aparelho. O fabricante não
assume qualquer responsabilidade por danos
resultantes de uma utilização incorrecta. Este
aparelho não se destina ao uso industrial.
®
35 PT
Page 36

Introdução
Q
Descrição das peças
Sensor de humidade:
1
Visor LC
2
Limite de inserção
3
Bolsa de protecção
4
Indicação LED
5
Sensor de solo (humidade)
6
Sensor de ar (temperatura)
7
Botão de alarme ON / OFF
8
Tampa do compartimento das pilhas
9
Compartimento das pilhas
10
Botão C / F
11
Sensor do solo (temperatura)
Indicação da humidade do solo (fig. A):
12
Molhado
13
Húmido
14
Ligeiramente seco
15
Seco
Indicação da temperatura do solo
(fig. B):
16
Indicação da temperatura
17
Indicação do modo do solo
Indicação da temperatura do ar
(fig. C):
18
Indicação da temperatura
19
Indicação do modo do ar
Indicação da bateria / alarme (fig. D):
20
Indicação de bateria fraca
21
Indicação de alarme ON / OFF
36 PT
®
Page 37

Q
Dados técnicos
Pilha: Pilha CR2450
(3 V
, lítio)
Tensão: 3 V
Amplitudes de medição:
Temperatura do solo: 0–50°C
(+32–+122F)
Temperatura do ar: 0–50°C
(+32–+122F)
Humidade do solo: 4 níveis (ver fig. A)
Actualização dos valores medidos:
Temperatura do solo: 1 x por minuto
Humidade do solo: 1 x por minuto
Temperatura do ar: 1 x por minuto
O produto está protegido contra salpicos de
água.
Q
Material fornecido
1 sensor de humidade
1 pilha CR2450 (3 V
, lítio)
1 bolsa de protecção
1 manual de instruções
Segurança
GUARDE TODAS AS INDICAÇÕES DE
SEGURANÇA E INSTRUÇÕES PARA
CONSULTA FUTURA!
®
37 PT
Page 38

Segurança
Indicações gerais
de segurança
J
AVISO!
PERIGO DE
MORTE E DE ACIDENTES
PARA BEBÉS E CRIANÇAS!
Nunca deixe crianças sem vigilância com
o material da embalagem. Existe perigo
de asfixia. As crianças subestimam frequentemente os perigos. Mantenha-as
sempre afastadas do produto. O produto
não é um brinquedo.
AVISO!
PERIGO DE MORTE! As
pilhas podem ser engolidas, o que constitui
perigo de morte. Se uma pilha for engolida,
procure imediatamente ajuda médica.
J Não coloque o aparelho em funcionamento
se este estiver danificado. Os aparelhos
danificados representam perigo de morte
por choque eléctrico!
J Não exponha o aparelho a
– temperaturas extremas,
– vibrações fortes,
– fortes esforços mecânicos.
Caso contrário, o aparelho pode ficar
danificado.
J Os danos causados por um manuseamento
inadequado, pela inobservância do manual
de instruções ou uma intervenção por
pessoal não autorizado estão excluídos
da garantia.
J Nunca desmonte o aparelho. Reparações
indevidas podem causar perigos significativos para o utilizar. As reparações só
devem ser efectuadas por pessoal especializado.
38 PT
®
Page 39

J As crianças ou as pessoas que não tenham
conhecimentos e/ou experiência no
manuseamento do aparelho ou cujas
capacidades físicas, sensoriais ou mentais
sejam limitadas não deverão utilizar o
aparelho sem a vigilância ou instruções
de uma pessoa responsável pela sua
segurança.
Indicações de segurança
relativas às pilhas
J Retire as pilhas do aparelho, se este não
for utilizado durante muito tempo.
J
J Ao colocar as pilhas, tenha em atenção
J Se necessário, limpe os contactos das
J Remova imediatamante as pilhas gastas
J Em caso de inobservância destas indi-
J As pilhas não devem ser depositadas no
CUIDADO! PERIGO DE
EXPLOSÃO! Nunca recarre-
gue as pilhas!
a polaridade correcta! Esta é indicada
nos compartimentos das pilhas.
pilhas e do aparelho antes da sua colocação.
do aparelho. Existe perigo de derrame
de ácido!
cações, as pilha podem ser descarregadas
para além da sua tensão final. Neste caso,
subsiste o perigo de derrame. Caso as
pilhas do seu aparelho comecem a derramar, retire-as imediatamente, de forma
a evitar danos no aparelho!
lixo doméstico!
®
39 PT
Page 40

Segurança / Utilização
J Cada consumidor é legalmente obrigado
a eliminar correctamente as pilhas!
J Mantenha as pilhas afastadas de crianças,
não as atire para o fogo, não as curtocircuite nem as desmonte.
J Evite o contacto com a pele, olhos e
mucosas. No caso de contacto com o
ácido das pilhas, lave o local afectado com
bastante água e / ou consulte um médico!
J Não provoque curto-circuito nos contactos
da pilha.
J
recarregáveis do tipo indicado
J
com a pele. Por isso, neste caso, use
Q
CUIDADO! PERIGO DE
EXPLOSÃO! Utilize exclusi-
vamente pilhas de lítio não
(CR2450, 3 V
).
As pilhas gastas ou danificadas
podem provocar queimaduras
ao entrar em contacto
sempre luvas adequadas.
Utilização
Nota: o aparelho é fornecido com as pilhas
colocadas. Antes da primeira utilização,
remova a isolamento de plástico do compartimento das pilhas
j Abra o compartimento das pilhas
9
.
8
,
deslocando-o na direcção da seta.
Remova o isolamento e feche a tampa
do compartimento das pilhas
Nota: o visor LC
1
do sensor de humi-
8
.
dade alterna automaticamente entre a
indicação da humidade do solo (fig. A),
40 PT
®
Page 41

a indicação da temperatura do solo
(fig. B) e a indicação da temperatura do
ar (fig. C).
Nota: a indicação da humidade do
solo é influenciada pela característica do
solo e o teor de adubo, podendo, portanto, oscilar. A indicação serve apenas
de visão geral, não apresentando dados
exactos.
Nota: se o solo for muito granuloso ou
poroso, a humidade do solo não pode
ser indicada correctamente, visto que o
sensor do solo
5
pode, eventualmente,
entrar em contacto com o ar. Neste caso,
é indicada uma humidade mais reduzida
do que esperado.
Nota: a indicação da humidade do
solo é actualizada a cada minuto. Deste
modo, espere um minuto depois da rega
e leia, em seguida, o valor actualizado.
Caso o medidor de humidade esteja inserido no solo a uma profundidade razoável, espere mais 10 minutos para que a
água se infiltre no solo até ao sensor
Nota: a amplitude de medição da tem-
peratura é de 0-50 °C. Para além dessa
amplitude, o sensor do solo (temperatu-
11
ra)
poderá não funcionar correcta-
mente.
5
.
®
41 PT
Page 42

Utilização
Q
Colocar o sensor
de humidade
j Retire a bolsa de protecção 3 do sensor
do solo
j Insira o sensor de humidade perto da
planta com o sensor do solo
terra. Seja cuidadoso para não danificar
o sensor do solo
de humidade no solo o mais possível na
vertical.
j Caso utilize o sensor de humidade num
vaso, posicione-o ao centro, entre o bordo
do vaso e a planta. Para vasos com um
diâmetro acima de 30,5 cm, deixe espaço
até cerca de 2 / 3 em relação ao bordo
do vaso.
j Pressione o sensor de humidade contra o
solo até que este alcance as raízes da
planta /da sementeira ou 2 / 3 da profundidade do vaso. O sensor de humidade
pode ser inserido no solo, no máximo, até
ao limite de inserção
Nota: caso introduza um sensor de
humidade num outro solo, limpe previamente as hastes metálicas do sensor do
solo
medição.
5
.
5
já na
5
. Tente inserir o sensor
2
.
5
para não falsear o resultado da
Q
Ligar/desligar a função
de alarme
Nota: o alarme sonoro indica quando a
humidade do solo está demasiado baixa
42 PT
®
Page 43

(Indicação seco (DRY) 15) e repete-se a
cada minuto.
j Retire o sensor de humidade do solo.
j Retire a tampa do compartimento das
8
pilhas
.
j Prima o botão de alarme ON / OFF
do compartimento das pilhas
9
durante
cerca de 3 segundos para ligar ou desligar
o alarme. No visor LC
cação de alarme ON / OFF
j Ligar o alarme: a indicação LED
1
aparece a indi-
21
.
4
fica
intermitente e ouve-se o sinal sonoro.
j Caso se active o alarme , a indicação
4
LED
pisca duas vezes. Em seguida,
ouve-se durante 5 minutos, a cada 30
segundos, um sinal sonoro para chamar
a atenção. Depois, o sinal sonoro fica
desligado durante 5 minutos. O aviso
sonoro repete-se a cada 5 minutos.
j A indicação de alarme ON / OFF
ca a cada 0,5 segundos no visor LC
21
1
Para parar o alarme, prima o botão
ON / OFF
7
durante 3 segundos. O sinal
sonoro pára e a indicação de alarme
ON / OFF
LED
21
apaga-se. A indicação
4
pisca, durante 5 minutos, a cada
30 segundos. Depois, a indicação LED
fica apagada durante 5 minutos. O sinal
óptico repete-se em intervalos de 5 minutos
até o solo estar suficientemente regado.
j Volte a colocar a tampa do comparti-
mento das pilhas
8
.
7
pis-
.
4
®
43 PT
Page 44

Utilização / Eliminação de avarias
Q
Substituir a unidade de
temperatura
j Retire a tampa do compartimento das
8
pilhas
j Prima o botão C / F
entre Celsius e Fahrenheit.
j Volte a colocar a tampa do comparti-
mento das pilhas
Q
Colocar / substituir
as pilhas
Nota: caso a pilha esteja muito fraca, tal é
indicado no visor LC
fig. D).
j Retire o medidor de humidade do solo.
j Retire a tampa do compartimento das
pilhas
j Se necessário, retire a pilha usada.
j Introduza uma nova pilha do tipo
CR2450 (3 V
das pilhas
Nota: tenha em atenção a polaridade
correcta. Esta é indicada no compartimento das pilhas.
j Volte a colocar a tampa do comparti-
mento de pilhas
.
10
para alternar
8
.
1
(pilha fraca 20, ver
8
.
, lítio) no compartimento
9
.
8
.
Q
Eliminação de avarias
= Avaria
= Causa
= Solução
44 PT
®
Page 45

Eliminação de avarias
= Após a rega do solo, o sensor
do solo
humidade do solo.
= A indicação da humidade do solo é
actualizada a cada minuto.
= Espere um minuto e consulte, em seguida,
o valor actualizado. Caso o medidor
de humidade esteja inserido no solo a
um profundidade razoável, espere um
pouco mais para que a água se infiltre
no solo até ao sensor do solo
= O valor de humidade do solo é
menor do que o esperado.
= As características do solo podem
influenciar o resultado da medição.
= Não insira o medidor de humidade em
solos muito pesados ou granulosos
(por ex. argila ou areia).
= Existem cavidades no solo.
= Retire o medidor de humidade e colo-
que-o num outro ponto.
= O sensor do solo 5 não está suficien-
temente inserido no solo.
= Insira o medidor de humidade mais um
pouco no solo (no vaso: 2 / 3 da pro-
fundidade do vaso), no máximo até ao
limite de inserção
= As hastes metálicas do sensor do solo 5
estão sujas.
= Limpe as hastes metálicas com cuidado.
5
não indica subida da
5
2
.
.
®
45 PT
Page 46

Q
Limpeza e conservação
j Limpe o produto com um pano seco e
que não desfie. Utilize, se necessário, um
pincel.
j Em caso de maior sujidade, utilize um
pano húmido e, se necessário, um produto
de limpeza suave.
j Não utilize de forma alguma produtos de
limpeza abrasivos ou corrosivos. Caso
contrário, poderá danificar o produto.
Q
Eliminação
A embalagem é feita de materiais
não poluentes que podem ser
eliminados nos contentores de
reciclagem locais.
As possibilidades de reciclagem dos artigos
utilizados poderão ser averiguadas no seu
Município ou Câmara Municipal.
No interesse da protecção do am-
biente, não deite fora este produto
juntamente com o lixo doméstico;
entregue-o num ponto de recolha
adequado. Pode informar-se no seu
município sobre os locais de recolha
adequados e o seu período de
funcionamento.
As pilhas avariadas ou gastas têm de ser recicladas de acordo com a directiva
2006 / 66 / EC. Entregue as pilhas e/ou o
46 PT
®
Page 47

Eliminação
aparelho nos locais específicos destinados à
sua recolha.
Danos ambientais devido
à eliminação incorrecta
Pb
das pilhas!
As pilhas não podem ser eliminadas no lixo
doméstico. Podem conter metais pesados tóxicos e são consideradas resíduos perigosos. Os
símbolos químicos dos metais pesados são
os seguintes: Cd = cádmio, Hg = mercúrio,
Pb = chumbo. Como tal, deposite as pilhas
utilizadas num ponto de recolha adequado
do seu município.
EMC
Designação do produto:
Sensor de humidade
Modelo nr.°: H14335
Versão: 11 / 2010
®
47 PT
Page 48

Table of Contents
Introduction
Proper Use .................................... Page 49
Description of parts
and features ................................. Page 50
Technical data ..............................Page 51
Scope of delivery ........................ Page 51
Safety .......................................... Page 51
General Safety
Information ................................... Page 52
Safety Instructions
for Batteries .................................. Page 53
Operation ................................ Page 54
Setting up the
humidity sensor ............................ Page 56
Switching the alarm
function o n / off ............................ Page 56
Changing the units of
temperature .................................. Page 57
Inserting / replacing
the battery .................................... Page 58
Troubleshooting ................. Page 58
Cleaning and care ............ Page 59
Disposal ..................................... Page 60
48 GB/MT
®
Page 49

Introduction
Humidity Sensor
Q
Introduction
Familiarise yourself with the product
before using it for the first time. In
addition please refer carefully to
the operating instructions below and the safety
advice. Use the product only as described and
for the indicated purpose. Keep these instructions in a safe place. If you pass the product
on to anyone else, please ensure that you also
pass on all the documentation.
Q
Proper Use
The humidity sensor is used to monitor the soil
and air conditions in plant pots and beds. It
measures soil and air temperature as well as
soil moisture content. The humidity sensor has
an alarm to indicate that the soil is too dry.
The device is suitable for indoor and outdoor
use. Any other use or modification of the
device constitute improper use and may result
in injury and / or damage to the device. The
manufacturer is not liable for damage caused
by improper use. The device is not intended
for commercial use.
®
49 GB/MT
Page 50

Introduction
Q
Description of parts
and features
Humidity Sensor:
1
LC display
2
Insertion limit
3
Protective cover
4
LED indicator
5
Soil sensor (moisture)
6
Air sensor (temperature)
7
Alarm ON / OFF button
8
Battery compartment cover
9
Battery compartment
10
C / F mode button
11
Soil sensor (temperature)
Soil moisture content display (Fig. A):
12
Wet
13
Moist
14
Slightly dry
15
Dry
Soil temperature display (Fig. B):
16
Temperature display
17
Soil mode indicator
Air temperature display (Fig. C):
18
Temperature display
19
Air mode indicator
Battery indicator / alarm (Fig. D):
20
Weak battery indicator
21
Alarm ON / OFF indicator
50 GB/MT
®
Page 51

Q
Technical data
Introduction / Safety
Battery: Battery type CR2450
(3 V
, lithium)
Voltage: 3 V
Measuring ranges:
Soil temperature: 0–50 °C (+32–+122 °F)
Air temperature: 0–50 °C (+32–+122 °F)
Soil moisture
content: 4 levels (see Fig. A)
Measured value update cycles:
Soil temperature: 1 x per minute
Soil moisture
content: 1 x per minute
Air temperature: 1 x per minute
The product is protected against splashing water.
Q
Scope of delivery
1 Humidity Sensor
1 Battery type CR2450 (3 V
, lithium)
1 Protective sleeve
1 Operating instructions
Safety
KEEP ALL ThE SAFETY ADVICE AND INSTRUCTIONS IN A SAFE PLACE FOR FUTURE
REFERENCE!
®
51 GB/MT
Page 52

Safety
General Safety
Information
J
WARNING!
DANGER
TO LIFE AND ACCIDENT
HAZARD FOR TODDLERS
AND
SMALL CHILDREN! Never allow
children
to play unsupervised with the
packaging material. There is a danger of
suffocation from the packaging material.
Children frequently underestimate the dangers. Children should be kept away from
the product at all times. This is not a toy.
WARNING!
DANGER TO LIFE! Bat-
teries can be swallowed, which may rep-
resent a danger to life. If a battery has
been swallowed, medical help is required
immediately.
J Do not use the device if it is damaged.
Damaged devices represent a danger of
death!
J Do not expose the device to
– extreme temperatures,
– strong vibrations,
– high mechanical loads.
Failure to observe this advice may result
in damage to the device.
J Please note that the guarantee does not
cover damage caused by incorrect handling, non-compliance with the operating
instructions or interference with the device
by unauthorised individuals.
J Under no circumstances should you take
the device apart. Improper repairs may
place the user in considerable danger.
52 GB/MT
®
Page 53

Safety
Repairs should only be carried out by
specialist personnel.
J Children or persons who lack the know-
ledge or experience to use the device or
whose physical, sensory or intellectual
capacities are limited must never be allowed
to use the device without supervision or
instruction by a person responsible for their
safety. Children must never be allowed to
play with the device.
Safety Instructions
for Batteries
J Remove the battery from the device if it is
not going to be used for a prolonged
period.
J
J When inserting the battery, ensure the
J If necessary, clean the battery and device
J Remove a spent battery immediately from
J If the above instructions are not complied
CAUTION! DANGER OF
EXPLOSION! The batteries
must never be recharged!
correct polarity! This is shown in the battery
compartment.
contacts before inserting the battery.
the device. There is an increased danger
of leaks!
with, the battery may discharge itself beyond its end voltage. There is then a danger
of leaking. If the battery has leaked inside
your device, you should remove it immediately in order to prevent damage to the
device!
®
53 GB/MT
Page 54

Safety / Operation
J Batteries must not be disposed of in the
normal domestic waste!
J Every consumer is legally obliged to dis-
pose of batteries in the proper manner!
J Keep batteries away from children; do not
throw them in the fire, short-circuit them or
take them apart.
J Avoid contact with the skin, eyes and
mucous membranes. Any parts of the body
coming into contact with battery acid
should be rinsed off with copious amounts
of water and / or a doctor contacted if
necessary!
J Do not short-circuit the battery contacts.
J
batteries of the type indicated above
J
is essential to wear appropriate protective
CAUTION! RISK OF EX-
PLOSION! Always use singleuse, non-rechargeable lithium
(CR2450, 3 V
).
Leaking or damaged batteries
may cause burns to the skin
when touched; in such cases it
gloves.
Q
Operation
Note: The product is supplied with batteries
already inserted. Remove the plastic insulation
strip from the battery compartment
9
before
first use.
j Slide open the battery compartment
8
cover
in the direction of the arrow.
Remove the insulation and reclose the
battery compartment cover
54 GB/MT
8
.
®
Page 55

Operation
Note: The LC display 1 of the humidity
sensor changes automatically between
the soil moisture content (Fig. A), soil
temperature (Fig. B) and air temperature
displays (Fig. C).
Note: The soil moisture content display
is influenced by the composition of the
soil and the organic material content and
can therefore fluctuate. The display should
therefore only be considered as a general
indicator and not as a source of precise
information.
Note: If the soil is very coarse or porous,
then the soil moisture content may not be
displayed correctly as the soil sensor
may be in contact with air in certain circumstances. In this case, the displayed value
is less than the anticipated soil moisture
content.
Note: The soil moisture content display
is updated every minute. Therefore you
should wait for one minute after watering
and then read the updated value. Insert
the humidity sensor deeply into the soil
and wait 10 minutes to allow the water
to percolate through the soil and reach
the soil sensor
5
.
Note: The temperature measurement
range of the humidity sensor is 0-50 °C.
Outside this range, the soil sensor (temper-
11
ature)
may not always work properly.
5
®
55 GB/MT
Page 56
Operation
Q
Setting up the
humidity sensor
j Remove the protective cover 3 from the
soil sensor
j Insert the humidity sensor (soil sensor
end first) into the soil near the plant. Be
careful that the soil sensor
aged while doing this. Try to keep the
humidity sensor as vertical as possible while
inserting it into the soil.
j When using the humidity sensor in a plant
pot, position the device midway between
the pot edge and the plant. In the case of
containers with a diameter exceeding
30.5 cm, position the device approx 2 / 3
of the way from the pot edge.
j Press the humidity sensor into the soil until
it reaches the roots of the plant / seedlings
or 2 / 3 of the pot depth. Do not insert the
humidity sensor any deeper into the soil
than the insertion limit
Note: Clean any adhering soil from the
metal rods of the soil sensor
inserting them into another patch of soil,
otherwise the readings may not be correct.
5
.
5
5
is not dam-
2
.
5
before
Q
Switching the alarm
function on / off
Note: The alarm is triggered if the soil moisture
content is too low (Soil moisture content display
15
DRY
) and sounds 1 x per minute.
j Take the moisture sensor out of the soil.
j Remove the battery compartment cover
56 GB/MT
8
.
®
Page 57

Operation
j Press the alarm ON / OFF button 7 in
1
.
9
for about 3
21
appears
21
21
4
is no longer
flashes
is no
8
1
the battery compartment
seconds to switch the alarm on or off.
j The alarm ON / OFF indicator
in the LC display
j Switching on the alarm: The LED indicator
4
flashes and an audible signal sounds.
j When the alarm is triggered, the LED indi-
4
cator
flashes twice. Then an acoustic
alarm signal sounds every 30 seconds
over a period of 5 minutes to remind you.
Then the acoustic alarm signal remains
silent for 5 minutes. The acoustic reminder
then repeats at 5-minute intervals.
j The alarm ON / OFF indicator
at 0.5-second intervals in the LC display
Press and keep pressed the alarm ON /
OFF button
7
for 3 seconds to stop the
alarm. The acoustic alarm signal stops and
the alarm ON / OFF indicator
longer illuminated. The LED indicator 4
flashes every 30 seconds for 5 minutes.
Then the LED indicator
illuminated for 5 minutes. The visual remainder repeats at 5-minute intervals until the
soil has been adequately watered.
j Place the battery compartment cover
back into position.
.
Q
Changing the units of
temperature
j Remove the battery compartment cover 8.
j Press the C / F mode button
change between Celsius and Fahrenheit.
®
10
to
57 GB/MT
Page 58

Operation / Troubleshooting
j Place the battery compartment cover 8
back into position.
Q
Inserting / replacing the
battery
Note: The LC-Display 1 indicates if the bat-
tery is too weak (Weak battery indicator
see Fig. D).
j Take the humidity sensor out of the soil.
j Remove the battery compartment cover
j Remove the used battery, if present.
j Insert a new battery, type CR2450 (3 V
lithium) into the battery compartment
Note: Make sure you fit the battery the
right way round (polarity). The correct
polarity is shown inside the battery compartment.
j Place the battery compartment cover
back into position.
Q
Troubleshooting
20
8
9
8
,
.
,
.
= Fault
= Reason
= Solution
= The soil sensor 5 does not
show an increase in moisture
content after the soil has been
watered.
= The soil moisture content display is
updated every minute.
= Wait one minute and then read the
58 GB/MT
®
Page 59

... / Cleaning and care
updated value. Insert the humidity sensor
deeply into the soil and wait a little time
to allow the water to percolate through
the soil and reach the soil sensor
= The moisture content of the soil
is less than anticipated.
= The composition of the soil can detrimen-
tally affect the readings.
= Do not insert the humidity sensor into very
heavy or coarse soils (e.g. loam or sand).
= There may be voids in the soil.
= Remove the humidity sensor and reinsert
it in another location.
= The soil sensor 5 is not inserted deeply
enough into the soil.
= Insert the humidity sensor further into the
soil (in a plant pot: 2 / 3 of the pot depth),
maximum up to the insertion limit
= The metal rods of the soil sensor 5 are
dirty.
= Clean the metal rods carefully.
Q
Cleaning and care
5
.
2
.
j Clean the product with a dry, fluff-free cloth.
If necessary, use a narrow brush as well.
j Use a moist cloth and if necessary a mild
detergent to remove stubborn dirt.
j Do not use corrosive or abrasive cleaning
agents. Otherwise damage to the product
may occur.
®
59 GB/MT
Page 60

Disposal
Q
Disposal
The packaging is made entirely of
recyclable materials, which you may
dispose of at local recycling facilities.
Contact your local refuse disposal authority for
more details of how to dispose of your worn-out
product.
To help protect the environment,
please dispose of the product
properly when it has reached the
end of its useful life and not in the
household waste. Information on
collection points and their opening
hours can be obtained from your
local authority.
Faulty or used batteries must be recycled in
accordance with Directive 2006 / 66 / EC.
Please return the batteries and / or the device
to the available collection points.
Environmental damage
through incorrect disposal of
Pb
the batteries!
Batteries may not be disposed of with the
usual domestic waste. They may contain toxic
heavy metals and are subject to hazardous
waste treatment rules and regulations. The
chemical symbols for heavy metals are as
follows: Cd = cadmium, Hg = mercury,
Pb = lead. That is why you should dispose of
used batteries at a local collection point.
60 GB/MT
®
Page 61

EMC
Product description:
Humidity Sensor
Model No.: H14335
Version: 11 / 2010
®
61 GB/MT
Page 62

Inhaltsverzeichnis
Einleitung
Bestimmungsgemäße
Verwendung ................................. Seite 63
Teilebeschreibung ........................ Seite 64
Technische Daten .........................Seite 65
Lieferumfang ................................ Seite 65
Sicherheit ................................. Seite 65
Allgemeine
Sicherheitshinweise......................Seite 66
Sicherheitshinweise
zu Batterien .................................. Seite 67
Bedienung ............................... Seite 68
Feuchtigkeitssensor aufstellen ..... Seite 70
Alarmfunktion ein - / ausschalten ... Seite 71
Temperatur-Einheit wechseln ...... Seite 72
Batte rie einsetzen /
auswechseln ................................. Seite 72
Fehlerbehebung ................. Seite 73
Reinigung und Pflege .... Seit e 74
Entsorgung.............................. Seit e 74
62 DE/AT/CH
®
Page 63

Einleitung
Feuchtigkeitssensor
Q
Einleitung
Machen Sie sich vor der ersten
Inbetriebnahme mit dem Gerät ver-
traut. Lesen Sie hierzu aufmerksam
die nachfolgende Bedienungsanleitung und die
Sicherheitshinweise. Benutzen Sie das Gerät
nur wie beschrieben und für die angegebenen
Einsatzbereiche. Bewahren Sie diese Anleitung
gut auf. Händigen Sie alle Unterlagen bei Weitergabe des Gerätes an Dritte ebenfalls mit aus.
Q
Bestimmungsgemäße
Verwendung
Der Feuchtigkeitssensor dient der Überwachung
der Boden- und Luftverhältnisse in Beeten und
Blumentöpfen. Er misst die Boden- und Lufttemperatur sowie die Boden-Feuchtigkeit. Der
Feuchtigkeitsmesser verfügt über eine Alarmfunktion bei zu trockenem Boden. Das Gerät
ist geeignet zur Verwendung im Innen- und
Außenbereich. Andere Verwendungen oder
Veränderungen des Gerätes gelten als nicht
bestimmungsgemäß und können Verletzungsgefahren und / oder Beschädigungen des
Gerätes nach sich ziehen. Für aus bestimmungswidriger Verwendung entstandene Schäden
übernimmt der Hersteller keine Haftung. Das
Gerät ist nicht für den gewerblichen Einsatz
bestimmt.
®
63 DE/AT/CH
Page 64

Einleitung
Q
Teilebeschreibung
Feuchtigkeitssensor:
1
LC-Display
2
Einsteck-Grenze
3
Schutzhülle
4
LED-Anzeige
5
Boden-Sensor (Feuchtigkeit)
6
Luft-Sensor (Temperatur)
7
Alarm-ON- / OFF-Taste
8
Batteriefach-Abdeckung
9
Batteriefach
10
C / F-Taste
11
Boden-Sensor (Temperatur)
Anzeige Boden-Feuchtigkeit (Abb. A):
12
nass
13
feucht
14
leicht trocken
15
trocken
Anzeige- Boden-Temperatur (Abb. B):
16
Temperatur-Anzeige
17
Anzeige Boden-Modus
Anzeige Luft-Temperatur (Abb. C):
18
Temperatur-Anzeige
19
Anzeige Luft-Modus
Anzeige Batterie / Alarm (Abb. D):
20
Anzeige schwache Batterie
21
Anzeige Alarm ON / OFF
64 DE/AT/CH
®
Page 65
Einleitung / Sicherheit
Q
Technische Daten
Batterie: Batterie CR2450
(3 V
, Lithium)
Spannung: 3 V
Messbereiche:
Boden-Temperatur: 0–50°C (+32–+122F)
Luft-Temperatur: 0–50°C (+32–+122F)
Boden-Feuchtigkeit: 4 Level (siehe Abb. A)
Aktualisierung der Messwerte:
Boden-Temperatur: 1 x pro Minute
Boden-Feuchtigkeit: 1 x pro Minute
Luft-Temperatur: 1 x pro Minute
Das Produkt ist spritzwassergeschützt.
Q
Lieferumfang
1 Feuchtigkeitssensor
1 Batterie CR2450 (3 V
1 Schutzhülle
1 Bedienungsanleitung
, Lithium)
Sicherheit
BEWAhREN SIE ALLE SIChERhEITShINWEISE UND ANWEISUNGEN FÜR DIE
ZUKUNFT AUF!
®
65 DE/AT/CH
Page 66

Sicherheit
Allgemeine
Sicherheitshinweise
J
DER!
WARNUNG!
UND
UNFALLGEFAHR FÜR
KLEINKINDER
LEBENS-
UND KIN-
Lassen Sie Kinder niemals unbeaufsichtigt mit dem Verpackungsmaterial. Es
besteht Erstickungsgefahr durch Verpackungsmaterial. Kinder unterschätzen
häufig die Gefahren. Halten Sie Kinder
stets vom Produkt fern. Das Produkt ist
kein Spielzeug.
WARNUNG!
LEBENSGEFAHR!
Batterien können verschluckt werden, was
lebensgefährlich sein kann. Ist eine Batterie
verschluckt worden, muss sofort medizinische Hilfe in Anspruch genommen
werden.
J Nehmen Sie das Gerät nicht in Betrieb,
wenn es beschädigt ist. Beschädigte
Geräte bedeuten Lebensgefahr durch
elektrischen Schlag!
J Setzen Sie das Gerät keinen
– extremen Temperaturen,
– starken Vibrationen,
– starken mechanischen Beanspruchungen
aus.
Andernfalls droht eine Beschädigung des
Gerätes.
J Beachten Sie, dass Beschädigungen durch
unsachgemäße Handhabung, Nichtbeachtung der Bedienungsanleitung oder
Eingriff durch nicht autorisierte Personen
von der Garantie ausgeschlossen sind.
66 DE/AT/CH
®
Page 67

Sicherheit
J Nehmen Sie das Gerät keinesfalls ausei-
nander. Durch unsachgemäße Reparaturen
können erhebliche Gefahren für den
Benutzer entstehen. Lassen Sie Reparaturen
nur von Fachkräften durchführen.
J Kinder oder Personen, denen es an Wissen
oder Erfahrung im Umgang mit dem Gerät
mangelt oder die in ihren körperlichen,
sensorischen oder geistigen Fähigkeiten
eingeschränkt sind, dürfen das Gerät
nicht ohne Aufsicht oder Anleitung durch
eine für ihre Sicherheit verantwortliche
Person benutzen.
Sicherheitshinweise
zu Batterien
J Entfernen Sie die Batterie, wenn sie längere
Zeit nicht verwendet worden ist, aus dem
Gerät.
J
J Achten Sie beim Einlegen auf die richtige
J Reinigen Sie Batterie- und Gerätekontakt
J Entfernen Sie eine erschöpfte Batterie um-
J Bei Nichtbeachtung der vorher genannten
VORSICHT! EXPLOSIONS-
GEFAHR! Laden Sie Batterien
niemals wieder auf!
Polarität! Diese wird im Batteriefach angezeigt.
vor dem Einlegen falls erforderlich.
gehend aus dem Gerät. Es besteht erhöhte
Auslaufgefahr!
Hinweise kann die Batterie über ihre Endspannung hinaus entladen werden. Es
besteht dann die Gefahr des Auslaufens.
®
67 DE/AT/CH
Page 68

Sicherheit / Bedienung
Falls die Batterie in Ihrem Gerät ausgelaufen sein sollte, entnehmen Sie diese
sofort, um Schäden am Gerät vorzubeugen!
J Batterien gehören nicht in den Hausmüll!
J Jeder Verbraucher ist gesetzlich verpflichtet,
Batterien ordnungsgemäß zu entsorgen!
J Halten Sie Batterien von Kindern fern,
werfen Sie sie nicht ins Feuer, schließen
Sie sie nicht kurz und nehmen Sie sie
nicht auseinander.
J Vermeiden Sie den Kontakt mit Haut, Augen
und Schleimhäuten. Bei Kontakt mit Batteriesäure spülen Sie die betroffene Stelle mit
reichlich Wasser ab und / oder suchen
Sie einen Arzt auf!
J Schließen Sie die Batteriekontakte nicht
kurz.
J
ladbare Lithium Batterien des vorgege-
J
ursachen. Tragen Sie deshalb in diesem
VORSICHT! EXPLOSIONS-
GEFAHR! Verwenden Sie
ausschließlich nicht-wiederauf-
benen Typs (CR2450, 3 V
).
Ausgelaufene oder beschädigte
Batterien können bei Berührung
mit der Haut Verätzungen ver-
Fall unbedingt geeignete Schutzhandschuhe.
Q
Bedienung
Hinweis: Das Produkt wird mit eingelegter
Batterie ausgeliefert. Entfernen Sie vor dem
ersten Gebrauch die Plastik-Isolation aus dem
Batteriefach
68 DE/AT/CH
9
.
®
Page 69

Bedienung
j Öffnen Sie die Batteriefach-Abdeckung 8,
indem Sie sie in Pfeilrichtung aufschieben.
Entfernen Sie die Isolierung und schließen
Sie die Batteriefach-Abdeckung
Hinweis: Das LC-Display
keitssensors wechselt automatisch zwischen
Anzeige Boden-Feuchtigkeit (Abb. A),
Anzeige- Boden-Temperatur (Abb. B) und
Anzeige Luft-Temperatur (Abb. C).
Hinweis: Die Anzeige der Boden-
Feuchtigkeit wird von der Beschaffenheit
des Bodens und dem Dünger-Gehalt beeinflusst und kann deshalb schwanken. Die
Anzeige dient deshalb nur dem generellen
Überblick und liefert keine genauen Daten.
Hinweis: Ist der Boden sehr grob oder
porös kann die Boden-Feuchtigkeit nicht
korrekt angezeigt werden, da der Boden-
5
Sensor
unter Umständen mit Luft in
Berührung kommt. In diesem Fall wird
eine geringere Feuchtigkeit als erwartet
angezeigt.
Hinweis: Die Anzeige der Bodenfeuch-
tigkeit aktualisiert sich jede Minute. Warten
Sie deshalb nach dem Gießen eine Minute
und lesen Sie dann den aktualisierten
Wert ab. Steckt der Feuchtigkeitsmesser
tief im Boden, warten Sie 10 Minuten
länger, damit das Wasser durch den Boden
bis zum Boden-Sensor
Hinweis: Der Temperatur-Messbereich
des Feuchtigkeitssensor reicht von 0-50 °C.
Außerhalb dieses Bereichs arbeitet der
Boden-Sensor (Temperatur)
Umständen nicht korrekt.
8
1
des Feuchtig-
5
sickern kann.
11
unter
wieder.
®
69 DE/AT/CH
Page 70

Bedienung
Q
Feuchtigkeitssensor
aufstellen
j Entfernen Sie die Schutzhülle 3 vom
Boden-Sensor
j Stecken Sie den Feuchtigkeitssensor nahe
der Pflanze mit dem Boden-Sensor
voran in das Erdreich. Seien Sie dabei
vorsichtig, damit Sie den Boden-Sensor
nicht beschädigen. Versuchen Sie den
Feuchtigkeitssensor so aufrecht wie möglich
in das Erdreich zu stecken.
j Wenn Sie den Feuchtigkeitssensor in
einem Blumentopf verwenden, positionieren
Sie ihn in der Mitte zwischen Topfrand
und Pflanze. Für Gefäße über 30,5 cm
Durchmesser, lassen Sie ca 2 / 3 zum
Topfrand hin frei.
j Drücken Sie den Feuchtigkeitssensor in das
Erdreich, bis er die Wurzeln der Pflanze /
das Saatbeet oder 2 / 3 der Topftiefe
erreicht. Der Feuchtigkeitssensor darf
maximal bis zur Einsteck-Grenze
das Erdreich gesteckt werden.
Hinweis: Wenn Sie den Feuchtigkeits-
sensor in einem anderen Boden einsetzen,
reinigen Sie vorher die Metallstäbe des
Boden-Sensors
nicht zu verfälschen.
5
.
5
, um das Messergebnis
5
5
2
in
70 DE/AT/CH
®
Page 71
Bedienung
Q
Alarmfunktion
ein- / ausschalten
Hinweis: Der Alarmton zeigt an, wenn die
Bodenfeuchtigkeit zu niedrig ist (Anzeige trocken (DRY)
j Nehmen Sie den Feuchtigkeitssensor aus
j Entfernen Sie die Batteriefach-Abdeck-
j Drücken Sie die Alarm-ON- / OFF-Taste
j Den Alarm einschalten: Die LED-Anzeige
j Wird der Alarm ausgelöst, blinkt die LED-
j Die Anzeige Alarm ON / OFF
Um den Alarm zu stoppen, drücken und
15
) und ertönt dann 1 x pro Minute.
dem Boden.
8
ung
.
7
im Batteriefach 9 für ca. 3 Sekunden, um den Alarm ein- oder auszuschalten. Im LC-Display
zeige Alarm ON / OFF
4
blinkt und es ertönt ein Signalton.
Anzeige
4
1
erscheint die An-
21
.
zwei Mal. Anschließend
ertönt 5 Minuten lang alle 30 Sekunden
ein Signalton zur Erinnerung. Danach
verstummt der Signalton für 5 Minuten.
Die akustische Erinnerung wiederholt sich
in 5-Minuten-Intervallen.
21
blinkt
im 0,5-Sekunden-Intervall im LC-Display
halten Sie die Alarm-ON- / OFF-Taste
1
7
für 3 Sekunden gedrückt. Der Signalton
stoppt und die Anzeige Alarm ON / OFF
21
erlischt. Die LED-Anzeige 4 blinkt 5
Minuten lang alle 30 Sekunden. Danach
erlischt die LED-Anzeige
4
für 5 Minuten.
Die optische Erinnerung wiederholt sich
in 5-Minuten-Intervallen, bis der Boden
ausreichend bewässert wird.
.
®
71 DE/AT/CH
Page 72

Bedienung
j Setzen Sie die Batteriefach-Abdeckung 8
wieder ein.
Q
Temperatur-Einheit
wechseln
j Entfernen Sie die Batteriefach-Abdeck-
8
ung
.
j Drücken Sie die C / F-Taste
schen Celsius und Fahrenheit zu wechseln.
j Setzen Sie die Batteriefach-Abdeckung
wieder ein.
Q
Batterie einsetzen /
auswechseln
Hinweis: Ist die Batterie zu schwach, wird
dies im LC-Display
20
Batterie
j Nehmen Sie den Feuchtigkeitsmesser aus
dem Boden.
j Entfernen Sie die Batteriefach-Abdeck-
8
ung
j Entfernen Sie gegebenenfalls die ver-
brauchte Batterie.
j Legen Sie eine neue Batterie des Typs
CR2450 (3 V
9
fach
Hinweis: Achten Sie dabei auf die rich-
tige Polarität. Diese wird im Batteriefach
angezeigt.
j Setzen Sie die Batteriefach-Abdeckung
wieder ein.
1
angezeigt (schwache
, siehe Abb. D).
.
, Lithium) in das Batterie-
ein.
10
, um zwi-
8
8
72 DE/AT/CH
®
Page 73
Fehlerbehebung
Q
Fehlerbehebung
= Fehler
= Grund
= Lösung
= Der Boden-Sensor 5 zeigt
nach dem Wässern des Bodens
keinen Anstieg der Erd-Feuchtigkeit an.
= Die Anzeige der Bodenfeuchtigkeit
aktualisiert sich jede Minute.
= Warten Sie eine Minute und lesen Sie
dann den aktualisierten Wert ab. Steckt
der Feuchtigkeitsmesser tief im Boden,
warten Sie etwas länger, damit das
Wasser durch den Boden bis zum Boden-
5
Sensor
=
Der Feuchtigkeitswert des Bodens
ist geringer als zu erwarten.
= Die Bodenbeschaffenheit kann das
Messergebnis beeinträchtigen.
= Setzen Sie den Feuchtigkeitsmesser
nicht in sehr schweren oder groben
Böden ein (z.B. Lehm oder Sand).
= Es befinden sich Hohlräume im Boden.
= Entfernen Sie den Feuchtigkeitsmesser
und setzten Sie ihn an einer anderen Stelle
ein.
= Der Boden-Sensor 5 steckt nicht tief
genug im Boden.
= Stecken Sie den Feuchtigkeitsmesser
weiter in den Boden (im Blumetopf:
2 / 3 der Topftiefe), maximal bis zur
Einsteck-Grenze
sickern kann.
2
.
®
73 DE/AT/CH
Page 74

... / Reinigung und... / Entsorgung
= Die Metallstäbe des Boden-Sensors 5
sind verdreckt.
= Reinigen Sie die Metall-Stäbe vorsichtig.
Q
Reinigung und Pflege
j Reinigen Sie das Produkt mit einem
trockenen, fusselfreien Tuch. Nehmen Sie
gegebenenfalls einen Pinsel zur Hilfe.
j Verwenden Sie bei stärkeren Verschmut-
zungen ein feuchtes Tuch und ggf. ein
mildes Reinigungsmittel.
j Verwenden Sie keinesfalls ätzende oder
scheuernde Reinigungsmittel. Andernfalls
kann es zu Beschädigungen des Produkts
kommen.
Q
Entsorgung
Die Verpackung besteht aus umwelt-
freundlichen Materialien, die Sie
über die örtlichen Recyclingstellen
entsorgen können.
Möglichkeiten zur Entsorgung des ausgedienten
Produkts erfahren Sie bei Ihrer Gemeinde
oder Stadtverwaltung.
Werfen Sie Ihr Produkt, wenn es
aus gedient hat, im Interesse des
Umweltschutzes nicht in den Hausmüll, sondern führen Sie es einer
fachgerechten Entsorgung zu.
Über Sammelstellen und deren
74 DE/AT/CH
®
Page 75

Entsorgung
Öffnungszeiten können Sie sich
bei Ihrer zuständigen Verwaltung
informieren.
Defekte oder verbrauchte Batterien müssen
gemäß Richtlinie 2006 / 66 / EC recycelt
werden. Geben Sie Batterien und / oder das
Gerät über die angebotenen Sammeleinrichtungen zurück.
Umweltschäden durch
falsche Entsorgung der
Pb
Batterien!
Batterien dürfen nicht über den Hausmüll
entsorgt werden. Sie können giftige Schwermetalle enthalten und unterliegen der Sondermüllbehandlung. Die chemischen Symbole
der Schwermetalle sind wie folgt:
Cd = Cadmium, Hg = Quecksilber, Pb = Blei.
Geben Sie deshalb verbrauchte Batterien bei
einer kommunalen Sammelstelle ab.
EMC
Produktbezeichnung:
Feuchtigkeitssensor
Modell Nr.: H14335
Version: 11 / 2010
®
75 DE/AT/CH
Page 76

IAN 57250
Milomex Ltd.
c / o Milomex Services
Hilltop Cottage
Barton Road
Pulloxhill
Bedfordshire
MK45 5HP
UK
© by ORFGEN Marketing
Estado de las informaciones
Versione delle informazioni
Estado das informações · Last
Information Update · Stand
der Informationen: 11 / 2010
Ident.-No.: H14335112010-5
5
 Loading...