

Page 1
®
IAN 96711
IAN 96713
GRANIT-SONNENSCHIRMSTÄNDER
GRANITE PARASOL STAND
Assembly and safety advice
GRANITOVÝ STOJAN SLNEČNÍKA
Pokyny pre montáž a bezpečnosť
GRANITOVÝ STOJAN NA SLUNEČNÍK
Pokyny k montáži a bezpečnostní pokyny
GRANIT-SONNENSCHIRMSTÄNDER
Montage- und Sicherheitshinweise
Page 2
Before reading, unfold the page containing the illustrations and familiarise yourself with all functions of the
device.
Před čtením si otevřete stranu s obrázky a potom se seznamte se všemi funkcemi přístroje.
Pred čítaním si odklopte stranu s obrázkami a potom sa oboznámte so všetkými funkciami prístroja.
Klappen Sie vor dem Lesen die Seite mit den Abbildungen aus und machen Sie sich anschließend mit allen
Funktionen des Gerätes vertraut.
GB Assembly and safety advice Page 5
CZ Pokyny k montáži a bezpečnostní pokyny Strana 7
SK Pokyny pre montáž a bezpečnosť Strana 9
DE / AT / CH Montage- und Sicherheitshinweise Seite 11
Page 3
A B
1
C D
1 3
2
4
E F
4
5
6
Page 4
Page 5

Introduction / Safety information / Assembly
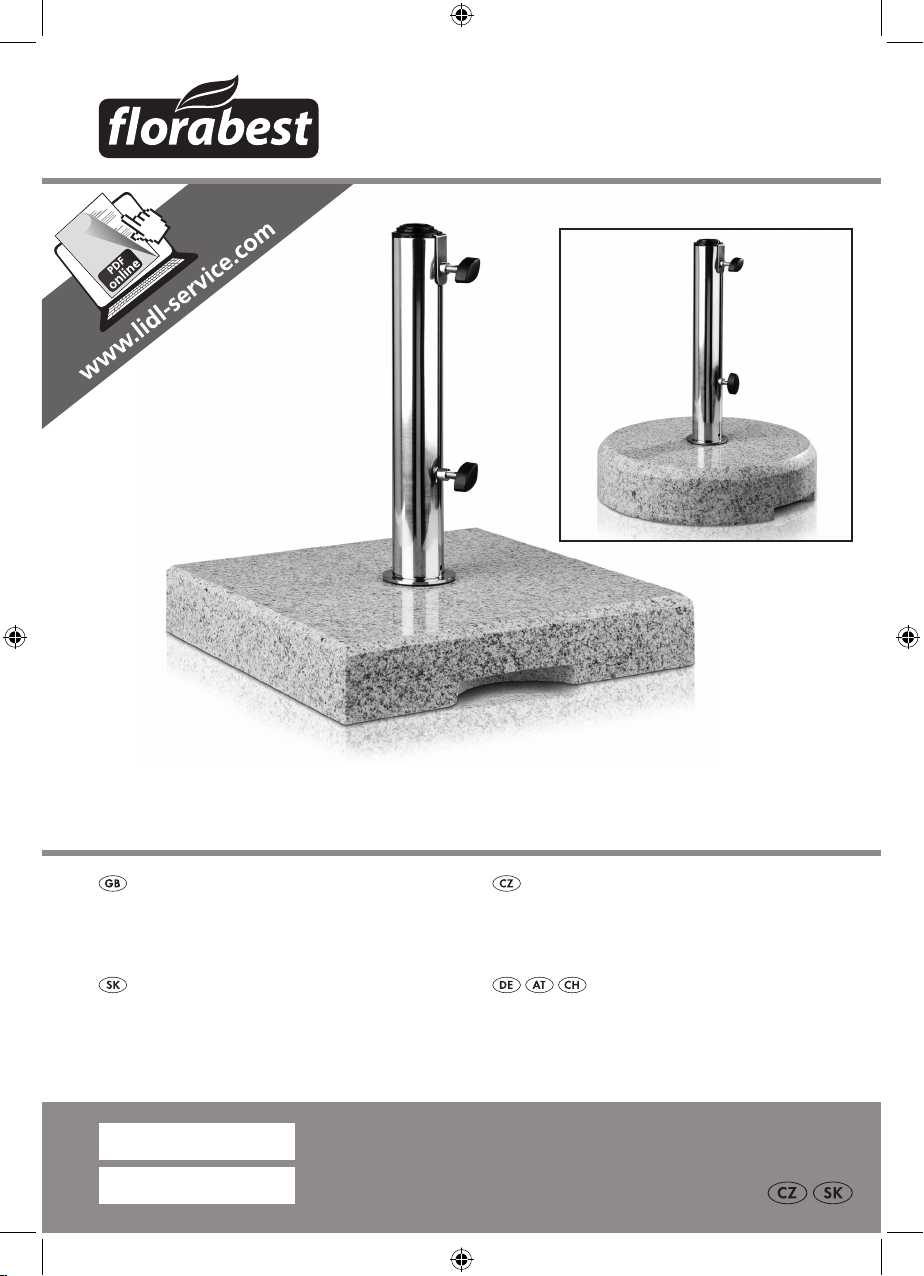
Granite Parasol Stand
Introduction
Congratulations on the purchase of your
new product. You have selected a high
quality product. The assembly and operating instructions are part of this product. Please
read through all of these instructions and take note
of the advice they contain before starting with
assembly. These instructions contain important
assembly and care information. Keep these instructions safe and if you pass on the product to anyone
else please pass on the documentation as well.
Intended use
The umbrella stand is suitable as a stand for patio
umbrellas with a specific pole diameter of 25, 32
and 38 mm, and a maximum size of 2.50 m
wind force mustn‘t exceed approx. 25 km/h. Close
the umbrella in stronger winds. The umbrella stand
is only intended for private use. It is not suitable for
commercial use.
2
. The
Parts description
1
Screw with spring ring, washer and rubber washer
2
Rubber washer
3
Stand tube
4
Clamping plate
5
Inserts
6
Wing bolt
Compatible pole diameters
in mm: 25, 32 + 38
Weight in kg: approx. 25.0
Item no.: TOZ96713
Height in cm: 9
Diameter in cm: 38.0
Compatible pole diameters
in mm: 25, 32 + 38
Weight in kg: approx. 25.0
All specifications are approximate values.
Subject to technical changes without notice.
Safety information
Please note the following safety instructions. The
manufacturer is not liable for damages due to
non-compliance.
The umbrella stand is not a toy. Children‘s
fingers or feet could be pinched.
Never leave the umbrella stand unattended –
the umbrella tipping can result in serious
injuries. Please remember, depending on the
wind force and diameter of the umbrella, this
umbrella stand could also be too light.
Be sure to close your umbrella if wind emerges.
Be sure to follow your country‘s national regu-
lations in addition to the rules specified in these
instructions.
Assembly
Technical Data
Item no.: TOZ96711
Height in cm: 6.5
Width in cm: 38.0
Length in cm: 38.0
You need:
– Size 17 socket key
– 1 Person to assist you
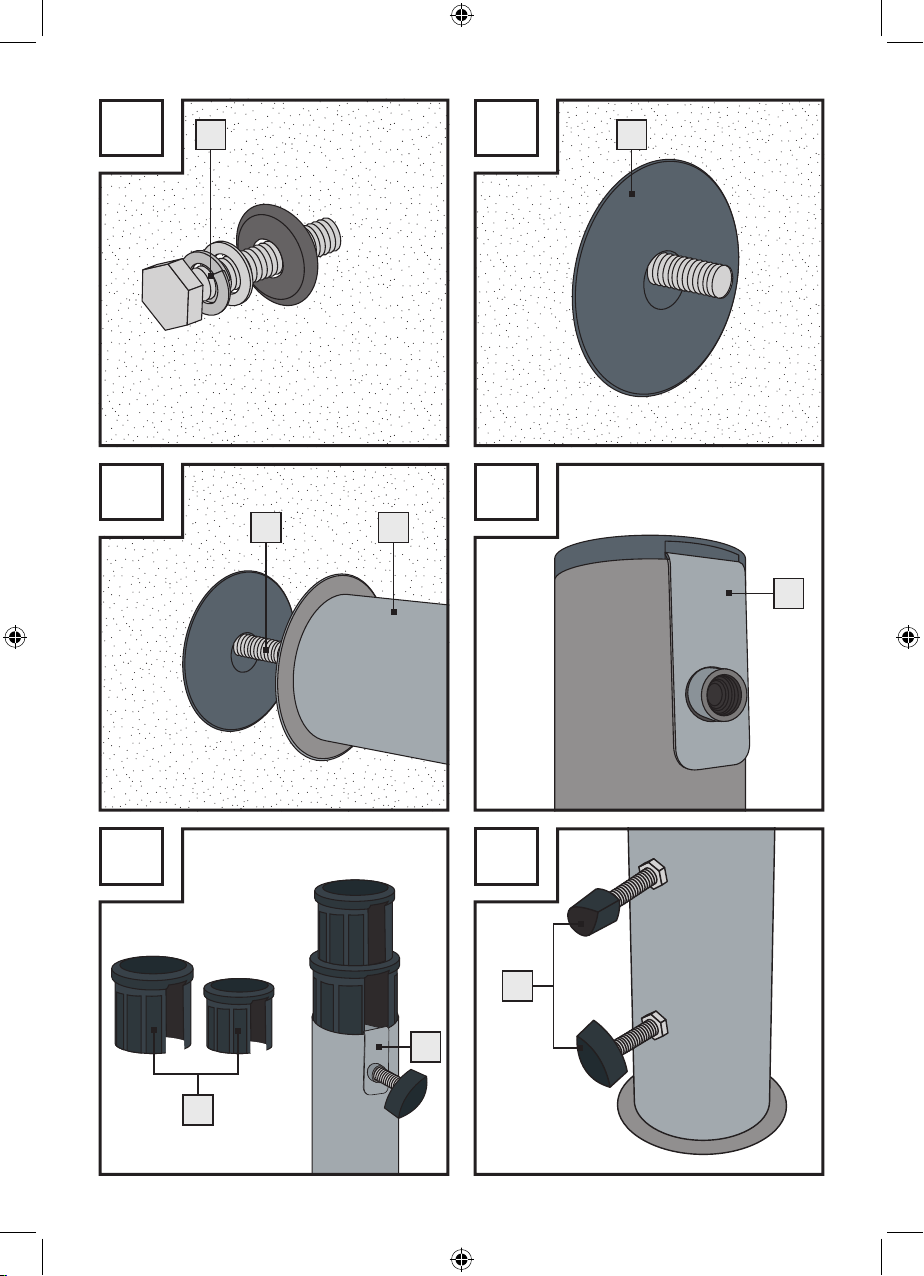
Assembling the base
Place the base upright and have a second
person support it firmly. Injuries may otherwise
occur!
5 GB
Page 6

Assembly / Storage and Care / Service / Disposal
Insert the screw with spring ring, washer and
rubber washer
Use the centre hole. Please note the position
of the washers (see Fig. A)!
Place the large rubber washer 2 over the
screw protruding at the top (see Fig. B).
Secure the screw 1 from below using a socket
key and place the stand tube
1
screw
Align the rubber washer 2 below the stand
3
tube
socket key (see Fig. C).
Note: The clamping plate
to protect the umbrella pole (see Fig. D).
Please do not remove.
1
into the base from below.
3
onto the
from the top, and slightly screw in.
. Tighten the stand tube 3 with the
4
is premounted
Using inserts
Use the inserts 5 to match the size of your
umbrella pole.
Insert the necessary inserts 5 in the stand
3
tube
. The groove of the respective insert is
intended to leave room for the clamping plate
(see Fig. E).
Insert the patio umbrella. Firmly secure the
wing bolts
6
(see Fig. F).
Service
SunRain Handels GmbH
Bahnhofstrasse 63
A-4910 Ried-Austria
gardenservice@gmx.at
IAN 96711
IAN 96713
For all inquiries about your product, please have
your receipt and the article number (e.g. IAN
12345) ready as your proof of purchase.
Granite Parasol Stand
square
Granite Parasol Stand
round
Disposal
The packaging is made of environmentally friendly
materials, which may be disposed of through your
4
local recycling facilities. Please dispose of this
product at the end of it‘s useful life.
Storage and Care
The granite stand is maintenance-free.
If necessary, remove any dirt with warm soapy
water.
Retighten screws as necessary.
Store granite stand in a dry location during
periods of non-use, e.g. over winter.
Stainless steel parts:
Please treat the stainless steel tube with an
automotive chrome care product or stainless
steel care lotion as necessary.
6 GB
Page 7

Úvod / Bezpečnostní pokyny / Montáž
Granitový stojan na slunečník
Úvod
Blahopřejeme vám ke koupi nového
výrobku. Rozhodli jste se pro vysoce
kvalitní výrobek. Návod k montáži a obsluze je součástí tohoto výrobku. Prosíme, přečtěte
si před instalací úplně tento návod a řiďte se následujícími pokyny. Tento návod obsahuje důležité informace k montáži a ošetřování. Návod si pečlivě
uschovejte a případně ho předejte dalšímu uživateli.
Použití ke stanovenému účelu
Podstavec je vhodný pro slunečníky s průměrem
tyčí 25, 32 a 38 mm a maximální plochou 2,50 m
Přitom nesmí být zatížení vyšší než větrem s rychlostí
cca 25 km/h. Při vyšší rychlosti větru se musí slunečník zavřít. Podstavec je určený jen pro privátní
použití. Není určen kprůmyslovému nebo podnikatelskému použití.
Popis dílů
1
Šroub s pérová podložka, podložka
a gumová podložka
2
Gumová podložka
3
Trubka stojanu
4
Upínací plech
5
Vložky
6
Křídlový šroub
Artikl č.: TOZ96713
Výška v cm: 9
Průměr v cm: 38,0
Použitelný průměr tyče
v mm: 25, 32 + 38
Váha v kg: cca 25,0
Všechny údaje jsou v přibližných hodnotách.
Technické změny jsou vyhrazeny.
Bezpečnostní pokyny
Prosíme, dbejte na následující bezpečnostní pokyny. V případě nerespektování neručí výrobce za
vzniklé škody.
2
.
Podstavec není hračka. Děti si mohou uskříp-
nout prsty nebo nohy.
Nenechávejte nikdy stát podstavec bez dozoru
- pád slunečníku může způsobit těžká zranění.
Dbejte na to, že může být tento podstavec, v
závislosti na síle větru a průměru slunečníku, i
nedostatečně těžký.
Při zvedajícím se větru slunečník zavřete.
Dbejte na předpisy ve Vaší zemi, které jsou
platné spolu s předpisy uvedenými v tomto
návodu.
Montáž
Potřebujete:
– nástrčkový klíč, velikost 17
– 1 osobu na pomoc
Technické údaje
Artikl č: TOZ96711
Výška v cm: 6,5
Šířka v cm: 38,0
Délka v cm: 38,0
Použitelný průměr tyče
v mm: 25, 32 + 38
Váha v kg: cca 25,0
Montáž soklu
Sokl postavit svisle, druhá osoba musí sokl
přidržovat. Jinak hrozí nebezpečí zranění!
Šroub s pérová podložka, podložka a gumová
podložka
střední otvor. Dbát na polohu podložek (viz
obr. A)!
Velkou gumovou podložku 2 položit přes
nahoře vyčnívající šroub (viz obr. B).
1
nasadit zdola do soklu. Použít
7 CZ
Page 8

Montáž / Údržba, skladování / Servis / Likvidace
Šroub 1 přidržovat dole nástrčkovým klíčem,
nasadit trubku
zatočit.
Srovnat gumovou podložku 2 pod trubkou 3.
Trubku
(viz obr. C).
Poznámka: Upínací plech
tovaný pro ochranu hlavní trubky slunečníku
(viz obr. D).
Prosíme, nesnímat.
3
zhora na šroub 1 a mírně
3
přišroubovat nástrčkovým klíčem
4
je již předmon-
Použití vložek
Vložky 5 použijte podle průměru hlavní
trubky slunečníku.
Nastrčte vhodnou vložku 5 do trubky 3.
Vybrání příslušné vložky slouží k zasunutí
kolem upínacího plechu
Nasadit slunečník. Křídlové šrouby 6 pevně
utáhnout (viz obr. F).
4
(viz obr. E).
Údržba, skladování
Žulový sokl je bezúdržbový.
Servis
SunRain Handels GmbH
Bahnhofstrasse 63
A-4910 Ried-Austria
gardenservice@gmx.at
IAN 96711
IAN 96713
Pro všechny požadavky si připravte pokladní blok
a číslo výrobku (např. IAN 12345) jako doklad o
nákupu.
Hranatý podstavec pod
slunečník
Kulatý podstavec pod
slunečník
Likvidace
Obal se skládá zekologických materiálů, které
můžete likvidovat prostřednictvím místních sběren
recyklovatelných materiálů. Nepoužitelný výrobek
odstraňujte do zbytkového odpadu.
Případné nečistoty omyjte mýdlovou vodou.
V případě potřeby dotáhněte šrouby.
Žulový sokl skladujte, např. přes zimu, v suchu.
Díly z ušlechtilé oceli:
V případě potřeby ošetřete trubku z ušlechtilé
oceli prostředkem na chrómové díly automobilů
nebo speciálním prostředkem na ušlechtilou
ocel.
8 CZ
Page 9

Úvod / Bezpečnostné upozornenia / Montáž
Granitový stojan slnečníka
Úvod
Blahoželáme Vám ku kúpe Vášho nového výrobku. Rozhodli ste sa tým pre
veľmi kvalitný výrobok. Návod na
montáž a obsluhu je súčasťou tohto výrobku. Pred
montážou si prosím prečítajte celý tento návod a
rešpektujte jeho pokyny. Tento návod obsahuje
dôležité informácie k montáži a údržbe. Návod si
preto dobre uschovajte a odovzdajte ho i prípadnému ďalšiemu majiteľovi.
Používanie v súlade s
určeným účelom
Stojan je vhodný ako stojan pre slnečníky s určitým
priemerom tyče 25, 32 a 38 mm a maximálnou
plochou 2,50 m
zaťaženie vetrom cca. 25 km/h. Pri silnom vetre
musí byť slnečník zatvorený. Stojan pre slnečníky je
vhodný iba pre nasadenie v súkromnej oblasti. Nie
je vhodný pre priemyselné používanie.
2
. Nesmie byť pritom prekročené
Popis častí
1
Skrutka s pružná podložka, podložka
a gumený krúžok
2
Gumený krúžok
3
Rúrový stojan
4
Upínací plech
5
Nasadenia
6
Krídlová skrutka
Použiteľné šírky tyče
v mm: 25, 32 + 38
Hmotnosť v kg: cca. 25,0
Číslo výrobku: TOZ96713
Výška v cm: 9
Priemer v cm: 38,0
Použiteľné šírky tyče
v mm: 25, 32 + 38
Hmotnosť v kg: cca. 25,0
Všetky údaje sú približné hodnoty.
Technické zmeny vyhradené.
Bezpečnostné
upozornenia
Dodržiavajte prosím nasledujúce bezpečnostné
upozornenia. Za škody vzniknuté v dôsledku
nedodržiavania pokynov výrobca neručí.
Stojan pre slnečník nie je hračka. Deti si môžu
pomliaždiť prsty a chodidlá.
Stojan pre slnečník nikdy nenechávajte stáť bez
dozoru – ak stojan spadne, môže spôsobiť
ťažké poranenia. Myslite na to, že závisle od
sily vetra a priemeru slnečníka môže byť i stojan pre slnečník príliš ľahký.
Zabezpečte, aby bol Váš slnečník pri prichá-
dzajúcom vetre zatvorený.
Bezpodmienečne dbajte na národné predpisy
platné vo Vašej krajine, ktoré sú platné dodatočne popri predpisoch uvedených v tomto
návode.
Technické údaje
Číslo výrobku: TOZ96711
Výška v cm: 6,5
Šírka v cm: 38,0
Dĺžka v cm: 38,0
Montáž
Budete potrebovať:
– 17-ku nástrčný kľúč
– 1 nápomocnú osobu
9 SK
Page 10

Montáž / Uskladnenie a údržba / Servis / Likvidácia
Montáž podstavca
Postavte podstavec zvisle a druhá osoba ho
musí pevne podopierať. Inak hrozí nebezpečenstvo poranenia!
Umiestnite skrutka s pružná podložka, podložka
a gumený krúžok
žite strednú dieru. Dbajte na polohu podložiek
pod matice (p. obr. A)!
Veľký gumený krúžok 2 položte nad vyčieva-
júcu skrutku (p. obr. B).
Skrutku 1 zdola pevne pridržte pomocou
nástrčného kľúča a rúrový stojan
zhora na skrutku
Vyrovnajte gumený krúžok 2 pod rúrovým
stojanom
pevne pomocou nástrčného kľúča (p. obr. C).
Poznámka: Upínací plech
vaný kvôli ochrane žrde slnečníka (p. obr. D).
Neodstraňujte ho prosím.
1
zdola do podstavca. Pou-
3
nasaďte
1
a zľahka priskrutkujte.
3
. Rúrový stojan 3 priskrutkujte
4
je predmonto-
Používanie nasadení
Nasadenia 5 používajte závisle od veľkosti
tyče slnečníka.
Vložte potrebné nasadenia 5 do rúrového
3
stojana
na to, aby bolo ponechané miesto pre upínací
plech
Nasaďte slnečník. Pevne zatiahnite krídlové
skrutky
. Výrez príslušného nasadenia slúži
4
(p. obr. E).
6
(p. obr. F).
Časti z ušľachtilej ocele:
Tyč z ušľachtilej ocele v prípade potreby ošet-
rite ošetrujúcim prostriedkom pre chrómové
časti automobilu alebo ošetrujúcou emulziou
pre ušľachtilú oceľ.
Servis
SunRain Handels GmbH
Bahnhofstrasse 63
A-4910 Ried-Austria
gardenservice@gmx.at
IAN 96711
IAN 96713
Pre všetky otázky majte pripravený pokladničný
doklad a číslo výrobku (napr. IAN 12345) ako
dôkaz o kúpe.
Stojan pre slnečník
hranatý
Stojan pre slnečník
okrúhly
Likvidácia
Obal pozostáva z ekologických materiálov, ktoré
môžete odovzdať na miestnych recyklačných zberných miestach. Po skončení životnosti prístroja ho
odhoďte do netriedeného odpadu.
Uskladnenie a údržba
Granitový stojan si nevyžaduje údržbu.
Prípadné usadeniny špiny odstráňte trochou
vlažného mydlového roztoku.
V prípade potreby dotiahnite skrutky.
Granitový stojan v prípade nepoužívania,
napr. počas zimy, uskladnite na suchom mieste.
10 SK
Page 11

Einleitung / Sicherheitshinweise
Granit-Sonnenschirmständer
Einleitung
Wir beglückwünschen Sie zum Kauf
Ihres neuen Produkts. Sie haben sich
damit für ein hochwertiges Produkt entschieden. Die Montage- / Bedienungsanleitung ist
Bestandteil dieses Produkts. Bitte lesen Sie vor der
Montage diese Anleitung vollständig durch und
beachten Sie die Hinweise. Diese Anleitung enthält
wichtige Montage- und Pflegeinformationen.
Bewahren Sie die Anleitung deshalb gut auf und
geben Sie diese auch an eventuelle Nachbesitzer
weiter.
Bestimmungsgemäße
Verwendung
Der Schirmständer ist geeignet als Ständer für
Sonnenschirme mit einem bestimmten Stockdurchmesser von 25, 32 und 38 mm und einer maximalen
Fläche von 2,50 m
ca. 25 km/h nicht überschreiten. Bei stärkerem
Wind muss der Sonnenschirm geschlossen werden.
Der Schirmständer ist nur zum Einsatz im privaten
Bereich bestimmt. Er eignet sich nicht für den gewerblichen Einsatz.
2
. Dabei darf die Windbelastung
Teilebeschreibung
1
Schraube mit Federring, Unterlegscheibe
und Gummischeibe
2
Gummischeibe
3
Standrohr
4
Klemmblech
5
Einsätze
6
Flügelschraube
Technische Daten
Artikelnr: TOZ96711
Höhe in cm: 6,5
Breite in cm: 38,0
Länge in cm: 38,0
Verwendbare Stockdurchmesser
in mm: 25, 32 + 38
Gewicht in kg: ca. 25,0
Artikelnr: TOZ96713
Höhe in cm: 9
Durchmesser in cm: 38,0
Verwendbare Stockdurchmesser
in mm: 25, 32 + 38
Gewicht in kg: ca. 25,0
Alle Angaben sind Zirka-Werte.
Technische Änderungen vorbehalten.
Sicherheitshinweise
Bitte beachten Sie die folgenden Sicherheitshinweise. Für Schäden infolge von Nichtbeachtung
haftet der Hersteller nicht.
Der Schirmständer ist kein Kinderspielzeug.
Kinder könnten sich die Finger oder Füße
quetschen.
Lassen Sie den Schirmständer niemals unbeob-
achtet stehen – fällt der Sonnenschirm um,
kann dies zu schweren Verletzungen führen.
Bedenken Sie, dass je nach Windstärke und
Durchmesser des Schirms auch dieser Schirmständer zu leicht sein kann.
Sorgen Sie dafür, dass Ihr Schirm bei aufkom-
mendem Wind geschlossen wird.
Beachten Sie unbedingt die in Ihrem Land gülti-
gen nationalen Vorschriften, die zusätzlich zu
den in dieser Anleitung genannten Vorschriften
gültig sind.
11 DE/AT/CH
Page 12

Montage / Lagerung und Pflege / Service / Entsorgung
Montage
Sie benötigen:
– 17-er Steckschlüssel
– 1 Person zur Hilfe
Sockel montieren
Sockel senkrecht stellen und durch eine zweite
Person gut festhalten lassen. Ansonsten droht
Verletzungsgefahr!
Schraube mit Federring, Unterlegscheibe und
Gummischeibe
stellen. Mittleres Loch verwenden. Position der
Scheiben beachten (s. Abb. A)!
Große Gummischeibe 2 über die oben
herausragende Schraube legen (s. Abb. B).
Schraube 1 von unten mit einem Steckschlüs-
sel festhalten und Standrohr
die Schraube
Gummischeibe 2 unter dem Standrohr 3
ausrichten. Standrohr
sel festschrauben (s. Abb. C).
Hinweis: Das Klemmblech
des Schirm-Masts vormontiert (s. Abb. D).
Bitte nicht entfernen.
1
von unten in den Sockel
3
von oben auf
1
setzen und leicht eindrehen.
3
mit dem Steckschlüs-
4
ist zum Schutz
Bei Bedarf Schrauben nachziehen.
Granitsockel bei Nichtgebrauch, z.B. über
Winter, trocken lagern.
Edelstahlteile:
Bitte das Edelstahlrohr bei Bedarf mit Auto-
Chrompflegemittel oder Edelstahl-Pflegelotion
behandeln.
Service
SunRain Handels GmbH
Bahnhofstrasse 63
A-4910 Ried-Austria
gardenservice@gmx.at
IAN 96711
IAN 96713
Bitte halten Sie für alle Anfragen den Kassenbon
und die Artikelnummer (z. B. IAN 12345) als
Nachweis für den Kauf bereit.
Granit-Sonnenschirm-
ständer eckig
Granit-Sonnenschirm-
ständer rund
Einsätze verwenden
Die Einsätze 5 nach der Größe Ihres Sonnen-
schirmstocks verwenden.
Benötigte Einsätze 5 in das Standrohr 3
stecken. Die Aussparung des jeweiligen Einsatzes dient dazu, Platz für das Klemmblech
zu lassen (s. Abb. E).
Sonnenschirm einsetzen. Flügelschrauben 6
fest anziehen (s. Abb. F).
Lagerung und Pflege
Der Granitsockel ist wartungsfrei.
Entfernen Sie eventuelle Schmutzablagerungen
mit etwas warmer Seifenlauge.
12 DE/AT/CH
Entsorgung
Die Verpackung besteht aus umweltfreundlichen
Materialien, die Sie über die örtlichen Recyclingstellen entsorgen können. Das Produkt entsorgen
Sie nach seiner Lebensdauer im Restmüll.
4
Page 13

IAN 96711
IAN 96713
SunRain Handels GmbH
Bahnhofstrasse 63
A-4910 Ried-Austria
Last Information Update · Stav informací
Stav informácií · Stand der Informationen: 11 / 2013
Ident.-No.: TOZ96713 / TOZ96711112013-CZ / SK
 Loading...