

Page 1

FREESTANDING COOKER
OR90SCI4 models
USER GUIDE
NZ AU
Page 2

Page 3

CONTENTS
Safety and warnings 2
Introduction 7
First use
Control panel and clock display 9
Setting the clock 10
Positioning the shelves 11
Conditioning the oven 14
Oven use
Cooking guide 16
Oven functions 18
Cooking charts 22
Setting the timer 28
Auto Cook 30
Locking the oven controls 33
User preference settings 34
Sabbath mode 36
Cooktop use
Using your induction cooktop 38
Locking the cooktop controls 42
Using your cooktop's special features 43
Choosing the right cookware 49
Cooking guidelines 51
Using the storage drawer 53
Care and cleaning
Manual cleaning chart 54
Removing the oven door 58
Removing and replacing the oven door glass 59
Replacing the oven door 67
Removing and replacing the side racks 68
Removing and replacing the storage drawer 69
Replacing an oven light bulb 70
Troubleshooting 71
Alert codes 76
Warranty and service 77
IMPORTANT!
SAVE THESE INSTRUCTIONS
The models shown in this user guide may not be available in all markets and are subject to change
at any time. For current details about model and specification availability in your country, please
visit our website listed on the back cover or contact your Fisher & Paykel dealer.
1
Page 4

SAFETY AND WARNINGS
Your freestanding cooker has been carefully designed to operate safely during normal
cooking procedures. Please keep the following guidelines in mind when you are using it:
!
WARNING!
Electrical Shock Hazard
Switch the cooker off at the wall before
replacing fuses or the oven lamp.
Failure to follow this advice may result in
electrical shock or death.
2
Page 5
SAFETY AND WARNINGS
!
WARNING!
Cut Hazard
Take care - some edges are sharp.
Failure to use caution could result in injury or
cuts.
!
WARNING!
Health Hazard
This appliance complies with electromagnetic
safety standards.
However, persons with cardiac pacemakers
or other electrical implants (such as insulin
pumps) must consult with their doctor or
implant manufacturer before using this
appliance to make sure that their implants
will not be affected by the electromagnetic
field.
Failure to follow this advice may result in
death.
3
Page 6
SAFETY AND WARNINGS
!
WARNING!
Fire Hazard
Unattended cooking on a hob with fat or oil
can be dangerous and may result in fire.
NEVER try to extinguish a fire with water, but
switch off the appliance and cover flame, eg
with a lid or fire blanket.
Do not place aluminium foil, dishes, trays,
water or ice on the oven floor during cooking,
as doing so will irreversibly damage the
enamel; lining the oven with aluminium foil
may even cause fire.
Never use your appliance for warming or
heating the room. Persons could be burned
or injured or a fire could start.
Storage in or on appliance: flammable
materials should not be stored in the oven
or storage compartment, or on the cooktop
surface.
Failure to follow this advice may result in
overheating, burning, and injury.
4
Page 7

SAFETY AND WARNINGS
!
WARNING!
Hot Surface Hazard
During use, accessible parts of this appliance
will become hot enough to cause burns.
Do not let body, clothing or any item other
than suitable cookware contact with the
ceramic glass until the surface is cool.
Never leave metal objects (such as kitchen
utensils) or empty pans on the cooktop as
they can become hot very quickly.
Beware: magnetisable metal objects worn on
the body may become hot in the vicinity of
the cooktop. Gold or silver jewellery will not
be affected.
Handles of saucepans may be hot to touch.
Check saucepan handles do not overhang
other cooking zones that are on. Keep
handles out of reach of children.
To avoid burns and scalds keep children
away.
Do not touch hot surfaces inside the oven.
Use oven mitts or other protection when
handling hot surfaces such as oven shelves or
dishes.
Take care when opening the oven door.
Let hot air or steam escape before removing
or replacing food.
Do not touch the cooktop components,
burners, trivets/pan supports or the base
when hot.
Before cleaning, turn the cooker off and
make sure it is cool.
Failure to follow this advice could result in
burns and scalds.
5
Page 8

SAFETY AND WARNINGS
IMPORTANT SAFETY INSTRUCTIONS!
y Read all the instructions before using the appliance.
Use the appliance only for its intended purpose as
described in these instructions.
y Proper installation: be sure your appliance is
properly installed and earthed by a qualified
technician. A risk of tip-over exists when the
appliance is not installed in accordance with the
installation instructions.
y Do not operate the appliance if it is damaged or
not working properly. If you received a damaged
product, contact your dealer or installer immediately.
y Clean only the parts listed in this manual.
y Do not modify this appliance.
y This appliance is to be serviced only by an
authorised person.
y Isolating switch: make sure this cooker is connected
to a circuit which incorporates an isolating switch
providing full disconnection from the power supply.
y Household appliances are not intended to be played
with by children.
y Do not leave children alone – Children should not
be left alone or unattended in the area where the
appliance is in use. They should never be allowed to
play with the appliance or to sit or stand on any part
of the appliance.
y Do not store things children might want above the
oven. Children could be burned or injured while
climbing on the oven to retrieve items.
6
Page 9

SAFETY AND WARNINGS
IMPORTANT SAFETY INSTRUCTIONS!
y Children of less than 8 years old must be kept away
from the appliance unless continuously supervised.
This appliance can be used by children aged from 8
years and above, and persons with reduced physical,
sensory or mental capabilities or lack of experience
and knowledge, if they have been given supervision
or instruction concerning the use of the appliance
in a safe way and they understand the hazards
involved. Cleaning and user maintenance shall not be
done by children without supervision.
y Safe food handling: leave food in the oven for as
short a time as possible before and after cooking.
This is to avoid contamination by organisms which
may cause food poisoning. Take particular care
during warmer weather.
y Do not place aluminium foil, dishes, trays, water
or ice on the oven floor during cooking as this will
irreversibly damage the enamel.
y Do not use aluminum foil to line any part of the
oven, storage drawer or cooktop. This will cause
heat to be trapped underneath it. This trapped heat
can upset the cooking performance and damage the
finish of the oven or cooktop parts.
y Do not stand on the door, or place heavy objects on
it.
y Do not use harsh abrasive cleaners or sharp metal
scrapers to clean the oven door glass since they
scratch the surface, which may result in shattering of
the glass.
y Do not use a steam cleaner to clean any part of the
cooker.
y Do not store flammable items in the oven or storage
drawer or on the cooktop surface.
7
Page 10

SAFETY AND WARNINGS
IMPORTANT SAFETY INSTRUCTIONS!
y Do not place aluminium foil or plastic dishes on the
cooktop.
y Do not let large saucepans or frying pans overlap the
bench as this can deflect heat onto your benchtop
and damage the surface.
y Do not let large saucepans, frying pans or woks push
any other pans aside. This could make them unstable
or deflect heat onto your benchtop and damage the
surface.
y Saucepan handles may be hot to touch. Keep
handles out of reach of children.
y If the electrical supply cord is damaged, it must only
be replaced by an authorised person.
y This oven is not to be used as a space heater,
especially if it is installed in marine craft or in a
caravan.
y Wear proper apparel. Do not wear loose fitting or
hanging garments when using the appliance. They
could ignite or melt if they touch an element or hot
surface and you could be burned.
y Always keep oven vents unobstructed.
y Use only dry oven mitts or potholders. Moist or
damp potholders on hot surfaces could result in
burns from steam. Do not let potholders touch hot
areas or heating elements. Do not use a towel or a
bulky cloth for a potholder. It could catch fire.
y Caution. Hot air can blow from the vent at the top of
the oven as part of the oven’s cooling system.
y Placement of oven shelves: always position shelves
in the desired location before preheating the oven.
If a shelf must be removed while the oven is hot,
do not let the oven mitts or potholder contact hot
heating elements in the oven or the base of the
oven.
8
Page 11
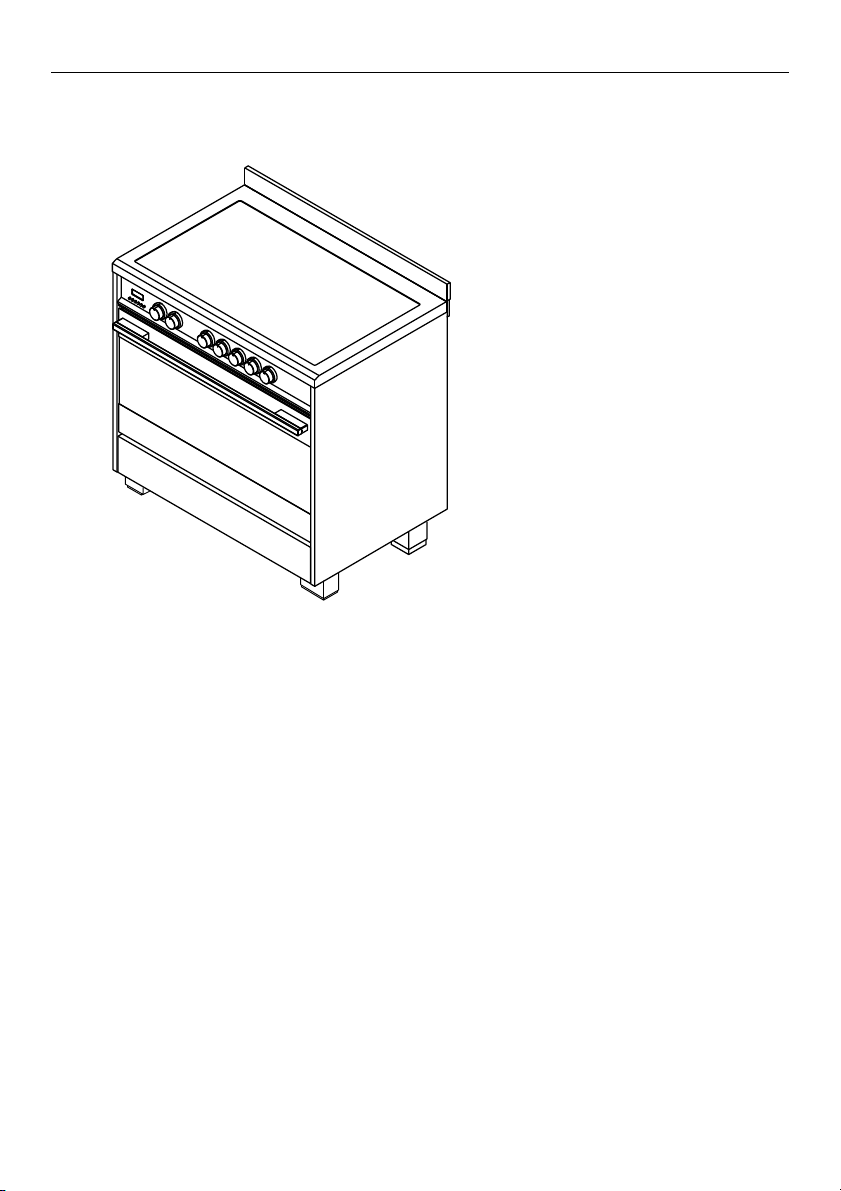
90cm MODEL
OR90SCI4
INTRODUCTION
Before you start
1 Make sure that the anti-tip bracket at the rear of the cooker has been properly installed.
2 Make sure that the installer has completed the ‘Final checklist’ in the Installation
instructions.
3 Read this guide, taking special note of the ‘Safety and warnings’ section.
4 Remove all accessories and packaging from the oven and cooktop. Recycle items that
you can. If any adhesive residue is left on surfaces, remove this using dishwashing liquid
on a soft cloth. Do not use any harsh or abrasive cleaners.
5 Make sure you follow the instructions under ‘First use’ before using your cooker for
cooking.
9
Page 12
INTRODUCTION
A word on induction cooking
Induction cooking is a safe, advanced, efficient, and economical cooking technology.
It works by electromagnetic vibrations generating heat directly in the pan, rather than
indirectly through heating the glass surface. The glass becomes hot only because
the pan eventually warms it up. This technology has a number of advantages over
traditional radiant energy cooking:
y Heat-up times are much faster.
y Use is safer as no heating takes place unless a suitable pan is placed on the
cooking zone.
y As heat is transferred without loss, you save energy.
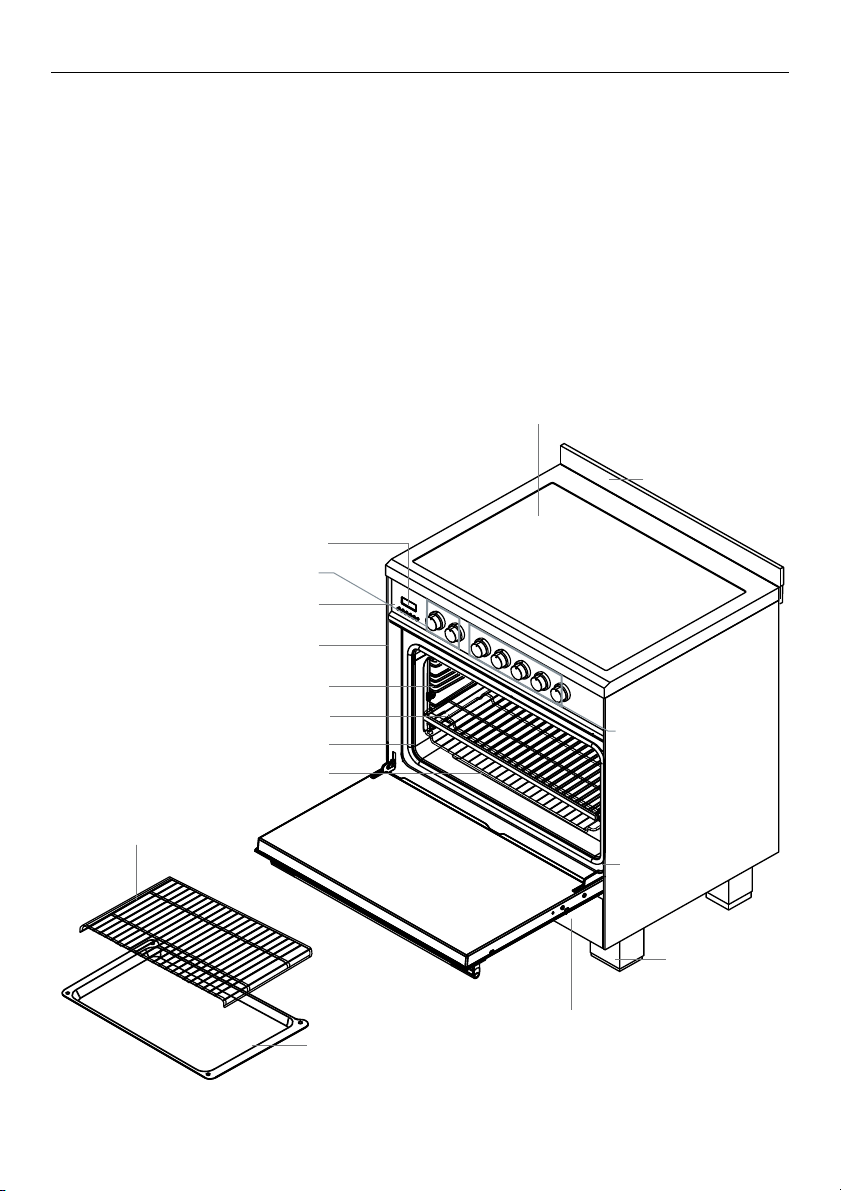
Overview
Features may vary.
Clock display and controls
Full extension sliding shelf
Grill Rack
Oven function and
temperature dials
Control panel
Oven frame
Side racks
Oven door gasket
Step down wire shelf
Induction cooktop
Back trim
Cooktop control dials
Label with model
and serial numbers
Foot (Cover)
10
Storage drawer
Roasting Dish
Page 13

FIRST USE
Control panel layout
1
234 5
1 Oven display
2 Oven controls
3 Function dial
Clock display and controls
Timer (see 'Setting the timer')
Cook time (see 'Auto cook')
Timer Menu Minus Plus Accept Cancel
4 Temperature dial
5 Cooktop control dials
End time (see 'Auto cook')
Lock (see 'Locking the oven controls')
8888
o
%
pm
Timer button
y Press to set the timer
Accept button
y Press to accept
Cancel/back button
y Press to go back
y Press and hold to cancel
11
Page 14

FIRST USE
Setting the clock
When your oven is first turned on, or after a power cut, the display will flash. You will
need to set the clock in order to use the oven.
24hr
1 The display will flash 24 hr
00 00
4 Press
or to adjust the time.
24hr
2 Press
24 hr and 12 hr
y The display will stop flashing.
3 Press to confirm.
or to scroll between
19 35
5 Press
the time.
to confirm and set
y Pressing the cancel
set the clock at 00:01
12
button at any point during the clock setting process will
Page 15

FIRST USE
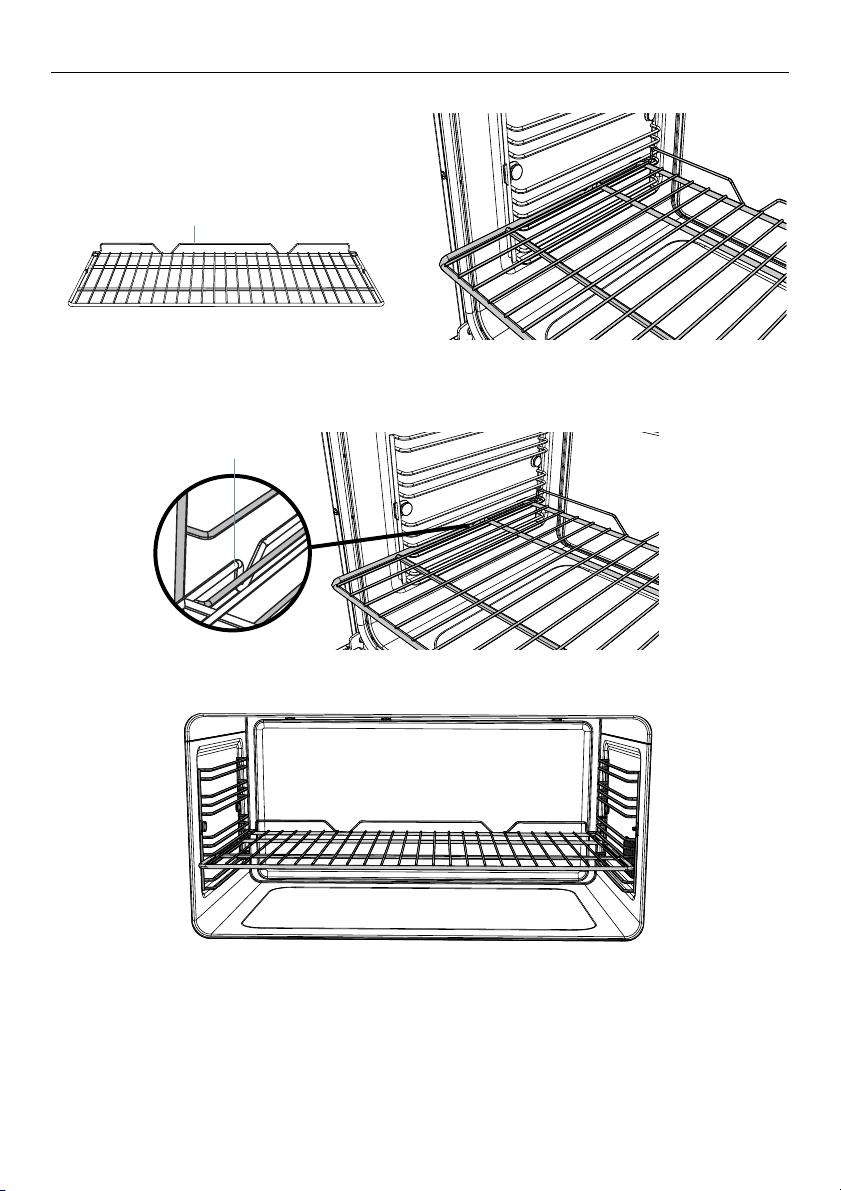
Positioning the shelves
y Shelf positions are numbered from the bottom.
y Position the shelves you will need before turning the oven on.
y For advice on which shelf position to use, see sections ‘Oven functions’, ‘Oven cooking
guidelines’, and ‘Cooking charts’.
IMPORTANT!
Always position the oven shelves before turning the oven on. Remove any unused
shelves and baking utensils from the oven.
7
6
5
4
3
2
1
Wire shelf
Safety stop
Wire shelf
Flat wire shelf and step-down wire shelf
y These shelves have safety stops to keep
them from sliding out of the oven when
pulled forward.
y The front stops prevent the shelves
from hitting against the back of the
oven.
Front safety stop
Wire shelf
Front stop
Full extension sliding shelves
y The wire shelves and slides are built
together as one unit.
y When positioned correctly, the slides
will prevent the wire shelves from
tilting when pulled forward.
y Beware: these shelves are heavy.
Slide
Safety stop
Full extension
sliding shelf
13
Page 16

FIRST USE
To insert the sliding shelves (some models only)
Guard rail
1 Make sure the guard rail is at the
back, facing up and the slides are not
extended.
3
3 Hook the rear tags over the wires of the
desired shelf position on both side racks.
To remove the shelves
2 Hold the shelf firmly with both hands,
making sure you grip the wire shelf too
to stop it sliding forward.
4
4 Push the shelf all the way into the oven,
ensuring the front and rear tags either
side are securely locked behind the side
rack wires.
1 Wait for the oven to cool down completely.
2 Hold the shelf firmly with both hands, making sure you grip the wire shelf too to stop it
sliding forward.
3 Pull the shelf forward about ¾ of the way.
4 Lift the rear of the shelf slightly so that the tags clear the side rack wires, then remove.
14
Page 17
To insert the wire shelves
Guard rail
FIRST USE
1 Make sure the guard rail is at the back,
facing up.
Safety stop
2 Position the shelf: it should rest on the
side rack wires, as shown.
3 Tilt the front up slightly to help the safety stops clear the side rack wires.
4 Lower the shelf back onto the side rack wires and slide all the way into the oven.
To remove the shelves
1 Wait for the oven to cool down completely.
2 Pull the shelf forward about ¾ of the way.
3 Tilt the front up slightly to help the safety stops clear the side rack wires.
4 Remove the shelf.
15
Page 18

FIRST USE
Conditioning the oven
It is important to condition your oven before using it for cooking and baking.
Conditioning will burn off any manufacturing residues and ensure that you get the best
results right from the start.
Before you start:
y Make sure you have removed all packaging and any cable ties used to secure the
shelving during transit.
y Make sure all shelves are fitted in the oven.
y Make sure all oven control dials are turned to O (OFF).
--->
1 Select the Bake function.
y The halo will glow white.
Fan
Grill
3 After 30 minutes, select the
Fan Grill function
y Heat at 200°C for 10 minutes.
2 Set the temperature to 200°C for 30
minutes.
y The halo will glow red while the oven is
heating up.
y When the oven has heated a tone will
sound and the halo will turn white.
Fan
Forced
4 After 10 minutes, select the
Fan Forced function.
y Heat at 200°C for 20 minutes
16
Page 19

FIRST USE
FUNCTION TEMPERATURE
5 After 20 minutes turn both the function and temperature dials to 0 (OFF).
The halos will go out.
y There will be a distinctive smell and a small amount of smoke during the conditioning
process as manufacturing residue is burnt off. This is normal, but make sure the kitchen
is well ventilated during the conditioning.
y Once cooled, wipe out the oven and warmer drawer with a damp cloth and mild
detergent, and dry thoroughly.
17
Page 20

COOKING GUIDE
Oven cooking guidelines
IMPORTANT!
y Use all the oven modes with the oven door closed.
y Never use aluminum foil to cover the oven shelves or to line the floor of the oven. The
trapped heat can irreversibly damage the enamel and may even cause fire.
y Do not place water, ice, or any dish or tray directly on the oven floor, as this will
irreversibly damage the enamel.
y Do not cover the roasting dish with aluminum foil. This will catch the grease and could
cause fire.
y Do not use plastic wrap or wax paper in the oven.
y For food safety reasons, do not leave food in the oven for longer than two hours
before and after cooking or defrosting. This is to avoid contamination by organisms
which may cause food poisoning. Take particular care during warmer weather.
Fans Upper Elements
Lower
Element
(concealed)
Shelf positions
6
5
4
3
2
1
7
BAKING
y For best results when baking, always preheat your oven. The temperature halo will
change from red to white when the set temperature is reached.
y While the oven is heating the grill element will be on.
y We advise you do not open the door until at least ¾ of the way through cooking.
y Make sure cake pans do not touch each other or the sides of the oven.
y When baking double the recipe (especially cookies) cook time may need to increase.
y Your cookware will influence baking times. Dark pans absorb the heat more quickly than
reflective pans; glass cookware may require a lower temperature
y Multi-shelf baking may also require a slight increase in cooking time.
Shelf Position Guide
y Single shelf: Place your baking on a shelf that will have the top of your pan near the
center of the oven cavity.
y Multi shelf: Always leave a space between shelves to allow the air to circulate.
18
Page 21

COOKING GUIDE
Oven cooking guidelines
ROASTING
y The Roast function is designed to brown the outside of the meat but still keep the inside
moist and juicy.
y Boneless, rolled or stuffed roasts take longer than roasts containing bones.
y Poultry should be well cooked with the juices running clear and an internal temperature
of 74°C.
y If using a roasting bag, do not use the Roast function. The initial searing stage is too
hot for roasting bags. Use Fan Bake or Fan Forced and follow the manufacturer’s
instructions.
y When using the Roast function, do not cover your roast, as this will stop the searing
process browning the outside of the meat. If you prefer to roast in a covered pan, use
the Fan Bake function instead and increase the temperature by 20°C.
y Cook larger cuts of meat at a lower temperature for a longer time. The meat will cook
more evenly.
y Always roast meat fat side up. That way, basting may not be required.
y Always rest the meat for at least 10 minutes after roasting to allow the juices to settle.
y Remember the meat will continue to cook for a few minutes after removing it from the
oven.
Shelf Position Guide
Place the meat on a shelf so that is is in the center of the oven or lower.
GRILLING
y This is a healthier alternative to frying.
y Always grill with the oven door completely shut.
y If you use glass or ceramic pans, be sure they can withstand the high temperatures of
the grill.
y To avoid piercing the meat and letting juices escape, use tongs or a spatula to turn the
meat halfway through cooking.
y Brush meat with a little oil to help keep the meat moist during cooking. Alternatively
marinade the meat before grilling (but be aware that some marinades may burn easily).
y Where possible grill cuts of meat of a similar thickness at the same time. This will ensure
even cooking.
y Always keep a close watch on your food while broiling to avoid charring or burning.
Shelf Position Guide
y For thinner cuts of meat, toasting or browning foods, use a higher shelf position.
y Thicker cuts of meats should be grilled on lower shelves or at a lower grill setting to
ensure even cooking.
REHEATING
y Use Bake or Fan Bake to reheat food.
y Bake and Fan Bake are particularly good for reheating pastry based items, as the base
heat will help re-crisp the pastry case.
y Always reheat food to piping hot. This reduces the risk of contamination by harmful
bacteria.
y Once hot, set the oven temperature to WARM.
Never reheat food more than once.
19
Page 22

OVEN FUNCTIONS
IMPORTANT!
y Use all the functions with the oven door closed.
BAKE
upper outer and lower elements
y Heat comes from both the upper and lower elements. The fan is not used in this
function.
y Ideal for cakes and foods that require baking for a long time or at low temperatures.
y This function is not suitable for multi-shelf cooking.
Ideal for moist foods that take a longer time to cook eg rich fruit cake, or bread.
FAN FORCED
fan and rear element
y By using the central rear heating element and fan, hot air is blown into the cavity,
providing a consistent temperature at all levels, making it perfect for multi-shelf cooking.
y Trays of cookies cooked on different shelves are crisp on the outside and chewy in the
middle.
y Meat and poultry are deliciously browned and sizzling while remaining juicy and tender.
y Casseroles are cooked to perfection and reheating is quick and efficient.
y When multi-shelf cooking it is important to leave a gap between trays (eg use shelves
3 & 5) to allow the air to move freely. This enables the browning of foods on the lower
tray.
y If converting a recipe from Bake to Fan Forced, we recommend that you decrease the
bake time or decrease the temperature by approximately 20°C.
y For items with longer bake times (eg over an hour) it may be necessary to decrease
both time and temperature.
Ideal for multi-shelf cooking biscuits, cookies, scones, muffins and cupcakes..
20
Page 23

OVEN FUNCTIONS
GRILL
upper inner and outer elements
y Intense radiant heat is delivered from both top elements. You can use Grill on Low OR
High (100% power).
y For best results allow 5 minutes of preheat before placing food in the oven.
y The temperature halo will remain red while using the Grill function.
y The most suitable function for ‘finishing off’ many meals, for example browning the top
of potato gratin and frittata.
Ideal for toasting bread or for top browning to ‘finish off dishes’.
FAN GRILL
fan plus upper inner and outer elements
y This function uses the intense heat from the elements for top browning and the fan to
ensure even cooking of foods.
y Meat, poultry and vegetables cook beautifully; food is crisp and brown on the outside
while the inside remains moist and tender.
Ideal for whole chicken, tenderloin of beef or broiling your favourite chicken, fish or steak.
FAN BAKE
fan plus upper outer and lower elements
y The oven fan circulates hot air from the top outer and the lower elements and
distributes it around the oven cavity.
y Food cooked tends to brown more quickly than foods cooked on the traditional Bake
function.
y You may need to decrease the time from that recommended in traditional recipes.
Ideal for single shelf baking that takes less than an hour to cook – foods such as muffins,
biscuits and cupcakes or things like enchiladas.
21
Page 24
OVEN FUNCTIONS
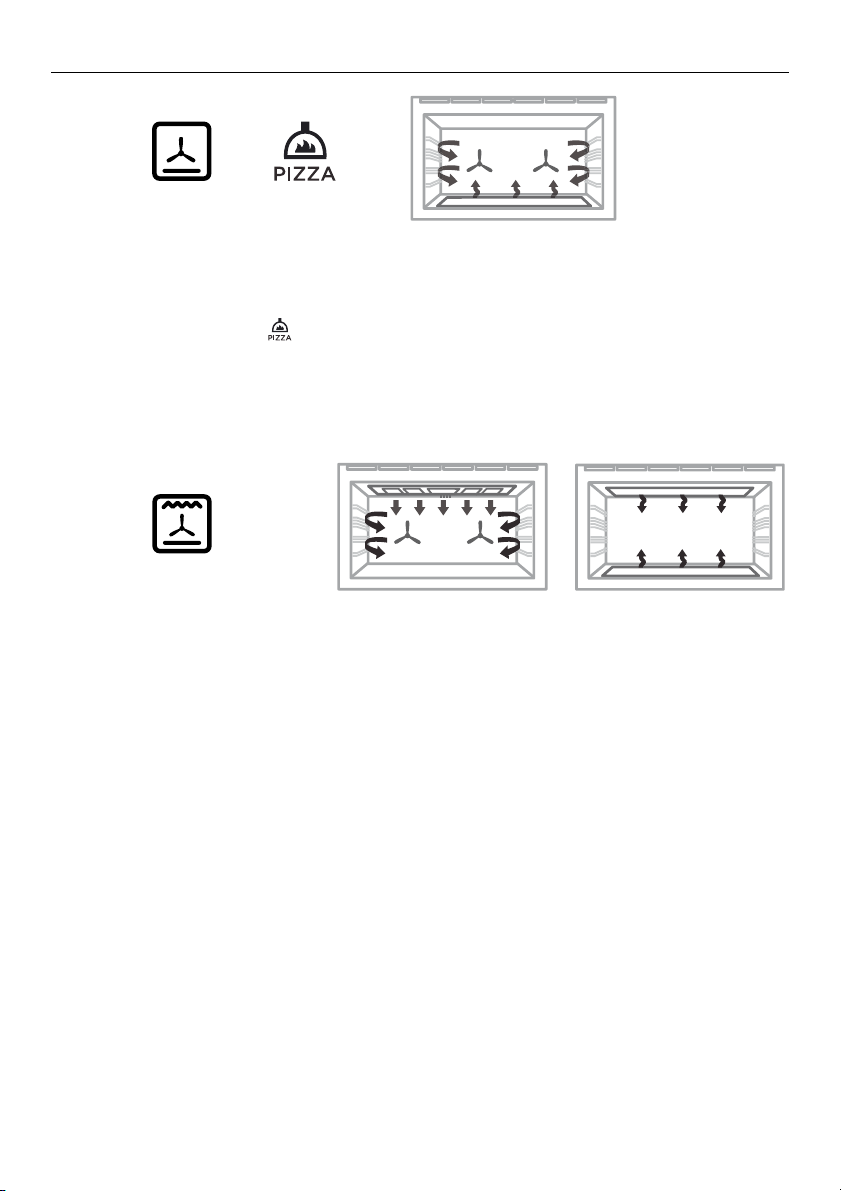
PASTRY BAKE + PIZZA
fan plus lower element
y The fan circulates heat from the lower element throughout the oven.
y Excellent for cooking pizza and flatbreads as it crisps the base beautifully without
overcooking the top.
y Set the temperature to for optimum pizza cooking temperature.
Ideal for foods such as sweet and savoury pastry foods and delicate foods that require
some top browning eg frittata, quiche.
ROAST
fan plus upper and lower elements
y A two-step program. An initial 20 minute searing stage crisps and browns the roast and
caramelises the outside of the meat, then the temperature drops to the level you have
preset for the remainder of the cooking period, producing a tender and juicy roast that
is full of flavor.
y Oven does not require preheating.
y If desired, use the broil rack or grid, or place vegetables under the roast to allow the
juices to drain away from your meat. This will allow the hot air to circulate under the
meat as well.
Ideal for Roasting meat, chicken and vegetables.
22
Page 25

OVEN FUNCTIONS
RAPID PROOF
this is not a cooking function
y Gentle heat is generated from the upper and lower elements
y Provides the optimum warm and draft-free environment for proving
yeast dough.
y This method provides a faster proof time than at room temperature.
y To prevent overproofing we recommend you check the dough every
30mins
Proving dough
1 Place dough in a lightly oiled bowl and cover with plastic wrap
and/or a clean damp cloth
2 Position the bowl in the center of the oven
3 Select Rapid Proof function
23
Page 26

COOKING CHARTS
y Shelf positions are counted from the base up
(1 is the lowest, 7 is the highest). Position shelves before you turn the oven on.
y For best results preheat the oven.
y Multi shelf cooking may need the shelves rotating midway through cooking.
y Oven accessories may temporarily deform slightly when they become hot.
This is normal and does not affect their function.
BAKING
FOOD SHELVES
Biscuits Plain Single
Multi
Chewy Choc Chip Single
Multi
Oatmeal Single
Cakes Vanilla Single
Pound Cake Single
Butter / Chocolate Single
Chocolate Brownie
Rich Fruit Cake Single
Light Fruit Cake Single
Sponge
(single large) Single
Sponge
(20x20cm) Single
Shortbread
Shortbread
Muffins / Cupcakes Cupcakes Single
Muffins Single
Scones Scones Single
Meringues Meringues Single
Bread/Bread rolls Sandwich Loaf
23x13cm Loaf Tin)
(
Wholewheat Loaf
23x13cm Loaf Tin)
(
Soft Bread Rolls Single
Dough proof Single
Pastry Pastry Case
Filo Single
Flaky / Puff Single
Choux Single
Croissants Single
Pies Apple Pie Single
Lemon Meringue Single
Baked Cheesecake
Custard Tart
Dessert Crème Brulee
24
Crème Caramel
(20x 20cm) Single
Single
Multi
Multi
Single
Single
(baked blind) Single
Multi
Multi
(in water bath) Single
(blind bake, then add filling) Single
(in water bath) Single
(in water bath) Single
Page 27

COOKING CHARTS
The information in these charts are guidelines only. Refer to your recipe or the
packaging and be prepared to adjust the cooking times and settings accordingly.
RECOMMENDED MODE SHELF POSITIONS TEMP (°C) TIME (MINS)
Fan Bake 3 210 - 220 8 - 10
Fan Forced 1 & 4 or 2 & 5 215 - 230 10 - 12
Fan Bake 3 180 - 190 10 - 15
Fan Forced 1 & 4 or 2 & 5 160 - 170 10 - 15
Fan Bake 3 160 - 170 12 - 15
Bake 3 160 - 165 30 - 35
Bake 3 160 70 - 80
Bake 3 160 - 180 50 - 60
Bake or Classic Bake 3 175 20 - 25
Bake or Classic Bake 3 135 - 150 3 - 6 hrs
Bake 3 155 - 165 60 - 90
Bake 3 170 - 180 30 - 40
Bake 3 170 - 180 15 - 25
Pastry Bake 3 130 - 140 20 - 25
Fan Bake 3 185 15 - 20
Fan Forced 1 & 4 or 2 & 5 170 20 - 25
Fan Bake 3 170 25 - 30
Fan Forced 1 & 4 or 2 & 5 170 25 - 30
Bake 3 215 - 230 10 - 15
Bake 3 120 - 130 60 - 70
Bake 3 200 - 220 40 - 50
Bake 3 200 - 220 35 - 45
Bake 3 190 15 - 18
Rapid Proof 3 PrF 30
Pastry Bake 2 or 3 175 15
Fan Bake 3 200 15 - 25
Fan Bake 3 185 - 200 20 - 30
Fan Bake 3 200 - 210 30 - 35
Fan Forced 1 & 4 or 2 & 5 200 - 20 30 - 35
Fan Bake 3 190 - 200 15 - 25
Fan Forced 1 & 4 or 2 & 5 190 - 200 15 - 25
Pastry Bake or Fan Bake 3 190 - 200 25 - 30
Pastry Bake or Fan Bake 3 175 - 180 30 - 40
Classic Bake 3 160 50 - 60
Classic Bake 3 175 - 150 15 - 30
Classic Bake 3 135 35 - 45
Classic Bake 3 175 35 - 45
25
Page 28

COOKING CHARTS
SAVOURY
FOOD SHELVES
Meat Pie Single
Sausage Rolls Single
Vegetables Single
Lasagne Single
Casserole Single
Pizza Single
Quiche
(blind bake, then add filling)
Potatoes (whole, baked) Single
Frittata (shallow) Single
Oven Meals Single
ROASTING
FOOD SHELVES
Beef (Boneless) Rare Single Roast
Medium Roast
Well Done Roast
Prime Rib Roast Rare Single Roast
Medium Roast
Well Done Roast
Lamb Rack Medium Rare Single Roast
Lamb leg (Bone in) Medium Single Roast
Well Done Roast
Lamb leg (Boneless) Medium Single Roast
Well Done Roast
Veal Medium Single Roast
Well Done Roast
Chicken Whole Unstuffed Single Fan Grill
Whole Stuffed Bake
Whole Butterflied Fan Grill
Turkey (Whole) Stuffed Single Bake
Unstuffed Bake
Pork (Boneless) Medium Single Roast
Well Done Roast
Pork Crackling Crisp (watch closely) Single Fan Grill
Venison Brown in a pan
first.
26
Rare Single Fan Grill
Medium
Rare
Single
RECOMMENDED
MODE
Fan Grill
Page 29

COOKING CHARTS
RECOMMENDED
MODE
Pastry Bake or Fan Bake 3 190 - 195 30 - 40
Pastry Bake or Fan Bake 3 190 - 200 20 - 25
Fan Bake 3 175 - 190 30 - 50
Fan Bake 3 175 - 190 35 - 45
Bake or Classic Bake 2 120 - 150 2 - 4 hrs
Pizza 1 or 2 Pizza (280) 10 - 15
Pastry Bake or Fan Bake 3 180 - 200 30- 40
Bake 3 200 50 - 60
Pastry Bake 3 170 - 180 15 - 20
Fan Forced 3 170 - 190 30 - 40
SHELF
POSITIONS
2 or 3 160 - 170 18-32 /450g 54 - 59
2 or 3 160 - 170 25-40 /450g 60 - 74
2 or 3 160 - 170 30-55 /450g 74 - 79
2 or 3 160 - 170 15-30 /450g 54 - 59
2 or 3 160 - 170 20-35 /450g 60 - 74
2 or 3 160 - 170 25-40 /450g 74 - 79
3 200 20 50
2 or 3 160 - 170 18-28 /450g 65 - 70
2 or 3 160 - 170 20-33 /450g 74 - 79
2 or 3 160 - 170 20-35 /450g 65 - 70
2 or 3 160 - 170 25-45 /450g 77 - 79
2 or 3 160 - 170 20-40 /450g 71
2 or 3 160 - 170 25-45 /450g 76
2 or 3 175 15-20 /450g 75
2 or 3 175 17-22 /450g 75
3 or 4 175 40-50 75
1 or 2 160 - 170 17-22 /450g 75
1 or 2 150 - 165 15-20 /450g 75
2 or 3 170 - 175 25-40 /450g 63 - 68
2 or 3 170 - 175 30-45 /450g 74 - 79
4 220 5 to 10 4 225 7 /2.5cm meat
4 225 9 /2.5cm meat
TEMP (°C) TIME (MINS)
SHELF
POSITIONS
TEMP (°C) TIME (MINS)
MEAT PROBE
(°C)
49 - 54
thickness
55 - 60
thickness
27
Page 30

COOKING CHARTS
GRILLING
FOOD SHELVES
Beef Steak Rare Single
Medium Single
Burgers Single
Meatballs Single
Lamb Chops Medium Single
Well done Single
Pork Chops (well done) Single
Ham steak Single
Bacon Single
Chicken Boneless pieces Single
Bone In Pieces Single
Sausages Sausages Single
Fish Fillets Single
Whole Single
Vegetables Sliced Single
28
Page 31

COOKING CHARTS
RECOMMENDED
MODE
Grill 6 or 7 HI 8 - 10
Grill 6 or 7 HI 10 - 15
Grill 6 or 7 HI 12 - 15
Grill 6 or 7 HI 12 - 15
Grill 6 or 7 HI 15 - 20
Grill 6 or 7 HI 20 - 25
Grill 6 or 7 HI 15 - 20
Grill 6 or 7 HI 15 - 20
Grill 6 or 7 HI 4 - 7
Fan Grill 6 or 7 175 30 - 40
Fan Grill 6 or 7 175 40 - 50
Grill 6 or 7 HI 10 - 15
Fan Grill 6 or 7 200 - 220 8 - 12
Fan Grill 6 or 7 200 - 220 15 - 20
Grill 6 or 7 HI 8 - 12
SHELF
POSITIONS
TEMP (°C) TIME (MINS)
29
Page 32

SETTING THE TIMER
y You can use the timer at any time, even if you are not using the oven.
y If the time is more than an hour, the display will count down in minutes (h :m). If it is less
than an hour, it will count down in seconds (m:s ).
y You can set the timer for up to 23 hours 59 minutes.
IMPORTANT!
The timer does NOT turn the oven off.
To set the timer
000
1 Press to access the timer.
y The timer indicator will appear
on the display.
y The display will flash.
y Press to return to the time of day.
14 59
3 Press
y The timer will begin to count down.
y The display will stop flashing.
to confirm and set the time.
2 Press
4 Press
day.
015
or to adjust the time.
19 35
to return to the time of
30
Page 33

SETTING THE TIMER
To edit the timer
19 35
1 Press to access the Timer.
2 Follow the steps on the previous page to adjust the timer.
To cancel the timer
17 59
1 Press
2 Press and hold to zero the countdown timer. The display will revert to
3 The timer icon will disappear.
When the set time is up
y A tone will sound every few seconds.
y Press any control to stop the tone sounding.
y The timer icon will disappear and the display will revert to showing the time of day.
to access the Timer.
showing the time of day.
19 35
31
Page 34

AUTO COOK
>
Use Auto Cook to
y Turn off the oven automatically after a set period of time.
y Set the oven for food to be ready at a specific time.
y If you start cooking manually and only want the oven to turn off automatically after a
set period of time: simply set the cook time following steps 1 to 3 below and select a
function and temperature. The oven will automatically turn off when the cook time is
over.
y Alternatively you can simply set the time of day you wish to the oven to turn off. Follow
steps 4 to 6. The oven will automatically turn off when the end time is reached.
Before you start
y Make sure that your oven is displaying the correct time of day and food is in the oven.
IMPORTANT!
Safe food handling: leave food in the oven for as short as time as possible before and
after cooking or defrosting. This is to avoid contamination by organisms which may
cause food poisoning. Take particular care during warmer weather.
Select function and temperature
---
1 Select a function.
y The dial halo will stop flashing.
To set the cook time
000
3 Press
y The cook time indicator will
appear in the display.
32
2 Select a temperature
y The dial halo will stop flashing.
015
4 Press or to set the cook
time. Make sure you allow for
pre-heat time in your calculation.
y The display will flash.
Page 35

AUTO COOK
015
5 Press
To set the end time
to confirm the cook time.
19 56
6 Press to scroll between cook
time and end time.
y The end time indicator will
appear and the display will flash.
2015
20 15
7 Press
you would like your food to be
ready (i.e. end time).
or to set the time
8 Press
to confirm the end time.
33
Page 36

AUTO COOK
When Auto Cook is set
y The oven and the lights will stay off, the halos will be unlit, but your oven is now set for
automatic cooking. It will automatically turn on at the required time.
y You can modify the function and temperature while the oven is waiting to start cooking.
y If setting Delayed Cook you will need to put the food in the oven before starting.
y For safety reasons opening the door while the oven is waiting to start will cancel
Delayed Cook.
To edit Auto Cook
Press
setting the cook time and end time.
To cancel Auto Cook
1 Press to scroll between cooking time and end time.
2 Press and hold
y The display will revert to showing the time of day.
y Turning the function and temperature dials back to 0 (OFF) will also cancel automatic
cooking.
When the set time is up
The oven will automatically turn off and a long tone will sound.
y Press any button to stop the tone sounding.
y Turn the function and temperature dials back to O (OFF).
to scroll between cooking time and end time. Follow previous instructions on
19 56
19 56
While the oven is heating up
IMPORTANT!
y During Auto Cook the grill element will come on while the oven is heating up. Food
placed into a cold oven could be prone to burning as the oven heats up.
y Large items and foods with a high fat or sugar content are especially prone to
burning. Take particular care with foods such as macaroni cheese, large poultry, and
enchiladas.
y Ideal foods for automatic cooking include stews, casseroles, braised meat and potato
top pie.
y Position food on a lower shelf to prevent burning.
y Where possible cook food in a pan with a lid, or cover food with foil.
34
Page 37

LOCKING THE OVEN CONTROLS
This function is to prevent accidental use of the oven (eg by children).
When locked, the controls are unresponsive and the oven will not turn on.
IMPORTANT!
This does not lock the cooktop controls.
To lock:
19 35
1 Press and hold until there is a beep.
y The lock indicator will appear on the display.
y The oven controls are now locked.
To unlock:
19 35
2 Press and hold until there is a beep
and the lock indicator disappears.
y The oven controls are now unlocked.
35
Page 38

USER PREFERENCE SETTINGS
Adjust the user settings to suit your personal setup preferences.
You can set your oven to:
y give audio feedback (tones and beeps) or operate quietly
y display time as 12-hr or 24-hr
y operate with the display off
y have its lights on or off during cooking
y operate in Sabbath setting (see ‘Sabbath setting’ following)
Note: You cannot change the user preference settings when you oven is operating or set
for automatic cooking.
How to change preference settings
24hr
1 Press and hold
beep
y The display will show 12 or 24 hr
until there is a
bP oF bP oF
3 Press
the options for that particular
setting.
y The display will flash while in
edit mode.
or to scroll through
bP on
2 Press
to the setting you want to
change.
4 Press
and exit user preference mode.
y The display will stop flashing.
y Press
mode without changing the
setting.
to scroll through
to save the new option
to exit user preference
36
Page 39

USER PREFERENCE SETTINGS
SETTING DEFAULT OPTION ALTERNATIVE OPTION(S)
CLOCK DISPLAY
Select between:
- Analog and digital
display
- 12-hr and 24-hr display
- Display off**
Turn the display off if you
only want to use the basic
functionalities of your oven.
24Hr
12 HR24 HR DISPLAY OFF **
12Hr oFF
AUDIO FEEDBACK
Turn the oven beeps and
tones on or off.*
OVEN LIGHTS
Have the light off during
cooking if you want to save
power or want the food you
cook to be a surprise for
others.
SABBATH MODE
* The timer tone and alert beeps will sound even if you save the BEEPS OFF option.
** With this option saved, you can still use the oven, and timer, however the display will remain unlit.
Any automatic functions will be cancelled when this option is selected.
To quit this option and enable the display, press and hold .
BEEPS/TONES ON BEEPS/TONES OFF
bPon
LIGHTS ON
DURING COOKING
Lton
SABBATH OFF
SboF
bPoF
LIGHTS OFF
DURING COOKING
LtoF
See ‘Sabbath Mode’ for
instructions.
37
Page 40

SABBATH MODE
This setting is designed for religious faiths that observe a ‘no work’ requirement on the
Sabbath.
While your oven is in Sabbath Mode
y The display, dial halos and indicators will be unlit, the controls will be unresponsive.
y No tones or beeps will sound.
y No alert codes or temperature changes will be displayed.
y The oven lights will stay on. If you want the oven lights to be off during Sabbath Mode,
first select the ‘Lights off’ option as described in ‘User preference settings’, and then set
Sabbath Mode afterwards.
y Bake
How to set Sabbath Mode
is the only function available in Sabbath Mode.
24hr
1 Set the oven function to Bake
and set the desired temperature.
y Note: Bake is the only function
that can be used in Sabbath Mode.
SboF
3 Press
Sabbath setting.
y The default setting is Sabbath Off.
38
to scroll through to
2 Press and hold
is a beep to enter the user
preference menu.
1 00
4 Press
5 Press to activate the option.
y
or to scroll between
Sabbath Off and Sabbath on.
will flash in the display.
1:00
until there
Page 41

SABBATH MODE
0023
6 Press
You may set the time up to 48
hours.
The display, indicators and dial halos will remain unlit and unresponsive, but the oven
will bake until you quit Sabbath setting.
To quit Sabbath Mode
Press and hold until the time of day appears in the display and the oven turns off, or
turn the function and temperature dials back to 0 (OFF).
or to set the time (hrs).
7 Press
0023
to confirm
39
Page 42

USING YOUR INDUCTION COOKTOP
22
COOKING
ZONE
1
2
3
3
1
ZONE
DIAMETER
Smartzone 1600 W 1850 W
Smartzone 2100 W 3000 W
250mm 2300 W 3000 W 145mm
POWER POWERBOOST
1
OR90 models
RECOMMENDED
MINIMUM PAN SIZE
120mm (unbridged)
250mm (bridged)
120mm (unbridged)
250mm (bridged)
40
Page 43

USING YOUR INDUCTION COOKTOP
Cooking zones display
The ceramic cooktop is fitted with induction cooking zones. These circular zones are
controlled by separate dials positioned on the control panel below.
At the front, is the display for the cooking zones (one for each zone). Each zone display
is activated by it’s corresonding control dial and displays:
Cooking zone Off (not activated)
Cooking zone On (activated but not operating).
If a zone is in zero setting, the display switches off automatically
after about 10 seconds.
Power levels
Auto RapidHeat feature
PowerBoost feature
Hot Surface indicator
Pan detection indicator
Childlock
Bridged zone indicators
Note: each lit figure refers to the relevant cooking zone
Cooking zones diplay
41
Page 44

USING YOUR INDUCTION COOKTOP
To turn a cooking zone on:
4 3 2 1 0
1 Place a suitable pan on the
cooking zone.
y Make sure the bottom of the
pan and the surface of the
cooking zone are clean and dry.
2 Press in and turn the corresponding
control dial clockwise to the desired heat
setting. Modify the heat setting at any
time during cooking.
IMPORTANT!
Always place small pans in the
centre of the cooking zone.
When you have finished cooking: Control dials:
2 1 0
1
2
1 Turn the corresponding control
dial back to 0 (OFF).
Beware of hot surfaces
will show in the display of any cooking
zones that are still too hot to touch. It will
disappear when the surface has cooled
down to a safe temperature.
9
8
7
3
4
6
5
42
Page 45

USING YOUR INDUCTION COOKTOP
If a display flashes alternately with the heat setting
This means that:
y you have not placed a pan on the correct cooking zone or
y the pan you’re using is not suitable for induction cooking or
y the pan is too small or not properly centred on the
cooking zone.
No heating takes place unless there is a suitable pan on the cooking zone.
The cooktop will automatically turn off after 10 minutes if no suitable pan is placed on it.
Dual zone cooking
When using a small pot on the dual cooking zone, be sure to centre it so that the inner
zone will detect the pan. If the pan covers the outer zone, then the outer zone will
automatically switch on.
SmartZones
The SmartZones are large. You may place several small pots on the SmartZone and they
will be detected as if they were one large pot.
IMPORTANT!
The whole of the SmartZone is activated when a pot is detected. This means that
other magnetisable items (such as cutlery) sitting in the cooking zone will heat up.
Never leave cutlery or other magnestisable items on your cooktop.
43
Page 46

LOCKING THE COOKTOP CONTROLS
Locking the cooktop
y You can lock the cooktop control dials for cleaning and to prevent unintended use.
(for example children accidentally turning cooking zones on).
y When the cooktop is locked the controls and cooktop display will remain unresponsive.
To lock the cooktop
1 Make sure that all cooking zones are turned OFF.
2 Push in and turn the control dials for the two left cooking zones anticlockwise to
3 Hold the dial at until appears in the cooktop display.
To unlock the cooktop
Repeat the steps above.
Hold the dials at until disappears from the cooktop display.
Your cooktop is now ready to be used again.
.
44
Page 47

USING YOUR COOKTOP’S SPECIAL FEATURES
Using the PowerBoost feature
This feature enables you to sear meat or bring liquid to the boil very quickly. When a
cooking zone is set for PowerBoost, it uses more than 100% of the rated power of that
particular cooking zone, resulting in a boost of intense heat.
IMPORTANT!
PowerBoost heats food and liquids very quickly. Do not leave the cooktop unattended
when using this feature.
To set a cooking zone for PowerBoost
9 8 7 9 8 7
1 Turn the cooking zone on to its highest heat setting (9)
2 From heat setting 9, turn and hold the dial to until appears in the display.
When PowerBoost is set
10 mins
The cooking zone will remain on PowerBoost for a maximum of 10 minutes.
After 10 minutes the cooking zone will automatically reduce its heat to setting 9.
To turn PowerBoost off
Turn the control dial to a lower heat setting or back to 0 (OFF).
45
Page 48

USING YOUR COOKTOP’S SPECIAL FEATURES
P
P
P
P
P
P
P
P
P
P
P
P
P
P
P
P
P
P
y You can set three cooking zones for PowerBoost at the same time as long as one is not
behind the other.
y It is not possible to set all the cooking zones for PowerBoost at the same time.
y If one cooking zone is set to PowerBoost and you accidentally also set a second
cooking zone immediately in front or behind to PowerBoost, the first cooking zone will
warn you that the configuration is not possible, flash
its power level.
y When a cooking zone is set for PowerBoost, the cooking zone immediately in front of or
behind may automatically reduce its power level.
y PowerBoost is not available if cooking zones are bridged.
and then automatically reduce
46
Page 49

USING YOUR COOKTOP’S SPECIAL FEATURES
Using the Auto RapidHeat feature
This feature lets you rapidly heat up food or liquid then automatically reduce the
temperature to a pre-selected heat setting.
To set a cooking zone forAuto RapidHeat
OFF A
1 Press in and turn the control dial
anticlockwise to A.
y Hold the dial at A until appears
in the cooking zone display
2 Turn the control dial to the desired
heat setting (1-8).
y The heat setting and will alternate
in the display.
y Auto RapidHeat is now set.
47
Page 50

USING YOUR COOKTOP’S SPECIAL FEATURES
When Auto RapidHeat is set
During rapid heat
alternately with the heat setting
you have selected.
The amount of time the cooking zone will rapidly heat for depends on the heat setting
you have selected. See below chart for rapid heat times.
SELECTED HEAT SETTING APPROXIMATE TIME AT RAPID HEAT
To cancel Auto RapidHeat (while A is still flashing)
Turn the control dial to a lower heat setting or back to (OFF). increasing the heat setting
to 9 will also cancel Auto RapidHeat.
Note:
The Auto RapidHeat and PowerBoost features cannot be used together. If you turn
PowerBoost on when Auto Heat-reduce is already set, the Auto RapidHeat will be
cancelled.
will flash
1
2
3
4
5
6
7
8
When rapid heat is finished will
stop flashing and the temperature
will automatically reduce to the heat
setting you have selected.
40 seconds
1 minute
2 minutes
3 minutes
4 minutes
7 minutes
2 minutes
3 minutes
48
Page 51

USING YOUR COOKTOP’S SPECIAL FEATURES
Bridging SmartZones
y The bridging zone function allows you to use two SmartZones together giving you a
larger cooking area. Your pan(s) will need to cover both cooking zones.
y There may be a cooler area in the centre of the cooktop between the cooking zones.
You may need to move food around the pan to ensure even cooking.
y When using bridging zones it is not possible to use the PowerBoost function.
Bridging zone
cooler
area
To select the bridging function
1 Place the pan on the cooktop over the two zones you wish to use, covering both
cooking zones (as shown above).
2 Push in and turn both control dials for the selected cooking zones anticlockwise to the
highest heat setting 9.
3 Turn both dials to
and hold until appears in the cooking zone displays.
y The front cooking zone display will show the heat setting.
y The rear cooking zone will show
4 Use the front cooking zone control dial to adjust the heat setting for the bridged zone.
y Adjusting the rear cooking zone will cancel bridging.
If no pan is detected
If no pan is detected on either cooking zone the front cookingzone display will alternate
between the selected setting and . The rear cooking display will show .
49
Page 52

USING YOUR COOKTOP’S SPECIAL FEATURES
If no pan is detected on one cooking zone:
The front cooking zone display will still show the selected temperature and the rear
cooking zone display will still show .
If after 10 minutes no pan is detected:
y the bridging function will switch off.
y the cooking zone without a detectable pan will continue to show
y the remaining cooking zone will continue cooking at the selected heat setting.
Using Auto RapidHeat in bridged mode
1 Bridge the cooking zones.
2 Turn the control dial for the front cooking zone back past OFF to A.
3 Hold the dial at A until starts alternating in the display.
4 Turn the control dial to your selected heat setting. the Heat setting and will alternate
in the display.
5 The bridged zone is now set for Auto RapidHeat
To cancel bridging
Turn both control dials back to OFF
50
Page 53

CHOOSING THE RIGHT COOKWARE
To check if cookware is suitable
y Carry out a magnet test:
y Move a magnet across the base of the pan.
If the magnet is attracted then the pan is induction suitable.
y Note: Make sure attraction is consistent across the base of the pan.
If there are gaps, such as an indented manufacturer’s logo,
then the performance of the pan will be impaired.
y If you do not have a magnet:
1 Put some water in the pan you want to check.
2 Follow the steps under ‘To start cooking’.
3 If
Quality of cookware
does not flash in the display and the water is heating, the pan is suitable.
IMPORTANT!
y The quality of your cookware can affect cooking performance. Only use induction
compatible cookware that has been specifically designed for induction cooking.
Look for the induction symbol on the packaging or the bottom of the pan.
y Cookware that has a high content of ferromagnetic material that continues up from
the base into the sides of the pan will give the best cooking performance.
See below:
Quickest heating
Performance
High content of
ferromagnetic material.
Heating area is
consistent across the
base and continues up
the sides of pan.
Average heating
Performance
Reduced area of
ferromagnetic material.
Reduced zone of
heating, results in poor
cooking performance
and slower heating.
Slow heating
Performance
Very limited area of
ferromagnetic material.
Results in very slow
heating performance.
Note: This type of pot is
good for very delicate
tasks such as melting
chocolate, as heating is
very slow.
51
Page 54

CHOOSING THE RIGHT COOKWARE
Cookware guidelines
y Cookware made from the following materials is suitable:
y stainless steel with a magnetic base or core
y aluminium and copper with a magnetic base or core
y cast iron
y steel or enamelled steel.
y Cookware made from the following materials is not suitable:
y pure stainless steel
y aluminium or copper without a magnetic base
y glass
y wood
y porcelain
y ceramic or earthenware.
Do not use cookware with jagged edges or a curved base.
Make sure that the base of your pan is smooth, sits flat against the glass, and is similar
in size as the cooking zone. A small pot on a large cooking zone may not be detected.
Always centre your pan on the cooking zone.
Always lift pans off the cooktop – do not slide, or they may scratch the glass.
52
Page 55

COOKING GUIDELINES
IMPORTANT!
Take care when frying: oil and fat heat up very quickly, particularly if you’re using
PowerBoost. At extremely high termperatures oil and fat will ignite spontaneously
and this presents a serious fire risk.
Cooking tips
y When food comes to the boil, reduce the temperature setting.
y Using a lid will reduce cooking times and save energy by retaining the heat.
y Minimise the amount of liquid or fat to reduce cooking times.
y Start cooking on a high setting and reduce the setting when the food has heated
through.
Simmering, cooking rice
y Simmering occurs below boiling point, at around 85oC, when bubbles are just rising
occasionally to the surface of the cooking liquid. It is the key to delicious soups and
tender stews because the flavours develop without overcooking the food. You should
also cook egg-based and flour-thickened sauces below boiling point.
y Some tasks, including cooking rice by the absorption method, may require a setting
higher than the lowest setting to ensure the food is cooked properly in the time
recommended.
Searing steak
To cook juicy flavoursome steaks:
1 Stand the meat at room temperature for about 20 minutes before cooking.
2 Heat up a heavy-based frying pan.
3 Brush both sides of the steak with oil. Drizzle a small amount of oil into the hot pan
and then lower the meat onto the hot pan.
4 Turn the steak only once during cooking. The exact cooking time will depend on the
thickness of the steak and how cooked you want it. Times may vary from about 2 – 8
minutes per side. Press the steak to gauge how cooked it is – the firmer it feels the
more ‘well done’ it will be.
5 Leave the steak to rest on a warm plate for a few minutes to allow it to relax and
become tender before serving.
For stir-frying
y When stir-frying be careful to lift the pan clear of the surface if tossing the
ingredients. Sliding the pan across the cooktop surface may scratch it.
1 Choose an induction compatible flat-based wok or a large frying pan.
2 Have all the ingredients and equipment ready. Stir-frying should be quick. If cooking
large quantities, cook the food in several smaller batches.
3 Preheat the pan briefly and add two tablespoons of oil.
4 Cook any meat first, put it aside and keep warm.
5 Stir-fry the vegetables. When they are hot but still crisp, turn the cooking zone to a
lower setting, return the meat to the pan and add your sauce.
6 Stir the ingredients gently to make sure they are heated through.
7 Serve immediately.
53
Page 56

COOKING GUIDELINES
Heat settings
The settings below are guidelines only. The exact setting will depend on several factors,
including your cookware and the amount you are cooking. Experiment with the cooktop
to find the settings that best suit you.
100
80
60
40
20
0
Percentage of rated power %
HEAT SETTING SUITABILITY
54
Heat setting
y gentle simmering
y slow warming
y reheating
y rapid simmering
y cooking rice
y pancakes
y sautéing
y cooking pasta
y stir-frying
y searing
y bringing soup to the boil
y boiling water
Page 57

USING THE STORAGE DRAWER
Your cooker is equipped with a storage drawer below the oven.
y Use this to store bakeware, oven trays and shelves when not in use.
y Do not store flammable items in the drawer.
To access the storage drawer
Grab the bottom of the drawer’s face and pull towards you to open it.
The drawer will slide out.
55
Page 58

CARE AND CLEANING
DOS DON’TS
y Read these cleaning instructions and the
‘Safety and warnings’ section before you
start cleaning your cooker.
y Before cleaning or removing any part,
make sure that everything on the cooker
has been turned off.
y Unless suggested otherwise in the chart
following, allow any part to cool to a safe
temperature before cleaning. If you do
need to handle a warm or hot part, take
extreme care. Wear long protective mitts
to avoid burns from steam or hot surfaces.
y Try using any cleaner on a small area first,
to ensure it doesn’t stain.
y See the pages following this chart for
instructions on removing and replacing
different parts of the cooker for cleaning
or maintenance.
y To help you identify any parts, see
illustrations in section ‘Introduction’ and
after this cleaning chart.
y Ensure the anti-tip device is re-engaged if
you move the cooker for cleaning. Failure
to do this may result in the oven tipping,
and adults and children may be killed.
y To prevent soiling from becoming ‘baked
on’ and stubborn, we recommend
removing any easy-to-reach spills, food or
grease stains from the oven cavity enamel
after each use.
y Do not use aerosol cleaners until
the cooker has completely cooled.
The propellant substance in these
cleaners could catch fire in the
presence of heat.
y Do not let soiling or grease
accumulate anywhere in or on
the cooker. This will make future
cleaning more difficult and may
present a fire hazard.
y Do not use any abrasive or harsh
cleaners, cloths, scouring pads or
steel wool. These will scratch your
cooker and damage its appearance.
y Do not use a steam cleaner to clean
any part of the cooker.
y Do not perform any cleaning
or maintenance on parts not
specifically named in the chart
below. If in doubt, contact Customer
Care.
56
Page 59

Manual cleaning chart
WHAT?
HOW OFTEN?
COOKER EXTERIOR
Door frame
exterior,
Control panel,
Cooktop trim
Back trim
Storage drawer
exterior
After every use
Dials
Oven handles
Clock display
and controls
Oven door glass
(exterior)
OVEN PARTS
Side racks
Oven shelves
Bake and
grill burners
CARE AND CLEANING
HOW? IMPORTANT!
1 Soften any stubborn stains
under a hot soapy cloth.
2 Clean with a solution of
mild detergent and hot
water, then wipe dry with a
microfiber cloth.
Stainless steel models: For
extra shine, use a suitable
stainless steel cleaner
and polish, following
manufacturer’s instructions.
Always rub the stainless steel
in the direction of the polish
lines.
1 Wipe with a damp cloth
using a solution of mild
detergent and hot water.
2 Dry thoroughly with
microfiber cloth.
Take particular care when
cleaning the clock and
surrounding area. Only use a
damp cloth with detergent.
Clean using a soft cloth and
a mixture of warm water and
dishwashing liquid or glass
cleaner.
Pre-soak any stubborn, burnton soiling, then clean with a
solution of mild detergent and
hot water and wipe dry with a
microfibre cloth.
Wipe with a damp cloth and
mild detergent. Do not wipe
off or wash away the white
lubricating grease (visible when
the shelf is
extended).
Do not clean these parts. They self-clean during normal use.
y Always read the label to
make sure your stainless steel
cleaner does not contain
chlorine compounds as
these are corrosive and may
damage the appearance of
your cooktop.
y Do not use and take care not
to spill any stainless steel
cleaner on the dials, oven
handles, or the kickstrip grate.
These are not stainless steel
parts and their surface may
be damaged by stainless steel
cleaner.
y Do not use stainless steel
cleaner on these parts, as
doing so may damage their
coating.
y Do not use any oven cleaners,
harsh or abrasive cleaners,
scouring pads, steel wool or
sharp metal scrapers on the
glass. These may scratch and
damage the surface.
y Do not wash the shelf in the
dishwasher, immerse in soapy
water, or use oven cleaner on
it. Doing so will prevent the
slides from running smoothly.
57
Page 60

CARE AND CLEANING
WHAT?
HOW OFTEN?
OVEN PARTS
Enamel
oven interior –
light soiling
Enamel
oven interior –
stubborn,
‘baked-on’
soiling
Roasting dish
and grill rack
Rotisserie
parts
Oven door
glass
(interior)
After every use
Oven door
gasket
58
HOW? IMPORTANT!
1 Wipe with a damp cloth and a
solution of hot water and mild
detergent.
2 Wipe dry with a soft cloth.
y To prevent soiling from
becoming ‘baked on’ and
stubborn, we recommend
removing any easy-toreach spills, food or greasy
Note: the oven door may be
removed to make reaching into
stains from the enamel
after each use.
the oven easier.
1 Remove everything from the oven:
shelves, side racks, all utensils.
2 Cover the floor in front of the
oven with several layers of
newspaper. This is to protect
these surfaces from damage
by oven cleaner seeping out or
accidentally dripping on them.
3 Apply an ammonia-based
y Oven cleaners are caustic
and may permanently stain
or damage some surfaces.
y When using, take care not
to let it come in contact
with any surface other
than the oven interior. If it
accidentally does, remove
immediately.
cleaner or oven cleaner following
the cleaner manufacturer’s
instructions.
4 After cleaning, replace the side
racks and shelves.
1 Pre-soak any stubborn soiling in a
solution of mild detergent and hot
water.
2 Wash by hand or in a dishwasher.
y Use a soft cloth and a mixture
of warm water and dishwashing
liquid to remove light soiling after
every use.
y For stubborn stains, try using
a mixture of baking soda and
warm water with a non-abrasive
scrubbing pad, then wipe dry with
a soft, lint-free cloth.
Avoid cleaning this part. If you
need to remove large food
particles off it, proceed as follows:
1 Dampen a sponge with clean hot
water.
2 Gently wipe off the soiling, but do
not rub.
3 Press a dry towel gently on the
gasket to dry.
y Do not use oven cleaners
or any other harsh/abrasive
cleaners, cloths, scouring
pads, steel wool or sharp
metal scrapers to clean
the oven door glass.
These scratch the glass,
which in turn could result
in the glass cracking and
shattering.
y Do not allow grease to
build up on the glass or
become baked on as this
reduces visibility into the
oven.
y Do not use any cleaning
agent on the gasket.
y The gasket is essential for a
good seal. Take care not to
rub, displace, or damage it.
Page 61

CARE AND CLEANING
WHAT? HOW? IMPORTANT!
Stoarge
drawer
(interior)
Drip tray under door
COOKTOP
Everyday soiling
on glass
(fingerprints, marks,
stains left by food or
non-sugary spillovers
on the glass)
Boilovers, melts,
acidic sauces or
marinades and hot
sugary spills on the
glass
Spillover on the
touch controls and
stainless steel trim
1 Wipe with a damp cloth and
a solution of hot water and
mild detergent.
1 Wipe dry with a soft cloth.
Note: the drawer may be
removed to make cleaning
easier.
1 Remove oven door.
2 Wipe with a damp cloth and a solution of hot water and mild
detergent.
1 Ensure the cooktop control
dials are all turned off.
2 Apply cooktop cleaner to a
clean lint-free cloth and rub
gently while the glass is still
warm (but not hot!)
3 Rinse and wipe dry with a
clean cloth or paper towel.
4 Switch the power to the
cooktop back on at the wall.
y Heavy-duty scourers, some
nylon scourers and harsh/
abrasive cleaning agents
may scratch the glass.
Always read the label to
check if your cleaner or
scourer is suitable.
y Never leave cleaning
residue on the cooktop:
the glass may become
stained.
Remove these immediately
with a fish slice, palette knife
or razor blade scraper suitable
for ceramic glass cooktops, but
beware of hot cooking zone
surfaces:
1 Switch the power to the
cooktop off at the wall.
2 Hold the blade or utensil at
a 30o angle and scrape the
soiling or spill to a cool area
of the cooktop.
3 Clean the soiling or spill up
with a dish cloth or paper
towel.
4 Follow steps 2 to 4 for
‘Everyday soiling on glass’
above.
y Remove stains left by
melts and sugary food
or spillovers as soon as
possible. If left to cool
on the glass, they may be
difficult to remove or even
permanently damage the
glass surface.
y Cut hazard: when the
safety cover is retracted,
the blade in a scraper
is razor-sharp. Use with
extreme care and always
store safely and out of
reach of children.
y When the power to the
cooktop is switched off,
there will be no ‘hot
surface’ indication but the
cooking zone may still be
hot! Take extreme care.
1 Switch the power to the cooktop off at the wall.
2 Soak up the spill.
3 Wipe the touch control area with a clean damp sponge or
cloth.
4 Wipe the area completely dry with a paper towel.
5 Switch the power to the cooktop back on at the wall.
59
Page 62

CARE AND CLEANING
Removing and replacing the oven door
IMPORTANT!
y Switch the oven off at the wall before removing the door.
y Do not lift the oven door by its handle. Doing so may damage the door.
y Make sure the oven and the door are cool before you begin to remove the door.
y Before removing the door, make sure there is a large enough clear, protected surface
in the kitchen to rest the door on.
y Take care, the oven door is heavy!
To remove the oven door
Lever
1 Open the door fully.
3
Holding the door firmly on both sides,
gently close it about halfway.
60
2
Open the levers fully on both sides.
4 Disengage the hinges and remove the
door. Place on a protected surface.
Page 63

CARE AND CLEANING
Removing and replacing the door glass panes for cleaning
Once you have removed the oven door, you can remove the inner and middle panes of
glass for cleaning if needed.
Make sure you follow the precautions and instructions below very carefully. Replacing
the glass panes and the door incorrectly may result in damage to the oven and may
void your warranty.
Your oven door has 3 panes of glass. The inner and middle panes may be removed for
cleaning.
C
B
A
inner
middle
outer
IMPORTANT!
y Take extreme care when handling the glass panes. Avoid the edges of the glass
bumping against any surface. This may result in the glass shattering.
y Don’t use oven cleaners or any other harsh/abrasive cleaners, cloths, scouring pads,
steel wool or sharp metal scrapers to clean the glass surfaces. These scratch the glass
and may damage its special coating, which in turn could result in the glass cracking or
shattering.
y If you notice any sign of damage on any of the glass panes (such as chipping or
cracks), do not use the oven. Call your Authorised Repairer or Customer Care.
y Make sure you replace all the glass panes correctly. Do not use the oven without all
glass panes correctly in place.
y If the glass panes feel difficult to remove or replace, do not force them. Call your
Authorised Repairer or Customer Care for help.
Note: service visits providing assistance with using or maintaining the oven are not
covered by your warranty.
61
Page 64

CARE AND CLEANING
To remove the door glass for cleaning
Latch
Latch
Outer screwInner screw
Open the latches securing the lower trim to the base of the oven door:
Loosen the inner and outer screws securing each of the latches by two turns.
1
y Do not loosen the middle screw.
y Do not fully remove the screws.
2 Slide the latches inwards so that the lower trim can be removed.
62
Page 65

CARE AND CLEANING
1
2
Ta b
3 Press down on the tabs to release the lower trim and remove it.
2
Lower trim
1
4 Remove the inner pane of glass:
a. Lift the lower end slightly.
b. Gently slide the glass out.
3
2
1
5 Remove the middle pane of glass:
a. Pull the pane slightly towards you so that the edges are clear of the support brackets
at the base of the door.
b. Lift the lower end and gently slide the glass out.
63
Page 66

CARE AND CLEANING
To replace the glass panes after cleaning
When replacing the glass panes, make sure that:
y You replace all panes correctly, as shown on the following page.
y Each pane must be in the position described below in order to fit into the door and to
ensure that the oven operates safely and correctly.
y You take extra care not to bump the edges of the glass against any object or surface.
y You do not force any of the panes into place. If you are experiencing difficulties
replacing the panes, remove them and start the process again from the beginning. If this
still does not help, call Customer Care.
64
Page 67

CARE AND CLEANING
3
To replace the glass panes after cleaning
1
Middle
pane B
Empty grooves
3
2
1 Replace the middle pane of glass:
a. Insert the glass into the middle set of grooves in the bracket at the top of the door.
b. Pull the pane slightly towards you.
c. Gently lower into place.
IMPORTANT!
y Make sure the glass is facing the same way as when you removed it from the door.
y Use the middle set of grooves. The set of grooves closest to the outer pane must
remain empty.
65
Page 68

CARE AND CLEANING
1
Angle-cut corner
PGW ECO
Angle-cut corner
2
2 Replace the inner pane of glass.
a. Ensure the angle cut corners are positioned at the bottom of the door.
b. Insert the the glass into the top set of grooves in the bracket at the top of the door.
c. Pull the pane slightly towards you.
d. Gently lower into place.
3
IMPORTANT!
y Make sure the glass is facing the same way as when you removed it form the door.
y You should be able to read the wording on it as it faces you.
66
Page 69

CARE AND CLEANING
Clamp
Clamp
Lower trim
3 Align the lower trim with the door glass as shown. It should sit on the bottom edge of
the outer door glass.
y Check that clamp in the centre is not damaged or misshapen.
“Click”
4 Gently push the lower trim back onto the door glass until it clicks into place.
Lower trim
IMPORTANT!
Make sure the lower trim is fitted correctly and firmly in place and that the glass
panes are secure.
67
Page 70

CARE AND CLEANING
5 Slide the two latches back into place on the base of the lower trim.
Outer screwInner screw
6 Re-tighten the screws so that the latches and the lower trim are firmly secured.
Latch
Latch
7 Replace the door following the instructions in the following section.
68
Page 71

To replace the oven door
CARE AND CLEANING
Notch
1 Hold the door firmly in an approximately
halfway open position.
2 Insert the hinge tongues into the slots,
making sure that the notches on both
sides drop into place as shown.
3 Open the door fully. 4 Fully close the levers on the left and
right hinges, as shown, then close the
door.
69
Page 72

CARE AND CLEANING
Removing and replacing the oven side racks
IMPORTANT!
Always turn off the cooker at the wall first.
Ensure the oven has cooled down
completely before starting.
Remove all shelves
Slide out all shelves and remove.
1
For easier access we recommend removing
the oven door. See ‘Removing and refitting
the oven door’.
To remove the side racks
Remove all
shelves
2 Use a small coin or a flat-head
screwdriver to loosen and remove the
fixing screws.
To replace the side racks
1
Make sure the side racks are the
right way up, as shown.
70
3 Remove the side racks
Refit the fixing screws and tighten.
2
Page 73

CARE AND CLEANING
Removing and replacing the storage drawer
IMPORTANT!
y Do not remove the drawer while the oven is in operation.
y Do not remove the drawer while the oven is hot.
y Ensure the drawer is completely empty before removing it.
y Always position your hand at the bottom of the drawer to open and close it.
To remove the storage drawer
1
Open the drawer completely
2 Open the levers fully on both sides and hold in place:
y On the left side push the lever down
y On the right side push the lever up
3 Remove the drawer while holding the levers in position.
Fitting the storage drawer
1
Insert the drawer guides onto the sliding runners on either side of the cooker interior.
y Make sure they are correctly lined up on both sides of the drawer.
2 Gently close the drawer completely. The safety catches will automatically hook into
place.
71
Page 74

CARE AND CLEANING
Replacing an oven light bulb
IMPORTANT!
Use a 25W, 220-240V 50Hz G9 halogen bulb for replacement.
Do not use a standard light bulb in any oven, the heat will break it.
Allow the oven (including the lamp cover and the bulb) to cool completely.
1
2 Remove any shelves that may get in the way.
3 Remove the door if the lamp will be hard to reach.
4 Turn the power supply to the cooker off at the main fuse or circuit breaker panel. If you
don’t know how to do this, contact an electrician.
IMPORTANT!
Failure to disconnect the cooker from the power supply may result in death or
electrical shock.
5 Remove the lamp cover.
y Upper lights: Wearing a rubber glove to improve grip turn the cover counter-
clockwise to unscrew.
y Side lights: Wearing a rubber glove to improve grip, hold the cover and prise out
using finger nails on other hand. If this does not work place a thin plastic spatula
between the cover and cavity wall and gently twist to prise the cover off. Take care
not to chip the glass covers or to damage the enamel finish inside the oven.
6 Remove the faulty bulb.
7 Holding the replacement bulb in a soft cloth or tissue insert it into the socket. Do not
touch the bulb with your fingers.
8 Replace the lamp cover.
y Upper lights: Turn the cover clockwise to tighten and then back a quarter turn
9 Turn the power supply to the cooker back on at the main fuse or circuit breaker panel.
72
Upper
Lamp cover
Light bulb
Side
Lamp cover
Light bulb
Upper
Lamp cover
Side
Lamp cover
Page 75

TROUBLESHOOTING
Troubleshooting chart
If there is a problem, check the chart below to see if you can fix it. If the problem cannot
be fixed or persists, call your Authorised Repairer or Customer Care.
PROBLEM POSSIBLE CAUSES WHAT TO DO
GENERAL
The oven does not work. No power.
Check that the mains power
supply (wall switch) is turned
on, the fuse has not tripped
and there is no power outage
in your area.
The clock has not been set
The oven does not work
but the display is lit.
One or all of the lights
do not come on, but the
oven works.
The temperature
indicator is blank and
the oven control dials
are unresponsive.
The oven is not heating. The door is not properly closed
A glass pane in the oven
door has cracked,
chipped, or shattered.
The oven is set for automatic
cooking.
The oven is in Demo Mode
The oven light bulb(s) have
blown.
The door is not correctly fitted.
The oven is in Sabbath setting
and the ‘Light off’ option has
been saved.
The control panel is locked. See ‘Locking the oven
or it is opened too frequently
during cooking.
Incorrect cleaning or the edge
of the glass hitting against
something.
The oven will not work unless
the clock is set. See ‘Setting
the clock’.
See ‘Automatic cooking’ for
instructions.
Contact Customer Care
Replace the light bulb(s). See
‘Care and cleaning’ for
instructions.
See ‘Care and cleaning’ for
instructions on fitting the
door correctly.
To quit Sabbath setting,
touch and hold the cancel
control. See ‘User preference
settings’ for instructions
on changing the ‘Light off’
option.
controls’ for instructions
The heating elements are
disabled while the door is
open.
Make sure the door is
properly closed and avoid
opening it frequently during
cooking.
You must NOT use the oven.
Call your Authorised Repairer
or Customer Care.
73
Page 76

TROUBLESHOOTINGTROUBLESHOOTING
PROBLEM POSSIBLE CAUSES WHAT TO DO
GENERAL
I can feel hot air
blowing out of the vents
after I have turned the
oven off.
The oven fan comes on
when I select a function
that does not use a fan
(eg bake)
The oven has reached
the set temperature
but the temperature
dial halo is still red
(indicating that the oven
is not ready to use).
The oven is heating but
the display is dark.
The oven cancels
automatic cooking when
I try to adjust the clock
setting.
The temperature dial
halo never turns white
when I use Grill .
The displays work,
and the function and
temperature dials halos
come on but the oven
does not heat up.
This is normal. For safety reasons the
cooling fans will continue
to run even when you have
turned the function dial to
‘Off’. The fans will switch
off automatically when the
oven has cooled.
This is normal.
The fan comes on while the
oven is preheating. It may turn
off when the oven has reached
the set temperature.
This is normal: when heating
up from cold, your oven is
designed to initially heat to a
temperature somewhat higher
than what you have set. This
is to provide optimal baking
conditions right from the start.
The oven is set to ‘Display off’
option.
The oven is in Sabbath setting.
The oven was set for automatic
cooking when you were trying
to adjust the clock setting.
This is normal: the halo stays red to indicate that the grill
element provides instant radiant heat.
The oven is in ‘Demo’ mode. Call Customer Care.
Wait until a long
tone sounds and the
temperature dial halo turns
white: the oven will then be
ready to use.
Wait until a long
tone sounds and the
temperature dial halo
turns white: the oven will
then be ready to use.
To quit the ‘Display off’
option, touch and hold the
cancel
display shows the time of
day.
To quit Sabbath setting,
touch and hold the cancel
shows the time of day.
You can only adjust the
clock setting while the oven
is not set for automatic
cooking.
control until the
control until the display
74
Page 77

TROUBLESHOOTING
PROBLEM POSSIBLE CAUSES WHAT TO DO
OVEN
Condensation around
oven (e.g. on control
panel or top of oven
door.)
Condensation building
up in the oven while
cooking on Grill.
Uneven baking. Oven not properly
COOKTOP
The cooktop cannot be
turned on.
The control dials are
unresponsive.
Food has high moisture
content or local climate
(temperature, humidity)
is contributing to
condensation.
Food in your oven releasing
moisture as it cooks
preheated.
Unsuitable or incorrectly
arranged bakeware.
No power. Make sure the cooktop is
The controls are locked. Unlock the controls. See section
Condensation is normal. You
can wipe the drops off the
control panel. If there is
frequent or excessive
condensation, make sure that
cabinetry around the cooker is
moisture-proofed.
Allow the grill element to
preheat for 5 minutes before
placing food in the oven or try
cooking on Fan Grill instead.
Wait until the halo around the
temperature dial has changed
from white to orange before
putting food in.
See 'Cooking guide' for advice.
connected to the power supply
and that it is switched on at the
wall. Check whether there is
a power outage in your home
or area. If you’ve checked
everything and the problem
persists, call your Authorised
Service Centre or Customer
Care.
‘Using your induction cooktop’
for instructions.
75
Page 78

TROUBLESHOOTING
PROBLEM POSSIBLE CAUSES WHAT TO DO
COOKTOP
The glass is being
scratched.
Rough-edged cookware. Use cookware with flat and
smooth bases. See ‘Choosing
the right cookware’.
Unsuitable, abrasive scourer or
cleaning products being used.
See ‘Care and cleaning’.
Some or all displays
flash
continuous beep.
Pans do not become
hot. The heat setting
display comes on, but
the does not flash
when I remove a pan.
shows in the timer
display when I turn on
the cooktop.
Condensation is
forming
on surrounding walls,
cabinetry or your
overhead rangehood.
or there is a
The control dials have been
held in either A or position
for too long.
The cooktop is in ‘Display
mode’
This is a normal for induction
cooking.
Energy efficient technology
means that no heat is lost to
surrounding surfaces.
This results in condensation
forming on these cooler
surfaces when steam is
produced by cooking.
Turn the control dial back to
OFF and wait until the error
flash has disappeared before
trying to use the cooktop
again.
Contact Customer Care or
your Authorised Service
Centre.
This is normal for induction
cooking and does not
indicate a fault.
To minimise condensation:
y Ensure adequate
ventilation when cooking.
y Switch your rangehood
on 5 minutes before
cooking and let it run
for at least minutes after
cooking.
y Use your rangehood on a
lower speed setting when
boiling.
y Use the cooktop on a
lower heat setting when
boiling.
y Use pot lids to stop
moisture from escaping.
y If condensation forms,
wipe down surrounding
walls and cabinetry as
needed.
76
Page 79

TROUBLESHOOTING
PROBLEM POSSIBLE CAUSES WHAT TO DO
Some pans make
crackling or clicking
noises.
This may be caused by the
construction of your
cookware (layers of different
metals vibrating differently).
This is normal for induction
cookware and does not
indicate a fault.
The cooktop makes
a low humming noise
when used on a high
heat setting (especially
PowerBoost).
Fan noise coming from
the cooktop.
Pans do not become hot
and appears in the
display.
flashes in the display
when you are trying to
set PowerBoost.
The cooktop or a cooking
zone has turned itself off
unexpectedly, a tone
sounds and an error code
is displayed (typically
or alternating with
one or two digits in the
cooking zone displays).
This is caused by the
technology of induction
cooking.
A cooling fan built into
your cooktop has come on
to prevent the electronics
from overheating. It may
continue to run even after
you’ve turned the cooktop
off.
The cooktop cannot detect
the pan because it is not
suitable for induction
cooking.
The cooktop cannot detect
the pan because it is too
small for the cooking zone or
not properly centred on it.
PowerBoost is temporarily
unavailable because the
cooktop needs to protect
itself from overheating.
Technical fault. Please note down the error
This is normal, but the
noise should quieten down
or disappear completely
when you decrease the
heat setting.
This is normal and needs
no action. Do not switch
the power to the cooktop
off at the wall while the
fan is running.
Use cookware suitable for
induction cooking. See
section ‘Choosing the right
cookware’.
Centre the pan and make
sure that its base matches
the size of the cooking
zone.
Allow the cooktop to cool
down.
letters and numbers,
switch the power to the
cooktop off at the wall, and
contact your Authorised
Service Centre or Customer
Care with the error code
information.
77
Page 80

ALERT CODES
If there is a problem with the oven, the cooker will:
y automatically suspend all oven functions
y beep five times
y display an alert code.
IMPORTANT!
Do not turn off the mains power supply to the cooker (wall switch) if you get an alert
code, unless the instructions in the chart following specifically instruct you to. There
are cooling fans within the cooker which are needed to cool the cooker components.
Turning off the power while the cooker is too hot may damage the cooker and its
surrounding cabinetry.
What to do if an alert code is displayed
1 If the beeping hasn’t stopped already, touch any control to stop it.
2 Make a note of the alert code displayed. You may need this information.
3 Check the chart following to see if you can fix the problem yourself and follow the
instructions.
4 If you can fix the problem and the alert code does not reappear, you can keep using
your oven.
OR
If you can’t fix the problem yourself or the alert code reappears and the problem
persists: wait until the cooling fans have stopped and the oven has completely cooled
down, then turn the power to the cooker off at the wall and call your Authorised
Repairer or Customer Care with the alert code information.
ALERT CODE POSSIBLE CAUSES WHAT TO DO
The oven has overheated.
A1
Technical fault.
+ number
F
78
1 Allow the oven to cool down.
2 Once the oven has cooled down
and the door has unlocked, the
alert code will disappear. You can
now use the oven again.
1 Note down the alert code.
2 Wait until the cooling fans
have stopped and the oven has
completely cooled down.
3 Turn the power to the oven off at
the wall.
4 Call your Authorised Repairer or
Customer Care with the alert code
information.
Page 81

WARRANTY AND SERVICE
Before you call for service or assistance ...
Check the things you can do yourself. Refer to the installation instructions and your
user guide and check that:
1 Your product is correctly installed.
2 You are familiar with its normal operation.
If after checking these points you still need assistance or parts, please refer to the
Service & Warranty book for warranty details and your nearest Authorised Service
Center, Customer Care, or contact us through our website www.fisherpaykel.com.
This oven has been designed and constructed in accordance with the following
codes and specifications:
In New Zealand and Australia
y AS/NZS 60335-1 General Requirements for Domestic electrical appliances
y AS/NZS 60335-2-6 Particular Requirements for Domestic electrical cooking appliances
y AS/NZS CISPR 14.1 2010 Electromagnetic Compatibility Requirements.
Complete and keep for safe reference:
Model
Serial No.
Purchase Date
Purchaser
Dealer
Suburb
Town
Country
79
Page 82

FISHERPAYKEL.COM
© Fisher & Paykel Appliances 2018 All rights reserved.
The product specifications in this booklet apply to the specific products
and models described at the date of issue. Under our policy of continuous
product improvement, these specifications may change at any time. You
should therefore check with your Dealer to ensure this booklet correctly
describes the product currently available.
NZ AU
59151A / 1105517 - ß0 0.18
 Loading...