

Page 1

1
US CA
OR24SDMBGX model
User guide
Freestanding range
Guide d’utilisation
Cuiseur indépendant
Page 2

2
✓ Do not store or use gasoline or other flammable vapors and liquids
in the vicinity of this or any other appliance.
✓ WHAT TO DO IF YOU SMELL GAS:
• Do not try to light any appliance.
• Do not touch any electrical switch; do not use any phone in your
building.
• lmmediately call your gas supplier from a neighbor's phone.
Follow the gas supplier's instructions.
• lf you cannot reach your gas supplier, call the fire department.
✓ Installation and service must be performed by a qualified installer,
service agency, or the gas supplier.
WARNING: IF THE INFORMATION IN THIS MANUAL IS NOT
FOLLOWED EXACTLY, A FIRE OR EXPLOSION MAY RESULT
CAUSING PROPERTY DAMAGE, PERSONAL INJURY, OR
DEATH.
WARNING
• ALL RANGES CAN TIP
• INJURY TO PERSON COULD RESULT
• INSTALL ANTI-TIP DEVICE PACKED
WITH RANGE
• SEE INSTALLATION INSTRUCTIONS
This appliance is designed and manufactured solely for the cooking of domestic (household)
food and in not suitable for any none domestic application and therefore should not be used
in a commercial environmement.
The appliance guarantee will be void if the appliance is used within a non domestic
environnement i.e. a semi commercial, commercial or communal environment.
WARNING!
NEVER use this appliance as a space heater to heat or warm the
room. Doing so may result in carbon monoxide poisoning and
overheating of the oven.
Page 3
3
Dear Customer,
Thank you for having purchased and given your preference to our product.
The safety precautions and recommendations reported below are for your own safety and that of others. They
will also provide a means by which to make full use of the features offered by your appliance.
Please preserve this booklet carefully. It may be useful in future, either to yourself or to others in the event
that doubts should arise relating to its operation.
This appliance must be used only for the task it has explicitly been designed for, that is for cooking foodstuffs.
Any other form of usage is to be considered as inappropriate and therefore dangerous.
The manufacturer declines all responsibility in the event of damage caused by improper, incorrect or illogical
use of the appliance.
IMPORTANT - PLEASE READ AND FOLLOW
✓ Before beginning, please read these instructions completely and carefully.
✓ Do not remove permanently affixed labels, warnings, or plates from the product. This
may void the warranty.
✓ Please observe all local and national codes and ordinances.
✓ Please ensure that this product is properly grounded.
✓ The electrical plug should always be accessible.
✓ The installer should leave these instructions with the consumer who should retain
for local inspector's use and for future reference.
Installation must conform with local codes or in the absence of codes, the National Fuel
Gas Code ANSIZ223.1 - Iatest edition. Electrical installation must be in accordance
with the National Electrical Code, ANSI/NFPA70 - latest edition and/or local codes. IN
CANADA: Installation must be in accordance with the current CAN/CGA-B149.1 National
Gas Installation Code or CAN/CGA-B149.2, Propane Installation Code and/or local codes.
Electrical installation must be in accordance with the current CSA C22.1 Canadian Electrical
Codes Part 1 and/or local codes.
INSTALLATION IN MANUFACTURED (MOBILE) HOME: The installation must conform
with the Manufactured Home Construction and Safety Standard, Title 24 CFR, Part 3280
[formerly the Federal Standard for Mobile Home Construction and Safety, Title 24, HUD
(Part 280)] or, when such standard is not applicable, the Standard for Manufactured Home
Installations, ANSI/NCSBCS A225.1, or with local codes where applicable.
INSTALLATION IN RECREATIONAL PARK TRAILERS: The installation must conform with
state or other codes or, in the absence of such codes, with the Standard for Recreational
Park Trailers, ANSI A119.5.
Installation of any gas-fired equipment should be made by a Iicensed plumber. A manual
gas shut-off valve must be installed in the gas supply line ahead of the appliance in the gas
stream for safety and ease of service.
If an external electrical source is utilized, the appliance, when installed, must be electrically grounded in accordance with local codes or, in the absence of local codes, with the
national Electrical Code, ANSI/NFPA 70.
This range is supplied with a protective film on steel and aluminium parts.
This film must be removed before installing/using the appliance.
THIS RANGE IS FOR RESIDENTIAL USE ONLY
Page 4

4
USER INSTRUCTIONS
GENERAL INFORMATION
WARNING!!
1. This appliance shall not be used for space heating. This
information is based on safety considerations.
2. AlI openings in the wall behind the appliance and in the floor
under the appliance shall be sealed.
3. Keep appliance area clear and free from combustible
materials, gasoline, and other flammable vapors.
4. Do not obstruct the flow of combustion and ventilation air.
5. Disconnect the electrical supply to the appliance before
servicing.
6. When removing appliance for cleaning and/or service;
A. Shut off gas at main supply.
B. Disconnect AC power supply.
C. Disconnect gas line to the inlet pipe.
D. Carefully remove the range by pulling outward.
CAUTION: Range is heavy; use care in handling.
7.
Electrical Requirement
Electrical installation should comply with national and local
codes.
8.
Air Supply and Ventilation
The installer must refers to local/national codes.
9.
Gas Manifold Pressure
Natural gas - 4.0” W.C.P.
LP/Propane - 11.0” W.C.P.
10. The misuse of oven door (e.g. stepping, sitting, or leaning
on them) can result in potential hazards and/or injuries.
11. When installing or removing the range for service, a rolling
lift jack should be used. Do not push against any of the
edges of the range in an attempt to slide it into or out of
the installation. Pushing or pulling a range (rather than using
a lift jack) also increases the possibility of bending the leg
spindles or the internal coupling connectors.
WARNING!!
ELECTRICAL GROUNDING INSTRUCTIONS
The range must be electrically grounded in accordance
with local codes or, in the absence of local codes, with the
National Electrical Code, ANSI/NFPA No. 70-latest edition.
Installation should be made by a Iicensed electrician.
FOR PERSONAL SAFETY, THIS APPLIANCE MUST BE
PROPERLY GROUNDED.
If an external electrical source is utilized, the installation must
be electrically grounded in accordance with local codes or, in
the absence of local codes, with the national Electrical Code,
ANSI/NFPA 70.
This appliance is equipped with a three-prong grounding
plug for your protection against shock hazard and should be
plugged directly into a properly grounded socket.
Do not under any circumstances cut or remove the third
(ground) prong from the power plug.
REPLACEMENT PARTS
Only authorized replacement parts may be used in performing
service on the range. Replacement parts are available from
factory authorized parts distributors. Contact the nearest parts
distributor in your area.
Page 5

5
IMPORTANT PRECAUTIONS AND RECOMMENDATIONS FOR
USE OF ELECTRICAL APPLIANCES
Use of any electrical appliance implies the necessity to follow a series of fundamental rules.
In particular:
✓
Never touch the appliance with wet hands or feet;
✓
Do not operate the appliance barefooted;
✓
Do not allow children or disabled people to use the appliance without your supervision.
The manufacturer cannot be held responsible for any damages caused by improper,
incorrect or unreasonable use of the appliance.
IMPORTANT PRECAUTIONS AND RECOMMENDATIONS
After having unpacked the appliance, check to ensure that it is not damaged.
In case of doubt, do not use it and consult your supplier or a professionally qualified technician.
Packing elements (i.e. plastic bags, polystyrene foam, nails, packing straps, etc.) should not
be left around within easy reach of children, as these may cause serious injuries.
The packaging material is recyclable and is marked with the recycling symbol
.
✓
Do not attempt to modify the technical characteristics of the appliance as this may
become dangerous to use.
✓
Do not carry out cleaning or maintenance operations on the appliance without having
previously disconnected it from the electric power supply.
✓
After use, ensure that the knobs are in
OFF
position.
✓
Do not allow children or other incapable people to use the appliance without
supervision.
✓
During and after use of the range, certain parts will become very hot. Do not touch
hot parts.
✓
Keep children away from the range when it is in use.
✓
This range is supplied with a protective film on steel and aluminium parts. This film
must be removed before installing/using the appliance.
✓
Fire risk! Do not store flammable material in the oven, and in the storage
compartment.
✓
Make sure that electrical cables connecting other appliances in the proximity of the
range cannot come into contact with the hob or become entrapped in the oven
door.
✓
Do not line the oven walls with aluminium foil. Do not place shelves, broiler pan,
pans or other cooking utensils on the base of the oven chamber.
✓
The manufacturer declines all liability for injury to persons or damage to property
caused by incorrect or improper use of the appliance.
✓
To avoid any possible hazard, the appliance must be installed by qualified personnel
only. Any repairs by unqualified persons may result in electric shock or short circuit.
In order to avoid possible injuries to your body or to the appliance, do not attempt
any repairs by yourself. Such work should be carried out by qualified service
personnel only.
✓
Danger of burns! The oven and cooking accessories may become very hot during
operation. Make sure children are kept out of reach and warn them accordingly. To
avoid burns use kitchen clothes and gloves when handling hot parts or utensils.
✓
Stand away from the range when opening oven door. Hot air or steam which
escapes can cause burns to hands, face, and/or eyes.
✓
Never clean the range, oven and storage compartment with a high-pressure steam
cleaning device, as it may provoke a short circuit.
✓
This appliance is intended for use in your household. Never use the appliance for
any other purpose!
✓
If you should decide not to use this appliance any longer (or decide to substitute an
older model), before disposing of it, it is recommended that it be made inoperative
in an appropriate manner in accordance to health and environmental protection
regulations, ensuring in particular that all potentially hazardous parts be made
harmless, especially in relation to children who could play with old appliances.
Remove the door and the storage drawer before disposal to prevent entrapment.
Page 6
6
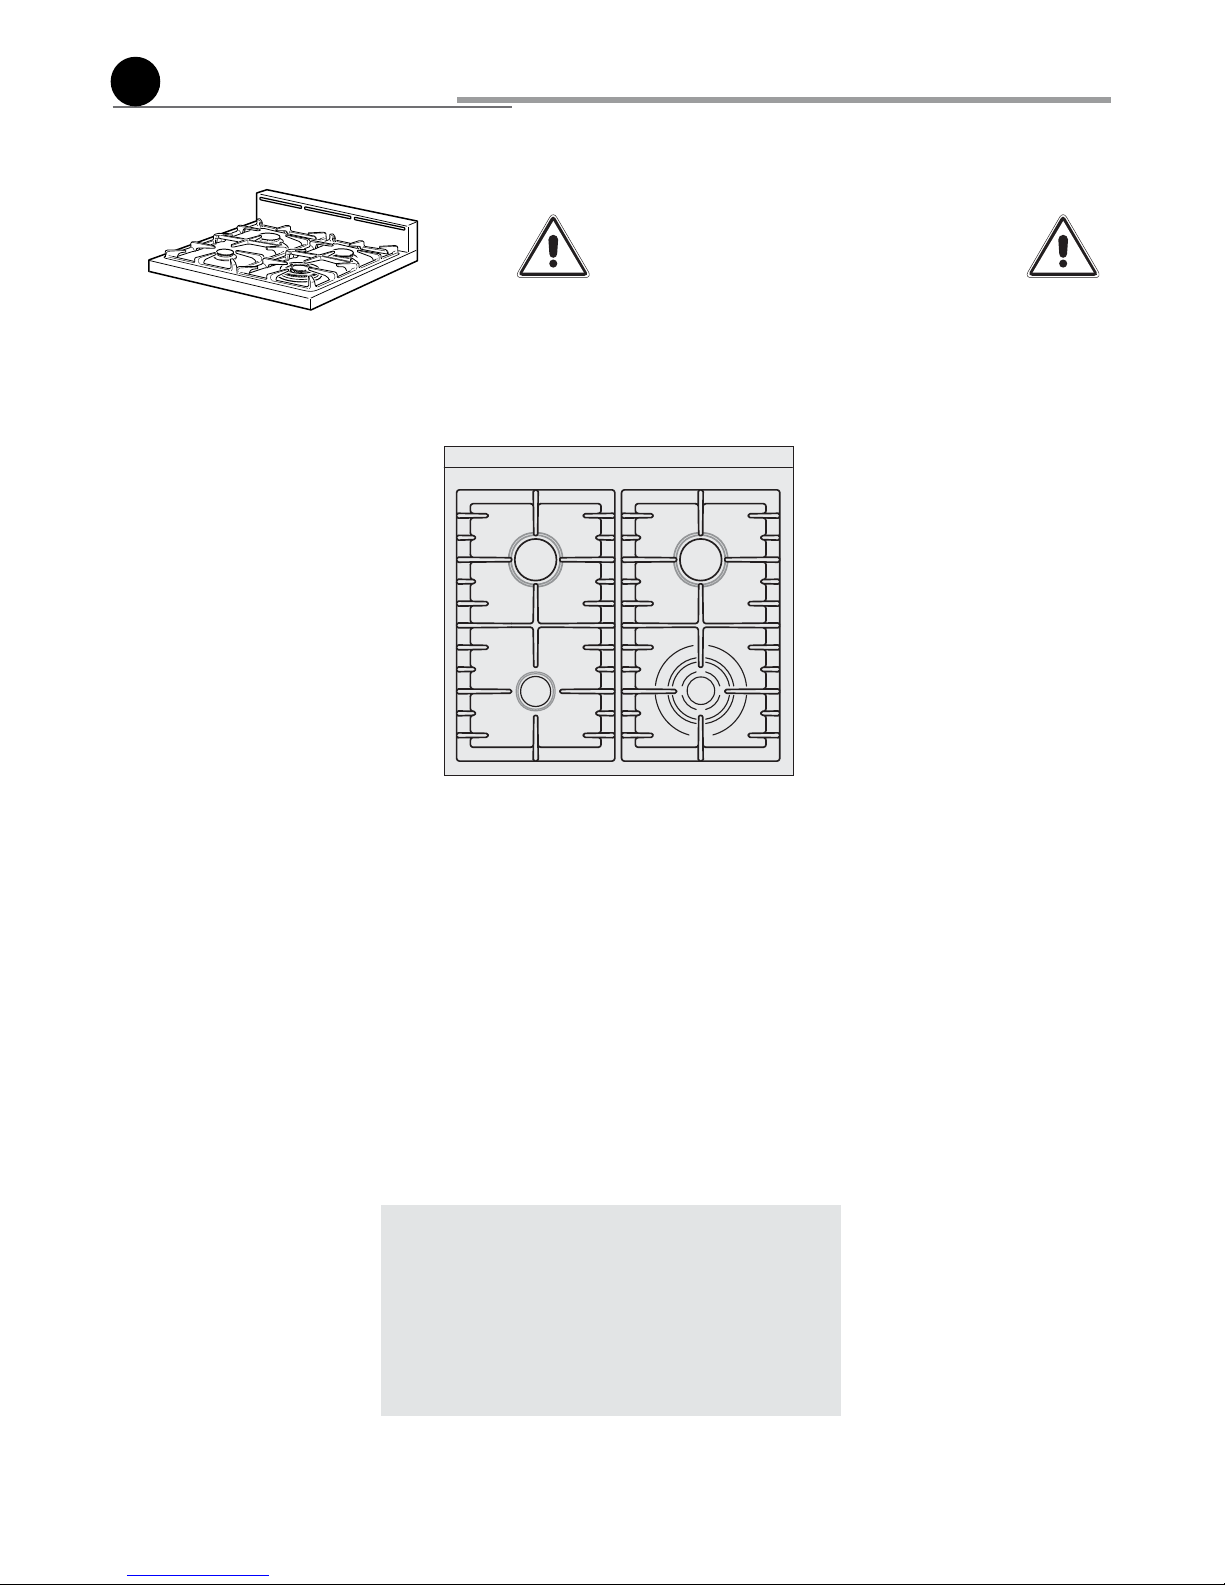
features
1
WARNING - VERY IMPORTANT NOTICE
Never obstruct the slots on the backguard.
CAUTION:
If the burner is accidentally extinguished, turn the gas
off at the control knob and wait at least 1 minute before
attempting to relight.
CAUTION:
Gas appliances produce heat and humidity in the environment in which they are installed.
Ensure that the cooking area is well ventilated following
national/local codes.
COOKING HOB
1. Auxiliary burner (A) - 3500 BTU/hr
2. Left semi-rapid burner (SR) - 6000 BTU/hr
3. Right semi-rapid burner (SR) - 6000 BTU/hr
4. Triple-ring burner (TR) - 12000 BTU/hr
Note:
- The electric gas-lighting device is incorporated into the
knobs.
- The appliance has a safety valve system fitted, the flow of
gas will be stopped if and when the flame should accidentally go out.
Fig. 1.1
1
1
2
3
3
4
1
Page 7
7
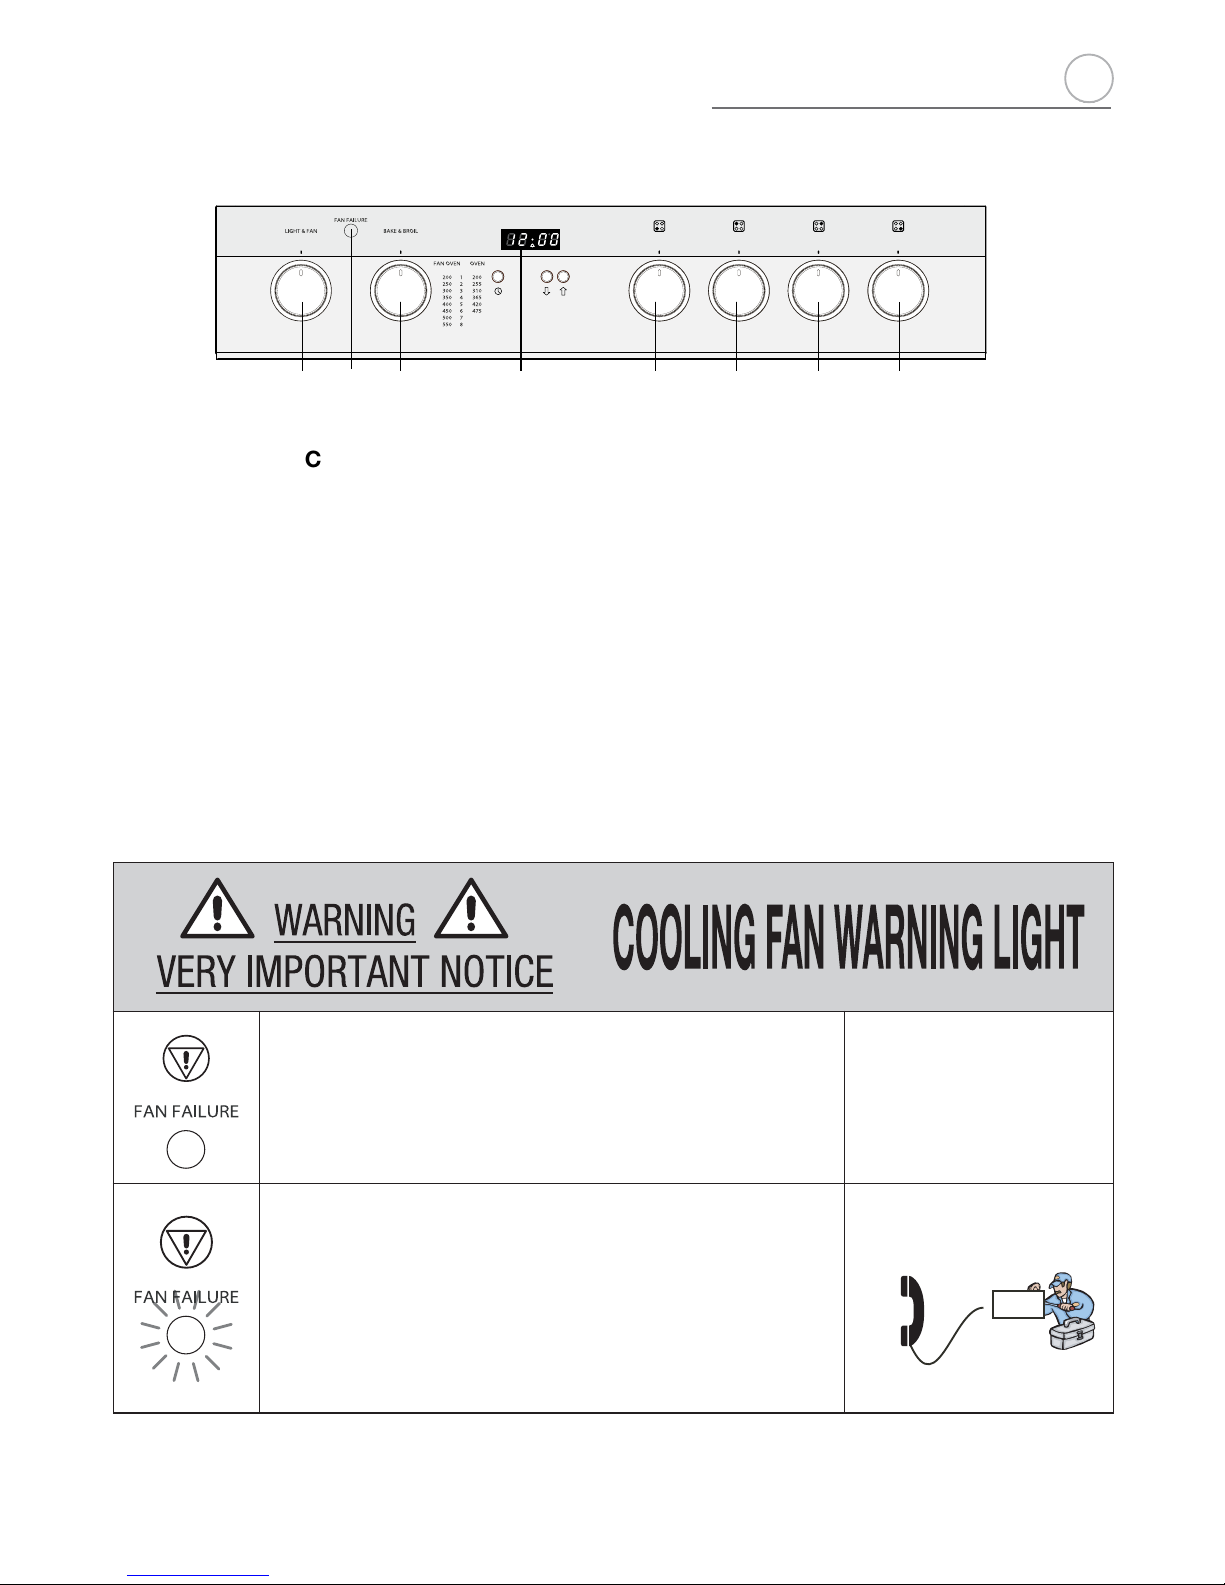
a
CONTROLS DESCRIPTION
1. Front left burner (1) control knob
2. Rear left burner (2) control knob
3. Rear right burner (3) control knob
4. Front right burner (4) control knob
5. Oven light & fan control knob
6. Gas oven/gas broil control knob
7. Electronic clock/electronic alarm
8. Cooling fan failure warning light
43217658
530
585
Fig. 1.2
When the cooling fan failure warning light is OFF the cooling fan
motor is correctly operating.
Operate the cooking hob
burners and the oven as
per instruction manual.
When the cooling fan failure warning light is lighted this indicates
the malfunctioning of the cooling fan motor.
The burners of the cooking hob and the
gas oven can be used.
SERVICE
The gas oven cannot be used.
Only the burners of the cooking hob
can be used.
Contact the After-Sales
Service.
1
Page 8
8
Fig. 2.1
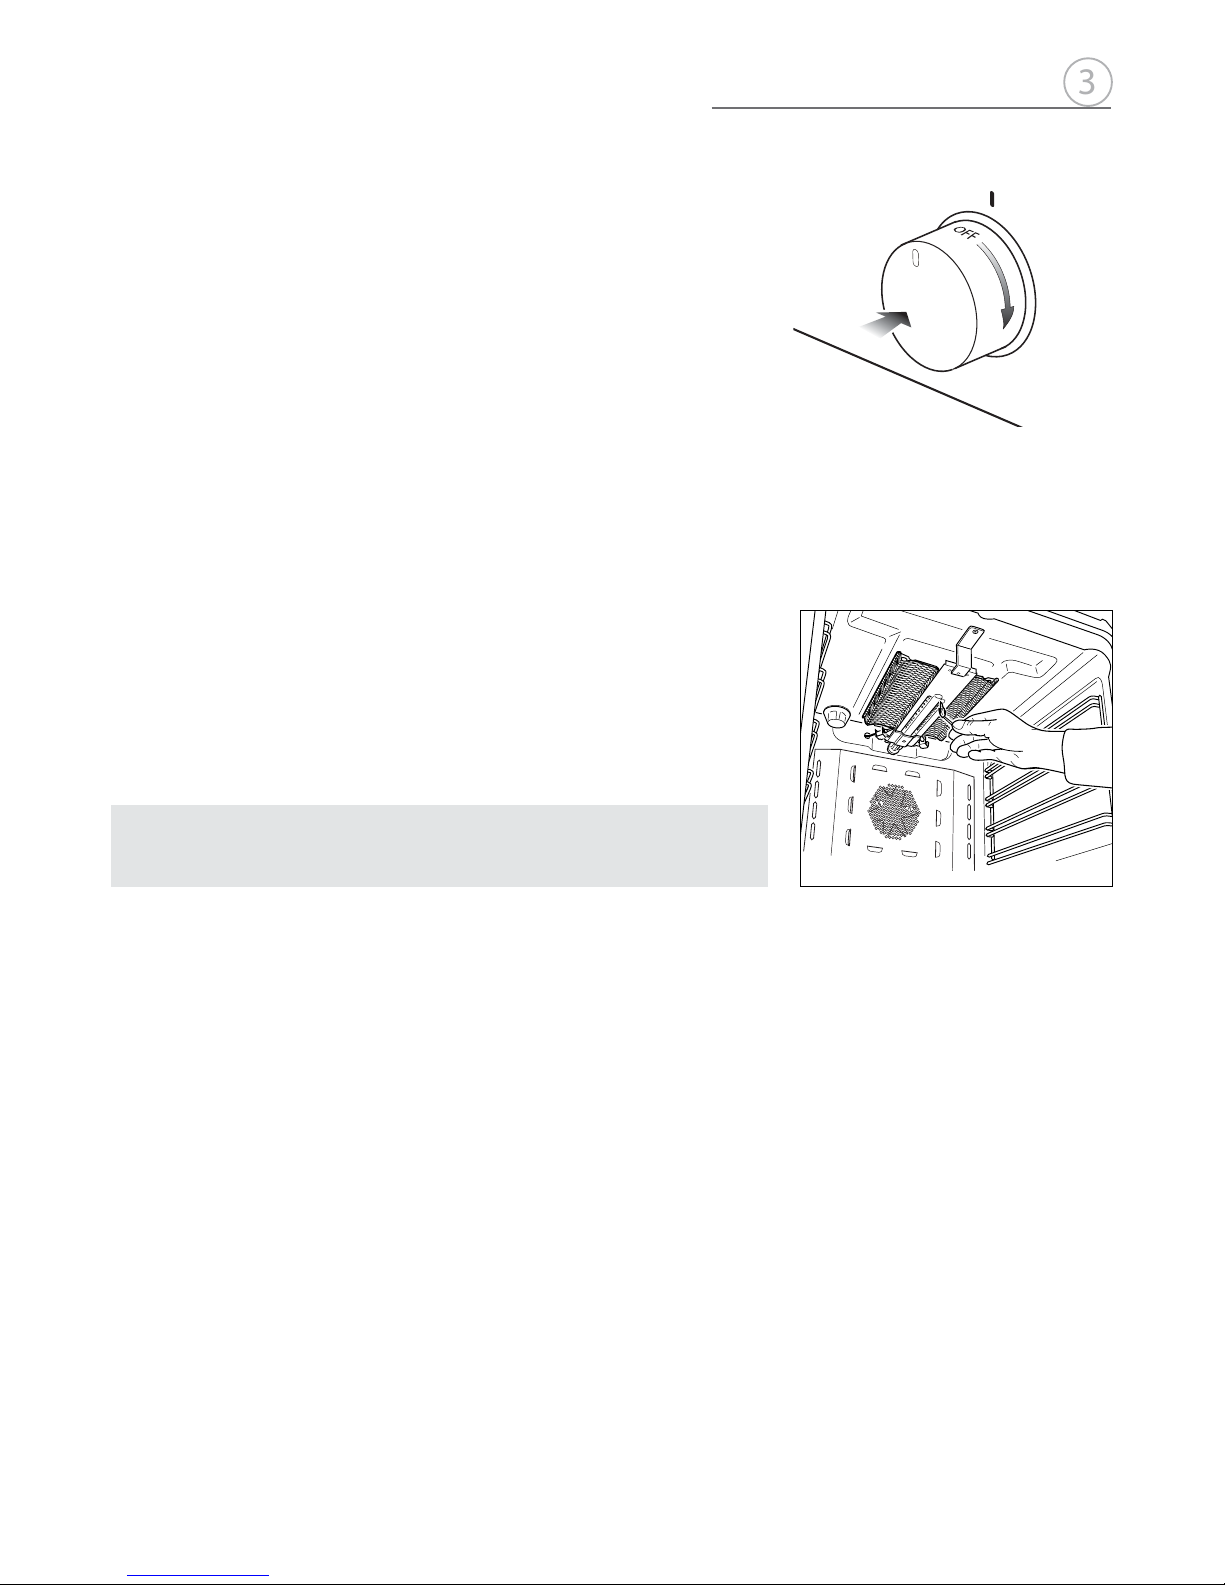
GAS BURNERS
Gas flow to the burners is adjusted by turning the knobs (illustrated in fig. 2.1) which
control the valves.
Turning the knob so that the symbols printed on itself point to the symbol printed on
the control panel achieves the following functions:
how to use the top burners
2
Knob
position
Function
AUXILIARY and
SEMI-RAPID burners
TRIPLE RING burner
closed
valve
maximum
rate
minimum
rate
Fig. 2.2
2
OFF
HI
LO
The maximum aperture position permits rapid boiling of liquids, whereas the minimum
aperture position allows simmer warming of food or maintaining boiling conditions of
liquids.
To reduce the gas flow to minimum, rotate the knob further anti-clockwise to point the
indicator towards the
LO position.
Other intermediate operating adjustments can be achieved by positioning the indicator
between the maximum and minimum aperture positions, and never between the
maximum aperture and
OFF positions.
N.B. When the range is not being used, set the gas knobs to their OFF positions
and also close the gas shut-off valve placed on the main gas supply line.
OFF
HI
LO
Page 9

9
Caution!
The range becomes very hot during operation.
Keep children well out of reach.
LIGHTING GAS BURNERS FITTED WITH FLAME FAILURE
SAFETY DEVICE
In order to light the burner, you must:
1 – Push and turn the knob in an anti-clockwise direction up to the
HI position
(maximum rate), push in and hold the knob until the flame has been lit.
The sparks produced by the lighter situated inside the relative burner will light the
flame.
In the event that the local gas supply conditions makes it difficult to light the burner
in
HI position, try again with the knob in LO position.
If there is no mains electrical supply, bring a lighted match close to the burner.
2 – Wait for about ten seconds after the gas burner has been lit before letting go the
knob (safety device activation delay).
3 – Adjust the gas valve to the desired position.
If the burner flame should go out for some reason, the safety valve will automatically
stop the gas flow.
To re-light the burner, return the knob to the closed OFF position, wait for at least
1 minute and then repeat the lighting procedure.
If your local gas supply makes it difficult to light the burner with the knob set to maximum, set the knob to minimum and repeat the operation.
b
2
Page 10
10
b
CHOICE OF BURNER (fig. 2.3)
The symbols printed on the panel above the gas knobs indicate the correspondence
between the knob and the burner.
The most suitable burner is to be chosen according to the diameter and volume capacity of the container to be warmed.
It is important that the diameter of the pots or pans suitably match the heating potential
of the burners in order not to jeopardise the efficiency of the burners, bringing about a
waste of gas fuel.
A small diameter pot or pan placed on a large burner does not necessarily mean that
boiling conditions are reached quicker.
Fig. 2.3
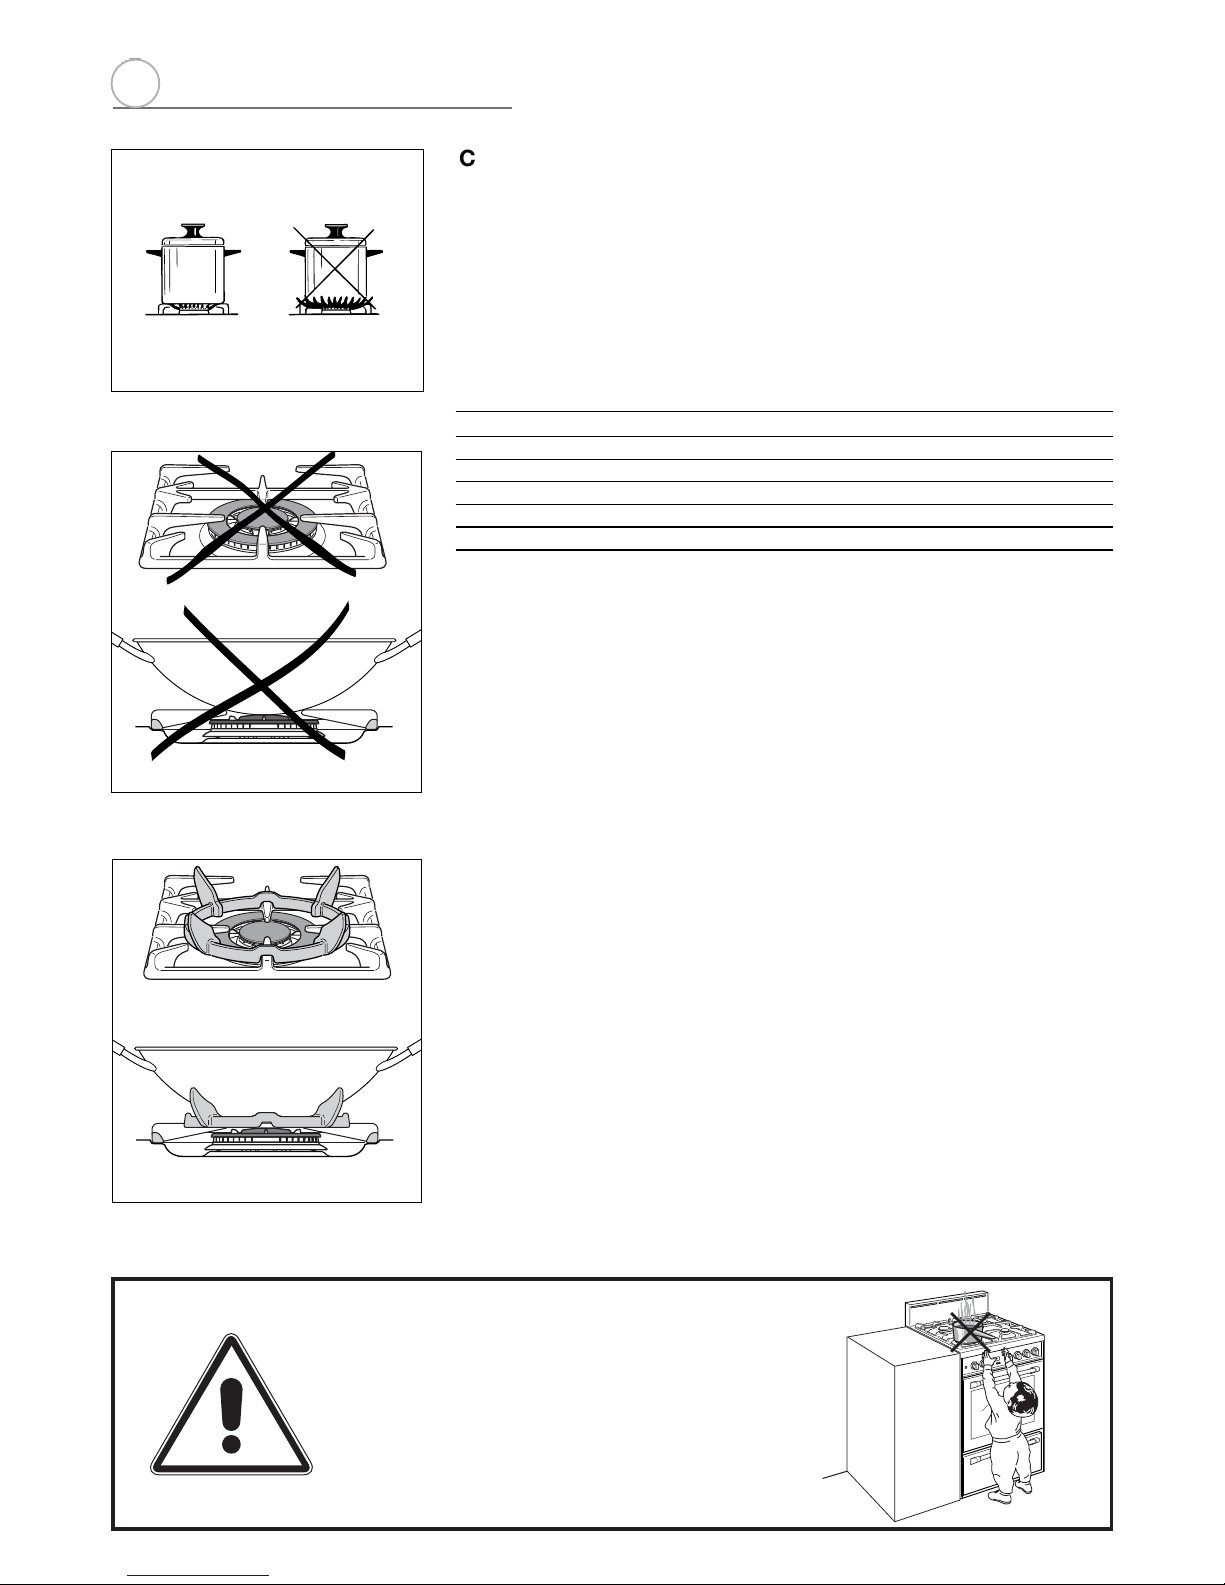
Make sure that the handles of
cookware do not stick out over
the edge of the range, to avoid
them being knocked over by
accident. This also makes it more
difficult for children to reach the
cooking vessels.
DIAMETERS OF PANS WHICH MAY BE USED ON THE HOB BURNERS
BURNER MINIMUM MAX.
Auxiliary 12 cm (4" 23/32 ) 14 cm (5" 1/2)
Semirapid 16 cm (6" 19/64) 24 cm (9" 7/16)
Triple-ring 26 cm (10" 3/16) 28 cm (11" 1/16)
Wok pans min 36 cm (14" 3/16) - max 40 cm (15" 3/4)
Fig. 2.4a
WRONG
Fig. 2.4b
CORRECT
Do not use pans with concave or convex bases (apart from wok pans used with the
special pan-support fitted)
CORRECT USE OF TRIPLE-RING BURNER (Fig.-2.4a - 2.4b)
The flat-bottomed pans are to be placed directly onto the pan-support.
When using a WOK you need to place the supplied stand in the burner to avoid any
faulty operation of the triple-ring burner (Figs.-2.4a - 2.4b).
IMPORTANT:
The special grille for wok pans (fig. 2.4b) MUST BE PLACED ONLY over the pan-rest
for the triple-ring burner.
3
Page 11
11
how to use the gas oven
USING THE OVEN FOR THE FIRST TIME
It is advised to follow these instructions:
– Furnish the interior of the oven by placing the wire racks as described at chapter
“Cleaning and maintenance”.
– Insert shelves and tray.
– Turn the oven on to the maximum temperature
8 to eliminate possible traces of
grease from the oven burner. The same operation should be followed for broil
burner.
– Switch off the electrical supply, let the oven cool down, then clean the interior of
the oven with cloth soaked in water and detergent (neutral) then dry carefully.
Attention: the range becomes
very hot during operation.
Attention: the oven door becomes
very hot during operation.
Keep children away.
WARNING:
The door is hot, use the handle.
GENERAL FEATURES
The gas oven is provided with:
a) Oven burner, mounted on the lower part of the oven (13000 BTU/hr).
b) Broil burner, mounted on the upper part of the oven (8500 BTU/hr).
c) Fan motor which can be used in combination with the oven burner or separately
(without heating). It is not possible to use the fan motor in combination with
the broil burner: a safety device switches off the fan motor when the gas
oven/broil control knob is turned on broil position.
d) Light that illuminates the oven to enable visually controlling the food that is
cooking.
N.B. When the range is not being
used, set the gas knobs to their
OFF positions and also close the
gas shut-off valve placed on the
main gas supply line.
VERY IMPORTANT
The oven/broil shall be used always
with the oven door closed.
OPERATING PRINCIPLES
Heating and cooking are obtained in the following ways:
a. by normal convection
The heat is produced by the oven burner.
c. by forced convection
The heat produced by the oven burner is distributed throughout the oven by
the fan. The hot air envelops the food in the oven, provoking a complete and
rapid cooking.
It is possible to cook several dishes simultaneously.
d. by radiation
The heat is irradiated by the infra red broil burner.
f. by ventilation (this is not a cooking function)
The food is defrosted by using the fan only without oven burner.
Do not use
Broiling level
Oven cooking level
Oven cooking level
1st STEP
2nd STEP
3
rd
STEP
4
th
STEP
C
3
Page 12
12
530
585
OK OK
NOT TURN
Fig. 3.1
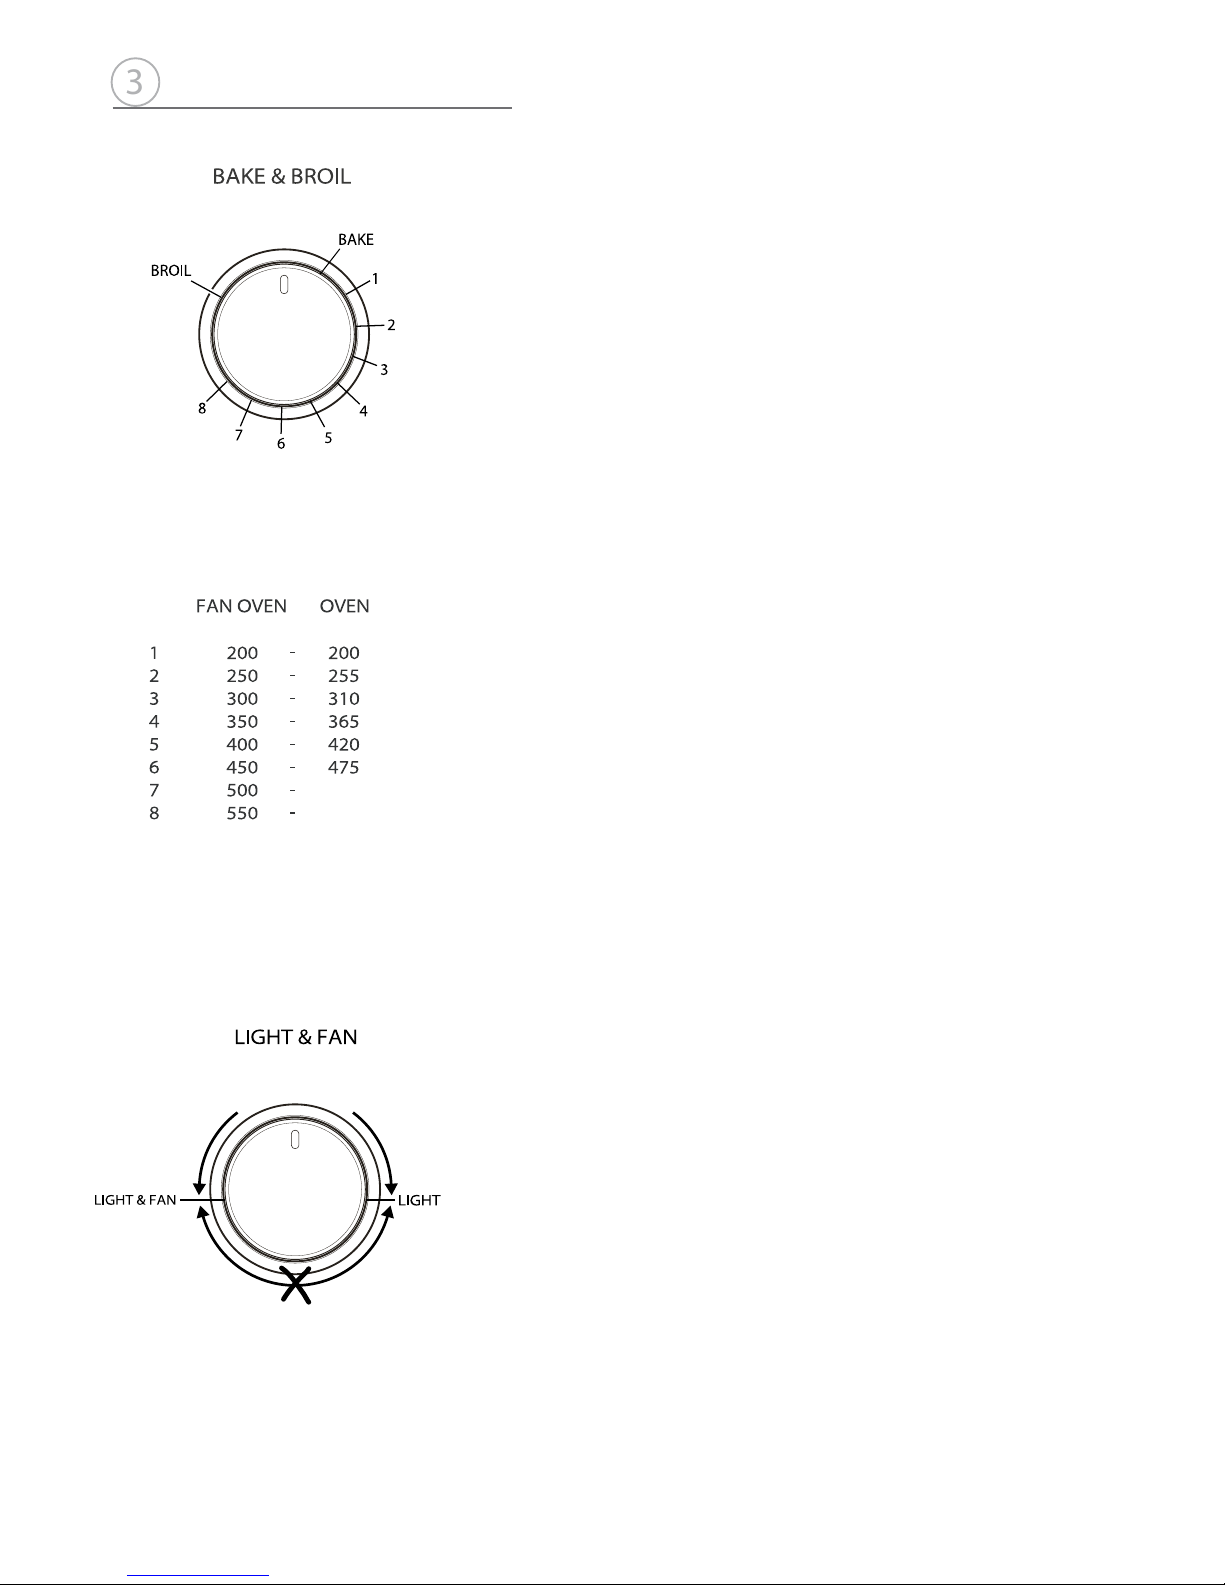
OVEN THERMOSTAT
The numbers printed on the control knob (fig. 3.1) indicate the increasing oven temperature value (see temperature table near the control knob - fig. 3.1).
Left column of the temperature table refers to oven burner used in combination with
the fan motor while right column refers to oven burner used in the normal convection
mode (without fan motor).
To regulate the temperature, set the chosen number onto the control panel indicator.
The position
BROIL serves only to turn on the broil burner.
Fig. 3.2
OVEN BURNER
It carries out normal “oven cooking”.
The gas flow to the burner is regulated by a thermostat which allow to maintain the
oven temperature constant.
The control of the temperature is assured by a thermostatic probe positioned inside
the oven.
The probe must be always kept in its housing, in a clean condition, as an incorrect position or encrustment may cause an alteration in the control of the temperature.
OVEN LIGHT AND FAN MOTOR
The oven light and the fan motor are controlled by a switch knob on the control panel
(fig. 3.2). To light up the oven lamp turn the knob anti-clockwise to
LIGHT position.
To operate the fan motor turn the knob clockwise to
LIGHT & FAN position.
In this setting also the oven lamp is lighted.
WARNING: The switch knob can be turned only clockwise from
OFF to LIGHT & FAN
position and anti-clockwise from OFF to LIGHT position.
The switch knob DO NOT TURN from
LIGHT & FAN to LIGHT position. DO NOT
FORCE.
IMPORTANT NOTE: The fan motor can be used in combination only with the oven
burner. A safety device switches off the fan motor when the gas oven/broil control knob
is turned on
BROIL position.
c
3
OFF
OFF
Page 13
13
Attention: the oven door becomes very hot during operation.
Keep children away.
IGNITION OF THE OVEN BURNER
IMPORTANT NOTE: during ignition of the oven burner the fan motor shall be
switched off (light and fan control knob in
OFF position - Fig. 3.2).
The thermostat allows the automatic control of the temperature.
The gas delivery to the oven burner is controlled by a two way thermostatic tap (oven
and broil burners) with flame-failure device.
To light the oven burner operate as follows:
1) Open the oven door to its full extent.
WARNING: Risk of explosion! The oven door must be open during this opera-
tion.
2) Lightly press and turn the thermostat knob anti-clockwise to max position
8.
3) Press the knob right down to prime the electric ignition. Keep the knob pressed.
In case of power cut, press the knob and immediately approach a lighted match to
the opening “A” (fig.-3.4).
Never continue this operation for more than 15 seconds. If the burner has still
not ignited, wait for about 1 minute prior to repeating the ignition.
4) Wait about 10/15 seconds after the burner lighting before releasing the knob (time
of priming of the valve).
5) Close the oven door slowly and adjust the burner according to the power required.
If the flame extinguishes for any reason, the safety valve will automatically shut off the
gas supply to the burner.
To re-light the burner, first turn the oven control knob to position
OFF, wait for at least
1 minute and then repeat the lighting procedure.
TRADITIONAL BAKING
(OVEN BURNER WITHOUT FAN MOTOR)
Before introducing the food, preheat the oven to the desired temperature.
For a correct preheating operation, it is advisable to remove the tray from the oven and
introduce it together with the food, when the oven has reached the desired temperature.
Check the cooking time and turn off the oven 5 minutes before the theoretical time to
recuperate the stored heat.
Recommended for:
For foods which require the same cooking temperature both internally and externally,
i.e. roasts, spare ribs, meringue, etc.
A
Fig. 3.4
c
Fig. 3.3
3
Page 14

14
DEFROSTING FROZEN FOODS (ONLY FAN MOTOR)
With the oven burner control knob in OFF position turn the LIGHT & FAN control knob
(fig.-3.2) on LIGHT & FAN position.
Only the fan and the oven lamp switch on. Defrosting takes place by the fan, without
heating.
Recommended for:
To rapidly defrost frozen foods; 2.2 lbs (1 kg) requires about one hour.
The defrosting times vary according to the quantity and type of foods to be defrosted.
CONVECTION BAKING WITH VENTILATION
(OVEN BURNER WITH FAN MOTOR)
After lighting the oven burner switch on the fan motor by turning the LIGHT & FAN
control knob (fig. 3.2) on LIGHT & FAN position.
Before introducing the food, preheat the oven to the desired temperature.
For a correct preheating operation, it is advisable to remove the tray from the oven and
introduce it together with the food, when the oven has reached the desired temperature.
Check the cooking time and turn off the oven 5 minutes before the theoretical time to
recuperate the stored heat.
It is possible to cook various different foods at the same time. Fish, cakes and meat
can be cooked together without the smells and flavours mixing.
The only precautions required are the following:
- The cooking temperatures must be as close as possible with a maximum difference
of 70-80 °F (20-25 °C) between the different foods.
- Different dishes must be placed in the oven at different times according to the cooking
time required for each one. This type of cooking obviously provides a considerable
saving on time and energy.
Recommended for:
For foods of large volume and quantity which require the same internal and external
degree of cooking; for ex: rolled roasts, turkey, legs, cakes, etc.
c
3
Page 15
15
IGNITION OF THE BROIL BURNER
IMPORTANT NOTE: the fan motor cannot be used in combination with the broil
burner. A safety device switches off the fan motor when the gas oven/broil control knob is turned on BROIL position.
The broil burner generates the infra-red rays for broiling.
To light the broil burner operate as follow:
1) Open the oven door to the full extent.
WARNING: Risk of explosion!
The oven door must be open during this
operation.
2)
Lightly press and turn the thermostat knob clockwise to the
BROIL
position.
3) Press the knob right down to prime the electric ignition. Keep the knob
pressed.
In case of power cut, press the knob and put a lighted match to the right and
left side of the burner (fig. 3.6).
Never continue this operation for more than 15 seconds. If the burner has still
not ignited, wait for about 1 minute prior to repeating the ignition.
4) Wait about 10/15 seconds after the burner lighting before releasing the knob (time
of priming of the valve).
5) Close the oven door slowly.
If the flame extinguishes for any reason, the safety valve will automatically shut off the
gas supply to the burner.
To re-light the burner, first turn the oven control knob to position OFF, wait for at
least 1 minute and then repeat the lighting procedure.
Fig. 3.5
Do always broil with oven door closed.
Attention: the oven door becomes very hot during operation.
Keep children away.
Fig. 3.6
c
3
Page 16

16
BROILING
Very important: the broil burner must always be used with
the oven door closed.
- Position the shelf on the second level from the top (fig. 3.7).
- Turn on the broil burner, as explained in the preceding paragraphs and let the broil burner preheat for about 5 minutes
with the door closed.
- Place the food to be cooked above the broiling pan.
- Introduce the broiling pan in the oven (fig. 3.8). The broiling
pan should be placed above the shelf and it should be centered with the broil burner (fig. 3.7).
Do not broil without using the broiling pan
.
Important: Use always suitable protective gloves when
inserting/removing the broiling pan, shelves, pans or other
cooking utensils from the oven.
Fig. 3.8
WRONG
CORRECT
Fig. 3.9
Fig. 3.10
Do not use
Broiling level
Oven cooking level
Oven cooking level
1st STEP
2nd STEP
3
rd
STEP
4th STEP
Fig. 3.7
c
4
Page 17

17
electronic clock /electronic alarm
4
Fig. 4.1
4
ELECTRONIC CLOCK (fig. 4.1)
The electronic alarm is a device which groups the functions of 12 hours clock with illuminated display and 10 hours alarm.
Upon immediate connection of the cooker or after a blackout, 12•00 will flash on the
display.
To set the hour it is necessary to push the
button and then, within 7 seconds, the
or button until you have set the exact hour.
ELECTRONIC ALARM
The alarm program consists only of a buzzer which may be set for a maximum period
of 10 hours.
To set the time, push the
or button until you obtain the desired time in the dis-
play.
From 0•10 to 99•50 you read the time in minutes and seconds (10 seconds step); then
from 1•40 to 10•00 you read the time in hours and minutes (minutes step).
Having finished the setting, the
symbol will be lighted and the countdown will start
immediately.
During countdown the timer has priority in the display. To show the time of day press
button. At the end of the time, the
symbol will be switched off and an intermittent
buzzer, lasting 7 minutes, will sound; this can be stopped by pressing any
button.
To stop the alarm countdown in any moment keep the
button pressed until you read
0•00 on the display (symbol
switches off).
IMPORTANT WARNING: THIS IS ONLY AN ELECTRONIC ALARM. REMEMBER TO
TURN OFF THE OVEN OR BROIL MANUALLY AT THE END OF COUNTDOWN.
SETTING THE FREQUENCY OF THE ALARM SOUND
The selection from 3 possibilities of sound can be made by pressing the button.
SET TIME OF DAY
Push
button and then, within 7 seconds, the
or button until you have set the
exact hour. This function remains activated 7 seconds after the last pushing of
or
button.
Change the hours only: press the
button for 5 seconds until the hours display will
flash.
Change the hours only by pushing the
or button. The minutes and hidden sec-
onds will not be affected.
Page 18

18
Do not use steam jet cleaners
because the humidity could
infiltrate into the appliance making
it dangerous.
cleaning and maintenance
GENERAL RECOMANDATION
✓ Important: Before any operation of cleaning and maintenance disconnect the
appliance from the electrical supply.
✓ It is advisable to clean when the appliance is cold and especially for cleaning the
enamelled parts.
✓ Avoid leaving alkaline or acidic substances (lemon juice, vinegar, etc.) on the sur-
faces.
✓ Avoid using cleaning products with a chlorine or acidic base.
The oven must always be cleaned after every use, using suitable products and keep-
ing in mind that its operation for 30 minutes on the highest temperature eliminates
most grime reducing it to ashes.
ENAMELLED PARTS
✓ All the enamelled parts must be cleaned with a sponge and soapy water only or other
non-abrasive products.
Dry preferably with a chamois leather.
PAINTED PARTS AND SILK-SCREEN PRINTED SURFACES
✓ Clean using an appropriate product. Always dry thoroughly.
IMPORTANT: these parts must be cleaned very carefully to avoid scratching and abrasion. You are advised to use a soft cloth and neutral soap.
STAINLESS STEEL ELEMENTS
✓ Stainless steel parts must be rinsed with water and dried with a soft and clean
cloth or with a chamois leather.
✓ For difficult dirt, use a specific non-abrasive product available commercially or a
little hot vinegar.
✓ Note: regular use could cause discolouring around the burners, because of
the high flame temperature.
INSIDE OF OVEN
✓ This must be cleaned regularly.
✓ With the oven warm, wipe the inside walls with a cloth soaked in very hot soapy
water or another suitable product.
BURNERS AND GRIDS
✓ These parts can be removed and cleaned with appropriate products.
✓ After cleaning, the burners and their flame distributors must be well dried and cor-
rectly replaced.
✓ It is very important to check that the burner flame distributor and the cap has been
correctly positioned - failure to do so can cause serious problems.
✓
Check that the probe next to each burner is always clean to ensure correct operation
of the safety valves.
✓ In appliances with electric ignition keep the electrode clean so that the sparks always
strike.
✓ Note: To avoid damage to the electric ignition do not use it when the burners
are not in place.
Before any operation of maintenance
disconnect the appliance from the
electrical mains supply.
WARNING
VERY IMPORTANT
WARNING
Electrical Shock Hazard
Plug into a grounded 3-prong
outlet.
Do not remove ground prong.
Do not use an adapter.
Failure to follow these instructions
can result in death, fire, or
electrical shock.
3-prong polarized
ground-type outlet
ground
prong
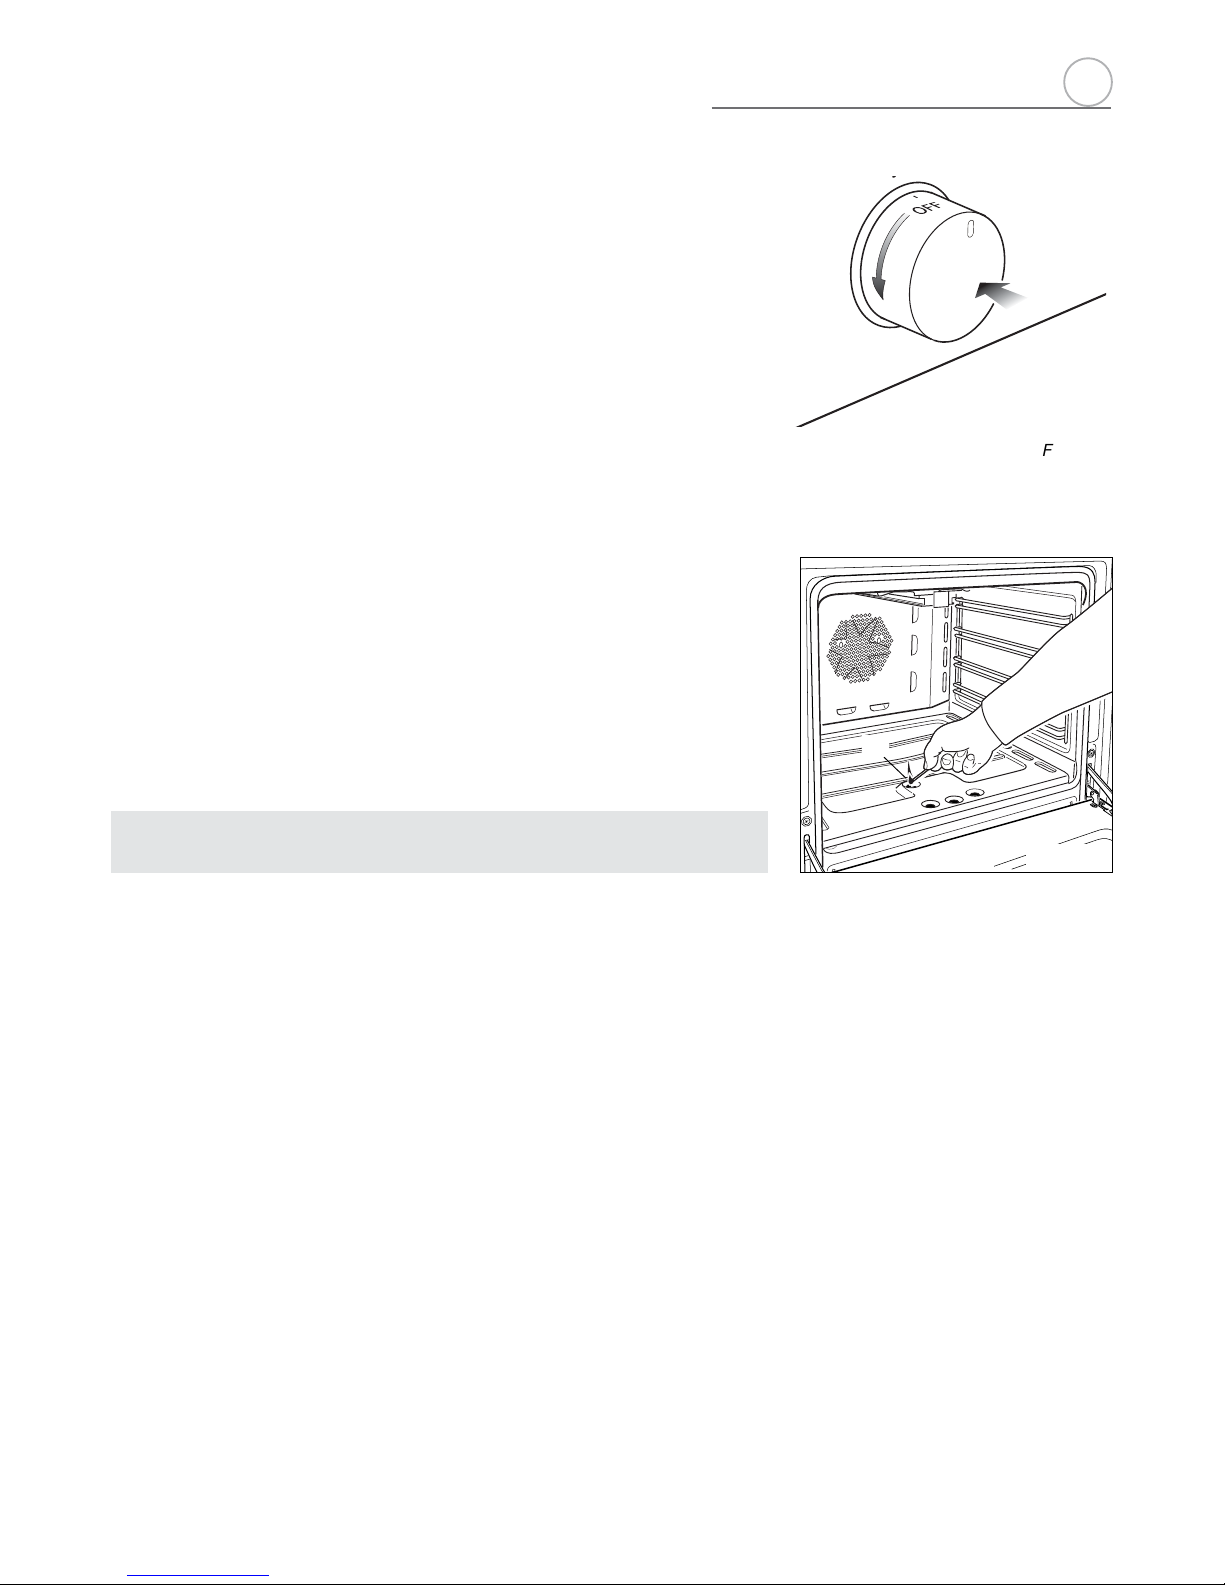
REPLACING THE OVEN LIGHT
Before any maintenance is started involving electrical parts of the appliance, it must be
disconnected from the power supply.
– Let the oven cavity and the broil burner cool down;
– Switch off the electrical supply;
– Remove the protective cover;
– Unscrew and replace the bulb with a new one suitable for high temperatures (300°C-
570°F) having the following specifications: 120V 60 Hz, 15W, E14;
– Refit the protective cover.
NOTE: Oven bulb replacement is not covered by your guarantee.
5
5
Page 19

19
CORRECT REPLACEMENT
OF THE SEMI-RAPID
BURNERS
It is very important to check that the
burner flame spreader “F” and the cap
“C” have been correctly positioned (see
figs. 5.1 and 5.2 ).
Failure to do so can cause serious
problems.
In appliances with electric ignition, check
that the electrode “S” (fig. 5.1) is always
clean to ensure trouble-free sparking.
Check that the probe “T” (fig. 5.1) next
to each burner is always clean to ensure
correct operation of the safety valves.
Both the probe and ignition plug must
be very carefully cleaned.
CORRECT POSITION OF
TRIPLE RING BURNERS
The triple ring burner must be correctly
positioned (see fig. 5.3); the burner rib
must be fitted in their housing as shown
by the arrow.
The burner correctly positioned must not
rotate (fig. 5.4).
Then position the cap A and the ring B
(fig. 5.4 - 5.5).
e
Fig. 5.2
Fig. 5.5
Fig. 5.3
A
B
Fig. 5.4
Fig. 5.1
S
F
C
T
5
Page 20

20
e
OVEN ACCESSORIES
INSTALLATION AND
REMOVAL
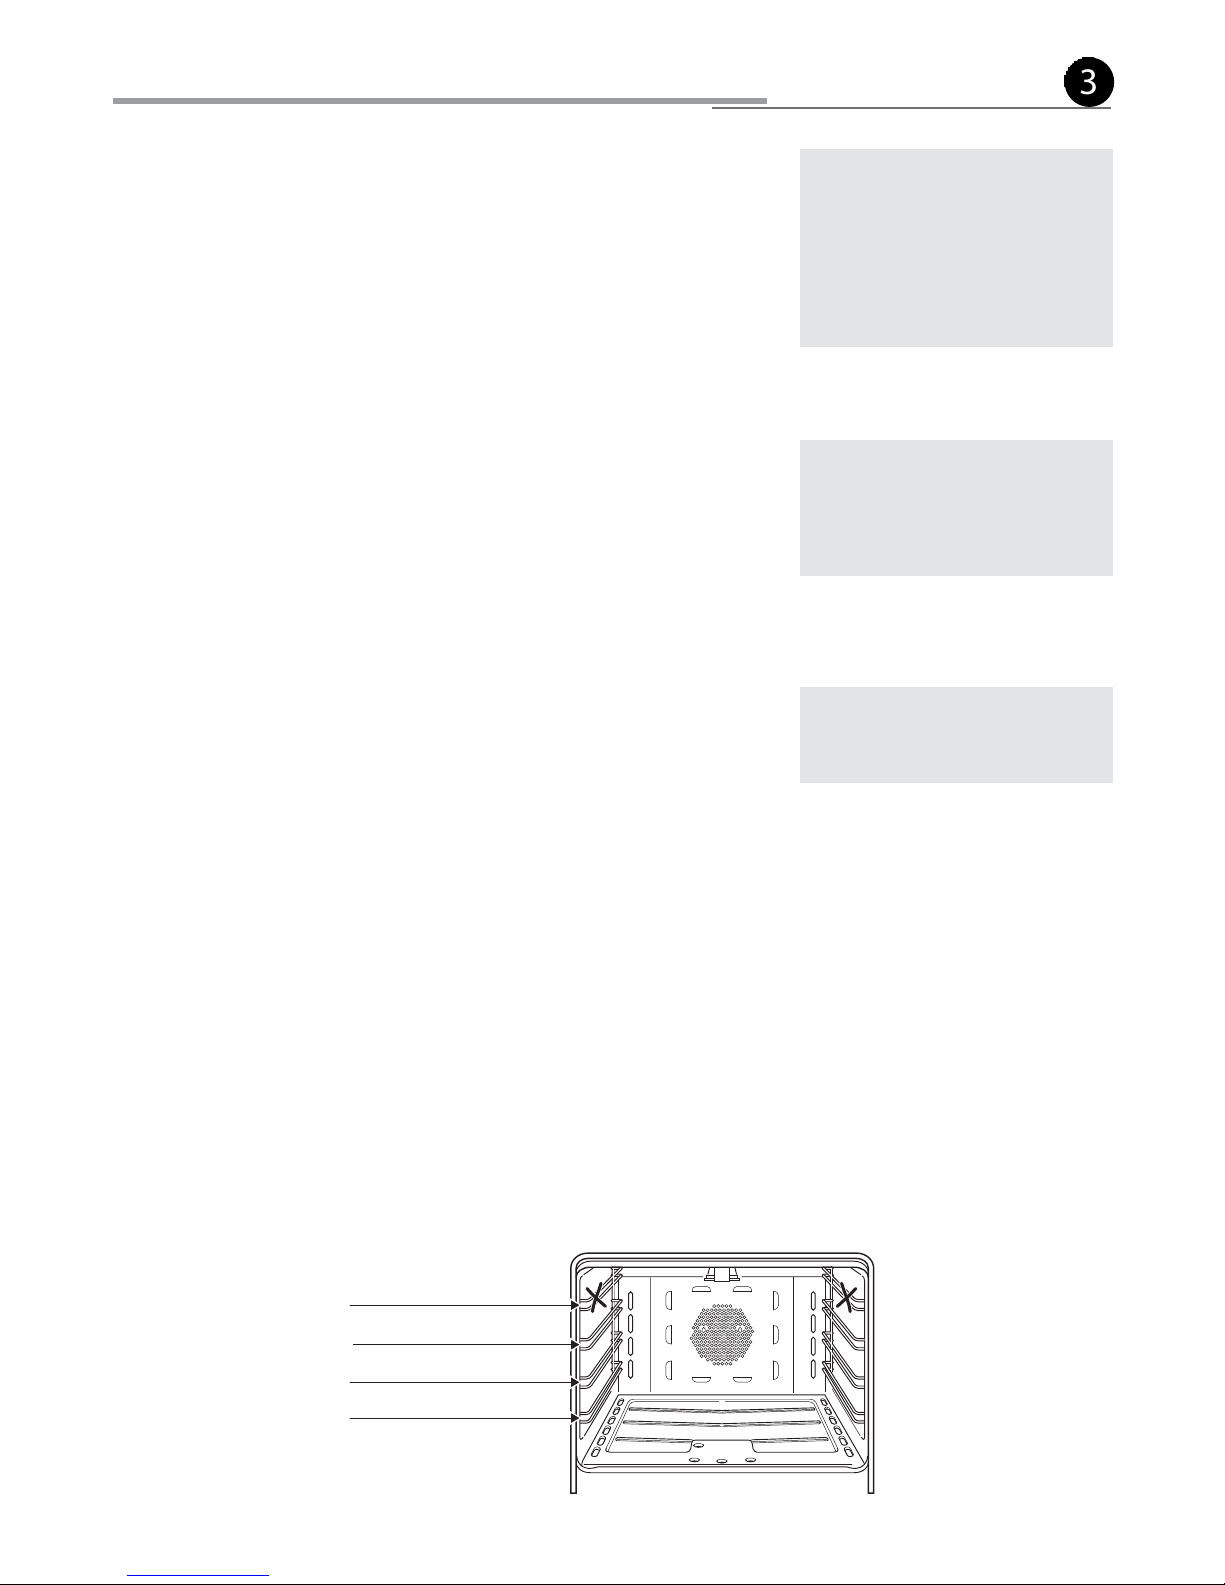
– Hang up the wire racks “G” on the oven
walls (fig. 5.6).
– Slide in, on the guides, the shelves (fig.
5.7). Do not use the first step from the
top.
The rack must be fitted so that the
safety catch, which stops it sliding out,
faces the inside of the oven.
– Position the broiling pan above the
oven shelf (see page 16).
– To dismantle, operate in reverse order.
Fig. 5.6
G
Safety
catch
Do not use this step
Fig. 5.7
Fig. 5.8
Fig. 5.9
Do not store flammable material in the oven or in the drawer.
OVEN DOOR
The internal glass of the oven door can be easily removed for cleaning by unscrewing
the retaining screws (fig. 5.8).
REMOVABLE STORAGE DRAWER
The drawer comes out like a normal drawer. A safety catch stops it from sliding out.
To remove the drawer proceed as per figure 5.9.
To replace the drawer repeat the steps in reverse order.
1
2
3
4
5
Page 21

21
e
REMOVING THE OVEN DOORS
Type B
The oven door can easily be removed as follows:
– Open the door to the full extent (fig. 5.13A).
– Attach the retaining rings to the hooks on the left and right hinges (fig. 5.13B).
– Hold the door as shown in fig. 5.13.
– Gently close the door and withdraw the lower hinge pins from their location (fig.
5.13C).
– Withdraw the upper hinge pins from their location (fig. 5.13D).
– Rest the door on a soft surface.
– To replace the door, repeat the above steps in reverse order.
Fig. 5.13D
Fig. 5.13C
Fig. 5.13B
Fig. 5.13A
Fig. 5.13
REMOVING THE OVEN
DOORS
Type A
To facilitate oven cleaning, it is possible
to remove the door.
Please follow the instructions carefully:
– Open the door completely.
– Push down the lever “L” and, keeping
it in this position, slowly close the
DOOR ASSEMBLY
– Grip the door with your hands placed near the hinges and raise the levers “H” with
your forefingers (fig. 5.12)
– Insert the hinges in their position until levers “H” are hooked.
– Open the door completely to obtain the release of levers “L”.
L
Fig. 5.10
Fig. 5.11
H
Fig. 5.12
door in order to block the hinge (fig. 5.10).
– Grip the door (as indicated in fig. 5.11) and, while closing it, release the two hinges
as shown in fig. 5.12.
– Rest the door on a soft surface.
5
Page 22

22
DO’S AND DO NOT’S
• Do always use the oven with the door closed.
• Do always broil with the door closed.
• Do read the user instructions carefully before using the range for first time.
• Do allow the oven to heat for about two hours, before using for the first time, in order to
expel any smell from the new oven insulation, without the introduction of food.
• Do clean your oven regularly.
• Do remove spills as soon as they occur.
• Do always use oven gloves when removing food shelves and trays from the oven.
• Do not allow children near the range when in use.
• Do not allow fat or oils to build up in the oven base, or oven accessories.
• Do not place cooking utensils or plates directly onto the oven base.
• Do not place hot enamel parts in water. Leave them to cool first.
• Do not allow vinegar, coffee, milk, saltwater, lemon or tomato juice to remain in contact
with enamel parts (i.e. inside the oven).
• Do not use abrasive cleaners or powders that will scratch the surface of the stainless
steel and the enamel.
• Do not attempt to repair the internal workings of your range.
• Do remove the protective film before the first use.
• Fire risk! Do not store flammable material in the oven and in the storage drawer.
• Do not use the oven with the oven door open.
• Do not use the oven to warm or heat a room.
FOR YOUR SAFETY
Under no circumstances should any external covers be removed for servicing or
maintenance except by suitably qualified personnel
e
5
Page 23

23
Page 24

24
✓ Ne rangez pas et n’utilisez pas d’essence ou d’autres vapeurs et
liquides inflammables à proximité de cet appareil ou de tout autre
appareil électroménager.
✓ QUOI FAIRE SI VOUS SENTEZ UNE ODEUR DE GAZ :
• N’essayez pas d’allumer un appareil quel qu’il soit.
• Ne touchez à aucun interrupteur électrique. N’utilisez aucun téléphone de votre domicile.
• Appelez immédiatement votre fournisseur de gaz depuis le téléphone d’un voisin.
Suivez les instructions de votre fournisseur de gaz.
• Si vous ne pouvez joindre votre fournisseur de gaz, appelez les
pompiers.
✓ L’installation, ainsi que toute réparation, doivent être effectuées par
un installateur ou une entreprise de service qualifiés, ou par le fournisseur de gaz.
AVERTISSEMENT : SI L’INFORMATION CONTENUE DANS CE
MANUEL N’EST PAS SUIVIE À LA LETTRE, UN INCENDIE OU
UNE EXPLOSION PEUVENT SE PRODUIRE ET ENTRAÎNER DES
DOMMAGES MATÉRIELS, DES BLESSURES OU MÊME LA MORT.
AVERTISSEMENT
• TOUS LES TYPES DE CUISINIÈRE
PEUVENT BASCULER
• CELA PEUT PROVOQUER DES BLESSURES
• INSTALLEZ LE DISPOSITIF
ANTIBASCULEMENT FOURNI AVEC LA
CUISINIÈRE
• CONSULTEZ LES INSTRUCTIONS
D’INSTALLATION
Cet appareil a été conçu et fabriqué uniquement pour la cuisson domestique des aliments et
ne convient pas à l’usage non ménager. Cet appareil ne devrait donc pas être utilisé dans un
environnement commercial.
La garantie de l’appareil sera annulée s’il est utilisé dans un environnement non domestique,
c’est-à-dire un environnement semi-commercial, commercial ou communautaire.
AVERTISSEMENT
Ne vous servez JAMAIS de cet appareil comme d’un radiateur pour
chauffer ou réchauffer une pièce. Cela peut entraîner une intoxication
par le monoxyde de carbone et une surchauffe du four.
Page 25

25
Cher client,
Nous vous remercions d’avoir acheté et préféré notre produit.
Les mesures de sécurité et les recommandations ci-dessous sont pour votre propre sécurité et pour celle des
autres. Elles permettront également de profiter au maximum des fonctions offertes par votre appareil.
Veuillez ranger le présent livret avec soin. Il pourrait être utile dans le futur, soit pour vous ou pour les autres,
dans le cas de doutes à propos du fonctionnement de l’appareil.
Cet appareil doit être utilisé uniquement pour la tâche pour laquelle il a été expressément conçu, soit la cuisson des aliments. Toute autre forme d’utilisation sera considérée incorrecte, et donc, dangereuse.
Le fabricant nie toute responsabilité dans le cas de dommages provoqués par l’utilisation inopportune, incorrecte ou illogique de l’appareil.
IMPORTANT - VEUILLEZ LIRE ET SUIVRE
✓ Avant de commencer, veuillez lire attentivement toutes les instructions.
✓ N’enlevez pas les étiquettes, plaques ou avertissements permanents de l’appareil. Cela
pourrait annuler la garantie.
✓ Veuillez respecter tous les codes et les règlements locaux et nationaux.
✓ Veuillez vous assurer que cet appareil est bien mis à la terre.
✓ La prise de courant devrait être toujours accessible.
✓ L’installateur doit confier ces instructions au consommateur qui les conservera
pour l’usage de l’inspecteur local et pour s’y reporter ultérieurement.
L’installation doit être conforme aux codes locaux, ou en l’absence de ceux-ci, à la dernière
édition du National Fuel Gas Code ANSIZ223.1. L’installation électrique doit être conforme
à la dernière édition du Code national de l’électricité, ANSI/NFPA70 et/ou aux codes locaux.
AU CANADA : L’installation doit être conforme au CAN/CGA-B149.1, Code d’installation du
gaz naturel ou au CAN/CGA-B149.2, Code d’installation du propane en vigueur et/ou aux
codes locaux. L’installation électrique doit être conforme au Code canadien de l’électricité
CSA C22.1, partie 1, en vigueur et/ou aux codes locaux.
INSTALLATION DANS UNE MAISON PRÉFABRIQUÉE (MOBILE) : L’installation doit être
conforme au Manufactured Home Construction and Safety Standard, Titre 24 CFR, Partie
3280 (anciennement le Federal Standard for Mobile Home Construction and Safety, Titre 24,
HUD/Partie 280) ou, lorsque cette norme n’est pas applicable, au Standard for Manufactured
Home Installations, ANSI/NCSBCS A225.1, ou aux codes locaux, là où il y a lieu.
INSTALLATION DANS UNE CARAVANE DE PARC : L’installation doit être conforme aux
codes de l’État ou aux autres codes ou, en l’absence de tels codes, au Standard for
Recreational Park Trailers, ANSI A119.5.
L’installation de tout appareil au gaz doit être effectuée par un technicien qualifié. Par mesure de sécurité et pour faciliter le service, un robinet d’arrêt de gaz manuel doit être installé
dans le tuyau d’alimentation en gaz, juste avant l’appareil.
Si vous utilisez une source d’alimentation électrique extérieure, cet appareil doit être, au
moment de son installation, mis à la terre conformément aux codes locaux en vigueur ou, en
l’absence de tels codes, conformément au Code national de l’électricité, ANSI/NFPA 70.
Cette cuisinière est livrée avec une pellicule protectrice recouvrant les pièces en
acier et en aluminium.
Cette pellicule doit être enlevée avant l’installation ou l’utilisation de l’appareil.
CETTE CUISINIÈRE EST RÉSERVÉE À L’USAGE
RÉSIDENTIEL UNIQUEMENT.
Page 26

26
MODE D’EMPLOI
RENSEIGNEMENTS GÉNÉRAUX
AVERTISSEMENT!!
1. Cet appareil ne doit pas être utilisé pour chauffer une pièce.
Ces renseignements sont basés sur des facteurs de sécurité.
2. Toute ouverture dans le mur derrière l’appareil et dans le sol
au-dessous de l’appareil doit être obstruée.
3. Gardez l’appareil loin des matériaux combustibles, de
l’essence ou de toute autre vapeur inflammable.
4. N’obstruez pas le flux de l’air de combustion et de l’air de
ventilation.
5. Coupez l’alimentation électrique de l’appareil avant de
procéder à l’entretien.
6. Lors du déplacement de l’appareil pour le nettoyage et/ou une
réparation :
A. Fermez l’alimentation générale en gaz.
B. Coupez l’alimentation c.a.
C. Débranchez le tuyau d’alimentation en gaz du tuyau
d’entrée.
D. Déplacez la cuisinière avec soin en la tirant en dehors de
l’installation.
ATTENTION : La cuisinière est lourde. Faites attention
lorsque vous la manipulez.
7.
Exigences électriques
L’installation électrique doit être conforme aux codes
nationaux et locaux.
8.
Alimentation d’air et ventilation
L’installateur doit consulter les codes locaux et nationaux.
9.
Pression du collecteur d’alimentation en gaz
Gaz naturel - 4,0 po CE
Gaz propane/GPL - 11,0 po CE
10. L’utilisation inappropriée de la porte du four (par exemple,
marcher, s’asseoir ou s’appuyer dessus) peut présenter des
dangers possibles et/ou entraîner des blessures.
11. Lors de l’installation ou du déplacement de la cuisinière
pour une réparation, un timon rouleur devrait être utilisé. Ne
poussez pas en appuyant sur les rebords de la cuisinière en
tentant de la faire glisser dans ou en dehors de l’installation.
Pousser ou tirer une cuisinière (plutôt que d’utiliser un timon
rouleur) augmente également les risques de déformation
des tiges ou des connecteurs de couplage internes.
AVERTISSEMENT!!
INSTRUCTIONS DE MISE À LA TERRE
La cuisinière doit être mise à la terre conformément aux
codes locaux ou, en l’absence de ceux-ci, à la dernière
édition du Code national de l’électricité, ANSI/NFPA n° 70 ou
au Code canadien de l’électricité au Canada.
L’installation doit être effectuée par un électricien qualifié.
POUR VOTRE SÉCURITÉ, CET APPAREIL DOIT ÊTRE
CORRECTEMENT MIS À LA TERRE.
Si vous utilisez une source d’alimentation électrique extérieure,
cet appareil doit être, au moment de son installation, mis à
la terre conformément aux codes locaux en vigueur ou, en
l’absence de ceux-ci, conformément au Code national de
l’électricité, ANSI/NFPA 70.
Pour diminuer les risques de choc électrique, cet appareil est
muni d’une fiche à trois broches (mise à la terre) et devrait être
branché directement dans une prise correctement mise à la
terre.
Ne coupez et ne retirez en aucun cas la troisième broche (mise
à la terre) de la fiche du cordon d’alimentation.
PIÈCES DE RECHANGE
Seules les pièces de rechange autorisées peuvent être utilisées
lors d’une réparation sur la cuisinière. Des pièces de rechange
sont disponibles chez les concessionnaires de pièces d’origine.
Veuillez communiquer avec le concessionnaire de pièces de
votre région.
Page 27

27
CONSIGNES ET RECOMMANDATIONS IMPORTANTES POUR
L’UTILISATION DES APPAREILS ÉLECTRIQUES
L’utilisation de tout appareil électrique suppose la nécessité de suivre une série de règles fondamentales. Plus précisément :
✓
Ne touchez jamais l’appareil avec les mains ou les pieds mouillés.
✓
Ne faites jamais fonctionner l’appareil lorsque vous êtes pieds nus.
✓
Ne permettez pas aux enfants ni à toute autre personne inapte d’utiliser l’appareil sans surveillance.
Le fabricant ne peut être tenu responsable des dommages provoqués par l’utilisation inopportune, incorrecte ou abusive de l’appareil.
CONSIGNES ET RECOMMANDATIONS IMPORTANTES
Après avoir déballé l’appareil, assurez-vous qu’il n’est pas endommagé.
Si vous n’êtes pas certain, ne l’utilisez pas et consultez votre fournisseur ou un technicien
professionnel qualifié.
Les éléments d’emballage (sacs de plastique, mousse de polystyrène, clous, feuillards de
cerclage, etc.) doivent être gardés hors de la portée des enfants, car ils peuvent entraîner
de graves blessures.
Le matériel d’emballage est recyclable et porte le symbole de recyclage
.
✓
N’essayez pas de modifier les caractéristiques techniques de l’appareil, car cela pourrait le rendre dangereux à utiliser.
✓
N’effectuez aucun entretien ni aucune réparation sur l’appareil sans l’avoir d’abord
déconnecté de l’alimentation électrique.
✓
Après l’utilisation, assurez-vous que les boutons sont à la position OFF.
✓
Ne permettez pas aux enfants ni à toute autre personne inapte d’utiliser l’appareil sans
surveillance.
✓
Pendant et après l’utilisation de la cuisinière, certaines pièces deviendront très chaudes.
Ne touchez pas aux pièces chaudes.
✓
Gardez les enfants éloignés de la cuisinière lorsqu’elle fonctionne.
✓
Cette cuisinière est livrée avec une pellicule protectrice recouvrant les pièces en acier et
en aluminium. Cette pellicule doit être enlevée avant l’installation ou l’utilisation de l’appareil.
✓
Risque d’incendie! N’entreposez jamais de matériaux inflammables dans le four, ni
dans le compartiment de rangement.
✓
Assurez-vous que les câbles électriques qui raccordent les autres appareils situés à
proximité de la cuisinière ne peuvent entrer en contact avec la surface de cuisson ou se
coincer dans la porte du four.
✓
Ne recouvrez pas les parois du four avec du papier d’aluminium. Ne placez pas de grilles,
lèchefrite, casseroles ou autres ustensiles de cuisson sur la base de la cavité du four.
✓
Le fabricant nie toute responsabilité quant aux blessures corporelles ou dommages
matériels occasionnés par l’utilisation incorrecte ou inopportune de l’appareil.
✓
Pour éviter tout risque possible, l’appareil doit être installé uniquement par du personnel
qualifié. Des réparations effectuées par des personnes non qualifiées peuvent provoquer
un choc électrique ou un court-circuit. Pour éviter d’éventuelles blessures corporelles ou
des dommages à l’appareil, n’essayez pas d’effectuer les réparations vous-même. Ce
genre de travail devrait être effectué seulement par un technicien qualifié.
✓
Risque de brûlures! Le four et les accessoires de cuisson peuvent devenir très chauds
lors de l’utilisation. Assurez-vous de garder le four hors de la portée des enfants et
avertissez-les en conséquence. Pour éviter les brûlures, utilisez des vêtements et des
gants de cuisine lorsque vous manipulez des pièces ou des ustensiles chauds.
✓
Éloignez-vous de la cuisinière lorsque vous ouvrez la porte du four. De l’air chaud ou de
la vapeur s’échappant du four pourrait brûler vos mains, votre visage et/ou vos yeux.
✓
Ne nettoyez jamais la cuisinière, le four ni le compartiment de rangement à l’aide d’un
dispositif de nettoyage à vapeur haute pression. Cela pourrait provoquer un court-circuit.
✓
Cet appareil a été conçu pour une utilisation domestique. N’utilisez jamais cet appareil
pour aucune autre fin!
✓
Si vous décidez de ne plus utiliser cet appareil (ou de remplacer un vieux modèle), il est
recommandé, avant de se débarrasser du modèle non désiré, de le rendre inopérant de
façon appropriée, conformément aux règlements sur la santé et la protection de l’environnement. Plus précisément, assurez-vous que toutes les pièces potentiellement dangereuses sont rendues inoffensives, au cas où des enfants joueraient avec l’appareil.
Retirez la porte et le tiroir rangement avant de mettre l’appareil au rebut pour éviter tout
risque d’enfermement.
Page 28

28
1
Fig. 1.1
1
1
2
3
3
4
1
caractéristiques
ATTENTION - REMARQUE TRÈS IMPORTANTE
N’obstruez jamais les fentes situées sur le dosseret.
ATTENTION :
Si le brûleur s’éteint accidentellement, fermez l’arrivée de
gaz à partir du bouton de commande et attendez au moins
1 minute avant d’essayer de le rallumer.
ATTENTION :
Les appareils à gaz dégagent de la chaleur et de l’humidité
dans l’environnement dans lequel ils sont installés.
Assurez-vous que la zone de cuisson est bien aérée
conformément aux codes nationaux/locaux.
SURFACE DE CUISSON
1. Brûleur auxiliaire (A) - 3 500 BTU/h
2. Brûleur semi-rapide (SR) gauche - 6 000 BTU/h
3. Brûleur semi-rapide (SR) droit - 6 000 BTU/h
4. Brûleur triple couronne (TR) - 12 000 BTU/h
Remarque :
- Le dispositif d’allumage électrique est incorporé dans les
boutons.
- L’appareil est muni d’une soupape de sécurité. L’alimentation
en gaz s’arrêtera automatiquement si les flammes s’éteignent accidentellement.
Page 29

29
a
43217658
530
585
Fig. 1.2
1
AVERTISSEMENT
TRÈS IMPORTANT
Si le voyant avertisseur de défaillance du ventilateur de
refroidissement est éteint, le ventilateur de refroidissement
fonctionne correctement.
Faites fonctionner les
brûleurs de la surface de
cuisson et le four comme
l’indique le manuel
d’instructions.
Si le voyant avertisseur de défaillance du ventilateur de
refroidissement est allumé, le moteur du ventilateur de
refroidissement est défectueux.
Vous pouvez utiliser les brûleurs de la surface
de cuisson et le four à gaz.
SERVICE
Communiquez avec le
Service après-vente.
VOYANT AVERTISSEUR
DU VENTILATEUR
DE REFROIDISSEMENT
Vous ne pouvez pas utiliser le four
à gaz.
Vous pouvez utiliser les brûleurs de la
surface de cuisson seulement.
FAN FAILURE
DEFAULT DE VENTILATION
FAN FAILURE
DEFAULT DE VENTILATION
DESCRIPTION DES COMMANDES
1. Bouton de commande du brûleur avant gauche (1)
2. Bouton de commande du brûleur arrière gauche (2)
3. Bouton de commande du brûleur arrière droit (3)
4. Bouton de commande du brûleur avant droit (4)
5. Bouton de commande du ventilateur et de la lampe du four
6. Bouton de commande du four à gaz/gril à gaz
7. Horloge électronique/alarme électronique
8. Voyant avertisseur de défaillance du ventilateur de refroidissement
Page 30

30
Fig. 2.1
2
Fig. 2.2
2
OFF
HI
LO
Position du
bouton
Fonction
Brûleurs AUXILIAIRE et
SEMI-RAPIDE
Brûleur TRIPLE COURONNE
soupape
fermée
ouverture
maximale
ouverture
minimale
OFF
HI
LO
BRÛLEURS À GAZ
Vous pouvez ajuster l’alimentation en gaz des brûleurs en tournant les boutons (fig. 2.1) qui
contrôlent les soupapes.
En tournant le bouton de façon à ce que les symboles qui y sont imprimés pointent vers
ceux imprimés sur le tableau de commande, vous pouvez accomplir les fonctions suivantes:
La position d’ouverture maximale permet de porter rapidement des liquides à ébullition,
tandis que la position d’ouverture minimale permet de laisser mijoter des aliments ou
de maintenir l’ébullition des liquides.
Pour réduire l’alimentation en gaz au minimum, tournez le bouton davantage dans le
sens antihoraire jusqu’à ce que l’indicateur pointe vers la position
LO.
Vous pouvez procéder à d’autres ajustements intermédiaires en positionnant l’indicateur entre les positions d’ouverture maximale et minimale. Ne positionnez jamais
l’indicateur entre la position d’ouverture maximale et la position
OFF.
N.B. Lorsque vous n’utilisez pas la cuisinière, tournez les boutons d’alimentation
en gaz à la position
OFF et fermez le robinet d’arrêt de gaz situé sur le tuyau
principal d’alimentation en gaz.
comment utiliser les brûleurs de la surface de cuisson
Page 31

31
b
2
Attention!
La cuisinière devient très chaude lorsqu’elle fonctionne.
Tenez les enfants bien à l’écart.
ALLUMAGE DES BRÛLEURS À GAZ MUNIS D’UN DISPOSITIF
DE SÉCURITÉ EN CAS D’EXTINCTION DES FLAMMES
Pour allumer le brûleur, vous devez procéder de la façon suivante :
1 – Poussez et tournez le bouton dans le sens antihoraire jusqu’à la position
HI (ouver-
ture maximale). Enfoncez et tenez le bouton jusqu’à ce que les flammes s’allument
(fig. 2.2).
Les étincelles produites par le diffuseur situé à l’intérieur du brûleur allumeront les
flammes.
Dans le cas où les conditions d’alimentation en gaz locales rendent difficile l’allu-
mage du brûleur avec le bouton à la position
HI, essayez de nouveau en plaçant
le bouton à la position
LO.
S’il n’y a pas d’alimentation électrique principale, approchez du brûleur la flamme
d’une allumette.
2 – Attendez une dizaine de secondes après avoir allumé le brûleur à gaz avant de
relâcher le bouton (délai d’activation du dispositif de sécurité).
3 – Ajustez le robinet de gaz à la position désirée.
Si les flammes du brûleur s’éteignent pour quelque raison que ce soit, la soupape de
sécurité arrêtera automatiquement l’alimentation en gaz.
Pour rallumer le brûleur, réglez le bouton à la position fermée
OFF. Attendez au moins
1 minute et répétez la procédure d’allumage.
Si l’alimentation en gaz locale rend difficile l’allumage du brûleur lorsque le bouton est
à la position d’ouverture maximale, tournez le bouton à la position d’ouverture minimale
et répétez l’opération.
Page 32

32
b
Fig. 2.3
Fig. 2.4a
INCORRECT
Fig. 2.4b
CORRECT
3
Assurez-vous que la poignée des
ustensiles ne dépasse pas du
rebord de la cuisinière, pour éviter
de les renverser par accident.
Cette précaution rend aussi
l’accès aux ustensiles de cuisson
plus difficile pour les enfants.
UTILISATION ADÉQUATE DU BRÛLEUR TRIPLE COURONNE
(fig. 2.4a, 2.4b)
Vous devez placer les ustensiles à fond plat directement sur le support de plat.
Lorsque vous utilisez un WOK, vous devez placer le support fourni dans le brûleur pour
éviter d’endommager le brûleur triple couronne (fig.-2.4a, 2.4b).
IMPORTANT :
La grille spéciale conçue pour les woks (fig. 2.4b) DOIT ÊTRE PLACÉE SEULEMENT sur
le support de plat conçu pour le brûleur triple couronne.
CHOIX DU BRÛLEUR (fig. 2.3)
Les symboles imprimés sur le tableau situé au-dessus des boutons de commande
indiquent la correspondance entre le bouton et le brûleur.
Vous devez choisir le brûleur le plus approprié en fonction du diamètre et de la capacité
de volume du récipient à chauffer.
Il est important que le diamètre des casseroles convienne le mieux possible à la capacité de cuisson des brûleurs de façon à ne pas compromettre l’efficacité des brûleurs
et ainsi entraîner un gaspillage de gaz.
Le fait de placer une casserole de petit diamètre sur un grand brûleur ne permet pas
nécessairement une ébullition plus rapide.
DIAMÈTRES DES CASSEROLES À UTILISER SUR LES BRÛLEURS DE LA
SURFACE DE CUISSON
BRÛLEUR MINIMUM MAX.
Auxiliaire 12 cm (4-23/32 po) 14 cm (5-1/2 po)
Semi-rapide 16 cm (6-19/64 po) 24 cm (9-7/16 po)
Triple couronne 26 cm (10-3/16 po) 28 cm (11-1/16 po)
Woks 36 cm (14-3/16 po) min -40 cm (15-3/4 po) max
N'utilisez pas d'ustensiles à fond concave ou convexe (à part pour les woks utilisés avec la
grille spéciale).
Page 33

33
C
3
comment utiliser le four à gaz
UTILISATION DU FOUR POUR LA PREMIÈRE FOIS
Il est recommandé de suivre ces instructions :
– Équipez l’intérieur du four en plaçant les grilles en métal tel que décrit à la section
« Nettoyage et entretien ».
– Placez les grilles et le plateau.
– Réglez le four à la température maximale (position
8) pour éliminer du brûleur du
four toute trace possible de graisse. La même opération doit être effectuée pour
le brûleur du gril.
– Coupez l’alimentation électrique, laissez refroidir le four, puis nettoyez l’intérieur
du four avec un linge imbibé d’eau et de détergent (neutre) et séchez avec soin.
Attention : La cuisinière devient
très chaude lorsqu’elle fonctionne.
Attention : La porte du four devient
très chaude lorsque le four fonctionne.
Tenez les enfants à l’écart.
AVERTISSEMENT :
La porte est chaude, utilisez la
poignée.
CARACTÉRISTIQUES GÉNÉRALES
Sont fournis avec le four à gaz :
a) Le brûleur du four, installé sur la partie inférieure du four (13 000 BTU/h).
b) Le brûleur du gril, monté sur la partie supérieure du four (8 500 BTU/h).
c) Le moteur de ventilateur, qui peut être combiné avec le brûleur du four ou non (sans
chaleur). Vous ne pouvez toutefois pas combiner le moteur de ventilateur et le
brûleur du gril : un dispositif de sécurité met le moteur de ventilateur en position d’arrêt lorsque le bouton de commande du four/gril à gaz est à la position
de cuisson au gril.
d) La lampe qui éclaire le four et permet un contrôle visuel de la cuisson des ali-
ments.
N.B. Lorsque vous n’utilisez pas
la cuisinière, tournez les boutons d’alimentation en gaz à la
position OFF et fermez le robinet
d’arrêt de gaz situé sur le tuyau
principal d’alimentation en gaz.
TRÈS IMPORTANT
Vous devez toujours fermer la
porte du four lorsque vous utilisez
le four/gril.
PRINCIPES DE FONCTIONNEMENT
Le chauffage et la cuisson sont ainsi obtenus :
a. par convection naturelle
La chaleur est produite par le brûleur du four.
c. par convection forcée
La chaleur produite par le brûleur du four est diffusée uniformément dans le four
grâce au ventilateur. L’air chaud enveloppe les aliments placés dans le four, entraînant une cuisson rapide et complète.
Il est possible de cuire plusieurs plats à la fois.
d. par rayonnement
La chaleur est irradiée par le brûleur du gril infrarouge.
f. par ventilation (il ne s’agit pas d’une fonction de cuisson)
Les aliments sont décongelés à l’aide du ventilateur uniquement, sans le brûleur
du four.
À ne pas utiliser
Gril
Cuisson
Cuisson
NIVEAU 1
NIVEAU 2
NIVEAU 3
NIVEAU 4
Page 34

34
530
585
OK OK
NOT TURN
Fig. 3.1
Fig. 3.2
c
3
OFF
OFF
THERMOSTAT DU FOUR
Les nombres imprimés sur le bouton de commande (fig. 3.1) indiquent l’augmentation
de la valeur de la température du four (reportez-vous au tableau de température près
du bouton de commande - fig. 3.1).
La colonne de gauche du tableau de température se rapporte au brûleur du four combiné au moteur de ventilateur, tandis que la colonne de droite se rapporte au brûleur du
four utilisé en mode de convection naturelle (sans moteur de ventilateur).
Pour contrôler la température, réglez le nombre choisi sur l’indicateur du tableau de
commande.
La position
BROIL sert uniquement à allumer le brûleur du gril.
BRÛLEUR DU FOUR
Il effectue de la « cuisson au four » normale.
L’alimentation en gaz du brûleur est réglée par un thermostat qui permet de maintenir
la température du four constante.
Le contrôle de la température est assuré par une sonde thermostatique située à l’intérieur du four.
La sonde doit toujours être gardée propre, dans son logement, car une position
incorrecte ou de l’incrustation pourraient provoquer une altération du contrôle de la
température.
LAMPE DU FOUR ET MOTEUR DE VENTILATEUR
La lampe du four et le moteur de ventilateur sont contrôlés par un bouton d’interrupteur
situé sur le tableau de commande (fig. 3.2). Pour allumer la lampe du four, tournez le
bouton dans le sens antihoraire à la position
LIGHT.
Pour mettre le moteur de ventilateur en marche, tournez le bouton dans le sens horaire
à la position
LIGHT & FAN.
À cette position, la lampe du four est aussi allumée.
AVERTISSEMENT : Vous pouvez tourner le bouton d’interrupteur seulement dans le sens
horaire de la position
OFF à la position LIGHT & FAN et dans le sens antihoraire de la
position
OFF à la position LIGHT.
Le bouton d’interrupteur NE TOURNE PAS de la position
LIGHT & FAN à la position
LIGHT. NE LE FORCEZ PAS.
REMARQUE IMPORTANTE : Le moteur de ventilateur ne peut être combiné qu’avec
le brûleur du four. Un dispositif de sécurité met le moteur de ventilateur en position
d’arrêt lorsque le bouton de commande du four/gril à gaz est à la position BROIL.
NE PAS TOURNER
Page 35

35
A
Fig. 3.4
c
Fig. 3.3
3
Attention : La porte du four devient très chaude lorsque le four fonctionne.
Tenez les enfants à l’écart.
ALLUMAGE DU BRÛLEUR DU FOUR
REMARQUE IMPORTANTE : Lors de l’allumage du brûleur du four, le moteur de
ventilateur doit être à la position d’arrêt (bouton de commande de la lampe et du
ventilateur à la position
OFF - fig 3.2).
Le thermostat permet le contrôle automatique de la température.
L’alimentation en gaz du brûleur du four est contrôlée par un robinet thermostatique à
double réglage (brûleur du four et brûleur du gril) muni d’un dispositif en cas d’extinction des flammes.
Pour allumer le brûleur du four, procédez comme suit :
1) Ouvrez complètement la porte du four.
AVERTISSEMENT : Risque d’explosion! La porte du four doit demeurer ouverte
pendant l’allumage.
2) Appuyez légèrement sur le bouton du thermostat et tournez-le dans le sens antihoraire (fig. 3.3), jusqu’à la position maximale
8.
3) Appuyez complètement sur le bouton pour amorcer l’allumage électrique. Maintenez
le bouton enfoncé.
En cas de coupure de courant, appuyez sur le bouton et approchez immédiatement
la flamme d’une allumette de l’ouverture « A » (fig. 3.4).
Ne poursuivez pas cette opération pendant plus de 15 secondes. Si le brûleur
ne s’allume toujours pas, attendez environ 1 minute avant de répéter l’allumage.
4) Attendez environ de 10 à 15 secondes après l’allumage du brûleur avant de relâcher
le bouton (temps de l’amorçage du robinet).
5) Fermez lentement la porte du four et réglez le brûleur en fonction de la puissance
désirée.
Si les flammes s’éteignent pour une raison ou une autre, la soupape de sécurité arrêtera automatiquement l’alimentation en gaz du brûleur.
Pour rallumer le brûleur, tournez d’abord le bouton de commande du four à la
position
OFF. Attendez au moins 1 minute et répétez la procédure d’allumage.
CUISSON TRADITIONNELLE
(BRÛLEUR DU FOUR SANS MOTEUR DE VENTILATEUR)
Avant de placer les aliments, préchauffez le four à la température souhaitée.
Pour une opération de préchauffage correcte, il est recommandé de retirer le plateau
du four et de le placer en même temps que les aliments, lorsque le four aura atteint la
température désirée.
Vérifiez le temps de cuisson et arrêtez le four 5 minutes avant la fin pour récupérer la
chaleur de réserve.
Recommandée pour :
Des aliments nécessitant la même température de cuisson tant à l’intérieur qu’à l’extérieur, p. ex. des rôtis, des côtes levées, etc.
Page 36

36
c
3
DÉCONGÉLATION DES ALIMENTS (MOTEUR DE
VENTILATEUR SEULEMENT)
Réglez le bouton de commande du brûleur du four à la position OFF
et tournez le bouton de commande du ventilateur et de la lampe du four (fig. 3.2) à la position LIGHT
& FAN.
Seuls le ventilateur et la lampe du four se mettent en marche. La décongélation est
effectuée par le ventilateur, sans chaleur.
Recommandée pour :
Décongeler rapidement des aliments; environ une heure pour 2,2 lb (1 kg).
Le temps de décongélation varie en fonction de la quantité et du type d’aliment à
décongéler.
CUISSON À CONVECTION AVEC VENTILATION
(BRÛLEUR DU FOUR AVEC MOTEUR DE VENTILATEUR)
Après avoir allumé le brûleur du four, allumez le moteur de ventilateur en tournant le
bouton de commande du ventilateur et de la lampe du four (fig. 3.2) à la position LIGHT
& FAN.
Avant de placer les aliments, préchauffez le four à la température souhaitée.
Pour une opération de préchauffage correcte, il est recommandé de retirer le plateau
du four et de le placer en même temps que les aliments, lorsque le four aura atteint la
température désirée.
Vérifiez le temps de cuisson et arrêtez le four 5 minutes avant la fin pour récupérer la
chaleur de réserve.
Vous pouvez cuire différents aliments en même temps. Du poisson, des gâteaux et
de la viande peuvent être cuits ensemble sans que les odeurs ni les saveurs ne se
mélangent.
Les seules précautions à suivre sont les suivantes :
- Les températures de cuisson des différents aliments doivent être aussi rapprochées
que possible et différer au maximum de 70 à 80 °F (20 à 25 °C).
- Les plats doivent être placés dans le four à des moments différents en fonction du
temps de cuisson requis pour chacun d’eux. Ce type de cuisson permet évidemment
une économie considérable de temps et d’énergie.
Recommandée pour :
Des aliments de grand volume et en grande quantité qui nécessitent le même degré
de cuisson à l’intérieur et à l’extérieur, p. ex. des rôtis roulés, de la dinde, des pilons,
Page 37

37
Fig. 3.5
Fig. 3.6
c
3
ALLUMAGE DU BRÛLEUR DU GRIL
REMARQUE IMPORTANTE : Le moteur de ventilateur ne peut pas être combiné
avec le brûleur du gril. Un dispositif de sécurité met le moteur de ventilateur à la
position d’arrêt lorsque le bouton de commande du four/gril à gaz est à la position BROIL.
Le brûleur du gril génère les rayons infrarouges pour la cuisson au gril.
Pour allumer le brûleur du gril, procédez comme suit :
1) Ouvrez complètement la porte du four.
AVERTISSEMENT : Risque d’explosion!
La porte du four doit demeurer ouverte
pendant l’allumage.
2)
Appuyez légèrement sur le bouton du thermostat et tournez-le
dans le sens horaire
jusqu’à la position BROIL (fig. 3.5).
3) Appuyez complètement sur le bouton pour amorcer l’allumage électrique. Maintenez
le bouton enfoncé.
En cas de coupure de courant, appuyez sur le bouton et approchez immédiatement
la flamme d’une allumette du côté droit ou gauche du brûleur (fig. 3.6).
Ne poursuivez pas cette opération pendant plus de 15 secondes. Si le brûleur
ne s’allume toujours pas, attendez environ 1 minute avant de répéter l’allumage.
4) Attendez environ de 10 à 15 secondes après l’allumage du brûleur avant de relâcher
le bouton (temps de l’amorçage du robinet).
5) Fermez lentement la porte du four.
Si les flammes s’éteignent pour une raison ou une autre, la soupape de sécurité
arrêtera automatiquement l’alimentation en gaz du brûleur.
Pour rallumer le brûleur, tournez d’abord le bouton de commande du four à la
position OFF
. Attendez au moins 1 minute et répétez la procédure d’allumage.
Fermez toujour la porte du four lorsque vous utilisez la cuisson au gril.
Attention : La porte du four devient très chaude lorsque le four fonctionne.
Tenez les enfants à l’écart.
Page 38

38
CUISSON AU GRIL
Très important : Vous devez toujours fermer la porte du four
lorsque vous utilisez le brûleur du gril.
- Placez la grille sur le deuxième support à partir du haut
(fig. 3.7).
- Allumez le brûleur du gril, tel qu’expliqué dans les paragraphes précédents, et laissez-le préchauffer pendant environ
5 minutes en gardant la porte fermée.
- Placez les aliments à cuire sur la lèchefrite.
- Déposez la lèchefrite dans le four (fig. 3.8). La lèchefrite doit
être placée sur la grille et centrée avec le brûleur du gril
(fig. 3.7).
N’utilisez jamais la cuisson au gril sans utiliser de lèchefrite
.
Important : Utilisez toujours des gants de cuisine lorsque
vous déposez ou retirez du four la lèchefrite, les grilles, les
casseroles ou tout autre ustensile de cuisson.
À ne pas utiliser
Gril
Cuisson
Cuisson
NIVEAU 1
NIVEAU 2
NIVEAU 3
NIVEAU 4
Fig. 3.8
INCORRECT
CORRECT
Fig. 3.9
Fig. 3.10
Fig. 3.7
c
4
Page 39

39
4
Fig. 4.1
4
horloge électronique/alarme électronique
HORLOGE ÉLECTRONIQUE (fig. 4.1)
L’alarme électronique est un dispositif qui regroupe les fonctions d’une horloge de
12 heures avec affichage lumineux et d’une alarme de 10 heures.
Immédiatement après le branchement du four ou après une panne d’électricité, 12•00
clignotera sur l’écran d’affichage.
Pour régler l’heure, appuyez sur le bouton
et, dans les 7 secondes suivantes, sur le
bouton
ou jusqu’à ce que l’heure soit correcte.
ALARME ÉLECTRONIQUE
Le programme de l’alarme est constitué seulement d’une sonnerie que vous pouvez
régler pour une période maximale de 10 heures.
Pour régler la durée, appuyez sur le bouton
ou jusqu’à ce que la durée souhaitée
soit affichée.
De 0•10 à 99•50, la lecture de la durée se fait en minutes et en secondes (intervalles de
10 secondes); de 1•40 à 10•00, la lecture de la durée se fait en heures et en minutes
(intervalle de minutes).
Une fois le réglage complété, le symbole
s’illuminera et le décompte débutera
immédiatement.
Pendant le décompte, la minuterie est affichée en priorité. Pour afficher l’heure,
appuyez sur le bouton
. À la fin du décompte, le symbole s’éteindra et une sonnerie intermittente retentira pendant 7 minutes. Vous pouvez l’arrêter en appuyant sur
un des boutons.
Pour arrêter le décompte de l’alarme à tout moment, maintenez le bouton
enfoncé
jusqu’à ce que l’écran d’affichage indique 0•00 (le symbole
s’éteint).
AVERTISSEMENT IMPORTANT : CECI N’EST QU’UNE ALARME ÉLECTRONIQUE.
N’OUBLIEZ PAS D’ARRÊTER LE FOUR OU LE GRIL MANUELLEMENT À LA FIN
DU DÉCOMPTE.
RÉGLAGE DE LA FRÉQUENCE DU SON DE L’ALARME
Vous pouvez choisir parmi 3 possibilités de son en appuyant sur le bouton .
RÉGLAGE DE L’HEURE
Appuyez sur le bouton et, dans les 7 secondes suivantes, sur le bouton ou
jusqu’à ce que l’heure soit correcte. Cette fonction reste active pendant 7 secondes
après avoir appuyé sur
ou .
Pour changer seulement les heures : Appuyez sur le bouton
pendant 5 secondes,
jusqu’à ce que l’affichage des heures clignote.
Changez uniquement les heures en appuyant sur le bouton
ou . Cela n’aura
aucun effet sur les minutes et les secondes dissimulées.
Page 40

40
5
5
N’utilisez pas de nettoyants à jet
de vapeur. L’humidité pourrait s’infiltrer à l’intérieur de l’appareil et
le rendre dangereux.
nettoyage et entretien
RECOMMANDATION GÉNÉRALE
✓ Important : Avant toute opération de nettoyage et d’entretien, déconnectez
l’appareil de l’alimentation électrique.
✓ Il est recommandé de nettoyer l’appareil lorsqu’il est froid, en particulier pour le net-
toyage des pièces émaillées.
✓ Évitez de laisser des substances alcalines ou acides (jus de citron, vinaigre, etc.) sur
les surfaces.
✓ Évitez d’utiliser des produits nettoyants à base de chlore ou d’acide.
Le four doit toujours être nettoyé après chaque utilisation, à l’aide de produits appropriés.
Rappelez-vous que faire fonctionner l’appareil pendant 30 minutes à la température
maximale élimine la majeure partie de la saleté en la réduisant en cendres.
PIÈCES ÉMAILLÉES
✓ Toutes les pièces émaillées doivent être nettoyées avec une éponge imbibée d’eau
savonneuse seulement ou avec d’autres produits non abrasifs.
Séchez de préférence avec un chamois.
PIÈCES PEINTES ET SURFACES IMPRIMÉES PAR
SÉRIGRAPHIE
✓ Nettoyez en utilisant un produit approprié. Séchez bien.
IMPORTANT : Ces pièces doivent être nettoyées très soigneusement afin d’éviter les égratignures et l’abrasion. Il est recommandé d’utiliser un linge doux et un savon neutre.
ÉLÉMENTS EN ACIER INOXYDABLE
✓ Les pièces en acier inoxydable doivent être rincées avec de l’eau et séchées avec
un linge propre et doux ou avec un chamois.
✓ Pour la saleté difficile à déloger, utilisez un produit non abrasif spécifique disponible
dans le commerce ou un peu de vinaigre chaud.
✓ Remarque : Une utilisation régulière pourrait entraîner une décoloration autour
des brûleurs en raison de la température élevée.
INTÉRIEUR DU FOUR
✓ Il doit être nettoyé régulièrement.
✓ Lorsque le four est tiède, essuyez les parois de la cavité du four avec un linge imbibé
d’eau savonneuse très chaude ou un autre produit approprié.
BRÛLEURS ET GRILLES
✓ Ces pièces peuvent être retirées et nettoyées avec des produits appropriés.
✓ Après le nettoyage, les brûleurs et leur veilleuse doivent être bien séchés et replacés
correctement.
✓ Il est très important de vérifier que la veilleuse du brûleur et le chapeau ont été remis
en place correctement. Si vous ne respectez pas ces consignes, des problèmes
graves pourraient survenir.
✓
Assurez-vous que la sonde placée à côté de chaque brûleur est toujours propre.
Vous assurerez ainsi le bon fonctionnement des soupapes de sécurité.
✓ Dans le cas des appareils à allumage électrique, gardez l’électrode propre pour ne
pas gêner la production des étincelles.
✓ Remarque : Pour éviter d’endommager le système d’allumage électrique, ne
l’utilisez pas lorsque les brûleurs ne sont pas en place.
Avant toute opération d’entretien,
déconnectez l’appareil de l’alimentation électrique.
AVERTISSEMENT
TRÈS IMPORTANT
AVERTISSEMENT
Risque de choc électrique
Branchez dans une prise à 3 alvéoles.
Ne retirez pas la broche de mise à
la terre.
N’utilisez pas d’adaptateur.
Le non-respect de ces instructions
peut entraîner la mort, provoquer un
incendie ou un choc électrique.
Prise de type
avec terre
à 3 plots polarisée
Plot
de terre
REMPLACEMENT DE LA LAMPE DU FOUR
Avant d’entreprendre toute opération d’entretien impliquant des pièces électriques,
vous devez déconnecter l’appareil de l’alimentation électrique.
– Laisser refroidir la cavité du four et le brûleur du gril.
– Coupez l’alimentation électrique.
– Retirez le couvercle de protection.
– Dévissez et remplacez l’ampoule. La nouvelle ampoule doit être adaptée à de hautes
températures (570 °F - 300 °C) et comporter les caractéristiques suivantes : 120 V,
60 Hz, 15 W, E14.
– Replacez le couvercle de protection.
REMARQUE : Le remplacement de l’ampoule du four n’est pas couvert par votre garantie.
Page 41

41
e
Fig. 5.2
Fig. 5.5
Fig. 5.3
A
B
Fig. 5.4
Fig. 5.1
S
F
C
T
5
REMISE EN PLACE
ADÉQUATE DES BRÛLEURS
SEMI-RAPIDES
Il est très important de vérifier que le
diffuseur de flammes « F » et le chapeau
« C » ont été correctement positionnés
(fig. 5.1 et 5.2).
Si vous ne respectez pas cette consigne, des problèmes graves pourraient
survenir.
Dans le cas des appareils à allumage
électrique, assurez-vous que l’électrode
« S » (fig. 5.1) est toujours propre pour
faciliter la production d’étincelles.
Assurez-vous que la sonde « T » (fig.
5.1) placée à côté de chaque brûleur est
toujours propre pour assurer le bon fonctionnement des soupapes de sécurité.
La sonde et la bougie d’allumage doivent toujours être nettoyées soigneusement.
POSITION CORRECTE
DES BRÛLEURS TRIPLE
COURONNE
Le brûleur triple couronne doit être positionné correctement (fig. 5.3); la nervure du brûleur doit s’emboîter dans son
emplacement comme l’indique la flèche.
Une brûleur correctement installé ne doit
pas tourner (fig. 5.4).
Placez ensuite le chapeau A et la couronne B (fig. 5.4, 5.5).
Page 42

42
INSTALLATION ET RETRAIT
DES ACCESSOIRES DU
FOUR
– Accrochez les grilles de métal « G » aux
parois du four (fig. 5.6).
– Glissez les grilles sur les guides
(fig. 5.7). N’utilisez pas le premier support à partir du haut.
La grille doit être placée de façon à ce
que le dispositif de sécurité, qui empêche la grille de glisser, soit orienté vers
l’intérieur du four.
– Placez la lèchefrite sur la grille du four
(reportez-vous à la page 16).
– Pour démonter, accomplissez les éta-
pes dans l’ordre inverse.
Dispositif de
sécurité
N‘utilisez pas ce niveau
N’entreposez jamais de matériaux inflammables dans le four ou dans le
tiroir.
PORTE DU FOUR
La vitre interne de la porte du four peut être retirée facilement pour le nettoyage en
dévissant les vis qui la retiennent (fig. 5.8).
TIROIR DE RANGEMENT AMOVIBLE
Le tiroir se retire comme un tiroir normal. Un dispositif de sécurité l’empêche de glisser.
Pour retirer le tiroir, procédez tel qu’indiqué à la figure 5.9.
Pour replacer le tiroir, accomplissez les étapes dans l’ordre inverse.
e
Fig. 5.6
G
Fig. 5.7
Fig. 5.8
Fig. 5.9
1
2
3
4
5
Page 43

43
e
Fig. 5.13D
Fig. 5.13C
Fig. 5.13B
Fig. 5.13A
Fig. 5.13
L
Fig. 5.10
Fig. 5.11
H
Fig. 5.12
5
DÉPOSE DE LA PORTE DU FOUR
Type B
Vous pouvez facilement enlever la porte du four en procédant comme suit :
– Ouvrez complètement la porte du four (fig. 5.13A).
– Attachez les freins d’axe aux crochets sur les charnières gauche et droite (fig.
5.13B).
– Tenez la porte tel qu’indiqué à la fig. 5.13.
– Refermez doucement la porte et retirez les tiges des charnières inférieures de leur
emplacement (fig. 5.13C).
– Retirez les tiges des charnières supérieures de leur emplacement (fig. 5.13D).
– Déposez la porte sur une surface douce.
– Pour remettre la porte en place, répétez les étapes ci-dessus dans l’ordre inverse.
DÉPOSE DE LA PORTE DU
FOUR
Type A
Pour faciliter le nettoyage du four, il est
possible d’enlever la porte.
Veuillez suivre attentivement les
instructions suivantes :
– Ouvrez complètement la porte.
– Poussez le levier « L » vers le bas
MONTAGE DE LA PORTE
– Agrippez la porte en plaçant vos mains près des charnières et levez les leviers « H »
avec vos index (fig. 5.12).
– Insérer les charnières dans leur position jusqu’à ce que les leviers « H » soient
accrochés.
– Ouvrez la porte complètement pour que les leviers « L » se relâchent.
et, en le gardant dans cette position, refermez lentement la porte pour bloquer la
charnière (fig. 5.10).
– Agrippez la porte (tel qu’indiqué à la fig. 5.11) et, en la refermant, dégagez les
deux charnières comme le montre la fig. 5.12.
– Déposez la porte sur une surface douce.
Page 44

44
e
5
À FAIRE ET À NE PAS FAIRE
• Fermez toujours la porte du four lorsque vous utilisez le four.
• Fermez toujours la porte du four lorsque vous utilisez la cuisson au gril.
• Lisez attentivement le mode d’emploi avant d’utiliser la cuisinière pour la
première fois.
• Laissez chauffer le four deux heures avant de l’utiliser pour la première fois. Vous
évacuerez ainsi toute odeur provenant de l’isolant du four avant d’introduire des aliments.
• Nettoyez le four régulièrement.
• Essuyez immédiatement toute éclaboussure.
• Utilisez toujours des gants de cuisine lorsque vous retirez des aliments, des grilles
et des plateaux du four.
• Tenez les enfants à l’écart de la cuisinière lorsque celle-ci fonctionne.
• Ne laissez pas de graisse ou d’huile s’accumuler sur la base de la cavité ou sur les
accessoires du four.
• Ne placez pas d’ustensiles de cuisson ou d’assiettes directement sur la base de la
cavité du four.
• Ne placez pas de pièces émaillées chaudes dans l’eau. Laissez-les d’abord refroidir.
• Ne laissez pas de vinaigre, café, lait, eau salée, jus de citron ou de tomate en con-
tact avec les pièces émaillées (c’est-à-dire à l’intérieur du four).
• N’utilisez pas de poudres ou de nettoyants abrasifs. Vous égratigneriez l’acier
inoxydable et l’émail.
• N’essayez pas de réparer le mécanisme interne de votre cuisinière.
• Retirez la pellicule protectrice avant la première utilisation.
• Risque d’incendie! N’entreposez jamais de matériaux inflammables dans le four, ni
dans le tiroir de rangement.
• N’utilisez pas le four avec la porte du four ouverte.
• N’utilisez pas le four pour chauffer une pièce.
POUR VOTRE SÉCURITÉ
Les recouvrements externes ne doivent en aucune circonstance être retirés pour
entretien ou réparation, excepté par un technicien qualifié.
Page 45

45
Page 46

Page 47

Page 48

Copyright © Fisher & Paykel 2007. All rights reserved.
The product specifications in this booklet apply to
the specific products and models described at the
date of issue. Under our policy of continuous product
improvement, these specifications may change at any
time. You should therefore check with your Dealer to
ensure this booklet correctly describes the product
currently available.
Droits réservés © Fisher & Paykel 2007.
Les spécifications du produit contenues dans ce manuel
s’appliquent aux modèles et produits spécifiques
comme décrits à la date de publication. Dans le cadre
de notre politique d’améliorations en permanence de
nos produits, ces spécifications pourront être modifiées
à tout moment. Nous vous recommandons de vérifier
auprès de votre revendeur que ce manuel décrit le
produit actuellement disponible.
www.usa.fisherpaykel.com
US CA
Freestanding range user guide
Published: 03/2007
Part No. 599394 A
Elba Part No. 1102999
 Loading...