

Page 1
After the lens replacement (before attaching the top cabinet), check the following
things.
1. Check the lens is properly installed.
2. Check no wiring is tangled on the gear of the lens motor or other mechanical
parts.
3. Check no parts is missing, or no mounting part is lost.
LCD Projector
Lens Replacement Procedure
Model Number
1AA6P1P3841-- (IDEP)
LNS-T10/LNS-W10
Lens replacement should be performed by the qualified service
personnel.
It should be followed by this procedure precisely.
Before an attempt to replace the lens, confirm the model number
(both the LCD projector and the lens) and prepare the proper lens.
The lens cover is on the lens for protection. Be sure to remove the
lens cover before installation.
When installing or removing the lens, be careful not to stain,
scratch or damage the lens.
If you have any questions, contact the dealers.
Notes on Lens Replacement
Following parts are contained in the packing.
● LENS
● LIGHT-BLOCK SHEET (Spare)
1 piece
1 piece (Part No. 610 301 5040)
Notes on Lens Replacement
Parts List
Printed in Japan
Page 2
-2-
Lens Replacement Procedure
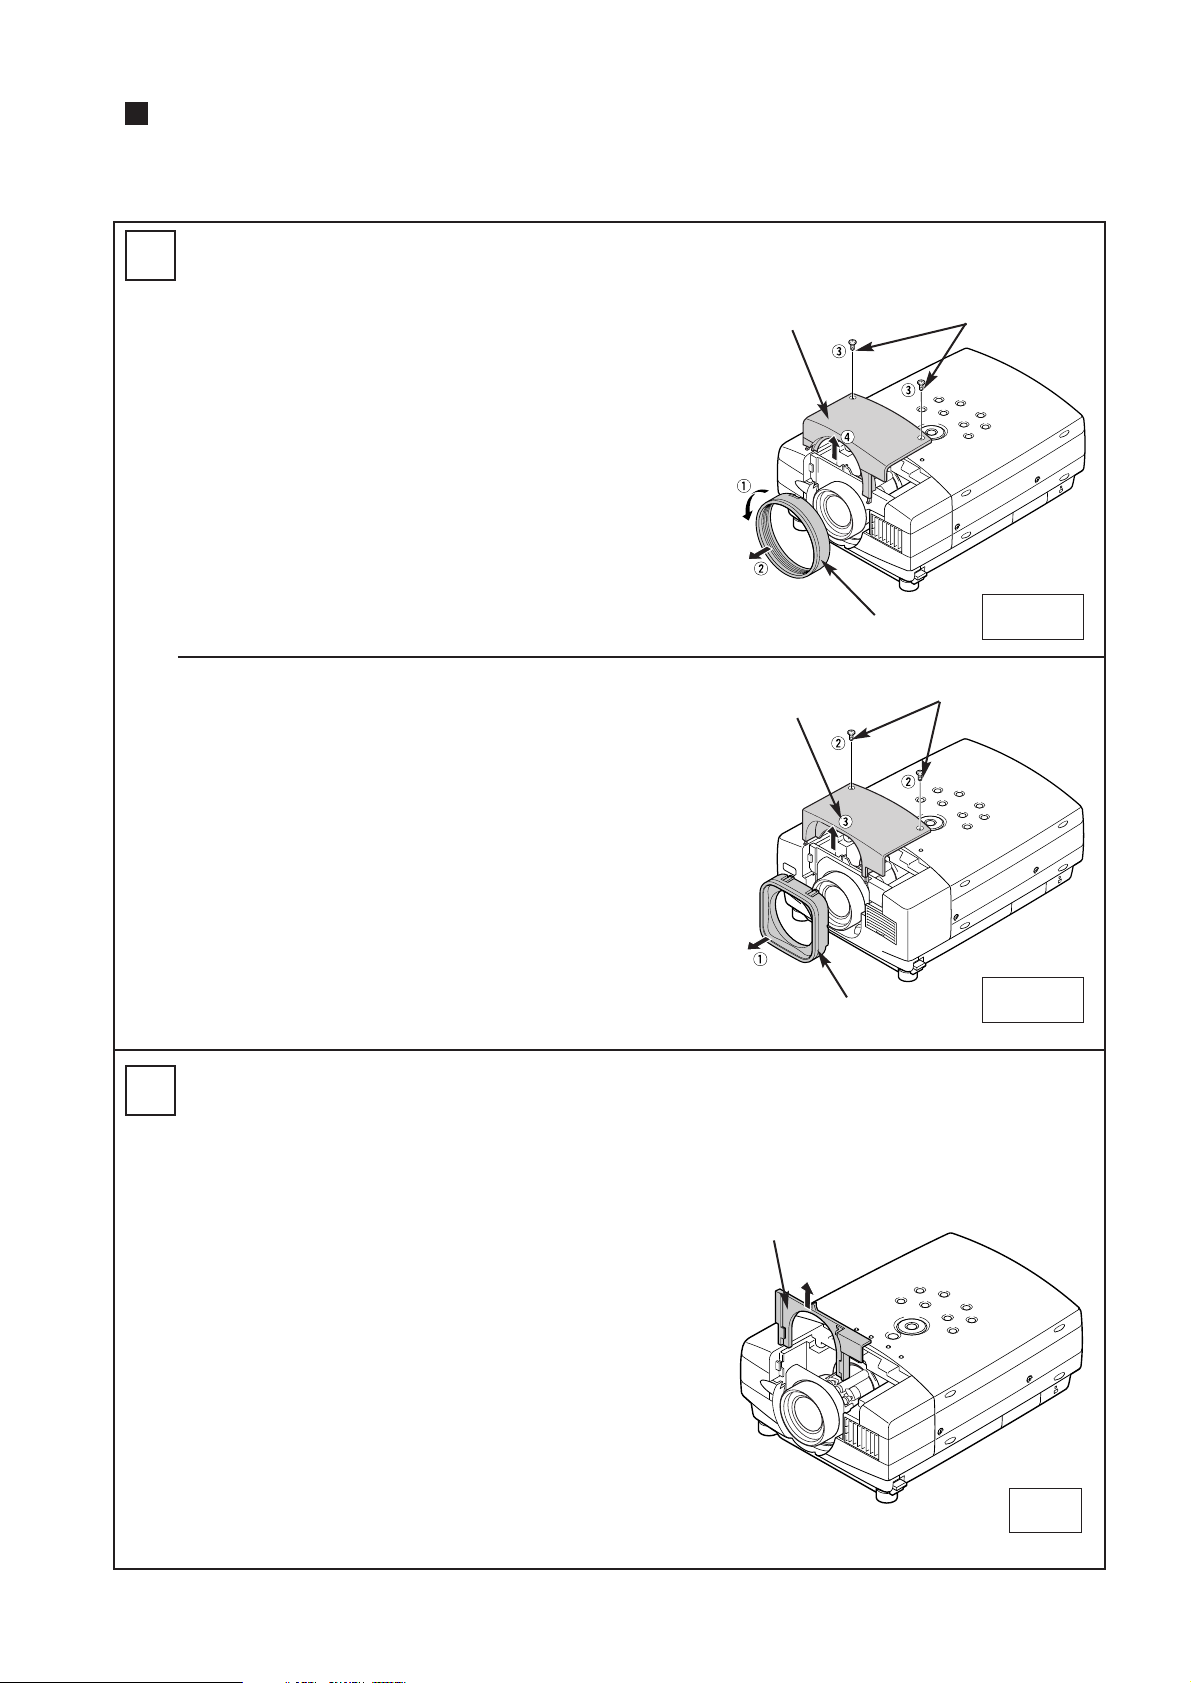
1. Turn the Lens Cover counter-clockwise and pull it
toward front to remove the Lens Cover.
2. Remove the two screws (SCREW "A") and remove
the Top Cabinet.
Remove the Lens Cover and the Top Cabinet
1
SCREW "A"
LENS COVER
TOP CABINET
Fig-1-1
Slide the Light-Block Sheet Base upward to remove it.
Fig-2
LIGHT-BLOCK
SHEET BASE
2
Perform the steps 1-6 for lens replacement.
First set the lens at the highest position with lens shift adjustment.
Remove the Light-Block Sheet Base
SCREW "A"
LENS COVER
TOP CABINET
1. Pull Lens Cover toward front and remove it.
2. Remove the two screws (SCREW "A") and remove
the Top Cabinet.
Fig-1-2
Page 3

1. Remove the protective caps (front and back) on the
lens.
2. Put the Light-Block Sheet through the lens.
3. Insert the lens into the Lens Bracket of the projector
as matching the mark on the lens to that on the
Lens Bracket.
4. Turn the lens clockwise until the lens is locked with
Lens Lock Lever.
Fig-4
Insert the lens into the Lens Bracket
as matching these marks.
LENS
BRACKET
-3-
4
Mount the Lens
Fig-3
Push the Lens Lock Lever and turn the lens counterclockwise (1/4 turn) and then take it out.
Be careful not to drop the lens.
LENS LOCK
LEVER
3
Remove the Lens
Page 4

-4-
Mount the Light-Block Sheet Base.
Turn the projector on and check Lens shift, Zoom and
Focus is operating properly.
If Light-Block Sheet interfere with those operations,
check if the Light-Block Sheet is set properly.
LIGHT-BLOCK
SHEET BASE
LIGHT-BLOCK
SHEET
Fig-5
Light-Block Sheet should be
located under the hooks.
HOOKS
HOOKS
5
6
Mount the Light-Block Sheet Base
Mount the Top Cabinet and the Lens Cover
1. Mount the Top Cabinet with 2 screws.
2. Mount the Lens Cover.
Position the mark "UP" of the Lens Cover on top and
push into the cabinet. Turn the Lens Cover
clockwise until it is securely locked.
1. Mount the top cabinet with 2 screws.
2. Push into the Lens Cover to the Top Cabinet.
Confirm the top and bottom of the lens cover.
The part circled in Fig-6-2 should be fitted.
For the Cabinet Fig. 6-1
For the Cabinet Fig. 6-2
Fig-6-1
Fig-6-2
UP
Page 5

1AA6P1P3841-- (IDEP)
交換作業上の注意
安全のために注意していただくこと
部品明細
液晶プロジェクターレンズ
品番 LNS-T10/LNS-W10
レンズ交換作業手順書
レンズ交換はサ−ビス技術員が行ってください。
レンズ交換はこの作業手順書に従い、正しく行ってください。
レンズ交換のまえに、液晶プロジェクターの品番と交換レンズの品番
をよく確認のうえ、正しい品番のレンズをご使用ください。
レンズにはレンズ保護のためのキャップが付いています。レンズを取
り付けるまえに、かならずキャップを外してください。
レンズの取り付け、取り外しのとき、レンズ表面を手でさわったり傷
を付けたりしないようご注意ください。
適合レンズの詳しくは取扱販売店にご相談ください。
梱包にはつぎの部品が入っています。
・レンズ本体
・遮光板 (予備)
1本
1枚 (品番 6103015040)
安全のため、必ずつぎの点検と確認を行ってください。
レンズ交換のあと、キャビネットを組み立てるまえに、つぎの点検を行ってください。
1.レンズが確実に取り付けられているか。
2.配線がレンズモーターのギヤーおよびその他のメカ部品にからまっていないか。
3.外れている部品はないか。
日本印刷
Page 6

-2-
1
2
レンズ交換は
レンズカバーを矢印の方向に回し手前に引っ張り、レ
ンズカバーを取り外します。
スクリューA(2本)を外し、それから上面キャビネット
を取り外します。
レンズ交換のしかた
レンズカバー及び上面キャビネットを外す。
1.
2.
1 6
〜 の手順で行います。
遮光プレートベースを外す。
遮光プレートベースを上方にスライドさせ取り外します。
はじめにレンズシフトでレンズを最上位にセットします。
図 1-1
スクリュー "A"
図2
遮光プレートベース
図 1-2
スクリュー "A"
レンズカバーを手前に引っ張り取り外します。
スクリューA(2本)を外し、それから上面キャビネット
を取り外します。
1.
2.
上面キャビネット
上面キャビネット
レンズカバー
レンズカバー
Page 7

レンズとレンズ取り付けベースのマーカーが
一致する位置でレンズをガイドへ挿入する。
-3-
4
3
レンズを取り付ける。
交換レンズに付いているレンズ保護キャップ(前後2箇所)
を外します
遮光プレートにレンズを通す。
レンズと取り付けベースのマーカーが一致する位置でレン
ズをガイドへ挿入する。
固定レバーAが固定位置にセットされるまでレンズを時計
方向へゆっくりと回し(1/4回転)ます。
1.
2.
図4
レンズを外す。
レンズ固定レバーを押しながら、レンズを反時計方向に回
し(1/4回転)レンズを外します。
レンズを落下させないようご注意ください。
図3
レンズ固定レバー
レンズ取り付けベース
3.
4.
Page 8

-4-
遮光プレートをホック内側
の溝に通す。
ホック
5
6
図 6ー1のキャビネットの場合
図5
遮光プレートベースを取り付ける。
遮光プレートベースを取り付けます。
上面キャビネットをスクリュー(2本)で取り付ける。
レンズカバーを上面キャビネットに取り付ける。
レンズカバーは凹部にUPの記載のある部分を上側に
し、上面キャビネットに差し込み、レンズカバーが止
まるまで右一杯に回し、レンズカバーをしっかり固定
します。
1.
2.
上面キャビネット及びレンズカバーを取り付ける。
遮光プレート
遮光プレートベース
プロジェクターに電源を入れ、レンズシフトを上下に、ま
たズーム・フォーカスを動かし、遮光プレートがレンズと
共に正しく動くか確認ください。
図 6-1
図 6-2
上面キャビネットをスクリュー(2本)で取り付ける。
レンズカバーを上面キャビネットに取り付ける。
レンズカバーを前面より押し込んで取り付けます。
レンズカバーには上下があります。
図の部分を確認のうえ取り付けてください。
図 6ー2のキャビネットの場合
ホック
UP
 Loading...