

Page 1

IP COMMUNICATOR
IPDACT-UD
Technical Reference
Document DM385-Iv2
Version 2.0
April, 2007
i
Page 2

TABLE OF CONTENTS
I - INTRODUCTION......................................................................................I-1
I - 1. IPDACT-UD Introduction............................................................................ I-1
I - 1.1. User Scenario............................................................................................I-1
I - 1.2. Operation Mode........................................................................................I-3
I - 1.2.1. Monitoring............................................................................................I-3
I - 1.2.2. Alarm sending......................................................................................I-5
I - 1.3. Additional features....................................................................................I-6
II - IPDACT-UD DESCRIPTION...................................................................II-7
II - 1. General Description......................................................................................II-7
II - 2. LEDs..............................................................................................................II-9
II - 3. Jumper.........................................................................................................II-10
II - 4. Connection points to the Control Panel and external..............................II-10
II - 5. LAN..............................................................................................................II-12
II - 6. Console ........................................................................................................II-13
III - CONFIGURATION............................................................................III-15
III - 1. Configuration modes............................................................................ III-15
III - 2. DHCP..................................................................................................... III-15
III - 3. Telephonic Console............................................................................... III-17
III - 3.1. Configuration...................................................................................III-18
III - 3.1.1. Default Configuration...................................................................III-19
III - 3.1.2. Register description......................................................................III-20
III - 3.1.3. Minimum configuration for the installer ......................................III-27
III - 3.1.4. Configuration Example ................................................................III-28
III - 4. Asynchronous Console......................................................................... III-30
III - 4.1. Accessing the console......................................................................III-30
III - 4.2. Main Menu ......................................................................................III-30
III - 4.3. IPDACT-UD generic configuration.................................................III-31
III - 4.4. Monitoring configuration and sending of alarms.............................III-31
ii
Page 3

III - 4.5. IPDACT-UD Quick Configuration..................................................III-32
III - 4.6. Monitoring.......................................................................................III-33
III - 5. Telnet.....................................................................................................III-35
IV - APPENDIX .......................................................................................IV-37
IV - 1. IPDACT-UD Technical Specifications.................................................IV-37
The manufacturer reserves the right to introduce changes and
improvements to the appropriate features of both the hardware and
the software of this product, modifying the specifications included in
this manual without prior notice.
iii
Page 4

I - Introduction
I - 1. IPDACT-UD Introduction
The IPDACT-UD is a device which, when connected to a security control
panel, carries out three basic tasks:
• To send over an IP network the alarm information sent by the pan el
to which this is connected.
• To check the connectivity between the control panel and the alarms
reception center.
• In cases where it is not possible to transmit over the IP net work, the
IPDACT-UD will stop intercepting the alarms from the panel. At this
point the alarms will be sent over the telephone line.
The IPDACT-UD operates together with the Teldat VisorALARM device,
located in the alarm receiver center. This behaves as an alarm receiver which
receives the said alarms through an IP network (instead of the traditional
public switch telephone network) and sends them through a serial port to
automation software in order to be processed. Additionally, this receives
monitoring messages from multiple IPDACT-UD and generates the
corresponding alarm in cases where communication fails with one or more of
these.
I - 1.1. User Scenario
A traditional security scenario consists of a control panel (CP), located in the
client environment and an alarm receiver center (ARC) located in the securit y
company’s control center. The CP contains a group of sensors which trigger
a series of alarms or events which, when produced, are sent to the ARC to be
processed.
Communication between the above is traditionally carried out over the
telephone line so that both ends can initiate a call to the remote end: the CP in
order to notify events and the ARC for bi-directional tasks (activation,
teleloading and general control).
The communication protocol varies depending on the manufacturers who
usually tend to use their own solutions. The IPDACT-UD supports Contact -ID
protocol.
The CP is placed as the first connection element to the PSTN so that it can
prioritize the customer’s telephone line.
IPDACT-UD - Introduction
I-1
Doc.DM385-I
Rev. 2.0
Page 5
Alarm
Control Panel
Public Telephony
Switched Network
Client
Fax
Alarm Receiver
Sur-Gard/Radionics
Alarm Receiver Center
Automation SW
IBS/ MAS/ Micr o Ke y
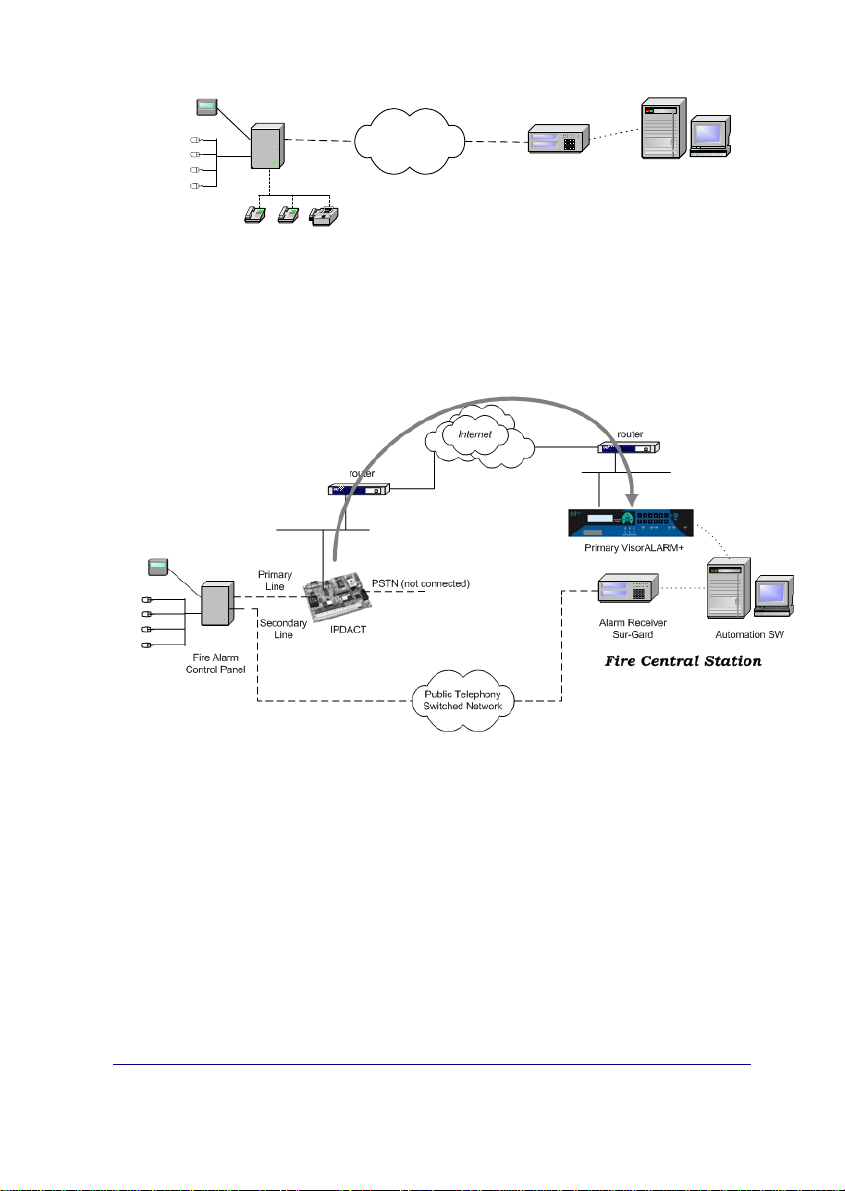
Figure 1. Traditional security scenario
Within the general user scenario, the IPDACT-UD device is located in the
client area, next to the control panel, intercepting the telepho ne line. This is
displayed in Figure 2. The arrow in the figure demonstrates the preferred
path to send alarms from the CP; here the telephone line is used as a backup
in case there is a communication malfunction in the IP network.
Figure 2. Teldat VisorALARM and IPDACT-UD operating scenario
The IPDACT-UD has a functionality incorporated giving rise to a third possib le
scenario: network backup. In the previous scenario, where communication
fails between the device and the ARC, the IPDACT-UD hands over the
communications to the control panel. With the new functionality, the IPDACTUD tries to open communications with a second device, the backup
VisorALARM. Only in cases where there are problems with this second
device does the control panel take over. Meanwhile, even in this state, the
IPDACT-UD continues to try and communicate with the ARC until one of the
VisorALARMs responds.
IPDACT-UD - Introduction
I-2
Doc.DM385-I
Rev. 2.0
Page 6
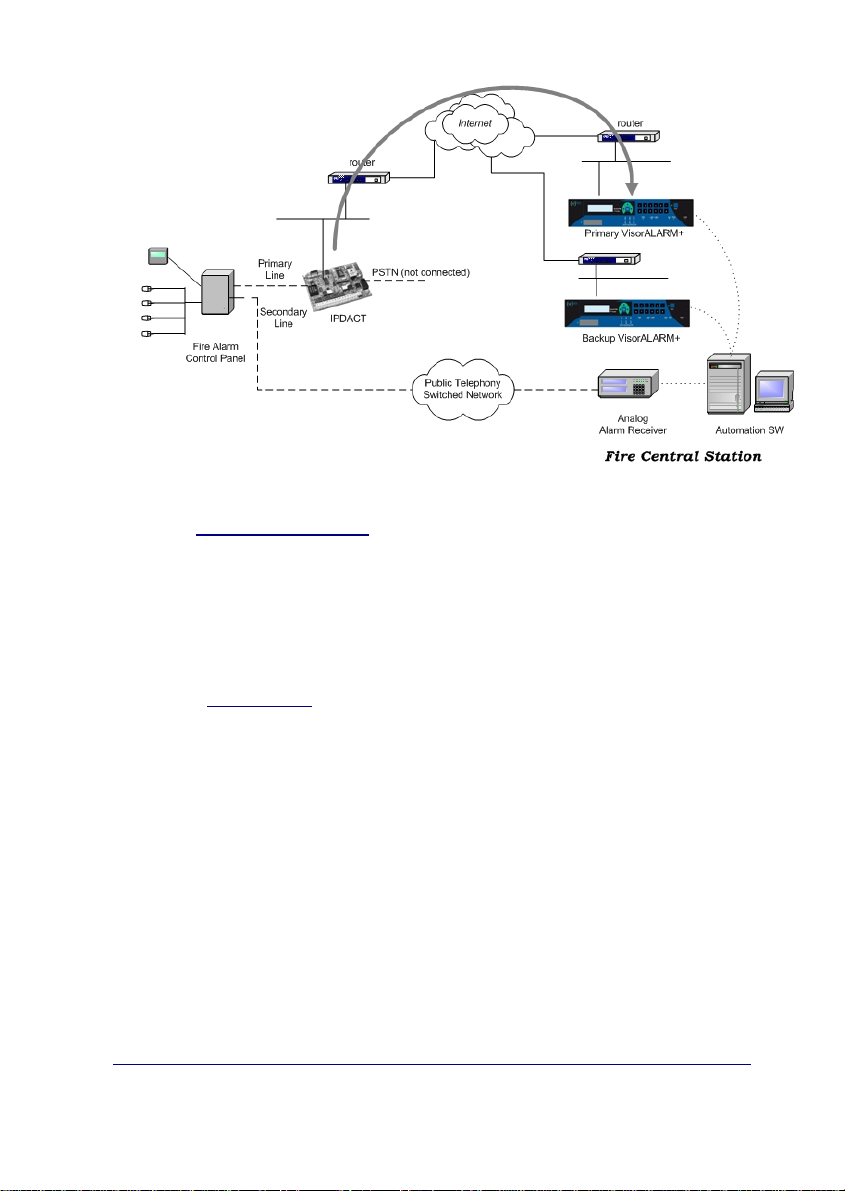
Figure 3. Network backup function scenario.
I - 1.2. Operation Mode
The IPDACT-UD connected to the client control panel carries out two tasks:
sending alarms from the panel and monitoring the connection with the IP
receiver. The network backup option has implications in connection
monitoring. The alarms reception center is composed of two VisorALARM
devices, one main and the other backup.
I - 1.2.1. Monitoring
The IPDACT-UD is a device that intercepts the control panel telephone
connection with two aims: firstly to detect when the panel sends an alarm in
order to capture it and retransmit over the connected IP network and secondl y
to allow the telephone line to be used at the same time as sending alarms.
The interception of the telephone line takes place ONLY in cases where
connectivity with either of the Teldat VisorALARM devices has been verified.
The IPDACT-UD-VisorALARM connectivity is checked through a traffic
monitor which the IPDACT-UD periodically sends and to which the main
Teldat VisorALARM responds. (Through configuration, the main
VisorALARM IP address is given to the IPDACT-UD and is the primary
communication option. The backup VisorALARM IP address is also
configured and is used in cases where the main device fails). If the exchange
of messages does not occur during the configured time, the IPDACT-UD tries
to resend. If, after a configurable number of attempts, a satisfactory response
is not received, the connectivity with the main VisorALARM is presumed lost.
At this point the IPDACT-UD tries to communicate with the backup
IPDACT-UD - Introduction
I-3
Doc.DM385-I
Rev. 2.0
Page 7

VisorALARM, to which it will now try and send the alarms, polls, etc. In
=
cases where communication with this second device also fails, the telephone
line access is returned to the control panel as if the IPDACT-UD was not
present. From this point on, the IPDACT-UD will try to re-establish
communications both with the main Teldat VisorALARM and the backup,
communication with the main device taking priority. The moment
communications are reestablished with either of the two ARC devices, the
IPDACT-UD intercepts the telephone line once more.
The supervision traffic is encrypted UDP. The Ethern et frame size does not
exceed 70 bytes. The monitoring interval, the number of retries and time
between retries are all configurable, and are values that must be carefully
considered. Normally the monitoring interval in the control pane l is high as
this implies a telephone call. However, in the case of IPDACT-UD, this cost is
irrelevant as it is dealing with traffic which in all likeliness is runn ing over a flat
rate connection. In addition, a high value here is not advisable in cases where
the IPDACT-UD connects to Internet through a router executing NAT, a very
probable situation. This is because traffic coming from the ARC towards the
IPDACT-UD reaches this thanks to the router maintaining the entry in the NAT
table active during a period of time, the entry bei ng refreshed with supervision
traffic. If the supervision interval is greater than the residence time for the
entry in the NAT table, communications from the ARC will not be possible.
There is no rule to say how long an entry i n the NAT table must last for. In
cases of the TELDAT devices, this is around 5 minutes. A low value has the
problem that the traffic the VisorALARM must process is high, the same as
the bandwidth requirements. If ARC Internet access is ADSL, you need to
consider that the upstream channel is smaller than the downstream one and
that supervision traffic returned to the IPDACT-UDs is slighter larger than the
incoming.
The incoming traffic to the ARC is:
NTC **528
−
mipsALIVEKEEP
The minimum supervision time can be 1 second and a Vis orALARM can have
3000 IPDACT-UDs registered that give an input traffic of 1,58 Mbps. The
return traffic is approximately 6% larger.
The Teldat VisorALARM received monitoring messages from the IPDACTUDs. If these are registered, they are assumed alive and an
acknowledgement response is sent to them; if the IPDACT-UDs are not
registered, they are ignored. Periodically the status of all the registered
IPDACT-UDs is checked and all those which have not notified th eir avail abilit y
(i.e. those which have not responded since the last check) an alarm is
generated. This is a 350 code alarm from the Contact-ID protocol
(Communication trouble) which is received in SwAut.
In order to prevent the Teldat VisorALARM from sending hundreds or
thousands of communication failure alarms when faced with a situation of
general failure of IP traffic reception, the device itself monitors the network
IPDACT-UD - Introduction
I-4
Doc.DM385-I
Rev. 2.0
Page 8

access through echo ICMP packets (ping) to a known address: if the echo
ICMP packets (ping) towards this address fail then a code 356 alarm is
generated from the Contact-ID protocol (Loss of central polling).
Apart from the above codes, the VisorALARM also generates others related
to network backup.
I - 1.2.2. Alarm sending
When the IPDACT-UD has connectivity with the Teldat VisorALARM, the
former intercepts the telephone line and processes all the incoming and
outgoing calls taking place.
The supported alarm sending protocol is Contact-ID. This format sends
alarms through DTMF digits complying with the following format:
AAAA MM QEEE GG CCC S
where AAA is the client number, MM the type of message, Q an event
qualifier, EEE the type of alarm, GG the group or partition number, CCC the
zone number and lastly S is the frame validation digit.
When the panel opens to send an alarm, the IPDACT-UD provides power and
emits the dialing tone. When the control panel dials the alarm center
telephone number, it issues the Contact-ID handshake and receives the alarm
frame. From this point, the IPDACT-UD sends this alarm to the
VisorALARM.
The control panel is not given the frame sent acknowledgement (kissoff) until
the said acknowledgement is received from the Teldat VisorALARM. If the
IPDACT-UD does not receive the acknowledgement within 2 seconds, this
carries on resending a configured number of times after which connection with
the Teldat VisorALARM is assumed lost and the control panel sends the
alarm over the telephone line. From this point, the IPDACT-UD tries to reestablish communication with the VisorALARM as previously descr ibed. In
cases where the network backup functionality is operative, a failur e in sendi ng
an alarm to the main VisorALARM changes into an attempt to establish
communications with the backup VisorALARM and to send the alarms to this
second device. If this attempt also fails, then the control panel takes over the
process of sending the alarms.
It’s essential that the total time, in which the IPDACT-UD deactivates
in cases where communications fail with both the IP receivers, is
greater than the control panel’s highest retry time.
The IP VisorALARM receiver on receiving an alarm from an IPDACT-UD
stores this in a non-volatile internal memory. When the operation has
successfully finished, it sends the acknowledgement to the IPDACT-UD
originating the alarm so that in turn this is sent to the associated control panel.
If the alarm storage memory cannot store the alarm, no acknowledgeme nt is
given.
IPDACT-UD - Introduction
I-5
Doc.DM385-I
Rev. 2.0
Page 9

As regards the SwAut, the Teldat VisorALARM behaves as an alarm rec eiver
that sends alarms received through a serial port. The Teldat VisorALARM
can emulate a Sur-Gard, an Ademco 685 or a Radionics 6500 receiver. The
serial line parameters are configurable as well as those relative to the
emulated receiver (link-test, receiver and line identifier, start and end frame
characters, etc.)
I - 1.3. Additional features
In order to simplify installation and updating of the registered IPDACT -UDs,
the IP VisorALARM receiver has additional facilities.
To install new IPDACT-UDs, the Teldat VisorALARM possesses
configuration patterns associated to installer passwords. These permit you to
automatically register new IPDACT-UDs in the supported IPDACT-UD list and
at the same time enable the IPDACT-UD to request the necessary
configuration for start up. The device can simultaneously have multiple
patterns; the choice of one or other depends on the installer pass word used in
the IPDACT-UD to request the service.
In order to maintain and update the registered IPDACT-UDs base, the Teldat
VisorALARM has commands available to remotely update one or multiple
configuration parameters used by the IPDACT-UDs.
Additionally, in order to simplify the IP parameters configuration, something
that is not always easy, the IPDACT-UD has a DHCP client program, which
attempts to automatically obtain all the IP connectivity information (address,
mask and gateway) on startup. To do this, you need to have a DHCP server
in the local network. If the IPDACT-UD does not automatically obtain the IP
address, use the parameters that have been statically configured, permitting
you to make sure that the device operates even when the said server is down.
The IPDACT-UD allows trouble signaling to be sent to a maintenance
VisorALARM receiver, which is a different device from the main and backup
VisorALARMs. The IPDACT-UD does not discriminate between sending
to one receiver or another depending on the type of signal (alarm or
trouble), but sends the same signal to both the operating receiver and to
the maintenance receiver. It is the receiver’s task to filter the signals t o be
sent to the automation software.
Receivers that can be configured as maintenance are those containing
firmware version 10.5.16 and higher. These receivers are characterized as
they do not execute IPDACT-UDs supervision functions, nor carry out any
remote operations over the IPDACT-UDs, nor do they admit IPDACT-UD
registration. These are repeat alarms coming from the IPDACT-UDs and
simply filter the signals, sending only the required signals to the automation
software.
IPDACT-UD - Introduction
I-6
Doc.DM385-I
Rev. 2.0
Page 10
II - IPDACT-UD Description
II - 1. General Description
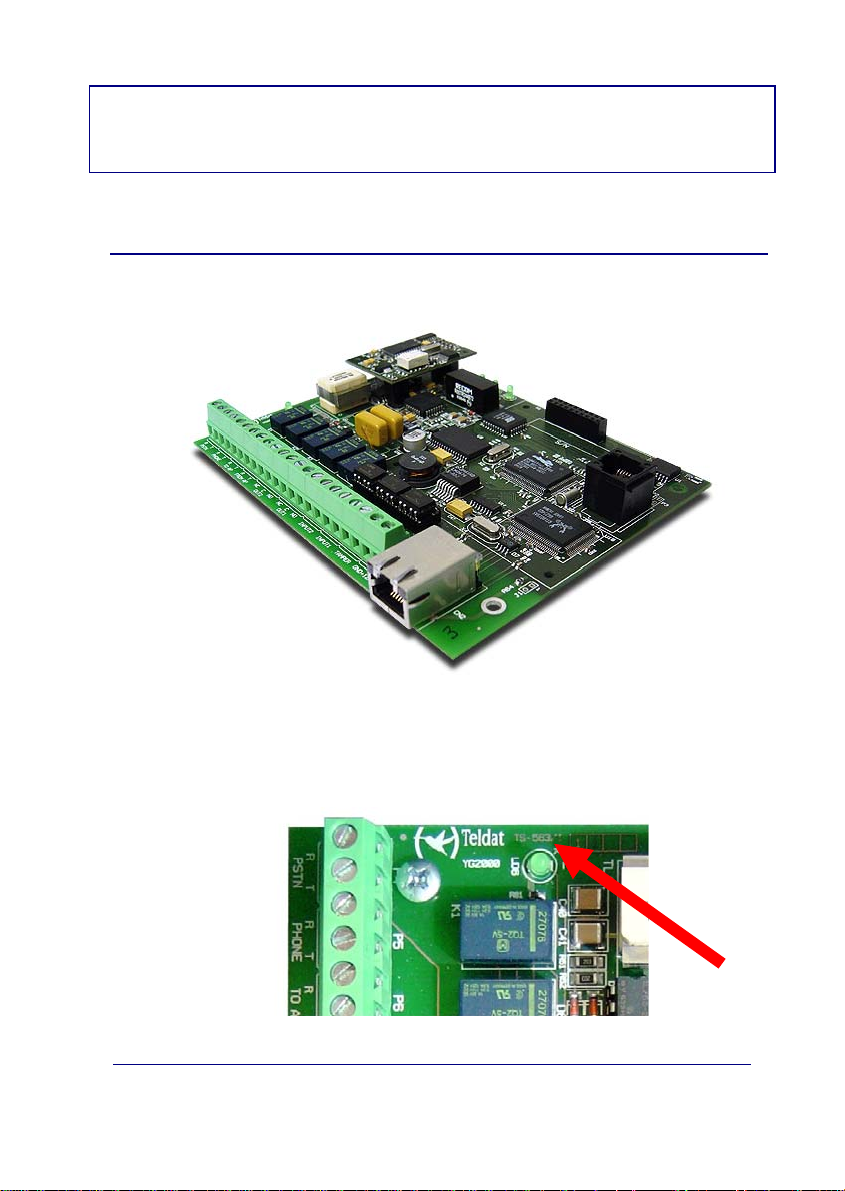
The figure displayed below, represents the IPDACT-UD hardware.
Figure 4. IPDACT-UD
The hardware version and release is identified through its board number
which is TS-563/X where X is the release number.
The following figure shows the identifier details and how to locate it.
Board identifier
Figure 5. Board identification details
IPDACT-UD - Description
II-7
Doc.DM385-I
Rev. 2.0
Page 11
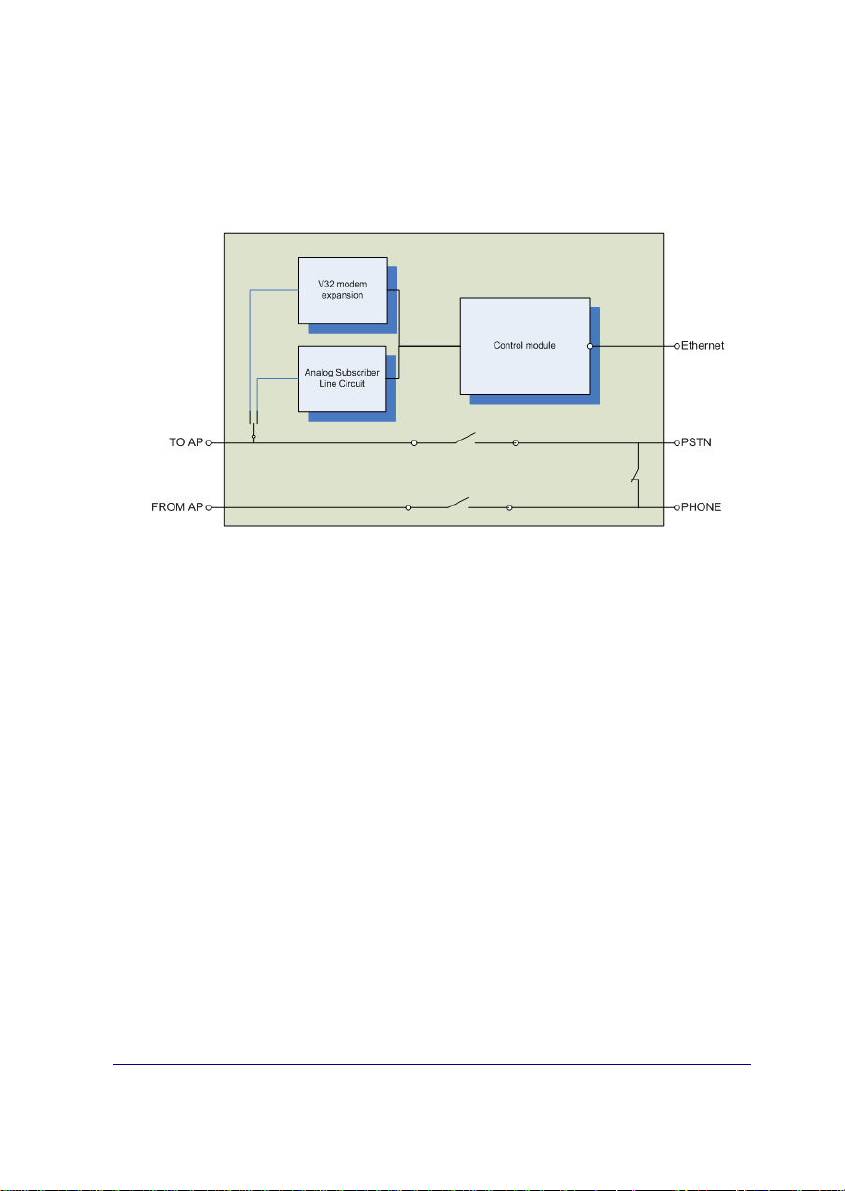
The IPDACT-UD basically consists of three elements:
• The Analog Subscriber Line Circuit module (Telephonic module).
• The V32 modem module.
• The Control module.
Figure 6. IPDACT-UD circuit details.
The device CPU, memory and the LAN (identifiable through the RJ-45
connector) are found in the control module. This manages all the information
procedure and the sending of the said information through a n IP network over
the LAN.
The telephonic module physically supports the control and contains all the
connection points with the control panel. This manages the entire telephon ic
interface with the control panel and the client telephone network (public
telephone network termination point and client phone wiring).
The V32 modem module adds the necessary elements to make telephonic
data calls to the control panel and so support upload/download functionality.
From a configuration / monitoring point of view, the IPDACT-UD possesses
LEDs that permit you to view the status of the various elements, from the P1
jumper to control various aspects and a telephonic c onsole. This telephonic
console is accessible from the connection to the control panel (TO-AP) and
requires an analog telephone with tone dialing.
The IPDACT-UD has an asynchronous console which permits you to monitor /
configure the device through an asynchronous terminal.
IPDACT-UD - Description
II-8
Doc.DM385-I
Rev. 2.0
Page 12
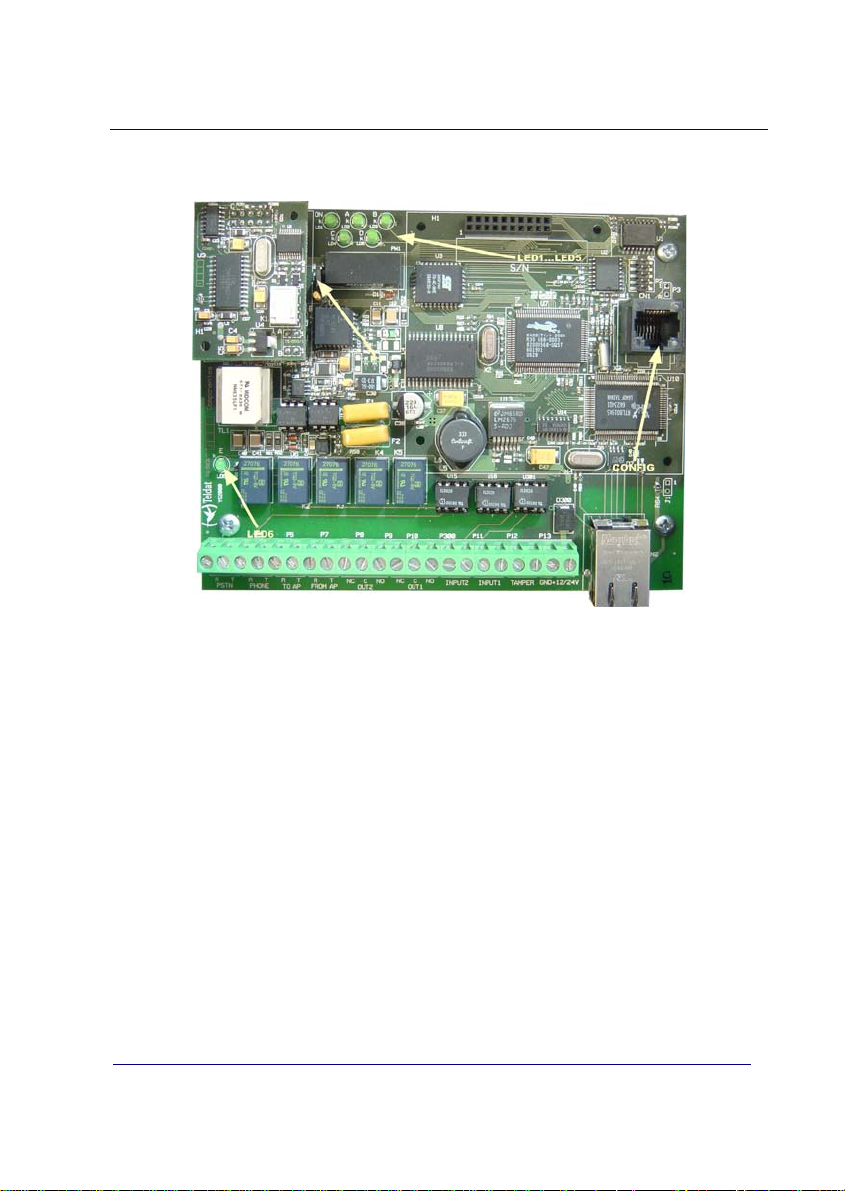
II - 2. LEDs
The IPDACT-UD has three groups of LEDs that provide information on the
status of each type. These are displayed in the following figures:
Figure 7. LEDs and pins for a IPDACT-UD
The LED labeled “ON” (LD1 for all the versions an d releases) is green and
indicates that the IPDACT-UD is powered.
Line status LED: Next to the relays there is a LED labeled LD6. In green this
indicates that the telephone relays are active i.e. the IPDACT-UD interce pts
the telephone line. In normal working mode, this only occurs when the
IPDACT-UD has connectivity with the configured VisorALARM. The relays
also activate when the telephone console activates (pleas e see section IV.2
for further information). When the control panel is executing maintenance
tasks due to a bi-directional call, the relays are inactive.
LEDs LD2, LD3, LD4 and LD 5 each have an independent connotation:
• LED A LD2: Supervision information.
ON: a management frame is sent to the VisorALARM (contact or keep-alive).
OFF: a response is received to the sent management frame. If there is no response,
this remains active, indicating the lack of connectivity with the VisorALARM.
• LED B LD3: TO-AP terminal status
ON: the alarms panel telephone line is off hook.
OFF: the alarms panel telephone line is on hook.
IPDACT-UD - Description
II-9
Doc.DM385-I
Rev. 2.0
Page 13

• LED C LD4: alarm sending to the VisorALARM.
ON: an alarm has been sent to the VisorALARM.
OFF: a response has been received to the sent alarm.
• LED D LD5: a bi-directional call to the alarm panel is in progress.
ON: there is a bi-directional call to the alarm panel. The LED located next to the
relays is off as the alarm panel has directly accessed the telephone line.
OFF: no bi-directional call in progress. The panel is operating normally.
II - 3. Jumper
The bridge labeled P1 operates by short-circuiting both pins through a metallic
element such as a screwdriver or a clip. This permits two tasks:
a) On device startup this permits you to configure the IPDACT-UD with the
default configuration. For further information on how to activate the
default configuration, please see section IV.2.1.1.
b) Access the telephonic console. This permits you to configure / monitor
the IPDACT-UD through a telephone connected to the said IPDACT-UD.
For further information, please see section IV.2.
II - 4. Connection points to the Control Panel and external
In order to connect the IPDACT-UD to the control panel and to po wer this,
there is a row of choc blocks. All the connections are limited in power. As
can be seen in the following figure, the connections are grouped in the
following manner:
ETHERNET
Female JACK
NC C NO
FROM AP
TO AP
PHONEPSTN
OUT2
NC C NO
OUT1
TAMPER
GND+12/24VINPUT2 INPUT1
Figure 8. Connection choc block
Choc block connection to the control panel
• TO-AP: terminals proving telephonic connection to the control panel.
This must be connected to the control panel connection which this is
using to access the PSTN.
IPDACT-UD - Description
II-10
Doc.DM385-I
Rev. 2.0
RJ45
Page 14

• FROM-AP: terminals receiving telephonic connection from the control
panel. This must be connected to the control panel connection which this
uses to provide a line to the subscriber numbers.
Choc block connection to the Public Switched Telephone Network
• PSTN: access terminals to th e public switched telephone network. This
connection is supervised. In cases where there is a failure, the analog
output activates.
Choc block connection to the client telephone handsets
• PHONE: terminals providing telephonic connection to the telephone
handsets possessed by the client at home or at installations.
Choc block associated to dry contact outputs OUT1 and OUT2
• OUT1 NC-C: terminals whose state is normally short-circuited. On
activating the output, these terminals stop being short-circuited. Short
circuit is carried out through an electric-mechanical rela y. The technical
data for this can be found in appendix V.3.
• OUT1 NO-C: terminals whose state is normal open. On activating the
output these terminals pass to a short circuit state. Short circuit is carried
out through an electric-mechanical relay. The technical data for this can
be found in appendix V. 3.
This output is also related to the input status of the PSTN and LAN and with
the IP connectivity status with the alarms reception center. When there is IP
connectivity, the OUT NO terminals will be in their normal state i.e. op en. If
there is a failure in IP connectivity, then these terminals pass to a closed
state.
The IPDACT-UD output is a status indicator for the IPDACT-UD. It
is necessary to connect this said output to a panel zone which, as
this is active, compulsorily generates an audible and visible si gnal,
as well as sending the trouble signal to the alarm reception center.
• OUT2 NC-C: terminals whose state is norm all y short-circui ted. While the
CPU is working properly these terminals are open. Short circuit is
carried out through an electric-mechanical relay. The technical data for
this can be found in appendix V.3.
• OUT2 NO-C: terminals whose state is normal open. While the CPU is
working properly these terminals are in a short circuit state. Short
circuit is carried out through an electric-mechanical rela y. The technical
data for this can be found in appendix V. 3.
IPDACT-UD - Description
II-11
Doc.DM385-I
Rev. 2.0
Page 15

Choc block associated to the inputs INPUT1 and INPUT2
• INPUT1 (Normally Open): terminals associated to the input number 1
(zone 1). This input is supervised and considered inactive when a 1K
ohms resistance is detected between its ends. When an open circ uit is
detected, the device, which should be connected to this i nput, is reg arded
as having been disconnected i.e. it has been sabotaged.
• INPUT2 (Normally Open): terminals associated to the input number 2
(zone 2). This input is supervised and considered inactive when a 1K
ohms resistance is detected between its ends. When an open circ uit is
detected, the device, which should be connected to this i nput, is reg arded
as having been disconnected i.e. it has been sabotaged.
In UL compliance installations, these inputs should not be used and
must be bridged with a 1K resistance. This resistor is factory
installed.
Tamper Chock Blocks
• TAMPER (Normally closed): An additional input connecting to a box
tamper which indicates if the box is open. The input is normally closed.
Choc block power connections
+12/24V: It is possible to power the unit at either 12 or 24 volts.
• GND: power ground terminal.
II - 5. LAN
The device connects to the LAN through an RJ45 (CN2) connector.
IPDACT-UD - Description
II-12
Doc.DM385-I
Rev. 2.0
Page 16

Figure 9. LAN Connector and cable.
Failure detection in the Ethernet interface is indicated by the analog output
activating.
II - 6. Console
An asynchronous console is available for configuration / monitoring tasks.
The IPDACT-UD has a black RJ45 connected labeled CN1 for console
connection. Consequently you will need a DB9 to RJ45 converter for the said
connection which is provided by Teldat. The following figures show both the
converter and the connector respectively.
Figure 10. DB9-RJ45 converter for the console connection
IPDACT-UD - Description
II-13
Doc.DM385-I
Rev. 2.0
Page 17
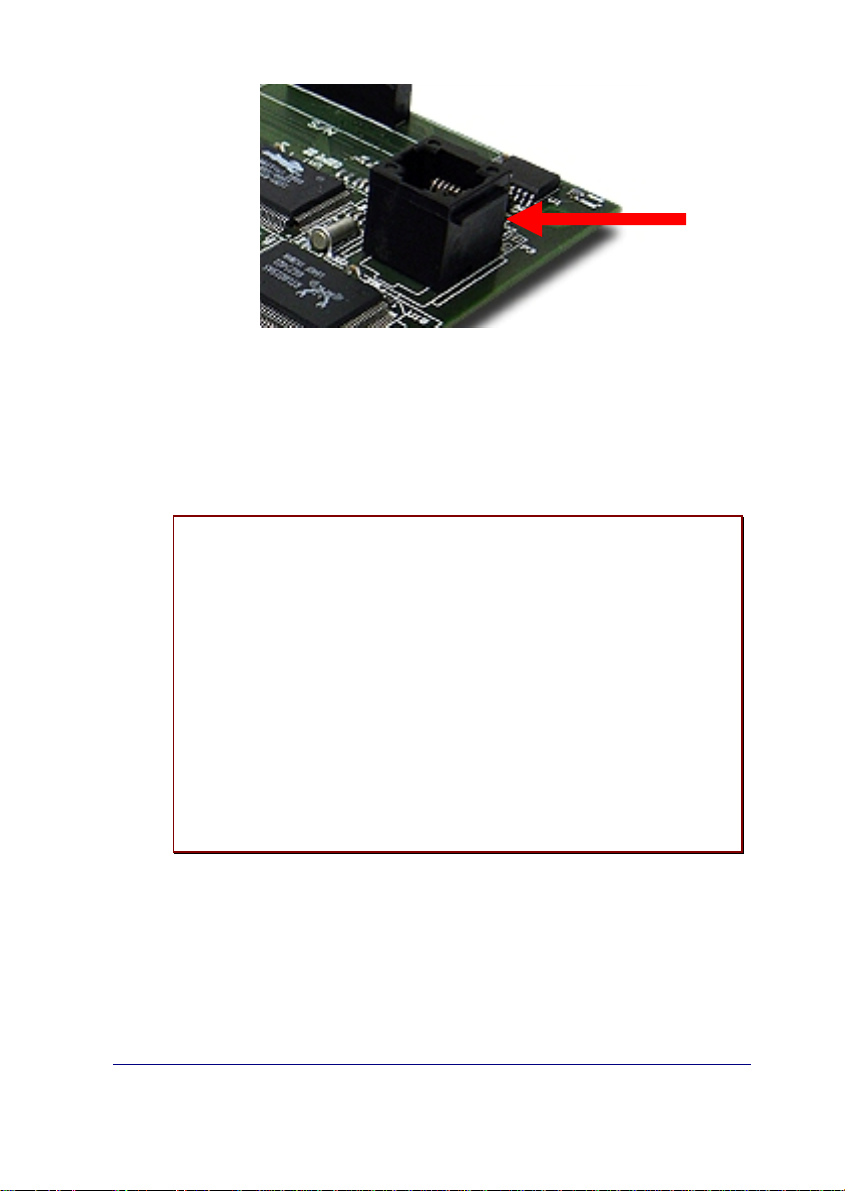
RJ-45
connector
Figure 11. Console connector details
The access configuration is 9600 8N1 (8 bits, without parity, 1 stop bit).
The environment is a simple one orientated to menus. The main menu is
displayed in the following figure.
- Main Menu -
Configuration
a) Generic IPDACT-UD config
b) Transmission Parameters
c) Quick Install
d) IP polling
Monitoring
e) General Info
f) Remote Monitor
g) Events
h) IP Connectivity
i) IP polling status
z) Exit
option:
IPDACT-UD - Description
II-14
Doc.DM385-I
Rev. 2.0
Page 18

III - Configuration
III - 1. Configuration modes
The IPDACT-UD can be configured both locally and remotely.
1. Locally:
a. Telephone console: through a normal analog telephone
connected to the TO-AP labeled choc blocks.
b. Asynchronous console: from a PC with terminal emulated and a
cable for this.
2. Remotely:
a. From the VisorALARM IP receiver: through a register operation
carried out by the IPDACT-UD installer or through ‘update’
commands from the VisorALARM console.
b. From a telnet session: from the IPDACT-UD software release 2,
the remote configuration can also be carried out throug h a telnet
session to the IPDACT-UD IP address, provided that the said IP
address is available (if this is in the same LAN for ex ample). In
cases of a telnet session, the given interface is identical to the
asynchronous console interface.
c. Through DHCP: this is also from release 2, the parameters for
the IP address, IP mask and gateway can by dynamically
obtained from a DHCP server that is located in the sam e local
network as the IPDACT-UD. From release 2.2 onwards, the
DHCP client can be disabled.
The following sections will show each of the above methods in more detail.
Accessing the device configuration, both for telephone and serial
port, always requires an access password.
III - 2. DHCP
DHCP stands for “Dynamic Host Configuration Protocol”. DHCP is an Internet
protocol used to automate the configuration of devices using the TCP/IP
protocol stack. DHCP can be used to automatically assign IP addresses and
IPDACT-UD - Configuration
III-15
Doc.DM385-I
Rev. 2.0
Page 19

other TCP/IP configuration parameters such as the network mask and the
default router (or gateway) among others.
In the IPDACT-UD environment, this is used to automatically obtain the IP
communication parameters (IPDACT-UD IP address, network mask and
gateway), simplifying the device installation process.
So this runs correctly, you need to have a DHCP server correctly configured in
the local network where the IPDACT-UD is connected. Normally the access
routers (in ADSL for example) have the possibility to act as a DHCP server,
therefore in these environments, start up is immediate.
The IPDACT-UD functioning mode is as follows: when the devic e boots up, it
tries to dynamically obtain the IP configuration from any DHCP server which is
in the network. If this is achieved, it activates the said configuration and
displays a message on the console.
Teldat (c)2003
Config file... read
Trying to get DHCP lease...Lease obtained
Address assignment in the DHCP protocol is defined so that this can be
permanent or expire after a certain period of time (configurable in the DHCP
server). If the assignment is permanent, the IPDACT-UD will not renew the
address until the next time it is rebooted. Contrariwise, before the validit y of
the address times out, the IPDACT-UD will automatically request the s erver to
renew the assignment.
If during the first attempt (or during the renewal attempt) the IPDACT-UD
cannot get the IP address from a DHCP server, and with the aim of not
leaving the device without IP connectivity, the device will use the IP
parameters which have been statically configured i n the device console and
will operate with these parameters until the next time the IPDACT-UD is
restarted. Therefore, if you need to force to IPDACT-UD to renegotiate an
address, you will need to reboot.
The following message is displayed by the IPDACT -UD on console if it cannot
obtain an assignment through DHCP.
Teldat (c)2003
Config file... read
Trying to get DHCP lease...Lease not obtained.
DHCP server may be down.
Using static IP configuration.
From release 2.2 onwards, the DHCP client can be en abled/disabled. In the
previous releases this was always operating. In the default configur ation it is
enabled. To enable/disable the client, enter the IPDACT-UD generic
configuration:
IPDACT-UD - Configuration
III-16
Doc.DM385-I
Rev. 2.0
Page 20

-- Generic IPDACT-UD config --
IP Connectivity
a) DHCP client: OFF
b) IP addr: 192.168.0.202 msk: 255.255.255.0
c) Gateway IP: 192.168.0.250
User Access Control
d) Password: 1234
Miscellaneous
e) Date & time: 01/16/1980 17:37:28
f) Events: PHON RMON CID RALA RCFG
g) PC verifying digit: OFF
z) Exit
option:
In the DHCP client section, you can configure the client as enabled/disabled.
option: a
DHCP client: (0:OFF - 1:ON)
III - 3. Telephonic Console
In order to use the telephonic console, a normal an alog telephone connected
to the choc blocks labeled TO-AP is required. This telephone must be
configured to dial through tones. These choc blocks are used to connect the
IPDACT-UD to the control panel consequently the telephonic console is not
always available and it’s necessary to activate it.
To activate the telephonic console, short circuit the P1 jumper, for a little more
than a second with some metallic element. You can use a small screwdriver
or a simple clip. During this process the telephone must be on hook. On
activating the console, if the telephone relays are inactive (line status LED
off), they activate (i.e. the LED lights up); if they are already active, they will
briefly deactivate to indicate that the telephonic console is available.
On picking up the phone, you will hear an int ermittent tone which requir es you
to introduce an access password. In order to introduce the password, you
need to press “**#” (asterisk, asterisk, pound) and the acc ess password. By
default the access password is 24680. If this is correct, you will hear three
beeps (the OK signal) and subsequently the telephonic console dialing tone (a
continuous low frequency tone). You have 4 or 5 seconds for this proc ess
after which you return to the initial situation; if the relays are inactive, yo u also
IPDACT-UD - Configuration
III-17
Doc.DM385-I
Rev. 2.0
Page 21

return to the start. If the password is incorrect, the telephonic console will
automatically deactivate and return to the initial position; if the relays are
inactive then you return to the initial position.
If at any point you hang up the phone, the telephonic console deactivates.
III - 3.1. Configuration
Configuring the various parameters is carried out through the access and
register writing. A register is used for each parameter to be configured. Each
register is made up of one or various fields. The number of fields and size of
each depends on the type of register. All the fields pertaining to one register
have the same size. In order to access a register, press * and the two digits
corresponding to the register to be configured. After selecting a register you
will hear a simple beep indicating that this register can be configured. From
this point you can configure the first field in the register. Should you select an
invalid register, an error signal is emitted. This consists of a long tone.
The access process for a register can be terminated at any point using the
escape sequence *# (asterisk, pound). In this case an escape signal is
emitted which consists of three short tones.
The available configuration registers are as follows:
Types of register register fields Field size Default value
IPDACT-UD IP address and mask 01 8 (3+1) 192.168.000.100
IPDACT-UD access gateway 02 4 (3+1) 192.168.000.200
Access password for the console 03 2 Variable, max. 16
Remote configuration request 04 1 Variable None
IPDACT-UD Reset 05 1 Variable N/A
IPDACT-UD account number 11 1 (8+1) 000000
Visor Alarm IP address 12 4 (3+1) None
UDP port 13 1 (5+1) 00080
IPDACT-UD message encryption
VisorAlarm message encryption
Interval between keep-alive (sec)
Retries after failed keep-alive
Time between retries for sending
Number of digits for a telephone
Retries for sending an alarm 20 1 (1+1) 5
key
key
keep-alives (sec).
number.
14 2 Variable, max. 16
15 2 Variable, max. 16
16 1 (5+1) 00010
17 1 (1+1) 3
18 1 (1+1) 3
19 1 (2+1) 09
IPDACT-UD - Configuration
characters, these must be
the same.
characters, these must be
the same.
characters, these must be
the same.
255.255.255.000
24680
None
None
III-18
Doc.DM385-I
Rev. 2.0
Page 22

Backup VisorALARM IP address 21 8 (3+1) None
Interval between keep-alives
(seconds) with the backup
VisorALARM
Retries after failed keep-alives with
the backup VisorALARM
Time between retries for keep-alive
sendings (seconds) with the backup
VisorALARM
Callback phone number 25 2 Variable, max. 15
DHCP Client activation /
deactivation
Output relay switch time 28 1 (3+1) 0
Action to take when the telephone
Maintenance VisorALARM address 36 4 (3 +1) None
Key to encrypt packets sent to the
line fails
maintenance receiver.
Use of the checking digits 49 1 (1+1) 1
22 1 (5+1) 00010
23 1 (1+1) 3
24 1 (1+1) 1
characters, these must be
the same.
27 1 (1+1) 1
29 1 (1+1) 2 (Alarm sending)
37 2 Variable, max. 16
characters, these must be
equal
None
None
Through the syntax (n+1) this indicates that n is the number of significant
digits and with +1 this indicates that the last figure is the checking digit
depending on the data. This is done as such to prevent errors when
configuring the device and to reduce the time required for the process. The
passwords are verified through repetition. The checking digit is obtained
through the IPDACTDATA.exe program in the PC which supplies th e data to
be configured. This characteristic enabled and disabled through register 49.
A register’s fields are configured by entering the number of data required and
finally # (pound). If the number of digits is incorrect or the data invalid, an
error signal composed of a long tone is emit ted. At this point you must wait to
repeat the value for the said field. If the data is correct an ackno wledgement
signal made up of two short tones is emitted and subs equently you move on
to the next field. If this is the last field, all the fields are stored in the
configuration and an OK signal made up of three short beeps is emitted. At
this point, the dialing tone is emitted in order to dial the telephonic console
(continuous low frequency tone).
In some cases it may be necessary to enter A, B, C, D, E or F. These digits
can be obtained through the key sequence * and a num ber between 1 and 6.
I.e. digit A is obtained through * 1, B through * 2, and so on.
Configuration changes are dynamic, i.e. you do not need t o restart the device
to activate the said changes.
III - 3.1.1. Default Configuration
Through a short circuit in the IPDACT-UD P1 jumper during the start up
process, you can configure the IPDACT-UD with the factory settings. This
configuration is displayed in the previous table.
IPDACT-UD - Configuration
III-19
Doc.DM385-I
Rev. 2.0
Page 23

The process for this is as follows: 1) switch off the IPDACT-UD, 2) short
circuit the P1 jumper, 3) switch on the device, 4) maintain the P1 short
circuited during the first burst from LEDs A, B, C and D (they light up and
switch off consecutively) and open it half way through the second burst. If the
process has executed successfully, the IPDACT-UD will display a third burst
indicating the default configuration has been activated.
III - 3.1.2. Register description
IPDACT-UD IP address and mask
IP address and mask associated to the IPDACT-UD in order to operate in the
client’s local network. From IPDACT-UD software release 2.0 onwards, this
parameter is only necessary in cases where you do not have a DHCP server
or as a backup configuration in cases where the said DHCP server is down.
The register is made up of 8 fields; both the IP address as well as the mask is
composed of 4 numbers between 0 and 255. Each number has a ver ification
digit. This contains the following value by default:
192 168 000 100 255 255 255 000
IPDACT-UD access Gateway
IP address associated to the access gateway in the client local network. T his
gateway gathers all the traffic from the IPDACT-UD and ensures that it
reaches the next hop to the Teldat VisorALARM. From IPDACT-UD software
release 2.0 onwards, this parameter is only necess ary in cases where yo u do
not have a DHCP server or as a backup configuration in c ases where the said
DHCP server is down.
The register is made up of 4 fields corresponding to the 4 numbers in the IP
address; this admits values between 0 and 255. Each number has a
verification digit. This contains the following value by default:
192 168 000 200
Access password for the console
Access password for the telephonic console which prevents unauthorized
access. This is also used to verify some operations. This must be entered
twice in order to validate it.
The register is made up of one field with up to 16 digits. The default value is
24680.
The password field cannot be left empty.
Remote configuration request
IPDACT-UD - Configuration
III-20
Doc.DM385-I
Rev. 2.0
Page 24

This permits you to prompt the Teldat VisorALARM for the complete
configuration required by the IPDACT-UD in order to function. T his register
does not require you to configure any parameters and is limited to simply
execute a request. In order to do this, you require the installer password.
The configuration the IPDACT-UD receives has been configured in the
VisorALARM through a profile. The parameters common to a set of IPDACTUDs are in the said profile.
The register mechanism permits you to quickly configure a set of IPDACTUDs with common parameters. Only those parameters which uniquely
identify an IPDACT-UD must be configured by the installer: accou nt number,
local IP parameters, output switch and actions to take should the PSTN fail.
The register is composed of one field with up to 16 digits. By default this
register is not configured with a value. Should you enter a value, it is not
maintained between requests. For further information, please see section IV-
2.1.3.
IPDACT-UD Reset
Permits you to reset the IPDACT-UD so that some parameters have validity.
So that the operation is effective you need t o provid e the access p ass word for
the console.
The register is made up of a single field, corresponding to the access
password. If the password is valid, the device will reset; should this be
incorrect an error tone will be emitted followed by the console dialing tone.
This register does not store any data in the IPDACT-UD configuration.
IPDACT-UD account number
Account number identifying the IPDACT-UD to the IP Visor Alarm receiver
and the security company’s automation software. In order to simplify the
identification process, we recommend that the last four figures in this
parameter coincide with the account number assigned to the control panel to
which this is designated.
The account number is made up by two parts:
4 bytes for LINE-ID 4 bytes for the account number
The 4 left-hand bytes (digits) are inserted in the LINE-ID field in the
CONTACT-ID frame. Depending on the type of alarm-receiver simulated by
the VisorALARM, the CONATCT-ID frame uses from 1 to 3 digits to code the
CONTACT-ID field. Currently, the VisorALARM can simulate several t ypes of
alarm-receiver, and the following table depicts the amount of bits to code
LINE-ID field for every simulated alarm-receiver:
Emulated receiver LINE-ID digits
SUR-GAR MLR200 3
IPDACT-UD - Configuration
III-21
Doc.DM385-I
Rev. 2.0
Page 25
SURGAR MLR2D 1
RADIONICS 6500 1
ADEMCO 685 1
The IPDACT-UD permits you to code the LINE-ID field with up to 4 digits to
anticipate a new alarm-receiver with up to 4 digits for LINE-ID.
How the LINE-ID is coded according to the type of alarm-receiver is shown by
the following example: if the account number is A2345678, the LINE-ID is
coded as depicted in the following table:
Emulated receiver LINE-ID digits
SUR-GAR MLR200 A23
SURGAR MLR2D A
RADIONICS 6500 A
ADEMCO 685 A
With the aim of consistency in the information shown by the Automation
Software, it is necessary that the 4 right-hand digits of the IPDACT-UD
account number are the same as the panel’s 4 digit account number.
Teldat VisorALARM IP address
IP address for the IP VisorALARM receiver which receives both the
monitoring traffic as well as the traffic corresponding to the alarms generated
by the control panel.
The register is made up of 4 fields corresponding to the 4 numbers in the IP
address; this admits values between 0 and 255. Each number has a
verification digit. This contains the following value by default:
000 000 000 000
UDP Port
UDP port used to send and receive monitoring, alarms and remote
configuration information. This port must coincide with that programmed in
the IP VisorALARM receiver.
The register is composed of one 5-digit field which admits values within the
range of 00000 to 65535. The field contains a verification digit of the
configured number. Default value is 00080.
A 0 value is not permitted.
IPDACT-UD message encryption key
This key is used to encrypt the messages sent to the Teldat VisorALARM.
This must be entered twice in order to validate it.
IPDACT-UD - Configuration
III-22
Doc.DM385-I
Rev. 2.0
Page 26

The register is composed of one field containing up to 16 DTMF digits. By
default there is no configured value.
VisorALARM message encryption key
The Teldat VisorALARM uses this key to encrypt the messages sent to the
IPDACT-UD. This must be entered twice in order to validate it.
The register is composed of one field containing up to 16 DTMF digits. By
default there is no configured value.
Keep-Alive Interval (sec.) (KEEP_ALIVE_INTERVAL)
Time interval when the IPDACT-UD executes a connectivity test with the
Teldat VisorALARM. For this, a keep-alive frame is sent and a response is
expected from the IP receiver.
The register is made up of one 5-digit field. The interval is expressed in
seconds and admits values between 00000 and 90 seconds. The rang e of
values this register can take comply with the UL1610 section 6 2.10. The field
contains a verification digit for the number. Default value is 00010.
Retries after failed keep-alive (KEEP ALIVE RETRIES)
If the IPDACT-UD, on executing the connectivity test with the Teldat
VisorALARM, does not receive a response within the “time-between-sendkeep-alive-retries” seconds, the IPDACT-UD repeats the process of sending
the keep-alive frame. Should there be no response within same time interval,
the IPDACT-UD repeats the process until the number of retries configured in
the register has been completed. The connection with the Teldat
VisorALARM is considered down once the number of configured retries in
this register has been executed and subsequently the control panel can
access the telephone network.
The register is made up of one single digit field. T his admits values between
1 and 9. Default value is 3.
Time between send keep-alive retries (secs) (KEEP_ALIVE_RETRIES_TIME)
Time measured between sending of keep-alive frames when a possible
connectivity problem has been detected with the IP VisorALARM receiver.
The register is made up of one single digit field. This is expressed in seconds
and admits values between 3 and 9.
The field contains a verification digit for the number. Default value is 3.
Backup Teldat VisorALARM IP address
IPDACT-UD - Configuration
III-23
Doc.DM385-I
Rev. 2.0
Page 27

This is the IP address that the backup VisorALARM IP receiver has, which
receives both monitoring traffic as well as traffic corresponding to the alarms
generated by the control panel in cases where the main VisorALARM fails.
The register is made up of 4 fields, corresponding to the 4 numbers in the IP
address; this admits values between 0 and 255. Each number has a
verification digit for this. Default is:
000 000 000 000
Interval between backup keep-alives (seconds)
Time period where the IPDACT-UD executes a check on connectivity with the
backup Teldat VisorALARM. To do this, the IPDACT-UD sends a keep-alive
frame and waits for a response from the IP receiver.
The register is made up of a 5-digit field. T he interval is expressed in seconds
and admits values between 00000 and 90 seconds. The field contains one
verification digit for the number. Default value is 00010.
Retries after failed keep-alives to backup
If the IPDACT-UD, on checking connectivity with the backup Teldat
VisorALARM, does not receive a response to this within “interval-betweenretries-to-send-keep-alives” seconds, the IPDACT-UD repeats the keep-alive
sending process. If there is no response within the same time interval, the
sending process is repeated and so on until the configured number of sendin g
times in this register has been completed. After this number of configured
retries, the connection with the Teldat VisorALARM is considered down and
the control panel subsequently accesses the telephone network.
The register is made up of one 1-digit field. This admits values between 1 and
9. Default value is 3.
Interval between retries to send keep-alives (seconds) for the backup
Time interval between sending keep-alive frames when a possible
connectivity problem with the backup VisorALARM IP receiver has been
detected.
The register consists of one 1-digit field. This is expressed in seconds and
admits values between 3 and 9.
This field contains one verification digit for the number. Default value is 3.
Number of digits for a telephone number
This is the number of digits containing the telephone number which the control
panel must dial to carry out a call. Depending o n the country, if there is a
switchboard, etc.
IPDACT-UD - Configuration
III-24
Doc.DM385-I
Rev. 2.0
Page 28

This register is composed of one 2-digit field. Admits values bet ween 1 and
15. The field contains a verification digit for the number. Default value is 9.
Alarm sending retries (ALARM_RETRIES)
Number of times that the IPDACT-UD sends an alarm to the Teldat
VisorALARM to ensure that this receives the alarm and sends an
acknowledgement to the IPDACT-UD. Connection with the main IP receiver
is considered lost once this number of retries has been completed, in which
case the IPDACT-UD is forced into backup and once again tries to send to the
backup receiver. If the IPDACT-UD doesn’t succeed in communic ating with
the backup after all the retries have been executed, the telephone relays
switch to allow the control panel to send the alarm over the telephone line.
The register is made up of one single digit field. T his admits values between
5 and 10. The field contains a verification digit for the number. Default value
is 5.
It is essential to consider what effect the number of alarm send retries
parameter configured in the panel has. The first attempt from the panel
activates alarm send through the IPDACT-UD. If this fails, the panel does not
need to try again in order to force the IPDACT-UD to send the previous alarm
to the backup VisorALARM as the IPDACT-UD does this automatically.
However, the panel is responsible for backup over th e telephone line should
there be IP connectivity failure, i.e. the number of retries m ust be hi gh en ough
so once these have been completed with both the main and backup
VisorALARMs, the panel takes over the process of sending the alarm over
the telephone line.
This means that the time between the first and the last attempt b y the pan el to
send an alarm must be greater than the number of alarm sending retries
programmed in the IPDACT-UD by 2 seconds (time between retries) and
moreover twice, given that the same number of retries are executed with the
backup VisorALARM. The time used in the rest of the oper ations carried out
by the IPDACT-UD is negligible as this can be counted in milliseconds.
DHCP Client activation/deactivation
The DHCP client is a device functionality permitting a DHCP server to assign
an IP address and mask to the Ethernet interface plus an output gateway.
The majority of the ADSL routers have a DHCP server so the IPDACT-UD
automatically configures and can connect to Internet through the router.
The registrar consists of a one-digit field which admits a value of 1 to activate
the client and a value of 0 to deactivate it. The field contains a number
verification digit. By default this is configured to 1 i.e. the client is activated.
Switch time for the output relay
IPDACT-UD - Configuration
III-25
Doc.DM385-I
Rev. 2.0
Page 29

The two output relays in the device (terminals OUT NO) have two
complementary states, i.e. when the first is open the other one is closed.
These states show device connectivity with the IP receiver (VisorALARM) so
when the IPDACT-UD loses connectivity the relay closes (the other stays
open) remaining in this state while connectivity is lost. This behavi or can be
modified by introducing periodicity in the status of the relays, i.e. that this
remains closed during a programmable period of time, open for a set time (2
seconds) and returning to the closed state. T his behavior is maintained while
there is no connectivity.
Switch time can take values between 0 and 300 seconds. A zero value
means that the relay permanently remains in a closed position provided that
the connectivity state does not change.
Action to execute when a telephone line failure occurs
The IPDACT-UD supervises the telephone line so if a failure is detected, it
can carry out three actions:
• Send an alarm to the VisorALARM (programmed value 2).
• Activate the output relay in the sam e way as if a communication failure
had been detected (programmed value 1).
• Both of the above actions (programmed value 3).
The possibility of not doing anything at all exists together with the above
actions (programmed value 0).
In UL listed fire installations, this value must be programmed to 0.
Maintenance VisorALARM address
Apart from the main VisorALARMs and the backups, you can send tro uble
alarms (300-388 CONTACT-ID group) to a third VisorALARM known as
maintenance. This device does not have IP module registers, nor monitors its
status and does not have backup. The main VisorALARMs and the back ups
execute those functions. The maintenance device only receives trouble
alarms and resends them to the automation software.
The register is made up of four fields corresponding to the 4 numbers of the IP
address; this admits values between 0 and 255. Each number has a
verification digit. The default value is:
000 000 000 000
Alarm encryption key for the IPDACT-UD to the maintenance receiver
This is the key used by the IPDACT-UD to send alarms to the Teldat
maintenance VisorALARM. So the configuration is valid, this must be
repeated twice.
IPDACT-UD - Configuration
III-26
Doc.DM385-I
Rev. 2.0
Page 30

The registrar consists of one field with up to 16 DTMF digits. B y default, no
value is configured.
Autoregister password
This is a password for the IPDACT-UD to perform a delayed registration in the
configured VisorALARM receiver and consequently get the full configuration
parameters needed for operating purposes.
It must match the Installation Password defined in the Configuration Patterns
in the VisorALARM receiver that corresponds to the parameter set that must
be downloaded in the IPDACT-UD.
From this moment the IPDACT starts trying to connect the VisorALARM to
complete registration and start operating.
While the IPDACT is in the auto-registering process, LED A flashes green.
When the registration has completed, LED A stops flashing and LED E lights
up in green.
Using the testing digits
In order to increase the reliability of the telephonic console, some registers
require an additional testing digit in each of their fields s o that if the control
digit does not adjust to the introduced value, the data is considered invalid
and an error tone is emitted. This facility can be enabled or disab led through
this register.
The register is made up of a single digit field which admits a value of 1 to
activate the use of the testing digits and value 0 to deactivate. The fields
contain a verification digit for the number. Default value is 0.
III - 3.1.3. Minimum configuration for the installer
By using the configuration patterns in the Teldat VisorALARM, you can
simplify the IPDACT-UD installation process. So that the whole of the process
is possible, it is essential that there is a configuration pattern configure d in the
VisorALARM. In the pattern, an installer password is associated to a given
IPDACT-UD configuration. This configuration includes the passwords through
which information is exchanged between the IPDACT-UD and the
VisorALARM, monitoring time, etc.
The minimum configuration for an IPDACT-UD which permits an installer to
use this installation mechanism is as follows:
a) If you do not have a DHCP server
Type of register Register
IPDACT-UD IP address and mask 01
IPDACT-UD - Configuration
III-27
Doc.DM385-I
Rev. 2.0
Page 31

IPDACT-UD access gateway 02
IPDACT-UD account number 11
Main VisorAlarm IP address 12
Backup VisorAlarm IP Address 21
UDP Port 13
b) If you have a DHCP server
Type of register Register
IPDACT-UD account number 11
Main VisorAlarm IP address 12
Backup VisorAlarm IP Address 21
UDP Port 13
After configuring these parameters and restarting the device, the installer
must re-access the telephonic console as previously described and access
register 04. Here the installer password configured in the VisorALARM must
be configured. If the IPDACT-UD has IP connectivity with the VisorALARM
and the password is correct, the IPDACT-UD will receive the configuration
defined in the profile configured in the VisorALARM.
Through this mechanism, the installed IPDACT-UD is reg istered in the Teldat
VisorALARM which from this point begins to monitor the former and the
IPDACT-UD receives the necessary configuration in order to exchange
information with the Teldat VisorALARM.
If the whole process has gone smoothly, the IPDACT-UD will begin to
exchange monitoring messages with the VisorALARM and from this point
onwards the IPDACT-UD telephone relays activate (the line status LED lights
up).
III - 3.1.4. Configuration Example
In cases of configuring the IPDACT-UD with the following data:
IP address: 192.168.1.100, mask 255.255.255.0
Access GW: 192.168.1.20
IPDACT-UD account number: 1234
Main VisorAlarm IP: 10.24.6.1
Backup VisorAlarm IP: 80.6.189.123
UDP port: 3000
The registers and the data are, in cases where the testing digit is disabled
(through register 49):
IPDACT-UD - Configuration
III-28
Doc.DM385-I
Rev. 2.0
Page 32

IP Address del IPDACT-UD *01 192# 168# 001# 100# 255# 255# 255# 000#
Gateway *02 192# 168# 001# 020#
CID *11 001234#
IP VisorAlarm principal *12 010# 024# 006# 001#
IP VisorAlarm backup *21 080# 036# 189# 123#
UDP Port *13 03000#
And in cases where the testing digit is enabled:
IP Address del IPDACT-UD *01
1928#1684#0018#1008#2550#2550#2550#0005#
Gateway *02 1928#1684#0018#0206#
CID *11 001234#
IP VisorAlarm principal *12 010#024#006#001#
IP VisorAlarm backup *21 0808#0368#1894#1238#
UDP Port *13 03000#
IPDACT-UD - Configuration
III-29
Doc.DM385-I
Rev. 2.0
Page 33

III - 4. Asynchronous Console
You have the same access from the telephonic console as from the
asynchronous console which also provides a better display of the processes
taking place in the IPDACT-UD. The console is orientated to menus whose
options permit the monitoring and configuration of the various IPDACT-UD
parameters. The asynchronous console acc ess parameters are 9600 bps, 8
bits, without parity, 1 stop bit. The console is password protected.
III - 4.1. Accessing the console
The asynchronous console is protected by a user password. This pass word is
the same as that configured in the telephonic console register 03. This is
24680 by default. Entering the valid password accesses the main menu.
Password:
III - 4.2. Main Menu
This provides access to the configuration and monitoring menus. If you select
an invalid option, the main menu is displayed once more. W hen configuring
an option, if you press the ESC key, the operation is aborted and the
parameter does not change. If you press INTRO in the parameters being
handled as character strings, these are deleted. The z options releases the
asynchronous console and requests the access pass word as described in the
above section.
- Main Menu -
Configuration
a) Generic IPDACT-UD config
b) Transmission Parameters
c) Quick Install
Monitoring
d) General Info
e) Remote Monitor
f) Events
g) IP Connectivity
z) Exit
option:
IPDACT-UD - Configuration
III-30
Doc.DM385-I
Rev. 2.0
Page 34

III - 4.3. IPDACT-UD generic configuration
Configures data pertaining to the IPDACT-UD which is not related to the
monitoring function and the sending of alarms. Data included here is the
IPDACT-UD IP address, the access gateway to the Teldat VisorALARM, the
console access password, the events you wish to vie w, use of the check digit
in the telephone console, etc.
In the following figure, the default values are displayed. Press z to return to
the previous menu.
-- Generic IPDACT-UD config --
IP Connectivity
a) DHCP client: OFF
b) IP addr: 192.168.0.100 msk: 255.255.255.0
c) Gateway IP: 192.168.0.200
User Access Control
d) Password: 24680
Miscellaneous
e) Date & time: 06/16/2003 12:41:25
f) Events: PHON
g) PC verifying digit: 0
z) Exit
option:
III - 4.4. Monitoring configuration and sending of alarms
Configures everything relative to the IPDACT-UD as a security element.
Permits you to configure the account number associated to the IPDACT -UD,
the Teldat VisorALARM IP address and the UDP port used for
communication, the passwords used to encrypt the IPDACT-UD messages
(local password) and that used to decrypt the Teldat VisorALARM messages
(remote password), the interval used to send the monitoring messages (keep-
alive) and the number of retries and the time between these in cases where
the Teldat VisorALARM does not acknowledge them. Lastly this also permits
you to configure the number of digits a telephone number has, the number of
times an alarm is sent to the Teldat VisorALARM until this can be s ent over
the telephone line and the telephone number dial ed by the control panel to
execute bi-directional operations in call-back mode.
The following figure displays the default values. Press z to return to the
previous menu.
IPDACT-UD - Configuration
III-31
Doc.DM385-I
Rev. 2.0
Page 35

-- Transmission parameters --
Supervisory VisorALARM
Main
a) Remote IP addr: 80.26.96.183
Backup
b) Remote IP addr: 80.36.189.123
Maintenance VisorALARM
c) Remote IP addr: 172.24.77.57
d) Password:5555
Common Params
e) Account Number: A1111
f) Port: 1222
g) Local Password: 1234567890
h) Remote Password: 0987654321
VisorAlarm Main Keep-Alive
i) Timer: 10
j) Retries: 9 Timer 9
VisorAlarm backup Keep-Alive
k) Timer: 10
l) Retries: 9 Timer 9
Remote Alarm
m) Telephone len: 4
n) Tx retries: 10
Output
o)Output Switching Period: 0
PSTN Survaillance
p)Action due to Alarm: NONE
z) Exit
option:
III - 4.5. IPDACT-UD Quick Configuration
This allows an installer to completely configure an IPDACT-UD from a singl e
menu. This includes all the parameters described in section IV.2.1.3.
Additionally, this also permits you to reset the device and exec ute the device
register in the configured Teldat VisorALARM.
The IPDACT-UD registration process implies registering the device in the
VisorALARM. The result of the register operation is dumped in the console.
IPDACT-UD - Configuration
III-32
Doc.DM385-I
Rev. 2.0
Page 36

If the process has successfully completed, an OK will appear on the con sole.
If however there has been as error, this could be either:
“VA unreachable”: It has not been possible to send the register
command over the IP network.
“No answer”: T he register command has been sent but a response
has not been received from the VisorALARM.
“Error on answer”: The ans wer from the VisorALARM for the register
command is wrong.
The following figure displays the default values. Press z to return to the
previous menu.
-- Quick Install - a) DHCP client: OFF
b) IP addr: 172.24.77.250 mask: 255.255.0.0
c) Gateway IP: 172.24.0.98
d) Account Number: 9005
e) Supervisory Main: 80.26.96.183
f) Supervisory Backup: 80.36.189.123
g) Maintenance: 172.24.77.57
h) Port: 1222
i) Register MIP
j) Reset
k) Autoregister MIP:
z) Exit
option:
III - 4.6. Monitoring
The rest of the options permit you to inspect the distinct IP DACT-UD aspects
and to monitor the state and view the enabled events. In order to exit each
option, press any key which will return you to the main menu.
Option e) displays the IPDACT-UD general parameters, such as the serial
number, firmware release, etc.
IPDACT-UD - Configuration
III-33
Doc.DM385-I
Rev. 2.0
Page 37

Teldat MIP v3 @ 29.4912 MHz (18)
S/N: 0563/01000 FF020407 0
v5.0 EU Apr 13 2007
04/20/2018 05:39:00
LAN
MAC: 0-A0-26-32-3-84 state: up
INPUT, OUTPUT
Input1:1K-TERM
Input2:1K-TERM
Output:INACT
TAMPER INPUT
state: BOX OPEN
PSTN Line
state: line cut
Reset/Phone console jumper
state: OPEN
Modem V32 daughter board
state: detected
Press any key to continue...
Option f) displays the state of the connection with the VisorALARM IP
receiver.
State: Active (4)
Press any key to continue...
Option g) displays the enabled events. To return to the menu, strike any key.
Option h) displays the IP parameters that are running in the device. If the
device has not obtained an address through DHCP, this displays the IP
address, mask and gateway configured in the “a) Generic IPDACT-UD
config” menu. If on the other hand, IP configuration has been dynamically
obtained from a DHCP server, these parameters will be displayed together
with other parameters pertaining to the DHCP protocol: r emaining time for the
obtained address value, remaining time until the next attempt to renew the
said address and the DHCP server the parameters were taken from.
IPDACT-UD - Configuration
III-34
Doc.DM385-I
Rev. 2.0
Page 38

My IP Address: 61.156.44.3
Netmask: 255.255.252.0
Gateway: 61.156.44.1
DHCP information.
Remaining lease = 107559 (sec)
Renew lease in 53559 (sec)
DHCP server: 61.156.44.1
Press any key to continue...
As you can see, this displays not only the current status of the device
(Alive/Lost), but also the ICMP statistics:
• Consecutive ICMP reponses and failures.
• Total ICMP responses and failures.
• Host last, minimum and maximum response times.
III - 5. Telnet
As previously mentioned, it is possible to access the IPDACT-UD console
through a telnet client, from a PC or any other workstation. To do this, simply
execute the telnet client, indicating the IPDACT-UD IP address. The interface
for this said console is identical to the one for the as ynchronous console, so
for further information on this please see the section on this console.
The following figure shows an example of accessing through telnet from the
default client program in the Windows operating system.
Figure 12. Example of accessing through Telnet
IPDACT-UD - Configuration
III-35
Doc.DM385-I
Rev. 2.0
Page 39

Figure 13. Access Results
IPDACT-UD - Configuration
III-36
Doc.DM385-I
Rev. 2.0
Page 40

IV - Appendix
IV - 1. IPDACT-UD Technical Specifications
Power Supply
NOMINAL VOLTAGE RANGE 10 VDC – 24 VDC
MAX CURRENT
Dimensions and weight
LENGTH x WIDTH x HEIGHT 149 x 117 x 22 mm
WEIGHT 150 gr
Environmental Specifications
OPERATING TEMPERATURE 0º to 49º C (32º to 120º F).
RELATIVE HUMIDITY Maximum: 93%
LAN Port
CONNECTOR RJ45 female
SPEED 10 Mbps
PROTOCOLS UDP, IP, ARP, DHCP, Telnet, Ethernet Blue Book
Upload/Download Modem
SPEED From 75 bps up to 14400 bps
STANDARDS Bell202, V.23, Bell 103, V.21, V.22, V.22bis, V.32, V.32bis
COMPATIBLE CONTROL PANELS Ademco Vista12, Ademco Vista48, Paradox Spectra, General Electric
Other Characteristics
OUTPUT1 and OUTPUT2
INPUT1 and INPUT2 Normally Open, 1K EOL supervised.
1
The IPDACT-UD power consumption should be subtracted from the maximum power of the output
delivered by the control panel. A 750mA power source is recommended in all cases.
2
Transient lasting 75ms is produced when the control panel takes over the telephone line to call the control
center.
1
12V: Idle: 180 mA Alarm: 230 mA Transient2: 400mA
24 V: Idle: 104 mA Alarm: 130 mA Transient2: 200mA
NetworX, Firelite 9200UD, Firelite 9600
500mA max. if V ≤ 30 V
DC for resistive loads
IPDACT-UD - Appendix
IV-37
Doc.DM385-I
Rev. 2.0
 Loading...