

Page 1
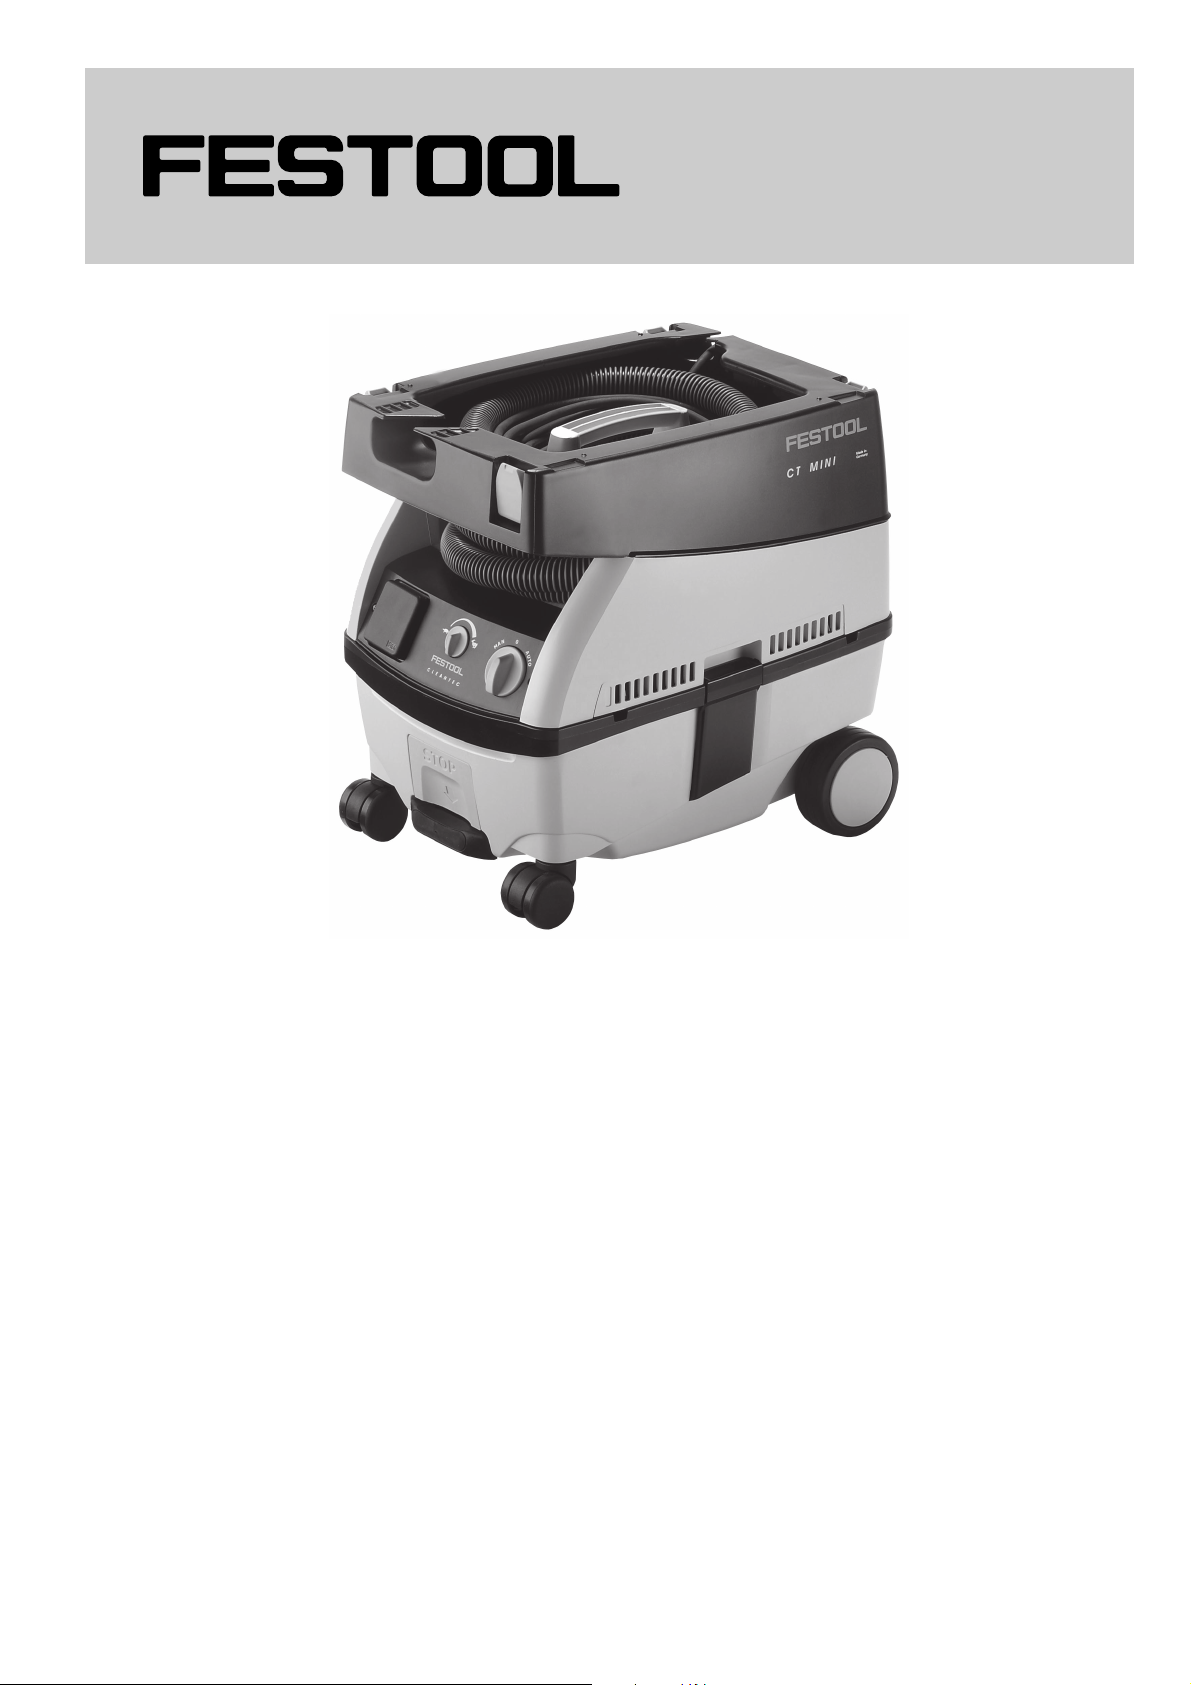
CT MINI
Instruction manual
Page 2 - 5
IMPORTANT: Read and understand all instructions before
using.
Vacuum cleaner
Guide dutilisation
Page 6 - 10
IMPORTANT: Lire et comprendre toutes les instructions
avant de démarrer les travaux.
Manual de instrucciones
Página 12 - 16
IMPORTANTE: Lea y comprende todas las instrucciones
antes de usar.
456 134_003
1
Aspirateur
Aspirador
Page 2
SAFETY INSTRUCTIONS
READ ALL INSTRUCTIONS BEFORE
USING THIS APPLIANCE !
To reduce the risk of fire, electric
shock, or injury:
1 Do not leave this appliance unattended
when plugged in. Unplug from outlet when
not in use and before servicing.
2 To reduce the risk of electric shock Do
not expose to rain. Store indoors.
3 Do not allow to be used as a toy. Close
attention is necessary when used by or near
children or animals.
4 Use only as described in this manual. Use
only manufacturers recommended attachments.
5 Do not use with damaged power cord or
plug. If the appliance is not working as it
should, has been dropped, damaged, left
outdoors, or immersed in or dropped into
water, return it to a service center.
6 Do not pull or carry by the power cord, use
power cord as a handle, close a door on power
cord, or pull power cord around sharp edges
or comers. Do not run appliance over power
cord. Keep power cord away from heated
surfaces.
7 Do not unplug by pulling on power cord.
To unplug, grasp the plug, not the cord.
8 Do not handle plug or appliance with wet
hands.
9 Do not put any object into the appliance
openings. Do not use the appliance with any
opening blocked; keep openings free of dust,
lint, hair, and anything that may impede
airflow.
10 Keep hair, loose clothing, fingers, and all
parts of body away from openings and
moving parts.
11 Turn off all controls before unplugging.
12 Use extra care when cleaning on stairs.
13 Do not use this appliance to vacuum
flammable or combustible liquids such as
gasoline, or vacuum in areas where these may
be present.
14 Connect to a properly grounded outlet
only. See Grounding Instructions.
15 Do not vacuum anything that is burning
or smoking, such as cigarettes, matches,
or hot ashes. Do not use this appliance to
extract flammable or explosive dusts (such
as magnesium, aluminum, etc.). Risk of
explosion!
16 Do not use without dust bag and/or
filters in place.
17 Do not use to vacuum up caustic or
aggressive liquids (e.g. acids, alkalis,
solvents).
18 Protect the power cord against heat, oil
and sharp edges.
19 Check the plug and power cord regularly
and have them replaced by a qualified
technician if damaged.
20 Do not lift or carry the appliance by its
handles using a crane hook or lifting
gear.
21 Use only accessories approved by Festool
(see the Festool Catalog).
Various dust created by power sanding, sawing,
grinding, drilling and other construction
activities contains chemicals known (to the State
of California) to cause cancer, birth defects or
other reproductive harm. Some examples of
these chemicals are:
lead from lead-based paints,
crystalline silica from bricks and cement and
other masonry products, and
arsenic and chromium from chemically-treated
lumber.
The risk from these exposures varies, depending on how often you do this type of work.
To reduce your exposure to these
chemicals: work in a well
ventilated area, and work with
approved safety equipment, such
as dust masks that are specially
designed to filter out microscopic
particles.
GROUNDING INSTRUCTIONS
This appliance must be grounded. If it should
malfunction or break down while in use,
grounding provides a path of least resistance for
the electric current and reduces the risk of electric
shock to the operator. This appliance has a power
cord with equipment-grounding conductor and
grounding plug. The plug must be inserted into
an appropriate outlet that is properly installed
and grounded in accordance with all local codes
and ordinances.
Improper connection of the
equipment-grounding conductor can result in a
risk of electric shock. Check with a qualified
electrician or service person if you are in doubt
as to whether the outlet is properly grounded.
Do not modify the plug provided
with the appliance if it will not fit the outlet,
have a proper outlet installed by a qualified
electrician.
This appliance is rated more than
15 amperes and is for use on a circuit having a
nominal rating of 120 volts, and is factoryequipped with a specific electric cord and plug to
permit connection to a proper electric circuit.
Make sure that the appliance is connected to an
outlet having the same configuration as the plug.
2
Page 3
No adapter should be used with this appliance.
If the appliance must be reconnected for use on
a different type of electric circuit, the
reconnection must be made by qualified service
personnel.
SAVE THESE INSTRUCTIONS
Technical data CT MINI
Power consumption 400 - 1,200 W
Max. connected load to tool plug socket 1,200 W
Total connected load max. (vacuum cleaner and
plug socket) 2,400 W
Max. airflow volume, turbine 168 m3/h (6,04 cu.ft./h)
Max. vacuum, turbine 20,000 Pa
Filter surface 5,000 cm2 (775 sq. in.)
Suction hose, diameter x length 22 mm x 3,5 m (0.87 in. x 11.48 ft.)
Tank capacity 10 l (2.6 gal.)
Dimensions L x W x H 440 x 340 x 420 mm (17.3 x 13.4 x 16.5 in.)
Weight 9.5 kg (21 lbs)
Power cord length 7.5 m (24.6 ft.)
Protection type IP X4
Intended use
This dust extractor is designed for the aspiration
and evacuation of non-toxic, non-hazardous
dusts, dirt, sand, shavings etc., and for
vacuuming water.
This dust extractor is designed in accordance with
IEC 60 335-1 and IEC 60 335-2-69 for a higher
loading in industrial use.
The user is solely responsible for
any damage or accident caused by using this
machine for other than its intended purpose.
Getting started
Electrical connection
The operating voltage shown on the specification
plate must be the same as the mains power
voltage (wall socket).
Make sure that the dust extractor
is switched off when you plug in the power cord.
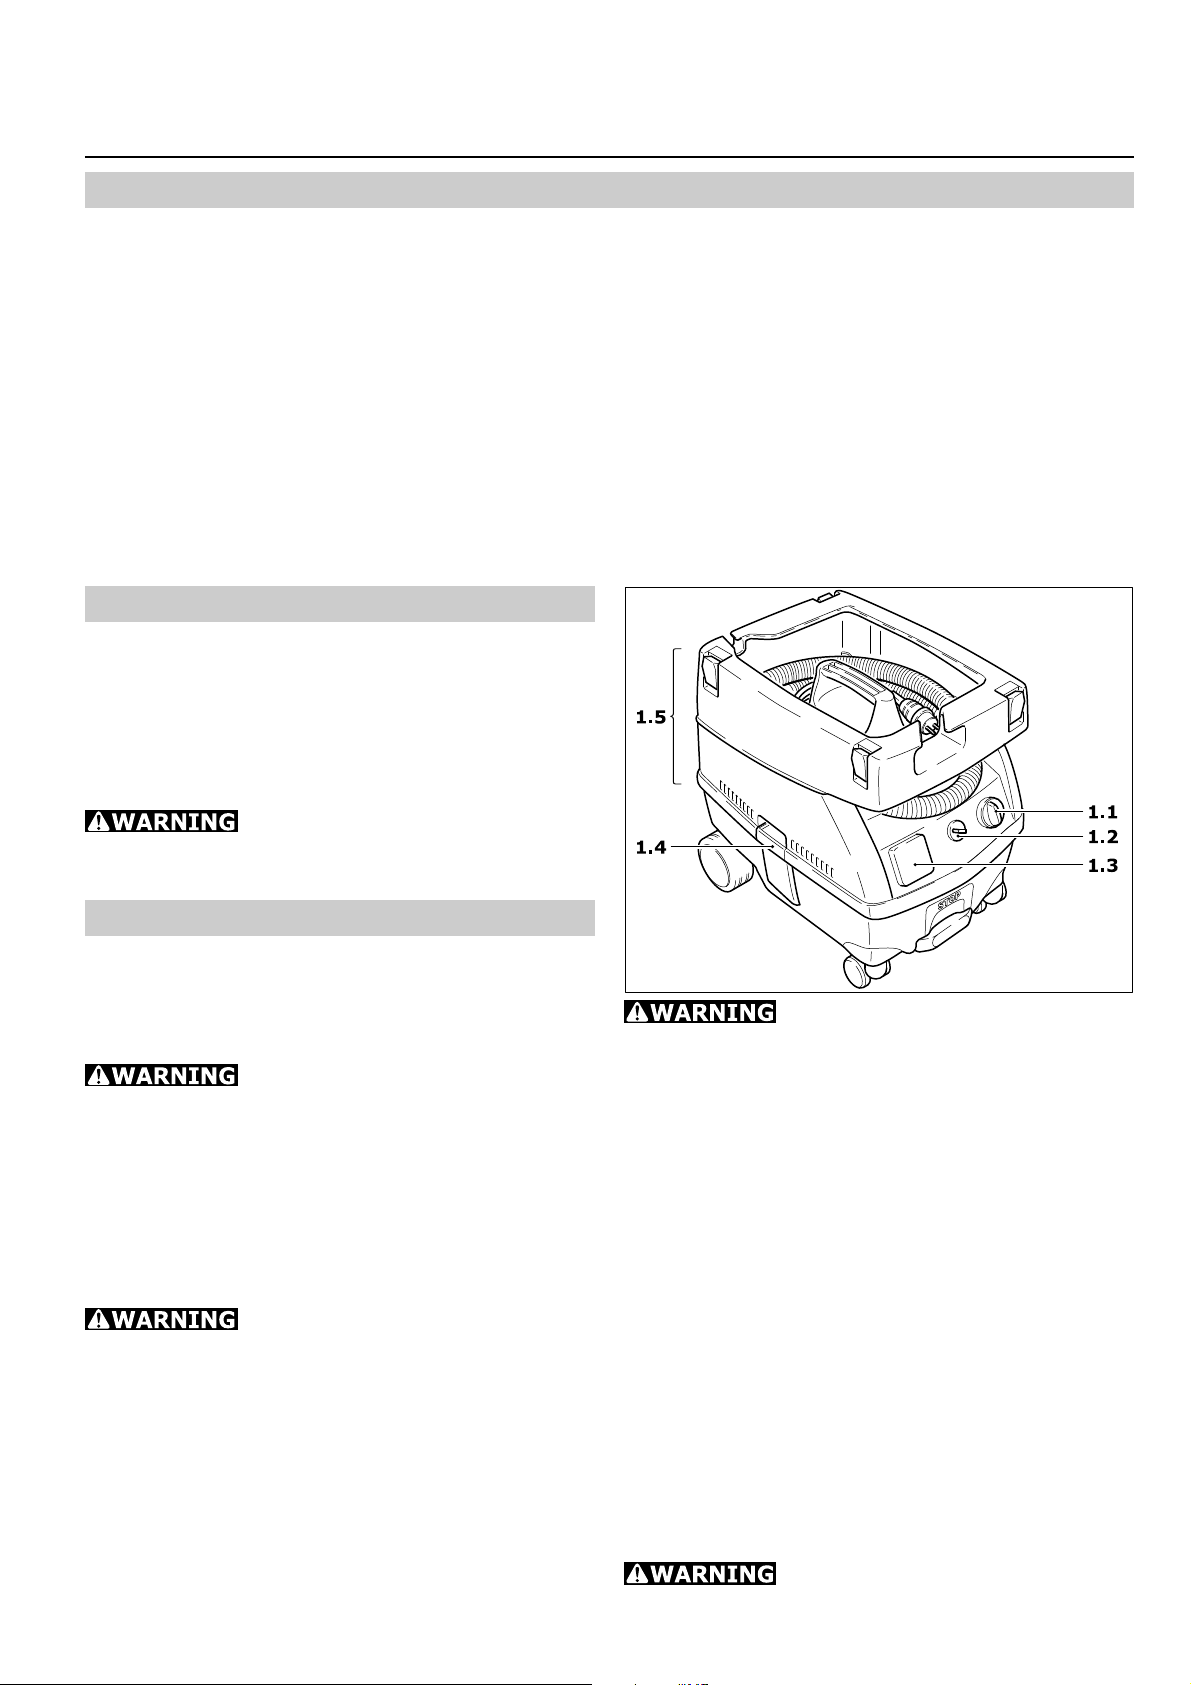
On/off switch (1.1)
In position O the dust extractor is switched off
and the tool plug socket (1.3) is dead.
Two modes of operation are possible:
a) Switch at MAN (manual control):
The tool plug socket is live.
Before turning the switch to the
MAN position, make sure that the tool
connected to the tool plug socket is switched off.
When you turn the switch to MAN the extractor
motor will start immediately and will stay on as
long as the switch is at this position.
You can also use this mode of operation without
a tool connected to the tool plug socket.
b) Switch at Auto (automatic tooltriggered operation):
The tool plug socket is live.
Before turning the switch to the
Auto position, make sure that the tool
connected to the tool plug socket is switched off.
When you turn the switch to Auto the dust
extractor will not come on until you turn on the
tool connected to the tool plug socket. When you
turn off the tool, the dust extractor will
automatically switch off. When you turn the tool
back on, the dust extractor will automatically
start.
Suction force regulator (1.2)
The suction force regulator lets you set the
suction force that works best for the material to
be vacuumed up.
Connecting an electric tool
Observe the maximum connected load on the
tool plug socket (see Technical Data). The tools
rated power consumption must not exceed this!
Plug the tool power cord to the tool plug socket
(1.3).
Make sure the tool is switched off
when you plug or unplug it!
3
Page 4
Use
During the following procedures,
take care not to raise unnecessary dust.
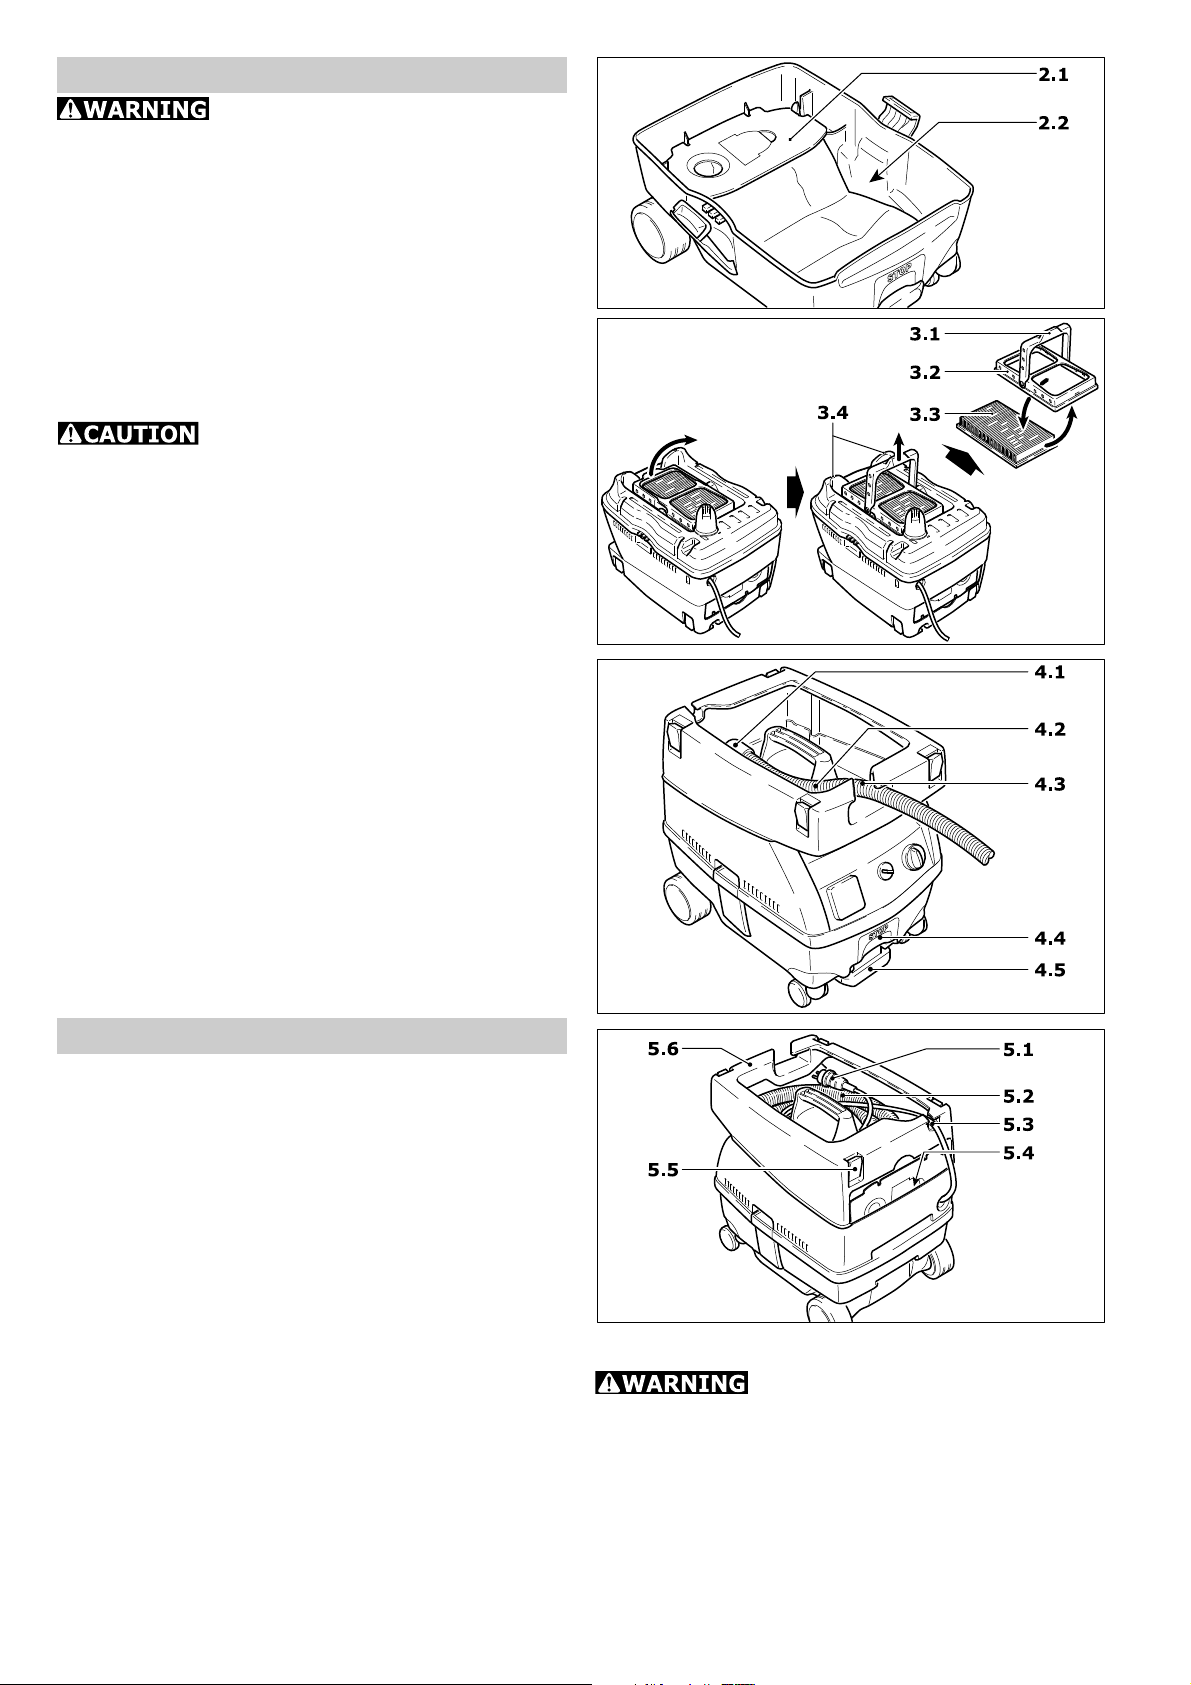
Changing the filter bag
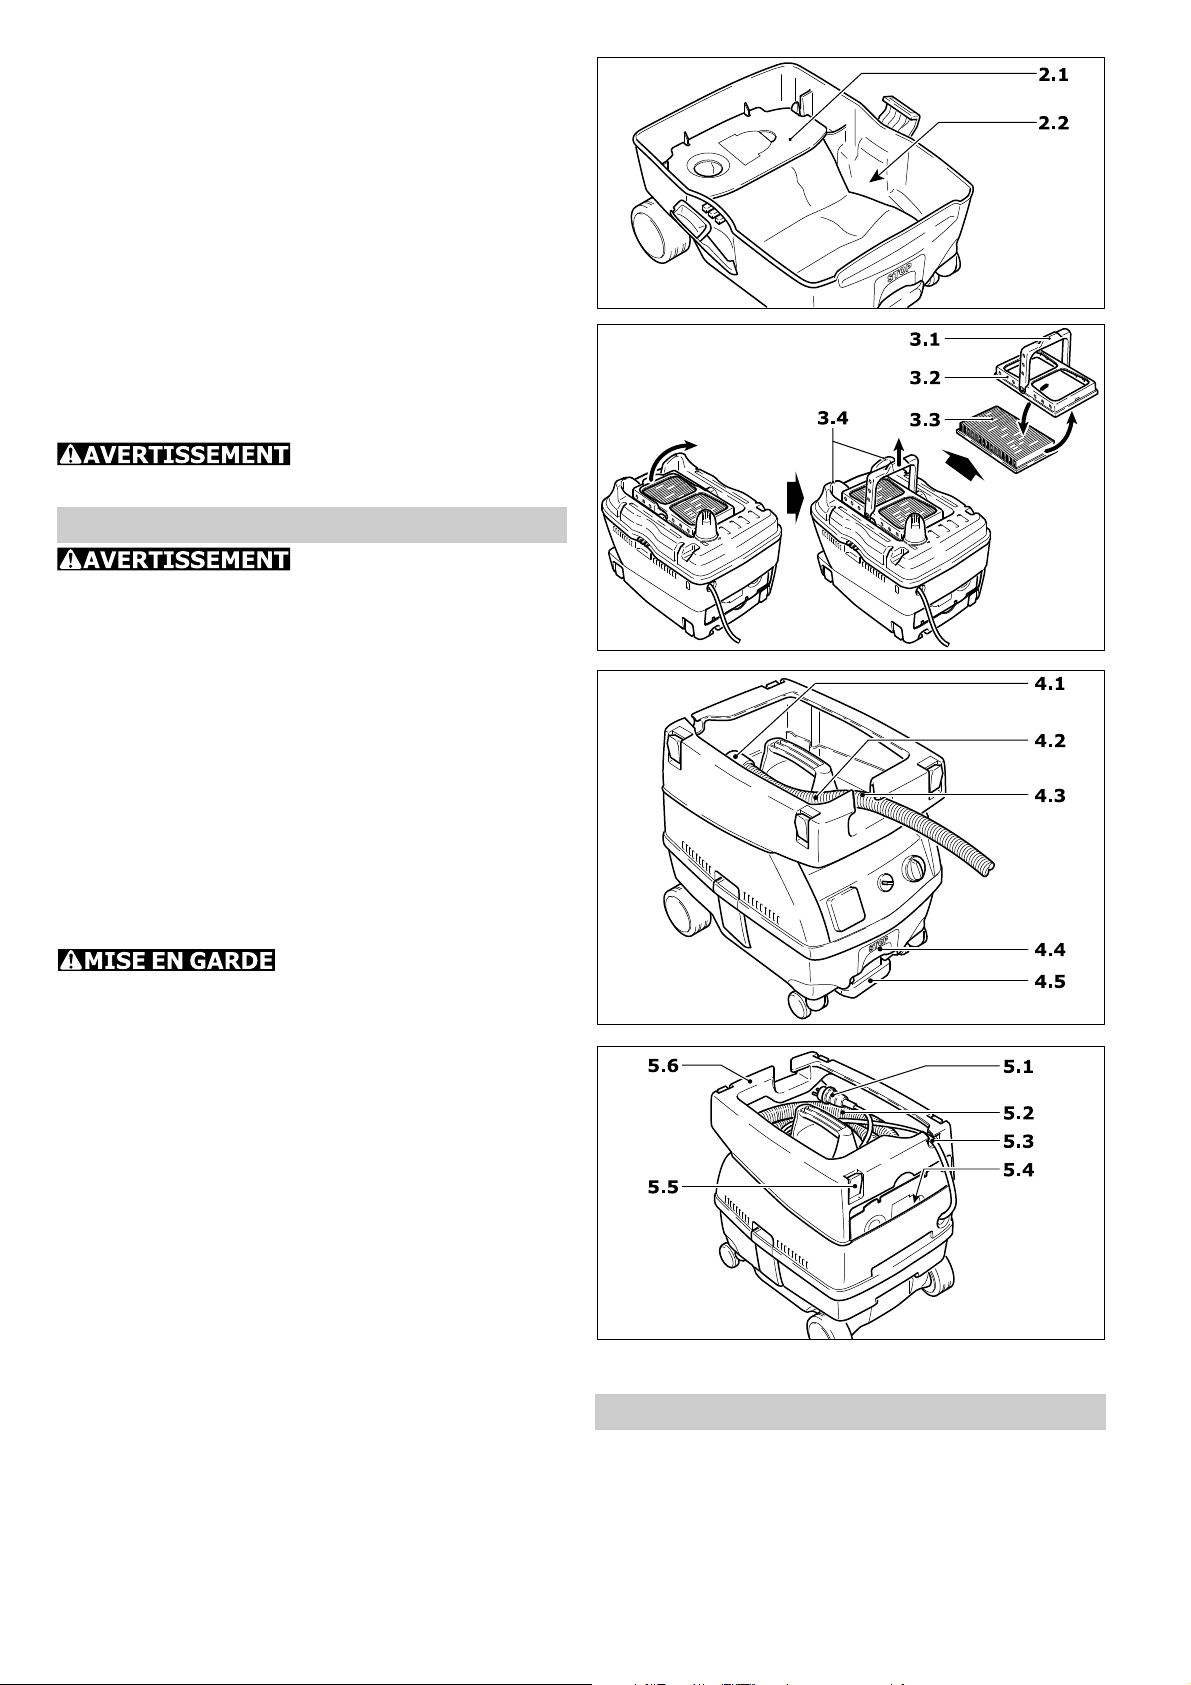
- Open locking clips (1.4), remove top section
(1.5).
- Change filter bag (2.1) see instructions printed
on filter bag.
- Replace top section, close locking clips.
Note: A replacement filter bag can be stored in
the storage compartment (5.4).
Changing the filter
Do not operate this dust extractor
without a filter, as doing so may damage the
motor.
- Open locking clips (1.4), remove top section
(1.5).
- Fold over handle (3.1) and remove holder (3.2).
- Remove used filter (3.3) and replace with a new
one.
- Replace holder and fold over handle until it
latches into place.
- Replace top section, close locking clips.
Emptying the dirt trap
The dirt trap (2.2) can be emptied after removing
the top section.
Stand
Extending the stand (4.5) keeps the dust
extractor from rolling.
To do this, lift the front end of the dust extractor
slightly and push the stand downwards until it
latches into place.
Press the button (4.4) to release the stand.
Application
The extractor hose (4.2) is connected to the
extractor opening by the angle tube (4.1). During
operation, the extractor hose goes through the
hose opening (4.3).
A Systainer can be attached to the top of the
storage area (5.6) via the four locking clips (5.5).
Note: If this is done, the power cord must run
through opening (5.3).
Vacuuming dry materials
Do not do any dry vacuuming or dust extraction
of dry substances without a filter bag in the tank!
This protects the motor, and lets you dispose of
the evacuated material easily.
The filter becomes damp after evacuating liquids.
A damp filter will suffer accelerated wear if it is
used for dry materials. Accordingly, allow the
filter to dry or replace it with a dry one before
dry operation.
Vacuuming liquids
If foam or liquid escapes, stop
immediately and empty the tank.
The filter bag must be removed before evacuating
liquids. We recommend using a special wet filter
for wet vacuuming.
When the maximum fill level is reached, a level
stop (3.4) will automatically interrupt extraction.
4
Page 5

The antistatic system (AS)
The friction of material running through the
suction hose causes electrostatic charges, which
can result in unpleasant electric shocks for the
operator.
In order to prevent this, this dust extractor has
an integrated antistatic system which conducts
these static charges to ground. This requires the
use of antistatic hoses and accessories.
Temperature control
A heat-triggered limit switch turns off the dust
extractor if it reaches a critical temperature, to
protect against overheating. If this happens,
switch the dust extractor off and let it cool for
around 5 minutes. If the dust extractor still
cannot be switched back on, consult a Festool
service center.
After finishing work
- Switch off the dust extractor and unplug the
power cord.
- Empty filter bag and tank.
- Place the suction hose (5.1) and the power cord
(5.2) in the top section.
- Clean the dust extractor inside and outside by
vacuuming and wiping.
- Leave the dust extractor in a dry area out of
reach of unauthorized persons.
Filters and accessories
The accessory and filter order number can be
found in your Festool catalog or on the Internet
at www.festool-usa.com.
Maintenance and care
Always unplug the power cord
from the plug socket before doing any
maintenance!
Do not attempt any maintenance
or repairs involving opening the motor housing.
This may be carried out only by an authorized
customer service center.
A safety test must be performed
at least once a year by the manufacturer or a
qualified person, to check for possible leaks and
damage to the filter, and to ensure that the
control devices are functioning.
Warranty
Conditions of 1+2 Warranty
You are entitled to a free extended warranty (1
year + 2 years = 3 years) for your Festool power
tool. Festool shall be responsible for all shipping
costs during the first year of the warranty. During
the second and third year of the warranty the
customer is responsible for shipping the tool to
Festool. Festool will pay for return shipping to
the customer using UPS Ground Service. All
warranty service is valid 3 years from the date
of purchase on your receipt or invoice.
Festool Limited Warranty
This warranty is valid on the pre-condition that
the tool is used and operated in compliance with
the Festool operating instructions. Festool
warrants, only to the original consumer
purchaser, that the specified tool will be free from
defects in materials and workmanship for a term
of one year from the date of procurement. Festool
makes no other warranty, express or implied,
for Festool portable power tools. No agent,
representative, distributor, dealer or employee
of Festool has the authority to increase or
otherwise change the obligations or limitations
of this warranty. The obligations of Festool in its
sole discretion under this warranty shall be
limited to the repair or replacement of any Festool
portable power tool that is found to be defective
as packaged with the User Manual.
Excluded from coverage under this warranty are:
normal wear and tear; damages caused by
misuse, abuse or neglect; damage caused by
anything other than defects in material and
workmanship. This warranty does not apply to
accessory items such as circular saw blades, drill
bits, router bits, jigsaw blades, sanding belts,
and grinding wheels. Also excluded are wearing
parts, such as carbon brushes, lamellas of air
tools, rubber collars and seals, sanding discs and
pads, and batteries.
Festool portable power tools requiring
replacement or repair are to be returned with
the receipt of purchase to Festool (call 800-5548741 for address details).
IN NO EVENT SHALL FESTOOL BE LIABLE
FOR ANY CONSEQUENTIAL OR INCIDENTAL
DAMAGES FOR BREACH OF THIS OR ANY
OTHER WARRANTY, EXPRESSED OR
IMPLIED WHATSOEVER. ALL WARRANTIES
IMPLIED BY STATE LAW, INCLUDING THE
IMPLIED WARRANTIES OF MERCHANTABILITY AND FITNESS FOR A PARTICULAR
PURPOSE, ARE HEREBY LIMITED TO THE
DURATION OF THREE YEARS.
Some states in the U.S. and some Canadian
provinces do not allow the limitations on how
long an implied warranty lasts, so the above
limitation may not apply to you. With the
exception of any warranties implied by state or
province law as hereby limited, the foregoing
express limited warranty is exclusive and in lieu
of all other warranties, guarantees, agreements
and similar obligations of Festool.
This warranty gives you specific legal rights and
you may also have other rights which vary from
state to state in the U.S. and province to province
in Canada.
5
Page 6

IMPORTANTES MESURES DE
SÉCURITÉ
LIRE TOUTES LES INSTRUCTIONS AVANT
DUTILISER CET APPAREIL !
Pour réduire les risques
dincendie, de choc électrique ou de blessure:
1 Ne pas laisser lappareil sans surveillance
lorsquil est branché. Débrancher lorsquil
nest pas utilisé et avant tout entretien.
2 Ne pas exposer à la pluie; entreposer à
lintérieur.
3 Ne pas laisser les enfants sen servir
comme jouet. Une attention particulière est
nécessaire lorsque lappareil est utilisé en
présence denfants ou danimaux.
4 Nutiliser que conformément à cette
notice, avec les accessoires recommandés
par le fabricant.
5 Ne pas utiliser si le cordon ou la fiche est
endommagé. Retourner lappareil à un
atelier de réparation sil ne fonctionne pas
correctement, sil est tombé, sil a été
endommagé, immergé ou laissé à lextérieur.
6 Ne pas tirer, soulever ou traîner lappareil par
le cordon. Éviter dutiliser le cordon comme
une poignée, de le coincer dans lembrasure
dune porte ou de lappuyer contre des arêtes
vives ou des coins. Ne pas faire rouler
lappareil sur le cordon. Garder le cordon à
lécart des surfaces dégageant de la chaleur.
7 Ne pas débrancher en tirant sur le
cordon. Tirer plutôt la fiche.
8 Ne pas toucher la fiche ou lappareil
lorsque vous avez les mains humides.
9 Ninsérer aucun objet dans les
ouvertures. Ne pas utiliser lappareil
lorsquune ouverture est bloquée. Sassurer
quaucune matière (poussière, peluche,
cheveux ou autre) ne gêne la circulation dair.
10 Tenir les vêtements amples, cheveux,
doigts et autres parties du corps à lécart
des ouvertures et des pièces mobiles.
11 Mettre toutes les commandes à la
position ARRÊT avant de débrancher
lappareil.
12 Faire particulièrement attention lors du
nettoyage des escaliers.
13 Ne pas aspirer de liquides inflammables
ou combustibles, comme de lessence, et
ne pas faire fonctionner dans des endroits où
peuvent se trouver de tels liquides.
14 Brancher uniquement dans une prise de
courant avec mise à la terre. Voir les
instructions concernant la mise à la terre.
15 Ne pas aspirer de matières en
combustion ou qui dégagent de la fumée
telles que cigarettes, allumettes ou
cendres chaudes. Ne pas aspirer de liquide
inflammable ou explosif (p. ex. essence,
diluant, etc.) Il y aurait risque dexplosion !
16 Ne pas utiliser lappareil si le sac à
poussière ou le filtre nest pas en place.
17 Ne pas aspirer de matière sèche ou de
liquide agressif (acide, lessive, solvant,
etc.).
18 Protéger le câble contre la chaleur, lhuile
et les arêtes vives.
19 Vérifier régulièrement létat de la fiche
et du cordon et demander à un spécialiste
de les remplacer sils sont défectueux.
20 Ne pas soulever et transporter lappareil
par la poignée à laide de crochets de grue
ou de dispositif de levage.
21 Nutiliser que des accessoires autorisés
par Festool (voir le catalogue Festool).
Certaines poussières créées par le ponçage
mécanique, le sciage, le meulage, le perçage et
autres activités reliées à la construction
contiennent des substances chimiques connues
(dans lÉtat de la Californie) comme pouvant
causer le cancer, des anomalies congénitales ou
représenter dautres dangers pour la
reproduction. Voici quelques exemples de telles
substances:
Plomb provenant de peintures à base de plomb,
Silice cristallisée utilisée dans les briques, le
ciment et autres matériaux de maçonnerie, et
Arsenic et chrome du bois duvre traité avec
un produit chimique.
Le risque dexposition à de tels produits varie
selon la fréquence à laquelle vous faites ce genre
de travail.
Pour réduire les risques
dexposition à ces substances
chimiques : travaillez dans un
endroit adéquatement ventilé et
utilisez un équipement de
sécurité approuvé, tel que
masques antipoussières
spécialement conçus pour filtrer
les particules microscopiques.
INSTRUCTIONS CONCERNANT LA MISE
À LA TERRE
Cet appareil doit être mis à la terre. En cas de
défectuosité ou de panne, la mise à la terre
fournit au courant un chemin de moindre
résistance qui réduit le risque de choc électrique.
Cet appareil est pourvu dun cordon muni dun
conducteur de terre et dune fiche avec broche
de terre. La fiche doit être branchée dans une
prise appropriée correctement installée et mise
à la terre conformément aux règlements et
ordonnances municipaux.
6
Page 7
Un conducteur de terre
mal raccordé peut entraîner un risque de choc
électrique. Consulter un électricien ou un
technicien dentretien qualifié si vous nêtes pas
certain que la prise est correctement mise à la
terre.
Ne pas modifier la fiche
fournie avec lappareil si elle ne peut être
insérée dans la prise, faire installer une prise
adéquate par un électricien qualifié.
Cet appareil a une
puissance nominale de plus de 15 A prévue pour
un circuit de 120 V. Il a été pourvu, en usine,
dun cordon et dune fiche spécifiques permettant
de le brancher à un circuit électrique adéquat.
Sassurer que lappareil est branché sur une prise
de courant de même configuration que la fiche.
Aucun adaptateur ne devrait être utilisé avec cet
appareil. Sil est nécessaire de modifier les
connexions de lappareil pour ladapter à une
alimentation électrique dun autre type, la
modification doit être faite par un technicien
qualifié.
CONSERVER CES INSTRUCTIONS
Caractéristiques techniques CT MINI
Consommation de courant 400 - 1,200 W
Charge maximale connectée à la prise de lappareil 1,200 W
Puissance connectée totale maximale (aspirateur
et prise de lappareil) 2,400 W
Débit dair max., turbine 168 m3/h (6,04 cu.ft./h)
Contrainte max., turbine 20,000 Pa
2
Surface du filtre 5,000 cm
Tuyau daspiration, diamètre x longueur 22 mm (0.87 in. x 11.48 ft.)
Capacité du réservoir 10 l (2.6 gal.)
Dimensions P x L x A 440 x 340 x 420 mm (17.3 x 13.4 x 16.5 in.)
Poids 9.5 kg (21 lbs)
Longueur du cordon 7.5 m (24.6 ft.)
Type de protection IP X4
(775 sq. in.)
Utilisation prévue
Les aspirateurs sont conçus pour aspirer des
poussières, des impuretés, du sable, des
copeaux, etc. qui ne sont pas nocifs pour la santé;
ils peuvent aussi aspirer de leau.
Cet aspirateur a été conçu selon les normes IEC
60335-1 et IEC 60335- 2-69, et il peut supporter
de fortes sollicitations en utilisation industrielle.
Lutilisateur est seul
responsable des dommages et accidents
consécutifs à une utilisation de la machine non
conforme à lusage prévu.
Préparation et mise en service de
lappareil
Branchement électrique
La tension de service indiquée sur la plaque
signalétique doit correspondre à la tension du
réseau de distribution (prise murale).
Vérifier que laspirateur
est éteint avant de brancher le cordon
dalimentation.
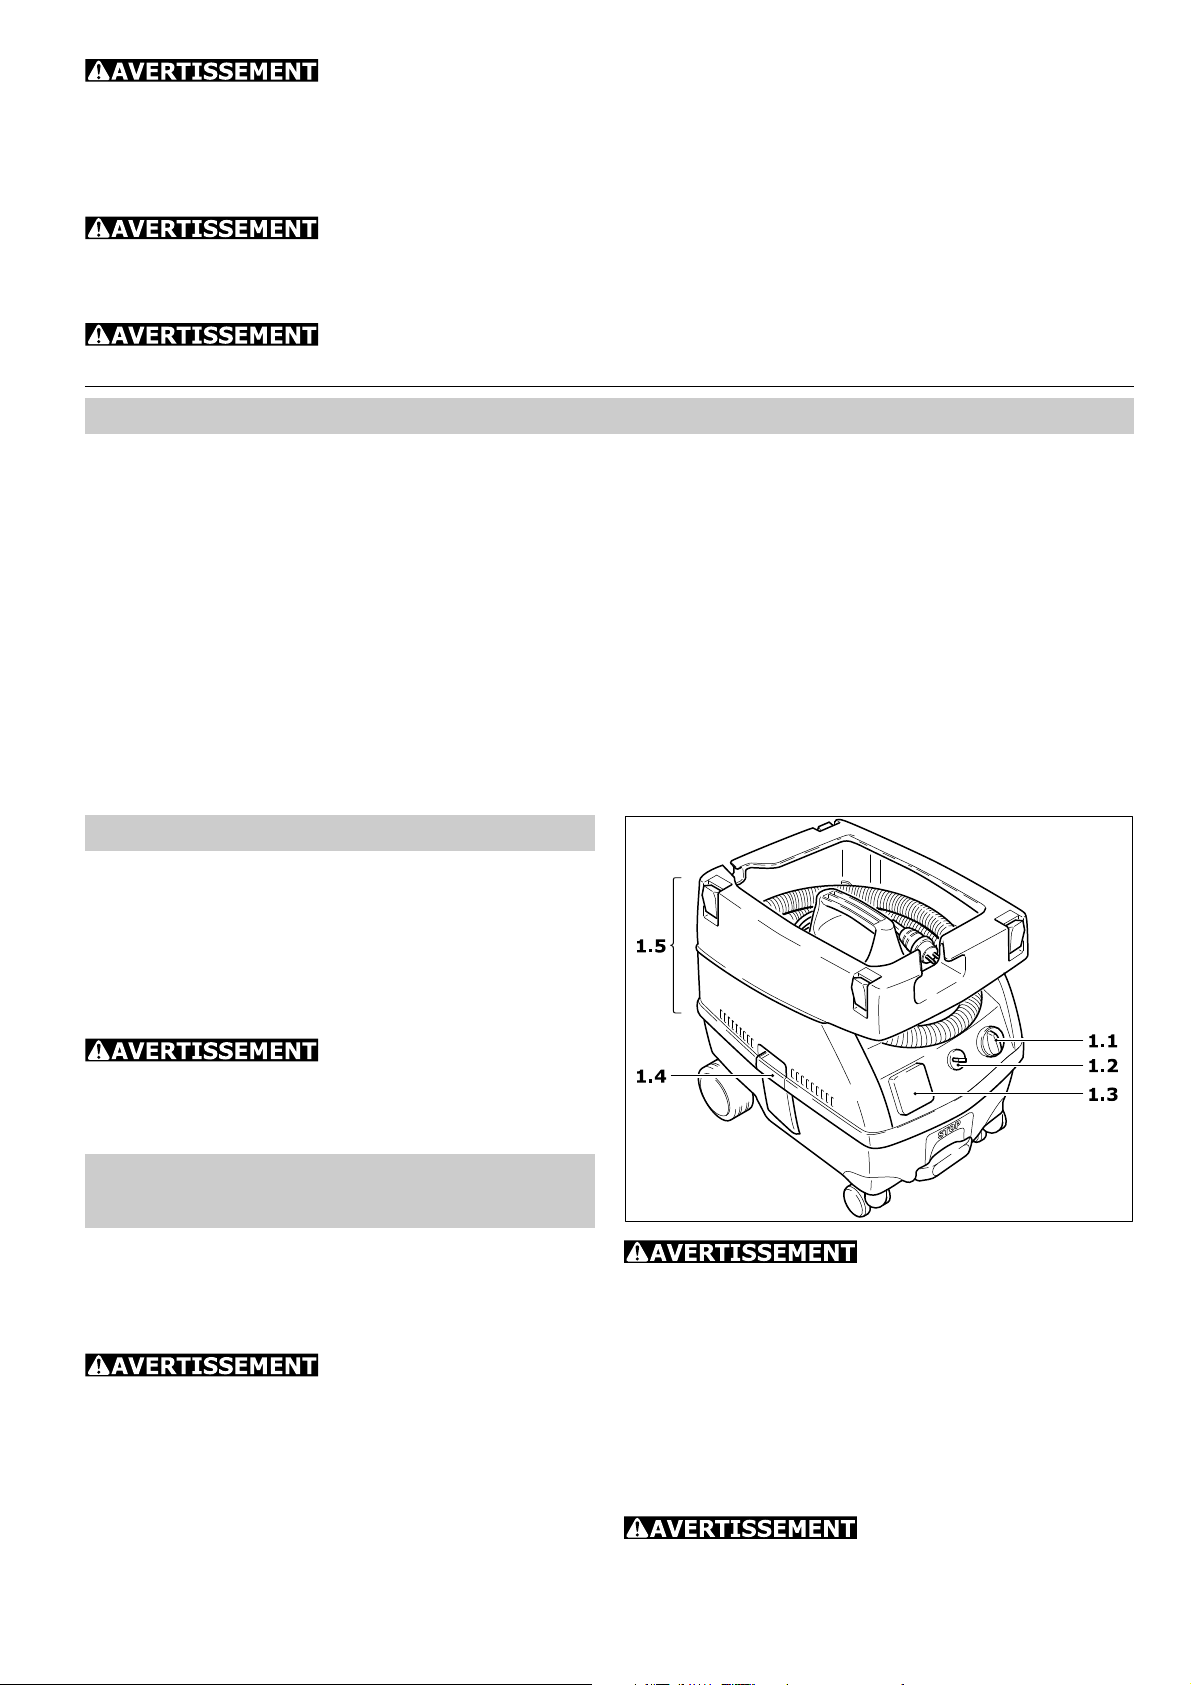
Interrupteur Arrêt/marche (1.1)
En position O, laspirateur est éteint et la prise
de lappareil (3) nest pas sous tension.
Deux modes de fonctionnement sont possibles:
a) Commutateur sur position « MAN » :
La prise de lappareil est sous tension.
Avant de mettre le
commutateur à la position « MAN », veiller à ce
que lappareil branché soit éteint.
Le moteur daspiration démarrera immédiatement et restera en marche jusquà ce que vous
léteignez.
Vous pouvez utiliser ce mode de fonctionnement
sans avoir doutil connecté dans la prise de loutil.
b) Commutateur sur position «Auto» :
La prise de lappareil est sous tension.
Avant de mettre le
commutateur à la position «Auto», veiller à ce
que lappareil branché soit éteint.
7
Page 8
Le moteur daspiration démarrera dès que loutil
branché sera mis sous tension.
Réglage de la puissance
daspiration (1.2)
Ce réglage permet de varier la puissance
daspiration en fonction des différentes matières
à aspirer.
Raccordement dun outil électrique
Respecter la valeur de raccordement maximale
indiquée sur la prise de courant (voir «Données
techniques»).
Raccorder loutil électrique à la prise de courant
intégrée (1.3).
Veiller à ce que loutil soit
éteint lors du branchement et du débranchement.
Utilisation
Lors des travaux suivants,
éviter de soulever inutilement des tourbillons de
poussières.
Changement du sac filtre
- Ouvrir les brides de fermeture (1.4) et retirer
(1.5) la partie supérieure.
- Changer le sac filtre (2.1) : lire les instructions
sur le sac.
- Remettre en place la partie supérieure et fermer
à laide des brides de fermeture.
Remarque : Il est possible de stocker un sac
filtre de réserve dans le compartiment de
rangement (5.4).
Remplacement du filtre
Ne pas utiliser lappareil
sans le filtre ! Vous risqueriez dendommager le
moteur.
- Ouvrir les brides de fermeture (1.4) et retirer
(1.5) la partie supérieure.
- Basculer le levier (3.1) et retirer la ferrure (3.2).
- Retirer le filtre (3.3) et le remplacer par un neuf.
- Remettre en place la ferrure et pousser le levier
jusquà enclenchement.
- Poser la partie supérieure, puis fermer à laide
des brides de fermeture.
Vidage de la cuve de collecte
La cuve de collecte (2.2) peut être vidée en
retirant la partie supérieure.
Béquille / Frein
En basculant la béquille (4.5), on peut bloquer
une roue de laspirateur mobile.
Pour cela, soulever légèrement laspirateur
mobile à lavant et presser la béquille vers le bas
jusquà ce quelle sencliquette.
Pour libérer la béquille, presser la touche (4.4).
Utilisation
Le tuyau daspiration (4.2) est raccordé à lorifice
daspiration à laide de la pièce coudée (4.1).
Pendant le fonctionnement, le tuyau daspiration
est guidé par louverture (4.3).
Sur la surface de desserte (5.6), on peut fixer
un Systainer à laide des quatre fermoirs (5.5).
8
Page 9

Remarque : Dans ce cas, le cordon dalimentation doit être guidé par ouverture (5.3).
ou sur le site Internet de la compagnie à ladresse
«www.festool.com».
Aspiration de matières sèches
Insérer toujours un sac filtre dans la cuve avant
daspirer des matières sèches. Les matières
aspirées seront alors faciles à éliminer.
Après laspiration de liquides, le filtre reste
humide. Un filtre humide sencrasse plus
rapidement lorsquon aspire des matières sèches.
Pour cette raison, il faut sécher le filtre ou le
remplacer par un filtre sec avant daspirer des
matières sèches.
Aspirations de liquides
En cas de fuite de mousse
ou de liquide, interrompre immédiatement le
travail et vider la cuve.
Retirer le sac filtre avant daspirer des liquides.
Nous recommandons lutilisation dun filtre
spécial pour liquides.
Lorsque le niveau de remplissage maximum est
atteint, les indicateurs de niveau (3.4)
interrompent automatiquement laspiration.
Le système Antistatic (AS)
Laspiration provoque des charges statiques par
frottement dans le tuyau daspiration. Lutilisateur
peut les ressentir par des chocs électriques
désagréables.
Pour décharger ces charges électrostatiques,
laspirateur est doté dun système antistatique.
Il est cependant nécessaire dutiliser un tuyau
et des accessoires antistatiques.
Protection thermique
Un commutateur sensible à la chaleur met
laspirateur hors tension dès quil atteint une
température critique. Si cela se produit, éteindre
laspirateur et le laisser se refroidir pendant 5
minutes environ. Si, à la suite de cette phase de
refroidissement, il nest pas possible de remettre
laspirateur en marche, contacter un centre de
service Festool.
Après le travail
- Éteindre laspirateur et débrancher le cordon
dalimentation.
- Vider le sac filtre et le réservoir.
- Ranger le tuyau daspiration (5.1) et le conduit
de raccordement (5.2) dans la partie supérieure.
- Nettoyer lintérieur et lextérieur de laspirateur.
- Entreposer lappareil dans un endroit sec, hors
de portée de toute personne non autorisée.
Accessoires et filtre
On trouvera les numéros de commande des
accessoires et du filtre dans le catalogue Festool,
Entretien
Il faut toujours dé-
brancher lappareil avant deffectuer tout
entretien !
Tout entretien ou
réparation nécessitant louverture du moteur doit
être fait par un centre de service autorisé.
Un contrôle technique de
sécurité doit être effectué au moins une fois par
an par le fabricant ou une personne qualifiée,
qui vérifiera par exemple une éventuelle
détérioration du filtre, létanchéité de lappareil
et le bon fonctionnement des dispositifs de
contrôle.
Garantie
Conditions de la garantie (1+2 ans)
Vous avez droit à une prolongation de garantie
gratuite (1 an + 2 ans = 3 ans) sur votre outil
électrique Festool. Festool assumera tous les
coûts dexpédition pendant la première année
de la garantie alors que les deuxième et troisième
années, les coûts devront être assumés par le
client. Festool paiera les frais de retour de loutil
au client par service de livraison terrestre UPS.
La garantie est valable pour une période de 3
ans à compter de la date dachat indiquée sur
votre reçu ou votre facture.
Garantie limitée de Festool
Cette garantie est valable à condition que loutil
soit utilisé conformément aux instructions de
Festool. Festool garantit, à lacheteur initial
seulement, que loutil indiqué sera exempt de
tout défaut de matériau et de fabrication pendant
un an à compter de la date dachat. Festool ne
donne aucune garantie supplémentaire, implicite
ou explicite, sur les instruments portables
électriques Festool. Aucun agent, représentant
commercial, distributeur, vendeur ou employé de
Festool nest autorisé à prolonger ou à modifier
les obligations ou restrictions de la présente
garantie. Les obligations de Festool sont, à son
entière discrétion, limitées à la réparation ou à
léchange des outils portables électriques Festool
trouvés défectueux dans le présent emballage,
tels que fournis avec le présent Guide
dutilisation.
Cette garantie exclut lusure normale, les
dommages causés par un usage impropre, les
abus ou la négligence, ou tout dommage autre
que ceux attribuables à des défauts de matériau
et de fabrication. Cette garantie ne sapplique
pas aux accessoires tels que lames de scie
circulaire, mèches de perceuse et vilebrequin,
9
Page 10

lames de scie sauteuse, bandes abrasives et
meules. Sont également exclues les pièces
dusure, telles que balais de charbon, lamelles
pour outils à air comprimé, joints et manchons
de caoutchouc, disques et patins ponceurs, ainsi
que les piles.
Les outils électriques portables Festool à
remplacer ou à réparer doivent être retournés
avec le reçu dachat à Festool (appelez au 800554-8741 pour connaître ladresse
dexpédition).
FESTOOL NEST EN AUCUN CAS
RESPONSABLE DES DOMMAGES DIRECTS OU
INDIRECTS, IMPLICITES OU EXPLICITES,
DÉCOULANT DE LA RUPTURE DE CETTE
GARANTIE OU DE TOUTE AUTRE GARANTIE.
TOUTES LES GARANTIES IMPLICITES, Y
COMPRIS LES GARANTIES IMPLICITES DE
QUALITÉ MARCHANDE ET DADÉQUATION À
UN USAGE PARTICULIER, SONT LIMITÉES À
UNE PÉRIODE DE TROIS ANS.
Certains états américains et certaines provinces
canadiennes ne permettent pas la limitation des
garanties implicites; il se pourrait donc que les
limites indiquées ci-dessus ne sappliquent pas
dans votre cas. À lexception de certaines
garanties implicites des provinces ou des états
indiquées ici, la présente garantie est exclusive
et remplace toute autre garantie, convention
et obligation similaire de Festool.
Cette garantie vous confère des droits légaux
spécifiques, et vous pouvez aussi avoir dautres
droits pouvant varier dun état à lautre, ou
dune province à lautre au Canada.
10
Page 11

11
Page 12

INSTRUCCIONES IMPORTANTES
DE SEGURIDAD
LEA TODAS LAS INSTRUCCIONES ANTES
DE USAR ESTE APARATO.
Para reducir el riesgo de
fuego, descarga eléctrica, o lesión:
1 No deje el aparato enchufado. Desenchufe
de la toma de corriente cuando no esté en
uso y antes de darle servicio.
2 No lo exponga a la lluvia para reducir el
riesgo de una descarga eléctrica.
Conserve en el interior.
3 No permita que se use como juguete. Se
requiere de mucho cuidado y atención cuando
se usa por o cerca de niños o animales.
4 Use sólo de acuerdo con las instrucciones
en este manual. Use sólo accesorios
recomendados por el fabricante.
5 No usar con el cable o el enchufe dañado.
Si el aparato no funciona como debería, si se
ha caído, dañado, dejado afuera o caído al
agua, devuélvalo a uno de los centros de
servicio.
6 No lo transporte o tire por del cable, no use
el cable como mango, no cierre una puerta
sobre el cable ni pase el cable por esquinas o
filos agudos. No pase el aparato por encima
del cable. Mantenga el cable alejado de
superficies calientes.
7 No desenchufe tirando del cable. Para
desenchufar, sujete el enchufe, no el cable.
8 No maneje el enchufe o el aparato con
las manos húmedas.
9 No coloque ningún objeto en las
aperturas. No lo use con alguna apertura
bloqueada; manténgalo limpio de polvo,
hilachos, pelos y cualquier cosa que pudiera
reducir el paso del aire.
10 Mantenga el pelo, ropa suelta, los dedos
y todas las partes del cuerpo alejados de
las aperturas y del alcance de las partes
movibles.
11 Apague todos los controles antes de
desenchufar.
12 Preste especial atención cuando esté
limpiando escaleras.
13 No lo utilice para recoger líquidos
inflamables o combustibles como gasolina
ni lo use en áreas donde puedan estar
presentes.
14 Solo conéctelo a un toma corrientes
correctamente conectado a tierra. Véanse
las instrucciones de conexión a tierra.
15 No recoja nada que se esté quemando o
esté echando humo como cigarrillos,
cerillas, o ceniza caliente. No aspire polvos
inflamables o explosivos (como magnesio,
aluminio, etc.) ¡Peligro de explosión!
16 No usar sin la bolsa y/o filtro de polvo
en su lugar.
17 No succione / aspire líquidos agresivos
(como ácidos, líquidos alcalinos, solventes,
etc.).
18 Proteja al cable contra el calor, aceite y
cantos agudos.
19 Cheque regularmente el enchufe y el
cable, y, en el caso de que se detecte
algún daño, que un experto lo reemplace
si está dañado.
20 No levante ni transporte el aparato por
los mangos usando una grúa o de un
aparato elevador.
21 Sólo use los accesorios autorizados por
Festool (ver el catálogo Festool).
Algunos polvos creados por lijadoras mecánicas, aserraderos, trituradores, perforadoras y
otras actividades de construcción contienen
sustancias químicas que se sabe (en el Estado
de California) causan cáncer, defectos de
nacimiento u otros daños al sistema reproductivo. Algunos ejemplos de estas sustancias
químicas son:
Plomo de las pinturas con base de plomo
Sílice cristalino de los ladrillos y cemento y
otros productos de mampostería, y
Arsénico y cromo de madera tratada con
sustancias químicas
El riesgo de exposición a estas sustancias varía,
dependiendo de cuantas veces se hace este tipo
de trabajo.
Para reducir el contacto con
estas sustancias químicas:
trabaje en un área con buena
ventilación y trabaje con equipo
de seguridad aprobado, como
mascarillas para el polvo
diseñadas específicamente para
filtrar partículas microscópicas.
INSTRUCCIONES DE CONEXIÓN A
TIERRA
Este aparato debe estar conectado a tierra. En
caso de un funcionamiento incorrecto o avería,
la conexión a tierra ofrece una vía de mínima
resistencia para la corriente eléctrica que reduce
el riesgo de una descarga eléctrica. Este aparato
está equipado con un cable que cuenta con un
conductor y un enchufe de conexión a tierra para
el equipo. El enchufe debe ser introducido en un
tomacorriente que esté correctamente instalado
y conectado a tierra, de acuerdo con la normativa
vigente.
La conexión incorrecta del
conductor para conexión a tierra del equipo puede
resultar en el riesgo de una descarga eléctrica.
12
Page 13

Verifíquelo con un electricista calificado o una
persona de servicio si tiene dudas acerca de la
conexión a tierra correcta del tomacorriente.
No modifique el enchufe
suministrado con el aparato en caso de no
encajar en el tomacorriente, haga que un
electricista calificado instale una toma de
corriente apropiada.
Este aparato está clasificado
para más de 15 amperios, está previsto para
usarse con circuito con valor nominal de 120
voltios y viene provisto de fábrica con un cable y
un enchufe específicos para permitir la conexión
a un circuito eléctrico apropiado. Asegúrese de
que el aparato esté conectado a un
tomacorriente que cuente con la misma
configuración que el enchufe. No debe utilizar
ningún adaptador con este aparato. Si el aparato
se tiene que conectar a un tipo de circuito
eléctrico distinto, la conexión la deberá realizar
una persona de servicio calificada.
CONSERVE ESTAS INSTRUCCIONES
Datos técnicos CT MINI
Consumo de energía 400 - 1,200 W
Carga conectada al enchufe del aparato max. 1,200 W
Potencia total conectada, máx.
(aspirador y enchufe del aparato) 2,400 W
Max. caudal volumétrico (aire), turbina 168 m3/h (6,04 cu.ft./h)
Aspiración max., turbina 20,000 Pa
Superficie del filtro 5,000 cm2 (775 sq. in.)
Tubo flexible de aspiración, diametro x longitud 22 mm x 3.5 m (0.87 in. x 11.48 ft.)
Capacidad del depósito 10 l (2.6 gal.)
Dimensiones P x An x Al 440 x 340 x 420 mm (17.3 x 13.4 x 16.5 in.)
Peso 9.5 kg (21 lbs)
Longitud del cable eléctrico 7.5 m (24.6 ft.)
Clase de protección IP X4
Uso especificado
Las aspiradoras están diseñadas para aspirar de
polvos no perjudiciales a la salud, suciedad,
arena, virutas, etc.. Además, las aspiradoras
están diseñadas de conformidad con lo
especificado para la succión de agua.
Las aspiradoras están diseñadas de conformidad
con las normas IEC 60335-1 y IEC 60335- 2-69
para una carga mayor en usos industriales.
El usuario es el único
responsable por cualquier daño u accidente en
caso de que el aparato se use de manera distinta
a lo especificado.
Preparación y puesta en servicio de
la aspiradora
Conexión eléctrica
¡El voltaje de operación que debe corresponder
con el voltaje la alimentación de corriente se
muestra en la placa de clasificación!
Asegúrese que la aspiradora
esté apagada cuando se enchufe el cable.
Interruptor de encendido/apagado
(1.1)
En la posición O la aspiradora se encuentra
apagada y el enchufe de la máquina (1.3) está
sin corriente.
Hay dos modos de operación posibles:
a) Posición del conmutador en MAN:
El enchufe de la máquina tiene corriente.
Antes de girar el interruptor
a la posición MAN asegúrese que la herramienta
conectada al enchufe del aparato esté apagada.
El motor de aspiración se pone en marcha
inmediatamente y se quedará encendido siempre
y cuando el interruptor esté en esta posición.
También puede usar esta modalidad de operación
sin una herramienta conectadas al enchufe de
herramienta.
b) Posición del interruptor en Auto:
La caja de enchufe de la máquina conduce
corriente.
13
Page 14

Antes de girar el interruptor
a la posición Auto, asegúrese que la
herramienta conectada al enchufe del aparato
esté apagada.
El motor de aspiración se arranca sólo cuando
está encendida la herramienta conectada al
enchufe del aparato.
Regulador de fuerza de aspiración
(1.2)
El regulador de la fuerza de aspiración se puede
usar para variar la potencia de aspiración. Esto
permite una adaptación precisa para las distintas
sustancias que se van a recoger.
Conexión de la herramienta eléctrica
¡Observe la potencia conectada máxima en el
enchufe de la máquina (véase Datos técnicos)!
¡El consumo de potencia clasificada no debe
exceder de esto!
Conecte la herramienta eléctrica al enchufe de
la máquina (1.3).
Asegúrese que la herra-
mienta eléctrica ésta esté desconectada cuando
la esté enchufando y desenchufando.
Operación
Durante el siguiente pro-
cedimiento, deberá observar que no se levante
más polvo del que es necesario.
Sustitución de la bolsa filtrante
- Abra los sujetadores de cierre (1.4) y retire la
parte superior (1.5).
- Sustituya la bolsa filtrante (2.1) véase la
inscripción que hay en la misma.
- Reemplace la parte superior y cierre los
sujetadores de cierre.
Nota: Se puede guardar una bolsa filtrante de
repuesto en el compartimiento de almacenamiento (5.4).
Cambio del filtro
No opere la máquina sin el
elemento del filtro. Podría dañar el motor.
- Abra los sujetadores de cierre (1.4) y retire la
parte superior (1.5).
- Abate la palanca (3.1) y retire el soporte (3.2).
- Extraiga el elemento de filtro usado (3.3) y
sustitúyalo por uno nuevo.
- Vuelva a colocar el soporte y mueva la palanca
hasta que encaje.
- Coloque la parte superior y cierre los
sujetadores de cierre.
Vaciado del depósito para suciedad
Una vez retirada la parte superior, se puede vaciar
el depósito de suciedad (2.2).
Soporte / freno
Al sacar el soporte (4.5) se evita que el sistema
móvil de aspiración se aleje rodando.
Para lograr esto, eleve ligeramente el sistema
móvil de aspiración en la parte delantera y ejerza
presión hacia abajo en el soporte hasta que
encaje.
Para soltar el soporte, oprima del botón (4.4).
14
Page 15

Aplicación
El tubo flexible de aspiración (4.2) se conecta
mediante la pieza angular (4.1) al orificio de
aspiración. Durante la operación, el tubo flexible
de aspiración es insertado en el hueco (4.3).
Es posible fijar un Systainer al área de
almacenamiento (5.6) por medio de los cuatro
sujetadores de cierre (5.5).
Nota: Para ello, el cable de red debe hacerse
pasar por el hueco (5.3).
Una vez terminado el trabajo
- Desconecte la aspiradora y desenchufe el cable
de alimentación de corriente.
- Vacíe el depósito para recoger la suciedad.
- Coloque el tubo flexible de aspiración (5.1) y el
cable de conexión (5.2) en la parte superior.
- Limpie el interior y el exterior de la aspiradora
meditante succión y frotación.
- Coloque la aspiradora en una habitación seca,
protegida contra el uso no autorizado.
Aspiración de materiales secos
Antes de proceder a la aspiración de materiales
secos siempre debería haber una bolsa de filtro
adentro del depósito. Así es más fácil desechar
el material aspirado.
El elemento filtrante se humedece después de
haber succionado líquidos. El elemento filtrante
húmedo se desgasta con mayor rapidez cuando
se aspiran materiales secos. Por este motivo, el
elemento filtrante deberá secarse antes de
realizar una aspiración de materiales secos o
deberá cambiarse por uno seco.
Succión de líquidos
Cuando se note que sale
espuma o líquido, se debe terminar
inmediatamente el trabajo y vaciar el depósito
para recoger la suciedad.
Antes de proceder a la succión de líquidos
siempre se tiene que retirar la bolsa filtrante. Se
recomienda el empleo de un filtro húmedo
especial.
Al alcanzar el nivel máximo de llenado la
aspiración es interrumpida automáticamente por
los indicadores del nivel de llenado (3.4).
El sistema antiestático (AS)
Durante la aspiración se producen cargas
estáticas en el tubo flexible de aspiración a causa
de la fricción. Estas cargas estáticas pueden ser
desagradables como descargas eléctricas para
el operador de la máquina.
Para facilitar la descarga de estas cargas
estáticas, la aspiradora está equipado un sistema
antiestático. Sin embargo, para ello resulta
necesario emplear un tubo flexible y accesorios
antiestáticos.
Control de temperatura
Para proteger contra el sobrecalentamiento se
cuenta con un fusible térmico que desconecta la
aspiradora antes de que llegue a una temperatura
crítica. Apague la aspiradora y déjela que se
enfríe durante aproximadamente 5 minutos. En
caso de que después del proceso descrito no se
vuelva a encender la aspiradora, póngase en
contacto con un centro de servicio de Festool.
Accesorios, filtros
Los números de pedido para los respectivos
accesorios y filtros se encuentran en su catálogo
Festool o en la dirección de la Internet
«www.festool.com.
Mantenimiento y conservación
¡Siempre desconecte la
alimentación de corriente del enchufe antes de
hacer cualquier trabajo de mantenimiento!
Todos los trabajos de
mantenimiento y de reparación que requireen
que se abra la caja del motor, sólo deben llevarse
a cabo por un taller autorizado de servicio.
Como mínimo una vez al año
tiene se debe realizar una prueba de seguridad
por la casa productora o por una persona
correspondientemente instruida, por ejemplo, en
cuanto a daños al filtro, hermeticidad del aparato
y funcionamiento de los aparatos de control.
Garantía
Condiciones de la Garantía 1 + 2
Usted tiene derecho a una garantía extendida
gratuita (1 año + 2 años = 3 años) para su
herramienta mecánica Festool. Festool se hará
responsable por los gastos de envío durante el
primer año de garantía. Durante el segundo y
tercer año de garantía el cliente es responsable
por el costo del envío de la herramienta a
Festool. Festool pagará el embarque de regreso
al cliente usando UPS Ground Service. Todo el
servicio de garantía es válido por 3 años desde
la fecha de la compra de acuerdo a la fecha de
su recibo o factura de compra.
Garantía limitada de Festool
Esta garantía es válida con la condición previa
de que la herramienta se usa y opera de
conformidad con las instrucciones de operación
de Festool. Festool garantiza, sólo al comprador
original, que la herramienta especificada estará
libre de defectos de fabricación y materiales
durante un periodo de un año a partir de la
fecha de compra. Festool no otorga otras
garantías, ni explícitas ni implícitas para
ninguna de las herramientas mecánicas
15
Page 16

portátiles Festool. Ningún agente,
representante, distribuidor, comerciante o
empleado de Festool está autorizado para
extender o modificar de cualquier manera las
obligaciones o limitaciones de esta garantía.
Las obligaciones de Festool, a su propia entera
discreción, están limitadas a la reparación o
sustitución de cualquier herramienta portátil
Festool que se encuentre estar defectuosa en
el momento de ser embalada junto con el
manual de usuario.
Quedan excluidos de la cobertura en esta
garantía: el desgaste normal; los daños
causados por uso indebido, el abuso o
negligencia; los daños causados por cualquier
otra causa que no sean defectos del material o
de la fabricación. Esta garantía no aplica a
accesorios como cuchillas de sierras circulares,
brocas de taladro, barrenas de buriladora,
cuchillas de sierra, cuchillas para sierras de
calado, correas de lijadoras y ruedas de esmeril.
También se excluyen las partes que se
desgastan como cepillos de carbón, laminillas
de herramientas de aire, collarines de hule y
sellos, discos y cojines de lijado, y baterías.
Las herramientas mecánicas portátiles Festool
que requieran de reemplazo o reparación deben
devolverse con el recibo de compra a Festool
(llame al 800-554-8741 para los detalles de la
dirección).
EN NINGÚN CASO FESTOOL SE HARÁ
RESPONSABLE POR LOS DAÑOS
SECUNDARIOS O CONSECUENTES
OCASIONADOS POR LA VIOLACIÓN DE ESTA
O CUALUQUIER OTRA GARANTÍA, SEA
EXPLÍCITA O IMPLÍCITA. TODAS LAS
GARANTÍAS IMPLICADAS POR LEYES
ESTATALES, INCLUYENDO LAS GARANTÍAS
IMPLICADAS DE COMERCIALIZACIÓN Y
ADECUACIÓN A UN PROPÓSITO PARTICULAR, QUEDAN LIMITADAS A TRES AÑOS
DE DURACIÓN.
Algunos estados de EE.UU. y algunas provincias
de Canadá no permiten las limitaciones en
cuanto a la duración de las garantías implícitas,
de modo que la limitación arriba indicada puede
que no le afecte. A excepción de algunas
garantías implicadas por leyes estatales o
provinciales, limitadas por la presente, la
anteriormente citada garantía, expresamente
limitada, es exclusiva y sustituye a cualquier
otra garantía, acuerdo u obligación similar de
Festool.
Esta garantía le concede derechos legales
específicos y usted podría tener otros derechos
legales que varían de estado a estado en EE.UU.
y de provincia a provincia en Canadá.
16
 Loading...