

Page 1

703005_001
Instruction manual
Page 3
IMPORTANT: Read and understand all instructions before using.
Guide d’utilisation
Page 11
IMPORTANT: Lire et comprendre toutes les instructions avant de
démarrer les travaux.
Manual de instrucciones
Pagina 21
IMPORTANTE: Lea y comprende todas las instrucciones antes de
usar.
Instruction manual
Guide d’utilisation
Manual de instrucciones
CT MINI HEPA
CT MIDI HEPA
Page 2

Page 3

3
General Safety Rules
Read and understand all instructions. Failure to follow all instructions listed
below, may result in electric shock, fi re and/or
serious personal injury.
SAVE THESE INSTRUCTIONS
Work Area
Keep your work area clean and well lit. Cluttered
and dark areas invite accidents.
Do not operate vacuum cleaners in explosive atmospheres, such as in the presence of fl ammable
liquids, gases, or dust. Appliances create sparks,
which may ignite the dust or fumes.
Keep bystanders, children, and visitors away
while operating the vacuum cleaner. Do not allow
to be used as a toy. Close attention is necessary
when used by or near children.
Electrical Safety
This vacuum cleaner intended only for use indoor
and for dry or wet pick-up.
The power tool outlet is grounded and the vacuum
cleaner must be plugged into an outlet properly
installed and grounded in accordance with all
codes and ordinances. Never remove the grounding prong or modify the plug in any way. Do not
use any adapter plugs. Check with a qualifi ed
electrician if you are in doubt as to whether the
outlet is properly grounded. If the vacuum clean-
ers should electrically malfunction or break down,
grounding provides a low resistance path to carry
electricity away from the user.
Do not insert objects like paper clips or screwdrivers into power tool outlet. The outlet is live
when the vacuum cleaner is plugged into power
source and switch is set to power tool activation
mode or fi lter cleaning mode. Electric shock may
occur.
Avoid body contact with grounded surfaces such
as pipes, radiators, ranges and refrigerators.
There is an increased risk of electric shock if your
body is grounded. If operating the vacuum cleaner
in damp locations is unavoidable; a Ground Fault
Circuit Interrupter must be used to supply the
power to your vacuum cleaner. Electrician’s rubber gloves and footwear will further enhance your
personal safety.
Don’t expose vacuum cleaner to rain or wet conditions. This vacuum cleaner can be used for pick-
ing up non-fl ammable liquids but it is not intended
to be immersed or submerged in a fl uid. Electric
shock may occur.
Do not handle plug or appliance with wet hands.
Electric shock may occur.
Do not abuse the cord. Never use the cord to carry
the vacuum cleaner, pull the vacuum cleaner or
yank the plug from an outlet. Keep cord away
from heat, oil, sharp edges or moving parts. Replace damaged cords immediately. Don’t drive
over it or close a door on it. Damaged cords in-
crease the risk of electric shock.
When operating a vacuum cleaner outside, use
an outdoor extension cord marked “W-A” or “W”.
These cords are rated for outdoor use and reduce
the risk of electric shock. Refer to Recommended
sizes of Extension Cords in the Accessory section
of this manual.
General Safety Rules ...................................... 3
Vacuum Cleaner Safety Rules ......................... 4
Health hazard by dust ..................................... 5
Technical data ................................................ 5
Symbols .......................................................... 5
Intended use ................................................... 5
Getting started ................................................ 6
Electrical connection ...................................... 6
On/off switch ................................................... 6
Suction force regulator ................................... 6
Temperature control ....................................... 7
Connecting an electric tool ............................. 7
Operation ........................................................ 7
Changing the filter bag ................................... 7
Changing the filter .......................................... 7
Emptying the dirt trap ..................................... 7
Application ...................................................... 8
Stand ............................................................... 8
Vacuuming dry materials ................................ 8
Vacuuming liquids ........................................... 8
After finishing work ........................................ 9
Filters and accessories ................................... 9
Maintenance and care ..................................... 9
Warranty ........................................................ 9
Contents
Page 4

4
Personal Safety and Vac-
uum Cleaner Use
Stay alert, watch what you are doing and use
common sense when operating a vacuum cleaner.
Do not use vacuum cleaner while tired or under
the infl uence of drugs, alcohol, or medication. A
moment of inattention while operating vacuum
cleaner may result in serious personal injury.
Avoid accidental starting. Be sure vacuum cleaner and tool switches are OFF before plugging
in or putting vacuum cleaner switch into power
tool activation mode or fi lter cleaning mode. Do
not keep power tool plugged into the vacuum
cleaner’s power tool outlet during normal vacuuming. Plugging in vacuum cleaners or tools that
have the switch ON invites accidents.
Do not overreach. Keep proper footing and balance both for you and the vacuum cleaner at all
times. Use extra care when cleaning on stairs.
Proper footing and balance enables better control
of the vacuum cleaner in unexpected situations.
Do not vacuum burning, smoking or smoldering
things like cigarettes, matches or hot ashes. Fire
inside the vacuum cleaner tank may occur.
Do not use to vacuum fl ammable liquids, alcohol,
gases, or explosive dusts, like gasoline or other
fuels, lighter fl uid, varnish, polyurethane coatings, cleaners, oil-based paints, natural gas, hydrogen, coal dust, magnesium dust, grain dust, or
gun powder. Electric motors create sparks which
may ignite the dust or fumes.
Dress properly. Do not wear loose clothing or
jewelry. Contain long hair. Keep your hair, clothing, and gloves away from moving parts. Loose
clothes, jewelry, or long hair can be caught in moving parts, hose, and suction nozzles. Keep handles
dry, clean and free from oil and grease.
Do not hold the hose against any body parts during operation.
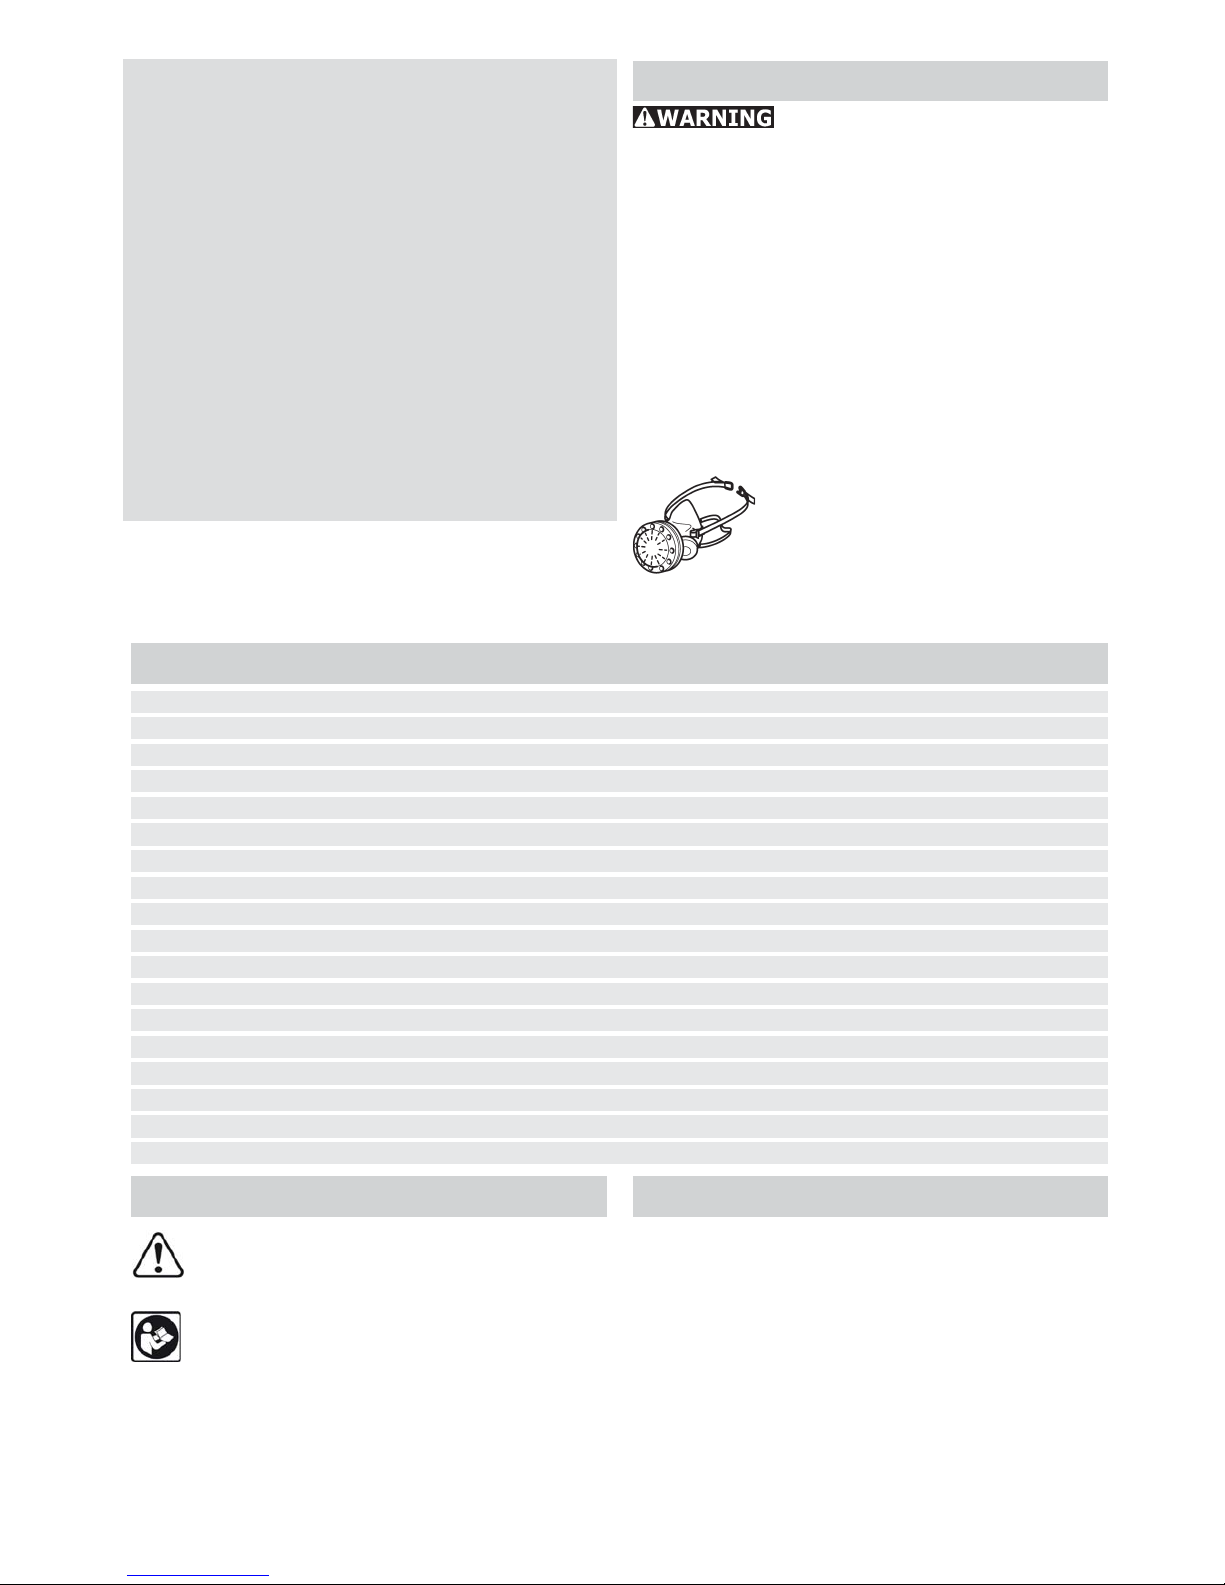
Use safety equipment. Always wear eye and hearing protection. Dust mask, non-skid safety shoes,
hard hat, or hearing protection must be used for
appropriate conditions.
Not suitable to vacuum hazardous or toxic substances or dusts e.g. asbestos. The fi lters will not
be able to capture all particles and may exhaust
them back into the environment.
Vacuum Cleaner Safety Rules
Vacuum cleaner Care
Do not use vacuum cleaner if switch does not turn
it ON or OFF. Any vacuum cleaner that cannot be
controlled with the switch is dangerous and must
be repaired.
Disconnect the plug from the power source before
making any adjustments, changing accessories,
or storing the vacuum cleaner. Such preventive
safety measures reduce the risk of starting the
vacuum cleaner accidentally.
Never connect a tool with a rating greater than
the maximum amperes listed on the receptacle.
This vacuum cleaner has a power tool outlet for
use in conjunction with other appliances such as
sanders, jigsaws and planers; tools with greater
ratings may cause a fi re.
Do not vacuum dust when liquid/fl uid is contained
in the vacuum cleaner tank. Do not vacuum liq-
uids/fl uids when dust is in the tank. In either case
empty the tank and/or remove dust bag before
use so that dust does not cake and harden inside
the tank.
Dry fi lters completely after wet vacuuming or
use a second dry fi lter set for dust vacuuming.
Damp or wet fi lters will cake with dust or develop
mold or mildew.
Store idle vacuum cleaner out of reach of children
and other untrained persons. Vacuum cleaners
are dangerous in the hands of untrained users.
Maintain vacuum cleaner with care. Properly
maintain vacuum cleaner to keep hose unobstructed. Do not put any object into openings. Do
not use with any opening blocked; keep free of
dust, lint, hair and anything that may reduce air
fl ow. Any alteration or modifi cation is a misuse
and may result in a dangerous condition.
Check for misalignment or binding of moving
parts, breakage of parts, and any other condition
that may affect the vacuum cleaners operation.
If damaged, have the vacuum cleaner serviced
before using. Poorly maintained vacuum cleaners
cause many accidents. Develop a periodic maintenance schedule for your vacuum cleaner.
Use only accessories that are recommended by
the manufacturer for your model. Accessories
that may be suitable for one vacuum cleaner may
become hazardous when used on another vacuum
cleaner.
Page 5
5
Technical data
Power consumption 400 - 1200 W
Connected load to appliance plug socket max. 1200 W
Total connected load max. (vacuum cleaner and plug socket) 2400 W
Volume fl ow (air) max., turbine 222 m3/h (7.84 cu.ft./h)
Vacuum max., turbine 24000 Pa
Filter surface 5000 cm2 (775 sq.in.)
Suction hose, diameter x length 27 mm x 3.5 m (1.06 in. x 11.48 ft.)
Dimensions L x W x H:
CT MINI HEPA 430 x 330 x 420 mm (16.9 x 13.0 x 16.5 in.)
CT MIDI HEPA 430 x 330 x 470 mm (16.9 x 13.0 x 18.5 in.)
Container capacity:
CT MINI HEPA 10 l (2.6 gal.)
CT MIDI HEPA 15 l (3.9 gal.)
Weight:
CT MINI HEPA 8.7 kg (19.2 lbs)
CT MIDI HEPA 9.0 kg (19.8 lbs)
Power cable length 7.5 m (24.6 ft.)
Protection type IP X4
Service
Only qualifi ed repair personnel must perform
vacuum cleaner service. Service or maintenance
performed by unqualifi ed personnel could result in
a risk of injury. For example: internal wires may be
misplaced or pinched, safety guard return springs
may be improperly mounted.
When servicing a vacuum cleaner, use only identical replacement parts. Follow instructions in
the Maintenance section of this manual. Use of
unauthorized parts or failure to follow the Maintenance Instructions may create a risk of electric
shock or injury. Certain cleaning agents such as
gasoline, carbon tetrachloride, ammonia, etc. may
damage plastic parts.
Health hazard by dust
Various dust created by power
sanding, sawing, grinding, drilling and other construction activities contains chemicals known (to
the State of California) to cause cancer, birth defects or other reproductive harm. Some examples
of these chemicals are:
• lead from lead-based paints,
• crystalline silica from bricks and cement and
other masonry products, and
• arsenic and chromium from chemically-treated
lumber.
The risk from these exposures varies, depending on how
often you do this type of work.
To reduce your exposure to these
chemicals: work in a well ventilated
area, and work with approved safety
equipment, such as dust masks that
are specially designed to filter out
microscopic particles. Wash hands after handling.
Symbols
Warning of general danger
Read the Operating Instructions/Notes!
Intended use
This dust extractor is designed for the aspiration and evacuation of non-toxic, non-hazardous
dusts, dirt, sand, shavings etc., and for vacuuming
water.
This dust extractor is designed in accordance with
IEC 60 335-1 and IEC 60 335-2-69 for a higher
loading in industrial use.
The fi ltering performance of the overall unit, which is
fi tted with a HEPA fi lter element, corresponds to HEPA
quality H 13 (medium degree of fi ltration 99.95 %).
Page 6
6
Electrical connection
The operating voltage shown on the specifi cation
plate must be the same as the mains power voltage (wall socket).
Make sure that the dust extractor
is switched off when you plug in the power cord.
The antistatic system (AS)
The friction of material running through the suction hose causes electrostatic charges, which
can result in unpleasant electric shocks for the
operator.
In order to prevent this, this dust extractor has an
integrated antistatic system which conducts these
static charges to ground. This requires the use of
antistatic hoses and accessories.
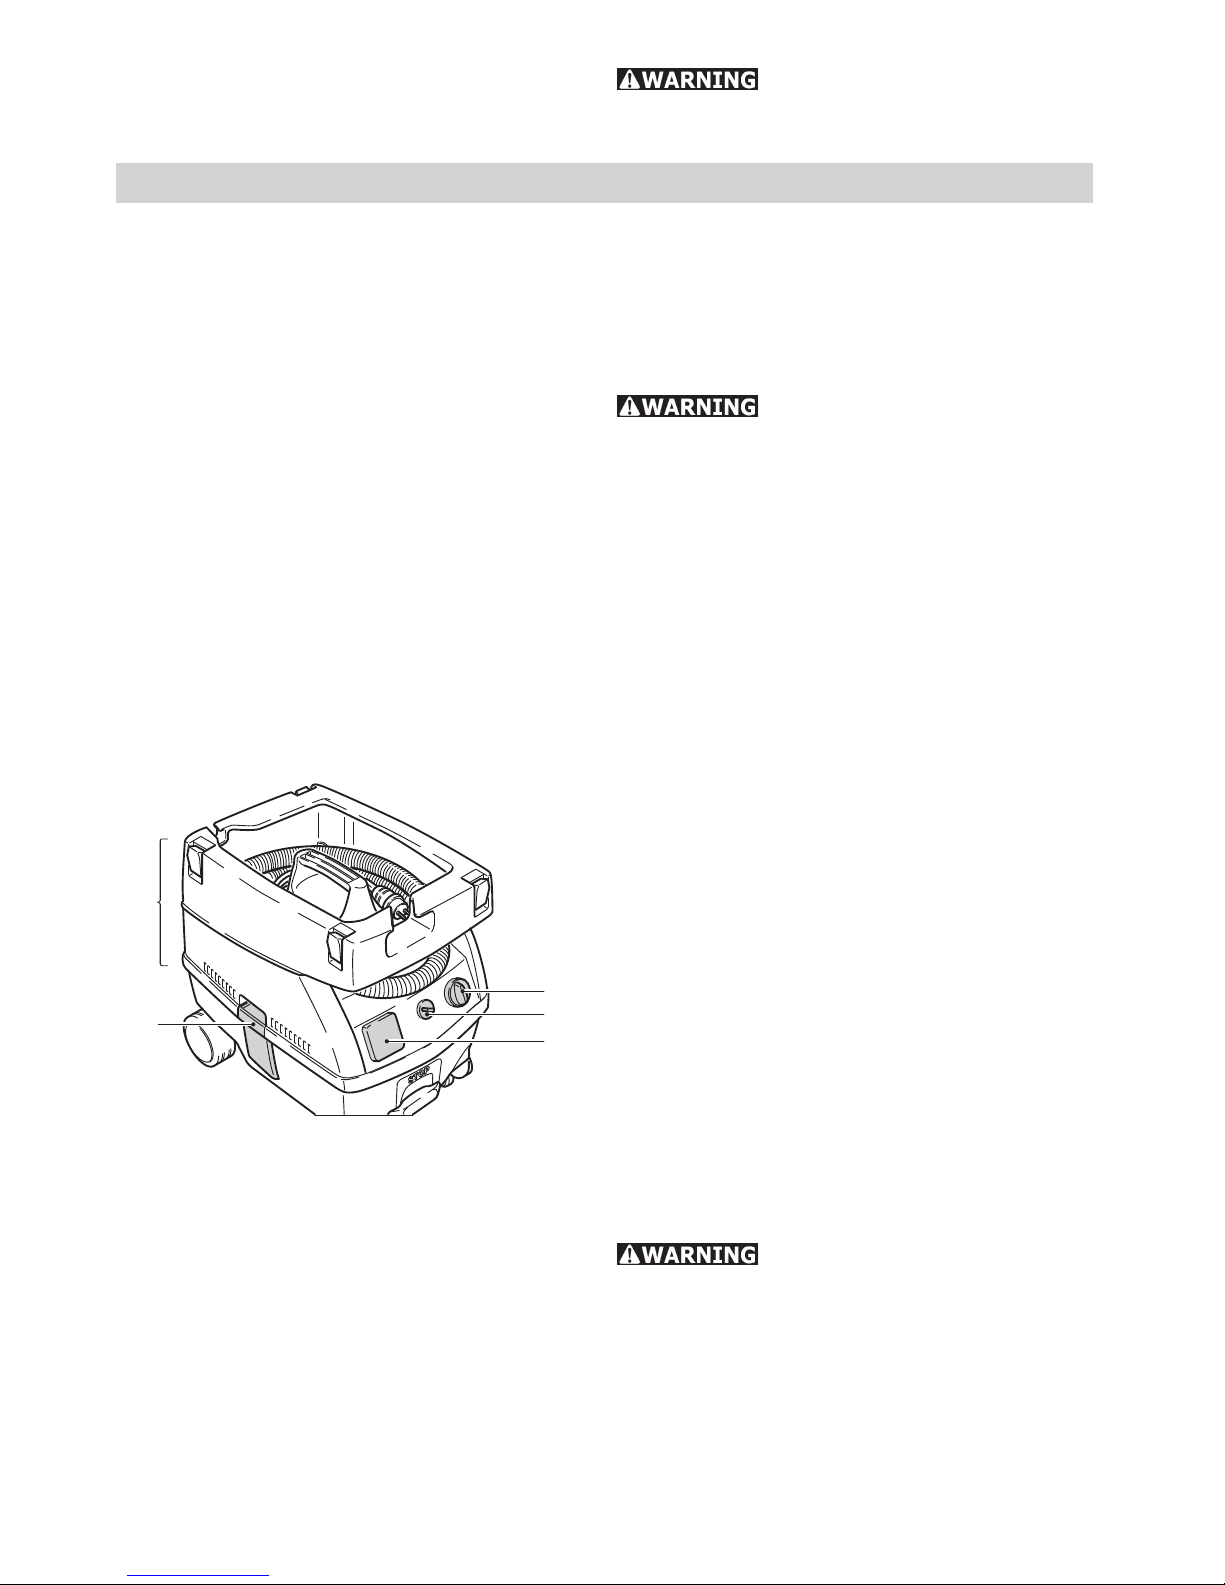
On/off switch
In position O (1.1) the dust extractor is switched
off and the tool plug socket (1.3) is dead.
Two modes of operation are possible:
a) Switch at “MAN” (manual control):
The tool plug socket is dead.
When you turn the switch to “MAN” the extractor
motor will start immediately and will stay on as
long as the switch is at this position.
You can use this mode of operation with out a tool
connected to the tool plug socket.
b) Switch at “Auto” (automatic tool-triggered
operation):
The tool plug socket is live.
Before turning the switch to the
“Auto” position, make sure that the tool connected
to the tool plug socket is switched off.
The cleaner motor starts only when the tool connected to the appliance plug socket is switched
on.
1.4
1.5
1.1
1.2
1.3
Getting started
The user is solely responsible for
any damage or accident caused by using this machine for other than its intended purpose.
Page 7
7
Suction force regulator
The suction force regulator (1.2) lets you set the
suction force that works best for the material to
be vacuumed up.
Temperature control
A heat-triggered limit switch turns off the dust
extractor if it reaches a critical temperature,
to protect against overheating. If this happens,
switch the dust extractor off and let it cool for
around 5 minutes. If the dust extractor still cannot be switched back on, consult a Festool service
center.
Connecting an electric tool
Observe the maximum connected load on the tool
plug socket (see “Technical Data”). The tool’s rated
power consumption must not exceed this!
Plug the tool power cord to the tool plug socket
(1.3).
Make sure the tool is switched off
when you plug or unplug it!
Operation
During the following procedures,
take care not to raise unnecessary dust.
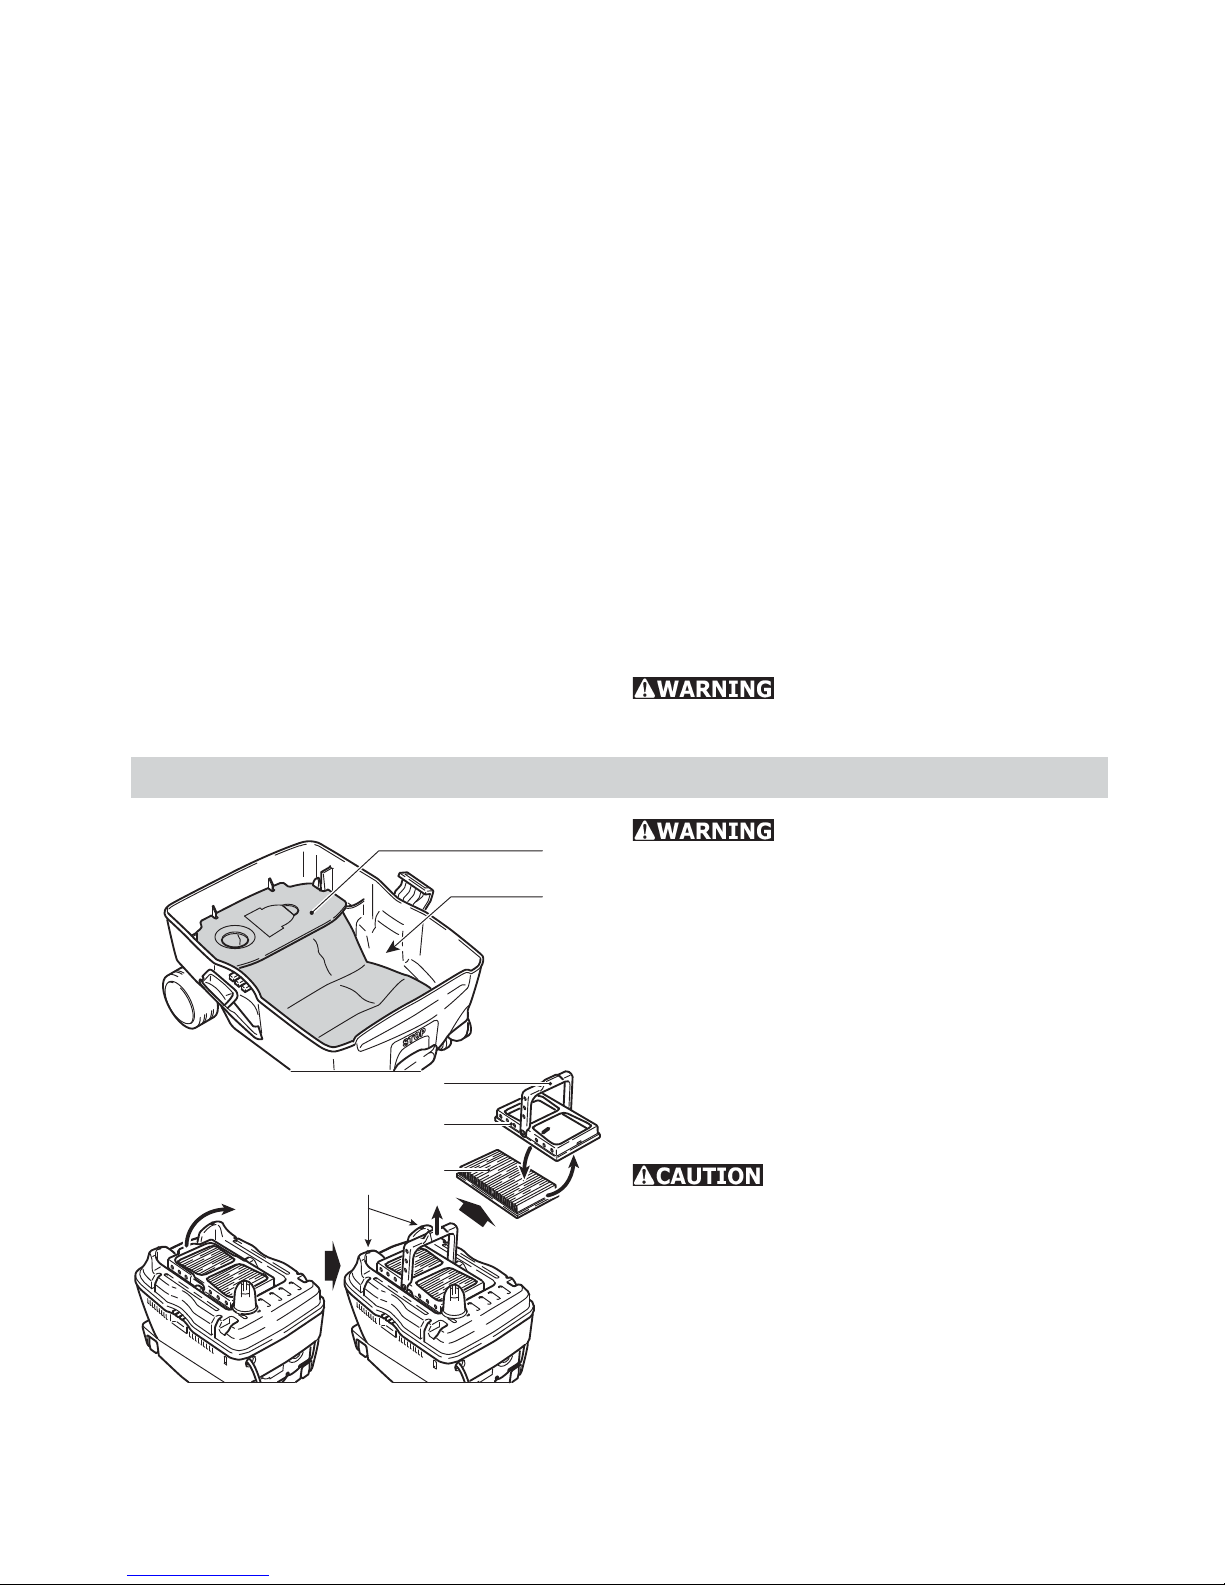
Changing the fi lter bag
- Open locking clips (1.4), remove top section
(1.5).
- Change fi lter bag (2.1) – see instructions printed
on fi lter bag.
- Replace top section, close locking clips.
Changing the fi lter
Do not operate this dust extractor
without a fi lter, as doing so may damage the motor.
- Open locking clips (1.4), remove top section
(1.5).
- Fold over handle (3.1) and remove holder (3.2).
- Remove used fi lter (3.3) and replace with a new
one.
- Replace holder and fold over handle until it
latches into place.
- Replace top section, close locking clips.
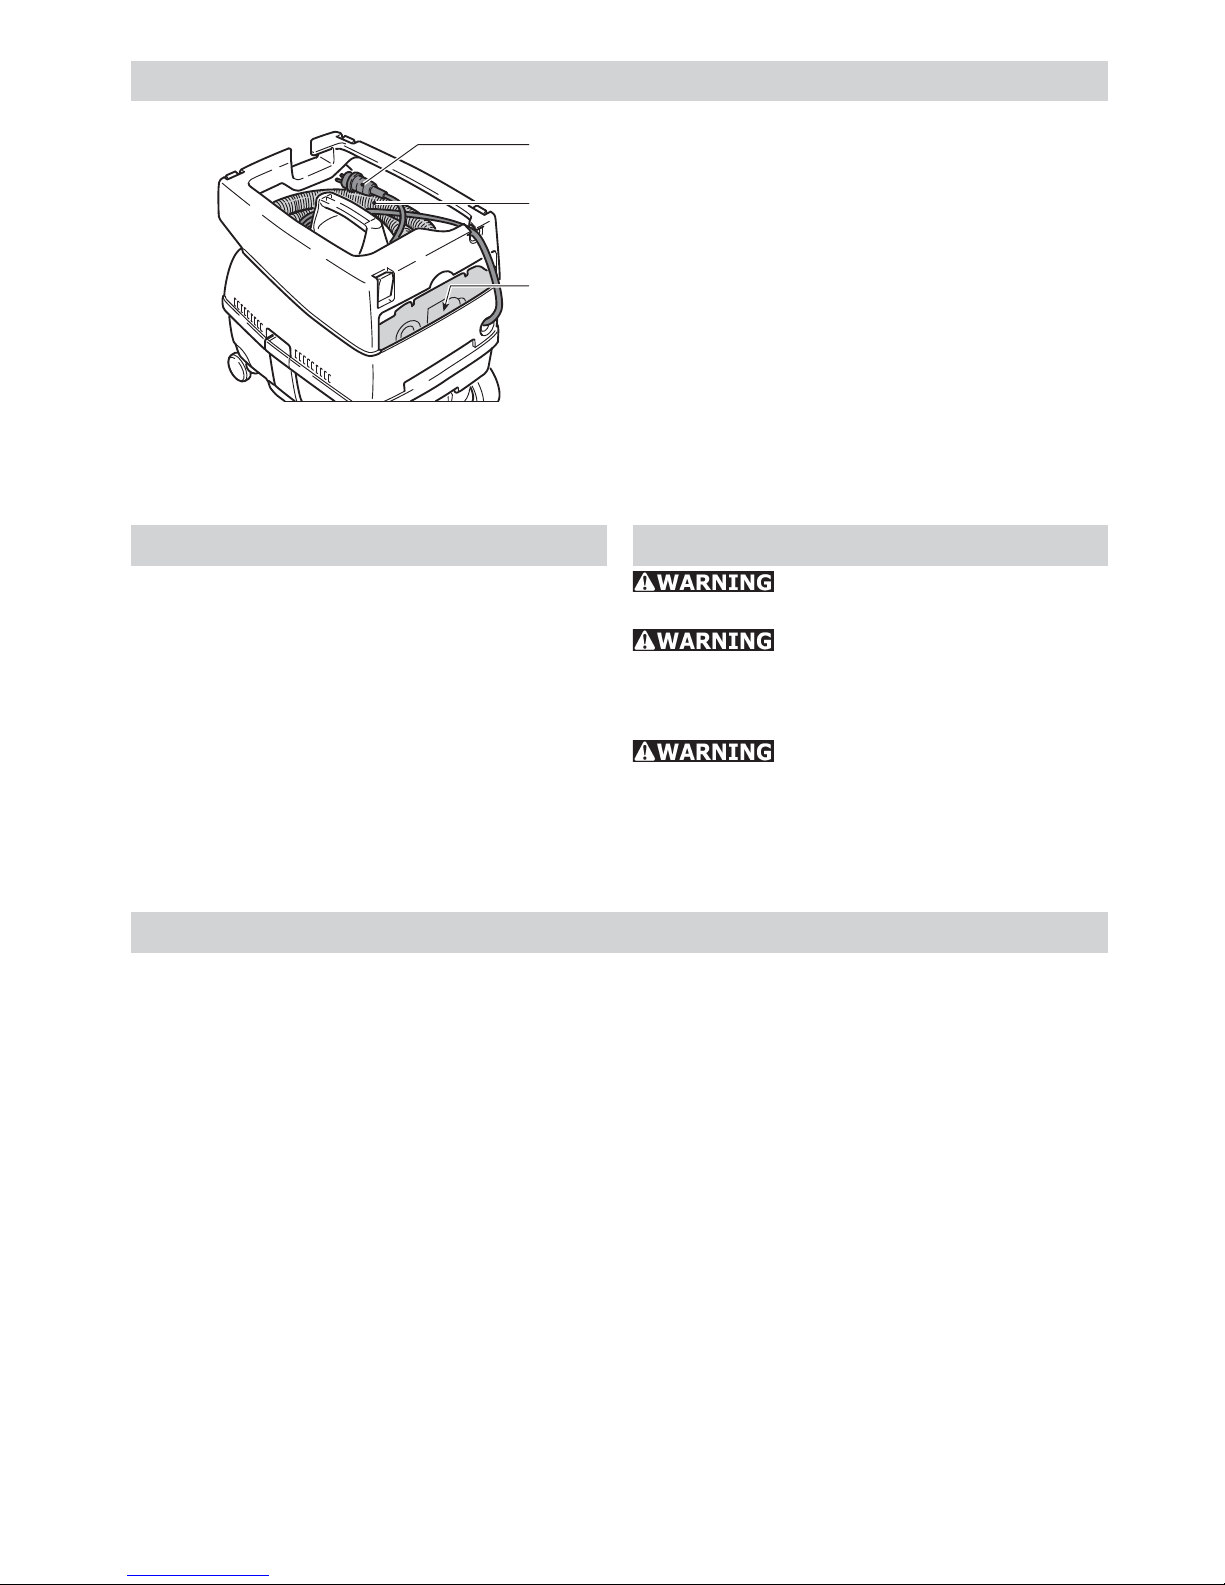
2.1
2.2
3.1
3.2
3.3
3.4
Page 8
8
4.5
4.4
4.2
4.3
4.1
4.6
4.7
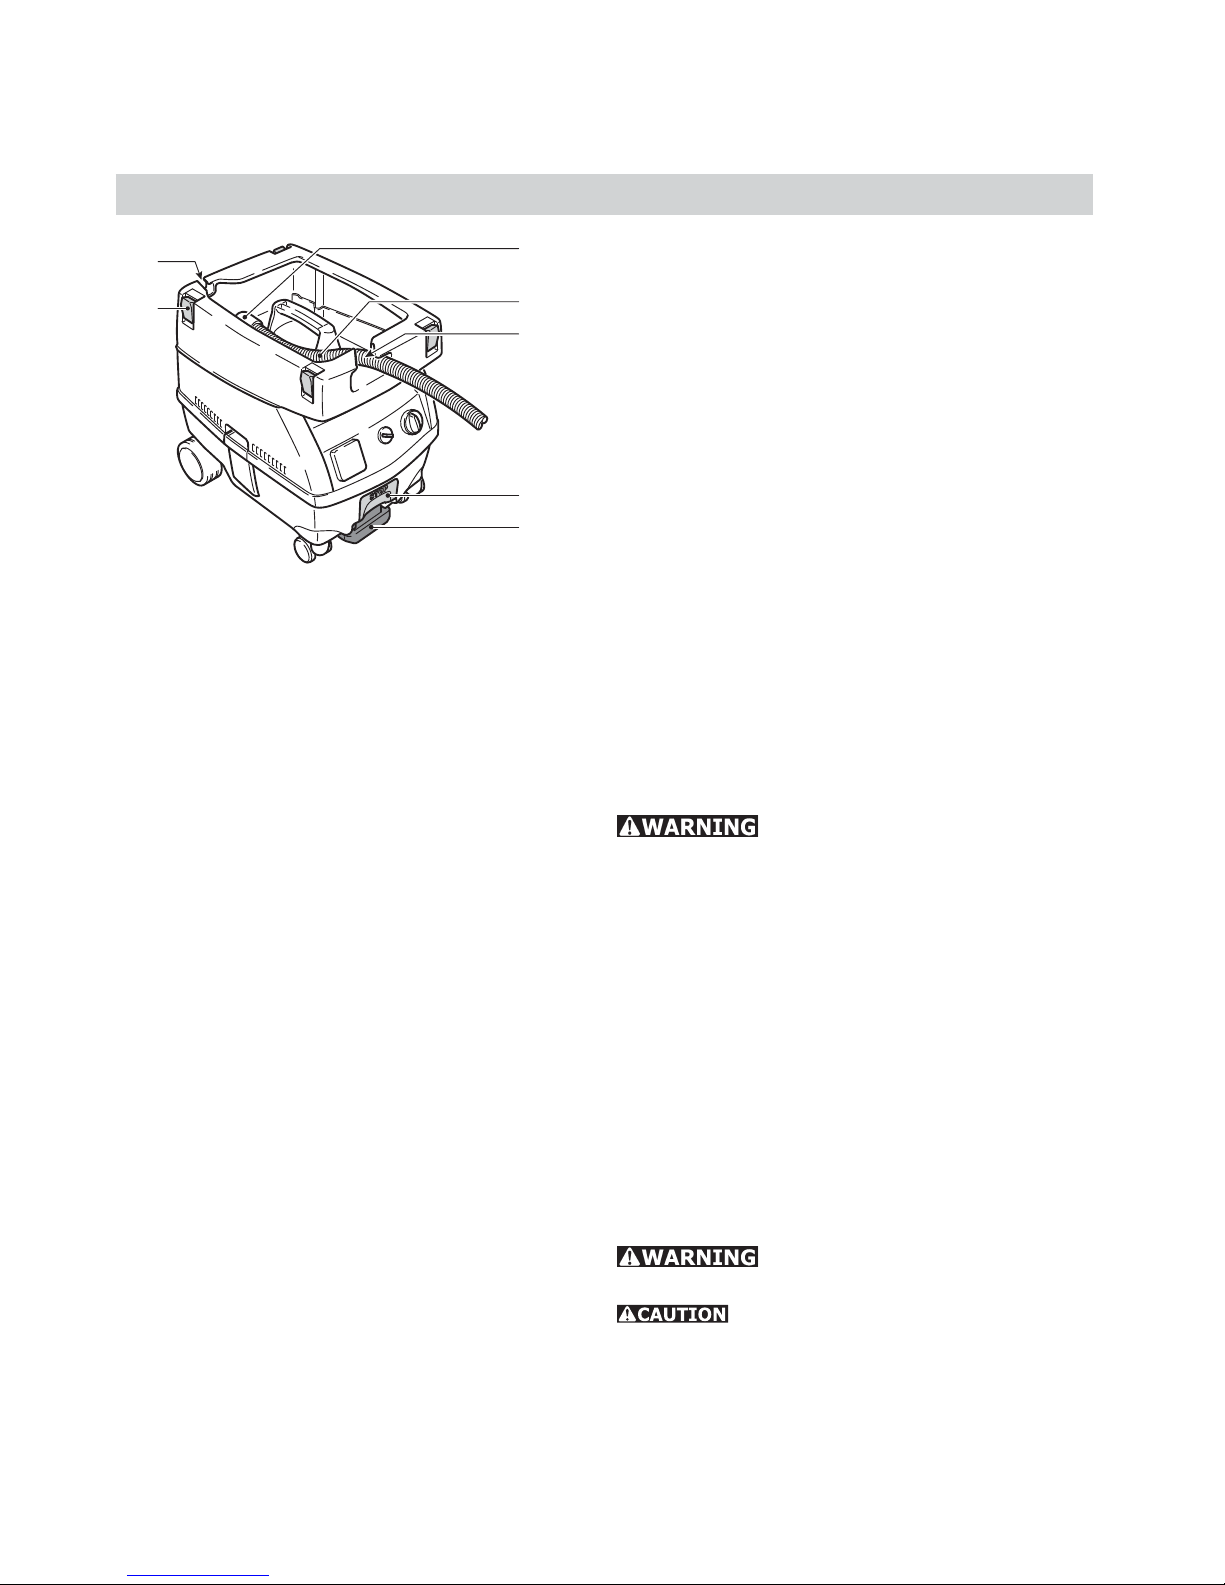
Application
The extractor hose (4.2) is connected to the extractor opening by the angle tube (4.1). During
operation, the extractor hose goes through the
hose opening (4.3).
A Systainer can be attached to the top of the storage area via the four locking clips (4.6).
Note: If this is done, the power cord must run
through opening (4.7).
Stand
Extending the stand (4.5) keeps the dust extractor
from rolling.
To do this, lift the front end of the dust extractor
slightly and push the stand downwards until it
latches into place.
Press the button (4.4) to release the stand.
Vacuuming dry materials
Not suitable to vacuum hazardous
or toxic substances or dusts e.g. asbestos. The
fi lters will not be able to capture all particlesand
may exhaust them back into the environment.
Do not do any dry vacuuming or dust extraction
of dry substances without a fi lter bag in the tank!
This protects the motor, and lets you dispose of
the evacuated material easily.
The fi lter becomes damp after evacuating liquids.
A damp fi lter will suffer accelerated wear if it is
used for dry materials. Accordingly, allow the fi lter to dry or replace it with a dry one before dry
operation.
Vacuuming liquids
If foam or liquid escapes, stop im-
mediately and empty the tank.
The HEPA fi lter element shall only be
used for extracting dry materials.
The fi lter bag must be removed before evacuating
liquids. We recommend using a special wet fi lter
for wet vacuuming.
When the maximum fi ll level is reached, a level
stop (3.4) will automatically interrupt extraction.
Emptying the dirt trap
The dirt trap (2.2) can be emptied after removing
the top section.
Page 9
9
- Switch off the dust extractor and unplug the
power cord.
- Empty fi lter bag and tank.
- Place the suction hose (5.1) and the power cord
(5.2) in the top section.
- Clean the dust extractor inside and outside by
vacuuming and wiping.
- Leave the dust extractor in a dry area out of reach
of unauthorized persons.
- A replacement fi lter bag can be stored in the
storage compartment (5.3).
After fi nishing work
Filters and accessories
The accessory and fi lter order number can be
found in your Festool catalog or on the Internet at
www.festoolusa.com.
Festool offers a 3 year limited warranty, one of
the strongest in the industry. This warranty is
valid on the pre-condition that the tool is used and
operated in compliance with the Festool operating
instructions. Festool warrants that the specified
tool will be free from defects in materials and
workmanship for a term of 3 years from the date
of purchase.
Conditions of 1 + 2 warranty
All customers receive a free extended limited
warranty (1 year + 2 years = 3 Years) on new
Festool power tools purchased from an authorized
retailer. Festool is responsible for all shipping
costs during the first year of the warranty. During
the second and third year of the warranty the
customer is responsible for shipping the tool to
Festool. Festool will pay for return shipping to the
5.1
5.2
5.3
Maintenance and care
Always unplug the power cord from
the plug socket before doing any maintenance!
Do not attempt any main tenance or
repairs involving opening the motor housing. This
may be carried out only by an authorized customer
service center.
A safety test must be performed at
least once a year by the manufacturer or a qualifi ed
person, to check for possible leaks and damage
to the fi lter, and to ensure that the control devices
are functioning.
customer using UPS Ground Service. All warranty
service is valid 3 years from the date of purchase
on your receipt or invoice. Proof of purchase may
be required.
Excluded from the coverage under this warranty
are: normal wear and tear, damages caused
by misuse, abuse, or neglect; damage caused
by anything other than defects in material and
workmanship. This warranty does not apply to
accessory items such as circular saw blades, drill
bits, router bits, jigsaw blades, sanding belts, and
grinding wheels. Operating a tool at a voltage
or frequency different from the tool’s rating
will void the warranty. This includes the usage
of the tool in combination with a transformer.
Festool does not condone nor support the use
of any non-Festool engineered, designed, and
manufactured accessories or consumables with
Festool products. Use of any non-Festool products
Warranty
Page 10

10
may affect performance or void the warranty.
Festool is not responsible for any damages or
losses incurred and user assumes all risk and
responsibility with non-Festool derived products.
Also excluded are "wearing parts," such as carbon
brushes, lamellas of air tools, rubber collars and
seals, sanding discs and pads, and Festool gear
(hats and shirts).
The obligations of Festool in its sole discretion
under this warranty shall be limited to repair or
replacement or a refund of the purchase price for
any Festool portable power tool that is found to
have a defect in materials or workmanship during
the warranty period. FESTOOL SHALL NOT BE
LIABLE FOR ANY CONSEQUENTIAL, INCIDENTAL
OR SPECIAL DAMAGES REGARDLESS OF THE
THEORY OF LAW ON WHICH THE CLAIM IS
BASED. ALL WARRANTIES IMPLIED BY STATE
LAW, INCLUDING THE IMPLIED WARRANTIES
OR MERCHANTABILITY AND FITNESS FOR A
PARTICULAR PURPOSE ARE HEREBY LIMITED
TO THE DURATION OF THREE YEARS.
Some states in the U.S. and some Canadian
provinces do not allow the limitations on how long
an implied warranty lasts, so the above limitation
may not apply to you. This warranty gives you
specific legal rights, and you may also have other
rights that vary from state to state in the U.S. and
from province to province in Canada.
With the exception of any warranties implied
by state or province law as limited above, the
foregoing express limited warranty is exclusive
and in lieu of all other warranties, guarantees,
agreements, and similar obligations of Festool.
Festool makes no other warranty, express or
implied, for Festool portable power tools. This
warranty policy is only valid for tools that are
purchased in the US and Canada. Warranty
policies of other countries may vary when
obtaining warranty service outside the US and
Canada.Some countries do exclude warranty for
products bought outside their territory. Festool
reserves the right to reject the repair of any tool
that is not part of the US/Canada product line.
No agent, representative, distributor, dealer, or
employee of Festool has the authority to increase
or otherwise change the obligations or limitations
of this warranty.
Page 11

11
Régles de sécurité générales
Veuillez lire et comprendre
toutes les consignes. Si on n‘observe pas toutes
les consignes décrites ci-dessous, il y a risque
de choc électrique, d’incendie et/ou de blessures
corporelles graves.
CONSERVEZ CES CONSIGNES
Aire de travail
Maintenez l’aire de travail propre et bien éclairée.
Les risques d’accident sont plus élevés quand on
travaille dans un endroit encombré ou sombre.
N’utilisez pas d’aspirateurs dans des atmosphères explosives, comme par exemple en présence
de gaz, poussières ou liquides infl ammables. Les
appareils produisent des étincelles qui risquent
d’enfl ammer les poussières ou les vapeurs.
Éloignez les curieux, les enfants et les visiteurs
quand vous vous servez d’un aspirateur. Un
aspirateur n’est pas un jouet et ne doit pas être
utilisé comme tel. Il faut être très attentif quand
des enfants se trouvent à proximité ou l’utilisent.
Sécurité électrique
Cet aspirateur a été conçu exclusivement pour
aspirer des déchets secs ou humides à l‘intérieur.
La prise pour outil électroportatif est munie
d’une mise à la terre, par conséquent l’aspirateur doit être branché sur une prise correctement installée et reliée à la terre selon tous les
règlements et décrets en vigueur. Ne démontez
jamais la broche de mise à la terre, ne modifi ez
jamais la fi che. N’utilisez pas d’adaptateur de
prise. Renseignez-vous auprès d’un électricien
qualifi é si vous avez des doutes quant à la mise à
la terre correcte de la prise. Si l’aspirateur venait
à présenter un défaut électrique ou une avarie,
la mise à la terre présente un passage de faible
résistance qui canalise le courant et l’éloigne de
l’utilisateur.
N’enfoncez pas d’objets tels que trombones ou
tournevis dans la prise pour outil électroportatif.
La prise est sous tension quand l’aspirateur est
branché sur une alimentation électrique et que
l’interrupteur est soit sur le mode d’alimentation
d’outil électroportatif, soit sur le mode de nettoyage du fi ltre. Il y a risque de choc électrique.
Évitez tout contact de votre corps avec des surfaces reliées à la terre tels que tuyaux, radiateurs,
gazinières ou réfrigérateurs. Le risque de choc
électrique augmente si votre corps est relié à la
terre. Si vous ne pouvez pas éviter d’utiliser l’aspirateur dans des endroits humides, vous devez
avoir un disjoncteur différentiel de détection de
défaut de masse dans le circuit d’alimentation de
votre aspirateur. Vous améliorerez votre sécurité
personnelle si vous portez des gants et des chaussures d’électricien en caoutchouc.
N’exposez pas l’aspirateur à la pluie ou à des
conditions humides. Cet aspirateur peut être uti-
lisé pour aspirer des liquides ininfl ammables mais
il n’est pas conçu pour être trempé ou immergé
dans un liquide. Il y a risque de choc électrique.
Ne manipulez pas la fi che ni l’appareil avec les
mains mouillées. Il y a risque de choc électri-
que.
Ne maltraitez pas le cordon. Ne vous en servez
jamais pour transporter l’aspirateur, pour le tirer
ou pour arracher la fi che de la prise. Éloignez
le cordon de la chaleur, des huiles, des arêtes
coupantes ou des pièces mobiles. Remplacez
Régles de sécurité générales ....................... 11
Consignes de sécurité pour les aspirateurs . 12
Risque sanitaire par la poussière ................. 13
Caractéristiques techniques ......................... 14
Symboles ...................................................... 14
Utilisation prévue ......................................... 14
Préparation et mise en service de l’appareil 14
Branchement électrique ............................... 14
Interrupteur Arrêt/marche ........................... 15
Réglage de la puissance d’aspiration ........... 15
Protection thermique .................................... 15
Raccordement d’un outil électrique ............. 15
Manipulation ................................................. 16
Changement du sac filtre.............................. 16
Remplacement du filtre ................................ 16
Utilisation ..................................................... 17
Aspiration de matières sèches ..................... 17
Aspirations de liquides .................................. 17
Après le travail ............................................. 18
Accessoires et filtre ..................................... 18
Entretien....................................................... 18
Garantie ........................................................ 18
Table des matières
Page 12

12
immédiatement tout cordon abîmé. Ne roulez
pas dessus, ne le pincez pas dans une porte. Les
cordons abîmés augmentent les risques de choc
électrique.
Si vous utilisez un aspirateur à l’extérieur, utilisez une rallonge pour usages extérieurs repérée ‘W-A’ ou ‘W’. Ces rallonges sont faites pour
être utilisées à l’extérieur et réduisent le risque
d’électrocution. Consultez le chapitre ‘accessoires’
de ce mode d’emploi pour les tailles de rallonges
électriques recommandées.
Sécurité personnelle et uti-
lisation de l’aspirateur
Restez concentré, faites attention à ce que vous
faites, et servez-vous de votre bon sens lorsque
vous utilisez un aspirateur. N‘utilisez pas l’aspi-
rateur quand vous êtes fatigué ou sous l’emprise
de drogues, d’alcool ou de médicaments. Quand
on utilise un aspirateur, un moment d’inattention
est suffi sant pour causer des blessures corporelles graves.
Évitez les démarrages intempestifs. Assurezvous que l’interrupteur de l’aspirateur et celui
de l’outil sont en position arrêt (OFF) avant de
brancher l’aspirateur ou de mettre l’interrupteur de l’aspirateur en mode d’alimentation
d’outil électroportatif ou en mode de nettoyage
des fi ltres. Ne laissez pas l’outil électroportatif
branché sur la prise de l’aspirateur quand vous
vous servez de ce dernier pour aspirer normalement. Brancher des aspirateurs ou des outils avec
l’interrupteur en position «marche» (ON) présente
des risques d’accident.
Ne vous penchez pas. Conservez toujours une
bonne assiette et un bon équilibre pour vousmême et pour l’aspirateur. Soyez particulière-
ment prudent quand vous passez l’aspirateur dans
un escalier. Une bonne assise et un bon équilibre
permettent un meilleur contrôle de l’aspirateur
dans des situations inattendues.
N’aspirez pas d’objets en feu, émettant de la
fumée ou rougeoyant tels que cigarettes, allumettes ou cendres chaudes. Il y a risque qu’un
incendie se déclare dans le réservoir de l’aspirateur.
N’utilisez pas l’aspirateur pour aspirer des liquides infl ammables, de l’alcool, des gaz ou des
poussières explosives telles que de l’essence
ou autres carburants, de l’essence à briquet, du
vernis, de l’enduit polyuréthane, des nettoyants,
des peintures à base d’huile, du gaz naturel,
de l’hydrogène, de la poussière de charbon, de
la poussière de magnésium, de la poussière
de grain ou de la poudre à canon. Les moteurs
électriques produisent des étincelles qui risquent
d’enfl ammer la poussière ou les fumées.
Habillez-vous de manière appropriée. Ne portez
pas de vêtements amples ou de bijoux. Attachez
les cheveux longs. N’approchez pas les cheveux,
les vêtements ou les gants des pièces en mouvement. Les vêtements amples, les bijoux ou
les cheveux longs risquent d’être happés par les
pièces en mouvement ou d’être aspirés par les
tuyaux ou les buses d’aspiration. Maintenez les
poignées sèches, propres et exemptes d’huile et
de graisse.
N’appuyez pas le tuyau contre votre corps pendant l’utilisation
Utilisez des équipements de sécurité. Portez
toujours une protection oculaire et auditive. Si
les conditions le demandent, il faut porter un
masque à poussière, des chaussures de sécurité
antidérapantes, un casque de chantier ou une
protection auditive.
Ne convient pas à l’aspiration de substances ou
poussières toxiques ou dangereuses comme
l’amiante par exemple. Les fi ltres ne sont pas
conçus pour bloquer toutes les particules et risquent de les rejeter dans l’atmosphère.
Consignes de sécurité pour les
aspirateurs
Entretien de l’aspirateur
N‘utilisez pas l’aspirateur si l’interrupteur ne
peut le mettre en marche ni l’arrêter. Un aspira-
teur qui ne répond pas à la commande de l’interrupteur est dangereux et doit être réparé.
Débranchez l’aspirateur avant tout réglage,
changement d’accessoire ou avant de le ranger.
De telles mesures de prévention réduisent le risque de démarrage intempestif de l’aspirateur.
Ne branchez jamais un outil dont la consommation est supérieure à la valeur maximale indiquée
en ampères sur la prise. Cet aspirateur est muni
d’une prise pour outils électroportatifs qui permet
de l’utiliser avec d’autres appareils tels que ponceuses, scies sauteuses et rabots. Si on utilise des
outils plus puissants, il y a risque d’incendie.
Page 13

13
N’aspirez pas de poussière quand il y a un liquide
ou un fl uide dans le réservoir de l’aspirateur.
N’aspirez pas de liquides ou de fl uides quand il y
a de la poussière dans le réservoir. Dans les deux
cas, videz le réservoir ou enlevez le sac à poussière avant usage pour éviter que la poussière ne
s’agglutine et ne durcisse dans le réservoir.
Séchez les fi ltres complètement après avoir aspiré un liquide ou utilisez un jeu de fi ltres secs de
rechange pour aspirer des poussières. La pous-
sière tend à s’agglutiner sur les fi ltres mouillés
ou humides et à les boucher et ils risquent aussi
de moisir.
Rangez l’aspirateur hors de portée des enfants ou
autres personnes inexpérimentées quand vous
ne l‘utilisez pas. Les aspirateurs sont dangereux
entre les mains d’utilisateurs inexpérimentés.
Entretenez l’aspirateur avec soin. Entretenezle correctement pour éviter que le tuyau ne se
bouche. Ne placez aucun objet dans les orifi ces.
N’utilisez pas l’aspirateur si un des orifi ces est
bloqué; dégagez-les de toute poussière, peluche,
cheveux ou tout autre objet qui risque de réduire
le débit d’air. Tout changement ou modifi cation
de l’appareil constitue une mauvaise utilisation et
risque de résulter en une situation dangereuse.
Vérifi ez que les pièces mobiles sont alignées
et qu’elles ne coincent pas. Vérifi ez qu’aucune
pièce n’est cassée, et que rien d’autre ne risque
d’affecter le fonctionnement de l’aspirateur. Si
l’aspirateur est abîmé, faites-le réparer avant de
l’utiliser. Les aspirateurs mal entretenus causent
de nombreux accidents. Développez un calendrier
d’entretien périodique pour votre aspirateur.
N’utilisez que des accessoires qui sont recommandés par le fabricant de votre modèle. Les
accessoires qui conviennent à un aspirateur donné
peuvent présenter un danger s’ils sont utilisés
avec un autre aspirateur.
Entretien
Seul les personnels d’entretien qualifi és sont
habilités à effectuer l’entretien de l’aspirateur.
Tout service ou entretien effectué par une personne non qualifi ée peut résulter en un risque de
blessure. Par exemple : les fi ls internes peuvent
être mal placés ou pincés, les ressorts de rappel
des capots de sécurité peuvent être montés incorrectement.
Lors de l’entretien d’un aspirateur, utilisez exclusivement des pièces de rechange identiques.
Suivez les instructions se trouvant au chapitre
«Entretien» de ce mode d’emploi. Si vous utili-
sez des pièces non agréées ou si vous n’observez
pas les instructions d’entretien, il se peut que
vous causiez un risque de choc électrique ou de
blessure. Certains produits de nettoyage tels que
l’essence, le tétrachlorure de carbone, l’ammoniaque, etc. risquent d’endommager les pièces
plastiques.
Risque sanitaire par la poussière
Certaines poussières
créées par le ponçage mécanique, le sciage, le
meulage, le perçage et autres activités reliées
à la construction contiennent des substances
chimiques connues (dans l’État de la Californie)
comme pouvant causer le cancer, des anomalies
congénitales ou représenter d’autres dangers
pour la reproduction. Voici quelques exemples de
telles substances:
• Plomb provenant de peintures à base de
plomb,
• Silice cristallisée utilisée dans les briques, le
ciment et autres matériaux de maçonnerie, et
• Arsenic et chrome du bois d’œuvre traité avec
un produit chimique.
Le risque d’exposition à de tels produits varie
selon la fréquence à laquelle vous faites ce genre
de travail.
Pour réduire les risques d’exposi-
tion à ces substances chimiques
: travaillez dans un endroit adéquatement ventilé et utilisez un
équipement de sécurité approuvé,
tel que masques antipoussières
spécialement conçus pour fi ltrer les
particules microscopiques. Lavezvous les mains après utilisation.
Page 14

14
Caractéristiques techniques
Consommation de courant 400 - 1200 W
Charge max. connectée à la prise de l’appareil 1200 W
Puissance connectée totale maximale (aspirateur et prise de l’appareil) 2400 W
Débit d’air max., turbine 222 m
3
/h (7.84 cu.ft./h)
Contrainte max., turbine 24000 Pa
Surface du fi ltre 5000 cm
2
(775 sq.in.)
Tuyau d’aspiration, diamètre x longueur 27 mm x 3.5 m (1.06 in. x 11.48 ft.)
Dimensions P x L x A:
CT MINI HEPA 430 x 330 x 420 mm (16.9 x 13.0 x 16.5 in.)
CT MIDI HEPA 430 x 330 x 470 mm (16.9 x 13.0 x 18.5 in.)
Capacité du réservoir:
CT MINI HEPA 10 l (2.6 gal.)
CT MIDI HEPA 15 l (3.9 gal.)
Poids:
CT MINI HEPA 8.7 kg (19.2 lbs)
CT MIDI HEPA 9.0 kg (19.8 lbs)
Longueur du cordon 7.5 m (24.6 ft.)
Type de protection IP X4
Symboles
Avertissement de danger
Lire les instructions / les remarques !
Utilisation prévue
Les aspirateurs sont conçus pour aspirer des
poussières, des impuretés, du sable, des copeaux,
etc. qui ne sont pas nocifs pour la santé; ils peuvent aussi aspirer de l’eau.
Cet aspirateur a été conçu selon les normes IEC
60335-1 et IEC 60335- 2-69, et il peut supporter de
fortes sollicitations en utilisation industrielle.
Les performances de fi ltrage du système dans
son ensemble, équipé de l‘élément fi ltre HEPA,
correspondent à la qualité HEPA H 13 (degré de
séparation moyen 99,95 %).
L’utilisateur est seul res-
ponsable des dommages et accidents consécutifs
à une utilisation de la machine non conforme à
l’usage prévu.
Préparation et mise en service de
l’appareil
Branchement électrique
La tension de service indiquée sur la plaque signalétique doit correspondre à la tension du réseau
de distribution (prise murale).
Vérifier que l’aspirateur
est éteint avant de brancher le cordon d’alimentation.
Le système Antistatic (AS)
L’aspiration provoque des charges statiques par
frottement dans le tuyau d’aspiration. L’utilisateur peut les ressentir par des chocs électriques
désagréables.
Pour décharger ces charges électrostatiques,
l’aspirateur est doté d’un système antistatique.
Il est cependant nécessaire d’utiliser un tuyau et
des accessoires antistatiques.
Page 15

15
Interrupteur Arrêt/marche
En position O (1.1), l’aspirateur est éteint et la prise
de l’appareil (1.3) n’est pas sous tension.
Deux modes de fonctionnement sont possibles:
a) Commutateur sur position « MAN »:
La prise de l’appareil n’est pas sous tension.
Le moteur d’aspiration démarrera immédiate-
ment et restera en marche jusqu’à ce que vous
l’éteignez.
Vous pouvez utiliser ce mode de fonctionnement sans avoir d’outil connecté dans la prise de
l’outil.
b) Commutateur sur position « Auto » :
La prise de l’appareil est sous tension.
Avant de mettre le com-
mutateur à la position « Auto », veiller à ce que
l’appareil branché soit éteint.
Le moteur d’aspiration démarre à la mise sous
tension de l’outil raccordé.
Réglage de la puis-
sance d’aspiration
Ce réglage permet de varier la puissance d’aspiration (1.2) en fonction des différentes matières
à aspirer.
Protection thermique
Un commutateur sensible à la chaleur met
l’aspirateur hors tension dès qu’il atteint une
température critique. Si cela se produit, éteindre
l’aspirateur et le laisser se refroidir pendant 5
minutes environ. Si, à la suite de cette phase de
refroidissement, il n’est pas possible de remettre
l’aspirateur en marche, contacter un centre de
service Festool.
Raccordement d’un outil électrique
Respecter la valeur de raccordement maximale
indiquée sur la prise de courant (voir « Données
techniques »).
Raccorder l’outil électrique à la prise de courant
intégrée (1.3).
Veiller à ce que l’outil soit
éteint lors du branchement et du débranchement.
1.4
1.5
1.1
1.2
1.3
Page 16

16
Lors des travaux suivants,
éviter de soulever inutilement des tourbillons de
poussières.
Changement du sac fi ltre
- Ouvrir les brides de fermeture (1.4) et retirer
(1.5) la partie supérieure.
- Changer le sac fi ltre (2.1) : lire les instructions
sur le sac.
- Remettre en place la partie supérieure et fermer
à l’aide des brides de fermeture.
Remplacement du fi ltre
Ne pas utiliser l’appareil
sans le fi ltre ! Vous risqueriez d’endom mager le
moteur.
- Ouvrir les brides de fermeture (1.4) et retirer
(1.5) la partie supérieure.
- Basculer le levier (3.1) et retirer la ferrure
(3.2).
- Retirer le filtre (3.3) et le remplacer par un
neuf.
- Remettre en place la ferrure et pousser le levier
jusqu’à enclenchement.
- Poser la partie supérieure, puis fermer à l’aide
des brides de fermeture.
Vidage de la cuve de collecte
La cuve de collecte (2.2) peut être vidée en retirant
la partie supérieure.
2.1
2.2
3.1
3.2
3.3
3.4
Manipulation
Page 17

17
Le tuyau d’aspiration (4.2) est raccordé à l’orifi ce
d’aspiration à l’aide de la pièce coudée (4.1). Pendant le fonctionnement, le tuyau d’aspiration est
guidé par l’ouverture (4.3).
Sur la surface de desserte, on peut fi xer un Systainer à l’aide des quatre fermoirs (4.6).
Remarque : Dans ce cas, le cordon d’alimen tation
doit être guidé par ouverture (4.7).
Béquille / Frein
En basculant la béquille (4.5), on peut bloquer une
roue de l’aspirateur mobile.
Pour cela, soulever légèrement l’aspirateur mobile
à l’avant et presser la béquille vers le bas jusqu’à
ce qu’elle s’encliquette.
Pour libérer la béquille, presser la touche (4.4).
Aspiration de matières sèches
Ne convient pas pour aspirer des substances ou des poussières dangereuses ou toxiques telles que l’amiante. Les
fi ltres ne sont pas conçus pour arrêter toutes les
particules et l’aspirateur risque de les rejeter
dans l’atmosphère.
Insérer toujours un sac fi ltre dans la cuve avant
d’aspirer des matières sèches. Les matières aspirées seront alors faciles à éliminer.
Après l’aspiration de liquides, le fi ltre reste humide. Un fi ltre humide s’encrasse plus rapidement
lorsqu’on aspire des matières sèches. Pour cette
raison, il faut sécher le fi ltre ou le remplacer par un
fi ltre sec avant d’aspirer des matières sèches.
Aspirations de liquides
En cas de fuite de mousse
ou de liquide, interrompre immédiatement le travail et vider la cuve.
L‘élément fi ltre HEPA ne doit
être utilisé que pour l‘aspiration de substances
sèches.
Retirer le sac fi ltre avant d’aspirer des liquides.
Nous recommandons l’utilisation d’un fi ltre spécial pour liquides.
Lorsque le niveau de remplissage maximum est
atteint, les indicateurs de niveau (3.4) interrompent automatiquement l’aspiration.
4.5
4.4
4.2
4.3
4.1
4.6
4.7
Utilisation
Page 18

18
- Éteindre l’aspirateur et débrancher le cordon
d’alimentation.
- Vider le sac fi ltre et le réservoir.
- Ranger le tuyau d’aspiration (5.1) et le conduit de
raccordement (5.2) dans la partie supérieure.
- Nettoyer l’intérieur et l’extérieur de l’aspirateur.
- Entreposer l’appareil dans un endroit sec, hors
de portée de toute personne non autorisée.
- Il est possible de stocker un sac fi ltre de réserve
dans le compartiment de rangement (5.3).
5.1
5.2
5.3
Après le travail
Accessoires et fi ltre
On trouvera les numéros de commande des accessoires et du fi ltre dans le catalogue Festool, ou
sur le site Internet de la compagnie à l’adresse
www.festoolusa.com.
de la garantie. Durant la deuxième et la troisième
année de la garantie, le client a la responsabilité
d’expédier l’outil à Festool. Festool paiera les frais
d’expédition de retour au client en utilisant le service terrestre d'UPS. Tout service de garantie est
valide 3ans à compter de la date d’achat indiquée
sur votre reçu ou votre facture. La preuve d'achat
peut être exigée.
Sont exclus de la couverture au titre de la présente garantie: usure normale, dommage causé
par un usage impropre, un usage abusif ou de la
négligence ; dommage causé par toute autre chose
qu’un vice de matériel ou de malfaçon. La présente
garantie ne s’applique pas aux articles accessoires
tels que lames de scie plongeante, forets de per-
Entretien
Il faut toujours dé brancher
l’appareil avant d’effectuer tout entretien !
Tout entretien ou réparation
nécessitant l’ouverture du moteur doit être fait par
un centre de service autorisé.
Un contrôle technique de
sécurité doit être effectué au moins une fois par
an par le fabricant ou une personne qualifi ée, qui
vérifi era par exemple une éventuelle détérioration
du fi ltre, l’étanchéité de l’appareil et le bon fonctionnement des dispositifs de contrôle.
Garantie
Festool offre une garantie restreinte de trois ans,
une des plus longues de l’industrie. La présente
garantie est valide à la condition préalable que
l’outil soit utilisé et exploité en conformité avec
les consignes d’utilisation de Festool. Festool
garantit que l’outil spécifi é sera exempt de vices
de matériel ou de malfaçon durant une période de
3 ans à compter de la date d’achat.
Conditions de la garantie1 + 2
Tous les clients reçoivent une extension de garantie restreinte gratuite (1an+ 2ans= 3ans) pour
tous les outils électriques achetés auprès d'un
détaillant agréé. Festool est responsable de tous
les frais d’expédition durant la première année
Page 19

19
ceuse, forets de défonceuse, lames de scie sauteuse, bandes abrasives et meules. L'utilisation
d'un outil à une tension ou fréquence différente de
la puissance nominale de l'outil annule la garantie. L'annulation de garantie inclut l'utilisation de
l'outil avec un transformateur. Festool ne tolère
ni n'approuve aucune utilisation d'accessoires ou
de consommables d'ingénierie, de conception et
de fabrication autres que Festool sur des produits
Festool. Toute utilisation de produits autres que
Festool peut affecter le rendement de l'outil et
annuler la garantie. Festool ne peut être tenu
responsable de tous dommages ou pertes subis,
l'utilisateur assumant tous les risques et l'entière
responsabilité liés à l'utilisation de produits qui ne
sont pas d'origine Festool.Sont également exclues
toutes les « pièces d’usure » telles que les balais
de carbone, les lamelles de l'outillage pneumatique, les manchons et joints de caoutchouc, les
disques abrasifs et les patins de ponçage, ainsi
que les vêtements Festool (chapeaux et t-shirts).
Les obligations de Festool aux termes de la présente garantie se limitent, à sa seule discrétion,
à la réparation ou au remplacement ou au remboursement du prix d’achat de tout outil électrique
Festool portable jugé comme faisant montre
d’un vice de matériel ou de malfaçon durant la
période de la garantie. FESTOOL NE PEUT ÊTRE
TENU RESPONSABLE DE QUELQUE DOMMAGE
CONSÉCUTIF, ACCESSOIRE OU PARTICULIER
INDÉPENDAMMENT DU PRINCIPE DE DROIT SUR
LEQUEL SE FONDE LA DEMANDE. TOUTES LES
GARANTIES IMPLICITES AUX TERMES DE LA LOI
ÉTATIQUE, Y COMPRIS LES GARANTIES IMPLICITES DE QUALITÉ MARCHANDE ET D’ADAPTATION À UN USAGE PARTICULIER, SONT PAR LES
PRÉSENTES RESTREINTES À UNE DURÉE DE
TROIS ANS.
Certains états américains et certaines provinces
canadiennes ne permettent pas de restrictions
quant à la durée d’une garantie implicite, de sorte
que la restriction qui précède peut ne pas s’appliquer à vous. La présente garantie vous confère des
droits légaux spécifi ques, et il se peut que vous
ayez d’autres droits variant d’un état à l’autre aux
É.-U. et d’une province à l’autre au Canada.
En dehors de toute garantie imposée par une loi
d’état ou une loi provinciale telle que restreinte
ci-dessus, la garantie restreinte qui précède est
exclusive et aux lieu et place de toute autre garantie, engagement formel, entente et autre obligation similaire de Festool. Festool ne fait aucune
autre garantie, expresse ou implicite, à propos des
outils électriques. La présente garantie est valide
uniquement pour les outils achetés aux É.-U. et
au Canada. Les régimes de garantie d'autres pays
peuvent varier pour les cas de service obtenus
en dehors des É.-U. et du Canada.Certains pays
peuvent exclure de la garantie les produits achetés
en dehors de leur territoire. Festool se réserve
le droit de refuser la réparation de tout outil ne
faisant pas partie de la gamme de produits des
É.-U. et du Canada. Aucun agent, représentant,
distributeur, concessionnaire ou employé de Festool n’a l’autorité d’augmenter ou d’autrement
modifi er les obligations ou les restrictions de la
présente garantie.
Page 20

20
Page 21

21
Mantenga a las personas que estén presentes,
los niños y los visitantes alejados mientras esté
utilizando la aspiradora. No permita que la as-
piradora se use como un juguete. Es necesario
prestar máxima atención cuando la aspiradora
sea usada por niños o cuando se utilice cerca de
éstos.
Seguridad eléctrica
Esta aspiradora está diseñada solamente para
uso en interiores y para recogida de materiales
secos o mojados.
El tomacorriente para herramientas mecánicas
está conectado a tierra y la aspiradora debe
enchufarse en un tomacorriente instalado adecuadamente y conectado a tierra apropiadamente
de acuerdo con todos los códigos y ordenanzas.
No quite nunca el terminal de conexión a tierra
ni modifi que el enchufe de ningún modo. No use
enchufes adaptadores. Consulte con un electricista califi cado si tiene dudas sobre si el tomacorriente está conectado a tierra apropiadamente.
Si la aspiradora tiene algún malfuncionamiento
eléctrico o se avería, la conexión a tierra proporciona un camino de baja resistencia para llevar la
electricidad alejándola del usuario.
No introduzca objetos como sujetapapeles o
destornilladores en el tomacorriente para herramientas mecánicas. El tomacorriente tiene
electricidad cuando la aspiradora está enchufada
en una fuente de energía y el interruptor está colocado en el modo de activación de herramienta
mecánica o en el modo de limpieza del fi ltro. Podrían producirse descargas eléctricas.
Evite el contacto del cuerpo con las superfi cies
conectadas a tierra, como tuberías, radiadores,
estufas y refrigeradores. Hay un riesgo mayor
de que se produzcan descargas eléctricas si el
cuerpo está conectado a tierra. Si la utilización de
la aspiradora en lugares húmedos es inevitable,
se debe usar un interruptor de circuito accionado
por corriente de pérdida a tierra para suministrar
la energía a la aspiradora. Los guantes de goma
y el calzado de goma de electricista aumentarán
más su seguridad personal.
No exponga la aspiradora a la lluvia ni a condiciones mojadas. Esta aspiradora puede utilizarse
para recoger líquidos in infl amables, pero no está
diseñada para inmersión o sumersión en un líquido. Podrían producirse descargas eléctricas.
Normas generales de seguridad .................. 21
Normas de seguridad para aspiradoras ....... 22
Peligro para la salud por el polvo ................. 23
Datos técnicos .............................................. 24
Símbolos ....................................................... 24
Uso especificado ........................................... 24
Preparación y puesta en servicio de la
aspiradora .................................................... 24
Conexión eléctrica ......................................... 24
Interruptor de encendido/apagado ............... 25
Regulador de fuerza de aspiración ............... 25
Control de temperatura ................................ 25
Conexión de la herramienta eléc trica .......... 26
Operación ..................................................... 26
Sustitución de la bolsa filtrante .................... 26
Cambio del filtro ............................................ 26
Vaciado del depósito para suciedad ............. 26
Aplicación ..................................................... 27
Soporte / freno .............................................. 27
Aspiración de materiales secos .................... 27
Succión de líquidos ....................................... 27
Una vez terminado el trabajo ........................ 28
Accesorios, filtros......................................... 28
Mantenimiento y conservación ..................... 28
Garantía ........................................................ 28
Contenido
Normas generales de seguridad
Lea y entienda todas las ins-
trucciones. Si no se siguen todas las instrucciones
que aparecen a continuación, el resultado podría
ser descargas eléctricas, incendio y/o lesiones
corporales graves.
GUARDE ESTAS INSTRUCCIONES
Área de trabajo
Mantenga el área de trabajo limpia y bien iluminada. Las áreas desordenadas y oscuras invitan
a que se produzcan accidentes.
No utilice aspiradoras en atmósferas explosivas,
como las causadas por la presencia de líquidos,
gases o polvos infl amables. Los electrodomésti-
cos generan chispas, las cuales pueden incendiar
el polvo o los vapores.
Page 22

22
tener mejor control de la aspiradora en situaciones inesperadas.
No use la aspiradora para recoger cosas que se
estén quemando, que estén humeando o que estén ardiendo sin llama, como cigarrillos, fósforos
o cenizas calientes. Podría producirse un incendio
dentro del tanque de la aspiradora.
No use la aspiradora para recoger líquidos, alcoholes o gases infl amables, ni polvos explosivos,
como gasolina u otros combustibles, líquido
encendedor, barniz, revestimientos de poliuretano, limpiadores, pinturas a base de aceite, gas
natural, hidrógeno, polvo de carbón, polvo de
magnesio, polvo de granos o pólvora. Los motores
eléctricos generan chispas que pueden incendiar
el polvo o los vapores.
Vístase adecuadamente. No use ropa ni joyas
holgadas. Sujétese el pelo largo. Mantenga el
pelo, la ropa y los guantes alejados de las piezas
móviles. La ropa holgada, las joyas holgadas o el
pelo largo pueden quedar atrapados en las piezas
móviles, la manguera y las boquillas de succión.
Mantenga las asas secas, limpias y libres de aceite
y grasa.
No sujete la manguera contra ninguna parte del
cuerpo durante la utilización de la aspiradora.
Utilice equipo de seguridad. Use siempre protección de los ojos y de la audición. Se debe usar
una máscara antipolvo, zapatos de seguridad
antideslizantes, casco o protección de la audición
para las condiciones apropiadas.
Esta aspiradora no es adecuada para recoger
sustancias o polvos peligrosos o tóxicos, como
por ejemplo asbesto. Los fi ltros no podrán atrapar
todas las partículas y es posible que las expulsen
de vuelta al medio ambiente.
Normas de seguridad para aspira-
doras
Cuidado de la aspiradora
No use la aspiradora si el interruptor no la enciende o apaga. Toda aspiradora que no pueda
controlarse con el interruptor es peligrosa y debe
repararse.
Desconecte el enchufe de la fuente de energía
antes de hacer cualquier ajuste, cambiar accesorios o almacenar la aspiradora. Dichas medidas
No maneje el enchufe ni el electrodoméstico con
las manos mojadas. Podrían producirse descargas
eléctricas.
No maltrate el cable de alimentación. No use
nunca el cable de alimentación para transportar
la aspiradora, tirar de ella o jalar del enchufe
para sacarlo de un tomacorriente. Mantenga el
cable de alimentación alejado del calor, el aceite,
los bordes afi lados o las piezas móviles. Reemplace inmediatamente los cables de alimentación
dañados. No maneje un vehículo ni cierre una
puerta sobre un cable de alimentación. Los cables
de alimentación dañados aumentan el riesgo de
que se produzcan descargas eléctricas.
Cuando utilice una aspiradora en el exterior, use
un cordón de extensión para intemperie marcado
con las letras „W-A“ o „W“. Estos cordones tienen
capacidad para uso a la intemperie y reducen el
riesgo de que se produzcan descargas eléctricas.
Consulte la sección Tamaños recomendados de
cordones de extensión que se encuentra en la
sección Accesorios de este manual.
Seguridad personal y uso
de la aspiradora
Manténgase alerta, fíjese en lo que está haciendo
y use el sentido común cuando esté utilizando
una aspiradora. No use la aspiradora cuando esté
cansado o bajo la infl uencia de drogas, alcohol o
medicamentos. Un momento de distracción mientras esté utilizando una aspiradora puede causar
lesiones corporales graves.
Evite el arranque accidental. Asegúrese de que
los interruptores de la aspiradora y de la herramienta estén en la posición de APAGADO antes de
enchufar la aspiradora o poner su interruptor en
el modo de activación de herramienta mecánica
o en el modo de limpieza del fi ltro. No mantenga la herramienta mecánica enchufada en el
tomacorriente para herramientas mecánicas de
la aspiradora durante la recogida normal con la
aspiradora. Enchufar aspiradoras o herramientas
que tengan el interruptor en la posición de ENCENDIDO invita a que se produzcan accidentes.
No intente alcanzar demasiado lejos. Mantenga
un apoyo adecuado de los pies y un equilibrio
apropiado, así como un apoyo y un equilibrio
apropiados de la aspiradora en todo momento.
Tenga cuidado adicional cuando limpie en escaleras. El apoyo adecuado de los pies y el equili-
brio apropiado del usuario, junto con el apoyo y el
equilibrio apropiados de la aspiradora, permiten
Page 23

23
preventivas de seguridad reducirán el riesgo de
arrancar accidentalmente la aspiradora.
No conecte nunca una herramienta con una capacidad nominal superior a los amperios máximos
indicados en el receptáculo. Esta aspiradora tiene
un tomacorriente para herramientas mecánicas
para utilizarse en combinación con otros electrodomésticos, como lijadoras, sierras caladoras y
cepillos mecánicos; las herramientas con capacidades nominales mayores pueden causar un
incendio.
No use la aspiradora para recoger polvo cuando
el tanque de la aspiradora contenga líquido o
fl uido. No use la aspiradora para recoger líquidos
o fl uidos cuando haya polvo en el tanque. En cual-
quiera de estos dos casos, vacíe el tanque y/o quite
la bolsa para polvo antes de usar la aspiradora,
para que el polvo no se aglutine y se endurezca
dentro del tanque.
Seque completamente los fi ltros después de usar
la aspiradora para recoger materiales mojados
o use un segundo juego de fi ltros secos para recoger polvo. En los fi ltros húmedos o mojados se
aglutinará polvo o se formará moho o verdín.
Cuando no se esté usando la aspiradora, guárdela
fuera del alcance de los niños y de otras personas
que no hayan recibido capacitación para utilizarla. Las aspiradoras son peligrosas en manos de los
usuarios que no hayan recibido capacitación.
Mantenga la aspiradora con cuidado. Mantenga
apropiadamente la aspiradora para mantener
desobstruida la manguera. No ponga ningún
objeto en las aberturas. No use la aspiradora si
alguna de las aberturas está bloqueada; mantenga las aberturas libres de polvo, pelusa, pelo y
cualquier cosa que pueda reducir la circulación
de aire. Cualquier alteración o modifi cación es
un uso incorrecto y puede causar una situación
peligrosa.
Compruebe si hay piezas desalineadas o que se
atasquen, si hay piezas rotas y cualquier otra
situación que pueda afectar el funcionamiento de
la aspiradora. Si la aspiradora está dañada, haga
que le realicen servicio de ajustes y reparaciones
antes de utilizarla. Las aspiradoras mal mante-
nidas causan muchos accidentes. Desarrolle un
programa de mantenimiento periódico para su
aspiradora.
Utilice únicamente accesorios que estén recomendados por el fabricante para su modelo. Los
accesorios que pueden ser adecuados para una
aspiradora pueden volverse peligrosos cuando se
utilicen en otra aspiradora.
Servicio de ajustes y reparaciones
Solamente personal de reparaciones califi cado
deber realizar servicio de ajustes y reparaciones
en la aspiradora. El servicio de ajustes y repara-
ciones o el mantenimiento realizado por personal
no califi cado podría causar un riesgo de lesiones.
Por ejemplo, los cables internos podrían quedar
colocados incorrectamente o pellizcados, o los
resortes de retorno del protector de seguridad
podrían quedar montados incorrectamente.
Cuando haga servicio de ajustes y reparaciones
en una aspiradora, utilice únicamente piezas de
repuesto idénticas. Siga las instrucciones de la
sección Mantenimiento de este manual. El uso de
piezas no autorizadas o no seguir las instrucciones
de la sección Mantenimiento puede crear un riesgo
de que se produzcan descargas eléctricas o lesiones. Ciertos agentes de limpieza, como gasolina,
tetracloruro de carbono, amoníaco, etc., pueden
dañar las piezas de plástico.
Peligro para la salud por el polvo
Algunos polvos creados por
lijadoras mecánicas, aserraderos, trituradores,
perforadoras y otras actividades de construcción
contienen sustancias químicas que se sabe (en el
Estado de California) causan cáncer, defectos de
nacimiento u otros daños al sistema reproductivo.
Algunos ejemplos de estas sustancias químicas
son:
• Plomo de las pinturas con base de plomo
• Sílice cristalino de los ladrillos y cemento y otros
productos de mampostería, y
• Arsénico y cromo de madera tratada con sus-
tancias químicas
El riesgo de exposición a estas sustancias varía,
dependiendo de cuantas veces se hace este tipo
de trabajo.
Para reducir el contacto con estas
sustancias químicas: trabaje en un
área con buena ventilación y trabaje
con equipo de seguridad aprobado,
como mascarillas para el polvo diseñadas espe cí fi camente para fi ltrar
partículas microscópicas. Lávese las
manos después de manejarlo.
Page 24

24
Datos técnicos
Consumo de energía 400 - 1200 W
Carga conectada al enchufe del aparato max. 1200 W
Potencia total conectada, máx. (aspirador y enchufe del aparato) 2400 W
Max. caudal volumétrico (aire), turbina 222 m
3
/h (7.84 cu.ft./h)
Aspiración max., turbina 24000 Pa
Superfi cie del fi ltro 5000 cm2 (775 sq.in.)
Tubo fl exible de aspiración, diametro x longitud 27 mm x 3.5 m (1.06 in. x 11.48 ft.)
Dimensiones P x An x Al:
CT MINI HEPA 430 x 330 x 420 mm (16.9 x 13.0 x 16.5 in.)
CT MIDI HEPA 430 x 330 x 470 mm (16.9 x 13.0 x 18.5 in.)
Capacidad del depósito:
CT MINI HEPA 10 l (2.6 gal.)
CT MIDI HEPA 15 l (3.9 gal.)
Peso:
CT MINI HEPA 8.7 kg (19.2 lbs)
CT MIDI HEPA 9,0 kg (19.8 lbs)
Longitud del cable eléctrico 7.5 m (24.6 ft.)
Clase de protección IP X4
Símbolos
Aviso ante un peligro general
¡Leer las instrucciones e indicaciones!
Uso especifi cado
Las aspiradoras están diseñadas para aspirar de
polvos no perjudiciales a la salud, suciedad, arena,
virutas, etc.. Además, las aspiradoras están diseñadas de conformidad con lo especifi cado para la
succión de agua.
Las aspiradoras están diseñadas de conformidad
con las normas IEC 60335-1 y IEC 60335- 2-69 para
una carga mayor en usos industriales.
El rendimiento de fi ltración de todo el aparato,
compuesto del elemento fi ltrante HEPA, corresponde con la calidad HEPA H 13 (rendimiento de
eliminación medio 99,95 %).
El usuario es el único responsable por cualquier daño u accidente en caso
de que el aparato se use de manera distinta a lo
especifi cado.
Preparación y puesta en servicio
de la aspiradora
Conexión eléctrica
¡El voltaje de operación que debe corresponder
con el voltaje la alimentación de corriente se
muestra en la placa de clasifi cación!
Asegúrese que la aspira dora
esté apagada cuando se enchufe el cable.
El sistema antiestático (AS)
Durante la aspiración se producen cargas estáticas en el tubo fl exible de aspiración a causa
de la fricción. Estas cargas estáticas pueden ser
desagradables como descargas eléctricas para el
operador de la máquina.
Para facilitar la descarga de estas cargas estáticas, la aspiradora está equipado un sistema
antiestático. Sin embargo, para ello resulta necesario emplear un tubo fl exible y accesorios
antiestáticos.
Page 25

25
Interruptor de encendido/apagado
En la posición O (1.1) la aspiradora se encuentra
apagada y el enchufe de la máquina (1.3) está sin
corriente.
Hay dos modos de operación posibles:
a) Posición del conmutador en “MAN“:
El enchufe de la máquina está sin corriente.
El motor de aspiración se pone en marcha inmediatamente y se quedará encendido siempre y
cuando el interruptor esté en esta posición.
Puede usar esta modalidad de operación sin una
herramienta conectadas al enchufe de herramienta.
b) Posición del interruptor en “Auto“:
La caja de enchufe de la máquina conduce corriente.
Antes de girar el interruptor a
la posición “Auto“, asegúrese que la herramienta
conectada al enchufe del aparato esté apagada.
El motor de aspiración se arranca al conectar la
herramienta conectada.
Regulador de fuerza de aspiración
El regulador de la fuerza de aspiración (1.2) se
puede usar para variar la potencia de aspiración.
Esto permite una adaptación precisa para las distintas sustancias que se van a recoger.
Control de temperatura
Para proteger contra el sobrecalentamiento se
cuenta con un fusible térmico que desconecta la
aspiradora antes de que llegue a una temperatura
crítica. Apague la aspiradora y déjela que se enfríe
durante aproximadamente 5 minutos. En caso de
que después del proceso descrito no se vuelva a
encender la aspiradora, póngase en contacto con
un centro de servicio de Festool.
1.4
1.5
1.1
1.2
1.3
Page 26

26
Conexión de la herra-
mienta eléc trica
¡Observe la potencia conectada máxima en el enchufe de la máquina (véase “Datos técnicos“)! ¡El
consumo de potencia clasifi cada no debe exceder
de esto!
Conecte la herramienta eléctrica al enchufe de la
máquina (1.3).
Asegúrese que la herra mienta
eléctrica ésta esté desconectada cuando la esté
enchufando y desenchufando.
2.1
2.2
3.1
3.2
3.3
3.4
Operación
Durante el siguiente procedimiento, deberá observar que no se levante
más polvo del que es necesario.
Sustitución de la bolsa fi ltrante
- Abra los sujetadores de cierre (1.4) y retire la
parte superior (1.5).
- Sustituya la bolsa fi ltrante (2.1) – véase la ins-
cripción que hay en la misma.
- Reemplace la parte superior y cierre los sujeta-
dores de cierre.
Cambio del fi ltro
No opere la máquina sin el elemen-
to del fi ltro. Podría dañar el motor.
- Abra los sujetadores de cierre (1.4) y retire la
parte superior (1.5).
- Abate la palanca (3.1) y retire el soporte (3.2).
- Extraiga el elemento de fi ltro usado (3.3) y sus-
titúyalo por uno nuevo.
- Vuelva a colocar el soporte y mueva la palanca
hasta que encaje.
- Coloque la parte superior y cierre los sujetadores
de cierre.
Vaciado del depósito para suciedad
Una vez retirada la parte superior, se puede vaciar
el depósito de suciedad (2.2).
Page 27

27
El tubo fl exible de aspiración (4.2) se conecta
mediante la pieza angular (4.1) al orifi cio de aspiración. Durante la operación, el tubo fl exible de
aspiración es insertado en el hueco (4.3).
Es posible fi jar un Systainer al área de almacenamiento por medio de los cuatro sujetadores de
cierre (4.6).
Nota: Para ello, el cable de red debe hacerse pasar
por el hueco (4.7).
Soporte / freno
Al sacar el soporte (4.5) se evita que el sistema móvil de
aspiración se aleje rodando.
Para lograr esto, eleve ligeramente el sistema móvil de
aspiración en la parte delantera y ejerza presión hacia
abajo en el soporte hasta que encaje.
Para soltar el soporte, oprima del botón (4.4).
Aspiración de materiales secos
Esta aspiradora no es adecuada para recoger sustancias o polvos peligrosos o
tóxicos, como por ejemplo asbesto. Los fi ltros no
podrán atrapar todas las partículas y es posible
que las expulsen de vuelta al medio ambiente.
Antes de proceder a la aspiración de materiales
secos siempre debería haber una bolsa de fi ltro
adentro del depósito. Así es más fácil desechar el
material aspirado.
El elemento fi ltrante se humedece después de
haber succionado líquidos. El elemento fi ltrante
húmedo se desgasta con mayor rapidez cuando
se aspiran materiales secos. Por este motivo, el
elemento fi ltrante deberá secarse antes de realizar una aspiración de materiales secos o deberá
cambiarse por uno seco.
Succión de líquidos
Cuando se note que sale espuma o líquido, se debe terminar inmediatamente
el trabajo y vaciar el depósito para recoger la
suciedad.
El elemento fi ltrante HEPA sólo
puede utilizarse para aspirar sustancias secas.
Antes de proceder a la succión de líquidos siempre
se tiene que retirar la bolsa fi ltrante. Se recomienda el empleo de un fi ltro húmedo especial.
Aplicación
4.5
4.4
4.2
4.3
4.1
4.6
4.7
Page 28

28
- Desconecte la aspiradora y desenchufe el cable
de alimentación de corriente.
- Vacíe el depósito para recoger la suciedad.
- Coloque el tubo fl exible de aspiración (5.1) y el
cable de conexión (5.2) en la parte superior.
- Limpie el interior y el exterior de la aspiradora
meditante succión y frotación.
- Coloque la aspiradora en una habitación seca,
protegida contra el uso no autorizado.
- Se puede guardar una bolsa fi ltrante de repuesto en el compartimiento de almacena miento
(5.3).
5.1
5.2
5.3
Una vez terminado el trabajo
Accesorios, fi ltros
Los números de pedido para los respectivos
accesorios y filtros se encuentran en su catálogo Festool o en la dirección de la Internet
www.festoolusa.com.
clientes recibirán de forma gratuita una garantía
limitada ampliada (1 año + 2 años = 3 años). Festool
será responsable de todos los gastos de envío
durante el primer año de vigencia de la garantía.
Durante el segundo y tercer año, el cliente será
responsable del envío de la herramienta a Festool.
Festool pagará la devolución al cliente utilizando
el servicio UPS Ground. Todos los servicios de
garantía serán válidos durante 3 años a partir de la
fecha de compra que figura en el recibo o factura.
Puede que se precise una prueba de compra.
Quedan excluidos de la cobertura de la presente
garantía el desgaste normal, los daños ocasionados
Al alcanzar el nivel máximo de llenado la aspiración es interrumpida automáticamente por los
indicadores del nivel de llenado (3.4).
Mantenimiento y conservación
¡Siempre desconecte la alimentación de corriente del enchufe antes de hacer
cualquier trabajo de mantenimiento!
Todos los trabajos de mantenimiento y de reparación que requireen que se
abra la caja del motor, sólo deben llevarse a cabo
por un taller autorizado de servicio.
Como mínimo una vez al año
tiene se debe realizar una prueba de seguridad
por la casa productora o por una persona correspondientemente instruida, por ejemplo, en cuanto
a daños al fi ltro, hermeticidad del aparato y funcionamiento de los aparatos de control.
Garantía
Festool ofrece una garantía limitada de 3 años,
una de las más sólidas de la industria. Esta
garantía será válida con la condición previa de
que la herramienta se utilice conforme a las
instrucciones de funcionamiento de Festool.
Festool garantiza que la herramienta especificada
no presentará defectos de material o de acabado
durante un periodo de 3 años a partir de la fecha
de compra.
Condiciones de la garantía 1+2
Al adquirir una herramienta eléctrica nueva de
Festool en un distribuidor autorizado, todos los
Page 29

29
por un uso indebido, abuso o negligencia; los
daños provocados por otra causa que no sea un
defecto de material o de acabado. La presente
garantía no es aplicable a elementos accesorios
tales como hojas de sierra circulares, brocas,
puntas de fresadora, hojas de calar, bandas
lijadoras y ruedas de amolar.El hecho de utilizar
la herramienta a una tensión o una frecuencia
diferentes de los valores nominales anulará la
garantía. Esto incluye el uso de la herramienta
combinada con un transformador.Festool no
aprueba ni apoya el uso, con productos Festool,
de accesorios o consumibles que no hayan sido
construidos, diseñados y fabricados por Festool.La
utilización de cualquier producto que no sea de
Festool puede afectar al rendimiento o anular la
garantía.Festool no se responsabilizará de ningún
daño o pérdida y el usuario asumirá los riesgos
y la responsabilidad por el uso de productos no
derivados de Festool.Se excluyen asimismo las
"piezas de desgaste" como, por ejemplo, cepillos
de carbón, láminas de herramientas neumáticas,
abrazaderas y juntas de caucho, platos lijadores y
artículos de ropa de Festool (gorras y camisetas).
Las obligaciones de Festool, según su propio
criterio y de acuerdo con la presente garantía,
se limitarán a la reparación, sustitución o
reembolso del precio de compra de cualquier
herramienta eléctrica portátil de Festool en la
que se haya detectado un defecto de material o de
acabado durante el periodo de garantía. FESTOOL
NO SERÁ RESPONSABLE DE NINGÚN DAÑO
CONSECUENCIAL, INCIDENTAL O ESPECIAL,
INDEPENDIENTEMENTE DEL FUNDAMENTO
LEGAL EN EL QUE SE BASE LA RECLAMACIÓN.
TODAS LAS GARANTÍAS IMPLÍCITAS DE ACUERDO
CON LA LEGISLACIÓN ESTATAL, INCLUIDAS LAS
DE COMERCIALIZACIÓN Y ADECUACIÓN PARA
UN FIN PARTICULAR, SE LIMITARÁN POR LA
PRESENTE A UNA DURACIÓN DE TRES AÑOS.
En determinados estados de EE.UU. y provincias
de Canadá, las limitaciones de duración de una
garantía implícita no están permitidas, de modo
que es posible que la limitación anterior no sea
aplicable en su caso. La presente garantía le
otorga derechos legales específicos; además, es
posible que goce de otros derechos que varíen
en los diferentes estados de EE.UU. y provincias
de Canadá.
A excepción de cualquier garantía implícita de
acuerdo con la legislación estatal o provincial
y limitada según lo expuesto anteriormente,
la garantía limitada expresa precedente será
exclusiva y sustituirá a todas las demás garantías,
acuerdos y obligaciones similares de Festool.
Festool no concede ninguna otra garantía, ya
sea expresa o implícita, para sus herramientas
eléctricas portátiles.Esta póliza de garantía
únicamente será válida para aquellas herramientas
que se hayan adquirido en EE.UU. y Canadá.
Las pólizas de garantía de otros países podrán
diferir al acudir al servicio de garantía fuera de
EE.UU. y Canadá.Determinados países excluyen
de la garantía los productos adquiridos fuera de
su territorio. Festool se reserva el derecho de
rechazar la reparación de cualquier herramienta
que no forme parte de la línea de productos de
EE.UU./Canadá. Ningún agente, representante,
distribuidor, proveedor o empleado de Festool
estará autorizado a incrementar o modificar las
obligaciones o limitaciones estipuladas en la
presente garantía.
Page 30

Page 31

Page 32

FESTOOL Group GmbH & Co. KG
Wertstraße 20
D-73240 Wendlingen
Germany
www.festoolusa.com
 Loading...