

Festool CTM 22 E, CTM 33 E, CTM 33 LE, CTM 44 E, CTM 44 LE Operating Instructions Manual
...Page 1
CTM 22 E CTM 44 E
Seen at Ideal Tools.
CTM 33 E CTM 44 LE
CTM 33 LE CTM 55 E
Bedienungsanleitung Absaugmobil 4 - 8
Operating Instructions Vacuum cleaner 9 - 13
Mode demploi Aspirateur 14 - 18
Instrucciones de servicio Aspirador 19 - 23
Istruzioni duso Aspiratore 24 - 28
Gebruiksaanwijzing Stofafzuiger 29 - 33
Bruksanvisning Dammsugare 34 - 37
Käyttöohje Imuri 38 - 41
Driftsvejledning Støvsuger 42 - 46
Bruksanvisning Støvsuger 47 - 50
Instruções de uso Aspirador 51 - 55
Руководство по эксплуатации Аппарат пылеудаляющий 56 - 60
Návod k obsluze Vysavaè 61 - 64
Instrukcja obs³ugi Odkurzacz 65 - 69
Kezelési utasítás Elszívókészülék 70 - 74
456 026_002
ПдзгЯб лейфпхсгЯбт Укпэффб брпссьцзузт 75 - 79
Festool GmbH Wertstr. 20 D-73240 Wendlingen ( 07024/804-0
Page 2
1.1
1.2
1.4
1.3
1.5
1.6
1.8
1.10
1.12
1.7
1.9
1.11
1.13
1.14
Seen at Ideal Tools.
Page 3

2.1
2.3
2.5
2.2
2.4
2.6
2.7
2.8
2.9
2.10
2.11
2.12
3.1
3.2
3.3
3.4
Seen at Ideal Tools.
Page 4

GB
Seen at Ideal Tools.
Please read the operating instructions and observe the safety precautions!
The specified illustrations can be found at the beginning of the operating instructions.
1 Technical data
1.1 CTM 22 E CTM 33 E
CTM 33 LE
Power consumption W 350 - 1,200 350 - 1,200
Connected load to appliance plug socket max.:
EC W 2,400 2,400
CH W 1,100 1,100
GB W 1,800 1,800
AUS W 1,200 1,200
Volume flow (air) max., turbine m3/h 228 228
Vacuum max., turbine Pa 23,000 23,000
Volume flow (air), typical value in operation m3/h 160 160
Vacuum, typical value in operation Pa 18,000 18,000
Filter surface cm² 14,000 14,000
Suction hose ø mm x m 27 x 3.5 27 x 3.5
Sound pressure level in compliance
with DIN 45 635 dB(A) 72 72
Container capacity l 22 33
Dimensions L x W x H mm 625 x 380 x 440 625 x 380 x 500
Weight kg 12 14.5
Power cable length m 7.5 7.5
Protection type IP X4 IP X4
1.2 CTM 44 E CTM 55 E
CTM 44 LE
Power consumption W 350 - 1,200 350 - 1,200
Connected load to appliance plug socket max.:
EC W 2,400 2,400
CH W 1,100 1,100
GB W 1,800 1,800
AUS W 1,200 1,200
Volume flow (air) max., turbine m3/h 228 228
Vacuum max., turbine Pa 23,000 23,000
Volume flow (air), typical value in operation m3/h 160 160
Vacuum, typical value in operation Pa 18,000 18,000
Filter surface cm² 14,000 14,000
Suction hose ø mm x m 27 x 3.5 27 x 3.5
Sound pressure level in compliance
with DIN 45 635 dB(A) 72 72
Container capacity l 44 55
Dimensions L x W x H mm 710 x 380 x 935 710 x 380 x 935
Weight kg 20 22
Power cable length m 7.5 7.5
Protection type IP X4 IP X4
2 Specified use
The vacuum cleaners are designed as specified for the aspiration and evacuation of noxious dusts
industrial threshold limit values (LTL-values) up to 0.1 mg/m3 and of wood dusts corresponding to dust
class M in accordance with IEC 60335-2-69.
The vacuum cleaners are designed as specified for extracting water.
The vacuum cleaners are designed in accordance with EN 60335-1 and EN 60335-2-69 for a higher
loading in industrial use.
9
Page 5

2.1 Safety instructions
Seen at Ideal Tools.
- Use only accessories approved by Festool (see
the Festool Catalogue).
- Warning: The appliance may contain dust that
is hazardous to health.
The appliance must not be emptied, nor must
maintenance work, including filter changes, be
carried out, by anyone other than authorized
specialist personnel with appropriate protective
equipment.
Do not operate the appliance without a fully
installed filter system.
- If used to extract dusts with LTL values or large
quantities of beech or oak sawdust, only one dust
source (electric or air tool) may be connected.
Two tools may not be connected at any one time.
- The appliance may be operated only in an
adequately ventilated space (in compliance with
national industrial safety provisions).
- Do not suck in any sparks or hot chippings.
- With the exception of wood dust, do not suck in
any flammable or explosive dusts such as
magnesium, aluminium etc. - Risk of explosion!
- Do not use to extract flammable or explosive
liquids (e.g. petrol, thinners). - Risk of explosion!
- Do not use to extract aggressive liquids (e.g.
acids, alkalis, solvents)
- Remove plug from mains socket when not in use
and before maintenance work.
- Do not pull plug out of mains socket by its cable.
- Protect the cable against heat, oil and sharp
edges.
- Do not leave devices out in the rain.
- Check the plugs and cables regularly and have
them replaced by an expert if damaged.
- Do not lift or carry the devices by their handles
using a crane hook or lifting gear.
- The device may only be used by persons who
have been trained in its use and who are
authorised to do so.
- If noxious dusts have been extracted, the vacuum
cleaner and all accessories must be completely
cleaned (inside and outside) by suction and
wiping, before removal from the contaminated
area.
Parts that cannot be completely cleaned are to
be packed for transport in a plastic bag with an
airtight seal.
The suction opening (1.8) must be sealed with
the blanking plug (1.7) for transport purposes.
- For safety reasons, only operate the machine
using a totally earthed socket.
3 Appliance preparation and initial
operation
Stick the enclosed sticker in your national language
on the text area of the warning plate. Fix the blanking
plug (1.7) in accordance with Fig. 4.
3.1 Electrical connection
Caution! The operating voltage shown on the rating
plate must correspond to the voltage of the mains
power supply. Make sure that the vacuum cleaner
is switched off when you plug the power cable in.
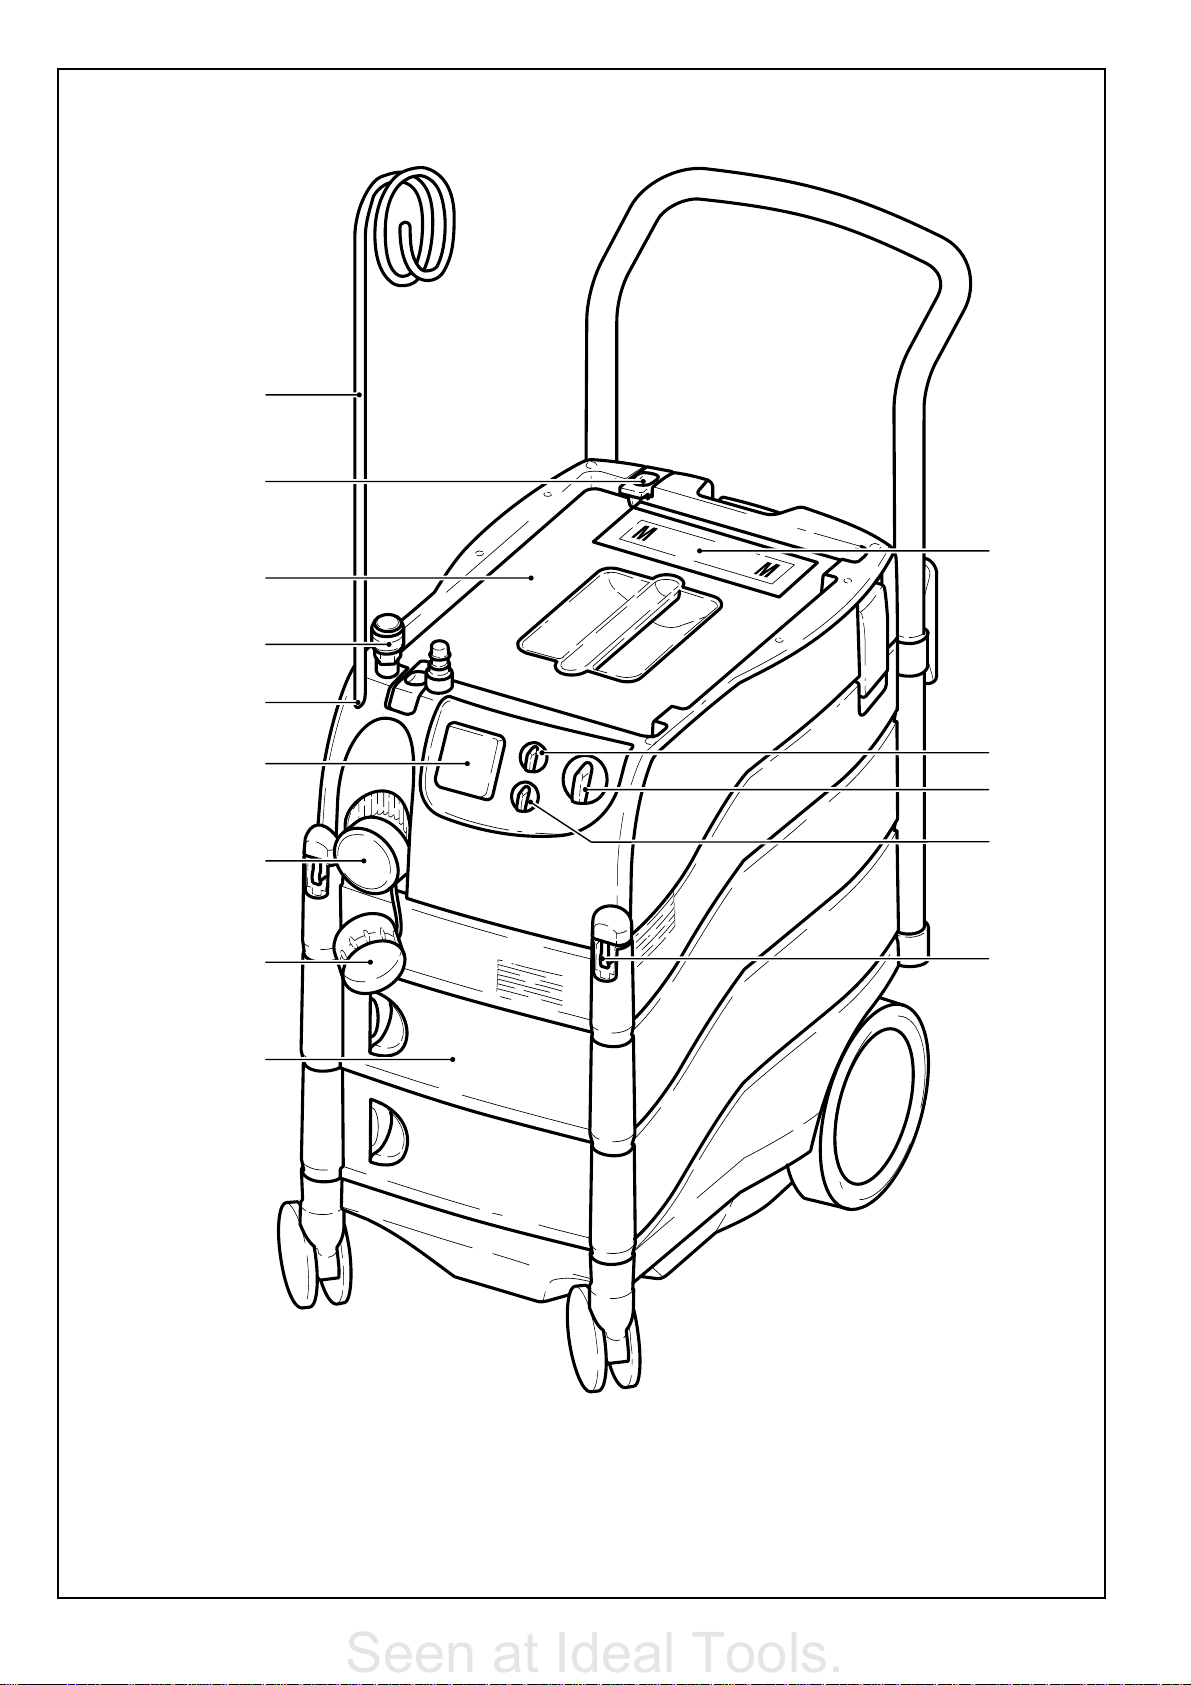
3.2 On/off switch (1.3)
In position 0 the vacuum cleaner is switched off and
the appliance plug socket (1.9) is dead.
Before switching on, the rotary knob (1.2) must be
adjusted to the diameter of the connected suction
hose. Two modes of operation are possible:
a) Switch position MAN (1.3):
The cleaner motor starts immediately. The
appliance plug socket is dead.
b) Switch position Auto (1.3):
The appliance plug socket is live. The cleaner motor
starts only when the tool connected to the appliance
plug socket is switched on.
Caution! Before turning the switch to the Auto
position, ensure that the tool connected to the
appliance plug socket is switched off.
3.3 Suction force regulator (1.4)
The suction force regulator can be used to vary the
suction capacity. This permits a precise adaptation
to different substances to be picked up.
3.4 Connecting an electric tool
Warning! Observe the maximum connected load
on the appliance plug socket (see Technical Data)!
Connect the electric tool to the appliance plug
socket (1.9).
Make sure that the electric tool is switched off when
plugging it in and unplugging it.
10
Page 6

3.5 Connecting a compressed-air tool
Seen at Ideal Tools.
When the compressed-air module (1.11, Order No.
452 829, supplied ready with CTM 33 LE and
CTM 44 LE) is fitted, the automatic cut-in of the
appliance also operates in conjunction with
compressed-air tools.
We also recommend fitting of the VE supply unit
(Order No. 452 797).
The supply unit filters and oils the compressed air
and allows the air pressure to be regulated.
An IAS connecting piece (Order No. 454 757) is
available for connecting Festool compressed-air
tools with the IAS system.
To ensure trouble-free functioning of the automatic
cut-in, the operating pressure of the tool must be 6
bar. Make sure that the compressed-air tool is
switched off when plugging it in and unplugging it!
A damp filter element clogs up quickly if it is used
for dry materials.
Accordingly, the filter element should be dried or
replaced with a dry one before dry operation.
4.2 Vacuuming liquids
The filter bag has to be removed before evacuating
liquids. We recommend use of a special wet filter
(Order No. 452 924).
When the maximum filling level is reached, a level
indicator (2.11) automatically interrupts extraction.
Warning: Do not evacuate combustible liquids! If
foam or liquid escapes, stop work immediately and
empty the dirt container (see 5.4).
N.B.: With wet operation, the volume flow monitor
acoustic warning may sound on account of
increased flow resistance. This does not impair
functional safety.
4 Application
A systainer can be fixed on the shelf (1.12) with the
two clamps (1.13).
Tools or accessories can also be stowed on the
shelf and in the storage compartments (1.6, not with
CTM 22).
A hose coupling (1.14, Order No. 487 072) can also
be plugged into the opening (1.10).
Alternatively, a hose clip (order No. 452 998) can
be fitted for coiling the suction hose.
The suction hose is connected to the tool from
above with the hose coupling.
The wheels can be blocked by the brakes (2.7),
thus preventing the vacuum cleaner from rolling
away unexpectedly.
The push handle (2.10, Order No. 452 921; supplied
ready with CTM 44 and CTM 55) makes the
vacuum cleaner easier to move.
Accessories (e.g. vacuum accessories) can be
fixed to the push handle batten (2.8).
An air blast is obtained by inserting a suction hose
in the blast opening (2.12).
4.1 Vacuuming dry materials
Before using the vacuum cleaner to evacuate dry
substances, a filter bag must always be inserted in
the container.
Then the evacuated material can be disposed off
easily.
Warning: A filter bag must be used without
exception when evacuating noxious substances!
The filter element becomes damp after evacuating
liquids.
4.3 Volume flow monitoring
If the air speed in the suction hose drops below
20 m/s, an acoustic warning signal sounds for
safety reasons.
Possible causes and adjustments:
Cause
ð Adjustment
Suction force regulator (1.4) set to a too low value
ð Adjust suction force regulator to a higher value
Rotary knob (1.2) not adjusted to the connected
hose diameter
ð Adjust to correct hose diameter
Suction hose blocked or twisted
ð Remove blockage or twist
Filter bag full
ð Change filter bag
Filter element dirty
ð Change filter element
ð Only when operating without a filter bag: clean
filter element
Electronic monitoring system malfunctioning
ð Call Festool customer service for adjustment
Wet suction
ð Functional safety not impaired; no action
necessary
11
Page 7

4.4 The antistatic system (AS)
Seen at Ideal Tools.
Friction in the suction hose causes electrostatic
charges which can result in unpleasant electric
shocks for the operator.
In order to conduct these static charges to earth,
the extraction units are provided with an antistatic
system as a standard feature.
However, antistatic hoses and accessories have
to be used in this case.
Caution: the antistatic function will only work if the
plug is plugged into a totally earthed socket.
5 Operation
5.1 Opening/closing the vacuum cleaner
- Open retaining clamps (2.2) ,
- Raise upper part (2.4) until support catch (2.5)
engages.
Follow the reverse order to close the appliance.
You must raise the upper part slightly before
depressing or disengaging the support.
5.2 Changing the filter
Warning: During the following procedure, take
care not to raise dust more than is unavoidable.
Wear a P2 breathing protection mask with
health-hazardous dusts!
a) Changing filter bag (3.4)
Order No.:
CTM 22 E: 452 970 CTM 33 E / LE: 452 971
CTM 44 E / LE: 452 972 CTM 55 E: 452 973
- Open the vacuum cleaner,
- Remove the used filter bag (see printed text on
filter bag),
- Dispose of the used filter bag in accordance with
statutory requirements,
- Thoroughly clean the dirt container (2.9) and the
space (3.1) for suction turbine (wipe down with a
damp cloth),
- Insert new filter bag (see printed text on filter bag).
Important: Press the filter bag sleeve (3.3) firmly
onto the dust extraction fitting (3.2)!
- Close the vacuum cleaner.
- Dispose of the used filter element in a sealed,
dust-tight bag in accordance with statutory
requirements,
- Thoroughly clean dirt container (2.9) and space
(3.1) for the suction turbine (wipe down with a
damp cloth),
- Fit a new filter element (see printed text on the
filter element packaging),
- Close vacuum cleaner.
5.3 Cleaning the filter element
To clean, move the handle (2.1) to and fro about 10
times.N.B.: You need to clean the filter element only
if you use the vacuum cleaner without a filter bag.
5.4 Emptying the dirt container (2.9)
Warning: Always remove the upper part of the
vacuum cleaner before emptying the dirt container!
- Open the vacuum cleaner,
- Raise the upper part slightly, depress the support
(2.5),
- Raise the upper part to the stop (vertical position),
- Remove the upper part by moving it forwards
horizontally,
- Empty the dirt container,
- Replace the upper part.
Warning: Make sure that both upper-part pins
are fully inserted in the recesses (1.5)!
- Close the vacuum cleaner.
6 After finishing work
- Switch off the cleaner and pull the plug of the
mains lead out of the plug socket.
- Wind up the mains lead (2.6).
- Empty dirt container.
- Clean the vacuum cleaner inside and outside by
suction and wiping.
- Deposit the appliance in a dry room, safe from
unauthorised use.
b) Changing the filter element (2.3, Order No.
452 923)
Do not operate the suction unit without a filter
element. Otherwise, the motor may be damaged.
- Open the vacuum cleaner,
- Remove the used filter element (see printed text
on the filter element packaging),
7 Temperature control
A temperature fuse switches the dust extractor off
before this reaches a critical temperature to protect
against overheating ® switch dust extractor off and
leave for around 5 minutes to cool down.
If the dust extractor still cannot be switched back
on, please consult a Festool service centre.
12
Page 8

8 Maintenance and care
Seen at Ideal Tools.
Always remove the mains plug from the socket
before carrying out any maintenance work!
Any maintenance and repair work requiring an
opening of the motor housing may only be carried
out by an authorised customer service workshop.
Electrotechnical tests must be performed in
accordance with the provisions of the Accident
Prevention Regulations (VBG 4) and with
DIN VDE 0701 Part 1 and Part 3.
According to DIN VDE 0702, these tests must be
performed at regular intervals and after repair or
modification.
A safety test is to be carried out at least once a
year by the manufacturer or an instructed person,
e.g. for possible damage to the filter and leaks in
the appliance, and to ensure that the control devices
are functioning.
If the user services the appliance, it must be
dismantled, cleaned and serviced, as far as
possible without any danger to the maintenance
staff and other persons.
Appropriate measures include decontamination
before dismantling, locally filtered forced ventilation
on the dismantling site, cleaning the service area,
and suitable personal safety equipment.
9 Accessories, filter
The accessory and filter order number can be found
in your Festool catalogue or on the Internet under
www.festool.com.
10 Warranty
Our equipment is under warranty for at least 12
months with regard to material or production faults
in accordance with national legislation.
In the EU countries, the warranty period is 24 months
(an invoice or delivery note is required as proof of
purchase).
Damage resulting from, in particular, normal wear
and tear, overloading, improper handling, or caused
by the user or other damage caused by not
following the operating instructions, or any fault
acknowledged at the time of purchase, is not
covered by the warranty.
Complaints will only be acknowledged if the
equipment has not been dismantled before being
sent back to the suppliers or to an authorised
Festool customer support workshop.
Store the operating instructions, safety notes, spare parts list and proof of purchase in a safe place.
In addition, the manufacturers current warranty
conditions apply.
Note
We reserve the right to make changes to the
technical data contained in this information as a
result of ongoing research and development work.
The plastics used in this product have been marked
in the works to facilitate recycling.
13
Page 9

EG-Konformitätserklärung. Wir erklären in alleiniger
Seen at Ideal Tools.
Verantwortung, dass dieses Produkt mit den
folgenden Normen oder normativen Dokumenten übereinstimmt:
EN 60335-1, EN 60335-2-69, EN 55 014, EN 61 000 gemäß
den Bestimmungen der Richtlinien 73/23/EWG, 89/336/EWG.
CE-Konformitetserklæring. Vi erklærer på eget ansvar
at dette produktet er i overensstemmelse med
følgende normer eller normative dokumenter:
EN 60335-1, EN 60335-2-69, EN 55 014, EN 60 555 i henhold
til bestemmelsene i direktivene 73/23/EØF, 89/336/EØF.
EC-Declaration of Conformity: We declare at our sole
responsibility that this product is in conformity with
the following standards or standardised documents:
EN 60335-1, EN 60335-2-69, EN 55 014, EN 61 000,
in accordance with the regulations 73/23/EEC,
89/336/EEC.
CE-Déclaration de conformité communautaire. Nous
déclarons sous notre propre responsabilité que ce
produit est conforme aux normes ou documents de
normalisation suivants: EN 60335-1, EN 60335-2-69,
EN 55 014, EN 61 000, conformément aux prescriptions des
directives 73/23/CEE, 89/336/CEE.
CE-Declaración de conformidad. Declaramos bajo
nuestra exclusiva responsabilidad que este producto
corresponde a las siguientes normas o documentos
normalizados: EN 60335-1, EN 60335-2-69, EN 55 014,
EN 61 000, conforme a las prescripciones estipuladas en las
directrices 73/23/CEE, 89/336/CEE.
CE-Dichiarazione di conformità CE. Dichiariamo sotto
la nostra esclusiva responsabilità che il presente
prodotto è conforme alle norme e ai documenti normativi
seguenti: EN 60335-1, EN 60335-2-69, EN 55 014, EN 61 000,
conformemente alle normative delle direttive
73/23/CEE, 89/336/CEE.
CE-Declaração de conformidade: Declaramos, sob
a nossa exclusiva responsabilidade, que este
produto corresponde às normas ou aos documentos normativos
citados a seguir: EN 60335-1, EN 60335-2-69, EN 55 014,
EN 61 000 segundo as disposições das directivas 73/23/CEE,
89/336/CEE.
Заявление о конформности СЕ. Мы заявляем в
единоличной ответственности, что данное изделие
соответствует требованиям следующих стандартов или
нормативов: EN 60335-1, EN 60335-2-69, EN 55 014,
EN 61 000 в соответствии с постановлениями директив
ЕЭС 73/23, ЕЭС 89/336.
Prohláení o souladu s normami CE. Prohlaujeme
na vlastní zodpovìdnost, e tento výrobek odpovídá
následujícím normám nebo normativním dokumentùm:
EN 60335-1, EN 60335-2-69, EN 55 014, EN 61 000 v souladu
s ustanoveními smìrnic 73/23/EHS, 89/336/EHS.
Owiadczenie o zgodnoci CE. Niniejszym
owiadczamy z ca³¹ odpowiedzialnoci¹, ¿e wyrób
ten odpowiada nastêpuj¹cym normom wzglêdnie dokumentom
normatywnym : EN 60335-1, EN 60335-2-69, EN 55 014,
EN 61 000 zgodnie z postanowieniami wytycznych 73/23/EWG,
89/336/EWG.
EG-conformiteitsverklaring. Wij verklaren op eigen
verantwoordelijkheid dat dit produkt voldoet aan de
volgende normen of normatieve documenten.
EN 60335-1, EN 60335-2-69, EN 55 014, EN 61 000, conform
de richtlijnen 73/23/EEG, 89/336/EEG.
EG-konformitetsförklaring. Vi förklarar i eget ansvar,
att denna produkt stämmer överens med följande
normer och normativa dokument:
EN 60335-1, EN 60335-2-69, EN 55 014,EN 61 000 enligt
bestämmelserna i direktiven 73/23/EEG, 89/336/EEG.
EY-standardinmukaisuusvakuutus. Vakuutamme
yksinvastuullisina, että tuote on seuraavien
standardien ja normatiivisten ohjeiden mukainen:
EN 60335-1, EN 60335-2-69, EN 55 014, EN 61 000 direktiivien
73/23/EY, 89/336/EY määräysten mukaan.
EF-konformitetserklæring: Vi erklærer at have alene
ansvaret for, at dette produkt er i overensstemmelse
med de følgende normer eller normative dokumenter:
EN 60335-1, EN 60335-2-69, EN 55 014, EN 61 000 i henhold
til bestemmelserne af direktiverne 73/23/EØF, 89/336/EØF.
CE-konformitás-nyilatkozat. Kizárólagos felelõsség-
vállalás mellett ezennel tanúsítjuk, hogy a jelen
termék megfelel az alábbi szabványoknak ill.
szabványdokumentá-ciónak: EN 60335-1, EN 60335-2-69,
EN 55 014, EN 61 000 a 73/23/EWG, 89/336/EWG irányvonalak
rendelkezései szerint.
Дзлуз унммьсцщузт ЕК. Ме бнблзцз фзт
ухнoлйкзт ехихнзт дзлщнпнме, пфй фo рбспн рспйпн
унмцщней ме фб рбсбкбфщ рспфнрб кбй ме фa рспфнрб рпн
бнбцеспнфбй уфб уцефйкб еггсбцб EN 60335-1,
EN 60335-2-69, EN 55 014, EN 61 000 унмцщнб ме фпнт
кбнпйумпнт 73/23 ЕOК, 89/336/ЕOК.
Leitung Forschung und Entwicklung
Management Research and Development
Direction de recherce et développement
Festool GmbH
Wertstr. 20
D-73240 Wendlingen
Dr. Johannes Steimel
450 589 /02.03
Page 10

Festool GmbH
Seen at Ideal Tools.
Postfach 1163
D- 73236 Wendlingen
Wertstr. 20
D- 73240 Wendlingen
) (07024) 804-0
Fax (07024) 804-608
http://www.festool.com
 Loading...