

Page 1
GB - USER’S MANUAL ............................................................... 2
F - MANUEL D’UTILISATION................................................... 20
D - BEDIENUNGSANLEITUNG................................................. 38
E - INSTRUCCIONES DE USO ................................................. 56
I - MANUALE DI ISTRUZIONI................................................. 74
GUARANTEE-GARANTIE-GARANTIE-GARANTIA-GARANZIA....... 95
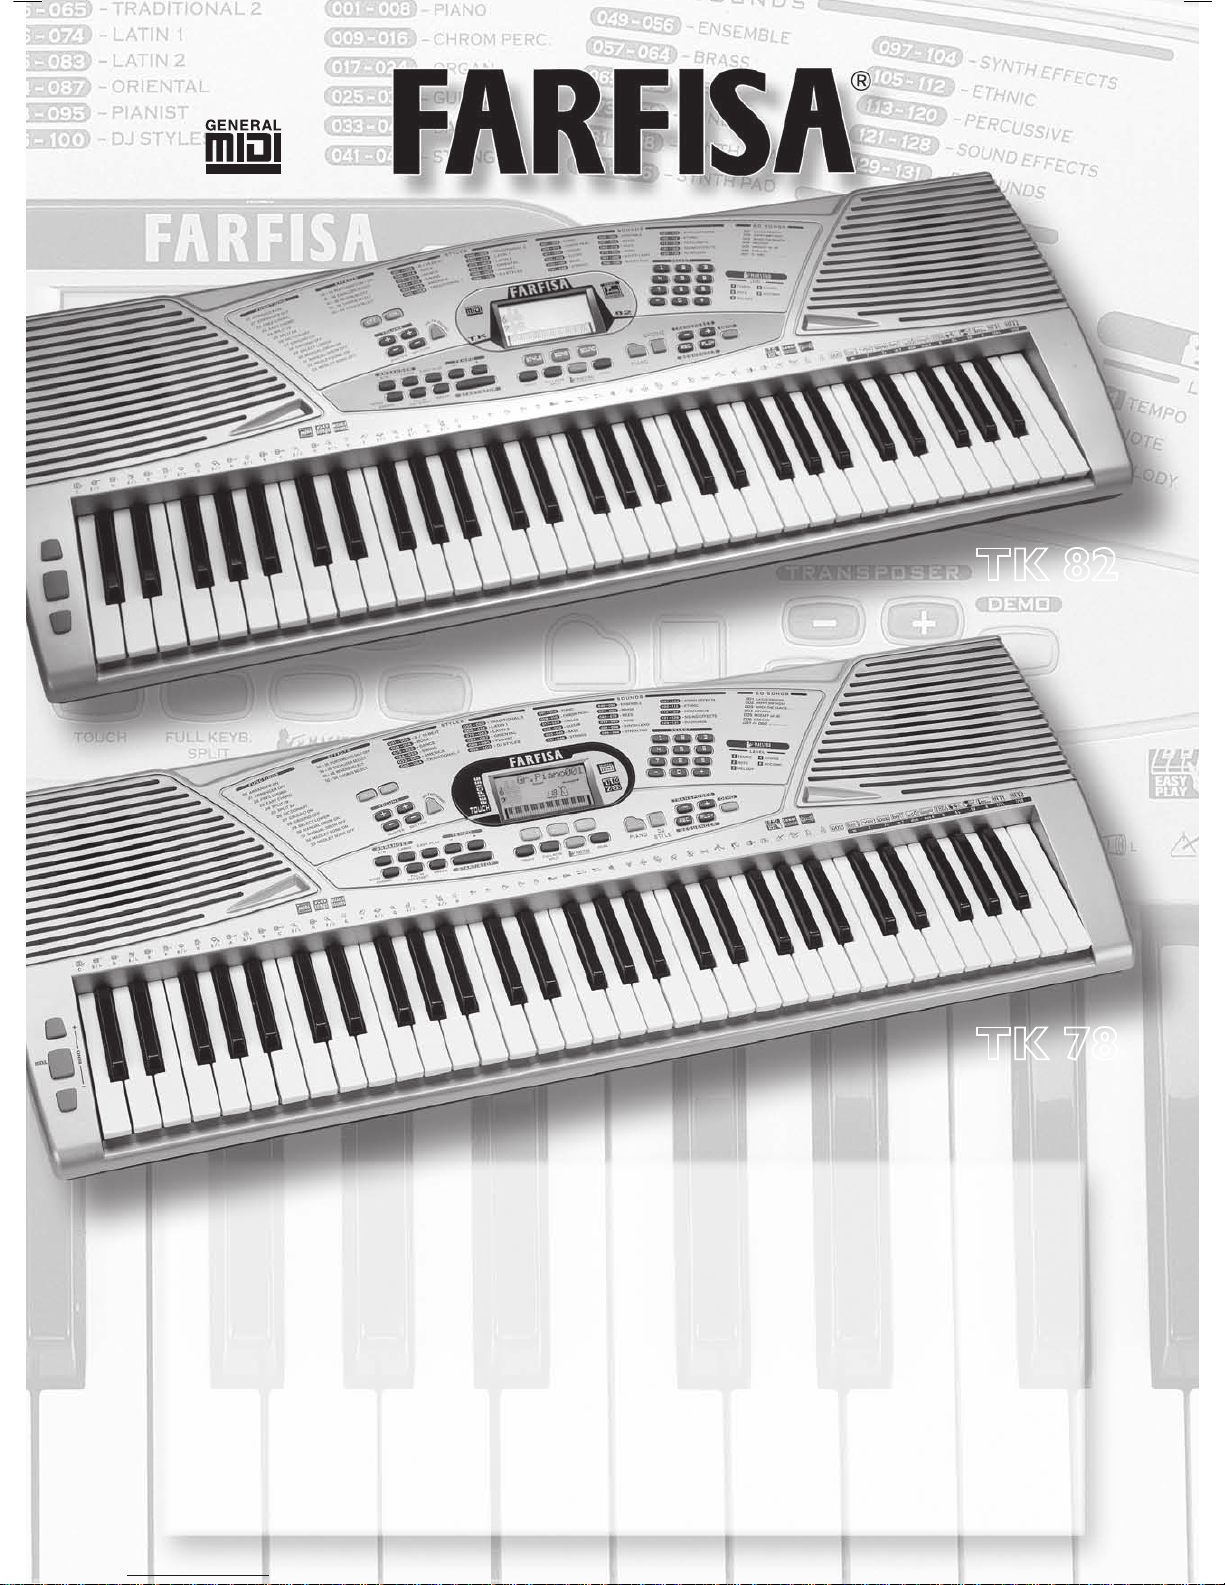
TK 78TK 78
TK 82
TK 82
Page 2
2
1. TECHNICAL CARACTERISTICS ........................2
2. INTRODUCTION .....................................3
MUSIC-STAND .......................................3
POWER SUPPLY ......................................3
MAINS SUPPLY......................................3
BATTERY SUPPLY....................................3
OPTIONAL ACCESSORIES..............................3
3. CONTROL PANEL ................................4
4. SOCKETS........................................4
5. DIRECTIONS ON THE KEYBOARD
....................5
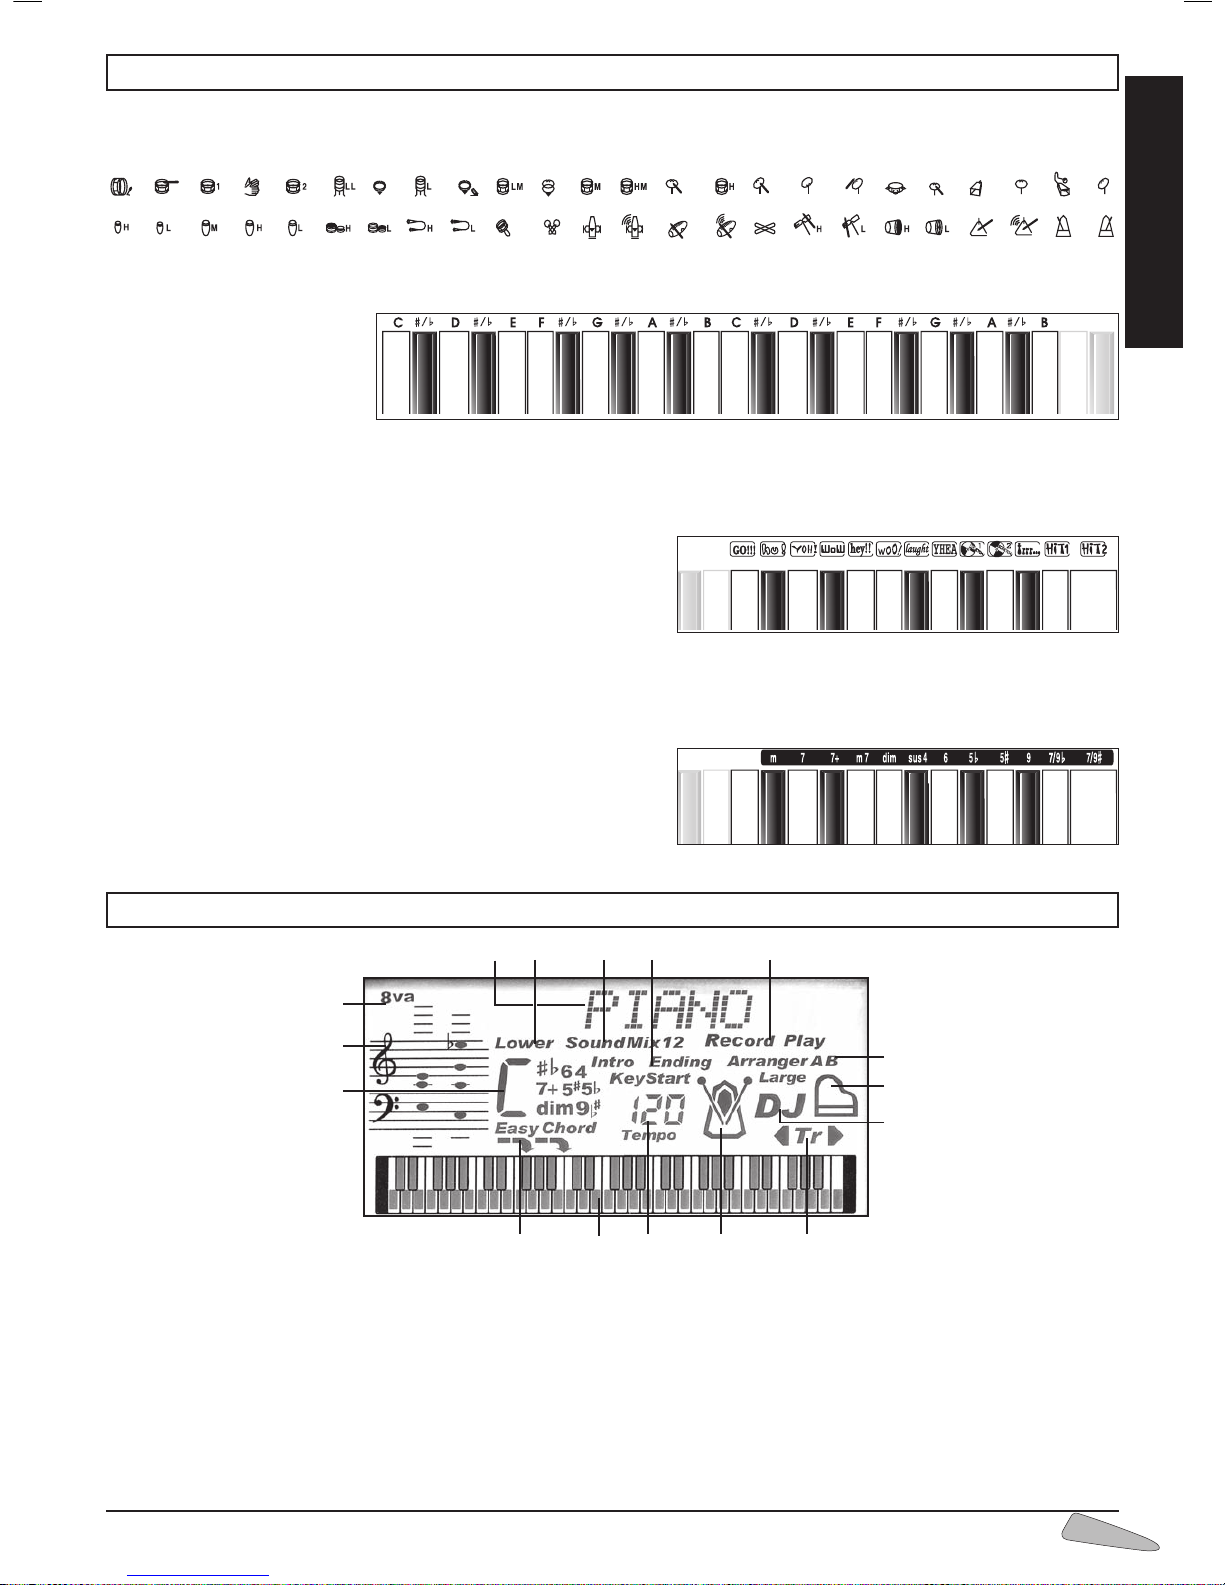
THE RHYTHM INSTRUMENTS OF THE MANUAL DRUM ........5
LETTERS ON THE LEFT ................................5
EFFECTS OF THE DJ GROOVE (TK 82)....................5
EFFECTS OF THE DJ STYLE (TK 78) ......................5
THE DICTIONARY CHORDS ...........................5
6. THE DISPLAY .........................................5
7. HOW TO USE THE KEYBOARD........................6
SWITCH ON AND SWITCH OFF .......................6
DEMO – CHOSEN EXCERPT ...........................6
VOLUMES ...........................................6
SONGS..............................................6
THE SOUNDS ........................................7
THE DUAL...........................................7
THE TOUCH .........................................7
THE TRANSPOSER ....................................7
THE PIANO ..........................................7
THE METRONOME....................................8
THE KEYBOARD......................................8
THE PITCH BENDING AND MODULATION CONTROLS
.....8
THE SOUNDS OF THE LEFT PART OR LOWER
.............8
THE STYLES .........................................9
THE PIANIST STYLES ..................................9
ARRANGER A, B......................................9
LARGE ..............................................9
EASY PLAY...........................................9
TEMPO ..............................................9
INTRO / ENDING . . . . . . . . . . . . . . . . . . . . . . . . . . . . . . . . . . .10
FILL IN ............................................10
INDEX
KEY START .........................................10
BREAK .............................................10
FUNCTIONS .......................................10
ARRANGER ON / OFF.............................10
FREE CHORD ....................................10
EASY CHORD ....................................10
SPLIT 19 or SPLIT 24 ..............................11
DICTIONARY ....................................11
DJ GROOVE (TK 82)...............................11
DJ STYLE (TK 78) .................................11
GROUND ON / OFF ..............................11
SELECT LOWER ..................................11
MANUAL DRUM ON / OFF ........................11
MEDLEY SONG ON / OFF .........................11
THE EFFECTS .......................................12
PORTAMENTO ON / OFF ..........................12
EQUALIZER SELECT...............................12
REVERB SELECT ..................................12
CHORUS SELECT .................................12
TOUCH SELECT (TK 82) ...........................12
SEQUENCER ........................................12
MAESTRO ..........................................12
DISPLAY DIRECTIONS ...............................13
1
ST
LEVEL: TEMPO OF THE TUNE ...................13
2
ND
LEVEL: THE NOTES OF THE MELODY............13
3
RD
LEVEL: THE SONG MELODY ....................13
4
TH
LEVEL: THE SONG CHORDS....................14
5TH LEVEL: ACCOMPANIMENT WITH ORCHESTRA.
.......14
8. TROUBLE SHOOTING GUIDE .......................14
9. MAINTENANCE AND REMARKS ....................15
10. TABLE OF DICTIONARY.............................15
11. CONNECTION TO A PERSONAL COMPUTER........16
12. DETAILED MIDI IMPLEMENTATION ..................92
13. DRUM SET TABLE (Midi Channel 10) ..................92
14. SOUNDS LIST ......................................93
15. STYLES LIST ........................................94
GUARANTEE ..........................................95
1. TECHNICAL CARACTERISTICS
SEQUENCER: REC and PLAY to record and listen
AUTOMATIC ACCOMPANIMENT: Free Chord, Easy Chord,
Arranger A and B, LARGE
Controls: Volume of Sections, ARRANGER ON/OFF, GROUND
ON/OFF, Split 19 / 24, Full Keyb./Split
General controls: ON/OFF, Master Volume, Section Volume
Select, Easy Play, Style, Song, Sound, Dual, Bending, Modulation
DICTIONARY: Chord dictionary on the display
DEMO: Demo song
SONGS: 60 pre-recorded songs with Medley ON/OFF
MAESTRO: 5 learning levels
AMPLIFICATION: Stereo 2,5+2,5 watt (RMS)
Two high efficiency 100mm speakers
POWER: 8 x 1,5 Volt IEC R14/C batteries
AC/DC Adapter – Input Vdc= 12 V / I = 1,2 A
PHONES/AUX-OUT: Output for headphones and external
amplification.
MIDI IN: Connection from a MIDI unit and data reception
MIDI OUT: Connection to a MIDI unit and data transmission
DIMENSIONS: (945 x 360 x 125) mm
WEIGHT: 4,9 Kg
KEYBOARD: 61 professional keys (C-C) sensitive to touch
(Dynamics)
POLYPHONY: maximum 64 notes
TOUCH: Immediate exclusion and restoration of sensitivity to
touch. (Dynamics) - 5 dynamic levels (only for TK 82)
DISPLAY: backlit LCD 80 x 40 mm
BASIC SOUNDS: 131 polyphonic tones
MIXED SOUNDS: thousands of combinations of sounds
EQUALISER: 4 equalization levels
TRANSPOSER: range +/– 12 semitones
PORTAMENTO: creates a pitch slide
PIANO: immediate selection of the piano tone
SOUNDS FOR ACCOMPANIMENT: 131 polyphonic tones
EFFECTS: 8 CHORUSES, 8 REVERBS and SUSTAIN ON / OFF
STYLES: 100 rhythms including 4 Oriental, 8 Pianist and 5 Styles
with 13 effects
DJ GROOVE (TK 82): Drum Machine effects on keyboard
DJ STYLES (TK 78): 5 styles with 13 effects, 3 dedicated sounds
Controls: START/STOP, DOWN BEAT, TEMPO +/–,
KEY START/FILL IN, BREAK, INTRO/ENDING
METRONOME: with immediate control
MANUAL DRUM: 48 rhythm percussions on the keyboard
BONTEMPI S.p.A. reserves all rights to modify specifications of this product without notice
Page 3
ENGLISH
3
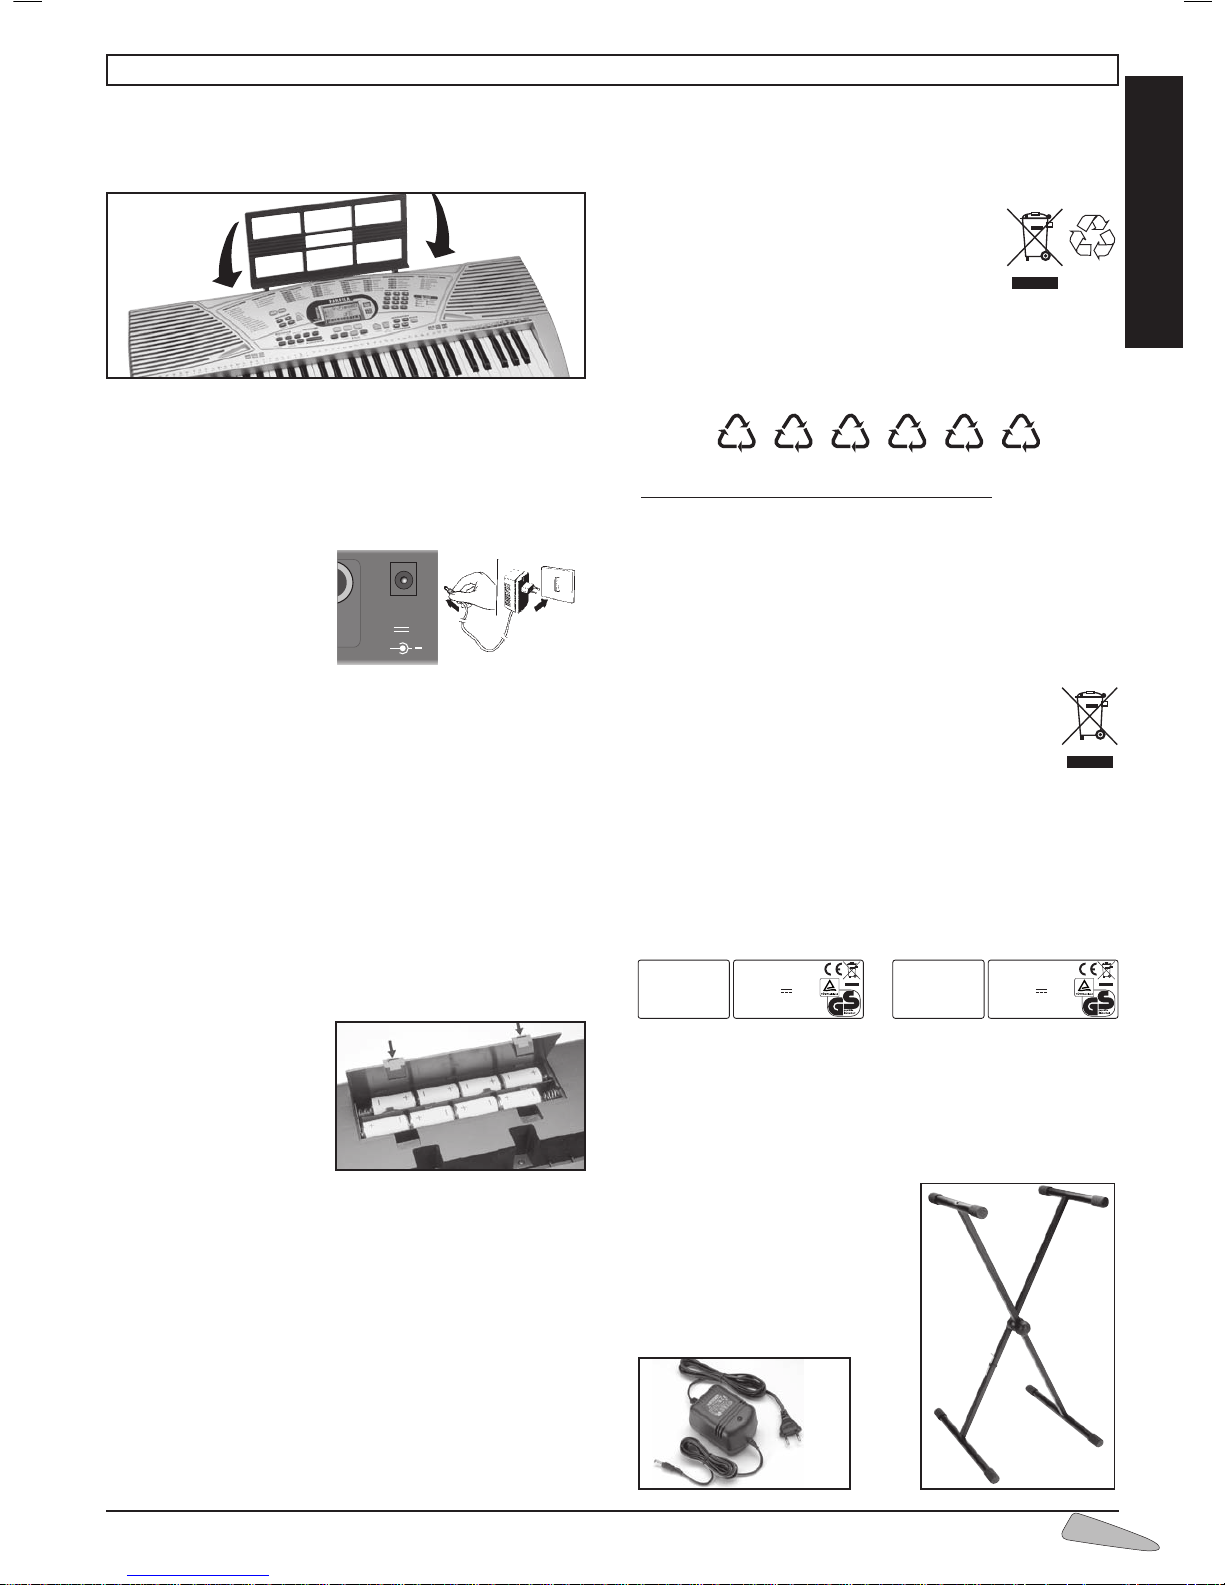
MUSIC-STAND
Insert the music-stand in the special holes located on the backside of the keyboard.
POWER SUPPLY
This electronic keyboard can function with mains or battery.
MAINS SUPPLY
The instrument can be supplied by the AC/DC “AD
177.12” (Vdc =12V / I =
1,2A) positive central adap-
ter conforms to national and international safety regulations
covering electrical appliances.
RECOMMENDATIONS: The socket (1) for the adapter plug
must be easily accessible. Inserting the plug into the socket at
the back of the instrument automatically cuts off supply from
the batteries. Ensure that the adapter is sufficiently ventilated
and that the ventilation slits are not covered with objects such
as newpapers, tablecloths, curtains, etc. Do not expose the
adapter to drops or splashes of water.
WARNING: All batteries or transformers with safety insulation
must be checked regularly for faults in cable, wire, or plug insulation or other parts.
BATTERY SUPPLY
This instrument works with
eight 1.5V IEC R14/C
batteries (not supplied)
which are inserted in the
housing at the bottom.
To open press on the part
of the lid marked OPEN.
Fit the batteries as shown
at the bottom of the housing.
ADVICE ON USING THE BATTERIES
• Take worn batteries out.
• Recharge only “rechargeable” batteries and always in the
presence of an adult.
• Avoid using batteries of different types at the same time.
• Do not use combinations of new and worn batteries.
• Do not shortcircuit the power supply terminals.
2. INTRODUCTION
WASTE DISPOSAL STANDARDS
For information regarding the disposal of the items mentioned
here below, please refer to Council Administration office regarding specialised waste collection centres.
1 - DISPOSAL OF BATTERIES
Protect the environment by disposing of
batteries in the special containers provided
for this use.
2 - PACKAGING DISPOSAL
Take the paper, cardboard and corrugated board to the appropriate waste collection centres. Plastic material must be placed
in the relevant collection containers.
The symbols indicating the various types of plastic are:
Key for the different types of plastic materials:
PET= Polyethylene terephtalate
PE= Polyethylene, code 02 for PE-HD, 04 for PE-LD
PVC=Polyvinyl chloride
PP= Polypropylene
PS= Polystyrene, Polystyrene foam
O= Other polymers (ABS, Laminates, etc.)
3 - WASTE DISPOSAL OF USED ELECTRICAL AND
ELECTRONIC APPLIANCES
All articles displaying this symbol on the body, packaging or instruction manual of same, must not be
thrown away into normal disposal bins but brought
to specialised waste disposal centres.
Here, the various materials will be divided by characteristics
and recycled, thus making an important contribution to environmental protection.
INSTRUMENT IDENTIFICATION
Always quote the serial number on the bottom of the keyboard in any correspondence.
OPTIONAL ACCESSORIES
LE 127
Metal legs.
AD 177.12
Mains supply adaptor.
Output 12V / 1200 mA.
BONTEMPI S.p.A.
VIALE DON BOSCO, 35
62018 POTENZA PICENA (MC)
ITALY
MODEL
TK 82
SR
RATING
12V
12W
SER. N°.
G2858001
BONTEMPI S.p.A.
VIALE DON BOSCO, 35
62018 POTENZA PICENA (MC)
ITALY
MODEL
TK 78
SR
RATING
12V
12W
SER. N°.
G2858001
01
PET02PE03PVC
05
PP06PS
07
O
+
INPUT
DC 12V
PHONES
AUX. OUT
(1)
LE 127
AD 177.12
Page 4
4
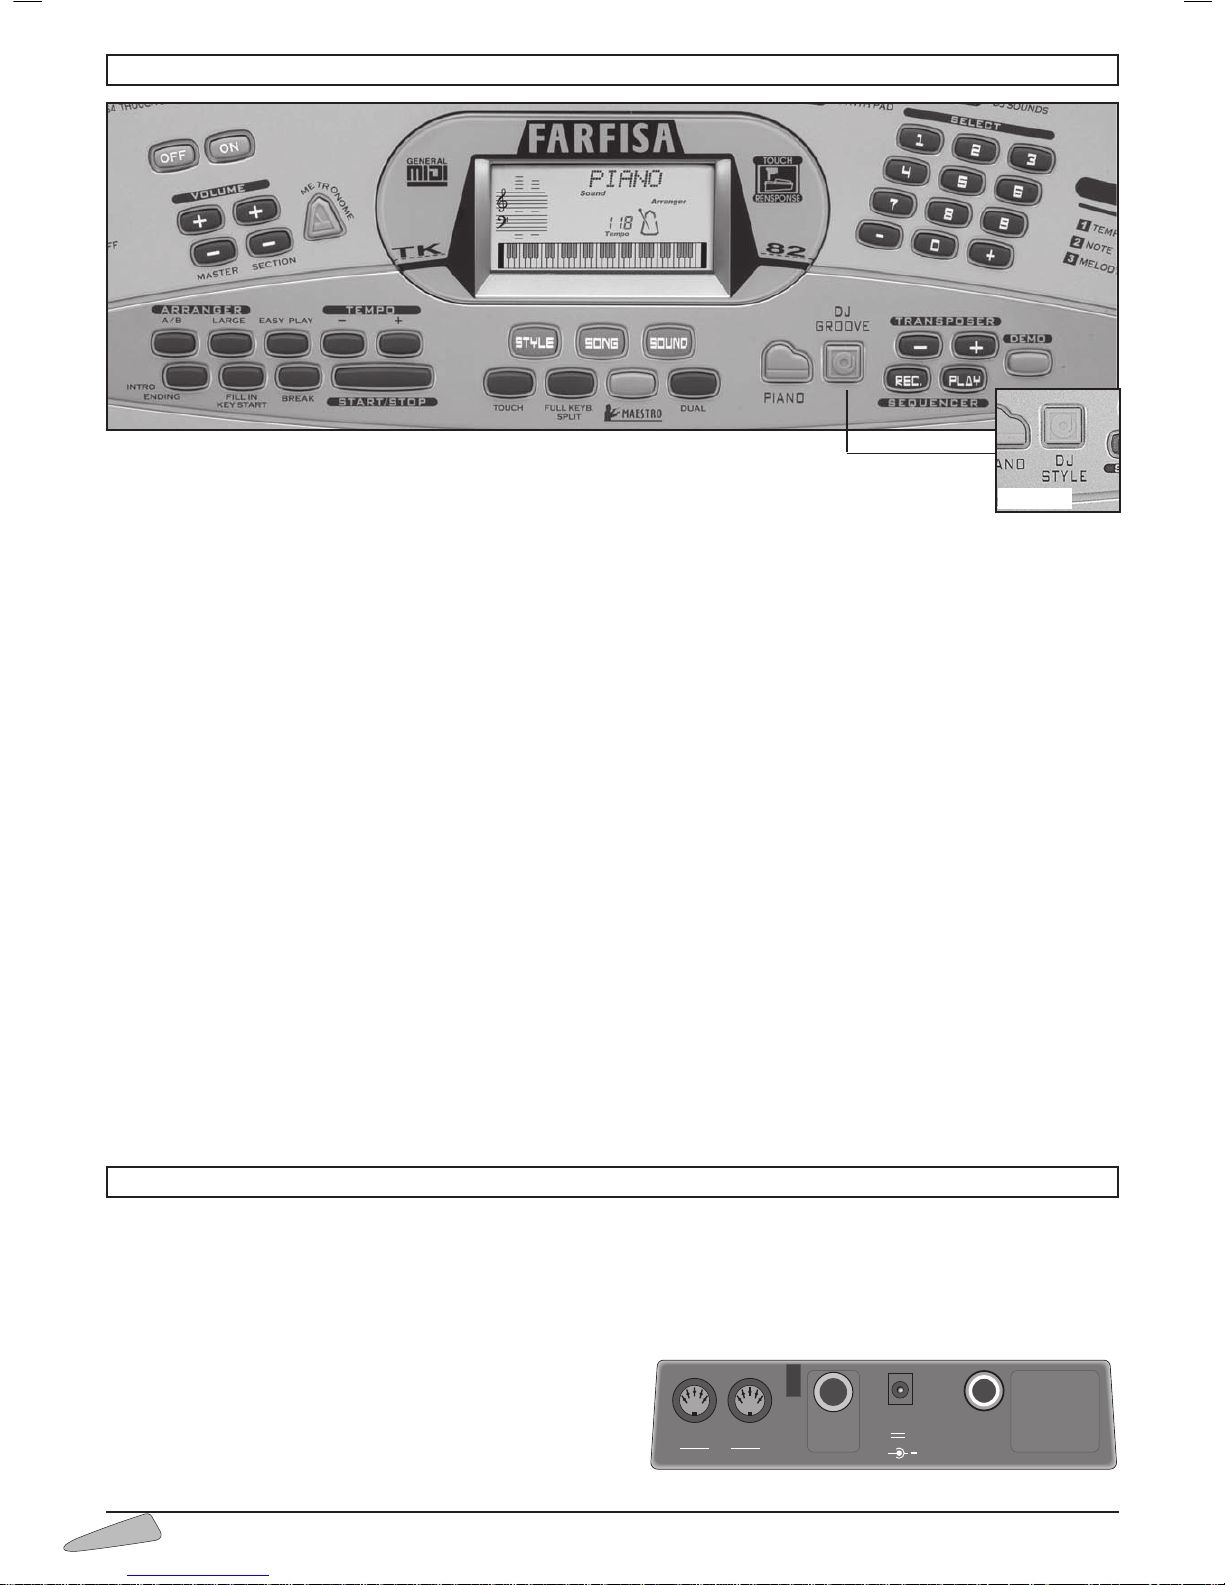
STYLE – Selects the rhythm styles.
SONG – Selects the pre-recorded
songs.
SOUND – Selects the right-hand sound or two sounds to
mix together.
TOUCH – Turns the touch sensitivity on keys on and off
(Dynamics).
FULL KEYB. / SPLIT – Splits the keyboard between two
sounds or to set just one.
MAESTRO – Enters the 5 levels learning mode.
DUAL – Allows mixing and the selection of two sounds.
PIANO – Enables PIANO tone and identification of chords
across the whole keyboard.
DJ GROOVE
(TK 82) - Enable Drum Machine effects on
keyboard.
DJ STYLE
(TK 78) - Enables the DJ STYLE rhythm with dedi-
cated sound and effects on the right-hand side of the keyboard.
TRANSPOSER +/– - Allows pitch of notes to be changed.
SEQUENCER REC – Records what is being played.
SEQUENCER PLAY – Plays what has been recorded.
DEMO – Plays the demo song.
SELECT 0-9 and +/– - Selects functions, rhythms, songs and
sounds.
ON/OFF – Turns the instrument on and off.
VOLUME MASTER – Selects the master volume.
VOLUME SECTION – Selects the sections volume.
METRONOME – Switches on and off the metronome
beat.
ARRANGER A/B – Selects the automatic accompaniment
with A and B rhythms.
ARRANGER LARGE – Selects the automatic accompani-
ment with Large rhythms.
EASY PLAY – Depending on the style, selects right-hand
and left-hand tone, the best tempo for the performance and
sets the FREE CHORD setting on the keyboard. In the 60
songs, it selects the sound and the tempo connected to the
songs.
TEMPO +/– - Sets the tempo for style performance, songs
or metronome.
INTRO/ENDING – Prepares a musical intro or plays an
ending when the rhythm is on.
FILL IN/KEY START – Allows rhythm to be enabled by
pressing one or more keys or enables changes while rhythm
is on.
BREAK – Prepares a temporary variation of the rhythm style
or a short intro.
START/STOP – Starts/Stops a rhythm style or a song.
3. CONTROL PANEL
4. SOCKETS
INPUT DC 12 V - Switches the instrument on with an AC/
DC adapter.
PHONES / AUX-OUT – Socket for headphones and Hi-Fi;
output impedance 150 Ohm – To play without disturbing and/
or being disturbed, you can use a stereo headphone. When the
cable is inserted the speaker is automatically excluded and all
sections of the keyboard can be heard in the headphone. The
socket also allows an additional stereo amplifier, a recorder, etc.
to be connected.
Warning: only connect stereo cables to the “PHONES/ AUXOUT” socket.
+
INPUT
DC 12V
PHONES
OUT IN
MIDI
AUX. OUT
PEDAL
SWITCH
MIDI IN – Socket to connect a cable coming from a MIDI
unit and to receive data.
MIDI OUT - Socket to connect a cable going to a MIDI unit
and to transmit data.
PEDAL SWITCH - Socket to connect a SUSTAIN pedal.
(TK 78)
Page 5
ENGLISH
5
1) Indicates the name
of sounds, rhythm
styles, volumes and
other functions.
2) Indicates the selec-
tion for the tone of
the left side of the
keyboard or Lower.
3) Shows the selection
of the two mixed
sounds.
4) Indication of “Intro”,
”Ending”, ”KeyStart”
con t rols fo r the
rhythm style.
5) Indication of enabled SEQUENCER: “Record” or
“Play”.
6) Indication of active automatic accompaniment and
pattern (Arranger A, B, A-Large, B-Large).
7) Indicates “PIANO” function is active.
8) Indicates “DJ GROOVE” (TK 82) or “DJ STYLE” (TK 78)
function is active.
9) I n d i c a t e s
“TRANSPOSER” is
active (transposition
high or low).
10) Metronome icon,
shows beat tempo.
11) Indicates the tempo
of the rhythm style,
of the song or of
the metronome.
12) 61 key keyboard
showing notes that
are pressed or that
have to be pressed if
in MAESTRO mode.
13) Indication of Split point (19 or 24).
14) Indication of the identified chord and EASYCHORD
function.
15) Pentagram with notes displayed.
16) Indicates an octave higher for the last 5 keys.
ENGLISH
The rhythm instruments of the MANUAL DRUM
With function 30 MANUAL DRUM ON enabled, each key is connected to a percussion instrument.
Letters on the left
Indicate the basic note for the
name of the chord.
Effects of the DJ GROOVE
(TK 82)
When DJ GROOVE is active, DRUM MACHINE effects are activated on
the keyboard.
Effects of the DJ STYLE
(TK 78)
When the DJ function is enabled, each key corresponds to a special
effect.
The DICTIONARY chords
When function 26 DICTIONARY is enabled, the display shows name
and composition of chords.
6. THE DISPLAY
15
14
7
1
8
9
2
3 4 5
6
101112
13
16
5. DIRECTIONS ON THE KEYBOARD
Page 6
6
SWITCH ON AND SWITCH OFF
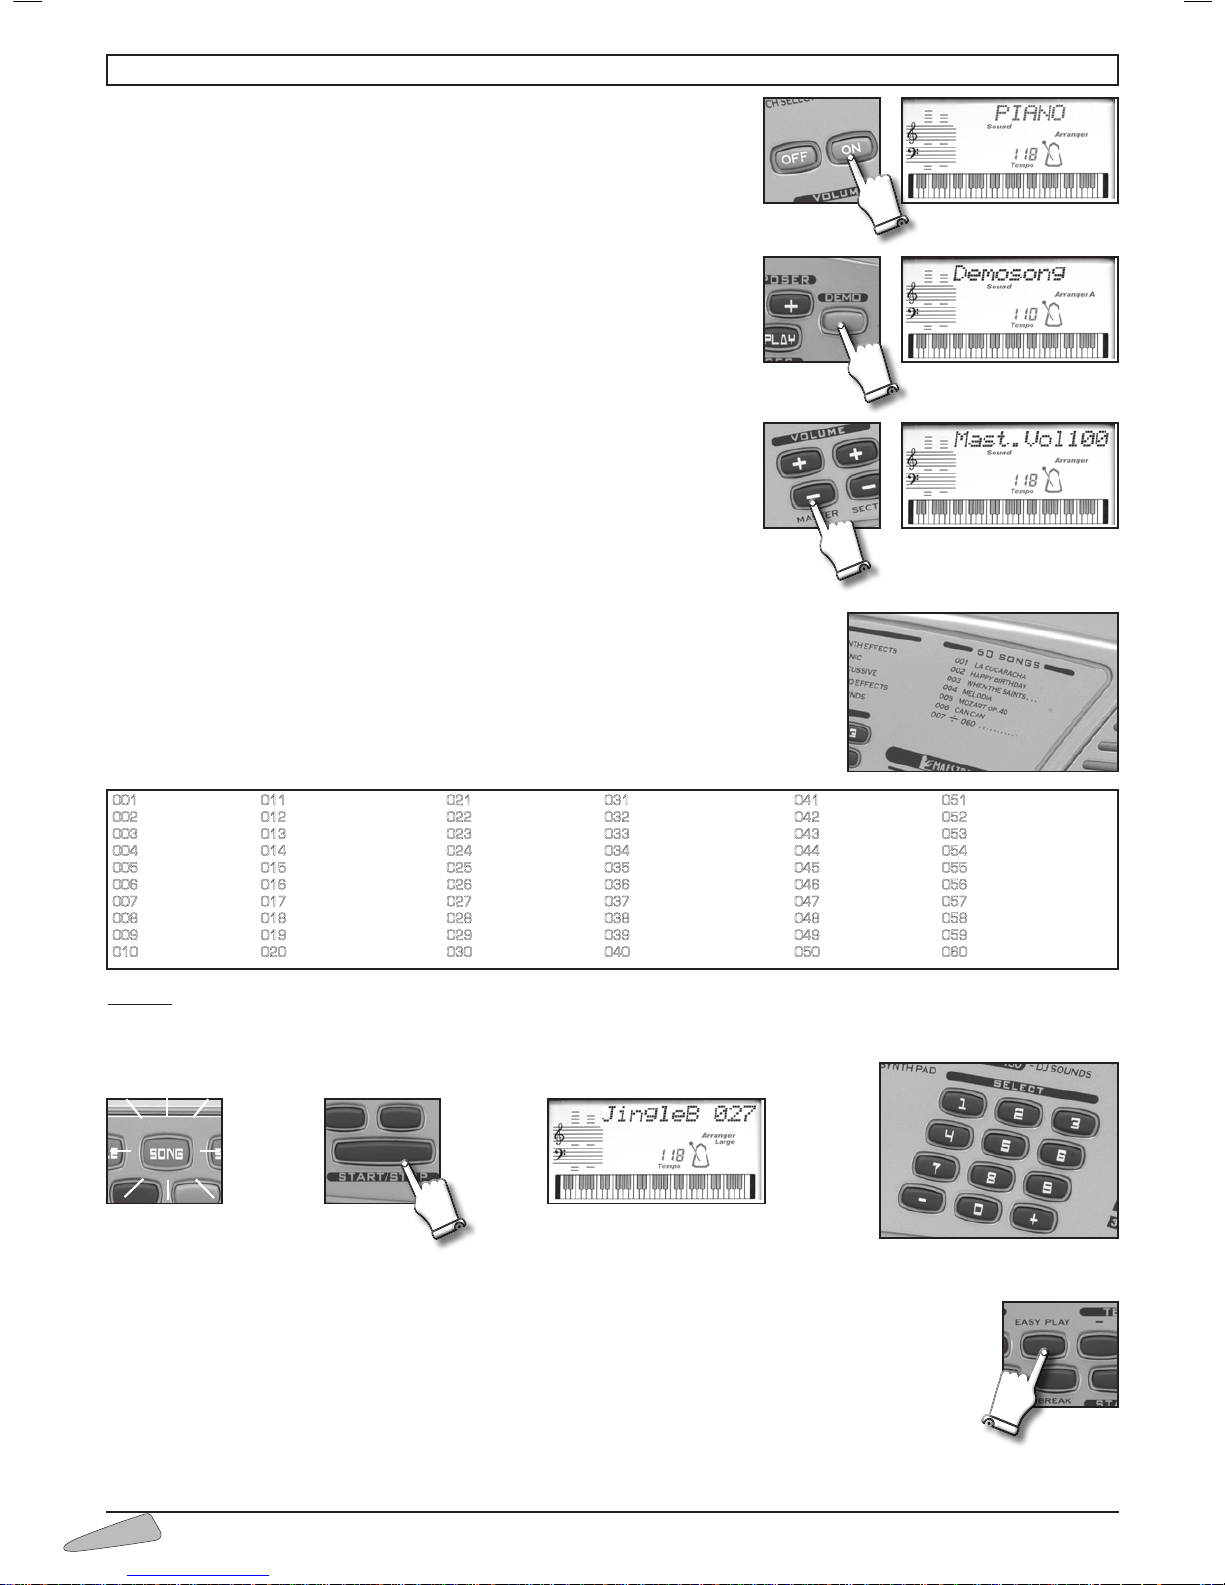
The instrument can be turned on and off by using the ON/OFF button. When turned on, the keyboard is set to operate with the PIANO sound, the 8 Beat 1
rhythm and the song La Cucaracha.
DEMO – Chosen excerpt
Switching on the DEMO button, a melody that will emphasise the characteristics of
the keyboard will play. To turn off the melody press the DEMO button.
VOLUMES
To regulate the volume of the instrument you must use buttons MASTER
VOLUME + (to turn up) or MASTER VOLUME – (to turn down). By holding
the button pressed down, the variation becomes continuous.
To restore the standard volume press both MASTER VOLUME + and MASTER
VOLUME – buttons together.
SONGS
The instrument contains 60 classic repertoire songs.
To select the songs, enter a three digit number according to the SONGS list.
Example: for song 027 Jingle Bells,
• press the SONG button (light on);
• enter SELECT, 0, 2, 7 on the numerical keyboard;
• press the START/STOP button to start or stop the musical performance.
When a song is being played, you can immediately listen to other songs by entering the number of the song you have chosen or by
using the SELECT “– / +” buttons.
The EASY PLAY control sets the melody of the song and the standard TEMPO on the keyboard.
7. HOW TO USE THE KEYBOARD
001
002
003
004
005
006
007
008
009
010
LA CUCARACHA
HAPPY BIRTHDAY
WHEN THE SAINTS...
MELODIA
MOZART op. 40
CAN CAN
GREENSLEEVES
MY LORD
JOHN BROWN'S BODY
KATJUSCHA
011
012
013
014
015
016
017
018
019
020
THE CAMPTOWN RACES
AURA LEE
HOME IN THE RANGE
SANTA LUCIA
DU, DU LIEGST MIR IM HERZEN
DARK EYES
ROMANZE IN F op.50
WA LTZ FROM SWAN LAKE
LA PRIMAVERA
ODE AN DIE FREUDE
021
022
023
024
025
026
027
028
029
030
SONATINE IN G
POLOVETZIAN DANCE
MENUETT IN
G
WILDER REITER
ALLEGRO
ANDANTE
JINGLE BELLS
STILLE NACHT
O COME ALL . .
.
GOOD KING WENCESLAS
031
032
033
034
035
036
037
038
039
040
TRÄUMEREI
MEXICAN HAT DANCE
TWINKLE TWINKLE LITTLE STAR
MARY HAD A LITTLE LAMB
SUR LE PONT D'AVIGNON
OH! CHRISTMAS TREE
OH! SUSANNA
LONDON BRIDGE
MY DARLING CLEMENTINE
FRÈRE JACQUES
041
042
043
044
045
046
047
048
049
050
YANKEE DOODLE
RED RIVER VALLEY
CIELITO LINDO
ARIA SULLA IV CORDA
ROSE DEL SUD
DANZA DELLE ORE
ONDE DEL DANUBIO
RADETZKY MARCH
MINUETTO (Bach)
RONDÒ (Clementi)
051
052
053
054
055
056
057
058
059
060
FASCINATION
BARCAROLLE
IL CARNEVALE DI VENEZIA
IL BRINDISI
CANTATA
ALOUETTE
KOMM LIEBER MAI
THE FARMER IN THE DELL
LIGHTLY ROW
LA DONNA È MOBILE
Page 7
ENGLISH
7
THE SOUNDS
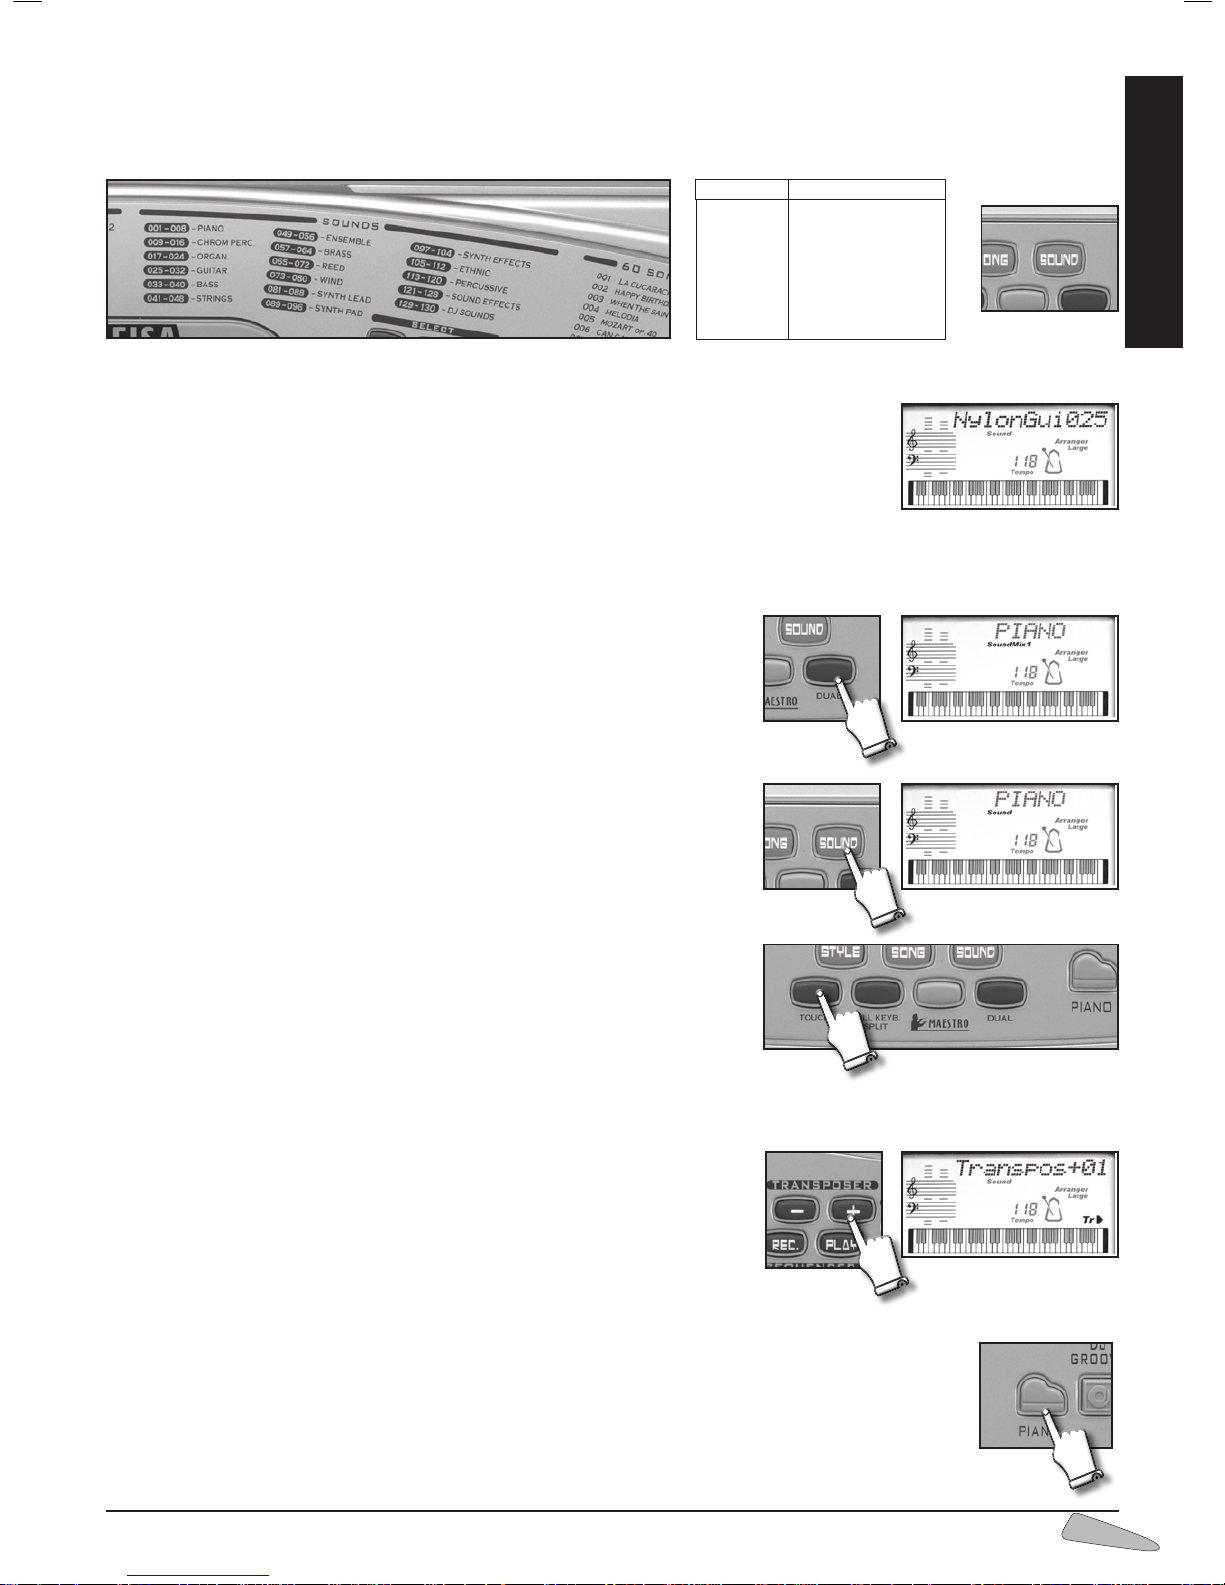
The keyboard features 131 sounds divided into 17 families (e.g. 025-032 GUITAR).
They are selected when the SOUND button is on by entering a three digit number between 001 and 131 of the SOUNDS list
you will find at the end of the Instructions Manual.
Example: for NYLON GUITAR type in number 025 (0, 2, 5 with the SELECT keyboard.)
If the display shows “Disable”, this means an incorrect number has been typed in.
Sounds can be selected also by using the SELECT “+ / –” buttons.
By entering code 29 you will enable the “SELECT LOWER” function, the keyboard will be split and
you will also be able to choose different sounds for the left hand; enter the code for the chosen
sound.
IMPORTANT: With some sounds you might notice a slight difference of volume or sound quality when playing
them in different areas of the keyboard. This is an inevitable consequence of multiple sampling and not a technical problem.
THE DUAL
With the DUAL control, you can mix two sounds and create thousands of combinations.
To mix press DUAL; the display shows “SoundMix1”; select a sound and press the
SOUND button: the display shows “SoundMix2”; select the second sound that
will be mixed with the first one.
To select other sounds, keep using the SOUND button.
To return to just one sound, press the DUAL button again: the display shows
“Sound”. To change the volume of the two sounds, to use the “+/–“ buttons of
VOLUME SECTION and to select the first or second sound, keep SOUND
button pressed.
THE TOUCH
By pressing the TOUCH button, you will enable and disable the keyboard’s sensitivity to touch (dynamics).
THE TRANSPOSER
The TRANSPOSER +/– controls shift the whole keyboard tonality by +/– 12
semitones.
By pressing one of the two buttons, the display temporarily shows the current
value.
The TRANSPOSER variation is always indicated on the display by the “< Tr “ or “
Tr > “ signs. By simultaneously pressing the “+/–“ buttons of TRANSPOSER, you will
return to the standard 00 value.
THE PIANO
With the PIANO button, the PIANO sound and the chord identifier will be immediately enabled on the whole
keyboard.
GUITAR
025 - 032
025 NYLON GUITAR
026 STEEL GUITAR
027 JAZZ GUITAR
028 CLEAN GUITAR
029 MUTED GUITAR
030 OVERDR. GUITAR
031 DISTORT . GUITAR
032 HARMON. GUITAR
FAMILY SOUNDS LIST
Page 8
8
THE METRONOME
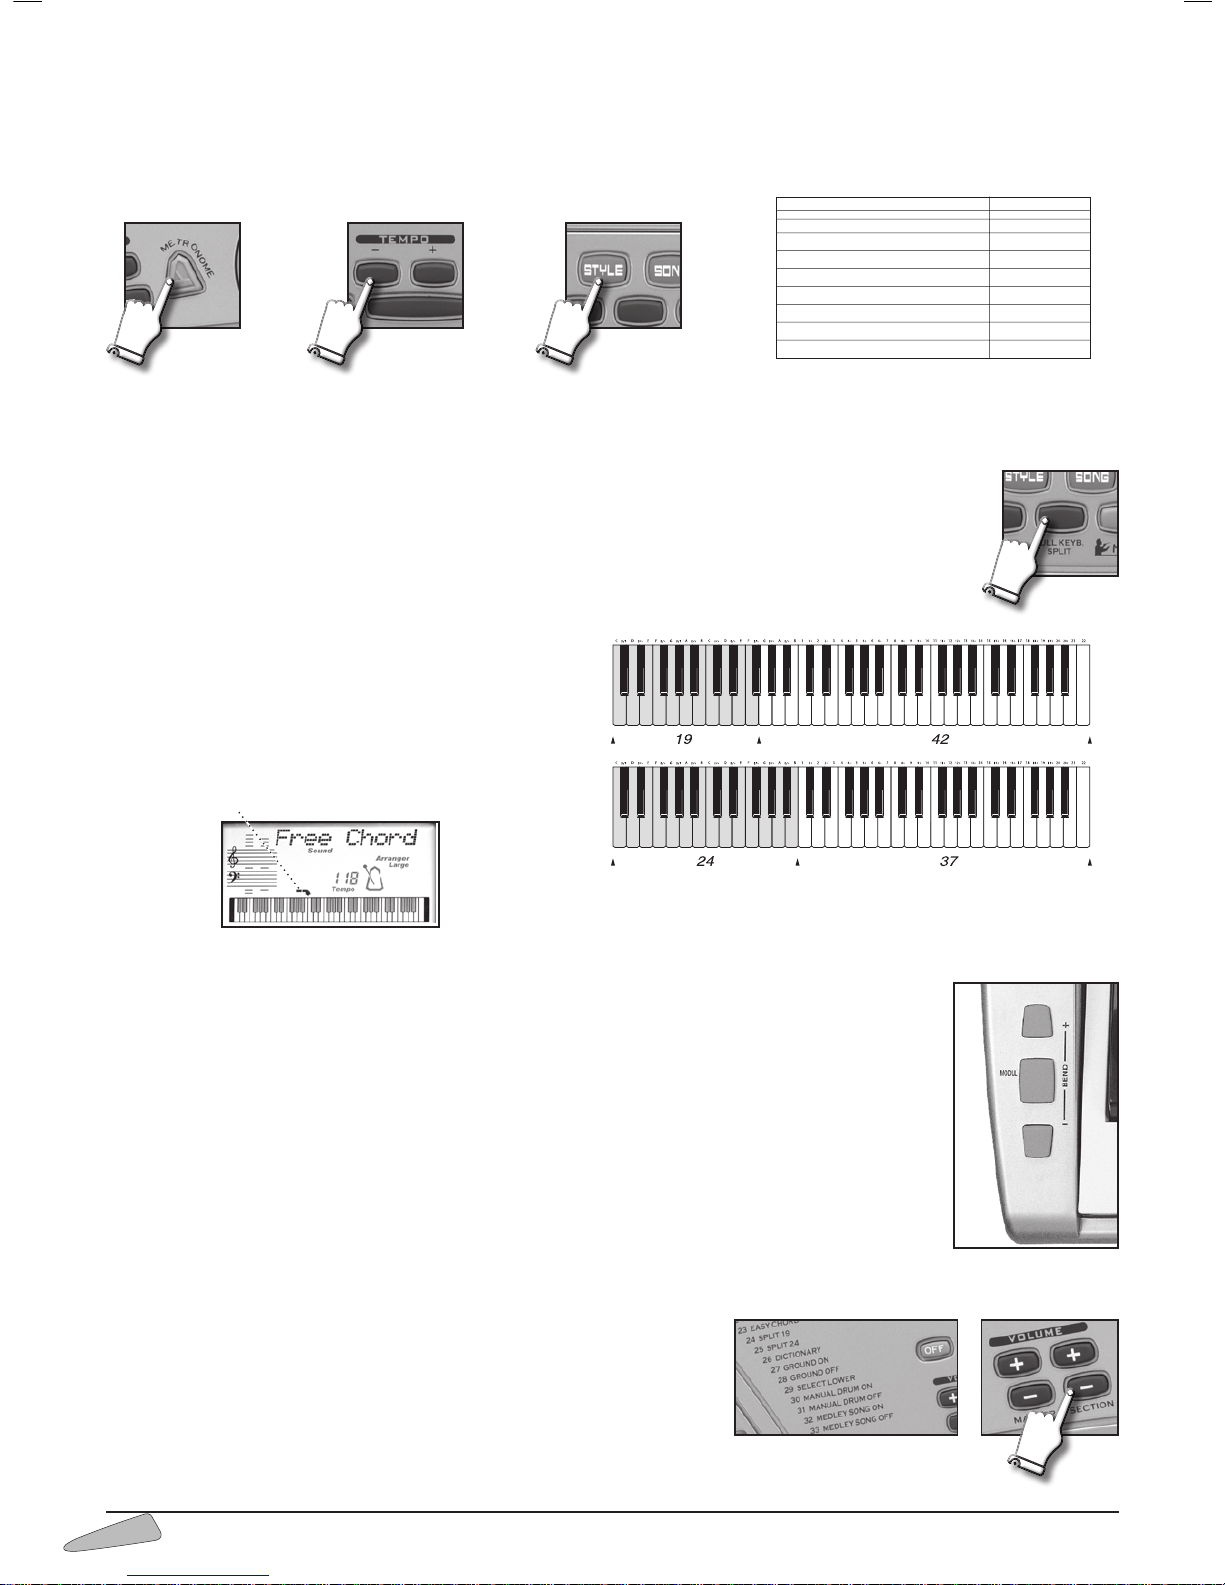
The metronome helps you to learn the music, giving the beat during musical exercises and simulating the traditional time-marking
instrument.
It can be turned on and off with the METRONOME button. To change the tempo, use the “TEMPO +/–“ buttons. To set the volume, press the STYLE or SONG button and use the VOLUME SECTION +/– button.
Chart of general BEATS for the METRONOME.
THE KEYBOARD
It has 61 professional pace keys and can be used in the following ways:
1. When simply turned on, one single sound is enabled over the whole keyboard, together with the chord identifier.
2. By pressing the FULL KEYB/SPLIT button, the keyboard will be divided into two sections: one dedicated to
accompaniment to form chords (keys on the left) and the other one to play the melody (keys on the right).
It is possible to set the point where the keyboard will be divided into two modes:
a. by entering 24, the display indicates “
Split 19”; this
means that the left part of the keyboard goes from the
first to the nineteenth key.
b. by entering 25, the display indicates “
Split 24”; this
means that the left part of the keyboard goes from the
first to the twenty-fourth key.
The keyboard on the display shows the division point
with an arrow.
Chords can be played in the FREE CHORD mode, which means in the traditional way, or in the EASY CHORD mode, which
means in the simplified mode (see the EASY CHORD paragraph).
THE BENDING AND MODULATION CONTROLS
To the left of the keyboard there are three keys, two BEND (Pitch Bending) and one MODUL (Modulation).
When playing a note and pressing one of the two BEND keys you will hear a variation in the frequency of
the note. This simulates the “pulling” of a string on an instrument such as the guitar. The “Modulation” control
modulates the frequency of the sound.
THE SOUNDS OF THE LEFT PART OR LOWER
The sounds for the ACCOMPANIMENT, when the rhythm is not playing, can be selected by entering 29 (SELECT LOWER) and
the corresponding number in the SOUNDS list.
To set the volume of the accompaniment section, use the VOLUME SECTION
+ / – buttons;
The display shows “
Lower Vol” and the value of the volume.
By keeping the button pressed, the variation will continue.
To return to the standard volume, simultaneously press the + and – buttons of
the VOLUME SECTION.
TEMPO
40 - 60
60 - 66
66 - 76
76 - 108
108 - 120
120 - 168
168 - 200
200 - 240
Voice in musical scores
Largo
Larghetto
Adagio
Andante
Moderato
Allegro
Presto
Prestissimo
Page 9
ENGLISH
9
THE STYLES
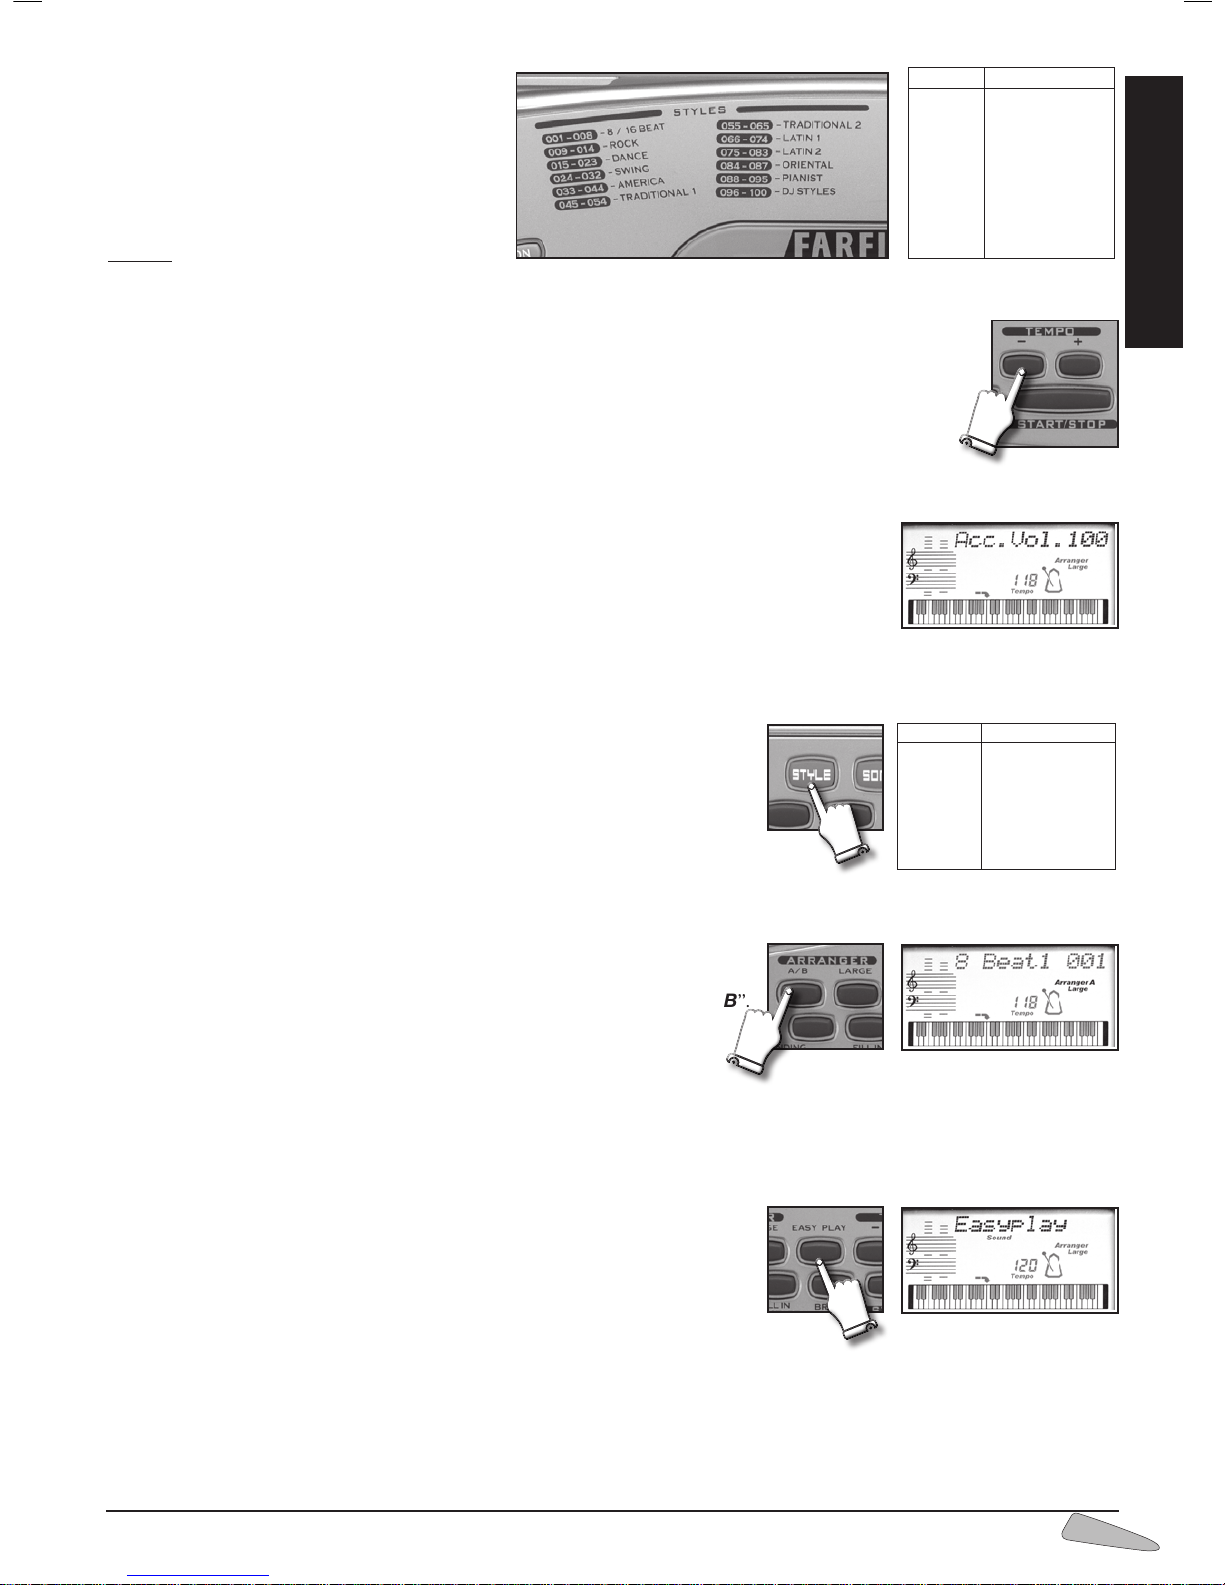
The keyboard has 100 rhythmic styles enriched
by automatic accompaniments and completed by
drums.
They are sub-divided into 12 families (e.g. 015023 DANCE) , see the list on page 94.
To select them press the STYLE button and then
a 3 digit figure from the STYLES list.
Example: to select DISCO 70 rhythm, digit number
019 (0, 1, and 9).
You can also select rhythms using buttons “+ / –” of SELECT.
To start or to stop a rhythm press the START/STOP button.
To increase or decrease the speed of the song press the two buttons TEMPO + and TEMPO – .
By holding the button pressed down, the variation becomes continuous.
To go back to standard rhythm press buttons TEMPO + and TEMPO – together.
The metronome icon of the display shows the musical quarters and the beginning of every beat or measure.
When a rhythm is on function and you select a new style this latter starts at the end of the previous
rhythm pattern.
To adjust the volume of the accompaniment section, use the VOLUME SECTION + / – buttons.
The display will show “
Acc. Vol.” with the value of the volume. By holding the button pressed down,
the variation becomes continuous. To restore the standard volume press together buttons VOLUME
SECTION + and VOLUME SECTION –.
THE PIANIST STYLES
The PIANIST styles are automatic accompaniments created with the piano alone.
To select them, press the STYLE button and enter a three digit number from the
PIANIST list. See the STYLES list at the end of the Instructions Manual.
ARRANGER A, B
By pressing the ARRANGER A / B control, you will be able to switch between a
basic rhythm style and one with a variation.
The display shows the selected mode by showing “Arranger A” or “Arranger B”.
LARGE
With the LARGE control, you can elaborate further on the arrangement of the rhythm style.
The display shows “Large”.
EASY PLAY
Depending on the rhythm, EASY PLAY sets the tone for the right hand, the best
tempo for the performance and splits the keyboard to play chords in the FREE
CHORD mode.
TEMPO
The “ + / – ” TEMPO buttons can be used to set the tempo of the rhythm or of a song.
DA NCE
015 - 023
015 TECHNO
016 HOUSE
017 RAP
018 SKA
019 DISCO 70
020 DISCO 1
021 DISCO 2
022 DISCO SAMBA
023 HULLY GULLY
FAMILY STYLES LIST
PIANIST
088 - 095
088 8 BEAT
089 16 BEAT
090 BALLAD
091 RO MANTIC
092 SWING
093 BLUES
094 RO CK'N RO LL
095 BOSSANOVA
FAMILY STYLES LIST
Page 10
10
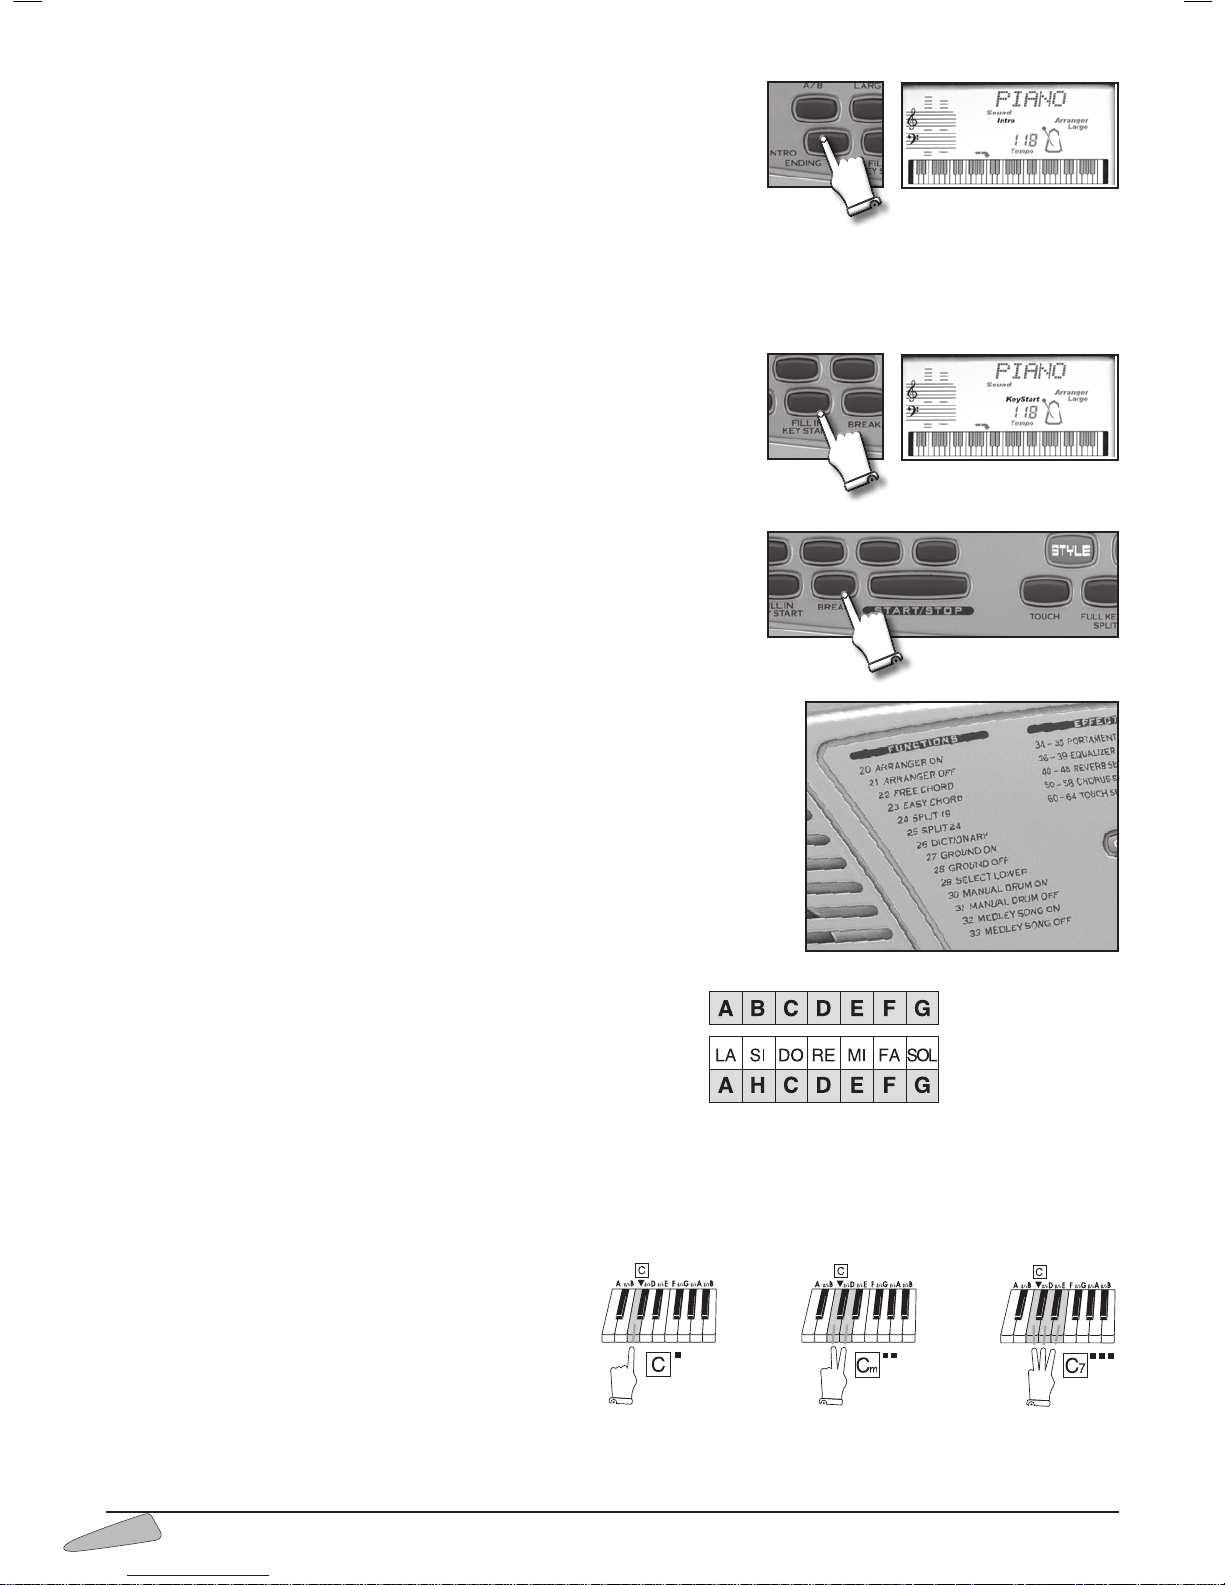
INTRO / ENDING
When a rhythm is stopped, by pressing the INTRO button the display will show
“Intro” and a rhythm style is predisposed, and a preliminary music sequence will
then starts when you press the START / STOP or KEY START buttons.
When a rhythm is on, by pressing the ENDING button, a final musical sequence
stars.
FILL IN
When a rhythm is on function and you press the FILL IN button you produce a rhythmic variation of the drums.
KEY START
The KEY START function can be switched on when the rhythm is not playing; the
display shows “Key Start”.
If the keyboard is split, you can activate the rhythm by playing a chord in the left part
of the keyboard.
If it is not split, play a chord including at least three keys anywhere on the keyboard.
BREAK
By pressing the BREAK control during the performance of a rhythm style, you will
activate an orchestral ‘break’.
By pressing BREAK when the rhythm is not playing, a brief introductive orchestral
break will be executed. The display shows “Intro”.
BREAK replaces the ENDING's execution
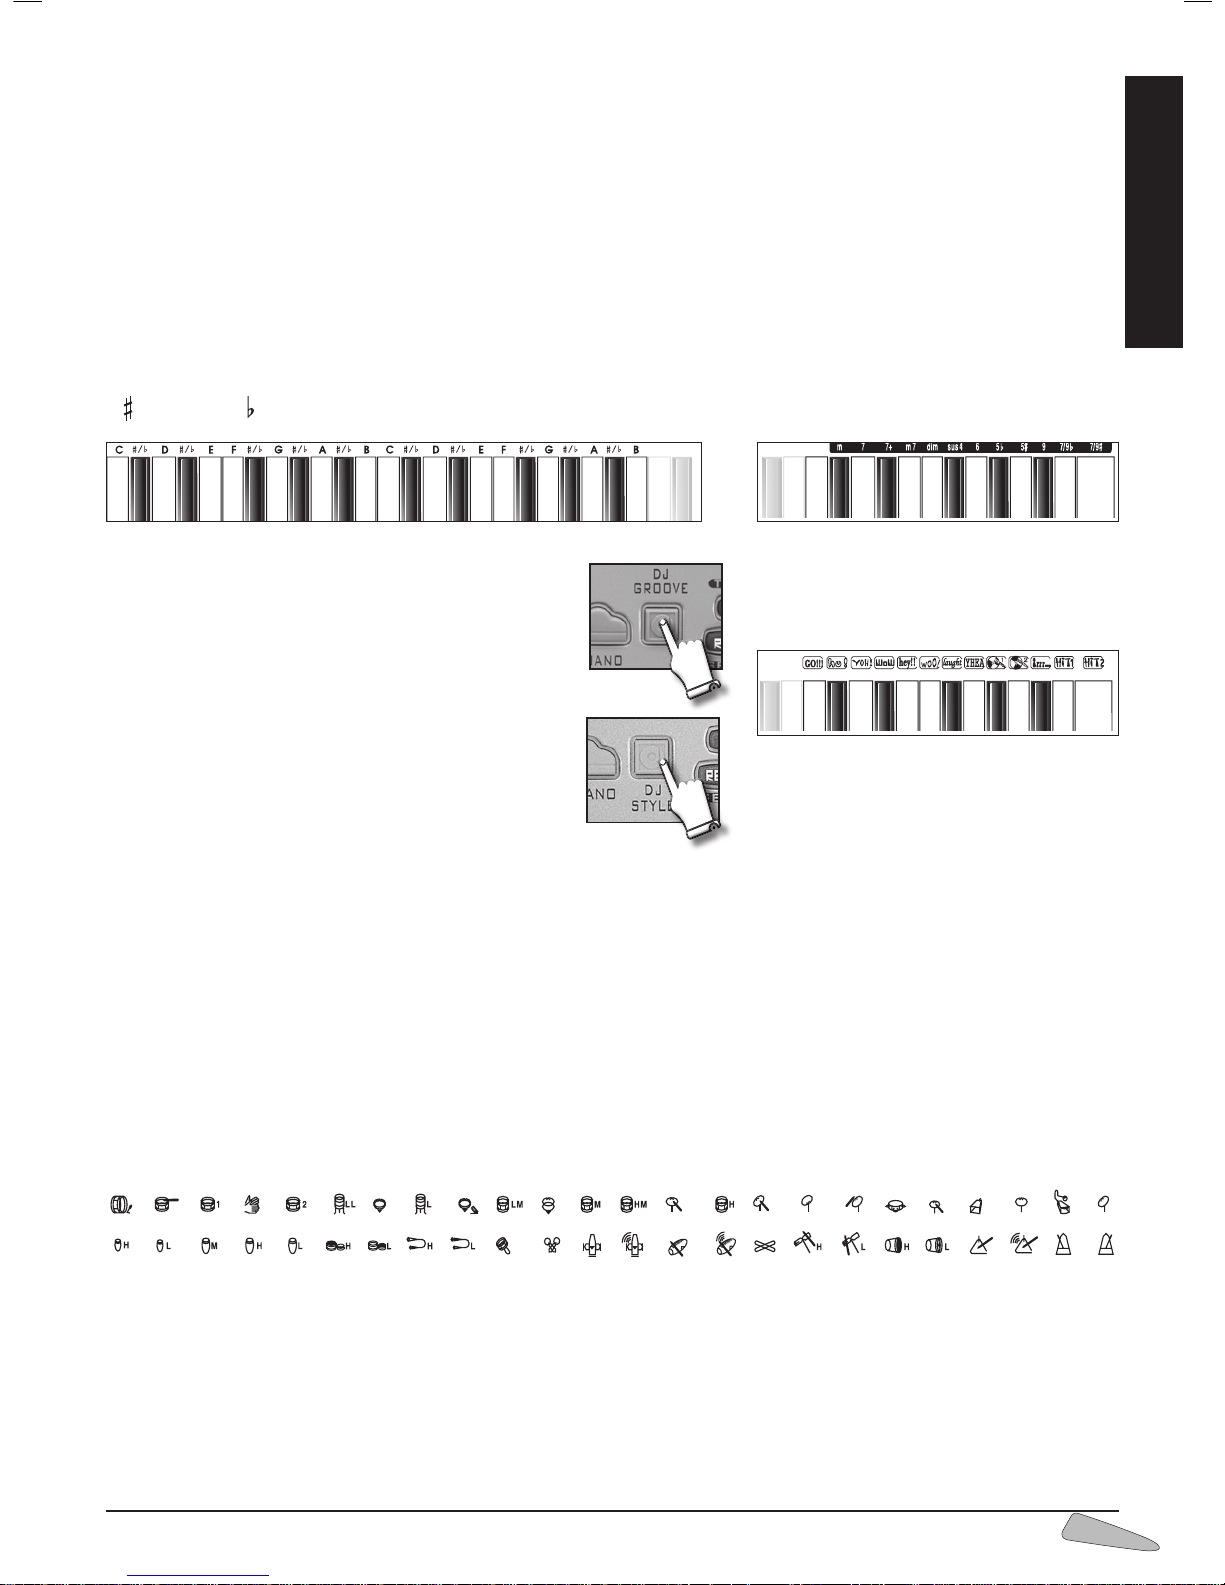
FUNCTIONS
ARRANGER ON / OFF
When a rhythm is functioning it starts or stops the arrangement of the rhythm.
To start press number 20 ARRANGER ON (usually on) and to stop press number 21
ARRANGER OFF.
FREE CHORD
Chords are played in the traditional way and all the main chords are identified.
It can be enabled by entering 22 FREE CHORD or by selecting EASY
PLAY.
The FREE CHORD mode works across the whole keyboard too when FULL
KEYBOARD is on.
The display shows the name of the chord.
EASY CHORD
This function allows you to compose chords on the left side
of the keyboard with the simplified mode:
one key will provide a major chord;
two keys a minor chord and
three keys a dominant 7th chord.
It can be enabled by entering 23 EASY CHORD.
The fundamental note of the chord (the most important one
and the one that gives the name to the chord) is represented
by the key pressed on the far left. For example, by pressing
simultaneously C, D and E, you will get a C7 dominant chord.
MAJOR
CHORD
MINOR
CHORD
SEVENTH
CHORD
Anglo-Saxon notation
Latin notation
German notation
Page 11
ENGLISH
11
SPLIT 19 or SPLIT 24
It is possible to set the point where the keyboard will be divided in two ways:
a. by entering 24, the display indicates “
Split 19”; this means that the left side of the keyboard goes from the first to the ninete-
enth key.
b. by entering 25, the display indicates “Split 24”; this means that the left side of the keyboard goes from the first to the
twenty-fourth key.
The keyboard on the display shows the division point with an arrow.
Chords can be played in the FREE CHORD mode, which means in the traditional way, or in the EASY CHORD mode, which means
in the simplified mode (see the EASY CHORD paragraph).
DICTIONARY
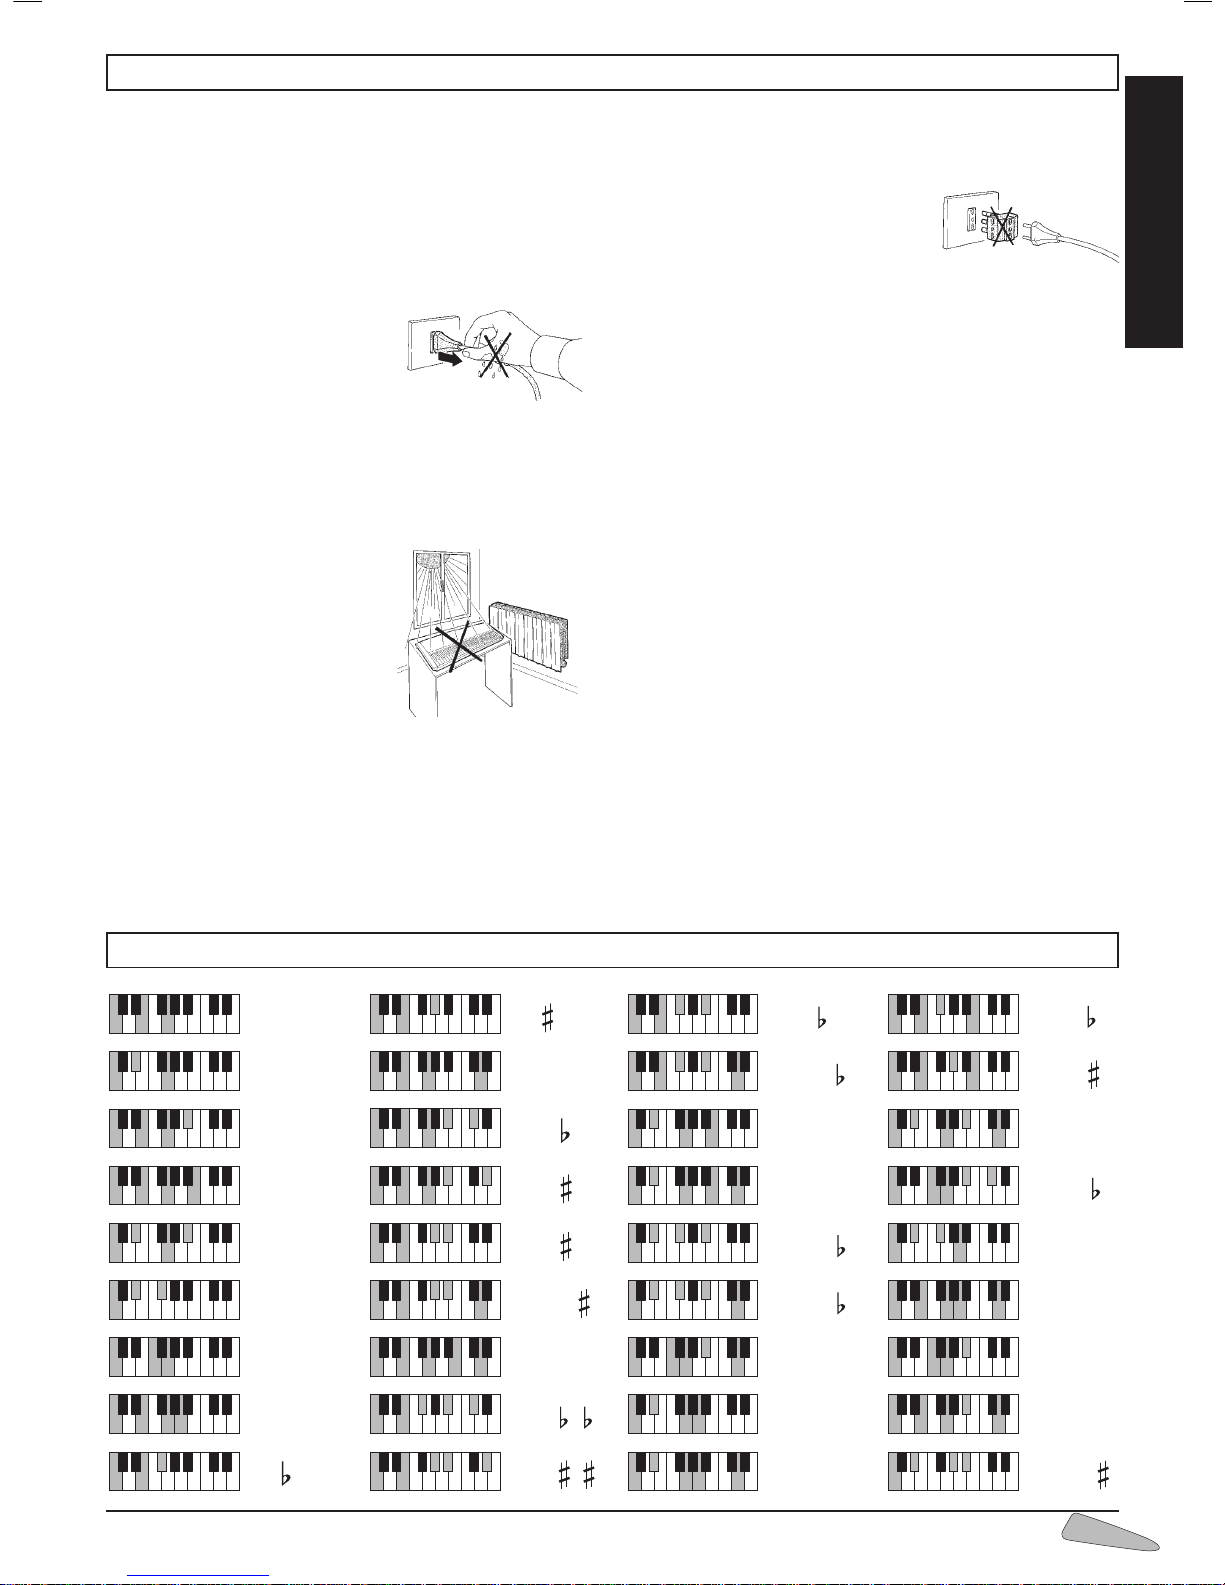
The DICTIONARY function shows the name of a chord, the notes that it includes on the pentagram and the keys required to compose the chord on the display. (See chart on page 15). It can be enabled by entering 26; the display shows “Dictionary”.
By pressing a key within the first two octaves on the left, you can choose the basic tonality C, D, E, F, G, A or B with the corresponding
“
” (flats) or “ ” (sharps) and the kind of chord in the last octave on the right.
DJ GROOVE (TK 82)
DJ GROOVE activates a DRUM MACHINE on the keybo-
ard. Each key corresponds to a percussion rhythm, a groove
effect or vocal effects which can by played individually or
combined.
DJ STYLE (TK 78)
The DJ STYLE control activates the DJ effects on the last
13 keys on the keyboard and sets a rhythmic style and a
sound adapt for a DJ. The style and sound can however be
changed and the DJ effects used in the same way.
GROUND ON / OFF
When a rhythm is active, and so is FREE CHORD, the GROUND provides a musical background for the arrangement.
It can be enabled with 27 GROUND ON (it is usually active as a standard) and disabled with 28 GROUND OFF.
SELECT LOWER
The sounds for the ACCOMPANIMENT, when the rhythm is not playing, can be selected by entering 29 SELECT LOWER and the
corresponding number in the SOUNDS list.
To set the volume of the accompaniment section, use the VOLUME SECTION + / – buttons;
The display shows “
Lower Vol” and the value of the volume. By keeping the button pressed, the variation will continue.
To return to the standard volume, simultaneously press the + and – buttons of the VOLUME SECTION.
MANUAL DRUM ON / OFF
The MANUAL DRUM allows you to play rhythm patterns using the keys indicated with the percussion instrument symbols.
It can be enabled with 30 MANUAL DRUM ON and disabled with 31 MANUAL DRUM OFF.
The display temporarily shows “
Drum On” or “Drum Off”
To set the volume, use VOLUME SECTION while the STYLE control is active and the led lit.
At the end of the Instructions Manual, the ‘DRUM SET TABLE’ chart lists the rhythm instruments.
The rhythm elements come out of the right or left speaker, with a stereophonic mix.
MEDLEY SONG ON / OFF
This function allows you to listen to all the songs one after the other, starting with the one you selected. It can be enabled by entering
32 MEDLEY SONG ON and disabled with 33 MEDLEY SONG OFF.
Page 12
12
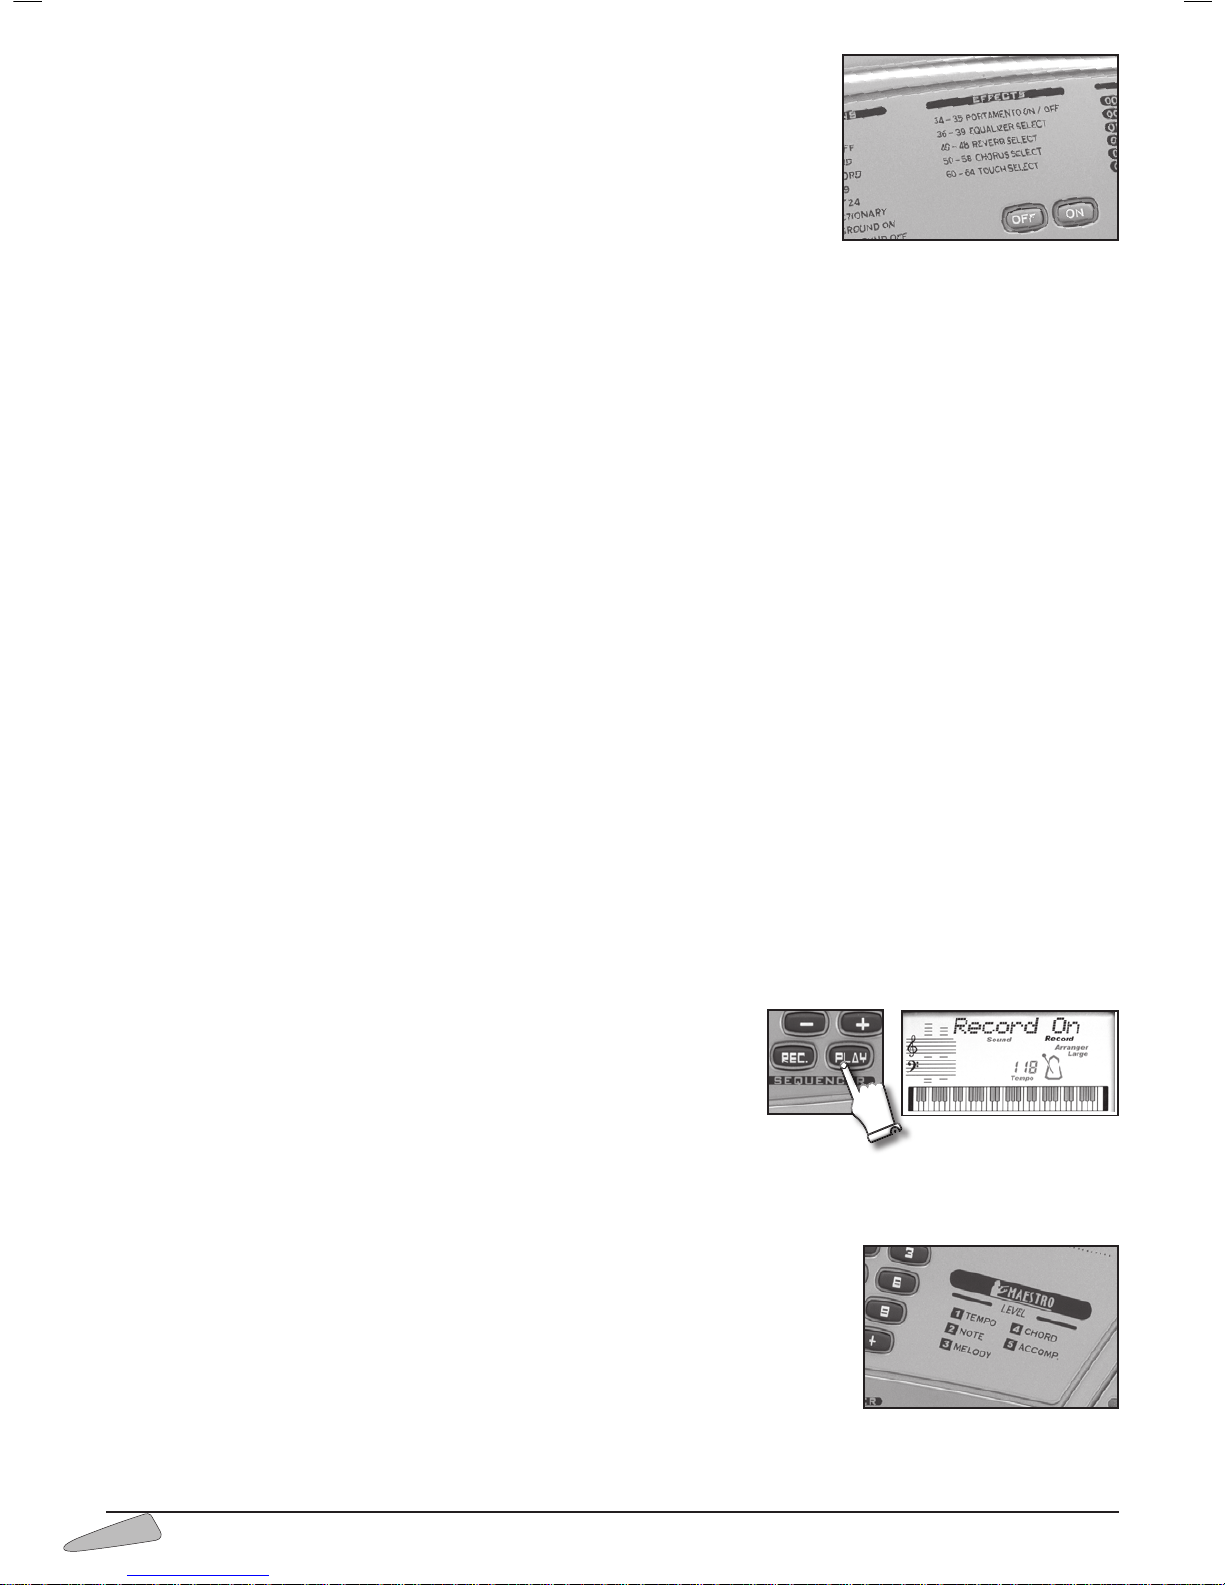
THE EFFECTS
The effects modify the tone-colour characteristics of the sounds.
PORTAMENTO ON / OFF
The portamento creates a pitch slide between two keys; it is more evident when two keys far
away one from the other are played. It can be enabled by entering 34 PORTAMENTO ON
and disabled with 35 PORTAMENTO OFF.
EQUALIZER SELECT
It allows you to choose among four different equalisations that intensify treble or bass frequencies.
By entering 36, the display shows “
Disco”, and bass frequencies are more intense; middle frequencies are more intense with 37
“Jazz” and 38 “Classic”; 39 “Flat” intensifies treble frequencies.
IMPORTANT: When connecting the keyboard to an external amplification, it is better to choose a middle frequency equalisation and, most important, to set the initial volume level at minimum.
REVERB SELECT
The reverb effect allows you to hear sounds as if they were produced in a big hall. You can choose between eight different types of
reverb. By entering 40 you will have “Room-1”, with 41 “Room-2”, with 42 “Room-3”, with 43 “Hall-1”, with 44 “Hall-2”, with
45 “Plate”, with 46 “Delay”, with 47 “Pan Delay” and with 48 “Reverb Off” you can turn the reverb effect off.
CHORUS SELECT
The ‘chorus’ effects enrich the SOUNDS section with special modulations that penetrate to a greater or lesser degree depending
on the selected sound.
You can choose between eight different types of chorus. By entering 50 you can have the “Chorus-1” effect, with 51 “ Chorus-2”,
with 52 “ Chorus-3”, with 53 “ Chorus-4”, with 54 “Feed Back”, with 55 “Flanger”, with 56 “Short Delay”, with 57 “FB
Delay” and with 58 “Chorus Off” you can turn the chorus effect off.
TOUCH SELECT (TK 82)
Five dynamic levels can be chosen: typing in code 60 enables the VERY SOFT level; 61 the SOFT level, 62 the NORMAL level,
63 the HARD level and 64 the HEAVY level. The 62 NORMAL level is usually activated.
SEQUENCER
The sequencer section allows you to record and listen to everything you play. The Sequencer also allows you to check your learning
level; the musician can play the melody, record it while listening to a song and then listen to the result.
It can be enabled by pressing the REC. button. The display shows “
Record On” to show that the Sequencer is active.
Press REC. again to stop recording and then press PLAY to listen to what has been recorded.
Press PLAY again to stop listening.
You can memorize up to 500 events.
When the memory is full, the display temporarily shows “
Sequen.Full” and the
“Record” sign vanishes.
After a recording session, while PLAYis active, variations made on the control panel
can alter recorded events.
Recorded data is memorised as long as the keyboard is switched on. If nothing has
been recorded in the Sequencer, by pressing PLAY the display will temporarily show “
SequenEmpty”.
MAESTRO
The
MAESTRO
section helps you in the music learning process just as if a real musical teacher
were there with you, teaching you five fundamental aspects:
1. Tempo 2. Notes 3. Melody 4. Chords 5. Accompaniment
Page 13
ENGLISH
13
DISPLAY DIRECTIONS
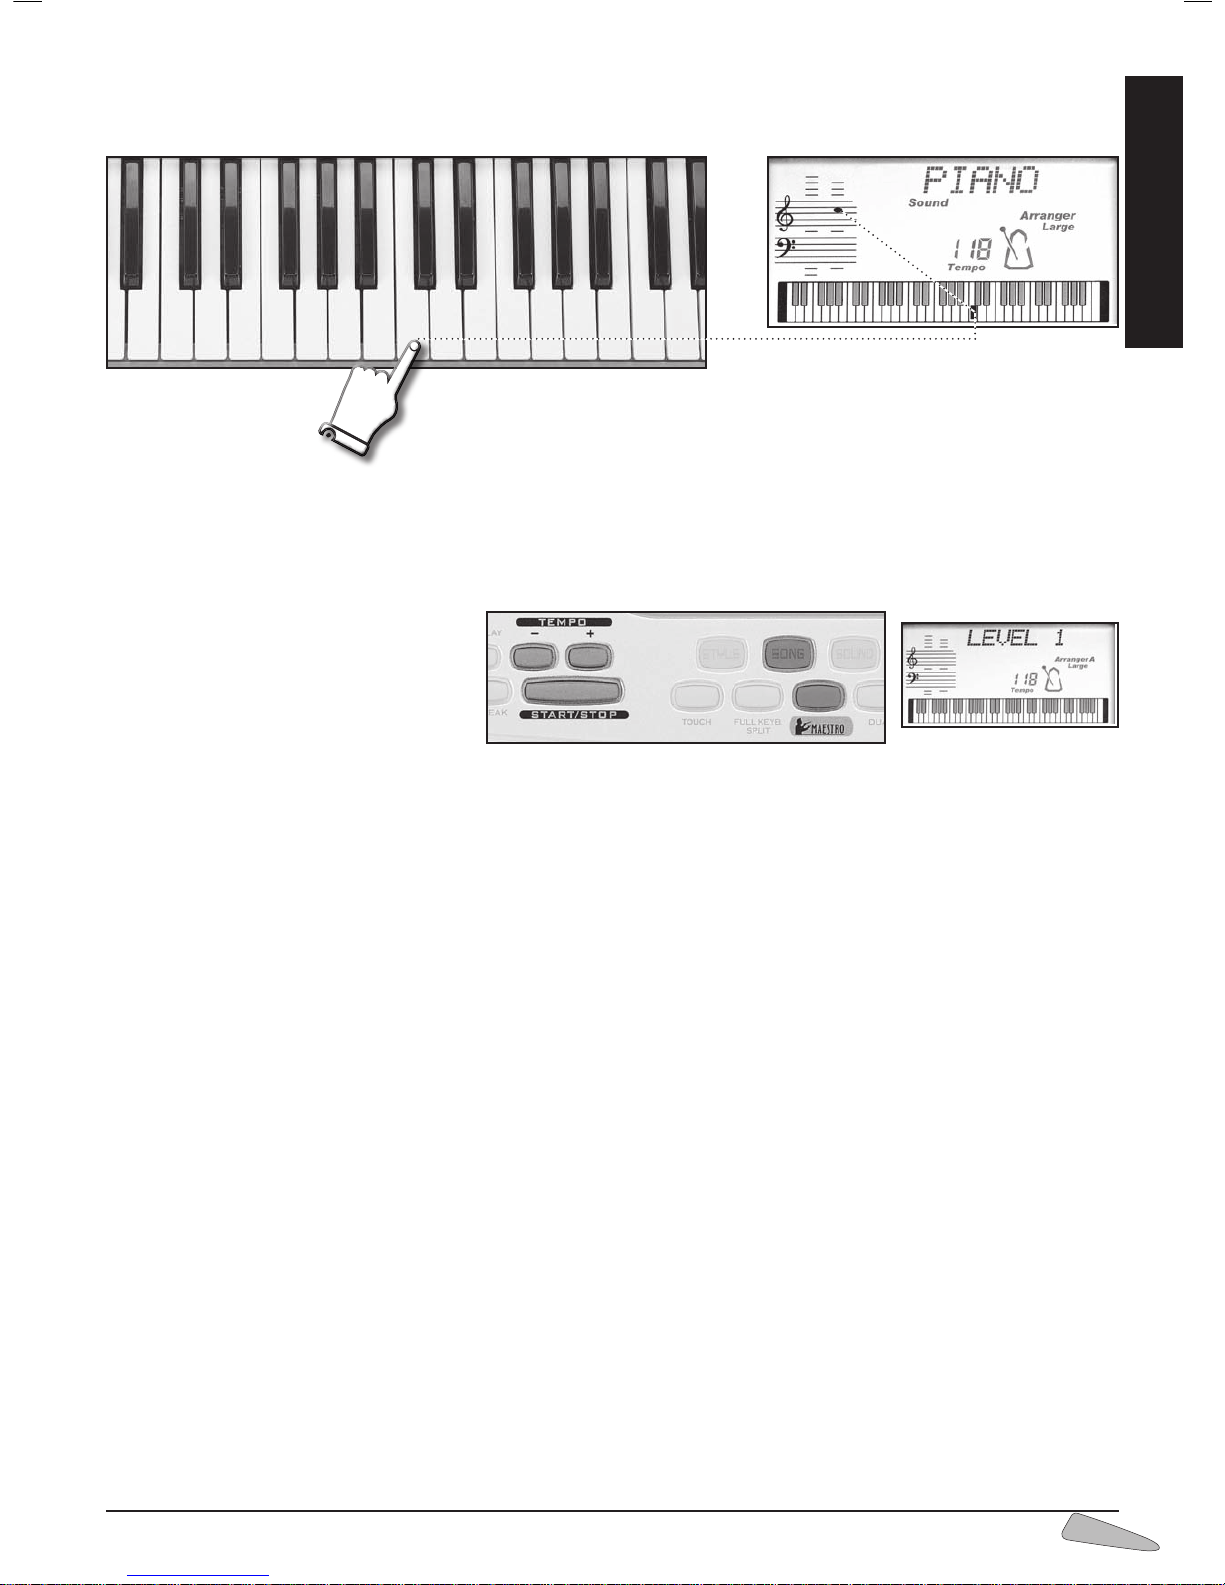
Press a key on the keyboard. The display shows which key you are pressing and the relative note will be shown on the pentagram.
1
st
level: Tempo of the song
At the 1st level, you can become familiar with the melody notes and learn the tempo of the song.
=== How to do it:
After having chosen a tune, select level 1 first
by pressing the
MAESTRO
button and then,
when the display shows “
LEVEL ?”, number
1 of SELECT.
Use the START/STOP control to start and
stop the performance. You can quicken or slow
down the tempo by using the TEMPO “+/–“
buttons. The song begins with a musical introduction, shown in the middle of the display as “Intro”.
When the “Intro” sign disappears, try playing the melody by pressing one or more keys and keeping time with the orchestra.
During your performance, the display will show the correct notes of the melody.
The accompaniment will automatically follow you.
You will be able to change tune by pressing the corresponding button on the SONGS list, or by using the SELECT “+ / –“ buttons.
If you wish to listen to the whole song, press START/STOP, then press SONG and then START/STOP again.
2nd level: The Notes of the melody
When you are able to keep time you can try the 2nd level, which means playing the correct keys to perform the correct melody.
=== How to do it:
After having chosen a tune, select the 2nd level by pressing the
MAESTRO
button and then SELECT number 2.
Use the START/STOP control to start and stop the performance.
When the intro has ended, try playing the melody; this time you will have to press the correct buttons for the other ones not to play.
The display will help by showing you the correct melody keys in advance.
The accompaniment will automatically follow your performance.
3rd level: The song Melody
This time the accompaniment will play normally, without waiting for you. This means you will have to perform the melody with the
right keys while keeping time, or else the song will sound out of tune.
=== How to do it:
After having chosen a song, select the 3rd level by pressing the
MAESTRO
button and then the SELECT number 3.
Use the START/STOP control to start and stop the performance.
When the intro has ended, try playing the melody of the song.
The display will help by showing notes and keys for the melody.
Page 14
14
4th level: The song Chords
At this level the song will be played with the rhythm section and the melody; you will be able to play the accompaniment chords using the left
side of the keyboard. If you do not play the right chord, the rhythm part will keep on going with the last chord and the melody will stop.
=== How to do it:
After having chosen a song, select the 4th level by pressing the
MAESTRO
button and then SELECT number 4.
Use the START/STOP control to start and stop the performance. When starting you will always have a metronome counting for
you. Play the first chord and then the others, following the directions shown on the display. If you play a wrong chord, the melody
will not play, and if you play it at the wrong time, accompaniment and melody will be out of tempo.
To make the first lessons easier, try slowing the tempo of the song, using the TEMPO + and – buttons.
The display will help by showing the name of the chord, the keys and the notes on the pentagram.
There are two ways of playing chords:
• Free Chord for playing chords in the traditional way. • Easy Chord for playing simplified chords.
To choose the desired mode, see the “FUNCTIONS” paragraph.
5th level: Accompaniment with orchestra
At this level the song will be played with the drums rhythm section together with the melody and you will be able to play the accompaniment. Rhythm and melody will keep going so you will have to play the right chord in time, or else it will be out of tune.
=== How to do it:
After having chosen a song, select the 5th level by pressing the
MAESTRO
button and then the SELECT number 5. Use the START/
STOP control to start and stop the performance.To start the complete accompaniment, play the first chord following the directions
shown on the display. The display will help by showing the name of the chord, the keys and the notes on the pentagram.
There are two ways of playing chords:
• Free Chord for playing chords in the traditional way.
• Easy Chord for playing simplified chords.
To choose the desired mode, see the “FUNCTIONS” paragraph.
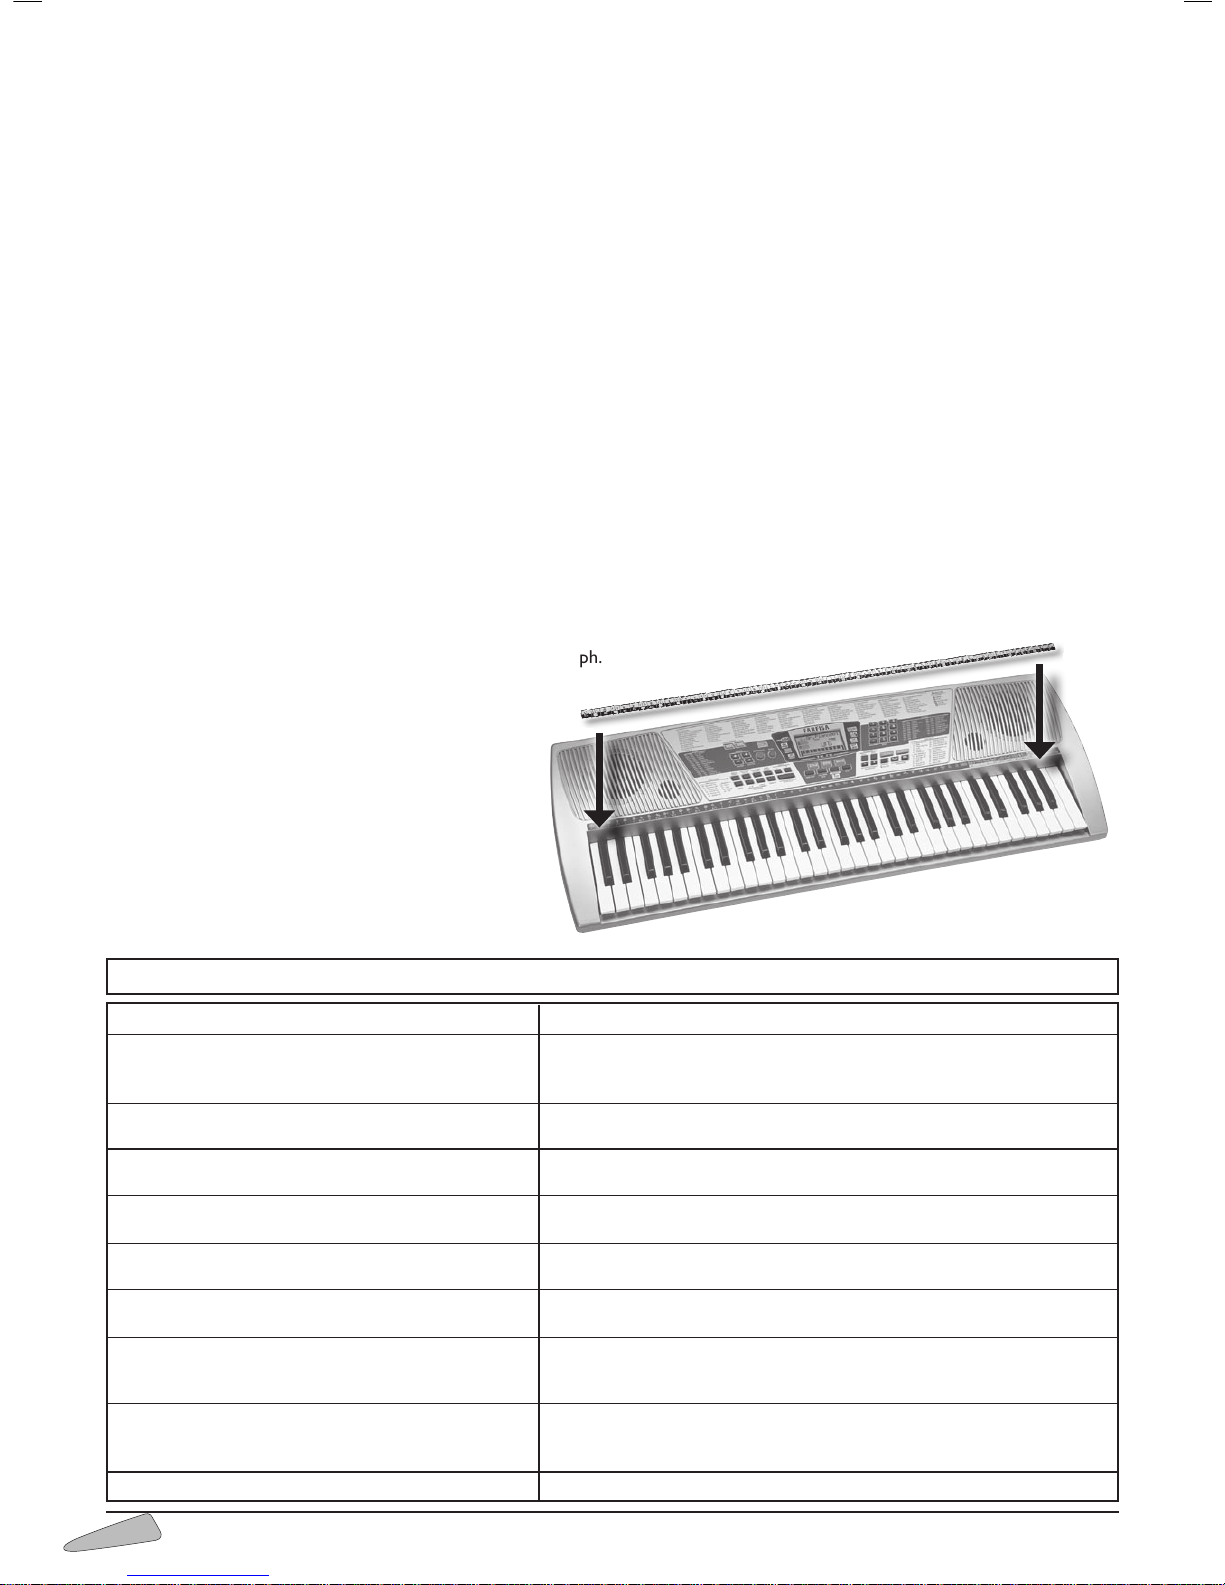
Strip with numbers and letters
Position the strip with numbers and letters above the
keyboard as shown in the picture.
The numbers on the strip correspond to the keys that
have to be pressed in order to play the tune of the
simplified scores contained in the enclosed "FARFISA
Music Book".
PROBLEM
It does not switch on
No sound when the keyboard is played.
The automatic accompaniment does not play.
No sound is produced when the MIDI data are reproduced
from a computer.
Reproduction on the keyboard produces an unnatural sound
when the keyboard is connected to a computer.
When a mobile phone is used you can hear a noise.
No sound is produced even when the keyboard is played or
reproducing a song.
The sound of the voice changes from note to note.
Any other anomalies.
POSSIBLE CAUSE AND SOLUTION
Problem with the power supply.
Connect the adaptor correctly. Ensure that the battery poles (+/-) are facing the correct
direction, and control that the batteries are charged.
The volume is set at a level that is too low.
Use the VOLUME MASTER keys to raise the volume.
The accompaniment volume is set at 0.
Use the VOLUME SECTION keys to raise the volume.
The MIDI cables are not connected correctly.
Connect the MIDI cables correctly.
The MIDI THRU function of the computer is activated.
Deactivate the MIDI THRU function of the computer.
The use of a mobile phone near to the computer may cause interference. To prevent this
problem, switch the mobile phone off or use it at a distance from the keyboard.
Control that the headphones are not connected to the PHONES/OUTPUT socket of
the rear panel. When headphones are connected to this socket, no sound is transmitted.
The method of sound generation uses multiple recordings (samples) of one instrument
on the whole extension of the keyboard. It is therefore normal that the sound of the voice
differs slightly from note to note.
Switch off and then switch back on after a few seconds
8. TROUBLE SHOOTING GUIDE
Page 15
ENGLISH
15
10. TABLE OF DICTIONARY
C
C
m
C
7
C
7+
C
m7
C
dim
C
sus4
C
6
C
5
C
7 5
C
7 9 5
C
m7+
C
m9 7+
C
m7 5
C
m9 5
C
7 9sus4
C
m6
C
m6 9
C
7+ 5
C
7+ 5
C
m7 9
C
7 4 9
C
7dim
C
6 9
C
7 4
C
7 9
C
m7 5
C
5
C
9
C
7 9
C
7 9
C
7 5
C
7 9 5
C
9 7+
C
7 9 5
C
7 9 5
9. MAINTENANCE AND REMARKS
• Keep this manual for future reference. •
When using electrical products, basic precautions must be followed, including the following:
1. Read all the instructions before using the product.
2. When the product is used by children, supervision by an
adult is advised.
3. Do not use the product near water, for example near a
bath tub, washbowl, kitchen sink, or near a swimming pool
etc., or in a wet or humid basement.
4. When connecting to the mains
supply ensure that:
a) your hands are not wet (to
avoid electric shocks);
b) do not pull on the cable.
5. This product, either by itself, or when connected to an
external amplifier and headphones or speakers, is capable
of producing sound levels that can cause damage to hearing.
Do not operate it for a long period of time at high volume
levels or in any case at an uncomfortable volume level.
Especially when using headphones, always moderate the
volume.
6. The product should be posi-
tioned so that it’s location will
provide adequate ventilation.
7. The product should be posi-
tioned away from heat sources
such as radiators, heaters or
other products that produce
heat.
8. This product should only be connected to a power supply
of the voltage corresponding to that shown on the label on
the instrument using an AC/DC adaptor. This label, containing all electrical data, relevant warning messages and the
instrument identification data, can be found on the underside of the product.
9. If the product is not used for long periods, the AC/DC
adaptor should be unplugged from mains.
10. The adaptor must be connected directly to the mains supply without any other plugs.
11. Do not obstruct the air entry
points of the feeder with objects
such as curtains, cloths, etc.
12. Do not place the adaptor
behind furniture or in hidden places.
13. Do not place sticky or adhesive objects on the keyboard,
such as burning candles.
14. Care should be taken to avoid foreign objects falling into or
liquid being splilt into the inside of the instrument through
any of the slots or openings in the case.
15. Ensure that the adapter is sufficiently ventilated and that
the ventilation slits are not covered with objects such as
newpapers, tablecloths, curtains, etc..
16. Do not expose the keyboard or the adaptor to drops or
sprays of any kind of liquid.
17. This product should be referred to an approved service
centre when: a) It has been exposed to rain. b) It appears
to operate incorrectly or shows a marked change in performance. c) It has been dropped or if the case has been
damaged. d) Objects have fallen into the instrument or
liquid has been spilt into or over it. e) The AC/DC adaptor
has been damaged.
18. Never attempt to repair your instrument yourself. Any
operation should be referred to authorized personnel,
otherwise the guarantee will be declared void.
19. Do not use alcohol, solvents or similar chemical substances
for cleaning. Use a soft cloth dampened in a bland solution
of water and neutral detergent. Dip the cloth in the solution and then wring it until it is nearly dry.
Page 16
16
What is “MIDI”
The initials MIDI are an abbreviation for "Musical Instrument Digital Interface" and represent a standard for the transmission of data via cable between a musical instrument (usually a keyboard) and a Personal Computer (or another musical
instrument).
The General MIDI System (General Midi)
This keyboard adopts the MIDI General System (General Midi): a standard that allows to receive or send MIDI data
(to a personal computer or to another keyboard) without having problems of compatibility deriving from the different
brands of the product. The general MIDI system specifies factors like the numeration of sounds, the available MIDI
channels etc.
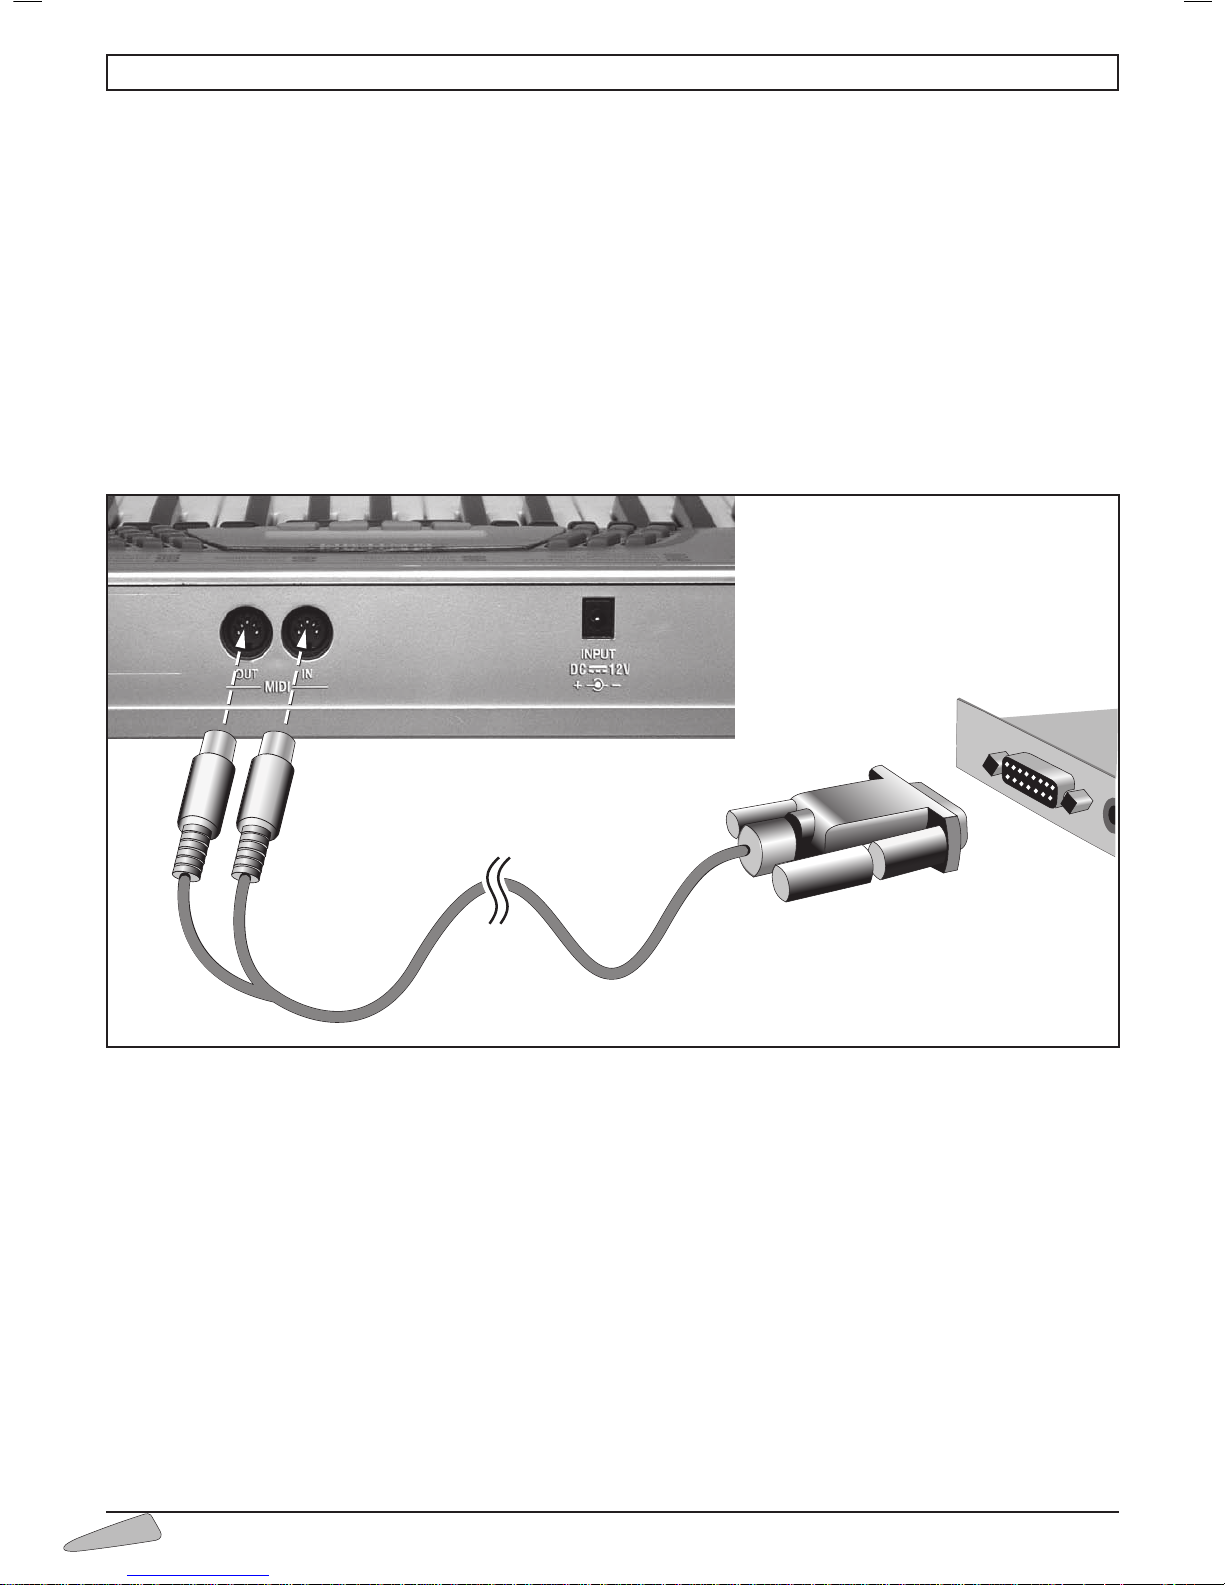
The keyboard is provided with MIDI IN and OUT sockets which enable the user to connect it to a Personal Computer
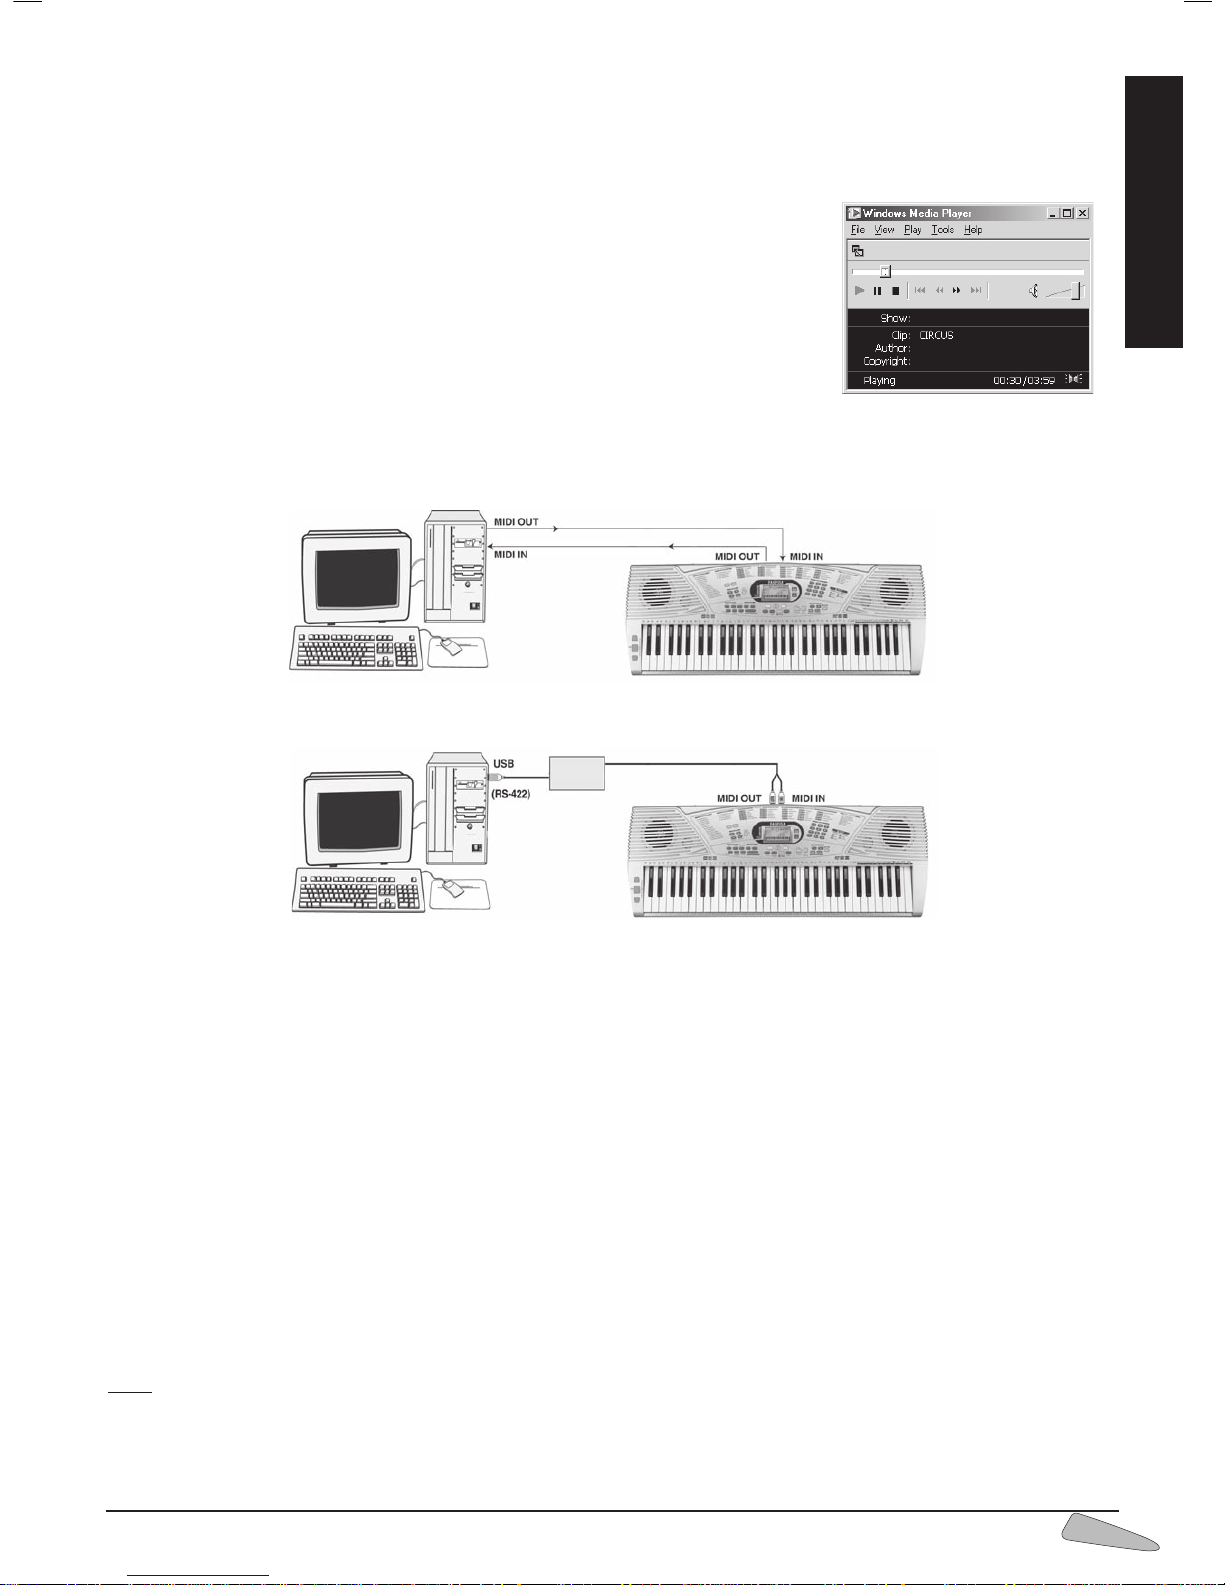
using a cable (not supplied). This can be connected as indicated in the figure: Connect the IN and OUT plugs to the keyboard and the connector to the JOYSTICK socket (games socket) of the Personal Computer.
SYSTEM REQUIREMENTS
Personal Computer with Windows 95/98 operative system, Windows 2000/Millennium, Windows XP equipped
with a GAMES portal. It is indicated also as the JOYSTICK portal.
PROCEDURE
Connect the cable to the MIDI IN and MIDI OUT portals of the keyboar. Follow the instructions on the connectors.
Connect the connector to the JOYSTICK portal (as in the diagram shown below). This operation can be carried out even
with the computer switched on.
11. CONNECTION TO A PERSONAL COMPUTER
COMPUTER
OUT
IN
Page 17
ENGLISH
17
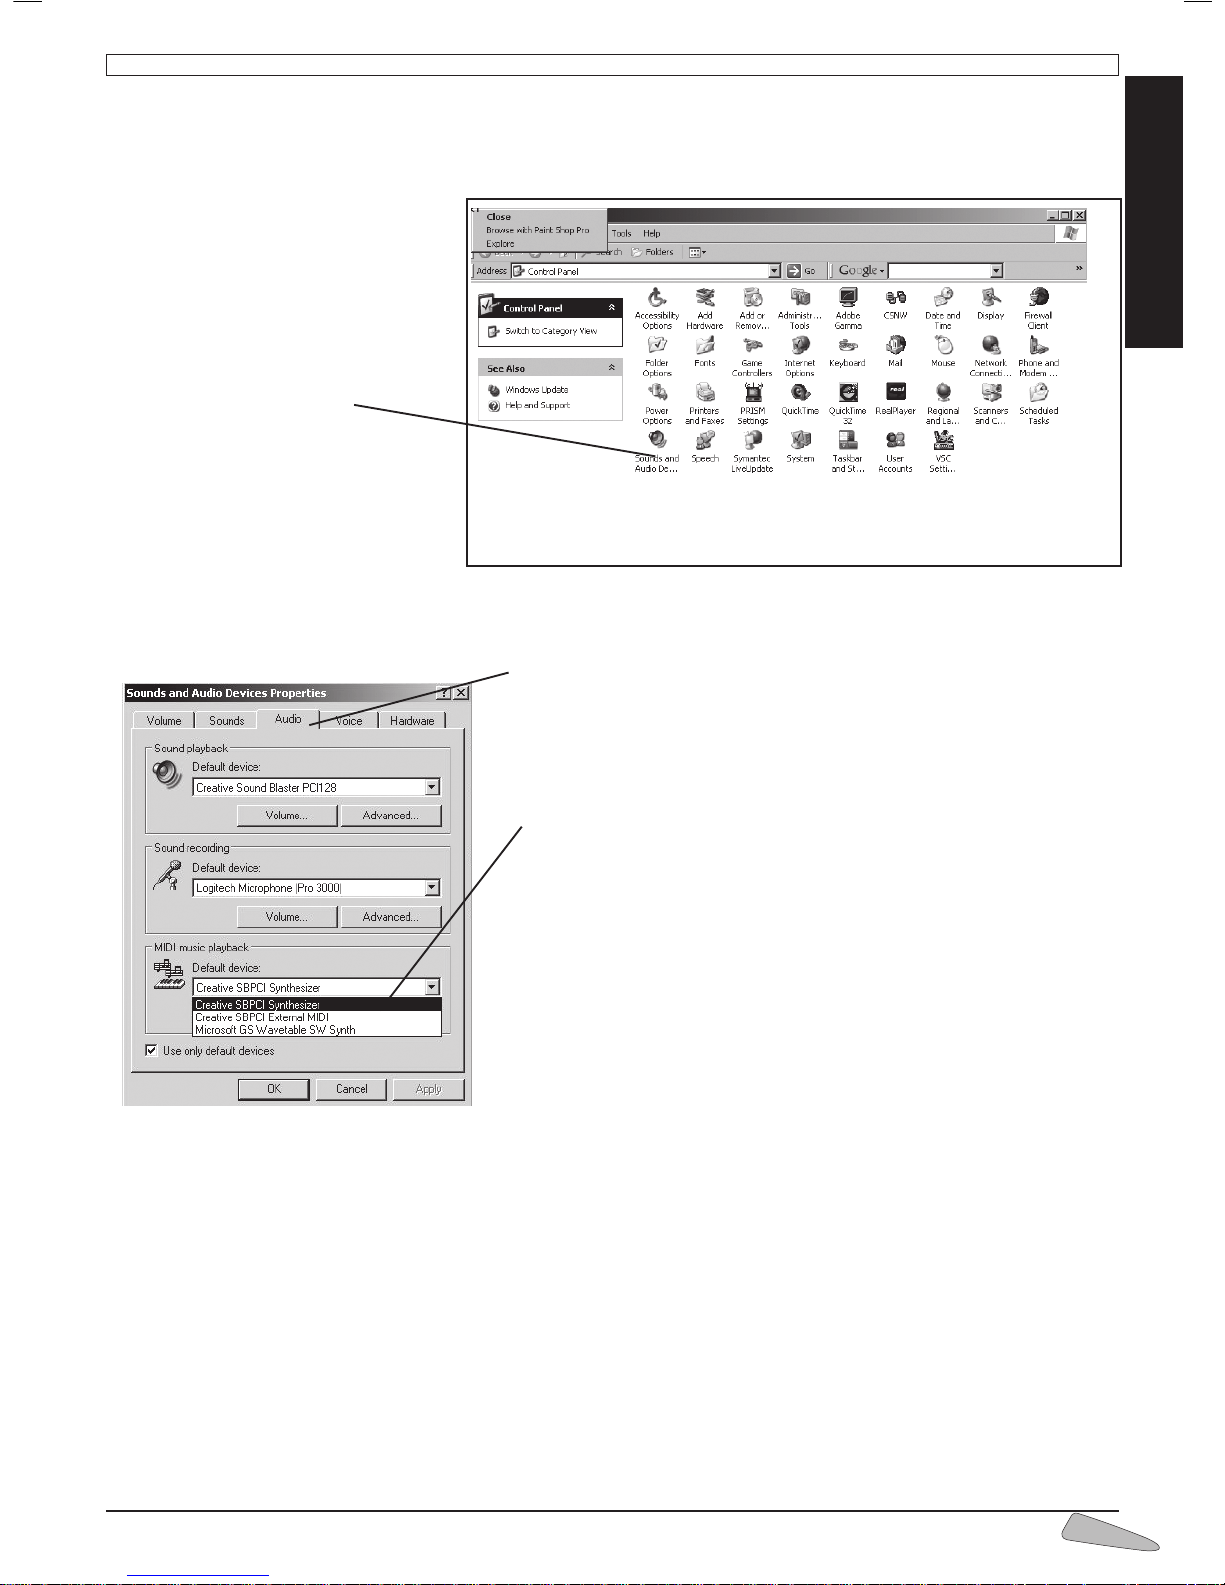
CONFIGURATION OF THE COMPUTER - Windows XP
To open the control panel, select:
- START
- then LAYOUT
- and finally CONTROL PANEL.
Double click on
Sound and audio peripheral
This window will open:
Chose the AUDIO file
It is necessary to select a peripheral that corresponds with the
MIDI Music Reproduction MENU, which guides the MIDI data to
the outside. The name of this peripheral varies according to the
Audio file present in the computer; the most commonly found is
MPU-401
NOTE: If it is not possible to recognise the peripheral, try in turn all of
those present (normally there are not more than two or three), until the
correct one is found.
Click on OK
Now the computer is configured to use the external MIDI interface and
every MIDI file will be reproduced on the keyboard.
N.B.: even if the procedure is very simple, it can become difficult in the
presence of particular computer configurations. In this case it is advisable
to contact a computer technician who will easily be able to resolve the
problem. (Continues on page 19 par. “System function test”).
Page 18
18
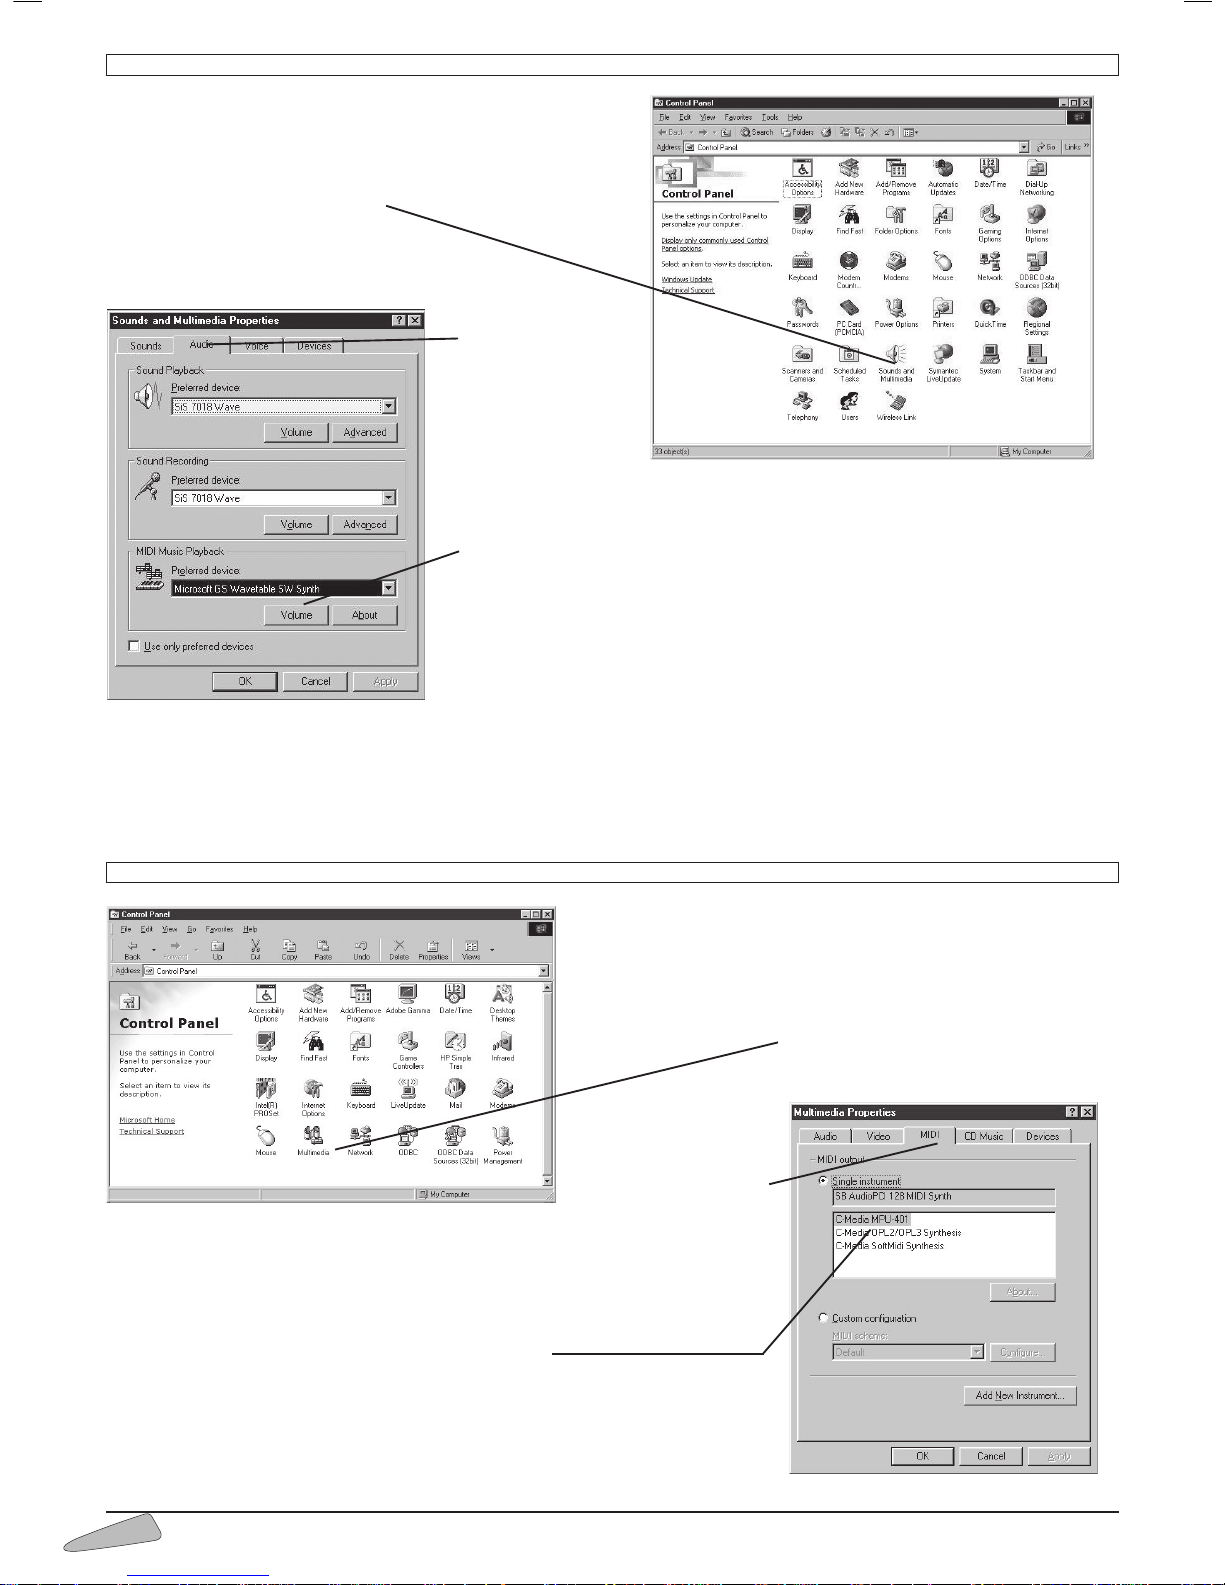
CONFIGURATION OF THE COMPUTER - Windows 2000 / Millennium
To open the control panel, select:
- START then LAYOUT
- and finally CONTROL PANEL.
- Double click on Multimedia
This window will open:
Chose the
AUDIO file.
It is necessary to
select a peripheral
that corresponds
with the MIDI
Music Reproduction MENU, which guides the MIDI data to the outside. The
name of this peripheral varies according to the Audio file present in the
computer; the most commonly found is MPU-401.
NOTE: If it is not possible to recognise the peripheral, try in turn all of those
present (normally there are not more than two or three), until the correct one
is found. Click on OK
Now the computer is configured to use the external MIDI interface and every
MIDI file will be reproduced on the keyboard.
N.B.: even if the procedure is very simple, it can become difficult in the presence of particular computer configurations. In this case it is advisable to contact a computer technician who will easily be
able to resolve the problem. (Continues on page 19 par. “System function test”).
CONFIGURATION OF THE COMPUTER - Windows 95 / 98
To open the control panel, select:
- START
- then LAYOUT
- and finally CONTROL PANEL.
Double click on Multimedia
This window will open:
Chose the MIDI
file
It is necessary to select a peripheral that corresponds with the MIDI Music
Reproduction MENU, which guides the MIDI data to the outside.
The name of this peripheral varies according to the Audio file present in the
computer; the most commonly found is MPU-401
NOTE: If it is not possible to recognise the peripheral, try in turn all of those
present (normally there are not more than two or three), until the correct one
is found.
Click on OK
Page 19
ENGLISH
19
Now the computer is configured to use the external MIDI interface and every MIDI file will be reproduced on the keyboard. N.B.: even if the procedure is very simple, it can become difficult in the presence of particular computer configurations. In this case it is advisable to contact a computer technician who will easily be able to resolve the problem.
SYSTEM FUNCTION TEST
On the computer’s hard disk, search for a MIDI file (*.mid).
Double-click on the file name. Now the window of the WINDOWS Media Player will
appear. The keyboard will begin to play.
Note: If a programme was installed on the computer that uses the Midi files, it is probable that the operation will activate that programme.
In such a case, you can try out the system by manually activating the Media Player by
loading it among the programmes.
You can also use the programme that was activated automatically. But in this case the
use of the external MIDI port must be reconfigured.
Other connection options
If the computer is not provided with the JOYSTICK socket but with MIDI IN and MIDI OUT sockets, it is an option to purchase two standard MIDI cables from your local personal computer centre or electrical outlet.
For computers provided with sockets RS -422 / USB, etc. buy the most suitable cables and MIDI interface from the your
local personal computer centre or electrical outlet.
Possible malfunctions
If the instrument does not play:
• Check whether the Media Player programme is running; the bar should be moving.
• Make sure that the MIDI properties in the multimedia section are configured correctly.
• Make sure the cable is properly connected to the instrument (the writing MIDI In and MIDI Out on the labels placed
on the plugs must be the same as the one on the instrument).
• If another programme is active, check if the external Midi port was reconfigured.
Usable Programmes
In addition to WINDOWS Media Player, many other computer programmes are commercially available. They offer the
possibility to expand the range of functions of the keyboard. Some allow the registration of pieces in Midi format. In other
cases, it is possible to register on the computer what is being played on the keyboard. Later, the piece can be replayed,
and its musical score can be visualised or printed. It is also possible to correct errors, change sounds, etc.
Many of these software programmes are also available on the Internet in Demo or Shareware format.
How to find the Midi Files
On the Internet or in music stores, countless Midi Files can be found for modern or classical music of all kinds. They can
be played with the keyboard, or used as an orchestral base to play a melody.
Note: The Midi Files available on the Internet have sometimes been made for specific instruments. Some are Midi devises
that do not respect the MIDI standard, others have their own specific additional functions. In such cases, it is possible that
the musical piece will not be played with the same sounds and effects that are supposed to be used. In any event, the
keyboard respects the GM standard, and has many commonly used functions that can be seen on the map on the instrument’s manual.
MIDI interface
Page 20
92
Midi Message
NOTE OFF
NOTE ON
PROGRAM CHANGE
PITCH BEND
CTRL 06
CTRL 07
CTRL 10
CTRL 11
CTRL 64
CTRL 100
CTRL 101
CTRL 120
CTRL 121
CTRL 123
RPN 0000H
Real Time Message “Start”
Real Time Message “Stop”
Real Time Message “Clock”
Description / Notes
Midi channel n(0-15) - Note OFF #kk(1-127) - vv is don’t care.
Midi channel n(0-15) - Note ON #kk(1-127) - Velocity vv(1-127). vv=0 means NOTE OFF
Program (patch) change. Please refer to sounds list
Pitch bend as specified by bh|bl (14 bits)
Maximum swing is +/- 2 tone (power-up). Can be changed using " pitch bend
sensitivity " (RPN 00 00) . Center position is 00H 40H.
Data entry : provides data to RPN and NRPN MIDI
Volume (default=100)
Cc = Pan (default=64 center)
Expression (default=127)
Sustain (damper) pedal
RPN LSB
RPN MSB
All sounds off
Reset all controllers
All notes off
vv = Pitch bend sensitivity in semitones (default=2)
Start (only sent, not received)
Stop (only sent, not received)
Clock (only sent, not received)
Hex code
8nH kk vv
9nH kk vv
CnH pp
EnH bl bh
BnH 06H cc
BnH 07H cc
BnH 0AH cc
BnH 0BH cc
BnH 40H cc
BnH 64H cc
BnH 65H cc
BnH 78H 00H
BnH 79H 00H
BnH 7BH 00H
BnH 65H 00H
64H 00H 06H vv
FAH
FCH
F8H
Midi Code
(decimal)
35
36
37
38
39
40
41
42
43
44
45
46
47
48
49
50
51
52
53
54
55
56
57
58
59
Instrument
Kick drum2
Kick drum1
Side Stick
Snare Drum
Hand Clap
Snare Drum
Low Floor
Closed Hi Hat
High Floor Tom
Pedal Hi Hat
Low Tom
Open Hi Hat
Low Mid Tom
Hi Mid Tom
Crash Cymbal 1
High Tom
Ride Cymbal 1
Chinese Cymbal
Ride Bell
Tambourine
Splash Cymbal
Cowbell
Crash Cymbal 2
Vibraslap
Ride Cymbal 2
Note
B1
C2
C#2
D2
D#2
E2
F2
F#2
G2
G#2
A2
A#2
B2
C3
C#3
D3
D#3
E3
F3
F#3
G3
G#3
A3
A#3
B3
Midi Code
(decimal)
60
61
62
63
64
65
66
67
68
69
70
71
72
73
74
75
76
77
78
79
80
81
82
83
Instrument
Hi Bongo
Low Bongo
Mute Hi Conga
Open Hi Conga
Low Conga
High Timbale
Low Timbale
High Agogo
Low Agogo
Cabasa
Maracas
Short Whistle
Long Whistle
Short Guiro
Long Guiro
Claves
Hi Wood Block
Low Wood Block
Mute Cuica
Open Cuica
Mute Triangle
Open Triangle
Metronome Tic
Metronome Toc
Note
C4
C#4
D4
D#4
E4
F4
F#4
G4
G#4
A4
A#4
B4
C5
C#5
D5
D#5
E5
F5
F#5
G5
G#5
A5
A#5
B5
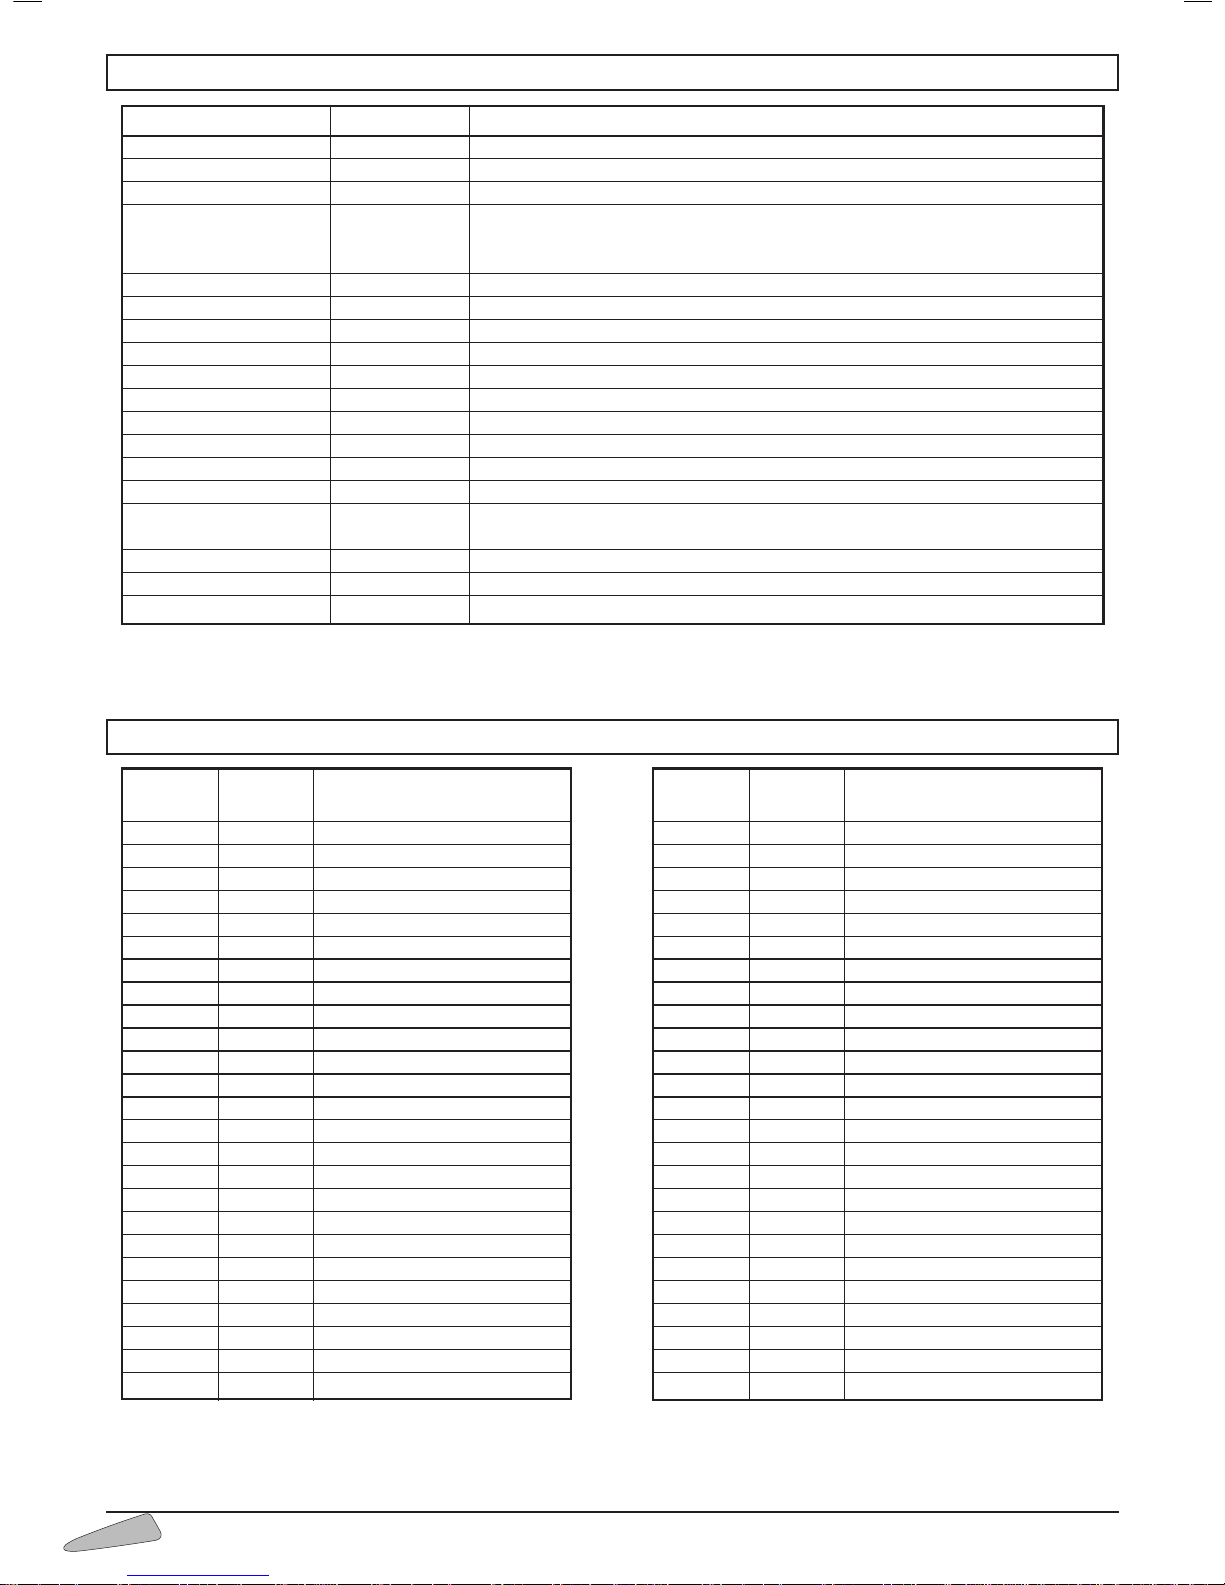
12. DETAILED MIDI IMPLEMENTATION
13. DRUM SET TABLE (MIDI CHANNEL 10)
Page 21
93
001 GRAND PIANO
002 BRIGHT PIANO
003 EL. GRD PIANO
004 HONKY TONK
005 EL. PIANO 1
006 EL. PIANO 2
007 HARPSICHORD
008 CLAVINET
009 CELESTA
010 GLOCKENSPIEL
011 MUSIC BOX
012 VIBRAPHONE
013 MARIMBA
014 XYLOPHONE
015 TUBULAR BELLS
016 DULCIMER
017 DRAWBAR ORGAN
018 PERCUSS. ORGAN
019 ROCK ORGAN
020 CHURCH ORGAN
021 REED ORGAN
022 ACCORDION
023 HARMONICA
024 TANGO ACCORD.
025 NYLON GUITAR
026 STEEL GUITAR
027 JAZZ GUITAR
028 CLEAN GUITAR
029 MUTED GUITAR
030 OVERDR. GUITAR
031 DISTORT. GUITAR
032 HARMON. GUITAR
033 ACOUSTIC BASS
034 FINGER BASS
035 PICKED BASS
036 FRETLESS BASS
037 SLAP BASS 1
038 SLAP BASS 2
039 SYNTH BASS 1
040 SYNTH BASS 2
041 VIOLIN
042 VIOLA
043 CELLO
044 CONTRABASS
045 TREMOLO STR
046 PIZZICATO STR
047 HARP
048 TIMPANI
049 STRINGS ENSAMBLE 1
050 STRINGS ENSAMBLE 2
051 SYNTH STRINGS 1
052 SYNTH STRINGS 2
053 CHOIR AAHS
054 VOICE OOHS
055 SYNTH VOICE
056 ORCHESTRA HIT
057 TRUMPET
058 TROMBONE
059 TUBA
060 MUTED TRUMPET
061 FRENCH HORN
062 BRASS SECTION
063 SYNTH BRASS 1
064 SYNTH BRASS 2
PIANO
001 - 008
CHROM
PERCUSSION
009 - 016
ORGAN
017 - 024
GUITAR
025 - 032
BASS
033 - 040
STRINGS
041 - 048
ENSEMBLE
049 - 056
BRASS
057 - 064
REED
065 - 072
WIND
073 - 080
SYNTH LEAD
081 - 088
SYNTH PAD
089 - 096
SYNTH
EFFECTS
097 - 104
ETHNIC
105 - 112
PERCUSSIVE
113 - 120
SOUND
EFFECTS
121 - 128
DJ SOUNDS
129 - 131
065 SOPRANO SAX
066 ALTO SAX
067 TENOR SAX
068 BARITONE SAX
069 OBOE
070 ENGLISH HORN
071 BASSOON
072 CLARINET
073 PICCOLO
074 FLUTE
075 RECORDER
076 PAN FLUTE
077 BLOWN BOTTLE
078 SHAKUHACHI
079 WHISTLE
080 OCARINA
081 SQUARE
082 SAWTOOTH
083 CALLIOPE
084 CHIFFER LEAD
085 CHARANG
086 LEAD VOICE
087 FIFTHS SAW
088 BASS LEAD
089 NEW AGE
090 WARM PAD
091 POLYSYNTH
092 SPACE VOICE
093 BLOWED GLASS
094 METALLIC PAD
095 HALO PAD
096 SWEEP PAD
097 ICE RAIN
098 SOUNDTRACK
099 CRYSTAL
100 ATMOSPHERE
101 BRIGHTNESS
102 GOBLINS
103 ECHO DROPS
104 SCI-FI
105 SITAR
106 BANJO
107 SHAMISEN
108 KOTO
109 KALIMBA
110 BAG PIPE
111 FIDDLE
112 SHANAI
113 TINKLE BELL
114 AGOGO
115 STEEL DRUMS
116 WOODBLOCK
117 TAIKO DRUM
118 MELODIC TOM
119 SYNTH DRUM
120 REVERSE CYMBAL
121 GUITAR FRET N.
122 BREATH NOISE
123 SEASHORE
124 BIRD TWEET
125 TELEPHONE RING
126 HELICOPTER
127 APPLAUSE
128 GUN SHOT
129 DJ SND 1
130 DJ SND 2
131 DJ SND 3
FAMILY SOUNDS LIST FAMILY SOUNDS LIST
14. SOUNDS
Page 22
94
8 BEAT 1
8 BEAT2
8 BEAT3
8 BEAT 4
16 BEAT 1
16 BEAT 2
16 BEAT 3
POP BALLAD
ROCK
HARD ROCK
NEW AGE
SOUL
FUNKY
FUSION
TECHNO
HOUSE
RAP
SKA
DISCO 70
DISCO 1
DISCO 2
DISCO SAMBA
HULLY GULLY
BIG BAND 1
BIG BAND 2
ELECTRIC JAZZ
MEDIUM SWING
JAZZ BLUES
SHUFFLE
FOXTROT 1
FOXTROT 2
JAZZ WALTZ
BLUES
ROCK'N ROLL
CHARLESTON
DIXIE
QUICK STEEP
BOOGIE 1
TWIST
RHYTHM & BLUES
BLUE GRASS
COUNTRY WEST
COUNTRY WALTZ
STEELER
FOLK WALTZ
WALTZ
MUSETTE
WIEN WALTZ
SYMPH. WALTZ
SLOW WALTZ 1
SLOW WALTZ 2
MAZURKA
TANGO
POLKA
001
002
003
004
005
006
007
008
009
010
011
012
013
014
015
016
017
018
019
020
021
022
023
024
025
026
027
028
029
030
031
032
033
034
035
036
037
038
039
040
041
042
043
044
045
046
047
048
049
050
051
052
053
054
PASO DOBLE
MARCH
MARCH 6/8
BALLAD
RHUMBA 1
RHUMBA 2
BEGUINE 1
HAPPY POLKA
SLOW ROCK 1
SLOW ROCK 2
TARANTELLA
SAMBA 1
SAMBA 2
BOSSA
SALSA 1
SALSA 2
CHA CHA CHA 1
CHA CHA CHA 2
MERENGUE 1
MERENGUE 2
MAMBO
REGGAE
BOLERO
MEXICAN
GUARACHA
B ACH ATA
CALYPSO
LAMBADA
MACARENA
7 / 8 LAZ
BOLORO
ISTSOKAK
SOPAR
8 BEAT
16 BEAT
BALLAD
ROMANTIC
SWING
BLUES
ROCK'N ROLL
BOSSANOVA
DJ GARAGE
DJ HIP HOP
DJ PROGRESSIVE
DJ TECHNO
DJ TRIBE
055
056
057
058
059
060
061
062
063
064
065
066
067
068
069
070
071
072
073
074
075
076
077
078
079
080
081
082
083
084
085
086
087
088
089
090
091
092
093
094
095
096
097
098
099
100
8/16 BEAT
001 - 008
ROCK
009 - 014
DANCE
015 - 023
SWING
024 - 032
AMERICA
033 - 044
TRADITIONAL 1
045 - 054
TRADITIONAL 2
055 - 065
LATIN 1
066 - 074
LATIN 2
075 - 083
ORIENTAL
084 - 087
PIANIST
088 - 095
DJ STYLES
096 - 100
FAMILY SYLES LIST FAMILY SYLES LIST
15. STYLES
Page 23
95
GUARANTEE • GARANTIE • GARANTIE • GARANTIA • GARANZIA
✂
✂
Cut out this coupon and return it, by post, to your local Farfisa office (see Farfisa - Organization in your country)
Découper ce coupon et l’expedier, sous enveloppe, à l’adresse figurant dans la liste par pays des distributeurs Farfisa
Diesen Coupon bitte abtrennen und per Post an die zuständige Farfisa -Filiale senden (s. Farfisa - Organisation in Ihrem Land)
Recorte el siguiente cupon y envielo a la oficina autorizada de Farfisa (ver la organización Farfisa en su pais)
Ritagliare il presente tagliando e spedirlo in busta chiusa alla competente sede della Farfisa (v. Farfisa - Organization in your country)
GB
F
D
E
Retailer’s stamp or name and address where you have bought the product:
Cachet ou nom et adresse du magasin où vous avez acheté le produit:
Stempel oder Name und Adresse des Händlers bei dem das Produkt gekauft wurde:
Sello o nombre y dirección del vendedor en el que se compró el producto:
Timbro o nome ed indirizzo del rivenditore dove è stato aquistato il prodotto:
DATE OF PURCHASE: DATE D’ACHAT:
KAUFDATUM: FECHA ADQUISICIÓN:
DATA D’ACQUISTO:
MODEL: TYPE: TYP:
MODELO: MODELLO:
TK 82 / TK 78
NAME OF PURCHASER:
NOM ET PRENOM
DE L’ACHETEUR:
NAME DES KÄUFERS:
NOMBRE DEL
COMPRADOR
NOME E COGNOME
DELL’ACQUIRENTE:
ADDRESS:
ADRESSE:
ANSCHRIFT:
DIRECCION:
INDIRIZZO:
I
Page 24
96
✂
✂
QUESTIONNAIRE • QUESTIONAIRE • FRAGEBOGEN • CUESTIONARIO • QUESTIONARIO
User’s age • Votre age • Alter des Spielers/in
• Edad de quien lo usa • Leeftijd • Età dell’utilizzatore
User’s sex • Votre sexe • Weiblich/Männlich • Sexo de quien lo usa • Sex
van de gebruiker • Sesso dell’utilizzatore
Who has bought the product? • Par qui à été acheté le produit? • Wer hat
das Produkt gekauft? • ¿Quien compró el producto? • Wie heeft het product
gekocht? • Da chi è stato acquistato il prodotto?
by the user • par vous-même • der Spieler-/in • la persona que lo
usa • de gebruiker zelf • dall’utilizzatore stesso
by the parents or grandparents •parents ou grands-parents •die Eltern oder Großeltern
•los padres/los abuelos •de ouders of grootouders •dai genitori/nonni
by relatives or friends •par un relation ou un ami •Verwandte oder Freunde
•parientes/amigos •door familieleden of vrienden •da parenti/amici
by others •autres •oder andere •otras personas •door anderen •da altri
In occasion of: • A l’ occasion de: • Zum Anlass von:
•¿En qué ocasión? • Ter gelegenheid van: • In quale occasione?
Christmas •Nöel •Weihnachten •Navidad •St. Nicolaas/Kerst •Natale
birthday • anniversaire • Geburtstag • cumpleaños • verjaardag
• compleanno
other and precisely: • autres occasions: • anderes:
• otras es decir: • andere gelegenheid: • altro e cioè:
I’ve seen the keyboard the first time in: • A été vu pour la première
fois: • ich habe die Orgel zum ersten Mal gesehen: • ¿Donde la via por
primera vez? • Ik heb het keyboard voor het eerst gezien in: • Dove
l'ha visto per la prima volta?
advertising • en pubblicité • in einer Werbung • en publicidad
• advertenties • in pubblicità
at a point of sale • dans un point de vente • in einem Geschäft
• en un punto de venta• winkel • in un punto vendita
demonstration • dans une demonstration • in einem
Propagandastand eines Warenhauses • en demonstración
• demonstraties • in dimostrazione
at friends/relatives • dans la maison d’un ami/d’un parent
• im Hause von Freuden/Verwandten • en casa de amigos/parientes
• bij vrienden/bekenden • in casa di amici/parenti
Can you already play an instrument? • Connais-tu déjà la musique? •
Spielen Sie ein anderes Musikinstrument? • ¿Conoce ya la música? •
Kent U het notenschrift? • Conosce già la musica?
yes • oui • ja • si • ja • si no • non • nein • no • nee • no
Page 25
97
GB - GUARANTEE
This guarantee is valid when it is duly completed in all parts and returned, by post, within 15 days of purchase directly to your local Farfisa office
(see Farfisa - Organization in your country). It is recommanded you keep the purchase receipt or invoice received, so as to show in case
of repair under guarantee. This 24 month manufactures guarantee covers faults in materials or production. Any faults must be reported
directly to the retailer, Farfisa will supply replacement parts free of charge within the guarantee period. This guarantee is invalid if the instrument
is damaged through accident, negligence, improper use, tampering, or damaged due to improper packing when being returned.
F - GARANTIE
Cette garantie est valable lorsqu’elle est dûment completée et retournée, sous enveloppe, dans les 15 jours de l’achat directement à l’adresse figurant dans la liste par pays des distributeurs Farfisa. Il est recommandé de garder le ticket de caisse ou facture délivrés au moment de
l’achat, afin de les présenter en cas de réparation sous garantie. Cette garantie de 24 mois couvre les défauts de matériel ou de production. Les vices rendant impropre le matériel doivent étre notifiés au revendeur chez lequel ce matériel a été acheté. Les pièces défectueuses seront
réparées ou remplacées gratuitement. La main d’oeuvre et le transport seront à la charge de l’utilisateur. La garantie sera déclarée non valable si
l’instrument est endommagé pendant son transport, s’il y a négligence, usage impropre ou intervention personnelle ou non agréée. Les présentes
conditions de garantie ne font pas obstacles aux conditions légales prévues par les articles 1641 et suivants du code civil.
D - GARANTIE
Die Garantie ist nur dann gültig, wenn die Garantiekarte in allen Teilen ordnungsgemäß ausgefüllt und innerhalb von 14 Tagen per Post direkt an
die zuständige Farfisa-Filiale eingesandt wird. Es wird empfohlen, den Kaufbeleg aufzubewahren, damit im Falle einer Reklamation
die Garantieleistung wirksam wird. Ein Garantieanspruch von 24 Monaten ab Kaufdatum besteht nur bei Mängeln, die auf Material - oder
Fertigungsfehlern beruhen. Die Erfüllung der Garantieleistungen obliegt dem Händler, bei dem das Produkt gekauft wurde. Durch einen erfüllten
Garantieanspruch verlängert sich die Garantie weder für das Produkt noch für die nachbesserten Teile. Der Garantieanspruch ist nicht berech-
tigt bei unsachgemäßer Behandlung oder Benutzung, bei Reparaturen, Reparaturversuchen oder technischen Änderungen bzw.bei Transportschäden
und Schäden in Folge von höherer Gewalt.
I - GARANZIA
La presente garanzia è valida se compilata in ogni sua parte ed inviata in busta chiusa entro 15 giorni dall’acquisto alla competente sede della
Farfisa (vedi Farfisa - Organization in your country). Si raccomanda di conservare lo scontrino fiscale o fattura ricevuti al momento
dell’acquisto da esibire nel caso di eventuale riparazione in garanzia. La presente garanzia copre per la durata di 24 mesi, esclusiva-
mente i difetti di fabbricazione o di materiale. La segnalazione del difetto deve essere fatta direttamente al rivenditore. Le parti difettose saranno
riparate o sostituite gratuitamente. Il costo della manodopera e del trasporto saranno a carico dell’acquirente. La garanzia è nulla se lo strumento risulta danneggiato per incidente di trasporto, incuria, cattivo uso e manomissioni (garanzia secondo le leggi vigenti).
E - GARANTIA
Esta garantia es valida cuando se incluye correctamente la información solicitada y se devuelve, por correo, a la oficina autorizada de Farfisa (ver
la organización en su pais), dentro de los 15 dias inmediatos despues de la compra. Le recomendamos que conserve el recibo de la com-
pra, para poder demostrar que el teclado se encuentra en garantia. Esta garantia, relativa a los componentes en lo que se refiere a
defectos de fabricación o de los materiales, es valida por un periodo de 24 meses a partir de la fecha de adquisición. Las partes averiadas serán
reparadas o sostituidas gratuitamente. El transporte del instrumento y la mano de obra será por cuenta del cliente. Esta garantia se cubre por
mediación del vendedor (concesionarios o vendedores autorizados). La garantia no será válida si el instrumento ha sido dañado - en el transporte, accidente, negligencia, uso indebido, etc. (Garantia válida de acuerdo con la nueva ley).
ORGANIZATION
IN YOUR
COUNTRY
ITALIA: BONTEMPI S.p.a.
Viale Don Bosco, 35
62018 - Potenza Picena (MC)
✆
0733. 885.1
Fax 0733.885.302
www.
farfisa.eu
E-mail: [email protected]
DEUTSCHLAND:
RRV Marketing & Vertrieb
Münchner Str. 19 a
D - 82319 STARNBERG
✆
(08151) 78163
Fax (08151) 444765
E-mail: [email protected]
FRANCE: K’COSTA SARL. 52
Route Nationale, 39190
Beaufort . FRANCE
✆
03.84.25.18.18
Fax 03.84.25.18.19
E-mail: [email protected]
SVIZZERA/SUISSE/SCHWEIZ/
ÖSTERREICH: BONTEMPI
SAHLI Vertrieb GmbH
Flugbrunnenstrasse 2
Postfach 296 CH - 3065 BOLLIGEN
✆
(031) 381.36.38
Fax (031) 381.79.20
E-mail: [email protected]
ESPAÑA:
SIGMA IBERIA S.L.
Calle Castelló, 59 Bajo
28001 MADRID
Tel. & Fax: 900900950
E-mail: [email protected]
UNITED KINGDOM:
COMUS (U.K.) LTD. 168
Lomeshaye
Business Village,Turner RD
NELSON, LANCS - BB9 7DR
✆
(0)1282 606600
Fax (0)1282 606660
E-mail: [email protected]
Page 26
98
Page 27
99
Page 28
GB/USA:06"3&"%7*4&%503&5"*/5)&."/6'"$563&3/".&"/%"%%3&44tF *-&453&$0.."/%&%&3&5&/*3-&/0.&5-h"%3&44&%6'"#3*$"/5tD - WIR EMPFEHLEN IHNEN, DEN NAMEN UND
%*&"%3&44&%&4)&345&--&34"6';6#&8")3&/tNL8*+"%7*4&3&/%&/"".&/)&5"%3&47"/%&'"#3*,"/55&#&8"3&/tDK #3(&..&4*5*-'-%&"'7&/56&-4&/&3&)&/7&/%&-4&t
E &43&$0.&/%"#-&26&."/5&/("&-/0.#3&:%*3&$$*0/%&-'"#3*$"/5&tP 4°0"$0/4&-)"%04"."/5&/&30/0.&&&/%&3&±0%0'"#3*$"/5&tGR - ΣAΣ ΣΥΝIΣTOΥME NA
KPATHΣETE THN ΔIEΥΘΥNΣH MAΣ IΣΩΣ THN XPEIAΣTEITE ΣTO MEΛΛ0/tS 41"3"5*--7&3,"3&/4/"./0$)"%3&44tSF - PYYDÄMME SÄILYTTÄMÄAN MAAHANTUOJAN NIMEN JA OSDITTEN
tN 5"7"3&1¯&.#"--"4+&/*5*-'&--&&/&7&/56&-&4&/&3&)&/7&/%&-4&5*-*.10353&/tI - SI RACCOMANDA DI CONSERVARE IL NOME E L'INDIRIZZO DEL PRODUTTORE.
BONTEMPI S.p.A. 7JBMF%PO#PTDP1PUFO[B1JDFOB.$*UBMZtXXXGBSöTBFVtFNBJMJOGP!GBSöTBFV
Printed in Ital y cod. 2011702 0
 Loading...