


DEHUMIDIFIER DÉSHUMIDIFICATEUR DESHUMIDIFICADOR
Owner’s Manual
IMPORTANT – PLEASE READ THIS MANUAL BEFORE INSTALLING UNIT
Models / Modèles / Modelos
GDC124CSS
GDC124CS
GDC80CS
Operating Instructions 2 Guide d'utilisation 6 Instrucciones de uso 10
OPERATION AND MAINTENANCE MANUAL
OPERATION
Built in Electrical Safety
For your safety and protection this appliance is manufactured with a grounded plug on its power cord. The power cord must be plugged into a properly grounded receptacle. If a grounded receptacle does not exist, have one installed by a certified electrician. Do not cut or remove the grounding prong on the power cord plug if equipped. We recommend that this electrical circuit/ receptacle operate under a separate breaker or fuse.
Recommended Limits of Use
Temperatures: 0 to 35ºC (32º to 95ºF).
Relative humidity: 20 to 80%.
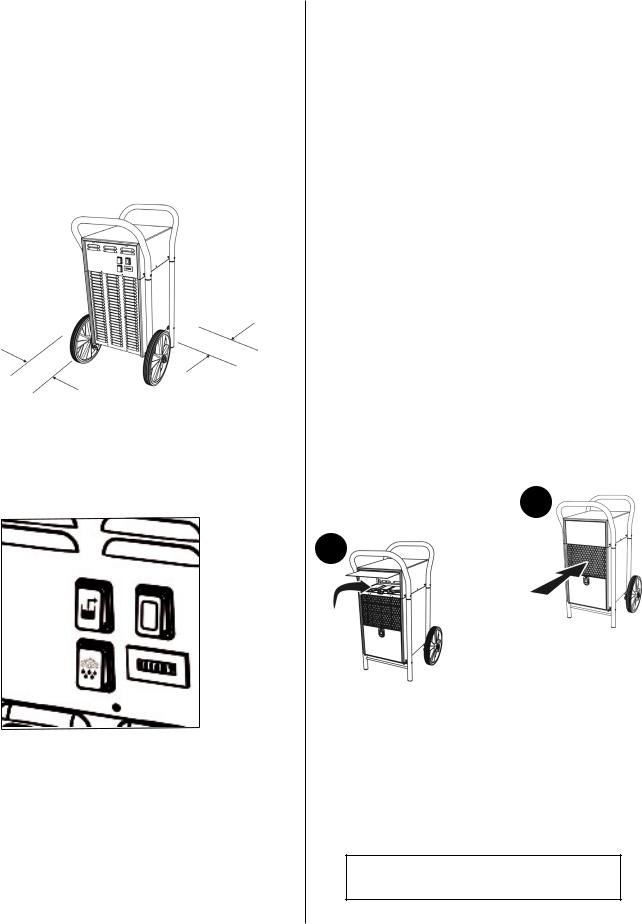
Location of Unit
Minimum 25cm (10") distance from walls. Close all doors and windows.
25cm
(10")
25cm
(10")
Initial Start-up
Check the rating plate for the appropriate power supply needed by your unit. Connect the dehumidifier. Ensure that one of the water collection options is working and active. Depress the ON switch.
Control Panel Settings
C 
 A
A
D 
 B
B
(A) ON/OFF Switch
Depress the switch to start or stop the dehumidifier. "O" for power off, "I" for power on.
(B) Hour Counter
The counter will accumulate and display the total running hours of the unit in 1/100 of an hour. It can not be reset to zero. No user input is required.
(C) Pump Purge: (Green button - some models)
Depressing this button activates the condensate pump. This can be used to empty the pump reservoir. The button must be held depressed until drain line is clear of water, this is when pump reservoir is empty. The dehumidifier must be switched "ON".
NOTE: Depress the switch long enough to perform the function. Prolonged depression of the switches could harm the equipment.
(D) Hot Gas On Demand: (Red button - some models)
Depressing this button activates the hot gas defrost system. This can be used to clear the evaporator coil of frost if required. The button must be held depressed until the evaporator coil is cleared of frost. The dehumidifier must be switched "ON".
NOTE: Depress the switch long enough to perform the function. Prolonged depression of the switches could harm the equipment.
Automatic Defrost Cycle
All units are equipped with an automatically activated (thermostat controlled) Defrost cycle to automatically defrost the evaporator coils.
Cleaning
DANGER: Electrical shock hazard. Disconnect power before cleaning.
Exterior Parts
Use a mild, non-abrasive soap and clean water solution to clean the metal cabinet, handles and wheels. Wipe dry.
Air Filter
Remove filter. Wash in a mild soap and water. Rinse with clean water. Air dry before reinstalling. Torn or ripped filters should be replaced with a new filter.
Fan Motor
Does not require lubrication.
Condenser and Evaporator Coils
1. Light cleaning: Remove the air filter and |
1 |
spray evaporator coil with water.
2
2. Heavy cleaning: Open upper door. Remove plastic cleanout by pushing the two locking tabs and lifting. Spray water at coils. Replace the cleanout.
A qualified refrigeration technician must service all refrigerant leaks.
Important - If power to the unit is disconnected or unit is turned off, allow 3 minutes before restarting the dehumidifier. This allows the internal pressures to equalize.
Storage:
Single unit: It is best to cover the unit if extended storage periods are contemplated. Remove all water in collection system.
Stacking Two Units: This dehumidifier can be stacked two high.
An assembled unit weighs 39 kgs (86 lbs). Position on a level surface.
WARNING: Personal injury hazard. Use two individuals to lift. Maximum stacking height: 2 units
2
HOW A DEHUMIDIFIER WORKS |
|
|
|
|
|
|
|
|
|
|
|
|
|
|
|
|
|
||||||
The dehumidifier removes moisture from the air by passing the moist air over a |
|
|
|
|
|
|
|
|
|
|
|
|
|
|
|
||||||||
|
|
|
|
|
|
|
|
|
|
|
|
|
|
|
|||||||||
cold dehumidifying coil. The moisture condenses out of the air on this coil and then |
|
|
|
|
|
|
|
|
|
|
|
|
|
|
|
||||||||
drains from the coil into a bucket. |
|
|
|
|
|
|
|
|
|
|
|
|
|
|
|
|
|
||||||
A dehumidifier reduces the relative humidity of the surrounding air two ways. The |
|
|
|
|
|
|
|
|
|
|
|
|
|
|
|
||||||||
removal of moisture from the air (as just described) reduces its humidity. The |
|
|
|
|
|
|
|
|
|
|
|
|
|
|
|
||||||||
relative humidity of the air is further reduced by heating as the dry air is discharged |
|
|
|
|
|
|
|
|
|
|
|
|
|
|
|
||||||||
over the condenser and out the front. The air is actually heated several degrees in |
|
|
|
BentHandle (2) |
|
|
|
|
|
|
|
WheelAxle(1)(1) |
|
|
|||||||||
this process. It is normal for the surrounding air to slightly increase in temperature |
|
|
|
|
|
|
|
|
|
|
|
|
|||||||||||
|
|
|
|
|
|||||||||||||||||||
|
|
|
|
|
|
|
|||||||||||||||||
as the dehumidifier operates. |
|
|
|
|
|
|
|
|
|
|
|
|
|
|
|
|
|
||||||
|
|
|
|
|
|
|
|
|
|
|
|
|
|
|
|
|
|||||||
|
|
|
|
|
|
|
|
|
|
|
|
|
|
|
|
|
|||||||
|
|
|
|
Condenser |
|
|
|
|
|
|
|
|
|
|
|
|
|
|
|
|
|
||
Evaporator |
|
Air Circulating Fan |
|
|
|
|
|
|
|
|
|
|
|
|
|
|
|
||||||
Humid Air In |
|
|
|
|
|
|
|
Dry Air Out |
|
|
|
|
|
|
|
|
|
|
|
|
|
|
|
|
|
|
|
|
|
|
|
|
|
|
|
|
|
|
|
|
|
|
|
|
|||
|
|
|
|
|
|
|
|
|
|
|
|
|
|
|
|
|
|
|
|
|
|||
|
|
|
|
|
|
|
|
|
|
|
|
|
|
|
|
|
|
|
|
|
|
||
|
|
|
|
|
|
|
|
|
Wheel (2) |
|
|
|
|
|
|
|
|
Screw - Handle (6) |
|
|
|||
|
|
|
|
||||||||||||||||||||
|
|
|
|
|
|
|
|
|
|
|
|
Wheel (2) |
|
|
|
|
|
|
|
|
Screw - Handle (6) |
|
|
Continuous Drain |
|
Compressor |
|
|
|
|
|
|
|
|
|
|
|
|
|
|
|
||||||
|
|
|
|
|
|
|
|
|
|
|
|
|
|
|
|
||||||||
|
|
|
|
|
|
|
|
|
|
|
|
|
|
|
|
||||||||
Connector |
|
|
|
|
|
|
|
|
|
|
|
|
|
|
|
|
|||||||
Float |
|
|
|
|
|
|
|
|
|
|
|
|
|
|
|
|
|
||||||
Condensate Pump |
|
|
|
|
|
|
|
|
|
|
|
|
|
|
|
|
|
||||||
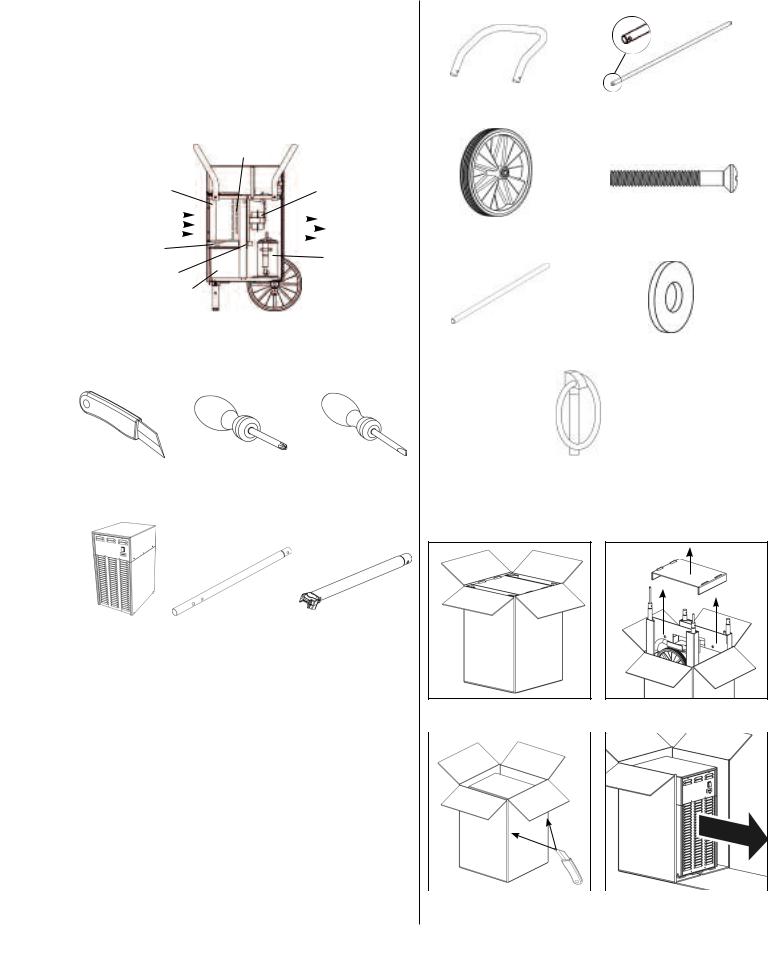
Assembly |
|
|
|
|
|
Hand Axle (1) |
|
|
|
|
|
Washer(2) |
|
|
|||||||||
|
|
|
|
|
|
|
|
|
|
|
|
||||||||||||
|
|
|
|
|
|
|
|
|
|
|
|
||||||||||||
Tools Required |
|
|
|
|
|
|
|
|
|
|
|
|
|
|
|
|
|
||||||
|
|
|
|
|
|
|
|
|
|
|
|
|
|
|
|
|
|||||||
Knife |
Phillips Screwdriver PH-3 |
Slot Screwdriver |
|
LynchPin(2)(2) |
|
|
|
||||
|
|
|
|||
|
|
|
Parts
1 |
2 |
Basic Unit (1) |
Long Tube (2) |
Short Tube (2) |
Unpacking Instructions
Recycle all cardboard and plastic bags. Keep plastic bags out of the reach of children.
Position up and open top. |
|
Remove inserts and handle |
|
|
components. |
|
|
|
3 |
4 |
|
Cut two vertical corners. |
|
Remove the unit. |
CAUTION: Do not damage unit with knife. |
|
|
3

ASSEMBLY
Wheel / Handle Assembly
|
|
|
|
|
|
|
|
|
|
1 |
|
|
|
|
|
|
2 |
||
|
|
|
|
|
|
|
|
|
|
|
|
|
|
|
|
|
|
|
|
|
|
|
|
|
|
|
|
|
|
Positionuniton back. Remove 4 shipping |
|
Slide wheel axle into wheels brackets. |
||||
|
on back. Remove 4 |
|
. |
|
||
shippingscrews andscrewsdiscardand. discard. |
|
Offset totoonesideside. . |
||||
|
|
|
|
|
|
|
3 |
|
4 |
|
|
||
Install oneshortubetubeononwheelwheelaxleaxle. . Installl benthandleononshortubetube. Install. Installone handleone handlescrew andscrewtightena d. tighten.
|
|
6 |
5 |
|
|
|
|
|
Install one shorttube.Install one handle |
|
Install twowheeelson wheelaxle. |
|
. Install one |
on |
axle. |
|
handlescrew andscrewtightenand. tighten.
7
WARNING:WARNING:Personal injury hazardPersonal. Do notinjuryplacehazardfingers. in ringDo not areaplace .fingersRing ringis areaspring. Ring loadedis spring loadedand closesand closeswithwithforceforce. .
Installl washer and lynchpinpintotoeacheach wheel axle end..
Lower Door, Second Handle Assembly
8 |
9 |
!
Position |
unit |
air filter up. |
|
|
|
one long tube, plastic bushing |
|||
t withair filter up. |
Installl one long tube, plastic bushing |
||||||||
|
|
|
|
|
facesinward.Insert one handle screw. |
||||
|
|
|
|
|
. |
one handle screw. |
|||
|
|
|
|
|
Donotnottighten. . |
|
|||
|
|
|
|
|
|
|
|
|
|
|
10 |
|
|
|
11 |
|
|
||
Insert benttubeintointolonglongtubetube. Rotate. Rotate |
|
|
Insert handaxle..Insert secondlongtube.. |
||
longtubetotoalignalignwithwithcabinetholeholeandand |
|
|
|
|
|
|
. Do not tighten. |
|
|
|
|
insert onehandlescrew. Do not tighten. |
|
|
|
|
|
12 |
|
|
|
13 |
|
Insert twohandlescrewsscrews. Tighten. Tightenall hallnPositiion unit upright. .Wait 30 minutes handlescrewsscrews. . Waitbefore30startingminutestobeforeallow compressstarting tor to
allowdrain compressorback. to drain back.
4
TROUBLESHOOTING
The Unit is NOT working:
•Why do you believe the dehumidifier is not working?
•Is the power ON?
•Has the breaker tripped? – Reset breaker
•If in a wet area, is the unit plugged into a GFI protected circuit? – Excessive moisture will trip GFI. Remove from area.
•Is the unit being run off a generator? - Check output does not fluctuate as the unit will not operate at low voltage.
•If using an extension cord - Is the cord of the correct gauge for the distance run? (14 AWG up to 25’ and 12 AWG over 25’). Note: Verify voltage while unit is starting. Start up will cause the highest current draw and largest voltage drop. Even if plugged directly to outlet there can be a significant voltage drop. Never assume the voltage is ok without verifying.
•Is the unit draining? – Check the condensate receptacle. If full, the float is up and the unit will not operate – drain receptacle.
The unit continually ices up: Note that some ice buildup on the evaporator coils is normal but airflow should not be blocked.
•Is the fan working? – Fan not working, check run capacitor and fan unit.
•Is warm air blowing out the front of the unit? - No warm air, temperature may be too low. Raise temperature with supplementary source.
•Is the air filter clean and airflow unobstructed? – Clean filter. Unit should have a minimum of 10” clearance all around it.
•Dirty evaporator coils? – Clean coils.
•Defrost thermostat loose or not working? – Secure or replace.
•Defrost timer set incorrectly or defective? – Reset or replace.
•Temperature in the operating space is too low? - Raise temperature with supplementary source.
Unit moves some water but not as much as expected:
•Air temperature and Relative Humidity have dropped - Check levels with calibrated humidity meter and/or thermostat.
•Unit is in defrost cycle – Unit will start after cycle.
•Air filter dirty or airflow obstructed - Unit should have a minimum of 10” clearance all around it. Clean air filter and ensure adequate airflow/space around unit.
•Evaporator coils dirty – Clean coils.
•Restrictive or kinked exhaust ducting (if used) – Straighten out ducting.
•Defrost timer set incorrectly for conditions – Reset timer.
•Defrost thermostat defective - Replace
•Refrigerant charge is low – Have unit checked by qualified technician
•Defective compressor – Replace compressor by qualified technician as it requires recycling of refrigerant.
Unit runs continuously for days:
•Unit is working removing water - High Relative Humidity in space.
•Humidity or water is getting into the space – Find source and stop it.
•Unit is undersized for space – Use larger unit or multiple units.
•Poor air movement in space – Use air movers to increase movement.
Unit runs but does not pump water:
•Drain hose kinked or blocked – Straighten or unblock hose.
•Pump float stuck closed – Reset or replace.
•Pump not working – Check electrical operation with outside supply.
•Hose disconnected internally – Reconnect hose.
•Compressor capacitor bad – Check capacitor.
Fan runs but Compressor does not:
•Condensate pump not working – Check pump and float.
•Bad connection in pump circuit – Check connections.
•Bad compressor capacitor – Check capacitor.
•Defective compressor – Replace compressor by qualified technician.
•Defective time delay or Thermistor – Check and/or replace.
Fan does not run. Compressor runs briefly but cycles on/off:
•Defective fan capacitor – Check capacitor.
•Loose connection in fan circuit – Check connections.
•Fan obstructed and not turning – Remove obstruction.
•Defective fan – Replace fan.
5

LIMITED PRODUCT WARRANTY
Industrial Dehumidifier
WARRANTY - ONE YEAR
This product is warranted against defects in material and workmanship for a period of one year from the date of purchase by the original purchaser. During this period, all parts and labor will be provided at no cost. Consumable parts (ie: light bulbs and filters) are not warranted or guaranteed for any length of time. This warranty is non transferable.
ADDITIONAL SIX YEAR WARRANTY
For a period of six years following the ONE YEAR WARRANTY components of the sealed system are warranted against defects in material. Parts will be supplied (freight prepaid) free of charge. Installation labor is not covered. This warranty is non transferable.
NOTICE
1.This warranty applies only to the original purchaser and applies only within the boundaries of CANADA and CONTINENTAL USA.
2.This is the only warranty of the dealer and Fantech Limited. for the above mentioned product and no other warranty or condition, expressed or implied shall apply, except where specifically excluded by law.
3.The original purchaser should complete this warranty form and retain it in the event warranty service is required.
4.Proof of purchase date will be required for warranty claims. Please retain bills of sale for proof.
5.Some states do not allow the exclusion or limitation of incidental or consequential damages, so the above limitation or exclusion may not apply to you. This warranty gives specific legal rights, and the purchaser may have other rights which vary from state to state. For more information regarding legal rights the purchaser may contact the local or state consumer affairs office or the appropriate state Attorney General.
GENERAL PROVISIONS
No warranty or insurance herein contained or set out shall apply when damage or repair is caused by any of the following:
1.Power failure.
2.Damage in transit or when moving the appliance.
3.Improper power supply such as low voltage, defective house wiring or inadequate fuses.
4.Accident, alteration, abuse or misuse of the appliance such as inadequate air circulation in the room or abnormal operating conditions, (extremely high or low room temperatures).
5.Fire, water, damage, theft, war, riot, hostility, acts of God such as hurricanes, floods, etc.
For information concerning your warranty, contact:
In Canada
Fantech
50 Kanalflakt Way,
Bouctouche, NB E4S 3M5
Phone: 800.565.3548; 506.743.9500
Fax: 877.747.8116; 506.743.9600
In Continental USA
Fantech
10048 Industrial Blvd.
Lenexa, KS 66215
Phone: 800.747.1762; 913.752.6000
Fax: 800.487.9915; 913.752.6466
email: service@fantech.net
Model Number |
|
Serial Number |
|
||||||
Date of Purchase |
|
|
Customer Name |
|
|||||
Address |
|
|
City |
|
|||||
Purchased from |
|
|
|
|
|
||||
6
 Loading...