

Euro-Pro 9120 Instruction Manual
INSTRUCTION MANUAL
MANUAL DE INSTRUCCIONES
9120
Draft 4 2003/8/12
INSTRUCTION MANUAL
This sewing machine is intended for household use.
MANUAL DE INSTRUCCIONES
Esta máquina de coser está diseñada sólo para uso doméstico.
IMPORTANT SAFETY
INSTRUCTIONS
When using a sewing machine, basic safety precautions should
always be followed, including the following.
Read all instructions before using.
DANGER - To reduce the risk of electric shock:
Never leave unattended when plugged in. Always unplug this
machine from the electric outlet immediately after using and before
cleaning.
WARNING- To reduce the risk of burns, fire,
electric shock, or injury to persons:
1.Do not allow to be used as a toy. Close attention is necessary
when this sewing machine is used by or near children.
2.Use this sewing machine only for its intended use as described in
this manual. Use only attachments recommended by the
manufacturer as contained in this manual.
3.Never operate this sewing machine if it has a damaged cord or
plug, if it is not working properly, if it has been dropped or
damaged, or dropped into water. Return the sewing machine to
the nearest authorized dealer or service center for examination,
repair, electrical or mechanical adjustment.
4.Never operate the sewing machine with any air openings
blocked. Keep ventilation openings of the sewing machine and
foot controller free from the accumulation of lint, dust, and loose
cloth.
5.Never drop or insert any object into any opening.
6.Do not use out doors.
7.Do not operate where aerosol (spray) products are being used or
where oxygen is being administered.
8.To disconnect, turn the power switch to the off position (symbol
O), then remove plug from outlet.
9.Do not unplug by pulling on cord. To unplug, grasp the plug, not
the cord.
10.Keep fingers away from all moving parts. Special care is required
around the sewing machine needle.
11.Always use the proper needle plate. The wrong plate can cause
the needle to break.
12.Do not use bent needles.
13.Do not pull or push fabric while stitching. It may deflect the
needle causing it to break.
14.Switch the sewing machine off (symbol O) when making any
adjustments in the needle area, such as threading needle,
changing needle, threading bobbin, or changing presser foot.
15.Always unplug sewing machine from the electrical outlet when
removing covers, lubricating, or when making any other user
servicing adjustments mentioned in the instruction manual.
16.Handle the foot controller with care and avoid dropping it on the
floor. Be sure not to place anything on top of it.
17.Use only the handle to lift and move the machine.
18.Do not expose the machine or machine plastic case to sunlight
directly. Also, do not keep it in a very warm or damp place.
SAVE THESE INSTRUCTIONS
Servcing should be performed by an authorized service
representative.
INSTRUCCIONES
IMPORTANTES DE SEGURIDAD
Al usar una máquina de coser siempre se deben tomar
precauciones básicas de seguridad, incluyendo las siguientes:
Lea todas las instrucciones antes de usar la máquina de coser.
PELIGRO: Para reducir el riesgo de choque
eléctrico:
No deje la máquina de coser desatendida cuando esté enchufada.
Siempre desenchúfela del tomacorriente inmediatamente después
de usarla o antes de limpiarla.
ADVERTENCIA: Para reducir el riesgo de
quemaduras, incendio, choque eléctrico o lesiones
personales:
1.No permita que se use como juguete. Se debe supervisar
estrechamente a los niños cuando usen la máquina de coser o
se use cerca de ellos.
2.Use la máquina de coser sólo para lo que está diseñada y para
lo que está descrito en este manual. Sólo use los accesorios
recomendados por el fabricante en este manual.
3.Nunca opere la máquina de coser si tiene el cordón o el enchufe
dañado, después que hubiese funcionado mal, que se hubiese
caído, dañado de cualquier forma o caído en agua. Dev uélvala
al distribuidor o servicentro autorizado para su revisión,
reparación o ajuste eléctrico o mecánico.
4.Nunca opere la máquina de coser si alguna de sus aberturas
para aire está obstruida. Mantenga las aberturas de ventilación y
el control de pie sin acumulaciones de pelusa, polvo y sin telas
sueltas.
5.Nunca inserte o deje caer objeto alguno en las aberturas.
6.No usar en exteriores.
7.No opere en ambientes donde se estén usando aerosoles o
donde se esté administrando ox ígeno.
8.Para desconectar, primero apague la máquina con su interruptor
(O) y después desenchúfela del tomacorriente.
9.No desconecte del tomacorriente jalando del cordón, hacerlo
jalando del enchufe.
10.Mantenga los dedos alejados de las piezas móviles. Tenga
cuidado especial alrededor de la aguja de coser.
11.Siempre use la placa adecuada para la aguja. La placa
equivocada puede hacer que la aguja se rompa.
12.No use agujas dobladas.
13.No empuje ni jale la tela mientras la máquina esté dando
puntadas porque la aguja puede doblarse y romperse.
14.Apague la máquina de coser con su interruptor (O) antes de
hacer cualquier ajuste alrededor de la aguja, como enhebrar o
cambiar la aguja, cambiar el carrete, enrollar la bobina, cambiar
la pata prensora, etc.
15.Siempre desenchufe la máquina de coser del tomacorriente
antes de quitarle las cubiertas, lubricarla o hacerle cualquier otro
servicio o ajuste mencionado en este manual.
16.Manipule el pedal controlador cuidadosamente y evite dejarlo
caer en el piso. Cerciórese de no colocarle cosa alguna encima.
17.Para levantar o mover la máquina, hacerlo sólo del asa.
18.No exponga la máquina o su estuche plástico a la luz solar
directa. Tampoco las mantenga en lugares calientes y húmedos.
CONSERVE ESTAS
INSTRUCCIONES
El servicio debe hacerlo un representante autorizado de servicio.

CONTENTS
MAIN PARTS ...................................................... 2
ACCESSORIES .................................................. 3
DUST COVER .................................................... 3
EXTENSION TABLE ...........................................4
a. REMOVING THE EXTENSION TABLE .............................. 4
b. OPENING THE ACCESSORY CASE ................................ 4
CHANGING THE PRESSER FOOT ................... 4
A. Changing the presser foot .................................................. 4
B. Removing the presser foot holder ...................................... 4
INSERTING THE NEEDLE ................................. 5
FABRIC, THREAD AND NEEDLE TABLE .......... 5
CONNECTING THE MACHINE .......................... 6
FOOT CONTROLLER ........................................ 6
FUNCTION OF EACH PART .............................. 7
A. START/STOP BUTTON ..................................................... 7
B. REVERSE STITCH BUTTON ............................................. 7
C. SLOW BUTTON ................................................................. 7
D. SPEED CONTROL BUTTON ............................................. 7
E. NEEDLE UP/DOWN BUTTON ........................................... 7
F. PRESSER FOOT LIFTER .................................................. 7
G. DROP FEED LEVER .......................................................... 7
H. TOP COVER ...................................................................... 7
I. HAND WHEEL .................................................................... 7
TO SELECT A UTILITY PATTERN .................... 8
A. CONTRAST OF THE L.C.D. ............................................... 8
B. UTILITY BUTTONS ............................................................ 8
C. TO SELECT A UTILITY STITCH PATTERN ...................... 8
INFORMATIONS OF SELECTED PATTERN ...............................
D.
a.Stitch Pattern ........................................................................ 9
b.Pattern Numer ...................................................................... 9
c.Suitable Presser Foot ........................................................... 9
d.Stitch Width ........................................................................... 9
e.Stitch Length ......................................................................... 9
f. Setting of Auto-tack stitch ..................................................... 9
BOBBIN SETTING ............................................10
A. REMOVING THE BOBBIN ............................................... 10
B. SETTING SPOOL OF THREAD ON SPOOL PIN ............ 10
C. WINDING THE BOBBIN ................................................... 10
D. INSERTING THE BOBBIN ............................................... 11
THREADING THE MACHINE ........................... 12
A. PREPARING TO THREAD MACHINE ............................. 12
B. SETTING SPOOL OF THREAD ON SPOOL PIN ............ 12
C. THREADING THE UPPER THREAD ............................... 12
D. THREADING THE NEEDLE EYE ..................................... 13
E. DRAWING UP THE BOBBIN THREAD ............................ 13
STARTING TO SEW ......................................... 14
A. START AND END OF SEAM ............................................ 14
B. REVERSE STITCHING .................................................... 14
C. TURNING CORNERS ...................................................... 15
D. SEWING HEAVY FABRIC ................................................ 15
E. SEWING OVER OVERLAPPED AREAS ......................... 15
F. WIDTH OF SEAM ALLOWANCE ..................................... 15
ADJUSTING THE THREAD TENSIONS .......... 16
A. Correct Thread Tensions .................................................. 16
B. When bobbin thread appears on top side of fabric. .......... 16
C. When upper thread appears on the bottom side of fabric. 16
D. Thread Tension for Zigzag Stitches .................................. 16
Helpful Hint ............................................................................ 16
STRAIGHT STITCH SEWING .......................... 17
A. Straight Stitch ................................................................... 17
B. Straight Stitch With Auto-reverse Stitch ........................... 17
ZIGZAG STITCH SEWING ............................... 18
SATIN STITCHING (No. 8) .................................................... 18
MULTI-STITCH ZIGZAG ................................... 18
A. Elastic Band Sewing ......................................................... 18
B. Overcast Stitching ............................................................ 18
ELASTIC STITCH SEWING ............................. 19
FREE ARM SEWING ........................................19
OVERCASTING-OVERLOCKING .................... 20
A. USING THE OVERCASTING FOOT ................................ 20
B. USING THE REGULAR FOOT ......................................... 20
C. NOTE: ............................................................................... 20
BLIND HEM STITCHING .................................. 21
BUTTONHOLE SEWING ..................................22
A. WHEN SEWING STRETCH FABRIC ............................... 23
SEWING ON BUTTONS ...................................24
A. Thread Shank ................................................................... 24
AUTOMATIC BAR-TACK .................................. 25
PATCH WORK .................................................. 25
INSERTING ZIPPERS
CENTERED INSERTION .................................. 26
LAPPED INSERTION ....................................... 27
A.
TO OPEN THE ZIPPER WHILE STITCHING ............................
APPLIQUE ........................................................ 28
a. When sewing sharp angles .............................................. 28
CONTENIDO
PARTES PRINCIPALES .....................................2
ACCESORIOS .................................................... 3
TAPA DE LA MÁQUINA ..................................... 3
MESA EXTENSIBLE ........................................... 4
a. DESMONTAJE DE LA MESA EXTENDIBLE ..................... 4
b. ABERTURA DEL ESTUCHE DE ACCESORIOS ............... 4
CAMBIO DE PATA PRENSORA ........................ 4
A. Cambio de la pata prensora ............................................... 4
B. Extracción del portapata ..................................................... 4
INSERCIÓN DE LA AGUJA ................................ 5
CARTILLA GUÍA PARA HILO Y AGUJA SEGÚN
LA TELA ..........................................................5
CONEXIÓN DE LA MÁQUINA ............................ 6
PEDAL CONTROLADOR ................................... 6
FUNCIONES DE LOS COMPONENTES ........... 7
A. BOTÓN DE ENCENDIDO .................................................. 7
B. BOTÓN PARA PUNTADA INVERSA ................................. 7
C. BOTÓN PARA COSTURA LENTA ..................................... 7
D. BOTÓN PARA CONTROL DE VELOCIDAD ...................... 7
E. BOTÓN PARA SUBIR Y BAJAR LA AGUJA ...................... 7
F. LEVANTADOR DE LA PATA PRENSORA ........................ 7
G. PALANCA PARA BAJAR EL MECANISMO DE
ALIMENTACIÓN DE LA TELA ................................................ 7
H. CUBIERTA SUPERIOR ...................................................... 7
I. MANIVELA ......................................................................... 7
PARA SELECCIONAR UN PATRÓN DE
COSTURA ....................................................... 8
9
A. Contraste de la Pantalla Digital .......................................... 8
B. Botones Selectores de Patrones ........................................ 8
C. Selección del Patrón de Costura ........................................ 8
D. Información del Patrón Seleccionado ................................. 9
a. El Patrón de Puntada ......................................................... 9
b. El Número que identifica el patrón ..................................... 9
c. Tipo de pata prensora que debe usarse. ............................ 9
d. Ancho de la Puntada .......................................................... 9
e. Largo de la Puntada ........................................................... 9
f. Configuración del Hilván Automático .................................. 9
ARMADO DE LA BOBINA ................................ 10
A. Extracción de la Bobina .................................................... 10
B. Colocación del Carrete de Hilo en su Eje ......................... 10
C. ENROLLADO DEL HILO EN LA BOBINA ........................ 10
D. Inserción de la Bobina ...................................................... 11
SCALLOP STITCH ........................................... 28
a. SCALLOP HEM (No. 26) .................................................. 28
b. SCALLOP EDGING (No. 27) ............................................ 28
QUILTING ..................................................................29
A. Joining the pieces of fabric .......................................................... 29
B. Quilting ........................................................................................ 29
C. Hand Look Quilting Stitch (No. 6) ................................................ 29
GATHERING .............................................................. 29
NARROW HEMMING ................................................ 30
CORDING ..................................................................30
A. SINGLE CORDING ..................................................................... 30
B. TRIPLE CORDING ...................................................................... 30
DARNING/FREE-HAND EMBROIDERY ................... 31
A. ATTACHING THE DARNING/EMBROIDERY FOOT .................. 31
B. DARNING .................................................................................... 31
C. FREE-HAND EMBROIDERY ...................................................... 31
DECORATIVE AND LETTER STITCH SEWING ......
A. DECORATIVE AND LETTER STITCH BUTTONS ........... 32
B. TO SELECT DECORATIVE AND LETTER STITCH
PATTERN .............................................................................. 32
C. TO CHECK SELECTED PATTERNS ............................... 33
D.
ADJUSTING STITCH WIDTH AND LENGTH ............................
E. TO DELETE SELECTED PATTERN ................................ 33
F. TO SEW SELECTED PATTERNS ................................... 34
G. TIPS .................................................................................. 34
a. To sew selected patterns from beginning. ........................ 34
b. To recall selected patterns ................................................ 34
MAINTENANCE ................................................35
CLEANING ........................................................ 35
A. Bobbin Holder ................................................................... 35
B. Hook Race and Feed Dog ................................................ 35
HELPFUL HINT ................................................ 36
27
PATTERN CHART ............................................37
ENHEBRADO DE LA MÁQUINA ...................... 12
A. Preparación para Enhebrar la Máquina ............................ 12
B. Colocación del Carrete de Hilo en el Eje .......................... 12
C. Enhebrado del Hilo Superior ............................................ 12
D. ENSARTADO DEL HILO EN LA AGUJA ......................... 13
E. TEMPLADO DEL HILO DE LA BOBINA ........................... 13
PARA COMENZAR A COSER ......................... 14
A. Comienzo de un Extremo de una Costura ....................... 14
B. Puntada Inversa ............................................................... 14
C. CAMBIO DE DIRECCIÓN DE LA COSTURA .................. 15
D. COSTURA DE TELAS GRUESAS ................................... 15
E. COSTURA DE TELAS TRASLAPADAS ........................... 15
F. TOLERANCIA PARA EL ANCHO DE LA COSTURA ....... 15
REGULACIÓN DE LA TENSIÓN DE LOS
HILOS ........................................................... 16
A. Tensión correcta de los hilos ............................................ 16
B. Cuando el hilo de la bobina aparece en el lado superior de la
tela. ........................................................................................ 16
C.
Cuando el hilo superior aparece en la parte inferior de la tela ...
D. Tensión del hilo para puntadas zigzag ............................. 16
CONSEJO PRÁCTICO ..................................... 16
COSTURA CON PUNTADA RECTA ................ 17
A. Puntada Recta .................................................................. 17
B. Puntada Recta con Puntada Inversa Automática ............. 17
COSTURA ZIGZAG .......................................... 18
PUNTADA SATÉN (No. 8) ................................18
ZIGZAG DE PUNTADA MÚLTIPLE ..................18
A. Costura de Bandas Elásticas ........................................... 18
B. Puntada Ribeteadora ........................................................ 18
COSTURA CON PUNTADAS ELÁSTICAS ...... 19
MESA EXTENSIBLE ......................................... 19
COSTURA CON PUNTADA RIBETEADORA .. 20
A. Usando la Pata Ribeteadora ............................................ 20
B. Uso de la Pata Estándar ................................................... 20
C. NOTA: ............................................................................... 20
PUNTADA ELÁSTICA INVISIBLE .................... 21
COSTURA DE OJALES .................................... 22
A. Costura de Telas Elásticas ............................................... 23
COSTURA DE BOTONES ................................24
A. Vástago de Hilo para el Botón. ......................................... 24
COSTURA AUTOMÁTICA DE REFUERZOS ... 25
COSTURA DE PARCHES ................................ 25
COSTURA CENTRADA DE CREMALLERAS ..26
COSTURA TRASLAPADA DE CREMALLERAS27
A. Abertura de la Cremallera Mientras se Cose ................... 27
APLICACIONES ............................................... 28
a. Al coser ángulos pronunciados ........................................ 28
PUNTADA FESTÓN ......................................... 28
a. Costura Festón (No. 26) ................................................... 28
b. Acabado con Costura Festón (No. 27) ............................. 28
COSTURA DE COLCHAS ................................ 29
A. Unión de las tres piezas de tela ....................................... 29
B. Acolchado ......................................................................... 29
C. Puntada con apariencia manual para colchas (No. 6) ...... 29
RECOGIDOS .................................................... 29
DOBLADILLOS ANGOSTOS30
COSTURA DE CORDONES ............................. 30
A. Un solo cordón ................................................................. 30
B. Cordón Triple .................................................................... 30
ZURCIDO Y BORDADO A MANO LIBRE ........ 31
A. Instalación de la pata para zurcir y bordar. ...................... 31
B. Zurcido .............................................................................. 31
C. Bordado a Mano Libre ...................................................... 31
D. Después de Terminar de Zurcir o Bordar. ........................ 31
COSTURA DECORATIVA Y MONOGRAMAS .32
32
A. Costura Decorativa y Monogramas .................................. 32
B. Selección del Patrón de Puntadas Decorativas y
Monogramas .......................................................................... 32
C. Revisión de los Patrones Seleccionados ......................... 33
D. Regulación del Ancho y Largo de la Puntada .................. 33
E. Para Borrar el Patrón Seleccionado ................................. 33
33
F. Costura de los Patrones Seleccionados ............................ 34
G. CONSEJOS PRÁCTICOS ................................................ 34
a. Para coser los patrones seleccionados desde el principio 34
b. Para ver los patrones seleccionados ................................ 34
MANTENIMIENTO ............................................35
LIMPIEZA .......................................................... 35
A. Portabobina ...................................................................... 35
B. Pista de la Lanzadera y Mecanismo de Avance de la Tela 35
DIAGNÓSTICO DE PROBLEMAS ................... 36
16
1

MAIN PARTS
1. Light Cover
2. Needle Up/Down Button
3. Speed Control Button
4. Slow Button
5. Reverse Button
6. Start/Stop Button
7. Extension Table
8. Top Cover
9. Hand Wheel
10.Control Panel
1
2
3
4
5
6
7
PARTES PRINCIPALES
8
1. Cubierta de la Luz
2. Botón para Subir y Bajar la Aguja
9
3. Botón de Control de Velocidad
4. Botón de Costura Lenta
10
5. Botón de Costura Inversa
6. Interruptor
7. Mesa Extensible
8. Cubierta Superior
9. Manivela
10.Panel de Control
11.Thread Cutter
12.Buttonhole Lever
13.Needle Threader
14.Needle Threader Lever
15.Presser Foot Thumb Screw
16.Presser Foot Holder
17.Presser Foot
18.Fabric Feed Dogs
19.Needle Plate
20.Needle Clamp Screw
21.Needle Bar Thread Guide
22.Needle
23.Bobbin Cover
24.Bobbin Cover Latch
25.Thread Take-Up Lever (Inside)
26.Thread Tension Regulator
27.Thread Guide Plate
28.Spool Pin
29.Spool Cap
30.Bobbin Winder Thread Guide
31.Felt Washer
32.L. C. D. Contrast Control
33.Bobbin Winder Shaft
34.Bobbin Winder Stop
35.Liquid Crystal Display (L. C. D.)
36.Function Buttons (x5)
37.Utility Stitch Buttons (x5)
38.Decorative Stitch Button
39.Letter Stitch Buttons (x2)
40.Scroll Buttons
41.Clear Button
42.Read Button
11
12
13
14
15
16
17
18
19
26 27 28 29 30 31 32 33
25
35
36
37
38
39
34
11.Cortador de Hilo
20
12.Palanca para Ojales
13.Enhebrador de Hilo
21
14.Palanca del Enhebrador de Hilo
22
15.Perilla para Pata Prens ora
23
16.Sujetador de la Pata Prensora
17.Pata Prensora
24
18.Mecanismo Alimentador de Tela
19.Placa de la Aguja
20.Perilla del Porta Aguja
21.Guía del Hilo del Vástago del Porta Aguja
22.Aguja
23.Tapa de la Bobina
24.Pestillo de la Tapa de la Bobina
25.Palanca Tensora del Hilo (Interior)
26.Regulador de Tensión del Hilo
27.Placa Guía del Hilo
28.Eje para el Carrete del Hilo
29.Tapa para el Carrete del Hilo
30.Guía para Enrollar el Hilo en la Bobina
31.Arandela de Fieltro
32.Regulador de Contraste del Visualizador
33.Eje Enrollador de la Bobina
34.Tope del Enrollador de la Bobina
40
35.Pantalla Visora Digital de Cuarzo Líquido
41
36.Botones de Funciones (x5)
42
37.Botones para Puntadas (x4)
38.Botón para Puntada Decorativa
39.Botones para Monogramas (x2)
40.Botones Visualizadores
47
41.Botón para Despejar
42.Botón para Leer
43.Presser Foot Lifter
44.Drop Feed Lever
45.Power Line Cord
46.Foot Controller
47.Handle
48.Power Switch
49.Terminal Box
50.Controller Jack
2
43
44
45
46
43.Palanca Levantadora de la Pata
Prensora
44.Palanca del Mecanismo Alimentador de
48
49
50
Tela
45.Cordón de Suministro Eléctrico
46.Pedal Controlador
47.Asa
48.Interruptor
49.Caja Terminal
50.Enchufe para el Controlador

ACCESSORIES
ACCESORIOS
Accessories are provided in the accessory
case.
(See next page, [EXTENSION TABLE])
1. Needle Pack (#11, #14, #16, Needle for
knit and synthetic fabric #11, #14)
2. 4 Bobbins ( 1 is in the machine)
3. Seam Ripper
4. Screw Driver
5. Thread Cap (On the machine when
delivered)
6. Satin Foot (B)
7. Overcasting Foot (C)
8. Zipper Foot (E)
9. Button Sewing Foot
10. Straight Stitch / Quilting Foot
11. Quilting Bar
12. Narrow Hemming Foot
13. Cording Foot
14. Gathering Foot
15. Darning Embroidery Foot
16. Blind Foot (D)
17. Buttonhole Foot (F)
18. Regular Foot (A) (On machine when
delivered)
1
5
8
12 13 14
15
234
6
9
16
10
Los accesorios se proveen en el estuche de
accesorios.
(Ver la siguiente página para la mesa
extensible)
1. Paquete de agujas (No. 11, 14, 16 y para
Telas Tejidas y Sintéticas No. 11 y 14).
2. 4 bobinas (1 instalada)
3. Cortador de Costuras
7
11
4. Entornillador
5. Tapa para Carrete de Hilo (Instalada)
6. Pata para Puntada Satén (B)
7. Pata para Ribetear (C)
8. Pata para Cremalleras (E)
9. Pata para Coser Botones
10. Pata para Puntada Recta y Colchas
11. Guia de Acolchar
12. Pata para Dobladillos Angostos
13. Pata para Cordones
14. Pata para Recogidos
15. Pata para Zurcidos y Bordados
16. Pata para Puntada Invisible (D)
17. Pata para Ojales (F)
18. Pata Estándar (A) (Instalada)
DUST COVER
Cover the machine with dust cover
when it is not to be used.
17
18
TAPA DE LA MÁQUINA
Cubre la máquina para protegerla contra el
polvo cuando no está en uso.
3
EXTENSION TABLE
MESA EXTENSIBLE
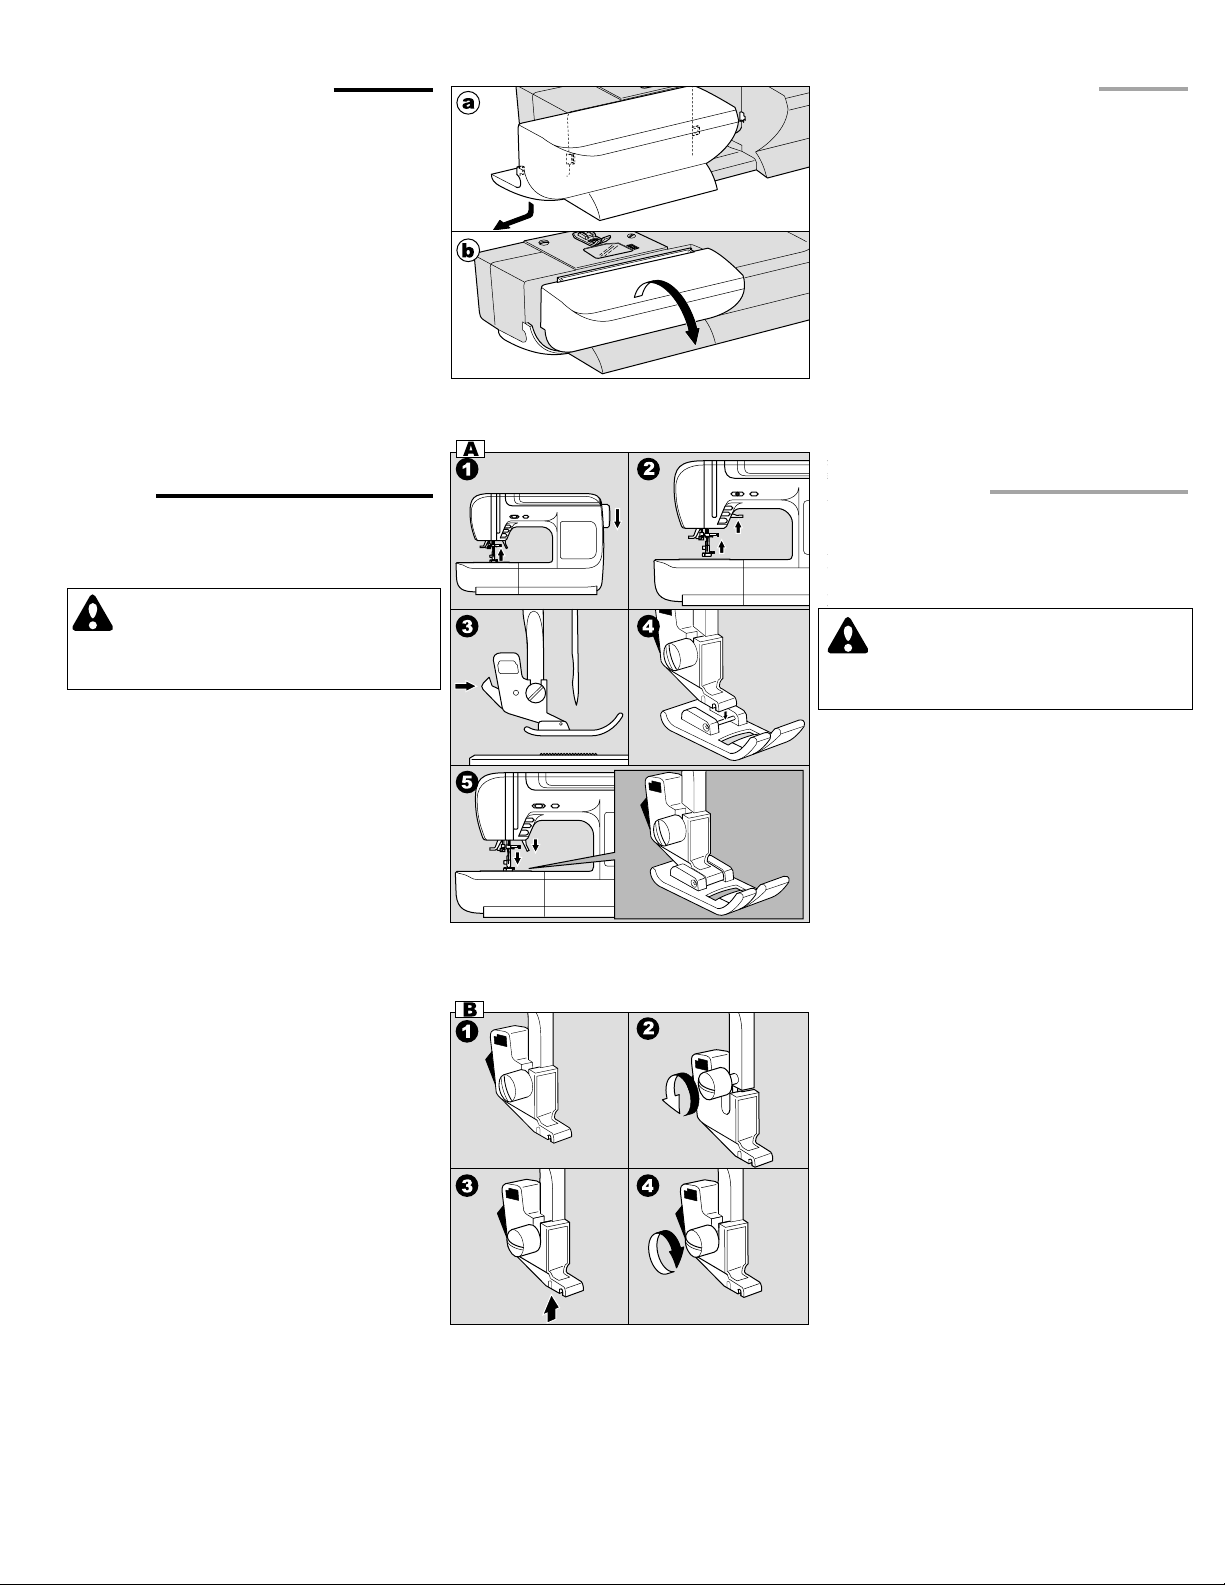
a. REMOVING THE EXTENSION TABLE
Hook your finger to the left bottom side of
extension table and slide it to the left. To
attach, insert to the right.
b. OPENING THE ACCESSORY CASE
Hook your finger to the this side of
accessory case and pull toward you.
CHANGING THE PRESSER
FOOT
The presser foot must be changed according
to the stitch you sew, or work you do.
CAUTION: To prevent accidents.
Turn off the power switch before you change
the presser foot.
A. Changing the presser foot
1. Turn the hand wheel toward you until the
needle is at its highest point.
2. Raise the presser foot lifter.
3. Remove the presser foot by pushing the
presser foot release lever toward you.
4. Place desired foot with its pin directly
under the slot in presser foot holder.
5. Lower the presser foot lifting lever and the
presser foot will snap into place.
a. DESMONTAJE DE LA MESA
EXTENDIBLE
Enganche el dedo en el lado inferior
izquierdo de la mesa extendible y
deslícela a la izquierda. Para reinstalarla,
insértela y deslícela a la derecha.
b. ABERTURA DEL ESTUCHE DE
ACCESORIOS
Enganche el dedo en éste lado del
estuche de accesorios y jálelo hacia
usted.
CAMBIO DE PATA
PRENSORA
La pata prensora debe cambiarse de
acuerdo al tipo de puntada que se va a usar
para coser.
PRECAUCIÓN: Para evitar
accidentes,
corte el suministro de corriente a la máquina
antes de cambiar la pata prensora.
A. Cambio de la pata prensora
1. Gire la manivela hacia Usted Hasta que la
aguja quede en su posición más alta.
2. Levante la pata prensora con el
levantador.
3. Saque la pata prensora empujando la
palanca de zapata prensora hacia Usted
4. Coloque la pata prensora deseada con su
vástago directamente bajo la ranura del
porta pata.
5. Baje la palanca levantadora de la pata
prensora y ésta enganchará en posición.
B. Removing the presser foot holder
When cleaning around the feed dog or
attaching extra foot (option), you may
remove the presser foot holder.
1. Remove the presser foot.
2. Loosen the presser foot thumb screw and
remove the presser foot holder.
3. To replace the holder, pull up the holder
as far as it will go from bottom of presser
bar.
4. Tighten the thumb screw.
4
B. Extracción del portapata
Cuando limpie alrededor del mecanismo
alimentador de tela o instale una pata
adicional (opcional), se puede sacar el porta
pata.
1. Saque la pata prensora.
2. Saque el portapata aflojando su perilla de
fijación.
3. Para reinstalar el porta pata, empujarlo
tan arriba como sea posible en el vástago
del porta pata.
4. Ajuste la perilla.
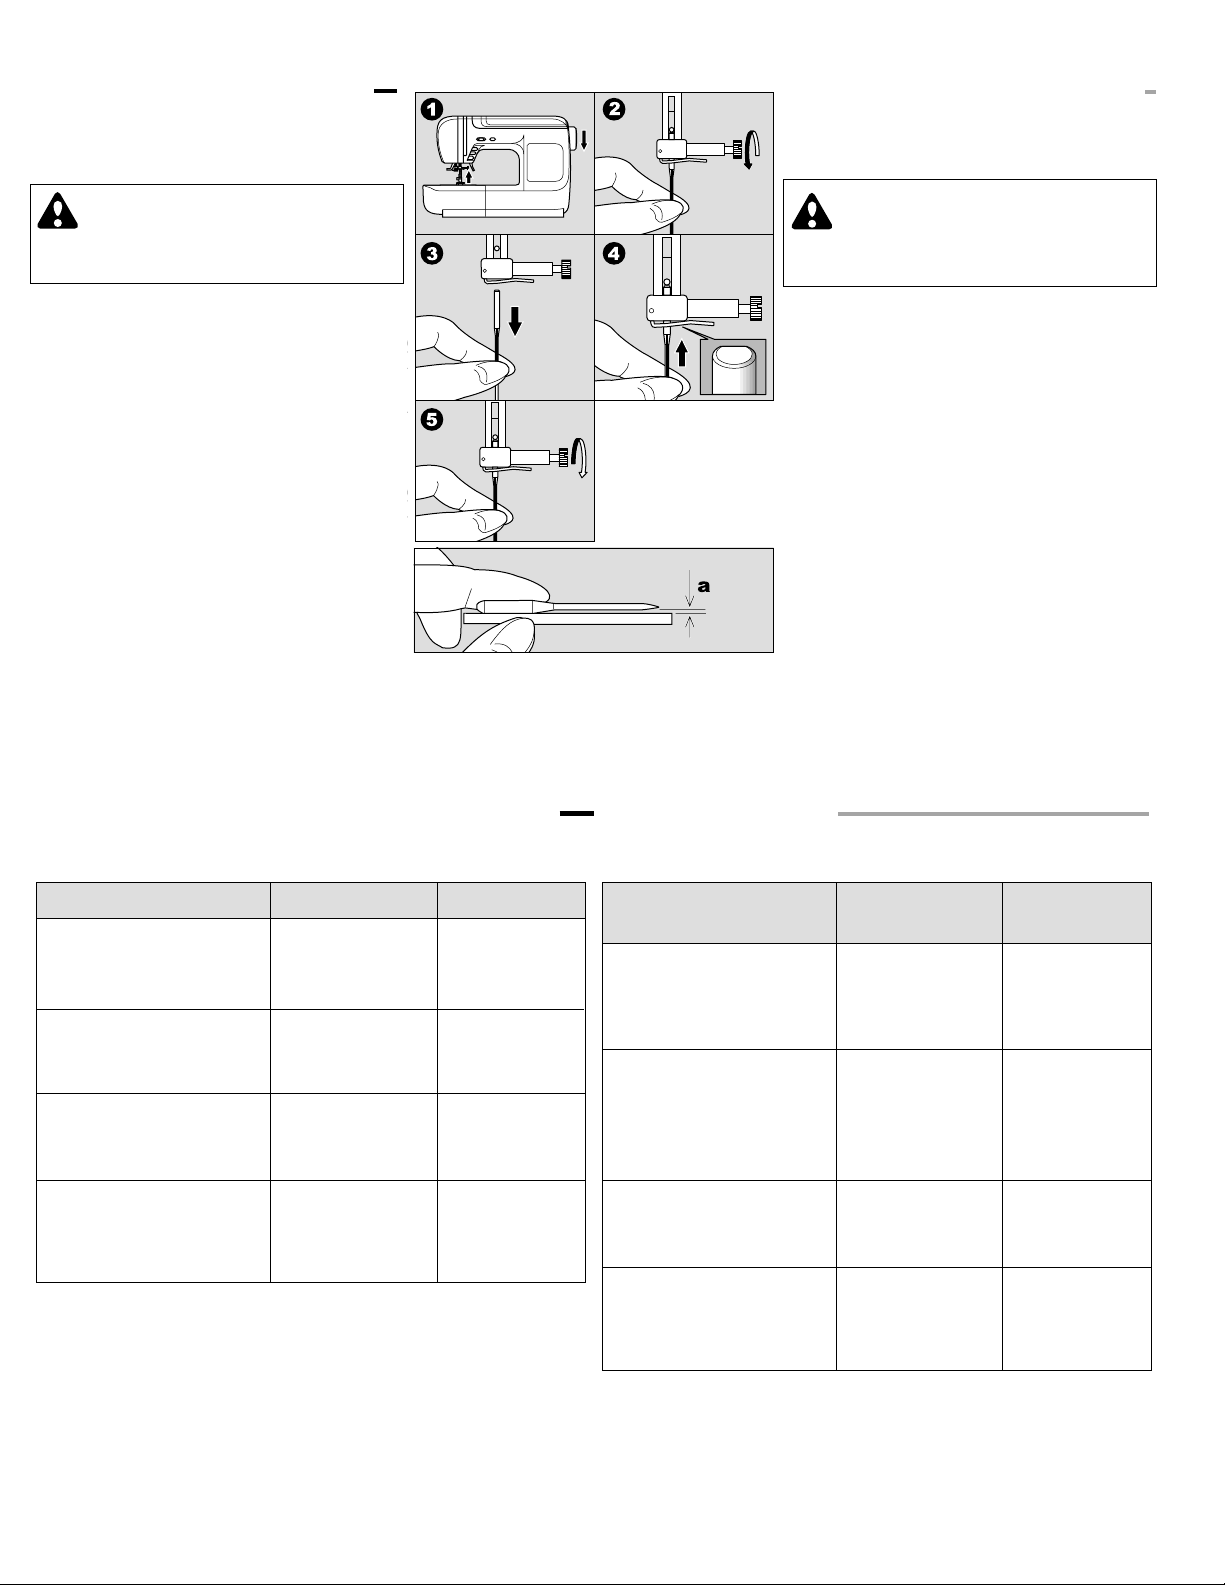
INSERTING THE NEEDLE
INSERCIÓN DE LA AGUJA
Select a needle of the right type and size for
the fabric to be sewn.
CAUTION: To prevent accidents.
Turn off the power before removing the
needle.
1. Turn the hand wheel toward you until the
needle is at its highest point.
2. Loosen the needle clamp screw.
3. Remove the needle.
4. Insert new needle into needle clamp with
the flat side to the back and push it up as
far as it will go.
5. Tighten the needle clamp screw.
a. Do not use the bent or blunt needle. Place
needle on a flat plate and check
straightness.
Seleccione la aguja del tipo y tamaño
adecuado para la tela que se va a coser.
PRECAUCIÓN: Para evitar
accidentes,
corte el suministro eléctrico antes de sacar la
aguja.
1. Gire la manivela hacia Usted hasta que la
aguja llegue a su posición más alta.
2. Afloje el tornillo sujetador de la aguja.
3. Saque la aguja.
4. Inserte la aguja nueva en el sujetador con
la parte plana hacia atrás y empújela
hacia arriba hasta el tope.
5. Vuelva a ajustar el tornillo sujetador de la
aguja.
a. No use agujas dobladas o sin punta.
Coloque la aguja sobre una placa plana y
verifique que esté recta.
FABRIC, THREAD AND NEEDLE TABLE
Select size of thread and needle in accordance with fabric to be sewn.
Type of Fabric
Light Weight - thin
georgette, organdy, voile,
taffeta, silk, etc.
Medium Weight - gingham,
pique, linen, cotton, satin,
thin corduroy, velvet
Heavy Weight - gabardine,
tweed, denim, corduroy
Stretch - double knit, tricot,
spandex, jersey
Use a Home sewing machine needle.
Thread Size
Ctn #80 - 100
Silk 60 - 80
Syn 80 - 100
Ctn 50 - 80
Silk 50
Syn 50 - 80
Ctn 40 - 50
Silk 50
Syn 50 - 60
Syn 50 - 80
Silk 50
Thread for knit
Needle Size
9/70-11/80
11/80-14/90
14/90-16/100
11/80-14/90
Needle for knit
and synthetic
fabric
CARTILLA GUÍA PARA HILO Y AGUJA
SEGÚN LA TELA
Seleccione el hilo y la aguja de acuerdo a la tela que se va a coser.
Tipo de Tela
Tela delgada: gasas de
algodón, sedas sintéticas,
georget, organdí, tafetán,
etc.
Tela Mediana: telas de
algodón, sintéticas, piqué,
popelinas, lino, algodón,
satén, corduroy delgado,
terciopelo
Telas Gruesas: gabardina,
tweed, denim, mezclilla,
corduroy
Telas estirables: de doble
punto, tricot, spandex,
jersey
Tamaño de Hilo
Algodón 80 a100
Seda 60 a 80
Sintético 80 a100
Algodón 50 A 80
Seda 50 A
Sintético 50 A 80
Algodón 40 A 50
Seda 50 A
Sintético 50 A 60
Algodón 50 a 80
Seda 50 a
Hilo para tejer
Tamaño de
Aguja
9/10 – 11/80
11/80 – 14/90
14/90 – 16/100
11/80 – 14/90
Aguja para telas
tejidas y
sintéticas
Use una aguja para máquinas de coser domésticas
5
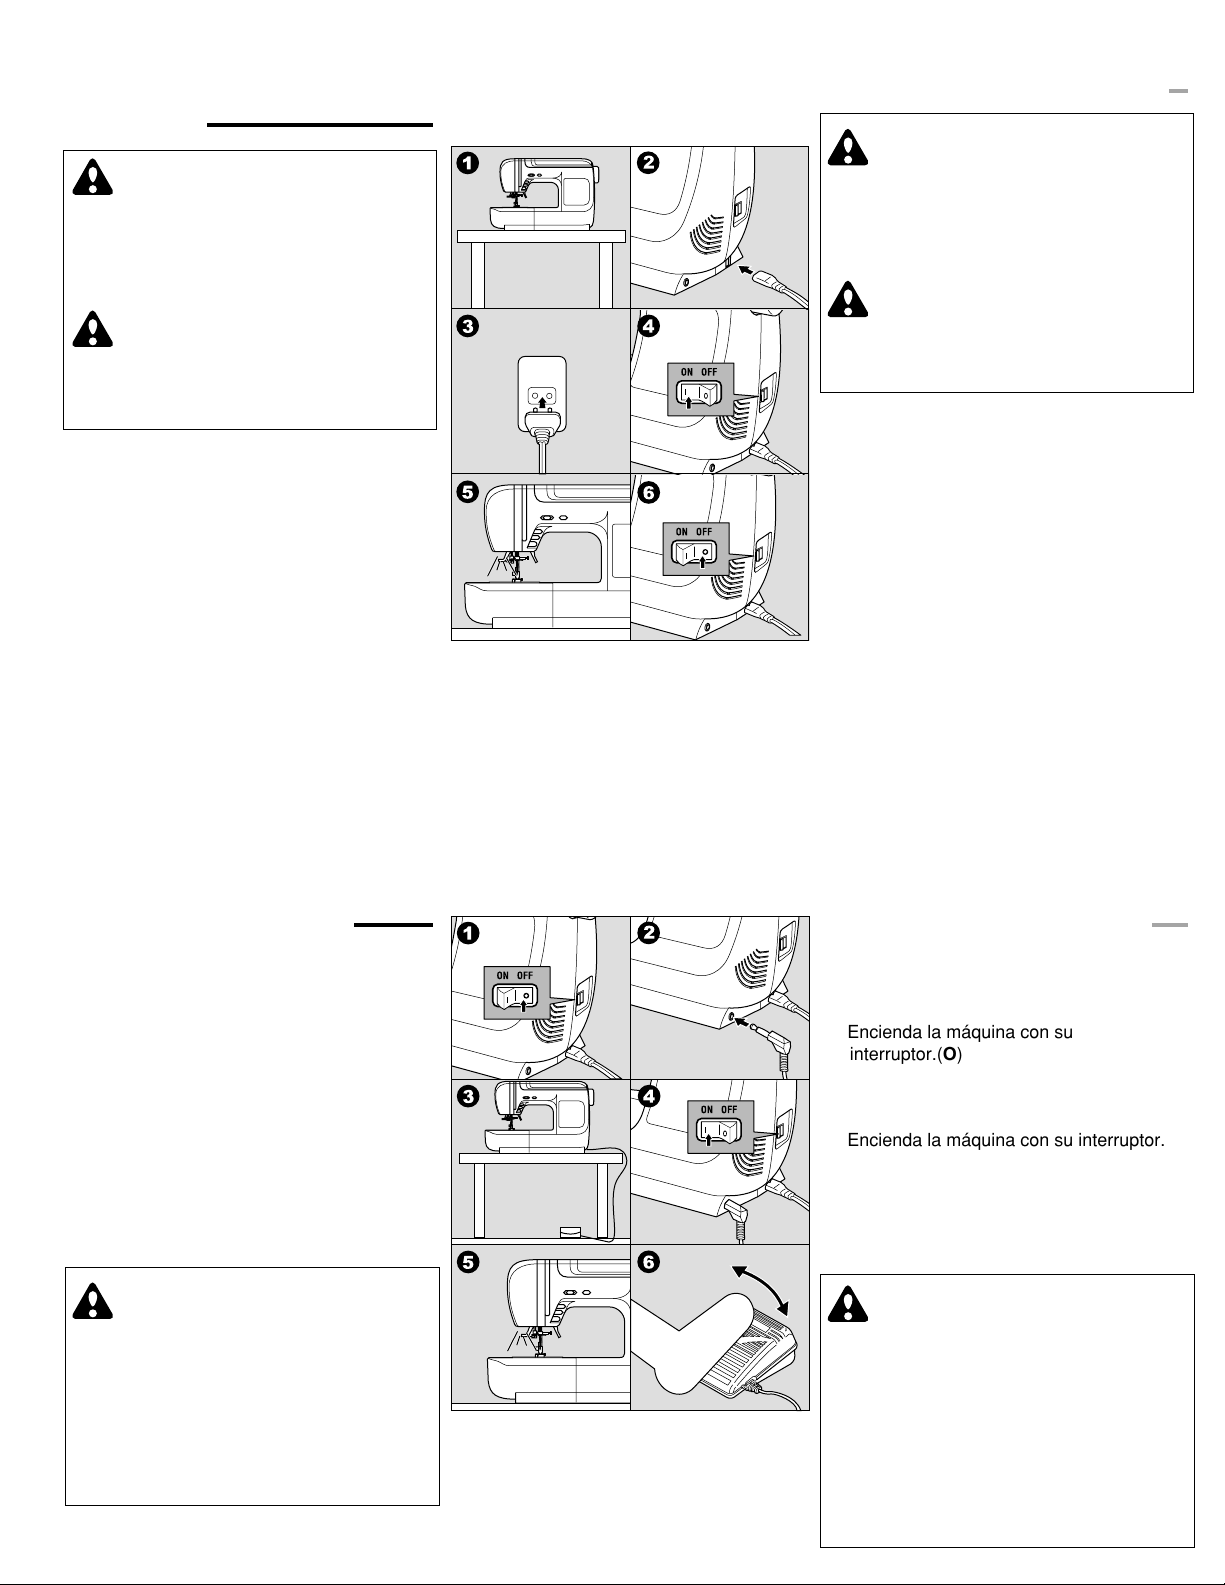
CONNECTING THE
MACHINE
DANGER: To reduce the risk of
electric shock.
Never leave unattended when plugged in.
Always unplug this machine from the electric
outlet immediately after using and before
maintenance.
WARNING: To reduce the risk of
burns, fire, electric shock, or injury
to persons.
Do not unplug by pulling on cord. To unplug,
grasp the plug, not the cord.
1. Place machine on stable table.
2. Connect the power line cord to the
machine by inserting the 2-hole plug into
the terminal box.
3. Connect the power line plug to the electric
outlet.
4. Turn on the power switch.
5. A lamp will light up when switch is turned
on.
6. To disconnect, turn the power switch to
the off position (symbol O), then remove
plug from outlet.
POLARIZED PLUG INFORMATION
This appliance has a polarized plug (one blade wider than the
other). To reduce the risk of electric shock, this plug is intended to
fit in a polarized outlet only one way. If the plug does not fit fully in
the outlet, reverse the plug. If it still does not fit, contact a qualified
electrician to install the proper outlet. Do not modify the plug in any
way.
CONEXIÓN DE LA MÁQUINA
PELIGRO: Para reducir el riesgo de
choque eléctrico.
Nunca deje la máquina desatendida cuando
esté enchufada. Siempre desenchufe la
máquina del tomacorriente inmediatamente
después de usarla y antes de darle
mantenimiento.
ADVERTENCIA: Para reducir el riesgo
de quemaduras, incendios, choque
eléctrico o lesiones personales,
no desenchufe la máquina jalando del
cordón, hágalo agarrando del enchufe.
1. Coloque la máquina sobre una mesa
estable.
2. Conecte el enchufe hembra de 2 orificios,
al tomacorriente de la máquina.
3. Conecte el enchufe macho a un
tomacorriente en la pared.
4. Encienda la máquina con el interruptor.
5. Una luz indicadora se iluminará cuando la
máquina esté encendida.
6. Antes de desenchufar la máquina del
tomacorriente, apáguela con su
interruptor. (O)
INFORMACIÓN REFERENTE AL ENCHUFE POLARIZADO
Este electrodoméstico está equipado con un enchufe polarizado
(note que una patita es más ancha que la otra). Para reducir el
riesgo de choques eléctricos, este enchufe solamente puede ser
usado en una toma de corriente polarizada. Si no puede insertar el
enchufe completamente en la toma de corriente, déle la vuelta e
inténtelo de nuevo. Si el enchufe no entra todavía correctamente,
contrate a un electricista cualificado para que le instale la toma de
corriente adecuada. No intente modificar el enchufe.
FOOT CONTROLLER
Use of foot controller will permit control of
start, stop and speed with your foot.
1. Turn off the power switch. (symbol O)
2. Push foot controller plug into the jack on
machine.
3. Place foot controller at your feet.
4. Turn on the power switch.
5. A lamp will light up when switch is turned
on.
6. The harder you press the foot controller,
the faster the machine will sew. The
machine will stop when foot controller is
released.
WARNING: To reduce the risk of
burns, fire, electric shock, or injury
to persons.
1. Turn off the power when connecting the
foot controller to the machine.
2. Handle the foot controller with care and
avoid dropping it on the floor. Be sure not
to place anything on top of it.
3. Use only foot controller provided with this
machine. (Type 4C-337B)
6
PEDAL CONTROLADOR
El uso del pedal controlador le permitirá
poner en marcha la máquina, detenerla y
regular la velocidad.
1. Encienda la máquina con su
interruptor.(O)
2. Inserte el conector en el enchufe de la
máquina.
3.
Ponga el pedal en el piso, debajo de su pie.
4. Encienda la máquina con su interruptor.
5. Una luz iluminará cuando la máquina esté
encendida.
6. Cuando más fuerte presione el pedal, más
rápido cocerá la máquina. La máquina se
detendrá cuando suelte el pedal.
ADVERTENCIA: Para reducir el riesgo
de quemaduras, incendios, choque
eléctrico o lesiones personales:
1. Corte el suministro eléctrico a la máquina
antes de conectar el pedal controlador a
la máquina.
2. Manipule el pedal controlador con
cuidado y evite dejarlo caer al piso.
Cerciorese de no colocar objeto alguno
encima.
3. Use el pedal suministrado con esta
máquina. (Tipo 4C-337B)
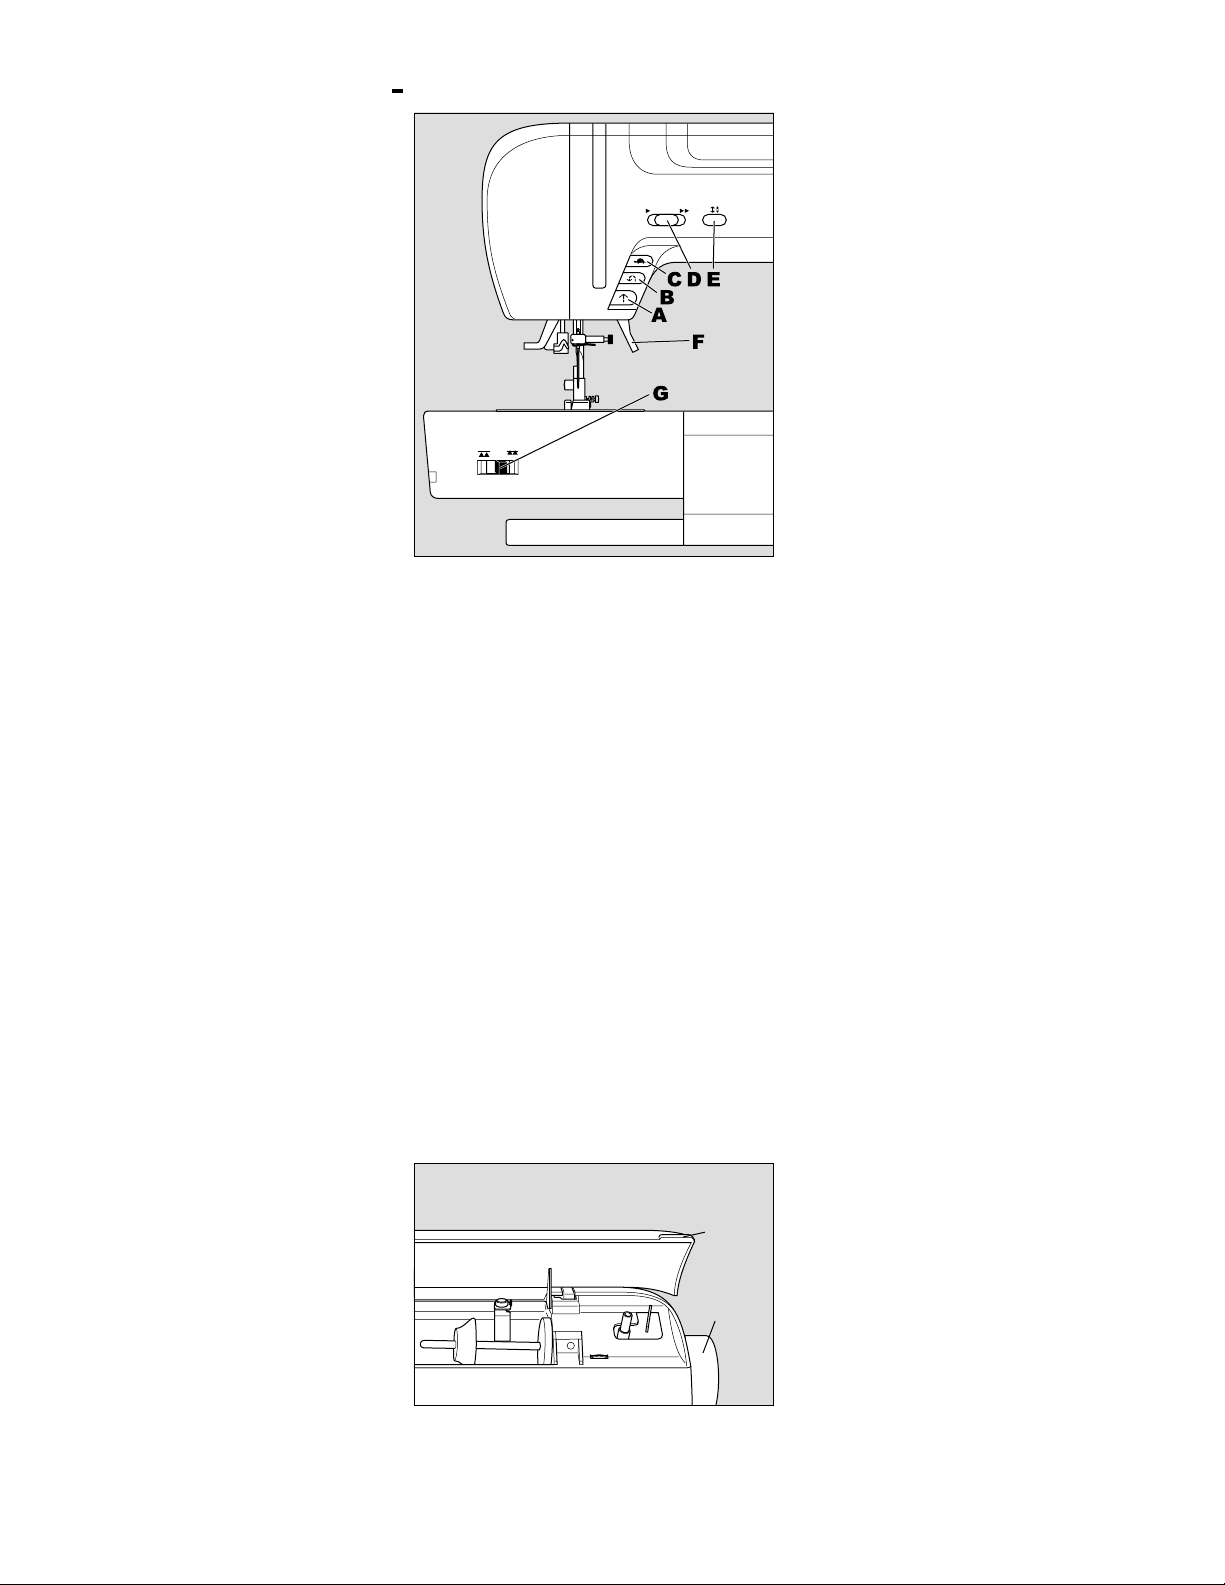
FUNCTION OF EACH PART
A. START/STOP BUTTON
The machine will start running when start/
stop button is pressed and will stop when
pressed the second time. The machine will
rotate slowly at start of sewing.
Note: When the foot controller is connected,
start/stop button will be disactivated.
B. REVERSE STITCH BUTTON
The machine will continue to sew in reverse
at low speed while this button is pressed and
stop when this button is released.
Note:When the foot controller is connected,
machine will sew in reverse (at low speed)
while this button is pressed. When released,
machine will sew forward.
C. SLOW BUTTON
While sewing, by pressing this button,
machine will sew in slow speed. Pressing
this button again, the speed will return.
FUNCIONES DE LOS
COMPONENTES
A. BOTÓN DE ENCENDIDO
La maquina comenzará a funcionar cuando
se apriete este botón y se detendrá cuando
se apriete por segunda vez. La maquina
comenzará a coser lentamente.
Nota: Este botón queda desactivado cuando
el pedal controlador está conectado,.
B. BOTÓN PARA PUNTADA INVERSA
La máquina continuará cosiendo pero a la
inversa a velocidad lenta, mientras este
botón esté presionado.
Dejará de hacerlo, cuando se suelte el
botón.
Nota: cuando el pedal controlador esté
conectado, la máquina coserá a la inversa (a
baja velocidad) mientras este botón esté
presionado y coserá hacia delante cuando
se suelte.
D. SPEED CONTROL BUTTON
The machine will sew faster when the button is slided to the right,
and sew slower when button is slided to the left.
Note: When the foot controller is connected, this button limit the
maximum speed.
E. NEEDLE UP/DOWN BUTTON
Needle stop position will be changed up or down by pressing this
button.
F. PRESSER FOOT LIFTER
The presser foot is lifed up or down by this lever.
Note: Machine will not start when the presser foot is lifted. (Except
for bobbin winding)
G. DROP FEED LEVER
The fabric feed dogs project up through the needle plate, directly
below the presser foot. Their function is to move the fabric being
sewn. The drop feed lever controls the fabric feed dogs.
For ordinary sewing, move the lever to the right. This raises feed
dogs to their highest position. For most sewing, the lever should be
in this position.
For darning or free motion embroidery or whenever fabric is to be
moved by hand, move the lever to the left to lower the fabric feed
dogs.
H. TOP COVER
To open the top cover, lift up the right side
of cover.
I. HAND WHEEL
By turning the hand wheel, the needle will
raise or lower. You should turn hand wheel
toward you.
C. BOTÓN PARA COSTURA LENTA
Si al estar cosiendo se presiona este botón, la máquina coserá a
velocidad lenta y regresará a su velocidad normal al volverlo a
presionar
D. BOTÓN PARA CONTROL DE VELOCIDAD
La máquina coserá más rápido cuando este botón esté a la
derecha y más lento cuando esté a la izquierda.
Nota: Cuando el pedal controlador esté conectado, este botón
limitará la velocidad máxima.
E. BOTÓN PARA SUBIR Y BAJAR LA AGUJA
Donde la aguja se detenga, cambiar de arriba abajo presionando
éste botón.
F. LEVANTADOR DE LA PATA PRENSORA
Sirve para subir o bajar la pata prensora. Nota: La máquina no
funcionará cuando la pata esté levantada. (Excepto para enrollar
hilo en la bobina).
G. PALANCA PARA BAJAR EL MECANISMO DE
ALIMENTACIÓN DE LA TELA
Las uñas del alimentador de tela se proyectan hacia arriba,
sobresaliendo por la placa de la aguja y debajo de la
pata prensora. Su función es hacer avanzar la tela cuando se cose.
Mueva la palanca hacia la derecha para la
costura común. Esto sube los dientes del
mec anismo de avance hasta su posición
más alta. La palanca debe estar en esta
H
I
posición para la mayoría de las costuras.
Para zurcir o bordar a mano libre o cuando
se quiera mover la tela a mano, mueva la
palanca a la izquierda para que los dientes
del mecanismo de avance bajen.
H. CUBIERTA SUPERIOR
Para abrirla, lev ántela del lado derecho.
I. MANIVELA
La aguja sube y baja cuando gire esta
manivela hacia usted.
7

TO SELECT A UTILITY
PATTERN
PARA SELECCIONAR UN
PATRÓN DE COSTURA
This machine has 45 utility patterns.
(See page 37 [PATTERN CHART].)
When you turn on the machine, straight
stitch (No. 1) will be selected and indicated
on the L. C. D..
A. CONTRAST OF THE L.C.D.
The contrast of the L.C.D is adjusted by
turning the L.C.D. contrast control dial.
B. UTILITY BUTTONS
The utility stitch patterns are separeted into 4
groups. They are selected by pressing the
utility buttons.
a. Straight Stitches
b. Utility Stitches
c. Quilting & Heirloom Stitches
d. Buttonholes
Esta máquina tiene programados 45
patrones de costura (La Cartilla con
Patrones de Puntadas está en la página 37)
Al encender la máquina, ésta se prepara
automáticamente para trabajar con puntada
recta (No. 1) y aparecerá indicada en la
pantalla..
A. Contraste de la Pantalla Digital
El contraste se regula girando el dial de
control de contraste.
B. Botones Selectores de Patrones
Los patrones de costura preprogramados
están separados en 4 grupos y se
seleccionan presionando estos botones:
a. Puntada Recta
b. Puntadas Especiales
c. Puntadas para Colchas y Alfombras
d. Puntadas para Ojalillos.
C. TO SELECT A UTILITY STITCH
PATTERN
1. Press the utilty button including the
desired pattern.
First 5 patterns of group will appear on the
L.C.D..
2. Press the same button again. Next
pattern(s) of selected group will appear.
By pressing this button, patterns of
selected group will change incrementally.
3. When desired pattern has appeared,
press the function button directly under
the desired pattern.
The L.C.D. screen will indicate the
informations of selected pattern. (Next
page)
To select decorative or letter patterns, See
page 32 [DECORATIVE AND LETTER
STITCH SEWING].
C. Selección del Patrón de Costura
1. Presione el botón selector que incluya el
patrón deseado.
Los primeros 5 patrones de cada grupo
aparecerán en la pantalla digital.
2. Presione el botón nuevamente para ver
los siguientes patrones del grupo.
3. Cuando aparezca el patrón deseado,
presione el botón directamente debajo de
ese patrón.
La pantalla digital indicará la información
correspondiente al patrón seleccionado
(siguiente página).
Para seleccionar los patrones de costura
decorativa y monogramas, refiérase a la
página 32 (COSTURA CON PUNTADAS
DECORATIVAS Y MONOGRAMAS).
8
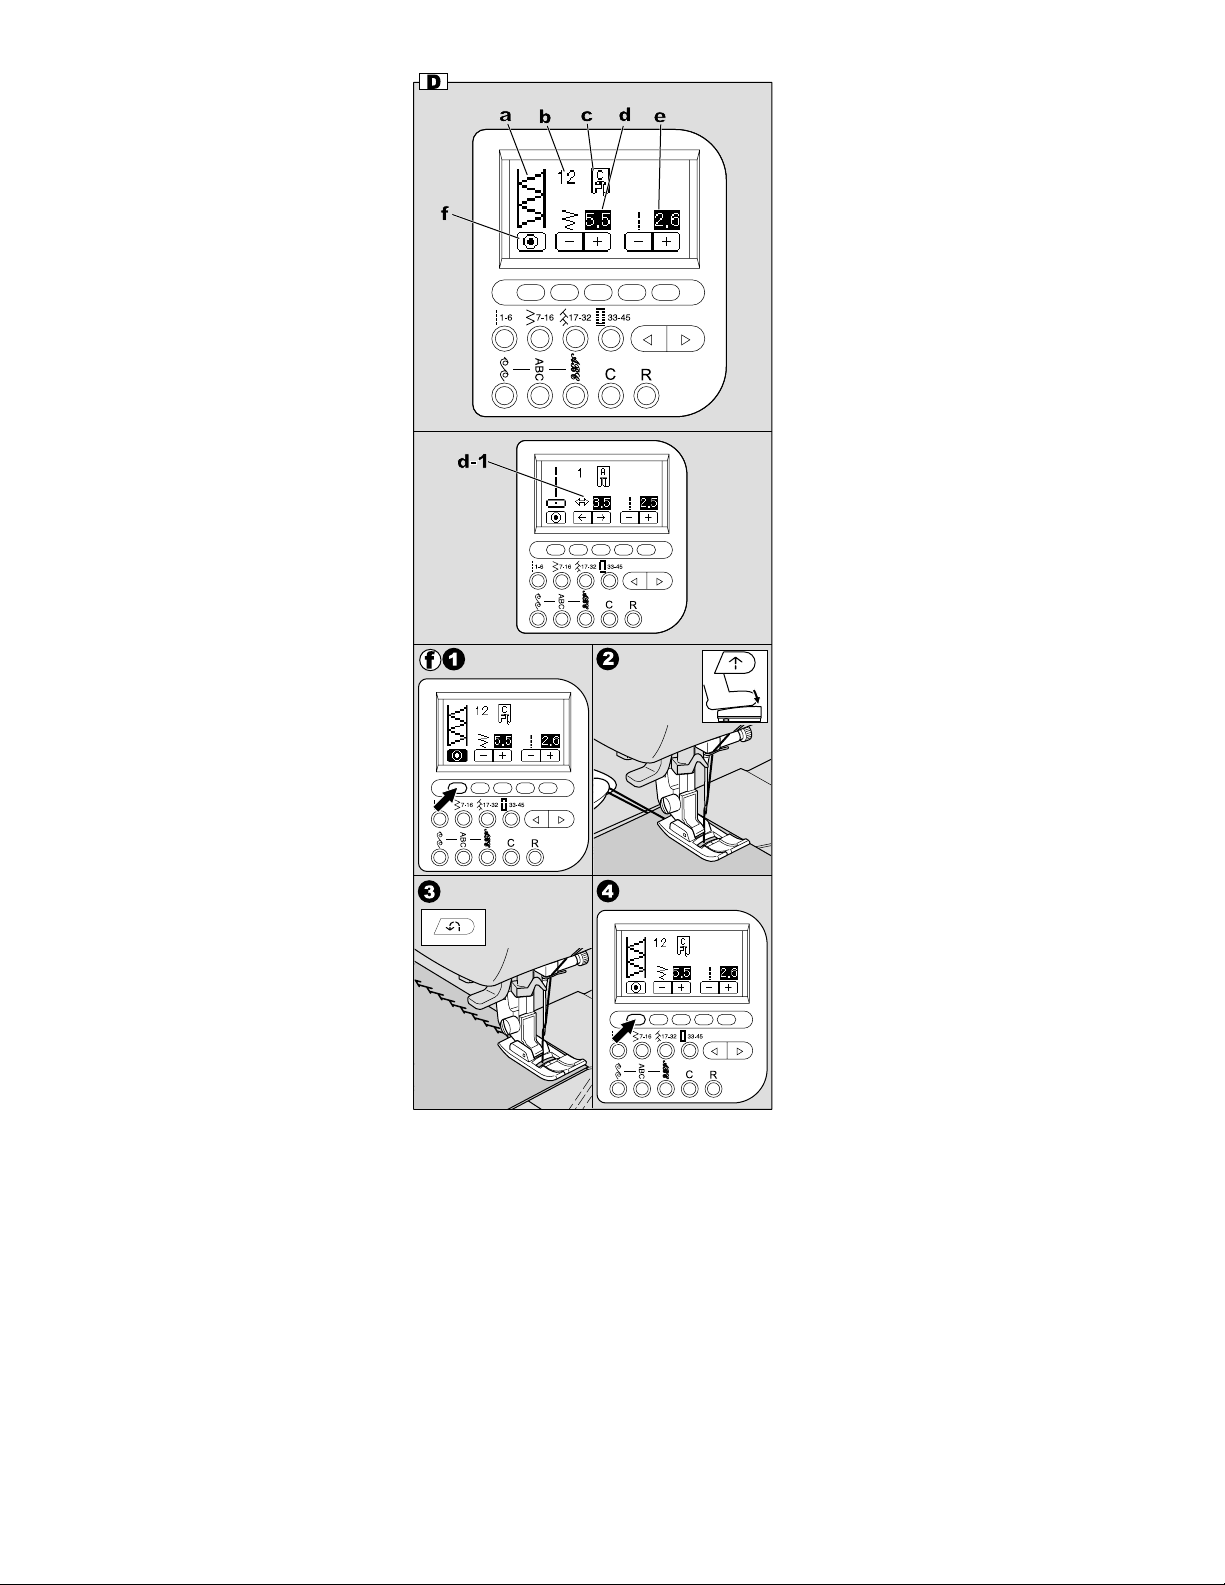
D. INFORMATIONS OF SELECTED
PATTERN
When pattern is selected, L.C.D. will indicate
following informations.
a.Stitch Pattern
b.Pattern Numer
c.Suitable Presser Foot
Indicated presser foot is one of suggested
foot for normal sewing. You can use other
presser foot according to the purpose of
sewing described in this booklet.
d.Stitch Width
Preset stitch width is indicated as a
highlighted number.
For narrower stitch width, press the Function
button directly under the width - button.
For wider stitch width, press the Function
button directly under the width + button.
D. Información del Patrón Seleccionado
Cuando seleccione un patrón la pantalla
digital le indicará la siguiente información:
a. El Patrón de Puntada
b. El Número que identifica el patrón
c. Tipo de pata prensora que debe
usarse.
La pata prensora indicada será una de las
sugeridas para costura normal. Se puede
usar otra pata prensora de acuerdo al
material que se vaya a coser según lo
descrito en éste manual.
d. Ancho de la Puntada
El ancho pre-establecido para la puntada
seleccionada está indicado mediante un
número que debajo tiene un botón de
función (-) y otro (+) que sirven para
aumentar o disminuir el ancho de la puntada.
d-1. Needle Position Control
When straight stitch patterns No. 1, 2, 5, 6
has been selected, these buttons adjust the
needle position.
e.Stitch Length
Preset stitch length is indicated as a
highlighted number.
For shorter stitch length, press the Function
button directly under the length - button.
For longer stitch length, press the Function
button directly under the length + button.
f. Setting of Auto-tack stitch
You can sew tack stitch at the beginning and
end of the stitch.
1. Press the Function button directly under
the tack mark.
Tack mark will be highlighted.
2. Start to sew. (See page14 [STARTING
TO SEW])
Machine will sew tacking automatically
and start to sew the selected pattern.
3. When you reach the end of seam, press
the reverse button.
Machine will sew tacking and stop
automatically.
4. If you want to cancel this function, press
this Function button again. Highlight will
turn off.
d-1 Control de la Posición de la Aguja
Cuando se seleccionen los patrones de
Patrón No. 1, 2, 5 ó 6, estos botones sirven
para regular la posición de la aguja.
e. Largo de la Puntada
El largo pre-establecido para la puntada
seleccionada está indicado mediante un
número que debajo tiene un botón de
función (-) y otro (+) que sirven para
aumentar o disminuir el largo de la puntada.
f. Configuración del Hilván Automático
Se puede programar la puntada automática
de hilván para el principio y el final de la
puntada.
1. Presione el botón de función directamente
debajo de la marca de la puntada de
hilván y la marca se iluminará.
2. Comience a coser. (Ver la sección
“Comenzando a Coser” en la página 14).
La máquina comenzará automáticamente
a hacer la costura tipo hilván y luego el
patrón de costura seleccionado.
3. Cuando llegue al final de la costura,
presione el botón para costura inversa y
la máquina seguirá cosiendo pero con
puntada de hilván y se detendrá
automáticamente.
4. Si desea cancelar esta función presione
el botón nuevamente y la luz se apagará.
9
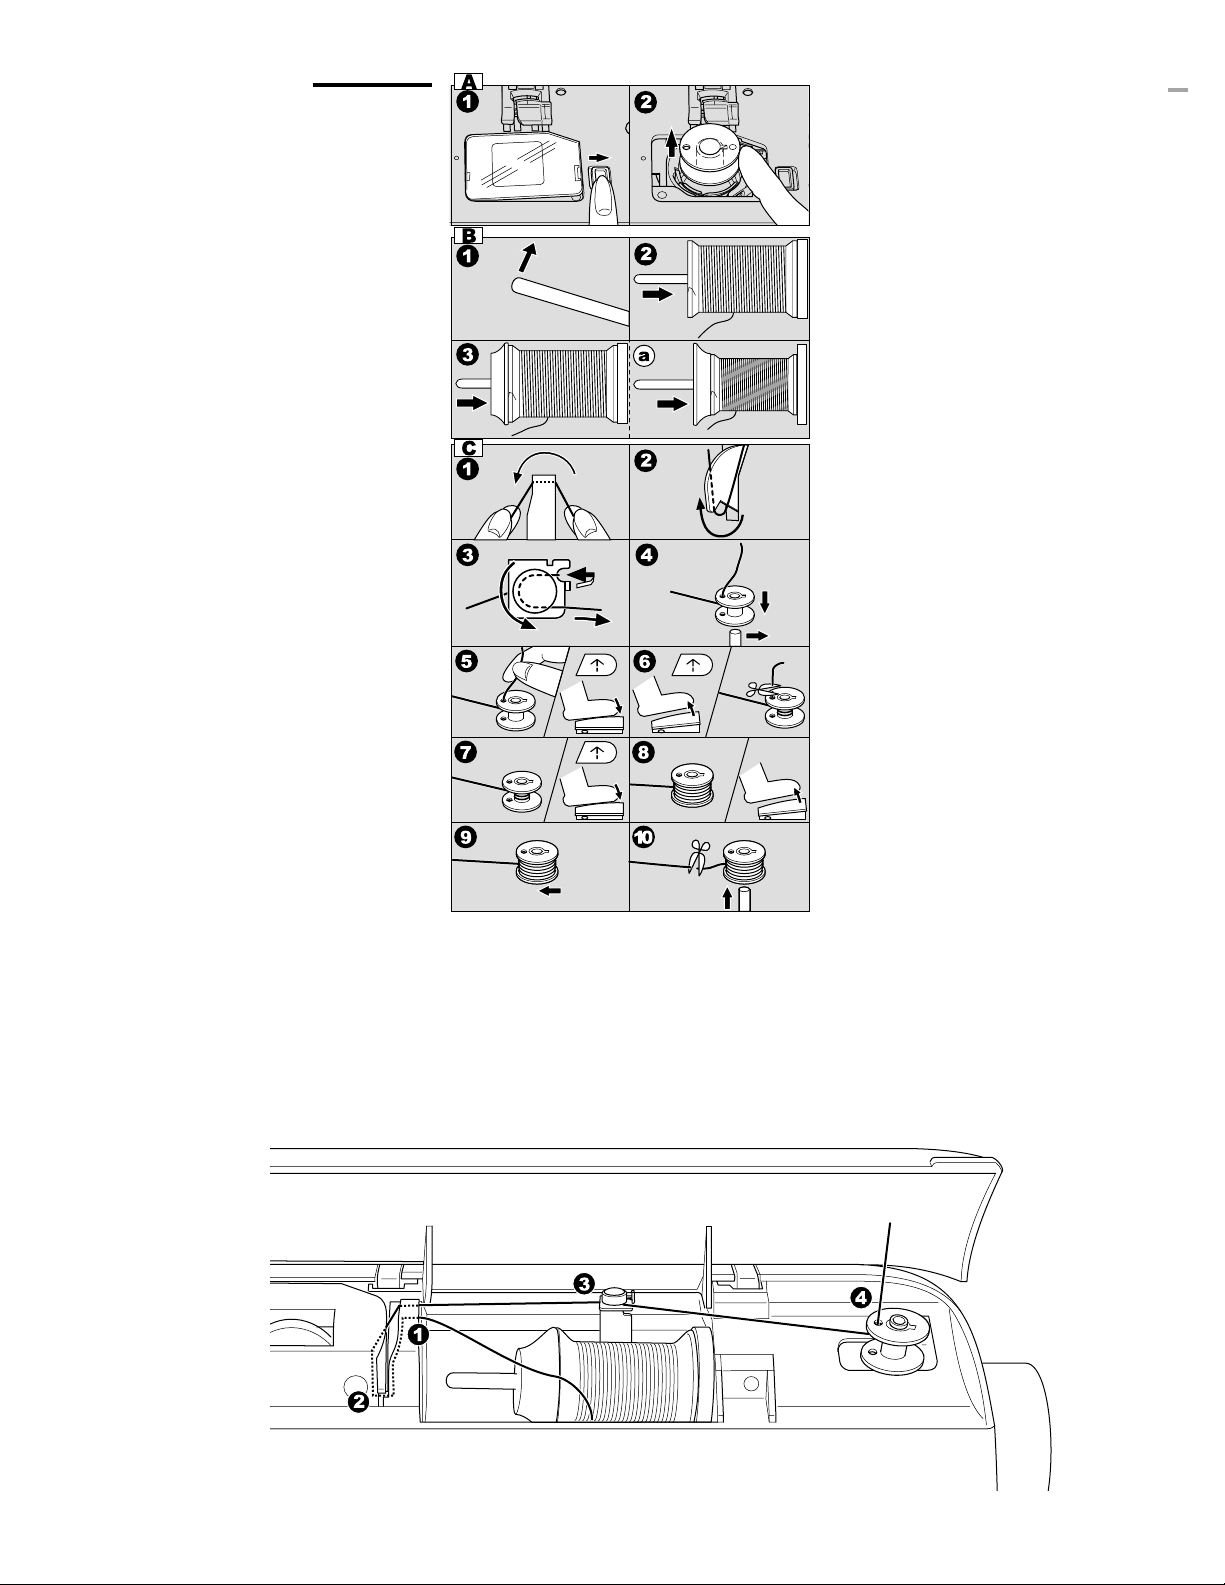
BOBBIN SETTING
A. REMOVING THE BOBBIN
1. Pull the bobbin cover latch to the right and
remove the bobbin cover
2. Lift up the bobbin from the machine.
B. SETTING SPOOL OF THREAD ON
SPOOL PIN
1. Pull up the left end of spool pin.
2. Set the spool of thread on spool pin so that
the thread unrolls from the front of the
spool.
3. Set the spool cap on spool pin as far as it
will go.
a: Reverse spool cap direction according to
the size of spool.
C. WINDING THE BOBBIN
1. Hold thread in both hands and hook thread
to the guide from rear opening.
2. Bring thread frontward and pass through
the thread guide plate from rigth to left.
3. Bring thread to the right and pass thread to
the thread guide from under side. Pass
through under tension disc in counterclockwise.
4. Insert thread through hole in bobbin and
place the bobbin on bobbin winder spindle.
Push bobbin to the right to engage bobbin
winder. L.C.D. will indicate the bobbin
winding mode.
5. Hold the end of the thread and start the
machine by pressing the start/stop button or
pressing the foot controller pedal.
6. After the bobbin winds a few turns, stop the
machine by pressitng the start/stop button
or releasing the foot controller pedal. Cut
the thread near hole.
7. Start the machine again.
8. The bobbin winding will stop automatically
when bobbin is full. (Release the pedal.)
9. Push the bobbin and spindle to the left.
10 Remove the bobbin from the spindle and
cut the thread.
ARMADO DE LA BOBINA
A. Extracción de la Bobina
1. Mueva el pestillo de la tapa a la derecha y
sáquela.
2. Extraiga la bobina levantándola.
B. Colocación del Carrete de Hilo en su
Eje
1. Levante el extremo izquierdo del eje para
el carrete.
2. Inserte el carrete en el eje de modo que el
hilo se desenrolle por el frente del carrete.
3. Póngale la tapa al carrete deslizándola en
el eje hasta el tope.
a. Se puede invertir la posición de la tapa de
acuerdo al tamaño del carrete.
C. ENROLLADO DEL HILO EN LA BOBINA
1. Sostenga el hilo con ambas manos e
insértelo en la guía por la abertura
posterior.
2. Traiga el hilo hacia el frente y páselo por
la placa guía de derecha a izquierda.
3. Lleve el hilo a la derecha y páselo por la
guía desde abajo. Pase el hilo por debajo
del disco tensionador en contra del
sentido del reloj.
4. Inserte el hilo en uno de los orificios de la
bobina y coloque la bobina en el eje de
embobinado.
Presione la bobina hacia la derecha para
enganchar la bobina en el embobinador.
El visualizador digital indicará que la
máquina está en el modo de embobinado.
5. Agarre el extremo del hilo y arranque la
máquina presionando el botón de
encendido o el pedal controlador.
6. Después de enrollar unas cuantas
vueltas, detenga la máquina presionando
el botón interruptor o soltando el pedal
controlador. Corte el hilo cerca del orificio.
7. Encienda la máquina nuevamente.
8. El enrollado del hilo en la bobina se
detendrá automáticamente cuando la
bobina se llene. (Suelte el pedal).
9. Presione la bobina y el eje hacia la
izquierda.
10. Saque la bobina del eje y corte el hilo.
10
 Loading...