

Page 1
XP-850
Small-in-One™ Printer
Imprimante Small-in-One
MC
Quick Guide
About Your Product . . . . . . . . . . . . . . . . . . . . . . . . . . . . . . . . . . . . . . . . . . . . . 2
Loading Paper. . . . . . . . . . . . . . . . . . . . . . . . . . . . . . . . . . . . . . . . . . . . . . . . . . 4
Placing Originals for Copying, Scanning, or Faxing. . . . . . . . . . . . . . . . . . . . . 10
Copying a Document or Photo . . . . . . . . . . . . . . . . . . . . . . . . . . . . . . . . . . . . 12
Printing From a Memory Card . . . . . . . . . . . . . . . . . . . . . . . . . . . . . . . . . . . . 13
Printing From Your Computer. . . . . . . . . . . . . . . . . . . . . . . . . . . . . . . . . . . . . 15
Faxing a Document. . . . . . . . . . . . . . . . . . . . . . . . . . . . . . . . . . . . . . . . . . . . . 19
Scanning a Document or Photo . . . . . . . . . . . . . . . . . . . . . . . . . . . . . . . . . . . 23
Maintaining Your Product . . . . . . . . . . . . . . . . . . . . . . . . . . . . . . . . . . . . . . . . 26
Solving Problems . . . . . . . . . . . . . . . . . . . . . . . . . . . . . . . . . . . . . . . . . . . . . . 32
Notices . . . . . . . . . . . . . . . . . . . . . . . . . . . . . . . . . . . . . . . . . . . . . . . . . . . . . . 40
Guide rapide
À propos de votre produit. . . . . . . . . . . . . . . . . . . . . . . . . . . . . . . . . . . . . . . . 49
Chargement du papier . . . . . . . . . . . . . . . . . . . . . . . . . . . . . . . . . . . . . . . . . . 51
Positionnement des originaux . . . . . . . . . . . . . . . . . . . . . . . . . . . . . . . . . . . . 57
Copie d’un document ou d’une photo . . . . . . . . . . . . . . . . . . . . . . . . . . . . . . 59
Impression depuis une carte mémoire . . . . . . . . . . . . . . . . . . . . . . . . . . . . . . 60
Impression depuis un ordinateur . . . . . . . . . . . . . . . . . . . . . . . . . . . . . . . . . . 62
Télécopie d’un document . . . . . . . . . . . . . . . . . . . . . . . . . . . . . . . . . . . . . . . . 67
Numérisation d’un document ou d’une photo . . . . . . . . . . . . . . . . . . . . . . . . 72
Entretien du produit . . . . . . . . . . . . . . . . . . . . . . . . . . . . . . . . . . . . . . . . . . . . 76
Résolution des problèmes . . . . . . . . . . . . . . . . . . . . . . . . . . . . . . . . . . . . . . . 83
Avis. . . . . . . . . . . . . . . . . . . . . . . . . . . . . . . . . . . . . . . . . . . . . . . . . . . . . . . . . 91
Page 2
About Your Product
After you set up your XP-850 (see the Start Here sheet), turn to this Quick Guide and your
online User’s Guide for instructions on using your product.
English
Features Where to find information
Copy, scan, and fax from the easy-to-use touch
screen.
Easy networking—WiFi, Wi-Fi Direct, and
Ethernet
Process large documents with the 30-page
capacity Automatic Document Feeder
Print photos from a USB flash drive, external
hard drive, or CD burner.
Copy files to and from your computer with the
built-in memory card reader.
Print on card stock and other thick media using
the rear paper feed slot.
Print and scan from anywhere with EPSON
Connect
®
.
™
Solutions, and Google Cloud Print™.
Adjusting the Control Panel
See this Quick Guide for the basics. See the online User’s Guide for details.
See the Start Here sheet and the online
User’s Guide.
See this Quick Guide for the basics.
See the online User’s Guide for details.
See the online User’s Guide for details.
See this Quick Guide for the basics.
See the online User’s Guide for details.
See www.epson.com/connect and the
online User’s Guide for details.
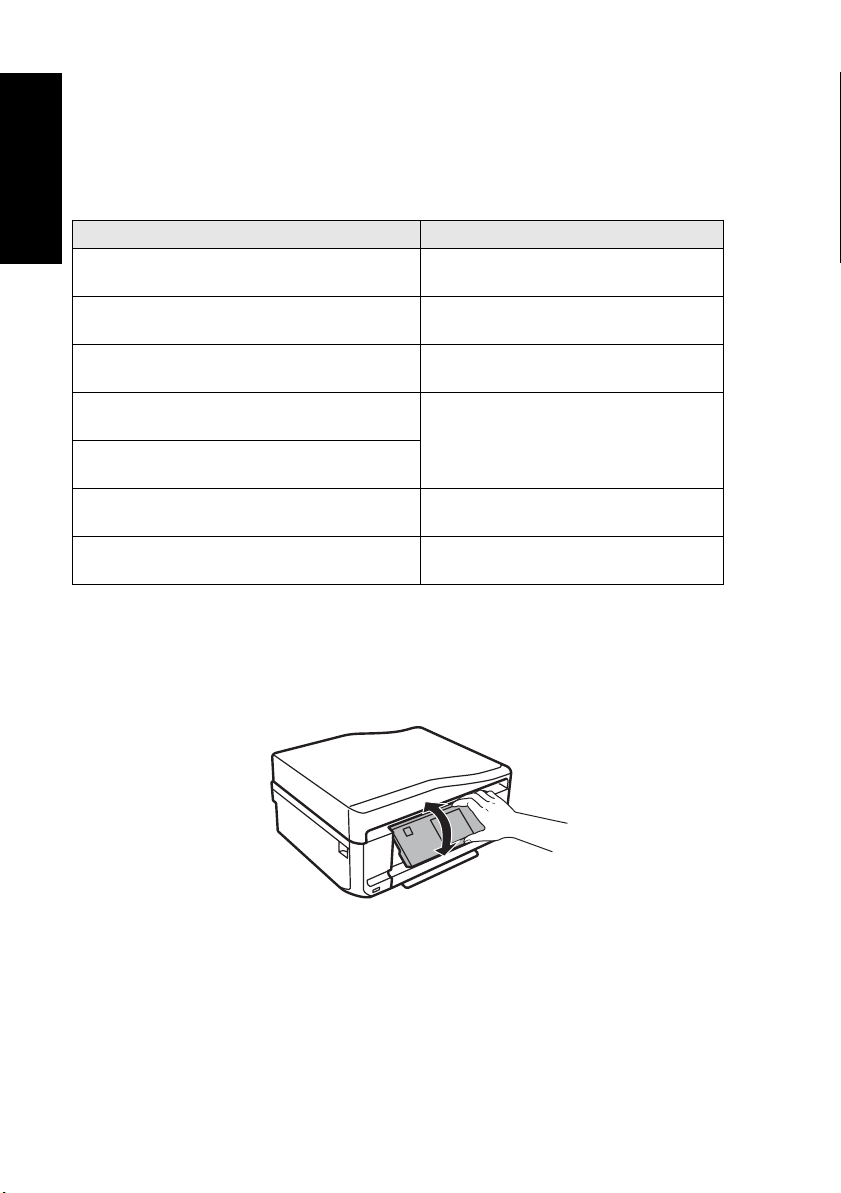
The control panel is adjustable. Raise or lower it to the desired angle as shown.
2 About Your Product
Page 3

Using the Touch Screen
The touch screen makes it easy to use all the features of your product. To save energy, the
screen goes dark after several minutes of inactivity. Touch the screen to wake it up.
The touch screen displays only the buttons that are available for the task you are working
on.
1
Number Description
1 Turns product on/off
2 Returns to the Home menu
3 LCD screen shows menus and status
4 Use the arrow keys to navigate menus
5 Shows wireless network status
6 Opens the CD/DVD menu
7 Cancels/returns to the previous menu
8 Starts copying/printing/scanning/faxing
Caution: Press the touch screen gently with the tip of your finger; don’t press too hard
or use sharp objects.
234
765
8
Tip: To turn off the “beep” heard when you press a button, or to reduce its volume,
press
Setup > Printer Setup > Sound and adjust one of the settings. If you turn off the
sound, the dialing sound made when you transmit a fax is also turned off.
Note: The light is green when the product is connected to a network. It flashes
when network settings are being adjusted (green for wireless and orange for wired).
For more information on the icons displayed on the screen, press l or r, then select Help
on the product’s touch screen.
About Your Product 3
Page 4
Loading Paper
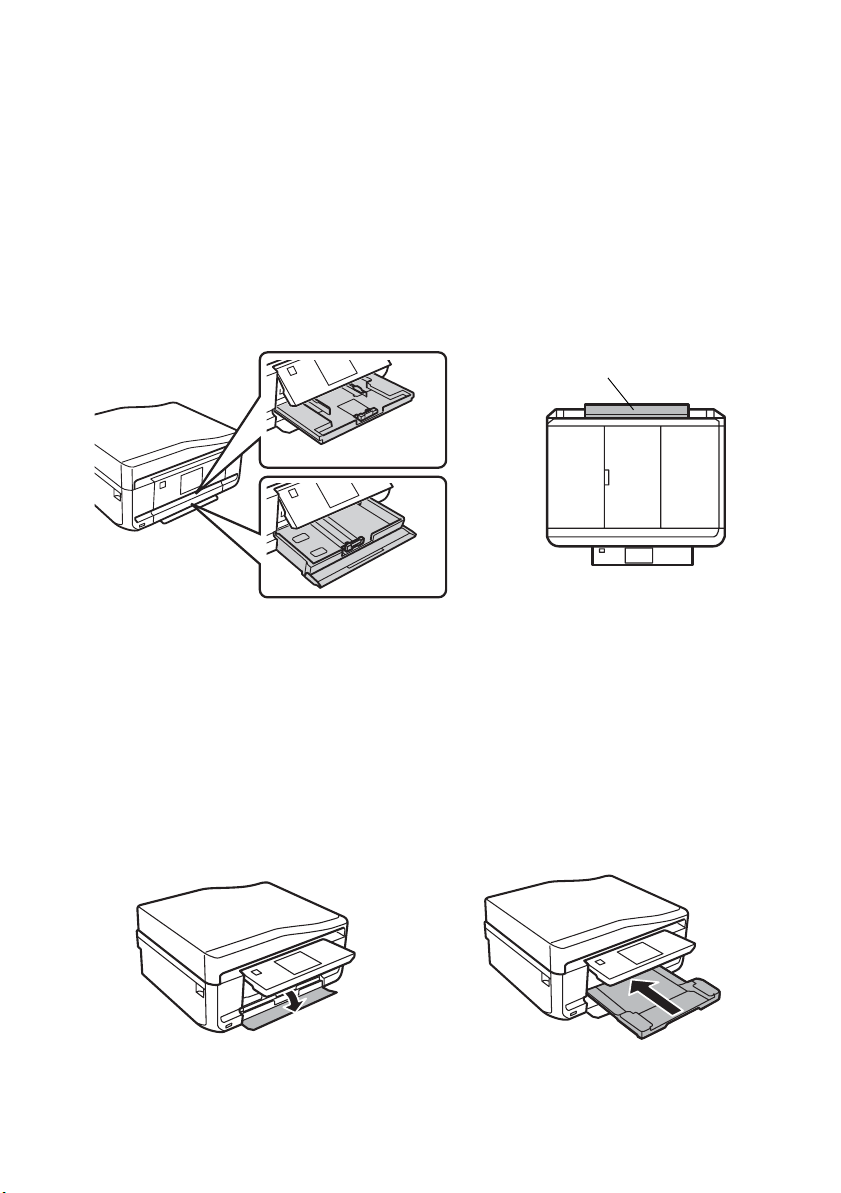
Your printer has two paper cassettes and a rear paper feed slot. You can load the following
paper sizes:
■ Cassette 1 (upper cassette): 4 × 6- or 5 × 7-inch photo paper
■ Cassette 2 (lower cassette): letter-size, A4, legal-size, 4 × 6-, 5 × 7-, or 8 × 10- inch
paper
■ Rear paper feed slot: one sheet at a time
Rear paper feed slot
Cassette 1
Cassette 2
For details on loading paper in the lower cassette, see the Start Here sheet. To load paper in
the upper cassette or rear paper feed slot, follow the instructions in this section.
Loading Paper in Cassette 1 (Upper Cassette)
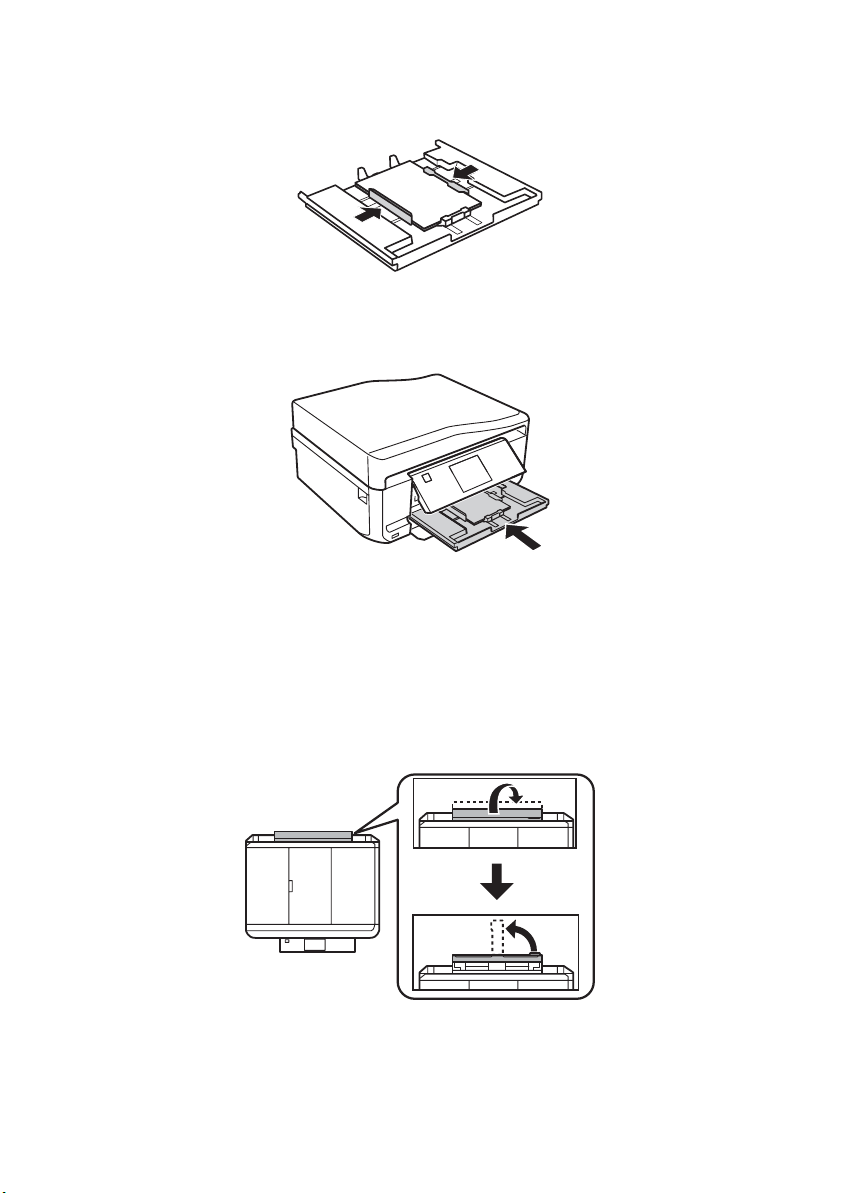
1. Open the front cover. If the output tray is open, close it before going to the next step.
(As you slide in the output tray, there may be slight resistance and noise. This is
normal.)
4 Loading Paper
Page 5
2. Pull out the upper paper cassette.
Note: If you do not see the upper cassette, it may be pushed into the printer.
Remove the lower cassette, then carefully pull out the upper cassette.
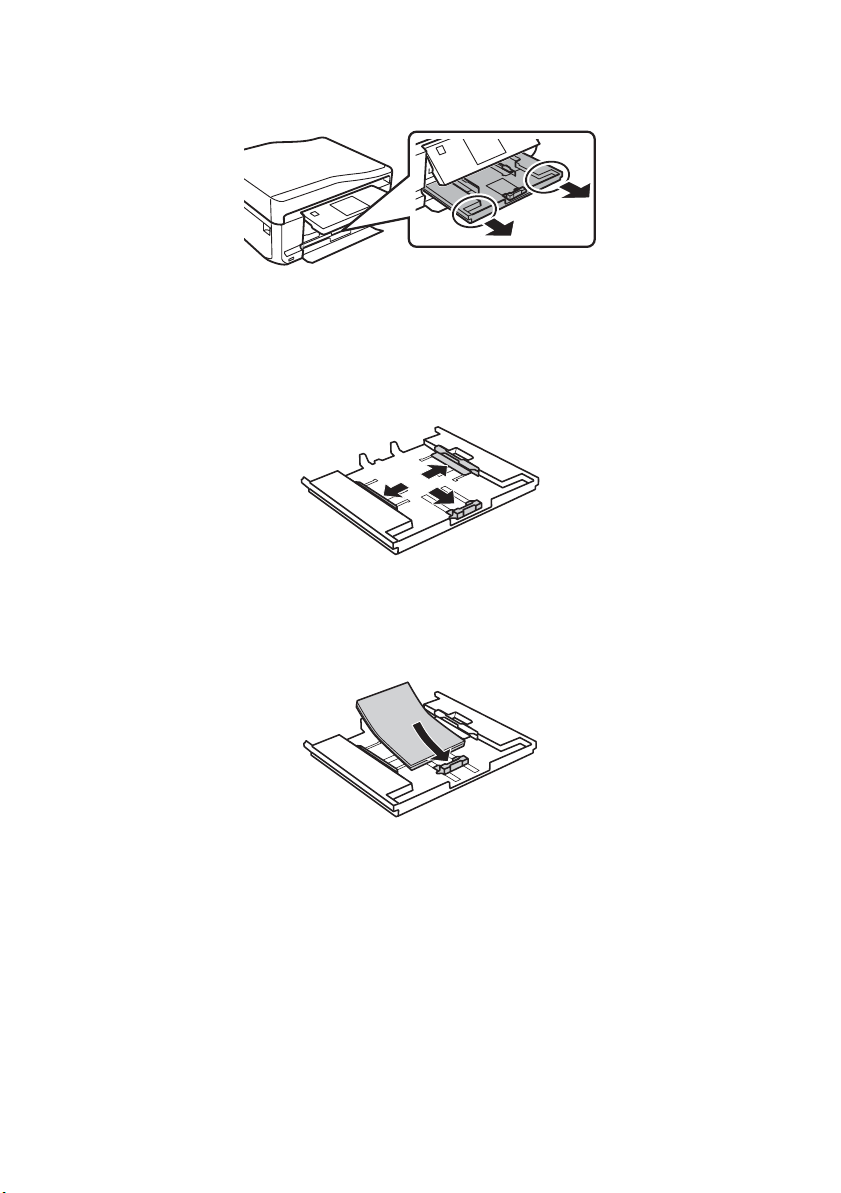
3. Slide the edge guides outward.
4. Set the front edge guide to the paper size you are using. Then insert paper with the
glossy or printable side facedown. Make sure the paper is loaded against the front edge
guide.
Loading Paper 5
Page 6
5. Slide the side edge guides against the paper, but not too tight. Make sure the paper is
under the tabs on the edge guides.
6. Keep the cassette flat as you insert it. Insert the cassette until the arrows on the right
side line up.
Loading Paper in the Rear Feed Slot
First, send your print job to the printer. Be sure to select Rear Paper Feed Slot for the
Source setting. (You can send the print job from a computer or by using the touch screen.)
Then follow the steps below to load paper in the rear paper feed slot.
1. Open the rear paper feed slot cover and pull up the paper support.
2. Slide the edge guides outward.
6 Loading Paper
Page 7
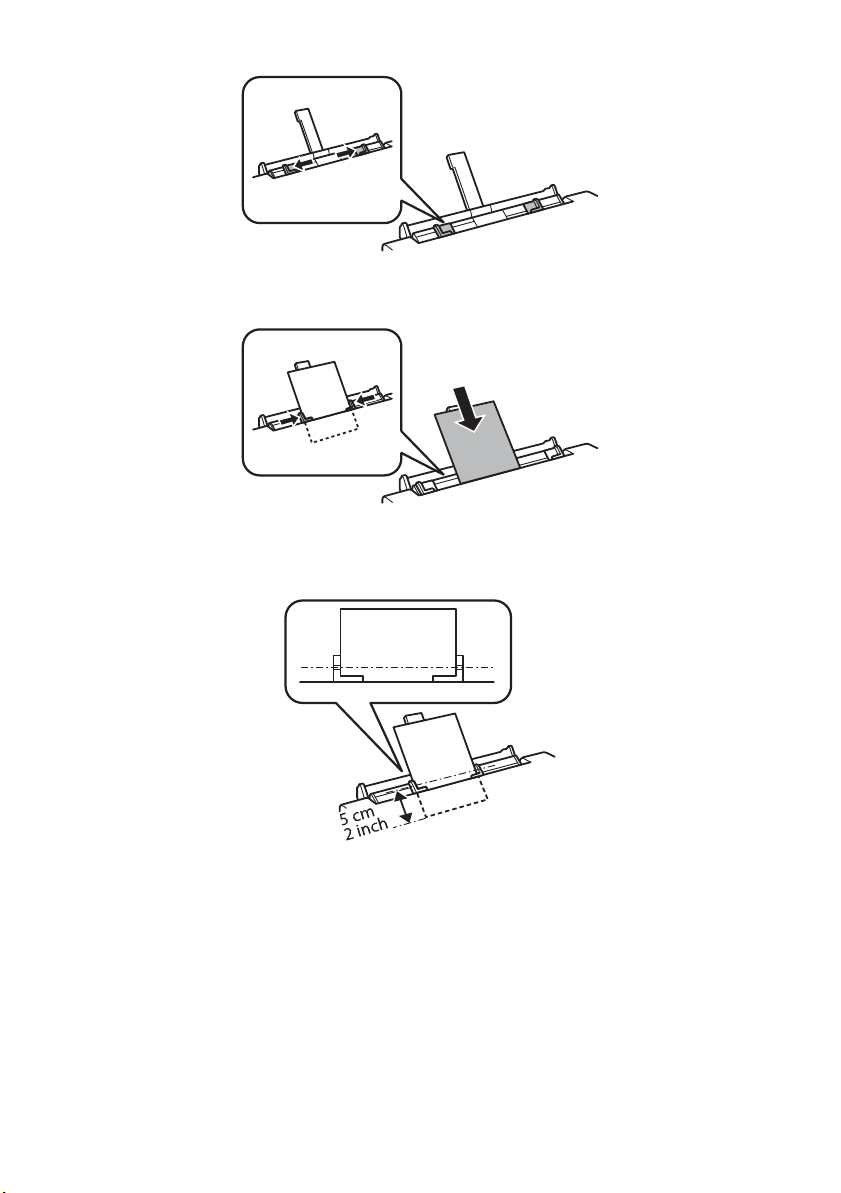
3. Load a single sheet of paper with the printable side faceup at the center of the rear
paper feed slot. Slide the edge guides against the paper, but not too tight.
Note: Push paper down until it meets resistance (about 2 inches [5 cm]) of the
paper should be inside the printer as shown).
4. When you’re ready to print, press x.
To cancel printing, press y
Cancel.
Loading Paper 7
Page 8

Using Special Papers
Epson offers a wide array of high quality papers, making it easy to maximize the impact of
your documents, photos, presentations, and creative projects.
You can purchase genuine EPSON ink and paper at EPSON
www.epson.com/ink3 (U.S. sales) or www.epson.ca (Canadian sales). You can also
purchase supplies from an EPSON authorized reseller. To find the nearest one, call
800-GO-EPSON (800-463-7766).
Paper name Size
EPSON Bright White Paper Letter (8.5 × 11 inches
[216 × 279 mm])
EPSON Brochure & Flyer Paper
Matte Double-sided
EPSON Ultra Premium Presentation
Paper Matte
EPSON Premium Presentation
Paper Matte
EPSON Premium Presentation
Paper Matte Double-sided
EPSON Presentation Paper Matte Letter (8.5 × 11 inches
EPSON Ultra Premium Photo Paper
Glossy
EPSON Ultra Premium Photo Paper
Luster
EPSON Premium Photo Paper
Glossy
EPSON Premium Photo Paper
Semi-gloss
Letter (8.5 × 11 inches
[216 × 279 mm])
Letter (8.5 × 11 inches
[216 × 279 mm])
8 × 10 inches (203 × 254 mm) S041467 50
Letter (8.5 × 11 inches
[216 × 279 mm])
Letter (8.5 × 11 inches
[216 × 279 mm])
[216 × 279 mm])
Legal (8.5 × 14 inches
[216 × 356 mm])
4 × 6 inches (102 × 152 mm) S042181
5 × 7 inches (127 × 178 mm) S041945 20
8 × 10 inches (203 × 254 mm) S041946 20
Letter (8.5 × 11 inches
[216 × 279 mm])
Letter (8.5 × 11 inches
[216 × 279 mm])
4 × 6 inches (102 × 152 mm) S041808
5 × 7 inches (127 × 178 mm) S041464 20
8 × 10 inches (203 × 254 mm) S041465 20
Letter (8.5 × 11 inches
[216 × 279 mm])
4 × 6 inches (102 × 152 mm) S041982 40
Letter (8.5 × 11 inches
[216 × 279 mm])
®
Supplies Central® at
Part
number
S041586 500
S042384 150
S041341 50
S041257
S04218050100
S041568 50
S041062 100
S041067 100
S04217460100
S042182
S0421752550
S041405 50
S04172740100
S042183
S0416672550
S041331 20
Sheet
count
8 Loading Paper
Page 9

Part
Paper name Size
EPSON Photo Paper Glossy 4 × 6 inches (102 × 152 mm) S041809
Letter (8.5 × 11 inches
[216 × 279 mm])
EPSON Photo Quality Self-adhesive
Sheets
EPSON Iron-on Cool Peel Transfer
paper
A4 (8.3 × 11.7 inches
[210 × 297 mm])
Letter (8.5 × 11 inches
[216 × 279 mm])
number
S04203850100
S041141
S041649
S041271
S041106 10
S041153 10
Sheet
count
20
50
100
Note: Media availability varies by country.
For additional paper loading instructions, see the Start Here sheet or online User’s Guide.
For best results:
■ Fan and align the edges of the paper before loading.
■ If the paper is curled, flatten it or curl it slightly in the opposite direction before
loading. Printing on curled paper may cause ink to smear on your prints.
■ Load paper into the paper cassettes with the glossy or printable side facedown making
sure the paper is under the edge guides. Load paper in the rear feed slot with the
glossy or printable side faceup.
■ Always load paper short edge first and make sure the paper stack fits under the edge
guides.
■ Make sure the paper is loaded against the edge guide and not sticking out from the
end of the cassette.
■ Do not load more than the recommended number of sheets.
Loading Paper 9
Page 10
Placing Originals for Copying, Scanning, or Faxing
Before you copy, scan, or fax, place your documents on the scanner glass or in the
Automatic Document Feeder (ADF). Place photos on the scanner glass only.
Using the Scanner Glass
You can place a photo or a document up to letter-size (or A4-size)
on the scanner glass.
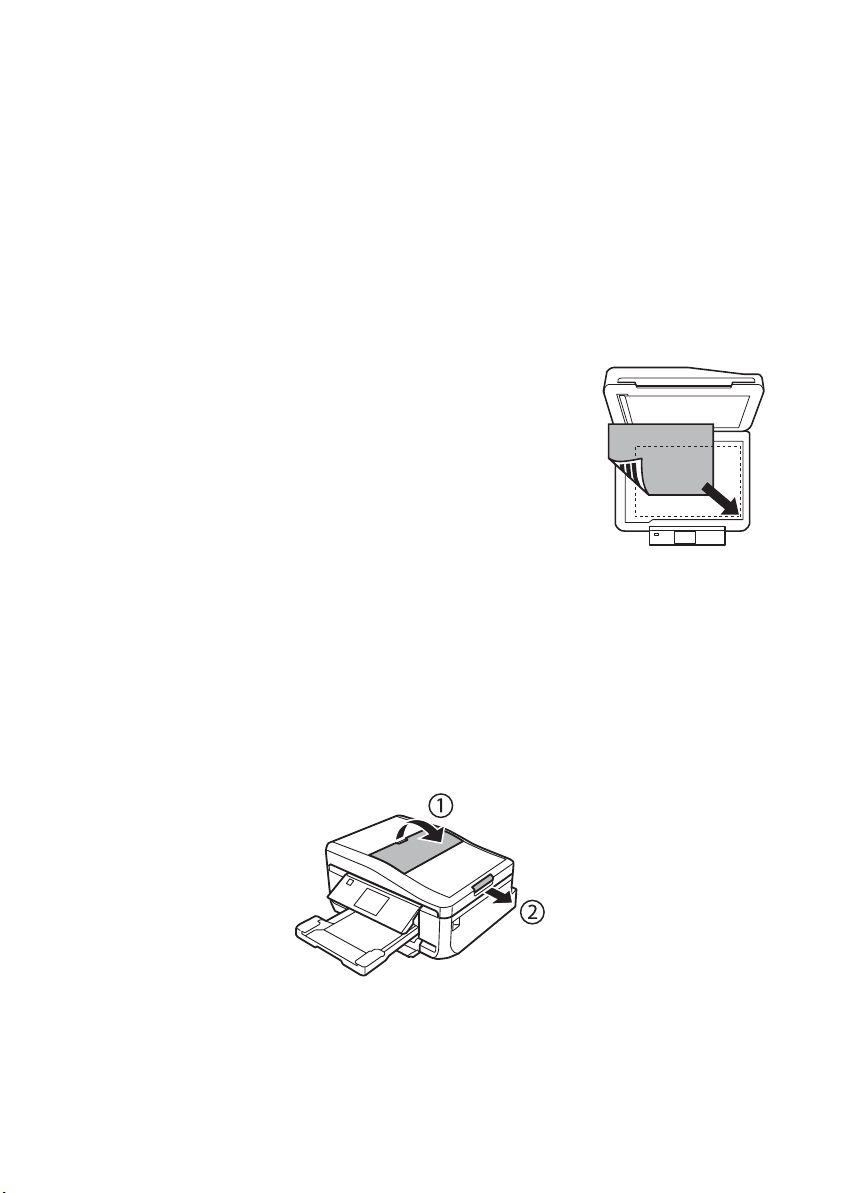
1. Raise the document cover.
2. Place your original facedown on the scanner glass, with the
bottom against the front-right corner.
3. Close the cover gently to keep your original in place.
Using the Automatic Document Feeder
You can place up to 30 letter- or A4-size sheets (single- or double-sided), or 10 legal-size
sheets (single-sided only) in the ADF.
Caution: Make sure your originals are not creased or folded, and do not contain holes,
staples, tape, or other materials that could obstruct the feeder.
1. Open the ADF paper support, and then slide out the output tray extension.
10 Placing Originals for Copying, Scanning, or Faxing
Page 11
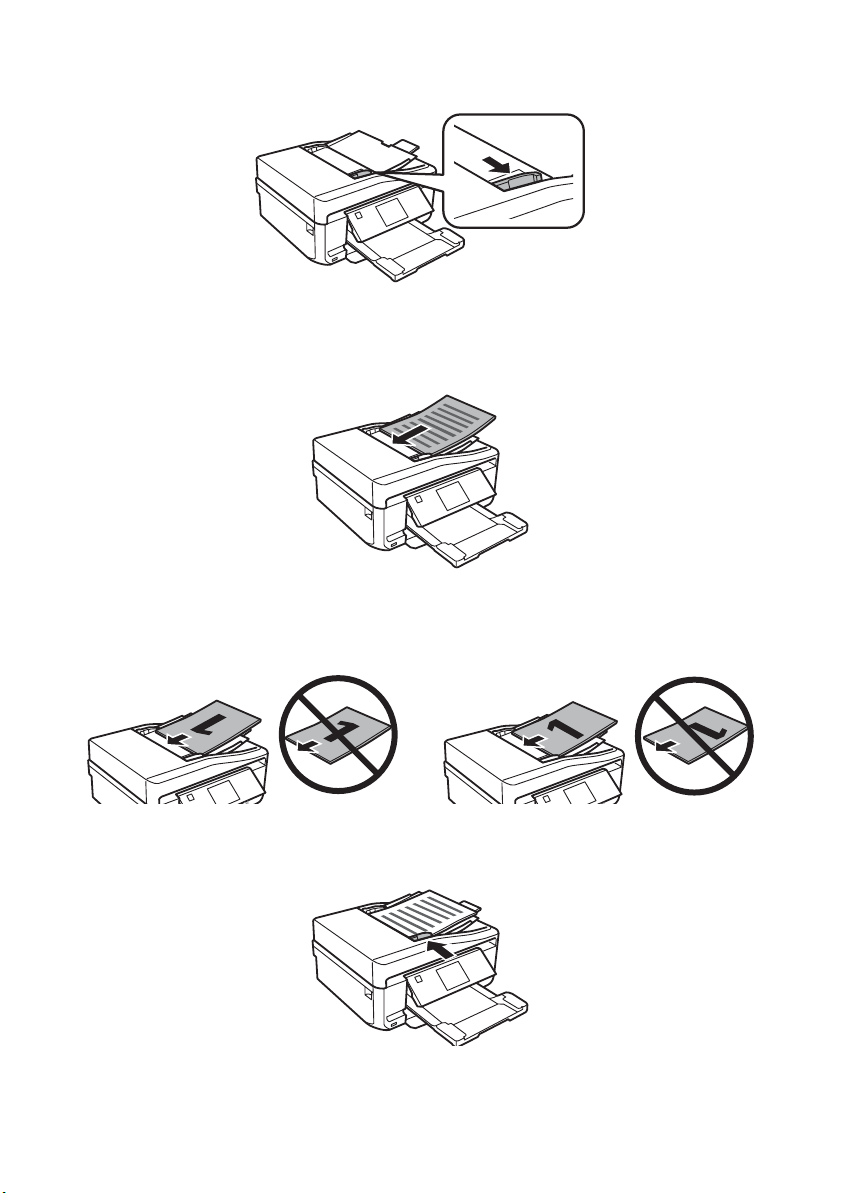
2. Slide out the edge guide.
3. Fan the originals, then tap them on a flat surface to even the edges.
4. Insert the originals face up, top edge first. The
Note: If you’re using the Letter, 2-up Copy or A4, 2-up Copy layout, make sure the
originals are loaded as shown below.
ADF icon appears on the screen.
5. Slide the edge guide against the originals, but not too tight.
Placing Originals for Copying, Scanning, or Faxing 11
Page 12

Copying a Document or Photo
Follow the steps in this section to make color or black-and-white copies.
You can copy documents just like on a copy machine. If you use the Automatic Document
Feeder (ADF), you can copy up to 30 sheets at a time.
1. Make sure paper is loaded in one of the paper cassettes (see page 4).
2. Place your original document on the scanner glass or in the ADF (see page 10).
Note: When you use the Copy function with originals loaded in the ADF, letter-size
paper is automatically selected for your printed copies. If you copy a legal-size
document, the image will be cropped. To copy a full legal-size document on lettersize paper, scroll down and select
3. Press if necessary, and select Copy. You see this
screen:
Reduce/Enlarge. Then select Legal->Letter.
4. Press
5. Select
6. Scroll down to view additional copy settings.
7. Select any settings as needed.
8. When you’re ready to copy, press x.
Note: When printing two-sided, if ink on the front of the paper smears, select a longer
Dry Time setting.
+ or – to select the number of copies you want
(up to 99). Or press the number
numeric keyboard, then select the number and press
Done.
Color or B&W (black-and-white).
Note: To clear previously used copy settings, scroll
down and select Clear All Settings. For more
information about copy settings, see your online
User’s Guide.
To cancel copying, press y
1 to display the
Cancel.
12 Copying a Document or Photo
Page 13
Printing From a Memory Card
Your printer lets you print photos directly from your digital camera’s memory card; just
insert it into the memory card slot and you’re ready to print.
See the online User’s Guide for a list of compatible memory cards and instructions on
copying memory card files between your printer and a computer.
Inserting the Card
1. Make sure your printer is turned on.
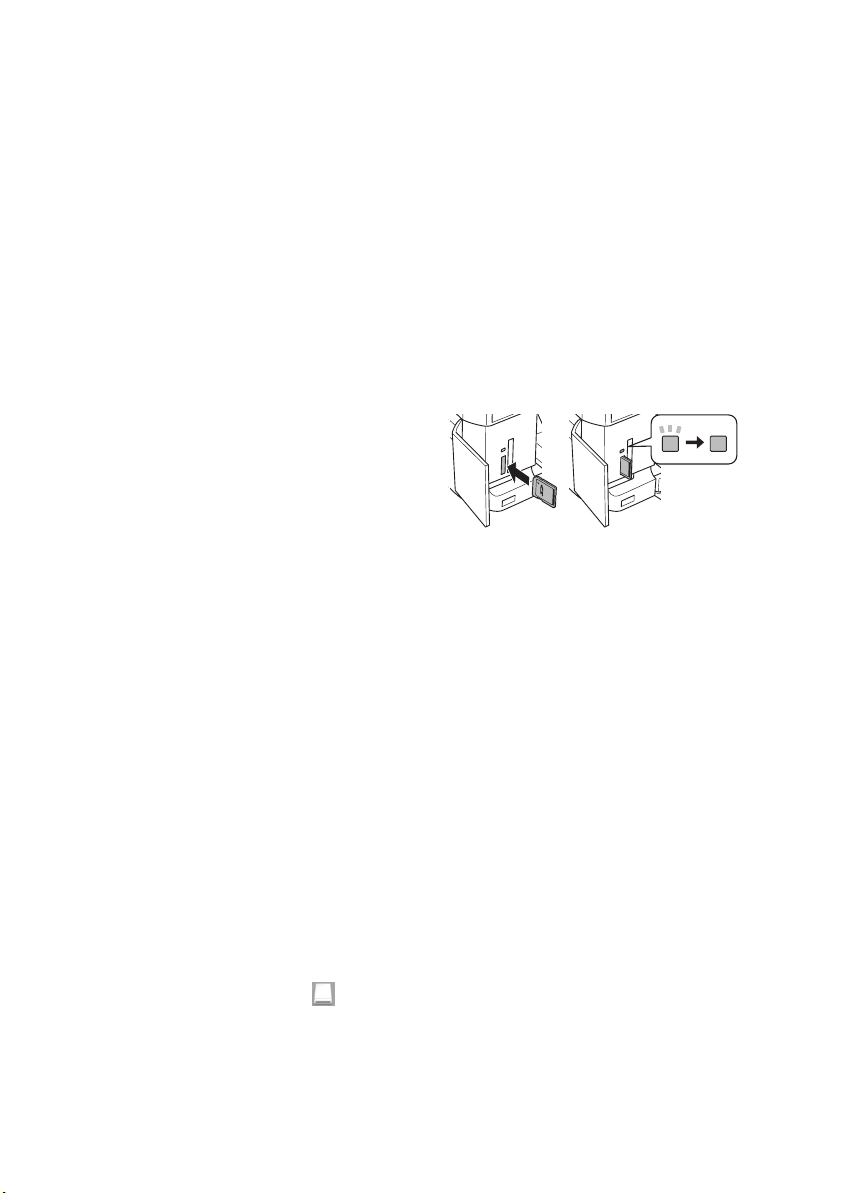
2. Insert your card into the correct slot as
shown. Insert just one card at a time.
Caution: Do not force the card into the
slot; it won’t go in all the way. If your
memory card requires an adapter, attach
it before inserting the card into the slot.
Otherwise, the card might get stuck.
The memory card access light flashes, then stays lit. Now you can view your photos on the
LCD screen and print them (see page 14).
Memory card
access light
Removing the Card
After you finish printing your photos, follow these steps to remove the card:
1. Make sure the memory card access light is not flashing.
Caution: Do not remove the card or turn off your printer while the memory card
access light is flashing; you may lose data on the card.
2. If the printer is connected to your computer with a USB cable, do one of the
following before removing the memory card or turning off the printer:
■ Windows:
Computer or Windows Explorer, and select
■ Mac OS X: Drag the removable disk icon from your desktop into the trash.
3. Pull the card straight out of its slot.
Right-click the name of your card (removable disk) in Computer, My
Eject.
Printing From a Memory Card 13
Page 14
Printing Photos From the LCD Screen
You can select individual photos for printing as you view them on the LCD screen. See the
online User’s Guide for instructions on printing various types of layout sheets and
personalized note paper.
1. Load several sheets of EPSON photo paper (various types available; see page 8).
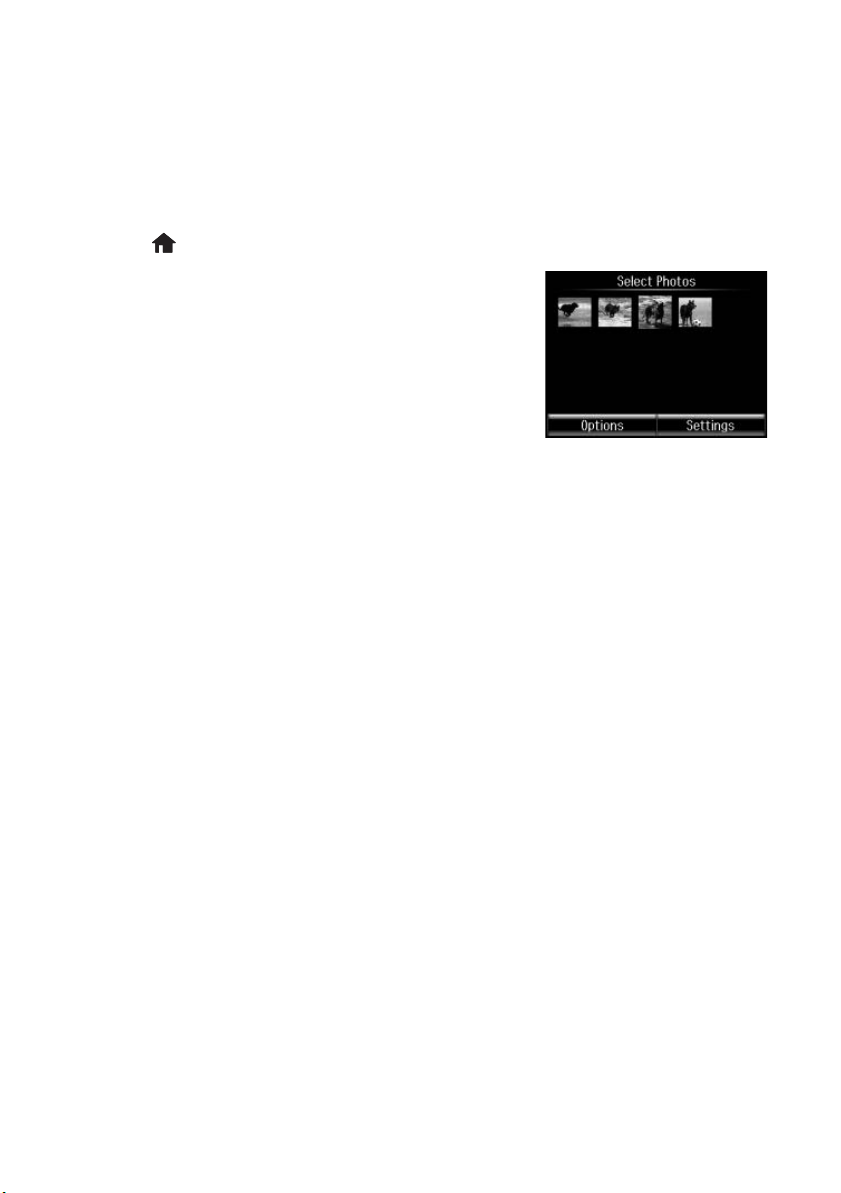
2. Press if necessary, and select
3. Touch a photo on the screen to select it for printing.
Print Photos.
4. Press
5. To select another photo, press l or r to scroll through your photos, or press y and
6. To choose print settings, select
7. When you’re ready to print, press x.
+ or – to select the number of copies you want of
that photo.
To crop or zoom into a photo, select
Zoom
, then make your adjustments.
To adjust the photo image, select
Adjustments
select a thumbnail image.
print settings, as necessary.
To cancel printing, press y
, then make your adjustments.
Cancel.
Edit > Crop/
Edit > Photo
Settings. Then scroll down and change additional
14 Printing From a Memory Card
Page 15
Printing From Your Computer
This section describes the basic steps for printing from a Windows® or Mac computer. For
detailed instructions on printing, including two-sided printing on plain paper or EPSON
Bright White Paper with the auto duplexer, see the online User’s Guide.
Printing in Windows
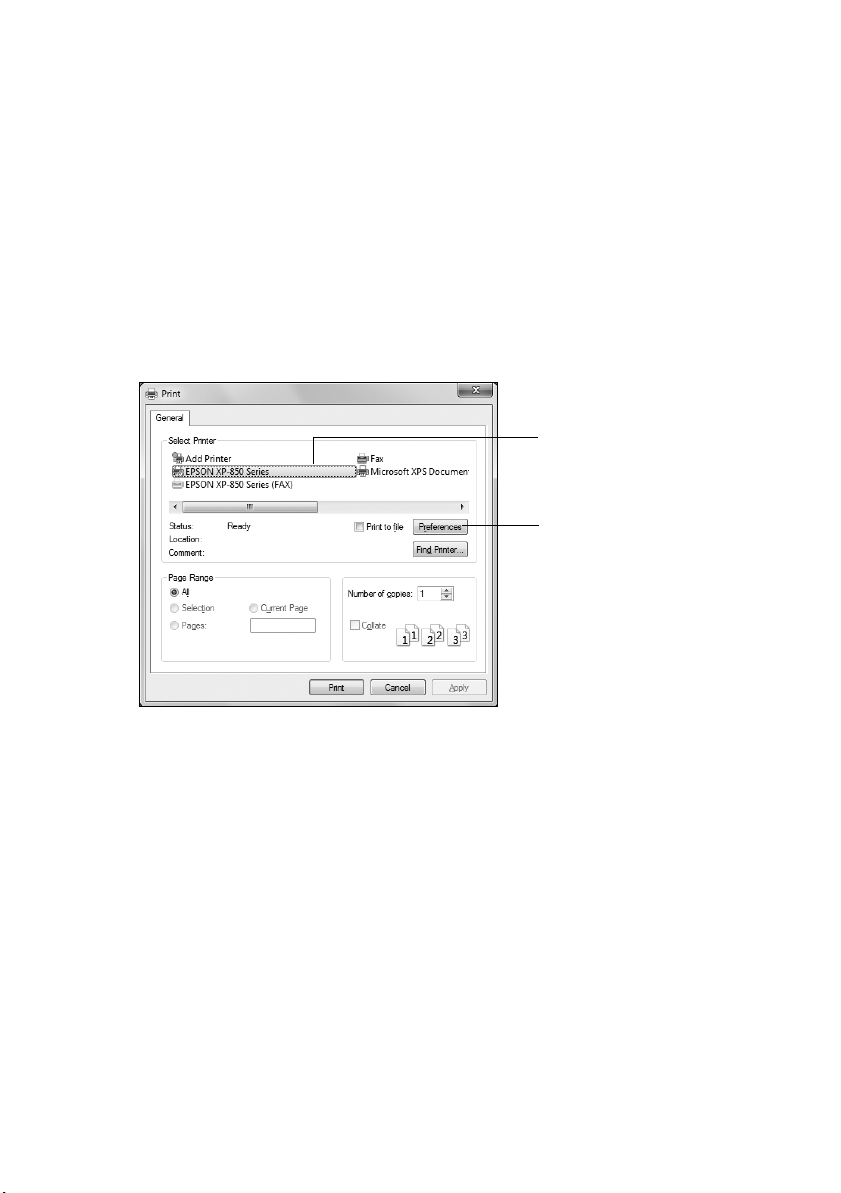
1. Select the print command in your application.
Select your EPSON
product
Click here to open
your printer software
2. Select your product, then click the
(If you see a
Properties on the next screen.)
Setup, Printer, or Options button, click it. Then click Preferences or
Preferences or Properties button.
Printing From Your Computer 15
Page 16
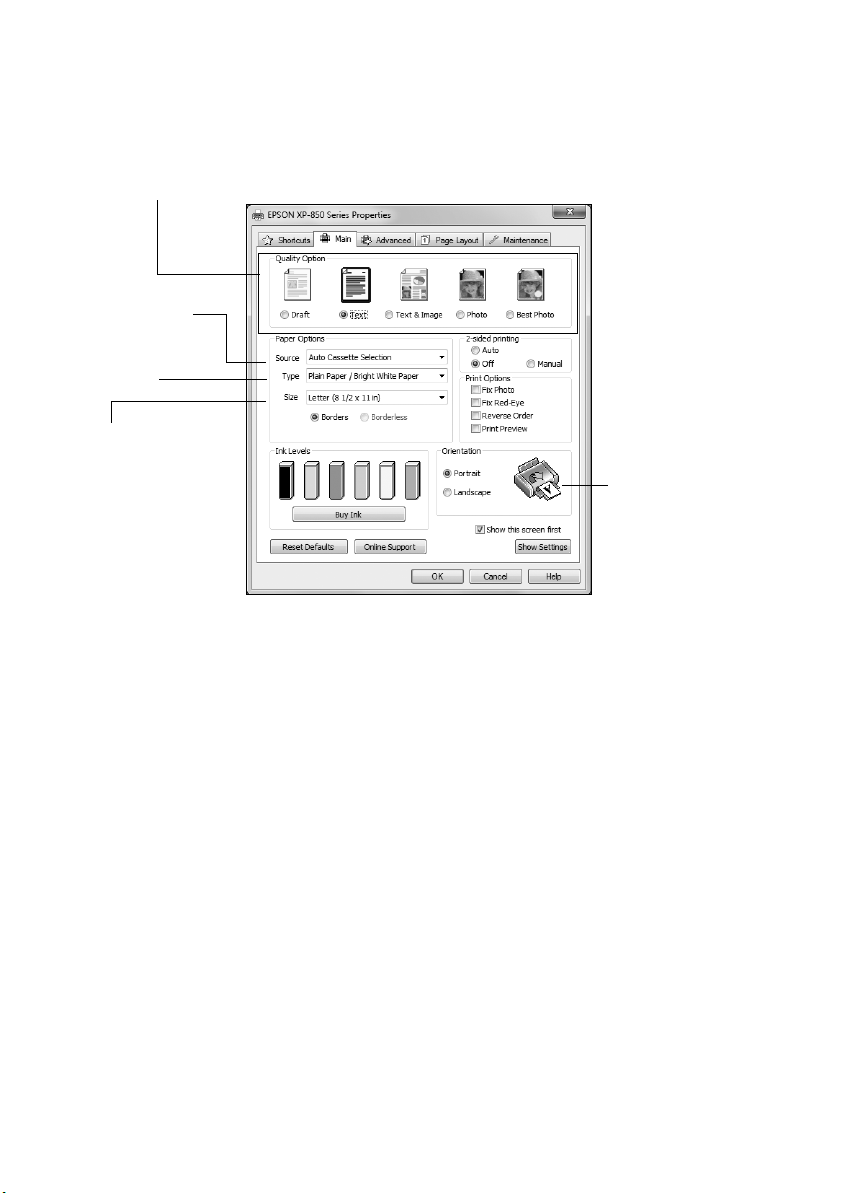
3. On the Main tab, select the basic print settings. Make sure you choose the correct
paper
Source and Type setting for the paper you are using (see page 18 for details).
Select the type of document you’re
printing (choose
for pictures)
Photo
Select the
correct
Source
Select your
paper
Type
Select your
paper
Size
Photo or Best
Select your
document or photo
Orientation
Tip: For quick access to the most common settings, click the Shortcuts tab and
select one of the
Add/Remove button.
Printing Presets. You can create your own presets by clicking the
4. To resize your printout or select other print settings, click the Page Layout tab and
select settings as necessary.
5. For more printing options, click the
Advanced tab.
Note: For more information about print settings, click Help or see your online
User’s Guide.
6. Click OK to save your settings.
7. Click
OK or Print to start printing.
16 Printing From Your Computer
Page 17
Printing with Mac OS X
Follow the steps below to print from Mac OS X.
1. Open a photo or document in an application.
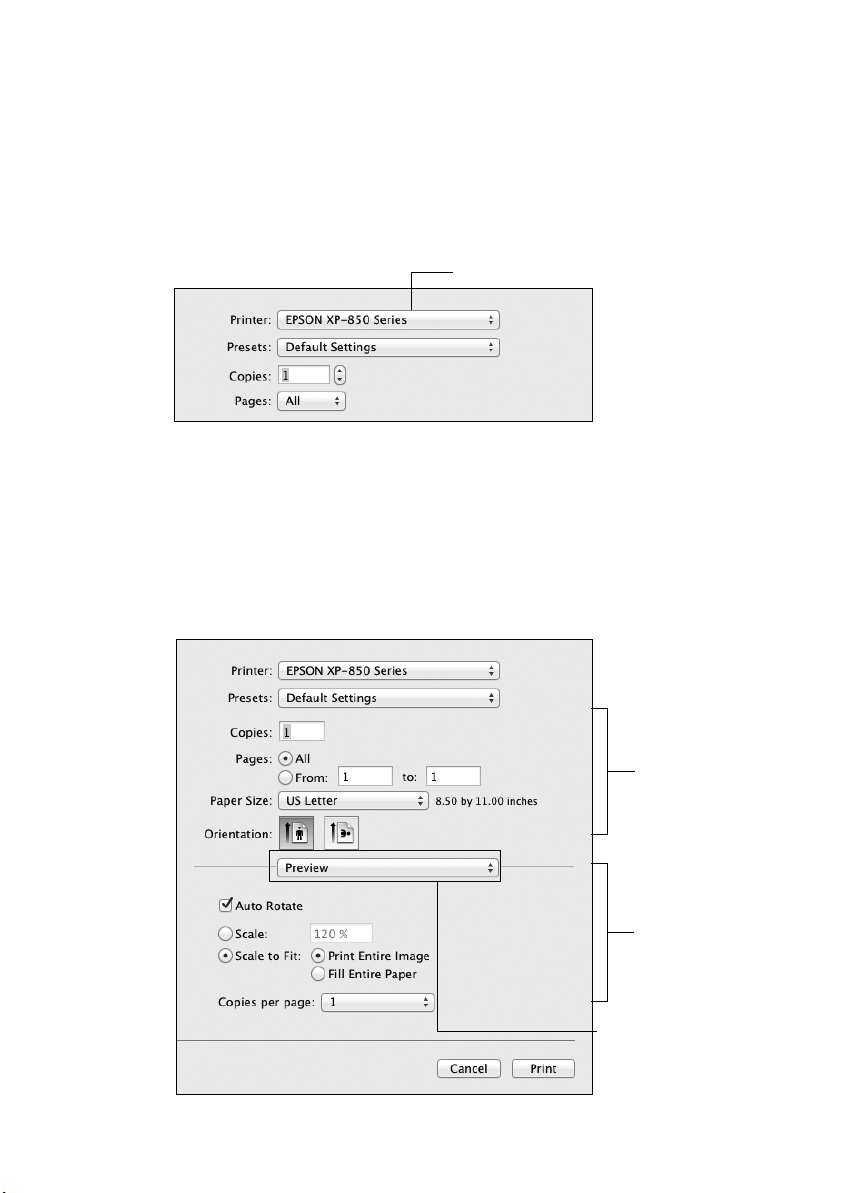
2. Open the
3. Select your EPSON product as the
File menu and select Print.
Printer setting.
Select your EPSON product
4. Click the arrow or
5. Select basic copy and page settings. For borderless printing, choose a
setting with a
Note: If the setting you want isn’t shown (for example, Scale), check for it in your
application before printing. Or select your application from the pop-up menu in this
window and check if the setting is available.
Show Details to expand the print window, if necessary.
Paper Size
Borderless option.
Copy and page
settings
Application
settings
Pop-up menu
Printing From Your Computer 17
Page 18
6. Choose Print Settings from the pop-up menu, and select your Paper Source,
Media Type, Print Quality, and other print settings.
7. Choose any other printing options you may need from the pop-up menu. See the
online User’s Guide for details.
8. Click
Print.
9. To monitor your print job, click the printer icon in the Dock.
Selecting the Correct Paper Type
Select the correct Type (Windows) or Media Type (Mac OS X) setting in your printer
software. This tells your product what kind of paper you’re using, so the ink coverage can
be adjusted accordingly.
For this paper Select this setting
Plain paper
EPSON Bright White Paper
EPSON Iron-on Cool Peel Transfer paper
EPSON Photo Quality Self-adhesive Sheets
EPSON Ultra Premium Photo Paper Glossy Ultra Premium Photo Paper Glossy
EPSON Premium Photo Paper Glossy Premium Photo Paper Glossy
EPSON Photo Paper Glossy Photo Paper Glossy
EPSON Presentation Paper Matte Presentation Paper Matte
EPSON Premium Photo Paper Semi-gloss Premium Photo Paper Semi-Gloss
EPSON Ultra Premium Photo Paper Luster Ultra Premium Photo Paper Luster
EPSON Premium Presentation Paper Matte
EPSON Premium Presentation Paper Matte
Double-sided
EPSON Ultra Premium Presentation Paper Matte
EPSON Brochure & Flyer Paper Matte Double-sided
Envelopes Envelope
Plain Paper/Bright White Paper
Premium Presentation Paper Matte
18 Printing From Your Computer
Page 19
Faxing a Document
Your product lets you send faxes by entering fax numbers or selecting entries from a speed
dial or group dial list. Using the Automatic Document Feeder (ADF), you can fax up to 30
pages at a time.
Note: You can also send and receive a fax from your computer using the FAX Utility.
For more information, see the online User’s Guide.
Breakdown or repair of this product may cause loss of fax data and settings. Epson is
not responsible for backing up or recovering data and settings during or after the
warranty period. We recommend that you make your own backup or print out your fax
data and settings.
This product allows you to store names, telephone numbers, and fax data in its
memory even when the power is turned off. Use the following procedure to erase the
memory if you give away or dispose of the product: Press if necessary, press
r to select Setup > Restore Default Settings > All Settings. This procedure will erase
all of your network settings and fax data.
Connecting a Phone or Answering Machine
l or
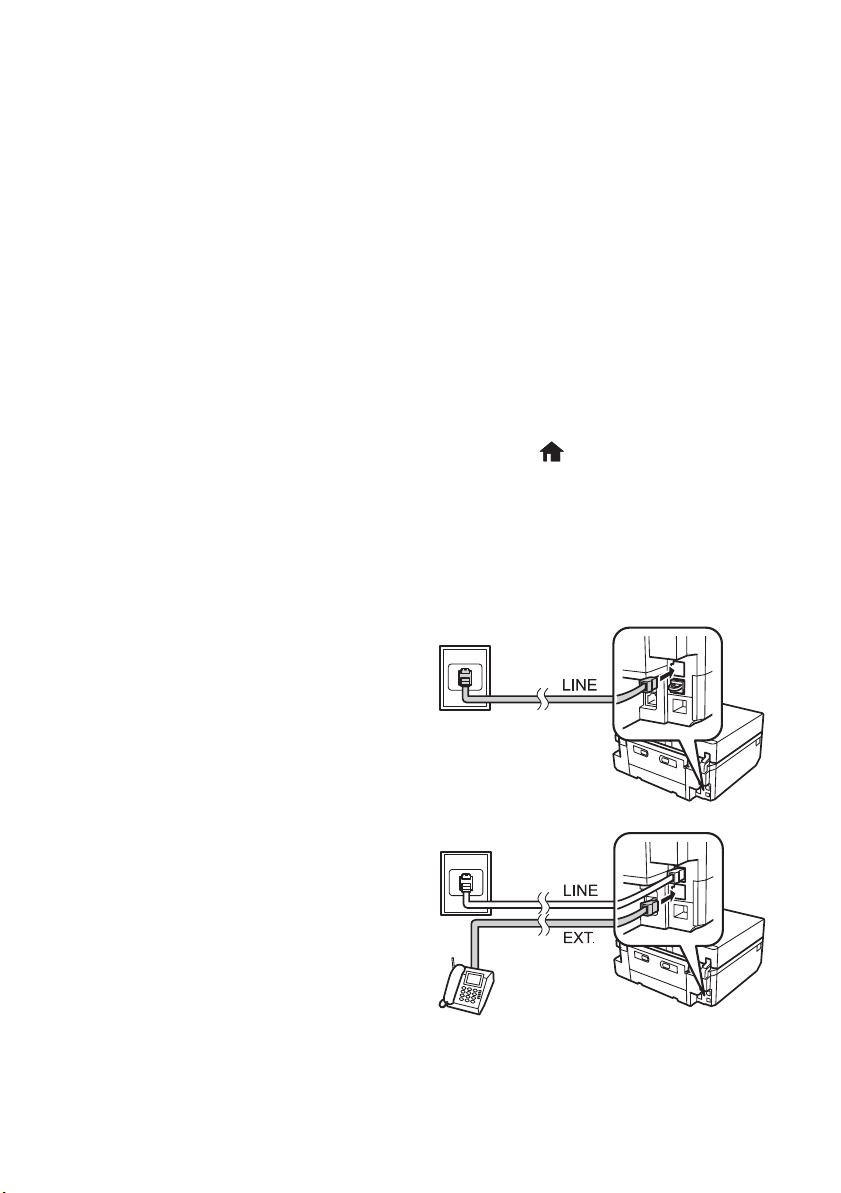
1. Connect the phone cable from the wall
jack to the
LINE port on the back of the
product.
Note: If you’re connecting the product
to a DSL phone line, you must plug a
DSL filter into the wall jack or you won’t
be able to use the fax or telephone
equipment. Contact your DSL provider
for the necessary filter.
2. To use a telephone or answering machine
on the same line, you need a second
phone cable. Remove the cap from the
EXT. port on the back of the product.
Connect one end of the cable to the
telephone or answering machine, and
connect the other end to the
Note: Set the printer ringer to answer
one ring after the answering machine.
EXT. port.
Telephone wall jack
Telephone wall jack
Faxing a Document 19
Page 20

In Auto Answer mode, if the incoming call is a fax and you pick up the phone or the
answering machine answers, the product automatically begins receiving the fax. If the
other party is a caller, the phone can be used as normal or a message can be left on the
answering machine.
Note: Any phone or answering machine must be connected to the EXT. port for your
product to detect an incoming fax call when the phone is picked up. Epson cannot
guarantee compatibility with VoIP, cable phone systems, or fiberoptic digital services such
as FiOS™.
Setting Up Fax Features
Before sending or receiving faxes, you should create a fax header and select the number of
rings before the fax answers.
Note: To select other settings or use the FAX Utility, see the online User’s Guide.
Entering Fax Header Information
You should enter your name and phone number in the fax header before sending faxes so
that recipients can identify the origin of the fax.
Note: If you leave your product unplugged for a long period of time, the date and time
settings may get lost. See the online User’s Guide for instructions on resetting them.
Entering Your Sender Name
1. Press if necessary, then press l or r and select Setup.
2. Scroll down and select
3. Select
4. Scroll down and select
5. Select
6. Use the keypad to enter the header information. You
7. Press
20 Faxing a Document
Communication.
Fax Header. You see the Fax Header screen.
can enter up to 40 characters or digits for your name
and other contact information.
To enter text, press a key repeatedly to cycle through
uppercase and lowercase letters, and numbers.
Done to return to the Header menu.
Fax Settings.
Header.
Page 21
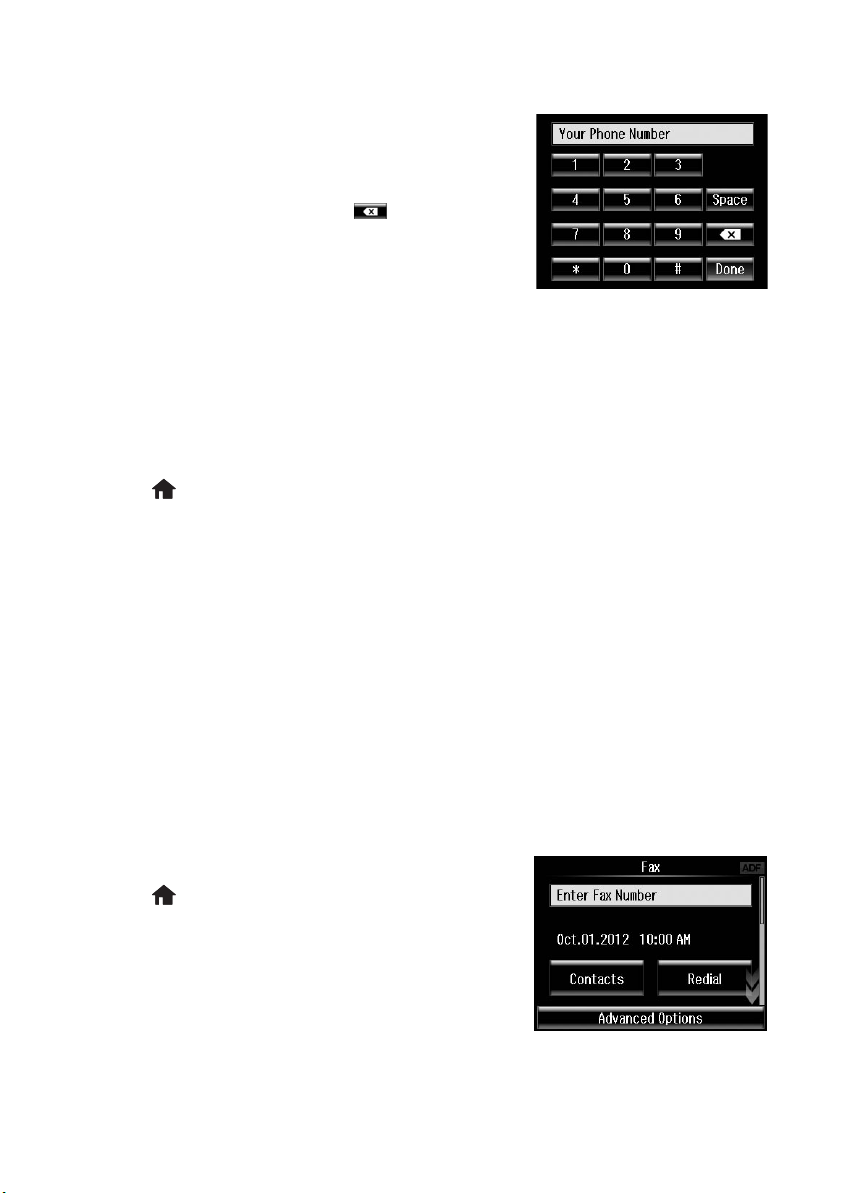
Entering Your Phone Number
1. Select Your Phone Number from the Header menu.
2. Use the keypad to enter your phone number, up to 20
digits. You don’t need to use dashes.
■ To delete a character, press .
■ To type the + symbol for an international
number, press #.
3. Press
Done to return to the Header menu.
Selecting the Number of Rings to Answer
If you connected an answering machine and it is set to pick up on the fourth ring, you
should set the product to pick up on the fifth ring or later. Otherwise, your answering
machine will not be able to pick up incoming calls.
1. Press if necessary, then press l or r and select
2. Scroll down and select
Fax Settings.
Setup.
3. Select
4. Press
Communication, then Rings to Answer.
+ or – to select the number of rings, then press Done.
Note: Set the fax to answer at least one ring after the answering machine.
Sending a Fax From the Control Panel
You can send a fax by manually entering a fax number, as described below.
Note: To dial the number using a telephone, by redialing, or by selecting from your
speed dial or group dial list, see the next section. To send a fax from your computer
using the FAX Utility, see your online User’s Guide.
1. Place your original(s) for faxing (see page 10).
2. Press if necessary, then select
To fax a two-sided document, place your document
in the ADF. Scroll down on the fax screen and select
2-sided Faxing, then select On.
3. Press
Enter Fax Number, then use the numeric
keypad to enter the fax number (up to 64 digits).
Then press
4. Scroll down and select
Done.
Color or B&W.
Fax.
Faxing a Document 21
Page 22

5. If necessary, scroll down and change any other fax settings.
6. Press x to begin scanning and faxing your document. (To cancel, press y
■ You can select 2-Sided Faxing even if the recipient’s fax machine does not print
Cancel.)
2-sided.
■ If the recipient’s fax machine prints only in black and white, your fax is
automatically sent in black and white even if you select
■ If you are scanning with the ADF (see page 10), your document is automatically
Color.
scanned and faxed.
■ If you placed your document on the scanner glass, you can scan additional pages
after the first one is sent.
■ If the fax number is busy, you see a redialing message and the product redials
after one minute. To redial immediately, press
Note: If you turn off the product, the following data stored in the product’s temporary
memory will be lost: received faxes that haven’t yet been printed, faxes scheduled to
be sent later, and faxes being retransmitted automatically.
Redial.
Receiving Faxes
Before receiving faxes, make sure you load plain paper and select the correct settings for the
paper you’ve loaded.
1. Press if necessary, then press l or r and select
Setup.
2. Scroll down and select
3. Select
Receive Settings.
4. To receive faxes automatically, select
5. Select the
Note: If the incoming fax is larger than the paper you loaded, it is reduced to fit or
printed on multiple pages, depending on the
Note: To change the number of rings before the product answers, see page 21.
Paper Size you want to use for printing faxes.
Fax Settings.
Auto Answer, then select On.
Auto Reduction setting you select.
If you run out of paper during printing, you see an error message. Load more paper and
press x to continue.
Note: To manually receive a fax, see your online User’s Guide.
22 Faxing a Document
Page 23

Scanning a Document or Photo
You can use your product to scan original documents or photos and save them on your
computer.
Note: For detailed scanning instructions, see the online User’s Guide.
Quick Scanning with the Touch Screen
Use the touch screen to quickly scan a photo or document and save it on your computer.
You can even scan and send the image or document to an online service or to a remote
printer.
1. Place your original document or photo as shown on page 10. For 2-sided scanning,
place your document in the ADF.
2. Press if necessary, then select
3. Scroll up or down and select one of the following options:
■ Scan to Memory Card automatically scans a photo or document and saves it to
an inserted memory card or USB storage device.
■ Scan to Cloud sends your scanned files to a destination that you have registered
with EPSON Connect.
■ Scan to PC automatically creates a JPG image and saves it to your computer;
ideal for scanning photos.
■ Scan to PC (PDF) automatically creates a PDF file and saves it to your computer;
ideal for scanning documents.
■ Scan to PC (Email) automatically scans a photo, resizes it, launches your email
application, and attaches a JPG image to a new outgoing message. This works
with MAPI-type email such as Microsoft
not web-based email such as Gmail.
■ Scan to PC (WSD) lets you manage network scanning in Windows 7 or
Windows Vista
(Web Services for Devices) on the computer.
®
(English only). To use this feature, you must first set up WSD
Scan.
®
Outlook or Windows Live Mail, but
Scanning a Document or Photo 23
Page 24

4. If you’re scanning to a memory card or USB storage device, select your scan settings,
then press x to begin scanning.
If you’re scanning to the cloud, select your destination, then press x to begin
scanning.
If you’re scanning to your computer, select
USB Connection if your product is
connected by a USB cable, or select the name of your computer if your product is
connected over a network. Press x to begin scanning.
Once your image is scanned, you see its icon on your computer screen, or as an
attachment in your email application.
Scanning with EPSON Scan Software
You can scan original documents and photos and save them as files on your computer
using the EPSON Scan software. You can also launch EPSON Scan from any TWAINcompliant application.
Note: For Mac OS X 10.6 or 10.7, see “Scanning with Mac OS X 10.6 or 10.7” on
page 25. For detailed scanning instructions, see the online User’s Guide.
1. Place your original document or photo as shown on page 10. For 2-sided scanning,
place your document in the ADF.
2. Do one of the following to start EPSON Scan:
■ Windows: Double-click the EPSON Scan icon on your desktop.
■ Mac OS X 10.5: Double-click EPSON Scan in Applications > Epson
Software
■ To scan from an application, start your application. Then open the File menu,
choose
.
Import or Acquire, and select your EPSON product.
24 Scanning a Document or Photo
Page 25
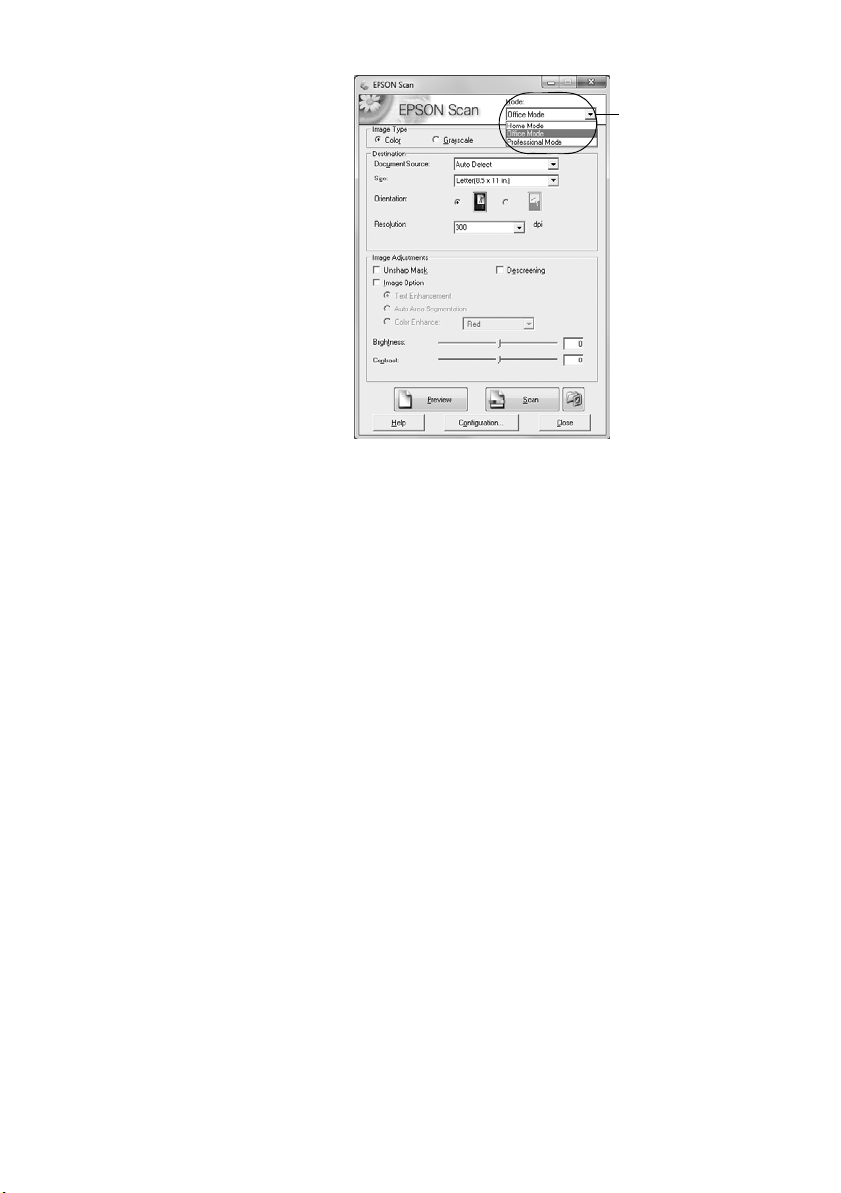
EPSON Scan opens in
Mode
the first time you use
it. (You can change the scan
Office
Click here to change
the scan mode
mode using the Mode selector
in the upper right corner.)
Note: You cannot use Home
mode to scan with the
Automatic Document
Feeder.
3. Click Scan. The image is scanned and you see its icon in the folder you have selected.
Scanning with Mac OS X 10.6 or 10.7
You can scan original documents and photos and save them as files on your computer.
1. Place your original document or photo as shown on page 10. For 2-sided scanning,
place your document in the ADF.
2. Open an image editing application such as Image Capture and select your product
from the DEVICES or SHARED list, if necessary.
3. In the Mode pop-up menu, select the setting indicating where you placed your
original.
4. If you would like to select scan settings, such as Color Restoration and file save
settings, click
Show Details.
5. In the Scan To pop-up menu, select the folder in which you want to save your image.
6. Click the
Note: With Mac OS X 10.6 or 10.7, in addition to scanning with Image Capture, you can
download and install EPSON Scan scanning software. EPSON Scan provides additional
image adjustment and photo correction features for enhancing scanned images, and
provides an interface for TWAIN-compliant OCR scanning software, such as ABBYY
FineReader
epson.com/support (U.S.) or epson.ca/support (Canada).
Scan button to begin scanning. Your image is saved to the folder selected.
®
. To download EPSON Scan, visit Epson’s driver download site
Scanning a Document or Photo 25
®
Page 26
Maintaining Your Product
Follow the instructions in this chapter to check and clean the print head nozzles, check ink
levels, and replace ink cartridges. If you need to align the print head, see the online User’s
Guide.
Caution: To keep your product looking like new, don’t place anything on top of the
cover or use it as a writing surface. If you need to clean the cover, use only a soft,
non-abrasive microfiber-type cloth.
Checking the Print Head Nozzles
If your printouts are faint or have gaps in them, some of the nozzles in the print head may
be clogged or ink may be running low in one or more of the ink cartridges. Follow the
steps below to check the print head nozzles.
1. Load a few sheets of plain paper in the lower paper cassette (cassette 2).
2. Press if necessary, then press l or r and select
Setup.
3. Select
4. Press x. The nozzle check is printed.
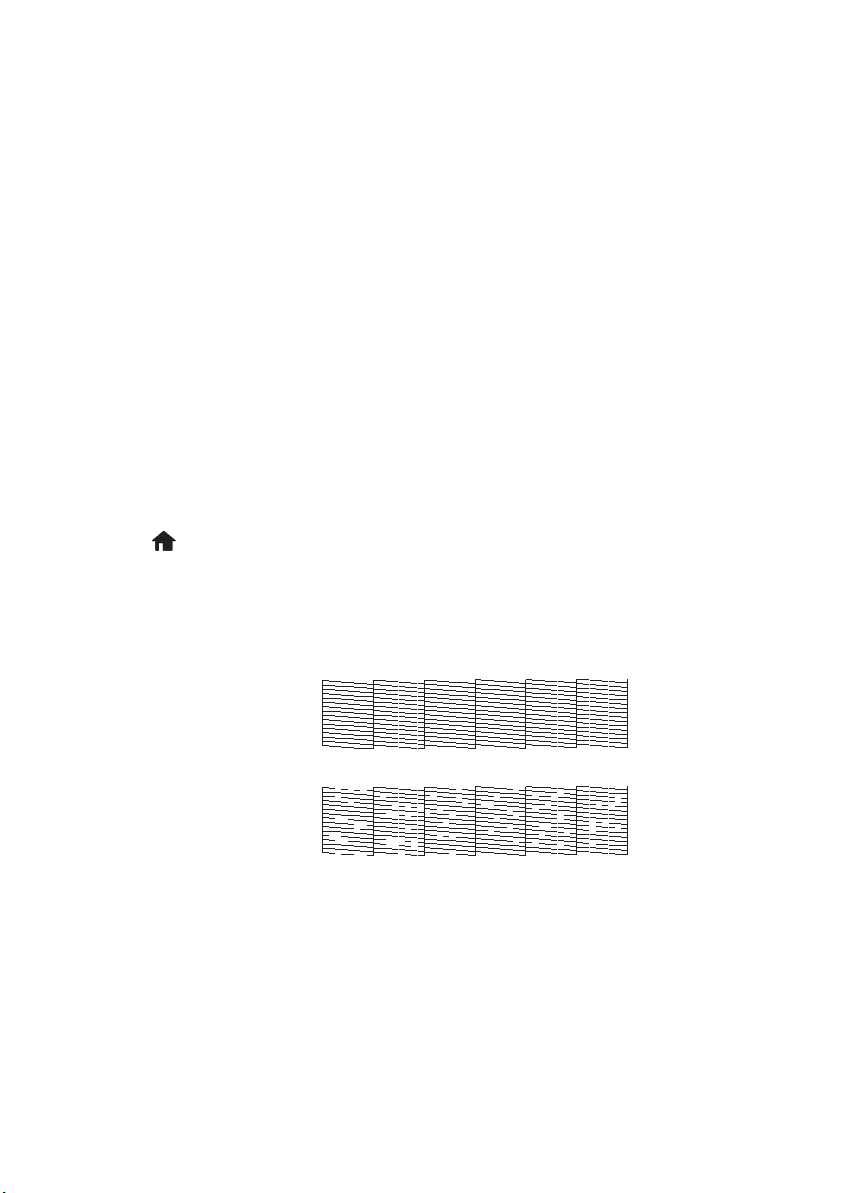
5. Check the printed pattern to see if there are gaps in the lines:
6. If there are no gaps, the print head is clean. Select
26 Maintaining Your Product
Maintenance, then Nozzle Check.
Nozzles
are clean
Nozzles need
cleaning
If there are gaps or the pattern is faint, select
instructions on the screen to clean the print head (see page 27).
Clean the Print Head.Then follow the
Done.
Page 27

Cleaning the Print Head
If print quality has declined and the nozzle check indicates clogged nozzles, you can clean
the print head. Print head cleaning uses ink, so clean it only if necessary.
Note: You cannot clean the print head if an ink cartridge is expended, and may not be
able to clean it when a cartridge is low. You must replace the cartridge first
page 29).
1. Load a few sheets of plain paper in the lower paper cassette (cassette 2).
2. Press if necessary, then press l or r and select
3. Select
Maintenance, then Head Cleaning.
Setup.
4. Press x.
Cleaning takes a few minutes. When it’s finished, you see a message on the display
screen.
Caution: Never turn off the printer during head cleaning or you may damage it. Do
not open the scanner unit or insert the CD/DVD tray during head cleaning.
5. Select Print Nozzle Check Pattern, then press x to run a nozzle check and confirm
that the print head is clean.
6. If there are still gaps or lines, or the test patterns are faint, run another cleaning cycle
and check the nozzles again.
Note: If you don’t see any improvement after cleaning the print head four times, leave
the printer on and wait at least six hours to let any dried ink soften. Then try cleaning
the print head again. If quality does not improve, one of the ink cartridges may need to
be replaced. If that doesn’t help, contact Epson as described on page 39.
If you do not use your printer often, it is a good idea to print a few pages at least once a
month to maintain good print quality.
(see
Checking Ink Levels
You can check the ink levels anytime right on the LCD screen. To check the ink levels with
your Windows or Mac OS X software, see the instructions in your online User’s Guide.
Note: You cannot print or copy when an ink cartridge is expended even if the other
cartridges are not expended. Replace any expended cartridges before printing or
copying.
1. Press if necessary, then press l or r and select Setup.
2. Select
3. Press
Ink Levels.
The ink cartridge status is displayed. See page 29 to replace a cartridge, if necessary.
OK to exit.
Maintaining Your Product 27
Page 28

In Windows, a window may appear on your computer screen when you try to print when
ink is low. This window can optionally display ink offers and other updates from Epson.
Note: To disable checking for ink offers or updates from Epson, see the instructions in
your online User’s Guide.
Purchasing EPSON Ink Cartridges
You can purchase genuine EPSON ink and paper from EPSON Supplies Central at
www.epson.com/ink3 (U.S. sales) or www.epson.ca (Canadian sales). You can also
purchase supplies from an EPSON authorized reseller. To find the nearest one, call
800-GO-EPSON (800-463-7766).
Use the following list when you order or purchase new ink cartridges (you can mix
Standard- and High-capacity cartridges):
Ink color Standard-capacity High-capacity
Black 277 277XL
Cyan 277 277XL
Magenta 277 277XL
Yellow 277 277XL
Light Cyan 277 277XL
Light Magenta 277 277XL
Note: We recommend that you use genuine EPSON cartridges and do not refill them.
The use of other products may affect your print quality and could result in printer
damage.
Yields vary considerably based on images printed, print settings, paper type, frequency
of use, and temperature. Actual yields will be lower with higher-density images, hot or
dusty conditions, less frequent printing or printing predominantly with one color. All ink
colors are used for printing and all-in-one printer maintenance, and all colors have to be
installed for printing. For print quality, part of the ink from the included cartridges is
used for printer startup and a variable amount of ink remains in the cartridges after the
“replace cartridge” signal.
For best printing results, use up a cartridge within six months of opening the package,
and before the expiration date on the cartridge box.
Store ink cartridges in a cool, dark place. If cartridges have been exposed to cold
temperatures, allow them to warm up to room temperature for at least 3 hours before
using them.
28 Maintaining Your Product
Page 29

Replacing Ink Cartridges
Make sure you have a new ink cartridge before you begin. You must install new cartridges
immediately after removing old ones.
Caution: Do not open ink cartridge packages until you are ready to install the ink.
Cartridges are vacuum packed to maintain reliability.
Leave the expended cartridge installed until you have obtained a replacement, or the
ink remaining in the print head nozzles may dry out.
Note: If you remove a low or expended ink cartridge, you cannot reinstall and use the
cartridge.
1. Turn on your product.
2. If an ink cartridge is expended, you see a message on the LCD screen indicating which
color to replace.
If you’re replacing a cartridge before you see a message on the LCD screen, select
Setup > Ink Levels > Cartridge Replacement.
Note: If a cartridge is expended, you must replace it to be able to print. If a
cartridge is low, you can continue printing until a cartridge needs replacement.
3. Lift up the scanner unit.
Caution: Do not move
the print head by hand;
otherwise, you may
damage your product.
Do not touch the flat
white cable inside the
printer.
4. Push in the blue tab to unlock the ink cartridge you are replacing. Then lift the
bottom of the ink cartridge to remove it.
Warning: If ink gets on your skin, wash it off thoroughly with soap and water. If it
gets in your eyes, flush them immediately with water. If you still have discomfort
or vision problems, see a doctor immediately. Keep ink cartridges out of the reach
of children and don't allow them to drink the ink.
Maintaining Your Product 29
Page 30
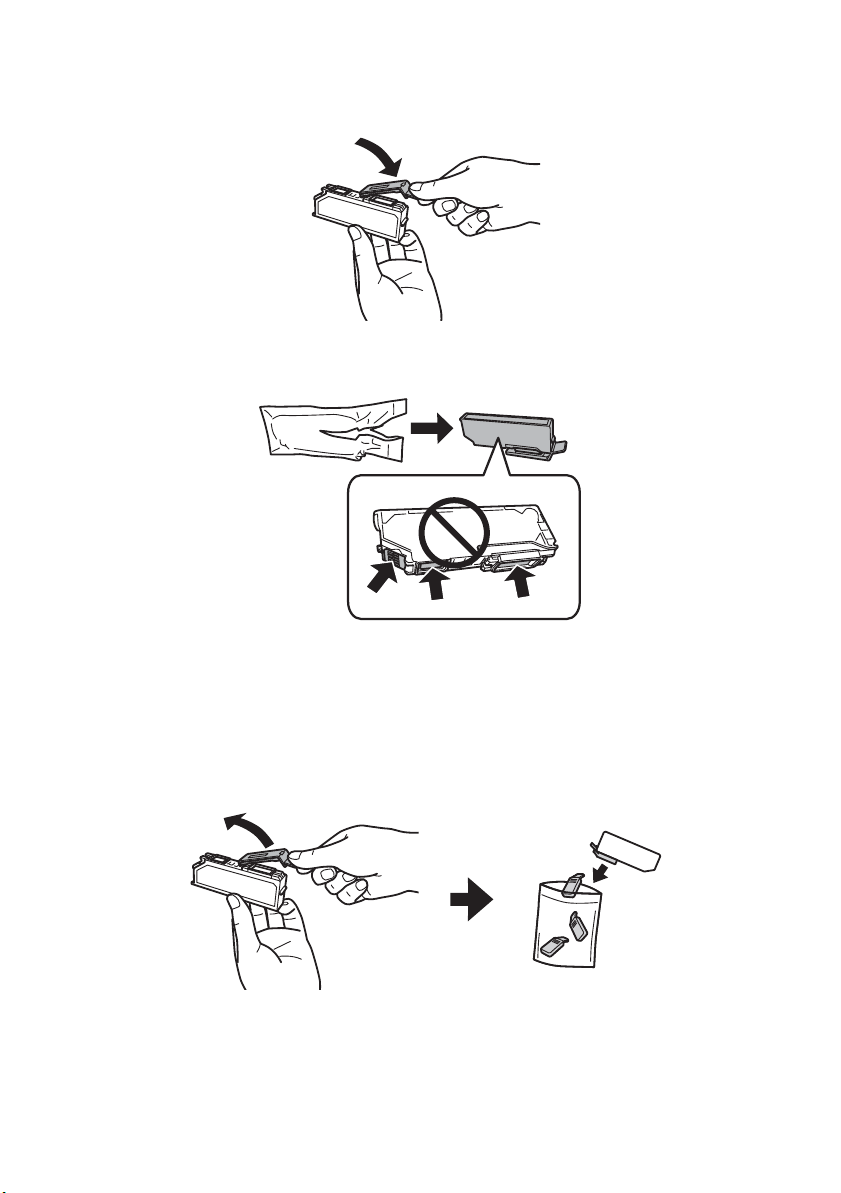
5. Recap the ink cartridge using the cap that came with it. Dispose of it carefully. Do not
take the used cartridge apart or try to refill it.
6. Open the new ink cartridge package.
Caution: Do not touch the areas shown above. Doing so may prevent normal
operation and printing.
Note: Do not shake cartridges after opening the package, as they may leak.
7. Remove the cap from the cartridge and store it in the included plastic bag for later
use.
30 Maintaining Your Product
Page 31

8. Insert the ink cartridge head first into the ink cartridge holder. Then press the bottom
of the ink cartridge down until it clicks into place.
9. Once you replace all the cartridges that need replacing, close the scanner to begin
priming the ink. This takes a few minutes. When you see a completion message on
the LCD screen, ink priming is finished.
Caution: Never turn off your product while ink is priming or you’ll waste ink. If you
see an ink replacement message on the LCD screen, lift the scanner unit and press
down on all the cartridges firmly. If printing on a CD or DVD, do not insert the
CD/DVD tray until ink priming is finished.
Maintaining Your Product 31
Page 32

Solving Problems
If you have a problem with your EPSON product, check the messages on the LCD screen
to diagnose the cause of most problems. Press if necessary, then press l or r and select
Help. Select Troubleshooting, then scroll up or down to see all the help topics.
Note: If the screen is dark, press the touch screen to wake the printer from sleep
mode.
You can also check the basic troubleshooting suggestions below, or in your online User’s
Guide. Or, access interactive troubleshooting and FAQs at epson.com/support (U.S.) or
epson.ca/support (Canada).
Note: Breakdown or repair of this product may cause loss of fax and network data and
settings. Epson is not responsible for backing up or recovering data and settings during
or after the warranty period. We recommend that you make your own backup or print
out your fax and network data and settings.
Network Problems
Note: For more detailed network instructions, see your online User’s Guide.
■ Try connecting to the wireless router or access point with your computer or another
device to confirm that it is working correctly.
■ Try restarting the router (turn it off and then on), then try to connect to it again.
■ Print a Network Status Sheet (see page 34). Verify that the network settings are correct
and check the signal strength. If it is poor, try moving the product closer to your
router or access point. Avoid placing it next to a microwave oven, 2.4 GHz cordless
phone, or large metal object such as a filing cabinet.
■ If your wireless router doesn’t broadcast its network name (SSID), see the following
page for instructions on manually entering your wireless network name.
■ If your wireless router has security enabled, make sure you entered the WEP key or
WPA passphrase correctly.
■ When using TCP/IP, make sure your network’s DHCP option is enabled (your router
manufacturer will be able to assist you with this setting).
■ Remove and reinsert the CD to reinstall your product software.
■ Disable the firewall temporarily to see if that may be causing the problem. Contact
your firewall manufacturer for assistance.
32 Solving Problems
Page 33

Connect the Printer to Your Wireless Network
If you are unable to connect to your wireless network using the product CD and the Start
Here sheet, you can use the touch screen on your product. Before you start, make sure you
know your network name (SSID) and password.
1. Press if necessary, then select
Wi-Fi Setup on the touch screen.
2. Select
Wi-Fi Setup Wizard.
3. Scroll down until you see the name of your wireless network, then select it. Continue
with step 6.
If you don’t see your network name, select
Networks
. You see this screen:
Other
4. Enter your network name (SSID).
■ Press the touch screen buttons repeatedly to scroll
through characters.
■ If your network name has uppercase (ABC) or
lowercase (abc) letters, make sure you enter them
correctly.
■ Press or to move the cursor.
■ Press to enter symbols.
■ Press to delete.
5. Select
Done when you’re finished entering your network name.
6. If your network has security enabled, you see the
password screen:
7. Follow the instructions above to enter the password. If
your network password has uppercase or lowercase
letters, be sure to enter them correctly.
8. Select
Done when you’re finished entering your
password.
When the printer is connected to your network, the WiFi light should be green, and not
flashing. Make sure you install the software on every computer from which you want to
print. When prompted during software setup, select
wireless network
.
The printer is already on my
Solving Problems 33
Page 34

Cannot Scan Over the Network
■ EPSON Scan is not installed in Mac OS X 10.6 or 10.7; see page 25 for scanning and
download instructions.
■ If you cannot scan from the product’s touch screen, make sure you restarted your
computer after installing the product software. Make sure EPSON Event Manager is
not being blocked by your firewall or security software. Try turning off the firewall.
■ If you are scanning a large document at high resolution, a communication error may
occur. If the scan did not complete, lower the scan resolution.
■ If network communication was interrupted while starting EPSON Scan, exit EPSON
Scan and restart it after a few seconds. If EPSON Scan cannot restart, turn the
product off and on, and then try again. Check the
Settings
■ Make sure EPSON Event Manager is set up to communicate with your product.
. For details, see the EPSON Scan Help.
Timeout Setting in EPSON Scan
Print a Network Status Sheet
1. Press if necessary, then press l or r and select Setup.
2. Scroll up or down and select
3. Scroll up or down and select
4. Select
Print the status sheet, then press x.
Wi-Fi/Network Settings.
Wi-Fi/Network Status.
Printing and Copying Problems
■ When loading paper in the paper cassettes, make sure it is loaded facedown (usually
the whiter, brighter, or glossy side) and under the edge guides. When loading paper in
the rear feed slot, make sure to load it face up.
■ Make sure the paper size and source selected on the touch screen or in your printer
software is correct for the paper you loaded.
■ Letter-size paper is automatically selected for copying. If your legal-size document is
cropped, scroll down and select
■ When scanning, position your original with the bottom against the front right corner
of the scanner glass. If the edges are cropped, move it away from the corner slightly.
■ You cannot print, copy, or receive faxes when an ink cartridge is expended. Replace
any expended cartridges before printing.
■ To select two-sided printing in Mac OS X, choose 2-sided Settings from the pop-up
menu. Do not select
Layout from the pop-up menu.
Reduce/Enlarge, then select Legal->Letter.
34 Solving Problems
Page 35

Paper Feeding Problems
■ If paper doesn’t feed correctly, remove the paper and fan the sheets, then reload them
as shown on page 4. Make sure paper is loaded under the edge guides.
■ Do not load more than the recommended number of sheets. See your online User’s
Guide for information on paper loading capacity.
■ If paper has jammed, follow the steps on the LCD screen. If necessary, check the
following areas:
1. Carefully remove any jammed paper from the rear feed slot.
2. Lift the scanner unit and carefully remove any paper trapped inside.
3. Remove the paper cassettes, then remove any jammed paper trapped inside.
Solving Problems 35
Page 36

4. Remove the auto-duplexer from the back of the printer and check for any
jammed paper.
5. Remove any paper stuck in the auto-duplexer.
ADF Document Feeding Problems
If documents don’t feed correctly in the Automatic Document Feeder (ADF), make sure
the paper is not bent, folded, or curled.
If paper has jammed:
1. Open the ADF cover and remove any jammed paper.
36 Solving Problems
Page 37

2. If necessary, lift the scanner cover and remove the document mat. Then carefully
remove any pages caught beneath it.
3. Open the ADF input tray and remove any jammed paper.
Caution: Do not try to remove the pages without opening the ADF cover or you could
damage the mechanism.
Faxing Problems
■ Make sure the recipient’s fax machine is turned on and working.
■ Make sure the LINE port on the product is connected to a telephone wall jack. Verify
that the telephone wall jack works by connecting a phone to it.
■ Print a fax connection report using your product control panel or fax software to help
diagnose the problem.
■ Make sure Auto Answer is on to receive faxes automatically (see page 22).
■ Make sure the ECM (Error Correction Mode) setting is turned on if you are trying to
send or receive a color fax.
■ If your phone line includes voicemail services, turn off Auto Answer. Otherwise, calls
or faxes may be inadvertently received by your voicemail service.
■ If the product is connected to a DSL phone line, you must have a DSL filter
connected to the phone jack. Contact your DSL provider for the necessary filter.
Solving Problems 37
Page 38

■
If you connected a telephone or answering machine, make sure it is connected to the
EXT. port. Do not use a phone line splitter.
■ If an answering machine is connected, set the number of rings to answer for receiving
faxes to be greater than the number of rings for the answering machine.
■ Tr y l ow er in g t he Fax Speed setting.
Print Quality Problems
■ Load the paper printable side down (usually the whiter, brighter, or glossy side) in the
paper cassettes. Load paper printable side up in the rear paper feed slot.
■ Make sure your paper isn’t damp or curled.
■ For the best print quality, use EPSON papers (see page 8) and genuine EPSON ink
cartridges (see page 28).
■ Make sure the paper type setting on the touch screen or in your printer software is
correct for the type of paper you loaded (see page 18).
■ If you notice light or dark bands across your printouts or they are too faint, run a
nozzle check (see page 26) to see if the print head needs cleaning.
■ If you notice jagged vertical lines, you may need to align the print head. See the online
User’s Guide for instructions.
■ The ink cartridges may be low on ink. Check your cartridge status and replace
cartridges, if necessary (see page 29).
■ Clean the scanner glass with a soft, dry, lint-free cloth (paper towels are not
recommended), or use a small amount of glass cleaner on a soft cloth, if necessary. Do
not spray glass cleaner directly on the glass.
38 Solving Problems
Page 39

Where to Get Help
Internet Support
Visit epson.com/support (U.S.) or epson.ca/support (Canada) for solutions to common
problems. You can download drivers and documentation, get FAQs and troubleshooting
advice, or e-mail Epson.
Speak to a Support Representative
Before you call Epson for support, please have the following information ready:
■ Product name (XP-850)
■ Product serial number (located on the back of the product and under the scanner)
■ Proof of purchase (such as a store receipt) and date of purchase
■ Computer configuration and description of the problem
Then call: (562) 276-4382 (US) or (905) 709-3839 (Canada) 6
Monday through Friday, and 7
AM – 4 PM, Pacific Time, Saturday.
AM – 8 PM, Pacific Time,
Days and hours of support are subject to change without notice. Toll or long distance
charges may apply.
Purchase Supplies and Accessories
You can purchase genuine EPSON ink and paper at EPSON Supplies Central at
www.epson.com/ink3 (U.S. sales) or www.epson.ca (Canadian sales). You can also
purchase supplies from an EPSON authorized reseller. To find the nearest one, call
800-GO-EPSON (800-463-7766).
Other Software Technical Support
ABBYY FineReader
Phone: (408) 457-9777
www.abbyy.com
support@abbyyusa.com
Solving Problems 39
Page 40

Notices
Important Safety Instructions
Before using your EPSON product, read and follow these safety instructions:
■ Be sure to follow all warnings and instructions marked on the product.
■ Use only the type of power source indicated on the product label.
■ Use only the power cord that comes with the product. Use of another cord may cause fires or
electric shock. Do not use the cord with any other equipment. Make sure the power cord meets
all relevant local safety standards.
■ The product’s power cord is for use with the product only. Use with other equipment may
cause fire or electric shock.
■ Place the product near a wall outlet where the plug can be easily unplugged.
■ If you won’t be using the product for a long period, unplug the power cord from the electrical
outlet.
■ Always turn off the product using the P power button, and wait until the P power light stops
flashing before unplugging the product or cutting off power to the electrical outlet.
■ Avoid plugging the product into an outlet on the same circuit as a photocopier or air
conditioning system that regularly switches on and off, or on an outlet controlled by a wall
switch or timer.
■ Do not let the power cord become damaged or frayed. Place it to avoid abrasions, cuts, fraying,
crimping, and kinking. Do not place objects on top of it and do not allow it to be stepped on or
run over. Be careful to keep the cord straight at each end. If damage occurs to the plug, replace
the cord or consult a qualified electrician. If there are fuses in the plug, make sure you replace
them with fuses of the correct size and rating.
■ If you use an extension cord with the product, make sure the total ampere rating of the devices
plugged into the extension cord does not exceed the cord’s ampere rating. Also, make sure the
total ampere rating of all devices plugged into the wall outlet does not exceed the wall outlet’s
ampere rating.
■ When connecting the product to a computer or other device with a cable, ensure the correct
orientation of the connectors. Each connector has only one correct orientation. Inserting a
connector in the wrong orientation may damage both devices connected by the cable.
■ Place the product on a flat, stable surface that extends beyond its base in all directions. It will
not operate properly if it is tilted or at an angle.
■ Avoid placing the product in locations that are subject to rapid changes in heat or humidity,
shocks or vibrations, or dust. Do not place the product near a radiator or heating vent or in
direct sunlight. Do not place or store the product outdoors.
■ Keep the product away from potential sources of electromagnetic interference, such as
loudspeakers or the base units of cordless phones.
40 Notices
Page 41

■ Allow space behind the product for the cables, and space above the product so that you can
fully raise the document cover.
■ Leave enough space in front of the product for the paper to be fully ejected.
■ Leave enough room around the product for sufficient ventilation. Make sure the product is at
least 4 inches (10 cm) away from the wall.
■ Do not block or cover openings in the product case or insert objects through the slots.
■ Do not use aerosol products that contain flammable gases inside or around the product. Doing
so may cause fire.
■ Do not press too hard on the scanner glass when placing the originals.
■ Do not open the scanner section while the product is faxing, copying, printing, or scanning.
■ Be careful not to trap your fingers when closing the scanner cover or scanner.
■ Do not touch the flat white cable inside the product.
■ Do not spill liquid on the product. Do not use the product near water. Do not use with wet
hands.
■ Unplug the product and refer servicing to qualified service personnel under the following
conditions: if the power cord or plug is damaged; if liquid has entered the product; if the
product has been dropped or the case damaged; if the product does not operate normally or
exhibits a distinct change in performance.
■ Adjust only those controls that are covered by the operating instructions. Except as specifically
explained in your documentation, do not attempt to service the product yourself.
■ Never disassemble, modify, or attempt to repair the product by yourself, except as specifically
explained in the documentation. Do not adjust controls that are not covered by the operating
instructions.
■ When storing or transporting the product, do not tilt it, stand it on its side, or turn it upside
down; otherwise ink may leak from the cartridges.
■ Always keep this guide handy.
Touch Screen Safety
■ Press the touch screen gently with your fingertip. Do not press with force or use your fingernail.
■ The LCD screen may contain a few small bright or dark spots or uneven brightness. This is
normal and does not indicate that the touch screen is damaged in any way.
■ Use only a dry, soft cloth to clean the touch screen. Do not use liquid or chemical cleansers.
■ Do not use items such as ball point pens, pencils, etc. to operate the touch screen.
■ Do not touch the screen with wet or gloved hands or through the protective sheet or sticker; it
may not respond.
■ Do not place heavy items on the touch screen. Contact Epson if the panel chips or cracks; do
not attempt to remove broken pieces.
■ Do not place your product in areas where abrupt changes in temperature or humidity may
occur. Condensation inside the screen may cause performance to deteriorate.
Notices 41
Page 42

■ If the touch screen is damaged, contact Epson. If the liquid crystal solution gets on your hands,
wash them thoroughly with soap and water. If the liquid crystal solution gets into your eyes,
flush them immediately with water. If discomfort or vision problems remain after a thorough
flushing, see a doctor immediately.
Memory Card Safety
■ Use only compatible memory cards (see the User’s Guide for a detailed list).
■ Do not remove a memory card or turn off the product while the memory card light is flashing.
Wireless Network Safety
■ Do not use this product inside medical facilities or near medical equipment. Radio waves from
the product may adversely affect the operation of medical equipment.
■ Do not use this product near automatically controlled devices such as automatic doors or fire
alarms. Radio waves from this product may adversely affect these devices.
■ To avoid adversely affecting the operation of the following equipment and causing an accident,
do not use the product: near medical equipment in a medical facility; within 8.7 inches (22 cm)
of a cardiac pacemaker; near automatically controlled devices, such as automatic doors or fire
alarms.
Ink Cartridge Safety
■ Keep ink cartridges out of the reach of children and don’t allow them to drink the ink.
■ Be careful when you handle used ink cartridges; there may be ink remaining around the ink
supply port. If ink gets on your skin, wash it off thoroughly with soap and water. If it gets in
your eyes, flush them immediately with water. If you still have discomfort or vision problems,
see a doctor immediately. If ink gets in your mouth, spit it out and see a doctor right away.
■ Do not put your hand inside the product or touch any cartridges during printing.
■ Do not try to move the print head by hand, or you may damage the product.
■ Do not touch the green IC chip on the side of the cartridge. This may prevent normal
operation.
■ Before transporting the product, make sure the print head is in the home (far right) position
and the ink cartridges are in place.
■ Install a new ink cartridge immediately after removing a used one. Leaving cartridges
uninstalled can dry out the print head and may prevent the product from printing.
■ Do not dismantle an ink cartridge. This could damage the print head.
■ Use the ink cartridge before the date printed on its package.
■ If you remove an ink cartridge for later use or disposal, make sure you put the cap back on the
cartridge’s ink supply port to prevent ink from drying out or to prevent surrounding areas from
getting smeared by ink.
42 Notices
Page 43

■ Store ink cartridges in a cool, dry place.
■ After bringing an ink cartridge in from a cold storage site, allow it to warm up at room
temperature for at least 3 hours before using it.
■ Although the ink cartridges may contain recycled materials, this does not affect product
function or performance.
Telephone Equipment Safety
When using telephone equipment, you should always follow basic safety precautions to reduce the
risk of fire, electric shock, and personal injury, including the following:
■ Avoid using a telephone during an electrical storm. There may be a remote risk of electric shock
from lightning.
■ Do not use a telephone to report a gas leak in the vicinity of the leak.
Caution: To reduce the risk of fire, use only a No. 26 AWG or larger telecommunication
line cord.
Declaration of Conformity
According to 47CFR, Part 2 and 15 for: Class B Personal Computers and Peripherals; and/or CPU
Boards and Power Supplies used with Class B Personal Computers:
We: Epson America, Inc.
Located at: MS 3-13
3840 Kilroy Airport Way
Long Beach, CA 90806
Telephone: (562) 290-5254
Declare under sole responsibility that the product identified herein, complies with 47CFR Part 2 and
15 of the FCC rules as a Class B digital device. Each product marketed is identical to the
representative unit tested and found to be compliant with the standards. Records maintained
continue to reflect the equipment being produced can be expected to be within the variation
accepted, due to quantity production and testing on a statistical basis as required by 47CFR §2.909.
Operation is subject to the following two conditions: (1) this device may not cause harmful
interference, and (2) this device must accept any interference received, including interference that
may cause undesired operation.
Tra de N am e : EP SO N
Type of Product: Multifunction printer
Model: C492A
Notices 43
Page 44

FCC Compliance Statement
For United States Users
This equipment complies with Part 68 of the FCC rules and the requirements adopted by the
Administrative Council for Terminal Attachments (ACTA). On the surface of this equipment is a
label that contains, among other information, a product identifier in the format
US:AAAEQ##TXXXX. If requested, this number must be provided to the telephone company.
Applicable certification jack Universal Service Order Codes (USOC) for the equipment: RJ11C.
A plug and jack used to connect this equipment to the premises wiring and telephone network must
comply with the applicable FCC Part 68 rules and requirements adopted by the ACTA. A compliant
telephone cord and modular plug is provided with this product. It is designed to be connected to a
compatible modular jack that is also compliant. See installation instructions for details.
The REN is used to determine the number of devices that may be connected to a telephone line.
Excessive RENs on a telephone line may result in the devices not ringing in response to an incoming
call. In most but not all areas, the sum of RENs should not exceed five (5.0). To be certain of the
number of devices that may be connected to a line, as determined by the total RENs, contact the
local telephone company. For products approved after July 23, 2001, the REN for this product is
part of the product identifier that has the format US:AAAEQ##TXXXX. The digits represented by
## are the REN without a decimal point (e.g., 03 is a REN of 0.3). For earlier products, the REN is
separately shown on the label.
If this equipment causes harm to the telephone network, the telephone company will notify you in
advance that temporary discontinuance of service may be required. But if advance notice isn’t
practical, the telephone company will notify the customer as soon as possible. Also, you will be
advised of your right to file a complaint with the FCC if you believe it is necessary.
The telephone company may make changes in its facilities, equipment, operations or procedures that
could affect the operation of the equipment. If this happens the telephone company will provide
advance notice in order for you to make necessary modifications to maintain uninterrupted service.
If you have problems with this product and require technical or customer support, please visit
www.epson.com for more information. This product is not intended to be repaired by the customer.
If you experience trouble connecting this equipment to a telephone line, please contact:
Name: Epson America, Inc.
Address: 3840 Kilroy Airport Way, Long Beach, CA 90806 U.S.A.
Telephone: (562) 981-3840
If the equipment is causing harm to the telephone network, the telephone company may request that
you disconnect the equipment until the problem is resolved.
This equipment may not be used on coin service provided by the telephone company. Connection to
party line service is subject to state tariffs. Contact the state public utility commission, public service
commission or corporation commission for information.
44 Notices
Page 45

If your home has specially wired alarm equipment connected to the telephone line, ensure the
installation of this equipment does not disable your alarm equipment. If you have questions about
what will disable alarm equipment, consult your telephone company or a qualified installer.
The Telephone Consumer Protection Act of 1991 makes it unlawful for any person to use a
computer or other electronic device, including fax machines, to send any message unless such
message clearly contains in a margin at the top or bottom of each transmitted page or on the first
page of the transmission, the date and time it is sent and an identification of the business or other
entity, or other individual sending the message and the telephone number of the sending machine or
such business, other entity, or individual. (The telephone number provided may not be a 900
number or any other number for which charges exceed local or long-distance transmission charges.)
In order to program this information into your fax machine, follow the instructions in “Entering Fax
Header Information” on page 20.
According to the FCC’s electrical safety advisory, we recommend that you may install an AC surge
arrestor in the AC outlet to which this equipment is connected. Telephone companies report that
electrical surges, typically lightning transients, are very destructive to customer terminal equipment
connected to AC power sources and that this is a major nationwide problem.
This equipment has been tested and found to comply with the limits for a Class B digital device,
pursuant to Part 15 of the FCC Rules. These limits are designed to provide reasonable protection
against harmful interference in a residential installation. This equipment generates, uses, and can
radiate radio frequency energy and, if not installed and used in accordance with the instructions, may
cause harmful interference to radio or television reception. However, there is no guarantee that
interference will not occur in a particular installation. If this equipment does cause interference to
radio and television reception, which can be determined by turning the equipment off and on, the
user is encouraged to try to correct the interference by one or more of the following measures:
■ Reorient or relocate the receiving antenna.
■ Increase the separation between the equipment and receiver.
■ Connect the equipment into an outlet on a circuit different from that to which the receiver is
connected.
■ Consult the dealer or an experienced radio/TV technician for help.
WARNING
The connection of a non-shielded equipment interface cable to this equipment will invalidate the
FCC Certification of this device and may cause interference levels which exceed the limits
established by the FCC for this equipment. It is the responsibility of the user to obtain and use a
shielded equipment interface cable with this device. If this equipment has more than one interface
connector, do not leave cables connected to unused interfaces. Changes or modifications not
expressly approved by the manufacturer could void the user’s authority to operate the equipment.
For Canadian Users
1. This product meets the applicable Industry Canada technical specifications.
Notices 45
Page 46

2. The Ringer Equivalence Number is an indication of the maximum number of devices allowed to
be connected to a telephone interface. The termination on an interface may consist of any
combination of devices subject only to the requirement that the sum of the RENs of all the devices
does not exceed five.
This Class B digital apparatus complies with Canadian ICES-003.
Le présent matériel est conforme aux spécifications techniques applicables d’Industrie Canada.
L’indice d’équivalence de la sonnerie (IES) sert à indiquer le nombre maximal de terminaux qui peuvent
être raccordés à une interface téléphonique. La terminaison d’une interface peut consister en une
combinaison quelconque de dispositifs, à la seule condition que la somme d’indices d’équivalence de la
sonnerie de tous les dispositifs n’excède pas 5.
Cet appareil numérique de la classe B est conforme à la norme NMB-003 du Canada.
Epson America, Inc., Limited Warranty
What Is Covered: Epson America, Inc. (“Epson”) warrants to the original retail purchaser that the
EPSON printer covered by this limited warranty statement, if purchased and operated only in the
United States, Canada, or Puerto Rico, will be free from defects in workmanship and materials for a
period of one (1) year from the date of original purchase. For warranty service, you must provide
proof of the date of original purchase.
What Epson Will Do To Correct Problems: Should your EPSON printer prove defective during the
warranty period, please call the EPSON Connection
(Canada) for warranty repair instructions and return authorization. An EPSON service technician
will provide telephone diagnostic service to determine whether the printer requires service. If service
is needed, Epson will, at its option, exchange or repair the printer without charge for parts or labor. If
Epson authorizes an exchange for the defective unit, Epson will ship a replacement printer to you,
freight prepaid, so long as you use an address in the United States, Canada, or Puerto Rico.
Shipments to other locations will be made freight collect. You are responsible for securely packaging
the defective unit and returning it to Epson within five (5) working days of receipt of the
replacement. Epson requires a debit or a credit card number to secure the cost of the replacement
printer in the event that you fail to return the defective one. If Epson authorizes repair instead of
exchange, Epson will direct you to send your printer to Epson or its authorized service center, where
the printer will be repaired and sent back to you. You are responsible for packing the printer and for
all costs to and from the EPSON authorized service center. When warranty service involves the
exchange of the printer or a part, the item replaced becomes Epson property. The replacement
printer or part may be new or refurbished to the Epson standard of quality, and, at Epson’s option,
may be another model of like kind and quality. Exchange products and parts assume the remaining
warranty period of your original product covered by this limited warranty.
What This Warranty Does Not Cover: This warranty covers only normal use in the United States,
Canada, or Puerto Rico. Using this product for continuous production or similar high duty purposes
is not considered normal use; damage, maintenance or service from such use will not be covered
under this warranty. This warranty is not transferable. This warranty does not cover any color change
or fading of prints or reimbursement of materials or services required for reprinting. This warranty
does not cover damage to the EPSON product caused by parts or supplies not manufactured,
SM
at (562) 276-4382 (U.S.) or (905) 709-3839
46 Notices
Page 47

distributed or certified by Epson. This warranty does not cover ribbons, ink cartridges or third party
parts, components, or peripheral devices added to the EPSON product after its shipment from
Epson, e.g., dealer or user-added boards or components. Epson is not responsible for warranty
service should the Epson label or logo or the rating label or serial number be removed or should the
product fail to be properly maintained or fail to function properly as a result of misuse, abuse,
improper installation, neglect, improper shipping, damage caused by disasters such as fire, flood, and
lightning, improper electrical current, software problems, interaction with non-EPSON products, or
service other than by an EPSON Authorized Servicer. If a claimed defect cannot be identified or
reproduced, you will be held responsible for the costs incurred.
THE WARRANTY AND REMEDY PROVIDED ABOVE ARE EXCLUSIVE AND IN LIEU OF
ALL OTHER EXPRESS OR IMPLIED WARRANTIES INCLUDING, BUT NOT LIMITED
TO, THE IMPLIED WARRANTIES OF MERCHANTABILITY, NON-INFRINGEMENT OR
FITNESS FOR A PARTICULAR PURPOSE. SOME LAWS DO NOT ALLOW THE
EXCLUSION OF IMPLIED WARRANTIES. IF THESE LAWS APPLY, THEN ALL EXPRESS
AND IMPLIED WARRANTIES ARE LIMITED TO THE WARRANTY PERIOD
IDENTIFIED ABOVE. UNLESS STATED HEREIN, ANY STATEMENTS OR
REPRESENTATIONS MADE BY ANY OTHER PERSON OR FIRM ARE VOID. IN NO
EVENT SHALL EPSON OR ITS AFFILIATES BE LIABLE FOR ANY SPECIAL, INCIDENTAL
OR CONSEQUENTIAL DAMAGES RESULTING FROM THE USE OR INABILITY TO USE
THE EPSON PRODUCT, WHETHER RESULTING FROM BREACH OF WARRANTY OR
ANY OTHER LEGAL THEORY. IN NO EVENT SHALL EPSON OR ITS AFFILIATES BE
LIABLE FOR DAMAGES OF ANY KIND IN EXCESS OF THE ORIGINAL RETAIL
PURCHASE PRICE OF THE PRODUCT.
In Canada, warranties include both warranties and conditions.
Some jurisdictions do not allow limitations on how long an implied warranty lasts, and some
jurisdictions do not allow the exclusion or limitation of incidental or consequential damages, so the
above limitations and exclusions may not apply to you. This warranty gives you specific legal rights,
and you may have other rights, which vary from jurisdiction to jurisdiction.
To find the EPSON Authorized Reseller nearest you, visit our website at: www.epson.com.
To find the EPSON Customer Care Center nearest you, visit www.epson.com/support.
You can also write to: Epson America, Inc., P.O. Box 93012, Long Beach, CA 90809-3012
Copyright Notice
All rights reserved. No part of this publication may be reproduced, stored in a retrieval system, or
transmitted in any form or by any means, electronic, mechanical, photocopying, recording, or
otherwise, without the prior written permission of Seiko Epson Corporation. The information
contained herein is designed only for use with this Epson product. Epson is not responsible for any
use of this information as applied to other equipment.
Notices 47
Page 48

Neither Seiko Epson Corporation nor its affiliates shall be liable to the purchaser of this product or
third parties for damages, losses, costs, or expenses incurred by purchaser or third parties as a result
of: accident, misuse, or abuse of this product or unauthorized modifications, repairs, or alterations to
this product, or (excluding the U.S.) failure to strictly comply with Seiko Epson Corporation’s
operating and maintenance instructions.
Seiko Epson Corporation shall not be liable for any damages or problems arising from the use of any
options or any consumable products other than those designated as Original Epson Products or
Epson Approved Products by Seiko Epson Corporation.
In addition to software program rights owned by Seiko Epson Corporation, this product also
includes open source software. Refer to OSS.pdf on your product software CD-ROM for a list of
open source software and software license terms applied to this printer.
Responsible Use of Copyrighted Materials
Epson encourages each user to be responsible and respectful of the copyright laws when using any
Epson product. While some countries’ laws permit limited copying or reuse of copyrighted material
in certain circumstances, those circumstances may not be as broad as some people assume. Contact
your legal advisor for any questions regarding copyright law.
Trademarks
EPSON and Supplies Central are registered trademarks, EPSON Connect is a trademark, and
EPSON Exceed Your Vision is a registered logomark of Seiko Epson Corporation.
EPSON Connection is a service mark and Small-in-One is a trademark of Epson America, Inc.
General Notice: Other product names used herein are for identification purposes only and may be
trademarks of their respective owners. Epson disclaims any and all rights in those marks.
This information is subject to change without notice.
© 2012 Epson America, Inc. 7/12
48 Notices
Page 49

À propos de votre produit
Après avoir installé votre XP-850 (voir la feuille Point de départ), consultez ce Guide rapide et
le Guide de l’utilisateur en ligne pour des instructions sur l’utilisation de votre produit.
Fonctions Où trouver de l’information
Copier, numériser et télécopier à l’aide de
l’écran tactile facile à utiliser.
Connexion au réseau en toute facilité – Wi-Fi,
Wi-Fi Direct et Ethernet
Traiter des documents de grande dimension
avec le chargeur automatique de documents
d’une capacité de 30 pages.
Imprimer vos photos depuis une unité flash USB,
un disque dur externe ou un graveur de CD.
Copier des fichiers vers et depuis votre
ordinateur avec le lecteur de carte mémoire
intégré.
Imprimer sur des cartes ou d’autres types de
papier épais à l’aide de la fente d’alimentation
arrière.
Imprimer et numériser où que vous soyez avec
les Solutions d’EPSON Connect
Cloud Print
MC
.
®
.
MC
et Google
Consultez ce Guide rapide pour les étapes de base. Consultez le Guide de l’utilisateur en ligne pour les détails.
Consultez l’affiche Point de départ et le
Guide de l’utilisateur en ligne.
Consultez ce Guide rapide pour les étapes
de base.
Consultez le Guide de l’utilisateur en ligne
pour les détails.
Consultez le Guide de l’utilisateur en ligne
pour les détails.
Consultez ce Guide rapide pour les étapes
de base.
Consultez le Guide de l’utilisateur en ligne
pour les détails.
Visitez le site www.epson.com/connect
et consultez le Guide de l’utilisateur en
ligne pour plus de détails (site Web
présenté en anglais seulement).
Français
Réglage du panneau de commande
L’inclinaison du panneau de commande est réglable. Vous pouvez l’abaisser ou le hausser à
l’angle souhaité tel que montré.
À propos de votre produit 49
Page 50

Utilisation de l’écran tactile
L’écran tactile simplifie l’utilisation des nombreuses fonctions de votre produit. Afin de
réduire la consommation d’énergie, l’écran s’assombrit après quelques minutes d’inactivité.
Touchez l’écran pour annuler le mode veille.
L’écran tactile n’affiche que les boutons pertinents à la tâche en cours.
1
Numéro Description
1 Pour allumer/éteindre le produit
2 Pour revenir au menu Accueil
3 Écran ACL affichant les menus et les états
4 Touches fléchées servant à parcourir les menus
5 Pour afficher l’état du réseau sans fil
6 Pour ouvrir le menu du CD/DVD
7 Pour annuler et revenir au menu précédent
8 Pour lancer la copie/l’impression/la numérisation/la télécopie
Mise en garde : Appuyez délicatement du bout du doigt sur l’écran tactile; évitez
d’exercer une pression trop forte ou d’utiliser des objets pointus.
Astuce : Pour désactiver le « bip » émis lorsque vous appuyez sur un bouton ou si vous
souhaitez réduire le volume, appuyez sur
réglez l’un des paramètres. Si vous désactivez le son, le son de composition émis
lorsque vous transmettez une télécopie sera aussi désactivé.
Remarque : Lorsque le témoin est vert, le produit est connecté à un réseau.
Lorsqu’il clignote, les paramètres réseau sont en cours d’ajustement (vert pour réseau
sans fil et orange pour réseau câblé).
234
765
8
Config. > Configuration imprimante > Son et
Pour plus de détails sur les icônes qui s’affichent à l’écran, appuyez sur l ou r, ensuite,
sélectionnez
Aide sur l’écran tactile du produit.
50 À propos de votre produit
Page 51

Chargement du papier
Votre imprimante possède deux bacs papier et une fente d’alimentation de papier arrière.
Vous pouvez charger du papier des formats suivants :
■ Bac 1 (Bac supérieur) : papier photo de format 4 × 6 po (102 × 152 mm) ou 5 × 7 po
(127 × 178 mm)
■ Bac 2 (Bac inférieur) : papier de format lettre, A4, légal, 4 × 6 po (102 × 152 mm),
5 × 7 po (127 × 178 mm) ou 8 × 10 po (203 × 254 mm)
■ Fente d’alim. man. arr. (Fente d’alimentation de papier arrière) : une feuille à la fois.
Fente d’alimentation de
papier arrière
Bac 1
Bac 2
Pour obtenir des détails concernant le chargement du papier dans le bac inférieur,
consultez l’affiche Point de départ. Pour charger du papier dans le bac supérieur ou la fente
d’alimentation du papier arrière, suivez les instructions de cette section.
Charger du papier dans le bac 1 (bac supérieur)
1. Ouvrez le couvercle à l’avant. Si le plateau de sortie est ouvert, refermez-le avant de
passer à la prochaine étape. (Lorsque vous faites glisser le plateau de sortie, il y aura un
peu de résistance et de bruit. Cela est normal.)
Chargement du papier 51
Page 52

2. Tirez sur le bac supérieur pour le sortir.
Remarque : Si vous ne voyez pas le bac supérieur, il se peut qu’il soit inséré
profondément dans l’imprimante. Retirez le bac inférieur, puis tirez délicatement
sur le bac supérieur pour le sortir.
3. Faites glisser les guide-papier vers l’extérieur.
4. Placez le guide-papier avant à l’emplacement indiquant le format de papier que vous
utilisez. Puis insérez le papier, face d’impression ou face brillante vers le bas.
Assurez-vous que le papier est placé contre le guide-papier avant.
5. Faites glisser les guide-papier latéraux contre le papier, sans trop serrer. Assurez-vous
que le papier est placé sous les languettes des guide-papier.
52 Chargement du papier
Page 53

6. Maintenez le bac droit lorsque vous l’insérez. Insérez le bac jusqu’à ce que les flèches
sur le côté droit s’alignent.
Charger du papier dans la fente d’alimentation de papier arrière
Envoyez d’abord votre travail d’impression à l’imprimante. Assurez-vous de sélectionner
Fente d’alim. man. arr. (ou Fente insert. arrière) au paramètre Source avant d’envoyer
le travail d’impression. (Vous pouvez envoyer le travail d’impression depuis un ordinateur
ou en utilisant l’écran tactile.) Ensuite, suivez les étapes ci-dessous pour charger le papier
dans la fente d’alimentation de papier arrière.
1. Ouvrez le couvercle de la fente d’alimentation de papier arrière et soulevez le support
à papier.
Chargement du papier 53
Page 54

2. Faites glisser les guide-papier vers l’extérieur.
3. Chargez une seule feuille de papier, face d’impression vers le haut, au centre de la fente
d’alimentation de papier arrière. Faites glisser les guide-papier contre le papier, sans
trop serrer.
Remarque : Poussez sur le papier jusqu’à ce que vous sentiez une résistance (une
surface d’environ 2 po [5 cm] du papier devrait se situer sous les sillons des
guide-papier comme illustré).
4. Si vous êtes prêt à imprimer, appuyez sur x.
Pour annuler l’impression, appuyez sur y
54 Chargement du papier
po
Annuler.
Page 55

Supports spéciaux
Epson offre un vaste choix de papiers de haute qualité vous permettant ainsi de maximiser
l’impact de vos documents, photos, présentations et projets créatifs.
Vous pouvez vous procurer des cartouches d’encre et du papier EPSON d’origine auprès
d’EPSON
®
Supplies Central® à l’adresse www.epson.ca. Vous pouvez également acheter
des fournitures chez un revendeur autorisé de produits EPSON. Pour obtenir les
coordonnées du revendeur le plus proche, composez le 1 800 463-7766.
bre
N
de
feuilles
Nom du papier Dimensions
Papier blanc brillant EPSON Lettre (8,5 × 11 po;
216 × 279 mm)
Papier pour brochure et dépliant –
Mat recto-verso EPSON
Papier pour présentation ultra haute
qualité – Mat EPSON
Papier pour présentation haute
qualité – Mat EPSON
Papier pour présentation haute
qualité – Mat recto-verso EPSON
Papier pour présentation – Mat
EPSON
Papier photo ultra haute qualité –
Glacé EPSON
Papier photo ultra haute qualité –
Lustré EPSON
Papier photo haute qualité – Glacé
EPSON
Papier photo haute qualité – Semi-
glacé EPSON
Lettre (8,5 × 11 po;
216 × 279 mm)
Lettre (8,5 × 11 po;
216 × 279 mm)
8 × 10 po (203 × 254 mm) S041467 50
Lettre (8,5 × 11 po;
216 × 279 mm)
Lettre (8,5 × 11 po;
216 × 279 mm)
Lettre (8,5 × 11 po;
216 × 279 mm)
Légal (8,5 × 14 po;
216 × 356 mm)
4 × 6 po (102 × 152 mm) S042181
5 × 7 po (127 × 178 mm) S041945 20
8 × 10 po (203 × 254 mm) S041946 20
Lettre (8,5 × 11 po;
216 × 279 mm)
Lettre (8,5 × 11 po;
216 × 279 mm)
4 × 6 po (102 × 152 mm) S041808
5 × 7 po (127 × 178 mm) S041464 20
8 × 10 po (203 × 254 mm) S041465 20
Lettre (8,5 × 11 po;
216 × 279 mm)
4 × 6 po (102 × 152 mm) S041982 40
Lettre (8,5 × 11 po;
216 × 279 mm)
N° du
produit
S041586 500
S042384 150
S041341 50
S041257
S04218050100
S041568 50
S041062 100
S041067 100
S04217460100
S042182
S0421752550
S041405 50
S04172740100
S042183
S0416672550
S041331 20
Chargement du papier 55
Page 56

N° du
Nom du papier Dimensions
Papier photo – Glacé EPSON 4 × 6 po (102 × 152 mm) S041809
Lettre (8,5 × 11 po;
216 × 279 mm)
Feuilles autocollantes de qualité
photo EPSON
Papier décalque au fer chaud
transférable à froid EPSON
A4 (8,3 × 11,7 po;
210 × 297 mm)
Lettre (8,5 × 11 po;
216 × 279 mm)
produit
S04203850100
S041141
S041649
S041271
S041106 10
S041153 10
bre
N
de
feuilles
20
50
100
Remarque : La disponibilité des supports peut varier selon le pays.
Pour des instructions additionnelles sur le chargement du papier, consultez l’affiche Point
de départ ou le Guide de l’utilisateur en ligne.
Pour obtenir les meilleurs résultats :
■ Aérez et taquez les bords de la pile de papier avant de la charger.
■ Si le papier est gondolé, aplatissez-le ou pliez-le légèrement dans la direction opposée
avant de le charger. Imprimer sur du papier gondolé peut causer un maculage de
l’encre sur vos tirages.
■ Chargez le papier dans les bacs papier avec la face d’impression ou la face brillante vers
le bas, tout en vous assurant que le papier est placé sous les guide-papier. Chargez le
papier dans la fente d’alimentation de papier arrière avec la face d’impression ou la
face brillante vers le haut.
■ Chargez toujours le papier côté court en premier et assurez-vous que la pile de papier
est placée sous les guide-papier.
■ Assurez-vous de placer le papier contre le guide-papier et assurez-vous qu’il ne dépasse
pas du bac.
■ Ne chargez pas plus de feuilles que le nombre recommandé.
56 Chargement du papier
Page 57

Positionnement des originaux
Avant de copier, de numériser ou de télécopier, placez vos documents sur la vitre
d’exposition du scanner ou dans le chargeur automatique de documents. Placez les photos
sur la vitre d’exposition seulement.
Utilisation de la vitre d’exposition du scanner
Vous pouvez placer une photo ou un document allant jusqu’au
format lettre (ou A4) sur la vitre d’exposition du scanner.
1. Soulevez le capot.
2. Placez votre original face vers le bas sur la vitre d’exposition,
en vous assurant de placer le bas contre le coin avant droit.
3. Fermez doucement le capot afin d’éviter de déplacer l’original.
Utilisation du chargeur automatique de documents
Vous pouvez placer jusqu’à 30 feuilles de format lettre ou A4 (pour l’impression d’un côté
ou l’impression recto verso) ou 10 feuilles de format légal (recto seulement) dans le
chargeur automatique de documents.
Mise en garde : Assurez-vous que vos originaux ne sont pas froissés ou pliés et qu’ils
ne contiennent pas de trous, d’agrafes, de papier collant ou tout autre matériau qui
pourrait se coincer dans le chargeur.
1. Soulevez le support à papier du chargeur automatique de documents, puis tirez le
butoir vers l’extérieur.
Positionnement des originaux 57
Page 58

2. Faites glisser le guide-papier vers l’extérieur.
3. Aérez les documents originaux, puis taquez-les sur une surface plane afin d’égaliser les
bords.
4. Insérez les originaux face vers le haut, bord supérieur en premier. L’icône
ADF s’affiche
sur l’écran.
Remarque : Si vous utilisez la mise en page Copie lettre, 2 im ou Copie A4, 2 images
assurez-vous que les originaux sont chargés comme illustré ci-dessous.
5. Faites glisser le guide-papier contre les originaux, sans trop serrer.
58 Positionnement des originaux
Page 59

Copie d’un document ou d’une photo
Suivez les étapes de la section suivante pour faire des copies en couleur ou en noir et blanc.
Vous pouvez copier des documents comme sur un télécopieur. Si vous utilisez le chargeur
automatique de documents, vous pouvez copier jusqu’à 30 feuilles à la fois.
1. Assurez-vous que du papier est chargé dans l’un des bacs papier (voir page 57).
2. Placez votre document original sur la vitre d’exposition du scanner ou dans le
chargeur automatique de documents (voir page 57).
Remarque : Lorsque vous utilisez la fonction Copie avec des originaux chargés
dans le chargeur automatique de documents, le papier de format lettre est
automatiquement sélectionné pour vos copies imprimées. Si vous copiez un
document de format légal, l’image sera rognée. Pour copier un document de
format légal sur du papier de format lettre, faites défiler vers le bas et sélectionnez
Réduire/Agrandir. Ensuite, sélectionnez Légal->Lettre.
3. Appuyez sur , au besoin, et sélectionnez Copie.
L’écran suivant s’affiche :
4. Appuyez sur
copies de la photo que vous désirez faire (jusqu’à 99).
Ou appuyez sur le chiffre
numérique, et ensuite, sélectionnez le nombre et
appuyez sur
5. Sélectionnez
6. Faites défiler vers le bas pour voir les paramètres de
copie additionnels.
7. Sélectionnez les paramètres selon vos besoins.
Remarque : Pour effacer les paramètres de copie
utilisés auparavant, faites défiler vers le bas et
sélectionnez Effacer tous les paramètres. Pour plus
d’information sur les paramètres de copie, consultez
le Guide de l’utilisateur en ligne.
8. Appuyez sur x pour lancer la copie. Pour annuler la copie, appuyez sur y Annuler.
Remarque : Pendant l’impression recto verso, s’il se produit un maculage de l’encre
sur le papier, sélectionnez un paramètre
+ ou – pour sélectionner le nombre de
1 pour afficher le pavé
Term.
Couleur ou N&B (noir et blanc).
Temps de séchage plus long.
Copie d’un document ou d’une photo 59
Page 60

Impression depuis une carte mémoire
Votre imprimante vous permet d’imprimer des photos directement à partir de la carte
mémoire de votre appareil photo numérique; il suffit de l’insérer dans le logement de carte
mémoire et de lancer l’impression.
Consultez le Guide de l’utilisateur en ligne pour obtenir une liste de cartes mémoire
compatibles et des instructions sur la copie de fichiers de carte mémoire entre votre
imprimante et un ordinateur.
Insertion d’une carte
1. Assurez-vous que l’imprimante est sous tension.
2. Insérez votre carte dans le logement
approprié, tel qu’illustré ci-dessous.
Insérez une seule carte à la fois.
Mise en garde : Ne forcez pas la
carte dans le logement, car celle-ci ne
s’insère pas complètement. Si un
adaptateur est requis pour votre carte
mémoire, installez-le avant d’insérer
la carte dans le logement. Sinon, la
carte risque de se coincer.
Le témoin d’accès à la carte mémoire clignote, puis reste allumé. Vous pouvez maintenant
voir vos photos sur l’écran ACL et les imprimer (voir page 61).
Témoin d’accès à
la carte mémoire
Retrait de la carte
Une fois l’impression des photos terminée, suivez ces étapes pour retirer la carte mémoire :
1. Assurez-vous que le témoin d’accès à la carte mémoire ne clignote pas.
Mise en garde : Ne retirez pas la carte et ne mettez pas le produit hors tension
pendant que le témoin d’accès à la carte mémoire clignote, au risque de perdre
des données sur la carte.
60 Impression depuis une carte mémoire
Page 61

2. Si l’imprimante est reliée à votre ordinateur par un câble USB, effectuez une des étapes
suivantes avant de retirer la carte mémoire ou de mettre le produit hors tension :
■ Windows
sous Ordinateur, Poste de travail ou Windows Explorer et sélectionnez
■ Mac OS X : Glissez l’icône de disque amovible de votre bureau à la corbeille.
®
: Cliquez avec le bouton de droite sur le nom de la carte (disque amovible)
Éjecter.
3. Tirez ensuite la carte tout droit pour la sortir du logement.
Impression de photos depuis l’écran ACL
Vous pouvez sélectionner des photos individuelles pour l’impression au fur et à mesure
qu’elles s’affichent sur l’écran ACL. Consultez le Guide de l’utilisateur en ligne pour obtenir
les instructions sur l’impression de différents types de feuilles de disposition et de feuilles
de notes personnalisées.
1. Chargez plusieurs feuilles de papier photo EPSON (plusieurs types disponibles; voir
page 55).
2. Appuyez sur , au besoin, et sélectionnez
3. Touchez une photo sur l’écran pour la sélectionner
pour l’impression.
4. Appuyez sur le bouton
+ ou – pour sélectionner le
nombre de copies de la photo que vous désirez imprimer.
Imprimer les photos.
Pour rogner ou faire un zoom sur une photo,
sélectionnez
Modifier > Découper/Zoom, puis faites
les ajustements nécessaires.
Pour ajuster l’image de la photo, sélectionnez
Modifier > Ajustements photo, puis
faites les ajustements nécessaires.
5. Pour sélectionner une autre photo, appuyez sur l ou r pour faire défiler les photos,
ou appuyez sur y et sélectionnez la miniature de l’image désirée.
6. Pour sélectionner les paramètres d’impression, sélectionnez
Config. Puis faites défiler
l’écran vers le bas pour modifier des paramètres d’impression additionnels, au besoin.
7. Si vous êtes prêt à imprimer, appuyez sur x.
Pour annuler l’impression, appuyez sur y
Annuler.
Impression depuis une carte mémoire 61
Page 62

Impression depuis un ordinateur
Cette section décrit les étapes de base pour l’impression depuis votre ordinateur Windows
ou Mac. Pour des directives détaillées sur l’impression, incluant l’impression recto verso sur
du papier ordinaire ou du Papier blanc brillant EPSON avec l’unité recto verso, consultez
le Guide de l’utilisateur en ligne.
Impression sous Windows
1. Sélectionnez la commande d’impression dans votre application. Une fenêtre comme
celle-ci s’affiche :
Sélectionnez votre
produit EPSON.
Cliquez ici pour
ouvrir votre
logiciel d’impression.
2. Sélectionnez votre produit, puis cliquez sur le bouton
(Si un bouton
Puis, cliquez sur
62 Impression depuis un ordinateur
Configuration, Imprimante ou Options s’affiche, cliquez dessus.
Préférences ou Propriétés dans la fenêtre suivante.)
Préférences ou Propriétés.
Page 63

3. Dans l’onglet Principal, sélectionnez les paramètres d’impression de base. Assurez-vous
d’avoir choisi la
Source et le Type de papier approprié selon le papier que vous utilisez
(voir page 66 pour les détails).
Sélectionnez le type de document à
imprimer (choisissez
Photo supérieure pour les photos).
Sélectionnez la
bonne source.
Sélectionnez le
type de papier.
Sélectionnez la
taille du papier.
Photo ou
Sélectionnez
l’orientation de votre
document ou photo.
Astuce : Pour un accès rapide à la plupart des paramètres fréquemment utilisés,
cliquez sur l’onglet
d’impression
Raccourcis et sélectionnez l’une des Présélections
. Vous pouvez créer votre propre présélection en cliquant sur le
bouton Ajouter/supprimer.
4. Pour redimensionner vos tirages ou pour sélectionner d’autres paramètres
d’impression, cliquez sur l’onglet
Disposition et sélectionnez les paramètres
nécessaires.
5. Pour d’autres options d’impression, cliquez sur l’onglet
Remarque : Pour obtenir de plus amples renseignements sur les paramètres
d’impression, cliquez sur Aide ou consultez le Guide de l’utilisateur en ligne.
Plus d’options.
6. Cliquez sur OK pour enregistrer vos paramètres.
7. Cliquez sur
OK ou Imprimer pour lancer l’impression.
Impression depuis un ordinateur 63
Page 64

Impression sous Mac OS X
Suivez les étapes ci-dessous pour imprimer sous Mac OS X.
1. Ouvrez une photo ou un document dans une application.
2. Ouvrez le menu
3. Sélectionnez votre produit EPSON comme paramètre
Fichier et sélectionnez Imprimer.
Imprimante.
Sélectionnez votre produit EPSON.
4. Cliquez sur la flèche ou sur
au besoin.
Afficher les détails pour agrandir la fenêtre Imprimer,
64 Impression depuis un ordinateur
Page 65

5. Sélectionnez les paramètres de copie et page de base. Pour l’impression sans marges,
sélectionnez un paramètre
Remarque : Si le paramètre que vous désirez sélectionner n’est pas affiché,
(par exemple,
d’imprimer. Ou sélectionnez votre application dans le menu contextuel de cette
fenêtre et vérifiez si le paramètre est disponible.
Échelle), vérifiez s’il se trouve dans votre application avant
Taille du papier avec une option Sans marges.
Paramètres de
copie et page
Paramètres de
l’application
Menu
contextuel
6. Sélectionnez Configuration imprimante à partir du menu contextuel, puis
sélectionnez
Source papier, Support, Qualité et autres paramètres d’impression.
7. Choisissez les autres options d’impression dont vous avez besoin depuis le menu
contextuel. Consultez le Guide de l’utilisateur en ligne pour plus de détails.
8. Cliquez sur
Imprimer.
9. Pour suivre la progression du travail d’impression, cliquez sur l’icône de l’imprimante
sur le Dock.
Impression depuis un ordinateur 65
Page 66

Sélection du bon type de papier
Sélectionnez le paramètre Type (Windows) ou Support (Mac OS X) qui convient dans le
logiciel d’impression. Il indique au produit quel type de papier est utilisé, et ajuste le
niveau d’encre en conséquence.
Pour ce papier Sélectionnez ce paramètre
Papier ordinaire
Papier blanc brillant EPSON
Papier décalque au fer chaud transférable à froid
EPSON
Feuilles autocollantes de qualité photo EPSON
Papier photo ultra haute qualité – Glacé EPSON Papier photo ultra haute qualité Glacé
Papier photo haute qualité – Glacé EPSON Papier photo haute qualité Glacé
Papier photo – Glacé EPSON Papier photo Glacé
Papier pour présentation – Mat EPSON Papier pour présentation Mat
Papier photo haute qualité – Semi-glacé EPSON Papier photo haute qualité Semi-glacé
Papier photo ultra haute qualité – Lustré EPSON Papier photo ultra haute qualité Lustré
Papier pour présentation haute qualité – Mat
EPSON
Papier pour présentation haute qualité – Mat recto-
verso EPSON
Papier pour présentation ultra haute qualité – Mat
EPSON
Papier pour brochure et dépliant – Mat recto-verso
EPSON
Enveloppes Enveloppe
Papier ordinaire/Papier blanc brillant
Papier pour présentation haute qualité
Mat
66 Impression depuis un ordinateur
Page 67

Télécopie d’un document
Votre produit vous permet d’envoyer des télécopies en saisissant des numéros de
télécopieur ou en sélectionnant des entrées depuis une liste de composition abrégée ou de
numérotation groupée. Si vous utilisez le chargeur automatique de documents, vous
pouvez télécopier jusqu’à 30 pages à la fois.
Remarque : Vous pouvez aussi envoyer ou recevoir une télécopie à partir de votre
ordinateur en utilisant l’utilitaire FAX Utility. Pour obtenir plus d’information, consultez le
Guide de l’utilisateur en ligne.
La panne ou la réparation de ce produit peut entraîner la perte des données et des
paramètres de télécopie. Epson n’est pas responsable de la copie de sauvegarde ni de
la restauration des paramètres et des données au cours ou après la période de garantie.
Nous vous recommandons de faire vos propres copies de sauvegarde ou d’imprimer
vos données et paramètres de télécopie.
Ce produit vous permet de mémoriser des noms, des numéros de téléphone et des
données de télécopie même quand l’alimentation de l’appareil est coupée. Si vous
souhaitez offrir ou vous débarrasser de ce produit, vous pouvez effacer la mémoire
comme suit : Appuyez sur , au besoin, puis appuyez sur
Config. > Restaurer les para. par défaut > Tous les paramètres. Cette procédure
supprimera tous les paramètres du réseau et les données de télécopie.
Connexion d’un téléphone ou d’un répondeur
l ou r pour sélectionner
1. Branchez une extrémité du câble
téléphonique dans la prise
téléphonique murale, puis branchez
l’autre dans le port
LINE situé au dos
du produit.
Remarque : Si le produit a été
connecté à une ligne téléphonique
DSL, vous devez installer un filtre
DSL sur la ligne, sinon vous ne
pourrez pas utiliser le télécopieur
ou l’équipement téléphonique.
Communiquez avec votre fournisseur
de service DSL pour obtenir le filtre
nécessaire.
Prise murale téléphonique
Télécopie d’un document 67
Page 68

2. Pour utiliser un téléphone ou un
répondeur sur la même ligne, il vous
Prise murale téléphonique
faudra un second câble téléphonique.
Retirez le bouchon du port
EXT. situé
à l’arrière du produit. Branchez une
extrémité du câble dans le téléphone
ou le répondeur, puis l’autre extrémité
dans le port
Remarque : Réglez la sonnerie de
l’imprimante pour qu’elle réponde une sonnerie après le répondeur.
EXT.
En mode Réponse automatique, si l’appel entrant est une télécopie et que vous ou votre
répondeur répondez, le produit reçoit automatiquement la transmission. Si la tierce partie
est un appelant, le téléphone peut être utilisé comme à l’habitude et la personne pourra
laisser un message sur le répondeur.
Remarque : Le téléphone ou le répondeur doit être branché au port EXT. pour que le
produit puisse détecter une télécopie entrante lorsque vous répondez au téléphone.
Epson ne peut garantir la compatibilité avec la voix par IP, les systèmes de téléphonie par
câble ou les services numériques à fibre optique tel que FiOS
MC
.
Configuration des fonctions de télécopie
Avant d’envoyer ou de recevoir des télécopies, vous devez créer un en-tête de télécopie et
sélectionner le nombre de sonneries avant que le télécopieur réponde.
Remarque : Pour sélectionner d’autres paramètres ou utiliser l’utilitaire FAX Utility,
consultez le Guide de l’utilisateur en ligne.
Entrée des renseignements d’en-tête
Vous devez saisir votre nom et votre numéro de téléphone dans l’en-tête avant d’effectuer
un envoi de télécopie pour que vos destinataires puissent identifier l’origine de celle-ci.
Remarque : Lorsque vous laissez le produit débranché pendant une période prolongée,
les réglages de date et d’heure peuvent s’effacer. Consultez le Guide de l’utilisateur en
ligne pour des directives afin de les réinitialiser.
Entrée de votre nom d’expéditeur
1. Appuyez sur , au besoin, puis appuyez sur l ou r et sélectionnez Config.
2. Faites défiler la liste vers le bas et sélectionnez Paramètres de télécopie.
3. Sélectionnez
68 Télécopie d’un document
Communication.
Page 69

4. Faites défiler la liste vers le bas et sélectionnez
En-tête.
5. Sélectionnez
En-tête télécopie. L’écran de l’En-tête
télécopie s’affiche.
6. Utilisez le pavé numérique pour saisir les
renseignements de l’en-tête. Vous pouvez saisir
jusqu’à 40 caractères ou chiffres pour votre nom et
d’autres renseignements de contact.
Pour saisir du texte, appuyez à plusieurs reprises sur
un bouton pour passer des lettres majuscules aux
lettres minuscules ou aux chiffres.
7. Appuyez sur
Term. pour retourner au menu En-tête.
Entrée de votre numéro de téléphone
1. Sélectionnez Votre numéro de téléphone dans le
menu En-tête.
2. Utilisez le pavé numérique pour saisir jusqu’à 20
chiffres pour votre numéro de téléphone. Il n’est
pas nécessaire d’utiliser de tirets.
■ Pour effacer un caractère, appuyez sur .
■ Pour saisir le symbole + pour un numéro
international, appuyez sur #.
3. Appuyez sur
Term. pour retourner au menu En-tête.
Sélection du nombre de sonneries avant réponse
Si vous connectez un répondeur et qu’il est réglé pour se mettre en marche après quatre
sonneries, vous devez régler votre imprimante pour qu’elle se mette en marche après cinq
sonneries ou plus. Sinon, votre répondeur ne pourra pas répondre aux appels entrants.
1. Appuyez sur , au besoin, puis appuyez sur l ou r et sélectionnez
2. Faites défiler la liste vers le bas et sélectionnez Paramètres de télécopie.
3. Sélectionnez
4. Appuyez sur
Communication, puis Sonneries avant réponse.
+ ou – pour sélectionner le nombre de sonneries, puis appuyez sur Fini.
Sélectionnez un nombre supérieur de sonneries à celui choisi pour le répondeur.
Remarque : Réglez la sonnerie de l’imprimante pour qu’elle réponde au moins une
sonnerie après le répondeur.
Télécopie d’un document 69
Config.
Page 70

Envoi d’une télécopie à partir du panneau de commande
Vous pouvez envoyer une télécopie en entrant manuellement un numéro de télécopieur,
comme décrit ci-dessous.
Remarque : Pour composer le numéro en utilisant un téléphone, en recomposant ou
en sélectionnant un numéro dans la liste de composition abrégée ou de numérotation
groupée, consultez la section suivante. Pour envoyer une télécopie à partir de votre
ordinateur en utilisant l’utilitaire FAX Utility, consultez le Guide de l’utilisateur en ligne.
1. Placez votre original ou vos originaux pour la
télécopie (voir page 57).
2. Appuyez sur , au besoin, ensuite, sélectionnez
Télécopie.
Pour télécopier un document recto verso, placez
votre document dans le chargeur automatique de
documents. Faites défiler l’écran Télécopie vers
le bas, sélectionnez
sélectionnez
3. Appuyez sur
numéro de télécopieur (jusqu’à 64 chiffres peuvent être saisis). Appuyez ensuite
sur
Term.
Télécopie recto verso, puis
Activé.
Inscrire num. téléc., puis utilisez le pavé numérique pour saisir le
4. Faites défiler l’écran vers le bas et sélectionnez
Couleur ou N&B.
5. Si nécessaire, faites défiler l’écran vers le bas et changez les autres paramètres de
télécopie.
6. Appuyez sur x pour lancer la numérisation et la télécopie de votre document. (Pour
annuler, appuyez sur y
■ Vous pouvez sélectionner Télécopie recto verso même si le télécopieur de votre
Annuler.)
destinataire n’imprime pas recto verso.
■ Si le télécopieur du destinataire imprime seulement en noir et blanc, votre
télécopie sera automatiquement envoyée en noir et blanc même si vous
sélectionnez
■ Si vous numérisez au moyen du chargeur automatique de documents (voir
Couleur.
page 57), votre document sera automatiquement numérisé et télécopié.
■ Si vous avez placé votre document sur la vitre d’exposition, vous pouvez
numériser des pages additionnelles une fois la première page envoyée.
70 Télécopie d’un document
Page 71

■ Si la ligne est occupée, un message de recomposition s’affiche et le produit
recompose après une minute. Pour recomposer le numéro immédiatement,
appuyez sur
Remarque : Si vous mettez le produit hors tension, les données suivantes qui ont été
sauvegardées dans la mémoire temporaire du produit seront effacées : les télécopies
reçues qui n’ont pas été imprimées, les télécopies à envoyer ultérieurement et les
télécopies à retransmettre automatiquement.
Recomposer.
Réception d’une télécopie
Avant de recevoir des télécopies, assurez-vous d’avoir chargé du papier ordinaire et d’avoir
sélectionné les paramètres correspondant au papier chargé dans l’imprimante.
1. Appuyez sur , au besoin, puis appuyez sur l ou r et sélectionnez
2. Faites défiler la liste vers le bas et sélectionnez Paramètres de télécopie.
3. Sélectionnez
4. Pour recevoir des télécopies automatiquement, sélectionnez
puis sélectionnez
Paramètres de réception.
Réponse automatique,
Activé.
Config.
5. Sélectionnez la
Taille du papier que vous souhaitez utiliser pour l’impression des
télécopies.
Remarque : Si le format des pages de la télécopie entrante est supérieur au
format du papier chargé, la télécopie sera alors réduite pour tenir sur une seule
page ou sera imprimée sur plusieurs pages, selon le paramètre Réduction
automatique
Remarque : Pour modifier le nombre de sonneries après lequel le produit répond,
voyez la page 69.
sélectionné.
Lorsqu’il manque de papier pendant l’impression, un message d’erreur s’affiche. Chargez
du papier et appuyez sur x pour poursuivre l’impression.
Remarque : Pour recevoir une télécopie manuellement, consultez le Guide de
l’utilisateur en ligne.
Télécopie d’un document 71
Page 72

Numérisation d’un document ou d’une photo
Vous pouvez utiliser le produit pour numériser l’original d’une photo ou d’un document et
l’enregistrer sur votre ordinateur.
Remarque : Pour des directives détaillées sur la numérisation, consultez le Guide de
l’utilisateur en ligne.
Numérisation rapide à l’aide de l’écran tactile
Utilisez l’écran tactile pour numériser rapidement une photo ou un document et
l’enregistrer sur votre ordinateur. Vous pouvez même numériser une image ou un
document et l’envoyer à un service en ligne ou à une imprimante à distance.
1. Placez votre document ou photo d’origine tel que montré à la page 57. Pour la
numérisation recto verso, placez votre document dans le chargeur automatique de
documents.
2. Appuyez sur , au besoin, et sélectionnez
3. Faites défiler la liste vers le haut ou vers le bas, puis sélectionnez l’une des options
suivantes :
■ Numériser vers carte mém numérise automatiquement une photo ou un
document et la ou le sauvegarde sur une carte mémoire ou une unité de stockage
USB.
■ Numériser vers Cloud envoie vos fichiers numérisés vers une destination que
vous avez enregistrée avec EPSON Connect.
Balayer.
■ Numériser vers PC crée automatiquement une image JPG et la sauvegarde sur
votre ordinateur; il s’agit du moyen idéal pour numériser des photos.
■ Numériser vers PC (PDF) crée automatiquement un fichier PDF et le
sauvegarde sur votre ordinateur; il s’agit du moyen idéal pour numériser des
documents.
■ Numériser vers PC (email) numérise automatiquement une photo, la
redimensionne, lance l’application de courriel et joint une image JPG à un
nouveau message sortant. Cette fonction est compatible avec les applications de
courriel de type MAPI tel que Microsoft
Mail et Entourage, mais non avec les applications de courriel Web comme Gmail.
72 Numérisation d’un document ou d’une photo
®
Outlook, Windows Live Mail, Mac
Page 73

■ Numériser vers PC (WSD) permet de gérer la numérisation réseau sous
Windows 7 ou Windows Vista
®
(en anglais seulement). Pour utiliser cette
fonction, vous devez configurer WSD (Web Services for Devices [Services Web
pour périphériques]) sur l’ordinateur.
4. Si vous numérisez vers une carte mémoire ou un dispositif de stockage USB,
sélectionnez les paramètres de numérisation et appuyez sur x pour lancer la
numérisation.
Si vous numérisez vers le nuage, sélectionnez votre destination, et ensuite, appuyez sur
x pour lancer la numérisation.
Si vous numérisez vers un ordinateur, sélectionnez
Connexion USB si le produit est
connecté par un câble USB, ou sélectionnez le nom de votre ordinateur si le produit
est connecté à votre réseau. Appuyez sur x pour lancer la numérisation.
Une fois l’image numérisée, une icône s’affichera à l’écran de votre ordinateur, ou
encore, une pièce sera jointe dans votre application de courriel.
Numérisation à l’aide du logiciel EPSON Scan
Vous pouvez numériser des documents et des photos originales et les sauvegarder comme
fichiers sur votre ordinateur en utilisant le logiciel EPSON Scan. Vous pouvez aussi lancer
EPSON Scan à partir de n’importe quelle application compatible TWAIN.
Remarque : Pour Mac OS X 10.6 ou 10.7, consultez la section « Numérisation sous
Mac OS X 10.6 ou 10.7 » à la page 74. Pour des directives détaillées sur la
numérisation, consultez le Guide de l’utilisateur en ligne.
1. Placez votre original pour la numérisation (voir page 57). Pour la numérisation recto
verso, placez votre document dans le chargeur automatique de documents.
2. Effectuez l’une des étapes suivantes pour lancer EPSON Scan :
■ Windows : Double-cliquez sur l’icône EPSON Scan sur le bureau.
■ Mac OS X 10.5 : Double-cliquez sur EPSON Scan sous Applications > Epson
Software
.
Numérisation d’un document ou d’une photo 73
Page 74

■
Pour numériser à partir d’une application, lancez l’application. Ouvrez ensuite le
menu
Fichier et sélectionnez Importation ou Acquérir, puis sélectionnez votre
produit.
EPSON Scan s’ouvre en
Mode bureautique la première fois que vous l’utilisez.
(Vous pouvez changer le mode de numérisation à l’aide du sélecteur de mode dans le
coin supérieur droit de la fenêtre.)
Cliquez ici pour
modifier le mode
de numérisation.
Remarque : Il n’est pas possible d’utiliser le chargeur automatique de documents
en Mode loisirs.
3. Cliquez sur Numériser. L’image est numérisée et son icône s’affiche dans le dossier
que vous avez sélectionné.
Numérisation sous Mac OS X 10.6 ou 10.7
Vous pouvez numériser les originaux de documents et de photos et les sauvegarder sous
forme de fichiers sur votre ordinateur.
1. Placez votre document ou photo d’origine tel qu’illustré à la page 57. Pour la
numérisation recto verso, placez votre document dans le chargeur automatique
de documents.
2. Ouvrez une application d’édition d’images telle que Transfert d’images et sélectionnez
votre produit à partir de la liste APPAREILS ou PARTAGÉS, au besoin. Cliquez sur
le bouton
3. Dans le menu contextuel Mode, sélectionnez le paramètre indiquant où vous avez
placé l’original.
74 Numérisation d’un document ou d’une photo
Numériser pour voir un aperçu de votre image.
Page 75

4. Si vous souhaitez sélectionner les paramètres de numérisation tels que Restauration de
la couleur et les réglages d’enregistrement de fichier, cliquez sur
Afficher les détails.
5. Dans le menu Numériser vers, sélectionnez le dossier dans lequel vous souhaitez
enregistrer votre image.
6. Cliquez sur le bouton
sauvegardée dans le fichier sélectionné dans le menu contextuel
Remarque : Avec Mac OS X 10.6 ou 10.7, en plus de numériser avec Transfert
d’images, vous pouvez télécharger et installer EPSON Scan. Ce logiciel vous offre des
fonctionnalités de réglages d’image additionnelles ainsi qu’une interface pour les
logiciels de numérisation ROC compatibles avec TWAIN, tel qu’ABBYY
Pour télécharger EPSON Scan, consultez le site de téléchargements de pilotes Epson à
l’adresse
epson.ca/support (site Web présenté en anglais seulement).
Numériser pour lancer la numérisation. Votre image sera
Numériser vers.
®
FineReader®.
Numérisation d’un document ou d’une photo 75
Page 76

Entretien du produit
Suivez les directives de ce chapitre pour vérifier et nettoyer les buses de la tête d’impression,
vérifier le niveau d’encre des cartouches, ainsi que pour remplacer les cartouches d’encre.
Pour aligner la tête d’impression, consultez le Guide de l’utilisateur en ligne.
Mise en garde : Afin que votre produit conserve son apparence neuve, ne placez aucun
objet sur son capot et ne l’utilisez pas comme surface d’écriture. Si vous devez
nettoyer le capot, utilisez un chiffon en microfibres doux et non abrasif.
Vérification des buses de la tête d’impression
Si vos tirages sont estompés ou présentent des vides, il se peut que les buses de la tête
d’impression soient bouchées ou que le niveau d’encre soit faible dans l’une ou plusieurs
des cartouches. Suivez les étapes ci-après pour vérifier les buses de la tête d’impression.
1. Chargez quelques feuilles de papier ordinaire dans le bac papier inférieur.
2. Appuyez sur , au besoin, puis appuyez sur l ou r et sélectionnez
3. Sélectionnez Entretien, puis Vérification des buses.
4. Appuyez sur x. Le motif de vérification est imprimé.
5. Examinez le motif de vérification des buses pour voir s’il présente des écarts dans
les lignes :
Config.
Les buses
sont propres.
Les buses ont
besoin d’être
nettoyées.
6. S’il n’y a pas d’écarts, la tête d’impression est propre. Sélectionnez
S’il y a des écarts ou si le motif est estompé, sélectionnez
puis appuyez sur x pour nettoyer la tête d’impression (voir page 77).
76 Entretien du produit
Terminé.
Nettoyer la tête d’impr.,
Page 77

Nettoyage de la tête d’impression
Si la qualité d’impression s’est dégradée et que le motif de test indique que les buses sont
bouchées, vous pouvez nettoyer la tête d’impression. N’exécutez un nettoyage de la tête
d’impression que lorsque cela est nécessaire, car le processus consomme de l’encre.
Remarque : Vous ne pouvez pas nettoyer la tête d’impression si l’une des cartouches
est vide, et il est probable que vous ne pourrez pas nettoyer la tête d’impression
lorsqu’une cartouche est presque vide. Vous devez d’abord remplacer la cartouche (voir
page 79).
1. Chargez quelques feuilles de papier ordinaire dans le bac papier inférieur.
2. Appuyez sur , au besoin, puis appuyez sur l ou r et sélectionnez
3. Sélectionnez Entretien, puis Nettoyage de la tête.
4. Appuyez sur x.
Le nettoyage va durer quelques minutes. Une fois terminé, un message s’affiche à
l’écran.
Mise en garde : N’éteignez jamais l’imprimante pendant le nettoyage de la tête
d’impression, car vous risquez de l’endommager. Ne soulevez pas le scanner et
n’insérez pas le plateau de CD/DVD durant le nettoyage de la tête.
5. Sélectionnez Impr. modèle vérif. buse, puis appuyez sur x pour lancer une
vérification des buses et confirmer que la tête d’impression est propre.
6. Si les motifs sont toujours estompés ou comportent des écarts ou des lignes, exécutez
un autre cycle de nettoyage et vérifiez de nouveau les buses.
Config.
Remarque : Si vous ne remarquez aucune amélioration après quatre nettoyages,
éteignez le produit et attendez au moins six heures afin que l’encre sèche puisse
ramollir. Ensuite, nettoyez la tête d’impression de nouveau. Si la qualité ne s’améliore
pas, l’une des cartouches d’encre doit possiblement être remplacée. Si le problème
persiste, communiquez avec Epson tel que décrit à la page 90.
Si vous n’utilisez pas souvent l’imprimante, il est conseillé d’imprimer quelques pages
au moins une fois par mois pour maintenir une bonne qualité d’impression.
Entretien du produit 77
Page 78

Vérification des niveaux d’encre
Vous pouvez vérifier les niveaux d’encre en tout temps sur l’écran ACL. Pour vérifier les
niveaux d’encre au moyen de votre logiciel Windows ou Mac OS X, consultez les directives
du Guide de l’utilisateur en ligne.
Remarque : Vous ne pouvez ni copier ni imprimer lorsqu’une cartouche d’encre est
épuisée, même si les autres cartouches ne le sont pas. Remplacez les cartouches vides
avant d’imprimer ou de copier.
1. Appuyez sur , au besoin, puis appuyez sur l ou r et sélectionnez Config.
2. Sélectionnez Niveaux d’encre.
L’état des cartouches d’encre s’affiche. Consultez la page 79 pour remplacer une
cartouche, au besoin.
3. Appuyez sur
OK pour quitter.
Sous Windows, il se peut qu’une fenêtre s’affiche à l’écran de votre ordinateur lorsque vous
essayez d’imprimer alors que le niveau d’encre est bas. Cette fenêtre peut comporter des
offres d’achat de cartouches d’encre et d’autres mises à jour provenant d’Epson.
Remarque : Pour désactiver les offres et les mises à jour d’Epson, consultez les
directives dans le Guide de l’utilisateur en ligne.
Achat de cartouches d’encre EPSON
Vous pouvez vous procurer des cartouches d’encre et du papier EPSON d’origine auprès
d’EPSON Supplies Central à l’adresse www.epson.ca. Vous pouvez également acheter des
fournitures chez un revendeur autorisé de produits EPSON. Pour obtenir les coordonnées
du revendeur le plus près, composez le 1 800 463-7766.
Reportez-vous à cette liste lorsque vous commandez ou achetez des cartouches (vous pouvez
mélanger les cartouches à rendement standard et les cartouches à rendement élevé) :
Couleur d’encre Rendement standard Rendement élevé
Noir 277 277XL
Cyan 277 277XL
Magenta 277 277XL
Jaune 277 277XL
Cyan clair 277 277XL
Magenta clair 277 277XL
78 Entretien du produit
Page 79

Remarque : Nous vous recommandons d’utiliser des cartouches d’encre EPSON
d’origine et de ne pas les remplir. L’utilisation d’autres produits risque de nuire à la
qualité d’impression et d’endommager l’imprimante.
Le rendement des cartouches varie considérablement selon les images imprimées, les
paramètres d’impression, le type de papier, la fréquence d’utilisation et la température.
Le rendement des cartouches pourrait être moins élevé avec l’impression d’images de
haute densité, une température élevée ou un environnement poussiéreux, une
impression moins fréquente ou l’impression avec une couleur prédominante. Toutes
les couleurs d’encre sont utilisées pour l’impression et l’entretien de l’imprimante
multi-fonction et toutes les encres de couleur doivent être installées pour l’impression.
Pour la qualité d’impression, une partie de l’encre des cartouches incluses est utilisée
pour le chargement initial et une certaine quantité d’encre reste dans les cartouches
après que le message de remplacement de cartouches s’affiche.
Pour les meilleurs résultats, utilisez les cartouches dans les six mois suivant leur
déballage et avant la date limite inscrite sur la boîte des cartouches d’encre.
Rangez les cartouches d’encre dans un endroit frais, à l’abri de la lumière. Si les
cartouches ont été exposées au froid, laissez-les réchauffer à la température de la pièce
pendant au moins trois heures avant de les utiliser.
Remplacement de cartouches d’encre
Avant de commencer, assurez-vous d’avoir des cartouches de rechange. Vous devez installer
les cartouches d’encre neuves dès que vous avez retiré les cartouches usées de l’appareil.
Mise en garde : N’ouvrez pas l’emballage des cartouches d’encre avant d’être prêt à
les installer. Les cartouches sont emballées sous vide pour assurer leur fiabilité.
Laissez la cartouche épuisée en place jusqu’à ce que vous en ayez une de rechange,
sinon l’encre restant dans les buses de la tête d’impression risque de sécher.
Remarque : Si vous avez retiré une cartouche vide ou presque vide, il n’est plus
possible de la réinstaller et de l’utiliser.
1. Mettez votre produit sous tension.
2. Lorsqu’une cartouche est épuisée, un message s’affiche sur l’écran ACL de du produit
indiquant la couleur de la cartouche à remplacer.
Si vous remplacez une cartouche avant qu’un message ne s’affiche sur l’écran ACL,
sélectionnez
Remarque : Lorsqu’une cartouche d’encre est épuisée, vous devez la remplacer
pour pouvoir imprimer. Lorsque le niveau d’encre d’une cartouche est bas, vous
pouvez continuer à imprimer jusqu’à ce qu’il soit temps de la remplacer.
Config. > Entretien > Remplacement cartouche encre.
Entretien du produit 79
Page 80

3. Levez l’unité du scanner.
Mise en garde : Pour éviter d’endommager le produit, ne déplacez jamais
manuellement la tête d’impression. Ne touchez pas le câble blanc plat qui se
trouve à l’intérieur de l’imprimante.
4. Pressez la languette bleue sur la cartouche d’encre que vous remplacez pour la
déverrouiller. Puis soulevez le dessous de la cartouche d’encre pour la retirer.
Avertissement : En cas de contact de l’encre avec la peau, lavez bien avec de
l’eau et du savon. Si vous en recevez dans les yeux, rincez-les immédiatement à
grande eau. En cas d’inconfort ou de problèmes de vision après avoir rincé les yeux
à grande eau, consultez immédiatement un médecin. Gardez les cartouches
d’encre hors de portée des enfants et ne les laissez pas ingérer l’encre.
5. Replacez le bouchon d’origine sur la cartouche d’encre. Mettez la cartouche au rebut
en prenant les précautions nécessaires. Ne démontez pas la cartouche usée et ne tentez
pas de la remplir.
80 Entretien du produit
Page 81

6. Déballez la cartouche d’encre neuve.
Mise en garde : Ne touchez pas aux zones indiquées ci-dessus. Cela peut nuire à
l’impression et au fonctionnement normal.
Remarque : Ne secouez pas les cartouches après avoir ouvert l’emballage; cela
pourrait causer une fuite.
7. Retirez le bouchon de la cartouche et rangez-le dans le sac de plastique inclus pour
une utilisation ultérieure.
8. Insérez la cartouche d’encre, tête d’abord, dans le logement pour cartouches d’encre.
Puis pressez la cartouche d’encre vers le bas jusqu’à ce qu’elle s’enclenche.
Entretien du produit 81
Page 82

9. Une fois que vous avez remplacé les cartouches qui doivent être remplacées, fermez le
scanner pour commencer à charger l’encre. Le chargement va durer quelques minutes.
Le chargement de l’encre est terminé lorsqu’un message à cet effet s’affiche sur l’écran
ACL.
Mise en garde : N’éteignez jamais votre produit pendant le chargement initial
de l’encre, au risque de gaspiller de l’encre. Si vous voyez un message de
remplacement de cartouche d’encre à l’écran ACL, soulevez le scanner et appuyez
sur toutes les cartouches d’encre afin de vous assurer qu’elles sont bien installées.
Si vous imprimez sur un CD ou un DVD, n’insérez pas le plateau de CD/DVD avant
que le chargement initial de l’encre ne soit terminé.
82 Entretien du produit
Page 83

Résolution des problèmes
En cas de problème avec le produit EPSON, vérifiez les messages sur l’écran ACL pour
déterminer la cause de la plupart des problèmes qui peuvent survenir. Appuyez sur , si
nécessaire, puis appuyez sur l ou r et sélectionnez
faites défiler l’écran vers le haut ou vers le bas pour voir tous les sujets de l’aide.
Remarque : Si l’écran devient sombre, appuyez sur l’écran tactile afin que le produit
quitte le mode veille.
Vous pouvez aussi vérifier les suggestions de dépannage de base ci-dessous ou consulter le
Guide de l’utilisateur en ligne. Ou encore, accédez au dépannage interactif et à la foire aux
questions sur le site epson.ca/support (site Web présenté en anglais seulement).
Remarque : La panne ou la réparation de ce produit peut entraîner la perte de données
de télécopie et des paramètres de réseau. Epson n’est pas responsable de la copie de
sauvegarde ni de la restauration des paramètres et des données au cours ou après la
période de garantie. Nous vous recommandons de faire vos propres copies de
sauvegarde ou d’imprimer vos données de télécopie et paramètres de réseau.
Résolution des problèmes de réseau
Remarque : Pour obtenir des instructions plus détaillées concernant le réseau,
consultez le Guide de l’utilisateur en ligne.
Tentez de connecter votre ordinateur ou un autre appareil à votre routeur ou point
■
d’accès sans fil pour confirmer qu’il fonctionne correctement.
■ Redémarrez votre routeur (éteignez-le et rallumez-le), puis essayez de vous reconnecter
au routeur.
■ Imprimez une feuille d’état réseau (voir page 85). Vérifiez que les paramètres réseau
sont corrects et vérifiez la puissance du signal. S’il est faible, déplacez le produit pour
le rapprocher du routeur ou du point d’accès. Évitez de placer le produit près d’un
four à micro-ondes, d’un téléphone sans fil de 2,4 GHz ou d’objets métalliques de
grande taille, comme un classeur.
■ Si votre routeur sans fil ne diffuse pas le nom du réseau (SSID), consultez le Guide de
l’utilisateur pour obtenir des directives sur l’entrée manuelle du nom de votre réseau
sans fil.
■ Si la fonction de sécurité a été activée sur votre routeur sans fil, assurez-vous d’avoir
bien saisi correctement la clé WEP ou la phrase passe WPA.
■ Lorsque vous utilisez TCP/IP, assurez-vous que l’option DHCP du réseau est activée
(le fabricant de votre routeur pourra vous aider à cet égard).
Aide. Sélectionnez Dépannage et
Résolution des problèmes 83
Page 84

■
Retirez et réintroduisez le CD pour réinstaller les logiciels de votre produit.
■ Désactivez temporairement le pare-feu pour voir s’il ne serait pas à l’origine du
problème. Contactez le fabricant du pare-feu pour obtenir de l’aide.
Relier l’imprimante à votre réseau sans fil
Si vous ne pouvez établir une connexion à votre réseau sans fil en utilisant le CD du
produit et l’affiche Point de départ, vous pouvez utiliser l’écran de votre produit. Avant de
commencer, assurez-vous de connaître le nom du réseau (SSID) et le mot de passe.
1. Appuyez sur , au besoin, ensuite, sélectionnez
2. Sélectionnez
Assistant de configuration Wi-Fi.
3. Faites défiler vers le bas jusqu’à ce que le nom de votre réseau sans fil s’affiche, et
ensuite, sélectionnez-le. Passez à l’étape 6.
Si le nom de votre réseau ne s’affiche pas, sélectionnez
Autres réseaux. Cet écran s’affiche :
4. Saisissez le nom de votre réseau (SSID).
■ Appuyez sur les boutons de l’écran tactile à
plusieurs reprises afin de passer d’un caractère
àl’autre.
■ Si le nom du réseau comprend des lettres
majuscules (ABC) ou minuscules (abc), assurez-vous de les saisir correctement.
Config Wi-Fi sur l’écran tactile.
■ Appuyez sur ou pour déplacer le curseur.
■ Appuyez sur pour saisir des symboles.
■ Appuyez sur pour supprimer un caractère.
5. Sélectionnez
Term. lorsque vous avez terminé de saisir le nom de votre réseau.
6. Si la sécurité de votre réseau est activée, l’écran de saisie
du mot de passe s’affiche :
7. Suivez les instructions ci-dessus pour la saisie du mot
de passe. Si votre mot de passe réseau contient des
lettres majuscules ou minuscules, assurez-vous de les
saisir correctement.
8. Sélectionnez
Term. lorsque vous avez terminé de saisir
le mot de passe.
Lorsque l’imprimante est reliée à votre réseau, le témoin WiFi devrait être allumé en vert et
il devrait pas clignoter. Assurez-vous d’installer le logiciel sur chaque ordinateur à partir
duquel vous souhaitez imprimer. À l’invite, sélectionnez
mon réseau sans fil
lors de la configuration du logiciel.
L’imprimante est déjà reliée à
84 Résolution des problèmes
Page 85

Impossible de numériser sur un réseau
■ EPSON Scan n’est pas installé sous Mac OS X 10.6 ou 10.7; consultez la page 74
pour obtenir les directives concernant la numérisation et les instructions pour le
téléchargement.
■ Si vous ne pouvez pas numériser à partir de l’écran tactile du produit, assurez-vous que
vous avez redémarré votre ordinateur avant de réinstaller le logiciel de votre produit.
Assurez-vous qu’EPSON Event Manager n’est pas bloqué par un logiciel de sécurité ni
un pare-feu. Essayez de désactiver votre pare-feu.
■ Si vous numérisez un document de grande taille à haute résolution, une erreur de
communication risque de se produire. Si la numérisation a échoué, réduisez la
résolution de numérisation.
■ Si la communication réseau est interrompue pendant le lancement d’EPSON Scan,
quittez l’application, attendez quelques secondes, puis relancez-la. Si EPSON Scan ne
redémarre pas, mettez l’imprimante hors tension puis sous tension, et relancez
l’application Epson Scan. Vérifiez le paramètre
dans
Configuration EPSON Scan. Pour les détails, consultez l’aide en ligne
d’EPSON Scan.
■ Assurez-vous qu’EPSON Event Manager est configuré pour communiquer avec le
produit.
Délai maximum de configuration
Impression d’une feuille d’état réseau
1. Appuyez sur , au besoin, puis appuyez sur l ou r et sélectionnez Config.
2. Faites défiler l’écran vers le haut ou le bas et sélectionnez Paramètres Wi-Fi/Réseau.
3. Faites défiler l’écran vers le haut ou le bas et sélectionnez
4. Appuyez sur
Imprimer la feuille de statut., puis appuyez sur x.
Statut réseau Wi-Fi.
Problèmes d’impression et de copie
■ Lorsque vous chargez du papier dans les bacs papier, assurez-vous de le charger face
d’impression vers le bas (habituellement la face la plus blanche ou la plus brillante) et
sous les guide-papier. Lorsque vous chargez du papier dans la fente d’alimentation
arrière, assurez-vous de le charger face d’impression vers le haut.
■ Assurez-vous que la taille du papier et la source sélectionnées sur l’écran tactile ou
dans le logiciel d’imprimante sont correctes pour le papier que vous avez chargé.
■ Le papier de format lettre est automatiquement sélectionné pour la copie. Si votre
document de format légal est rogné, faites défiler l’écran vers le bas et sélectionnez
Réduire/Agrandir, puis sélectionnez Légal->Lettre.
Résolution des problèmes 85
Page 86

■
Lorsque vous numérisez, placez le bas de votre original dans le coin avant droit de la
vitre d’exposition. Si les bords sont rognés, éloignez-le légèrement des coins.
■ Vous ne pouvez pas imprimer, copier ou recevoir des télécopies lorsqu’une cartouche
d’encre est épuisée. Remplacez les cartouches vides avant d’imprimer.
■ Pour sélectionner l’impression recto verso sous Mac OS X, choisissez Impression
recto verso
à partir du menu contextuel. Ne sélectionnez pas Mise en page dans le
menu contextuel.
Problèmes d’alimentation du papier
■ Si le papier n’est pas alimenté correctement, retirez le papier, aérez les feuilles et
rechargez-les tel qu’indiqué à la page 51. Assurez-vous que le papier est placé sous les
guide-papier.
■ Ne chargez pas plus de feuilles de papier que le nombre recommandé. Consultez le
Guide de l’utilisateur en ligne pour plus d’informations concernant les capacités de
chargement du papier.
■ Si le papier est coincé, suivez les étapes affichées sur l’écran ACL. Au besoin, suivez les
étapes ci-dessous :
1. Retirez délicatement tout le papier coincé dans la fente d’alimentation arrière.
2. Soulevez l’unité du scanner et retirez doucement tout papier coincé à l’intérieur.
86 Résolution des problèmes
Page 87

3. Retirez les bacs papier, puis retirez tout le papier coincé à l’intérieur.
4. Retirez l’unité recto verso à l’arrière de l’imprimante et vérifiez s’il y a du papier
coincé.
5. Retirez tout papier coincé dans l’unité recto verso.
Problèmes d’alimentation dans le chargeur
automatique de documents
Si les documents ne sont pas alimentés correctement dans le chargeur automatique de
documents, assurez-vous que les coins du papier ne sont pas pliés ou recourbés.
Résolution des problèmes 87
Page 88

S’il y a un bourrage papier :
1. Soulevez le capot du chargeur automatique de documents et retirez le papier coincé.
2. Si nécessaire, soulevez le capot du scanner et retirez le cache pour documents opaques.
Puis retirez délicatement toutes les pages coincées sous le cache.
3. Ouvrez le chargeur automatique de documents et retirez le papier coincé.
Mise en garde : Ne tentez pas de retirer les pages sans d’abord ouvrir le chargeur
automatique de documents, sinon vous pourriez endommager le mécanisme.
Problèmes de télécopie
■ Assurez-vous que le télécopieur de votre destinataire est allumé et fonctionnel.
88 Résolution des problèmes
Page 89

■ Assurez-vous que le port LINE du produit est raccordé à la prise téléphonique murale.
Branchez un téléphone dans la prise téléphonique murale afin de vérifier si elle
fonctionne.
■ Imprimez un rapport de connexion de fax en utilisant le panneau de commande ou le
logiciel de télécopie afin de diagnostiquer le problème.
■ Assurez-vous que l’option Réponse automatique est activée pour recevoir des
télécopies automatiquement (voir page 71).
■ Assurez-vous que le paramètre ECM (Error Correction Mode [mode de correction
d’erreur]) est activé si vous essayez d’envoyer ou de recevoir une télécopie.
■ Si votre ligne téléphonique comprend la messagerie vocale, éteignez la fonction de
réponse automatique. Sinon, les appels ou télécopies seront reçus par erreur par votre
messagerie vocale.
■ Si le produit est branché sur une ligne téléphonique DSL, vous devez brancher un
filtre DSL dans la prise téléphonique. Communiquez avec votre fournisseur de service
DSL pour obtenir le filtre nécessaire.
■ Si vous avez branché un téléphone ou un répondeur, assurez-vous qu’il est raccordé au
port
EXT. N’utilisez pas de séparateurs de lignes téléphoniques.
■ Si un répondeur est branché, choisissez un nombre de sonneries avant réponse pour
les télécopies entrantes plus élevé que celui du répondeur.
■ Essayez de réduire le paramètre Vites. Fax.
Problèmes de qualité d’impression
■ Chargez le papier face d’impression vers le bas (habituellement plus blanche ou plus
brillante) dans les bacs papier. Chargez le papier face d’impression vers le haut dans la
fente d’alimentation arrière.
■ Assurez-vous que le papier n’est pas humide ou gondolé.
■ Pour une qualité d’impression optimale, utilisez les papiers EPSON (voir page 55) et
les cartouches d’encre EPSON d’origine (voir page 78).
■ Assurez-vous que le paramètre de type de papier à l’écran tactile ou dans le logiciel de
votre imprimante est correct pour le type de papier que vous avez chargé (voir
page 66).
■ Si vous remarquez des lignes claires ou foncées sur vos tirages ou si ces derniers sont
estompés, effectuez une vérification des buses (voir page 76) pour déterminer si la tête
d’impression doit être nettoyée.
■ Si vos tirages comportent des lignes verticales décalées, il peut être nécessaire d’aligner
la tête d’impression. Consultez le Guide de l’utilisateur en ligne pour les directives.
■ Il est possible que les cartouches d’encre soient presque vides. Vérifiez l’état des
cartouches et remplacez les cartouches, au besoin (voir page 79).
Résolution des problèmes 89
Page 90

■
Nettoyez la vitre d’exposition du scanner avec un chiffon non pelucheux sec et doux
(les serviettes de papier ne sont pas conseillées) ou utilisez une petite quantité de
nettoyant à vitre sur un chiffon doux, au besoin. Ne vaporisez pas de nettoyant à vitre
directement sur la vitre d’exposition.
Comment obtenir de l’aide
Soutien Internet
Visitez le site Web www.epson.ca et cliquez sur Français. Pour télécharger les pilotes,
cliquez sur Pilotes et soutien. Pour contacter Epson par courriel, veuillez cliquer sur
Soutien par courriel. Ensuite, suivez les instructions à l’écran.
Pour parler à un représentant du soutien technique
Avant de communiquer avec Epson, ayez ces renseignements à portée de main :
■ Nom du produit (XP-850)
■ Numéro de série du produit (situé à l’arrière du produit et sous le scanner)
■ Preuve d’achat (telle qu’un reçu de magasin) et date d’achat
■ Description du problème et la configuration de l’ordinateur
Puis composez le : (905) 709-3839, de 6 h à 20 h, heure du Pacifique, du lundi au
vendredi, et de 7 h à 16 h, heure du Pacifique, le samedi.
Les jours et heures de soutien peuvent être modifiés sans préavis. Des frais d’interurbain
peuvent s’appliquer.
Achat de fournitures et d’accessoires
Vous pouvez vous procurer des cartouches d’encre et du papier EPSON d’origine auprès
d’EPSON Supplies Central à l’adresse www.epson.ca. Vous pouvez également acheter des
fournitures chez un revendeur autorisé de produits EPSON. Pour les coordonnées du
revendeur le plus proche, composez 1 800 463-7766.
Soutien technique pour les autres logiciels
ABBYY FineReader
Téléphone : 1 (408) 457-9777
www.abbyy.com
support@abbyyusa.com
90 Résolution des problèmes
Page 91

Avis
Consignes de sécurité importantes
Avant d’utiliser votre produit EPSON, lisez et suivez les consignes de sécurité ci-après :
■ Observez les directives et les avertissements indiqués sur le produit.
■ N’utilisez que le type de source d’alimentation indiqué sur le produit.
■ N’utilisez que le cordon d’alimentation livré avec le produit. L’utilisation d’un autre cordon
peut occasionner un incendie ou provoquer une décharge électrique. N’utilisez pas le cordon
avec d’autres équipements. Assurez-vous que le cordon d’alimentation respecte toutes les
normes de sécurité locales en vigueur.
■ Le cordon d’alimentation de l’imprimante est conçu uniquement pour ce produit. L’utilisation
sur un autre appareil peut provoquer un incendie ou causer des chocs électriques.
■ Placez le produit près d’une prise murale où la fiche peut être débranchée facilement.
■ Si vous ne comptez pas utiliser le produit pendant une période prolongée, débranchez le cordon
d’alimentation de la prise de courant.
■ Éteignez toujours le produit au moyen du bouton P d’alimentation et attendez que le témoin
P d’alimentation cesse de clignoter avant de débrancher le produit ou d’interrompre le courant
de la prise murale.
■ Évitez de brancher l’imprimante dans une prise qui se trouve sur le même circuit qu’un
photocopieur ou un système de climatisation qui s’allume et s’éteint à intervalles réguliers ou
une prise commandée par un interrupteur mural ou une minuterie.
■ N’utilisez pas un cordon d’alimentation endommagé ou effiloché. Placez-le de manière à éviter
l’usure, les coupures, les ondulations, l’effilochage et les torsions. Ne placez aucun objet sur le
cordon d’alimentation et placez ce dernier de façon à éviter que l’on passe ou marche dessus.
Prenez soin de placer le cordon afin qu’il soit droit à chaque extrémité. En cas de dommage à la
fiche, remplacez le cordon d’alimentation ou consultez un électricien qualifié. Le cas échéant,
remplacez les fusibles uniquement par des fusibles de taille et de capacité identiques.
■ Si vous utilisez une rallonge avec le produit, assurez-vous que l’intensité nominale totale de tous
les dispositifs branchés sur la rallonge ne dépasse pas la capacité nominale de cette dernière.
Assurez-vous également que l’intensité nominale totale de tous les dispositifs branchés dans la
prise murale ne dépasse pas la capacité nominale de cette dernière.
■ Quand vous raccordez l’appareil à un ordinateur ou autre dispositif à l’aide d’un câble, assurez-
vous que les connecteurs sont orientés correctement. Les connecteurs ne disposent que d’une
seule orientation correcte. L’insertion du connecteur dans le mauvais sens peut endommager les
deux dispositifs reliés par le câble.
■ Placez le produit sur une surface plane, stable et plus grande que sa base. Le produit ne
fonctionnera pas correctement s’il est incliné.
Avis 91
Page 92

■ Évitez les emplacements soumis à des changements rapides de température ou d’humidité, aux
chocs, aux vibrations ou à la poussière. Ne placez pas le produit près d’un radiateur, d’un évent
de chauffage ou dans un endroit exposé à la lumière directe du soleil. Évitez de placer ou de
ranger l’appareil à l’extérieur.
■ Éloignez le produit des sources éventuelles d’interférence électromagnétique, comme les
haut-parleurs ou les socles de téléphones sans fil.
■ Laissez suffisamment d’espace derrière le produit pour les câbles ainsi qu’au-dessus du produit
afin de pouvoir lever complètement le capot de l’appareil.
■ Laissez suffisamment d’espace à l’avant du produit pour permettre la sortie complète du papier.
■ Prévoyez suffisamment d’espace autour du produit pour assurer une ventilation adéquate.
Prévoyez un espace d’environ 10 cm (4 po) entre le dos du produit et le mur.
■ Ne bloquez pas ou ne recouvrez pas les ouvertures du boîtier du produit; n’insérez pas d’objets
dans les fentes.
■ N’utilisez pas de produits aérosol contenant des gaz inflammables à l’intérieur ou autour du
produit. Cela risque de causer un incendie.
■ N’appuyez pas avec force sur la vitre d’exposition en plaçant les originaux.
■ Ne soulevez pas le scanneur de l’appareil pendant la télécopie, la copie, l’impression ou la
numérisation.
■ Faites attention pour ne pas coincer vos doigts lorsque vous rabattez le capot du scanner ou le
scanner.
■ Ne touchez pas le câble blanc plat qui se trouve à l’intérieur du produit.
■ Ne déversez pas de liquide sur le produit. N’utilisez pas le produit à proximité d’eau. N’utilisez
pas le produit lorsque vos mains sont mouillées.
■ Débranchez le produit et consultez un technicien agréé dans les cas suivants : si la fiche ou le
cordon d’alimentation est endommagé; si une substance liquide s’est infiltrée dans le produit; si
le produit est tombé ou son boîtier a été endommagé; si le produit ne fonctionne pas
correctement ou son rendement est en baisse.
■ Ne réglez que les commandes dont il est question dans les directives de fonctionnement. Sauf
lorsqu’indiqué spécifiquement dans votre documentation, ne tentez pas de réparer vous-même
le produit.
■ Ne jamais désassembler, modifier ou tenter de réparer vous-même le produit, sauf
lorsqu’indiqué spécifiquement dans votre documentation. Ne réglez que les commandes dont il
est question dans les directives de fonctionnement.
■ Pendant le stockage ou le transport du produit, ne le penchez pas, ne le placez pas sur ses côtés
et ne le tournez pas à l’envers, car les cartouches d’encre risquent de fuir.
■ Gardez toujours le présent guide à portée de main.
Consignes de sécurité concernant l’écran tactile
■ Appuyez délicatement sur l’écran tactile avec le doigt. N’appuyez pas trop fort ou avec l’ongle.
92 Avis
Page 93

■ L’écran ACL pourrait contenir quelques taches lumineuses ou foncées ou pourrait présenter
une luminosité inégale. Cela est normal et n’indique pas que l’écran tactile est endommagé de
quelque façon.
■ Utilisez seulement un chiffon sec et doux pour nettoyer l’écran tactile. N’utilisez pas de
produits de nettoyage liquides ou chimiques.
■ Ne touchez pas l’écran tactile avec des objets comme un stylo à bille, crayon, etc.
■ Ne touchez pas l’écran avec des mains humides ou gantées ou à travers la feuille protectrice ou
l’étiquette; il pourrait ne pas fonctionner.
■ Ne placez pas d’objets lourds sur l’écran tactile. Contactez Epson si le panneau s’est fissuré ou
s’est écaillé; ne tentez pas de retirer les pièces brisées.
■ N’installez pas votre produit dans des zones sujettes à des changements soudains de température
ou d’humidité. La condensation à l’intérieur de l’écran peut causer une dégradation des
performances.
■ Si l’écran tactile est endommagé, communiquez avec Epson. Si la solution à cristaux liquides
entre en contact avec vos mains, lavez-les soigneusement avec du savon et de l’eau. Si vous
recevez de la solution à cristaux liquides dans vos yeux, rincez-les immédiatement avec de l’eau.
En cas d’inconfort ou de problèmes de vision après avoir rincé les yeux à grande eau, consultez
immédiatement un médecin.
Consignes de sécurité de la carte mémoire
■ Utilisez uniquement des cartes mémoire compatibles (voir le Guide de l’utilisateur pour une liste
détaillée).
■ Ne retirez pas la carte mémoire et n’éteignez pas le produit pendant que le témoin de carte
mémoire clignote.
Consignes de sécurité concernant les réseaux
sans fil
■ N’utilisez pas le produit dans des installations médicales ou à proximité d’équipements
médicaux. Les ondes radio émises par le produit peuvent nuire au fonctionnement des
équipements médicaux.
■ N’utilisez pas le produit à proximité des dispositifs commandés automatiquement comme les
portes automatiques et les alarmes d’incendie. Les ondes radio émises par le produit peuvent
nuire à leur fonctionnement.
■ Pour éviter de dégrader le fonctionnement de l’équipement suivant et de provoquer un
accident, n’utilisez pas ce produit : près d’appareillage médical dans un centre médical; à 8,7 po
(22 cm) d’un stimulateur cardiaque; à proximité des dispositifs commandés automatiquement
comme les portes automatiques et les alarmes d’incendie.
Avis 93
Page 94

Consignes de sécurité concernant les cartouches
d’encre
■ Gardez les cartouches d’encre hors de portée des enfants et ne les laissez pas ingérer l’encre.
■ Redoublez de vigilance lorsque vous manipulez des cartouches d’encre usées; il pourrait y avoir
de l’encre autour du port de distribution d’encre. En cas de contact de l’encre avec la peau, lavez
bien avec de l’eau et du savon. Si vous en recevez dans les yeux, rincez-les immédiatement à
grande eau. En cas d’inconfort ou de problèmes de vision après avoir rincé les yeux à grande
eau, consultez immédiatement un médecin. Si vous avez de l’encre dans la bouche, crachez-la et
voyez un médecin immédiatement.
■ N’introduisez pas vos mains à l’intérieur du produit et ne touchez pas aux cartouches d’encre
pendant l’impression.
■ Pour éviter d’endommager le produit, ne déplacez jamais manuellement la tête d’impression.
■ Ne touchez pas la puce à circuit intégré verte située sur le côté de la cartouche. Cela peut nuire
au fonctionnement normal.
■ Avant de transporter le produit, assurez-vous que la tête d’impression est bien immobilisée à
droite et que les cartouches d’encre sont installées.
■ Installez une cartouche d’encre neuve dès que vous avez retiré une cartouche épuisée. Si vous
négligez de remplacer des cartouches d’encre, cela risque d’assécher la tête d’impression et
d’empêcher le produit d’imprimer.
■ Ne démontez pas une cartouche d’encre. Cela risque d’endommager la tête d’impression.
■ N’utilisez pas une cartouche d’encre dont la date indiquée sur l’emballage est expirée.
■ Si vous retirez une cartouche d’encre en vue d’une utilisation ou d’une élimination ultérieure,
assurez-vous de remettre le bouchon sur le port de distribution d’encre pour éviter que l’encre
ne sèche ou que les surfaces en contact avec la cartouche ne soient tachées d’encre.
■ Rangez les cartouches d’encre dans un endroit frais et sec.
■ Après avoir sorti une cartouche d’encre d’un site d’entreposage froid, laissez-la se réchauffer à la
température ambiante pendant au moins trois heures avant de l’utiliser.
■ Bien que les cartouches d’encre peuvent contenir des matériaux recyclés, cela n'affecte en rien le
fonctionnement ou la performance du produit.
Consignes de sécurité concernant l’équipement
téléphonique
Lorsque vous utilisez de l’équipement téléphonique, vous devez prendre des précautions de base pour
réduire le risque d’incendie, d’électrocution et de blessures, notamment :
■ Évitez d’utiliser un téléphone pendant un orage. La foudre peut poser un faible risque
d’électrocution.
94 Avis
Page 95

■ N’utilisez pas le téléphone pour signaler une fuite de gaz dans les environs de la fuite.
Mise en garde : Pour réduire le risque d’incendie, n’utilisez qu’un cordon de
télécommunication de calibre 26 AWG ou supérieur.
Déclaration de conformité
Selon la norme 47CFR, parties 2 et 15 régissant : les ordinateurs personnels et périphériques de classe
B, et/ou les unités centrales et les dispositifs d’alimentation électrique utilisés avec les ordinateurs
personnels de classe B :
Nous : Epson America, Inc.
Situés à : MS 3-13
3840 Kilroy Airport Way
Long Beach, CA 90806, É.-U.
Téléphone : 1 (562) 290-5254
Déclarons sous notre seule et unique responsabilité que le produit identifié dans la présente est
conforme à la norme 47CFR, parties 2 et 15, des règles FCC régissant les dispositifs numériques de
classe B. Chaque produit commercialisé est identique à l’appareil représentatif testé et jugé conforme
aux normes. Les dossiers indiquent que l’équipement produit se situe dans les limites acceptables, du
fait de la production en quantité et des essais statistiques réalisés, conformément au règlement
47CFR, alinéa 2.909. L’utilisation de l’appareil doit s’effectuer selon deux conditions : 1) cet appareil
ne doit pas provoquer d’interférences néfastes, et 2) cet appareil doit tolérer les interférences reçues, y
compris celles qui risquent de provoquer un fonctionnement indésirable.
Nom commercial : EPSON
Type de produit : Imprimante multifonction
Modèle : C492A
Déclaration de conformité FCC
Pour les utilisateurs des États-Unis
Le présent matériel est conforme à la partie 68 de la réglementation FCC ainsi qu’aux exigences
adoptées par l’Administrative Council for Terminal Attachments (ACTA). Une étiquette apposée sur
la surface de cet appareil contient, entre autres, l’identificateur du produit dans le format américain
suivant : AAAEQ##TXXXX. Sur demande, ce code doit être fourni à la compagnie de téléphone.
Certification Universal Service Order Codes (« USOC ») applicable de la prise du produit : RJ11C.
La fiche et la prise utilisées pour connecter le matériel au câblage de l’installation et au réseau
téléphonique doivent être conformes aux règlements et exigences applicables de la partie 68 de la
FCC adoptés par l’ACTA. Un cordon téléphonique conforme doté d’une fiche modulaire est fourni
avec le produit. Il est conçu pour être connecté à une prise modulaire compatible également
conforme. Voyez les directives d’installation pour les détails.
Avis 95
Page 96

L’indice IES sert à déterminer le nombre d’appareils pouvant être connectés à votre ligne
téléphonique. Si l’indice IES sur une ligne téléphonique est trop élevé, les appareils risquent de ne
pas sonner lors d’un appel entrant. Dans la plupart des régions, la somme des indices IES ne doit pas
dépasser cinq (5,0). Pour vous assurer du nombre d’appareils que vous pouvez connecter à une ligne,
tel que déterminé par la somme des indices IES, communiquez avec votre compagnie de téléphone
locale. Pour les produits approuvés après le 23 juillet 2001, l’IES est intégré à l’identificateur du
produit ayant le format américain : AAAEQ##TXXXX. Les chiffres ## correspondent à l’IES sans
virgule décimale (c.-à-d. que 03 correspond à l’indice 0,3). Pour les produits plus anciens, l’indice
d’équivalence de la sonnerie est indiqué sur l’étiquette.
Si ce matériel nuit au bon fonctionnement du réseau téléphonique, la compagnie de téléphone vous
informera à l’avance qu’une interruption temporaire du service pourrait être nécessaire. Si elle ne
peut pas vous envoyer de préavis, la compagnie de téléphone vous avisera dès que possible. Vous serez
également avisé de votre droit de porter plainte auprès de la FCC si vous le croyez nécessaire.
La compagnie de téléphone peut apporter des changements à ses installations, équipements, modes
d’exploitation ou procédures, lesquels changements pourraient avoir une incidence sur le
fonctionnement du matériel. Le cas échéant, la compagnie de téléphone vous informera à l’avance
pour vous donner la possibilité d’apporter les changements nécessaires afin d’éviter une interruption
du service.
Si vous éprouvez des problèmes avec ce produit et que vous avez besoin de communiquer avec le
soutien technique ou le service à la clientèle, veuillez visiter le site www.epson.com pour plus
d’informations. Ce produit n’est pas conçu pour être réparé par le client. Si vous ne parvenez pas à
connecter ce produit à une ligne téléphonique, veuillez contacter :
Nom : Epson America, Inc.
Adresse : 3840 Kilroy Airport Way, Long Beach, CA 90806, É.-U.
Téléphone : 1 (562) 981-3840
Si ce matériel nuit au bon fonctionnement du réseau téléphonique, la compagnie de téléphone
pourrait vous demander de déconnecter ce matériel jusqu’à ce que le problème soit résolu.
Ce matériel ne doit pas être utilisé sur une ligne d’appel à encaissement fournie par la compagnie de
téléphone. La connexion aux services de ligne commune est sujette aux tarifs en vigueur dans votre
région. Contactez la Commission des services publics de votre région, la Commission de la fonction
publique ou la commission des corporations pour obtenir de l’information.
Si vous possédez de l’équipement d’alarme câblé spécial connecté au réseau téléphonique, assurezvous que l’installation du présent modèle ne désactive pas l’équipement d’alarme. Si vous avez des
questions concernant les appareils pouvant désactiver votre dispositif d’alarme, communiquez avec
votre compagnie de téléphone locale ou un installateur qualifié.
La Loi sur la protection des consommateurs de services téléphoniques (Telephone Consumer
Protection Act) de 1991 rend illégal pour toute personne d’utiliser un ordinateur ou tout autre
dispositif électronique, y compris un télécopieur, pour envoyer un message à moins que ce message
stipule clairement, dans la partie supérieure ou inférieure de chaque page transmise ou de la première
page, la date et l’heure de l’envoi du message ainsi que l’identité de l’expéditeur commercial ou autre
entité, ou de tout individu envoyant le message, ainsi que le numéro de téléphone de l’appareil
expéditeur, de l’entreprise ou de toute autre entité ou tout autre individu. (Le numéro de téléphone
96 Avis
Page 97

indiqué ne peut pas être un numéro 900 ou tout autre numéro pour lequel des coûts excédants les
frais d’acheminement local ou longue distance sont appliqués.)
Afin de programmer ces renseignements dans votre télécopieur, suivez les directives de la section
« Entrée des renseignements d’en-tête » à la page 68.
Selon les consignes de sécurité en électricité de la FCC, nous recommandons d’installer un
suppresseur de transitoires CA dans la prise CA dans laquelle l’équipement sera connecté. Les
compagnies de téléphone signalent que les surtensions, habituellement causées par la foudre,
s’avèrent très destructives pour l’équipement terminal de client connecté aux sources d’alimentation
CA, et que cela représente un problème important à l’échelle nationale.
À l’issue des tests dont il a fait l’objet, cet appareil a été déclaré conforme aux normes des appareils
numériques de classe B, conformément à la partie 15 de la réglementation FCC. Ces normes sont
destinées à assurer un niveau de protection adéquat contre les interférences néfastes dans les
installations résidentielles. Cet appareil produit, utilise et peut émettre des fréquences
radioélectriques et, s’il n’est pas installé ou utilisé conformément aux directives, peut brouiller les
ondes radio ou télévisuelles. Toutefois, il est impossible de garantir qu’aucune interférence ne se
produira dans une installation particulière. Si cet équipement brouille la réception des ondes radio et
télévisuelles, ce que vous pouvez déterminer en éteignant et en rallumant l’équipement, nous vous
encourageons à prendre l’une ou plusieurs des mesures correctives suivantes :
■ Réorientez ou déplacez l’antenne.
■ Éloignez l’appareil du récepteur.
■ Branchez l’appareil à une autre prise ou sur un autre circuit que celui du récepteur.
■ Demandez conseil au revendeur de l’appareil ou à un technicien radio/télévision expérimenté.
AVERTISSEMENT
Le branchement d’un câble d’interface non blindé à ce matériel entraînera l’annulation de
l’homologation FCC de cet appareil et risque de causer des interférences dépassant les limites établies
par la FCC pour ce matériel. Il incombe à l’utilisateur de se procurer et d’utiliser un câble d’interface
blindé avec cet appareil. Si le matériel est doté de plusieurs connecteurs d’interface, évitez de
connecter des câbles à des interfaces inutilisées. Toute modification non expressément autorisée par le
fabricant peut annuler la permission d’utilisation du matériel.
Pour les utilisateurs du Canada
1. Le présent matériel est conforme aux spécifications techniques applicables d’Industrie Canada.
2. L’indice d’équivalence de la sonnerie (IES) sert à indiquer le nombre maximal de terminaux qui
peuvent être raccordés à une interface téléphonique. La terminaison d’une interface peut consister en
une combinaison quelconque de dispositifs, à la seule condition que la somme d’indices
d’équivalence de la sonnerie de tous les dispositifs n’excède pas 5.
Cet appareil numérique de la classe B est conforme à la norme NMB-003 du Canada.
Avis 97
Page 98

Garantie limitée Epson America, Inc.
Éléments couverts par la garantie : Epson America, Inc. (« Epson ») garantit à l’acheteur d’origine au
détail que l’imprimante EPSON couverte par la présente garantie limitée, si elle est achetée et utilisée
au Canada, aux États-Unis et à Porto Rico sera exempte de défaut de fabrication et de vice matériel
durant une période d’un (1) an à compter de la date d’achat. Pour toute intervention au titre de la
garantie, vous devez fournir une preuve de la date d’achat d’origine.
Intervention d’Epson pour remédier aux problèmes : Si, durant la période de garantie, l’imprimante
EPSON s’avère défectueuse, veuillez communiquer avec EPSON Connection
(Canada) ou (562) 276-4382 (É.-U.) pour obtenir des directives concernant les réparations sous
garantie et une autorisation de retour de la marchandise. Un technicien Epson réalisera un diagnostic
téléphonique pour déterminer si le produit a besoin d’être réparé. Si le produit a besoin d’être réparé,
Epson peut, selon son choix, le remplacer ou le réparer, sans frais de pièces ni de main-d’œuvre. Si
Epson autorise le remplacement du produit défectueux, on vous enverra un produit de
remplacement, en port payé si vous avez une adresse au Canada, aux États-Unis ou à Porto Rico. Les
livraisons vers d’autres destinations s’effectueront en port payable à l’arrivée. Il vous incombe
d’emballer correctement le produit défectueux et de le retourner à Epson dans un délai de cinq (5)
jours ouvrables après avoir reçu le produit de remplacement. Epson vous demandera un numéro de
carte de crédit ou de débit pour couvrir le coût du produit de remplacement au cas où vous ne
retourneriez pas le produit défectueux. Pour une réparation du produit, Epson vous demandera de
lui envoyer ce dernier directement ou à son centre de service autorisé qui réparera le produit et vous
le renverra. Vous avez la responsabilité d’emballer le produit et devez défrayer les coûts d’expédition
vers et depuis le centre de service autorisé EPSON. Lorsqu’une intervention au titre de la garantie
nécessite l’échange du produit ou d’une pièce, l’élément remplacé devient propriété d’Epson.
L’imprimante ou la pièce de remplacement pourra être neuve ou remise à neuf selon les normes de
qualité d’EPSON et, au choix d’Epson, pourra être un autre modèle de même type et qualité. Les
produits et pièces remplacés sont couverts pour la période de garantie restante du produit d’origine
couvert par la présente garantie limitée.
Éléments non couverts par la garantie : Cette garantie ne s’applique qu’au Canada, aux États-Unis et
à Porto Rico et dans le contexte d’une utilisation normale. L’utilisation de ce produit à des fins de
production continue ou à d’autres fins semblables n’est pas considérée une utilisation normale; tout
dommage, entretien ou besoin de réparations découlant d’une telle utilisation n’est pas couvert par la
présente garantie. Cette garantie n’est pas transférable. Cette garantie ne couvre pas la décoloration,
le jaunissement des tirages ni le remboursement des matériaux ou services nécessaires pour les travaux
de réimpression. Elle ne s’applique pas aux dommages subis par le produit EPSON du fait de
l’utilisation de pièces ou fournitures qui ne sont pas fabriquées, distribuées ni homologuées par
Epson. Sont notamment exclus de la garantie : les rubans, cartouches d’encre et pièces, composants
ou périphériques fabriqués par des tiers et ajoutés au produit EPSON après son expédition par
Epson, par exemple des cartes ou composants ajoutés par l’utilisateur ou le revendeur. Epson ne sera
pas tenue d’effectuer d’intervention au titre de la garantie lorsque l’étiquette ou le logo Epson, le
numéro de série ou la plaque signalétique ont été enlevés du produit; si le produit n’est pas
correctement entretenu ou ne fonctionne pas correctement du fait d’une utilisation inadéquate ou
abusive, d’une installation incorrecte, d’une négligence, d’avaries lors du transport, de dommages
causés par des désastres tels un incendie, une inondation ou la foudre, d’une surtension électrique, de
MS
au (905) 709-3839
98 Avis
Page 99

problèmes logiciels, d’une interaction avec des produits d’une autre marque qu’EPSON ou d’une
intervention effectuée par un tiers autre qu’un réparateur EPSON agréé. Si une anomalie signalée ne
peut être décelée ni reproduite, les frais engagés seront à votre charge.
CE QUI PRÉCÈDE CONSTITUE LA SEULE GARANTIE ET EXCLUT TOUTE AUTRE
GARANTIE, EXPRESSE OU IMPLICITE, Y COMPRIS, MAIS SANS S’Y LIMITER, TOUTE
GARANTIE IMPLICITE DE QUALITÉ MARCHANDE, DE NON-VIOLATION OU
D’APTITUDE À UNE FIN PARTICULIÈRE. CERTAINES LOIS N’AUTORISENT PAS
L’EXCLUSION DES GARANTIES IMPLICITES. SI CES LOIS S’APPLIQUENT, TOUTES LES
GARANTIES EXPRESSES OU IMPLICITES SONT LIMITÉES À LA PÉRIODE DE
GARANTIE DÉFINIE CI-DESSUS. SAUF DISPOSITIONS CONTRAIRES, TOUTE
DÉCLARATION OU GARANTIE FAITE PAR UNE AUTRE PERSONNE OU SOCIÉTÉ EST
NULLE. NI EPSON NI SES FILIALES NE POURRONT ÊTRE TENUES RESPONSABLES
EN CAS DE PERTE, DÉRANGEMENT OU DOMMAGES, Y COMPRIS LES DOMMAGES
DIRECTS, SPÉCIAUX, ACCESSOIRES OU INDIRECTS DÉCOULANT DE L’UTILISATION
OU DE L’IMPOSSIBILITÉ D’UTILISATION DU PRODUIT EPSON, QUE CE SOIT À LA
SUITE DU NON-RESPECT DE LA GARANTIE OU D’UNE AUTRE THÉORIE
JURIDIQUE. EN AUCUN CAS EPSON NI SES FILIALES NE POURRONT ÊTRE TENUES
RESPONSABLES DE DOMMAGES D’AUCUNE SORTE AU-DELÀ DU PRIX D’ACHAT
D’ORIGINE AU DÉTAIL DU PRODUIT.
Au Canada, les garanties englobent les garanties et les conditions.
Certains pays n’autorisant pas les limitations relatives à la durée d’une garantie implicite, et d’autres
n’autorisant pas l’exclusion ni la limitation des dommages accessoires ou indirects, il est possible que
les limitations et exclusions susmentionnées ne s’appliquent pas à l’acheteur. Cette garantie vous
confère des droits spéciaux et ces droits sont susceptibles de varier d’un territoire à l’autre.
Pour obtenir les coordonnées du revendeur EPSON le plus près de vous, visitez notre site Web à
l’adresse : http://www.epson.com.
Pour obtenir les coordonnées du centre de service après-vente EPSON le plus près de votre domicile,
visitez http://www.epson.ca/support.
Ou encore, écrivez-nous à l’adresse : Epson America, Inc., P.O. Box 93012, Long Beach, CA
90809-3012, É.-U.
Avis sur les droits d’auteur
Tous droits réservés. Il est interdit de reproduire, de conserver dans un système central ou de
transmettre le contenu de cette publication sous quelque forme et par quelque moyen que ce soit –
reproduction électronique ou mécanique, copie, enregistrement ou autre – sans la permission écrite
préalable de Seiko Epson Corporation. Les renseignements contenus dans le présent guide
concernent uniquement ce produit Epson. Epson ne peut être tenue responsable de l’utilisation de
ces renseignements pour faire fonctionner d’autres équipements.
Avis 99
Page 100

Ni Seiko Epson Corporation ni ses filiales ne sauraient être tenues responsables vis-à-vis de l’acheteur
X
X
de ce produit, ou de tiers, des dommages, pertes, frais ou dépenses découlant : d’un accident ou
d’une mauvaise utilisation de ce produit ou de modifications, réparations ou altérations non
autorisées de ce produit ou (sauf pour les États-Unis) du non-respect des directives de
fonctionnement et d’entretien fournies par Seiko Epson Corporation.
Seiko Epson Corporation décline toute responsabilité en cas de dommages ou de problèmes
découlant de l’utilisation d’options ou de produits consommables autres que les produits désignés
comme produits Epson d’origine ou comme produits approuvés pour Epson par Seiko Epson
Corporation.
Outre les droits de propriété intellectuelle que détient Seiko Epson Corporation relativement aux
logiciels, ce produit comprend également des logiciels libres. Veuillez consulter le document OSS.pdf
sur le CD-ROM des logiciels de l’imprimante pour obtenir la liste des logiciels libres et les conditions
d’utilisation des logiciels telles qu’elles s’appliquent à cette imprimante.
Utilisation responsable du matériel protégé par les
lois sur les droits d’auteur
Epson encourage les utilisateurs à faire preuve de responsabilité et à respecter les lois sur les droits
d’auteur lors de l’utilisation d’un produit Epson. Dans certains pays, la loi permet une reproduction
ou réutilisation limitée de matériel protégé dans certaines circonstances, mais ces dernières sont
parfois moins étendues que le croient certaines personnes. Pour toute question relative aux droits
d’auteur, communiquez avec votre conseiller juridique.
Marques de commerce
EPSON et Supplies Central sont des marques déposées, EPSON Connect est un marque de
commerce et EPSON Exceed Your Vision est un logotype déposé de Seiko Epson Corporation.
EPSON Connection est une marque de service et Small-in-One est une marque de commerce
d’Epson America, Inc.
Avis général : Les autres noms de produit figurant dans le présent document ne sont cités qu’à titre
d’identification et peuvent être des marques de commerce de leurs propriétaires respectifs. Epson
renonce à tous les droits associés à ces marques.
L’information contenue dans le présent document peut être modifiée sans préavis.
© 2012 Epson America, Inc. 7/12
CCPD-37260
Printed in XXXXX
Pays d’impression : XXXXX
 Loading...