

Page 1

WF-M1030 User's Guide
Page 2

Page 3

Contents
WF-M1030 User's Guide.............................................................................................................................. 7
Product Basics ............................................................................................................................................ 8
Loading Paper ........................................................................................................................................... 14
Printing From a Computer ........................................................................................................................ 22
Printer Parts Locations ......................................................................................................................... 8
Printer Parts - Top ........................................................................................................................... 8
Printer Parts - Back.......................................................................................................................... 9
Printer Parts - Inside...................................................................................................................... 10
Printer Parts - Control Panel Buttons and Lights ........................................................................... 10
The Power Off and Sleep Timers ....................................................................................................... 11
Changing the Power Off and Sleep Timer Settings - Windows...................................................... 11
Changing the Power Off and Sleep Timer Settings - Mac OS X .................................................... 12
Loading Paper for Documents ........................................................................................................... 14
Loading Envelopes ............................................................................................................................ 16
Paper Loading Capacity ..................................................................................................................... 18
Available EPSON Papers................................................................................................................... 19
Paper or Media Type Settings ............................................................................................................ 20
Printing with Windows ........................................................................................................................ 22
Selecting Basic Print Settings - Windows ...................................................................................... 22
Print Quality Options - Windows ............................................................................................... 24
Multi-Page Printing Options - Windows..................................................................................... 25
Selecting Double-sided Printing Settings - Windows ..................................................................... 25
Double-sided Printing Options - Windows................................................................................. 27
Selecting Additional Layout and Print Options - Windows ............................................................. 27
Custom Tone Correction Options - Windows ............................................................................ 29
Image Options and Additional Settings - Windows.................................................................... 30
Header/Footer Settings - Windows ........................................................................................... 30
Selecting a Printing Preset - Windows........................................................................................... 31
Printing Your Document - Windows............................................................................................... 32
Selecting Default Print Settings - Windows.................................................................................... 33
3
Page 4

Changing the Language of the Printer Software Screens ......................................................... 34
Changing Automatic Update Options ............................................................................................ 35
Printing with Mac OS X....................................................................................................................... 36
Selecting Basic Print Settings - Mac OS X .................................................................................... 37
Print Quality Options - Mac OS X.............................................................................................. 40
Selecting Page Setup Settings - Mac OS X ................................................................................... 40
Selecting Print Layout Options - Mac OS X ................................................................................... 41
Selecting Printing Preferences - Mac OS X ................................................................................... 42
Printing Preferences - Mac OS X .............................................................................................. 42
Printing Your Document - Mac OS X ............................................................................................. 43
Checking Print Status - Mac OS X ............................................................................................ 44
Cancelling Printing Using a Product Button........................................................................................ 44
Replacing the Ink Cartridge...................................................................................................................... 45
Check Cartridge Status ...................................................................................................................... 45
Checking Cartridge Status Lights .................................................................................................. 45
Checking Cartridge Status with Windows...................................................................................... 46
Checking Cartridge Status with Mac OS X .................................................................................... 48
Purchase Epson Ink Cartridges.......................................................................................................... 49
Ink Cartridge Part Numbers ........................................................................................................... 49
Removing and Installing the Ink Cartridge.......................................................................................... 50
Replacing the Ink Cartridge Using a Computer Utility......................................................................... 54
Adjusting Print Quality.............................................................................................................................. 56
Print Head Maintenance..................................................................................................................... 56
Print Head Nozzle Check............................................................................................................... 56
Checking the Nozzles Using the Product Buttons..................................................................... 56
Checking the Nozzles Using a Computer Utility........................................................................ 58
Print Head Cleaning ...................................................................................................................... 61
Cleaning the Print Head Using the Product Buttons.................................................................. 61
Cleaning the Print Head Using a Computer Utility..................................................................... 62
Print Head Alignment..................................................................................................................... 65
Aligning the Print Head Using a Computer Utility ...................................................................... 65
Cleaning the Paper Guide .................................................................................................................. 67
4
Page 5

Cleaning and Transporting the Product .................................................................................................. 68
Cleaning the Product.......................................................................................................................... 68
Transporting the Product.................................................................................................................... 68
Solving Problems ...................................................................................................................................... 71
Checking for Software Updates.......................................................................................................... 71
Product Light Status ........................................................................................................................... 71
Running a Product Check .................................................................................................................. 73
Solving Setup Problems ..................................................................................................................... 75
Noise After Ink Installation ............................................................................................................. 75
Software Installation Problems ...................................................................................................... 75
Solving Network Problems ................................................................................................................. 76
Product Cannot Connect to a Wireless Router or Access Point .................................................... 76
Network Software Cannot Find Product on a Network................................................................... 77
Product Does Not Appear in Mac OS X Printer Window................................................................ 78
Cannot Print Over a Network......................................................................................................... 78
Printing a Network Status Sheet.................................................................................................... 79
Solving Paper Problems..................................................................................................................... 79
Paper Feeding Problems............................................................................................................... 79
Paper Jam Problems ..................................................................................................................... 80
Paper Ejection Problems ............................................................................................................... 81
Solving Problems Printing from a Computer....................................................................................... 82
Nothing Prints................................................................................................................................ 82
Noise Occurs, But Nothing Prints .................................................................................................. 83
Noise When Product Sits for a While............................................................................................. 83
Product Icon Does Not Appear in Windows Taskbar ..................................................................... 83
Error After Cartridge Replacement ................................................................................................ 84
Printing is Slow .............................................................................................................................. 84
Solving Page Layout and Content Problems...................................................................................... 85
Inverted Image............................................................................................................................... 86
Too Many Copies Print .................................................................................................................. 86
Blank Pages Print .......................................................................................................................... 86
Incorrect Margins on Printout......................................................................................................... 87
Incorrect Characters Print.............................................................................................................. 87
5
Page 6

Incorrect Image Size or Position.................................................................................................... 88
Slanted Printout............................................................................................................................. 88
Solving Print Quality Problems........................................................................................................... 89
White or Dark Lines in Printout ...................................................................................................... 89
Blurry or Smeared Printout ............................................................................................................ 90
Faint Printout or Printout Has Gaps ............................................................................................... 91
Grainy Printout............................................................................................................................... 92
When to Uninstall Your Product Software .......................................................................................... 93
Uninstalling Printing Software - Windows ...................................................................................... 93
Uninstalling Product Software - Mac OS X .................................................................................... 94
Where to Get Help.............................................................................................................................. 94
Technical Specifications .......................................................................................................................... 96
EPEAT Registration ........................................................................................................................... 96
Windows System Requirements ........................................................................................................ 96
Mac System Requirements ................................................................................................................ 97
Printing Specifications........................................................................................................................ 97
Paper Specifications .......................................................................................................................... 97
Printable Area Specifications ............................................................................................................. 98
Ink Cartridge Specifications.............................................................................................................. 100
Dimension Specifications ................................................................................................................. 101
Electrical Specifications ................................................................................................................... 101
Environmental Specifications ........................................................................................................... 102
Interface Specifications .................................................................................................................... 102
Network Interface Specifications ...................................................................................................... 102
Safety and Approvals Specifications ................................................................................................ 103
Notices ..................................................................................................................................................... 104
FCC Compliance Statement............................................................................................................. 104
Software Notices .............................................................................................................................. 105
Trademarks...................................................................................................................................... 108
Copyright Notice............................................................................................................................... 108
A Note Concerning Responsible Use of Copyrighted Materials................................................... 109
Default Delay Times for Power Management for Epson Products ............................................... 109
Copyright Attribution.................................................................................................................... 109
6
Page 7

WF-M1030 User's Guide
Welcome to the WF-M1030 User's Guide.
7
Page 8
Product Basics
See these sections to learn about the basic features of your product.
Printer Parts Locations
The Power Off and Sleep Timers
Printer Parts Locations
See these sections to identify the parts on your printer.
Printer Parts - Top
Printer Parts - Back
Printer Parts - Inside
Printer Parts - Control Panel Buttons and Lights
Parent topic: Product Basics
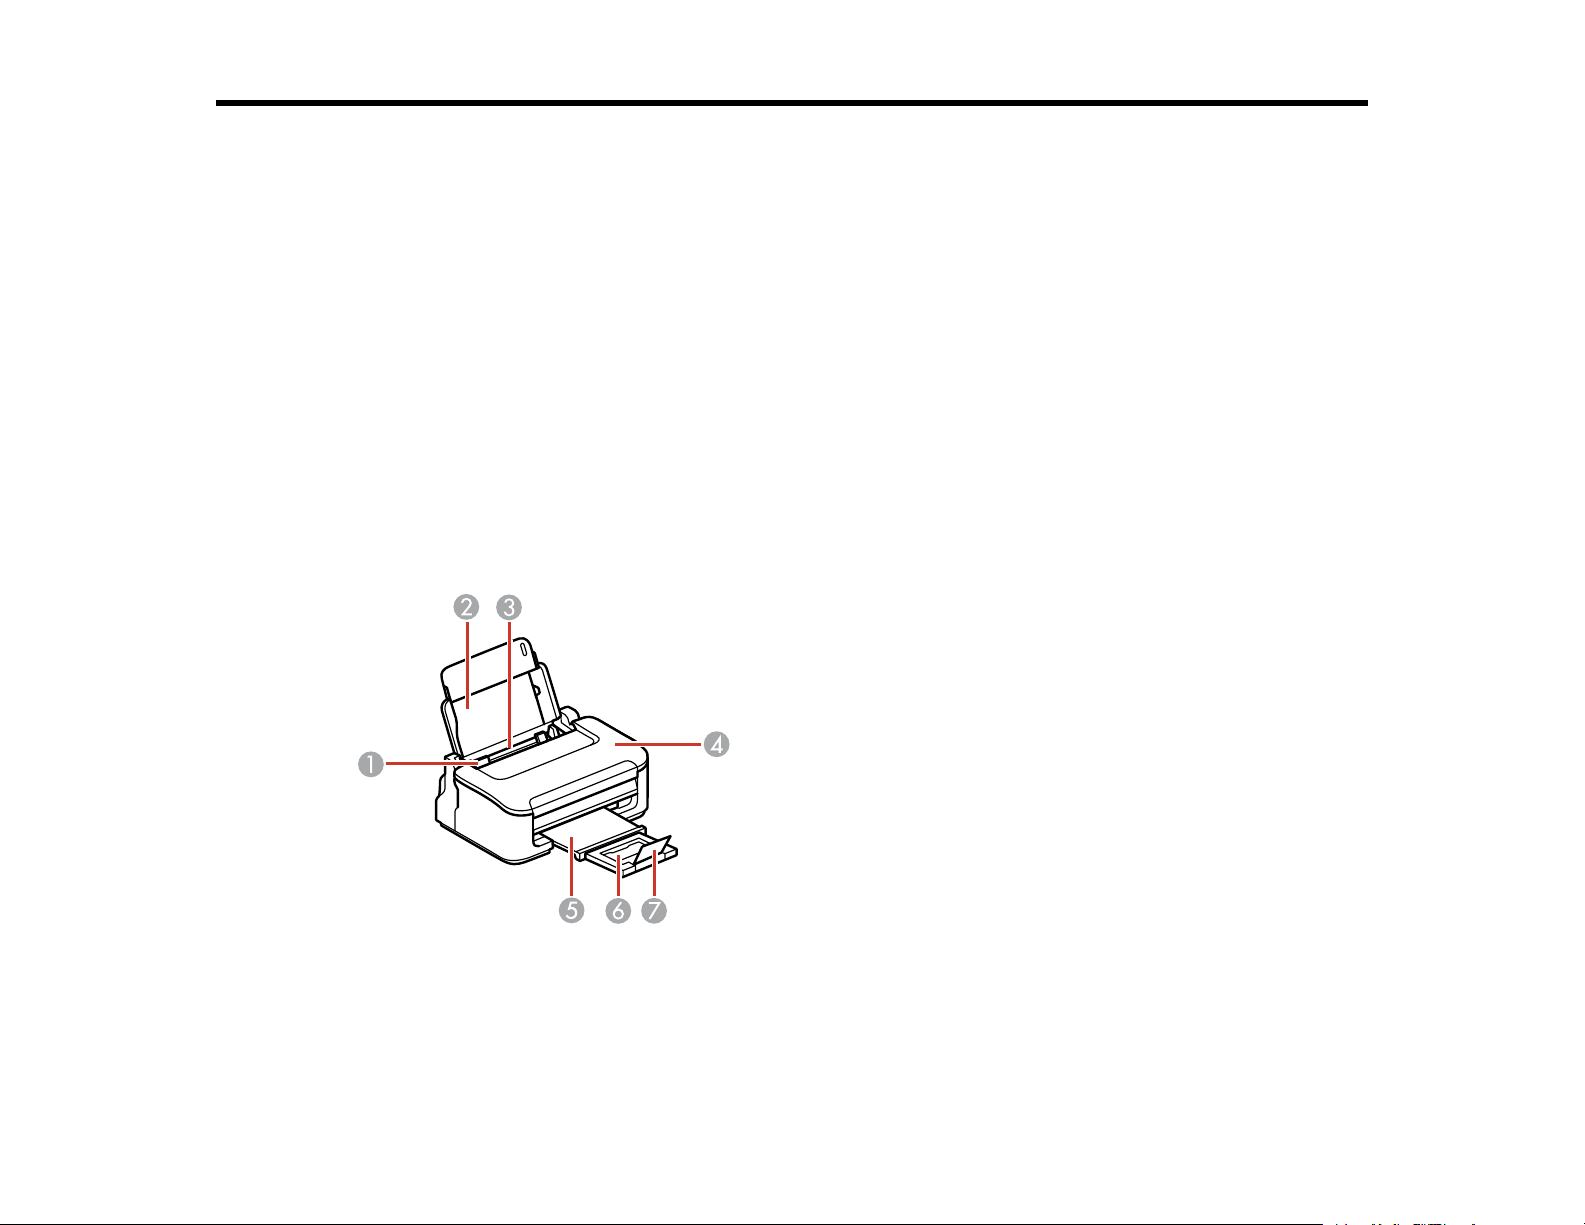
Printer Parts - Top
1 Edge guide
2 Paper support
3 Paper feed slot
8
Page 9
4 Printer cover
5 Output tray
6 Output tray extension
7 Paper stopper
Parent topic: Printer Parts Locations
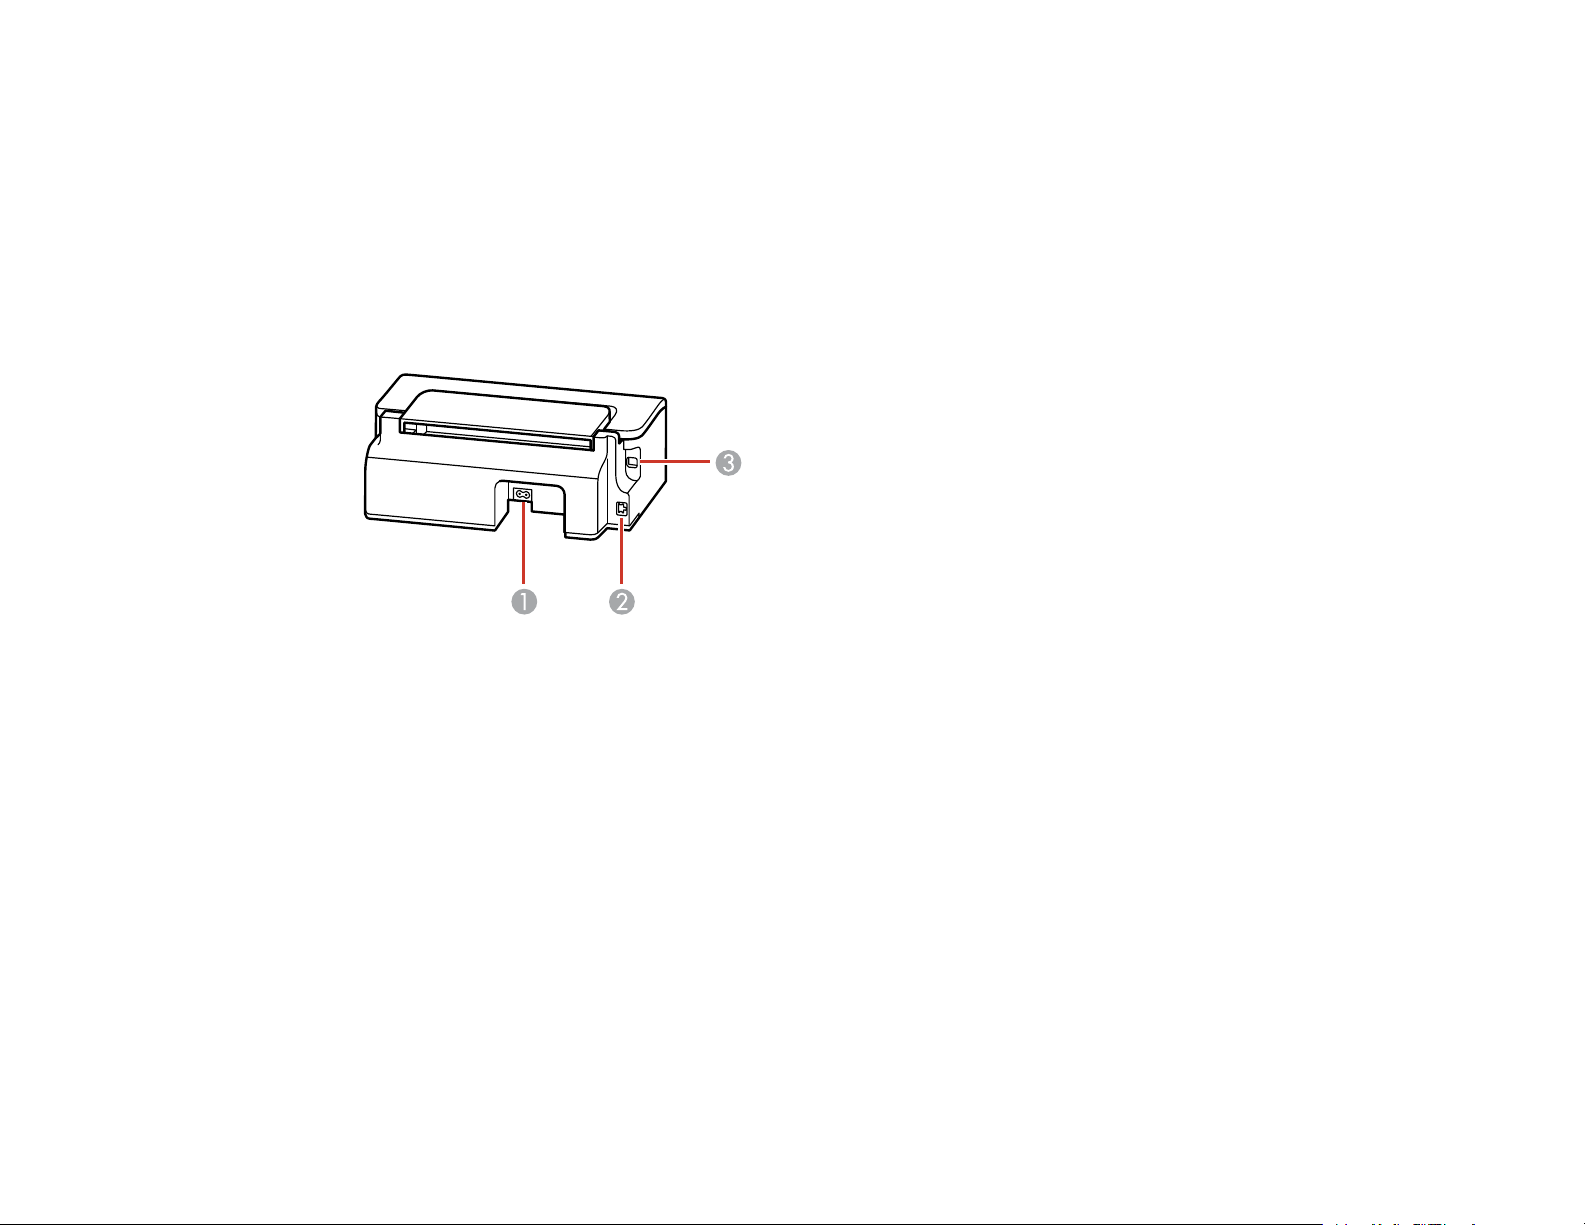
Printer Parts - Back
1 AC inlet
2 Ethernet LAN port
3 USB port
Parent topic: Printer Parts Locations
9
Page 10
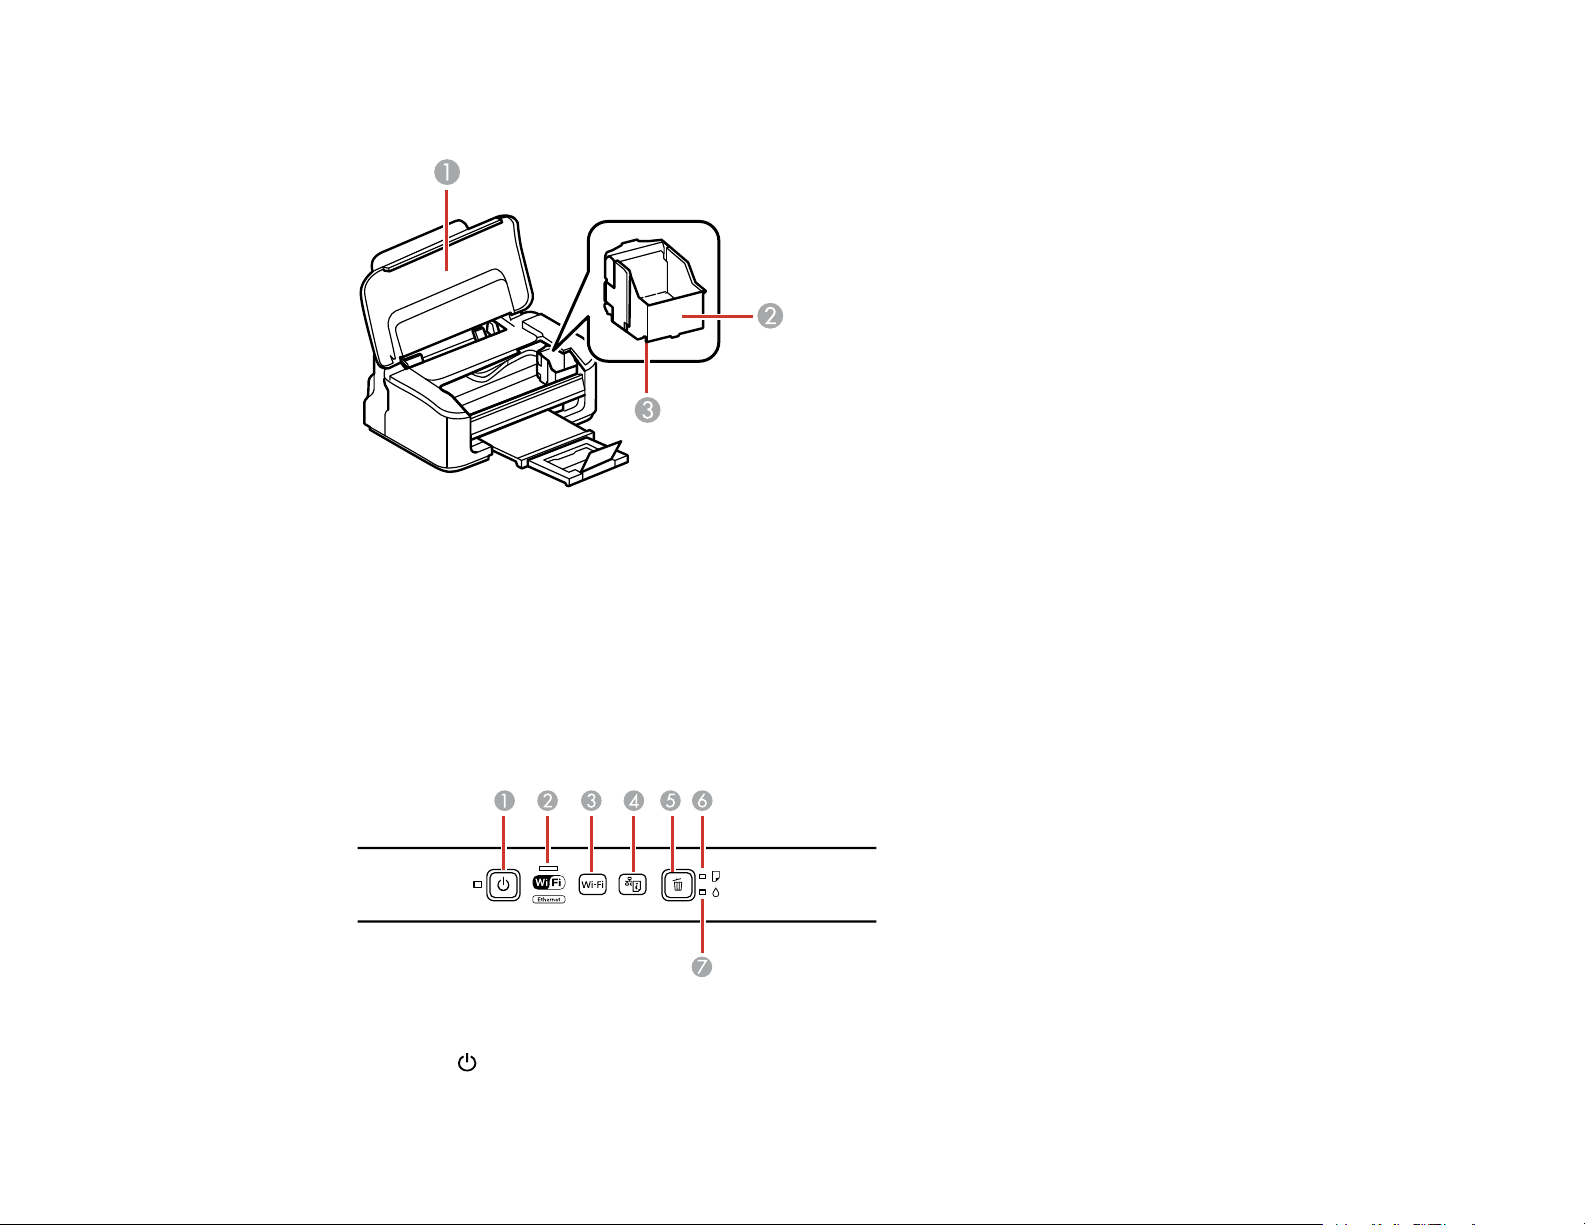
Printer Parts - Inside
1 Printer cover
3 Ink cartridge holder (do not remove)
4 Print head (underneath the ink cartridge holder)
Parent topic: Printer Parts Locations
Printer Parts - Control Panel Buttons and Lights
1
The power button and power light
10
Page 11

2 The WiFi light
3 The Wi-Fi button
4 The network status button
5
The cancel button
6
The paper light
7 The ink light
Parent topic: Printer Parts Locations
Related references
Product Light Status
The Power Off and Sleep Timers
The product enters sleep mode or turns off automatically if it is not used for a period of time. You can
adjust the time period before power management, but increasing the time reduces the product's energy
efficiency.
Changing the Power Off and Sleep Timer Settings - Windows
Changing the Power Off and Sleep Timer Settings - Mac OS X
Parent topic: Product Basics
Changing the Power Off and Sleep Timer Settings - Windows
You can use the printer software to change the time period before the printer enters sleep mode or turns
off automatically.
1. Right-click the product icon in the Windows taskbar and select Printer Settings.
2. Click the Maintenance tab.
3. Click the Printer and Option Information button.
You see this window:
11
Page 12
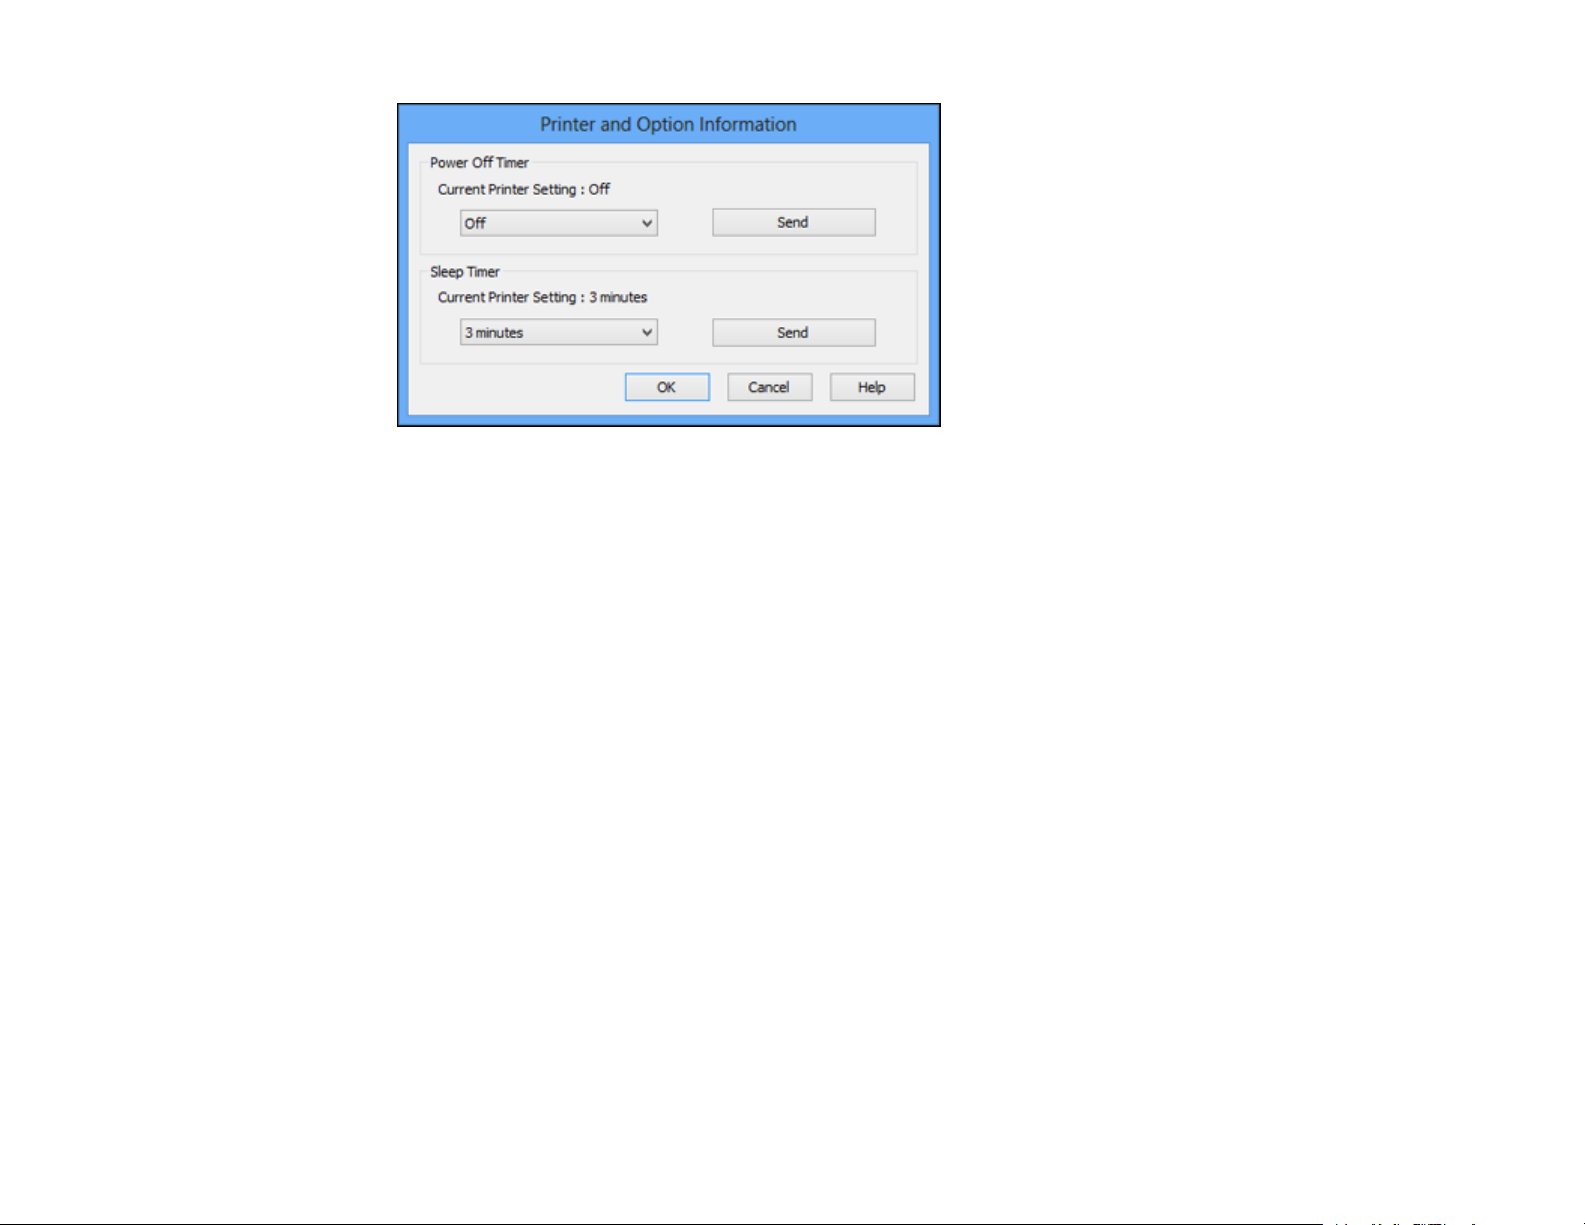
4. Select the time period you want as the Power Off Timer setting.
5. Click Send.
6. Select the time period you want as the Sleep Timer setting.
7. Click Send.
8. Click OK to close the open program windows.
Parent topic: The Power Off and Sleep Timers
Changing the Power Off and Sleep Timer Settings - Mac OS X
You can use the printer software to change the time period before the printer enters sleep mode or turns
off automatically.
1. Do one of the following:
• Mac OS X 10.6/10.7/10.8: In the Apple menu or the Dock, select System Preferences. Select
Print & Fax or Print & Scan, select your product, and select Options & Supplies. Select Utility
and select Open Printer Utility.
• Mac OS X 10.5: In the Apple menu or the Dock, select System Preferences. Select Print & Fax,
select your product, and select Open Print Queue or Print Queue. Select Utility.
2. Select Printer Settings.
You see this screen:
12
Page 13
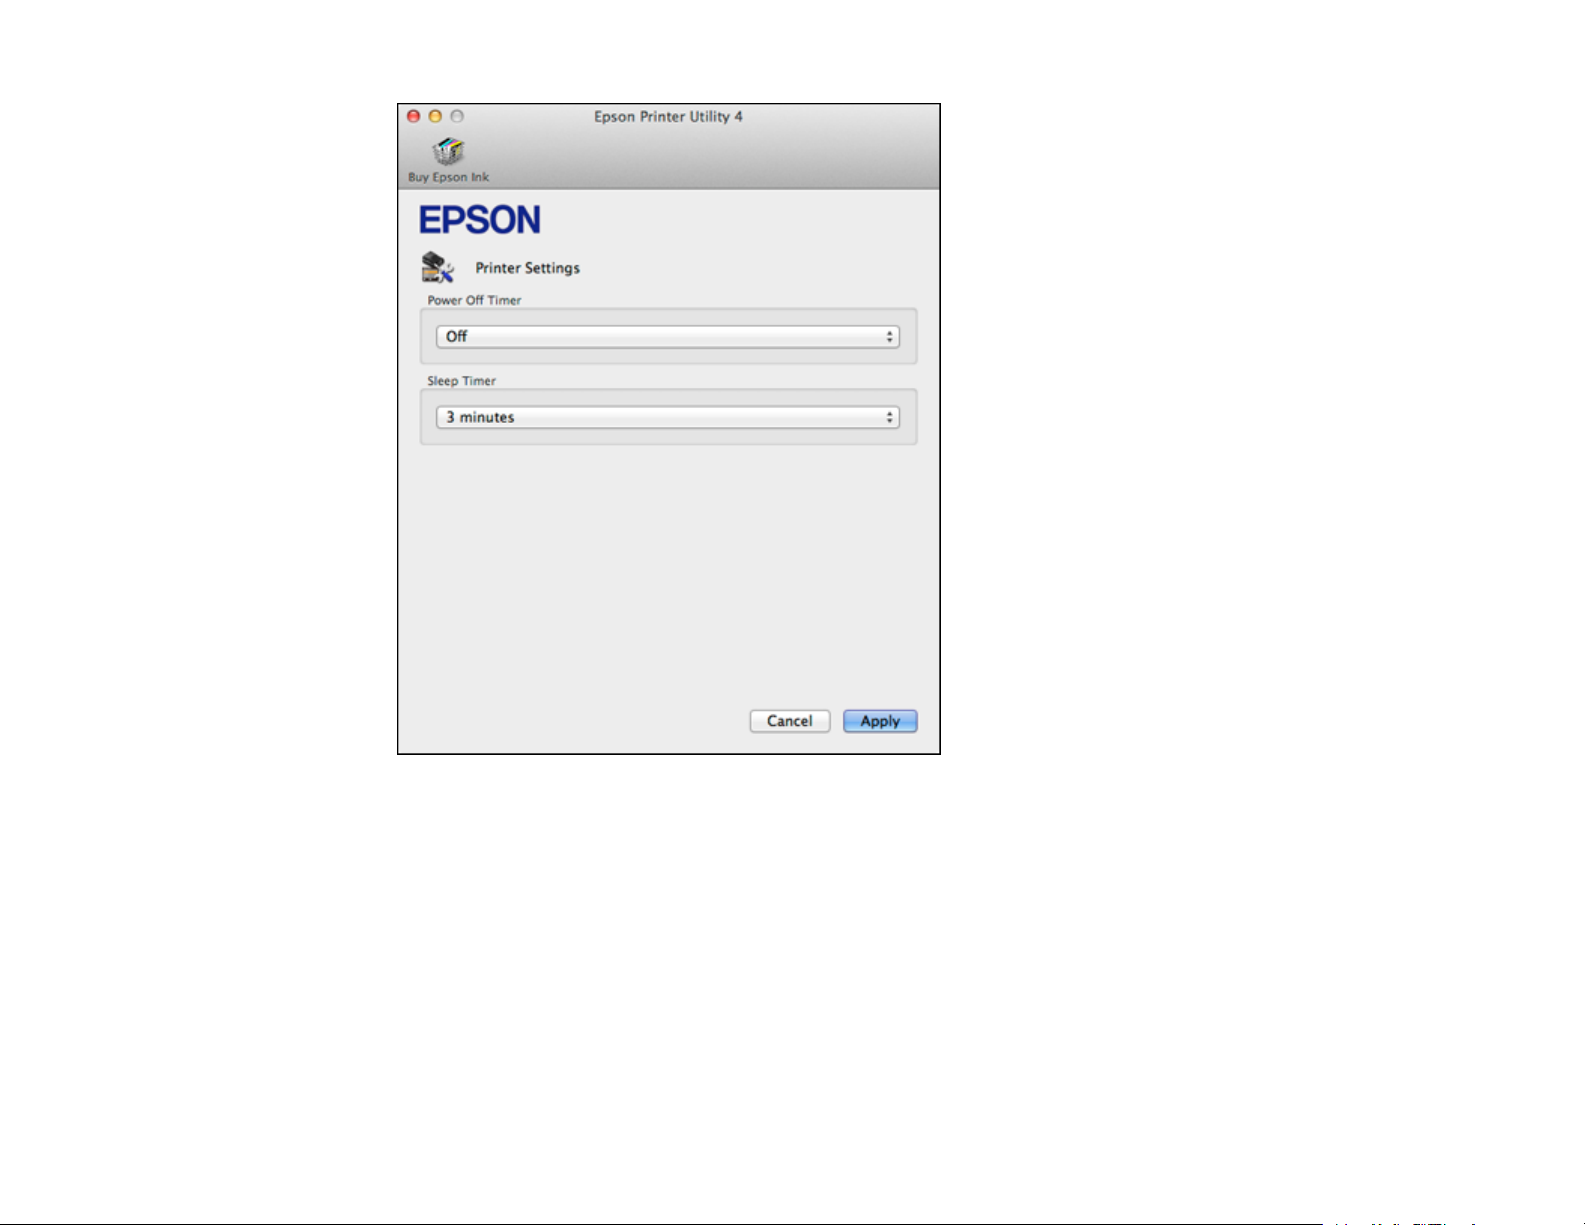
3. Select the time period you want as the Power Off Timer setting.
4. Select the time period you want as the Sleep Timer setting.
5. Click Apply.
6. When you see the confirmation message, click Yes, then close the Printer Settings window.
Parent topic: The Power Off and Sleep Timers
13
Page 14

Loading Paper
Before you print, load paper for the type of printing you will do.
Loading Paper for Documents
Loading Envelopes
Paper Loading Capacity
Available EPSON Papers
Paper or Media Type Settings
Loading Paper for Documents
You can print documents on a variety of paper types and sizes.
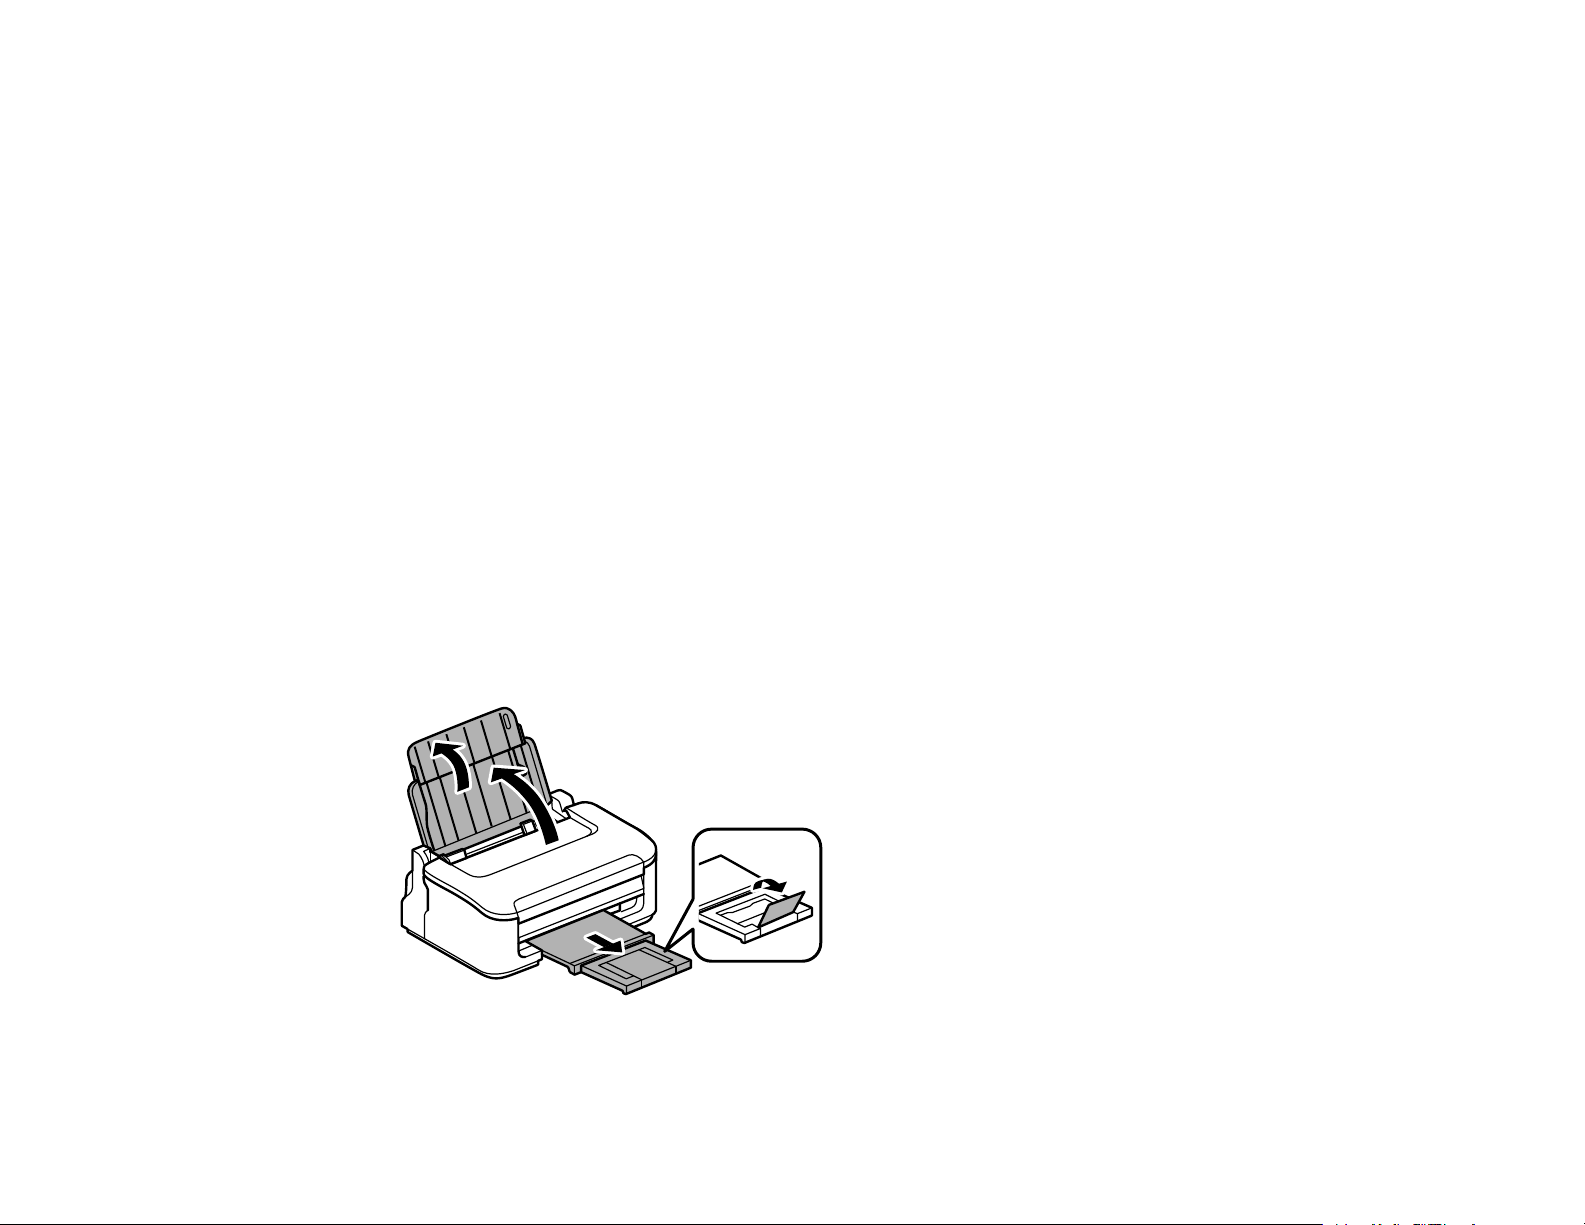
1. Raise the paper support and its extension, pull out the output tray, then raise the paper stopper.
14
Page 15
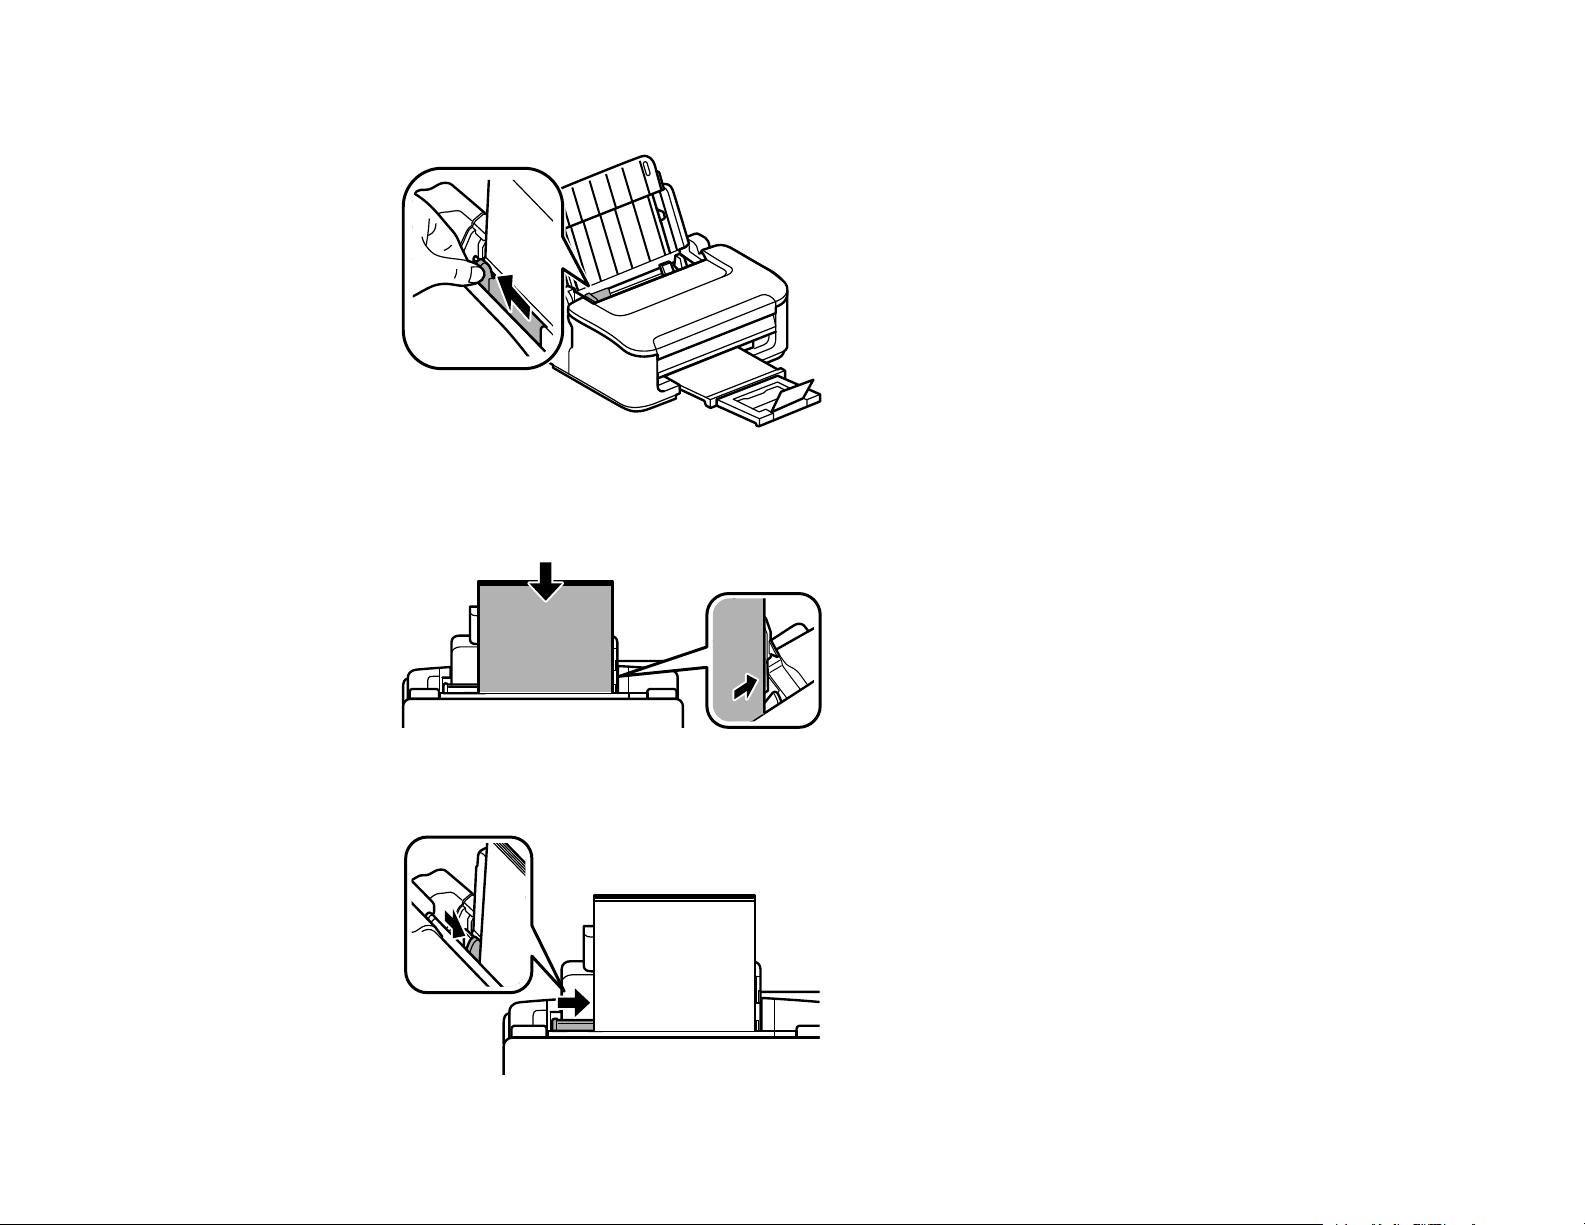
2. Slide the edge guide to the left.
3. Insert paper, glossy or printable side up and short edge first, against the right side. If you are
inserting a stack of paper, fan the sheets first and tap the stack on a flat surface to even the edges.
4. Slide the edge guides against the paper, but not too tightly.
15
Page 16
Always follow these paper loading guidelines:
• Load only the recommended number of sheets.
• Load paper short edge first, no matter which way your document faces.
• Load letterhead or pre-printed paper top edge first.
• Do not load paper above the arrow mark inside the edge guide.
• Check the paper package for any additional loading instructions.
• If you use paper with binder holes, load only one sheet at a time and use only these sizes: Letter
(8.5 × 11 inches [216 × 279 mm]), A4 (8.3 × 11.7 inches [210 × 297 mm]), or Legal (8.5 × 14
inches [216 × 357 mm]).
Parent topic: Loading Paper
Related references
Paper Loading Capacity
Related tasks
Loading Envelopes
Loading Envelopes
You can print on plain paper envelopes in this size: No. 10 (4.1 × 9.5 inches [105 × 241 mm]).
1. Raise the paper support and its extension, pull out the output tray, then raise the paper stopper.
16
Page 17
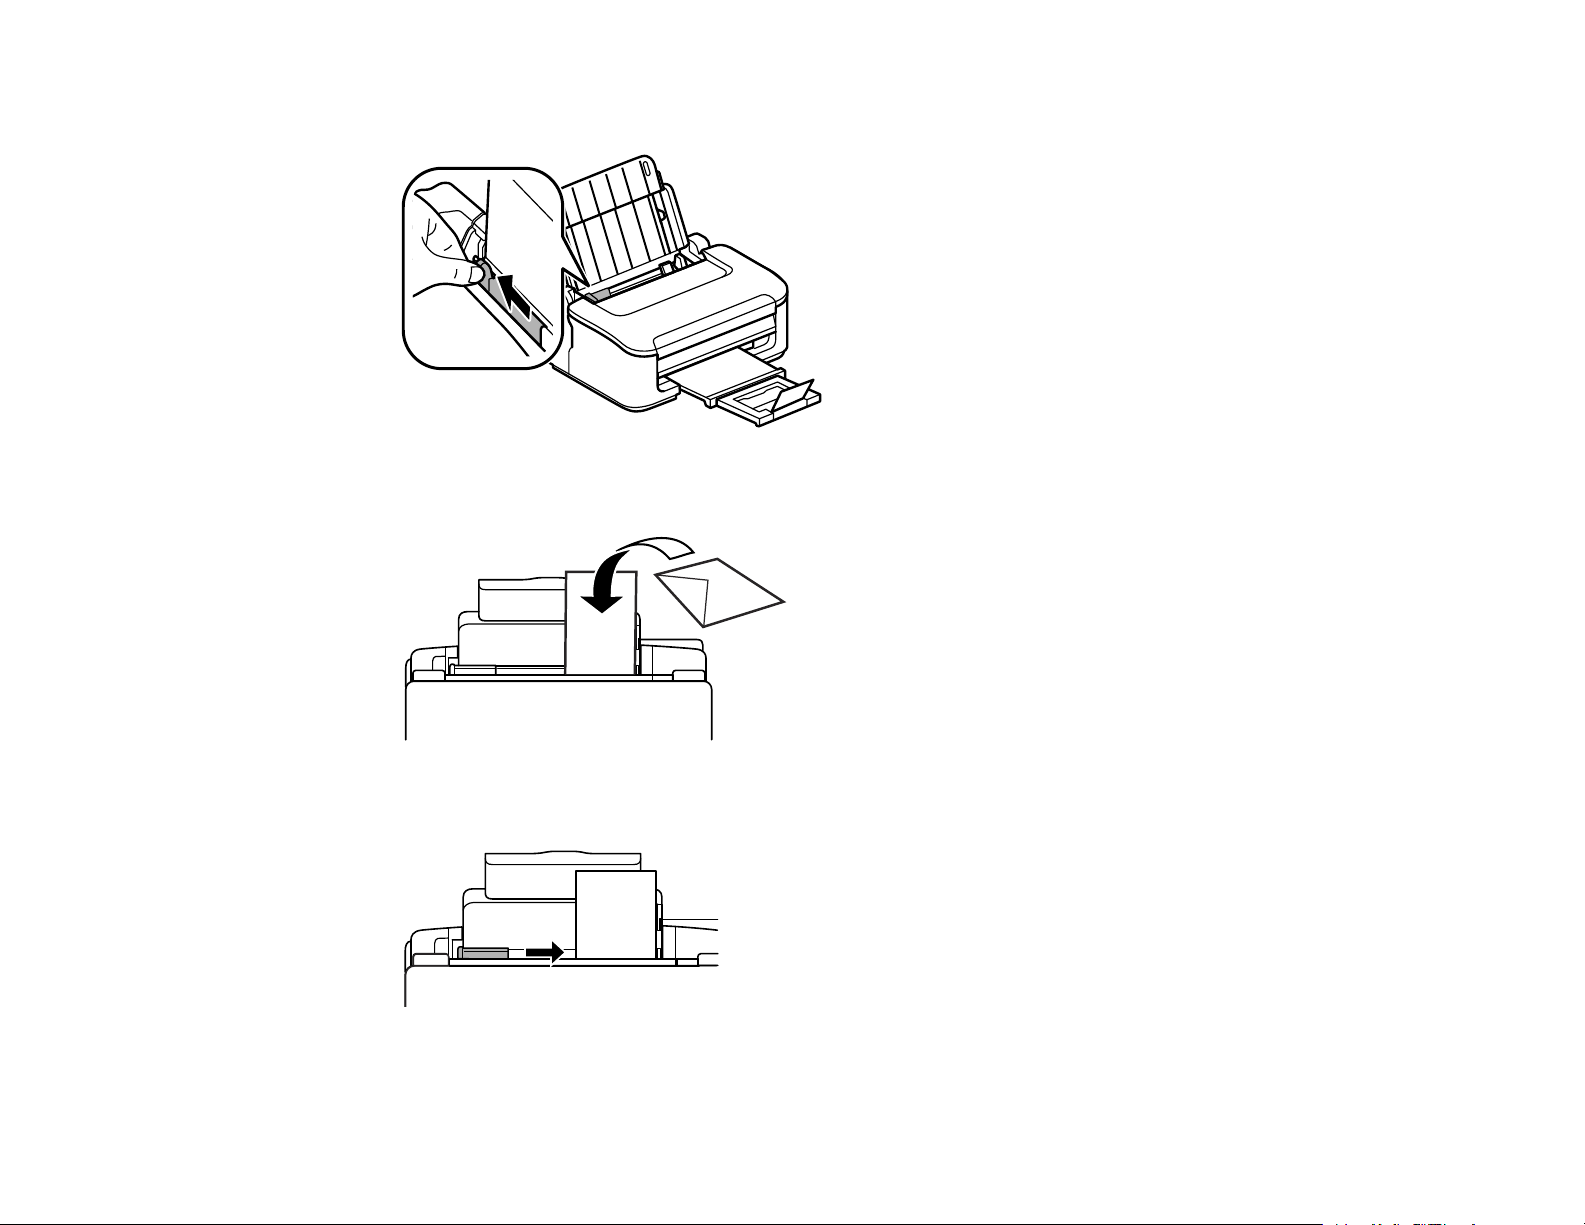
2. Slide the edge guide to the left.
3. Load up to 10 envelopes against the right side. Load them printable side up and flap edge left.
4. Slide the edge guides against the envelopes, but not too tightly.
17
Page 18
Always follow these loading guidelines:
• If you have trouble loading a stack of envelopes, press each envelope flat before loading it or load
one envelope at a time.
• If print quality declines when printing multiple envelopes, try loading one envelope at a time.
• Do not load envelopes that are curled, folded, or too thin, or that have plastic windows.
Parent topic: Loading Paper
Related references
Paper Loading Capacity
Related tasks
Loading Paper for Documents
Paper Loading Capacity
Paper type Loading capacity
Plain paper - Letter (8.5 × 11 inches Approximately 100 sheets *
[216 × 279 mm]) or A4 (8.3 × 11.7 inches
[210 × 297 mm]) **
Epson Bright White Paper 80 sheets
Epson Presentation Paper Matte - Letter (8.5 × 11
inches [216 × 279 mm])
18
Page 19
Paper type Loading capacity
Plain paper - Legal (8.5 × 14 inches 1 sheet
[216 × 357 mm])
Epson Presentation Paper Matte - Legal (8.5 × 14
inches [216 × 357 mm])
Epson Premium Presentation Paper Matte
Epson Premium Presentation Paper Matte Doublesided
Epson Ultra Premium Presentation Paper Matte
Epson Brochure & Flyer Paper Matte Double-sided
Epson Iron-on Cool Peel Transfer paper
Epson Photo Quality Self-adhesive Sheets
User defined paper size of any type
Any type of paper with binder holes
Envelopes 10 envelopes
* Based on 20 lb (75 g/m2) paper weight. Do not load paper above the arrow mark inside the edge guide.
** For two-sided printing, load up to 30 sheets.
Parent topic: Loading Paper
Available EPSON Papers
You can purchase genuine Epson ink and paper at Epson Supplies Central at www.epson.com/ink3
(U.S. sales) or www.epson.ca (Canadian sales). You can also purchase supplies from an Epson
authorized reseller. To find the nearest one, call 800-GO-EPSON (800-463-7766).
Paper Type Size Part number Sheet count
Epson Bright White Paper Letter (8.5 × 11 inches S041586 500
Epson Brochure & Flyer Paper Letter (8.5 × 11 inches S042384 150
Matte Double-sided [216 × 279 mm])
Epson Ultra Premium Presentation Letter (8.5 × 11 inches S041341 50
Paper Matte [216 × 279 mm])
[216 × 279 mm])
19
Page 20
Paper Type Size Part number Sheet count
Epson Premium Presentation 8 × 10 inches (203 × 254 mm) S041467 50
Paper Matte
Epson Premium Presentation Letter (8.5 × 11 inches S041568 50
Paper Matte Double-sided [216 × 279 mm])
Epson Presentation Paper Matte Letter (8.5 × 11 inches S041062 100
Epson Photo Quality Self-adhesive A4 (8.3 × 11.7 inches S041106 10
Sheets [210 × 297 mm])
Epson Iron-on Cool Peel Transfer Letter (8.5 × 11 inches S041153 10
paper [216 × 279 mm])
Parent topic: Loading Paper
Paper or Media Type Settings
For this paper Select this paper Type or Media Type setting
Letter (8.5 × 11 inches S041257 50
[216 × 279 mm])
[216 × 279 mm])
Legal (8.5 × 14 inches S041067 100
[216 × 357 mm])
S042180 100
Plain paper Plain Paper/Bright White Paper
Epson Bright White Paper
Epson Presentation Paper Matte
Epson Photo Quality Self-adhesive Sheets
Epson Iron-on Cool Peel Transfer paper
Epson Premium Presentation Paper Matte Premium Presentation Paper Matte
Epson Premium Presentation Paper Matte Doublesided
Epson Ultra Premium Presentation Paper Matte
Epson Brochure & Flyer Paper Matte Double-sided
Envelopes Envelope
20
Page 21

Parent topic: Loading Paper
21
Page 22

Printing From a Computer
Before printing from your computer, make sure you have set up your product and installed its software
as described on the Start Here sheet.
Note: If you have an Internet connection, it is a good idea to check for updates to your product software
on Epson's support website. If you see a Software Update screen, select Enable automatic checking
and click OK. The update scans your system to see if you have the latest product software. Follow the
on-screen instructions.
Printing with Windows
Printing with Mac OS X
Cancelling Printing Using a Product Button
Printing with Windows
You can print with your product using any Windows printing program, as described in these sections.
Selecting Basic Print Settings - Windows
Selecting Double-sided Printing Settings - Windows
Selecting Additional Layout and Print Options - Windows
Selecting a Printing Preset - Windows
Printing Your Document - Windows
Selecting Default Print Settings - Windows
Changing Automatic Update Options
Parent topic: Printing From a Computer
Selecting Basic Print Settings - Windows
Select the basic settings for the document you want to print.
1. Open a document for printing.
2. Select the print command in your application.
Note: You may need to select a print icon on your screen, the Print option in the File menu, or
another command. See your application's help utility for details.
22
Page 23
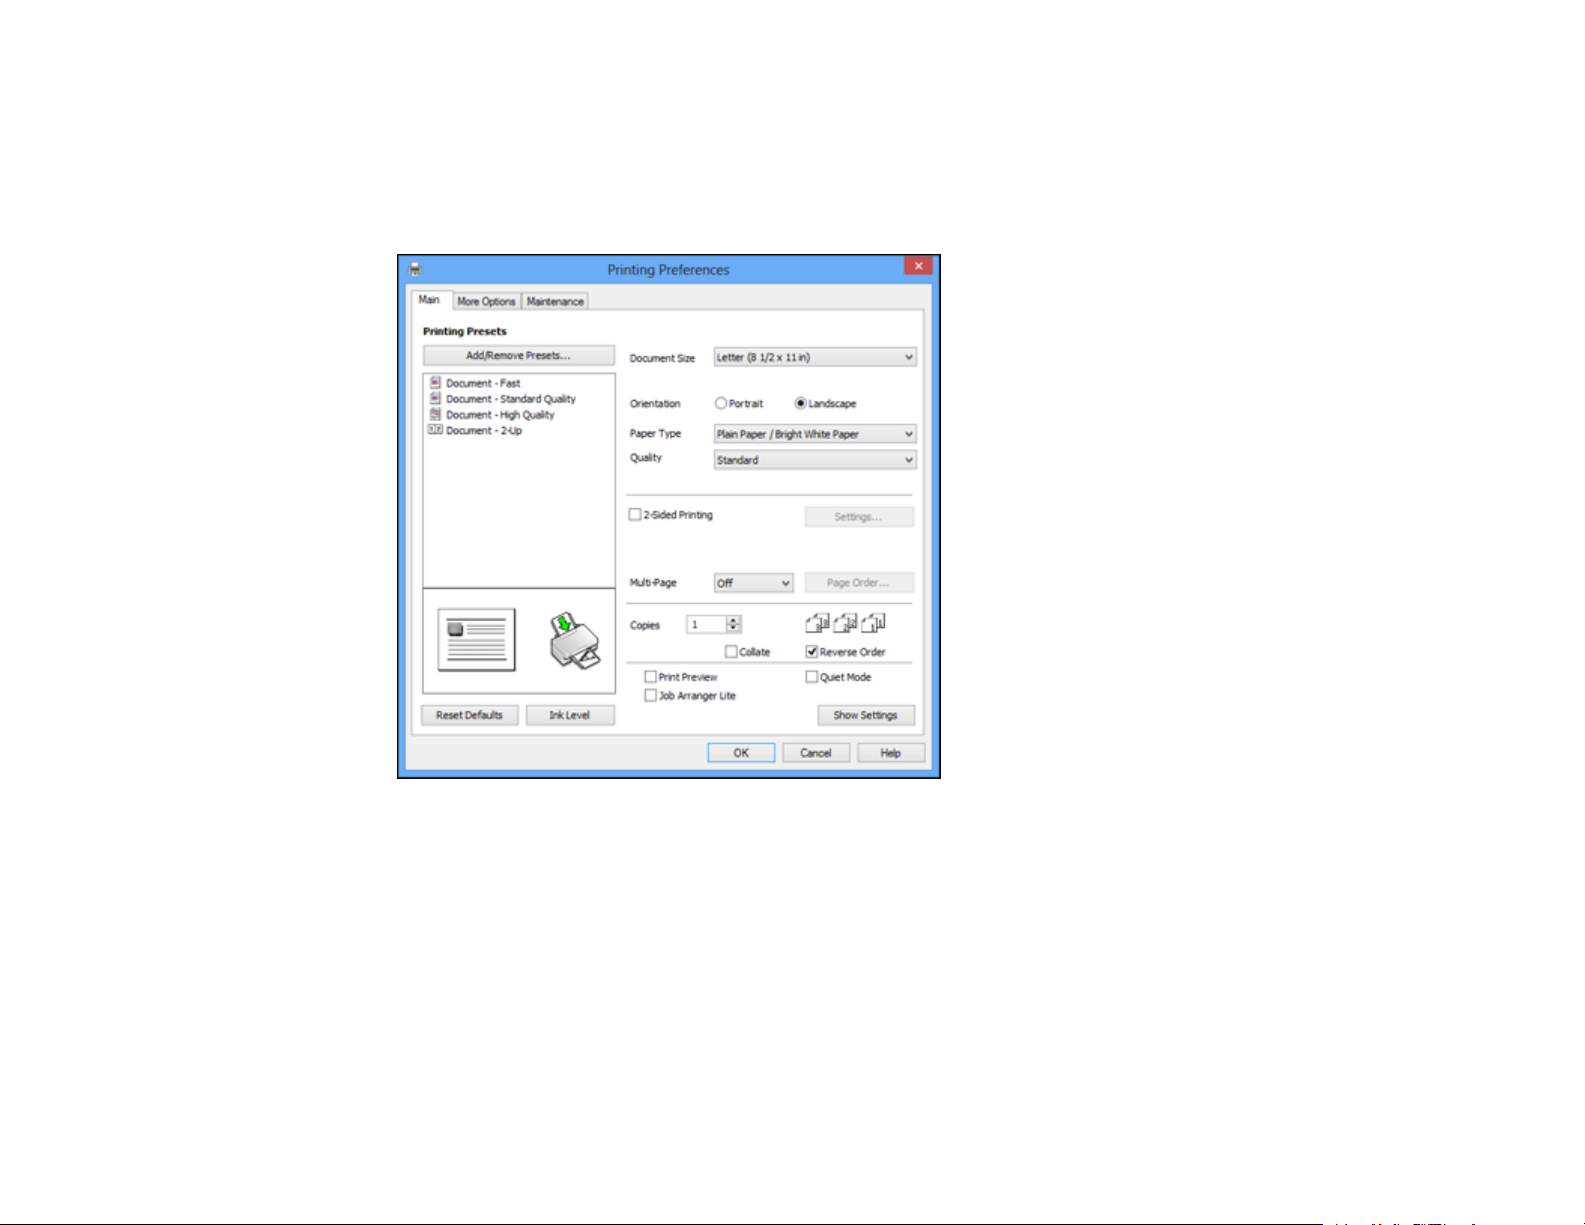
3. If necessary, select your product name as the printer you want to use.
Note: You may also need to select Properties or Preferences to view your print settings.
You see the Main tab of your printer settings window:
4. Select the size of the paper you loaded as the Document Size setting.
5. Select the orientation of your document.
Note: If you are printing an envelope, select Landscape.
6. Select the type of paper you loaded as the Paper Type setting.
Note: The setting may not exactly match the name of your paper. Check the paper type settings list
for details.
23
Page 24

7. Select the Quality setting that matches the print quality you want to use.
8. To print on both sides of the paper, select the 2-Sided Printing checkbox and select the options you
want.
9. To print multiple pages on one sheet of paper, or print one image on multiple sheets of paper, select
one of the settings in the Multi-Page menu and select the printing options you want.
10. To print multiple copies and arrange their print order, select the Copies options.
11. To preview your job before printing, select Print Preview.
12. To save your print job as a project that can be modified and combined with other print jobs, select
Job Arranger Lite.
13. To reduce noise during printing when you select Plain Paper/Bright White Paper, select Quiet
Mode.
Print Quality Options - Windows
Multi-Page Printing Options - Windows
Parent topic: Printing with Windows
Related references
Paper or Media Type Settings
Related tasks
Printing Your Document - Windows
Selecting Double-sided Printing Settings - Windows
Print Quality Options - Windows
You can select any of the available Quality options to fine-tune the quality of your print. Some settings
may be unavailable, depending on the paper type setting you have chosen.
Draft
For draft printing on plain paper.
Standard
For everyday text and image printing.
High
For text and graphics with high print quality.
More Settings
Opens a window that lets you choose among levels of speed and quality.
Parent topic: Selecting Basic Print Settings - Windows
24
Page 25
Multi-Page Printing Options - Windows
You can select any of the available options in the Multi-Page menu to set up your multi-page print job.
2-Up and 4-Up
Prints 2 or 4 pages on one sheet of paper. Click the Page Order button to select page layout and
border options.
2×1 Poster, 2×2 Poster, 3×3 Poster, 4×4 Poster
Prints one image on multiple sheets of paper to create a larger poster. Click the Settings button to
select image layout and guideline options.
Parent topic: Selecting Basic Print Settings - Windows
Selecting Double-sided Printing Settings - Windows
You can print on both sides of the paper by selecting the 2-Sided Printing checkbox on the Main tab.
Note: Double-sided printing is only available when printing on plain paper in these sizes: Letter (8.5 × 11
inches [216 × 279 mm]), A4 (8.3 × 11.7 inches [210 × 297 mm]), Legal (8.5 × 14 inches [216 × 357 mm]),
or A6 (4.1 × 5.8 inches [105 × 148 mm]).
Note: Some options may be pre-selected or unavailable, depending on other settings you have chosen
or if you are accessing the product over a network or as a shared printer.
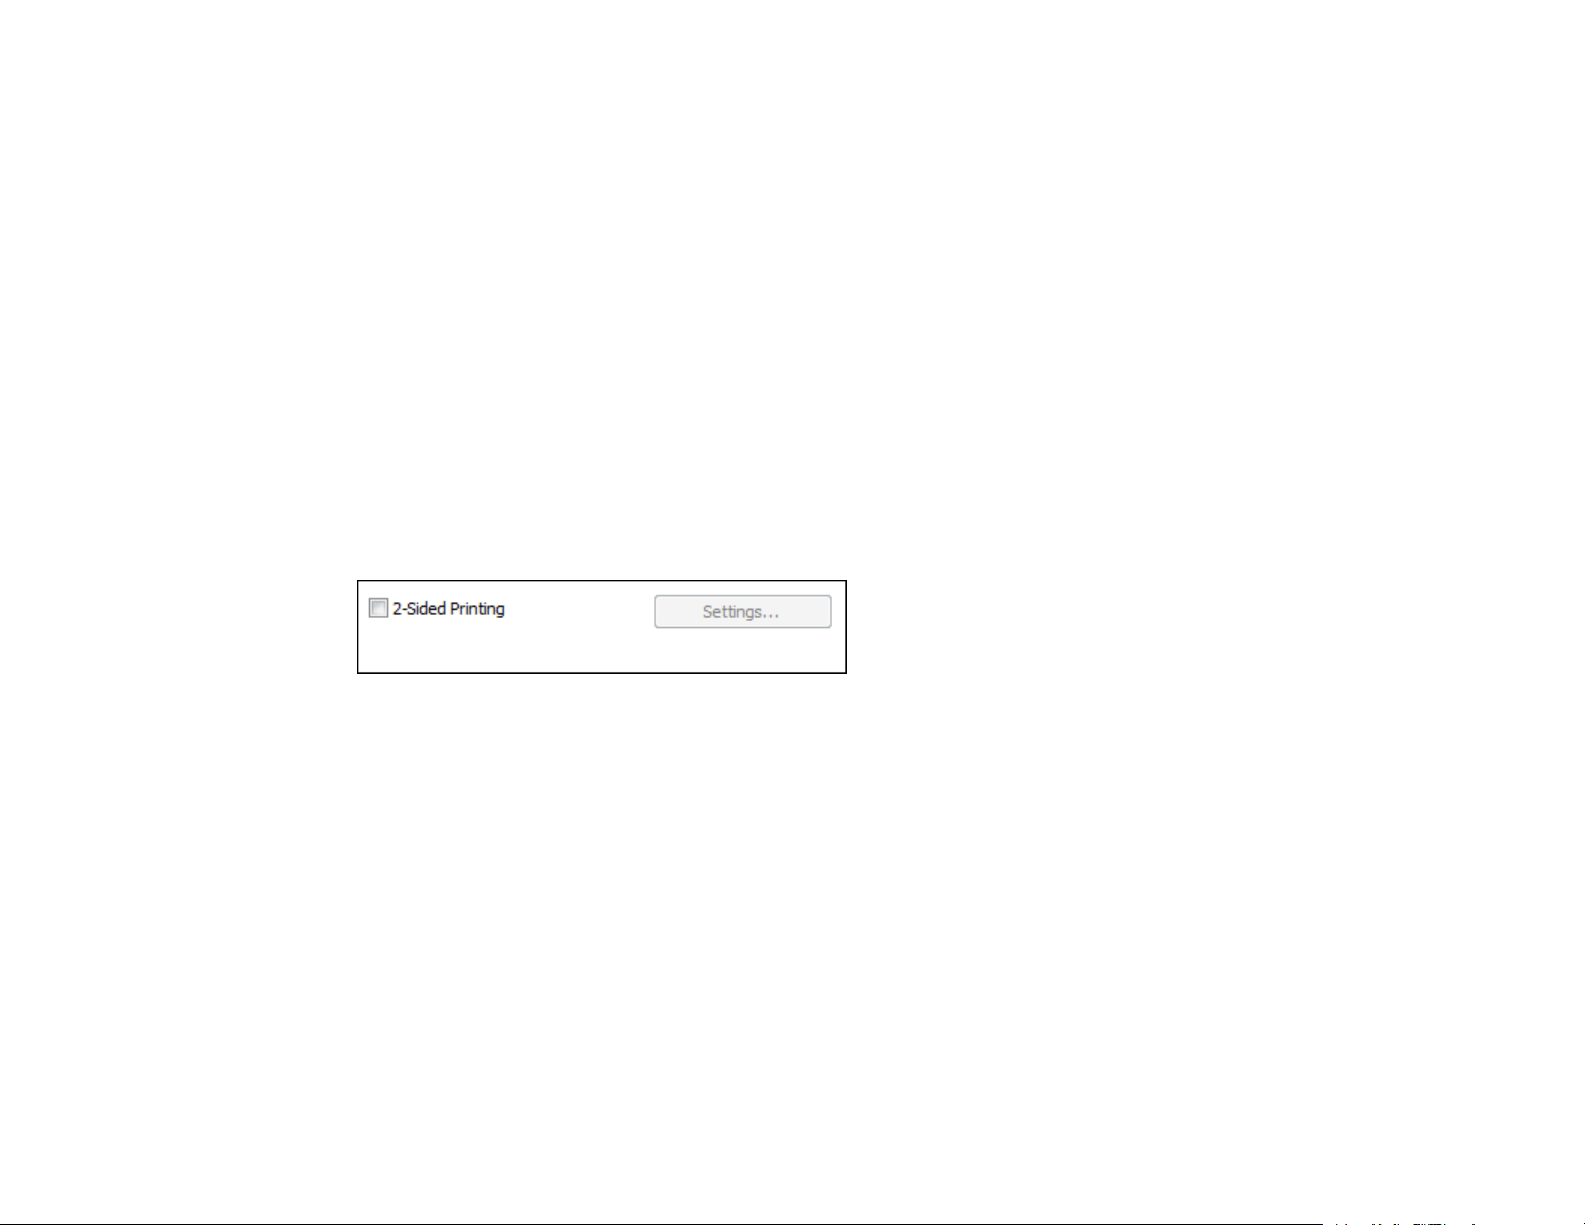
1. Select the 2-Sided Printing checkbox.
2. Click the Settings button.
You see this window:
25
Page 26
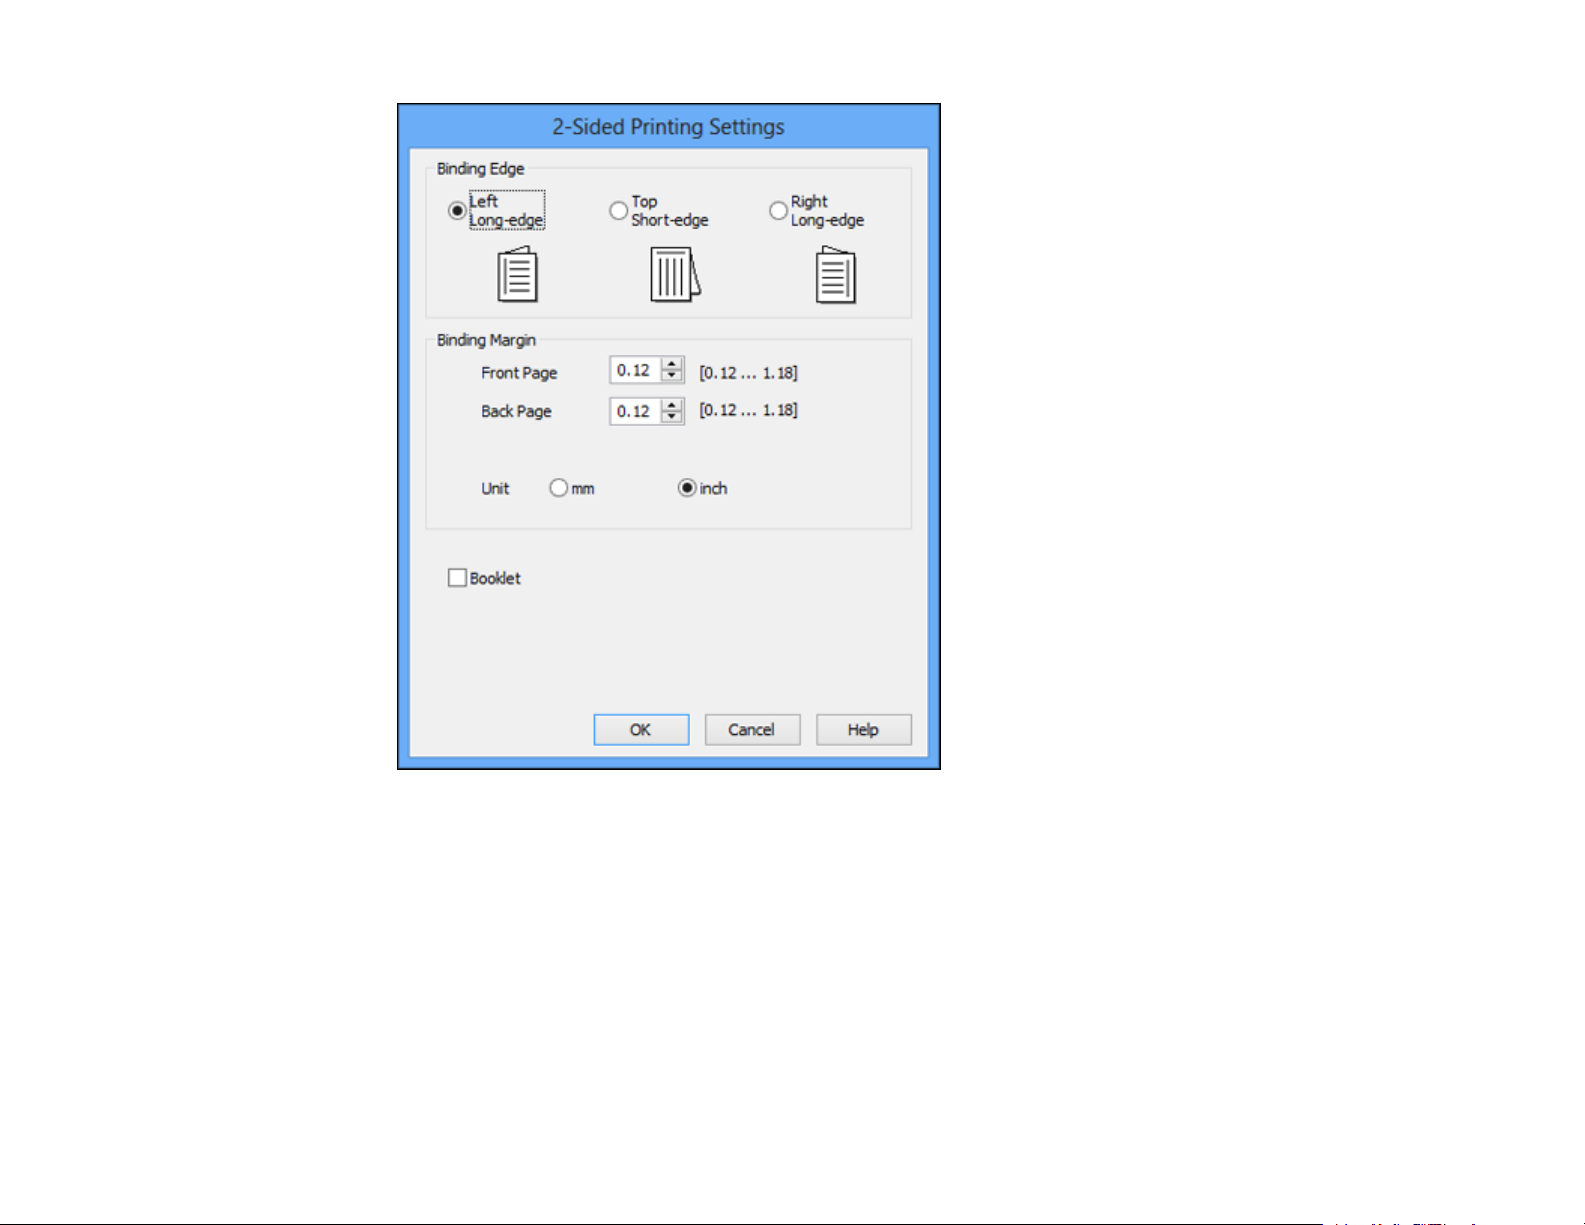
3. Select the double-sided printing options you want to use.
4. Click OK to return to the Main tab.
5. Print a test copy of your double-sided document to test the selected settings.
6. Follow any instructions displayed on the screen during printing.
Note: The surface of the paper may smear during double-sided printing. Make sure the ink has dried
before reloading the paper.
Double-sided Printing Options - Windows
26
Page 27

Parent topic: Printing with Windows
Double-sided Printing Options - Windows
You can select any of the available options on the 2-Sided Printing Settings window to set up your
double-sided print job.
Binding Edge Options
Select a setting that orients double-sided print binding in the desired direction.
Binding Margin Options
Select options that define a wider margin to allow for binding.
Booklet
Select the Booklet checkbox to print double-sided pages as a booklet.
Parent topic: Selecting Double-sided Printing Settings - Windows
Related references
Paper Loading Capacity
Selecting Additional Layout and Print Options - Windows
You can select a variety of additional layout and printing options for your document on the More Options
tab.
27
Page 28
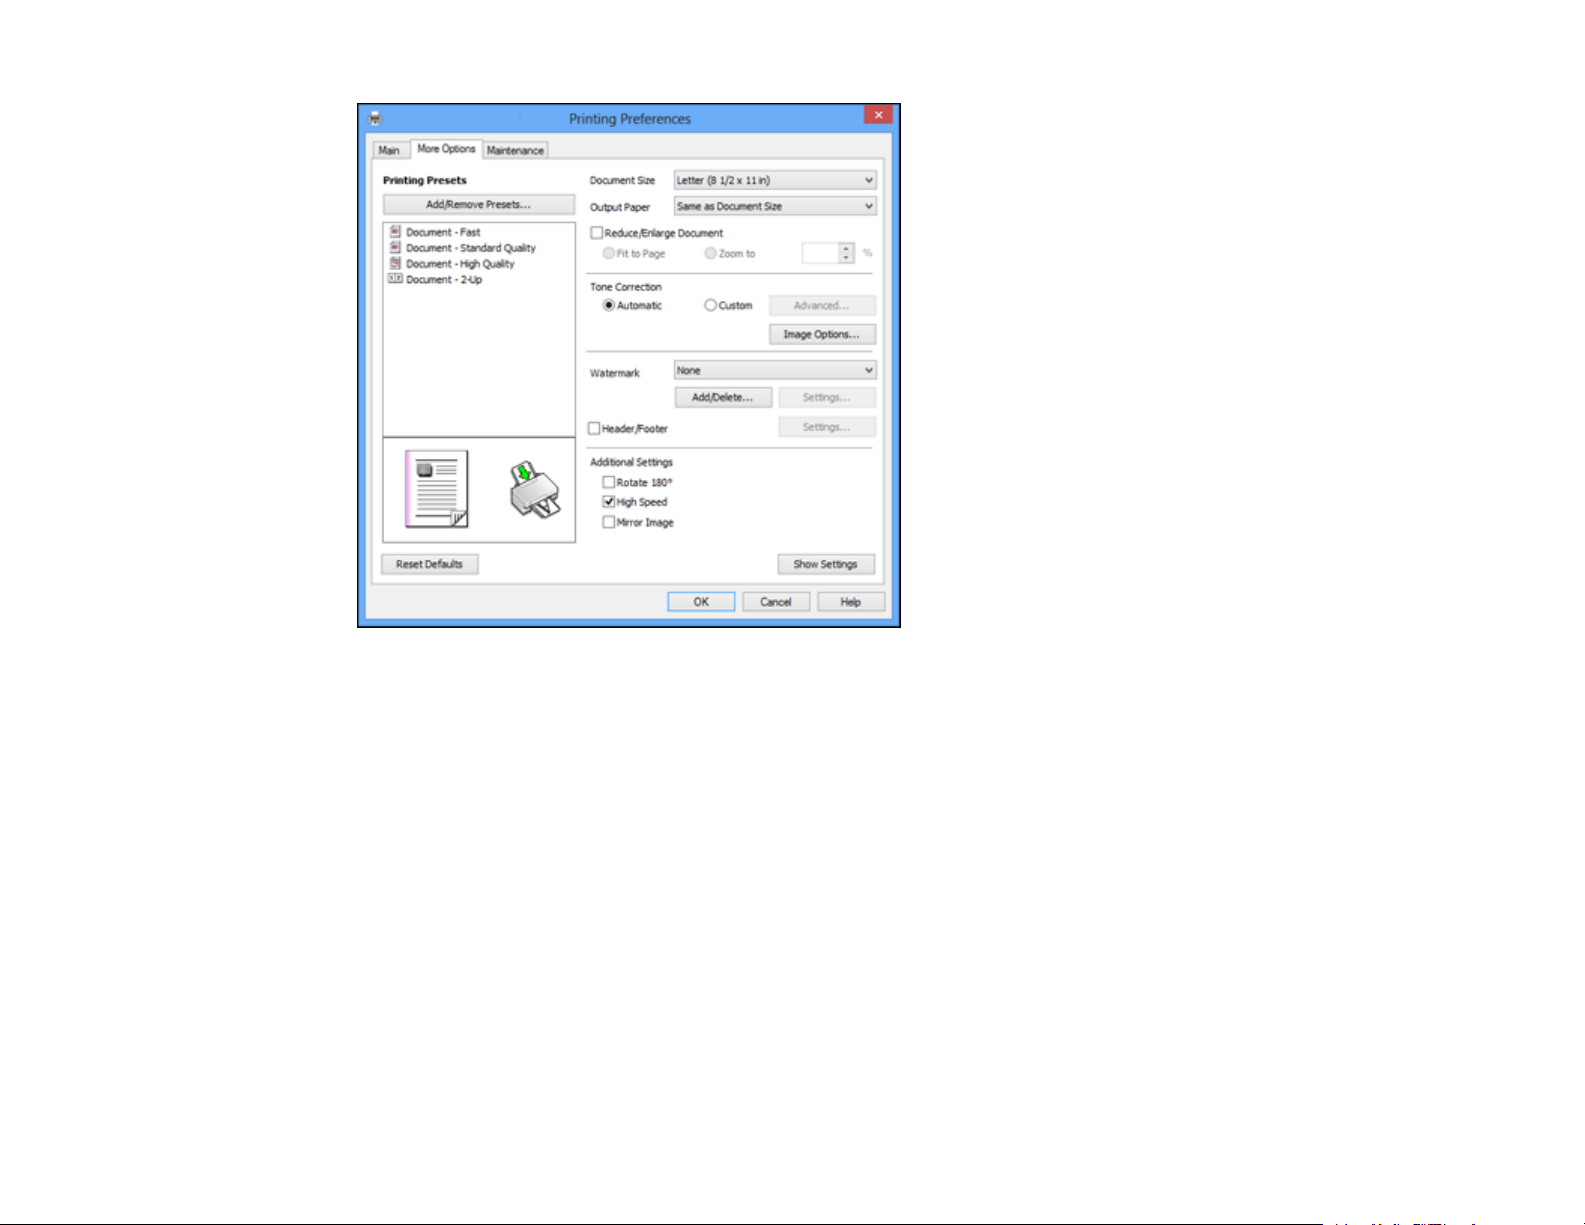
1. To change the size of your printed document, select the Reduce/Enlarge Document checkbox and
select one of these sizing options:
• Select the Fit to Page option to size your image to fit the paper you loaded. Select the size of the
your document as the Document Size setting, and the size of your paper as the Output Paper
setting.
• Select the Zoom to option to reduce or enlarge your document by a specific percentage. Select
the percentage in the % menu.
2. Select one of the following Tone Correction options:
• Select Automatic to automatically adjust the brightness and contrast for your documents.
• Select Custom and click the Advanced button to manually adjust the brightness and contrast
settings.
• Select Image Options and select Edge Smoothing to smooth jagged edges in low-resolution
images.
3. To add a watermark to your printout, select Watermark settings.
28
Page 29
4. To add a header or footer to your document, select Header/Footer, then select Settings to
customize the text and location.
5. Select any of the Additional Settings options to customize your print.
Custom Tone Correction Options - Windows
Image Options and Additional Settings - Windows
Header/Footer Settings - Windows
Parent topic: Printing with Windows
Related tasks
Printing Your Document - Windows
Custom Tone Correction Options - Windows
You can select any of the available options in the Tone Correction window to customize the image tone
for your print job.
29
Page 30

Gamma
Adjusts the midtone density of the image.
Brightness
Adjusts the overall lightness and darkness of the image.
Contrast
Adjusts the difference between the light and dark areas of the overall image.
Parent topic: Selecting Additional Layout and Print Options - Windows
Image Options and Additional Settings - Windows
You can select any of the Image Options and Additional Settings to customize your print. Some options
may be pre-selected or unavailable, depending on other settings you have chosen.
Image Options
Edge Smoothing
Smooths jagged edges in low-resolution images such as screen captures or images from the Web.
Additional Settings Options
Rotate 180º
Prints the image rotated 180º from its original orientation.
High Speed
Speeds up printing, but may reduce print quality.
Mirror Image
Flips the printed image left to right.
Parent topic: Selecting Additional Layout and Print Options - Windows
Header/Footer Settings - Windows
You can select any of the Header/Footer Settings options to add headers or footers when you print. The
items are available to print at the top or bottom of your pages, in either the left, right, or center of the
page.
Note: These settings are not saved with your document.
30
Page 31

You can select to print the following information, which comes from the Windows Control Panel on your
computer:
• User Name
• Computer Name
• Date
• Date/Time
Parent topic: Selecting Additional Layout and Print Options - Windows
Selecting a Printing Preset - Windows
For quick access to common groups of print settings, you can select a printing preset on the Main or
More Options tab.
Note: You can create your own preset by clicking the Add/Remove Presets button.
1. Click the Main or More Options tab.
You see the available Printing Presets on the left:
31
Page 32

2. Place your cursor over one of the Printing Presets to view its list of settings.
3. Use any of the available options on the screen to control your printing presets.
4. To choose an option for printing, select it.
5. Click OK.
Parent topic: Printing with Windows
Printing Your Document - Windows
Once you have selected your print settings, you are ready to save your settings and print.
32
Page 33

1. Click OK to save your settings.
You see your application's Print window, such as this one:
2. Click OK or Print to start printing.
Parent topic: Printing with Windows
Selecting Default Print Settings - Windows
When you change your print settings in a program, the changes apply only while you are printing in that
program session. If you want to change the print settings you use in all your Windows programs, you can
select new default print settings.
1. Right-click the product icon in the Windows taskbar.
2. Select Printer Settings.
You see the printer settings window:
33
Page 34

3. Select the print settings you want to use as defaults in all your Windows programs.
4. Click OK.
These settings are now the defaults selected for printing. You can still change them as needed for
printing in any program session.
Changing the Language of the Printer Software Screens
Parent topic: Printing with Windows
Changing the Language of the Printer Software Screens
You can change the language used on the Windows printer software screens.
1. Right-click the product icon in the Windows taskbar.
2. Select Printer Settings.
You see the printer settings window.
3. Click the Maintenance tab.
34
Page 35

You see the maintenance options:
4. Select the language you want to use as the Language setting.
5. Click OK to close the printer software window.
The printer software screens appear in the language you selected the next time you access them.
Parent topic: Selecting Default Print Settings - Windows
Changing Automatic Update Options
Your printer software for Windows automatically checks for updates to the product software. You can
change how often the software checks for updates or disable this feature.
1. Right-click the product icon in the Windows taskbar.
2. Select Software Update Settings.
You see this window:
35
Page 36

3. Do one of the following:
• To change how often the software checks for updates, select a setting in the Check every menu.
• To disable the automatic update feature, select the Never option.
4. Click OK to exit.
Note: If you choose to disable the automatic update feature, you can check for updates manually.
Parent topic: Printing with Windows
Related tasks
Checking for Software Updates
Printing with Mac OS X
You can print with your product using any Mac OS X printing program, as described in these sections.
Selecting Basic Print Settings - Mac OS X
Selecting Page Setup Settings - Mac OS X
Selecting Print Layout Options - Mac OS X
Selecting Printing Preferences - Mac OS X
Printing Your Document - Mac OS X
Parent topic: Printing From a Computer
36
Page 37

Selecting Basic Print Settings - Mac OS X
Select the basic settings for the document you want to print.
1. Open a document for printing.
2. Select the print command in your application.
Note: You may need to select a print icon on your screen, the Print option in the File menu, or
another command. See your application's help utility for details.
3. Select your product as the Printer setting.
4. If necessary, click the arrow next to the Printer setting or the Show Details button to expand the
print window.
You see the expanded printer settings window for your product:
37
Page 38

Note: The print window may look different, depending on the version of Mac OS X and the
application you are using.
5. Select the Copies and Pages settings as necessary.
Note: If you do not see these settings in the print window, check for them in your application before
printing.
6. Select the page setup options: Paper Size and Orientation.
Note: If you do not see these settings in the print window, check for them in your application before
printing. They may be accessible by selecting Page Setup from the File menu.
38
Page 39

7. Select any application-specific settings that appear on the screen, such as those shown in the image
above for the Preview application.
8. Select Print Settings from the pop-up menu.
You see these settings:
9. Select the type of paper you loaded as the Media Type setting.
Note: The setting may not exactly match the name of your paper. Check the paper type settings list
for details.
39
Page 40

10. Select the Print Quality setting you want to use.
Print Quality Options - Mac OS X
Parent topic: Printing with Mac OS X
Related references
Paper or Media Type Settings
Related tasks
Selecting Page Setup Settings - Mac OS X
Printing Your Document - Mac OS X
Print Quality Options - Mac OS X
You can select any of the available Print Quality options to fine-tune the quality of your print. Some
settings may be unavailable, depending on the paper type setting you have chosen.
Draft
For draft printing on plain paper.
Normal
For everyday text and image printing.
Fine
For text and graphics with good quality and print speed.
Quality
For text and graphics with increased quality and print speed.
High
For text and graphics with high print quality.
Parent topic: Selecting Basic Print Settings - Mac OS X
Selecting Page Setup Settings - Mac OS X
Depending on your application, you may be able to select the paper size and orientation settings from
the print window.
40
Page 41

Note: If you do not see these settings in the print window, check for them in your application before
printing. They may be accessible by selecting Page Setup from the File menu.
1. Select the size of the paper you loaded as the Paper Size setting. You can also select a custom
setting to create a custom paper size.
2. Select the orientation of your document as shown in the print window. If you are printing an
envelope, select the icon.
Note: You can reduce or enlarge the size of the printed image by selecting Paper Handling from the
pop-up menu and selecting a scaling option.
Parent topic: Printing with Mac OS X
Selecting Print Layout Options - Mac OS X
You can select a variety of layout options for your document by selecting Layout from the pop-up menu
on the print window.
• To print multiple pages on one sheet of paper, select the number of pages in the Pages per Sheet
pop-up menu. To arrange the print order of the pages, select a Layout Direction setting.
• To print borders around each page on the sheet, select a line setting from the Border pop-up menu.
41
Page 42

• To invert or flip the printed image, select the Reverse page orientation or Flip horizontally settings.
Parent topic: Printing with Mac OS X
Selecting Printing Preferences - Mac OS X
You can select printing preferences that apply to all the print jobs you send to your product.
1. In the Apple menu or the Dock, select System Preferences.
2. Select Print & Fax or Print & Scan, select your product, and select Options & Supplies.
3. Select Driver.
You see this screen:
4. Select any of the available printing preferences.
5. Click OK.
Printing Preferences - Mac OS X
Parent topic: Printing with Mac OS X
Printing Preferences - Mac OS X
You can select from these settings on the Driver tab.
42
Page 43

Skip Blank Page
Ensures that your product does not print pages that contain no text or images.
Quiet Mode
Lessens noise during printing when you select Plain Paper/Bright White Paper as the paper Type or
Media Type setting.
High Speed Printing
Speeds up printing, but may reduce print quality.
Warning Notifications
Lets you choose whether or not to receive warning notifications from the printer software when ink is
low.
Parent topic: Selecting Printing Preferences - Mac OS X
Printing Your Document - Mac OS X
Once you have selected your print settings, you are ready to print.
Click Print at the bottom of the print window.
Checking Print Status - Mac OS X
Parent topic: Printing with Mac OS X
43
Page 44

Checking Print Status - Mac OS X
During printing, you can view the progress of your print job, control printing, and check ink cartridge
status.
1. Click the printer icon when it appears in the Dock.
You see the print status window:
2. Select the following options as necessary for your version of Mac OS X:
• To cancel printing, click the print job and click or Delete.
• To pause a print job, click the print job and click or Hold. To resume a print job, click the
paused print job and click or Resume.
• To pause printing for all queued print jobs, click Pause or Pause Printer.
• To display other printer information, click Settings or Supply Levels.
Parent topic: Printing Your Document - Mac OS X
Cancelling Printing Using a Product Button
If you need to cancel printing, press the cancel button on your product.
Parent topic: Printing From a Computer
44
Page 45

Replacing the Ink Cartridge
When the ink cartridge is expended, you need to replace it.
You may also need to replace a cartridge that is more than six months old, if your printouts do not look
their best, even after cleaning and aligning the print head.
Note: Please dispose of your used Epson branded ink cartridges responsibly and in accordance with
local requirements. If you would like to return your used ink cartridges to Epson for proper disposal,
please go to www.epson.com/recycle for more information.
Check Cartridge Status
Purchase Epson Ink Cartridges
Removing and Installing the Ink Cartridge
Replacing the Ink Cartridge Using a Computer Utility
Check Cartridge Status
Your product and its printing software will let you know when the ink cartridge is low or expended.
Checking Cartridge Status Lights
Checking Cartridge Status with Windows
Checking Cartridge Status with Mac OS X
Parent topic: Replacing the Ink Cartridge
Checking Cartridge Status Lights
You can check the status of your ink cartridge by checking the lights on your product.
• If the ink light is flashing, the cartridge is low. You can continue printing until the cartridge needs
replacement.
• If the ink light is on, the cartridge is expended. You must replace the cartridge before you can print.
Parent topic: Check Cartridge Status
Related tasks
Removing and Installing the Ink Cartridge
45
Page 46

Checking Cartridge Status with Windows
A low ink reminder appears if you try to print when ink is low, and you can check your cartridge status at
any time using a utility on your Windows computer.
1. To check your cartridge status, double-click the product icon in the Windows taskbar, then click the
Details button in the window that appears.
You see a window like this:
2. Replace or reinstall the ink cartridge, if necessary.
Note: If the cartridge is broken, incompatible with the product model, or improperly installed, Epson
Status Monitor will not display an accurate cartridge status.
3. To disable the low ink reminder, right-click the product icon in the Windows taskbar and select
Monitoring Preferences.
You see a window like this:
46
Page 47

4. Deselect the See Low Ink Reminder alerts checkbox at the bottom of the screen.
5. To disable promotional offers, deselect the Display Epson Offers checkbox.
Parent topic: Check Cartridge Status
Related tasks
Removing and Installing the Ink Cartridge
47
Page 48

Checking Cartridge Status with Mac OS X
You can check your cartridge status using a utility on your Mac.
1. Do one of the following:
• Mac OS X 10.6/10.7/10.8: In the Apple menu or the Dock, select System Preferences. Select
Print & Fax or Print & Scan, select your product, and select Options & Supplies. Select Utility
and select Open Printer Utility.
• Mac OS X 10.5: In the Apple menu or the Dock, select System Preferences. Select Print & Fax,
select your product, and select Open Print Queue. Select Utility.
2. Select EPSON Status Monitor.
You see this window:
48
Page 49

3. Do the following as necessary:
• To update the ink cartridge status, click Update.
• Replace or reinstall the ink cartridge, if necessary.
Note: If the cartridge is broken, incompatible with the product model, or improperly installed, Epson
Status Monitor will not display an accurate cartridge status.
Parent topic: Check Cartridge Status
Related tasks
Removing and Installing the Ink Cartridge
Purchase Epson Ink Cartridges
You can purchase genuine Epson ink and paper at Epson Supplies Central at www.epson.com/ink3
(U.S. sales) or www.epson.ca (Canadian sales). You can also purchase supplies from an Epson
authorized reseller. To find the nearest one, call 800-GO-EPSON (800-463-7766).
Note: We recommend that you use genuine Epson cartridges and do not refill them. The use of other
products may affect your print quality and could result in printer damage.
The cartridge included with the printer is designed for printer setup and not for resale. After some ink is
used for priming, the rest is available for printing. Yields vary considerably based on images printed, print
settings, paper type, frequency of use, and temperature. For print quality, a variable amount of ink
remains in the cartridge after the "replace cartridge" indicator comes on.
Ink Cartridge Part Numbers
Parent topic: Replacing the Ink Cartridge
Ink Cartridge Part Numbers
Use these part numbers when you order or purchase new ink cartridges.
Note: For best printing results, use up a cartridge within 6 months of opening the package.
Ink color Part number
Standard-capacity High-capacity
Black 223 223XL
49
Page 50

Parent topic: Purchase Epson Ink Cartridges
Removing and Installing the Ink Cartridge
Make sure you have a replacement cartridge handy before you begin. You must install the new cartridge
immediately after removing the old one.
Caution: Leave your old cartridge in the printer until you are ready to replace it to prevent the print head
nozzles from drying out. Do not open the ink cartridge package until you are ready to install the ink.
Cartridges are vacuum packed to maintain reliability.
1. Turn on your product.
2. Lift up the printer cover.
Caution: Do not touch the flat white cable inside the printer.
3. Do one of the following:
• If the ink light is on, press the cancel button.
50
Page 51

• If the ink light is flashing or off, press the cancel button for six seconds until the ink cartridge
holder moves.
Caution: Do not move the print head by hand; otherwise, you may damage your product.
4. Squeeze the tab on the cartridge and lift the cartridge straight up to remove it.
Note: Dispose of used cartridges carefully. Do not take the used cartridge apart or try to refill it.
51
Page 52

Warning: If ink gets on your skin, wash it thoroughly with soap and water. If ink gets into your eyes,
flush them immediately with water. If ink gets into your mouth, spit it out and see a doctor right away.
Keep ink cartridges out of the reach of children.
5. Before opening the new cartridge package, shake it gently four or five times.
Caution: Do not shake the cartridge after opening the package, or ink may leak.
6. Remove the cartridge from the package.
Caution: Do not touch the green chip or the small window on the cartridge. Install the new cartridge
immediately after removing the old one; if you do not, the print head may dry out and be unable to
print.
52
Page 53

7. Remove the yellow tape from the cartridge.
Caution: Do not remove any other labels or seals, or ink will leak.
8. Insert the new cartridge into the holder and push it down until it clicks into place.
9. Close the printer cover.
53
Page 54

10. Press the cancel button.
The print head moves to its home position and the printer starts priming the ink. This takes about 2
minutes.
Caution: Never turn off the product while the power light is flashing or you will waste ink.
If you remove a low or expended ink cartridge, you cannot re-install and use the cartridge.
Caution: If you remove an ink cartridge for later use, protect the ink supply area from dirt and dust and
store it in the same environment as the printer. The valve in the ink supply port is designed to contain
any excess ink, but do not touch the ink supply port or surrounding area. Always store ink cartridges with
the label facing up; do not store cartridges upside-down.
Parent topic: Replacing the Ink Cartridge
Related concepts
Purchase Epson Ink Cartridges
Replacing the Ink Cartridge Using a Computer Utility
You can use the Ink Cartridge Replacement utility to view on-screen instructions for replacing the ink
cartridge. This method allows you to replace the cartridge before it is low or expended (if it is too old, for
example).
1. Do one of the following:
• Windows: Right-click the product icon in the Windows taskbar and select Printer Settings. Then
click the Maintenance tab.
• Mac OS X 10.6/10.7/10.8: In the Apple menu or the Dock, select System Preferences. Select
Print & Fax or Print & Scan, select your product, and select Options & Supplies. Select Utility
and select Open Printer Utility.
• Mac OS X 10.5: In the Apple menu or the Dock, select System Preferences. Select Print & Fax,
select your product, and select Open Print Queue. Select Utility.
You see a window like this:
54
Page 55

2. Click the Ink Cartridge Replacement icon and follow the on-screen instructions to replace your ink
cartridge.
Parent topic: Replacing the Ink Cartridge
Related concepts
Purchase Epson Ink Cartridges
55
Page 56

Adjusting Print Quality
If your print quality declines, you may need to run a utility to clean or align the print head.
If running these utilities does not solve the problem, you may need to replace the ink cartridge.
Print Head Maintenance
Cleaning the Paper Guide
Related topics
Replacing the Ink Cartridge
Print Head Maintenance
If your printouts become too light, or you see dark or light bands across them, you may need to clean the
print head nozzles. Cleaning uses ink, so clean the nozzles only if print quality declines.
You can check for clogged nozzles before you clean them so you don’t clean them unnecessarily.
Note: You cannot clean the print head if the ink cartridge is expended, and may not be able to clean it
when the cartridge is low. You must replace the cartridge first.
Print Head Nozzle Check
Print Head Cleaning
Print Head Alignment
Parent topic: Adjusting Print Quality
Related topics
Replacing the Ink Cartridge
Print Head Nozzle Check
You can print a nozzle check pattern to check for clogged nozzles.
Checking the Nozzles Using the Product Buttons
Checking the Nozzles Using a Computer Utility
Parent topic: Print Head Maintenance
Checking the Nozzles Using the Product Buttons
You can check the print head nozzles using the buttons on your product.
56
Page 57

1. Make sure no product lights are indicating errors.
2. Load a few sheets of plain paper in the product.
3. Turn off the product.
4. Hold down the cancel button as you press the power button to turn the product back on. Hold
down both buttons until the power light begins to flash, then release the buttons.
5. Check the printed pattern to see if there are gaps in the lines.
Print head is clean
57
Page 58

Print head needs cleaning
6. If there are no gaps, the print head is clean and you can continue printing.
If there are gaps or the pattern is faint, clean the print head.
Parent topic: Print Head Nozzle Check
Related concepts
Print Head Cleaning
Checking the Nozzles Using a Computer Utility
You can check the print head nozzles using a utility on your Windows or Mac computer.
58
Page 59

1. Make sure no product lights are indicating errors.
2. Load a few sheets of plain paper in the product.
3. Do one of the following:
• Windows: Right-click the product icon in the Windows taskbar.
• Mac OS X 10.6/10.7/10.8: In the Apple menu or the Dock, select System Preferences. Select
Print & Fax or Print & Scan, select your product, and select Options & Supplies. Select Utility
and select Open Printer Utility.
• Mac OS X 10.5: In the Apple menu or the Dock, select System Preferences. Select Print & Fax,
select your product, and select Open Print Queue. Select Utility.
4. Select Nozzle Check.
You see a window like this:
5. Click Print.
59
Page 60

6. Check the printed pattern to see if there are gaps in the lines.
Print head is clean
Print head needs cleaning
7. If there are no gaps, click Finish.
If there are gaps or the pattern is faint, clean the print head.
Parent topic: Print Head Nozzle Check
60
Page 61

Related concepts
Print Head Cleaning
Print Head Cleaning
If print quality has declined and the nozzle check pattern indicates clogged nozzles, you can clean the
print head.
Note: You cannot clean the print head if the ink cartridge is expended, and may not be able to clean it
when the cartridge is low. You must replace the cartridge first.
Cleaning the Print Head Using the Product Buttons
Cleaning the Print Head Using a Computer Utility
Parent topic: Print Head Maintenance
Related concepts
Print Head Nozzle Check
Related topics
Replacing the Ink Cartridge
Cleaning the Print Head Using the Product Buttons
You can clean the print head using the buttons on your product.
1. Make sure no product lights are indicating errors.
2. Load a few sheets of plain paper in the product.
3. Hold down the cancel button for 3 seconds until the power light flashes. The cleaning cycle
starts.
61
Page 62

The power light flashes throughout the cleaning cycle and stays on when the cleaning cycle is
finished.
Caution: Never turn off the product during a cleaning cycle or you may damage it.
4. Run a nozzle check to confirm that the print head is clean.
If you don’t see any improvement after cleaning the print head up to 4 times, turn off the product and wait
at least 6 hours. Then try cleaning the print head again. If quality still does not improve, the ink cartridge
may be old or damaged and needs to be replaced.
Parent topic: Print Head Cleaning
Related concepts
Print Head Nozzle Check
Related topics
Replacing the Ink Cartridge
Cleaning the Print Head Using a Computer Utility
You can clean the print head using a utility on your Windows or Mac computer.
1. Make sure no product lights are indicating errors.
2. Load a few sheets of plain paper in the product.
62
Page 63

3. Do one of the following:
• Windows: Right-click the product icon in the Windows taskbar.
• Mac OS X 10.6/10.7/10.8: In the Apple menu or the Dock, select System Preferences. Select
Print & Fax or Print & Scan, select your product, and select Options & Supplies. Select Utility
and select Open Printer Utility.
• Mac OS X 10.5: In the Apple menu or the Dock, select System Preferences. Select Print & Fax,
select your product, and select Open Print Queue. Select Utility.
4. Select Head Cleaning.
You see a window like this:
5. Click Start to begin the cleaning cycle.
The power light flashes throughout the cleaning cycle and stays on when the cleaning cycle is
finished.
Caution: Never turn off the product during a cleaning cycle or you may damage it.
63
Page 64

6. When the power light stops flashing and remains on, you can check to see if the nozzles are
clean; click Print Nozzle Check Pattern and click Print.
7. Check the printed pattern to see if there are gaps in the lines.
Print head is clean
Print head needs cleaning
• If there are no gaps, click Finish.
• If there are gaps or the pattern is faint, click Clean to clean the print head again.
64
Page 65

If you don’t see any improvement after cleaning the print head up to 4 times, turn off the product and wait
at least 6 hours. Then try cleaning the print head again. If quality still does not improve, the ink cartridge
may be old or damaged and needs to be replaced.
Parent topic: Print Head Cleaning
Related concepts
Print Head Nozzle Check
Related topics
Replacing the Ink Cartridge
Print Head Alignment
If your printouts become grainy or blurry, you notice misalignment of vertical lines, or you see dark or
light horizontal bands, you may need to align the print head.
Note: Banding may also occur if your print head nozzles need cleaning.
Aligning the Print Head Using a Computer Utility
Parent topic: Print Head Maintenance
Related concepts
Print Head Cleaning
Aligning the Print Head Using a Computer Utility
You can align the print head using a utility on your Windows computer or Mac.
1. Make sure no product lights are indicating errors.
2. Load a few sheets of plain paper in the product.
3. Do one of the following:
• Windows: Right-click the product icon in the Windows taskbar.
• Mac OS X 10.6/10.7/10.8: In the Apple menu or the Dock, select System Preferences. Select
Print & Fax or Print & Scan, select your product, and select Options & Supplies. Select Utility
and select Open Printer Utility.
• Mac OS X 10.5: In the Apple menu or the Dock, select System Preferences. Select Print & Fax,
select your product, and select Open Print Queue. Select Utility.
4. Select Print Head Alignment.
65
Page 66

5. Click Next, then click Print to print an alignment sheet.
Note: Do not cancel printing while you are printing a head alignment pattern.
You see a window like this:
6. Check the printed pattern and follow the instructions on the screen to choose the number
representing the best printed pattern for each set.
• After choosing each pattern number, click Next.
• If no patterns are aligned in one or more of the sets, choose the closest one in each set and click
Realignment. Then print another alignment sheet and check it.
Note: Click Skip (where available) if you want to skip a particular alignment sheet.
7. When you are done, click Finish.
Parent topic: Print Head Alignment
66
Page 67

Cleaning the Paper Guide
If you see ink on the back of a printout, you can clean the paper guide to remove any excess ink.
1. Make sure no product lights are indicating errors.
2. Load a few sheets of plain paper in the product.
3. Do one of the following:
• Windows: Right-click the product icon in the Windows taskbar and select Printer Settings. Then
click the Maintenance tab.
• Mac OS X 10.6/10.7/10.8: In the Apple menu or the Dock, select System Preferences. Select
Print & Fax or Print & Scan, select your product, and select Options & Supplies. Select Utility
and select Open Printer Utility.
• Mac OS X 10.5: In the Apple menu or the Dock, select System Preferences. Select Print & Fax,
select your product, and select Open Print Queue. Select Utility.
4. Select Paper Guide Cleaning.
5. Follow the on-screen instructions to feed paper through the paper guide.
6. Check the back of the ejected paper to see if it is clean.
7. Repeat as necessary until the paper comes out clean.
Parent topic: Adjusting Print Quality
67
Page 68

Cleaning and Transporting the Product
If your product gets dirty or you need to move it some distance, follow the instructions in these sections.
Cleaning the Product
Transporting the Product
Cleaning the Product
To keep your product working at its best, you should clean it several times a year.
Caution: Do not use a hard brush, benzene, alcohol, or paint thinner to clean the product or you may
damage it. Do not place anything on top of the cover or use the cover as a writing surface, or it could get
permanently scratched. Do not use oil or other lubricants inside the product or let water get inside.
1. Turn off the product.
2. Unplug the power cable.
3. Disconnect any connected cables.
4. Remove all the paper from the product.
5. Clean the outer case with a soft cloth dampened with a mild detergent.
Note: Close the paper support and output tray when you are not using the product.
Parent topic: Cleaning and Transporting the Product
Related tasks
Cleaning the Paper Guide
Transporting the Product
If you need to ship your product or transport it a long distance, prepare it for transportation as follows.
1. Turn off the product.
2. Remove all the paper from the product.
68
Page 69

3. Open the printer cover and check to see if the print head is in the far right position (the home
position). If not, turn on the product, wait for the print head to move, then turn the product off again.
4. Secure the ink cartridge holder to the case with tape.
Caution: Do not place tape on the white flat cable inside the product; otherwise, you may damage
your product.
5. Close the printer cover.
69
Page 70

6. Unplug the power cable.
7. Disconnect any connected cables.
8. Close the paper support and output tray.
9. Pack the product in its original box or one of a similar size using the protective materials that came
with it.
10. Keep the product level during transportation; otherwise the ink may leak.
Be sure to remove the tape from the ink cartridge holder before turning on your product. If print quality
has declined when you print again in a new location, clean and align the print head.
Parent topic: Cleaning and Transporting the Product
Related concepts
Print Head Alignment
Print Head Cleaning
70
Page 71

Solving Problems
Check these sections for solutions to problems you may have using your product.
Checking for Software Updates
Product Light Status
Running a Product Check
Solving Setup Problems
Solving Network Problems
Solving Paper Problems
Solving Problems Printing from a Computer
Solving Page Layout and Content Problems
Solving Print Quality Problems
When to Uninstall Your Product Software
Where to Get Help
Checking for Software Updates
Periodically, it's a good idea to check Epson's support website for free updates to your product software.
Visit the driver download site at (U.S. downloads or Canadian downloads).
You can also manually update the software by selecting Software Update here:
• Right-clicking the product icon in the Windows taskbar
• On the Maintenance tab in the printer settings window
• On the Start screen (Windows 8) or in the EPSON program group under your product name (other
Windows versions)
Parent topic: Solving Problems
Product Light Status
You can often diagnose problems with your product by checking its lights.
71
Page 72

Lights
1
power
2 WiFi
3
paper
4 ink
Light status Condition/solution
The power light is on
The product is turned on.
The power light is flashing The product is busy. Wait for the power light to stop flashing before
turning off the product.
The paper light is flashing
Paper is jammed in the product. Remove the jammed paper, and press
the cancel button to clear the error.
The paper light is on
No paper is loaded or multiple sheets fed at one time. Load paper in the
product, and press the cancel button to clear the error.
The ink light is on The ink cartridge is expended, incompatible with the product, or not
installed correctly. Make sure the cartridge is installed correctly or
replace it, if necessary.
The ink light is flashing The ink cartridge is low. Make sure you have a replacement cartridge.
The ink and paper lights
are flashing alternately
The ink pads are nearing or at the end of their service life. Contact
Epson for support. (If the ink pads are not yet at the end of their service
life, press the cancel button to resume printing.)
72
Page 73

Light status Condition/solution
The power, paper, and
ink lights are flashing fast
The paper and ink lights
are on
Note: The ink pads in the printer collect, distribute, and contain the ink that is not used on printed pages.
During the life of your product it may reach a condition where either satisfactory print quality cannot be
maintained or the ink pads have reached the end of their usable life. The Epson Status Monitor, your
LCD, or lights on the control panel will advise you when these parts need replacing. If this happens
during the standard warranty of the product, the exchange of the product or replacement of the pads is
covered under the standard warranty. If the product is out of warranty, the pads can be replaced by any
Epson authorized service provider. The waste ink pads are not a user-serviceable part.
Parent topic: Solving Problems
Related references
Paper Jam Problems
Where to Get Help
Related topics
Loading Paper
An unknown product error has occurred. Turn the product off. Make
sure no paper is jammed in the product, then turn the product back on
again. If the error continues, contact Epson for support.
An error has occurred during firmware updating. Connect your product
using a USB cable and try downloading the Firmware Update from
Epson's support website. If the error continues, contact Epson for
support.
Running a Product Check
Running a product check helps you determine if the printer is operating properly.
1. Press the power button to turn off the printer.
2. Disconnect any interface cables connected to your product.
3. Load plain paper in the product.
73
Page 74

4. Hold down the cancel button as you press the power button to turn the product back on. Hold
down both buttons until the power light begins to flash, then release the buttons.
The printer begins printing a nozzle check pattern.
5. Do the following, depending on the results of the printer check:
• If the page prints and the nozzle check pattern is complete, the printer is operating properly. Any
operation problem you may have could be caused by your computer, cable, software, or selected
print settings. Check the other solutions in this manual or try uninstalling and reinstalling your
printer software.
• If the page prints but the nozzle check pattern has gaps, clean or align the print head.
• If the page does not print, the printer may have a problem. Check the other solutions in this
manual. If they do not work, contact Epson.
Parent topic: Solving Problems
Related concepts
Print Head Alignment
Print Head Cleaning
When to Uninstall Your Product Software
Related references
Where to Get Help
74
Page 75

Solving Setup Problems
Check these sections if you have problems while setting up your product.
Noise After Ink Installation
Software Installation Problems
Parent topic: Solving Problems
Noise After Ink Installation
If you hear noises from your product after installing ink, check the following:
• The first time you install the ink cartridge, the product must prime its print head. Wait until priming
finishes before you turn off the product, or it may prime improperly and use excess ink the next time
you turn it on. Your product is finished priming the print head when the power light stops flashing.
• If the product's print head stops moving or making noise, and the charging process has not finished
after approximately 5 minutes, turn off your product. Turn it back on and check to see if charging is still
in progress. If it is still in progress, contact Epson for help.
Parent topic: Solving Setup Problems
Related topics
Replacing the Ink Cartridge
Software Installation Problems
If you have problems while installing your product software, try these solutions:
• Make sure your product is turned on and any necessary cables are securely connected at both ends. If
you still have problems installing software, disconnect the cable and carefully follow the instructions on
the Start Here sheet. Also make sure your system meets the requirements for your operating system.
• Close any other programs, including screen savers and virus protection software, and install your
product software again.
• In Windows, make sure your product is selected as the default printer and the correct port is shown in
the printer properties.
• If you see any error message or your software does not install correctly in Windows, you may not have
software installation privileges. Contact your System Administrator.
Parent topic: Solving Setup Problems
Related concepts
When to Uninstall Your Product Software
75
Page 76

Related references
Windows System Requirements
Mac System Requirements
Solving Network Problems
Check these solutions if you have problems setting up or using your product on a network.
Note: Breakdown or repair of this product may cause loss of network data and settings. Epson is not
responsible for backing up or recovering data and settings during or after the warranty period. We
recommend that you make your own backup or print out your network data and settings.
Product Cannot Connect to a Wireless Router or Access Point
Network Software Cannot Find Product on a Network
Product Does Not Appear in Mac OS X Printer Window
Cannot Print Over a Network
Printing a Network Status Sheet
Parent topic: Solving Problems
Product Cannot Connect to a Wireless Router or Access Point
If your product has trouble finding or connecting to a wireless router or access point, try these solutions:
• If you are connecting the product via Wi-Fi Protected Setup (WPS) and the WiFi light on your product
is not solid green, make sure you press the Wi-Fi button on the product within 2 minutes of pressing
the WPS button on your router. Hold down the Wi-Fi button on the product for 3 seconds.
• Make sure to place your product within contact range of your router or access point.
Note: Avoid placing your product near a microwave oven, 2.4 GHz cordless phone, or large metal
object, such as a filing cabinet.
• Verify that your router or access point is operating correctly by connecting to it from your computer or
another device.
• You may need to disable the firewall and any anti-virus software on your wireless router or access
point.
• Check to see if access restrictions, such as MAC address filtering, are set on the router or access
point. If access restrictions are set, add your product's MAC address to your router's address list. To
76
Page 77

obtain your product's MAC address, print a network status sheet. Then follow the instructions in your
router or access point documentation to add the address to the list.
• If your router or access point does not broadcast its network name (SSID), follow the instructions that
came with your product to enter your wireless network name manually.
• If your router or access point has security enabled, determine the kind of security it is using and any
required password or passphrase for connection. Then make sure to enter the exact WEP key or WPA
passphrase correctly.
• Check if your computer is restricting the available wireless channels. If so, verify that your wireless
access point is using one of the usable channels and change to a usable channel, if necessary.
Parent topic: Solving Network Problems
Network Software Cannot Find Product on a Network
If EpsonNet Setup cannot find your product on a network, try these solutions:
• Make sure your product is turned on and connected to your network. Verify connection using your
product control panel.
• Check if your network name (SSID) contains non-ASCII characters. Your product cannot display non-
ASCII characters.
• If necessary, reinstall your product software and try running EpsonNet Setup again:
1. Reset your product's network settings to their factory defaults.
2. Windows only: uninstall your product software.
3. Initialize your router following the instructions in your router documentation.
Note: If you are reading these instructions online, you will lose your internet connection when you
initialize your router, so note the next step before initializing it.
4. Download your product software from the Epson website, or install it from the CD that came with
your product using the instructions on the Start Here sheet.
• If you have replaced your router, reinstall your product software to connect to the new router.
Parent topic: Solving Network Problems
Related concepts
When to Uninstall Your Product Software
77
Page 78

Product Does Not Appear in Mac OS X Printer Window
If your product does not appear in the Mac OS X printer window, try these solutions:
• Turn your product off, wait 30 seconds, then turn it back on again.
• If you are connecting the product via Wi-Fi Protected Setup (WPS) and the WiFi light on your product
is not solid green, make sure you press the Wi-Fi button on the product within 2 minutes of pressing
the WPS button on your router. Hold down the Wi-Fi button on the product for 3 seconds.
• If you are connecting the product wirelessly via EpsonNet Setup and the WiFi light on your product is
not solid green, make sure your product software was installed correctly. If necessary, reinstall your
software.
Parent topic: Solving Network Problems
Cannot Print Over a Network
If you cannot print over a network, try these solutions:
• Make sure that your product is turned on.
• Make sure you install your product's network software as described in your product documentation.
• Print a network status sheet and verify that the network settings are correct. If the network status is
Disconnected, check any cable connections and turn your product off and then on again.
• If you are using TCP/IP, make sure the product's IP address is set correctly for your network. If your
network does not assign IP addresses using DHCP, set the IP address manually.
• Make sure your computer and product are both using the same wireless network.
• If network printing is slow, print a network status sheet and check the signal strength. If it is poor, place
your product closer to your router or access point.
Note: Avoid placing your product near a microwave oven, 2.4 GHz cordless phone, or large metal
object, such as a filing cabinet.
• If you are connecting the product via Wi-Fi Protected Setup (WPS) and the WiFi light on your product
is not solid green, make sure you press the Wi-Fi button on the product within 2 minutes of pressing
the WPS button on your router. Hold down the Wi-Fi button on the product for 3 seconds.
• Check your wired LAN router or access point to see if the LED for the port to which your product is
connected is on or flashing . If the link LED is off, try the following:
• Make sure the Ethernet cable is securely connected to your product and to your router, access
point, switch, or hub.
78
Page 79

• Try connecting your product to a different port or a different router, access point, switch, or hub.
• Try connecting with a different Ethernet cable.
• Try printing to your product from another computer on the network.
• If you are connecting the product via EpsonNet Setup and the WiFi light on your product is not solid
green , make sure your product software was installed correctly. If necessary, reinstall your software.
Parent topic: Solving Network Problems
Related tasks
Printing a Network Status Sheet
Printing a Network Status Sheet
You can print a network status sheet to help you determine the causes of any problems you may have
using your product on a network.
To print the status sheet, press the network status button on the product. Examine the settings shown
on the network status sheet to diagnose any problems you have.
Parent topic: Solving Network Problems
Solving Paper Problems
Check these sections if you have problems using paper with your product.
Paper Feeding Problems
Paper Jam Problems
Paper Ejection Problems
Parent topic: Solving Problems
Paper Feeding Problems
If you have problems feeding paper, try these solutions:
• If paper does not feed for printing, remove it. Then reload it in the sheet feeder against the right side
and beneath the tab. Slide the edge guide against the edge of the paper, making sure that the paper
stack is not above the arrow mark on the edge guide.
• If multiple pages feed at once, remove the paper, fan the edges to separate the sheets, and reload it.
• If paper jams when you load only one or two sheets, try loading more sheets at a time. Do not load
more than the recommended number of sheets.
• If paper jams when you print on both sides of the paper, try loading fewer sheets.
79
Page 80

• For best results, follow these guidelines:
• Use new, smooth, high-quality paper that is not curled, creased, old, too thin, or too thick.
• Load paper in the sheet feeder printable side up.
• Follow any special loading instructions that came with the paper.
Parent topic: Solving Paper Problems
Related references
Paper Jam Problems
Paper Loading Capacity
Related topics
Loading Paper
Paper Jam Problems
If paper has jammed inside the product, follow these steps:
1. Cancel the print job from your computer, if necessary.
2. Gently pull out any jammed paper from the output tray and sheet feeder.
3. Open the printer cover.
Note: Do not touch the flat, white cable inside the product.
4. Remove any jammed paper or torn pieces.
80
Page 81

5. Close the cover.
6. Press the cancel button to resume printing.
7. Carefully follow all paper loading instructions when you load new paper.
Parent topic: Solving Paper Problems
Related topics
Loading Paper
Paper Ejection Problems
If you have problems with paper ejecting properly, try these solutions:
• If paper does not eject fully, you may have set the wrong paper size. Cancel printing using the product
control panel, then press the cancel button to eject the paper. Remove any paper remaining in the
product. Select the correct size when you reprint.
• If paper is wrinkled when it ejects, it may be damp or too thin. Load new paper and be sure to select
the correct paper type setting in your printer software when you reprint.
Parent topic: Solving Paper Problems
Related references
Paper Jam Problems
Paper or Media Type Settings
81
Page 82

Related tasks
Cancelling Printing Using a Product Button
Related topics
Loading Paper
Solving Problems Printing from a Computer
Check these sections if you have problems while printing from your computer.
Nothing Prints
Noise Occurs, But Nothing Prints
Noise When Product Sits for a While
Product Icon Does Not Appear in Windows Taskbar
Error After Cartridge Replacement
Printing is Slow
Parent topic: Solving Problems
Nothing Prints
If you have sent a print job and nothing prints, try these solutions:
• Make sure your product is turned on.
• Make sure any interface cables are connected securely at both ends.
• If you connected your product to a USB hub, make sure it is a first-tier hub. If it still does not print,
connect your product directly to your computer instead of the hub.
• Run a product check to see if a test page prints. If the test page prints, check to see if your product
software is installed correctly.
• In Windows, make sure your product is selected as the default printer.
• In Windows, clear any stalled print jobs from the Windows Spooler:
• Windows 8: Navigate to the Start screen, right-click the screen, and select All apps. Select
Control Panel > Hardware and Sound > Devices and Printers. Right-click your product name,
select See what's printing, and select your product name again if necessary. Right-click the stalled
print job, click Cancel, and click Yes.
• Windows 7: Click and select Devices and Printers. Right-click your product name, select See
what's printing, and select your product name again, if necessary. Right-click the stalled print job,
click Cancel, and click Yes.
82
Page 83

• Windows Vista: Click and select Control Panel. Click Printer under Hardware and Sound,
right-click your product name, and select Open. Right click the stalled print job, click Cancel, and
click Yes.
• Windows XP: Click Start and select Printers and Faxes. (Or open the Control Panel, select
Printers and Other Hardware, if necessary, and select Printers and Faxes.) Right-click your
product name, select Open, right-click the stalled print job, click Cancel, and click Yes.
Parent topic: Solving Problems Printing from a Computer
Related tasks
Running a Product Check
Noise Occurs, But Nothing Prints
If your product makes a printing noise, but nothing prints, try these solutions:
• Run a print head nozzle check to see if any of the nozzles are clogged. Then clean the print head, if
necessary.
• Your product will not operate properly while tilted at an angle. Place it on a flat, stable surface that
extends beyond the base of the product in all directions.
Parent topic: Solving Problems Printing from a Computer
Noise When Product Sits for a While
Your product is performing routine maintenance. This is normal.
Parent topic: Solving Problems Printing from a Computer
Product Icon Does Not Appear in Windows Taskbar
If you do not see your product icon in the Windows taskbar, first try restarting your computer. If that does
not work, try this solution:
1. Do one of the following:
• Windows 8: Navigate to the Start screen, right-click the screen and select All apps. Select
Control Panel > Hardware and Sound > Devices and Printers.
• Windows 7: Click and select Devices and Printers.
• Windows Vista: Click , select Control Panel, and click Printer under Hardware and Sound.
• Windows XP: Click Start and select Printers and Faxes. (Or open the Control Panel, select
Printers and Other Hardware, if necessary, and Printers and Faxes.)
83
Page 84

2. Right-click your product name, select Printing Preferences, and select your product name again if
necessary.
3. Click the Maintenance tab.
4. Click the Extended Settings button.
5. Select Enable EPSON Status Monitor 3, then click OK.
6. Click the Monitoring Preferences button.
7. Click the Register the shortcut icon to the taskbar checkbox.
8. Click OK to close the open program windows.
Parent topic: Solving Problems Printing from a Computer
Error After Cartridge Replacement
If you see an error light or error message after you replace an ink cartridge, follow these steps:
1. Make sure the print head is in the ink cartridge replacement position. (The ink cartridge holder should
be beneath the cutout in the product case, allowing access to the cartridge.)
Note: If the print head is not in the ink cartridge replacement position, follow the instructions on
replacing an ink cartridge in this manual to move it.
2. Remove and reinsert the ink cartridge, making sure to push it all the way into its slot.
3. Complete the ink cartridge installation steps.
Parent topic: Solving Problems Printing from a Computer
Related topics
Replacing the Ink Cartridge
Printing is Slow
If printing becomes slow, try these solutions:
• Make sure your system meets the requirements for your operating system. If you are printing a high-
resolution image, you may need more than the minimum requirements. If necessary, increase your
system's memory.
• If you are using Windows 7, close the Devices and Printers window before you print.
• Clear space on your hard drive or run a defragmentation utility to free up existing space.
• Close any programs you are not using when you print.
84
Page 85

• If your product is connected to a USB hub, connect it directly to your computer instead.
• If printing becomes slower after printing continuously for a long time, the product may have
automatically slowed down to protect the print mechanism from overheating or becoming damaged.
Let the product rest with the power on for 30 minutes, then try printing again.
For the fastest printing, select the following settings in your product software:
• Make sure the paper type setting matches the type of paper you loaded.
• Turn on any high speed settings in your product software.
• Select a lower print quality setting.
• Windows: Click the Maintenance tab, select Extended Settings, and select the following settings:
• High Speed Copies
• Always spool RAW datatype
• Page Rendering Mode
• Print as Bitmap
Parent topic: Solving Problems Printing from a Computer
Related references
Windows System Requirements
Mac System Requirements
Paper or Media Type Settings
Related tasks
Selecting Basic Print Settings - Windows
Selecting Basic Print Settings - Mac OS X
Solving Page Layout and Content Problems
Check these sections if you have problems with the layout or content of your printed pages.
Inverted Image
Too Many Copies Print
Blank Pages Print
Incorrect Margins on Printout
Incorrect Characters Print
Incorrect Image Size or Position
Slanted Printout
85
Page 86

Parent topic: Solving Problems
Inverted Image
If your printed image is inverted unexpectedly, try these solutions:
• Turn off any mirror or inversion settings in your printing application.
• Turn off the Mirror Image, Flip horizontally, or Reverse page orientation settings in your printer
software. (This option has different names, depending on your operating system version.)
Note: Leave these options turned on when you print on Epson Iron-on Cool Peel Transfer paper, if
available for your product.
Parent topic: Solving Page Layout and Content Problems
Related tasks
Selecting Additional Layout and Print Options - Windows
Selecting Print Layout Options - Mac OS X
Too Many Copies Print
Make sure that the Copies setting in your printing program or printer software is not set for multiple
copies.
Parent topic: Solving Page Layout and Content Problems
Related tasks
Selecting Basic Print Settings - Windows
Selecting Basic Print Settings - Mac OS X
Blank Pages Print
If blank pages print unexpectedly, try these solutions:
• Make sure you selected the correct paper size settings in your printing program and printer software.
• If a blank page exists in a document you are printing and you want to skip printing it, select the Skip
Blank Page setting in your printer software.
• Run a print head nozzle check to see if any of the nozzles are clogged. Then clean the print head, if
necessary.
• Make sure your product is selected as the printer in your printing program.
Parent topic: Solving Page Layout and Content Problems
86
Page 87

Related concepts
Print Head Nozzle Check
Print Head Cleaning
Related tasks
Selecting Basic Print Settings - Windows
Selecting Basic Print Settings - Mac OS X
Selecting Printing Preferences - Mac OS X
Incorrect Margins on Printout
If your printed page has incorrect margins, try these solutions:
• Make sure you selected the correct paper size settings in your printing program and printer software.
• Make sure you selected the correct margins for your paper size in your printing program.
• Make sure your paper is positioned correctly for feeding into the printer.
You can use the preview option in your printer software to check your margins before you print.
Parent topic: Solving Page Layout and Content Problems
Related tasks
Selecting Basic Print Settings - Windows
Selecting Basic Print Settings - Mac OS X
Related topics
Loading Paper
Incorrect Characters Print
If incorrect characters appear in your prints, try these solutions before reprinting:
• Make sure any cables are securely connected at both ends.
• In Windows, delete all print jobs from the Windows Spooler:
• Windows 8: Navigate to the Start screen, right-click the screen, and select All apps. Select
Control Panel > Hardware and Sound > Devices and Printers. Right-click your product name,
select See what's printing, and select your product name again, if necessary. Right-click the
stalled print job, click Cancel, and click Yes.
• Windows 7: Click and select Devices and Printers. Right-click your product name, select See
what's printing, and select your product name again, if necessary. Right-click the stalled print job,
click Cancel, and click Yes.
87
Page 88

• Windows Vista: Click and select Control Panel. Click Printer under Hardware and Sound,
right-click your product name, and select Open. Right click the stalled print job, click Cancel, and
click Yes.
• Windows XP: Click Start and select Printers and Faxes. (Or open the Control Panel, select
Printers and Other Hardware if necessary, and select Printers and Faxes.) Right-click your
product name, select Open, right-click the stalled print job, click Cancel, and click Yes.
• Make sure your product is selected as the printer in your printing program.
• If your product is connected to a USB hub, connect it directly to your computer instead.
Parent topic: Solving Page Layout and Content Problems
Related tasks
Selecting Basic Print Settings - Windows
Selecting Basic Print Settings - Mac OS X
Incorrect Image Size or Position
If your printed image is the wrong size or in the wrong position, try these solutions:
• Make sure you selected the correct paper size and layout settings in your printing program and printer
software.
• Make sure your paper is positioned correctly for feeding into the printer.
You can use the preview option in your printer software to check your margins before you print.
Parent topic: Solving Page Layout and Content Problems
Related tasks
Selecting Basic Print Settings - Windows
Selecting Additional Layout and Print Options - Windows
Selecting Basic Print Settings - Mac OS X
Selecting Print Layout Options - Mac OS X
Related topics
Loading Paper
Slanted Printout
If your printouts are slanted, try these solutions:
• Slide the edge guide against the edge of the paper.
88
Page 89

• Select a higher print quality setting in your printer software.
• Align the print head.
• Make sure the product is not printing while tilted or at an angle.
Parent topic: Solving Page Layout and Content Problems
Related tasks
Selecting Basic Print Settings - Windows
Selecting Basic Print Settings - Mac OS X
Related topics
Loading Paper
Solving Print Quality Problems
Check these sections if your printouts have problems with print quality, but your image looks fine on your
computer screen.
White or Dark Lines in Printout
Blurry or Smeared Printout
Faint Printout or Printout Has Gaps
Grainy Printout
Parent topic: Solving Problems
White or Dark Lines in Printout
If you notice white or dark lines in your prints (also called banding), try these solutions before you reprint:
• Run a nozzle check to see if any of the print head nozzles are clogged. Then clean the print head, if
necessary.
• Make sure the paper type setting matches the type of paper you loaded.
• Make sure you loaded the printable side of the paper correctly for your product.
• Turn off any high speed settings in your product software.
• Align the print head.
• You may need to replace the ink cartridge.
Parent topic: Solving Print Quality Problems
Related concepts
Print Head Nozzle Check
89
Page 90

Print Head Cleaning
Print Head Alignment
Related references
Paper or Media Type Settings
Related tasks
Selecting Basic Print Settings - Windows
Selecting Additional Layout and Print Options - Windows
Selecting Basic Print Settings - Mac OS X
Selecting Print Layout Options - Mac OS X
Related topics
Replacing the Ink Cartridge
Blurry or Smeared Printout
If your printouts are blurry or smeared, try these solutions:
• Make sure your paper is not damp, curled, old, or loaded incorrectly in your product.
• Use a support sheet with special paper, or load special paper one sheet at a time.
• Make sure your paper meets the specifications for your product.
• Use Epson papers to ensure proper saturation and absorption of genuine Epson inks.
• Make sure the paper type setting in your product software matches the type of paper you loaded.
• Remove each sheet from the output tray as it is printed.
• Avoid handling printouts on glossy paper right after printing to allow the ink to set.
• Turn off any high speed settings in your product software.
• If you print on both sides of a sheet of paper, smudges may appear on the reverse side of heavily
saturated or dark images. If one side of a sheet will contain a lighter image or text, print that side first.
Make sure the ink has dried before reloading the paper to print on the other side.
• Run a nozzle check to see if any of the print head nozzles are clogged. Then clean the print head, if
necessary.
• Align the print head.
• Clean the paper path.
90
Page 91

Note: Your product will not operate properly while tilted at an angle. Place it on a flat, stable surface that
extends beyond the base of the product in all directions.
Parent topic: Solving Print Quality Problems
Related concepts
Print Head Cleaning
Print Head Alignment
Related references
Available EPSON Papers
Paper Specifications
Related tasks
Selecting Basic Print Settings - Windows
Selecting Additional Layout and Print Options - Windows
Selecting Basic Print Settings - Mac OS X
Selecting Print Layout Options - Mac OS X
Cleaning the Paper Guide
Related topics
Loading Paper
Faint Printout or Printout Has Gaps
If your printouts are faint or have gaps, try these solutions:
• Run a nozzle check to see if any of the print head nozzles are clogged. Then clean the print head, if
necessary.
• The ink cartridge may be old or low on ink, and you may need to replace it.
• Make sure the paper type setting matches the type of paper you loaded.
• Make sure your paper is not damp, curled, old, or loaded incorrectly in your product.
• Align the print head.
• Clean the paper path.
Parent topic: Solving Print Quality Problems
Related concepts
Print Head Nozzle Check
Print Head Cleaning
91
Page 92

Print Head Alignment
Related references
Paper or Media Type Settings
Related tasks
Selecting Basic Print Settings - Windows
Selecting Basic Print Settings - Mac OS X
Cleaning the Paper Guide
Related topics
Loading Paper
Replacing the Ink Cartridge
Grainy Printout
If your printouts are grainy, try these solutions:
• Make sure you loaded the printable side of the paper correctly for your product.
• Select a higher print quality setting and turn off any high speed settings in your product software.
• Run a nozzle check to see if any of the print head nozzles are clogged. Then clean the print head, if
necessary.
• Align the print head.
• You may need to increase the image resolution or print a smaller size; see your software
documentation.
Parent topic: Solving Print Quality Problems
Related concepts
Print Head Nozzle Check
Print Head Cleaning
Print Head Alignment
Related tasks
Selecting Basic Print Settings - Windows
Selecting Additional Layout and Print Options - Windows
Selecting Basic Print Settings - Mac OS X
Selecting Printing Preferences - Mac OS X
92
Page 93

Related topics
Loading Paper
When to Uninstall Your Product Software
If you have a problem that requires you to uninstall and re-install your software, follow the instructions for
your operating system.
Uninstalling Printing Software - Windows
Uninstalling Product Software - Mac OS X
Parent topic: Solving Problems
Uninstalling Printing Software - Windows
You can uninstall and then re-install your printer software to solve certain problems.
1. Turn off the product.
2. Disconnect any interface cables.
3. Do one of the following:
• Windows 8: Navigate to the Start screen, right-click the screen and select All apps. Select
Control Panel > Programs > Programs and Features. Select the uninstall option for your Epson
product, then select Uninstall/Change.
Note: If you see a User Account Control window, click Yes or Continue.
Select your product again, if necessary, then select OK, and click Yes to confirm the
uninstallation.
• Windows (other versions): Click or Start, and select All Programs or Programs. Select
EPSON, select your product, then click EPSON Printer Software Uninstall.
Note: If you see a User Account Control window, click Yes or Continue.
In the next window, select your product and click OK. Then follow any on-screen instructions.
4. Restart your computer, then see the Start Here sheet to re-install your software.
Note: If you find that re-installing your product software does not solve a problem, contact Epson.
Parent topic: When to Uninstall Your Product Software
93
Page 94

Uninstalling Product Software - Mac OS X
In most cases, you do not need to uninstall your product software before re-installing it. However, you
can download the Uninstaller utility from the Epson support website to uninstall your product software as
described here.
Note: If you find that re-installing your product software does not solve a problem, contact Epson.
1. To download the Uninstaller utility, visit the Epson download site (U.S. downloads or Canadian
downloads).
2. Follow the instructions on the screen to install the Uninstaller utility.
3. Quit all applications currently running on your Mac.
4. Double-click the Uninstaller icon.
5. Select the checkbox for each software program you want to uninstall.
6. Click Uninstall.
7. Follow the on-screen instructions to uninstall the software.
8. To reinstall your product software, see the Start Here sheet for instructions.
Note: If you uninstall the printer driver and your product name remains in the Print & Fax or Print & Scan
window, select your product name and click the – (remove) icon to remove it.
Parent topic: When to Uninstall Your Product Software
Where to Get Help
If you need to contact Epson for technical support services, use the following support options.
Internet Support
Visit Epson's support website at www.epson.com/support (U.S.) or www.epson.ca/support (Canada) for
solutions to common problems. You can download drivers and documentation, get FAQs and
troubleshooting advice, or e-mail Epson with your questions.
Speak to a Support Representative
Before you call Epson for support, please have the following information ready:
• Product name
• Product serial number (located on a label on the product)
94
Page 95

• Proof of purchase (such as a store receipt) and date of purchase
• Computer configuration
• Description of the problem
Then call:
• U.S.: (562) 276-7202, 6 AM to 8 PM, Pacific Time, Monday through Friday, and 7 AM to 4 PM, Pacific
Time, Saturday
• Canada: (905) 709-2567, 6 AM to 8 PM, Pacific Time, Monday through Friday, and 7 AM to 4 PM,
Pacific Time, Saturday
Days and hours of support are subject to change without notice. Toll or long distance charges may
apply.
Purchase Supplies and Accessories
You can purchase genuine Epson ink and paper at Epson Supplies Central at www.epson.com/ink3
(U.S. sales) or www.epson.ca (Canadian sales). You can also purchase supplies from an Epson
authorized reseller. To find the nearest one, call 800-GO-EPSON (800-463-7766).
Parent topic: Solving Problems
95
Page 96

Technical Specifications
These sections list the technical specifications for your product.
Note: Epson offers a recycling program for end of life products. Please go to www.epson.com/recycle for
information on how to return your products for proper disposal.
EPEAT Registration
Windows System Requirements
Mac System Requirements
Printing Specifications
Paper Specifications
Printable Area Specifications
Ink Cartridge Specifications
Dimension Specifications
Electrical Specifications
Environmental Specifications
Interface Specifications
Network Interface Specifications
Safety and Approvals Specifications
EPEAT Registration
This product is EPEAT registered at the Bronze level. For more information, see EPEAT specifications
here.
Parent topic: Technical Specifications
Windows System Requirements
To use your product and its software, your computer should use one of these Microsoft operating
systems:
• Windows 8
• Windows 7
• Windows Vista
• Windows XP Professional x64 Edition
96
Page 97

• Windows XP SP3
Note: Visit Epson's support website at www.epson.com/support (U.S.) or www.epson.ca/support
(Canada) for the latest in compatibility and drivers for your product.
Parent topic: Technical Specifications
Mac System Requirements
To use your product and its software, your Mac should use one of these operating systems:
• Mac OS X 10.5.8
• Mac OS X 10.6.x
• Mac OS X 10.7.x
• Mac OS X 10.8.x
Note: Visit Epson's support website at www.epson.com/support (U.S.) or www.epson.ca/support
(Canada) for the latest in compatibility and drivers for your product.
Parent topic: Technical Specifications
Printing Specifications
Paper path Rear paper feed, top entry
Sheet feeder capacity Approximately 100 sheets at 20 lb (75 g/m2)
Parent topic: Technical Specifications
Related references
Paper Loading Capacity
Paper Specifications
Note: Since the quality of any particular brand or type of paper may be changed by the manufacturer at
any time, Epson cannot guarantee the quality of any non-Epson brand or type of paper. Always test a
sample of paper stock before purchasing large quantities or printing large jobs.
97
Page 98

Single-sheets
Size A4 (8.3 × 11.7 inches [210 × 297 mm])
4 × 6 inches (102 × 152 mm)
5 × 7 inches (127 × 178 mm)
A6 (4.1 × 5.8 inches [105 × 148 mm])
3.5 × 5 inches (89 × 127 mm)
5 × 8 inches (127 × 203 mm)
8 × 10 inches (203 × 254 mm)
16:9 wide (4 × 7.1 inches [102 × 181 mm])
3.9 × 5.8 inches (100 × 148 mm)
Letter (8.5 × 11 inches [216 × 279 mm])
Legal (8.5 × 14 inches [216 × 357 mm])
Paper types Plain paper and paper distributed by Epson
Thickness 0.003 (0.08 mm) to 0.004 inch (0.11 mm)
Weight 17 lb (64 g/m2) to 24 lb (90 g/m2)
Envelopes
Size No. 10 (4.1 × 9.5 inches [105 × 241 mm])
Paper types Plain paper
Weight 20 lb (75 g/m2) to 24 lb (90 g/m2)
Parent topic: Technical Specifications
Printable Area Specifications
Note: When printing borderless, quality may decline in the expanded printable area.
98
Page 99

Single sheets
1 Top: 0.12 inch (3 mm) minimum
2 Left: 0.12 inch (3 mm) minimum
3 Right: 0.12 inch (3 mm) minimum
4 Bottom: 0.12 inch (3 mm) minimum
Envelopes
99
Page 100

1 Left: 0.12 inch (3 mm) minimum
2 Bottom: 0.20 inch (5 mm) minimum
3 Top: 0.20 inch (5 mm) minimum
4 Right: 0.83 inch (21 mm) minimum
Parent topic: Technical Specifications
Ink Cartridge Specifications
Note: We recommend that you use genuine Epson cartridges and do not refill them. The use of other
products may affect your print quality and could result in printer damage.
The cartridge included with the printer is designed for printer setup and not for resale. After some ink is
used for priming, the rest is available for printing. Yields vary considerably based on images printed, print
settings, paper type, frequency of use, and temperature. For print quality, a variable amount of ink
remains in the cartridge after the "replace cartridge" indicator comes on.
Color Black
Cartridge life Opened package: 6 months
Unopened package: do not use if the date on the package has
expired
Temperature Storage: –4 to 104 ºF (–20 to 40 ºC)
1 month at 104 ºF (40 ºC)
Ink freezes at 10.4 ºF (–12 ºC)
Ink thaws and is usable after 3 hours at 77 ºF (25 ºC)
Note: For best printing results, use up a cartridge within 6 months of opening the package.
Parent topic: Technical Specifications
Related references
Ink Cartridge Part Numbers
100
 Loading...