

Page 1

EN
Basic Guide
FR
Guide de base
DE
Grundlagenhandbuch
NL
Basishandleiding
IT
Guida di base
ES
Guía básica
PT
Guia básico
Page 2

Ink Cartridge Codes/Codes des cartouches d’encre/
Tintenpatronencodes/Cartridgecodes/
Codici cartucce inchiostro/Códigos de los cartuchos de tinta/
Códigos dos tinteiros
BK C M Y
Yellow
Jaune
Gelb
Geel
Giallo
Amarillo
Amarelo
Stag
Cerf
Hirsch
Hert
Cervo
Ciervo
Veado
Apple
Pomme
Apfel
Appel
Mela
Manzana
Maçã
Black
Noir
Schwarz
Zwart
Nero
Negro
Preto
T1301 T1302 T1303 T1304
T1291 T1292 T1293 T1294
Cyan
Cyan
Cyan
Cyaan
Ciano
Cian
Ciano
Magenta
Magenta
Magenta
Magenta
Magenta
Magenta
Magenta
http://www.epson.eu/pageyield
For information on Epson’s ink cartridge yields, please visit the website above. Available ink cartridge sizes
vary by area.
Pour des informations sur les rendements des cartouches d’encre Epson, consultez le site Web ci-dessus. Les
tailles des cartouches d’encre disponibles varient d’un pays à l’autre.
Für Informationen zur Lebensdauer der Tintenpatronen von Epson besuchen Sie bitte die obige Webseite. Die
verfügbaren Tintenpatronengrößen variieren je nach Land/Region.
Meer informatie over de capaciteit van de cartridge van Epson, bezoekt u bovenstaande website. De capaciteit
waarin de cartridges beschikbaar zijn, verschilt per land.
Per informazioni sui rendimenti delle cartucce di inchiostro Epson, visitare il sito web sopra riportato. I
formati delle cartucce disponibili variano a seconda dell’area di residenza.
Para obtener información sobre las cifras de los cartuchos de tinta de Epson, visite el sitio web anterior. Los
tamaños de cartucho de tinta disponibles dependen de la región.
Para informações sobre o fornecimento de tinteiros Epson, queira visitar o sítio web acima indicado. O
tamanho dos tinteiros disponíveis varia consoante as regiões.
Page 3

Basic Guide
Contents
Contents
Introduction......................... 2
Where to Find Information................... 2
Caution, Important and Note................. 2
Using Epson Connect Service................. 2
Safety Instructions................... 3
Control Panel Overview............. 3
Button and LCD........................... 4
Lights................................... 5
Paper and Media Handling.......... 5
Selecting Paper............................ 5
Loading Paper into the Paper Cassette........... 6
Placing Originals.......................... 7
Automatic Document Feeder (ADF).......... 7
Scanner glass........................... 9
Inserting a Memory Card.................... 9
Copying............................ 10
Scanning........................... 10
Faxing.............................. 11
Introducing FAX Utility.................... 11
Connecting to a Phone Line.................. 11
About a phone cable..................... 11
Using the phone line for fax only............ 11
Sharing line with phone device............. 12
Checking the fax connection............... 12
Setting Up Fax Features..................... 13
Setting up speed dial entries................ 13
Setting up group dial entries............... 13
Sending Faxes............................ 13
Receiving Faxes........................... 14
Printing Reports.......................... 14
Precautions.............................. 16
Replacing an ink cartridge................... 17
Basic Troubleshooting............. 19
Error Messages........................... 19
Paper Jams.............................. 20
Removing jammed paper from the rear cover
.................................... 20
Removing jammed paper from inside the
product.............................. 21
Removing jammed paper from the paper
cassette............................... 22
Removing jammed paper from the Automatic
Document Feeder (ADF). . . . . . . . .......... 23
Print Quality Help......................... 24
Faxing Help............................. 24
Where To Get Help.................. 24
Technical Support Web Site.................. 24
English
More Functions..................... 15
Replacing Ink Cartridges........... 16
Safety instructions......................... 16
1
Page 4

Basic Guide
Introduction
Where to Find
Information
Introduction
!
Caution
must be followed carefully to avoid bodily injury.
Important
c
must be observed to avoid damage to your
equipment.
The latest version of the following manuals are available
on the Epson support website.
http://www.epson.eu/Support (Europe)
http://support.epson.net/ (outside Europe)
❏ Start Here (paper):
Provides you with information on setting up the
product and installing the software.
❏ Basic Guide (paper):
Provides you with basic information when you are
using the product without a computer. This manual
may not be included depending on model and
region.
❏ User’s Guide (PDF):
Provides you with detailed operating, safety, and
troubleshooting instructions. See this guide when
using this product with a computer, or when using
advanced features such as 2 sided copying.
To view the PDF manual, you need Adobe Acrobat
Reader 5.0 or later, or Adobe Reader.
❏ Network Guide (HTML):
Provides network administrators with information
on both the printer driver and network settings.
❏ Help (on the product display):
Note
contain useful tips and restrictions on product operation.
Using Epson Connect
Service
Using Epson Connect and other companies’ services,
you can easily print directly from your smartphone,
tablet PC or laptop, anytime and practically anywhere
even across the globe! For more information about the
printing and other services, visit the following URL;
https://www.epsonconnect.com/ (Epson Connect
portal site)
http://www.epsonconnect.eu (Europe only)
You can view the Epson Connect guide by
double-clicking the
shortcut icon on the desktop.
Provides basic operating and troubleshooting
instructions on the product’s LCD screen. Select the
Help menu on the control panel.
Caution, Important and
Note
Caution, Important, and Note in this manual are
indicated as below and have the following meaning.
2
Page 5

Basic Guide
Safety Instructions
Safety Instructions
Read and follow these instructions to ensure safe use of
this product. Make sure you keep this guide for future
reference. Also, be sure to follow all warnings and
instructions marked on the product.
❏ Use only the power cord supplied with the product
and do not use the cord with any other equipment.
Use of other cords with this product or the use of the
supplied power cord with other equipment may
result in fire or electric shock.
❏ Be sure your AC power cord meets the relevant local
safety standard.
❏ Never disassemble, modify, or attempt to repair the
power cord, plug, printer unit, scanner unit, or
options by yourself, except as specifically explained
in the product’s guides.
❏ Unplug the product and refer servicing to qualified
service personnel under the following conditions:
The power cord or plug is damaged; liquid has
entered the product; the product has been dropped
or the casing damaged; the product does not
operate normally or exhibits a distinct change in
performance. Do not adjust controls that are not
covered by the operating instructions.
❏ Place the product near a wall outlet where the plug
can be easily unplugged.
❏ Do not place or store the product outdoors, near
excessive dirt or dust, water, heat sources, or in
locations subject to shocks, vibrations, high
temperature or humidity.
❏ Take care not to spill liquid on the product and not
to handle the product with wet hands.
❏ Keep this product at least 22 cm away from cardiac
pacemakers. Radio waves from this product may
adversely affect the operation of cardiac
pacemakers.
❏ If the LCD screen is damaged, contact your dealer.
If the liquid crystal solution gets on your hands,
wash them thoroughly with soap and water. If the
liquid crystal solution gets into your eyes, flush
them immediately with water. If discomfort or
vision problems remain after a thorough flushing,
see a doctor immediately.
❏ Avoid using a telephone during an electrical storm.
There may be a remote risk of electric shock from
lightning.
❏ Do not use a telephone to report a gas leak in the
vicinity of the leak.
Note:
The following provides safety instructions for ink
cartridges.
& “Replacing Ink Cartridges” on page 16
English
Control Panel Overview
Note:
❏ Control panel design varies depending on location.
❏ Although the control panel desi gn and what displayed on the LCD screen such as menu names and option names may
differ from your actual product, the method of operation is the same.
3
Page 6

Basic Guide
Button and LCD
Control Panel Overview
Buttons Function
a
b
c
d
e - LCD screen displays menus. If your product has a touch panel, you can scroll the screen by
f
g
h +, - Sets the number of copies.
i 0 - 9, *, # Specifies the date/time or the number of co pies , as well as fa x nu mber s. E nter s alp han umer ic
j
l, u, r, d, OK Press l, u, r, d to select menus. Press OK to confirm the setting you have selected and go to
Turns the product on or off.
Returns to the top menu. When on the top menu, switches between the modes.
Displays the last number dialed. When entering numbers in fax mode, this inserts a pause
symbol (-) that acts as a brief pause during dialing.
Displays the Contacts list in fax mode.
swiping the LCD screen. Try swiping a little harder if the touch panel is slow to respond.
Cancels/returns to the previous menu.
next screen. When typing a fax number, l acts as a backspace key, and r inserts a space.
characters and switches between uppercase, lowercase, and numbers each time it is pressed.
It may be easier to use the software keypad to enter text instead of using these buttons.
Starts printing/copying/scanning/faxing in black and white.
4
Page 7

Basic Guide
Buttons Function
k
Paper and Media Handling
Starts printing/copying/scanning/faxing in color.
l
m
u, d
Stops the current operation or initializes the current settings.
Scrolls the screen.
Lights
Lights Function
On when the product is on.
Flashes when the product is receiving data, printing/copying/scanning/faxing, replacing an
ink cartridge, charging ink, or cleaning the print head.
Stays on while the printer is connected to a network. Flashes while network settings are being
adjusted (green: Wi-Fi/orange: Ethernet).
Note:
For more information on the icons displayed on the LCD screen, see the Help on the control panel.
Paper and Media
Handling
Selecting Paper
The product automatically adjusts itself for the type of
paper you select in your print settings. That is why the
paper type setting is so important. It tells your product
what kind of paper you are using and adjusts the ink
coverage accordingly. The table below lists the settings
you should choose for your paper.
For this paper LCD paper type
Epson Premium Glossy
Photo Paper
Epson Premium Semigloss
Photo Paper
Epson Glossy Photo Paper Glossy
Epson Photo Paper Photo Paper
Epson Matte Paper –
Heavyweight
Epson Photo Quality Ink Jet
Paper
*1 You can perform 2-sided printing with this paper.
English
Prem. Glossy
Prem. Glossy
Matte
Matte
For this paper LCD paper type
Plain paper*
Epson Bright White Ink Jet
Paper*
Epson Ultra Glossy Photo
Paper
1
1
Plain Paper
Plain Paper
Ultra Glossy
5
Page 8

Basic Guide
Paper and Media Handling
Loading Paper into the
Paper Cassette
Follow these steps to load paper:
a. Paper cassette 1
b. Paper cassette 2
* The availability of this part varies by product.
Pull out the paper cassette.
A
*
Pinch and slide the edge guides to the sides of the
B
paper cassette.
Slide the edge guide to adjust to the paper size you
C
will use.
Load paper toward the edge guide with printable
D
side face down, and check that the paper is not
sticking out from the end of the cassette.
Note:
If the output tray has been ejected, close it before pulling
out the paper cassette.
6
Page 9

Basic Guide
Paper and Media Handling
Note:
❏ Paper cassette 2 supports plain paper size B5 or
larger only.
❏ Fan and align the edges of the paper before loading.
Slide the edge guides to the edges of the paper.
E
Slide out the output tray and raise the stopper.
G
Note:
❏ Leave enough space in front of the product for the
paper to be fully ejected.
❏ Do not remove or insert the paper cassette while the
product is operating.
❏ For instructions on loading media other than plain
paper such as envelopes and pre-punched paper, see
the PDF User’s Guide.
Placing Originals
Automatic Document Feeder
(ADF)
English
Note:
For plain paper, do not load paper above the H arrow
mark inside the edge guide.
For Epson special media, make sure the number of sheets
is less than the limit specified for the media.
Keep the cassette flat and slowly and carefully
F
reinsert it all the way into the product.
You can load your original documents in the Automatic
Document Feeder (ADF) to copy, scan, or fax multiple
pages quickly. The ADF can scan both sides of your
documents. To do so, select the option in the copy
setting menu. You can use the following originals in the
ADF.
Size A4/Letter/Legal
Type Plain paper
Weight
Capacity 30 sheets or 3 mm or less
When you scan a 2-sided document using the ADF, legal
size paper is not available.
7
2
64 g/m
to 95 g/m
(A4, Letter)/10 sheets
(Legal)
2
Page 10

Basic Guide
Paper and Media Handling
Important:
c
To prevent paper jams, avoid the following
documents. For these types, use the scanner glass.
❏ Documents held together with paper clips,
staples, etc.
❏ Documents that have tape or paper stuck to
them.
❏ Photos, OHPs, or thermal transfer paper.
❏ Paper that is torn, wrinkled, or has holes.
Tap the originals on a flat surface to even the
A
edges.
Slide the edge guide on the Automatic Document
B
Feeder.
Slide the edge guide until it is flush with the
D
originals.
Note:
❏ For 2-up Copy layout, place the original as shown.
Make sure the orientation of the original matches
the Document Orientation settings.
Insert the originals face-up and short edge first
C
into the Automatic Document Feeder.
❏ When you use the copy function with the Automatic
Document Feeder (ADF), the print settings are fixed
at Reduce/Enlarge - Actual Size, Paper Type - Plain
Paper, and Paper Size - A4/Legal. The print is
cropped if you copy an original larger than A4.
8
Page 11

Basic Guide
Paper and Media Handling
Scanner glass
Open the document cover and place your
A
original face-down on the scanner glass.
Slide the original to the corner.
B
Close the cover gently.
C
SD, miniSD, microSD, SDHC, miniSDHC,
microSDHC, SDXC, microSDXC, MultiMediaCard,
MMCplus, MMCmobile, MMCmicro, Memory Stick
Duo, Memory Stick PRO Duo, Memory Stick PRO-HG
Duo, Memory Stick Micro, MagicGate Memory Stick
Duo
Important:
c
The following memory cards require an adapter.
Attach it before inserting the card into the slot,
otherwise the card may get stuck.
❏ miniSD, microSD, miniSDHC, microSDHC,
microSDXC, MMCmicro
❏ MMCmobile
❏ Memory Stick Micro
Insert one card at a time.
A
English
Note:
When there is a document in the Automatic Document
Feeder (ADF) and on the scanner glass, priority is given
to the document in the Automatic Document Feeder
(ADF).
Inserting a Memory Card
You can print photos that are stored on a memory card,
or save scanned data on a memory card. The following
memory cards are supported.
9
Page 12

Basic Guide
Copying
Check the light stays on.
B
= on, = flashing
Important:
c
❏ Do not try to force the card all the way into the
slot. It should not be fully inserted.
❏ Do not remove the memory card while the light
is flashing. The data in the memory card may
be lost.
Copying
Follow the steps below to copy documents. For products
with two paper cassettes, if you want to copy a large
quantity of documents in a single batch, load A4/Legal
plain paper in both cassettes and set the Paper Source to
Cassette 1>Cassette 2 in step 7.
Select the appropriate copy settings such as paper
G
size, paper type, and paper quality.
Note:
❏ Depending on the model, you can make copy settings
in Paper and Copy Settings.
❏ You can preview the copy results before you start
copying.
❏ You can make various layout copies such as 2-sided
copy, 2-up copy, and so on. Change the 2-sided or
layout settings as necessary.
Press one of the x buttons to set the color mode,
H
and then start copying.
Note:
Refer to the PDF User’s Guide for other copying functions
and the Copy mode menu list.
Scanning
You can scan documents and send the scanned image
from the product to a connected computer.
Note:
For information on Scan to Cloud, see the Epson
Connect guide, which can be accessed using the shortcut
icon
on the desktop.
Load paper in the paper cassette.
A
& “Loading Paper into the Paper Cassette” on
page 6
Place original.
B
& “Placing Originals” on page 7
Enter Copy mode from the Home menu.
C
Press + and - to set the number of copies.
D
Set the density.
E
Press d to enter the Copy menu.
F
10
Place your original(s).
A
& “Placing Originals” on page 7
Select Scan from the Home menu.
B
Select a scan menu items.
C
If you select Scan to PC, select a computer.
D
If you select Scan to Memory Card, make settings
such as the scan format and 2-sided settings.
Page 13
Basic Guide
Faxing
Press the x buttons to start scanning.
E
Note:
For more information on other scan functions and the
scan mode menu list, see the PDF User’s Guide.
Your scanned image is saved.
Faxing
Introducing FAX Utility
FAX Utility is a software capable of transmitting data
such as documents, drawings, and tables created using a
word processing or spreadsheet application directly by
fax, without printing. In addition, this utility has a
function to save a received fax as a PDF file on a
computer. This enables you to check the data without
printing it and print only the data that you want to print.
Use the following procedure to run the utility.
Windows
Click the start button (Windows 7 and Vista) or click
Start (Windows XP), point to All Programs, select
Epson Software, and then click FAX Utility.
Mac OS X
Click System Preference, click Print & Fax or Print &
Scan, and then select FAX (your printer) from Printer.
Then click as follows;
Mac OS X 10.6.x, 10.7.x: Option & Supplies - Utility -
Open Printer Utility
Mac OS X 10.5.x: Open Print Queue - Utility
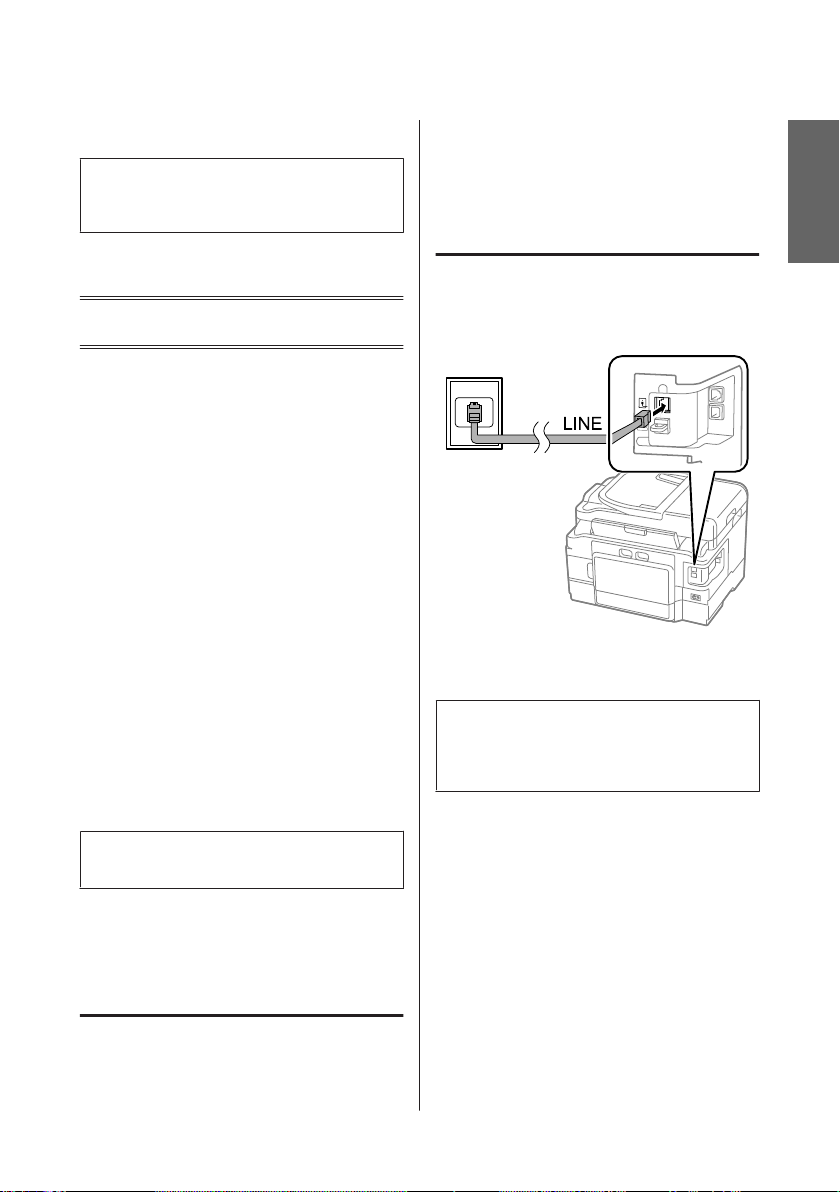
❏ RJ-11 Phone Line
❏ RJ-11 Telephone set connection
Depending on the area, a phone cable may be included
with the product. If so, use that cable.
Using the phone line for fax only
Connect a phone cable leading from a telephone
A
wall jack to the LINE port.
Make sure Auto Answer is set to On.
B
& “Receiving Faxes” on page 14
Important:
c
If you do not connect an external telephone to the
product, make sure you turn on auto answer.
Otherwise, you cannot receive faxes.
English
Note:
For more details, see the online help for FAX Utility.
Connecting to a Phone
Line
About a phone cable
Use a phone cable with the following interface
specification.
11
Page 14

Basic Guide
Faxing
Sharing line with phone device
Connect a phone cable leading from a telephone
A
wall jack to the LINE port.
Remove the cap.
B
Connect a phone or answering machine to the
C
EXT. port.
Note:
See the PDF User’s Guide for other connection methods.
Checking the fax connection
You can check whether the product is ready to send or
receive faxes.
Load plain paper in the cassette.
A
& “Loading Paper into the Paper Cassette” on
page 6
Note:
If your product is equipped with two cassettes, load paper
in cassette 1. If you have changed the Paper Source setting
(Setup > Fax Settings > Receive Settings > Paper
Source), load paper in the cassette you specified.
Enter Setup mode from the Home menu.
B
Select Fax Settings.
C
Select Check Fax Connection.
D
Press one of the x buttons to print the report.
E
Note:
If an errors are reported, try the solutions in the report.
12
Page 15

Basic Guide
Faxing
Setting Up Fax Features
Setting up speed dial entries
You can create a speed dial list allowing you to select fax
recipient numbers quickly when faxing. Up to 100
combined speed dial and group dial entries can be
registered.
Enter Fax mode from the Home menu.
A
Press or select Contacts.
B
Select Edit Contacts.
C
Select Speed Dial Setup. You see the available
D
speed dial entry numbers.
Select the speed dial entry number that you want
E
to register. You can register up to 100 entries.
Use the numeric keypad to enter a phone
F
number. You can enter up to 64 digits.
Note:
A hyphen ("-") causes a slight pause when dialing. Only
include it in phone numbers when a pause is necessary.
Spaces entered between numbers are ignored when
dialing.
Enter a name to identify the speed dial entry. You
G
can enter up to 30 characters.
Select Done to register the name.
H
Setting up group dial entries
You can add speed dial entries to a group, allowing you
to send a fax to multiple recipients at the same time. Up
to 99 combined speed dial and group dial entries can be
entered.
Enter Fax mode from the Home menu.
A
Select Edit Contacts.
C
Select Group Dial Setup. You see the available
D
group dial entry numbers.
Select the group dial entry number that you want
E
to register.
Enter a name to identify the group dial entry. You
F
can enter up to 30 characters.
Select Done to register the name.
G
Select a speed dial entry that you want to register
H
in the group dial list.
Repeat step 8 to add other speed dial entries to the
I
group dial list. You can register up to 99 speed
dial entries in a group dial.
Press OK to finish creating a group dial list.
J
Sending Faxes
Place your original in the Automatic Document
A
Feeder or on the scanner glass.
& “Placing Originals” on page 7
Enter Fax mode from the Home menu.
B
Use the keys on the numeric keypad to enter the
C
fax number. You can enter up to 64 digits.
Note:
❏ To display the last fax number you used, press
❏ Press d and make the send settings. To scan and fax
❏ Make sure you have entered the header information.
or Redial.
both sides of your original, select 2-Sided Faxing,
On, and then load the original in the Automatic
Document Feeder. Depending on the model, you can
also make the settings by selecting Send Settings.
Some fax machines automatically reject incoming
faxes that do not include header information.
English
Press or select Contacts.
B
13
Page 16

Basic Guide
Faxing
Press x (color) or x (B&W) to start sending a
D
color or monochrome fax.
Note:
If the fax number is busy or there is some problem, this
product redials after one minute. Press Redial to redial
immediately.
Receiving Faxes
Follow the instructions to make settings to receive faxes
automatically.
Note:
❏ Depending on the Fax Output settings, the received
fax is saved as a data or printed.
❏ If Fax Output is set to Save, the received fax data is
automatically saved as data, and you can skip step
1.
Load plain paper in the cassette.
A
& “Loading Paper into the Paper Cassette” on
page 6
Note:
If your product is equipped with two cassettes, make
Paper Source settings.
Setup > Fax Settings > Receive Settings > Paper Source
If you want to print a large quantity of faxes in a single
batch, load plain paper in both cassettes and set Paper
Source to Cassette 1>Cassette 2.
Make sure Auto Answer is set to On.
B
Setup > Fax Settings > Receive Settings > Auto
Answer > On
Note:
❏ When an answering machine is connected directly
to this product, make sure you set Rings to Answer
correctly using the following procedure.
❏ Depending on the region, Rings to Answer may be
unavailable.
❏ For more information on receiving faxes manually,
see the PDF User’s Guide.
Enter Setup mode from the Home menu.
C
Select Fax Settings.
D
Select Communication.
E
Select Rings to Answer.
F
Select the number of rings.
G
Important:
c
Select more rings than needed for the answering
machine to pick up. If it is set to pick up on the fourth
ring, set the product to pick up on the fifth ring or
later. Otherwise the answering machine cannot
receive voice calls.
Note:
When you receive a call and the other party is a fax, the
product receives the fax automatically even if the
answering machine picks up the call. If you pick up the
phone, wait until the LCD screen displays a message
saying that a connection has been made before you hang
up. If the other party is a caller, the phone can be used as
normal or a message can be left on the answering
machine.
Printing Reports
Follow the instructions below to print a fax report.
Load plain paper in the cassette.
A
& “Loading Paper into the Paper Cassette” on
page 6
Note:
If your product is equipped with two cassettes, make
Paper Source settings.
Setup > Fax Settings > Receive Settings > Paper Source
Enter Fax mode from the Home menu.
B
If Advanced Options is displayed on the LCD
C
screen, select Advanced Options.
If it is not displayed, press d.
14
Page 17
Basic Guide
More Functions
Select Fax Report.
D
Select the item you want to print.
E
Note:
Only Fax Log can be viewed on the screen.
Press one of the x buttons to print the report you
F
selected.
Note:
For more information on other fax functions and the fax
mode menu list, see the PDF User’s Guide.
More Functions
More Functions provides you with many special menus that make printing easy and fun! For more details, select More
Functions, select each menu, and then follow the instructions on the LCD screen.
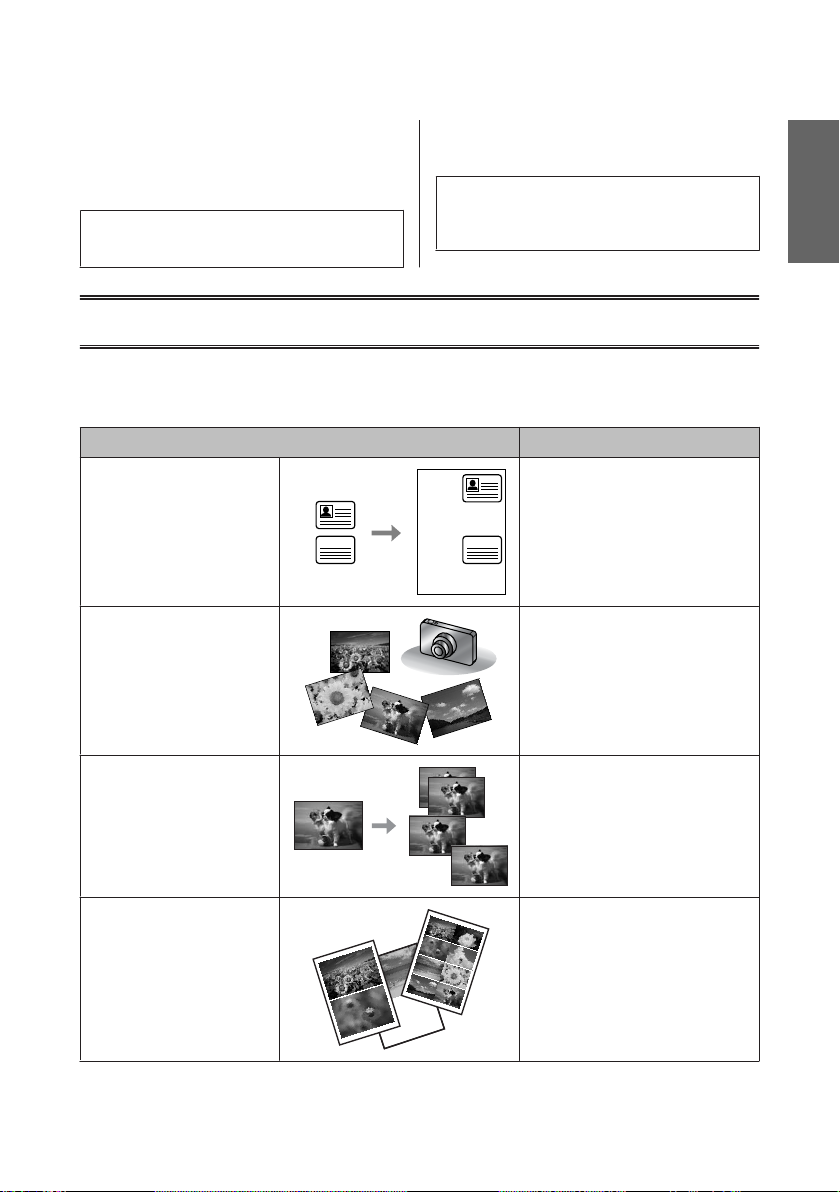
Menu Functions
ID Card Copy
Print Photos
Yo u ca n co p y b o th s id e s of an I D c a rd a t th e
same time.
You can print photos stored on a memory
card or an external USB device without
using a computer. You can also reduce and
enlarge your photos, and adjust the photo
quality.
English
Copy/Restore Photos
Photo Layout Sheet
15
You can make faithful copies of your
originals. If your original photo is faded,
you can restore color to bring it back to life.
You can print your photos on a memory
card in various layouts.
Page 18

Basic Guide
Replacing Ink Cartridges
Menu Functions
Print Ruled Papers
Replacing Ink
Cartridges
Safety instructions
❏ Keep ink cartridges out of the reach of children.
❏ Be careful when you handle used ink cartridges, as
there may be some ink around the ink supply port.
If ink gets on your skin, wash the area thoroughly
with soap and water.
If ink gets into your eyes, flush them immediately
with water. If discomfort or vision problems
continue after a thorough flushing, see a doctor
immediately.
If ink gets into your mouth, spit it out immediately
and see a doctor right away.
❏ To maintain optimum print head performance,
some ink is consumed from some cartridges not
only during printing but also during maintenance
operations such as ink cartridge replacement and
print head cleaning.
❏ If you nee d to rem ove an i nk c art ridg e te mpo rar ily ,
be sure to protect the ink supply area from dirt and
dust. Store the ink cartridge in the same
environment as the product. When storing the
cartridge, be sure that its label identifying the color
of the ink cartridge is facing upward. Do not store
ink cartridges upside down.
❏ For maximum ink efficiency, only remove an ink
cartridge when you are ready to replace it. Ink
cartridges with low ink status may not be used when
reinserted.
❏ Do not open the ink cartridge package until you are
ready to install it in the product. The cartridge is
vacuum packed to maintain its reliability. If you
leave a cartridge unpacked for a long time before
using it, normal printing may not be possible.
You can print ruled paper or graph paper
with or without a photo set as the
background.
Precautions
❏ Epson recommends the use of genuine Epson ink
cartridges. Epson cannot guarantee the quality or
reliability of non-genuine ink. The use of
non-genuine ink may cause damage that is not
covered by Epson’s warranties, and under certain
circumstances, may cause erratic product behavior.
Information about non-genuine ink levels may not
be displayed.
❏ Do not shake ink cartridges too vigorously;
otherwise ink may leak from the cartridge.
❏ Install all ink cartridges; otherwise, you cannot
print.
16
Page 19

Basic Guide
Replacing Ink Cartridges
Replacing an ink cartridge
Open the scanner unit. The ink cartridge holder
A
moves to the ink cartridge replacement position.
Important:
c
❏ Do not move the ink cartridge holder by hand;
otherwise, you may damage the product.
❏ Do not lift up the scanner unit when the
document cover is open.
Open the ink cartridge cover.
B
Pinch and remove the ink cartridge.
C
Note:
❏ The illustration shows replacement of the black ink
cartridge. Replace the cartridge appropriate to your
situation.
❏ Removed ink cartridges may have ink around the
ink supply port, so be careful not to get any ink on the
surrounding area when removing the cartridges.
English
Note:
If the ink cartridge holder does not move to the ink
cartridge replacement position, follow the instruction
below.
Home > Setup > Maintenance > Ink Cartridge
Replacement
17
Gently shake new replacement cartridges four or
D
five times and remove the replacement ink
cartridge from its package.
Page 20
Basic Guide
Replacing Ink Cartridges
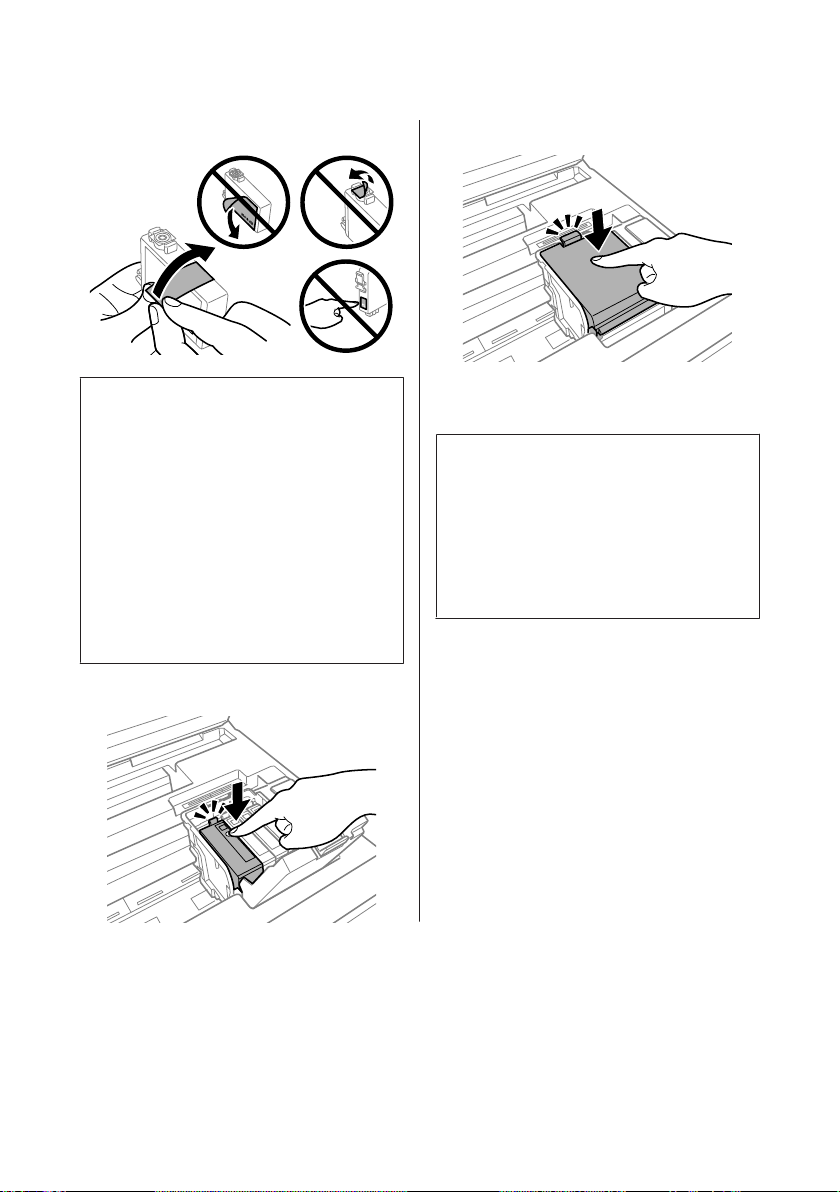
Remove only the yellow tape.
E
Important:
c
❏ You must remove the yellow tape from the
cartridge before installing it; otherwise, print
quality may decline or you may not be able to
print.
❏ If you have installed an ink cartridge without
removing the yellow tape, take the cartridge
out of the product, remove the yellow tape, and
then reinstall it.
❏ Do not remove the transparent seal from the
bottom of the cartridge; otherwise, the
cartridge may become unusable.
❏ Do not remove or tear the label on the
cartridge; otherwise, ink will leak.
Insert the cartridge and press it until it clicks.
F
Close the ink cartridge cover.
G
Close the scanner unit slowly. Ink charging
H
starts.
Note:
❏ The power light continues to flash wh ile the product
is charging ink. Do not turn off the product during
ink charging. If the ink charging is incomplete, you
may not be able to print.
❏ If you had to replace an ink cartridge during
copying, to ensure copy quality after ink charging is
finished, cancel the job that is copying and start
again from placing the originals.
Ink cartridge replacement is complete. The product will
return to its previous status.
18
Page 21

Basic Guide
Basic Troubleshooting
Basic Troubleshooting
Error Messages
This section describes the meaning of messages displayed on the LCD screen.
Error Messages Solutions
Paper out or Paper jam
Printer error. Turn the power off and on again. For details,
see your documentation.
Communication error. Check if a computer is connected. Make sure the computer is connected correctly. If the error
The maintenance box is nearing the end of its service life. Replace maintenance box before the end its service life.
The maintenance box is at the end of its service life. You
need to replace it.
A printer’s ink pad is nearing the end of its service life.
Please contact Epson Support.
A printer’s ink pad is at the end of its service life. Please
contact Epson Support.
No dial tone detected. Run Check Fax Connection under
Fax Settings in Setup menu.
Combination of the IP address and the subnet mask is
invalid. See your documentation.
Recovery Mode The firmware update has failed. You will need to re-attempt the
& See “Paper Jams” on page 20
Turn the product off and then back on. Make sure that no paper is
still in the product. If the error message still appears, contact Epson
support.
messages still appears, make sure that scanning software is
installed on your computer and that the software settings are
correct.
For more details, see the PDF User’s Guide.
When the maintenance box is full, the product stops and you need
to replace the maintenance box to continue printing.
Replace the maintenance box.
Press x button to resume printing. The message will be displayed
until the ink pad is replaced. Contact Epson support to replace ink
pads before the end of their service life. When the ink pads are
saturated, the product stops and Epson support is required to
continue printing.
Contact Epson support to replace ink pads.
Make sure the phone cable is connected correctly and the phone
line works.
& See “Connecting to a Phone Line” on page 11
If you connected the product to a PBX (Private Branch Exchange)
phone line or Terminal Adapter, turn off the Dial Tone Detection.
Select Fax Settings > Communication > Dial Tone Detection
>Off.
Refer the online Network Guide.
firmware update. Ready a USB cable and visit your local Epson
website for further instructions.
English
19
Page 22

Basic Guide
Basic Troubleshooting
Paper Jams
Caution:
!
Never touch the buttons on the control panel while
your hand is inside the product.
Note:
❏ Cancel the print job if prompted by a message from
the LCD screen or the printer driver.
❏ After you have removed the jammed paper, press the
button indicated in the LCD screen.
Removing jammed paper from
the rear cover
Pull out the rear cover.
A
Carefully remove the jammed paper.
C
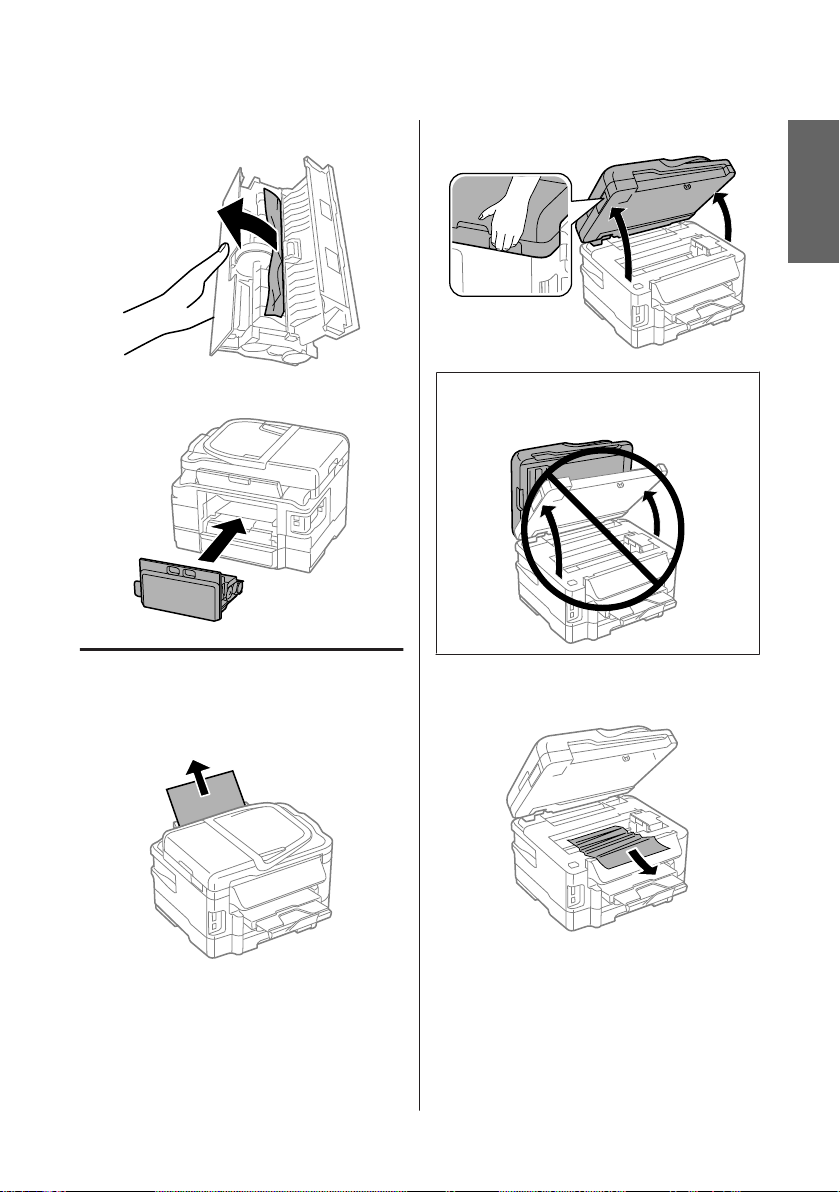
Open the rear cover.
D
Carefully remove the jammed paper.
B
20
Page 23
Basic Guide
Basic Troubleshooting
Carefully remove the jammed paper.
E
Reattach the rear cover.
F
Removing jammed paper from
inside the product
Carefully remove the jammed paper.
A
Open the scanner unit.
B
Important:
c
Do not lift up the scanner unit when the document
cover is open.
Remove all of the paper inside, including any
C
torn pieces.
English
21
Page 24

Basic Guide
Basic Troubleshooting
Important:
c
Do not touch the flat white cable connected to the
cartridge holder.
Close the scanner unit slowly.
D
Removing jammed paper from
the paper cassette
Pull out the paper cassette.
A
Note:
If you cannot pull out the cassette, unplug the power cord
from the product and the electrical outlet. Unplug all
other cables from the product.
Carefully stand the product on its side as shown below
and carefully pull out the cassette.
Remove the jammed paper from the cassette.
B
Carefully remove any paper jammed inside the
C
product.
22
Align the edges of the paper.
D
Keep the cassette flat and slowly and carefully
E
reinsert it all the way into the product.
Page 25

Basic Guide
Basic Troubleshooting
Removing jammed paper from
the Automatic Document Feeder
(ADF)
Remove the stack of paper from the ADF input
A
tray.
Open the ADF cover.
B
Important:
c
Make sure you open the ADF cover before removing
jammed paper. If you do not open the cover, the
product may be damaged.
Carefully remove the jammed paper.
C
Open the document cover.
E
Carefully remove the jammed paper.
F
Close the document cover.
G
English
Close the ADF cover.
D
23
Raise the ADF input tray.
H
Page 26

Basic Guide
Where To Get Help
Carefully remove the jammed paper.
I
Return the ADF input tray to its original
J
position.
Print Quality Help
If you see banding (light lines), missing colors, or any
other quality problems in your printouts, try the
following solutions.
❏ Make sure you have loaded the paper and place your
original correctly.
& “Loading Paper into the Paper Cassette” on
page 6
& “Placing Originals” on page 7
Faxing Help
❏ Make sure the phone cable is connected correctly
and check that the phone line works. You can check
the line status by using the Check Fax Connection
function.
& “Connecting to a Phone Line” on page 11
❏ If the fax did not send, make sure that the recipient’s
fax machine is turned on and working.
❏ If this product is not connected to a phone and you
want to receive faxes automatically, make sure you
turn on auto answer.
& “Receiving Faxes” on page 14
Note:
For more solutions to faxing problems, see the online
User’s Guide.
Where To Get Help
Technical Support Web
Site
❏ Check the paper size settings and the paper type
settings.
& “Selecting Paper” on page 5
❏ The print head may be clogged. Perform a nozzle
check first and then clean the print head.
Setup > Maintenance > Nozzle Check
(a) OK
(b) Needs a head cleaning
Epson’s Technical Support Web Site provides help with
problems that cannot be solved using the
troubleshooting information in your product
documentation. If you have a Web browser and can
connect to the Internet, access the site at:
http://support.epson.net/
http://www.epson.eu/Support (Europe)
If you need the latest drivers, FAQs, manuals, or other
downloadables, access the site at:
http://www.epson.com
http://www.epson.eu/Support (Europe)
Then, select the support section of your local Epson
Web site.
24
Page 27

Guide de base
Table des matières
Table des matières
Introduction......................... 2
Sources d'informations...................... 2
Indications Attention, Important et Remarque. . . . . 2
Utilisation du service Web Epson Connect........ 2
Consignes de sécurité................ 3
Présentation du panneau de
configuration........................ 4
Bouton et écran LCD....................... 4
Voyants................................. 5
Manipulation des papiers et supports
....................................... 6
Sélection du papier......................... 6
Chargement du papier dans le bac papier......... 6
Mise en place de documents originaux........... 8
Chargeur automatique de documents. . . . . . . . . . 8
Vitre du scanner........................ 10
Insertion d'une carte mémoire................ 10
Copie............................... 11
Numérisation....................... 11
Télécopie........................... 12
Présentation de FAX Utility.................. 12
Connexion à une ligne téléphonique........... 12
À propos du câble téléphonique............. 12
Utilisation de la ligne téléphonique pour la
télécopie uniquement.................... 13
Partage d'une ligne avec un téléphone........ 13
Vérification de la connexion de télécopie...... 14
Configuration des fonctions de télécopie........ 14
Configuration des entrées de numérotation
rapide................................ 14
Configuration des entrées de numérotation
groupée.............................. 15
Envoi de télécopies........................ 15
Réception de télécopies..................... 15
Impression de rapports..................... 16
Fonctions suite..................... 17
Remplacement des cartouches d’encre
..................................... 18
Consignes de sécurité...................... 18
Précautions.............................. 18
Remplacement d'une cartouche d'encre. . . . . . . . . 19
Dépannage de base................ 21
Messages d'erreurs........................ 21
Bourrages papier.......................... 22
Retrait de papier coincé près du capot arrière
.................................... 22
Retrait de papier coincé à l'intérieur du produit
.................................... 23
Retrait de papier coincé près du bac papier. . . . . 24
Retrait de papier coincé dans le chargeur
automatique de documents................ 24
Aide concernant la qualité d'impression......... 26
Aide concernant la télécopie................. 26
Où trouver de l'aide................ 26
Site Web du support technique............... 26
Français
1
Page 28

Guide de base
Introduction
Introduction
Sources d'informations
Les versions les plus récentes des manuels suivants sont
disponibles sur le site Web d'assistance Epson.
http://www.epson.eu/Support (Europe)
http://support.epson.net/ (hors Europe)
❏ Démarrez ici (papier) :
Fournit des informations sur la configuration du
produit et l'installation du logiciel.
❏ Guide de base (papier) :
Fournit des informations de base sur l'utilisation du
produit sans ordinateur. Ce manuel peut ne pas être
fourni, en fonction du modèle et de la région.
❏ Guide d'utilisation (PDF) :
Fournit les consignes détaillées sur l'utilisation, la
sécurité et le dépannage. Consultez ce guide lorsque
vous utilisez le produit avec un ordinateur ou
lorsque vous utilisez des fonctions avancées telles
que l'impression recto verso.
Pour afficher le manuel au format PDF, vous avez
besoin d'Adobe Acrobat Reader 5.0 ou plus ou
d'Adobe Reader.
❏ Guide réseau (HTML) :
Fournit aux administrateurs du réseau des
informations sur le pilote d'impression et les
paramètres réseau.
Indications Attention,
Important et Remarque
Les indications Attention, Important et Remarque sont
détaillées ci-dessous et ont la signification suivante.
Attention
!
Avertissement à suivre à la lettre pour éviter des
blessures corporelles.
Important
c
Mise en garde à respecter pour éviter
d’endommager votre équipement.
Remarque
Conseils utiles et informations sur les restrictions
d'utilisation du produit.
Utilisation du service Web
Epson Connect
Grâce à Epson Connect et aux services d'autres sociétés,
vous pouvez facilement imprimer depuis votre
smartphone, votre tablet PC ou votre ordinateur
portable, n'importe quand et pratiquement n'importe
où dans le monde ! Pour plus d'informations sur
l'impression et les autres services, consultez le site
suivant :
https://www.epsonconnect.com/ (site du portail
Epson)
http://www.epsonconnect.eu (Europe uniquement)
❏ Aide (sur l'écran du produit) :
Instructions de base concernant le fonctionnement
et le dépannage sur l'écran LCD du produit.
Sélectionnez le menu Aide dans le panneau de
configuration.
2
Page 29

Guide de base
Consignes de sécurité
Vous pouvez afficher le guide Epson Connect en
double-cliquant sur l'icône de raccourci
bureau.
sur le
Consignes de sécurité
Veuillez lire et suivre l’intégralité des consignes
indiquées dans cette section pour utiliser ce produit en
toute sécurité. Veillez à conserver ce guide pour pouvoir
le consulter ultérieurement. Veillez également à suivre
les avertissements et consignes repérés sur le produit.
❏ Utilisez uniquement le cordon d'alimentation
fourni avec le produit et ne l'utilisez avec aucun
autre équipement. L'utilisation d'autres cordons
avec ce produit ou l'utilisation de ce cordon
d'alimentation avec un autre équipement pourrait
vous exposer à des risques d’incendie ou
d’électrocution.
❏ Veillez à ce que votre cordon d’alimentation soit
conforme aux normes de sécurité locales
applicables.
❏ Sauf indication contraire spécifique dans les guides
du produit, ne procédez jamais à des travaux de
démontage, de modification ou de réparation au
niveau du cordon d'alimentation, du module
imprimante, du module scanner ou des accessoires.
❏ Débranchez le produit et faites appel à un
technicien qualifié dans les circonstances
suivantes :
Le cordon d'alimentation ou sa fiche est
endommagé, du liquide a coulé dans le produit, le
produit est tombé ou le boîtier a été endommagé, le
produit ne fonctionne pas normalement ou ses
performances ont changé de manière sensible.
N'ajustez pas les commandes non traitées dans les
instructions de fonctionnement.
❏ Placez le produit à proximité d'une prise de courant
permettant un débranchement facile du cordon
d'alimentation.
❏ Ne placez et ne rangez pas le produit à l'extérieur,
dans des lieux particulièrement sales ou
poussiéreux, à proximité de points d'eau ou de
sources de chaleur, ou dans des lieux soumis à des
chocs, des vibrations, des températures élevées ou
de l'humidité.
❏ Veillez à ne pas renverser de liquide sur le produit et
à ne pas le manipuler les mains mouillées.
❏ Maintenez le produit à au moins 22 cm de distance
des stimulateurs cardiaques. Les ondes radio
générées par le produit peuvent affecter de manière
négative le fonctionnement des stimulateurs
cardiaques.
❏ Si l'écran LCD est endommagé, contactez votre
revendeur. En cas de contact de la solution à base de
cristaux liquides avec vos mains, lavez-les
soigneusement avec de l'eau et du savon. En cas de
contact de la solution à base de cristaux liquides
avec vos yeux, rincez-les abondamment avec de
l’eau. Si une gêne ou des problèmes de vision
subsistent après un nettoyage approfondi,
consultez immédiatement un médecin.
❏ Évitez de téléphoner pendant un orage. Des éclairs
pourraient provoquer un risque d'électrocution.
❏ Ne téléphonez pas pour signaler une fuite de gaz
lorsque vous êtes à proximité de la fuite.
Remarque :
Respectez les consignes de sécurité suivantes pour la
manipulation des cartouches d’encre.
& « Remplacement des cartouches d’encre » à la
page 18
Français
3
Page 30

Guide de base
Présentation du panneau de configuration
Présentation du panneau de configuration
Remarque :
❏ le panneau de configuration n'est pas conçu de la même façon selon la région.
❏ Même si le panneau de configuration et les noms et options qui s'affichent sur l'écran LCD sont légèrement différents de
ceux de votre produit, la méthode d'utilisation est la même.
Bouton et écran LCD
Touches Fonction
a
b
c
d
e - L'écran LCD affiche des menus. Si votre produit possède un écran tactile, faites glisser vos
Met le produit sous ou hors tension.
Annule/renvoie au menu principal. Une fois dans le menu principal, bascule entre les modes.
Affiche le dernier numéro composé. Lorsque vous saisissez des chiffres en mode de télécopie,
cette touche insère un symbole de pause (-) qui ajoute une courte pause pendant la
numérotation.
Affiche la liste des Contacts en mode télécopie.
doigts dessus pour faire défiler les données à l'écran. Appuyez un peu plus fort si l 'écran tactile
est lent à répondre.
4
Page 31

Guide de base
Touches Fonction
f
Présentation du panneau de configuration
Annule/renvoie au menu précédent.
g
h +, - Définit le nombre de copies.
i 0 - 9, *, # Indique la date/heure ou le nombre de copies ainsi que les numéros de télécopie. Insère des
j
k
l
m
l, u, r, d, OK Appuyez sur l, u, r, d pour sélectionner les menus. Appuyez sur OK pour confirmer le
u, d
paramètre que vous avez sélectionné et passer à l'écran suivant. Lors de la saisie d' un numéro
de télécopie, l agit comme une touche d'efface arrière et r insère un espace.
caractères alphanumériques et bascule entre les majuscules, minuscules et les chiffres à
chaque pression. Pour la saisie de texte, il peut être plus simple d'utiliser le clavier logiciel au
lieu de ces boutons.
Lance l'impression/la copie/la numérisation/la télécopie en noir et blanc.
Lance l'impression/la copie/la numérisation/la télécopie en couleur.
Arrête l'opération en cours ou initialise les paramètres en cours.
Fait défiler l'écran.
Voyants
Voyants Fonction
Allumé lorsque le produit est sous tension.
Clignote lorsque le produit reçoit des données, pendant l'impression/la copie/numérisation/
télécopie, pendant le remplacement d'une cartouche d'encre, pendant le chargement
d'encre ou le nettoyage de la tête d'impression.
Reste allumé pendant que l'imprimante est connectée à un réseau. Clignote pendant le
paramétrage du réseau (vert : Wi-Fi, orange : Ether net).
Français
Remarque :
Pour plus d'informations sur les icônes de l'écran LCD, consultez la section Aide du panneau de configuration.
5
Page 32

Guide de base
Manipulation des papiers et supports
Manipulation des
papiers et supports
Sélection du papier
Le produit s'ajuste automatiquement en fonction du
type de papier sélectionné dans les paramètres
d'impression. C'est la raison pour laquelle le
paramétrage du type de papier est aussi important. Ce
paramètre indique au produit quel type de papier est
utilisé et ajuste la quantité d'encre nécessaire en
conséquence. Le tableau suivant répertorie les
paramètres que vous devez sélectionner en fonction du
papier utilisé.
Pour ce papier Type de papier sur
Papier ordinaire*
Epson Bright White Ink Jet
Paper (Papier jet d'encre
blanc brillant)*
Epson Ultra Glossy Photo
Paper (Papier photo ul‐
tra-glacé)
Epson Premium Glossy
Photo Paper (Papier photo
glacé Premium)
Epson Premium Semigloss
Photo Paper (Papier photo
semi-glacé Premium)
Epson Glossy Photo Paper
(Papier photo glacé)
Epson Photo Paper (Papier
photo)
Epson Matte Paper - Hea‐
vyweight (Papier mat
épais)
Epson Photo Quality Ink Jet
Paper (Papier couché qua‐
lité photo)
*1 L'impression recto verso est possible avec ce papier.
1
1
l'écran LCD
Plain Paper (Papier Ordi‐
naire)
Plain Paper (Papier Ordi‐
naire)
Ultra glacé
Glacé Prem.
Glacé Prem.
Glacé
Pap photo
Mat
Mat
Chargement du papier
dans le bac papier
Procédez comme suit pour charger le papier :
a. Bac papier 1
b. Bac papier 2
* La présence de cet élément varie selon les produits.
A
Remarque :
Si le bac de sortie a été éjecté, fermez-le avant de retire r le
bac papier.
*
Retirez le bac papier.
6
Page 33

Guide de base
Manipulation des papiers et supports
Rapprochez les guides latéraux des bords du bac
B
papier en les faisant glisser.
Ajustez la position du guide latéral au format du
C
papier que vous souhaitez utiliser.
Ch a rg ez l e p ap i er ju sq u 'à ce q u' il b ut e s u r l e g ui d e
D
latéral, côté imprimable vers le bas, puis vérifiez
que le papier ne dépasse pas du bac.
Remarque :
❏ Le bac papier 2 ne prend en charge que le papier
ordinaire au format B5 et supérieur.
❏ Aérez et alignez les bords du papier avant de le
charger.
Faites glisser les guides latéraux contre les bords
E
du papier.
Français
Remarque :
Si vous utilisez du papier ordinaire, ne chargez pas le
papier au-delà du repère en forme de flèche H, situé à
l'intérieur du guide latéral.
Si vous utilisez des supports spéciaux Epson, veillez à ce
que le nombre de feuilles soit inférieur à la limite définie
pour le support.
7
Page 34

Guide de base
Manipulation des papiers et supports
Vérifiez que rien ne dépasse du bac et réinsérez-le
F
doucement dans le produit.
Faites coulisser le bac de sortie et soulevez la
G
butée.
Remarque :
❏ Laissez suffisamment de place devant le produit
pour que le papier puisse être éjecté sans problème.
❏ Ne manipulez pas le bac papier si le produit est en
cours de fonctionnement.
❏ Pour obtenir des consignes sur le chargement de
supports autres que du papier ordinaire
(enveloppes, papier pré-imprimé, etc.), consultez le
Guide d'utilisation au format PDF.
Mise en place de
documents originaux
Chargeur automatique de
documents
Vous pouvez charger vos documents originaux dans le
chargeur automatique de documents pour copier,
numériser ou télécopier rapidement plusieurs pages. Le
chargeur automatique de documents peut numériser les
deux côtés d'un document. Sélectionnez l'option
correspondante dans le menu des paramètres de copie.
Vous pouvez utiliser les originaux suivants dans le
chargeur automatique de documents.
Taille A4/Lettre/Legal
Type Papier ordinaire
2
Poids
Capacité 30 feuilles ou 3 mm maxi‐
Lorsque vous numérisez un document recto verso avec
le chargeur automatique de documents, le format de
papier Légal n'est pas disponible.
Important :
c
Évitez les documents suivants pour prévenir des
bourrages papier. Pour ces types, utilisez la vitre du
scanner.
❏ Documents assemblés à l'aide de trombones,
agrafes, etc.
❏ Documents auxquels une bande ou un papier
est collé.
❏ Photos, OHP ou papier de transfert thermique.
❏ Papier déchiré, froissé ou perforé.
64 g/m
mum (A4, Lettre)/10 feuil‐
les (Legal)
à 95 g/m
2
8
Page 35

Guide de base
Manipulation des papiers et supports
Tapez les documents originaux sur une surface
A
plane pour uniformiser les bords.
Faites glisser le guide latéral sur le chargeur
B
automatique de documents.
Insérez les documents originaux face vers le haut
C
et bord court en premier dans le chargeur
automatique de documents.
Faites glisser le guide latéral jusqu'à ce qu'il
D
affleure les documents originaux.
Remarque :
❏ Pour effectuer une copie 2 en 1, placez le document
original comme indiqué. Orientez-le conformément
aux paramètres Orientation du document.
Français
❏ Lorsque vous utilisez la fonction de copie avec le
chargeur automatique de documents, les
paramètres d'impression sont définis sur Réduire/
Agrandir - Taille réelle, Type de papier - Pap.
ordinaire, et Taille du papier - A4/Légal.
L'impression est rognée si le format d'un document
original copié est supérieur au format A4.
9
Page 36

Guide de base
Manipulation des papiers et supports
Vitre du scanner
Ouvrez le capot de documents et placez votre
A
document original face vers le bas sur la vitre du
scanner.
Faites glisser le document original vers le coin.
B
Fermez le capot délicatement.
C
SD, miniSD, microSD, SDHC, miniSDHC,
microSDHC, SDXC, microSDXC, MultiMediaCard,
MMCplus, MMCmobile, MMCmicro, Memory Stick
Duo, Memory Stick PRO Duo, Memory Stick PRO-HG
Duo, Memory Stick Micro, MagicGate Memory Stick
Duo
Important :
c
Les cartes mémoire suivantes requièrent un
adaptateur. Placez la carte dans l'adaptateur avant
de l'insérer dans l'orifice pour éviter que la carte
reste coincée.
❏ miniSD, microSD, miniSDHC, microSDHC,
microSDXC, MMCmicro
❏ MMCmobile
❏ Memory Stick Micro
Insérez une carte à la fois.
A
Remarque :
Lorsqu'un document est chargé dans le chargeur
automatique de documents et qu'un autre document est
posé sur la vitre du scanner, le document chargé est traité
en priorité.
Insertion d'une carte
mémoire
Vous pouvez enregistrer des données sur une carte
mémoire ou imprimer des photos stockées dessus. Les
cartes mémoire suivantes sont prises en charge.
10
Page 37

Guide de base
Copie
Attendez que le voyant s'arrête de clignoter.
B
= voyant stabilisé, = voyant clignotant
Important :
c
❏ N'enfoncez pas la carte trop loin dans l'orifice.
Elle doit ressortir légèrement.
❏ Ne retirez pas la carte mémoire tant que le
voyant clignote. Vous risquez de perdre des
données.
Copie
Pour copier des documents, procédez comme suit. Si
votre produit comporte deux bacs papier, et si vous
souhaitez copier un grand nombre de documents à la
fois, chargez du papier ordinaire A4/Légal dans chaque
bac et définissez le paramètre Source du papier sur Bac
1 > Bac 2 dans l'étape 7.
Chargez le papier dans le bac papier.
A
& « Chargement du papier dans le bac papier » à
la page 6
Placez le document original.
B
& « Mise en place de documents originaux » à la
page 8
Sélectionnez le mode Copie dans le menu
C
Accueil.
Appuyez sur + et - pour définir le nombre de
D
copies.
Définissez la densité.
E
Appuyez sur d pour ouvrir le menu Copie.
F
Sélectionnez les paramètres de copie appropriés,
G
tels que le format, le type et la qualité du papier.
Remarque :
❏ Selon le modèle, vous pouvez définir les paramètres
de copie dans Réglages papier et copies.
❏ Avant de lancer la copie, vous pouvez en afficher un
aperçu.
❏ Il existe plusieurs types de copie : la copie recto verso,
la copie 2 en 1, etc. Modifiez les paramètres
d'impression recto verso et de disposition en fonction
de vos besoins.
Appuyez sur l'un des boutons x pour activer le
H
mode couleur, puis lancez la copie.
Remarque :
Pour obtenir des informations sur les autres fonctions de
copie et la liste de menus du mode Copie, consultez le
Guide d'utilisation au format PDF.
Numérisation
Vous pouvez numériser des documents et envoyer
l'image numérisée du produit vers un ordinateur
connecté.
Remarque :
Pour obtenir des informations sur la fonction Numériser
vers Cloud, consultez le guide Epson Connect accessible
par le biais de l'icône de raccourci
Placez vos originaux.
A
& « Mise en place de documents originaux » à la
page 8
Sélectionnez Scan dans le menu Accueil.
B
Sélectionnez un élément du menu de
C
numérisation.
du bureau.
Français
11
Page 38

Guide de base
Télécopie
Si vous sélectionnez Numériser vers PC,
D
sélectionnez un ordinateur.
Si vous sélectionnez Numériser vers carte
mémoire, définissez le format de numérisation et
les paramètres de copie recto verso.
Appuyez sur les boutons x pour lancer la
E
numérisation.
Remarque :
Pour obtenir des informations sur les autres fonctions de
numérisation et la liste de menus du mode de
numérisation, consultez le Guide d'utilisation au format
PDF.
Votre image numérisée est enregistrée.
Télécopie
Présentation de FAX
Utility
FAX Utility est un logiciel permettant de transmettre
des données tels que des documents, des schémas et des
tableaux créés à l'aide d'une application de traitement de
texte ou de feuille de calcul directement par télécopie
sans recourir à une impression. Cet utilitaire permet
également d'enregistrer un fax au format PDF sur
l'ordinateur. Vous pouvez ainsi consulter les données
sans avoir à les imprimer et imprimer uniquement celles
qui sont nécessaires. Procédez comme suit pour
exécuter l'utilitaire.
Mac OS X
Cliquez sur System Preference (Préférences Système),
cliquez sur Print & Fax (Imprimantes et fax) ou Print
& Scan (Imprimantes et scanners), puis sélectionnez
FAX (votre imprimante) dans Printer (Imprimante).
Cliquez ensuite comme suit :
Mac OS X 10.6.x, 10.7.x : Option & Supplies (Options
et fournitures) - Utility (Utilitaire) - Open Printer
Utility (Ouvrir l’utilitaire de l’imprimante)
Mac OS X 10.5.x : Open Print Queue (Ouvrir la liste
d’attente d’impression) - Utility (Utilitaire)
Remarque :
Pour plus d'informations, reportez-vous à l'aide en ligne
de FAX Utility.
Connexion à une ligne
téléphonique
À propos du câble téléphonique
Utilisez un câble téléphonique présentant les
caractéristiques d'interface ci-dessous.
❏ Ligne téléphonique RJ-11
❏ Connexion du poste téléphonique RJ-11
En fonction de la région, un câble téléphonique peut être
inclus avec le produit. Dans ce cas, utilisez-le.
Windows
Cliquez sur le bouton Démarrer (Windows 7 et Vista)
ou cliquez sur Start (Démarrer) (Windows XP),
pointez vers All Programs (Tous les programmes),
sélectionnez Epson Software, puis cliquez sur FAX
Utility.
12
Page 39

Guide de base
Télécopie
Utilisation de la ligne
téléphonique pour la télécopie
uniquement
Connectez un câble téléphonique provenant
A
d'une prise téléphonique murale au port LINE.
Assurez-vous que Réponse automatique est
B
défini sur Activé.
& « Réception de télécopies » à la page 15
Important :
c
Si vous ne connectez pas un téléphone externe au
produit, veillez à bien activer la fonction de réponse
automatique. Sinon vous ne pourrez pas recevoir de
télécopies.
Partage d'une ligne avec un
téléphone
Connectez un câble téléphonique provenant
A
d'une prise téléphonique murale au port LINE.
Retirez le cache.
B
Français
13
Page 40

Guide de base
Télécopie
Connectez un téléphone ou un répondeur au
C
port EXT.
Remarque :
Pour connaître les autres méthodes de connexion,
reportez-vous au Guide d'utilisation au format PDF.
Vérification de la connexion de
télécopie
Vous pouvez vérifier si le produit est prêt à envoyer ou
recevoir des télécopies.
Chargez le papier ordinaire dans le bac papier.
A
& « Chargement du papier dans le bac papier » à
la page 6
Remarque :
Si votre produit comporte deux bacs papier, chargez le
papier dans le bac papier 1. Si vous avez modifié le
paramètre Source du papier (Configuration >
Paramètres de télécopie > Paramètres de réception >
Source du papier), chargez le papier dans le bac spécifié.
Remarque :
Si une erreur est signalée, essayez les solutions proposées
dans le rapport.
Configuration des
fonctions de télécopie
Configuration des entrées de
numérotation rapide
Vous pouvez créer une liste de numérotation rapide
vous permettant de sélectionner rapidement des
numéros de destinataires lors d'un envoi de fax. Vous
pouvez enregistrer jusqu'à 100 entrées de numérotation
rapide et groupée combinées.
Sélectionnez le mode Fax dans le menu Accueil.
A
Appuyez sur ou sélectionnez Contacts.
B
Sélectionnez Modifier les Contacts.
C
Sélectionnez Config. num rapide. Les numéros
D
d'entrée de numérotation rapide disponibles
s'affichent.
Sélectionnez le numéro d'entrée de
E
numérotation rapide que vous souhaitez
enregistrer. Vous pouvez enregistrer jusqu'à
100 entrées.
Utilisez le pavé numérique pour entrer un
F
numéro de téléphone. Vous pouvez entrer
jusqu'à 64 chiffres.
Sélectionnez le mode Setup dans le menu
B
Accueil.
Sélectionnez Paramètres de télécopie.
C
Sélectionnez Vérif. connex fax.
D
Appuyez sur l'un des boutons x pour imprimer
E
le rapport.
Remarque :
Un tiret (« - ») crée un courte pause dans la
numérotation. Ne l'insérez dans les numéros de
téléphone que lorsqu'une pause est nécessaire. Les espaces
entrés entre les chiffres sont ignorés pendant la
numérotation.
Entrez un nom pour identifier l'entrée de
G
numérotation rapide. Vous pouvez entrer
jusqu'à 30 caractères.
14
Page 41

Guide de base
Télécopie
Appuyez sur Fin pour enregistrer le nom.
H
Configuration des entrées de
numérotation groupée
Vous pouvez ajouter des entrées de numérotation
rapide à un groupe pour envoyer un fax à plusieurs
destinataires simultanément. Vous pouvez entrer
jusqu'à 99 entrées de numérotation rapide et groupée
combinées.
Sélectionnez le mode Fax dans le menu Accueil.
A
Appuyez sur ou sélectionnez Contacts.
B
Sélectionnez Modifier les Contacts.
C
Sélectionnez Config. num groupe. Les numéros
D
d'entrée de numérotation groupée disponibles
s'affichent.
Sélectionnez le numéro d'entrée de
E
numérotation groupée que vous souhaitez
enregistrer.
Entrez un nom pour identifier l'entrée de
F
numérotation groupée. Vous pouvez entrer
jusqu'à 30 caractères.
Appuyez sur Fin pour enregistrer le nom.
G
Sélectionnez un numéro d'entrée de
H
numérotation rapide que vous souhaitez
enregistrer dans la liste de numérotation
groupée.
Envoi de télécopies
Placez votre document original dans le chargeur
A
automatique de documents ou sur la vitre du
scanner.
& « Mise en place de documents originaux » à la
page 8
Sélectionnez le mode Fax dans le menu Accueil.
B
Utilisez les touches du clavier numérique pour
C
entrer le numéro de télécopie. Vous pouvez
entrer jusqu'à 64 chiffres.
Remarque :
❏ Pour afficher le dernier numéro de télécopie utilisé,
appuyez sur
❏ Appuyez sur d pour définir les paramètres d'envoi.
Pour numériser et télécopier les deux côtés d'un
document original, sélectionnez Télécopie recto
verso, Activé, puis chargez le document dans le
chargeur automatique de documents. Selon le
modèle, vous pouvez également définir ces réglages
dans Paramètres d'envoi.
❏ Assurez-vous que vous avez entré les informations
d'en-tête. Certains télécopieurs rejettent
automatiquement les télécopies qui en sont
dépourvues.
Appuyez sur x (couleur) ou x (noir et blanc)
D
pour envoyer un fax couleur ou monochrome.
Remarque :
Si le numéro de télécopie est occupé ou en cas de
problème, ce produit le recompose après une minute.
Appuyez sur Recomposer pour recomposer
immédiatement.
ou Recomposer.
Français
Répétez l'étape 8 pour ajouter d'autres entrées de
I
numérotation rapide à la liste de numérotation
groupée. Vous pouvez enregistrer jusqu'à
99 entrées de numérotation rapide dans une liste
de numérotation groupée.
Appuyez sur OK pour terminer la création d'une
J
liste de numérotation groupée.
Réception de télécopies
Suivez les instructions ci-dessous pour configurer la
réception automatique des fax.
15
Page 42

Guide de base
Télécopie
Remarque :
❏ Selon le réglage de Sortie télécopie, le fax reçu est
enregistré sous forme de données ou imprimé.
❏ Si Sortie télécopie est défini sur Enregistrer, le fax
reçu est enregistré automatiquement dans un fichier
de données, et vous pouvez passer l'étape 1.
Chargez le papier ordinaire dans le bac papier.
A
& « Chargement du papier dans le bac papier » à
la page 6
Remarque :
Si votre produit comporte deux bacs papier, spécifiez le
paramètre Source du papier.
Configuration > Paramètres de télécopie >
Paramètres de réception > Source du papier
Si vous souhaitez imprimer un grand nombre de fax à la
fois, chargez du papier ordinaire dans chaque bac et
définissez le paramètre Source du papier sur Bac 1 > Bac
2.
Assurez-vous que Réponse automatique est
B
défini sur Activé.
Configuration > Paramètres de télécopie >
Paramètres de réception > Réponse
automatique > Activé
Remarque :
❏ Lorsqu'un répondeur est connecté directement à ce
produit, veillez à bien définir l'option Sonneries
avant réponse selon la même procédure.
❏ L'option Sonneries avant réponse peut ne pas être
disponible selon la région.
❏ Pour plus d'informations sur la réception manuelle
de fax, consultez le Guide d'utilisation au format
PDF.
Sélectionnez le mode Setup dans le menu
C
Accueil.
Sélectionnez Paramètres de télécopie.
D
Sélectionnez Communication.
E
Important :
c
Sélectionnez plus de sonneries que nécessaire pour
le répondeur. S'il est défini sur la quatrième
sonnerie, définissez le produit sur la cinquième
sonnerie ou ultérieure. Sinon le répondeur ne peut
pas recevoir d'appels vocaux.
Remarque :
Lorsque vous recevez un appel et que l'autre partie est une
télécopie, le produit reçoit la télécopie automatiquement
même si le répondeur prend l'appel. Si vous décrochez le
téléphone, patientez jusqu'à ce que l'écran LCD affiche
un message indiquant qu'une connexion a été établie
avant de raccrocher. Si l'autre partie est un appelant, le
téléphone peut être utilisé de manière normale ou un
message peut être laissé sur le répondeur.
Impression de rapports
Suivez les instructions ci-dessous pour imprimer un
rapport de télécopie.
Chargez le papier ordinaire dans le bac papier.
A
& « Ch argem ent du papie r dans le bac papie r » à
la page 6
Remarque :
Si votre produit comporte deux bacs papier, spécifiez le
paramètre Source du papier.
Configuration > Paramètres de télécopie >
Paramètres de réception > Source du papier
Sélectionnez le mode Fax dans le menu Accueil.
B
Si Options avancées s'affiche sur l'écran LCD,
C
sélectionnez Options avancées.
Dans le cas contraire, appuyez sur d.
Sélectionnez Rapport de télécopie.
D
Sélectionnez l'élément que vous souhaitez
E
imprimer.
Sélectionnez Sonneries avant réponse.
F
Sélectionnez le nombre de sonneries.
G
Remarque :
Seule l'option Journal télécopie s'affiche à l'écran.
16
Page 43

Guide de base
Fonctions suite
Appuyez sur l'une des touches x pour imprimer
F
le rapport sélectionné.
Remarque :
Pour obtenir des informations sur les autres fonctions de
télécopie et la liste de menus du mode télécopie, consultez
le Guide d'utilisation au format PDF.
Fonctions suite
Fonctions suite vous permet d'accéder à de nombreuses fonctionnalités d'impression supplémentaires. Pour plus
d'informations, sélectionnez Fonctions suite, puis, dans chaque menu, suivez les consignes qui s'affichent sur l'écran
LCD.
Menu Fonctions
Copie carte identité
Imprimer photos
Vous pouvez copier les deux côtés d'une
carte d'identité à la fois.
Vous pouvez imprimer des photos stoc‐
kées sur une carte mémoire ou un péri‐
phérique USB externe sans utiliser d'ordi‐
nateur. Vous pouvez également réduire et
augmenter la taille de vos photos, et régler
la qualité d'impression.
Français
Copier/restaurer des photos
Flle m. en page photo
17
Vous pouvez créer des copies fidèles de
vos originaux. Vous pouvez aussi rendre la
copie plus belle que l'original, en restau‐
rant les couleurs d'origine d'une vieille
photo par exemple.
Vous pouvez stocker vos photos sur une
carte mémoire avec un grand choix de dis‐
positions.
Page 44

Guide de base
Remplacement des cartouches d’encre
Menu Fonctions
Imprimer sur papier réglé
Remplacement des
cartouches d’encre
Consignes de sécurité
❏ Afin d’éviter tout risque de fuite, ne secouez pas les
cartouches d’encre trop vigoureusement.
❏ Pour garantir les performances optimales des têtes
d'impression, une certaine quantité d'encre est
consommée pendant l'impression et les opérations
de maintenance, notamment lors du remplacement
des cartouches et du nettoyage de la tête
d'impression.
Vous pouvez imprimer sur du papier réglé
ou graph avec ou sans photo en arriè‐
re-plan.
❏ Conservez les cartouches hors de portée des
enfants.
❏ Manipulez les cartouches d’encre usagées avec
précaution, le port d'alimentation en encre pouvant
être légèrement taché d’encre.
En cas de contact de l’encre avec la peau, nettoyez
énergiquement la région à l’eau et au savon.
En cas de contact avec les yeux, rincez-les
abondamment avec de l’eau. Si une gêne ou des
problèmes de vision subsistent après un nettoyage
approfondi, consultez immédiatement un
médecin.
En cas de contact de l'encre avec l'intérieur de votre
bouche, recrachez immédiatement et consultez un
médecin dans les plus brefs délais.
Précautions
❏ Nous vous recommandons d'utiliser des cartouches
d'origine Epson. Epson ne peut garantir la qualité
ou la fiabilité des encres non d'origine. L'utilisation
cartouches d’encre non d’origine peut conduire à
des dommages non couverts par les garanties
d'Epson. Dans certaines circonstances, elle peut
entraîner un fonctionnement erratique du produit.
Les informations de niveau des encres non
fabriquées par Epson pourraient ne pas s'afficher.
❏ Si vous devez retirer temporairement une
cartouche d'encre, veillez à protéger la zone
d’alimentation en encre de la saleté et de la
poussière. Stockez la cartouche d’encre dans le
même environnement que le produit. Lors du
stockage de la cartouche d'encre, veillez à orienter
l'étiquette indiquant la couleur de la cartouche vers
le haut. Ne stockez pas les cartouches d'encre à
l’envers.
❏ Pour une efficacité optimale, ne retirez une
cartouche que lorsque vous êtes prêt à la remplacer.
Il est possible que les cartouches d'encre dont le
niveau est faible ne puissent pas être utilisées
lorsqu'elles sont réinsérées.
❏ N'ouvrez pas l'emballage de la cartouche d'encre
avant d'être prêt à l'installer dans le produit. Pour
conserver une fiabilité optimale, la cartouche est
emballée sous vide. Si une cartouche est déballée
longtemps avant son utilisation, une impression
normale risque de ne pas être possible.
❏ Installez toutes les cartouches d'encre, sinon vous
ne pourrez pas imprimer.
18
Page 45

Guide de base
Remplacement des cartouches d’encre
Remplacement d'une
cartouche d'encre
Ouvrez le module scanner. Le porte-cartouche se
A
met en position de remplacement de la cartouche
d'encre.
Important :
c
❏ Ne déplacez pas le porte-cartouche
manuellement car vous pourriez endommager
le produit.
❏ Ne soulevez pas le module scanner lorsque le
capot de documents est ouvert.
Ouvrez le capot de la cartouche d'encre.
B
Saisissez la cartouche d'encre et retirez-la.
C
Remarque :
❏ La figure illustre le remplacement d'une cartouche
d'encre noire. Remplacez la cartouche qui
correspond à votre situation.
❏ Les cartouches d'encre retirées peuvent être
maculées d'encre autour de l'orifice d'alimentation
en encre. Veillez donc à ne pas mettre d'encre sur la
zone qui l'entoure pendant le remplacement des
cartouches.
Français
Remarque :
si le porte-cartouche ne se place pas en position de
remplacement de la cartouche, suivez la consigne
ci-dessous.
Accueil > Configuration > Entretien > Rempl cart
encre
19
Page 46

Guide de base
Remplacement des cartouches d’encre
Secouez doucement la nouvelle cartouche
D
d'encre quatre ou cinq fois, puis retirez-la de son
emballage.
Retirez uniquement la bande jaune.
E
Important :
c
❏ Vous devez retirer la bande jaune de la
cartouche avant de l'installer, sinon la qualité
d'impression pourrait diminuer ou
l'impression pourrait ne pas fonctionner.
❏ Si vous avez installé une cartouche d'encre sans
retirer la bande jaune, retirez la cartouche du
produit, retirez la bande puis remettez la
cartouche en place.
❏ Ne retirez pas le plastique transparent apposé
sous la cartouche, sinon elle deviendrait
inutilisable.
❏ Ne retirez pas et ne déchirez pas l’étiquette de la
cartouche car cela pourrait provoquer des
fuites d'encre.
Insérez la cartouche et appuyez dessus jusqu'à ce
F
qu'elle s'enclenche.
Fermez le capot de la cartouche d'encre.
G
Fermez lentement le module scanner. Le
H
chargement de l'encre commence.
Remarque :
❏ Le voyant d'alimentation continue de clignoter
pendant que le produit charge l'encre. Ne mettez pas
le produit hors tension pendant le chargement
d'encre. Vous ne pourrez peut-être pas imprimer si le
chargement d'encre est incomplet.
❏ Si vous avez dû remplacer une cartouche d'encre
pendant la copie, pour être sûr que la copie soit de
qualité une fois le chargement d'encre terminé,
annulez le travail en cours et recommencez-le en
positionnant les originaux.
Le remplacement de la cartouche d'encre est terminé. Le
produit reprend son état précédent.
20
Page 47

Guide de base
Dépannage de base
Dépannage de base
Messages d'erreurs
Cette section explique la signification des messages affichés sur l'écran LCD.
Messages d'erreurs Solutions
Fin de papier ou bourrage papier
Erreur impr. Mettez hrs/ss tens. Pour infos, voir documen‐
tation.
Erreur communication. Vérifiez que le PC est connecté. Assurez-vous que l'ordinateur est correctement connecté. Si le
Boîtier de maintenance approche fin de vis. Remplacez le boîtier de maintenance avant qu'il n'arrive en fin de
Boîtier de maintenance en fin de vie. Vous devez le rem‐
placer.
Tampon encreur impr bientôt fin de vie. Contactez sup‐
port Epson.
Un tampon encreur de l'imprimante est en fin de vie. Con‐
tactez le support Epson.
Aucune tonalité détectée. Essayez Vérif.connex fax ds Pa‐
ram télécop. menu Config.
Combo adresse IP et masque ss réseau non valide. Con‐
sultez documentation.
Recovery Mode La mise à jour du micrologiciel a échoué. Vous devrez réessayer la
& Voir « Bourrages papier » à la page 22
Mettez le produit hors tension, puis sous tension. Assurez-vous
qu'il ne reste pas de papier dans le produit. Si le message d'erreur
persiste, contactez l'assistance Epson.
message d'erreur persiste, assurez-vous que le logiciel de numé‐
risation est installé sur l'ordinateur et que les paramètres du logi‐
ciel sont corrects.
vie.
Pour plus d'informations, reportez-vous au Guide d'utilisation au
format PDF.
Lorsque le boîtier de maintenance est plein, le produit s'arrête et
vous devez le remplacer pour reprendre l'impression.
Remplacez le boîtier de maintenance.
Appuyez sur la touche x pour reprendre l'impression. Ce message
s'affichera jusqu'à ce que le réservoir d'encre usagée soit rempla‐
cé. Contactez le service d'assistance Epson pour remplacer le ré‐
servoir avant sa fin de vie. Lorsque le réservoir est saturé, le produit
s'arrête et vous devez faire intervenir le service d'assistance Epson
pour recommencer à imprimer.
Contactez le service d'assistance Epson pour remplacer les réser‐
voirs d'encre usagée.
Assurez-vous que le câble téléphonique est correctement con‐
necté et que la ligne téléphonique fonctionne.
& Voir « Connexion à une ligne téléphonique » à la page 12
Si vous avez connecté le produit à une ligne téléphonique PBX
(autocommutateur privé) ou à un adaptateur de terminal, désac‐
tivez l'option Détection de tonalité. Sélectionnez Paramètres de
télécopie> Communication> Détection de tonalité >Désacti‐
vé.
Reportez-vous au Guide réseau en ligne.
mise à jour du micrologiciel ultérieurement. Préparez un câble
USB et consultez votre site Web Epson local pour plus d'instruc‐
tions.
Français
21
Page 48

Guide de base
Dépannage de base
Bourrages papier
Important :
!
N'appuyez jamais sur les touches du panneau de
configuration lorsque vos mains se trouvent dans le
produit.
Remarque :
❏ Annulez le travail d'impression si vous y êtes invité
par un message de l'écran LCD ou du pilote
d'impression.
❏ Lorsque vous avez supprimé le bourrage papier,
appuyez sur la touche indiquée sur l'écran LCD.
Retrait de papier coincé près du
capot arrière
Tirez le capot arrière.
A
Retirez délicatement le papier coincé.
C
Ouvrez le capot arrière.
D
Retirez délicatement le papier coincé.
B
22
Page 49

Guide de base
Dépannage de base
Retirez délicatement le papier coincé.
E
Refermez le capot arrière.
F
Retrait de papier coincé à
l'intérieur du produit
Retirez délicatement le papier coincé.
A
Ouvrez le module scanner.
B
Important :
c
Ne soulevez pas le module scanner lorsque le capot
de documents est ouvert.
Retirez le papier coincé à l'intérieur, morceaux
C
déchirés inclus.
Français
23
Page 50

Guide de base
Important :
c
Ne touchez pas le câble plat blanc connecté au
porte-cartouche.
Dépannage de base
B
C
Retirez le papier coincé du bac.
Retirez délicatement tout le papier coincé à
l'intérieur du produit.
Fermez lentement le module scanner.
D
Retrait de papier coincé près du
bac papier
Retirez le bac papier.
A
Remarque :
Si vous ne parvenez pas à retirer le bac, débranchez le
cordon électrique du produit et de la prise de courant.
Débranchez tous les autres câbles du produit.
Placez délicatement le produit sur le côté, comme indiqué
ci-dessous, et retirez doucement le bac.
Alignez les bords du papier.
D
Vérifiez que rien ne dépasse du bac et réinsérez-le
E
doucement dans le produit.
Retrait de papier coincé dans le
chargeur automatique de
documents
Retirez la pile de papier du bac de sortie du
A
chargeur automatique de documents.
24
Page 51

Guide de base
Dépannage de base
Ouvrez le capot de l'ADF.
B
Important :
c
Veillez à ouvrir le capot de l'ADF avant de retirer le
papier coincé. Si vous n'ouvrez pas le capot, vous
risquez d'endommager le produit.
Retirez délicatement le papier coincé.
C
Retirez délicatement le papier coincé.
F
Fermez le capot de documents.
G
Relevez le bac d'entrée du chargeur automatique
H
de documents.
Français
Fermez le capot du chargeur automatique de
D
documents.
Ouvrez le capot de documents.
E
25
Retirez délicatement le papier coincé.
I
Remettez le bac d'entrée du chargeur
J
automatique de documents dans sa position
d'origine.
Page 52

Guide de base
Où trouver de l'aide
Aide concernant la qualité
d'impression
Si vous constatez des bandes (lignes claires), des
couleurs manquantes ou tout autre problème de qualité
sur vos impressions, essayez les solutions suivantes.
❏ Vérifiez que vous avez chargé le papier et placé
l'original correctement.
& « Chargement du papier dans le bac papier » à la
page 6
& « Mise en place de documents originaux » à la
page 8
❏ Vérifiez les paramètres de format et de type de
papier.
& « Sélection du papier » à la page 6
❏ La tête d'impression est peut-être obstruée.
Commencez par vérifier les buses, puis nettoyez la
tête d'impression.
Configuration > Entretien > Vérification des
buses
❏ Si la télécopie n'est pas partie, assurez-vous que le
télécopieur du destinataire est sous tension et qu'il
fonctionne.
❏ Si ce produit n'est pas connecté à un téléphone et
que vous souhaitez recevoir des télécopies
automatiquement, veillez à activer la fonction de
réponse automatique.
& « Réception de télécopies » à la page 15
Remarque :
Pour plus de solutions aux problèmes de télécopie,
reportez-vous au Guide d'utilisation.
Où trouver de l'aide
Site Web du support
technique
Le site Internet du support technique Epson fournit une
assistance pour les problèmes qui ne peuvent être
résolus à l'aide des informations de dépannage
contenues dans la documentation de votre produit. Si
vous disposez d’un navigateur web et pouvez vous
connecter à Internet, accédez au site à l’adresse
suivante :
(a) OK
(b) A besoin que la tête soit nettoyée
Aide concernant la
télécopie
❏ Assurez-vous que le câble téléphonique est
correctement connecté et vérifiez que la ligne
téléphonique fonctionne. Vous pouvez vérifier
l'état de la ligne à l'aide de la fonction Vérif. connex
fax.
& « Connexion à une ligne téléphonique » à la
page 12
http://support.epson.net/
http://www.epson.eu/Support (Europe)
Si vous souhaitez découvrir les derniers pilotes, la foire
aux questions, les manuels ainsi que d’autres éléments
pouvant être téléchargés, consultez le site :
http://www.epson.com
http://www.epson.eu/Support (Europe)
Sélectionnez ensuite la section d'assistance de votre site
Web EPSON local.
26
Page 53

Grundlagenhandbuch
Inhalt
Inhalt
Einleitung............................ 2
Informationsquellen........................ 2
Vorsicht, Wichtig und Hinweis................ 2
Verwenden des Epson Connect-Services......... 2
Sicherheitsanweisungen............. 3
Bedienfeldübersicht................. 4
Tasten und LCD-Anzeige.................... 4
Leuchten................................ 5
Umgang mit Papier und Medien
....................................... 6
Auswahl des Papiers........................ 6
Einlegen von Papier in die Papierkassette......... 6
Einlegen von Vorlagen...................... 8
Automatischer Vorlageneinzug (ADF)......... 8
Vorlagenglas........................... 10
Einstecken einer Speicherkarte............... 10
Kopieren............................ 11
Scannen............................ 12
Faxen............................... 12
Einführung in „FAX Utility“................. 12
Anschluss an eine Telefonleitung.............. 13
Über ein Telefonkabel.................... 13
Bei Verwendung einer ausschließlich für das
Fax vorgesehenen Telefonleitung............ 13
Bei Verwendung einer mit einem Telefongerät
geteilten Telefonleitung................... 14
Überprüfen der Fax-Verbindung............ 14
Einrichten der Faxfunktionen................ 15
Kurzwahleinträge einrichten............... 15
Gruppenwahleinträge einrichten............ 15
Senden von Faxen......................... 15
Empfangen von Faxen...................... 16
Druckberichte............................ 17
Mehr Funktionen................... 17
Auswechseln der Tintenpatronen
..................................... 19
Sicherheitsanweisungen.................... 19
Vorsichtsmaßnahmen...................... 19
Auswechseln einer Tintenpatrone............. 19
Grundlegende Fehlerbehebung.... 22
Fehlermeldungen......................... 22
Papierstau............................... 23
Entfernen von gestautem Papier aus der
hinteren Abdeckung..................... 23
Entfernen von gestautem Papier aus dem
Inneren des Geräts...................... 24
Entfernen von gestautem Papier aus der
Papierkassette.......................... 25
Entfernen von gestautem Papier aus dem
automatischen Vorlageneinzug (ADF)........ 26
Hilfe zur Druckqualität..................... 27
Fax-Hilfe............................... 27
Wo Sie Hilfe bekommen............ 27
Website für technischen Support.............. 27
Deutsch
1
Page 54

Grundlagenhandbuch
Einleitung
Einleitung
Informationsquellen
Die neuste Version der folgenden Handbücher sind von
der Epson-Support-Website erhältlich.
http://www.epson.eu/Support (Europa)
http://support.epson.net/ (außerhalb Europas)
❏ Hier starten (Papierdokument):
Liefert Informationen zum Einrichten des Geräts
und zur Installation der Software.
❏ Grundlagenhandbuch (Papierdokument):
Vermittelt grundlegende Informationen über den
Gebrauch des Produkts ohne Computer. Dieses
Handbuch ist je nach Modell und Region
möglicherweise nicht enthalten.
❏ Benutzerhandbuch (PDF-Datei):
Enthält eine detaillierte Anleitung zu Betrieb,
Sicherheit und Fehlerbehebung. Verwenden Sie
dieses Handbuch, wenn Sie das Produkt mit einem
Computer benutzen oder erweiterte Funktionen
verwenden, wie zum Beispiel 2-seitige Kopien.
Zur Anzeige des PDF-Handbuchs benötigen Sie
Adobe Acrobat Reader 5.0 oder höher, oder Adobe
Reader.
❏ Netzwerkhandbuch (HTML):
Liefert Netzwerkadministratoren Informationen
zu sowohl den Druckertreiber- als auch
Netzwerkeinstellungen.
Vorsicht, Wichtig und
Hinweis
Die in diesem Handbuch verwendeten Bezeichnungen
Vorsicht, Wichtig und Hinweis sind nachfolgend
dargestellt und haben die folgende Bedeutung.
Vorsicht
!
Diese Warnhinweise müssen unbedingt beachtet
werden, um Körperverletzungen zu vermeiden.
Wichtig
c
Anmerkungen dieser Art müssen befolgt werden,
um Schäden am Drucker oder Computer zu
vermeiden.
Hinweis
bezieht sich auf nützliche Tipps oder auf Betriebsgrenzen
des Produkts.
Verwenden des Epson
Connect-Services
Durch die Nutzung von Epson Connect und von
Diensten Dritter können Sie auf einfache Weise direkt
von Ihrem Smartphone, Tablet-PC oder Laptop
jederzeit und von praktisch überall auf der ganzen Welt
drucken! Weitere Informationen zum Drucken und zu
anderen Diensten finden Sie unter folgender URL:
https://www.epsonconnect.com/ (Epson Connect
Portal-Website)
http://www.epsonconnect.eu (nur Europe)
❏ Hilfe (auf der Anzeige des Produkts):
Bietet grundlegende Anweisungen zum Betrieb
und zur Fehlerbehebung auf der LCD-Anzeige des
Produkts bereit. Wählen Sie auf dem Bedienfeld das
Menü Hilfe.
2
Page 55

Grundlagenhandbuch
Sicherheitsanweisungen
Sie können das Epson Connect-Handbuch anzeigen,
indem Sie auf das Verknüpfungssymbol
Desktop doppelklicken.
auf dem
Sicherheitsanweisungen
Befolgen Sie diese Anweisungen, um den sicheren
Gebrauch des Produkts zu gewährleisten. Achten Sie
darauf, dieses Handbuch für den späteren Gebrauch
aufzuheben. Befolgen Sie außerdem alle am Gerät
angebrachten Warnungen und Hinweise.
❏ Verwenden Sie nur das mitgelieferte Netzkabel mit
diesem Produkt und verwenden Sie das Kabel nicht
mit anderen Geräten. Die Verwendung fremder
Netzkabel mit diesem Produkt oder die
Verwendung des mitgelieferten Netzkabels mit
anderen Geräten kann zu Bränden oder
elektrischen Schlägen führen.
❏ Vergewissern Sie sich, dass das Netzkabel den
geltenden Sicherheitsvorschriften entspricht.
❏ Versuchen Sie nie, das Netzkabel, den Stecker, die
Druckereinheit, die Scannereinheit oder optionales
Zubehör zu zerlegen, zu modifizieren oder zu
reparieren, außer wenn dies ausdrücklich in den
Handbüchern des Geräts angegeben ist.
❏ In folgenden Fällen müssen Sie das Gerät vom Netz
trennen und sich an einen autorisierten
Kundendiensttechniker wenden:
Das Netzkabel oder der Stecker ist beschädigt;
Flüssigkeit ist in das Gerät eingedrungen; das Gerät
ist heruntergefallen oder das Gehäuse wurde
beschädigt; das Gerät arbeitet nicht mehr normal
bzw. zeigt auffällige Leistungsabweichungen.
Nehmen Sie keine Einstellungen vor, die nicht in
der Dokumentation beschrieben sind.
❏ Stellen Sie das Gerät in der Nähe einer Steckdose
auf, so dass der Stecker jederzeit problemlos
herausgezogen werden kann.
❏ Das Gerät darf nicht im Freien, in der Nähe von viel
Schmutz oder Staub, Wasser, Wärmequellen oder
an Standorten, die Erschütterungen, Vibrationen,
hohen Temperaturen oder Feuchtigkeit ausgesetzt
sind, aufgestellt oder gelagert werden.
❏ Achten Sie darauf, keine Flüssigkeiten auf das
Produkt zu verschütten und das Gerät nicht mit
nassen Händen anzufassen.
❏ Halten Sie zwischen dem Gerät und
Herzschrittmachern einen Mindestabstand von 22
cm ein. Die Funkwellen, die das Gerät aussendet,
könnten die Funktion von Herzschrittmachern
nachteilig beeinflussen.
❏ Wenn das LCD-Display beschädigt ist, wenden Sie
sich an Ihren Händler. Falls die
Flüssigkristalllösung auf Ihre Hände gelangt,
waschen Sie sie gründlich mit Seife und Wasser.
Falls die Flüssigkristalllösung in die Augen gelangt,
spülen Sie diese sofort mit reichlich Wasser aus.
Wenn Sie sich nach dem gründlichen Ausspülen
immer noch schlecht fühlen oder Sehprobleme
haben, suchen Sie sofort einen Arzt auf.
❏ Telefonieren Sie nicht während eines Gewitters. Es
besteht ein entferntes Risiko von Stromschlag
durch Blitze.
❏ Verwenden Sie nicht das Telefon, um in der Nähe
eines Gaslecks das Gasleck zu melden.
Deutsch
Hinweis:
Folgende Sicherheitsregeln gelten für den Umgang mit
Tintenpatronen.
& „Auswechseln der Tintenpatronen“ auf Seite 19
3
Page 56

Grundlagenhandbuch
Bedienfeldübersicht
Bedienfeldübersicht
Hinweis:
❏ Das Bedienfelddesign variiert je nach Position.
❏ Obwohl das Bedienfelddesign und die auf der LCD-Anzeige dargestellten Elemente wie Menü- und Optionsnamen
vom tatsächlichen Produkt abweichen können, ist die Bedienung dieselbe.
Tasten und LCD-Anzeige
Tasten Funktion
a
b
c
d
e - Auf der LCD-Anzeige werden Menüs dargestellt. Wenn das Produkt über ein interaktives
Dient zum Ein- bzw. Ausschalten des Produkts.
Kehrt zum oberen Menü zurück. Im oberen Menü können Sie zwischen den Modi wechseln.
Zeigt die zuletzt gewählte Nummer an. Bei der Eingabe von Nummern im Faxmodus dient
diese Taste zum Einfügen eines Pausesymbols (-), welches während des Wählvorgangs eine
kurze Unterbrechung hinzufügt.
Zeigt die Liste Kontakte im Faxmodus an.
Bedienfeld verfügt, können Sie einen Bildlauf auf der LCD-Anzeige durchführen, indem Sie
über die Anzeige streichen. Wenn das Bedienfeld nur langsam reagiert, streichen Sie etwas
stärker.
4
Page 57

Grundlagenhandbuch
Tasten Funktion
f
Bedienfeldübersicht
Bricht den Vorgang ab bzw. kehrt zum vorherigen Menü zurück.
g
h +, - Legt die Anzahl der Kopien fest.
i 0 - 9, *, # Dient zum Eingeben des Datums bzw. der Uhrzeit, der Kopienanzahl sowie der Faxnummern.
j
k
l
m
l, u, r, d, OK Drücken Sie zur Auswahl von Menüs l, u, r, d. Drücken Sie OK, um die ausgewählten
u, d
Einstellungen zu bestätigen und zum nächsten Bildschirm zu wechseln. Bei der Eingabe einer
Faxnummer dient die Taste l als Rücktaste und die Taste r fügt ein Leerzeichen ein.
Bei der Eingabe von alphanumerischen Zeichen wechselt die Eingabe bei jedem Tastendruck
zwischen Großbuchstaben, Kleinbuchstaben und Zahlen. Es ist gegebenenfalls einfacher,
Text mithilfe der Softwaretastatur anstatt mit diesen Tasten einzugeben.
Startet das Drucken/Kopieren/Scannen/Faxen in Schwarzweiß.
Startet das Drucken/Kopieren/Scannen/Faxen in Farbe.
Stoppt den aktuellen Vorgang oder initialisiert die aktuellen Einstellungen.
Führt einen Bildlauf auf der Anzeige durch.
Leuchten
Leuchten Funktion
Leuchtet, wenn das Gerät eingeschaltet ist.
Blinkt, wenn das Gerät Daten empfängt, gedruckt/kopiert/gescannt/gefaxt wird, eine
Tintenpatrone ausgewechselt wird, das Tintenzuleitungssystem befüllt oder der Druckkopf
gereinigt wird.
Leuchtet, solange der Drucker mit einem Netzwerk verbunden ist. Blinkt, solange die
Netzwerkeinstellungen justiert werden (grün: Wi-FI/orange: Ethernet).
Deutsch
Hinweis:
Weitere Informationen zu den auf der LCD-Anzeige dargestellten Symbolen finden Sie in der Hilfe auf dem Bedienfeld.
5
Page 58

Grundlagenhandbuch
Umgang mit Papier und Medien
Umgang mit Papier
und Medien
Auswahl des Papiers
Das Produkt stellt sich automatisch auf den in den
Druckeinstellungen ausgewählten Papiertyp ein. Aus
diesem Grund ist die Einstellung des richtigen
Papiertyps besonders wichtig. So erkennt das Produkt,
welches Papier gerade verwendet wird, und stellt die
Tintendeckung entsprechend ein. In der folgenden
Tabelle sind die Einstellungen für das Papier aufgelistet.
Für dieses Papier LCD-Papiertyp
Normalpapier*
Epson Bright White Ink Jet
Paper (Weißes Tinten‐
strahlpapier)*
Epson Ultra Glossy Photo
Paper (Ultrahochglanz-Fo‐
topapier)
Epson Premium Glossy
Photo Paper (Premi‐
um-Hochglanz-Fotopa‐
pier)
Epson Premium Semigloss
Photo Paper (Premium-Sei‐
denglanz-Fotopapier)
Epson Glossy Photo Paper
(Fotopapier, glänzend)
Epson Photo Paper (Foto‐
papier)
Epson Matte Paper - Hea‐
vyweight (Mattes Papier schwer)
Epson Photo Quality Ink Jet
Paper (Fotoqualität-Tin‐
tenstrahlpapier)
*1 Mit diesem Papier können Sie beidseitig drucken.
1
1
Plain Paper (Normalpapier)
Plain Paper (Normalpapier)
Hochglänzend
Prem. glänzend
Prem. glänzend
Glänzend
Fotopapier
Matt
Matt
Einlegen von Papier in die
Papierkassette
Führen Sie zum Einlegen von Papier die folgenden
Schritte aus:
a. Papierkassette 1
b. Papierkassette 2
* Die Verfügbarkeit dieses Teils ist vom Produkt
abhängig.
Ziehen Sie die Papierkassette heraus.
A
*
6
Page 59

Grundlagenhandbuch
Umgang mit Papier und Medien
Hinweis:
Wenn das Ausgabefach geöffnet ist, schließen Sie es,
bevor Sie die Papierkassette herausziehen.
Drücken und schieben Sie die
B
Papierführungsschienen an die Kanten der
Papierkassette heran.
Richten Sie die Papierführungsschiene am
C
verwendeten Papierformat aus.
Legen Sie in Richtung der
D
Papierführungsschiene mit der bedruckbaren
Seite nach unten ein und stellen Sie sicher, dass
das Papier nicht über das Ende der Kassette
hinausragt.
Hinweis:
❏ Papierkassette 2 unterstützt nur das
Normalpapierformat B5 oder größer.
❏ Das Papier vor dem Einlegen aufstoßen und die
Papierkanten ausrichten.
Deutsch
7
Page 60

Grundlagenhandbuch
Umgang mit Papier und Medien
Schieben Sie die Papierführungsschienen an die
E
Papierkanten heran.
Hinweis:
Legen Sie Normalpapier nicht über die Pfeilmarkierung
H innen an der Papierführungsschiene hinaus ein.
Achten Sie Bei Epson-Spezialmedien darauf, dass die
Blattanzahl unter dem für das Medium festgelegten
Maximum liegt.
Ziegen Sie das Ausgabefach heraus und stellen
G
Sie den Anschlag auf.
Hinweis:
❏ Lassen Sie genügend Platz vor dem Gerät frei, damit
das Papier ungehindert ausgegeben werden kann.
❏ Wenn das Produkt in Betrieb ist, darf die
Papierkassette weder entfernt noch eingesetzt
werden.
❏ Informationen zum Einlegen anderer Medien als
Normalpapier wie z. B .Umschläge und vorgelochtes
Papier finden Sie im PDF Benutzerhandbuch.
Einlegen von Vorlagen
Automatischer Vorlageneinzug
(ADF)
Halten Sie die Papierkassette waagerecht und
F
setzen Sie sie langsam und vorsichtig wieder in
das Produkt ein.
Sie können Ihre Originale in den automatischen
Vorlageneinzug (ADF) einlegen, um mehrere Seiten
schnell kopieren, scannen oder faxen zu können. Der
ADF kann Dokumente beidseitig scannen. Wähen Sie
dazu die entsprechende Option im Menü für
Kopiereinstellungen. Folgende Originale eignen sich
für den ADF.
Format A4/Letter/Legal
Typ Normalpapier
Gewicht
Fassungsvermögen 30 Bl ätter oder 3 mm oder
8
2
64 g/m
bis 95 g/m
weniger (A4, Letter)/10
Blätter (Legal)
2
Page 61

Grundlagenhandbuch
Umgang mit Papier und Medien
Beim Scannen eines doppelseitigen Dokuments mit
dem ADF steht kein Legal-Papierformat zur
Verfügung.
Wichtig:
c
Vermeiden Sie die folgenden Vorlagen, um
Papierstau zu verhindern. Verwenden Sie für
folgende Typen das Vorlagenglas.
❏ Dokumente, die mit Büroklammern,
Heftklammern usw. zusammengeheftet sind
❏ Dokumente, auf die Klebeband oder Papier
geklebt ist
❏ Fotos, Overheadprojektor-Folien oder
Thermalpapier
❏ Abgerissenes, zerknittertes Papier oder Papier
mit Löchern
Glätten Sie die Kanten der Vorlagen auf einer
A
ebenen Oberfläche.
Legen Sie die Vorlagen mit der kurzen Seite
C
zuerst und der zu bedruckenden Seite nach oben
in den automatischen Vorlageneinzug ein.
Richten Sie die Papierführungsschiene an den
D
Vorlagen aus.
Deutsch
Schieben Sie die Papierführungsschiene des
B
automatischen Vorlageneinzugs auseinander.
9
Page 62

Grundlagenhandbuch
Umgang mit Papier und Medien
Hinweis:
❏ Legen Sie beim Layout „2 hoch kopieren“ die
Vorlage wie dargestellt auf. Vergewissern Sie sich,
dass die Ausrichtung der Vorlage den Einstellungen
für Dokumentausrichtung entspricht.
❏ Wenn Sie die Kopierfunktion mit dem
automatischen Vorlageneinzug (ADF) verwenden,
werden die Druckeinstellungen fest eingestellt auf
Verkl./Vergr — Tats. Größe, Papiertyp —
Normalpapier und Papiergröße — A4/Legal. Der
Ausdruck wird abgeschnitten, wenn Sie eine
Vorlage kopieren, die größer als A4 ist.
Vorlagenglas
Öffnen Sie die Dokumentenabdeckung und
A
legen Sie die Vorlage mit der Schrift nach unten
auf das Vorlagenglas.
Schieben Sie die Vorlage in die Ecke.
B
Schließen Sie die Abdeckung vorsichtig.
C
Hinweis:
Wenn sich ein Dokument im automatischen
Vorlageneinzug (ADF) und auf dem Vorlagenglas
befindet, hat das Dokument im ADF Priorität.
Einstecken einer
Speicherkarte
Sie können auf einer Speicherkarte abgelegte Fotos
drucken oder gescannte Daten auf einer Speicherkarte
sichern. Die folgenden Speicherkarten werden
unterstützt.
10
Page 63

Grundlagenhandbuch
Kopieren
SD, miniSD, microSD, SDHC, miniSDHC,
microSDHC, SDXC, microSDXC, MultiMediaCard,
MMCplus, MMCmobile, MMCmicro, Memory Stick
Duo, Memory Stick PRO Duo, Memory Stick PRO-HG
Duo, Memory Stick Micro, MagicGate Memory Stick
Duo
Wichtig:
c
Für die folgenden Speicherkarten ist ein Adapter
erforderlich: Schließen Sie den Adapter an, bevor
Sie die Karte in den Steckplatz einstecken.
Andernfalls kann die Karte stecken bleiben.
❏ miniSD, microSD, miniSDHC, microSDHC,
microSDXC, MMCmicro
❏ MMCmobile
❏ Memory Stick Micro
Stecken Sie nur eine Karte gleichzeitig ein.
A
Prüfen Sie, ob die LED durchgehend leuchtet.
B
= leuchtet durchgehend, = blinkt
Wichtig:
c
❏ Versuchen Sie nicht, gewaltsam die Karte
vollständig in den Steckplatz zu stecken. Sie
sollte nicht vollständig eingesteckt sein.
❏ Entfernen Sie die Speicherkarte nicht, wenn
die LED blinkt. Ansonsten gehen die Daten auf
der Speicherkarte möglicherweise verloren.
Kopieren
Befolgen Sie die nachfolgenden Schritte zum Kopieren
von Dokumenten. Wenn Sie bei Produkten mit zwei
Papierkassetten eine große Menge an Dokumenten auf
einmal kopieren möchten, legen Sie A4/
Legal-Normalpapier in beide Kassetten ein und setzen
Sie in Schritt 7 die Option Papierquelle auf Kassette1>
2.
Deutsch
11
Legen Sie Papier in die Papierkassette ein.
A
& „Einlegen von Papier in die Papierkassette“
auf Seite 6
Legen Sie die Vorlage auf.
B
& „Einlegen von Vorlagen“ auf Seite 8
Wechseln Sie über das Menü Startseite in den
C
Modus Kopie.
Drücken Sie auf + oder -, um die Anzahl der
D
Kopien festzulegen.
Stellen Sie die Dichte ein.
E
Page 64

Grundlagenhandbuch
Scannen
Drücken Sie d, um den Modus Kopie
F
aufzurufen.
Wählen Sie geeignete Kopiereinstellungen wie
G
Papierformat, Papiertyp und Papierqualität.
Hinweis:
❏ Je nach Modell können Sie unter Papier- und
Kopiereinstellungen die Kopiereinstellungen
vornehmen.
❏ Bevor Sie den Kopiervorgang starten, können Sie das
Kopierergebnis in einer Vorschau anzeigen.
❏ Sie können Kopien in verschiedenen Layouts wie
unter anderem „2-seitige Kopie“, „2 hoch kopieren“
usw. durchführen. Ändern Sie bei Bedarf die
Einstellungen für doppelseitige Kopien oder die
Layouteinstellungen.
Drücken Sie eine der Tasten unter x, um den
H
Farbmodus einzustellen, und starten Sie dann
den Kopiervorgang.
Hinweis:
In der PDF Benutzerhandbuch finden Sie Informationen
zu anderen Kopierfunktionen und die Menüliste für den
Kopie.
Scannen
Sie können Dokumente scannen und das gescannte Bild
vom Produkt an einen verbundenen Computer senden.
Hinweis:
Informationen zu In Cloud scannen finden Sie im
Handbuch Epson Connect, auf das Sie über das
Verknüpfungssymbol
können.
Legen Sie die Vorlage(n) auf.
A
& „Einlegen von Vorlagen“ auf Seite 8
auf dem Desktop zugreifen
Wenn Sie Scannen an PC auswählen, legen Sie
D
einen Computer fest.
Wenn Sie Scan auf Sp.-karte auswählen,
nehmen Sie verschiedene Eins
das Scanformat und Einstellungen für
doppelseitiges Scannen vor.
Drücken Sie die Taste x, um den Scanvorgang zu
E
starten.
Hinweis:
Weitere Informationen zu anderen Scanfunktionen und
der Scanmodus-Menüliste finden Sie im PDF
Benutzerhandbuch.
Ihr gescanntes Bild wurde gespeichert.
tellungen wie z. B.
Faxen
Einführung in „FAX
Utility“
Das „FAX Utility“ ist eine Software, mit der Daten, wie
z. B. in einem Textverarbeitungsprogramm oder einer
Tabellenkalkulation erstellte Dokumente, Zeichnungen
und Tabellen direkt gefaxt werden können, ohne sie
vorher drucken zu müssen. Außerdem verfügt dieses
Utility über eine Funktion zum Speichern empfangener
Faxe als PDF-Datei auf einem Computer. Dadurch
können Sie die Daten überprüfen, ohne sie zu drucken,
und den Druck auf die Daten begrenzen, die Sie
tatsächlich drucken möchten. Gehen Sie zum Starten
des Programms wie folgt vor.
Windows
Klicken Sie auf die Start-Taste (Windows 7 und Vista)
oder auf Start (Windows XP), zeigen Sie auf All
Programs (Alle Programme), wählen Sie Epson
Software und klicken Sie dann auf FAX Utility.
Wählen Sie im Menü Startseite die Option
B
Scan.
Wählen Sie eine Option des Scanmenüs.
C
12
Page 65

Grundlagenhandbuch
Faxen
Mac OS X
Klicken Sie auf System Preference
(Systemeinstellungen) und anschließend auf Print &
Fax (Drucken & Faxen) oder Print & Scan (Drucken &
Scannen) und wählen Sie dann FAX (Ihren Drucker)
aus der Liste Printer (Drucker). Klicken Sie dann auf
folgende Optionen;
Mac OS X 10.6.x, 10.7.x: Option & Supplies (Optionen
& Zubehör) — Utility (Sonstiges) — Open Printer
Utility (Drucker-Dienstprogramm öffnen)
Mac OS X 10.5.x: Open Print Queue
(Drucker-Warteliste öffnen) — Utility (Sonstiges)
Hinweis:
Weitere Informationen hierzu finden Sie in der
Online-Hilfe von „FAX Utility“.
Anschluss an eine
Telefonleitung
Über ein Telefonkabel
Verwenden Sie ein Telefonkabel mit folgender
Schnittstellenspezifikation.
❏ RJ-11-Telefonkabel
❏ RJ-11-Telefongerätverbindung
Je nach Region liegt dem Produkt möglicherweise
bereits ein Kabel bei. Verwenden Sie in diesem Fall
dieses Kabel.
Bei Verwendung einer
ausschließlich für das Fax
vorgesehenen Telefonleitung
Schließen Sie das Telefonkabel von der Buchse
A
an der Wand an den LINE-Anschluss des
Gerätes an.
Achten Sie darauf, dass Auto-Antwort auf Ein
B
eingestellt ist.
& „Empfangen von Faxen“ auf Seite 16
Wichtig:
c
Wenn Sie keine externe Telefonleitung an dieses
Gerät anschließen, müssen Sie den automatischen
Antwort-Modus aktivieren. Ansonsten können Sie
keine Faxe empfangen.
Deutsch
13
Page 66

Grundlagenhandbuch
Faxen
Bei Verwendung einer mit einem
Telefongerät geteilten
Telefonleitung
Schließen Sie das Telefonkabel von der Buchse
A
an der Wand an den LINE-Anschluss des
Gerätes an.
Entfernen Sie die Abdeckung.
B
Schließen Sie ein Telefon oder einen
C
Anrufbeantworter an den EXT.-Anschluss an.
Hinweis:
Informationen zu weiteren Anschlussmöglichkeiten
finden Sie im PDF Benutzerhandbuch.
Überprüfen der Fax-Verbindung
Sie können prüfen, ob das Produkt Faxe senden oder
empfangen kann.
Legen Sie Normalpapier in die Kassette ein.
A
& „Einlegen von Papier in die Papierkassette“
auf Seite 6
Hinweis:
Wenn das Produkt mit zwei Kassetten ausgestattet ist,
legen Sie das Papier in Kassette 1 ein. Wenn Sie die
Einstellung für Papierquelle (Setup >
Fax-Einstellungen > Empfangseinstellungen >
Papierquelle) geändert haben, legen Sie das Papier in die
angegebene Kassette ein.
Wechseln Sie über das Menü Startseite in den
B
Modus Setup.
Wählen Sie Fax-Einstellungen.
C
Wählen Sie Fax-Verbindungstest
D
Drücken Sie eine der x-Tasten, um den Bericht
E
zu drucken.
14
Page 67

Grundlagenhandbuch
Faxen
Hinweis:
Sollten Fehler angezeigt werden, versuchen Sie die
Ursache mittels der Lösungsvorschläge im Bericht zu
beseitigen.
Einrichten der
Faxfunktionen
Kurzwahleinträge einrichten
Sie können eine Kurzwahlliste erstellen, mit der Sie
häufig verwendete Faxempfängernummern schneller
auswählen können. Es können insgesamt bis zu 100
Kurzwahl- und Gruppenwahleinträge registriert
werden.
Wechseln Sie über das Menü Startseite in den
A
Modus Fax.
Drücken Sie oder wählen Sie Kontakte.
B
Wählen Sie Kontakte bearbeiten.
C
Wählen Sie Kurzwahl-Setup. Sie sehen die
D
verfügbaren Kurzwahlnummern.
Wählen Sie den Kurzwahlnummereintrag aus,
E
den Sie registrieren möchten. Sie können bis zu
100 Einträge speichern.
Verwenden Sie das Nummernfeld zur Eingabe
F
einer Telefonnummer. Sie können bis zu 64
Stellen eingeben.
Hinweis:
Ein Bindestrich („-“) bewirkt eine kurze Pause beim
Wählen. Verwenden Sie den Bindestrich nur bei
Telefonnummern, bei denen die Pause erforderlich ist.
Leerzeichen in Rufnummern werden beim Wählen
ignoriert.
Gruppenwahleinträge
einrichten
Sie können Kurzwahleinträge einer Gruppe
hinzufügen, um ein Fax gleichzeitig an mehrere
Empfänger zu senden. Es können insgesamt bis zu 99
Kurzwahl- und Gruppenwahleinträge eingegeben
werden.
Wechseln Sie über das Menü Startseite in den
A
Modus Fax.
Drücken Sie oder wählen Sie Kontakte.
B
Wählen Sie Kontakte bearbeiten.
C
Wählen Sie Gruppenwahl-Setup. Sie sehen die
D
verfügbaren Gruppenwahlnummern.
Wählen Sie den Gruppenwahleintrag aus, den
E
Sie registrieren möchten.
Geben Sie einen Namen ein, um den
F
Gruppenwahleintrag zu bezeichnen. Sie können
bis zu 30 Zeichen eingeben.
Klicken Sie auf Fertig, um den Namen zu
G
registrieren.
Wählen Sie einen Kurzwahleintrag aus, der in
H
der Gruppenwahlliste registriert werden soll.
Wiederholen Sie Schritt 8, um andere
I
Kurzwahleinträge zur Gruppenwahlliste
hinzuzufügen. Sie können bis zu 99
Kurzwahleinträge in einer Gruppenliste
registrieren.
Drücken Sie auf OK, um das Erstellen der
J
Gruppenwahlliste abzuschließen.
Senden von Faxen
Deutsch
Geben Sie einen Namen ein, um den
G
Kurzwahleintrag zu bezeichnen. Sie können bis
zu 30 Zeichen eingeben.
Drücken Sie auf Fertig, um den Namen zu
H
registrieren.
15
Legen Sie Ihre Vorlage in den automatischen
A
Vorlageneinzug ein oder auf das Vorlagenglas
auf.
& „Einlegen von Vorlagen“ auf Seite 8
Page 68

Grundlagenhandbuch
Faxen
Wechseln Sie über das Menü Startseite in den
B
Modus Fax.
Geben Sie die Faxnummer über die Tasten auf
C
den Nummernfeld ein. Sie können bis zu 64
Stellen eingeben.
Hinweis:
❏ Drücken Sie auf
zuletzt verwendete Faxnummer anzuzeigen.
❏ Drücken Sie d und nehmen Sie die
Sendeeinstellungen vor. Um beide Seiten der
Vorlage zu scannen und zu faxen, wählen Sie
Doppelseitiges Faxen und anschließend Ein und
legen Sie dann die Vorlage in den automatischen
Vorlageneinzug. Je nach Modell können Sie die
Einstellungen auch unter Sendeeinstellungen
vornehmen.
❏ Achten Sie darauf, die Kopfzeile eingegeben zu
haben. Einige Faxgeräte weisen eingehende Faxe,
die keine Kopfzeile haben, automatisch ab.
Wählen Sie x (Farbe) oder x (S&W), um ein
D
farbiges oder monochromes Fax zu senden.
Hinweis:
Wenn die Faxnummer besetzt ist oder ein anderes
Problem vorliegt, wählt das Gerät die Nummer nach
einer Minute erneut. Drücken Sie auf Wahlwdhlg, um
sofort neu zu wählen.
oder Wahlwdhlg, um die
Empfangen von Faxen
Befolgen Sie diese Anleitung, um den automatischen
Empfang von Faxen zu aktivieren.
Hinweis:
❏ Je nach den Einstellungen für Fax-Ausgabe wird
das empfangene Fax in Form von Daten gespeichert
oder gedruckt.
❏ Wenn für Fax-Ausgabe die Option Speichern
eingestellt ist, wird das empfangene Fax
automatisch in Form von Daten gespeichert und Sie
können Schritt 1 überspringen.
Legen Sie Normalpapier in die Kassette ein.
A
& „Einlegen von Papier in die Papierkassette“
auf Seite 6
Hinweis:
Wenn das Produkt mit zwei Kassetten ausgestattet ist,
nehmen Sie Einstellungen für Papierquelle vor.
Setup > Fax-Einstellungen > Empfangseinstellungen >
Papierquelle
Wenn Sie eine große Menge an Dokumenten auf einmal
drucken möchten, legen Sie Normalpapier in beide
Kassetten ein und setzen Sie die Option Papierquelle auf
Kassette1> 2.
Achten Sie darauf, dass Auto-Antwort auf Ein
B
eingestellt ist.
Setup > Fax-Einstellungen >
Empfangseinstellungen > Auto-Antwort > Ein
Hinweis:
❏ Wenn an dieses Gerät direkt ein Anrufbeantworter
angeschlossen wurde, müssen Sie sicherstellen, dass
die Option Klingeln bei Antwort anhand der
folgenden Anleitungen richtig eingestellt wurde.
❏ Abhängig von Ihrer Region steht die Option
Klingeln bei Antwort möglicherweise nicht zur
Verfügung.
❏ Weitere Informationen zum manuellen Empfang
von Faxen finden Sie im PDF Benutzerhandbuch.
Wechseln Sie über das Menü Startseite in den
C
Modus Setup.
Wählen Sie Fax-Einstellungen.
D
Wählen Sie Kommunikation.
E
Wählen Sie Klingeln bei Antwort.
F
Wählen die Anzahl der Klingelzeichen.
G
16
Page 69

Grundlagenhandbuch
Mehr Funktionen
Wichtig:
c
Wählen Sie mehr Klingelzeichen als notwendig
sind, bevor der Anrufbeantworter den Anruf
entgegennimmt. Wenn der Anrufbeantworter den
Anruf erst nach dem vierten Klingeln
entgegennimmt, stellen Sie die Anzahl der
notwendigen Klingelzeichen am Drucker auf
mindestens fünf ein. Anderenfalls kann der
Anrufbeantworter keine Gesprächsanrufe
empfangen.
Hinweis:
Wenn Sie einen Anruf von einem Fax empfangen,
empfängt das Gerät das Fax automatisch, selbst wenn
der Anrufbeantworter den Anruf entgegennimmt. Wenn
Sie den Anruf entgegennehmen, warten Sie bis auf dem
LCD-Bildschirm eine Bestätigungsnachricht bezüglich
der Verbindungsherstellung eingeblendet wird, bevor Sie
den Hörer auflegen. Handelt es sich bei dem anderen
Teilnehmer um einen Anrufer, kann das Telefon wie
gewohnt verwendet werden, oder der Anrufer kann eine
Nachricht auf dem Anrufbeantworter hinterlassen.
Druckberichte
Folgen Sie den nachfolgenden Anleitungen zum
Drucken eines Faxberichts.
Legen Sie Normalpapier in die Kassette ein.
A
& „Einlegen von Papier in die Papierkassette“
auf Seite 6
Wechseln Sie über das Menü Startseite in den
B
Modus Fax.
Wenn Erw. Optionen auf der LCD-Anzeige
C
angezeigt wird, wählen Sie Erw. Optionen.
Ist dies nicht der Fall, drücken Sie d.
Wählen Sie Fax-Bericht.
D
Öffnen Sie das Element, das Sie drucken
E
möchten.
Hinweis:
Nur das Fax-Protokoll kann auf dem Bildschirm
betrachtet werden.
Drücken Sie eine der x-Tasten, um den
F
gewählten Bericht zu drucken.
Hinweis:
Weitere Informationen zu anderen Faxfunktionen und
der Faxmodus-Menüliste finden Sie im PDF
Benutzerhandbuch.
Deutsch
Hinweis:
Wenn das Produkt mit zwei Kassetten ausgestattet ist,
nehmen Sie Einstellungen für Papierquelle vor.
Setup > Fax-Einstellungen > Empfangseinstellungen >
Papierquelle
Mehr Funktionen
Unter Mehr Funktionen finden Sie zahlreiche besondere Menüs, mit denen sich das Drucken einfach gestaltet und
Spaß macht. Für weitere Details wählen Sie zuerst Mehr Funktionen und dann die einzelnen Menüs und folgen Sie
anschließend den Anweisungen auf der LCD-Anzeige.
17
Page 70

Grundlagenhandbuch
Mehr Funktionen
Menü Funktionen
ID-Karte kopieren
Sie können beide Seiten einer ID-Karte
gleichzeitig kopieren.
Fotos drucken
Fotos kopieren/wiederherstel‐
len
Fotoentwurfsblatt
Linienpapier drucken
Sie können auf einer Speicherkarte oder
einem externen USB-Gerät gespeicherte
Fotos drucken, ohne einen Computer zu
verwenden. Sie können auch Fotos ver‐
kleinern oder vergrößern und die Foto‐
qualität anpassen.
Sie können originalgetreue Kopien Ihrer
Vorlagen erstellen. Wenn das Originalfoto
verschwommen ist, können Sie die Farben
wiederherstellen.
Sie können Fotos auf einer Speicherkarte
in verschiedenen Layouts drucken.
Sie können Linienpapier oder Millimeter‐
papier mit oder ohne Fotosatz als Hinter‐
grund drucken.
18
Page 71

Grundlagenhandbuch
Auswechseln der Tintenpatronen
Auswechseln der
Tintenpatronen
Sicherheitsanweisungen
❏ Bewahren Sie Tintenpatronen außerhalb der
Reichweite von Kindern auf.
❏ Seien Sie beim Umgang mit benutzten
Tintenpatronen vorsichtig, da um die
Tintenzuleitungsöffnung noch immer ein wenig
Tinte vorhanden sein kann.
Wenn Tinte auf Ihre Hände gerät, reinigen Sie diese
gründlich mit Wasser und Seife.
Sollte Tinte in die Augen gelangen, spülen Sie diese
sofort mit reichlich Wasser aus. Wenn Sie sich nach
dem gründlichen Ausspülen immer noch schlecht
fühlen oder Sehprobleme haben, suchen Sie sofort
einen Arzt auf.
Falls Sie Tinte in den Mund bekommen, sofort
ausspucken und umgehend einen Arzt aufsuchen.
❏ Wenn eine Tintenpatrone vorübergehend
herausgenommen wird, achten Sie darauf, den
Tintenzufuhrbereich vor Schmutz und Staub zu
schützen. Lagern Sie die Tintenpatrone in
derselben Umgebung wie das Produkt.
Tintenpatronen müssen so gelagert werden, dass
der Aufkleber, auf dem die Farbe der Tinte
angegeben ist, nach oben weist. Lagern Sie
Tintenpatronen nicht mit der Oberseite nach
unten.
❏ Für eine maximale Nutzung der Tinte die
Tintenpatrone erst herausnehmen, wenn Sie sie
ersetzen möchten. Tintenpatronen mit niedrigem
Tintenstand können nach dem erneuten Einsetzen
möglicherweise nicht verwendet werden.
❏ Verpackung der Tintenpatronen bis zum
Installationszeitpunkt nicht öffnen. Die
Tintenpatrone ist vakuumverpackt, um die
Haltbarkeit zu gewährleisten. Bleibt die
Tintenpatrone vor der Benutzung längere Zeit
ausgepackt liegen, ist normales Drucken unter
Umständen nicht möglich.
❏ Installieren Sie alle Tintenpatronen; andernfalls ist
das Drucken nicht möglich.
Deutsch
Vorsichtsmaßnahmen
❏ Es wird empfohlen, ausschließlich
Original-EPSON-Tintenpatronen zu verwenden.
Epson kann die Qualität und Zuverlässigkeit der
Tinte von Drittanbietern nicht garantieren. Die
Verwendung von Tinten anderer Hersteller kann
Schäden verursachen, die von der Epson-Garantie
nicht abgedeckt sind, und kann unter gewissen
Umständen ein fehlerhaftes Produktverhalten
hervorrufen. Tintenstandangaben zu
Nicht-Originaltintenpatronen werden
möglicherweise nicht angezeigt.
❏ Schütteln Sie die Tintenpatronen nicht zu stark;
andernfalls kann Tinte aus den Patronen austreten.
❏ Zum Erhalt der optimalen Druckkopfleistung wird
von einigen Patronen etwas Tinte verbraucht, nicht
nur während des Druckens, sondern auch bei
Wartungsvorgängen wie dem Auswechseln von
Tintenpatronen und der Druckkopfreinigung.
Auswechseln einer
Tintenpatrone
Öffnen Sie die Scannereinheit. Der
A
Tintenpatronenhalter wird in die Position zum
Austauschen der Tintenpatrone bewegt.
19
Page 72

Grundlagenhandbuch
Auswechseln der Tintenpatronen
Wichtig:
c
❏ Bewegen Sie den Tintenpatronenhalter nicht
von Hand, ansonsten kann das Gerät
beschädigt werden.
❏ Heben Sie die Scannereinheit nicht an, wenn
die Dokumentenabdeckung geöffnet ist.
Hinweis:
Wenn der Tintenpatronenhalter nicht in die Position
zum Austauschen der Tintenpatrone bewegt wird, folgen
Sie der nachfolgenden Anleitung.
Startseite > Setup > Wartung > Patronenaustausch
Öffnen Sie die Patronenabdeckung.
B
Drücken Sie die Tintenpatrone zusammen und
C
enfernen Sie sie.
Hinweis:
❏ Die Abbildung zeigt den Austausch der schwarzen
Tintenpatrone. Tauschen Sie die entsprechende
Tintenpatrone aus.
❏ Um die Tintenzufuhröffnung entnommener
Tintenpatronen befindet sich möglicherweise Tinte.
Achten Sie deshalb beim Entnehmen der
Tintenpatrone darauf, dass Tinte keine
Gegenstände in der Umgebung verschmutzt.
Schütteln Sie die Ersatztintenpatronen vier- oder
D
fünfmal leicht hin und her und nehmen Sie die
neue Tintenpatrone aus der Verpackung heraus.
20
Page 73

Grundlagenhandbuch
Auswechseln der Tintenpatronen
Nur das gelbe Band entfernen.
E
Wichtig:
c
❏ Sie müssen vor der Installation das gelbe Band
von der Patrone entfernen; andernfalls kann
die Druckqualität zurückgehen oder das
Drucken verhindert werden.
❏ Wenn Sie eine Tintenpatrone installiert
haben, ohne das gelbe Band zu entfernen,
nehmen Sie die Patrone aus dem Produkt,
entfernen Sie das gelbe Band und installieren
Sie sie erneut.
❏ Das durchsichtige Siegel am Boden der
Tintenpatrone nicht entfernen; die Patrone
wird sonst unbrauchbar.
❏ Sie dürfen das Etikett auf der Patrone nicht
entfernen oder daran ziehen, da hierdurch
Tinte austreten kann.
Setzen Sie die Patrone ein und drücken Sie sie bis
F
zum Klickpunkt.
Schließen Sie die Patronenabdeckung.
G
Schließen Sie langsam die Scannereinheit. Die
H
Tintenbefüllung startet.
Hinweis:
❏ Die Betriebsanzeige blinkt während der
Tintenbefüllung dauerhaft. Schalten Sie das
Produkt während des Tintenladevorgangs nicht
aus. Wird der Tintenladevorgang abgebrochen,
können Sie möglicherweise nicht drucken.
❏ Falls eine Tintenpatrone während des
Kopiervorgangs ausgewechselt werden muss, um die
Kopierqualität nach dem Laden der Tinte zu
garantieren, brechen Sie den Auftrag ab und starten
Sie ihn erneut mit dem Auflegen der Vorlagen.
Das Auswechseln der Tintenpatronen ist
abgeschlossen. Das Produkt wechselt in den bisherigen
Zustand.
Deutsch
21
Page 74

Grundlagenhandbuch
Grundlegende Fehlerbehebung
Grundlegende Fehlerbehebung
Fehlermeldungen
Dieser Abschnitt beschreibt die Bedeutung der Meldungen, die auf dem LCD-Bildschirm angezeigt werden.
Fehlermeldungen Lösungen
Kein Papier oder Papierstau
Druckerfehler. Aus- und wieder einschalten. Details siehe
Dokumentation.
Kommunikationsfehler. Prüfen, ob PC verbunden. Stellen Sie sicher, dass der Computer korrekt angeschlossen ist.
Wartungsbox bald am Ende ihrer Betriebszeit. Ersetzen Sie die Wartungsbox vor dem Ende ihrer Nutzungsdauer.
Wartungsbox ist am Ende ihrer Betriebszeit. Muss ersetzt
werden.
Drucker-Tintenkissen bald am Ende der Lebensdauer. Ep‐
son-Kundendienst kontakt.
Drucker-Tintenkissen am Ende der Lebensdauer. Ep‐
son-Kundendienst kontakt.
Kein Freizeichen erkannt.Fax- Verbindungstest in Fa‐
xeinstlg. unter Setup durchführen.
Kombination aus IP-Adresse und Subnetzmaske ungültig.
Siehe Dokumentation.
& Siehe „Papierstau“ auf Seite 23
Schalten Sie das Gerät aus und wieder ein. Achten Sie darauf, dass
sich kein Papier mehr im Produkt befindet. Falls die Fehlermel‐
dung weiterhin angezeigt wird, wenden Sie sich an den Ep‐
son-Kundendienst.
Sollten die Fehlermeldungen weiterhin angezeigt werden, stellen
Sie sicher, dass die Scansoftware auf Ihrem Computer installiert
wurde und die Softwareeinstellungen richtig sind.
Weitere Informationen finden Sie im PDF Benutzerhandbuch.
Wenn die Wartungsbox voll ist, stoppt das Gerät und Sie müssen
die Wartungsbox ersetzen, um mit dem Drucken fortzufahren.
Ersetzen Sie die Wartungsbox.
Drücken Sie die Taste x, um den Druckvorgang fortzusetzen. Die
Nachricht wird solange angezeigt, bis das Tintenkissen ausge‐
wechselt wurde. Kontaktieren Sie den Epson-Support, um die
Tintenkissen vor Ablauf der Service-Dauer auszuwechseln. Wenn
die Abfalltintenkissen voll sind, stoppt das Gerät und Sie müssen
sich an den Epson-Kundendienst wenden, um weiterdrucken zu
können.
Wenden Sie sich an den Epson-Support, um die Tintenkissen aus‐
wechseln zu lassen.
Stellen Sie sicher, dass das Telefonkabel richtig angeschlossen ist,
und überprüfen Sie die Telefonleitung auf ihre Funktionstüchtig‐
keit.
& Siehe „Anschluss an eine Telefonleitung“ auf Seite 13
Wenn Ihr Gerät an eine Nebenstellenanlage oder einen Termin‐
aladapter (TA) angeschlossen ist, deaktivieren Sie die Option
Wähltonerkennung. Wählen Sie anschließend Fax-Einstellun‐
gen > Kommunikation > Wähltonerkennung > Aus.
Entnehmen Sie weitere Hinweise dem Online-Netzwerkhand‐
buch.
22
Page 75

Grundlagenhandbuch
Grundlegende Fehlerbehebung
Fehlermeldungen Lösungen
Recovery Mode Die Aktualisierung der Firmware ist fehlgeschlagen. Sie müssen
die Aktualisierung der Firmware erneut ausführen. Halten Sie ein
USB-Kabel bereit und rufen Sie Ihre regionale Epson-Website für
weitere Hinweise auf.
Papierstau
Vorsicht:
!
Die Tasten im Bedienfeld niemals berühren, wenn
Ihre Hand im Gerät ist.
Hinweis:
❏ Brechen Sie den Druckauftrag ab, wenn Sie durch
eine Meldung auf dem LCD-Bildschirm oder vom
Drucker-Treiber dazu aufgefordert werden.
❏ Drücken Sie nach dem Entfernen des gestauten
Papiers die am LCD-Bildschirm gezeigte Taste.
Entfernen von gestautem Papier
aus der hinteren Abdeckung
Ziehen Sie die hintere Abdeckung heraus.
A
Entfernen Sie das gestaute Papier vorsichtig.
B
Entfernen Sie das gestaute Papier vorsichtig.
C
Deutsch
23
Page 76

Grundlagenhandbuch
Grundlegende Fehlerbehebung
Öffnen Sie die hintere Abdeckung.
D
Entfernen Sie das gestaute Papier vorsichtig.
E
Bringen Sie die hintere Abdeckung wieder an.
F
Entfernen von gestautem Papier
aus dem Inneren des Geräts
Entfernen Sie das gestaute Papier vorsichtig.
A
Öffnen Sie die Scannereinheit.
B
24
Wichtig:
c
Heben Sie die Scanner-Einheit nicht an, wenn das
Vorlagenglas geöffnet ist.
Page 77

Grundlagenhandbuch
Grundlegende Fehlerbehebung
Entfernen Sie sämtliches Papier im Innern,
C
einschließlich zerrissener Stücke.
Wichtig:
c
Berühren Sie nicht das flache, weiße Kabel, das an
die Patronenhalterung angeschlossen ist.
Hinweis:
Wenn Sie die Kassette nicht herausziehen können,
trennen Sie das Netzkabel vom Produkt und von der
Steckdose. Ziehen Sie alle weiteren Kabel vom Produkt
ab.
Stellen Sie das Produkt vorsichtig wie unten dargestellt
auf die Seite und ziehen Sie die Kassette behutsam
heraus.
Entfernen Sie das gestaute Papier aus der
B
Kassette.
Entfernen Sie vorsichtig sämtliches im Produkt
C
gestautes Papier.
Deutsch
Schließen Sie langsam die Scannereinheit.
D
Entfernen von gestautem Papier
aus der Papierkassette
Ziehen Sie die Papierkassette heraus.
A
25
Richten Sie die Papierränder aus.
D
Page 78

Grundlagenhandbuch
Grundlegende Fehlerbehebung
Halten Sie die Papierkassette waagerecht und
E
setzen Sie sie langsam und vorsichtig wieder in
das Produkt ein.
Entfernen von gestautem Papier
aus dem automatischen
Vorlageneinzug (ADF)
Entnehmen Sie den Papierstapel aus dem
A
Zufuhrfach des automatischen Vorlageneinzugs.
Öffnen Sie die Abdeckung des ADF.
B
Wichtig:
c
Öffnen Sie die Abdeckung des ADF, bevor Sie das
gestaute Papier entfernen. Wenn Sie die
Abdeckung nicht öffnen, kann das Gerät beschädigt
werden.
Entfernen Sie das gestaute Papier vorsichtig.
C
Öffnen Sie die Dokumentenabdeckung.
E
Entfernen Sie das gestaute Papier vorsichtig.
F
Schließen Sie die Dokumentenabdeckung.
G
Heben Sie das Zufuhrfach des automatischen
H
Vorlageneinzugs an.
Schließen Sie die Abdeckung des ADF.
D
26
Page 79

Grundlagenhandbuch
Wo Sie Hilfe bekommen
Entfernen Sie das gestaute Papier vorsichtig.
I
Bringen Sie das Zufuhrfach des automatischen
J
Vorlageneinzugs wieder in die ursprüngliche
Position.
Hilfe zur Druckqualität
Falls Sie Streifen (helle Bänder), fehlende Farben oder
andere Qualitätsprobleme bei Ihren Ausdrucken
bemerken, versuchen Sie folgende Lösungsansätze.
❏ Stellen Sie sicher, dass Papier eingelegt und die
Vorlage richtig platziert wurde.
& „Einlegen von Papier in die Papierkassette“ auf
Seite 6
& „Einlegen von Vorlagen“ auf Seite 8
Fax-Hilfe
❏ Stellen Sie sicher, dass das Telefonkabel richtig
angeschlossen ist und überprüfen Sie die
Telefonleitung auf ihre Funktionstüchtigkeit. Sie
können den Leitungszustand mithilfe der Funktion
Fax-Verbindungstest überprüfen.
& „Anschluss an eine Telefonleitung“ auf Seite 13
❏ Falls das Fax nicht gesendet wurde, vergewissern
Sie sich, dass das Faxgerät des Empfängers
eingeschaltet und betriebsbereit ist.
❏ Wenn dieses Gerät nicht an ein Telefon
angeschlossen ist und Sie Faxe automatisch
empfangen möchten, schalten Sie den
automatischen Antwort-Modus ein.
& „Empfangen von Faxen“ auf Seite 16
Hinweis:
Weitere Lösungsansätze für Faxprobleme finden Sie im
Online-Benutzerhandbuch.
Wo Sie Hilfe
bekommen
Deutsch
❏ Überprüfen Sie die Einstellungen für das
Papierformat und den Papiertyp.
& „Auswahl des Papiers“ auf Seite 6
❏ Der Druckkopf könnte verstopft sein. Führen Sie
zunächst einen Düsentest durch und reinigen Sie
anschließend den Druckkopf.
Setup > Wartung > Düsentest
(a) OK
(b) Druckkopfreinigung erforderlich
Website für technischen
Support
Die Website für technischen Support von Epson bietet
Ihnen Hilfe bei Problemen, die sich nicht anhand der
Informationen zur Problemlösung in der
Produktdokumentation beheben lassen. Wenn Sie über
einen Webbrowser verfügen und Zugang zum Internet
haben, besuchen sie die Website unter:
http://support.epson.net/
http://www.epson.eu/Support (Europa)
Um Zugang zu den neuesten Treibern, häufig gestellten
Fragen (FAQ), Handbüchern und sonstigen
herunterladbaren Objekten zu erhalten, besuchen Sie
die Website unter:
http://www.epson.com
http://www.epson.eu/Support (Europa)
27
Page 80

Grundlagenhandbuch
Wo Sie Hilfe bekommen
Wählen Sie dann den Abschnitt „Support“ Ihrer
regionalen Epson-Website aus.
28
Page 81

Basishandleiding
Inhoudsopgave
Inhoudsopgave
Inleiding............................. 2
Informatie vinden.......................... 2
Voorzorgsmaatregelen, belangrijke informatie
en opmerkingen........................... 2
De service Epson Connect gebruiken............ 2
Veiligheidsvoorschriften. . . ......... 3
Overzicht configuratiescherm....... 4
Knop en display........................... 4
Lampjes................................. 5
Papier en afdrukmateriaal gebruiken
....................................... 6
Papier selecteren........................... 6
Papier in de papiercassette laden............... 6
Originelen plaatsen......................... 8
Automatische documentinvoer (ADF)......... 8
Glasplaat............................. 10
Geheugenkaart plaatsen.................... 10
Kopiëren............................ 11
Scannen............................ 12
Faxen............................... 12
Introductie FAX Utility..................... 12
Verbinden met een telefoonlijn............... 13
Over een telefoonkabel................... 13
Gebruik de telefoonlijn alleen om te faxen..... 13
Lijn delen met telefoontoestel.............. 13
De faxverbinding controleren.............. 14
Faxfuncties instellen....................... 14
Snelkiezen instellen...................... 14
Invoeren voor groepskiezen instellen......... 15
Faxen verzenden.......................... 15
Faxen ontvangen.......................... 15
Rapporten afdrukken...................... 16
Meer functies....................... 17
Cartridges vervangen.............. 18
Veiligheidsvoorschriften.................... 18
Voorzorgsmaatregelen..................... 18
Een cartridge vervangen.................... 19
Eenvoudige probleemoplossing
..................................... 21
Foutmeldingen........................... 21
Vastgelopen papier........................ 22
Vastgelopen papier verwijderen uit het
achterdeksel........................... 22
Vastgelopen papier uit de printer verwijderen
.................................... 23
Vastgelopen papier verwijderen uit de
papiercassette.......................... 24
Vastgelopen papier verwijderen uit de
automatische documentinvoer (ADF). . . . . . . . 25
Hulp voor de afdrukkwaliteit................. 26
Hulp bij faxen............................ 26
Hulp vragen........................ 26
Technische ondersteuning (website)........... 26
Nederlands
1
Page 82

Basishandleiding
Inleiding
Inleiding
Informatie vinden
De nieuwste versies van de volgende handleidingen
staan op de ondersteuningswebsite van Epson.
http://www.epson.eu/Support (Europa)
http://support.epson.net/ (buiten Europa)
❏ Hier beginnen (document):
Biedt u informatie over de instellingen van het
product en de installatie van de software.
❏ Basishandleiding (document):
Biedt u basisinformatie voor gebruik van de printer
zonder computer. Of deze handleiding wordt
meegeleverd, is afhankelijk van model of regio.
❏ Gebruikershandleiding (PDF):
Biedt u uitvoerige instructies voor gebruik,
veiligheid en probleemoplossing. Raadpleeg deze
gids wanneer u dit apparaat met een computer
gebruikt, of wanneer u geavanceerde functies zoals
dubbelzijdig afdrukken gebruikt.
Om het PDF-bestand te kunnen bekijken, moet u
over Adobe Acrobat Reader 5.0 of hoger of over
Adobe Reader beschikken.
❏ Netwerkhandleiding (HTML):
Biedt netwerkbeheerders informatie over de
printerdriver en de netwerkinstellingen.
❏ Hulp (op het display van het apparaat):
Biedt basisinstructies voor bediening en
probleemoplossing op het display van het apparaat.
Selecteer het menu Hulp op het
configuratiescherm.
Voorzorgsmaatregelen,
belangrijke informatie en
opmerkingen
Voorzorgsmaatregelen, belangrijke informatie en
opmerkingen worden in deze gebruikershandleiding als
volgt aangegeven en hebben de hier beschreven
betekenis.
Voorzorgsmaatregelen
!
moet u zorgvuldig in acht nemen om lichamelijk
letsel te voorkomen.
Belangrijke informatie
c
wordt aangegeven met "Let op"; u moet dit naleven
om schade aan het apparaat te voorkomen.
Opmerkingen
bevatten handige tips en beperkingen voor het gebruik
van het apparaat.
De service Epson Connect
gebruiken
Met behulp van Epson Connect en de services van
andere bedrijven kunt u altijd, en vrijwel overal ter
wereld, gemakkelijk direct vanaf uw smartphone, tablet
of laptop afdrukken. Ga voor meer informatie over de
afdrukservice en andere services naar de volgende URL:
https://www.epsonconnect.com/ (Epson
Connect-portaalsite)
http://www.epsonconnect.eu (alleen Europa)
2
Page 83

Basishandleiding
Veiligheidsvoorschriften
U kunt de Epson Connect-handleiding bekijken door te
dubbelklikken op het snelkoppelingspictogram
het bureaublad.
Veiligheidsvoorschriften
Lees en volg deze instructies voor een veilig gebruik van
dit apparaat. Bewaar deze handleiding voor toekomstig
gebruik. Neem ook alle waarschuwingen en
voorschriften die op het apparaat zelf staan in acht.
❏ Gebruik alleen het netsnoer dat met het product is
meegeleverd en gebruik het snoer niet voor andere
apparatuur. Gebruik van andere snoeren met dit
apparaat of gebruik van het meegeleverde netsnoer
met andere apparatuur kan leiden tot brand of
elektrische schokken.
❏ Zorg ervoor dat het netsnoer voldoet aan de
relevante plaatselijke veiligheidsnormen.
❏ Haal het netsnoer, de stekker, de printer, de scanner
of de accessoires nooit uit elkaar en probeer deze
onderdelen nooit zelf te wijzigen of te repareren,
tenzij dit uitdrukkelijk staat beschreven in de
handleiding van het apparaat.
❏ Trek in de volgende gevallen de stekker uit het
op
❏ Zet het apparaat in de buurt van een
❏ Plaats of bewaar het apparaat niet buiten en zorg
❏ Zorg ervoor dat u geen vloeistoffen op het apparaat
❏ Houd dit product ten minste 22 cm verwijderd van
❏ Neem contact op met uw leverancier als het display
❏ Gebruik geen telefoon tijdens onweer. Er is enige
❏ Gebruik voor het melden van een gaslek geen
stopcontact en doe een beroep op een
onderhoudstechnicus:
Als het netsnoer of de stekker beschadigd is, als er
vloeistof in het apparaat is gekomen, als het
apparaat is gevallen of als de behuizing beschadigd
is, als het apparaat niet normaal werkt of als er een
duidelijke wijziging in de prestaties optreedt.
Wijzig geen instellingen als hiervoor in de
gebruiksaanwijzing geen instructies worden
gegeven.
wandstopcontact waar u de stekker gemakkelijk uit
het stopcontact kunt halen.
ervoor dat het apparaat niet wordt blootgesteld aan
vuil, stof, water of hittebronnen. Vermijd plaatsen
die onderhevig zijn aan schokken, trillingen, hoge
temperaturen of luchtvochtigheid.
morst en pak het apparaat niet met natte handen
vast.
pacemakers. De radiogolven die door dit product
worden uitgezonden kunnen een negatieve invloed
hebben op de werking van pacemakers.
Nederlands
beschadigd is. Als u vloeistof uit het display op uw
handen krijgt, was ze dan grondig met water en
zeep. Als u vloeistof uit het display in uw ogen krijgt,
moet u uw ogen onmiddellijk uitspoelen met water.
Raadpleeg onmiddellijk een arts als u ondanks
grondig spoelen problemen krijgt met uw ogen of
nog steeds ongemak ondervindt.
kans op elektrische schokken door bliksem.
telefoon in de directe omgeving van het lek.
Opmerking:
Volg de volgende link voor veiligheidsvoorschriften voor
cartridges.
& “Cartridges vervangen” op pagina 18
3
Page 84

Basishandleiding
Overzicht configuratiescherm
Overzicht configuratiescherm
Opmerking:
❏ Het ontwerp van het configuratiescherm verschilt afhankelijk van locatie.
❏ Hoewel het ontwerp van het configuratiescherm en wat wordt weergegeven op het display, zoals menunamen en opties,
kan verschillen van uw daadwerkelijke apparaat, is de bediening hetzelfde.
Knop en display
Knoppen Functie
a
b
c
d
e - Op het display worden menu's weer gegeven. Als uw apparaat een touchscreen heeft, kunt u
Schakelt het apparaat in of uit.
Hiermee gaat u terug naar het bovenste menu. Staat u in het bovenste menu, dan schakelt u
hiermee tussen de modi.
Geeft het laatst gekozen nummer weer. Wanneer u nummers in de faxmodus invoert, kunt u
hiermee een pauzesymbool (-) invoeren dat als een korte pauze dient wanneer het nummer
wordt gevormd.
Hiermee wordt de lijst Cont.pers. weergegeven in faxmodus.
scrollen door over het display te vegen. Veeg wat harder als het touchscreen traag reageert.
4
Page 85

Basishandleiding
Knoppen Functie
f
Overzicht configuratiescherm
Annuleren/terugkeren naar het vorige menu.
g
h +, - Hiermee stelt u het aantal exemplaren in.
i 0 - 9, *, # Hiermee voert u de datum/tijd of het aantal exemplaren en de faxnummers in. Hiermee voert
j
k
l
m
l, u, r, d, OK Druk op l, u, r, d om een menu te selecteren. Druk op OK om de gekozen instelling te
u, d
bevestigen en naar het volgende scherm te gaan. Wanneer u een faxnummer invoert, werkt l
als de backspace-toets en kunt u met r een spatie invoeren.
u alfanumerieke tekens in. Telkens wanneer u op deze knop drukt, wisselt u tussen
hoofdletters, kleine letters en nummers telkens. Het kan gemakkelijker zijn om het
softwaretoetsenbord te gebruiken voor tekstinvoer, in plaats van deze knoppen.
Hiermee wordt afdrukken/kopiëren/scannen/faxen in zwart-wit gestart.
Hiermee wordt afdrukken/kopiëren/scannen/faxen in kleur gestart.
Hiermee stopt u het actieve proces, of initialiseert u de huidige instellingen.
Hiermee kunt u het scherm laten scrollen.
Lampjes
Lampjes Functie
Brandt wanneer het product aan staat.
Knippert wanneer het apparaat gegevens ontvangt, afdrukt/kopieert/scant/faxt, wanneer
een cartridge wordt vervangen, inkt wordt geladen of wanneer de printkop wordt gereinigd.
Blijft branden wanneer de printer met een netwerk is verbonden. Knippert wanneer de
netwerkinstellingen worden aangepast (groen: Wi-Fi/oranje: Ethernet).
Nederlands
Opmerking:
Zie de Hulp op het configuratiescherm voor meer informatie over de pictogrammen die op het display worden weergegeven.
5
Page 86

Basishandleiding
Papier en afdrukmateriaal gebruiken
Papier en
afdrukmateriaal
gebruiken
Papier selecteren
Het apparaat stelt zichzelf automatisch in op het
afdrukmateriaal dat u in de afdrukinstellingen opgeeft.
Daarom is de instelling voor papiersoorten zo
belangrijk. Aan de hand van deze instelling weet het
apparaat welk papier u gebruikt en wordt de
hoeveelheid inkt automatisch aangepast. In de volgende
tabel staan de instellingen die u kunt opgeven voor uw
papier.
Voor dit papier Papiersoort op display
Gewoon papier*
Epson Bright White Ink Jet
Paper (Inkjetpapier helder‐
1
wit)*
Epson Ultra Glossy Photo
Paper (Fotopapier ultra‐
glanzend)
Epson Premium Glossy
Photo Paper (Fotopapier
glanzend Premium)
Epson Premium Semigloss
Photo Paper (Fotopapier
halfglanzend Premium)
Epson Glossy Photo Paper
(Fotopapier glanzend)
Epson Photo Paper (Foto‐
papier)
Epson Matte Paper - Hea‐
vyweight (Mat papier
zwaar)
Epson Photo Quality Ink Jet
Paper (Inkjetpapier foto‐
kwaliteit)
*1 U kunt dubbelzijdig afdrukken met dit papier.
1
Plain Paper (Gewoon pa‐
pier)
Plain Paper (Gewoon pa‐
pier)
Hoogglans
Prem. glans
Prem. glans
Glans
Fotopapier
Mat
Mat
Papier in de
papiercassette laden
Volg de onderstaande instructies om papier in het
apparaat te laden:
a. Papiercassette 1
b. Papiercassette 2
* De beschikbaarheid van dit onderdeel verschilt per
apparaat.
Trek de papiercassette uit het apparaat.
A
*
6
Page 87

Basishandleiding
Papier en afdrukmateriaal gebruiken
Opmerking:
Is de uitvoerlade uitgeworpen, sluit deze dan voordat u de
papiercassette uittrekt.
Knijp en schuif de zijgeleiders naar de zijkant van
B
de papiercassette.
Verschuif de zijgeleider om deze af te stemmen
C
op het papierformaat dat u wilt gebruiken.
Leg het papier in de richting van de zijgeleider in
D
met de afdrukzijde naar beneden en zorg ervoor
dat het papier niet aan het einde van de cassette
uitsteekt.
Opmerking:
❏ Papiercassette 2 is alleen geschikt voor
papierformaat B5 of hoger.
❏ Waaier het papier los en maak een rechte stapel
voordat u het papier in de lade plaatst.
Nederlands
7
Page 88

Basishandleiding
Papier en afdrukmateriaal gebruiken
Schuif de zijgeleiders naar de randen van het
E
papier.
Opmerking:
Let er bij gewoon papier op dat het papier niet boven het
pijltje H aan de binnenzijde van de zijgeleider uitkomt.
Zorg er bij speciaal afdrukmateriaal van Epson voor dat
het aantal vellen minder is dan het maximum dat voor
het betreffende afdrukmateriaal is opgegeven.
Schuif de uitvoerlade uit en zet de stop omhoog.
G
Opmerking:
❏ Zorg ervoor dat aan de voorkant van het apparaat
voldoende ruimte is voor het papier dat uit het
apparaat komt.
❏ De papiercassette niet verwijderen of terugschuiven
terwijl het apparaat in werking is.
❏ Zie de PDF Gebruikershandleiding voor instructies
over het laden van ander afdrukmateriaal dan
gewoon papier, zoals enveloppen en
voorgeperforeerd papier.
Originelen plaatsen
Automatische documentinvoer
(ADF)
Houd de cassette recht en schuif deze langzaam
F
en voorzichtig weer helemaal in het apparaat
terug.
U kunt uw originele documenten in de automatische
documentinvoer (ADF) plaatsen om meerdere pagina's
snel te kopiëren, scannen of faxen. De ADF kan beide
zijden van uw documenten scannen. Wilt u dit doen,
selecteer dan de optie in het menu met
kopieerinstellingen. U kunt de volgende originelen in de
ADF plaatsen.
Formaat A4/Letter/Legal
Type Gewoon papier
Gewicht
Capaciteit 30 vellen of maximaal 3 mm
Wanneer u een dubbelzijdig document scant met de
ADF, is het papierformaat Legal niet beschikbaar.
8
2
64 g/m
tot 95 g/m
(A4, Letter)/10 vellen (Le‐
gal)
2
Page 89

Basishandleiding
Papier en afdrukmateriaal gebruiken
Belangrijk:
c
Vermijd de volgende documenten te gebruiken om
te vermijden dat het papier vastloopt. Gebruik
hiervoor de glasplaat.
❏ Documenten die worden samengehouden met
papierklemmen, nietjes enz.
❏ Documenten waar plakband of papier aan
kleeft.
❏ Foto's, OHP's of papier voor thermische
overdracht.
❏ Papier dat gescheurd of gekreukt is of waar
gaten in zitten.
Tik de originelen op een vlakke ondergrond om
A
de randen mooi gelijk te maken.
Verschuif de zijgeleider in de automatische
B
documentinvoer.
Plaats de originelen in de automatische
C
documentinvoer met de bedrukte zijde naar
boven en de korte zijde eerst.
Verschuif de zijgeleider tot deze op gelijke
D
hoogte met de originelen komt.
Nederlands
9
Page 90

Basishandleiding
Papier en afdrukmateriaal gebruiken
Opmerking:
❏ Plaats het origineel zoals weergegeven voor de
lay-out 2op kopie. Zorg ervoor dat de afdrukstand
van het origineel overeenkomt met de instellingen
voor Documentstand.
❏ Wanneer u de kopieerfunctie met de automatische
documentinvoer (ADF) gebruikt, worden de
afdrukinstellingen vastgelegd op Verklein/Vergroot
— Ware grootte, Papiertype — Gewoon papier en
Papierformaat — A4/Legal. Als u een origineel
groter dan A4-formaat kopieert, wordt de afdruk
bijgesneden.
Glasplaat
Open het deksel en plaats uw origineel op de
A
glasplaat met de afdrukzijde naar beneden.
Schuif het origineel in de hoek.
B
Sluit de klep zachtjes.
C
Opmerking:
Wanneer er een document in de automatische
documentinvoer (ADF) en op de glasplaat ligt, wordt
voorrang gegeven aan het document in de automatische
documentinvoer.
Geheugenkaart plaatsen
U kunt foto's afdrukken die op een geheugenkaart zijn
opgeslagen, of gescande gegevens op een geheugenkaart
opslaan. De volgende geheugenkaarten worden
ondersteund.
10
Page 91

Basishandleiding
Kopiëren
SD, miniSD, microSD, SDHC, miniSDHC,
microSDHC, SDXC, microSDXC, MultiMediaCard,
MMCplus, MMCmobile, MMCmicro, Memory Stick
Duo, Memory Stick PRO Duo, Memory Stick PRO-HG
Duo, Memory Stick Micro, MagicGate Memory Stick
Duo
Belangrijk:
c
Voor de volgende geheugenkaarten is een adapater
vereist. Bevestig deze voordat u de kaart in de sleuf
plaats, anders kan de kaart klem komen te zitten.
❏ miniSD, microSD, miniSDHC, microSDHC,
microSDXC, MMCmicro
❏ MMCmobile
❏ Memory Stick Micro
Plaats één kaart tegelijk.
A
Kijk of het lampje aanblijft.
B
= aan, = knippert
Belangrijk:
c
❏ Probeer de kaart niet met kracht helemaal in
de sleuf te duwen. De kaart hoort uit te steken.
❏ Verwijder de geheugenkaart niet terwijl het
lampje knippert. De gegevens op de
geheugenkaart kunnen dan verloren gaan.
Kopiëren
Volg onderstaande instructies voor het kopiëren van
documenten. Als u een grote hoeveelheid documenten
in één batch wilt kopiëren, moet u voor apparaten met
twee papiercassettes gewoon papier van A4/
Legal-formaat in beide cassettes laden en Papierbron
instellen op Cassette1>2 in stap 7.
Nederlands
11
Laad papier in de papiercassette.
A
& “Papier in de papiercassette laden” op
pagina 6
Plaats het origineel.
B
& “Originelen plaatsen” op pagina 8
Ga naar de modus Kopiëren via het menu Home.
C
Druk op + en - om het aantal exemplaren in te
D
stellen.
Stel de dichtheid in.
E
Druk op d om naar het menu Kopiëren te gaan.
F
Page 92

Basishandleiding
Scannen
Selecteer de gewenste kopieerinstellingen, zoals
G
papierformaat, papiersoort en papierkwaliteit.
Opmerking:
❏ Afhankelijk van het model kunt u
kopieerinstellingen opgeven in Instel papier &
aantal afdr.
❏ U kunt het kopieerresultaat vooraf bekijken voordat
u het kopieerproces start.
❏ U kunt kopieën met verschillende lay-outs maken,
zoals dubbelzijdige kopieën, 2op kopieën enzovoort.
Wijzig de instellingen voor dubbelzijdig of de
lay-out indien nodig.
Druk op een van de x knoppen om de
H
kleurmodus in te stellen. Start vervolgens het
kopieerproces.
Opmerking:
Raadpleeg de PDF Gebruikershandleiding voor andere
kopieerfuncties en de menulijst voor de modus Kopiëren.
Scannen
U kunt documenten scannen en de gescande afbeelding
van de printer naar een computer sturen die met de
printer is verbonden.
Opmerking:
Raadpleeg voor informatie over Scannen naar cloud de
Epson Connect-handleiding die kan worden geopend
met behulp van het snelkoppelingspictogram
bureaublad.
Plaats een of meer originelen.
A
& “Originelen plaatsen” op pagina 8
Selecteer Scan in het menu Home.
B
Selecteer een optie in het scanmenu.
C
Selecteert u Naar pc scannen, selecteer dan een
D
computer.
Als u Naar geheugenkaart scannen selecteert,
geeft dan instellingen op zoals het scanformaat
en dubbelzijdig.
op het
Druk op de x knoppen om het scannen te
E
starten.
Opmerking:
Zie de PDF Gebruikershandleiding voor meer informatie
over andere scanfuncties en de menulijst in de
scanmodus.
Uw gescande beeld wordt opgeslagen.
Faxen
Introductie FAX Utility
FAX Utility is een softwareprogramma waarmee
gegevens zoals documenten, tekeningen en tabellen
gemaakt in een programma voor tekstverwerking of
werkbladen rechtstreeks doorgefaxt kunnen worden,
zonder afdrukken. Daarnaast is er een functie waarmee
een ontvangen fax als PDF-bestand kan worden
opgeslagen op een computer. Zo kunt u de gegevens
controleren zonder deze af te drukken, en hoeft u alleen
de gegevens af te drukken die u wilt afdrukken. Gebruik
de volgende procedure om het hulpprogramma uit te
voeren.
Windows
Klik op de startknop (Windows 7 en Vista) of klik op
Start (Windows XP), ga naar All Programs (Alle
programma's), selecteer Epson Software en klik op
FAX Utility.
Mac OS X
Klik op System Preference (Systeemvoorkeuren), klik
op Print & Fax (Afdrukken en faxen) of Print & Scan
(Afdrukken en scannen) en selecteer vervolgens FAX
(uw printer) onder Printer. Klik vervolgens op;
Mac OS X 10.6.x, 10.7.x: Option & Supplies (Opties en
toebehoren) — Utility (Hulpprogramma) — Open
Printer Utility (Open Printerhulpprogramma)
Mac OS X 10.5.x: Open Print Queue (Open
afdrukwachtrij) — Utility (Hulpprogramma)
Opmerking:
Zie de online-Help voor meer informatie over FAX
Utility.
12
Page 93

Basishandleiding
Faxen
Verbinden met een
telefoonlijn
Over een telefoonkabel
Gebruik een telefoonkabel met de volgende
interfacespecificaties.
❏ RJ-11-telefoonlijn
❏ RJ-11-telefoonsetaansluiting
Of een telefoonkabel met de printer wordt meegeleverd,
is afhankelijk van de regio. Gebruik de kabel als deze
wordt meegeleverd.
Gebruik de telefoonlijn alleen
om te faxen
Verbind een telefoonkabel van een
A
telefoonaansluiting naar de LINE-poort.
Lijn delen met telefoontoestel
Verbind een telefoonkabel van een
A
telefoonaansluiting naar de LINE-poort.
Verwijder de plug.
B
Nederlands
Controleer of Automatisch antwoord is
B
ingesteld op Aan.
& “Faxen ontvangen” op pagina 15
Belangrijk:
c
Als u geen externe telefoon met het apparaat
verbindt, moet u automatisch beantwoorden
activeren. Als u dit niet doet, kunt u geen faxen
ontvangen.
13
Page 94

Basishandleiding
Faxen
Verbind een telefoontoestel of
C
antwoordapparaat met de EXT.-poort.
Opmerking:
Zie de PDF Gebruikershandleiding voor andere
manieren van aansluiten.
De faxverbinding controleren
U kunt controleren of de printer faxberichten kan
verzenden of ontvangen.
Laad gewoon papier in de cassette.
A
& “Papier in de papiercassette laden” op
pagina 6
Opmerking:
Als uw apparaat is voorzien van twee cassettes, laadt u
papier in cassette 1. Als u de instelling Papierbron hebt
gewijzigd (Instellen > Faxinstellingen >
Ontvangstinstellingen > Papierbron), laadt u papier in
de cassette die u hebt opgegeven.
Ga naar de modus Setup via het menu Home.
B
Selecteer Faxinstellingen.
C
Selecteer Fax-aansluiting controleren
D
Opmerking:
Als er fouten op het rapport staan, probeert u de
oplossingen vermeld in het rapport.
Faxfuncties instellen
Snelkiezen instellen
U kunt een snelkieslijst maken zodat u snel de nummers
kunt kiezen van personen aan wie u een fax wilt sturen.
U kunt tot 100 gecombineerde invoeren voor snelkiezen
en groepskiezen registreren.
Ga naar de modus Fax via het menu Home.
A
Druk op of selecteer Cont.pers.
B
Selecteer Contacten bewerken.
C
Druk op Snelkeuze instellen. U krijgt de
D
beschikbare invoernummers voor snelkiezen te
zien.
Selecteer het nummer voor snelkeuze dat u wilt
E
registreren. U kunt tot 100 invoeren registreren.
Gebruik de toetsen op het numerieke
F
toetsenblok om een telefoonnummer in te
voeren. U kunt tot 64 tekens invoeren.
Opmerking:
Een koppelteken ("-") zorgt voor een korte pauze tijdens
het kiezen. Voeg het alleen aan telefoonnummers toe als
een pauze nodig is. Spaties tussen nummers worden
tijdens het kiezen genegeerd.
Voer een naam in om de snelkiesinvoer te
G
identificeren. U kunt tot 30 tekens invoeren.
Selecteer Gereed om de naam te registreren.
H
Druk op één van de knoppen x om het rapport af
E
te drukken.
14
Page 95

Basishandleiding
Faxen
Invoeren voor groepskiezen
instellen
U kunt invoeren voor snelkiezen toevoegen aan een
groep, waardoor u een fax naar verschillende
ontvangers tegelijk kunt versturen. U kunt tot 99
gecombineerde invoeren voor snelkiezen en
groepskiezen registreren.
Ga naar de modus Fax via het menu Home.
A
Druk op of selecteer Cont.pers.
B
Selecteer Contacten bewerken.
C
Selecteer Groepskiezen instellen. U krijgt de
D
beschikbare invoernummers voor groepskiezen
te zien.
Selecteer het nummer voor groepskiezen dat u
E
wilt registreren.
Voer een naam in om de groepskiesinvoer te
F
identificeren. U kunt tot 30 tekens invoeren.
Selecteer Gereed om de naam te registreren.
G
Selecteer een snelkiesinvoer dat u in de
H
groepskieslijst wilt registreren.
Herhaal stap 8 om nog meer snelkiesinvoeren toe
I
te voegen aan de groepskieslijst. U kunt tot 99
snelkiesinvoeren toevoegen aan een
groepskieslijst.
Druk op OK om het maken van een
J
groepskieslijst te voltooien.
Faxen verzenden
Gebruik de toetsen op het numerieke
C
toetsenbord om het faxnummer in te voeren. U
kunt tot 64 tekens invoeren.
Opmerking:
❏ Druk op
gekozen faxnummer weer te geven.
❏ Druk op d en geef de verzendinstellingen op. Als u
beide zijden van uw origineel wil scannen en faxen,
selecteert u Dubbelzijdig faxen, Aan. Laad
vervolgens het origineel in de automatische
documentinvoer. Afhankelijk van het model kunt u
de instellingen ook opgeven door
Verzendinstellingen te selecteren.
❏ Controleer of u de informatie voor de kopregel hebt
ingevoerd. Sommige faxapparaten weigeren
automatisch inkomende faxberichten die geen
informatie in de kopregel hebben.
Druk op x (kleur) of x (zwart-wit) om de
D
verzending van een kleurenfax of monochrome
fax te starten.
Opmerking:
Als het faxnummer bezet is of er een probleem is, zal het
apparaat na een minuut opnieuw proberen. Druk op
Opn. kiezen om dit onmiddellijk te doen.
of Opn. kiezen om het laatst
Faxen ontvangen
Volg de instructies om het automatisch ontvangen van
faxberichten in te stellen.
Opmerking:
❏ De ontvangen fax wordt opgeslagen als gegevens of
afgedrukt, afhankelijk van de instellingen voor
Faxuitvoer.
❏ Als Faxuitvoer is ingesteld op Opslaan, worden de
ontvangen faxgegevens automatisch als gegevens
opgeslagen en kunt u stap 1 overslaan.
Nederlands
Plaats uw origineel in de automatische
A
documentinvoer of op de glasplaat.
& “Originelen plaatsen” op pagina 8
Ga naar de modus Fax via het menu Home.
B
15
Page 96

Basishandleiding
Faxen
Laad gewoon papier in de cassette.
A
& “Papier in de papiercassette laden” op
pagina 6
Opmerking:
Als uw apparaat is voorzien van twee cassettes, moet u
instellingen voor Papierbron opgeven.
Instellen > Faxinstellingen > Ontvangstinstellingen >
Papierbron
Als u een groot aantal faxen in één batch wilt afdrukken,
laadt u gewoon papier in beide cassettes en stelt u
Papierbron op Cassette1>2 in.
Controleer of Automatisch antwoord is
B
ingesteld op Aan.
Instellen > Faxinstellingen >
Ontvangstinstellingen > Automatisch
antwoord > Aan
Opmerking:
❏ Wanneer een antwoordapparaat rechtstreeks met
dit apparaat verbonden is, moet u ervoor zorgen dat
u Overgaan voor antwoorden correct instelt met de
volgende procedure.
❏ Of Overgaan voor antwoorden beschikbaar is,
verschilt per land.
❏ Zie de PDF Gebruikershandleiding voor meer
informatie over handmatige ontvangst van
faxberichten.
Ga naar de modus Setup via het menu Home.
C
Selecteer Faxinstellingen.
D
Belangrijk:
c
Selecteer meer belsignalen dan het
antwoordapparaat nodig heeft om op te nemen. Als
dit is ingesteld om op te nemen na het vierde
belsignaal, moet u het apparaat instellen om op te
nemen na het vijfde belsignaal of later. Anders kan
het antwoordapparaat geen telefoonoproepen
ontvangen.
Opmerking:
Wanneer u een oproep ontvangt en de andere partij een
fax is, ontvangt het apparaat de fax automatisch, zelfs als
het antwoordapparaat de oproep opneemt. Als u de
telefoon opneemt, moet u wachten tot op het display een
melding wordt weergegeven dat verbinding is gemaakt
voor u ophangt. Als de andere partij een beller is, kan de
telefoon zoals gewoonlijk worden gebruikt of kan een
bericht worden achtergelaten op het antwoordapparaat.
Rapporten afdrukken
Volg de onderstaande instructies om een faxrapport af
te drukken.
Laad gewoon papier in de cassette.
A
& “Papier in de papiercassette laden” op
pagina 6
Opmerking:
Als uw apparaat is voorzien van twee cassettes, moet u
instellingen voor Papierbron opgeven.
Instellen > Faxinstellingen > Ontvangstinstellingen >
Papierbron
Selecteer Communicatie.
E
Selecteer Overgaan voor antwoorden.
F
Hiermee stelt u het aantal belsignalen in.
G
16
Ga naar de modus Fax via het menu Home.
B
Als Geavanc. Opties is uitgeschakeld op het
C
display, selecteert u Geavanc. Opties.
Wordt deze optie niet weergegeven, druk dan op
d.
Selecteer Faxverslag.
D
Page 97

Basishandleiding
Meer functies
Selecteer het item dat u wilt afdrukken.
E
Opmerking:
Alleen het Faxlogboek kan op het scherm worden
bekeken.
Druk op één van de knoppen x om het
F
geselecteerde rapport af te drukken.
Opmerking:
Zie de PDF Gebruikershandleiding voor meer informatie
over andere faxfuncties en de menulijst in de faxmodus.
Meer functies
Via Meer functies kunt u vele speciale menu's oproepen die afdrukken gemakkelijk en leuk maken! Selecteer Meer
functies, selecteer elk menu en volg dan de instructies op het display voor meer informatie.
Menu Functies
Kopie van id-kaart
Foto's afdrukken
U kunt beide zijden van een id-kaart tege‐
lijk kopiëren.
U kunt foto's die op een geheugenkaart of
extern USB-apparaat zijn opgeslagen, zon‐
der computer afdrukken. U kunt uw foto's
ook verkleinen en vergroten, en de foto‐
kwaliteit aanpassen.
Nederlands
Foto's kopiëren/herstellen
Vel fotolay-out
17
U kunt getrouwe kopieën van uw origine‐
len maken. Is uw oorspronkelijke foto ver‐
vaagd, dan kunt u de kleuren herstellen
om de foto weer tot leven te brengen.
U kunt de foto's op een geheugenkaart in
verschillende lay-outs afdrukken.
Page 98

Basishandleiding
Cartridges vervangen
Menu Functies
Gelinieerd papier afdr.
Cartridges vervangen
Veiligheidsvoorschriften
❏ Houd cartridges buiten het bereik van kinderen.
❏ Wees voorzichtig met gebruikte cartridges. Er kan
inkt rond de inkttoevoer kleven.
Als u inkt op uw huid krijgt, wast u de plek grondig
met water en zeep.
Als u inkt in uw ogen krijgt, moet u uw ogen
onmiddellijk uitspoelen met water. Raadpleeg
onmiddellijk een arts als u ondanks grondig
spoelen problemen krijgt met uw ogen of nog steeds
ongemak ondervindt.
Als er inkt in uw mond terechtkomt, spuugt u deze
onmiddellijk uit en raadpleegt u direct een arts.
Voorzorgsmaatregelen
❏ Voor optimale prestaties van de printkop wordt er
niet alleen tijdens het afdrukken inkt uit sommige
cartridges gebruikt, maar ook tijdens
onderhoudsactiviteiten, zoals vervanging van
cartridges en reiniging van de printkop.
❏ Als u een cartridge tijdelijk wilt verwijderen, moet u
er wel voor zorgen dat de inkttoevoer wordt
beschermd tegen stof en vuil. Bewaar de cartridge in
dezelfde omgeving als de printer. Bewaar cartridges
met het label met de inktkleur naar boven. Bewaar
cartridges nooit ondersteboven.
❏ Om zuinig om te gaan met de inkt mag u de
cartridge alleen verwijderen wanneer u deze wilt
vervangen. Cartridges die al bijna leeg zijn, kunnen
na een herinstallatie niet meer worden gebruikt.
❏ Open de verpakking van de cartridge pas op het
moment waarop u de cartridge wilt installeren. De
cartridge is vacuümverpakt om de
betrouwbaarheid te waarborgen. Als u een
cartridge langere tijd buiten de verpakking bewaart
en dan pas gebruikt, is normaal afdrukken
misschien niet meer mogelijk.
U kunt gelinieerd papier of grafiekpapier
afdrukken met of zonder fotoset als ach‐
tergrond.
❏ Epson raadt het gebruik van originele
Epson-cartridges aan. De kwaliteit of
betrouwbaarheid van niet-originele inkt kan niet
door Epson worden gegarandeerd. Het gebruik van
niet-originele cartridges kan leiden tot schade die
niet onder de garantie van Epson valt. Bovendien
kan het gebruik van dergelijke producten er in
bepaalde omstandigheden toe leiden dat de printer
niet correct functioneert. Mogelijk wordt bij
niet-originele inkt geen informatie over het inktpeil
weergegeven.
❏ Schud de cartridges niet te hard. Hierdoor kunnen
ze inkt gaan lekken.
❏ Installeer alle cartridges, anders kunt u niet
afdrukken.
18
Page 99

Basishandleiding
Cartridges vervangen
Een cartridge vervangen
Open de scanner. De cartridgehouder wordt
A
verplaatst naar de positie waarin de cartridge kan
worden vervangen.
Belangrijk:
c
❏ Verplaats de cartridgehouder niet met de
hand. Hierdoor kan het apparaat worden
beschadigd.
❏ Til de scanner niet op wanneer het deksel open
is.
Open het deksel van de cartridge.
B
Knijp en verwijder de cartridge.
C
Opmerking:
❏ De illustratie laat zien hoe u de cartridge voor
zwarte inkt vervangt. Vervang de cartridge die op
uw situatie van toepassing is.
❏ Bij verwijderde cartridges kan er inkt zitten om de
inkttoevoer. Wees dus voorzichtig dat er geen inkt in
de omgeving van de cartridge wordt gemorst
wanneer de cartridges worden verwijderd.
Nederlands
Opmerking:
Als de cartridgehouder niet wordt verplaatst naar de
positie waarin u de cartridge kunt vervangen, volg dan
onderstaande instructies.
Home > Instellen > Onderhoud > Inktcartridge
vervangen
19
Schud nieuwe cartridges voorzichtig vier of vijf
D
keer heen en weer, en haal ze vervolgens uit de
verpakking.
Page 100

Basishandleiding
Cartridges vervangen
Verwijder alleen de gele tape.
E
Belangrijk:
c
❏ Voordat u de cartridge installeert, moet u de
gele tape verwijderen, anders kan de
afdrukkwaliteit minder zijn of kunt u mogelijk
niet afdrukken.
❏ Als u een cartridge hebt geïnstalleerd zonder de
gele tape te verwijderen, haalt u de cartridge
uit de printer, verwijdert u de gele tape en
installeert u de cartridge opnieuw.
❏ Verwijder het transparante zegel aan de
onderkant van de cartridge niet omdat de
cartridge dan mogelijk onbruikbaar wordt.
❏ De beschermstrook op de cartridge mag niet
worden verwijderd of gescheurd, omdat de
cartridge anders gaat lekken.
Plaats de cartridge en druk erop tot u een klik
F
hoort.
Sluit het deksel van de cartridge.
G
Sluit de scanner langzaam. Het laden van inkt
H
wordt gestart.
Opmerking:
❏ Het aan-uitlampje blijft knipperen terwijl de inkt
wordt geladen. Schakel het apparaat nooit uit
terwijl inkt wordt geladen. Als de inkt niet volledig
geladen is, is het mogelijk dat u niet kunt afdrukken.
❏ Als u tijdens het kopiëren een cartridge moest
vervangen, moet u de afdruktaak annuleren en de
originelen opnieuw plaatsen om er zeker van te zijn
dat de kwaliteit na het laden van inkt in orde is.
Het vervangen van de cartridge is voltooid. Het apparaat
keert terug naar de vorige status.
20
 Loading...