

Page 1
1
Epson V850 Perfection Flatbed Scanner
Instruction Booklet
NOTICE:
The copyright law of the United States (Title 17, US Code) governs the making of copies of
materials in all formats, including the creation, online delivery, and use of digital copies of
copyrighted material, including photographs. Persons using this equipment are liable for any
infringements
DISCLAIMER:
MCMLS is not responsible for damages incurred to your media (photographic, audio, video or
digital) thru use of this scanning equipment. By using the EPSON V850 Flatbed Scanner, you are
consenting to use this equipment at your own risk and discretion.
Page 2

2
Using the EPSON V850 Perfection Flatbed Scanner
Table of Contents
Introduction / General setup . . . . . . . . . . . . . . . . . . . . . . . . . . . . . . . . . . . . . .. . . pg 3
Description of scanning modes . . . . . . . . . . . . . . . . . . . . . . . . . . . . . . . . . . .. . . . pg 7
Scanning Albums and Print Photos. . . . . . . . . . . . . . . . . . . . . . . . . . . . . . . . . . . . pg 10
Scanning Negatives . . . . . . . . . . . . . . . . . . . . . . . . . . . . . . . . . . . . . . . . . . . . . . . . pg 26
Scanning Slides . . . . . . . . . . . . . . . . . . . . . . . . . . . . . . . . . . . . . . . . . . . . . . . . . . . pg 63
Conclusion . . . . . . . . . . . . . . . . . . . . . . . . . . . . . . . . . . . . . . . . . . . . .. . . . . . . . . . pg 84
Page 3
3
INTRODUCTION / GENERAL SETUP
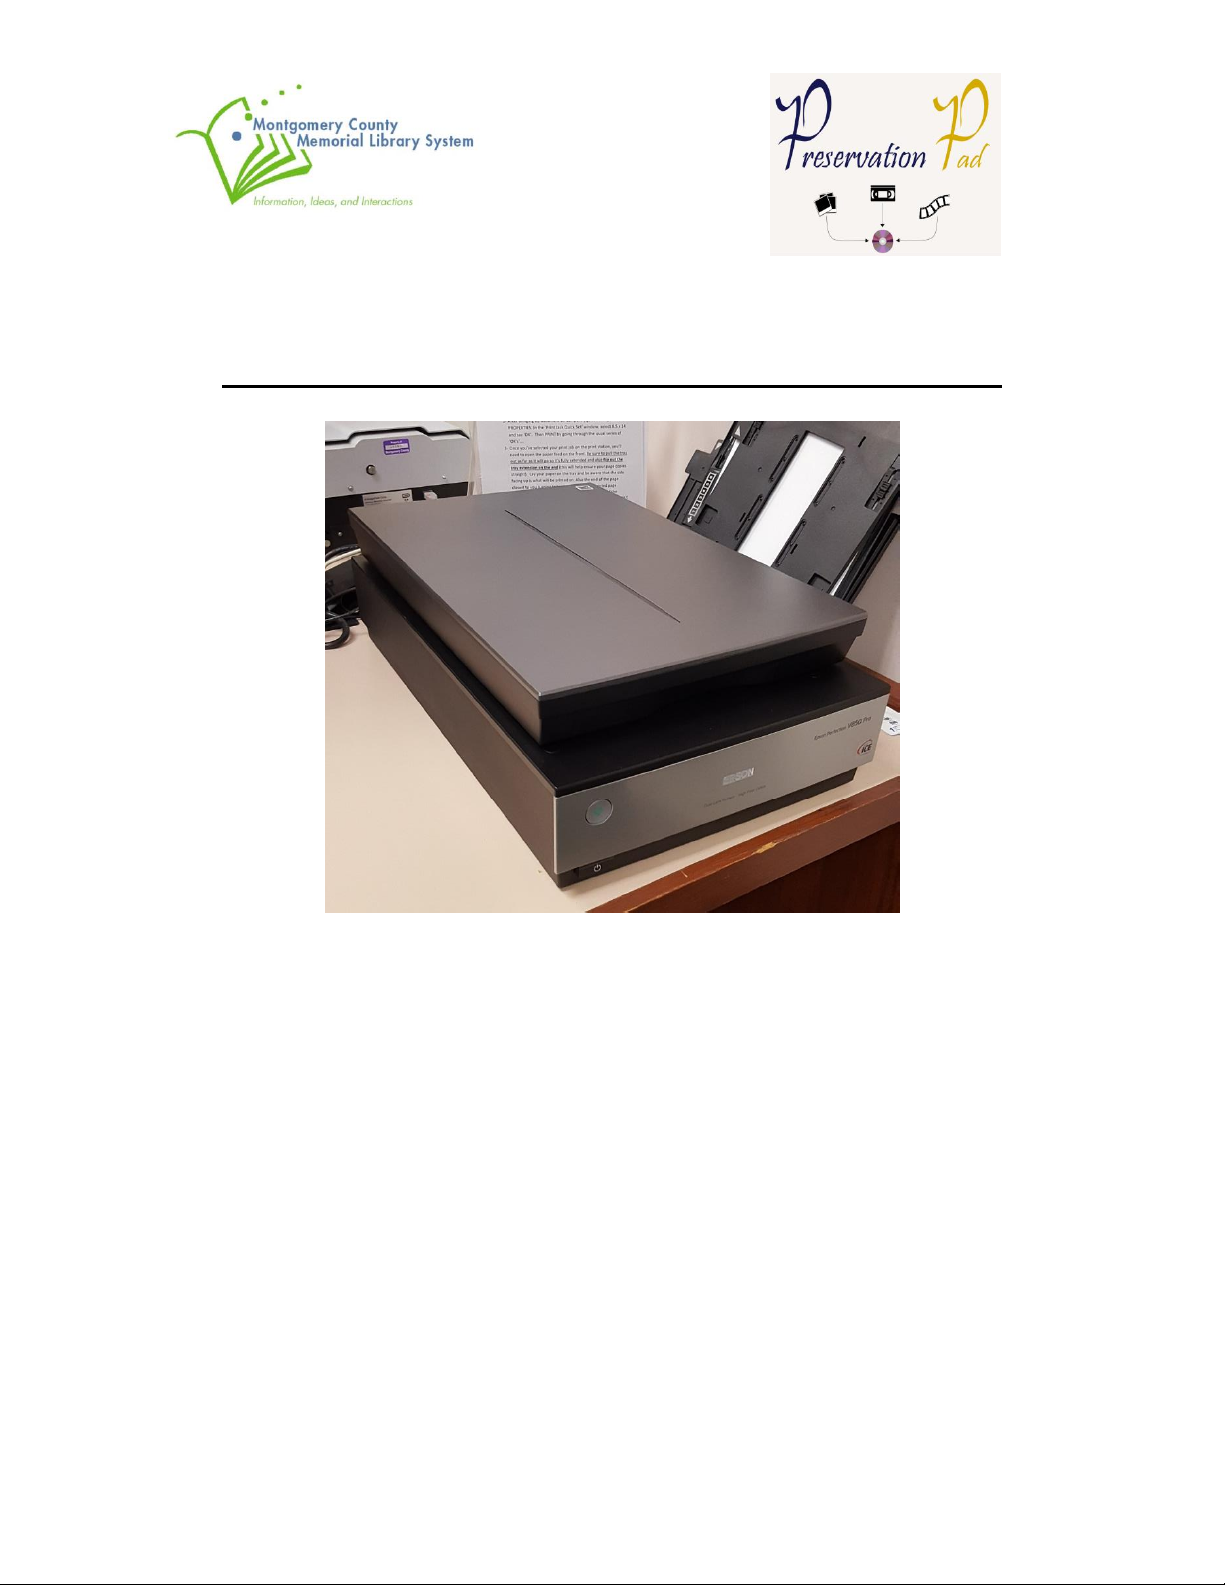
The EPSON V850 Perfection Flatbed Scanner is a power scanner capable of creating a highresolution digital image from your photo albums, slides, and negatives. Its software and
interface make is especially useful for magnetic albums and irregular sized negatives and slides.
The following is a step-by-step guide that will walk you through how to use the Epson V850
Flatbed Scanner with the accompanying EPSON scan software:
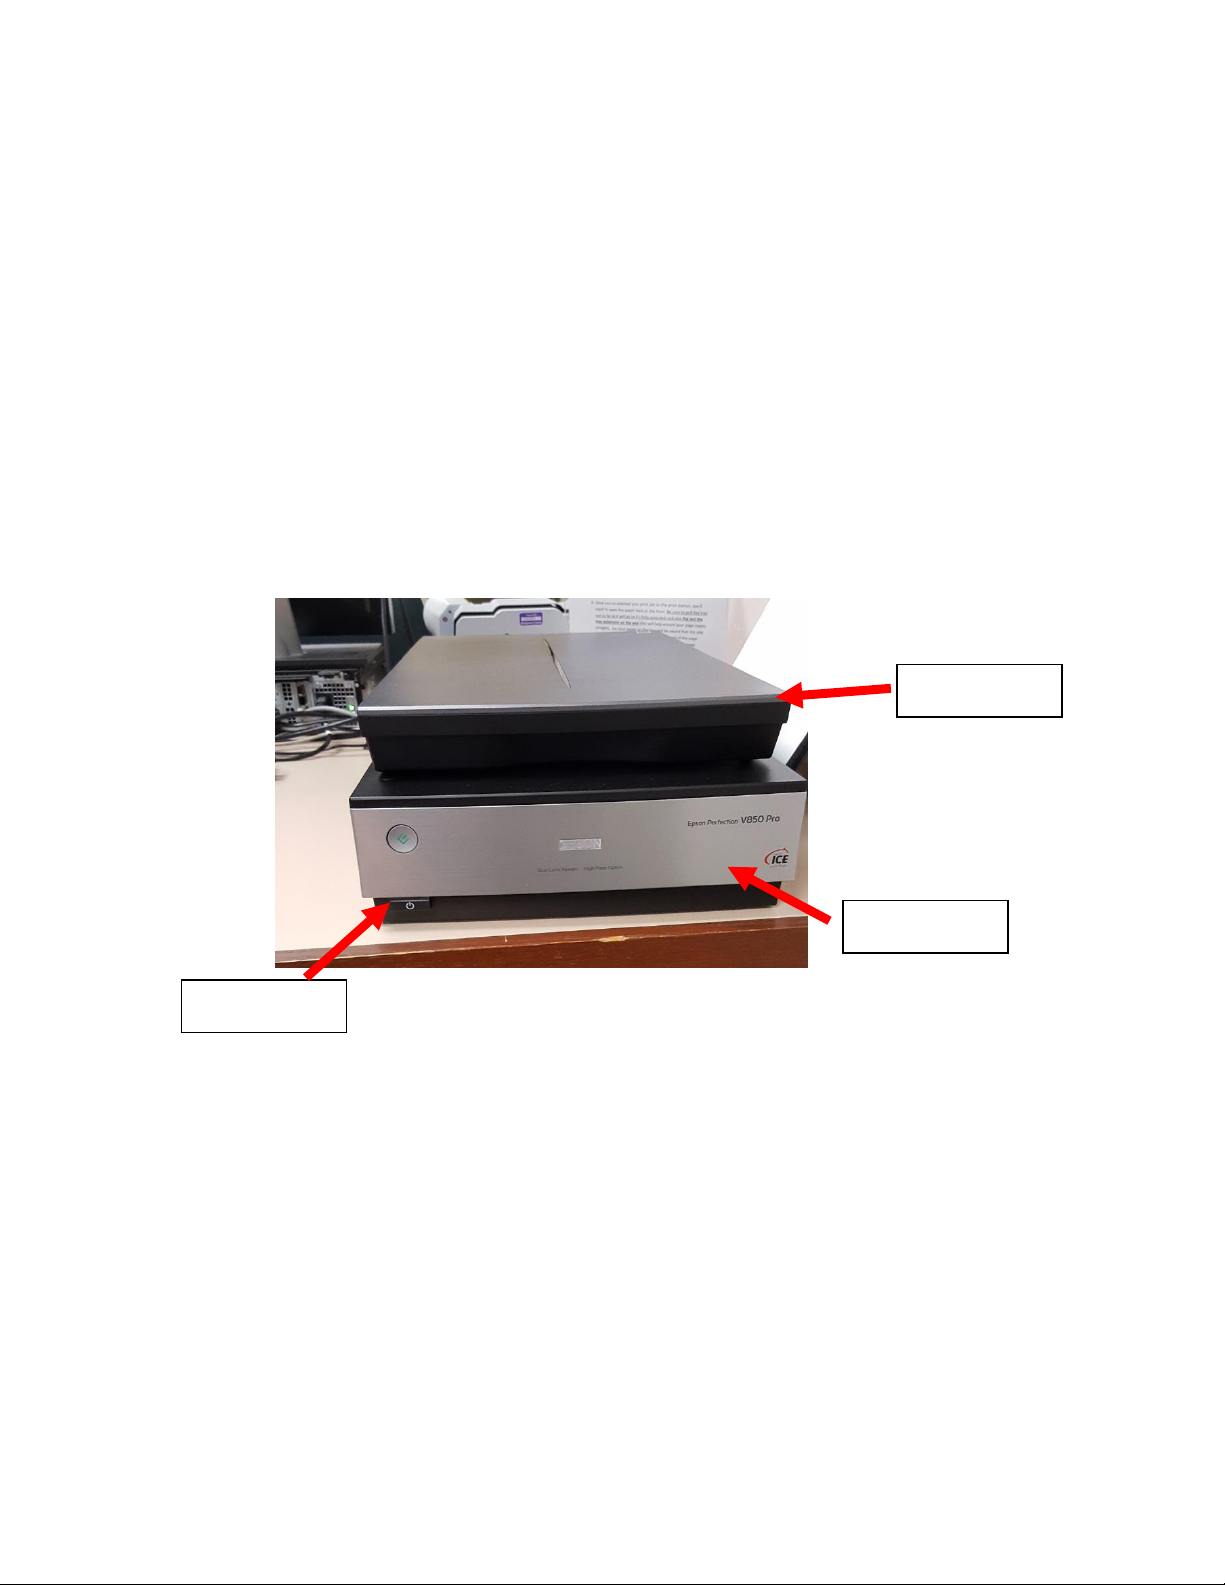
1. Familiarize yourself with Epson V850 Flatbed Scanner and its accessories:
SCANNER
POWER Button
Scanner Base
Scanner Cover
Page 4
4
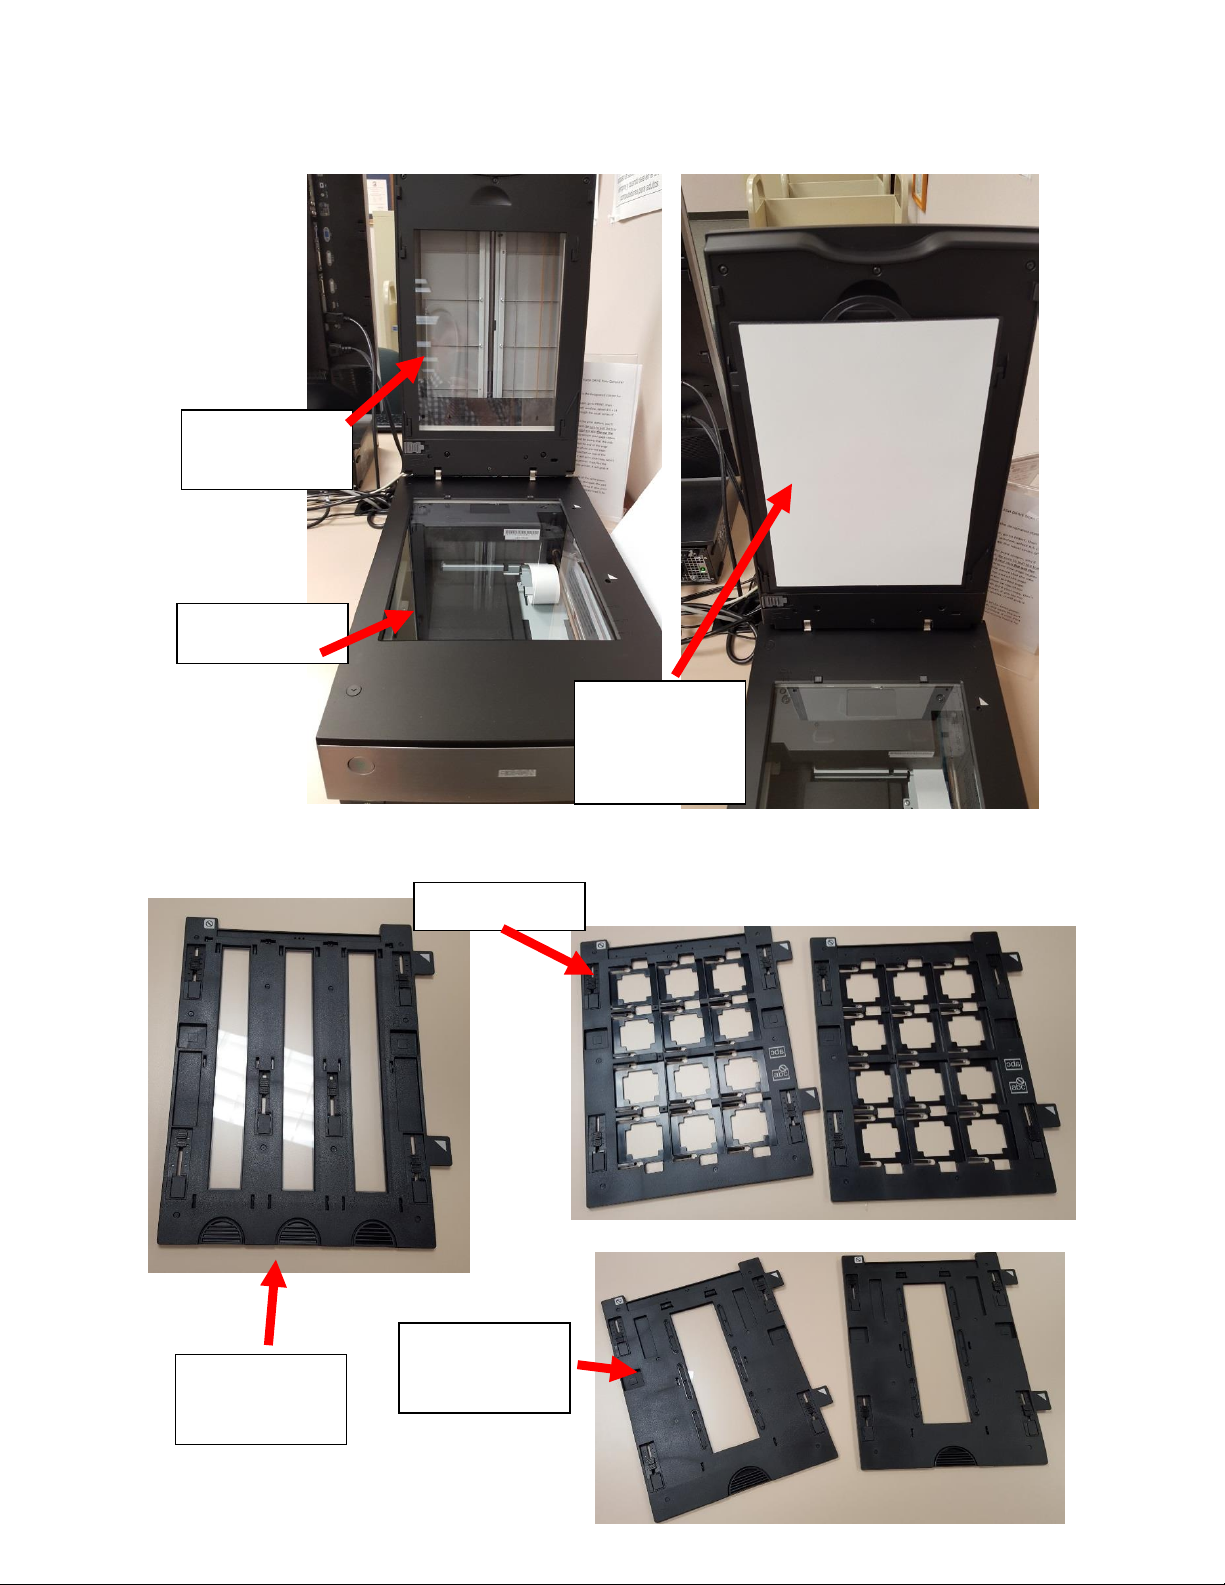
ACCESSORIES
Transparency
Glass
Scanner bed
White cover for
photographs /
album scanning
Negative strip
holder
Slide Trays (x2)
Large negative
holder (x2)
Page 5
5
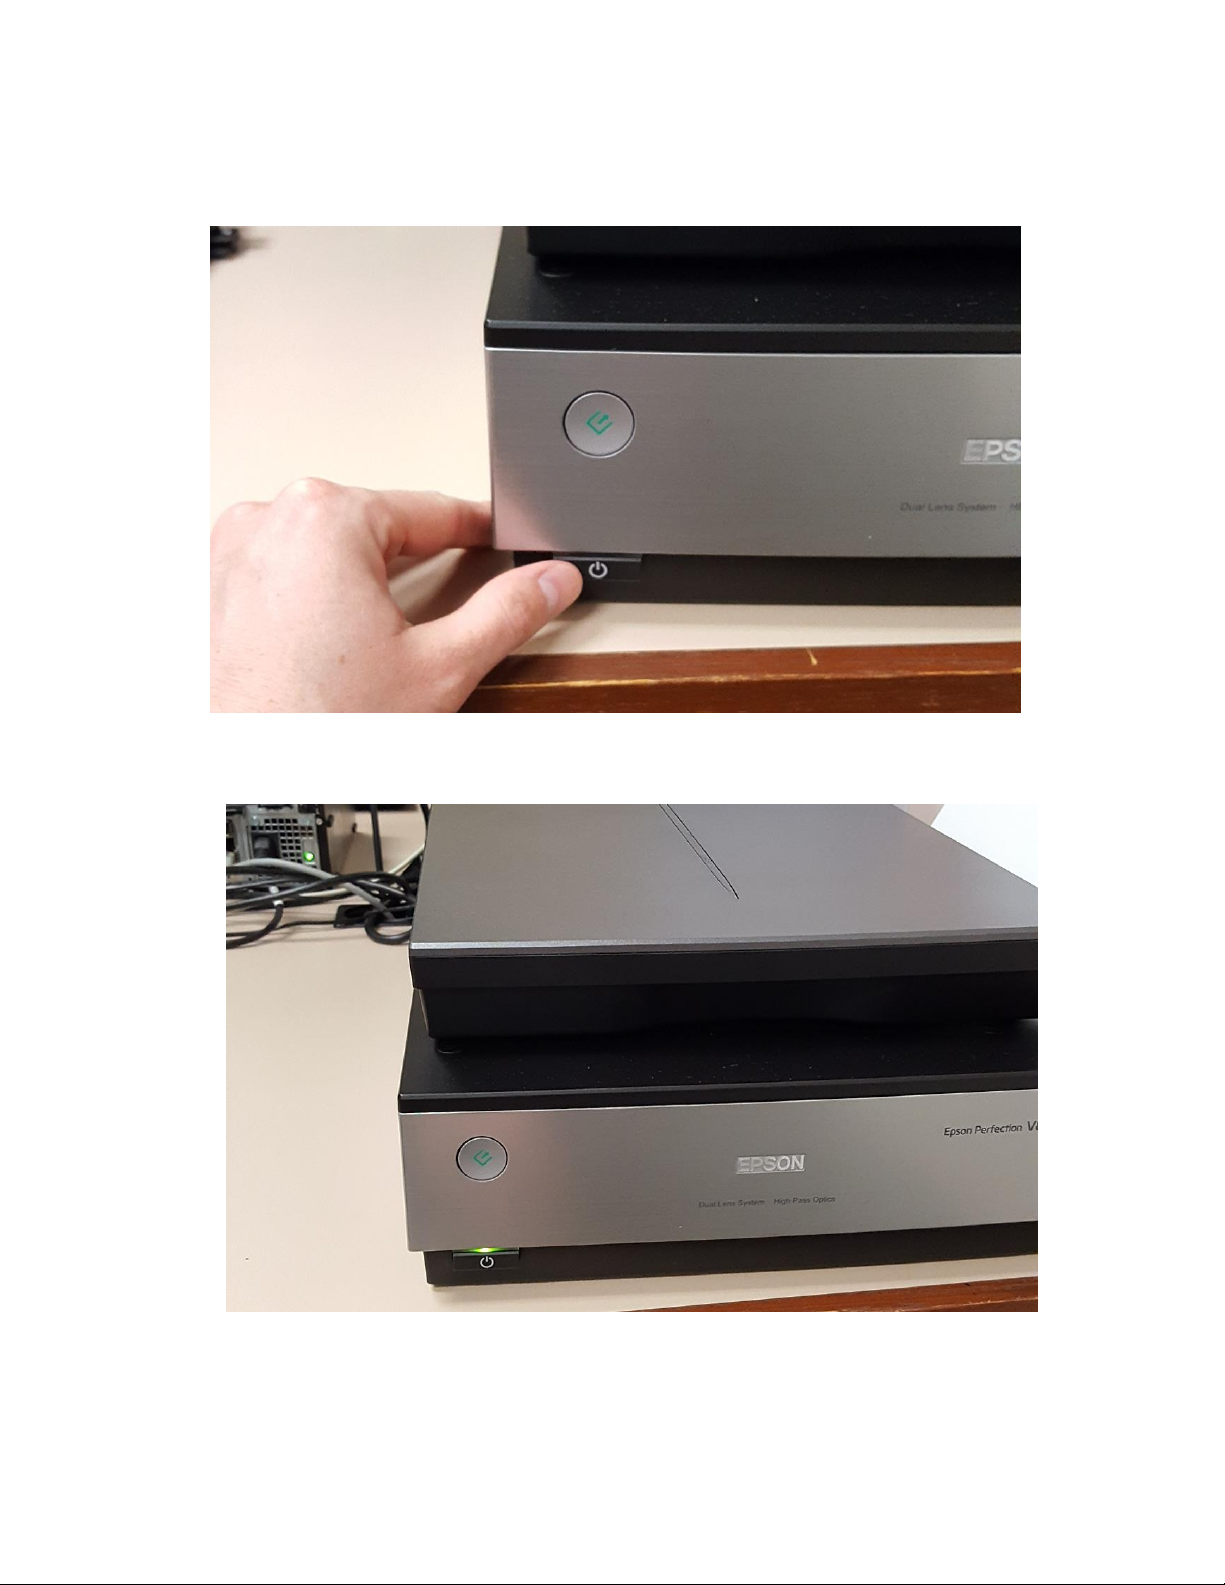
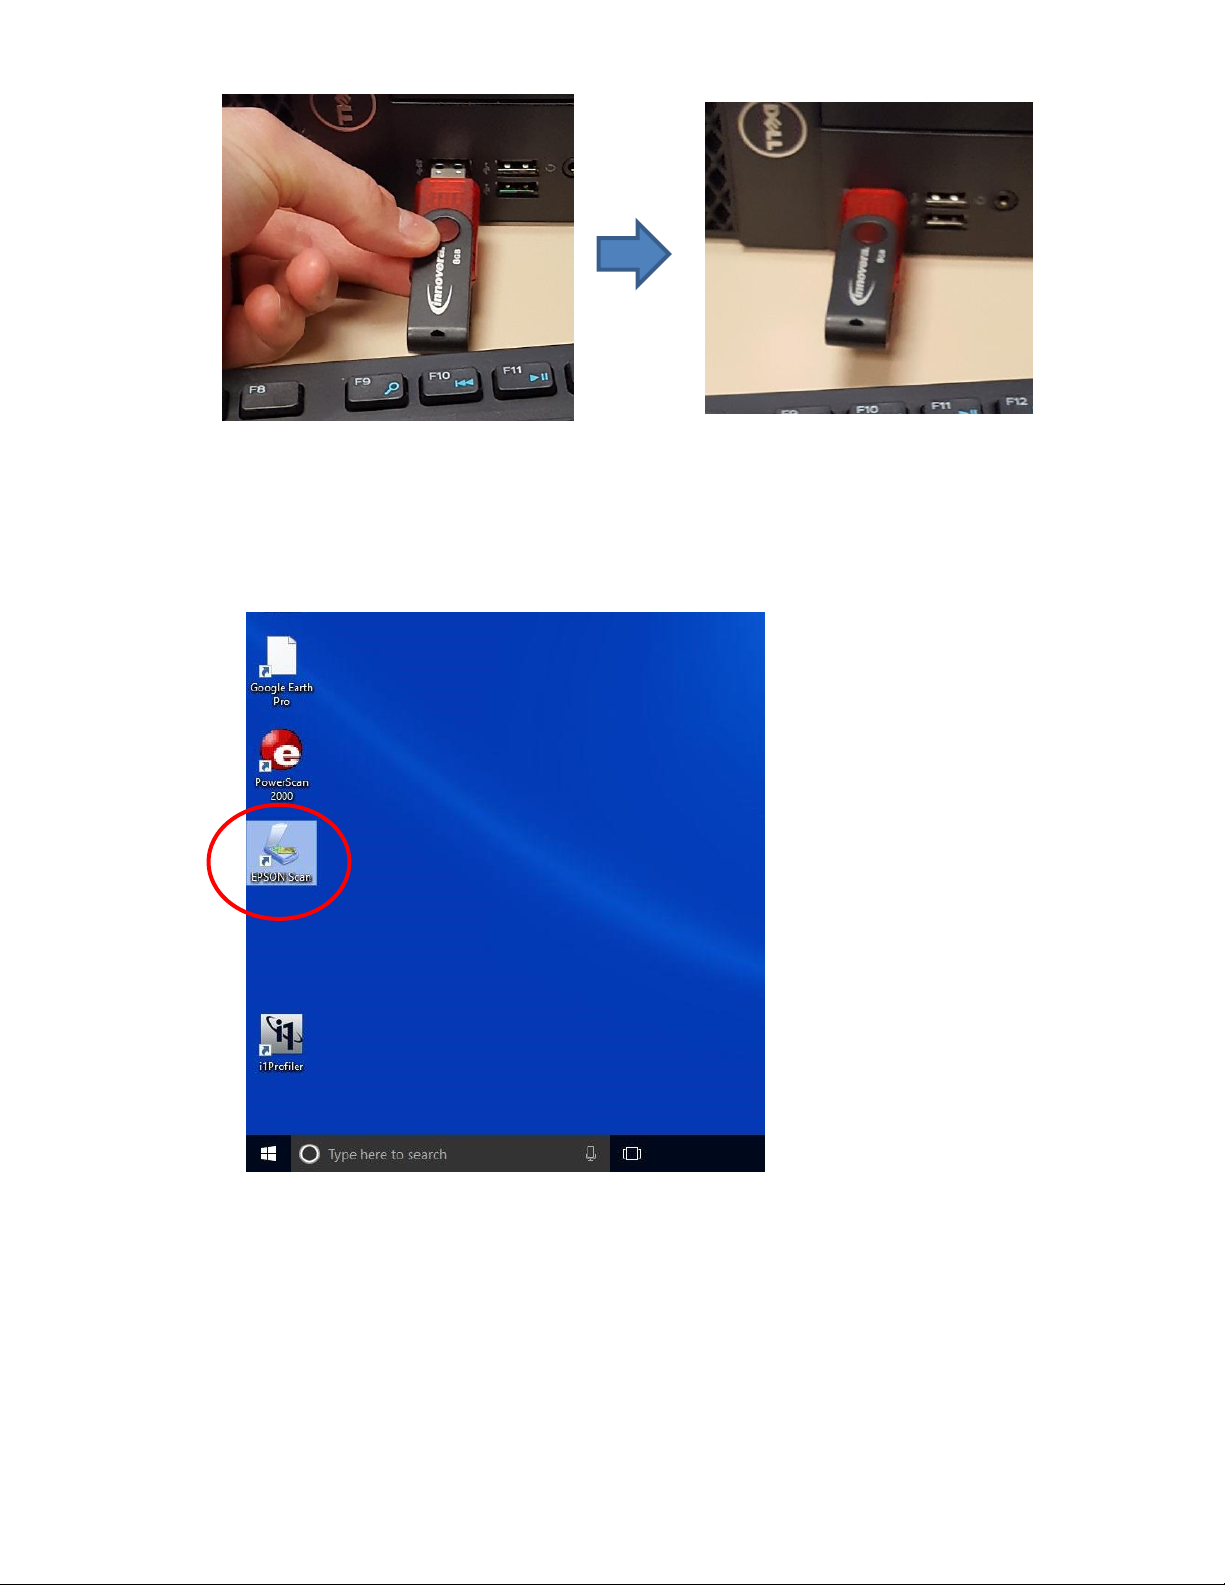
2. First turn the scanner on by pressing the POWER button located on the bottom left
corner on the front of the EPSON V850 scanner.
A green light indicates the scanner is on.
3. Insert your USB flash drive into an open USB port on the front of the PC unit.
Page 6
6
4. Using the mouse on the PC, double click on the EPSON scan software to open the
scanning program.
Page 7

7
DESCRIPTION OF SCANNING MODES
The EPSON Scan software comes with three different scanning modes:
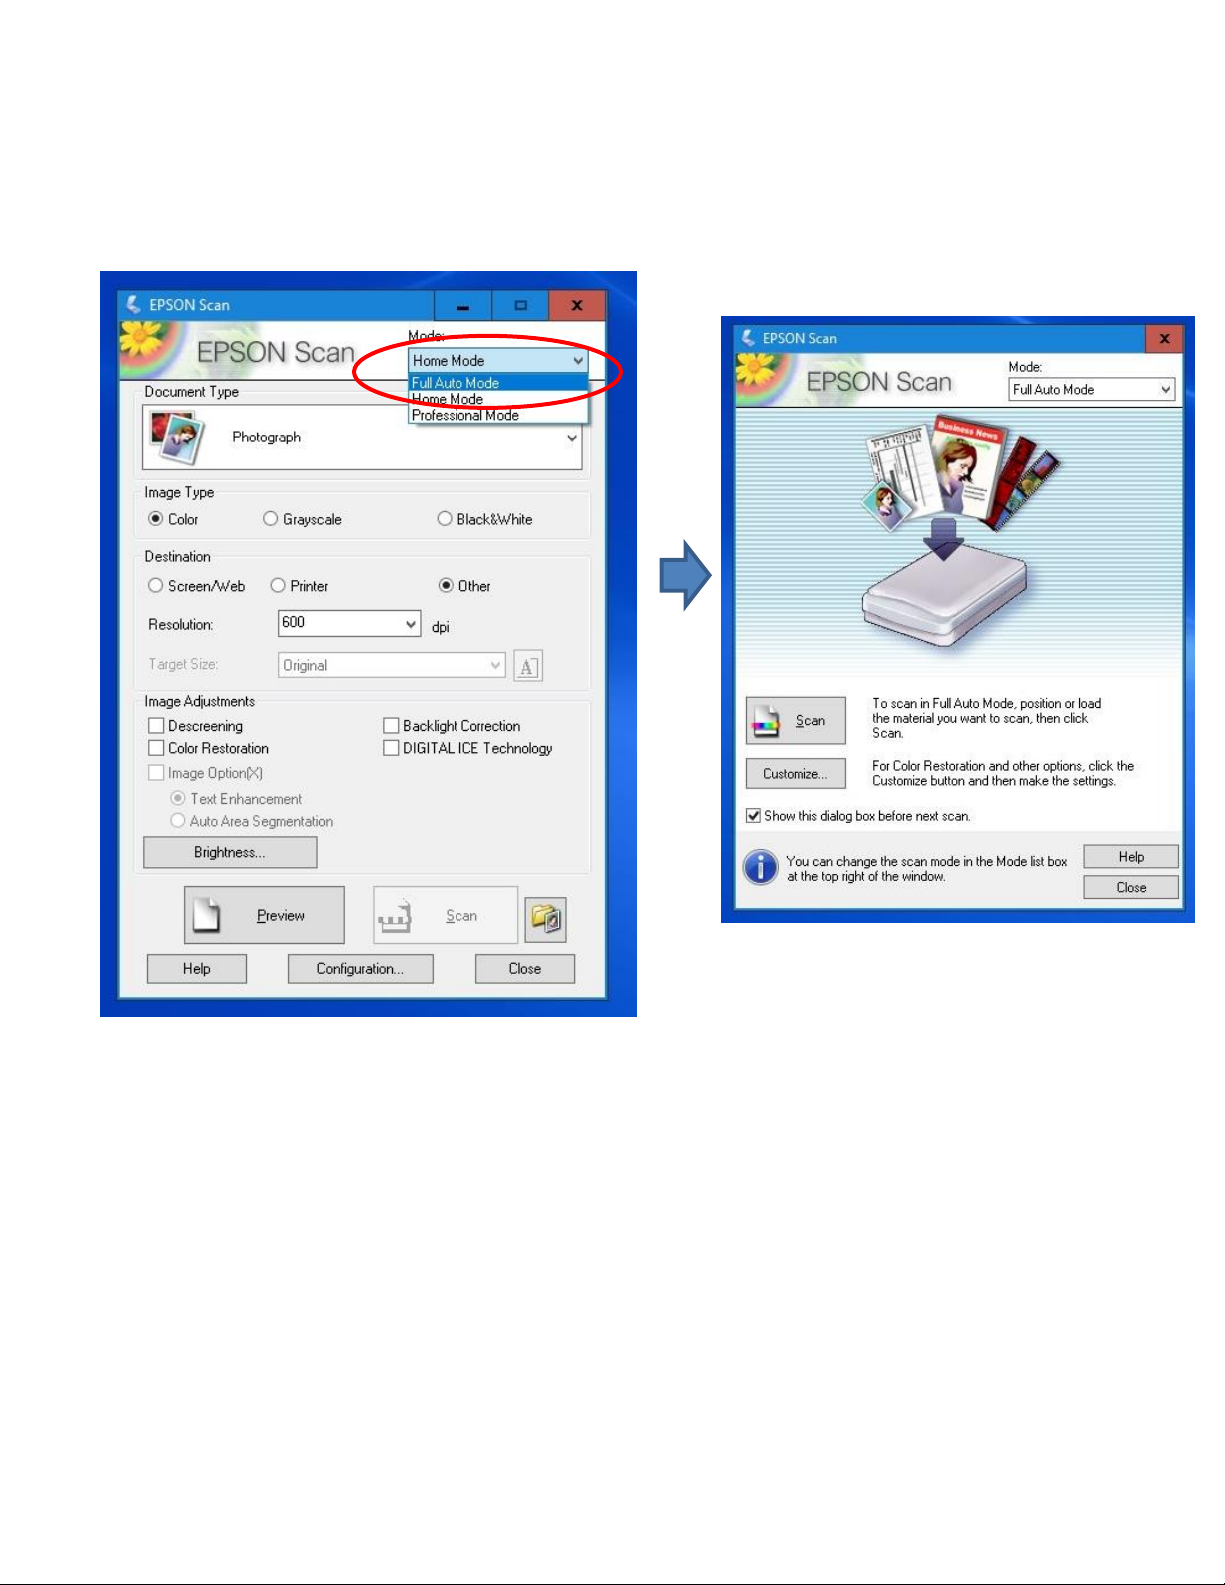
Full Auto Mode - This is the most basic interface and best for beginner users scanning
photo albums, 35mm slides, and standard sized negatives. Full auto mode will automatically
detect the type of material you are scanning, find edges automatically, and split multiple
images for you into separate files. Users just specify save settings and resolution and the
software does the rest!
NOTE: If you are having trouble with Full Auto mode cropping or cutting portions of your source
material, you might want to try using the Home mode instead.
Page 8
8
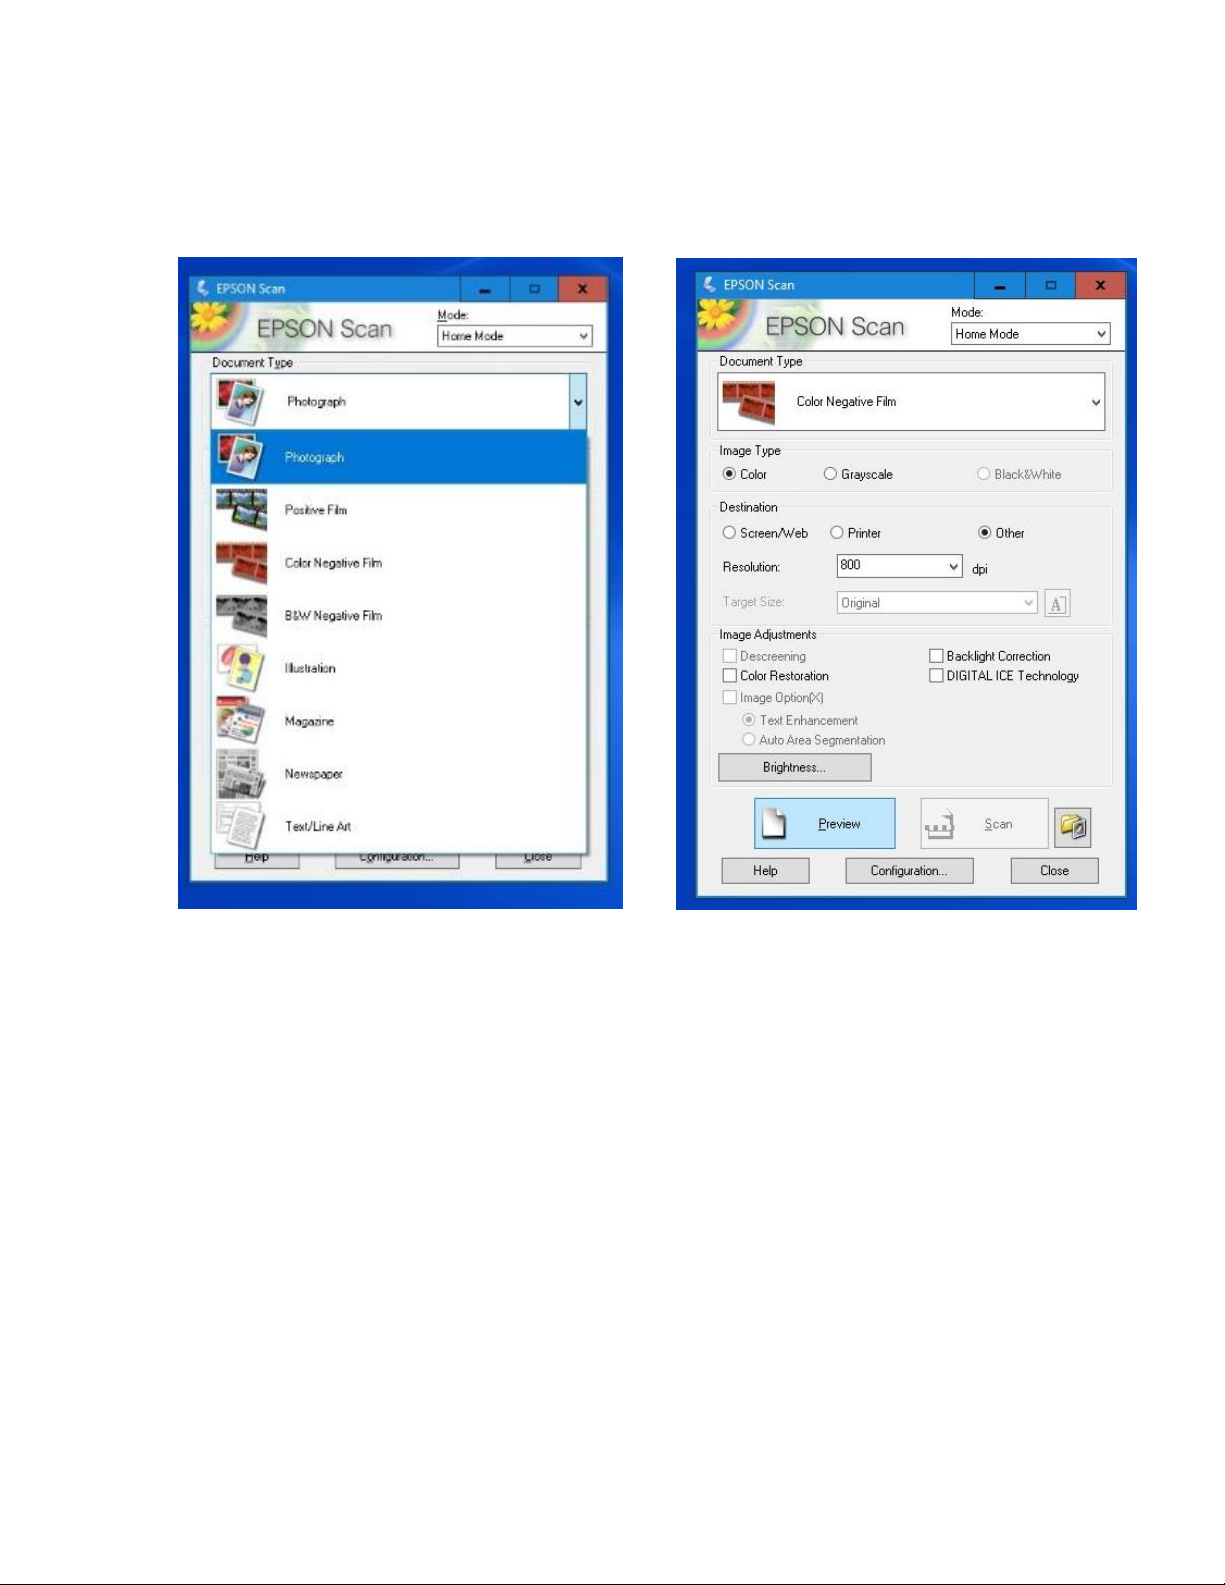
Home Mode - Using the Home mode provides you with a few more customization
options than the Full Auto mode. You are given the ability to specify the Document type
(print photograph, positive film (slides) color or b&w negative film etc.) and more advanced
settings for resolution and target size.
Page 9
9
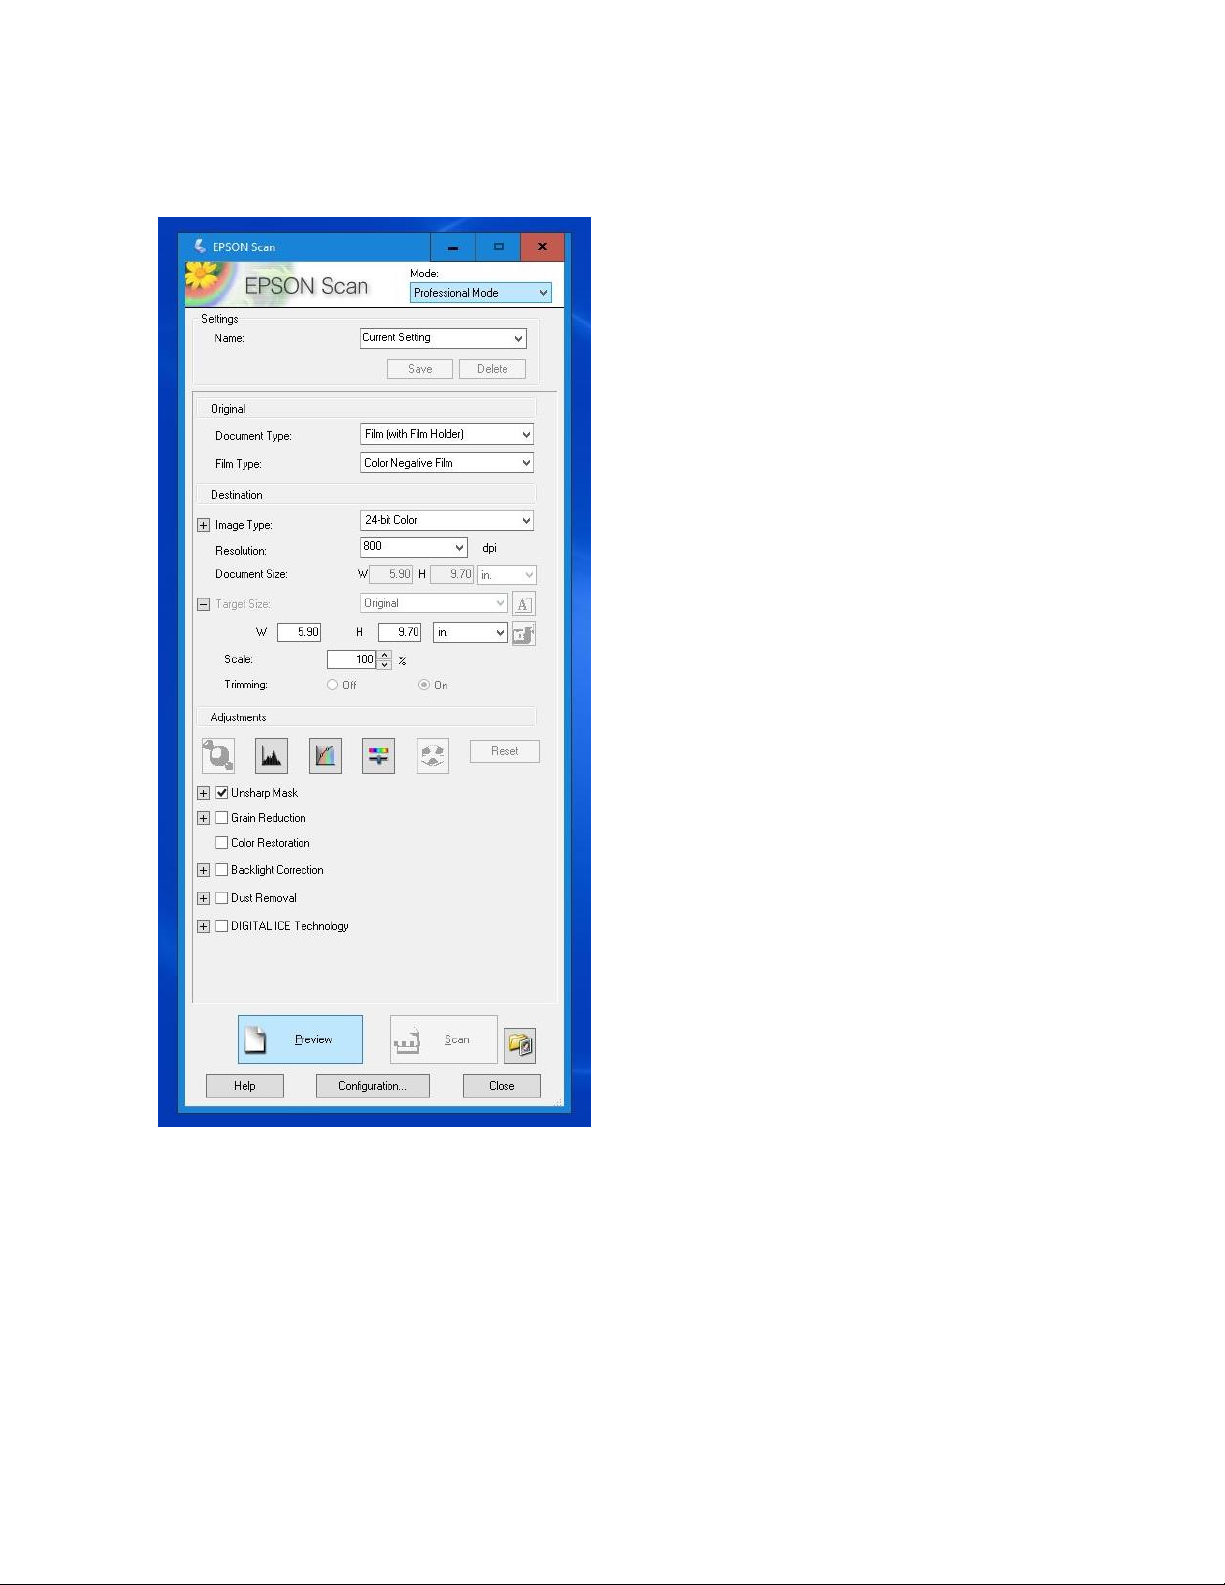
Professional Mode - Professional mode is for advanced users only. It provides access to
the full customization offered by the EPSON Scan software, including color and gamma
correction.
Page 10
10
Scanning Albums and Print Photos
It is recommended you use the Full Auto Mode to scan your Albums and print photographs if this is your
first time scanning. If needed, click on the Mode menu and change it to Full Auto Mode
Page 11
11
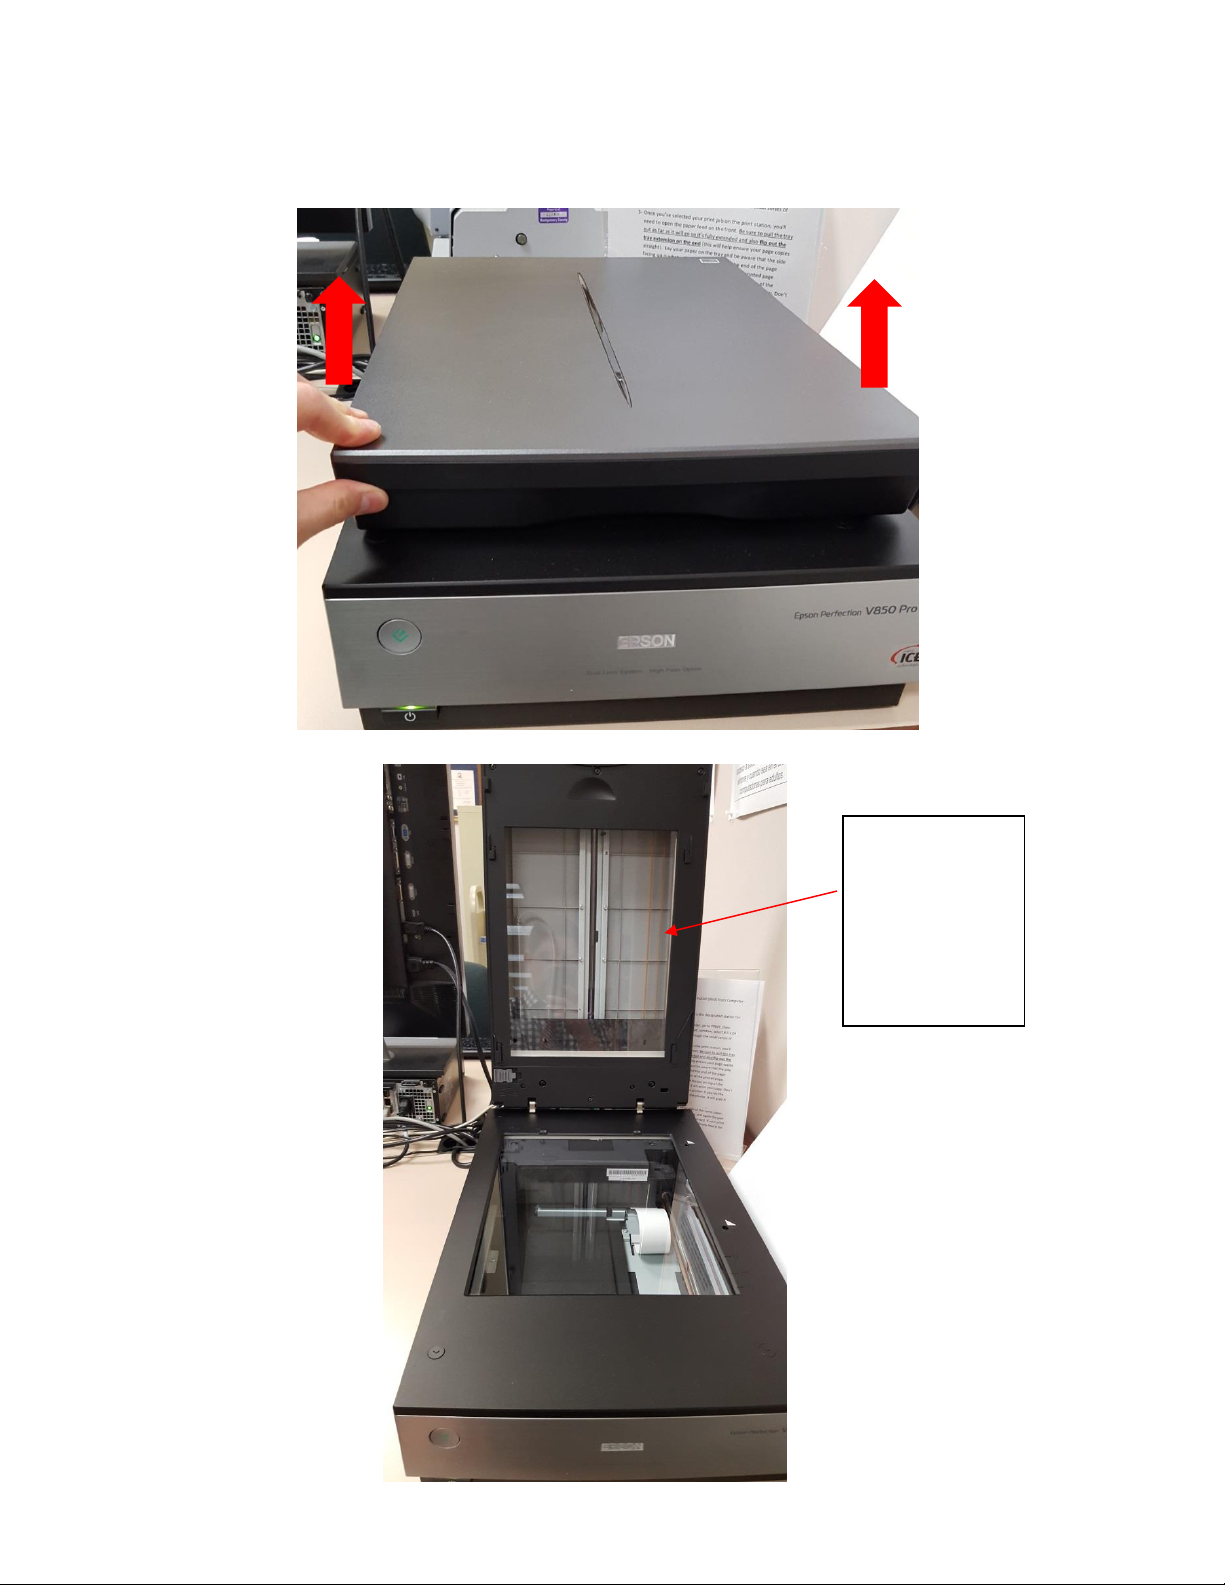
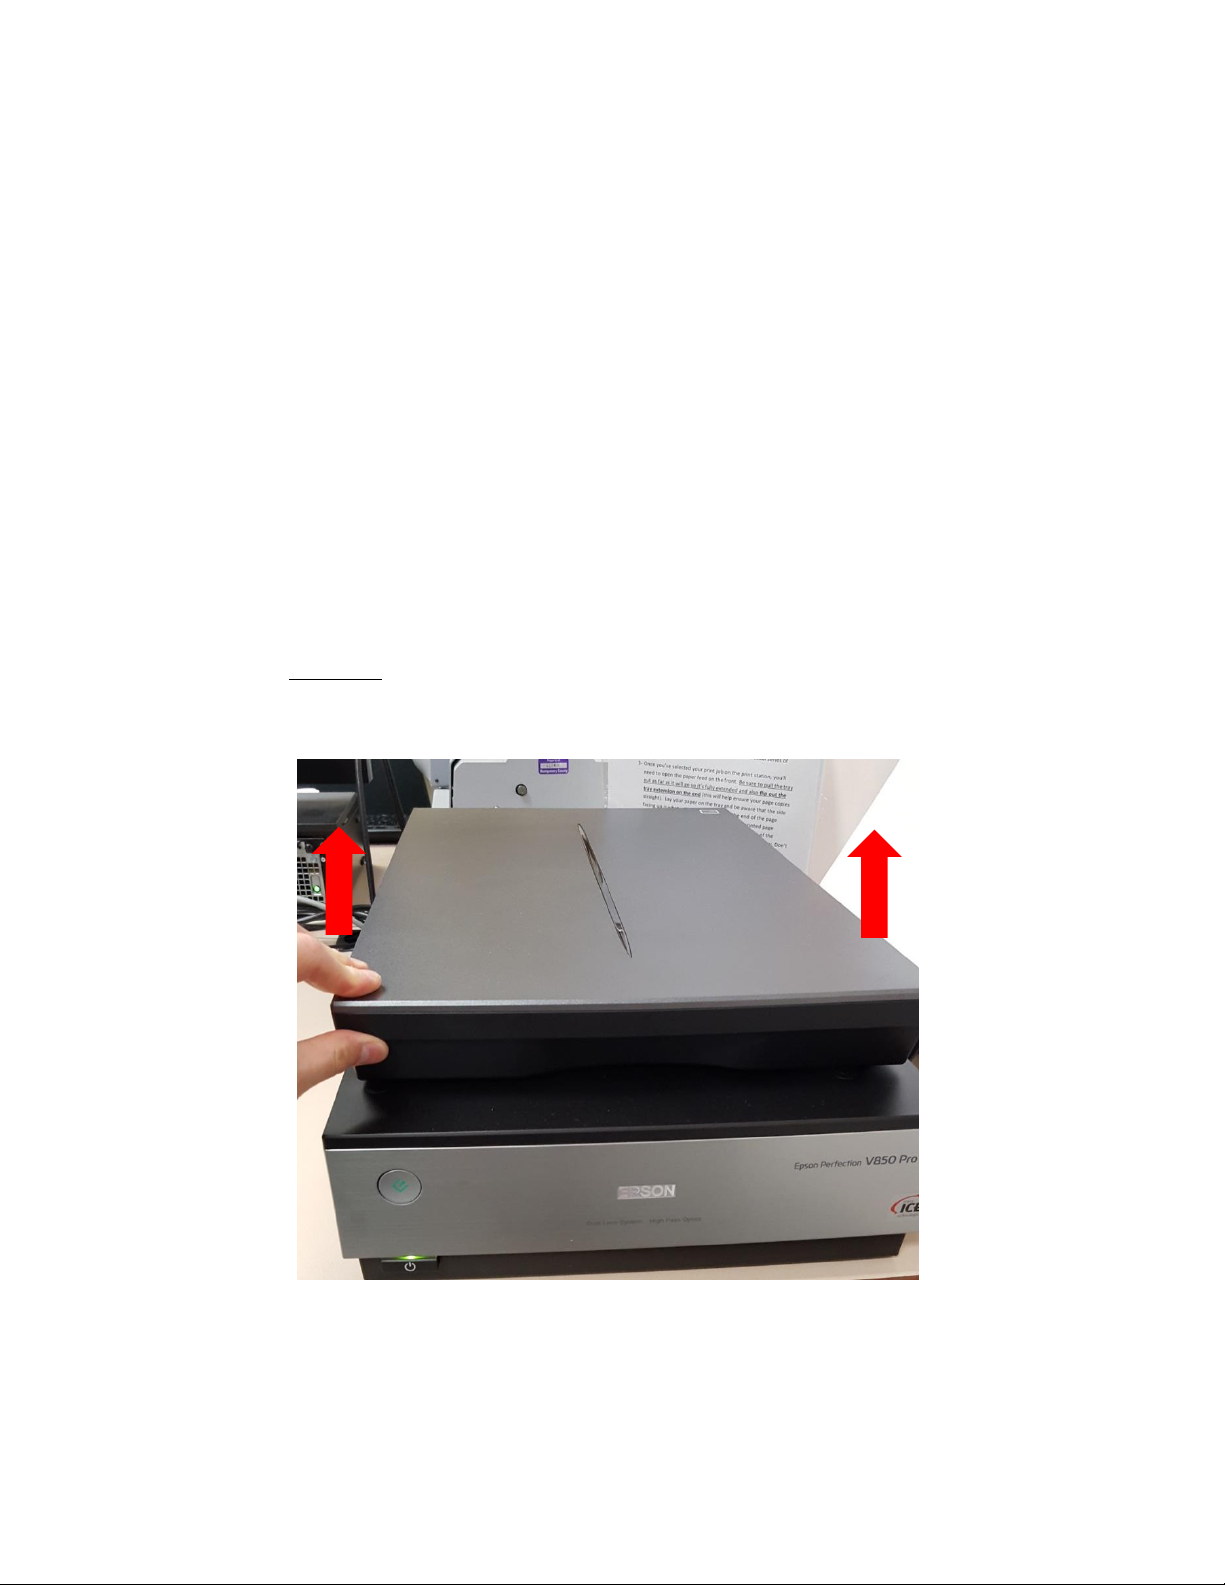
1. To start scanning, first open the cover on the scanner and verify that the white photograph
cover is in place over the glass on the inside of the scanner cover.
Missing Cover!
The cover
should be to the
right of scanner
on the table
Page 12
12
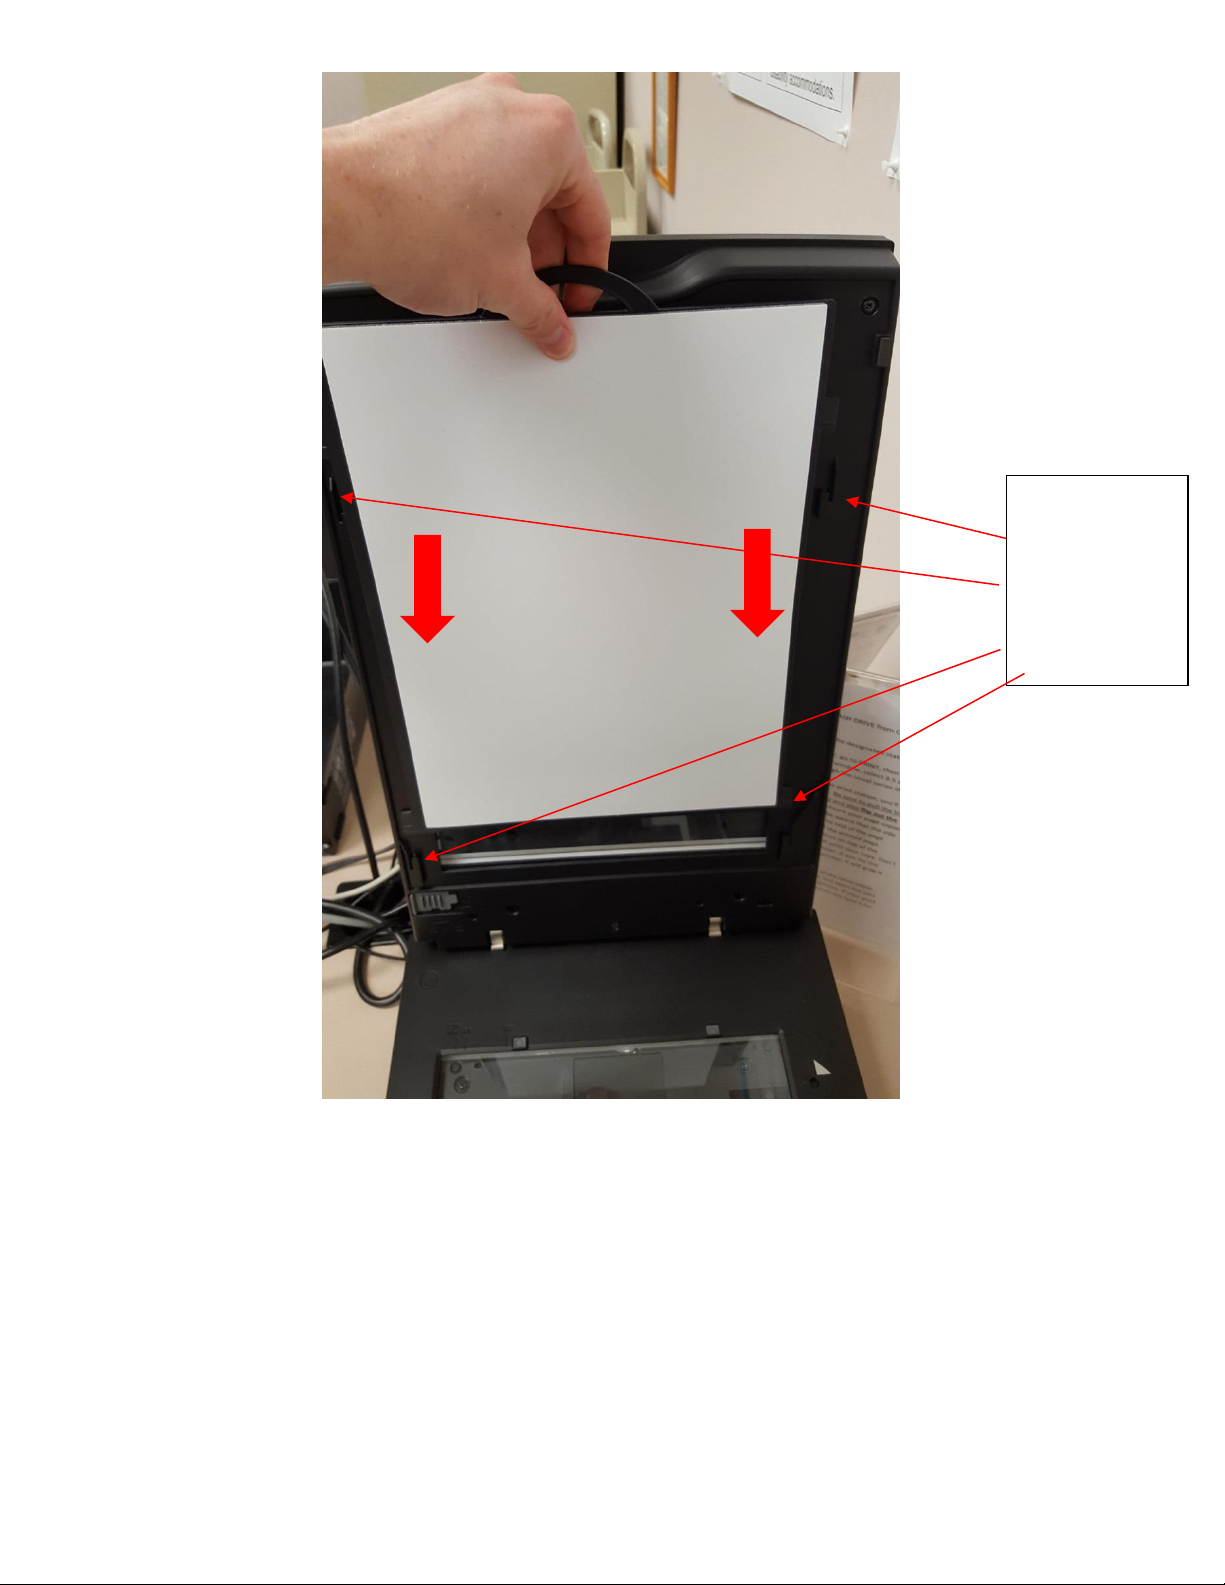
Line white cover
above the four
tabs, then push
down to secure.
Page 13

13
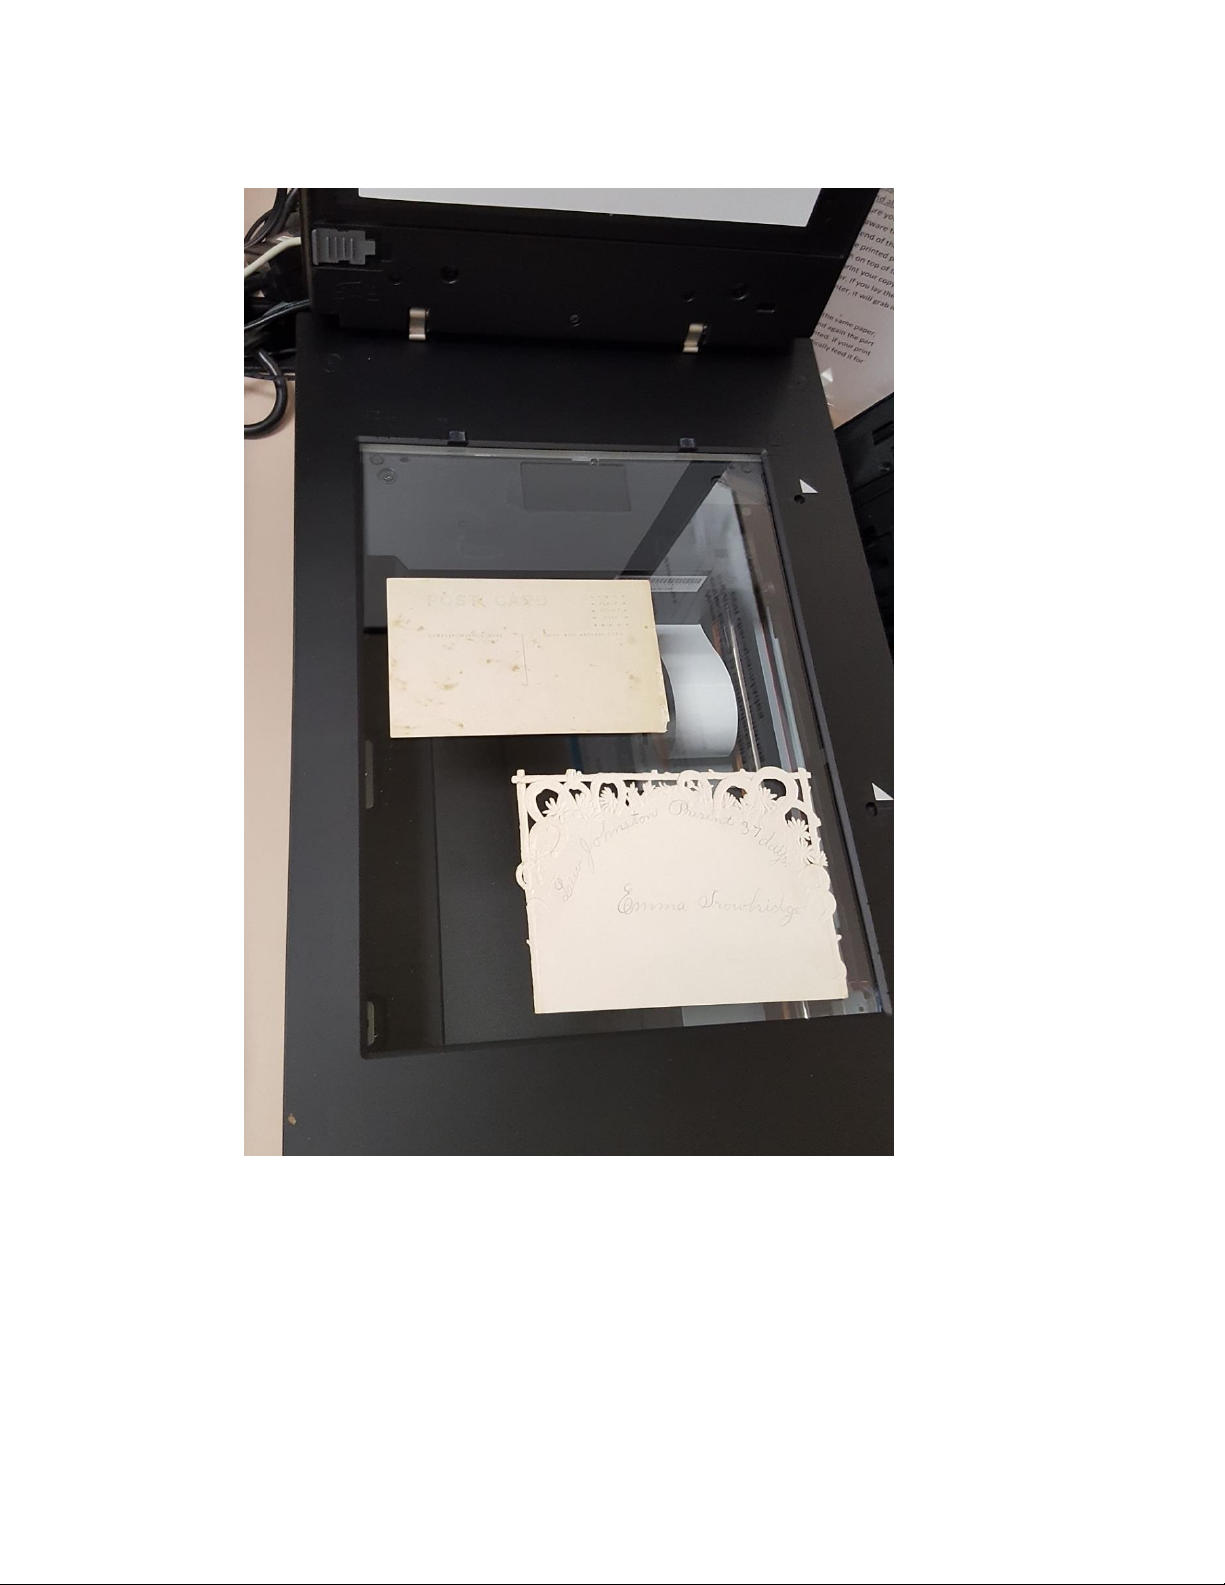
2. Place album or print photograph facedown on the bottom glass. Try to center the
albums or photographs on the middle of glass for best results.
Page 14

14
3. Close scanner cover to secure photographs into place.
Page 15
15
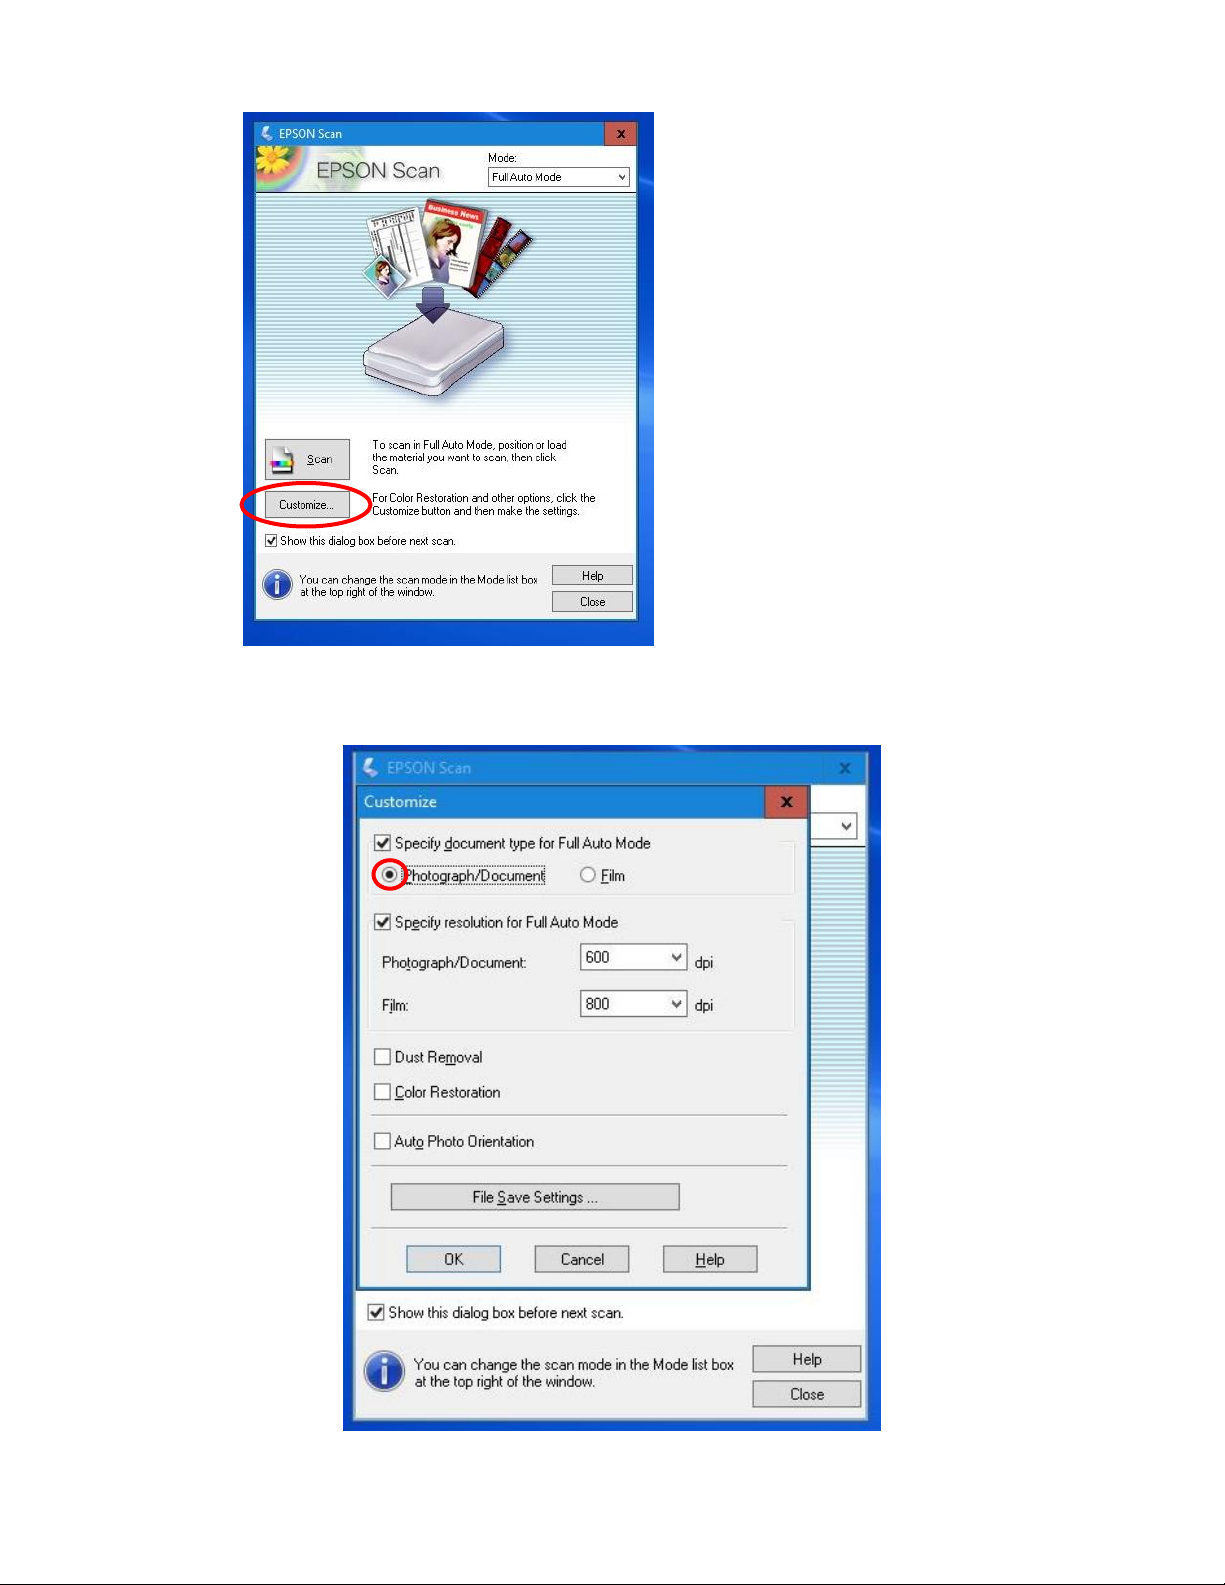
4. Back in the EPSON Scan program, click on the Customize button.
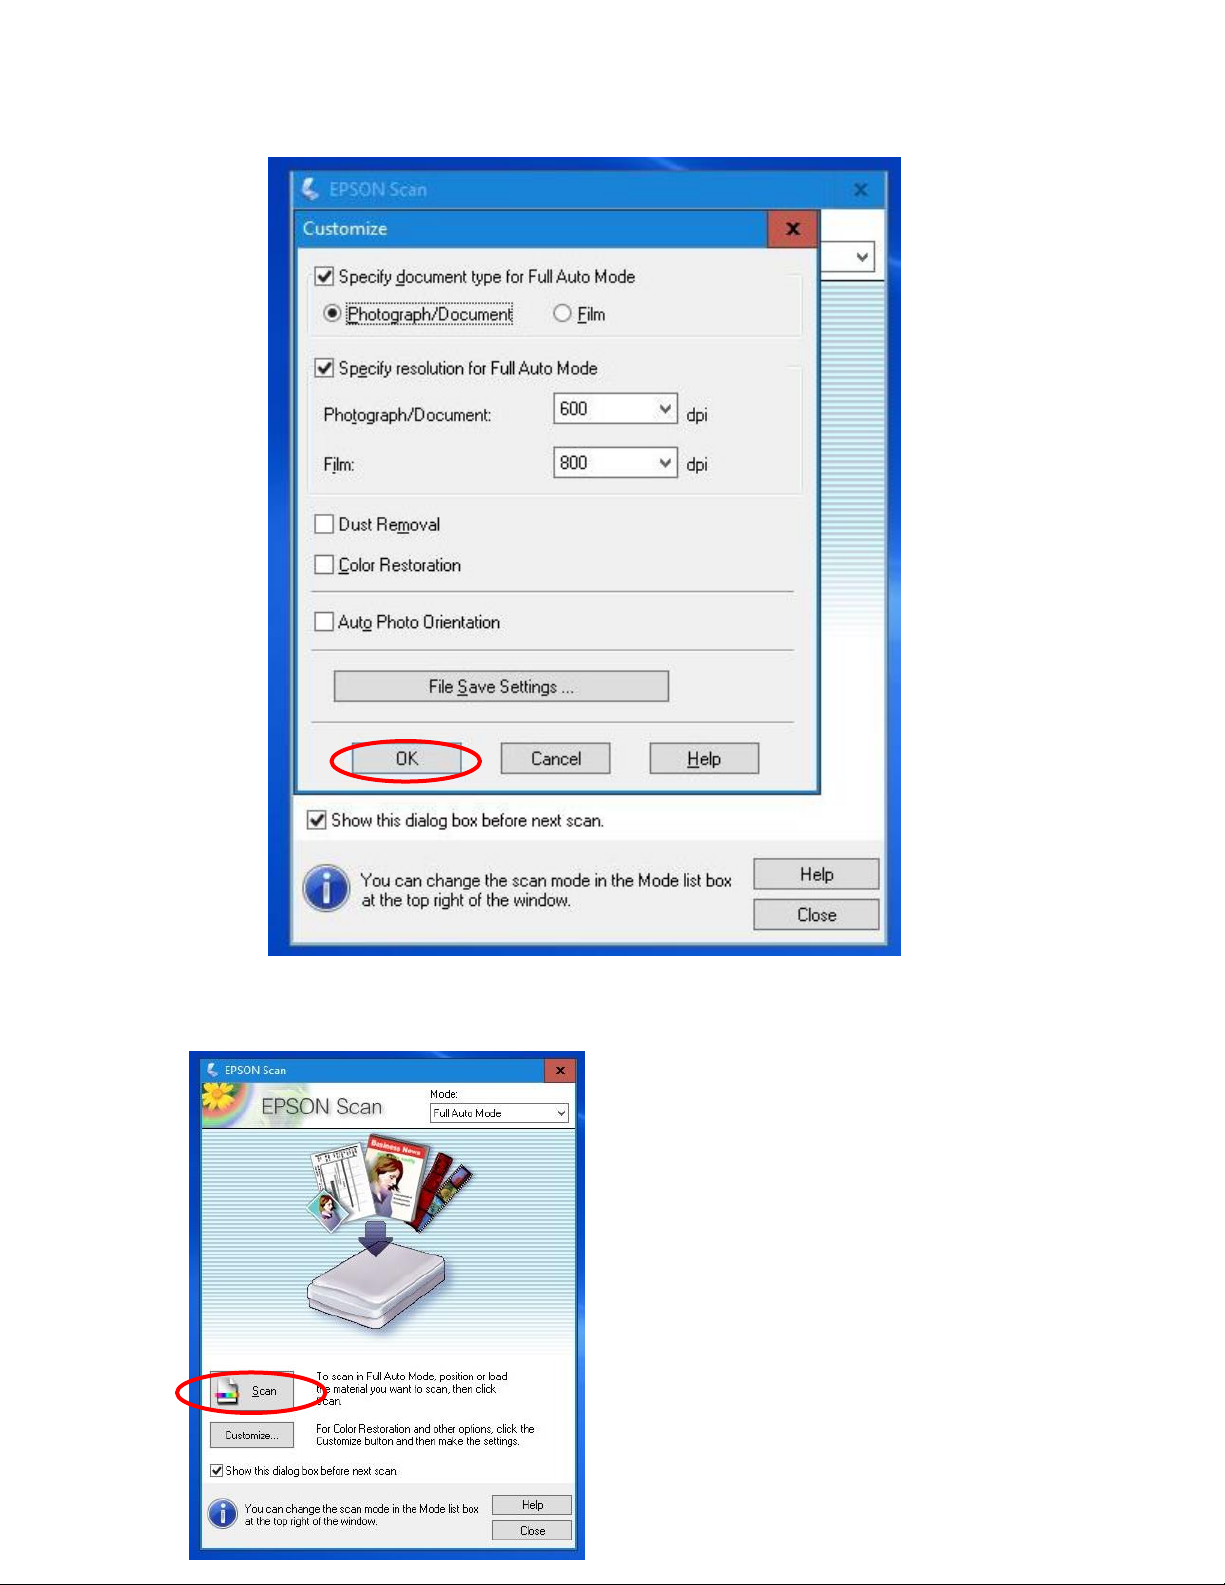
5. The Customize window appears. Here you can specify which type of document you are
scanning. Choose: Photograph/Document for print photos and albums.
Page 16
16
6. You also have the ability to change the resolution of the scan. The default settings of
600 dpi for Photographs and 800 dpi for film is recommended for most users.
Once you have verified the document type and resolution, Click on File Save Settings to
determine where and how to save your digital scans.
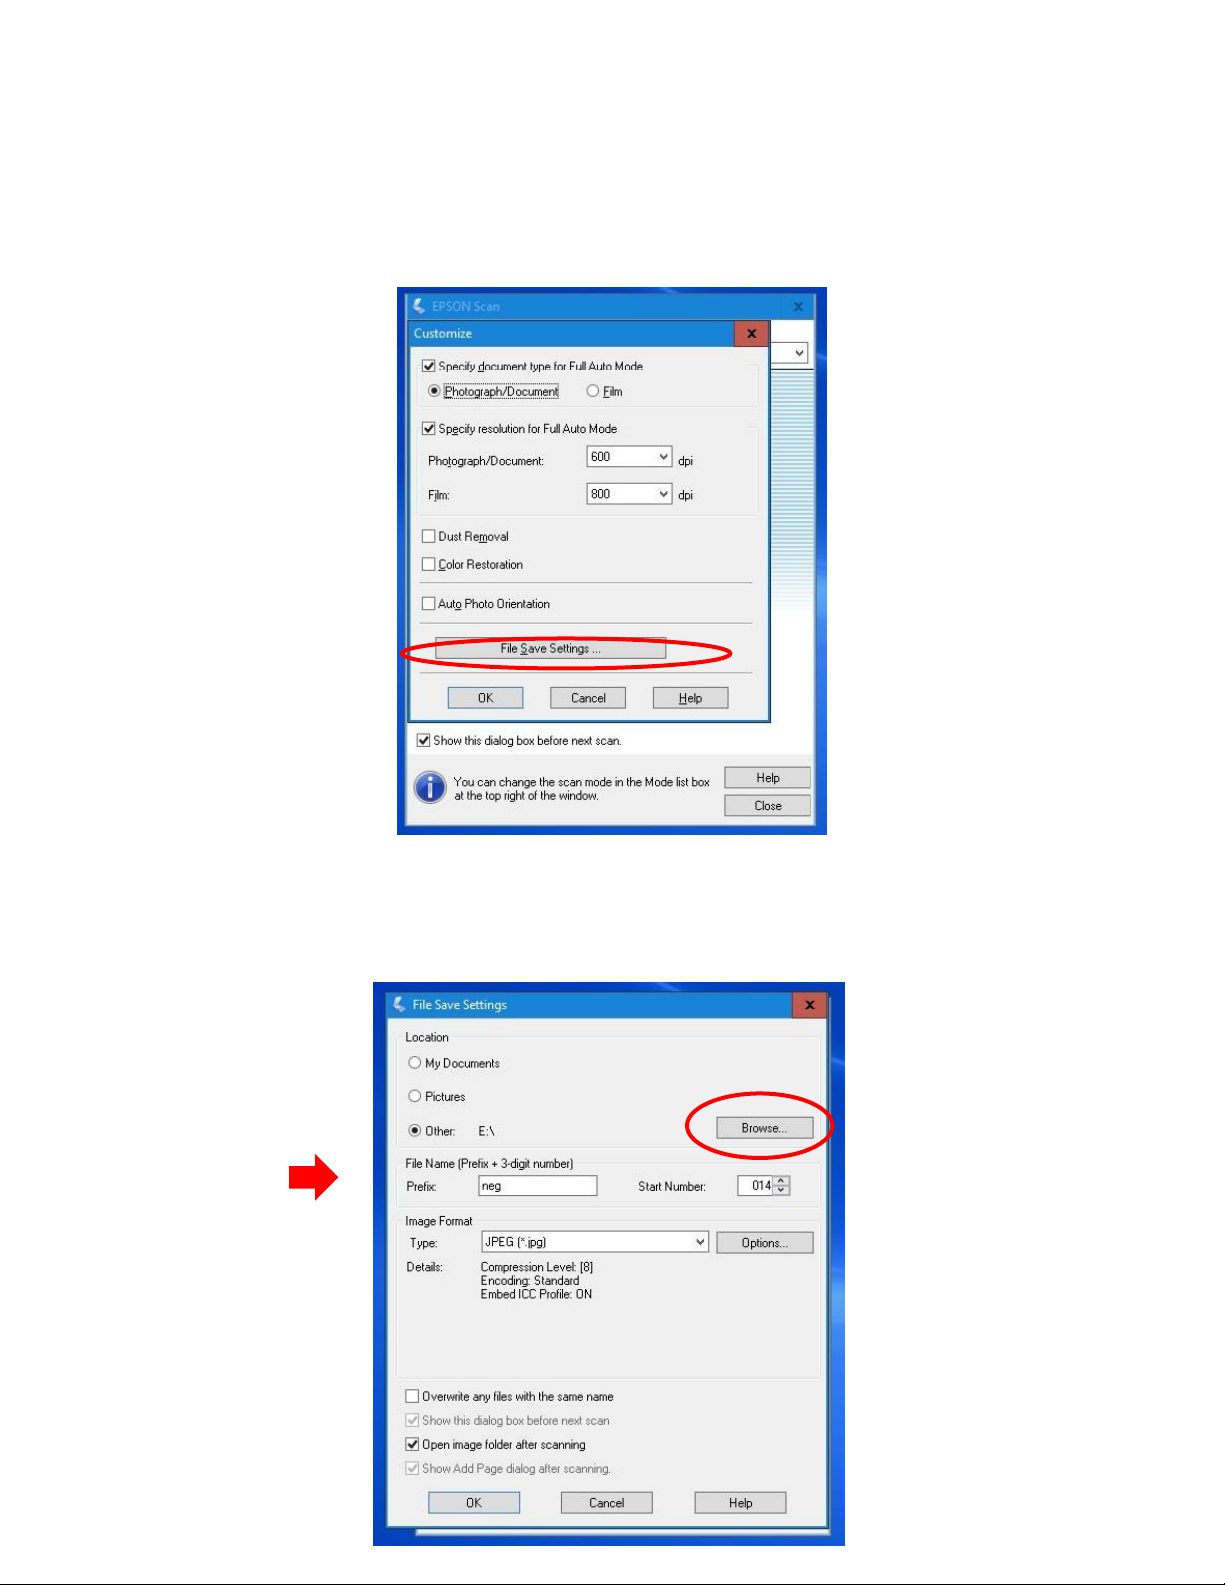
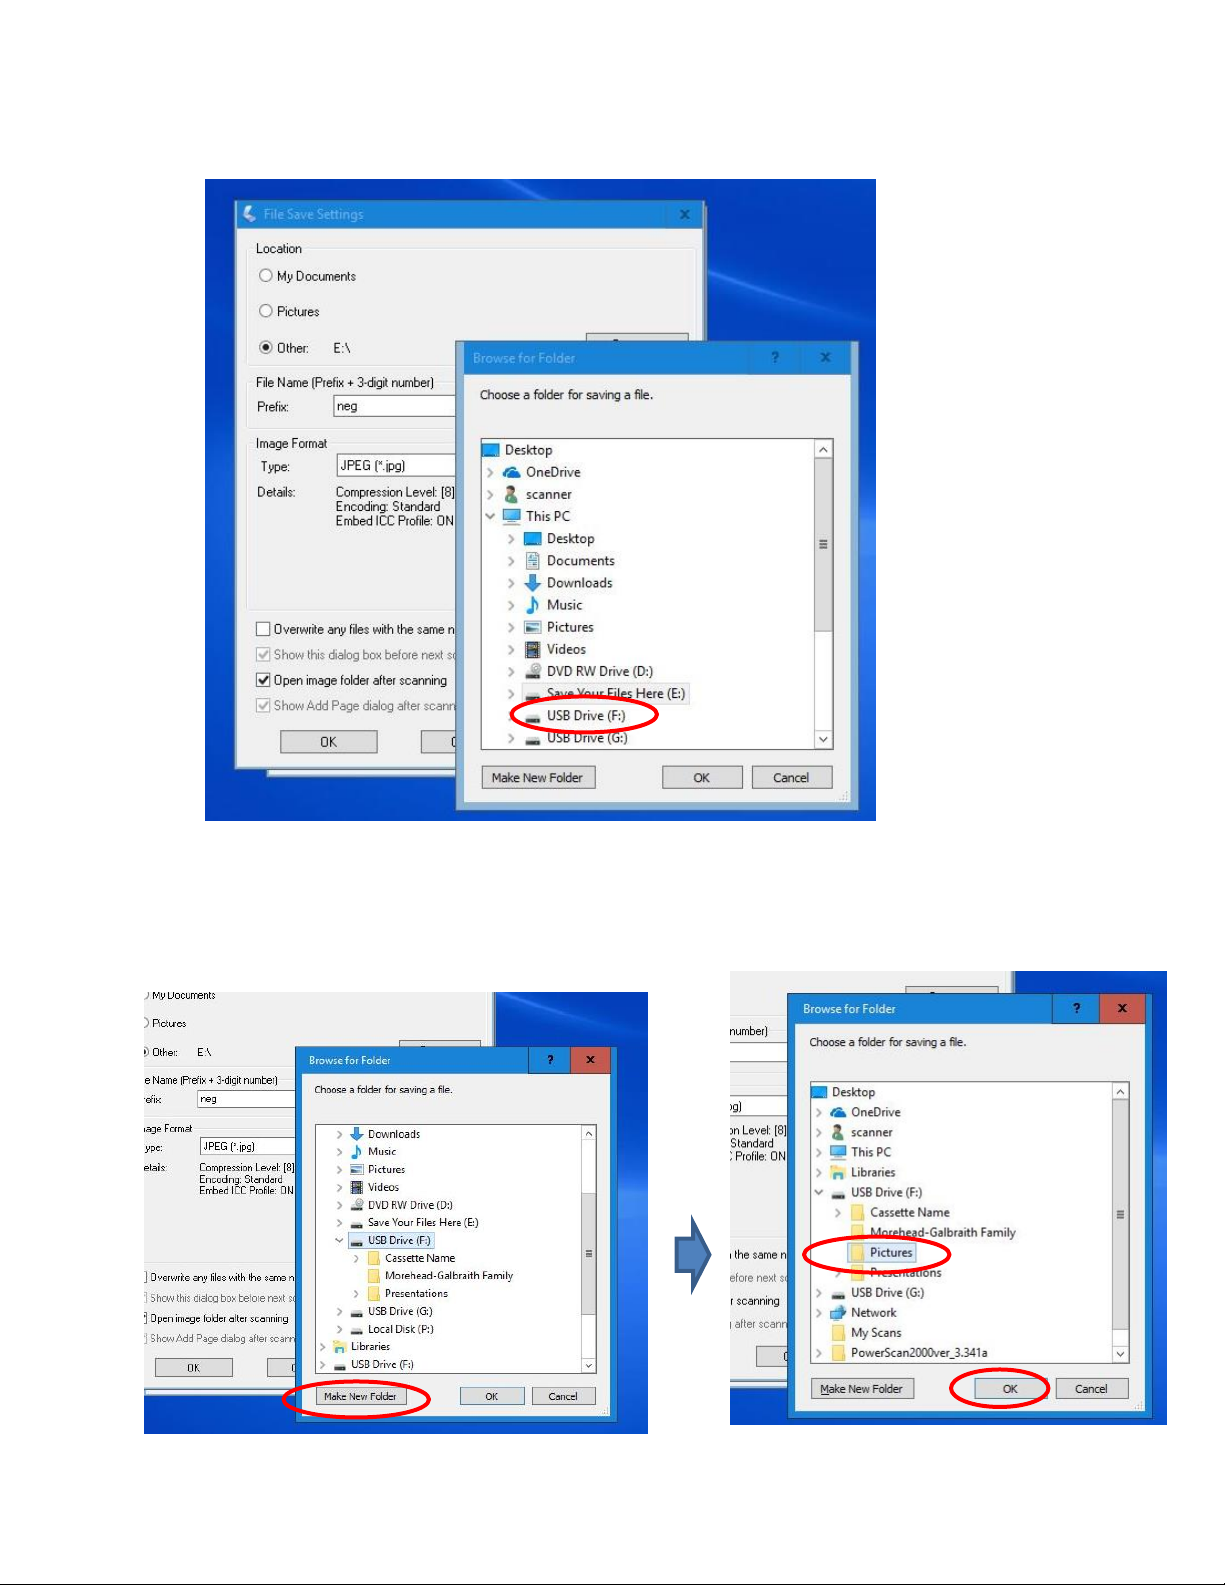
7. The File save settings window opens. First you will want to specify where you want to
save your scanned files. Under where is says Location is an Other option. Choose that
and click on the BROWSE button.
Page 17
17
8. A new window opens with options of where to save. In the list, choose the USB drive
port your USB flash drive is attached to (usually USB Drive F:).
\
If you want, you can create a new folder inside of your USB drive to save the photos in.
Just click of make new folder and give the folder a name. Click on the new folder to
select, then click OK to verify the save location.
Page 18
18
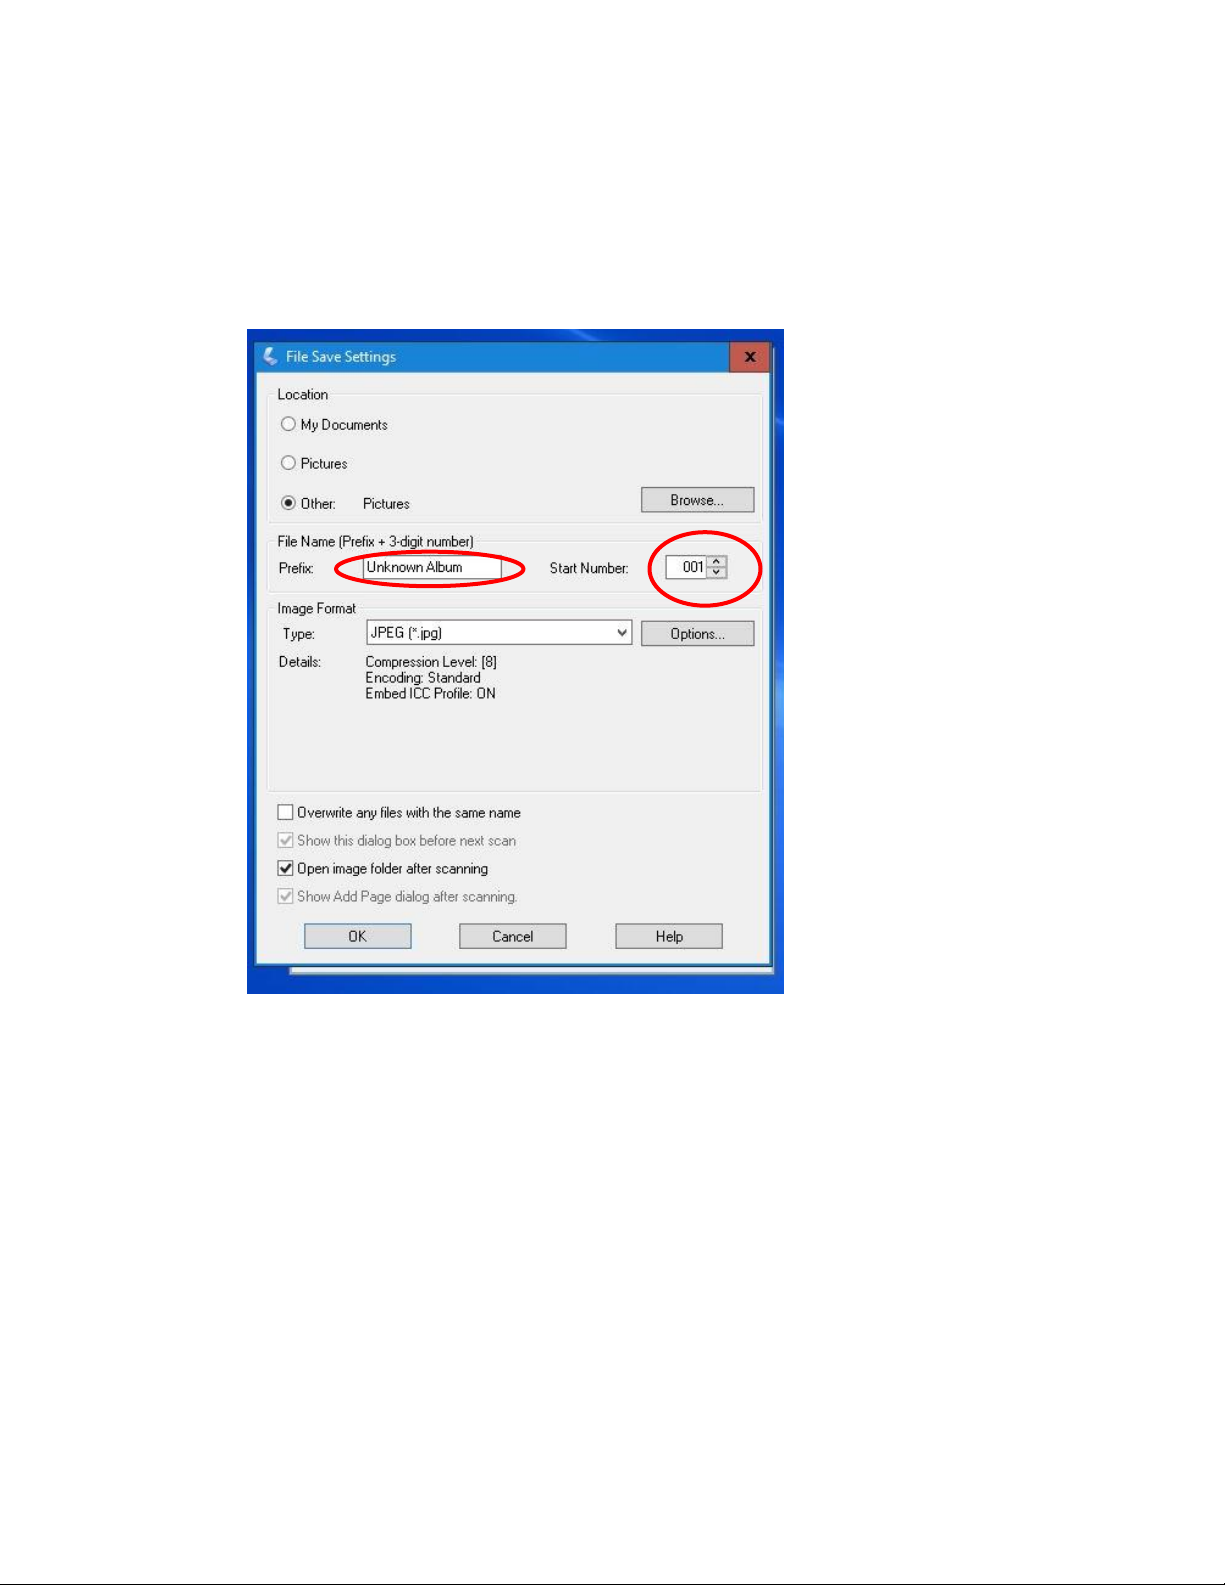
9. You will now be back on the file save setting screen. Under File Name you can specify
the filename prefix and what number to start the save counter with. In the example
below the filename will be Unknown Album001 for the first picture scan, and each
additional picture will be named sequentially : Unknown Album002, Unknown
Album003, etc.)
Page 19

19
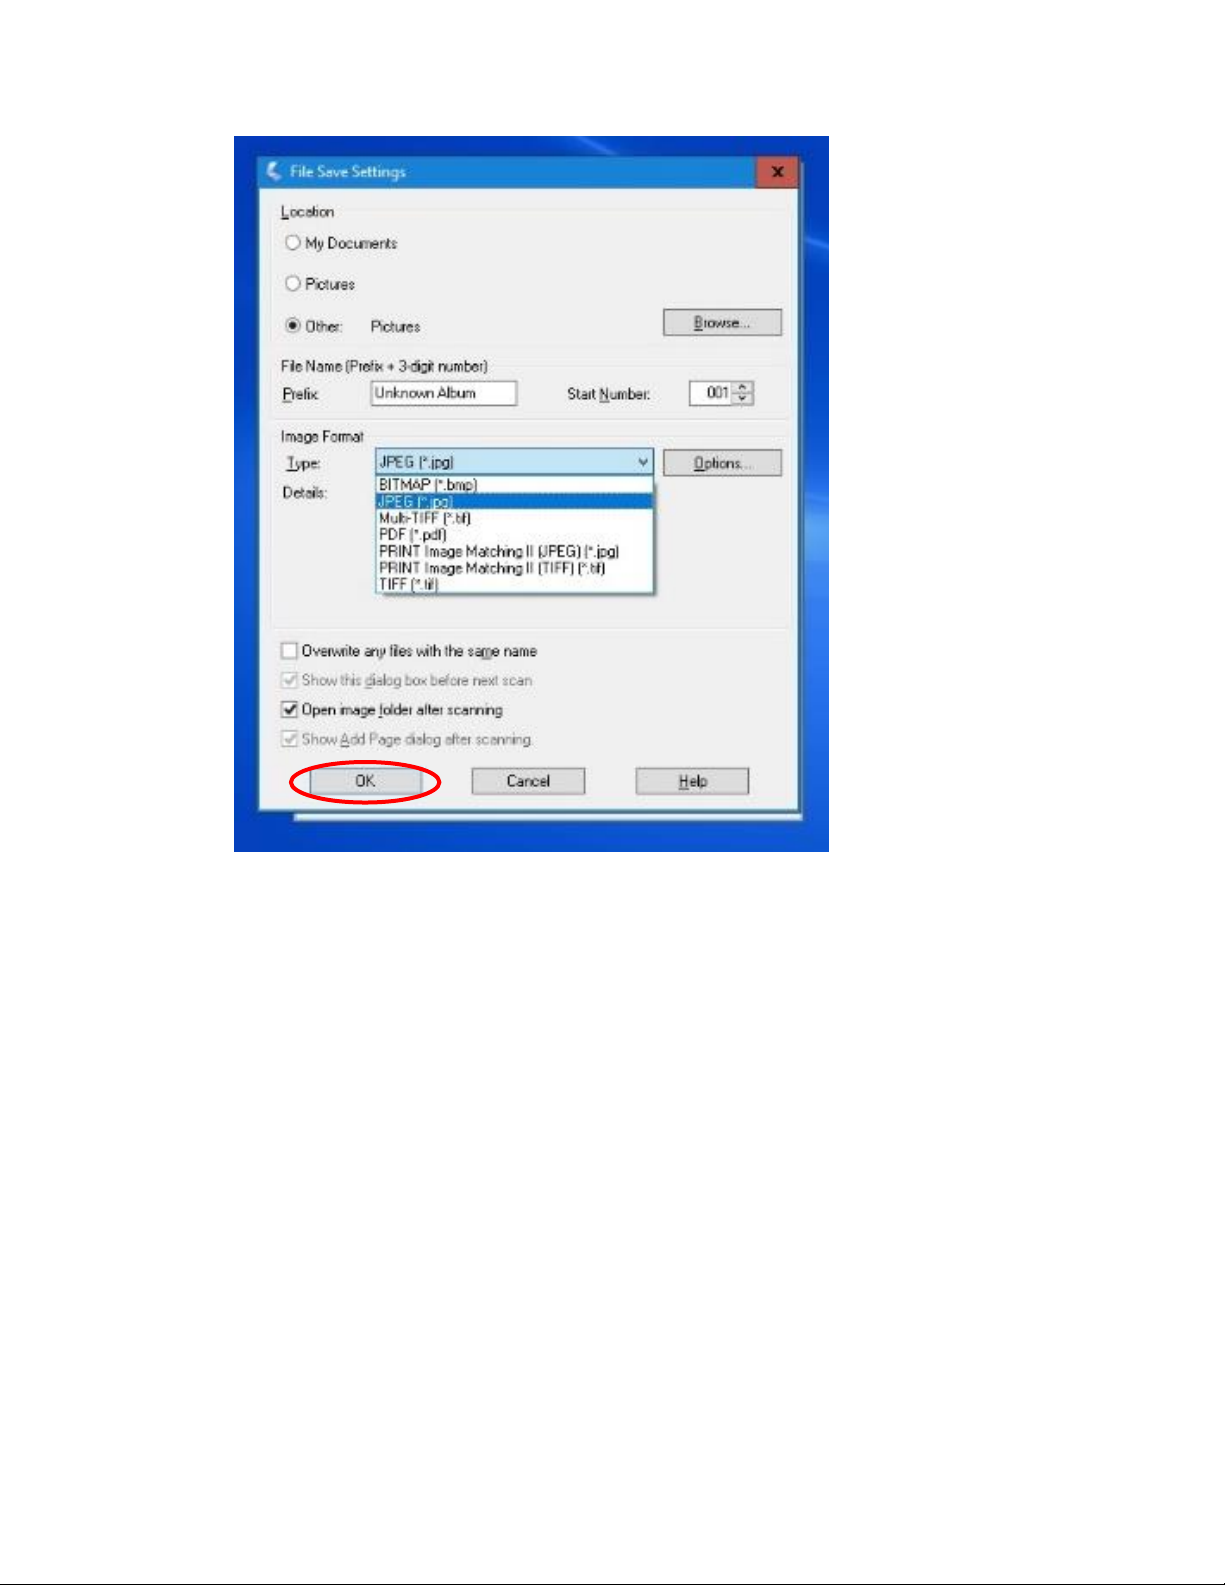
10. Next, you can specify what image format you want to save your digital images in. JPEG is
recommend for most users. For Lossless, larger file-sized images you might choose the
TIFF format as well.
Page 20
20
11. Then left click with mouse on OK to save the selected settings.
Page 21
21
12. You will be back on the customize window now. With the save settings set, you are
ready to go back to the welcome screen and start scanning. Click OK.
13. Click on the Scan button to begin the scanning process.
Page 22
22
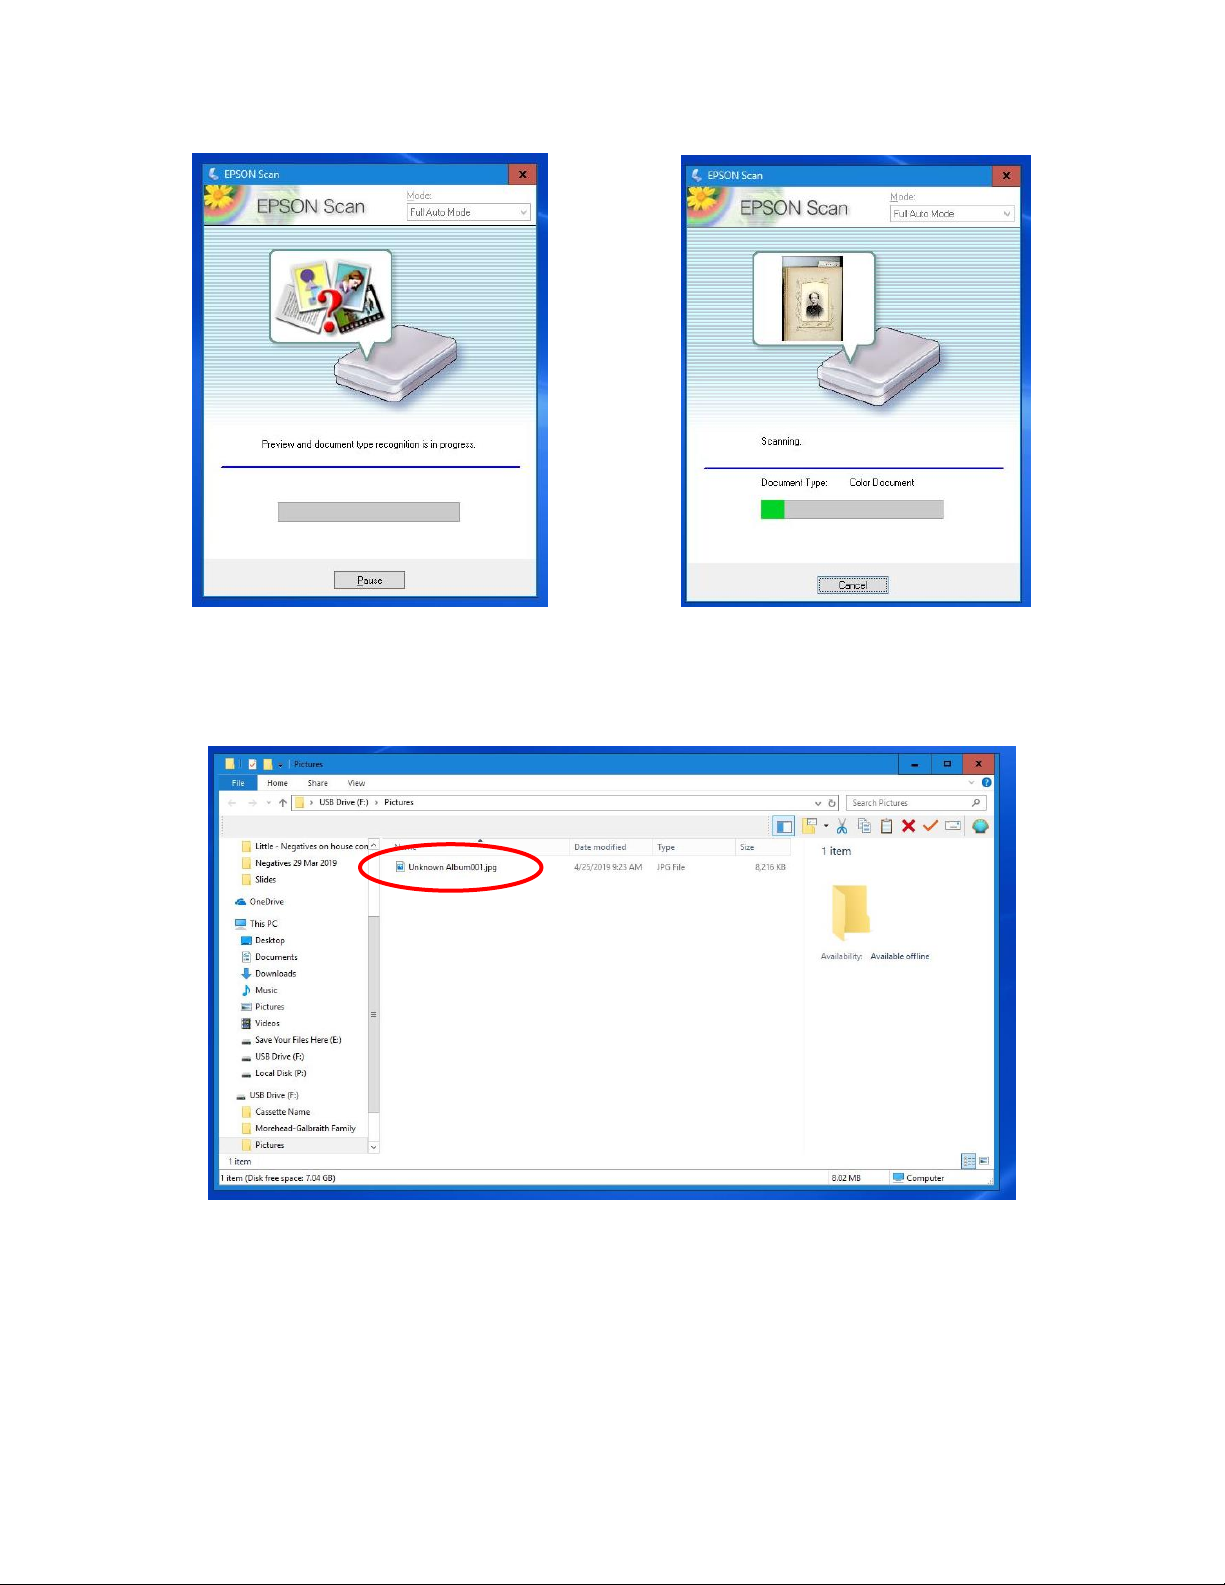
14. The scanner will scan the images on the glass.
15. Once the scanner has finished, the EPSON Scan software will close, and a window will
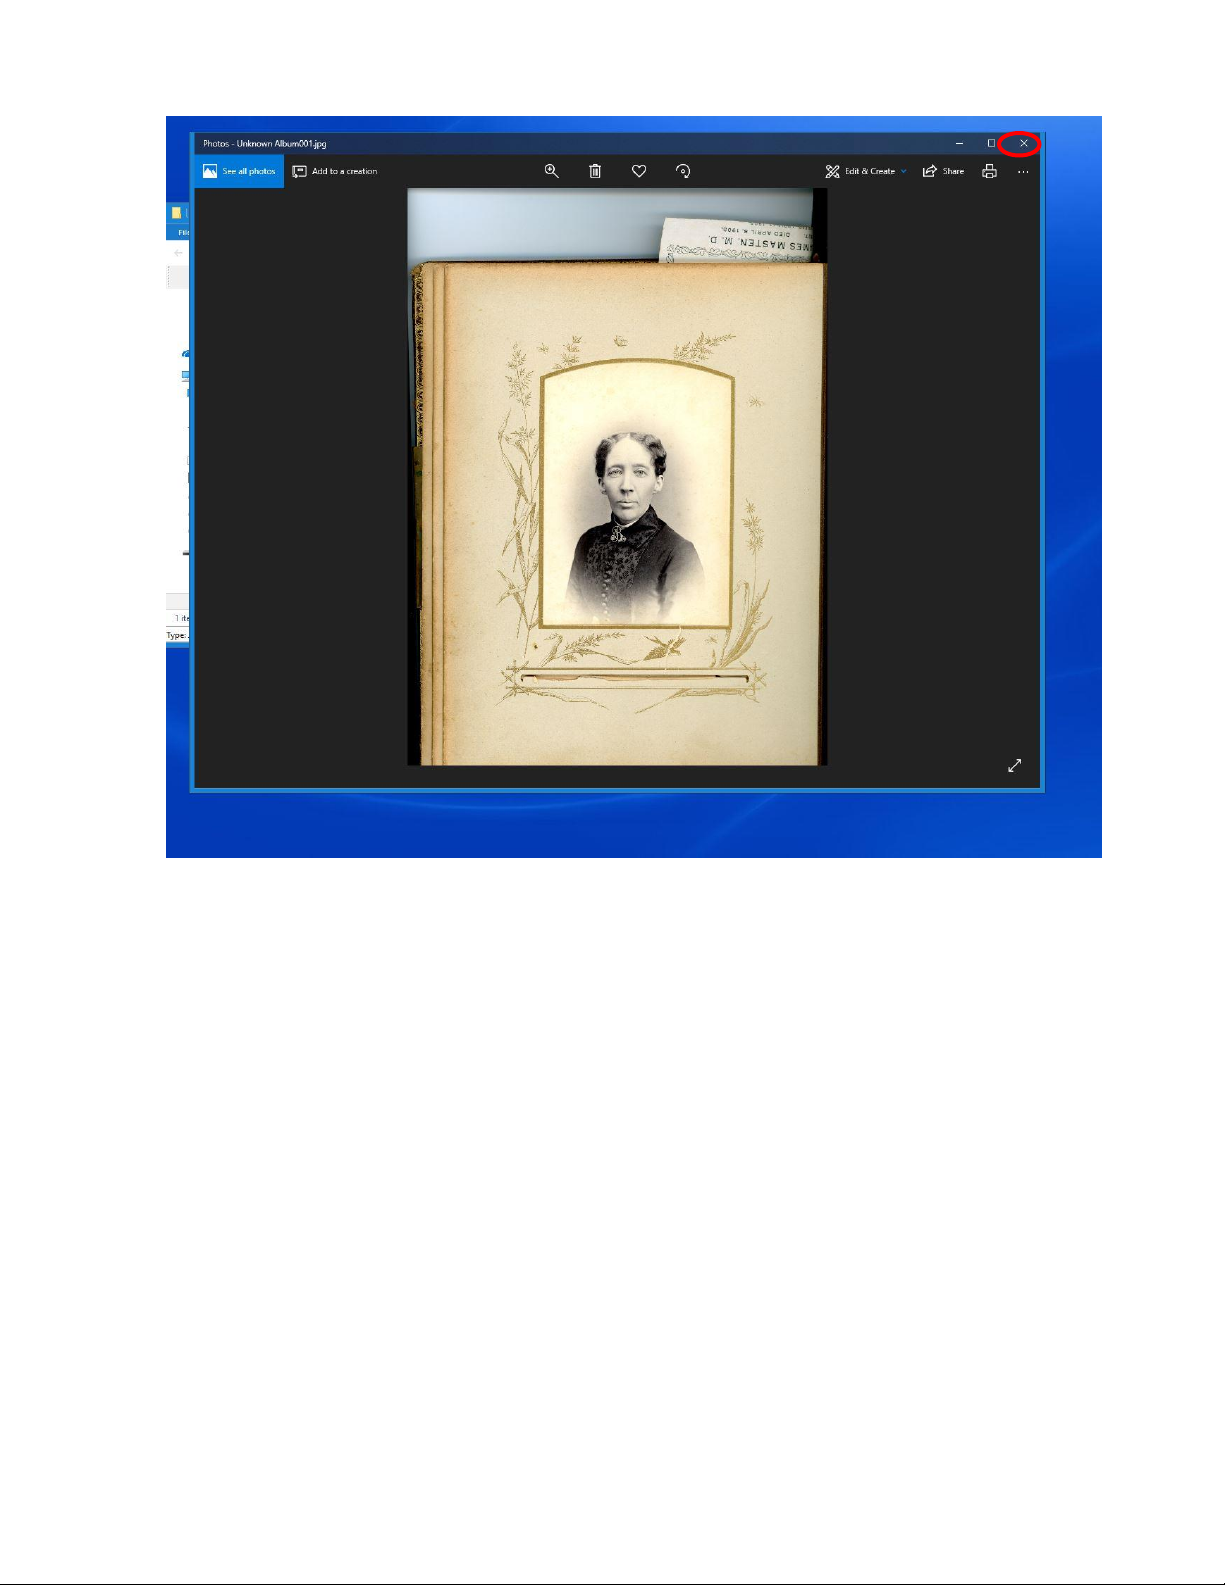
pop up showing the saved files. You can click on the photo filename to see the results.
Page 23
23
Click the X to close the photos app and return back to the desktop.
Page 24
24
16. If you have more photographs to scan, remove the photo that was just scanned and
place the next photograph or sets of photos down on the glass, and close the cover.
Page 25

25
17. Back on the desktop, double click on the EPSON Scan software to re-open the program.
18. The welcome screen shows up. Even though the software closed with the last scan, it
retains all the settings from the last scan. Just click the scan button to scan the next
image.
Page 26
26
19. You can keep doing steps 15 thru 18 until you have finished scanning all your
photographs. Once finished, be sure to remove all your photos from the scanner glass,
remove your USB flash drive, and close all the windows on the computer
Scanning Negatives
You can successfully utilize the Full Auto mode to scan when scanning negatives that are 24mm
x 35mm (these generally come in strips of 4- 6 photographs). Other sized negatives will require
you to use the Home Mode in order to get the best results. The following steps will guide you
thru using both modes to scan your negatives.
Preparing Negatives for Scanning
1. To start scanning, first open the cover on the scanner and verify that the white photograph
cover is REMOVED from the top scanner glass.
Page 27

27
Lift up off tabs to remove!
Page 28

28
You want the top glass open for scanning
transparencies (negatives, Slides).
Page 29

29
2. Locate the negative adapter located to the right side of the scanner.
Back of negative adapter
Page 30

30
3. On the front of the negative adapter are three tabs to open the trays. Pull the tabs to
open the trays. Then place the adapter face down to load the negative strips.
Pull back on tabs to
open
Page 31

31
Page 32

32
4. Beginning at the top tray, insert your negative filmstrips into the tray. The numbers on
the filmstrips should be facing up towards you. Slide the left edge of the filmstrip under
the two tabs in the tray to hold in place.
Page 33

33
5. Repeat to add negatives to the tray. Each row holds up to 6 negatives.
Page 34

34
6. Next, secure the filmstrips in place by closing the three tabs. Press all around so the
entire sockets on the side of the tab to lock negatives into place.
Page 35

35
7. Next, flip the negative adapter over, and line up the two small feet on the bottom left
side of the negative adapter with the two openings on the scanner bed (by the two
white triangles. (The white triangles on the adapter will line up with the ones on the
scanner when installed correctly)
Page 36

36
Page 37

37
8. Close the scanner cover.
9. With the negatives loaded on the scanner, you are now ready to scan using the EPSON
Scan software.
Page 38

38
Scanning Negatives in Full Auto Mode
1. Double click on the EPSON Scan program to open the software.
2. Verify that you are in Full Auto Mode.
Page 39

39
3. Click on the Customize button.
4. The Customize window appears. Here you can specify which type of document you
are scanning. Choose Film for negatives.
Page 40

40
5. You also have the ability to change the resolution of the scan. The default settings
of 600 DPI for Photographs and 800 dpi for film is recommended for most users.
Once you have verified the document type and resolution, Click on File Save Settings to
determine where and how to save your digital scans.
6. The File save settings window opens. First you will want to specify where you want
to save your scanned files. Under where is says Location is an Other option. Choose
that and click on the BROWSE button.
Page 41

41
7. A new window opens with options of where to save. In the list, choose the USB drive
port your USB flash drive is attached to (usually USB Drive F:).
\
If you want, you can create a new folder inside of your USB drive to save the photos in.
Just click of make new folder and give the folder a name. Click on the new folder to
select, then click OK to verify the save location.
Page 42

42
8. You will now be back on the file save setting screen. Under File Name you can
specify the filename prefix and what number to start the save counter with. In the
example below the filename will be Library photos for the first picture scan, and
each additional picture will be named sequentially: Library Photos001, Library
Photos002, etc.)
Page 43

43
9. Next you can specify what image format you want to save your digital images in.
JPEG is recommend for most users. For Lossless, larger file-sized images you might
choose the TIFF format as well.
Page 44

44
10. Then Click on OK to save the selected settings.
Page 45

45
11. You will be back on the customize window now. With the save settings set, you are
ready to go back to the welcome screen and start scanning. Click OK.
Page 46

46
12. Click on the Scan button to begin the scanning process.
13. Your negatives will be scanned.
Page 47

47
14. Once the scanner has finished, the EPSON Scan software will close, and a window
will pop up showing the saved files. You can click on the photo filename to see the
results.
Click on the X in the top right corner to close the preview
Page 48

48
15. You can now open the scanner and remove the scanned negative strips. Repeat the
process if you have more negatives to scan. The scanner software will remember
you file save settings, so once you load the negative tray and place it on the scanner,
simply open the EPSON Scan software, and click on Scan to process the next batch.
16. Once finished, be sure to remove all your photos from the scanner glass, remove
your USB flash drive, and close all the windows on the computer
Page 49

49
Scanning Negatives in Home Mode
1. Follow the steps in the Preparing Negatives for Scanning section on page #### to get
your negatives in place on the scanner.
2. Double click on the EPSON Scan program to open the software.
Page 50

50
3. Verify that the program in in Home mode. Change modes if needed.
Page 51

51
4. Verify the correct mode for your film (most newer negative film is color, but if you have
B&W you can specify under DOCUMENT TYPE)
2. Click on drop
down.
1. Make
selection
Page 52

52
5. Next specify verify the settings for Image Type (Color or grayscale) and Destination. The
destination settings will affect how many Dots per inch (DPI) or resolution of the image.
For film it’s recommended you use 600 to 800 dpi. Click on Other and use the Resolution
box to choose this setting if needed.
Page 53

53
6. Once the settings are correct, click on the preview button to bring up a preview scan on
the negatives.
Page 54

54
7. The scanner will run a preview of the scanner bed. A preview window opens as well.
8. By default the preview opens up on the thumbnail mode. This sets a standard target size
and crops negatives to fit for each thumbnail. You notice that the selection marquees
(rectangles with dotted lines) are slightly smaller than the whole thumbnail.
Page 55

55
Each individual marquee has an assigned target size. The target size is the size of the
image if you were to print out the photograph By default the program has selected 4x6
inches, but if you click the dropdown arrow under target size you can change the
settings. The original setting means that the file will be the size of the original (in this
case 24mm x 35mm for these negatives, which results in a small file size that won’t be
give a good resolution when enlarged. If you are planning on enlarging the negatives
and printing them out some day, select the appropriate size.
NOTE: selecting a larger target size will result in a larger image file, requiring more
storage space and taking longer to scan!
Page 56

56
9. Left clicking with the mouse on a thumbnail will select it in blue.
10. This first image is sideways. Clicking the rotate button will turn it 90 degrees.
Page 57

57
11. You also can click on the enlarge button under size to view each thumbnail individually
and larger, using the arrows below to toggle between all the thumbnails.
Page 58

58
12. For this example we will stay with the large multiple thumbnail view. Using the mouse
you can resize the marquee boxes. Hover the mouse over the dotted lines to change the
size. Resize the rectangles to that they include the entire thumbnail.
Page 59

59
13. We are almost ready to scan our images. First we need to select all the marquees, by
clicking the All button on the preview page.
Page 60

60
14. All the thumbnails will be highlighted in blue with the section marquees showing dotted
lines. Next click on the SCAN button on the left-hand window to begin the scanning
process.
15. The software will scan the selected photos.
Page 61

61
16. Once finished, a window will open showing the scanned image files. You can double click
to verify everything scanned okay. Then click the X on the top right corner of the
window to close the file explorer.
17. If you have more negatives to scan, remove the negative tray from the scanner bed and
replace with new negative strips. Place the negative tray back on the bed, close the tray,
and click on the Preview button to scan the next batch. Follow the steps again to
process the next batch of photos.
Page 62

62
18. When finished, click on the CLOSE button in the EPSON scan software to close the
program. Remember to remove your negatives from the negative tray, and to remove
and take your USB flash drive with you.
Page 63

63
Scanning Slides
You can successfully utilize the Full Auto mode to scan when scanning slides that are 24mm x
35mm. The following steps will guide you thru scan your slides.
Preparing Slides for Scanning
1. To start scanning, first open the cover on the scanner and verify that the white photograph
cover is REMOVED from the top scanner glass.
Page 64

64
Lift up off tabs to remove!
Page 65

65
You want the top glass open for scanning
transparencies (negatives, Slides).
Page 66

66
2. Locate the slide adapters (there are two adapter trays, and can be found on the table to
the right side of the scanner).
3. Load slides into the slide tray. Position slides as indicated on the side of the slide tray, so
they appear backwards when facing you. Slide the left side of the slide under that tab to
secure it in place.
Page 67

67
Each tray can hold up to 12 slides at a time. (TIP: if you have several slides to scan, fill
just one tray now, and while the machine is scanning the first tray, load the second tray
with slides).
Page 68

68
4. Next, open the scanner cover and insert the slide adapter with the two foot pegs into
the holes on the left of the scanner glass. This will hold the tray into the correct place
over the glass for scanning. The arrows on the slide tray will line up with the ones on the
scanner bed as seen below.
Page 69

69
5. Close the scanner cover.
Page 70

70
6. Double click on the EPSON Scan program to open the software.
7. Verify that you are in Full Auto Mode.
Page 71

71
8. click on the Customize button.
9. The Customize window appears. Here you can specify which type of document you are
scanning. Choose Film for slides.
Page 72

72
10. You also have the ability to change the resolution of the scan. The default settings of
600 DPI for Photographs and 800 dpi for film is recommended for most users.
Once you have verified the document type and resolution, Click on File Save Settings to
determine where and how to save your digital scans.
11. The File save settings window opens. First you will want to specify where you want to
save your scanned files. Under where is says Location is an OTHER option. Choose that
and click on the BROWSE button.
Page 73

73
12. A new window opens with options of where to save. In the list, choose the USB drive
port your USB flash drive is attached to (usually USB Drive F:).
\
If you want, you can create a new folder inside of your USB drive to save the photos in.
Just click of make new folder and give the folder a name. Click on the new folder to
select, then click OK to verify the save location.
Page 74

74
13. You will now be back on the file save setting screen. Under File Name you can specify
the filename prefix and what number to start the save counter with. In the example
below the filename will be Slides for the first picture scan, and each additional picture
will be named sequentially: Slides001, Slides002, etc.)
Page 75

75
14. Next you can specify what image format you want to save your digital images in. JPEG is
recommend for most users. For Lossless, larger file-sized images you might choose the
TIFF format as well.
Page 76

76
15. Then Click on OK to save the selected settings.
Page 77

77
16. You will be back on the customize window now. With the save settings set, you are
ready to go back to the welcome screen and start scanning. Click OK.
Page 78

78
17. Click on the Scan button to begin the scanning process.
Your slides will be scanned.
Page 79

79
18. Once finished the EPSON Scan program will close, and a file explorer window will open
showing the image files that were recently created. You can left click on the files to
verify that the slides were scanned correctly. Click the red and black X in the top right of
the file explorer to close the window and return to the computer desktop.
Page 80

80
19. Open the scanner cover and remove the slide tray. Remove your slides from the tray. If
you have more scanning to do, Insert the other slide tray with un-scanned slides to
begin processing the next batch.
Page 81

81
20. If you have more slides to scan click again on the EPSON scan program to open it.
Page 82

82
21. The EPSON scan software retains all the file settings from before. Simply click the Scan
button to continue scanning the next batch of slides.
Page 83

83
22. Repeat the last several steps until all your slides are scanned.
23. Once finished, replace the slide trays to the right of the scanner. Be sure to close out of
all the windows. Remember to take your slides and your USB drive home with you.
Troubleshooting NOTE : if you are having problems with cropping of slides in Full Auto Mode,
you can try scanning your slides in Home Mode. For slides choose the POSITIVE Film option for
the document type, and then follow the rest of the instructions under Scanning Negatives in
Home mode found on page 48.
Page 84

84
Conclusion
Be sure to close out of all the windows once you are finished scanning. Please remember to
take your photos, albums, negatives, or slides and your USB drive home with you.
Thank you for using our Epson V850 Perfection Flatbed Scanner! Please feel free to leave a
comment in the comment box. We’d love to hear about your experience.
 Loading...