


TM-U950
User’s Manual / Manual do utilizador
Manual del usuario
411236700
All rights reserved. No part of this publication may be reproduced, stored in a retrieval system, or transmitted in any
form or by any means, electronic, mechanical, photocopying, recording, or otherwise, without the prior written
permission of Seiko Epson Corporation. No patent liability is assumed with respect to the use of the information
contained herein. While every precaution has been taken in the preparation of this book, Seiko Epson Corporation
assumes no responsibility for errors or omissions. Neither is any liability assumed for damages resulting from the use
of the information contained herein.
Neither Seiko Epson Corporation nor its affiliates shall be liable to the purchaser of this product or third parties for
damages, losses, costs, or expenses incurred by purchaser or third parties as a result of: accident, misuse, or abuse of
this product or unauthorized modifications, repairs, or alterations to this product, or (excluding the U.S.) failure to
strictly comply with Seiko Epson Corporation’s operating and maintenance instructions.
Seiko Epson Corporation shall not be liable against any damages or problems arising from the use of any options or
any consumable products other than those designated as Original Epson Products or Epson Approved Products by
Seiko Epson Corporation.
®
EPSON
is a registered trademark of Seiko Epson Corporation in the U.S. and other countries
NOTICE: The contents of this manual are subject to change without notice.
Copyright © 2007 by Seiko Epson Corporation, Nagano, Japan.
DIP Switch Tables
Serial interface
SW Function ON OFF
1-1 Data word length 7 bits 8 bits
1-2 Parity Enabled Disabled
1-3 Parity selection Even Odd
1-4 ~
Transmission speed (see table below)
1-5
1-6 Display module
connection
1-7 Data receive error Ignored Prints “?”
1-8 Handshaking XON/XOFF DTR/DSR
Connected Not
connected
Transmission speed
Speed 1-4 1-5
1200 ON ON
2400 OFF ON
4800 ON OFF
9600 OFF OFF
SW Function ON OFF
2-1 Auto line feed Always
2-2 Receive buffer 32 bytes 2048 bytes
2-3 Font selection
(default)
2-4 Carriage speed
default
2-5 Handshaking
(BUSY)
2-6 Internal use Fixed —
2-7 I/F pin 6 reset Enabled Disabled
2-8 I/F pin 25 reset Enabled Disabled
Parallel interface
SW Function ON OFF
1-1 ~
Undefined — —
1-5
enabled
9 × 97 × 9
Low High
Receive
buffer full
Always
disabled
Offline or
receive
buffer full
Parallel interface
SW Function ON OFF
1-6 Internal use — Fixed
1-7 ~
Undefined — —
1-8
SW Function ON OFF
2-1 Auto line feed Always
2-2 Receive buffer 32 bytes 2048 bytes
2-3 Font selection
(default)
2-4 Carriage speed
default
2-5 Handshaking
(BUSY)
2-6 Internal use Fixed —
2-7 Undefined — —
2-8 Internal use Fixed —
enabled
9 × 97 × 9
Low High
Receive
buffer full
Always
disabled
Offline or
receive
buffer full
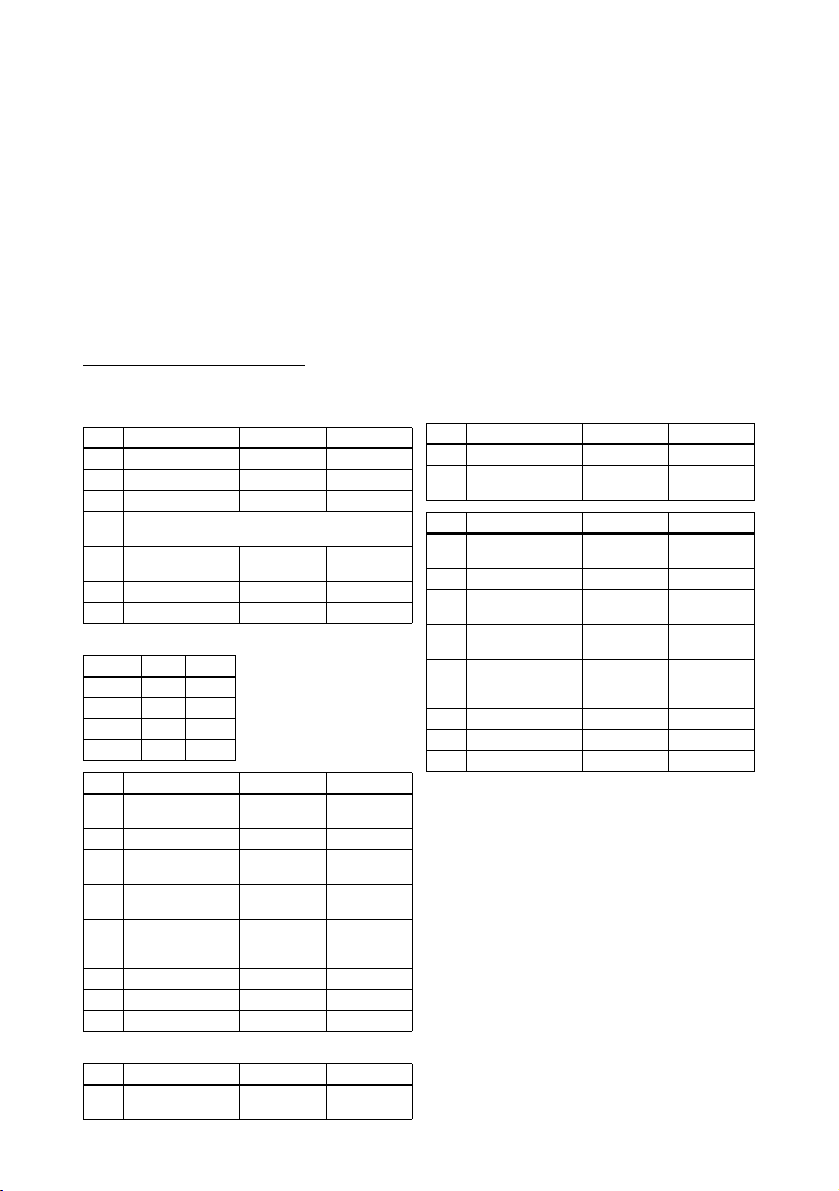
Printer Parts
English
printer cover
POWER
ERROR
RECEIPT
OUT
JOURNAL
OUT
SLIP
RECEIPT
FEED
JOURNAL/
SLIP FEED
take-up spool
power switch
control panel
cover open button
print head cover
Safety Precautions
This section presents important information intended to ensure safe
and effective use of this product. Please read this section carefully and
store it in an accessible location.
WARNING:
Shut down your equipment immediately if it produces smoke, a strange
odor, or unusual noise. Continued use may lead to fire. Immediately
unplug the equipment and contact your dealer or a SEIKO EPSON
service center for advice.
Never attempt to repair this product yourself. Improper repair work can
be dangerous.
Never disassemble or modify this product. Tampering with this product
may result in injury or fire.
Be sure to use the specified power source. Connection to an improper
power source may cause fire.
Do not allow foreign matter to fall into the equipment. Penetration by
foreign objects may lead to fire.
If water or other liquid spills into this equipment, unplug the power cord
immediately, and then contact your dealer or a SEIKO EPSON service
center for advice. Continued usage may lead to fire.
print head
TM-U950 User’s Manual 1
English
CAUTION:
Do not connect cables in ways other than those mentioned in this
manual. Different connections may cause equipment damage and
burning.
Be sure to set this equipment on a firm, stable, horizontal surface. The
product may break or cause injury if it falls.
Do not use in locations subject to high humidity or dust levels. Excessive
humidity and dust may cause equipment damage or fire.
Do not place heavy objects on top of this product. Never stand or lean
on this product. Equipment may fall or collapse, causing breakage and
possible injury.
To ensure safety, unplug this product before leaving it unused for an
extended period.
Do not use aerosol sprayers containing flammable gas inside or around
this product. Doing so may cause fire.
Caution Labels
WARNING:
Do not connect a telephone line to the drawer kick-out connector or
the display module connector; otherwise, the printer and the telephone
line may be damaged.
CAUTION:
Do not touch the print head cover and the print head because they
can be very hot after printing.
Restriction of Use
When this product is used for applications requiring high reliability/
safety such as transportation devices related to aviation, rail, marine,
automotive etc.; disaster prevention devices; various safety devices
etc; or functional/precision devices etc, you should use this product
only after giving consideration to including fail-safes and
redundancies into your design to maintain safety and total system
reliability. Because this product was not intended for use in
applications requiring extremely high reliability/safety such as
aerospace equipment, main communication equipment, nuclear power
control equipment, or medical equipment related to direct medical
care etc, please make your own judgment on this product’s suitability
after a full evaluation.
2 TM-U950 User’s Manual

Unpacking
The following items are included with the standard specification
printer. If any item is damaged, contact your dealer.
❏ Printer
❏ Paper rolls (2)
❏ Ribbon cassette
❏ Power switch cover
❏ Take-up spool
❏ Caution label
Downloading Drivers, Utilities, and Manuals
Drivers, utilities, and manuals can be downloaded from one of the
following URLs.
For customers in North America, go to the following web site:
http://www.epsonexpert.com/ and follow the on-screen instructions.
For customers in other countries, go to the following web site:
http://www.epson-pos.com/
Control Panel
RECEIPT FEED button
Press to feed receipt paper; hold down to feed continuously.
JOURNAL/SLIP FEED button
In roll paper mode, feeds the journal roll. In slip mode (when the SLIP
LED is on or flashing and slip paper is inserted), feeds slip paper.
POWER LED
On when the printer is on.
ERROR LED
Indicates an error.
RECEIPT OUT LED
Indicates a receipt paper near end or out.
JOURNAL OUT LED
Indicates a journal roll paper near end or out.
SLIP LED
Indicates slip mode. Flashes while waiting for a slip to be inserted or
removed.
English
TM-U950 User’s Manual 3
English
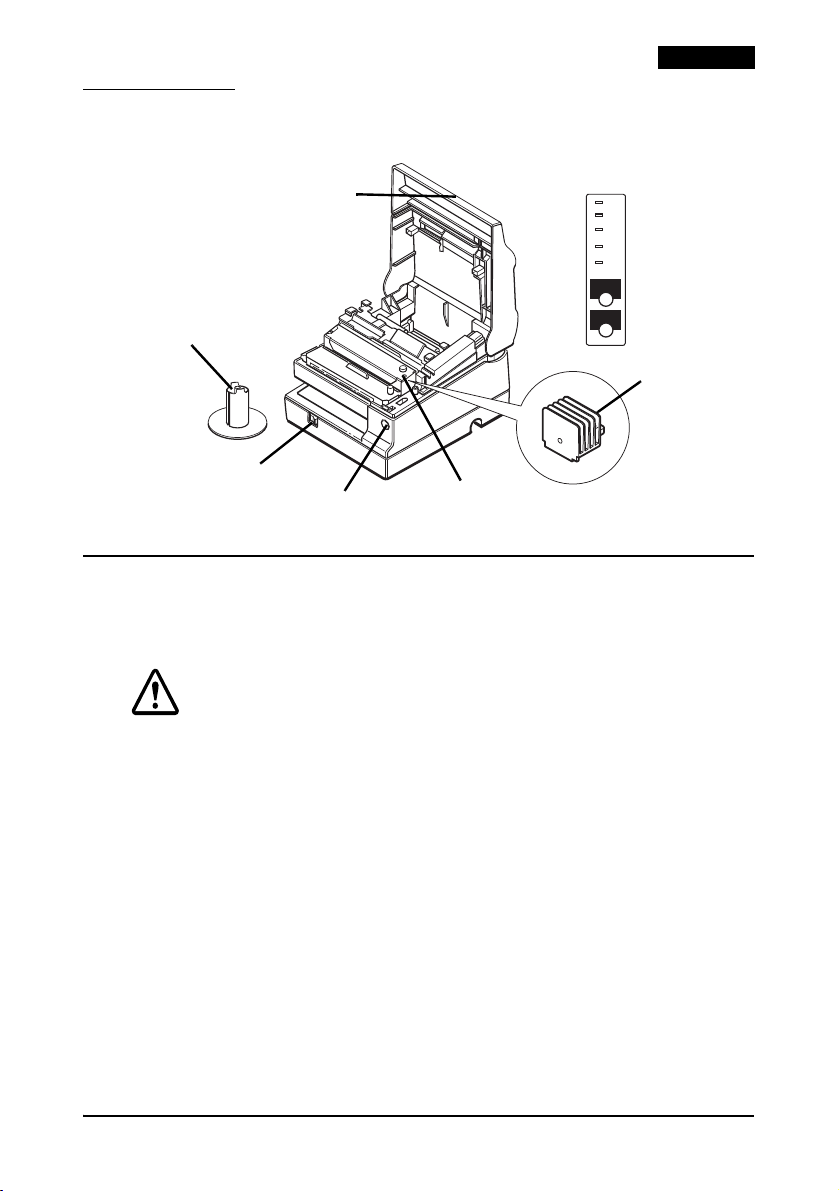
Removing the Transportation Damper
The printer is protected during
shipping by a transportation
damper that you must remove
before turning on the printer.
Pull the damper out, as shown in
illustration 1.
1
Note:
Before shipping the printer,
reinstall the transportation
damper.
Using the Power Switch Cover
WARNING:
If an accident occurs with the power
switch cover attached, unplug the
power cord immediately. Continued
use may cause fire.
The enclosed power switch cover
ensures that the power switch is not
pressed accidentally. To use this
cover, install it as shown in
illustration 2.
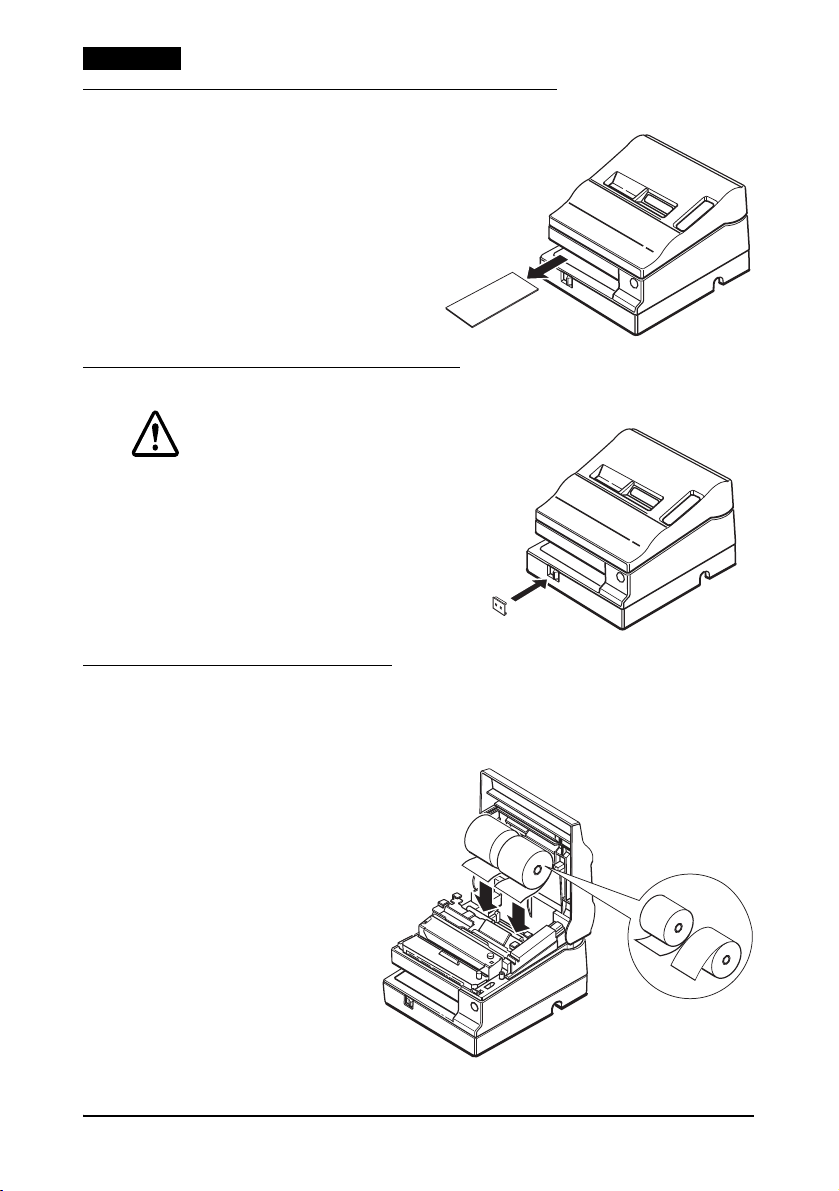
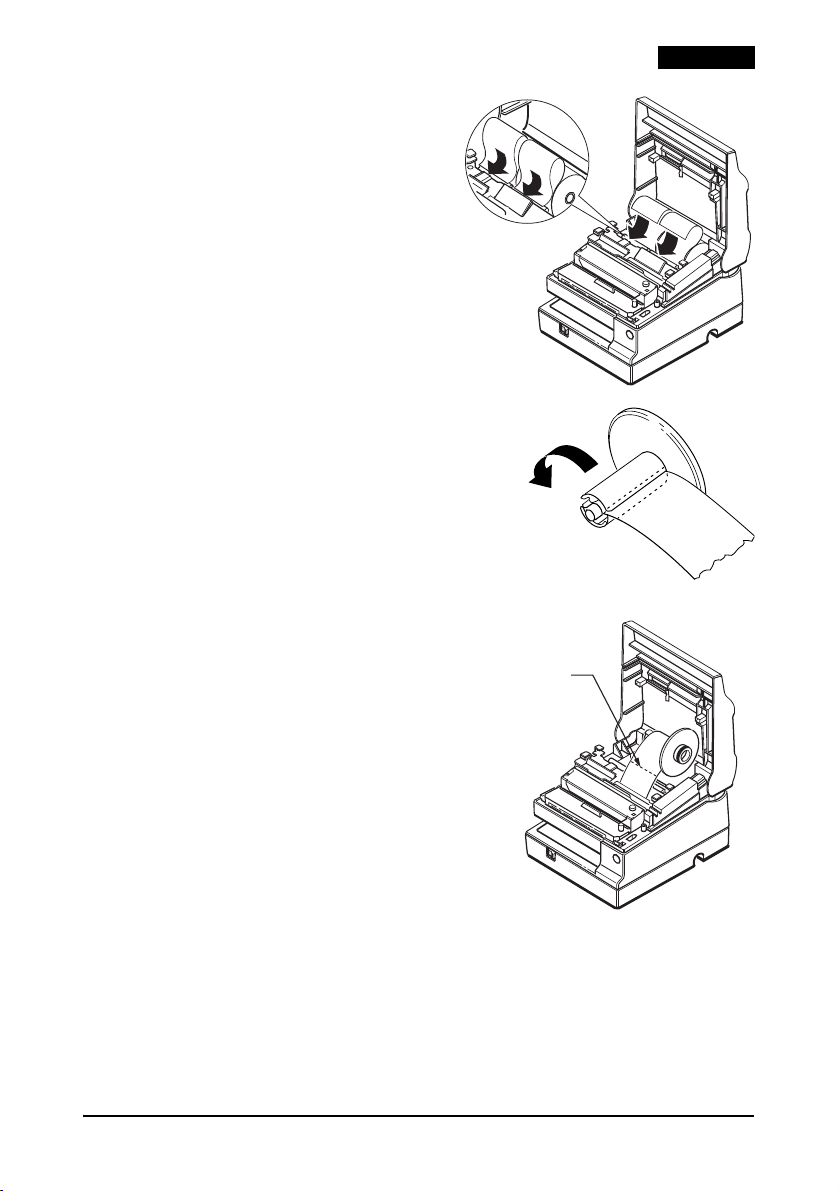
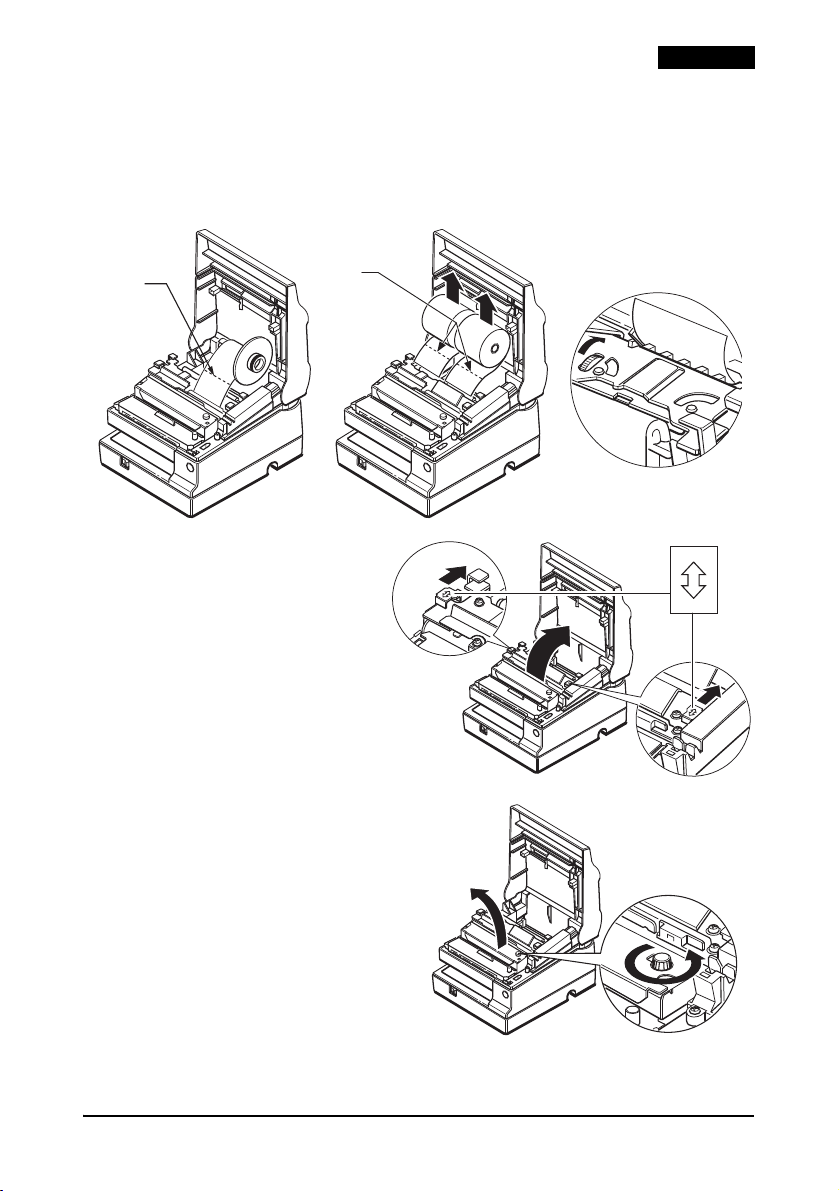
Installing the Paper Rolls
Note:
Use only paper rolls that meet the specifications.
1. Make sure the
leading edge of the
paper is straight.
2. Turn on the printer
and open the printer
cover.
3. Insert paper rolls on
both the receipt and
journal sides of the
printer, as shown in
illustration
3. (The
journal roll is on the
right in this
illustration.)
3
2
✔
✖
4 TM-U950 User’s Manual
4. For each roll, insert the tip of
the paper into the paper inlet
and push it in until it is
automatically detected and
fed into the printer. See
illustration
5. Tear off the receipt paper on
the cutter. If the paper was not
fed far enough, press the
RECEIPT FEED button to feed
additional paper.
6. Insert the tip of the journal paper into
the groove in the take-up spool and
rotate the spool two or three times to
secure the paper. See illustration
not enough paper was fed, press
JOURNAL/SLIP FEED to feed more.
7. Install the take-up spool and close the
printer cover.
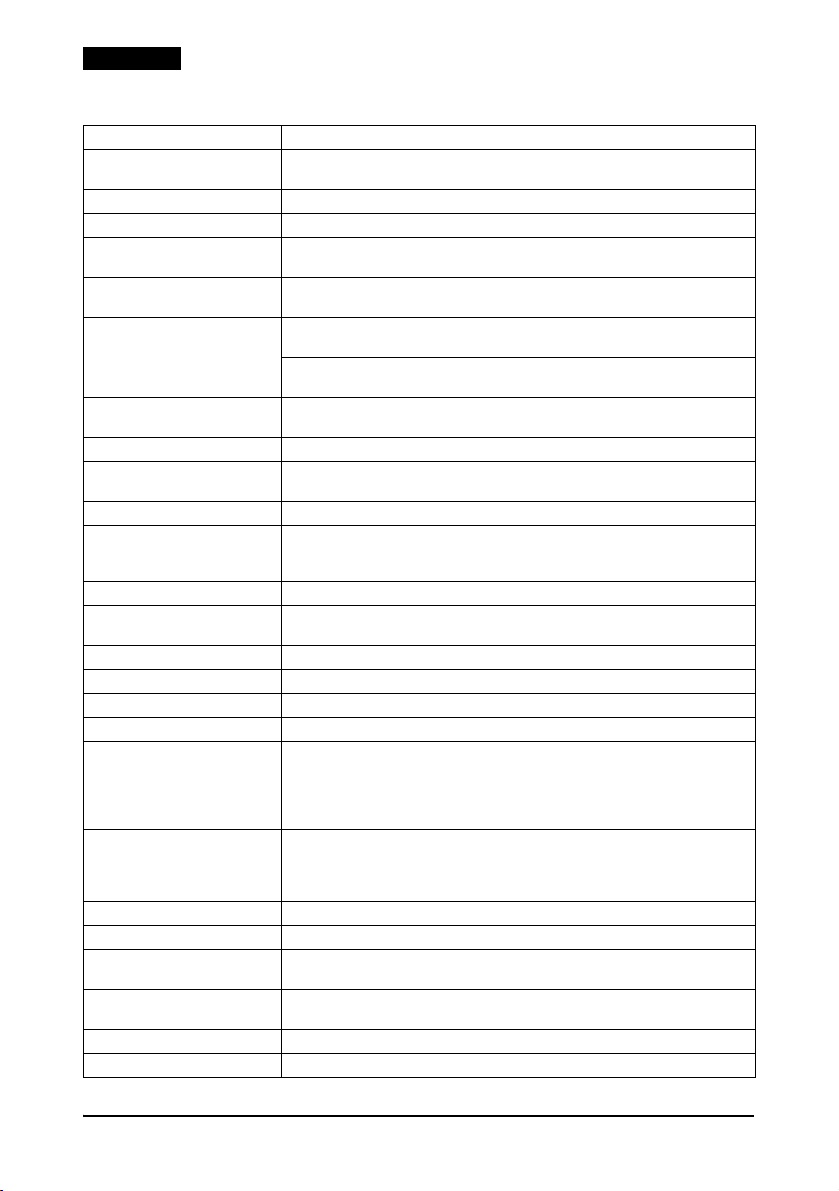
8. To remove the journal paper roll,
first lift the take-up spool and
cut the paper. Then remove the
take-up spool. See illustration
9. For either a journal or receipt
paper roll, next press the release
lever (marked PRESS) on the
appropriate side of the printer,
pull out the paper, and remove
the roll.
4.
5. If
6.
English
4
5
✄
6
TM-U950 User’s Manual 5
English
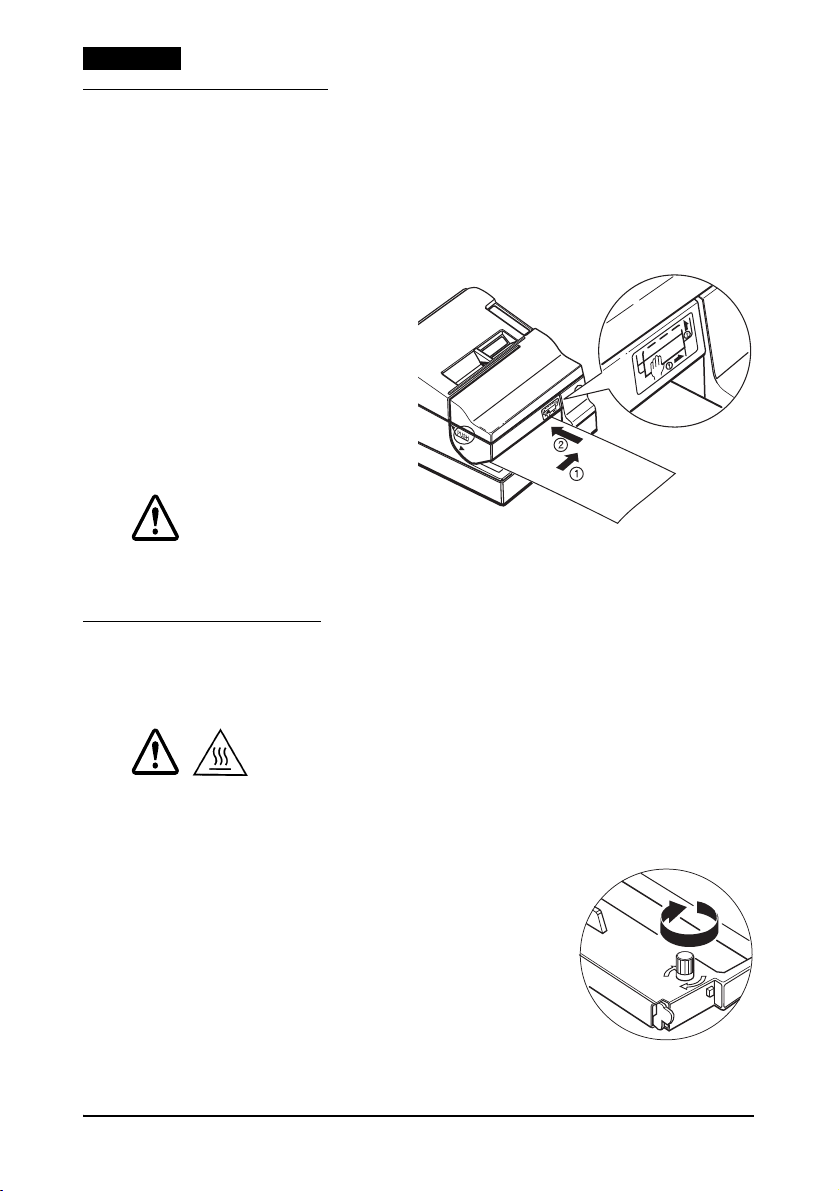
Inserting Slip Paper
Notes:
Do not use wrinkled, folded, or curled paper.
Use only slip paper that matches the printer’s specifications.
To prevent paper jams, install both paper rolls in the printer even if you
plan to print only on slip paper.
1. When the SLIP LED
flashes, insert slip paper,
using the right edge of
the slip paper inlet as a
guide. See illustration
7.
2. When the printer detects
the paper, it
automatically draws it in
and begins printing.
CAUTION:
Be sure to put the caution label exactly in the position shown. If you put
it another place, such as over the slip paper inlet, the printer may be
damaged.
7
Installing a Ribbon
Use the EPSON ERC-31. The use of any ribbon cassettes other than
those approved by EPSON may damage the printer and will void the
warranty.
CAUTION:
Do not touch the print head cover because it can be very hot after
printing.
1. Turn the printer on and open the printer cover.
2. Turn the ribbon cassette’s knob 2 or 3
times in the direction of the arrow in
illustration
8 to take up any slack.
3. Insert the ribbon in the printer and rotate
the cassette’s knob 2 or 3 more times to
place the ribbon in the correct position.
4. Make sure the ribbon is installed in front of
the print head without wrinkles or creases.
5. To remove the ribbon cassette, grasp the ribbon cassette’s tab
and pull it out of the printer.
6 TM-U950 User’s Manual
8
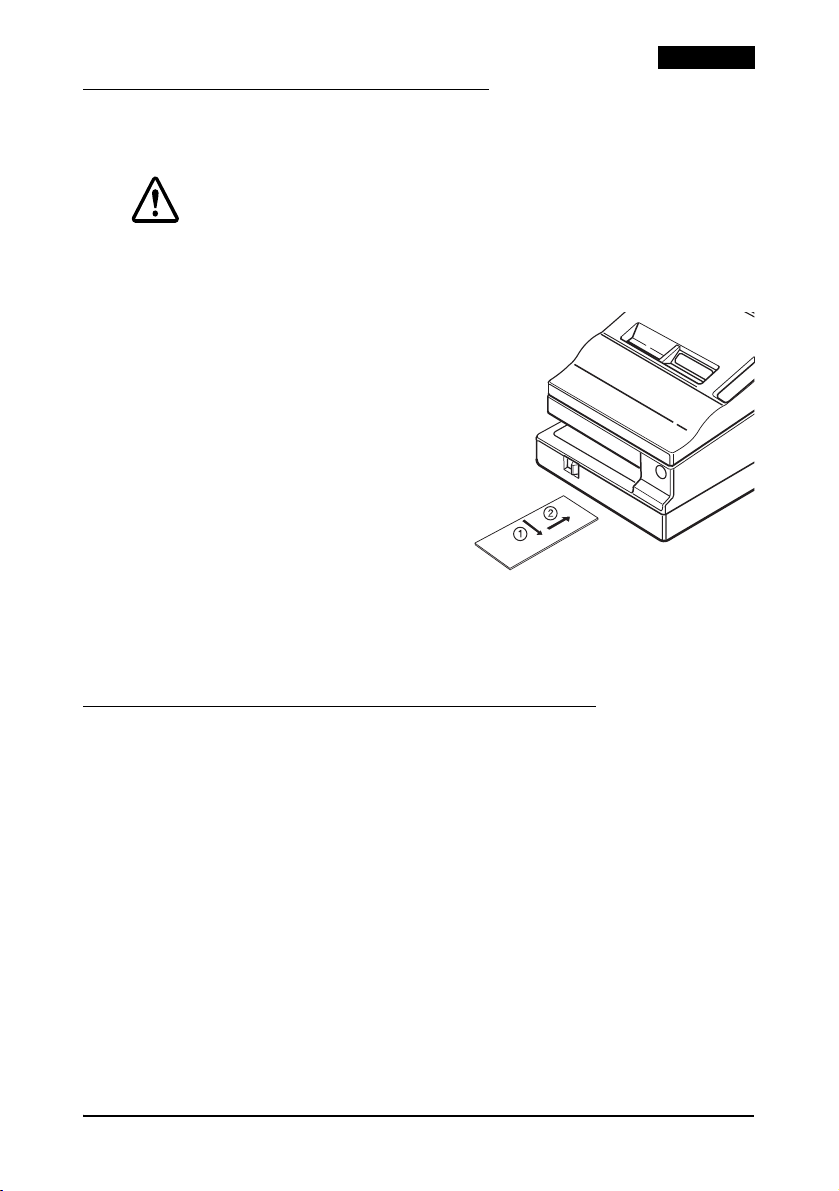
Using the MICR Reader (Option)
The optional, factory-installed magnetic ink character recognition
(MICR) reader lets the printer read MICR ink on personal checks.
CAUTION:
To prevent paper jams, be sure both paper rolls are installed.
Do not insert checks with staples in them; do not insert wrinkled checks.
1. The SLIP light flashes.
2. Insert the check face down,
with the MICR characters on
the right-hand side.
3. Insert the check straight into
the inlet, using the right edge
of the inlet as a guide, as far as
the check will go. See
illustration
9.
4. The printer starts drawing the
check in. Let go of the check
immediately. The SLIP LED
goes from blinking to on.
5. When MICR reading is complete, the printer ejects the check
and the SLIP LED starts blinking again.
6. Remove the check by pulling it straight out (not at an angle).
The SLIP LED goes off.
9
English
Cleaning the Optional MICR Mechanism
Clean the MICR head and MICR roller every 6000 passes or once a
month.
Note:
If you encounter frequent MICR reading errors, use the procedure below.
For the MICR head
Use a moistened cleaning sheet, such as PRESAT brand (KIC) “Check
Reader Cleaning Card” or an equivalent commercially available
cleaning sheet.
For the MICR feed roller
Use an adhesive cleaning sheet available from EPSON. Contact your
dealer.
TM-U950 User’s Manual 7
English
Cleaning procedure
Use this procedure for both cleaning sheets.
1. Load both paper rolls into the printer; then turn off the power.
2. Open the printer cover and turn the power back on while
holding down the JOURNAL/SLIP button.
3. Press the JOURNAL/SLIP button 3 times.
4. Close the printer cover (the SLIP LED flashes).
5. Follow the instructions on the cleaning sheet. You will insert
the cleaning sheet the same way you insert a normal check.
6. When the sheet is ejected, remove it from the printer; then turn
off the power.
Troubleshooting
LEDs on the control panel do not come on
Check the power cable and power outlet. If the outlet is controlled by a
switch or timer, use another outlet.
ERROR LED is on (not flashing) with no printing
If RECEIPT OUT or JOURNAL OUT is on, a paper roll is not installed
or nearly out. If these LEDs are off, the printer cover is not closed
properly.
ERROR LED is flashing with no printing (and no paper jam)
The print head may be overheated. Printing resumes after the print
head cools. If this does not occur, turn the printer off for 10 seconds
and then back on. If there is still a problem, contact a qualified servicer.
The printer appears to be printing, but nothing is printed
Check ribbon installation and ribbon wear.
A line of dots is missing
The print head may be damaged. Stop printing and contact a qualified
servicer.
Removing Jammed Paper
CAUTION:
Do not touch the print head cover and the print head because they
can be very hot after printing.
1. Turn the printer off and open the printer cover.
8 TM-U950 User’s Manual
English
2. For a journal roll paper jam, cut with scissors or a knife, as
shown in illustration
3. Cut the paper from the paper rolls as shown in illustration
4. If paper is caught in the automatic cutter, open the cutter blade
by turning the gear in the direction shown in illustration
10, and remove the take-up spool.
11.
12.
10
✄
5. Move the OPEN ↔
LOCK lever on each
side of the printer in
the direction shown in
illustration
cutter opens
automatically.
6. Pull the paper out
gently. If it tears,
remove any pieces.
7. If necessary, remove
the print head cover.
Loosen the screw on
the right as shown in
illustration
(Replace it by sliding
the tab in the slot, and
fasten the screw.)
8. After clearing all
paper, close and lock
the cutter unit (lock
both locks), and
reinstall the paper
rolls.
13; the
14.
11
✄
12
OPEN
LOCK
13
14
TM-U950 User’s Manual 9
English
TM-U950 Specifications
Printing method Serial impact dot matrix
Head wire configuration 9-pin vertical line, wire pitch 0.353 mm {1/72"}, 0.29 mm {0.01"} wire
Printing direction Bidirectional, minimum distance printing
Printing width Roll paper: 61.1 mm {2.41"}; slip paper: 135.6 mm {5.34"}
Characters per line
(default)
Character spacing
(default)
Print speed High-speed — 9 × 9: 233 characters/second
Paper feed speed Approx. 60.3 ms/line (4.23 mm {1/6"} feed);
Line spacing (default) 4.23 mm {1/6"}
Number of characters Alphanumeric characters: 95; International characters: 32
Character structure 9 × 9 or 7 × 9
Paper roll (single-ply) Size: Width: 69.5 ± 0.5 mm {2.74 ± 0.02"}
Slip paper Normal, carbon-copy, and pressure-sensitive
Number of copies for slip Original + 4 (at 20 to 40°C {68 to 104°F})
Total slip thickness 0.09 to 0.36 mm {0.0035 to 0.0141"}
Ribbon cassette ERC-31
Buffer size 32 bytes or 2 KB, depending on the DIP switch setting
Supply voltage +24 VDC ± 10%
Current consumption
(at 24V)
Life Mechanism: 7,500,000 lines
MTBF 180,000 hours
MCBF 18,000,000 lines
Temperature Operating: 5 to 40°C {41 to 104°F}
Humidity Operating: 30 to 80% RH
Overall dimensions 194.5 × 251 × 298 mm {7.7
Weight (mass) Approximately 5.6 kg {12.3 lb}
diameter
9 × 9: roll paper = 30; slip paper = 66
7 × 9: roll paper = 40; slip paper = 88
9 × 9: 3 dots (half dots); 7 × 9: 2 dots (half dots)
7 × 9: 311 characters/second
Low-speed — 9 × 9: 200 characters/second
Approx. 86.36 mm/second {3.4"/second} continuous feed
Extended graphics: 128 × 9 pages (including space pages)
Original + 1 to 3 copies (at 5 to 40°C {41 to 104°F})
Printing receipt and journal paper (40 columns):
Feeding slip paper to the print start position or MICR reading:
Print head: 150 million characters
Ribbon: 4,500,000 characters
MICR: 240,000 passes
Storage: –10 to 50°C {14 to 122°F}, except for ribbon
Storage: 30 to 90% RH
7 × 9: 267 characters/second
Maximum outside diameter: 83 mm {3.27"}
Paper roll spool inside diameter: 10 mm {0.39"} or more
Mean: Approx. 1.8 A (alphanumeric characters)
Peak: Approximately 8.0 A
Mean: Approx. 2.3 A for approx. 1.4 seconds
× 9.9 × 11.7"} (H × W × D)
10 TM-U950 User’s Manual

Português
TM-U950
Manual do utilizador
Todos os direitos reservados. Esta publicação não pode ser integral ou parcialmente reproduzida, arquivada nem
transmitida por meio de fotocópias, gravação ou qualquer outro sistema mecânico ou electrónico, sem a prévia
autorização por escrito da SEIKO EPSON CORPORATION, que não assume qualquer responsabilidade de patente no
que diz respeito ao uso das informações aqui contidas. Uma vez que foram tomadas todas as precauções na
elaboração deste manual, a SEIKO EPSON CORPORATION não se responsabiliza por erros ou omissões, nem por
quaisquer danos resultantes do uso das informações aqui contidas.
O comprador deste produto ou terceiros não podem responsabilizar a SEIKO EPSON CORPORATION, ou as suas
filiais, por quaisquer danos, perdas, custos ou despesas, incorridos por ele ou por terceiros, resultantes de acidentes,
abusos ou má utilização do produto, de modificações não autorizadas, reparações ou alterações do produto, ou
resultantes ainda da inobservância estrita das instruções de utilização e manutenção estabelecidas pela SEIKO
EPSON CORPORATION.
A SEIKO EPSON CORPORATION não se responsabiliza por quaisquer avarias ou problemas provocados pela
utilização de opções ou produtos não reconhecidos como sendo produtos genuínos EPSON ou produtos aprovados
pela EPSON.
®
EPSON
é marca comercial registada da Seiko Epson Corporation nos ESTADOS UNIDOS e noutros países.
AVISO: O conteúdo deste manual está sujeito a alterações sem aviso prévio.
© 2007, Seiko Epson Corporation, Nagano, Japão.

Português
Tabelas de interruptores DIP
Interface serial
Interruptor Função Ligado Desligado
1-1 Comprimento da
palavra de dados
1-2 Paridade Habilitado Desabilitado
1-3 Seleção de paridade Par Impar
1-4 ~
Velocidade de transmissão (veja tabela abaixo)
1-5
1-6 Conexão do módulo
do visor
1-7 Erro de recebimento
de dados
1-8 Saudação XON/XOFF DTR / DSR
Velocidade de transmissão;
Velocidade 1-4 1-5
1200 Ligado Ligado
2400 Desligado Ligado
4800 Ligado Desligado
9600 Desligado Desligado
Interruptor Função Ligado Desligado
2-1 Salto de linha
automático
2-2 Buffer de
recebimento
2-3 Seleção de fonte
(pré-definida)
2-4 Velocidade do
cabeçote
(pré-definida)
7 bits 8 bits
Conectado Não
Ignorado Imprime “?”
Sempre
habilitado
conectado
Sempre
desabilitado
32 bytes 2048 bytes
9 × 97 × 9
Baixo Alto
Interruptor Função Ligado Desligado
2-5 Saudação
(ocupado)
2-6 Uso interno Fixo —
2-7 Reinicialização I /F
6 pinos
2-8 Reinicialização I /F
25 pinos
Interface paralela
Interruptor Função Ligado Desligado
1-1 ~
Indefinido — —
1-5
1-6 Uso interno — Fixo
1-7 ~
Indefinido — —
1-8
Interruptor Função Ligado Desligado
2-1 Salto de linha
automático
2-2 Buffer de
recebimento
2-3 Seleção de fonte
(pré-definida)
2-4 Velocidade do
cabeçote
(pré-definida)
2-5 Saudação
(ocupado)
2-6 Uso interno Fixo —
2-7 Indefinido — —
2-8 Uso interno Fixo —
Buffer de
recebimento
cheio
Fora de linha ou
buffer de
recebimento cheio
Habilitado Desabilitado
Habilitado Desabilitado
Sempre
habilitado
32 bytes 2048 bytes
Sempre
desabilitado
9 × 97 × 9
Baixo Alto
Buffer de
recebimento
cheio
Fora de linha ou
buffer de
recebimento cheio
Componentes da impressora
Tampa da impressora
Carretel receptor
Chave liga-desliga
Trava da tampa
12 TM-U950 Manual do utilizador
Painel de controle
POWER
ERROR
RECEIPT
OUT
JOURNAL
OUT
SLIP
RECEIPT
FEED
JOURNAL/
SLIP FEED
Cabeçote
de impressão
Cobertura do cabeçote de impressão

Instruções de segurança
Esta secção contém informações importantes sobre como utilizar
este produto de uma forma eficaz e segura. Leia estas instruções e
guarde-as num local acessível para que as possa consultar sempre
que necessário.
ATENÇÃO:
Se o equipamento emitir fumo, um odor estranho ou um ruído invulgar,
desligue-o imediatamente. Se o continuar a utilizar, poderá provocar
um incêndio ou um choque eléctrico. Desligue imediatamente o
equipamento da tomada e contacte o Serviço de Assistência a
Clientes EPSON.
Nunca tente reparar este produto; as reparações indevidas podem
tornar-se perigosas.
Nunca desmonte ou modifique este produto; caso contrário pode ferirse, provocar um incêndio ou um choque eléctrico.
Utilize a fonte de energia especificada; caso contrário, poderá
provocar um incêndio ou um choque eléctrico.
Não insira objectos estranhos no interior do equipamento; caso
contrário, poderá provocar um incêndio ou um choque eléctrico.
Se derramar água ou outro líquido no equipamento, desligue o cabo
de corrente imediatamente e contacte o Serviço de Assistência a
Clientes EPSON. Se continuar a utilizar o equipamento, poderá
provocar um incêndio ou um choque eléctrico.
Português
IMPORTANTE:
Ao ligar os cabos, siga estritamente as instruções do manual. Diferentes
ligações podem danificar ou queimar o equipamento.
Instale o equipamento numa superfície firme, plana e estável, para
evitar que o equipamento caia e fique danificado ou cause
ferimentos.
Evite locais sujeitos a níveis de humidade e elevados e com demasiado
pó. Humidade e pó em excesso podem danificar o equipamento,
provocar um incêndio ou um choque eléctrico.
Não coloque objectos pesados em cima deste produto. Não se sente
nem se apoie em cima do produto. O equipamento pode cair ou
ceder e partir ou provocar ferimentos.
Para maior segurança, desligue este produto se não o for utilizar
durante um longo período.
Não utilize aspersores aerossóis que contenham gás inflamável no
interior ou em torno deste produto, pois isto pode causar incêndio.
TM-U950 Manual do utilizador 13

Português
Etiquetas de aviso
ATENÇÃO:
Não ligue uma linha telefónica ao conector de abertura da gaveta
nem ao conector do módulo do viso;, caso contrário, poderá danificar
a impressora e a linha telefónica.
IMPORTANTE:
Não toque na cobertura do cabeçote de impressão e nem no
cabeçote de impressão, pois eles podem estar muito quentes após
uma impressão.
Restrições quanto à utilização
Quando este produto for utilizado em aplicações que requeiram
alta fiabilidade/segurança, como por exemplo dispositivos de
transporte relacionados a aviação, carris, por via marítima,
automotiva, etc.; dispositivos para a prevenção de desastres; vários
dispositivos de segurança, etc.; ou dispositivos funcionais/de
precisão, etc., deve-se utilizá-lo apenas após considerar-se
adequadamente a inclusão de protecção contra falhas e de
redundâncias no seu projecto de forma a manterem-se a segurança
e a total fiabilidade do sistema. Como este produto não se destina à
utilização em aplicações que requeiram fiabilidade/segurança
extremamente altas, como equipamentos aeroespaciais,
equipamentos de base para comunicações, equipamentos para o
controlo de energia nuclear, ou equipamentos médicos
relacionados a cuidados médicos directos, etc., queira tomar a sua
própria decisão sobre a adequação deste produto após uma
avaliação completa.
Desembalagem
Os seguintes elementos são fornecidos com a impressora de
especificação padrão. Se algum dos componentes se encontrar
danificado, contacte o Serviço de Assistência a Clientes EPSON.
❏ Impressora
❏ Rolos de papel (2)
❏ Cassete de fita
❏ Tampa do interruptor de ligação
❏ Tensor do rolo
14 TM-U950 Manual do utilizador

❏ Etiqueta de aviso
Download de Drivers, Utilitários e Manuais
Pode-se fazer o download dos drivers, utilitários e manuais a partir
de um dos URL abaixo.
Para clientes na América do Norte, visitar o seguinte sítio da web:
http://www.epsonexpert.com/ e seguir as instruções no écran.
Para clientes noutros países, visitar o seguinte sítio da web:
http://www.epson-pos.com/
Painel de controlo
Tecla de alimentação do recibo (RECEIPT FEED)
Pressione esta tecla para alimentar o papel de recibo; mantenha-a
pressionada para alimentar o papel continuamente.
Tecla de alimentação do histórico/comprovativo
(JOURNAL/SLIP FEED)
No modo de papel em rolo, alimenta o rolo de histórico. No modo
de comprovativo (quando o indicador luminoso de comprovativo
[SLIP] está aceso ou intermitente e o papel de comprovativo está
inserido), alimenta o papel de comprovativo.
Indicador luminoso de ligação (POWER)
Acende quando a impressora está ligada.
Indicador luminoso de erro (ERROR)
Indica um erro.
Indicador luminoso de falta de recibo (RECEIPT OUT)
Indica que não tem papel de recibo ou que este está prestes a
terminar.
Indicador luminoso de falta de histórico (JOURNAL OUT)
Indica que não tem rolo de histórico ou que este está prestes a
terminar.
Indicador luminoso de comprovativo (SLIP)
Indica o modo de comprovativo. Fica intermitente enquanto
aguarda a inserção ou remoção do comprovativo.
Português
Remoção do amortecedor
A impressora está protegida durante o transporte por um
amortecedor, que deve ser retirado antes de ligar a impressora.
TM-U950 Manual do utilizador 15

Português
Puxe o amortecedor para fora, conforme se indica na figura 1 da
página 4.
Nota:
Reinstale o amortecedor antes de transportar a impressora.
Utilização da tampa do interruptor de ligação
ATENÇÃO:
Se ocorrer um acidente quando a tampa do interruptor de ligação
estiver instalada, desligue imediatamente o cabo de alimentação. Se
não o fizer, poderá provocar um incêndio.
A tampa do interruptor de ligação fornecida impede que o
interruptor de ligação seja pressionado acidentalmente. Para
utilizar esta tampa, instale-a conforme se indica na figura
página 4.
Instalação dos rolos de papel
Nota:
Utilize apenas rolos de papel que satisfaçam as especificações requeridas.
1. Assegure-se de que a extremidade do papel está cortada a
direito.
2. Ligue a impressora e abra a tampa da impressora.
3. Insira os rolos de papel na parte do recibo e do histórico da
impressora, conforme se indica na figura 3 da página 4 (o rolo
de histórico está à direita na figura).
4. Insira a ponta do papel de cada um dos rolos na entrada de
papel e empurre-a até que seja detectada automaticamente e
alimentada pela impressora. Veja a figura
5. Destaque o papel de recibo no dispositivo de corte. Se o papel
não for alimentado o suficiente, pressione a tecla de
alimentação do recibo (RECEIPT FEED) para alimentar mais
papel.
6. Insira a ponta do papel de histórico na ranhura do tensor do
rolo e rode o rolo duas ou três vezes para prender o papel. Veja
a figura
5 da página 5. Se o papel não for alimentado o
suficiente, pressione a tecla de alimentação do histórico/
comprovativo (JOURNAL/SLIP FEED) para alimentar mais
papel.
7. Instale o tensor do rolo e feche a tampa da impressora.
4 da página 5.
2 da
16 TM-U950 Manual do utilizador

8. Para retirar o rolo de histórico, levante primeiro o tensor do
rolo e corte o papel. Em seguida, retire o tensor do rolo. Veja a
figura
6 da página 5.
9. Tanto no caso do rolo de papel de histórico como no caso do
rolo de recibo, pressione em seguida a alavanca de libertação
(identificada com a palavra PRESS) do lado adequado da
impressora, puxe o papel para fora e retire o rolo.
Inserção de papel de comprovativo
Notas:
Não utilize papel enrugado, dobrado ou enrolado.
Utilize apenas papel de comprovativo que corresponda às especificações da
impressora.
Para evitar encravamentos de papel, instale ambos os rolos de papel na
impressora, mesmo que tencione imprimir apenas em papel de
comprovativo.
1. Quando o indicador luminoso de comprovativo (SLIP) ficar
intermitente, insira o papel de comprovativo, utilizando a
extremidade direita da entrada de papel de comprovativo
como guia (veja a figura
2. Quando detecta o papel, a impressora puxa-o automaticamente
e começa a imprimir.
7 da página 6).
Português
IMPORTANTE:
Coloque a etiqueta de aviso exactamente na posição indicada. Se a
colocar noutro local, por exemplo, sobre a entrada de papel de
comprovativo, pode danificar a impressora.
Instalação da fita
Utilize a fita EPSON ERC-31. A utilização de outras cassetes de fita
que não sejam aprovadas pela EPSON pode danificar a impressora
e irá anular a garantia.
IMPORTANTE:
Não toque na tampa da cabeça de impressão, pois ela poderá estar
muito quente após a impressão.
1. Ligue a impressora e abra a tampa da mesma.
TM-U950 Manual do utilizador 17

Português
2. Rode o botão da cassete de fita 2 ou 3 vezes na direcção da seta
para eliminar qualquer folga, conforme se indica na figura
página 6.
3. Insira a fita na impressora e rode o botão da cassete mais 2 ou 3
vezes para colocar a fita na posição correcta.
4. Certifique-se de que a fita fica instalada à frente da cabeça de
impressão, sem vincos nem dobras.
5. Para retirar a cassete de fita, segure firmemente na lingueta da
cassete e puxe-a para fora da impressora.
Utilização do leitor MICR opcional
O leitor de reconhecimento de caracteres de tinta magnética
(MICR) opcional, instalado de fábrica, permite que a impressora
leia os caracteres de tinta magnética (MICR) em cheques pessoais.
IMPORTANTE:
Para evitar encravamentos de papel, certifique-se de que ambos os
rolos estão instalados. Não insira cheques com agrafos; não insira
cheques com vincos.
1. O indicador luminoso de comprovativo (SLIP) fica intermitente.
2. Insira o cheque com a parte da frente virada para baixo e com
os caracteres MICR voltados para o lado direito.
3. Insira o cheque a direito na entrada, utilizando a extremidade
direita da entrada como guia, até encontrar resistência. Veja a
figura
4. A impressora começa a puxar o cheque. Solte o cheque
imediatamente. O indicador luminoso de comprovativo (SLIP)
deixa de estar intermitente e fica aceso.
5. Quando a leitura MICR terminar, a impressora ejecta o cheque
e o indicador luminoso de comprovativo (SLIP) fica
intermitente novamente.
6. Retire o cheque puxando-o para fora a direito (e não
inclinado). O indicador luminoso de comprovativo (SLIP)
apaga.
9 da página 7.
8 da
Limpeza do mecanismo MICR opcional
Limpe a cabeça MICR e o rolo MICR a cada 6000 passagens ou uma
vez por mês.
18 TM-U950 Manual do utilizador

Nota:
Se se deparar frequentemente com erros de leitura MICR, utilize o
procedimento indicado em seguida.
Para a cabeça MICR
Utilize uma folha de limpeza humedecida, como o cartão de
limpeza para leitores de cheques da marca PRESAT (KIC) ou outra
folha de limpeza equivalente disponível no mercado.
Para o rolo de alimentação MICR
Utilize uma folha de limpeza autocolante da EPSON. Contacte o
Serviço de Assistência a Clientes EPSON.
Procedimento de limpeza
Utilize este procedimento para ambas as folhas de limpeza.
1. Coloque os dois rolos de papel na impressora; em seguida,
desligue a impressora.
2. Abra a tampa da impressora e ligue a impressora novamente,
pressionando, ao mesmo tempo, a tecla JOURNAL/SLIP.
3. Pressione a tecla de histórico/comprovativo (JOURNAL/SLIP)
3 vezes.
4. Feche a tampa da impressora (o indicador luminoso SLIP fica
intermitente).
5. Siga as instruções indicadas na folha de limpeza. A folha de
limpeza deve ser inserida da mesma maneira que um cheque
normal.
6. Quando a folha for ejectada, retire-a da impressora; em
seguida, desligue a impressora.
Português
Resolução de problemas
Os indicadores luminosos do painel de controlo não acendem
Verifique as ligações do cabo de alimentação e da tomada eléctrica.
Se a tomada for controlada por um interruptor ou por um
temporizador, utilize outra tomada.
TM-U950 Manual do utilizador 19

Português
O indicador luminoso de erro (ERROR) está aceso (não intermitente) e
nada é impresso
Se o indicador de falta de recibo (RECEIPT OUT) ou de falta de
histórico (JOURNAL OUT) estiver aceso, o rolo de papel não está
instalado ou está prestes a terminar. Se estes indicadores luminosos
estiverem apagados, a tampa da impressora não está fechada
correctamente.
O indicador luminoso de erro (ERROR) está intermitente e nada é
impresso (mas não existe nenhum encravamento de papel)
A cabeça de impressão pode estar excessivamente quente. A
impressão recomeça quando a cabeça de impressão arrefece.
Se isto não acontecer, desligue a impressora durante 10 segundos e
ligue-a novamente. Se o problema persistir, contacte o Serviço de
Assistência a Clientes EPSON.
A impressora parece estar a imprimir, mas nada é impresso
Verifique se a fita está correctamente instalada ou se está gasta.
Falta uma linha de pontos
A cabeça de impressão pode estar danificada. Interrompa a
impressão e contacte o Serviço de Assistência a Clientes EPSON.
Remoção de papel encravado
IMPORTANTE:
Não toque na tampa da cabeça de impressão ou na cabeça de
impressão, pois elas poderão estar muito quentes após a impressão.
1. Desligue a impressora e abra a tampa da impressora.
2. No caso de encravamento do rolo de papel de histórico, corte o
papel com uma tesoura ou uma faca, conforme se indica na
figura
3. Corte o papel dos rolos conforme se indica na figura
página 9.
4. Se o papel ficar preso no dispositivo de corte automático, abra a
lâmina do dispositivo de corte rodando o mecanismo na
direcção indicada na figura
20 TM-U950 Manual do utilizador
10 da página 9, e retire o tensor do rolo.
12 na página 9.
11 da

Português
5. Coloque a alavanca de abertura ↔ bloqueio (OPEN ↔ LOCK)
existente de cada lado da impressora na direcção indicada na
figura
13 da página 9; o dispositivo de corte abre
automaticamente.
6. Puxe cuidadosamente o papel para fora. Se este se rasgar, retire
todos os pedaços.
7. Se necessário, retire a tampa da cabeça de impressão. Afrouxe o
parafuso do lado direito, conforme se indica na figura
página 9 (coloque-o de novo deslizando a lingueta existente na
abertura e aperte o parafuso).
8. Depois de extrair todos os pedaços de papel, feche e bloqueie a
unidade do dispositivo de corte (bloqueie ambos os fechos) e
reinstale os rolos de papel.
Características técnicas da TM-U950
Método de impressão Matriz de pontos de impacto série
Configuração das agulhas
da cabeça
Direcção de impressão Bidireccional, impressão à distância mínima
Largura de impressão Papel em rolo: 61,1 mm; papel de comprovativo: 135,6 mm
Caracteres por linha
(predefinidos)
Espaçamento entre
caracteres (predefinido)
Velocidade de impressão Alta velocidade — 9 × 9: 233 caracteres/segundo
Velocidade de
alimentação do papel
Espaçamento entre linhas
(predefinido)
Número de caracteres Caracteres alfanuméricos: 95; Caracteres internacionais: 32
Estrutura do carácter 9 × 9 ou 7 × 9
Rolo de papel
(camada única)
Papel de comprovativo Normal, papel químico e sensível à pressão
Número de cópias por
comprovativo
Espessura total do
comprovativo
Cassete de fita ERC-31
Linha vertical de 9 agulhas, 0,353 mm de densidade da agulha,
0,29 mm de diâmetro da agulha
9 × 9: papel em rolo = 30; papel de comprovativo = 66
7 × 9: papel em rolo = 40; papel de comprovativo = 88
9 × 9: 3 pontos (meios pontos); 7 × 9: 2 pontos (meios pontos)
7 × 9: 311 caracteres/segundo
Baixa velocidade — 9 × 9: 200 caracteres/segundo
Aprox. 60,3 ms/linha (alimentação de 4,23 mm);
Aprox. 86,36 mm/segundo de alimentação contínua
4,23 mm
Gráficos ampliados: 128 × 9 páginas (incluindo espaços por página)
Tamanho: Largura: 69,5 ± 0,5 mm
Original + 4 (de 20 a 40 °C)
Original + 1 a 3 cópias (de 5 a 40 °C)
0,09 a 0,36 mm
7 × 9: 267 caracteres/segundo
Diâmetro externo máximo: 83 mm
Diâmetro interno do tensor do rolo de papel:
10 mm ou mais
14 da
TM-U950 Manual do utilizador 21

Português
Características técnicas da TM-U950
Tamanho da memória de
recepção
Fonte de alimentação +24 VCC ± 10%
Consumo de corrente
(a 24 V)
Vida útil Mecanismo: 7.500.000 linhas
MTBF 180.000 horas
MCBF 18.000.000 linhas
Temperatura Em funcionamento: 5 a 40 °C
Humidade Em funcionamento: 30 a 80% de humidade relativa
Dimensões gerais 194,5 × 251 × 298 mm (A × L × P)
Peso Aproximadamente 5,6 kg
32 bytes ou 2 KB, dependendo do ajuste do interruptor DIP
Impressão de papel de recibo e de histórico (40 colunas):
Médio: aprox. 1,8 A (caracteres alfanuméricos)
Pico: aproximadamente 8,0 A
Alimentação de papel de comprovativo para a posição inicial de
impressão ou leitura MICR:
Médio: aprox. 2,3 A para aprox. 1,4 segundo
Cabeça de impressão: 150 milhões de caracteres
Fita: 4.500.000 caracteres
MICR: 240.000 passagens
Em armazém: –10 a 50 °C, excepto para a fita
Em armazém: 30 a 90% de humidade relativa
22 TM-U950 Manual do utilizador

Español
TM-U950
Manual del usuario
Se reservan todos los derechos. Ninguna porción de esta publicación podrá reproducirse, guardarse en un sistema de
recuperación de datos o transmitirse en forma o modo alguno, sea electrónico, mecánico, fotocopiado, grabado o de
otra forma, sin el permiso previo y por escrito de SEIKO EPSON Corporation. No se asume responsabilidad de
patente con respecto al uso de la información contenida aquí. Si bien se han tomado todas las precauciones en la
preparación de este libro, SEIKO EPSON Corporation no asume ninguna responsabilidad por errores u omisiones.
Tampoco asume responsabilidad alguna que surja por el uso de la información contenida aquí.
Ni SEIKO EPSON Corporation ni sus compañías afiliadas serán responsables ante el comprador de este producto o
ante terceros por daños, pérdidas, costos, o gastos incurridos por el comprador o por terceros como resultado de:
accidente, uso indebido, o abuso de este producto o de modificaciones, reparaciones o alteraciones no autorizadas de
este producto, o (excluyendo a los EE.UU.) por no cumplir estrictamente con las instrucciones de operación y
mantenimiento de SEIKO EPSON Corporation.
SEIKO EPSON Corporation no será responsable de cualquier daño o problema que surja por el uso de cualquier
opción o producto de consumo que no esté designado como Producto EPSON Original o Aprobado por SEIKO
EPSON Corporation.
®
EPSON
es una marca registrada de Seiko Epson Corporation en los ESTADOS UNIDOS y otros países.
AVISO: El contenido de este manual está sujeto a cambios sin previo aviso.
Copyright © 2007 SEIKO EPSON Corporation, Nagano, Japón.

Español
Tablas de interruptores DIP
Interfaz serial
Interruptor Función Activado Desactivado
1-1 Longitud de palabra
de dato
1-2 Paridad Habilitada Inhabilitada
1-3 Selección de paridad Par Impar
1-4 ~
Velocidad de transmisión (ver tabla de abajo)
1-5
1-6 Conexión de módulo
de display
1-7 Error de recepción de
datos
1-8 Asentimiento XON/XOFF DTR/DSR
Velocidad de transmisión
Velocidad 1-4 1-5
1200 Activado Activado
2400 Desactivado Activado
4800 Activado Desactivado
9600 Desactivado Desactivado
Interruptor Función Activado Desactivado
2-1 Alimentación
automática de línea
2-2 Memoria intermedia
de recepción
2-3 Selección de fuente
(por defecto)
2-4 Velocidad del carro
(por defecto)
7 bits 8 bits
Conectado No conectado
Ignorado Imprime “?”
Siempre
habilitado
32 bytes 2048 bytes
Siempre
inhabilitado
9 × 97 × 9
Baja Alta
Interruptor Función Activado Desactivado
2-5 Asentimiento
(OCUPADO)
2-6 Uso interno Fijo —
2-7 Patilla I/F 6
reposición
2-8 Patilla I/F 25
reposición
Interfaz paralela
Memoria
intermedia de
recepción llena
Fuera de línea o
memoria de
recepción llena
Habilitada Inhabilitada
Habilitada Inhabilitada
Interruptor Función Activado Desactivado
1-1 ~
No definida — —
1-5
1-6 Uso interno — Fijo
1-7 ~
No definida — —
1-8
Interruptor Función Activado Desactivado
2-1 Alimentación
automática de línea
2-2 Memoria intermedia
de recepción
2-3 Selección de fuente
(por defecto)
2-4 Velocidad del carro
(por defecto)
2-5 Asentimiento
(OCUPADO)
2-6 Uso interno Fijo —
2-7 No definida — —
2-8 Uso interno Fijo —
Siempre
habilitado
32 bytes 2048 bytes
Siempre
inhabilitado
9 × 97 × 9
Baja Alta
Memoria
intermedia de
recepción llena
Fuera de línea o
memoria de
recepción llena
Piezas de la impresora
Tapa de la impresora
Recogedor de papel
Interruptor de alimentación
Botón para abrir la tapa
24 Manual del usuario del TM-U950
Panel de control
POWER
ERROR
RECEIPT
OUT
JOURNAL
OUT
SLIP
RECEIPT
FEED
JOURNAL/
SLIP FEED
Cabezal impresor
Tapa del cabezal impresor

Precauciones de Seguridad
En esta sección, se presenta información importante cuyo propósito
es cerciorarse de un uso seguro y efectivo de este producto. Por
favor, lea esta sección con cuidado y guárdela en un lugar
accesible.
ADVERTENCIA:
Apague su equipo de inmediato si éste produce humo, un olor raro, o
un ruido inusual. El seguir utilizándolo podría ocasionar un incendio.
Desenchufe el equipo de inmediato y comuníquese con su distribuidor
o con un servicio técnico EPSON.
Nunca trate de reparar este producto usted mismo. Una reparación
incorrecta puede ser peligrosa.
Nunca desmonte o modifique este producto. La manipulación de este
producto puede causar lesiones o un incendio.
Cerciórese de usar la fuente de alimentación eléctrica especificada.
La conexión a una fuente de alimentación eléctrica inadecuada
puede causar un incendio.
No deje que materiales extraños caigan dentro del equipo, ya que
podría provocar un incendio.
Si se derrama agua o algún otro líquido dentro del equipo, desenchufe
el cable eléctrico inmediatamente, y después comuníquese con su
distribuidor o con un servicio técnico EPSON. El seguir usándolo podría
causar un incendio.
Español
PRECAUCIÓN:
No conecte los cables en formas que difieran a las mencionadas en
este manual. Conexiones diferentes podrían causar daños e incendios.
Cerciórese de poner este equipo sobre una superficie firme, estable,
horizontal. El producto se puede romper o causar lesiones si se cae.
No lo use en lugares sujetos a altos niveles de humedad o de polvo. El
exceso de humedad o de polvo podría causar daños o incendios al
equipo.
No ponga objetos pesados encima de este producto. Nunca se apoye
sobre este producto. El equipo podría caerse, causando roturas y
posibles lesiones.
Por razones de seguridad, por favor desenchufe este producto antes
de dejarlo sin usar por un largo periodo de tiempo.
No utilice aerosoles que contengan gases inflamables dentro o cerca
de este producto. Si lo hace, podría provocar un incendio.
Manual del usuario del TM-U950 25

Español
Etiquetas de precauciones
ADVERTENCIA:
No conecte una línea telefónica al conector de apertura del cajón ni
al conector del módulo de visualización; si lo hace, se pueden dañar la
impresora y la línea de teléfono.
PRECAUCIÓN:
No toque la tapa del cabezal impresor ni el cabezal impresor porque
estos podrían estar muy calientes después de imprimir.
Restricción en el uso
Cuando este producto se usa en aplicaciones que requieren de alta
fiabilidad/seguridad tales como los dispositivos relacionados con
la aviación, los ferrocarriles, la marina, los automóviles, etc.; los
dispositivos de prevención de desastres; dispositivos varios de
seguridad, etc.; o los dispositivos funcionales/de precisión, etc.,
usted deberá tener en cuenta los posibles fallos, las redundancias
de su diseño para mantener la seguridad y la fiabilidad total de su
sistema. Debido a que este producto no tuvo el propósito de usarse
en aplicaciones que requieren de una fiabilidad/seguridad
sumamente altas tales como los equipos aeroespaciales, equipos
principales de comunicación, equipos de control en plantas
nucleares, o en equipos médicos relacionados con los cuidados
médicos directos, etc., por favor decida usted mismo sobre la
adecuación de este producto después de una evaluación completa.
Desembalaje
Se incluyen los siguientes artículos con la impresora estándar. Si
algún artículo estuviera dañado, póngase en contacto con su
distribuidor.
❏ Impresora
❏ Rollos de papel (2)
❏ Cartucho de cinta
❏ Tapa del interruptor de alimentación
❏ Recogedor de papel
❏ Etiqueta de precaución
26 Manual del usuario del TM-U950

Cómo descargar drivers, utilidades y manuales
Los drivers, utilidades y los manuales se pueden descargar en uno
de los siguientes URLs.
Para los clientes de América del Norte, visiten el siguiente sitio en
Internet: http://www.epsonexpert.com/ y siga las instrucciones
que aparecen en pantalla.
Para los clientes de otros países, visiten el siguiente sitio en
Internet:
http://www.epson-pos.com/
Panel de control
Botón de alimentación de recibos (RECEIPT FEED)
Presiónelo para alimentar el papel de recibos; manténgalo
presionado para alimentar el papel en forma continua.
Botón de alimentación de diario/documento
(JOURNAL/SLIP FEED)
En el modo de rollo de papel, alimenta el rollo de papel del diario
(para contabilidad). En el modo de documento (cuando el
indicador SLIP está encendido o parpadeando y se ha insertado un
documento), alimenta el papel del documento.
Indicador de alimentación (POWER LED)
Encendido cuando la impresora está encendida.
Indicador de ERROR
Indica un error.
Indicador de falta de recibos (RECEIPT OUT)
Indica que el rollo de papel de recibos se acabó o se está
terminando.
Indicador de falta de diario (JOURNAL OUT)
Indica que el rollo de papel de diario se acabó o se está terminando
Indicador de documentos (SLIP)
Indica el modo de documento. Parpadea mientras espera a que se
inserte o se saque un documento.
Español
Retirar el protector de transporte
La impresora está protegida durante su envío por un protector de
transporte que usted tiene que quitar antes de encenderla.
Manual del usuario del TM-U950 27

Español
Tire del protector para sacarlo, como se muestra en la ilustración 1
en la página 4.
Nota:
Antes de transportar la impresora, vuelva a instalar el protector.
Uso de la tapa del interruptor de alimentación
ADVERTENCIA:
Si ocurre un accidente cuando esté puesta la tapa del interruptor de la
alimentación, desenchufe el cable eléctrico de inmediato. Seguir
usándola podría causar un incendio.
La tapa del interruptor de alimentación adjunta es para asegurarse
de que el interruptor de alimentación no se presione
accidentalmente. Para usar esta tapa, instálela como se muestra en
la ilustración
2 en la página 4.
Instalación de los rollos de papel
Nota:
Use únicamente rollos de papel que cumplan con las especificaciones.
1. Cerciórese de que el extremo del papel esté recto.
2. Encienda la impresora y abra la tapa de la impresora.
3. Inserte los dos rollos de papel, el de recibos y el del diario, en la
impresora, como se muestra en la ilustración 3 en la página 4.
(El rollo de diario está a la derecha en esta ilustración.)
4. Inserte el extremo de papel de cada rollo en la ranura del papel
que le corresponda y empújelo hasta que sea detectado y
alimentado automáticamente en la impresora. Vea la
ilustración
5. Recorte el papel de recibos en el cortador. Si no se alimentó
suficiente papel, presione el botón de alimentación de recibos
(RECEIPT FEED) para avanzar más papel.
6. Inserte el extremo de papel del diario en la ranura del
recogedor de papel y gire el recogedor dos o tres veces para
asegurar el papel. Vea la ilustración
alimentó suficiente papel, presione el botón de alimentación de
diario/documento (JOURNAL/SLIP FEED) para avanzar más
papel.
7. Instale el recogedor de papel y cierre la tapa de la impresora.
4 en la página 5.
5 en la página 5. Si no se
28 Manual del usuario del TM-U950

8. Para sacar el rollo del papel de diario, primero levante el
recogedor de papel y recorte el papel. Después extraiga el
recogedor. Vea la ilustración
6 en la página 5.
9. Para cualquiera de los dos rollos, del diario o de recibos,
presione la palanca de liberación (marcada con la palabra
presionar: PRESS) en el lado correspondiente de la impresora,
saque el papel de la ranura y extraiga el rollo.
Inserción del papel de documentos
Notas:
No use papel arrugado, doblado o rizado.
Use únicamente papel de documentos que coincida con las especificaciones
de la impresora.
Para evitar atascos de papel, instale los dos rollos de papel en la impresora
aunque vaya a imprimir únicamente en el papel de documentos.
1. Cuando el indicador de documentos (SLIP) parpadee, inserte el
documento usando como guía el borde derecho de la ranura
para documentos. Vea la ilustración
2. Cuando la impresora detecta el papel, tira de él
automáticamente hacia adentro y empieza a imprimir.
7 en la página 6.
Español
PRECAUCIÓN:
Asegúrese de poner la etiqueta de precaución exactamente en la
posición indicada. Si la pone en otro lugar, por ejemplo, sobre la ranura
para el papel de documentos, podría dañarse la impresora.
Instalación de una cinta
Recomendamos la utilización de la cinta EPSON ERC-31. El uso de
cualesquiera otros cartuchos de cinta que no sean los homologados
por EPSON podría dañar la impresora.
PRECAUCIÓN:
No toque la tapa del cabezal impresor porque éste podría estar muy
caliente después de imprimir.
1. Encienda la impresora y abra la tapa de la impresora.
2. Gire el botoncillo del cartucho de cinta 2 ó 3 veces en la
dirección de la flecha, como se muestra en la ilustración
página 6, para tensar la cinta.
Manual del usuario del TM-U950 29
8 en la

Español
3. Inserte la cinta en la impresora y gire el botoncillo del cartucho
2 ó 3 veces más para colocar la cinta en la posición correcta.
4. Asegúrese de que la cinta esté instalada frente al cabezal
impresor y sin arrugas ni dobleces.
5. Para extraer el cartucho de cinta, sujételo por la lengüeta y tire
de él hacia afuera.
Uso de la lectora MICR (Opción)
La lectora opcional de reconocimiento de caracteres por tinta
magnética (MICR), instalada de fábrica, le permite a la impresora
leer la tinta MICR de los cheques personales.
PRECAUCIÓN:
Para evitar atascos de papel, asegúrese de que los dos rollos de papel
estén instalados. No inserte cheques con grapas ni arrugados.
1. El indicador de documentos SLIP parpadea.
2. Inserte el cheque cara abajo, con los caracteres MICR en el lado
derecho.
3. Inserte el cheque directamente en la ranura alineándolo con el
borde derecho, hasta que el cheque llegue al fondo. Vea la
ilustración
4. La impresora empieza a tirar del cheque hacia adentro. Suéltelo
inmediatamente. El indicador de documentos (SLIP) pasa de
parpadeo a iluminación constante.
5. Al completarse la lectura MICR, la impresora expulsa el cheque
y el indicador de documentos (SLIP) empieza a parpadear de
nuevo.
6. Extraiga el cheque tirando de él en línea recta (no en ángulo). El
indicador de documentos (SLIP) se apaga.
9 en la página 7.
Limpieza del mecanismo MICR opcional
Limpie el cabezal MICR y el rodillo MICR cada 6,000 pasadas o una
vez al mes.
Nota:
Si se producen errores frecuentes de lectura con la MICR, siga los pasos
siguientes.
30 Manual del usuario del TM-U950

Para el cabezal MICR
Use una hoja de limpieza humedecida, de las que se pueden
adquirir en el mercado «Tarjeta de Limpieza de la Lectora de
Cheques».
Para el rodillo de alimentación MICR
Use una hoja adhesiva de limpieza EPSON. Póngase en contacto
con su distribuidor.
Procedimiento de limpieza
Utilice este procedimiento con las dos hojas de limpieza.
1. Póngale los dos rollos de papel a la impresora y después
apáguela.
2. Abra la tapa de la impresora y vuelva a conectar la corriente
mientras mantiene pulsado el botón de diario/documento
(JOURNAL/SLIP).
3. Presione el botón JOURNAL/SLIP 3 veces.
4. Cierre la tapa de la impresora [el indicador de documentos
(SLIP) parpadea].
5. Siga las instrucciones de la hoja de limpieza. La hoja de
limpieza se inserta igual que un cheque normal.
6. Cuando se expulse la hoja, sáquela de la impresora; después
desactive la impresora.
Español
Solución de problemas
No se encienden las luces del panel de control
Revise el cable de la alimentación y la toma de corriente. Si la toma
de corriente está controlada por un interruptor o por un
temporizador, use otra toma.
El indicador ERROR está encendido (no parpadeando), y no hay
impresión
Si el indicador RECEIPT OUT o JOURNAL OUT está encendido, es
que no está instalado uno de los rollos de papel o se está acabando.
Si estos indicadores están apagados, es que la tapa de la impresora
no está cerrada correctamente.
Manual del usuario del TM-U950 31

Español
El indicador ERROR está parpadeando sin haber impresión (y sin
atasco de papel)
El cabezal impresor podría estar sobrecalentado. La impresión se
reanuda después de que se enfríe el cabezal impresor. Si esto no
ocurre, apague la impresora durante 10 segundos y después
vuélvala a encender. Si el problema persiste, póngase en contacto
con un servicio técnico oficial.
La impresora parece que está imprimiendo, pero no imprime nada
Compruebe la instalación del cartucho de cinta y su desgaste.
Falta una línea de puntos
El cabezal impresor podría estar dañado. Suspenda la impresión y
póngase en contacto con un servicio técnico oficial.
Solucionar un atasco de papel
PRECAUCIÓN:
No toque la tapa del cabezal impresor ni el cabezal impresor porque
estos podrían estar muy calientes después de imprimir.
1. Apague la impresora y abra la tapa de la impresora.
2. Para un atasco del papel del rollo de diario, córtelo con unas
tijeras o cuchilla, como se muestra en la ilustración
página 9, y extraiga el recogedor de papel.
3. Corte el papel del rollo como se muestra en la ilustración
la página 9.
4. Si el papel está atascado en el cortador automático, abra la
cuchilla del cortador girando el engranaje en la dirección que se
muestra en la ilustración
12 de la página 9.
5. Mueva la palanca de bloqueo (OPEN ↔ LOCK), a cada lado de
la impresora, hacia atrás tal como se indica en la ilustración
de la página 9; el cortador se abre automáticamente.
6. Saque el papel con cuidado. Si se rompe, retire los trozos.
7. Si fuese necesario, extraiga la tapa del cabezal impresor. Afloje
el tornillo del lado derecho como se muestra en la ilustración
en la página 9. (Vuelva a colocar la tapa deslizando la lengüeta
dentro de la ranura, y apretando el tornillo.)
10 en la
11 de
13
14
32 Manual del usuario del TM-U950

8. Después de retirar todo el papel, cierre y bloquee la unidad del
cortador (bloquee ambos cierres), y vuelva a instalar los rollos
de papel.
Especificaciones de la TM-U950
Método de impresión Impacto serie por matriz de puntos
Configuración de agujas en
el cabezal
Dirección de la impresión Bidireccional, mínima distancia de impresión
Ancho de la impresión Papel de rollo: 61.1 mm; papel de documentos: 135.6 mm
Caracteres por línea
(por defecto)
Espaciado de caracteres
(por defecto)
Velocidad de impresión Alta velocidad — 9 × 9: 233 caracteres/segundo
Velocidad de la
alimentación de papel
Espaciado entre líneas
(por defecto)
Número de caracteres Caracteres alfanuméricos: 95; Caracteres internacionales: 32
Estructura de caracteres 9 × 9 ó 7 × 9
Rollo de papel (una capa) Tamaño: Ancho: 69.5 ± 0.5 mm
Papel de documentos Normal, copia carbón, y sensible a la presión
Número de copias para el
documento:
Espesor total del
documento
Cartucho de cinta ERC-31
Tamaño de la memoria
intermedia
Tensión de alimentación +24 V de C.C. ±10 %
Consumo:
(a 24 V)
Vida Mecanismo: 7,500,000 líneas
Línea vertical de 9 agujas, paso de la aguja 0.353 mm, diámetro de
la aguja 0.29 mm.
9 × 9: papel de rollo = 30; papel de documentos = 66
7 × 9: papel de rollo = 40; papel de documentos = 88
9 × 9: 3 puntos (medios puntos); 7 × 9: 2 puntos (medios puntos)
7 × 9: 311 caracteres/segundo
Baja velocidad — 9 × 9: 200 caracteres/segundo
Aprox. 60.3 ms/línea (4.23 mm de alimentación);
Aprox. 86.36 mm/segundo alimentación continua
4.23 mm
Gráficos ampliados: páginas 128 × 9 (incluyendo páginas de
espacio)
Original + 4 (entre los 20 y 40° C)
Original + 1 a 3 copias (entre los 5 y 40° C)
De 0.09 a 0.36 mm
32 bytes ó 2 KB, dependiendo de la fijación de los interruptores DIP
Impresión de papel de recibos y de libro diario (40 columnas):
Media: Aprox. 1.8 A (caracteres alfanuméricos)
Máxima: Aproximadamente 8.0 A
Alimentación del papel de documentos a la posición inicial o a la
lectura MICR:
Media: Aprox. 2.3 A durante aprox. 1.4 segundos
Cabezal impresor: 150 millones de caracteres
Cinta: 4,500,000 caracteres
MICR: 240,000 pasadas
7 × 9: 267 caracteres/segundo
Diámetro externo máximo: 83 mm
Diámetro interno del recogedor del rollo de papel:
10 mm o más
Español
Manual del usuario del TM-U950 33

Español
Especificaciones de la TM-U950
MTBF (Tiempo medio entre
averías)
MCBF 18,000,000 líneas
Temperatura Funcionamiento: De 5 a 40° C
Humedad Funcionamiento: De 30 a 80 % HR
Dimensiones totales 194.5 × 251 × 298 mm (H × A × P)
Peso Aproximadamente 5.6 kg
180,000 horas
Almacenaje: De -10 a 50° C, excepto por la cinta
Almacenaje: De 30 a 90 % HR
34 Manual del usuario del TM-U950

WEEE (Waste Electrical and Electronic Equipment) Directive
This information only applies to customers in the European Union, according to
Directive 2002/96/EC OF THE EUROPEAN PARLIAMENT AND OF THE COUNCIL
OF 27 January 2003 on waste electrical and electronic equipment (WEEE) and
legislation transposing and implementing it into the various national legal systems.
For other countries, please contact your local government to investigate the
possibility of recycling your product.
English
The crossed out wheeled bin label that can be found on
your product indicates that this product should not be
disposed of via the normal household waste stream. To
prevent possible harm to the environment or human health
please separate this product from other waste streams to
ensure that it can be recycled in an environmentally sound
manner. For more details on available collection facilities
please contact your local government office or the retailer
where you purchased this product.
Deutsch
Der Aufkleber mit durchgekreuzter Mülltonne an diesem
Produkt weist darauf hin, dass dieses Produkt nicht im
normalen Hausmüll entsorgt werden darf. Zur Vermeidung
einer möglichen Beeinträchtigung der Umwelt oder der
menschlichen Gesundheit und um zu gewährleisten, dass
es in einer umweltverträglichen Weise recycelt wird, darf
dieses Produkt nicht in den Hausmüll gegeben werden.
Informationen zu Entsorgungseinrichtungen erhalten Sie
bei der zuständigen Behörde oder dem Geschäft, in dem
Sie dieses Produkt erworben haben.
Français
L'étiquette apposée sur ce produit et représentant une
poubelle barrée indique que le produit ne peut être mis au
rebut avec les déchets domestiques normaux. Afin d'éviter
d'éventuels dommages au niveau de l'environnement ou
sur la santé, veuillez séparer ce produit des autres déchets
de manière à garantir qu'il soit recyclé de manière sûre au
niveau environnemental. Pour plus de détails sur les sites
de collecte existants, veuillez contacter l'administration
locale ou le détaillant auprès duquel vous avez acheté ce
produit.
Italiano
L'etichetta con il contenitore barrato applicata sull'imballo
indica che il prodotto non deve essere smaltito tramite la
procedura normale di smaltimento dei rifiuti domestici. Per
evitare eventuali danni all'ambiente e alla salute umana,
separare questo prodotto da altri rifiuti domestici in modo
che possa essere riciclato in base alle procedure di rispetto
dell'ambiente. Per maggiori dettagli sulle strutture di
raccolta disponibili, contattare l'ufficio competente del
proprio comune o il rivenditore del prodotto.
Español
La etiqueta de un contenedor tachado que hallará en su
producto indica que este producto no se puede tirar con la
basura doméstica normal. Para impedir posibles daños
medioambientales o para la salud, separe este producto de
otros canales de desecho para garantizar que se recicle de
una forma segura para el medio ambiente. Para más
información sobre las instalaciones de recolección
disponibles, diríjase a las autoridades locales o al punto de
venta donde adquirió este producto.
Português
A etiqueta com o símbolo de um contentor de lixo traçado
com uma cruz que aparece no produto indica que este
produto não deve ser deitado fora juntamente com o lixo
doméstico. Para evitar possíveis danos no ambiente ou na
saúde pública, por favor separe este produto de outros
lixos; desta forma, terá a certeza de que pode ser reciclado
através de métodos não prejudiciais ao ambiente. Para
obter mais informações sobre os locais de recolha de lixo
disponíveis, contacte a sua junta de freguesia, câmara
municipal ou localonde comprou este produto.
Nederlands
Op uw product is een label van een rolcontainer met een
kruis erdoor aangebracht. Dit label wil zeggen dat dit
product niet bij het normale huishoudelijk afval mag worden
ingezameld. Om eventuele schade aan het milieu of de
gezondheid van de mens te voorkomen moet dit product
gescheiden van al het ander afval worden ingezameld,
zodat het op een verantwoorde wijze kan worden verwerkt.
Voor meer informatie over uw lokale afvalinzameling wendt
u zich tot uw gemeente of de leverancier bij wie u dit
product hebt gekocht.
Dansk
Etiketten med et kryds over skraldespanden på hjul, der
sidder på produktet, angiver, at dette produkt ikke må
bortskaffes sammen med almindeligt husholdningsaffald.
For at beskytte miljø og helbred skal dette produkt
bortskaffes separat, så det kan genbruges på en måde, der
er god for miljøet. Kontakt de lokale myndigheder eller den
forhandler, hos hvem du har købt produktet, vedrørende
steder, hvor du kan aflevere produktet.
Suomi
Laite on merkitty jäteastia-symbolilla, jonka yli on vedetty
rasti. Tämä tarkoittaa, ettei laitetta saa hävittää normaalin
talousjätteen mukana. Älä hävitä laitetta normaalin jätteen
seassa vaan varmista, että laite kierrätetään
ympäristöystävällisellä tavalla, jottei ympäristölle tai
ihmisille aiheudu vahinkoa. Lisätietoja kierrätyksestä ja
keräyspisteistä saa ottamalla yhteyttä paikallisiin
viranomaisiin tai jälleenmyyjään, jolta laite ostettiin.
Svenska
Symbolen med en överkorsad soptunna innebär att denna
produkt inte får kastas i vanligt hushållsavfall. För att
skydda miljön ska denna produkt inte kastas tillsammans
med vanligt hushållsavfall utan lämnas för återvinning på
tillbörligt sätt. För mer information om uppsamlingsplatser
kontakta din lokala myndighet eller den återförsäljare där
du har köpt produkten.
Norsk
Det er krysset over merket av beholderen på hjul som vises
på produktet, som angir at dette produktet ikke skal kastes
sammen med vanlig husholdningsavfall. Hold dette
produktet atskilt fra annet avfall slik at det kan resirkuleres
på en miljømessig forsvarlig måte og dermed forhindre
eventuell skade på miljø eller helse. Hvis du vil ha mer
informasjon om hvor produktet kan leveres inn, kontakter
du kommunale myndigheter eller forhandleren der du
kjøpte dette produktet.

Česky
Štítek s přeškrtnutým odpadkovým košem na kolečkách,
který lze nalézt na výrobku, označuje, že tento product se
nemá likvidovat s běžným domovním odpadem. V zájmu
ochrany životního prostředí a lidského zdraví zlikvidujte
tento výrobek jako tříděný odpad, který se recykluje
způsobem šetrným k životnímu prostředí. Podrobnější
informace o sběrných dvorech pro tříděný odpad získáte na
obecním úřadě nebo u prodejce, u kterého jste příslušný
výrobek zakoupili.
Magyar
A terméken található, áthúzott szemetest ábrázoló címke
azt jelzi, hogy ezt a terméket nem szabad a rendes
háztartási szeméttel együtt kidobni. Az esetleges
környezeti- vagy egészségkárosodást megelõzendõ,
kérjük, hogy ezt a terméket a többi szeméttõl elkülönítve
helyezze el, és biztosítsa, hogy azt környezetbarát módon
újrahasznosítsák. A rendelkezésére álló begyûjtõ
létesítményekrõl kérjük tájékozódjon a megfelelõ helyi
állami szerveknél vagy a viszonteladónál, ahol a terméket
vásárolta.
Polski
Symbol przekreślonego kosza znajdujący się na produkcie
oznacza, że nie może on być utylizowany razem z
normalnymi odpadami z gospodarstwa domowego. Aby
zapobiec potencjalnemu zagrożeniu dla środowiska lub
zdrowia ludzkiego, produkt ten należy odseparować od
reszty odpadów z gospodarstwa domowego i utylizować w
ekologicznie właściwy sposób. Szczegółowe informacje na
temat punktów zbiórki odpadów można uzyskać w
lokalnych urzędach lub u sprzedawcy danego produktu.
Slovensky
Štítok s preškrtnutým odpadkovým košom na kolieskach,
ktorý je možné nájst’ na výrobku, označuje, že tento
product sa nemá likvidovat’ s bežným komunálnym
odpadom. V záujme ochrany životného prostredia a
ľudského zdravia zlikvidujte tento výrobok ako triedený
odpad, ktorý sa recykluje spôsobom šetrným k životnému
prostrediu. Podrobnejšie informácie o zberných dvoroch
pre triedený odpad získate na obecnom úrade alebo u
predajcu, u ktorého ste príslušný výrobok zakúpili.
Slovenski
Prečrtan koš za smeti na etiketi, katero lahko najdete na
vašem izdelku, pomeni, da tega izdelka ne smete odvreči
podobno kot vse ostale smeti. Da bi preprečili morebitne
škodljive vplive na okolje ali zdravje, ločite izdelek od vseh
ostalih in poskrbite, da bo recikliran na okolju prijazen
način. Natančne informacije o tem, kje se nahajajo
primerna odlagališča, pridobite v vašem krajevnem uradu
ali pri prodajalcu.
Eesti
Teie tootele kleebitud tähis, mis kujutab ratastega
prügikonteinerit, millele on rist peale tõmmatud, keelab
toote kõrvaldamise majapidamisjäätmetega sarnasel viisil.
Keskkonnale või inimeste tervisele tekitatava võimaliku
kahju vältimiseks eraldage toode teistest jäätmetest, et
tagada selle korduvkasutamine keskkonnasäästlikul viisil.
Kui soovite saada rohkem teavet võimalike
kogumispunktide kohta, võtke ühendust kohaliku
omavalituse ametnikuga või teile toote müünud
jaemüüjaga.
Lietuviškai
Užbraukta ratuota šiukšliadėžės etiketė, kurią rasite ant
jūsų produkto, reiškia, kad šis produktas neturėtų būti
išmestas kartu su įprastinėmis buitinėmis šiukšlėmis.
Siekiant išvengti galiamos žalos aplinkai bei žmonių
sveikatai, prašome atskirti šį produktą nuo kitų atliekų, ir
įsitikinti, kad jis būtų perdirbtas aplinkai nepavojingu būdu.
Jei reikia išsamesnės informacijos apie atliekų surinkimo
ypatumus, prašome kreiptis į savo vietos valdžios įstaigas
arba į mažmeninį pardavėją, iš kurio jūs įsigijote šį
produktą.
Latviski
Marķējums ar pārsvītrotu atkritumu tvertni uz ritenīšiem,
kas redzams uz izstrādājuma, norāda, ka šo izstrādājumu
nedrīkst likvidēt kopā ar parastajiem sadzīves atkritumiem.
Lai novērstu iespējamo kaitējumu videi vai cilvēku
veselībai, lūdzu, atdaliet šo izstrādājumu no citiem
atkritumiem, tādējādi nodrošinot tā otrreizējo pārstrādi videi
drošā veidā. Papildinformācijai par pieejamajām atkritumu
savākšanas iespējām, lūdzu, sazinieties ar vietējo
pašvaldību vai mazumtirgotāju, no kura jūs iegādājāties šo
izstrādājumu.
Ελληνικά
Η διαγραµµένη ετικέτα του τροχοφόρου κάδου
απορριµµάτων που θα βρείτε πάνω στο προϊόν σας
υποδεικνύει ότι αυτό το προϊόν δεν πρέπει να απορρίπτεται
µέσω του κανονικού δικτύου αποκοµιδής οικιακών
απορριµµάτων. Για να αποτρέψετε πιθανές επιπτώσεις στο
περιβάλλον ή την ατοµική υγεία, παρακαλούµε να
διαχωρίσετε
ώστε να διασφαλίσετε ότι είναι δυνατή η ανακύκλωσή του
µε έναν περιβαλλοντικά θεµιτό τρόπο. Για περισσότερες
πληροφορίες σχετικά µε τις διαθέσιµες δυνατότητες
συλλογής απορριµµάτων, παρακαλούµε να επικοινωνήσετε
µε την τοπική κυβερνητική αρχή ή το κατάστηµα λιανικής
από
Türkçe
Ürününüzün üzerinde bulunan çarpı işaretli tekerlekli kutu
etiketi, bu ürünün normal ev atık sistemi vasıtasıyla elden
çıkarılmaması gerektiğini gösterir. Çevreye ve insan
sağlığına zarar vermeyi önlemek için, lütfen bu ürünü
çevreye zarar vermeyecek şekilde geri dönüşüme tabi
tutulmak üzere diğer atıklardan ayırın. Mevcut toplama
tesisleri ile ilgili ayrıntılı bilgi edinmek için, yerel devlet
makamlarıyla veya bu ürünü satın aldığınız satıcıyla irtibata
geçin.
αυτό το προϊόν από άλλα δίκτυα αποκοµιδής
όπου αγοράσατε αυτό το προϊόν.
Română
Eticheta arătând un coş de gunoi tăiat cu două linii
încrucişate, care poate fi găsită pe produs, indică faptul că
acesta nu trebuie aruncat la gunoi laolaltă cu gunoiul
menajer. Pentru a evita posibila degradare a mediului
înconjurător sau a sănătăţii umane, colectaţi separat acest
produs de gunoiul menajer pentru a vă asigura că poate fi
reciclat într-un mod ecologic. Pentru mai multe detalii
privind punctele disponibile de colectare, contactaţi
autorităţile locale sau comerciantul de la care aţi
achiziţionat acest produs.
Български
Етикетът, представляващ зачертано кошче за боклук в
кръг, който можете да видите върху вашия продукт,
означава, че този продукт не трябва да се изхвърля
заедно с обикновените домакински отпадъци . За
предпазване от евентуални щети върху околната среда
или човешкото здраве, моля, отделете този продукт от
останалите отпадъци, за да се гарантира
бъде рециклиран по екологично съобразен начин. За
повече информация относно наличните места за
събиране на отпадъци, моля, свържете се с местните
власти или търговеца, от когото сте закупили този
продукт.
, че той ще


Printed in China
2007.10
 Loading...