

Epson TM-H6000IV-DT Technical Reference Guide
Technical Reference Guide
Describes features for this product.
Describes the printer functions and setting methods.
Describes the pre-installed Widows settings and specifications.
Describes the requirements for system development
using TM-DT software.
Describes the PC-POS System interface, the control
method for devices, and system development using the
Thin-Client environment.
Describes this product's specifications.
Product Overview
Printer Functions and Settings
Windows Settings
System Development Using TM-DT Software
PC-POS System Development
Product Specifications
M00070104
Rev. E

Cautions
No part of this document may be reproduced, stored in a retrieval system, or transmitted in any form or by
any means, electronic, mechanical, photocopying, recording, or otherwise, without the prior written permission of Seiko Epson Corporation.
The contents of this document are subject to change without notice. Please contact us for the latest informa-
tion.
While every precaution has been taken in the preparation of this document, Seiko Epson Corporation
assumes no responsibility for errors or omissions.
Neither is any liability assumed for damages resulting from the use of the information contained herein.
Neither Seiko Epson Corporation nor its affiliates shall be liable to the purchaser of this product or third
parties for damages, losses, costs, or expenses incurred by the purchaser or third parties as a result of:
accident, misuse, or abuse of this product or unauthorized modifications, repairs, or alterations to this
product, or (excluding the U.S.) failure to strictly comply with Seiko Epson Corporation’s operating and
maintenance instructions.
Seiko Epson Corporation shall not be liable against any damages or problems arising from the use of any
options or any consumable products other than those specified as Original EPSON Products or EPSON
Approved Products by Seiko Epson Corporation.
Trademarks
EPSON is a registered trademark of Seiko Epson Corporation.
Exceed Your Vision and ESC/POS are registered trademarks or trademarks of Seiko Epson Corporation.
Microsoft and Windows are registered trademarks of Microsoft Corporation.
®
Intel
, Intel® AtomTM are registered trademarks or trademarks of Intel Corporation in United States of America
and other countries/regions.
®
IOS
is a trademark or registered trademark of Cisco in the U.S. and other countries and is used under license.
Android
Wi-Fi
and other countries/regions.
All other trademarks are the property of their respective owners and used for identification purpose only.
TM
is trademark of Google Inc. in the United States and other countries.
®
, WPATM, WPA2TM are registered trademarks or trademarks of Wi-Fi Alliance in United States of America
ESC/POS® Command System
EPSON ESC/POS is a proprietary POS printer command system that includes patented or patent-pending
commands. ESC/POS is compatible with most EPSON POS printers and displays.
ESC/POS is designed to reduce the processing load on the host computer in POS environments. It comprises a
set of highly functional and efficient commands and also offers the flexibility to easily make future upgrades.
©Seiko Epson Corporation 2013-2017. All rights reserved.
2
For Safety
Key to Symbols
The symbols in this manual are identified by their level of importance, as defined below. Read the following
carefully before handling the product.
You must follow warnings carefully to avoid serious bodily injury.
WARNING
Provides information that must be observed to prevent damage to the equipment or loss of data.
Possibility of sustaining physical injuries.
CAUTION
Possibility of causing physical damage.
Possibility of causing information loss.
Provides information that must be observed to avoid damage to your equipment or a
malfunction.
Provides important information and useful tips.
3

Warnings
WARNING
To avoid risk of electric shock, do not set up this product or handle cables during a thunder-
storm.
Never insert or disconnect the power plug with wet hands.
Doing so may result in severe shock.
Handle the power cable with care.
Improper handling may lead to fire or electric shock.
Do not modify or attempt to repair the cable.
Do not place any heavy object on top of the cable.
Avoid excessive bending, twisting, and pulling.
Do not place the cable near heating equipment.
Check that the plug is clean before plugging it in.
Be sure to push the plug all the way in.
Be sure to use the specified power source.
Connection to an improper power source may cause fire or shock.
Do not place multiple loads on the power outlet.
Overloading the outlet may lead to fire or shock.
Shut down your equipment immediately if it produces smoke, a strange odor, or unusual
noise.
Continued use may lead to fire. Immediately unplug the equipment and contact your dealer
or a Seiko Epson service center for advice.
Never attempt to repair this product yourself.
Improper repair work can be dangerous.
Never disassemble or modify this product.
Tampering with this product may result in injury or fire.
Do not allow foreign matter to fall into the equipment.
Penetration by foreign objects may lead to fire.
If water or other liquid spills into this equipment, do not continue to use it.
Continued use may lead to fire. Unplug the power cord immediately and contact your dealer
or a Seiko Epson service center for advice.
Do not use aerosol sprayers containing flammable gas inside or around this product.
Doing so may cause fire.
4

Cautions
CAUTION
Do not connect cables in ways other than those mentioned in this manual.
Different connections may cause equipment damage or fire.
Be sure to set this equipment on a firm, stable, horizontal surface.
The product may break or cause injury if it falls.
Do not use this product in locations subject to high humidity or dust levels.
Excessive humidity and dust may cause equipment damage or fire.
Do not place heavy objects on top of this product. Never stand or lean on this product.
Equipment may fall or collapse, causing breakage and possible injury.
To avoid injury, do not insert fingers or any part of the hand in the roll paper opening where
the manual cutter is installed.
Do not open the roll paper cover without taking the necessary precautions, as this can result
in injury from the autocutter fixed blade.
To ensure safety, unplug this product before leaving it unused for an extended period.
To power off the product, use the application or OS function.
Do not use the operations shown below unless the product cannot be turned off due to an
application or OS problem. Doing so may cause loss of unsaved data, require OS recovery, or
damage the HDD, SSD or other hardware.
Forced termination by holding down the power button for approx. 4 sec.
Power shutdown by turning off the circuit breaker on the distribution board or by discon-
necting the AC cable/DC cable.
The same phenomenon may also occur due to power shutdown caused by power failure/temporary power failure.
To prevent power shutdown due to power failure/temporary power failure, using an uninterruptible power supply (UPS) is recommended.
Restriction of Use
When this product is used for applications requiring high reliability/safety, such as transportation devices
related to aviation, rail, marine, automotive, etc.; disaster prevention devices; various safety devices, etc.; or
functional/precision devices, etc., you should use this product only after giving consideration to including failsafes and redundancies into your design to maintain safety and total system reliability. Because this product was
not intended for use in applications requiring extremely high reliability/safety, such as aerospace equipment,
main communication equipment, nuclear power control equipment, or medical equipment related to direct
medical care, etc., please make your own judgment on this product's suitability after a full evaluation.
5

Contents
■ For Safety..................................................................................................................................3
Key to Symbols.................................................................................................................................................................... 3
Warnings ............................................................................................................................................................................... 4
Cautions................................................................................................................................................................................. 5
■ Restriction of Use....................................................................................................................5
■ Contents....................................................................................................................................6
Product Overview ..........................................................................................11
■ Features ................................................................................................................................. 11
■ System Outline ..................................................................................................................... 13
PC-POS system ..................................................................................................................................................................13
Thin-Client system ...........................................................................................................................................................14
Systems that Use TM-DT software..............................................................................................................................15
■ Development Information ................................................................................................. 16
Common to All Systems.................................................................................................................................................16
PC-POS system ..................................................................................................................................................................16
Thin-Client system ...........................................................................................................................................................17
Systems that Use TM-DT software..............................................................................................................................18
Printer Functions and Settings.....................................................................19
■ Part Names and Functions ................................................................................................. 19
Main Unit Front .................................................................................................................................................................19
Product Rear.......................................................................................................................................................................24
■ Installing the Product..........................................................................................................26
Security hook .....................................................................................................................................................................26
■ Connecting the AC Adapter ............................................................................................... 27
■ Turning Power On/Off ......................................................................................................... 29
Turning Power On............................................................................................................................................................29
Turning Power On for the First Time..........................................................................................................................29
Turning Power Off............................................................................................................................................................29
Power Button Settings....................................................................................................................................................30
Forced Termination..........................................................................................................................................................30
■ Powered USB mode setting................................................................................................ 31
■ Online and Offline................................................................................................................ 32
Online ...................................................................................................................................................................................32
Offline...................................................................................................................................................................................32
6

■ Handling the Receipt Printer Unit..................................................................................... 33
Loading the Roll Paper ...................................................................................................................................................33
Removing Jammed Paper .............................................................................................................................................35
Adjusting the Paper Roll Near-End (NE) Sensor ....................................................................................................37
■ Handling the Slip Printer Unit ........................................................................................... 38
Installing/Replacing the Ribbon Cartridges (for Front Slip Printing).............................................................38
Installing/Replacing the Ribbon Cartridges (for Endorsement Printing).....................................................39
Inserting the Slip Paper..................................................................................................................................................41
Removing Jammed Paper .............................................................................................................................................42
■ Attaching and Setting Peripherals.................................................................................... 43
Keyboard / mouse............................................................................................................................................................43
Display..................................................................................................................................................................................43
USB Interface Printer .......................................................................................................................................................44
Network printer ................................................................................................................................................................44
Customer display..............................................................................................................................................................44
Cash drawer........................................................................................................................................................................45
Key input device ...............................................................................................................................................................46
Serial communication device ......................................................................................................................................46
■ Network Settings ................................................................................................................. 47
Connect to the Wired LAN ............................................................................................................................................47
Connect to the Wireless LAN........................................................................................................................................48
■ Attaching Accessories ......................................................................................................... 50
Connector Cover...............................................................................................................................................................50
■ Cleaning................................................................................................................................. 52
Case.......................................................................................................................................................................................52
Thermal Head ....................................................................................................................................................................52
Cleaning the MICR Head................................................................................................................................................53
■ Preparing for Transport....................................................................................................... 53
■ Setting the Memory Switches/Receipt Enhancement.................................................. 54
Functions.............................................................................................................................................................................55
■ Setting/Checking Modes of the Printer........................................................................... 58
Self-test Mode ...................................................................................................................................................................59
NV Graphics Print Mode.................................................................................................................................................61
Receipt Enhancement Information Print Mode ....................................................................................................62
Software Setting Mode ..................................................................................................................................................63
Hexadecimal Dumping Mode .....................................................................................................................................64
7

Windows Settings ..........................................................................................65
■ Windows Embedded POSReady 7..................................................................................... 65
Windows Initial Settings ................................................................................................................................................65
Starting Up and Shutting Down Windows..............................................................................................................65
Enabling or Disabling ePOS-Device Service...........................................................................................................66
Adjusting the Speaker Volume....................................................................................................................................66
Windows Hibernation.....................................................................................................................................................67
Windows Recovery ..........................................................................................................................................................69
Specification ......................................................................................................................................................................70
System Development Using TM-DT Software.............................................71
■ Systems that Use TM-DT software .................................................................................... 71
Network Printer Control.................................................................................................................................................71
Controlling for POS Peripherals ..................................................................................................................................72
Spooler and Print Forwarding .....................................................................................................................................74
Software Access Point ....................................................................................................................................................80
Communication Box .......................................................................................................................................................81
Server Direct Print ............................................................................................................................................................83
Device Data Notification................................................................................................................................................85
Web Server .........................................................................................................................................................................87
Method Used to Set multiple TM-DT devices ........................................................................................................89
Controlling POS Peripherals from Smart Devices.................................................................................................91
Controlling POS Peripherals from Web Applications ..........................................................................................92
Printing from Web Service Compatible Applications..........................................................................................93
Controlling POS Peripherals from Socket Communication Compatible Applications............................94
■ TM-DT Software Settings.................................................................................................... 95
Starting EPSON TMNet WebConfig............................................................................................................................95
Help Screen Display.........................................................................................................................................................95
Version Screen Display ...................................................................................................................................................95
Updating TM-DT Software ............................................................................................................................................95
Information - Current status.........................................................................................................................................96
Information - System settings - Network.................................................................................................................97
Information - System settings - Date and Time.....................................................................................................98
Settings - Web service settings - Startup settings................................................................................................98
Settings - Web service settings - Printer ..................................................................................................................99
Settings - Web service settings - Customer Display......................................................................................... 100
Settings - Web service settings - Key input device............................................................................................ 101
Settings - Web Service settings - Serial communication Device.................................................................. 102
Settings - Web Service settings - Other Device .................................................................................................. 103
Settings - Web service settings - Control script - Add/delete........................................................................ 103
Settings - Web service settings - Control program - Device registration.................................................. 104
Settings - Web service settings - Control program - Add/delete ................................................................. 104
Settings - Web service settings - Print Settings - Spooler ............................................................................... 105
Settings - Web Service settings - Web Content - Update settings............................................................... 106
8

Settings - Web service settings - Server access - Direct Print........................................................................ 107
Settings - Web Service settings - Server access - Status notification.......................................................... 108
Settings - Web Service settings - Server access - Device Data Notification ............................................. 109
Settings - System settings - Network - Wired LAN - TCP/IP ............................................................................ 110
Settings - System settings - Network - Wireless LAN........................................................................................111
Settings - System settings - Network - Wireless LAN - TCP/IP ....................................................................... 112
Settings - System settings - Security - SSL ........................................................................................................... 112
Settings - System settings - Web access - Proxy settings................................................................................ 113
Settings - System settings - Web access - Server authentication.................................................................113
Settings - System settings - Access Point - Software access point settings ............................................. 114
Settings - System settings - Date and time - Time settings............................................................................ 114
Settings - System settings - Power - Shutdown settings ................................................................................ 115
Settings - Admin settings - Maintenance - Store restore settings ............................................................... 115
Settings - Admin settings - Maintenance - Initialization................................................................................. 121
Settings - Admin settings - Maintenance - Log .................................................................................................. 121
Settings - Admin settings - Maintenance - Update Web service function................................................ 121
Settings - Admin settings - Maintenance - Deployment ................................................................................ 122
Settings - Admin settings - Admin information - Admin information ....................................................... 122
Settings - Admin settings - Admin information - Password........................................................................... 123
■ TM-DT Software Specification ......................................................................................... 124
Controllable printer......................................................................................................................................................124
Controllable customer display ................................................................................................................................. 125
PC-POS System Development.................................................................... 126
■ PC-POS System Development ......................................................................................... 126
Interface............................................................................................................................................................................ 126
■ How to Control Peripherals.............................................................................................. 127
Printer................................................................................................................................................................................ 127
Cash drawer..................................................................................................................................................................... 127
Customer display........................................................................................................................................................... 127
Other devices.................................................................................................................................................................. 127
■ Software and Manual ........................................................................................................ 128
Development kit............................................................................................................................................................ 128
Driver ................................................................................................................................................................................. 128
Utility ................................................................................................................................................................................. 129
ESC/POS command reference .................................................................................................................................. 129
■ System Development using the Thin-Client Environment......................................... 130
Desktop Virtualization ................................................................................................................................................. 130
Application Virtualization........................................................................................................................................... 130
9

Product Specifications................................................................................ 131
■ Computer Specifications .................................................................................................. 131
N2800 CPU model.........................................................................................................................................................131
D2550 CPU model.........................................................................................................................................................133
■ Receipt Printer Specifications.......................................................................................... 135
Printing Specifications................................................................................................................................................. 135
Character Specifications ............................................................................................................................................. 136
Roll Paper Specifications ............................................................................................................................................ 137
Printable Area................................................................................................................................................................. 137
Printing and Cutting Positions ................................................................................................................................. 138
Reliability.......................................................................................................................................................................... 138
■ Slip Printer Specifications................................................................................................. 139
Printing Specifications................................................................................................................................................. 139
Character Specifications ............................................................................................................................................. 140
Paper Specifications ..................................................................................................................................................... 140
Printable Area................................................................................................................................................................. 142
Ribbon cartridge ........................................................................................................................................................... 143
Reliability.......................................................................................................................................................................... 143
■ MICR Reader Specifications ............................................................................................. 144
Reading Specifications ................................................................................................................................................144
Reliability.......................................................................................................................................................................... 144
■ Power supply capacity for external devices.................................................................. 144
■ Environmental Conditions ............................................................................................... 145
■ External Dimensions ......................................................................................................... 146
TM-H6000IV-DT (with connector cover) ............................................................................................................... 146
■ AC Adapter Specifications ................................................................................................ 147
■ Option .................................................................................................................................. 147
■ Setting Items for Software Setting Mode...................................................................... 148
■ Character Code Tables....................................................................................................... 149
10

Chapter 1 Product Overview
Product Overview
This chapter describes features of this product.
Features
The TM-H6000IV-DT is a highly-functional hybrid printer used in tandem with a Windows computer.
A number of modules that operate on Window can be used to configure an effective POS System.
TM-DT software
TM-DT software provides features for controlling the TM printer and POS peripherals from smart devices
and Web applications, and connecting with Web servers. There is also a feature for efficiently configuring the
TM-DT software and setting up the TM-DT. TM-DT software may be subject to upgrading with additional
or improved features.
For details, see
Windows printer driver
You can also conduct Windows POS application development using the Windows EPSON Advanced Printer
Driver or OPOS ADK, and system development utilizing existing Windows POS applications.
For details, see
"System Development Using TM-DT Software" on page 71.
"PC-POS System Development" on page 126.
1
Apache HTTP Server
You can use this product as a Web server. You can execute Web applications for server-side scripting (Perl or
php).
For details, see
"Web Server" on page 87.
11

Chapter 1 Product Overview
The product has the following features.
Space-saving design through integrating PC with printer.
The printer includes a Magnetic Ink Character Recognition (MICR) reader and an endorsement printer (E/
P).
Interfaces for connecting with peripherals
(USB x 3, Powered USB x 3, Serial x1, DisplayPort x 1, VGA x 1)
Equipped with Powered USB 12 V x 3 ports as standard.
*2
Printing and control of peripherals from Web applications or smart device applications
Server direct print function
The server direct print functions allows print data to be directly obtained and printing results to be notified
from the Web server.
TM-DT Software Ver.3.0 or later
.
1
12
System Outline
Application
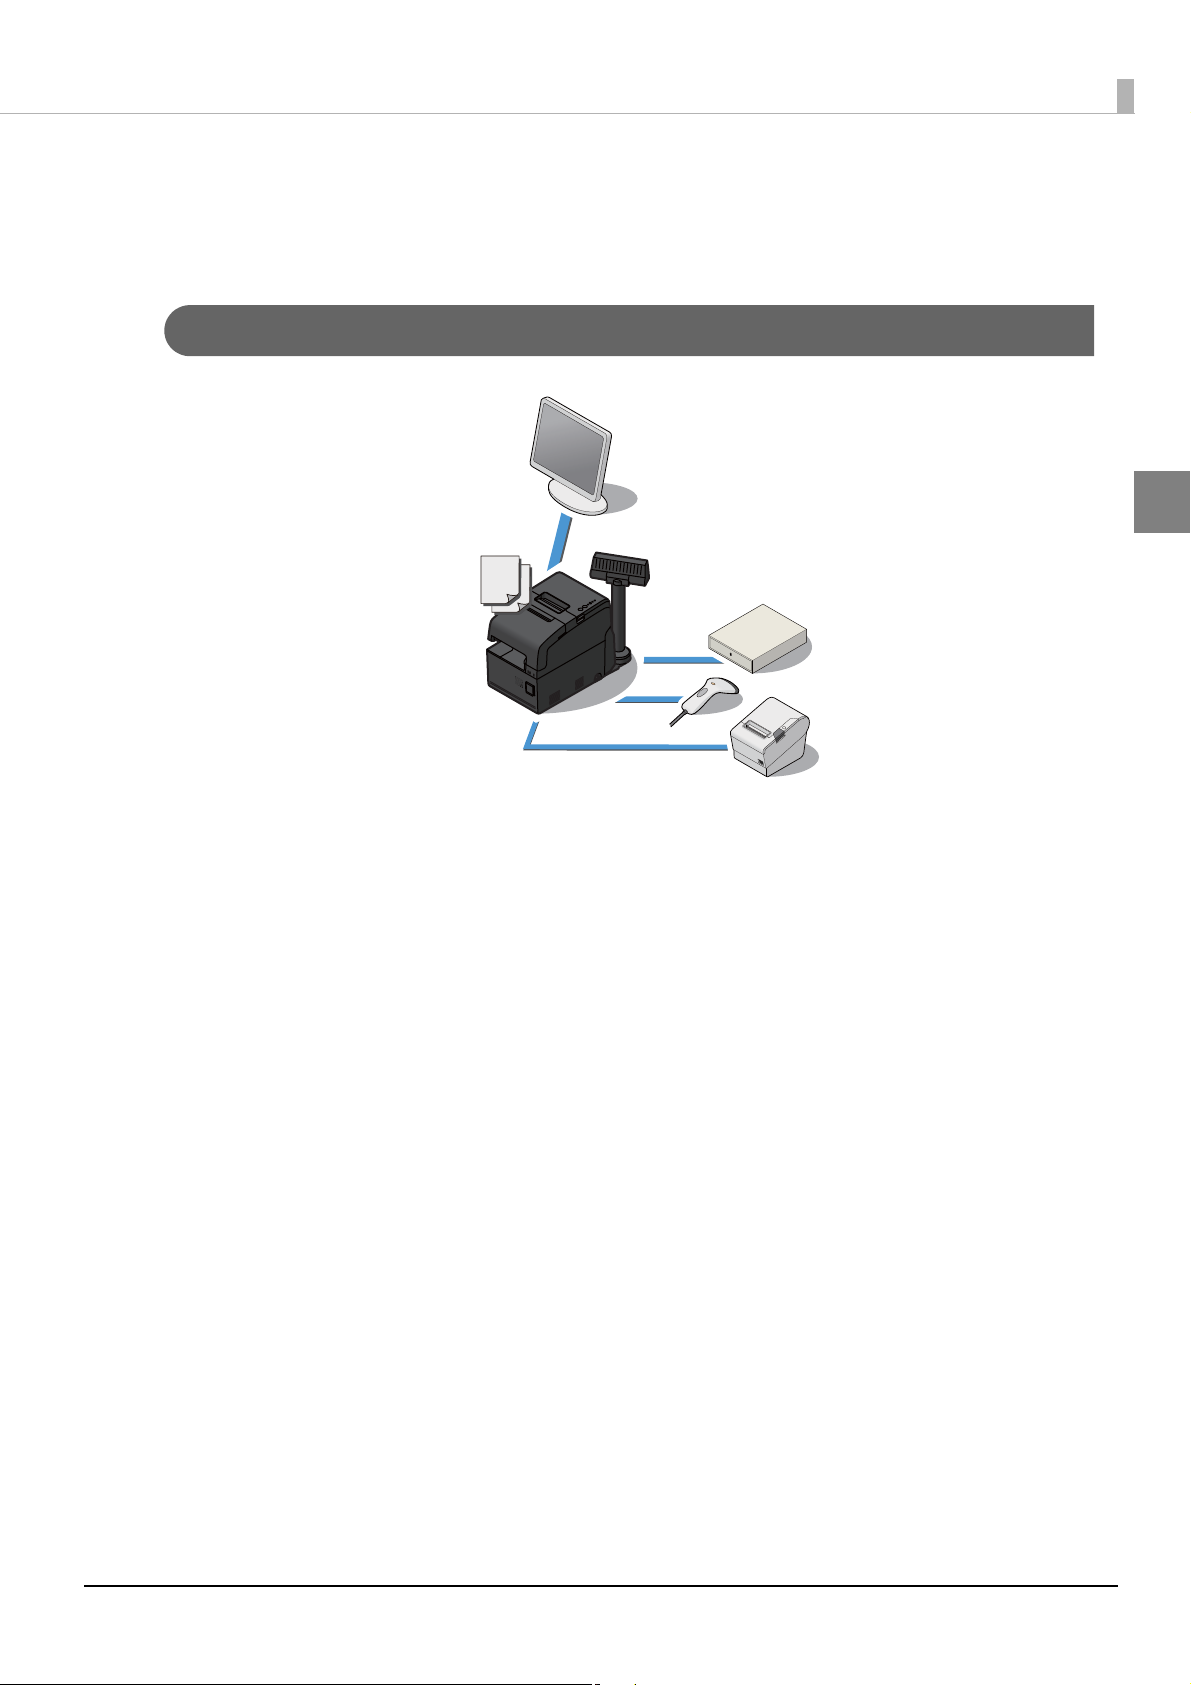
As shown below, you can configure various systems using this product.
PC-POS system
Chapter 1 Product Overview
1
13

Thin-Client system
Application
Guest OS
Display
Display
Device control
Device control
Guest OS desktop
Application
Guest OS
Guest OS desktop
Application
OS data
Server
Application
Client OS
Application
Client OS
Application
OS data
Virtual Desktop Infrastructure (VDI)
Chapter 1 Product Overview
1
Application virtualization system
14
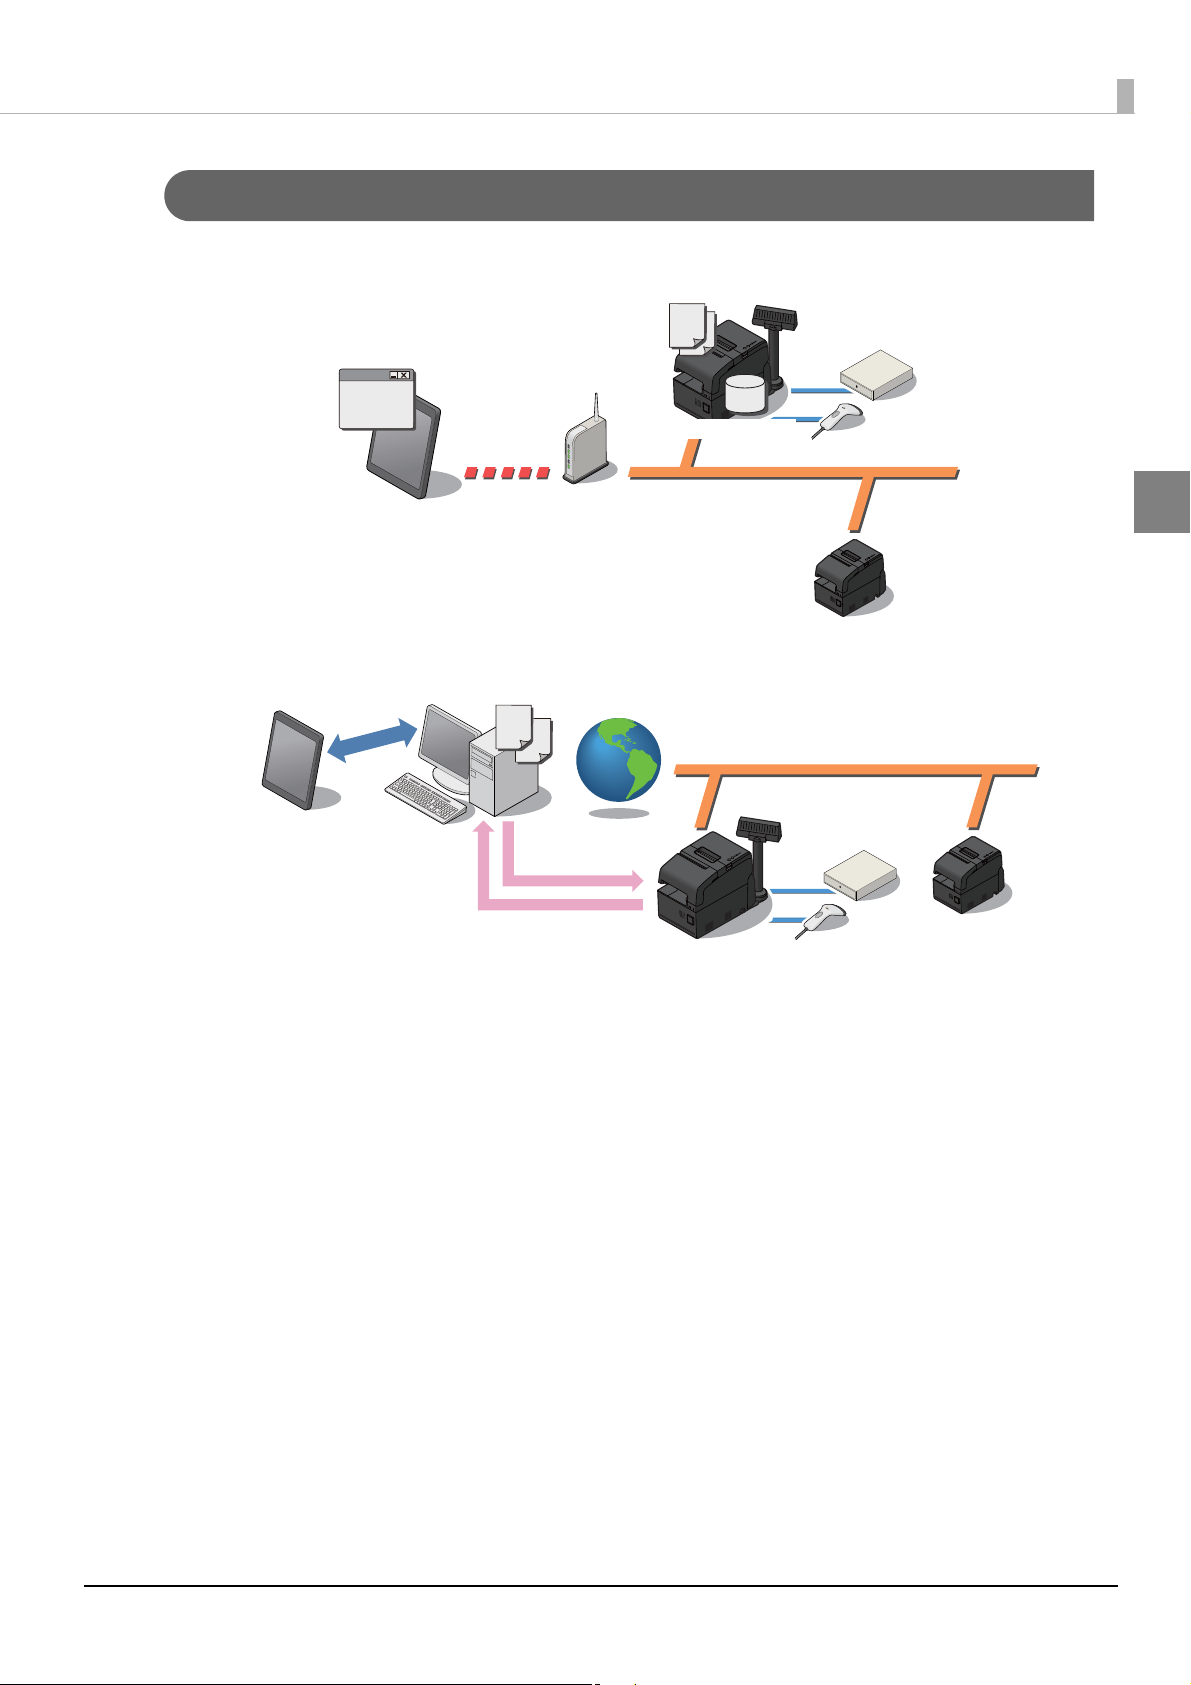
Systems that Use TM-DT software
Application
Browser
Database
Application
Acquisition of
print data
Notice of printing
results
Web application system
Server Direct Print system
Chapter 1 Product Overview
1
15
Chapter 1 Product Overview
Development Information
Development tools, drivers, related manuals, and utilities are provided for developing systems that make use of
this product. These can be obtained from the following URL.
For customers in North America, go to the following web site:
http://www.epson.com/support/ and follow the on-screen instructions.
For customers in other countries, go to the following web site:
https://download.epson-biz.com/?service=pos
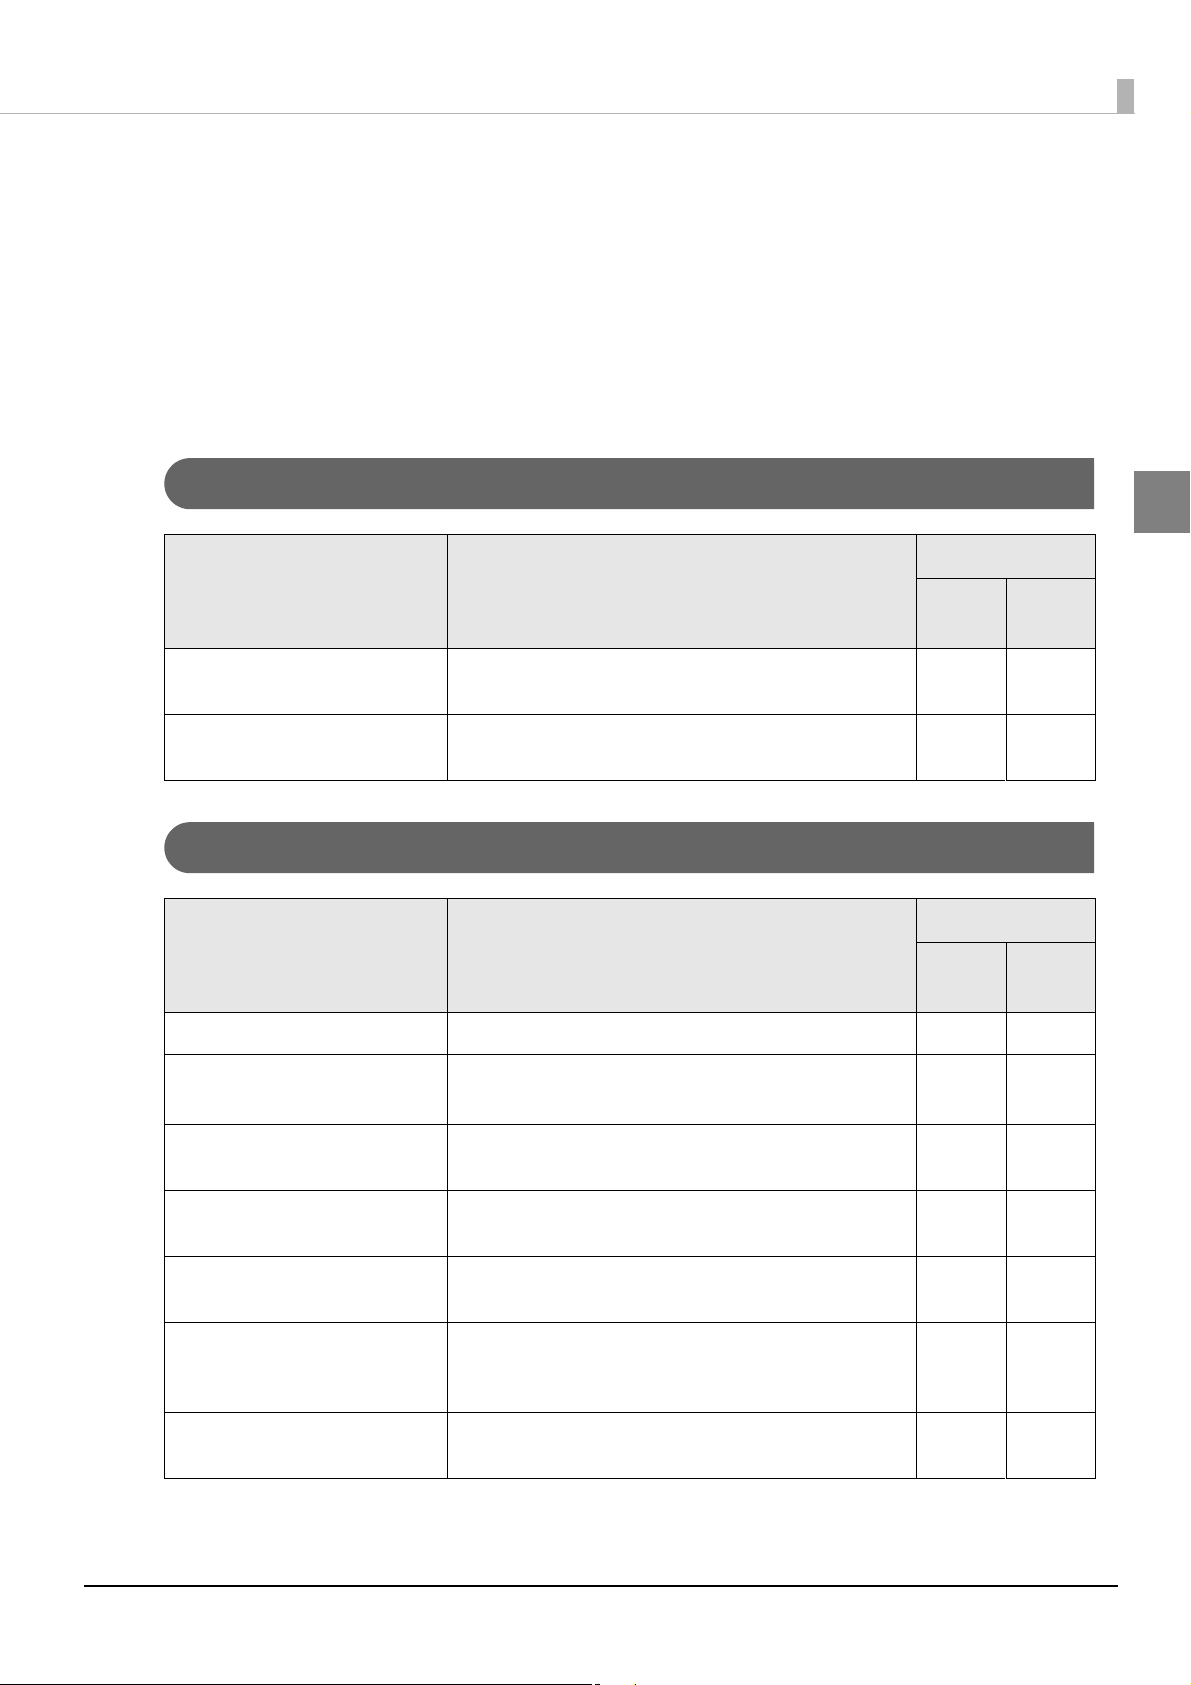
Common to All Systems
How to Obtain
1
Item Description
TM-H6000IV-DT Technical
Reference Guide
TM-H6000IV Utility This utility is for confirming and changing printer settings. It
This document.
is already installed in this product.
Web
site
✔ -
✔ -
Other
PC-POS system
How to Obtain
Item Description
EPSON Advanced Printer Driver Windows printer driver for the TM printer. ✔ -
EPSON Advanced Printer Driver
for DM-D
OPOS ADK Driver with UPOS (UnifiedPOS) specifications for use with
Windows printer driver for the customer display.
Win32 API compatible applications.
Web
site
✔ -
✔ -
Other
OPOS for .NET Driver with UPOS (UnifiedPOS) specifications for use with
.Net compatible applications.
JavaPOS Driver with UPOS (UnifiedPOS) specifications for use with
Java compatible applications.
ESC/POS Command Reference Provides ESC/POS for controlling the TM printer and the
customer display command detailed information, character
code table as a Web reference.
DM-D110/DM-D210 Technical
Reference Guide
Provides information necessary for system development
using the DM-D110 (customer display).
✔ -
✔ -
Web
-
✔ -
Refer-
ence
16

Thin-Client system
Chapter 1 Product Overview
How to Obtain
Item Description
TM-DT Thin-Client system Setup
Tool
IP address setting tool Tool for setting the IP address of this product (client) from
Tool for assisting Thin-Client system construction.
the Thin-Client system server.
Web
site
✔ -
✔ -
Other
1
17

Systems that Use TM-DT software
Chapter 1 Product Overview
How to Obtain
Item Description
Epson ePOS SDK Software development kit for controlling the printer and
for iOS
for Android
for Universal Windows apps
for JavaScript
TM-DT Series Peripheral Device
Control Guide
ePOS-Device XML User's Manual Manual describing the method for transmitting XML data
ePOS-Print XML User's Manual Manual describing the method for using Web services from
Server Direct Print User's Manual Manual describing the method for developing systems
*1
*1
peripherals from Web applications and smart device applications.
*2
Manual describing the method for controlling peripherals
with TM-DT series printers.
It explains device control programs and scripts.
This manual is included in the Epson ePOS SDK package.
from applications via socket communication to control
printing and peripherals.
applications to conduct printing.
using server direct print.
Web
site
✔
✔ -
✔ -
✔ -
✔ -
Other
Web
Refer-
ence
1
Device Data Notification User's
*2
Manual
Deployment Guide
*2
1 TM-DT Software Ver.2.5 or later.
2 TM-DT Software Ver.3.0 or later.
Manual describing the method for developing systems
using device data notification.
This guide includes the information needed to configure
settings for multiple products efficiently.
✔ -
✔ -
18
Chapter 2 Printer Functions and Settings
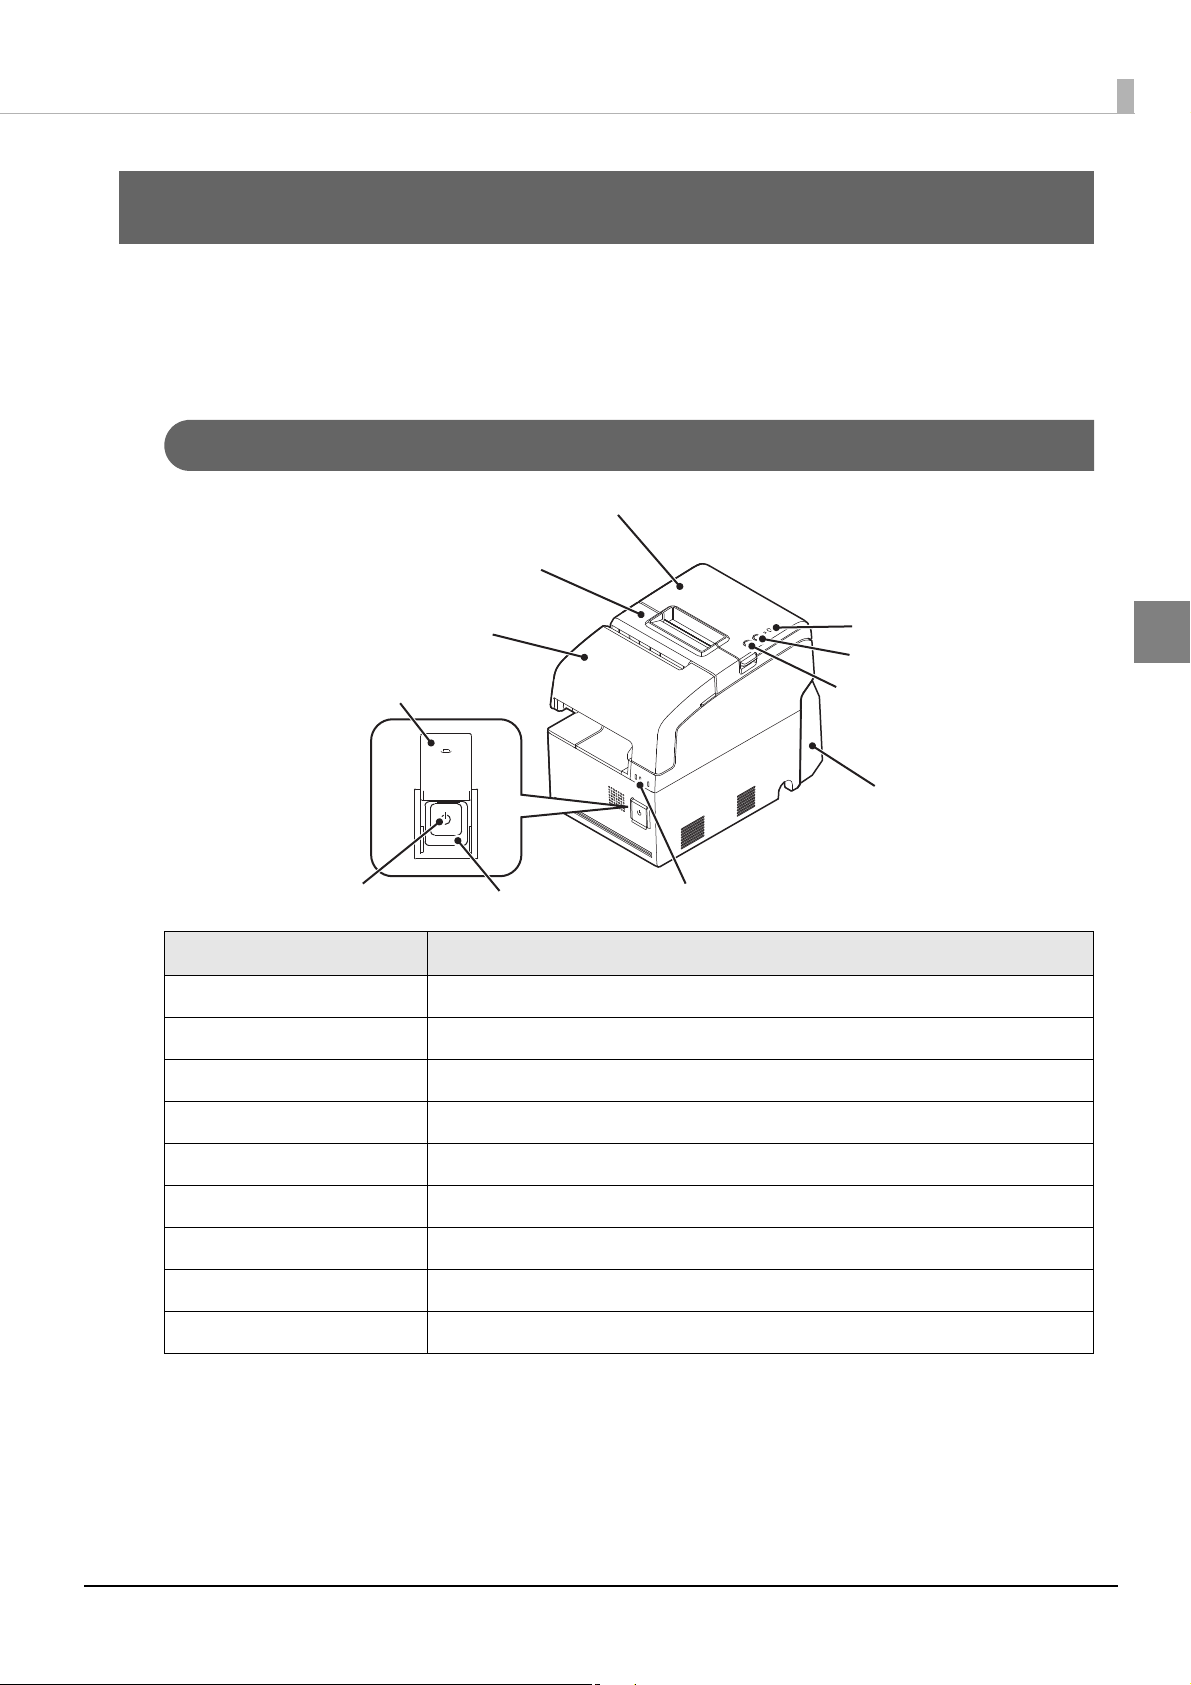
Controller LEDs
Power button cover
Power button
Printer reset button
Roll paper cover
Receipt unit cover
Front cover
Connector cover
Printer LEDs
Feed button
Release button
Printer Functions and Settings
This chapter describes the printer functions and setting methods.
Part Names and Functions
Main Unit Front
2
Name Description
Power button Turns this product power on or off.
Power button cover Open this cover to operate the power button and the printer reset button.
Printer reset button Resets this product's printer. This product's computer is not reset.
Release button Press this button to release the retained slip paper.
Feed button Press this button to feed the roll paper.
Front cover Open this cover to install/replace the ribbon cartridge for front slip printing.
Receipt unit cover Open this cover to install/replace the ribbon cartridge for endorsement printing.
Roll paper cover Open this cover to load/ replace the roll paper.
Connector cover Attach this cover to protect cables.
19

Controller LEDs
(Power) LED
Error LED
Paper LED
Slip LED
These display the computer status.
Name Status Description
Chapter 2 Printer Functions and Settings
Status LED
(Green)
Status LED
(Orange)
Storage access LED
(Green)
On Power is on
Flashing
(Approx. 1 second intervals)
Off Power is off
Flashing (Approx. 1 second intervals) OS start-up sequence
Flashing (Approx. 160 millisecond intervals) CPU high-temperature warning
On Accessing storage.
Printer LEDs
These display the printer status.
Stand-by mode
Accessing storage; Do not turn the power off.
Doing so may result in data loss.
An error has occurred. Contact the Epson
customer service.
2
Name Status Description
(Power) LED
(Green)
Error LED
(Orange)
On Power is being supplied
Off Power is not being supplied
On Offline
Immediately after the power is turned on or immediately after a reset (offline).
Automatically goes off after a while to indicate that the printer is ready.
The end of the roll paper is detected, and when printing has stopped (offline). If
this happens, replace the roll paper.
Flashing An error has occurred
Off Normal operation (online)
20
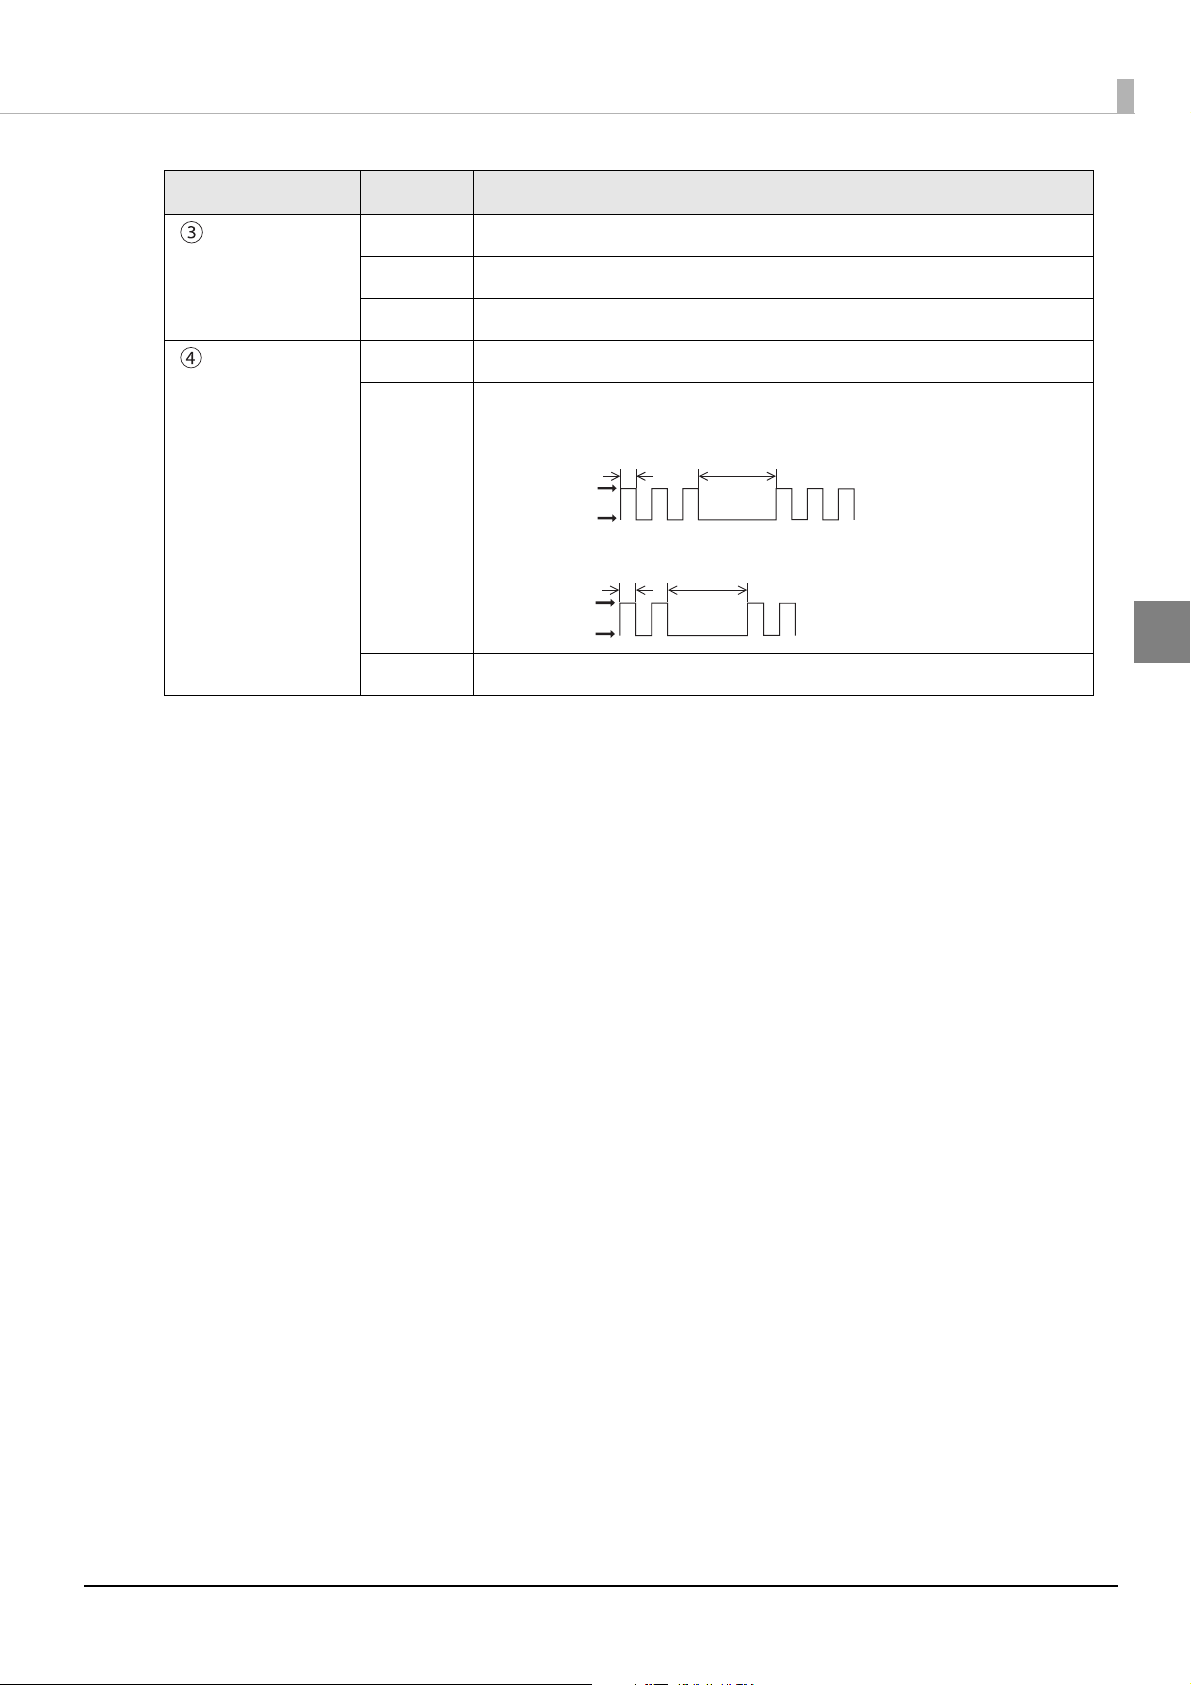
Chapter 2 Printer Functions and Settings
Approx. 160 ms Approx. 2080 ms
LED ON
LED OFF
Name Status Description
Paper LED
(Orange)
Slip LED
(Green)
On Roll paper near-end.
Flashing Waiting for the self-test printing to be continued.
Off There is a sufficient amount of roll paper remaining.
On Slip paper mode.
Flashing Waiting for slip paper to be inserted/removed.
Waiting to insert slip
Approx. 160 ms
LED ON
LED OFF
Waiting to remove slip
Off Roll paper mode.
Approx. 1760 ms
2
21
Chapter 2 Printer Functions and Settings
LED ON
LED OFF
Approx. 320 ms
LED ON
LED OFF
Approx. 320 ms
LED ON
LED OFF
Approx. 320 ms
LED ON
LED OFF
Approx. 320 ms
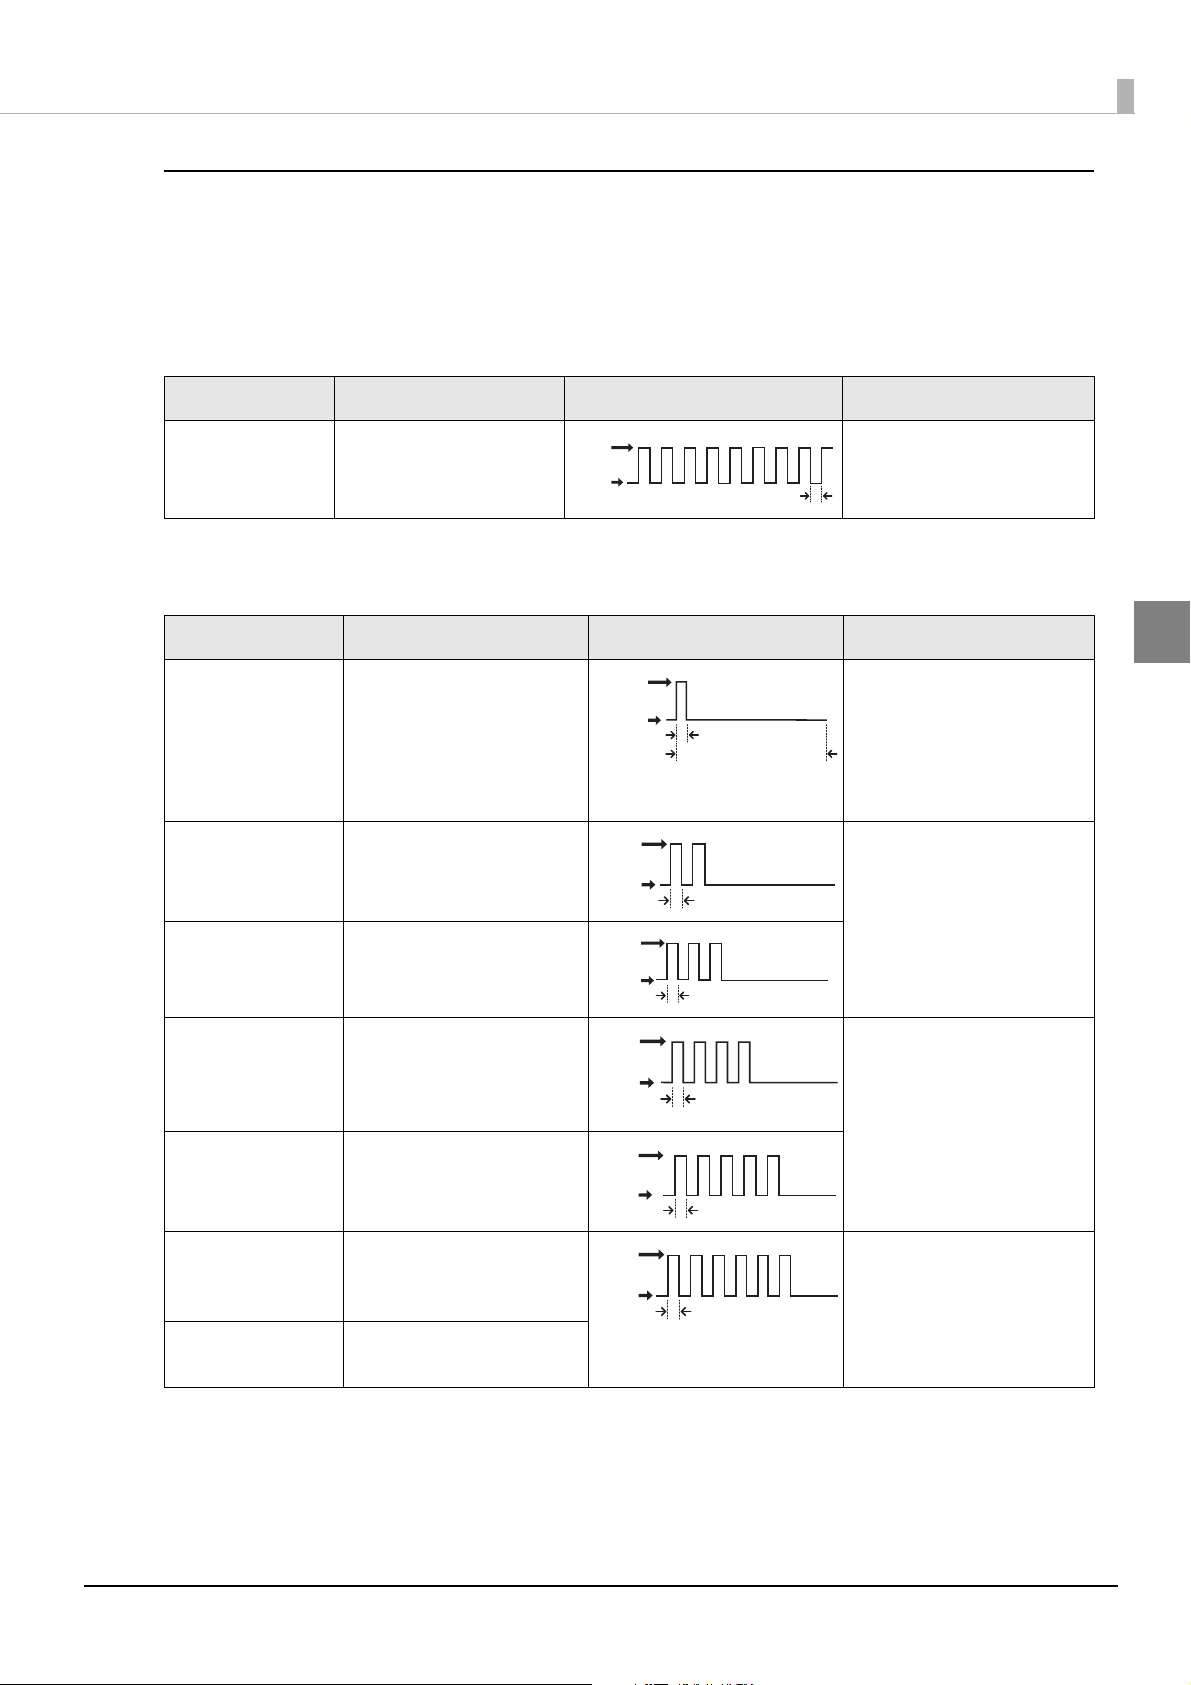
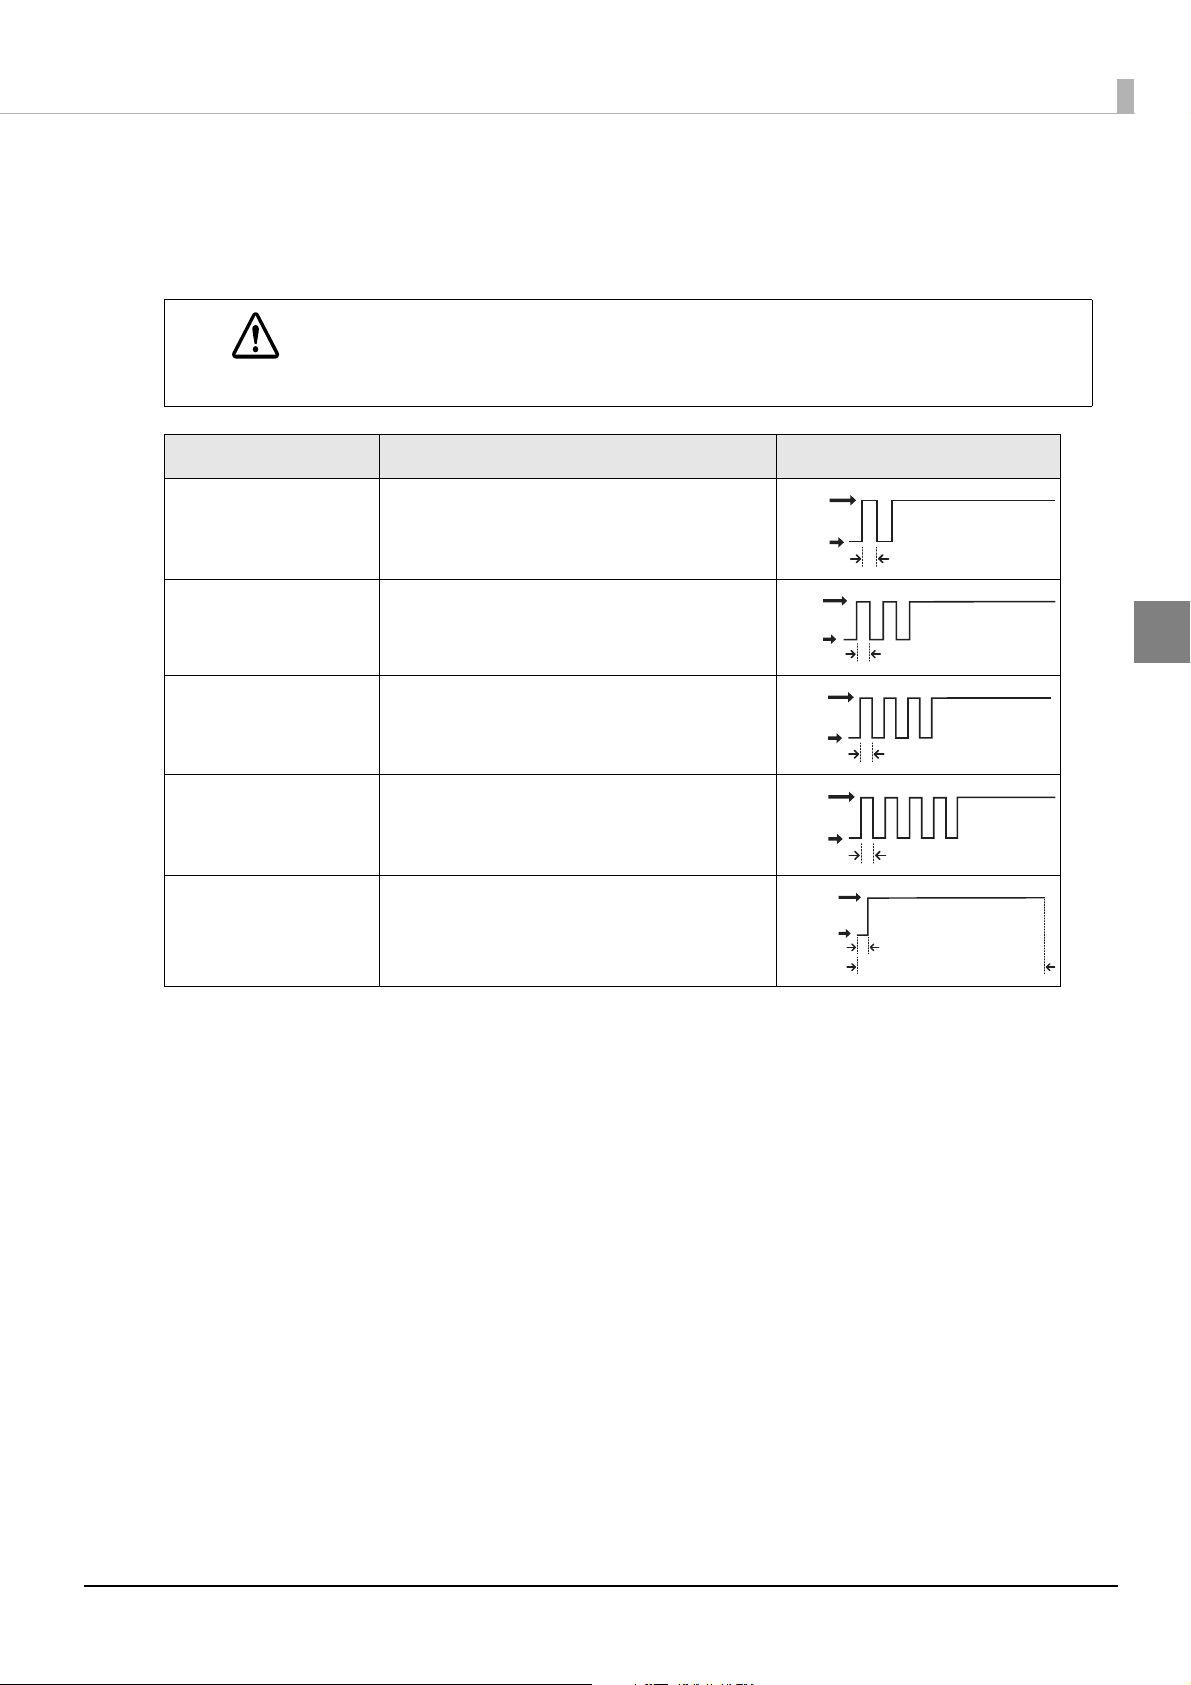
Error Status
Printing cannot be done when there is a printer error. There are three possible error types: automatically recoverable errors, recoverable errors, and unrecoverable errors. Check the error LED flash code.
Automatically Recoverable Errors
Online status can be restored by the methods described below.
Error Error description Error LED flash pattern Recovery measure
Print head temperature error
A high temperature outside the head drive operat-
Recovers automatically when
the print head cools.
ing range was detected.
Recoverable Errors
After removing the cause of error, online status can be restored by pressing the printer reset button.
Error Error description Error LED flash code Recovery measure
Autocutter error Autoc u t ter does n o t work
correctly.
Carriage detection
error in front slip
The carriage is malfunctioning due to a paper jam.
printing
Carriage detection
error in endorse-
The carriage is malfunctioning due to a paper jam.
ment printing
LED ON
LED OFF
Approx. 320 ms
Approx. 5,120 ms
LED ON
LED OFF
Approx. 320 ms
Remove the jammed paper or
foreign matter in the printer,
close the roll paper cover,
send the error recovery command, or turn the power on
again.
Remove the jammed paper or
foreign matter in the printer,
send the error recovery command, or turn the power on
again.
2
Slip ejection error The slip is not ejected after
feeding a specified amount
of paper, or the slip eject sensor does not detect paper.
Mechanical operation error
The position of the platen/
roller open and close mechanism cannot be detected.
Roll paper cover
open error
The roll paper cover or
receipt unit was opened
during printing on roll paper.
Receipt unit open
error *
The receipt unit was opened
during printing.
LED ON
LED OFF
Approx. 320 ms
Send the error recovery command or turn the power on
again.
Close the roll paper cover, and
then send the error recovery
command or turn the power
on again.
22
Chapter 2 Printer Functions and Settings
LED ON
LED OFF
Approx. 320 ms
LED ON
LED OFF
Approx. 320 ms
LED ON
LED OFF
Approx. 320 ms
LED ON
LED OFF
Approx. 5120 ms
Approx. 320 ms
Unrecoverable Errors
If an unrecoverable error occurs, immediately press the printer reset button. If the same error still occurs, turn
the printer power off. Since it is possible a failure has occurred in the printer, contact your dealer or a Seiko
Epson service center for advice.
If an unrecoverable error occurs after resetting the printer, immediately turn the printer power
off.
CAUTION
Error Error description Error LED flash code
R/W error in memory or
gate array
After R/W checking, the printer does not work correctly.
High voltage error The power supply voltage is extremely high.
Low voltage error The power supply voltage is extremely low.
CPU execution error The CPU is executing an incorrect address.
Circuit error A circuit error is detected.
2
LED ON
LED OFF
Approx. 320 ms
23
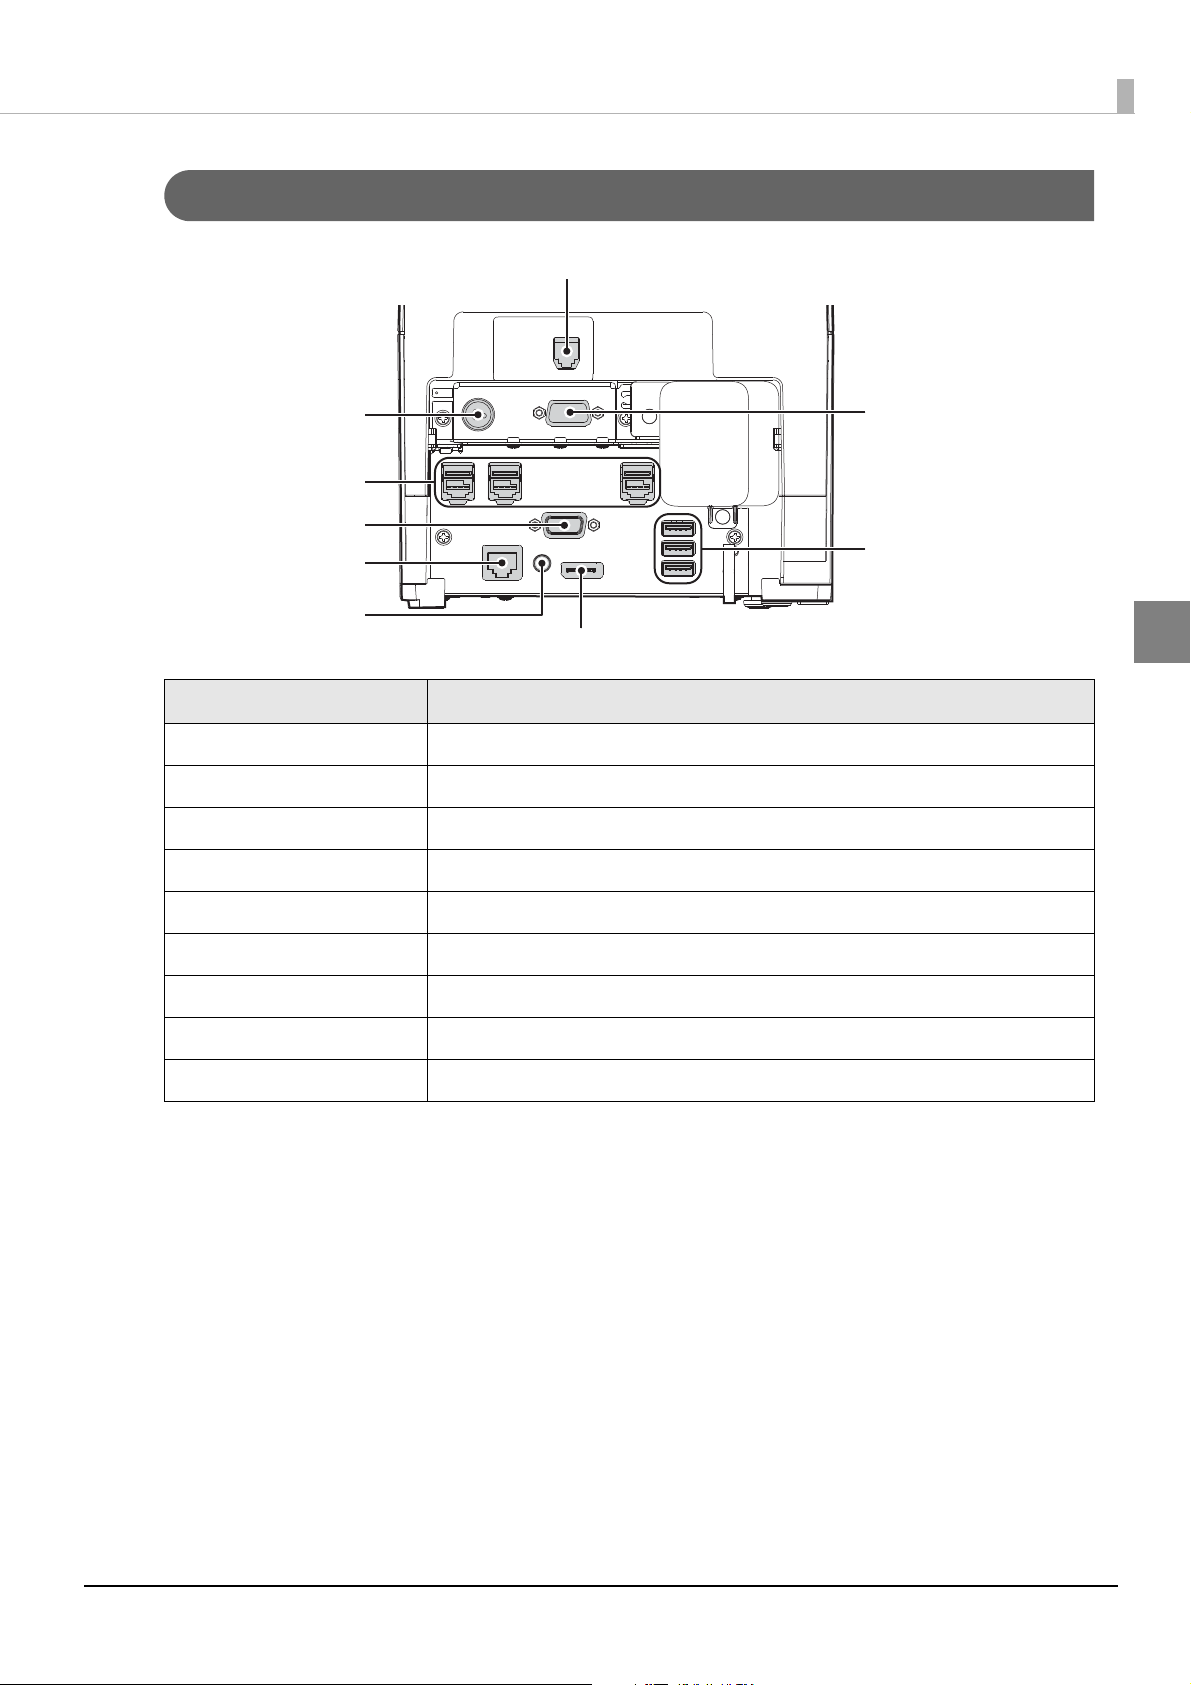
Product Rear
DK connector
DC-In connector
Powered USB
connector
VGA connector
LAN connector
Line-Out connector
DisplayPort
Serial connector
USB connector
Chapter 2 Printer Functions and Settings
2
Name Description
DK connector Connect the cash drawer here.
DC-In connector Connect the AC adapter, T here.
Powered USB connector Connect external devices with Powered USB interface here.
VGA connector Connect the display here.
LAN connector Connect the printer to the network.
Line-Out connector Connect an external speaker here.
DisplayPort Connect the display here.
USB connector Connect external devices with USB interface here.
Serial connector Connect a serial communication device with serial interface here.
24
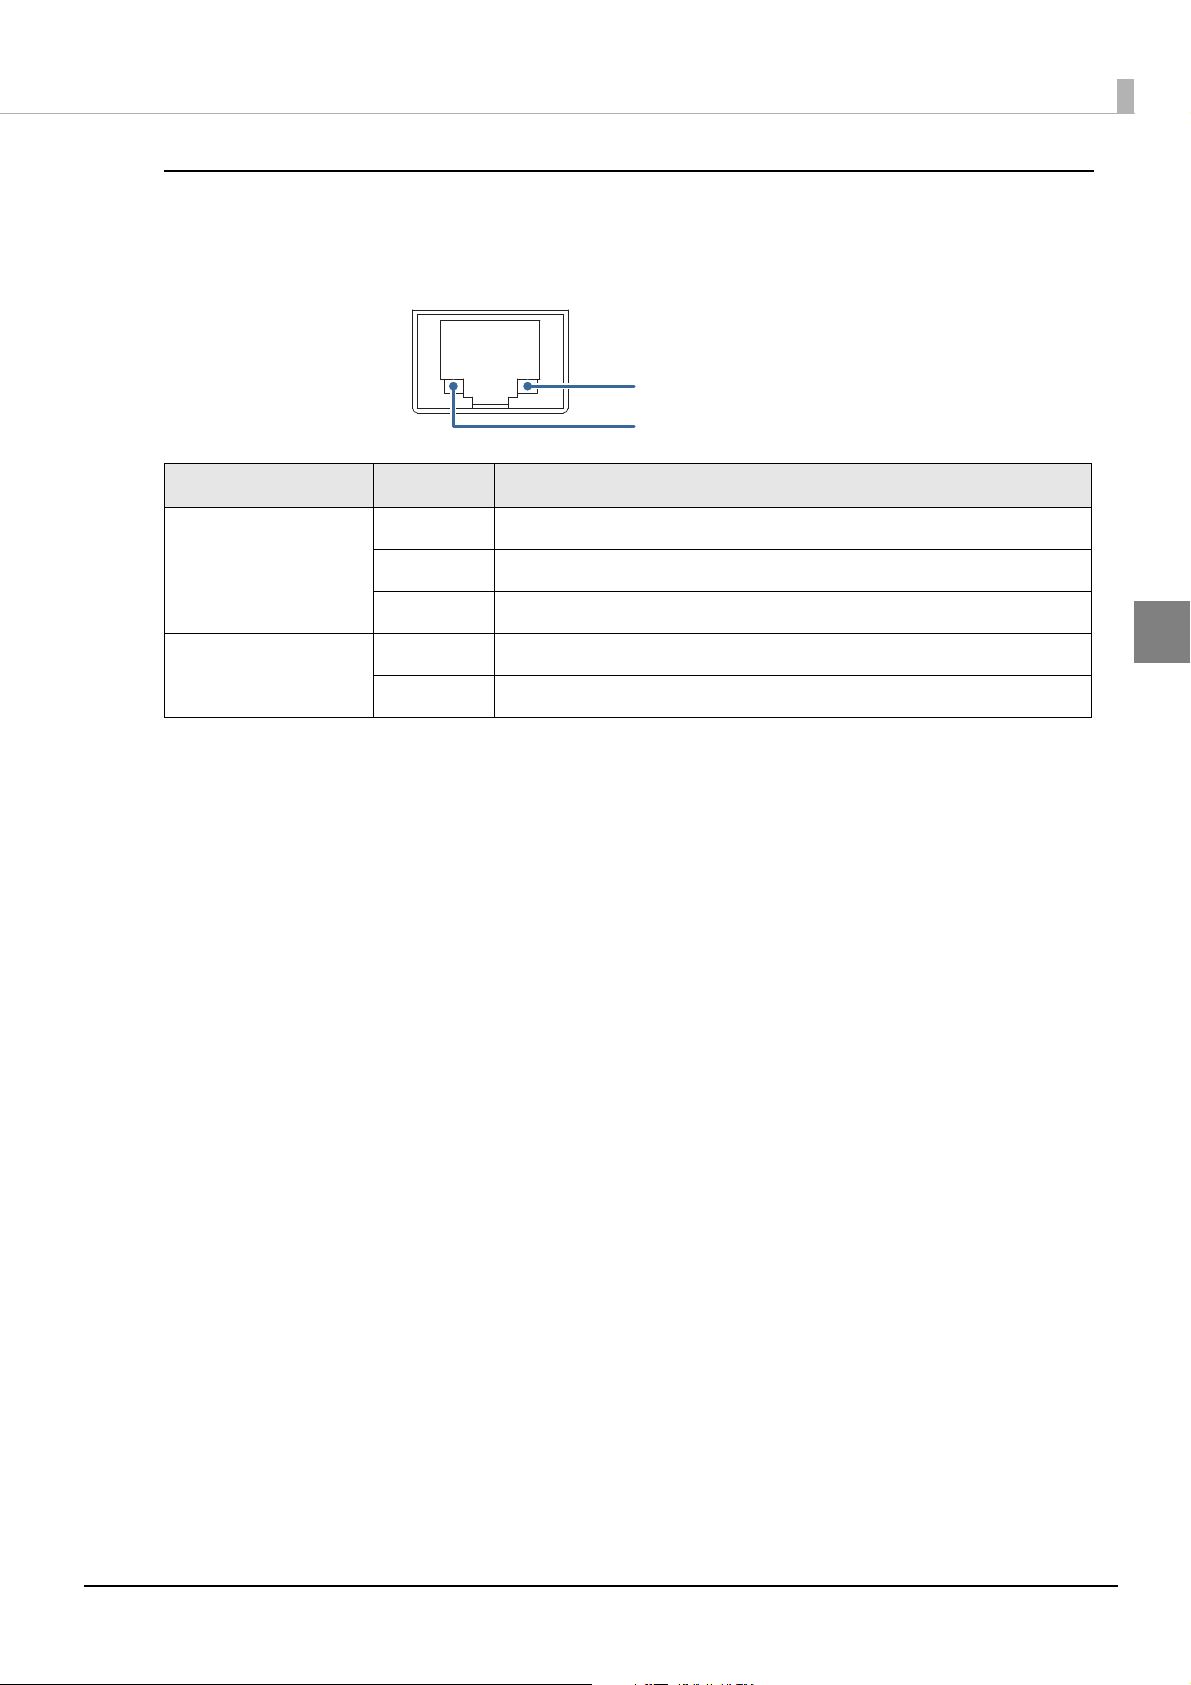
Chapter 2 Printer Functions and Settings
LED (Yellow)
LED (Green/Orange)
LAN Status LED
The LAN status LEDs are the LEDs on the LAN connector. They indicate the network communication status of
this product.
LED Status Description
Green / Orange On (Green) 1 Gbps link established
On (Orange) 100 Mbps link established
Off 10 Mbps link established or link not established
Yellow On Data is being exchanged.
Off Data is not being exchanged.
2
25
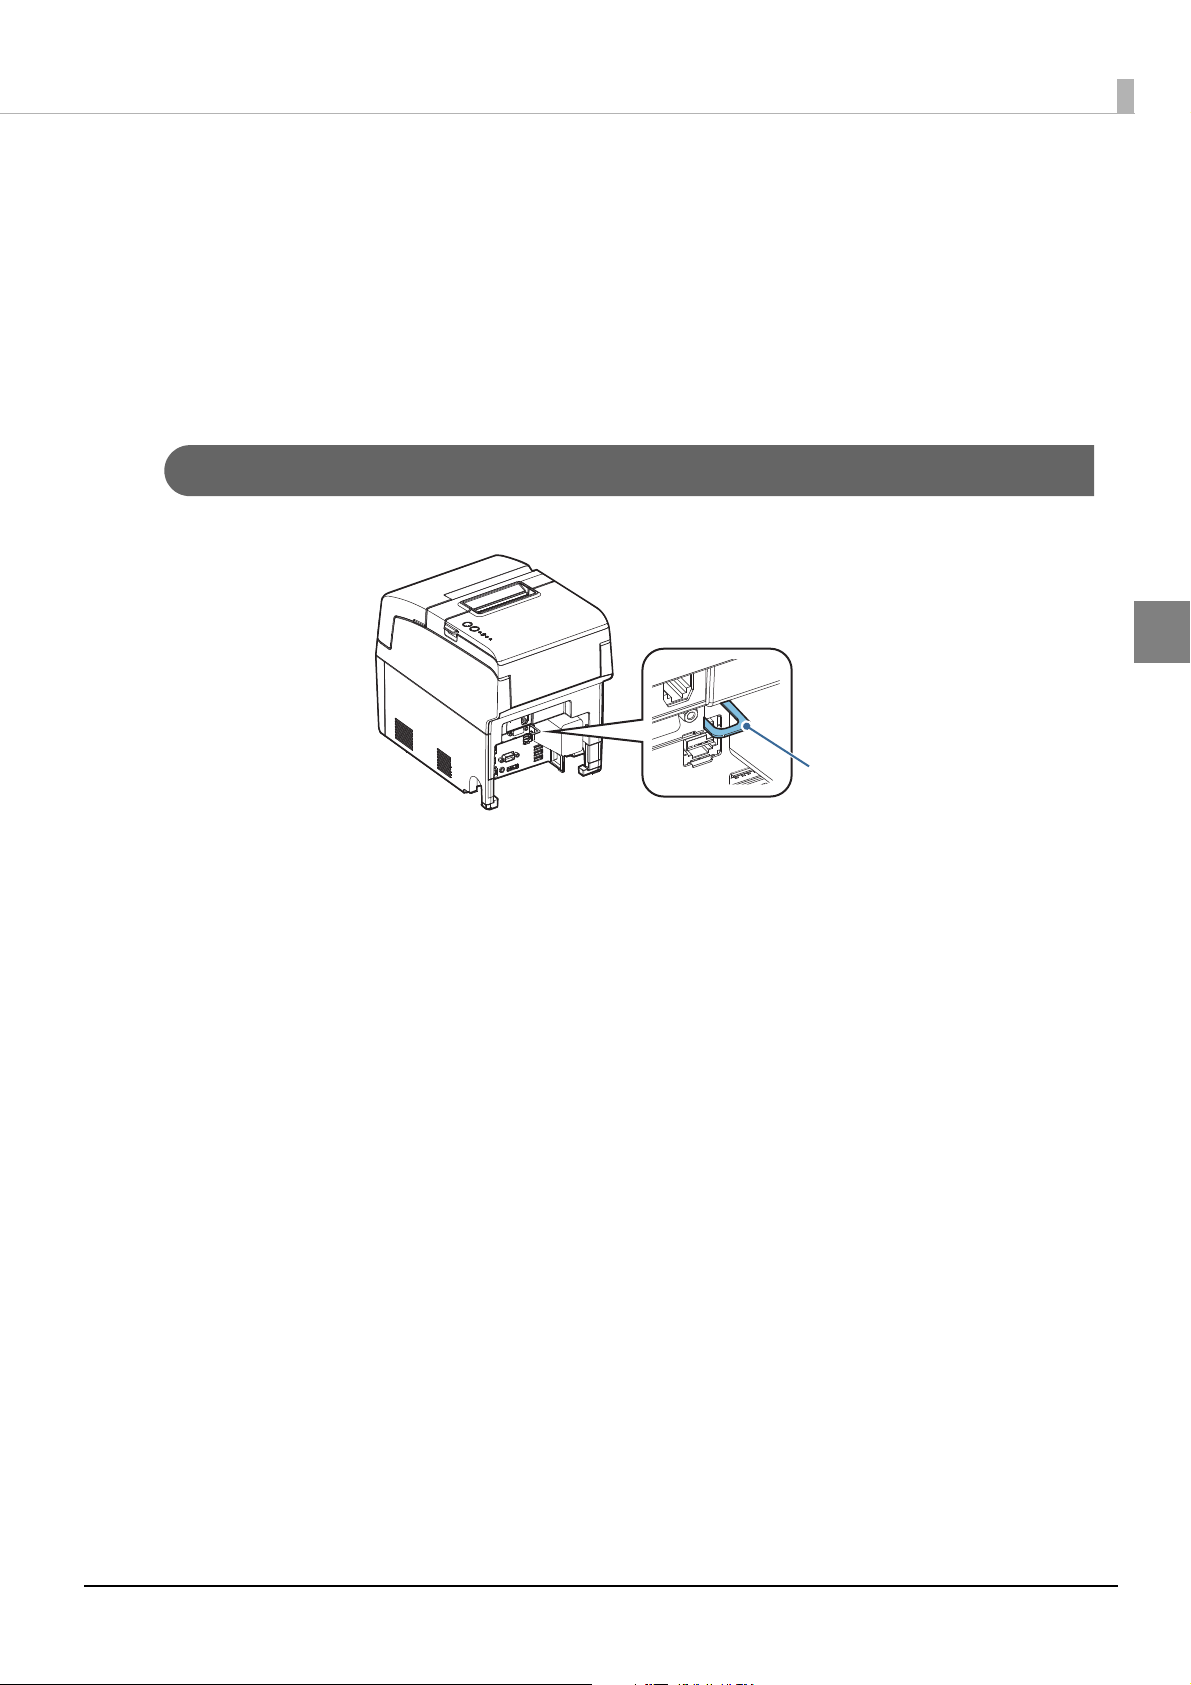
Installing the Product
Display caution regarding the following points when installing the Product.
The Product must be installed horizontally on a flat surface (not tilted).
Do not place the product in dusty locations.
Do not knock or strike the product. This may cause defective print.
Do not catch cables and do not place foreign matter under the product.
Security hook
Commercially available theft prevention wire can be attached.
Chapter 2 Printer Functions and Settings
2
26
Connecting the AC Adapter
Be sure to use the specified AC adapter (AC adapter, T).
If you use a non-standard AC adapter, there is a risk of causing fire or electric shock.
WARNING
CAUTION
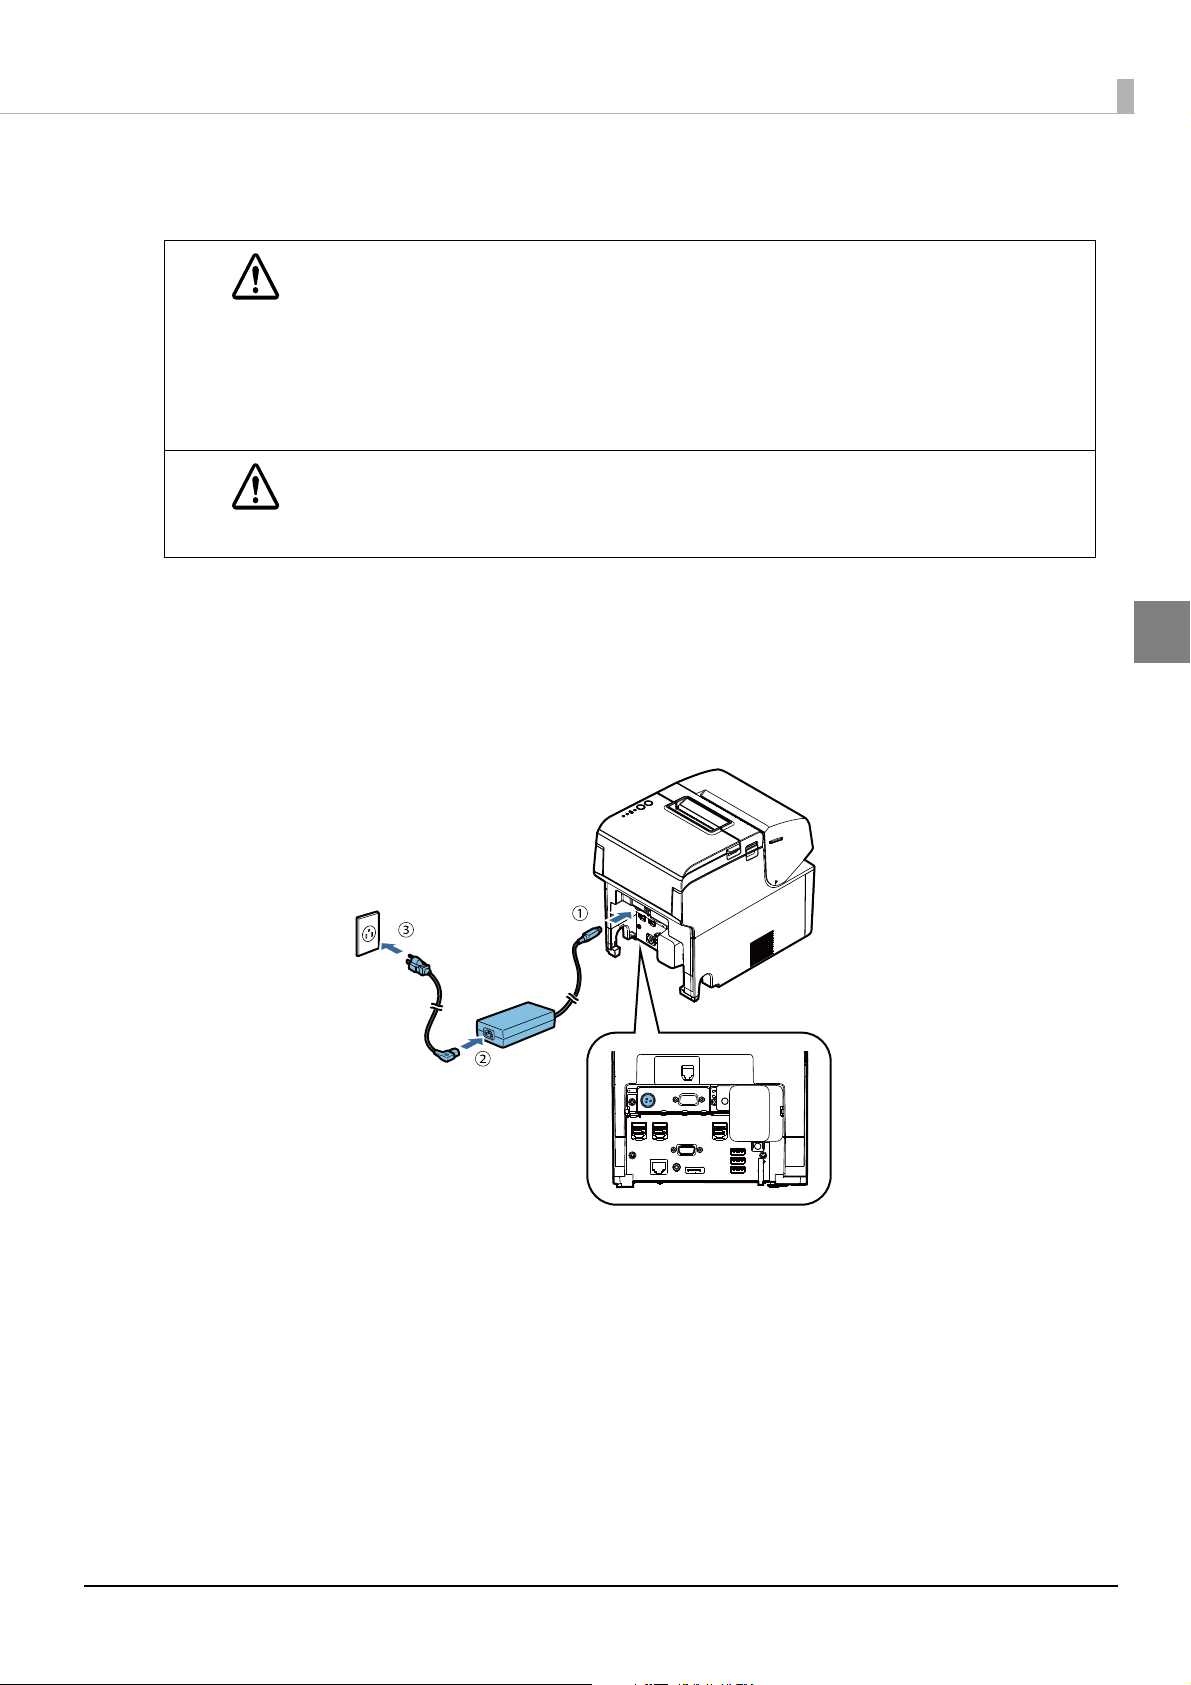
Connect the AC adapter to this product by the following procedure.
If an abnormality arises despite using this product's attachments, immediately turn the power
off and remove the power cord from the wall socket.
When connecting or detaching the AC adapter to and from this product, remove the AC
adapter's power cord from the wall socket.
If the power cord is not removed, there is a risk that the adapter and/or this product will be
damaged.
Use the AC adapter separated from the main unit.
Chapter 2 Printer Functions and Settings
Make sure that the power to the printer is turned off and that the AC adapter power
1
cord is unplugged from the wall socket.
Connect the DC cable of the AC adapter to the DC-In connector on the product.
2
2
Firmly insert the connector of the AC cable all the way into the AC inlet on the AC
3
adapter.
Firmly insert the plug all the way into the grounded wall outlet.
4
Set the AC adapter so that its label side is facing down.
5
27

Detaching the AC Adapter
Detach the AC adapter from this product by the following procedure.
Make sure that power is off.
1
Detach the power cord from the wall socket.
2
Detach the AC cable DC connector from this product.
3
Chapter 2 Printer Functions and Settings
2
28

Chapter 2 Printer Functions and Settings
Turning Power On/Off
Turning Power On
With product power turned off, press the power button.
The power LED and the status LED (green) comes on.
The status LED (orange) flashes during startup of the OS, when OS startup is finished, goes out.
Turning Power On for the First Time
When turning power on for the first time, it is necessary to perform Windows initial settings.
For details, see
"Windows Initial Settings" on page 65.
Turning Power Off
Turn the power off from an application or OS function.
To power off the product, use the application or OS function.
Do not use the operations shown below unless the product cannot be turned off due to an
application or OS problem. Doing so may cause loss of unsaved data, require OS recovery, or
damage the HDD, SSD or other hardware.
Forced termination by holding down the power button for approx. 4 sec.
Power shutdown by turning off the circuit breaker on the distribution board or by discon-
necting the AC cable/DC cable.
The same phenomenon may also occur due to power shutdown caused by power failure/temporary power failure. To prevent power shutdown due to power failure/temporary power
failure, using an uninterruptible power supply (UPS) is recommended.
Product power can also be turned off from EPSON TMNet WebConfig (
Product power can also be turned off from the Web application. For details, see "Epson ePOS
SDK for JavaScript User's Manual".
2
page 115).
29
Chapter 2 Printer Functions and Settings
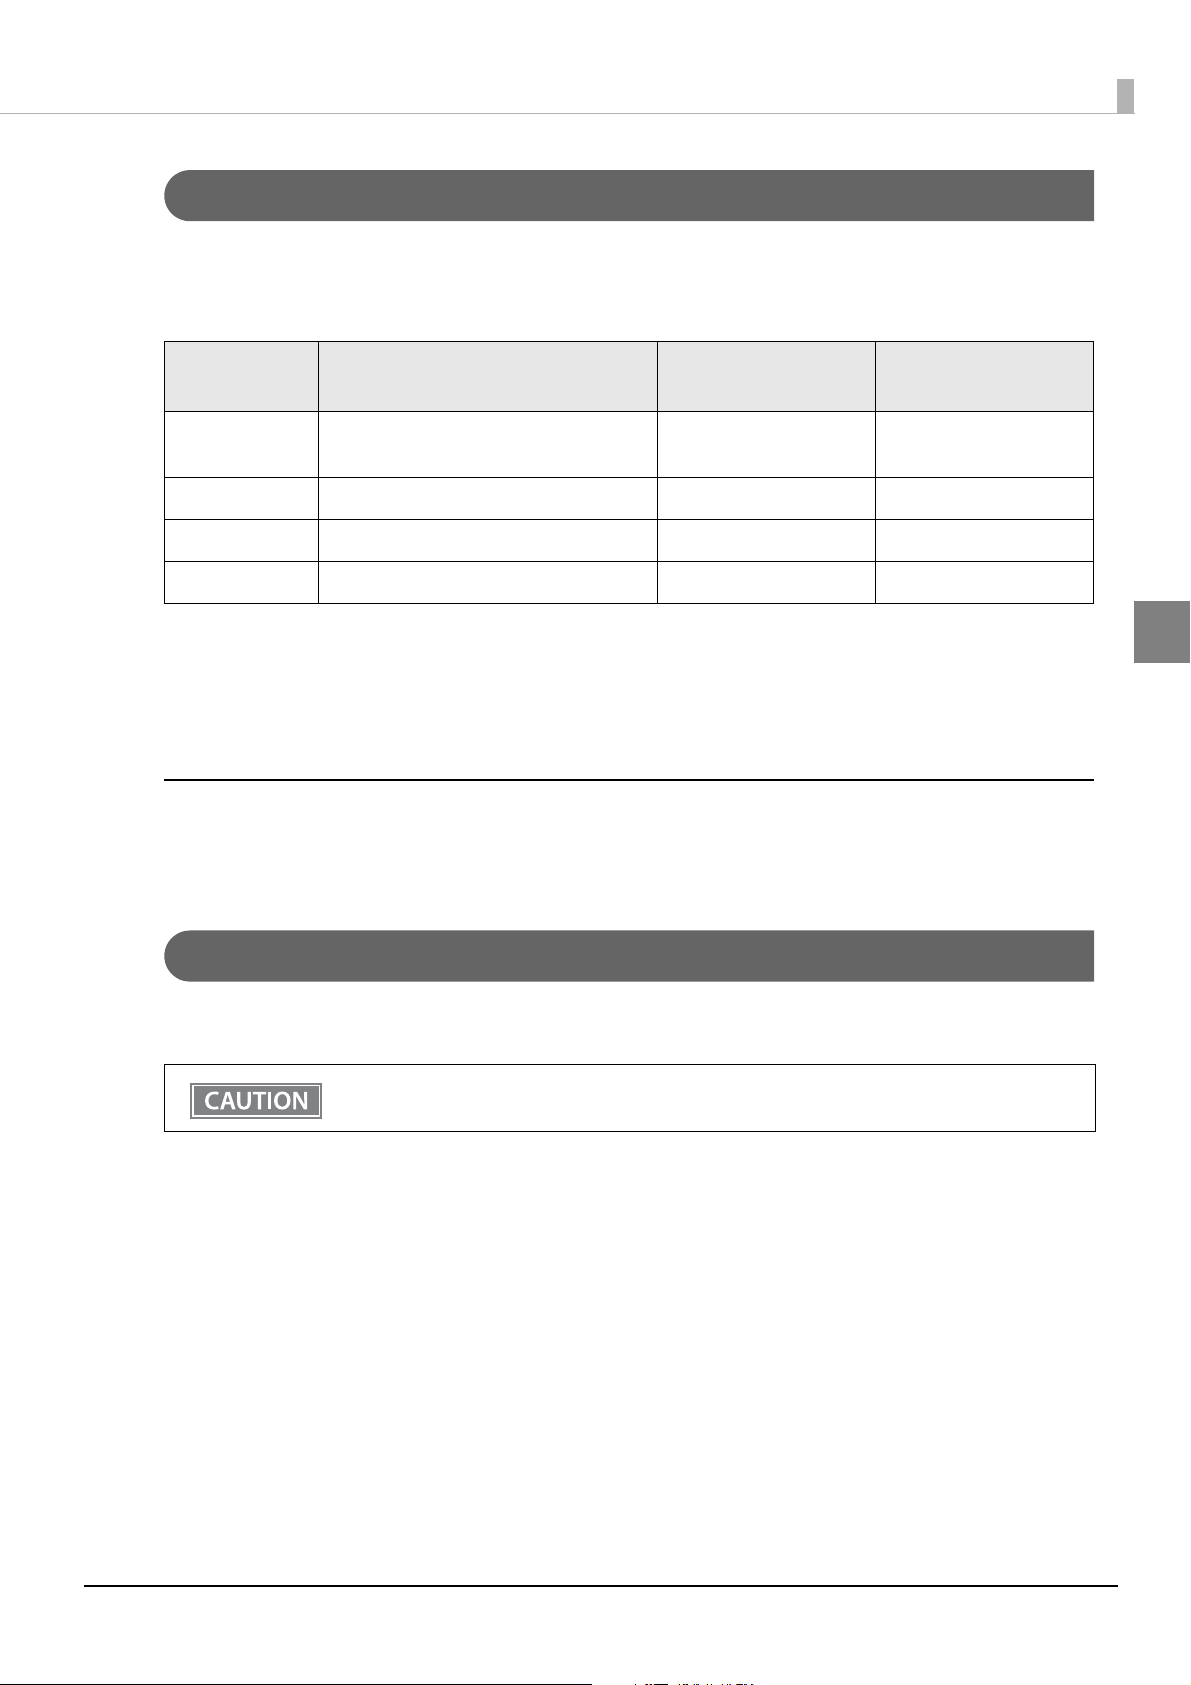
Power Button Settings
You can set the functions that are available when you press the power button while power is on to this product.
Revisions are made by means of Windows "Power Options" or EPSON TMNet Config "Shutdown Settings."
The functions that can be set, and the setting methods are described below.
Function Description
Shutdown Shuts down Windows and turns power off
(initial settings).
Do nothing Invalid (does nothing) ✔✔
Standby Switches to Windows standby ✔ -
Hibernation Switches to Windows hibernation ✔ -
In standby, the current work contents are saved in the memory. On returning from standby, work can be immediately resumed from where you left off.
If the AC adapter is removed in the standby mode, the work contents saved in the memory will be lost.
For settings when using Windows hibernation, see
"Windows Hibernation" on page 67.
Setting from
Windows
✔✔
Setting from EPSON
TMNet WebConfig
2
Return from Standby / Hibernation
When this product is in Windows standby or hibernate mode, press the power button to restore the original
state.
Forced Termination
If you cannot turn the product off using applications or the operating system, you can execute forced termination as a last resort by pressing the power button for approximately 4 seconds.
Be careful; when forced termination is executed, all unsaved data is lost.
30
 Loading...