

Page 1

Where to Find Information
This Startup Guide
Provides you with the basic information you need to start using
your EPSON STYLUS PRO 90 00 and its optional a nd consumable
products.
Online Guide
Provides you with detailed informat ion about prin ting on roll
paper or cut sheet media, the con trol panel, t he printer software,
and tips that will help you get the results you want.
Online Help
Provides you with detailed informat ion and instructions on the
printer software that controls your printer. (Online help will be
automatically installed when yo u install the printer software.) See
your Online Guide for information on accessing online help.
Page 2

Color Ink Jet Printer
All rights reserved. No part of this publication may be reproduced , stored in a retrieval
system, or transmitted in any form or by any means, electronic, mec h an ic al, pho t ocopying,
recording, or otherwise, without th e p rior written permiss ion of SEIKO EPSON
CORPORATION. The information contained herein is designed only for use with this EPSON
printer. EPSON is not responsible for any use of this information as applied to other printers.
Neither SEIKO EPSON CO RPORATION nor its affiliates shall be liable to the purchaser of
this product or third parties for damages, losses, costs, or expenses incurred by the purchaser
or third parti e s as a result of: accident, mis u se , or abuse of th is product or unauthori ze d
modificati ons, re pairs , or alte rati ons to th is prod uct, o r (excl uding t he U.S.) f ailur e to stri ctly
comply with SEIKO EPSON CORPORATION’s opera ting and maintenance instructions .
SEIKO EPSON CORPORATION shall not be liable for any damages or problems arising from
the use of any options or any consumable products other than those designated as Original
EPSON Products or EPSON Approved Products by SEIKO EPSON CORPORATION.
SEIKO EPSON CORPOR AT I ON shall not be held liable for any damage resulting from
electromagnetic interference that occurs from the use of any interface cables other than
EPSON Approved Products by SEIKO EPSON CORPORATION.
EPSON is a registered trademark and ESC/P Raster and EPSON STYLUS are trademarks of
SEIKO EPSON CORPORATION.
Microsoft and Windo ws are registered trademarks of Microsoft Corporation.
General Notice: Other product names used herein are for identification purposes only and may be
trademarks of their respective owners. EPSON disclaims any and all rights in those marks.
Copyright © 1999 by SEIKO EPSON CORPORATION, Nagano, Japan.
Startup Guide
Page 3
Declaration of Conformity
Manufacturer SEIKO EPSON CORPORATION
Address 3-5, Owa 3-chome, Suwa-shi,
Representative EPSON EUROPE B.V.
Address Prof. J. H. Bavincklaan 5 1183
Nagano-ken 392-8502 Japan
AT Amstelveen
The Netherlands
Declares that the Product:
Product Name Ink Jet Printer
Model P130A
Conforms to the following Directive(s) and Norm(s):
Directive 89/336/EEC EN 55022 Class B
Directive 73/23/EEC EN 60950
EN 61000-3-2
EN 61000-3-3
EN 50082-1
IEC 801-2
IEC 801-3
IEC 801-4
January 1999
H. Horiuchi
President of EPSON EUROPE B.V.
2
Page 4

Contents
Safety Instructions
Important Safety Instructions . . . . . . . . . . . . . . . . . . . . . . . . . . . . . . 5
A Few Precautions. . . . . . . . . . . . . . . . . . . . . . . . . . . . . . . . . . . . . . . . 6
ENERGY STAR Compliance . . . . . . . . . . . . . . . . . . . . . . . . . . . . . . . 8
For United Kingdom Users . . . . . . . . . . . . . . . . . . . . . . . . . . . . . . . . 8
Use of options . . . . . . . . . . . . . . . . . . . . . . . . . . . . . . . . . . . . . . . 8
Safety information . . . . . . . . . . . . . . . . . . . . . . . . . . . . . . . . . . . 8
Warnings, Cautions, and Notes. . . . . . . . . . . . . . . . . . . . . . . . . . . . . 9
Taking a Look at Your Printer
Front view . . . . . . . . . . . . . . . . . . . . . . . . . . . . . . . . . . . . . . . . . . 10
Rear view. . . . . . . . . . . . . . . . . . . . . . . . . . . . . . . . . . . . . . . . . . .10
Chapter 1 Setting up the Printer with Your PC
Connecting the Printer to Your PC . . . . . . . . . . . . . . . . . . . . . . . . . . 1-2
Using the built-in parallel interface. . . . . . . . . . . . . . . . . . . . .1-2
Installing the Printer Software on Your PC. . . . . . . . . . . . . . . . . . .1-4
Printer software components . . . . . . . . . . . . . . . . . . . . . . . . . .1-4
Installing on Windows 95, 98, and NT 4.0 . . . . . . . . . . . . . . . 1-5
Upgrading to Windows 98 . . . . . . . . . . . . . . . . . . . . . . . . . . . . 1-6
Printing on a Peer-to-Peer Network . . . . . . . . . . . . . . . . . . . . . . . . . 1-7
For Windows 95 and 98. . . . . . . . . . . . . . . . . . . . . . . . . . . . . . . 1-7
For Windows NT 4.0 . . . . . . . . . . . . . . . . . . . . . . . . . . . . . . . . .1-11
Chapter 2 Setting up the Printer with Your Macintosh
Connecting the Printer to Your Macintosh . . . . . . . . . . . . . . . . . . .2-2
Using the built-in serial interface. . . . . . . . . . . . . . . . . . . . . . .2-2
Installing the Printer Software on Macintosh . . . . . . . . . . . . . . . . . 2-4
Contents 3
Page 5

Printer software components. . . . . . . . . . . . . . . . . . . . . . . . . . 2-4
Installing on Macintosh . . . . . . . . . . . . . . . . . . . . . . . . . . . . . . 2-5
Using the Chooser to select your printer. . . . . . . . . . . . . . . . 2-7
Chapter 3 Printing and Printer Management
Loading Paper . . . . . . . . . . . . . . . . . . . . . . . . . . . . . . . . . . . . . . . . . . . 3-2
Loading roll paper. . . . . . . . . . . . . . . . . . . . . . . . . . . . . . . . . . . 3-2
Loading cut sheet media . . . . . . . . . . . . . . . . . . . . . . . . . . . . . 3-6
Printing From Your PC . . . . . . . . . . . . . . . . . . . . . . . . . . . . . . . . . . . 3-9
Making the printer driver settings . . . . . . . . . . . . . . . . . . . . . 3-9
Cancelling printing from your PC . . . . . . . . . . . . . . . . . . . . . 3-13
Printing From Your Macintosh . . . . . . . . . . . . . . . . . . . . . . . . . . . . 3-14
Making the printer driver settings . . . . . . . . . . . . . . . . . . . . . 3-14
Cancelling printing from your Macintosh. . . . . . . . . . . . . . . 3-17
Chapter 4 Checking the Printer’s Condition
Using Printer Utilities . . . . . . . . . . . . . . . . . . . . . . . . . . . . . . . . . . . . 4-2
Accessing the printer utilities . . . . . . . . . . . . . . . . . . . . . . . . . 4-2
Printing the Nozzle Check Pattern . . . . . . . . . . . . . . . . . . . . . . . . . 4-3
Cleaning the Print Heads . . . . . . . . . . . . . . . . . . . . . . . . . . . . . . . . . 4-4
Aligning the Print Heads . . . . . . . . . . . . . . . . . . . . . . . . . . . . . . . . . 4-6
Chapter 5 Using an Optional Interface Card
Available Optional Interface Cards. . . . . . . . . . . . . . . . . . . . . . . . . 5-2
Installing the Optional Interface Card. . . . . . . . . . . . . . . . . . . . . . . 5-3
4 Contents
Page 6

Safety Instructions
Important Safety Instructions
Read all of these instructions before using your printer. Also be
sure to follow all warnings a nd instructions marked on the
printer.
❏ Do not block or cover the openings in the printer’s cabinet.
❏ Do not insert objects through the slots. Take care not to spill
liquid on the printer.
❏ Use only the type of power source indicated on the printer’s
label.
❏ Connect all equipment to properl y gr ound ed po wer out lets.
Avoid using outlets on the same circui t as photocopiers or air
control system s that regularly switch on and off.
❏ Avoid electrical outlets controlled by wall switches or
automatic timers.
❏ Keep the entire computer system away from potenti al sources
of electromagnetic interference, such as loudspeakers or the
base units of cordless telephones.
❏ Do not use a damaged or frayed power cord.
❏ If you use an extension cord with the printer, make sure the
total ampere rating of the d evices plugged i nto the exte nsion
cord does not exceed the cord’s ampere rating. Also, make
sure the total ampere rating of all devices plugged into the
wall outlet does not exceed the wall outlet’s ampere rating.
❏ Do not attempt to service the printer yourself.
5
Page 7

❏ Unplug the printer and refer servicing to qualified service
personnel under the following conditions:
The power cord or plug is damaged; liquid has entered the
printer; the printer has been dro pped or the cabinet damaged;
the printer does not operate normally or exhibits a distinct
change in performance.
❏ If you plan to use the printer in Germany, observe the
following:
To provide adequate short-circuit protection and overcurrent protection for t his printer, the building installation
must be protected by a 16 Amp circuit breaker.
Bei Anschluß des Druckers an die Stromversorgung muß
sichergestellt werden, daß di e Gebäudeinstallation mit einem
16 A-Überstromschalter abgesichert ist.
A Few Precautions
When using the printer
❏ Do not put your hand inside the printer or touch the ink
cartridges during printing.
❏ Do not move the print heads by hand; otherwise you may
damage the printer.
❏ Always turn the printer off us ing the Power button on the
control panel. When this button is pr essed, the Oper ate light
flashes briefly then goes off. Do not unplug the printer or turn
off the power to the outlet un til the Operate light stops
flashing.
❏ Before transporti ng the printer, make sure the print heads are
in the home (far right) position and the ink cartridges are in
place.
6
Page 8

When handling the ink cartridges
❏ Keep ink cartridges out of the reach of children and do not
drink.
❏ If ink gets on your skin, wash it off with soap and water. If it
gets in your eyes, flush them immediately with water.
❏ Do not shake ink cartridges as this can cause leakage.
❏ Install ink cartridges immediately after removing from the
package. Leaving a c artridge unpacked for a long time before
use may result in reduced print quality.
❏ Once you install an ink cartridge, do not open the clamp or
remove the cartridge except to replace it wit h a new one. The
cartridge may become unusable otherwise.
❏ Do not use an ink cartridge beyond the date printed on the
cartridge carton. For best results, use up the ink cartridges
within six months of installat io n .
❏ Do not dismantle the ink c artri dges or tr y to ref ill them. This
could damage the print heads.
When choosing a place for the printer
❏ Place the printer on a flat, stable surface that is l arger than the
printer. The printer will not operate properly if it is tilted or
at an angle.
❏ Avoid places subject to rapid changes in temperature and
humidity. Also keep it away fro m direct sunlight, strong light,
or heat sources.
❏ Avoid places subject to shocks and vibrations.
❏ Place the printer near a wall outlet where the plug can be
easily unplugged.
Note for French-speaking users:
Placez l’imprimante près d’une prise de contacte où la fiche peut être
débranchée facilement.
7
Page 9

ENERGY STAR Compliance
As an ENERGY STAR Partner, EPSON has
determined that this product meets the
STAR guidelines for energy efficiency.
ENERGY
The International
a voluntary partnership with the computer and office equipment
industry to promote the introduction of e nergy-efficient pers onal
computers, monitors, printers, fax machines, and copiers in an
effort to reduce air pollution caused by power generation.
ENERGY STAR Office Equipment Program is
For United Kingdom Users
Use of options
EPSON (UK) Limited shall not be liable agai nst any damag e s or
problems arising from the use of any options or consumable
products other than those designated as Original EPSON
Products or EPSON Appro ved Products by EPSON (UK) Limited.
Safety information
Warning:
w
This appliance must be earthed. Refer to rating plate for voltage
and check that the appliance voltage corresponds to the supply
voltage.
Important:
The wires in the mains lead fitted to this appliance are coloured in
accordance with the following code:
Green and yellow — Earth
Blue — Neutral
Brown — Live
8
Page 10

If you have to fit a plug:
As the colours of the mains lead of this applianc e may not match
coloured markings used to ident ify the terminals in a plug, please
proceed as follows:
The green and yellow wire must be connected to the terminal in
the plug which is marked with the let ter E or the earth symbol (G).
The blue wire must be connected to the terminal in the plug
marked with the letter N.
The brown wire must be connected to the terminal in the plug
marked with the letter L.
If damage occurs to the plug, replace the cord set or consult a
qualified electrician.
Replace fuses only with a fuse of the correct size and rating.
Warnings, Cautions, and Notes
Warnings must be followed carefully to avoid bodily injury.
w
Cautions must be observed to avoid damage to your equipment.
c
Notes contain important information and useful tips on the operation
of your printer.
9
Page 11
Taking a Look at Your Printer
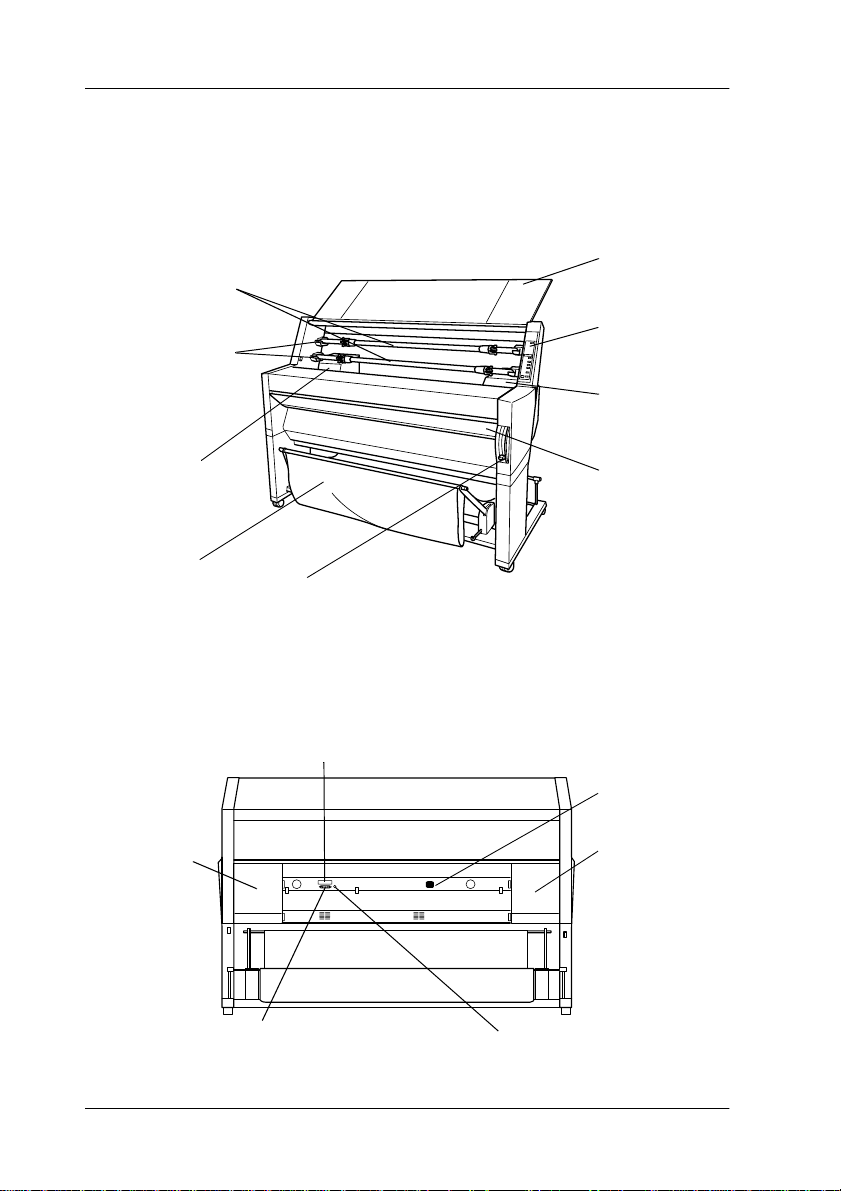
Front view
roll paper spindles
mounting brackets
ink cartridge
compartment
paper basket
paper set lever
Rear view
roll paper cover
control panel
ink cartridge
compartment
lower cover
ink cartridge
compartment
10
optional interface card slot cover
parallel interface connector
AC inlet
ink cartridge
compartment
serial interface connector
Page 12

Chapter 1
Setting up the Printer with Your PC
Connecting the Printer to Your PC . . . . . . . . . . . . . . . . . . . . . . . 1-2
Using the built-in parallel interface. . . . . . . . . . . . . . . . . . 1-2
Installing the Printer Software on Your PC. . . . . . . . . . . . . . . . 1-4
Printer software components . . . . . . . . . . . . . . . . . . . . . . . 1-4
Installing on Windows 95, 98, and NT 4.0 . . . . . . . . . . . . 1-5
Upgrading to Windows 98 . . . . . . . . . . . . . . . . . . . . . . . . . 1-6
Printing on a Peer-to-Peer Network . . . . . . . . . . . . . . . . . . . . . . 1-7
For Windows 95 and 98. . . . . . . . . . . . . . . . . . . . . . . . . . . . 1-7
For Windows NT 4.0 . . . . . . . . . . . . . . . . . . . . . . . . . . . . . . 1-11
1
Setting up the Printer with Your PC 1-1
Page 13
Connecting the Printer to Your PC
The method you use to connect the printer to your PC depends
on whether you want to send print jobs directly to the printer
using the printer’s built-in parallel interface, or send print jobs to
the printe r over a network using an optional interface c ard. For
information on using optional interface cards, see Chapter 5,
“Using an Optional Interface Card”.
To connect the printer to a Macintosh, see Chapter 2, “Setting up
the Printer with Your Macintosh”.
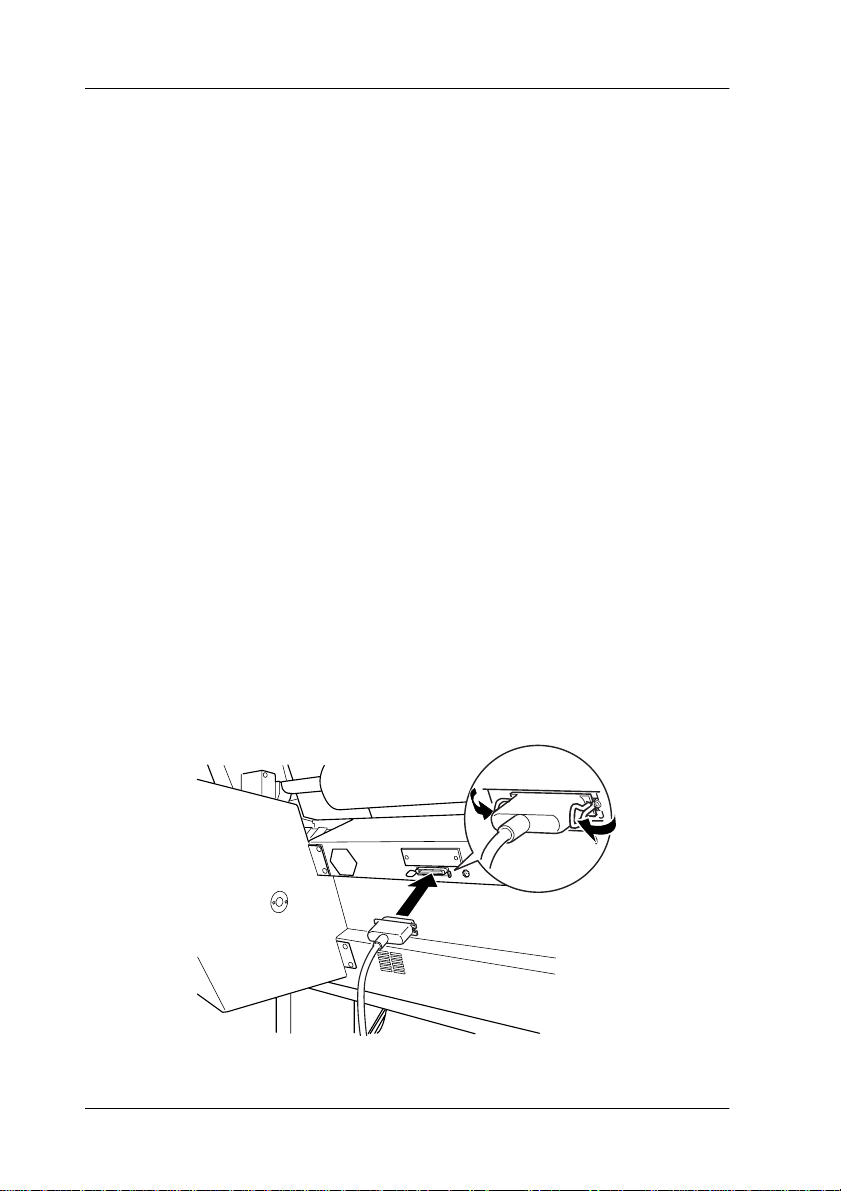
Using the built-in parallel interface
To use the printer’s built -in parallel in terface, you will need a
shielded, twisted-pair cable. Then follow the steps below to
connect the printer to your computer.
1. Make sure both the printe r and computer are turned off.
2. Plug the cable connector securel y into th e pr inter ’s interface .
Then squeeze the wire clips together until they lock into place
on both sides. If your cable has a ground wire, connect it to
the ground connector below the interface connector.
1-2 Setting up the Printer with Your PC
Page 14

3. Plug the other end of the cable into the computer’s parallel
port. If a ground wi re exists at the compu ter end of the cable,
connect it to the ground connector at the back of the computer.
Now see “Installing the Printer Software on Your PC” on page
1-4. You must install the printer software before using your
printer.
1
Setting up the Printer with Your PC 1-3
Page 15

Installing the Printer Software on Your PC
After connecting the printer to yo ur computer, you need to install
the software included on the “Printer Software for EPSO N Stylus
PRO 9000” CD-ROM shipped with your printer.
Printer software components
Your printer software includes the following items:
❏ Printer driv er
The printer driver is the software t hat runs your pr inter. With
it, you can make settings such as Media Type, Print Quality,
and Paper Size.
❏ Utilities
The Nozzle Check, Head Cleaning, and Print Head
Alignment utilities help you keep your printer in top
operating condition.
❏ EPSON Status Monitor 2
The EPSON Status Monitor 2 utility notifies you of printer
errors and displays printer status information such as the
amount of ink remaining. The St atus Monitor also guides you
when replacing ink cartridges.
1-4 Setting up the Printer with Your PC
Page 16

Installing on Windows 95, 98, and NT 4.0
Follow thes e steps to install y our printer soft ware:
Note:
If you wish to make a floppy disk version of the printer software
included on your CD-ROM, insert the printer software CD-ROM,
then click Create Floppy based printer driver/utility disks and
follow the on-screen instructions.
1. Make sure that the printer and computer are switched off.
2. Switch the PC on. Windows start s automatically. Then swi tch
the printe r on.
3. Insert the CD-ROM containing the printer software into the
CD-ROM drive. The AutoPlay function of the CD-ROM drive
automatically starts t he installation program on the CD -ROM.
Note:
If your system does not have a CD-ROM drive, you can make a
floppy disk version from which to install the printer software.
If the installation program does not start automatically, click
on Start and then on Run. In the Run dialog box, enter
E:\START.EXE in the command line and click on the OK
button.
1
Note:
If your CD-ROM drive has a drive letter other than "E", substitute
the appropriate letter.
The installation program starts. The subsequent pr ocedure is
menu-driven, i.e., you can select the relevant options from a
list simply by clicking with t he mouse. The r emaind er of the
installation is automatic and you do not need to enter any
more information.
Setting up the Printer with Your PC 1-5
Page 17

4. Select the desired options and follow the on-screen
instructions.
5. After the printer software has been successfully installed,
click on the button identified by a door icon to exit the
installation program.
Note:
❏ If the New Hardware Found screen or any other Wizard appears
when you turn on your computer, clic k Cancel and follow the
steps above.
❏ Installation time varies depending on your computer.
❏ EPSON Status Monitor 2 installation starts automatically.
Click Cancel if you do not want to install this utility. If you
want to install it later, see “Software” in the Online Guide.
If you install EPSON Status Monitor 2, your computer will
restart automatically.
For information on opening and using the printer software, see
“Printing From Your PC” on page 3-9. See also “Printe r Software”
in your Online Guide. If you use your printer on a network, see
“Printing on a Peer-to-Peer Network” on page 1-7.
Upgrading to Windows 98
When you upgrade from Windows 95 to Windows 98, uninstall
the current printer software, then install Windows 98 and the
printer software as explained below:
1. Click Start, point to Settings, then click Control Panel.
2. Double-click the Printers icon in the Control Panel window.
3. Right-click your printer icon and c lick Delete in the dialog
box.
4. Follow the messages on your screen.
1-6 Setting up the Printer with Your PC
Page 18

5. Install the printer driver again. See “Installing on Windows
95, 98, and NT 4.0” on page 1-5.
Printing on a Peer-to-Peer Network
For Windows 95 and 98, see below. For Windows NT 4.0, see “Fo r
Windows NT 4.0” on page 1-11.
For Windows 95 and 98
This section tells you how to set up your printer so that other
computers on a network can use it.
First, you need to set up the printer as a shared printer on the
computer to which the printer is connected. Then, you must
signify the network pat h to the printer from each computer to use
the printer, and install the printer software on those computers.
Note:
This section describes how to use your printer as a shared printer on a
network. To connect your printer directly to a network without setting
it up as a shared printer, consult your network administrator.
1
Setting up your printer as a shared printer
Follow these steps to share a printer connected directly to your
computer with other computers on a network:
1. Click Start, point to Settings, then click Control Panel.
2. Double-click Network.
Setting up the Printer with Your PC 1-7
Page 19
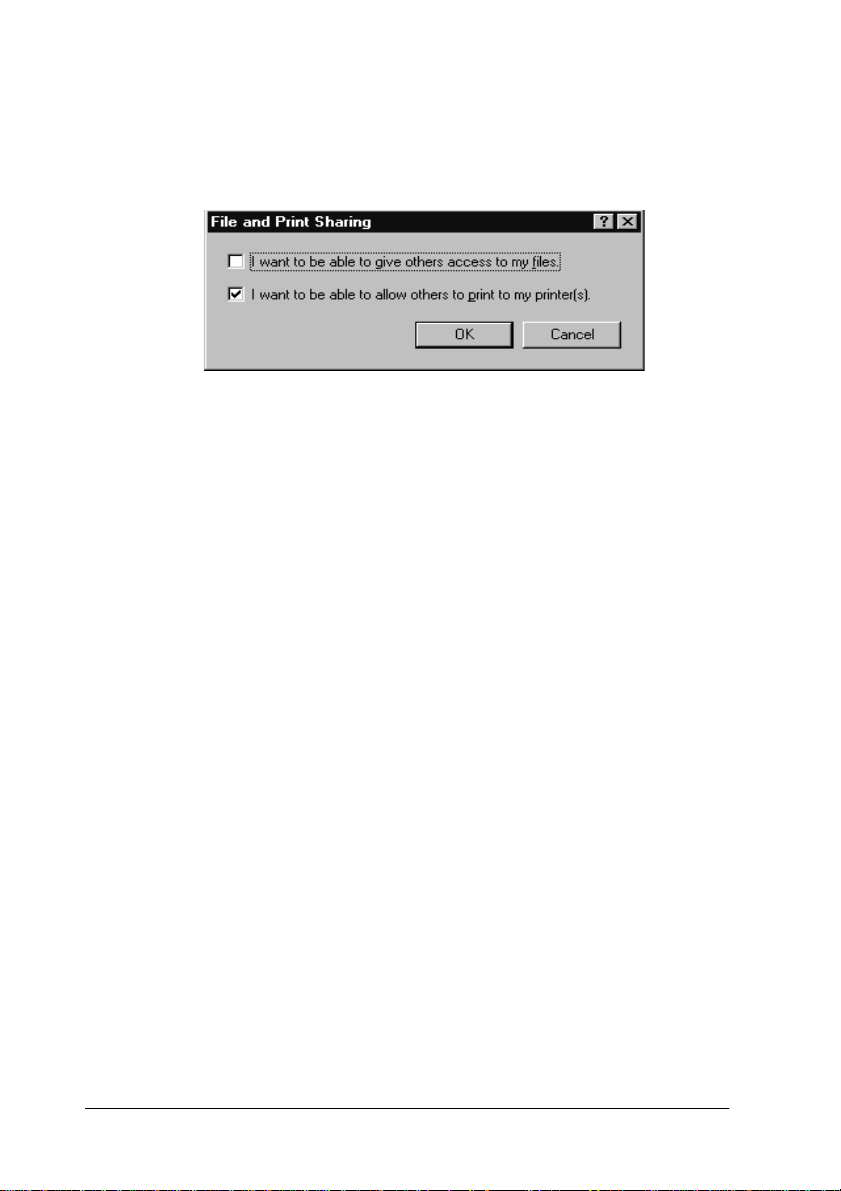
3. Click File and Print Sharing.
4. Click the I want to be able to allow others to print to my
printer(s) check box and click OK.
5. In the Network window, click OK.
6. In the Control Panel, double-click Printers.
Note:
❏ If a dialog box requesting the Windows 95 or 98 CD-ROM
appears, insert the CD-ROM in the CD-ROM drive, then
follow the messages on the screen.
❏ If a dialog box appears requesting you to restart your computer,
do so. Then open the Printer folder, and continue from step 7.
7. Select your printer, and choose Sharing from the File menu.
1-8 Setting up the Printer with Your PC
Page 20

8. Click Shared As, enter printer information as needed, then
click OK.
Accessing the printer through a network
1
To access your printer from another computer on a network,
follow these steps.
Note:
Your printer must be set up as a shared resource on the computer to
which it is directly connected before you can access it from another
computer. For instructions, see “Setting up your printer as a shared
printer” on page 1-7.
1. On the computer you want to access the printer from, click
Start, point to Settings, and click Printers.
2. Double-click the Add Printer icon.
3. The Add Printer Wizard screen appears. Click Next.
Setting up the Printer with Your PC 1-9
Page 21

4. Click N etwork printer, then click Next.
5. Click Browse.
1-10 Setting up the Printer with Your PC
Page 22

6. Double-click the icon of the computer that is directly
connected to the printer. Then click the printer’s icon.
7. Click OK and follow the messages on the screen.
For Windows NT 4.0
1
This section tells you how to set up your printer so that other
computers on the network can use it.
First, you need to set up the printer as a shared printer on the
computer to which the printer is connected. Then, you must
signify the network pat h to the printer from each computer to use
the printer, and install the printer software on those computers.
Setting up your printer as a shared printer
Follow these steps to share a p rinter t hat i s co nnected directly to
your computer with others on a network.
1. Click Start, point to Settings, and clic k Printers.
2. Select your printer, then click Sharing on the File menu.
Setting up the Printer with Your PC 1-11
Page 23

3. Click the Shared radio button and enter the Share Name.
4. Click OK.
Note:
Do not choose any drivers from the Alternate Drivers list.
Accessing the printer through a network
To access your printer from another computer on a network,
follow these steps.
Note:
Your printer must be set up as a shared resource on the computer to
which it is directly connected before you can access it from another
computer. For instructions, see “Setting up your printer as a shared
printer” on page 1-11.
1. On each computer from which you want to access the printer,
click Start, point to Settings, and click Printers.
1-12 Setting up the Printer with Your PC
Page 24

2. Double-click the Add Printer icon.
3. Click the Network printer server radio button. Click Next.
4. Double-click the icon of the computer that is directly
connected to the printer. Then click the printer’s icon.
1
Note:
Be sure to confirm all network settings with the network
administrator.
5. Click OK and follow the messages on the screen.
Setting up the Printer with Your PC 1-13
Page 25

Chapter 2
Setting up the Printer with Your Macintosh
Connecting the Printer to Your Macintosh . . . . . . . . . . . . . . . . 2-2
Using the built-in serial interface. . . . . . . . . . . . . . . . . . . . 2-2
Installing the Printer Software on Macintosh . . . . . . . . . . . . . . 2-4
Printer software components . . . . . . . . . . . . . . . . . . . . . . . 2-4
Installing on Macintosh. . . . . . . . . . . . . . . . . . . . . . . . . . . . 2-5
Using the Chooser to select your printer . . . . . . . . . . . . . 2-7
2
Setting up the Printer with Your Macintosh 2-1
Page 26

Connecting the Printer to Your Macintosh
The method you use to connect the printer to your Macintosh
depends on whether you want to send print jobs directly to the
printer usin g the printer’s built-in serial in terface, or send print
jobs to the printer over a network using an optional i nterface card.
For information on using an optional interface card, see
Chapter 5, “Using an Optional Interface Card”.
To connect the printer to a PC, see Chapter 1, “Setting up the
Printer with Your PC”.
Using the built-in serial interface
To use the printer’s built-in serial interface, you will need an
Apple System Peripheral-8 cable. Then follow the steps below to
connect the printer to your Macintosh.
1. Make sure both your printer and Macintosh are turned off.
2. Connect one end of the interface cable to the serial connect or
on the back of the printer.
2-2 Setting up the Printer with Your Macintosh
Page 27

Note:
Use only an Apple System Peripheral-8 cable to connect the printer
to your Macintosh. Do not use a LocalTalk cable.
correct incorrect
3. Connect the other end of the interface cable to either the
modem port or printer port on the Macintosh. The ports are
marked with the following icons. (Some Macintosh
PowerBook models have only one serial port.)
2
modem port
printer port
Note:
If your Macintosh has a built-in modem, connect the interface cable
to the printer port.
4. Turn on the printer by pressing the Power button.
5. Turn on your Macintosh.
See the next section for instructions on installing the printer
software. You must install the printer software before using your
printer.
Setting up the Printer with Your Macintosh 2-3
Page 28

Installing the Printer Software on Macintosh
After connecting the printer to yo ur Maci ntosh, yo u are r eady t o
install the printer software included in the “Printer Software for
EPSON Stylus PRO 9000” CD-ROM shipped with your printer.
Printer software components
Your printer software includes the following items:
EPSON Printer Driver Package
❏ SPro 9000
This is the printer driver software that runs your printer. With
it, you can make settings su ch as Med ia Type , Print Qual ity,
and Paper Size.
❏ SPro 9000 (AT)
This is the printer driver software that gives you control over
your printer when used on an AppleTalk network. You can
make settings such as Media Type, Print Quality, and Paper
Size.
❏ EPSON Monitor3
Monitors and manages background printing jobs. You must
turn on background printing in the Cho oser to use this utility.
❏ EPSON StatusMonitor
Keeps track of the current status of your printer, and alerts
you when printer errors occur.
❏ Nozzle Check
Checks for clogged nozzles.
❏ Head Cleaning
Cleans the print heads to maintain the best print quality.
2-4 Setting up the Printer with Your Macintosh
Page 29

❏ Print Head Alignment
Adjusts the print heads so that vertical and horizontal lines
are aligned.
ColorSync 2.0 and Profiles
Matches the colors in your p rintout with the colo rs displayed
on your screen automatically. Use this when pr inting scanned
photographs or computer graphics.
Installing on Macintosh
Caution:
c
Follow thes e steps to install y our printer soft ware:
1. Insert the printer softwa re CD shipped wi th your printer in
the CD-ROM drive.
2. The EPSON printer software opens automatically.
3. When the Installer icon appears, double-cl ick the icon.
Turn off all virus protection programs before you install your
printer software.
2
Setting up the Printer with Your Macintosh 2-5
Page 30

4. After the initial screen appears, click Continue. The following
dialog box appears.
5. If you want to install all o f the printer software included o n
your printer software CD-ROM, make sure the Install
Location box shows the correct disk drive and click Install.
If disk space is limited, select Custom Install from the pop-up
menu and click Serial Driver Package or Network Driver
Package. Confirm the destination for installation, then click
Install.
Note:
Click the icon to get information on each component.
6. When a message appears informing you that installation is
finished, click Restart to complete the installation and restart
your computer.
For information on opening and using the printer software, see
“Printing From Your Macintosh” on page 3-14 . See al so “Pr int er
Software” in the Online Guide.
2-6 Setting up the Printer with Your Macintosh
Page 31

Using the Chooser to select your printer
After you install the printer software, you need to open the
Chooser to select your print er. You have to choose the printer only
the first time y ou use i t or aft er yo u have cho sen an other pri nte r.
Your Macintosh will always print using the last printer selected.
If you are using the serial interface, choose your print er driver as
described in the following section, “Using the serial interface”. If
your system is connected to an AppleTalk network, see “Using
an AppleTalk network” on page 2-8.
Using the serial interface
Follow the steps below to use the serial interface to send print jobs
directly to the printer:
1. Make sure the printer is connected t o your Maci nt osh and is
turned on.
2. Select Chooser from the Apple menu. Then click the SPro
9000 icon and the port your printer is connected to.
2
Setting up the Printer with Your Macintosh 2-7
Page 32

Note:
❏ If you are using an AppleTalk network, an alert message may
appear when you click the port. In this case, reselect the other
port or make the AppleTalk setting Inactive , then select the port
again.
❏ If you are using your Macintosh in an Ethernet environment,
you can connect your printer to either the printer or modem
port and leave the AppleTalk setting Active.
3. Click the Background Printing radio buttons to turn
background printing on or off.
When background printing is on, you can use your Macintosh
while it is preparing a document for printing . You must turn
on background printing to use the EPSON Monitor3 util ity to
manage prin t jobs. For more information, see “Controlling
Background Printing” in the Online Guide.
4. Close the Chooser.
Using an AppleTalk network
Follow the steps below t o use an AppleTalk netwo rk to send print
jobs to the p rinter:
1. Make sure the printer is connected to your Macintosh and is
turned on.
2. Select Chooser from the Apple menu. Then click the SPro
9000(AT) icon. Select the AppleTalk zone you want to use.
A list of all the printers connected to the selected zone appear s
on the right .
2-8 Setting up the Printer with Your Macintosh
Page 33

Note:
If you don’t see the SPro 9000(AT) icon, use the arrows on the right
to scroll through the available icons.
3. Click the name you assigned to your EPSON St ylus Pro 9000 .
4. Click OK if the printer model name is correct.
If your printer name does not appear, make sure the printer
is turned on and connected properly.
2
5. Click the Background Printing radio buttons to turn
background printing on or off.
When background printing is on, you can use your Macintosh
while it is prepari ng a document for p rinti ng. You must tu rn
on background printing to u se the EPSON Monitor3 uti lity to
manage pr int jobs. For mo re information, see “Controlling
Background Printing” in your Online Guide.
6. Close the Chooser.
Setting up the Printer with Your Macintosh 2-9
Page 34

Chapter 3
Printing and Printer Management
Loading Paper . . . . . . . . . . . . . . . . . . . . . . . . . . . . . . . . . . . . . . . . 3-2
Loading roll paper . . . . . . . . . . . . . . . . . . . . . . . . . . . . . . . . 3-2
Loading cut sheet media . . . . . . . . . . . . . . . . . . . . . . . . . . . 3-6
Printing From Your PC. . . . . . . . . . . . . . . . . . . . . . . . . . . . . . . . . 3-9
Making the printer driver settings. . . . . . . . . . . . . . . . . . . 3-9
Cancelling printing from your PC. . . . . . . . . . . . . . . . . . . 3-13
Printing From Your Macintosh . . . . . . . . . . . . . . . . . . . . . . . . . . 3-14
Making the printer driver settings. . . . . . . . . . . . . . . . . . . 3-14
Cancelling printing from your Macintosh . . . . . . . . . . . . 3-17
3
Printing and Printer Management 3-1
Page 35

Loading Paper
Loading roll paper
To load the roll paper, follow the steps below.
1. Open the roll paper cover. Make sure that the roll paper is
attached to the printer properly.
Caution:
c
Note:
If two roll paper spindles are attached to the printer, keep the unused
roll wound up using the roll paper belt, to avoid paper jams. To
secure the roll paper, tap the end of the roll paper belt lightly on the
roll paper. To remove the roll paper belt from the roll paper, simply
take off the belt.
Keep your fingers off the printable surface of the media, as
fingerprints may reduce printout quality. Whenever
possible, use gloves to load paper into the printer.
2. Make sure that the printer is on.
3-2 Printing and Printer Management
Page 36

3. Press the Paper Source button repeatedly until the Roll Auto
Cut light or Roll Cutter Off light is on.
Caution:
c
4. Make sure the Operate light or Paus e light is not flashing, then
pull the paper set lever all the way up. The Paper Out light
turns on and
c
If you are loading thick roll paper, select Roll Cutter Off.
Paper that is too thick may damage the paper cutter.
LOAD PAPER
Caution:
Do not move the paper set lever up while the Operate light
or Pause light is flashing. Otherwise, damage may occur.
appears on the LCD panel.
3
Printing and Printer Management 3-3
Page 37

5. Load the paper into the paper insertion slot.
6. Pull the paper down through the paper insertion slot a small
way.
3-4 Printing and Printer Management
Page 38

7. Roll back the roll paper to remove the sla ck. Make sure th at
the bottom edge of the paper is positioned straightly and in
line with the rows of punch holes.
8. Push the paper set lever all the way down, then close the roll
paper cover.
PRESS PAUSE BUTTON
appears.
Note:
If the Roll Auto Cut light is on, and the bottom edge of the roll paper
was not cut properly after the previous print job, press
the Cut/Eject button to recut the edge.
3
Printing and Printer Management 3-5
Page 39

9. Press the Pause button.
The print heads move and the paper feeds into the printing
READY
position.
Note:
Even if you do not press the Pause button, the print heads move
and paper feeds into the printing position automatically.
appears on the LCD panel.
Now you are ready to print on roll paper. Make the printer
driver settings, then send the print job. See “Printing From
Your PC” on page 3-9 or “Printing From Yo ur Macintosh” on
page 3-14.
Note:
Allow time for the ink to dry thoroughly after printing to ensure the
printout quality.
appears on the LCD panel.
Loading cut sheet media
To load cut sheet media, follow the steps below.
READY
Note:
If you are printing on thick paper (0.5 mm or thicker), see your Online
Guide.
Caution:
c
1. Make sure that the printe r is on and the roll paper cover i s
2. Press the Paper Source button repeatedly until the Sheet light
3-6 Printing and Printer Management
Keep your fingers off the printable surface of the media, as
fingerprints may reduce printout quality. Whenever possible, use
gloves to load paper into the printer.
closed.
is on.
Page 40

3. Make sure the Operate light or Paus e light is not flashing, then
pull the paper set lever all the way up. The Paper Out light
turns on and
LOAD PAPER
appears on the LCD panel.
4. Load the sheet into the paper insert ion slot unt il it comes out
below. Make sure that the right and bottom edges of the paper
are straight and in line with the rows of punch holes.
3
Printing and Printer Management 3-7
Page 41

5. Push the paper set lever all the way down,
BUTTON
c
6. Press the Pause button.
The print heads move and the sheet feeds into the printing
position.
appears.
Caution:
Do not move the paper set lever up while the Operate light
or Pause light is flashing. Otherwise, damage may occur.
READY
appears on the LCD panel.
PRESS PAUSE
Note:
Even if you do not press the Pause button, the print heads move
and paper feeds into the printing position automatically.
appears on the LCD panel.
Now you are ready to print on cut sheet media. Make the
printer driver settings, then send the pr in t jo b. See “ Pri nti ng
From Your PC” on page 3-9 or “Printing From Your
Macintosh” on page 3-14.
Note:
Allow time for the ink to dry thoroughly after printing to ensure the
printout quality.
3-8 Printing and Printer Management
READY
Page 42

Printing From Your PC
After loading the paper, you are ready to print your document
from your PC.
Note:
To ensure the print quality, you may need to check the printer’s condition
before you start printing. See Chapter 4, “Checking the Printer’s
Condition”.
Making the printer driver settings
To make the basic settings to print your documents, access the
Main manu and Paper m enu in the p r inter driver. In the Paper
menu, you can set particul ar settings for printing on roll paper;
Auto Rotate, Auto Cut, and Print Page Line.
For details about the printer software, see onli ne help by pressing
the Help button in the driver settings window.
3
Printing and Printer Management 3-9
Page 43

1. Click Print on the File menu. The Print dialog box appears.
2. Make sure your printer is selected and then click Properties,
or Options. You may need to click a combination of these
buttons. The driver settings window appears.
3. Click the Main tab to display the Main menu.
4. Select the media you loaded in the printer from the Media
Type list.
Note:
The Media Type setting determines what other settings are
available, so you should always make this setting first.
5. In the Ink box, select Color to pri nt in color, or Black to p ri nt
in black and white.
6. Make sure the Automatic radio button in the Mode box is
selected.
3-10 Printing and Printer Management
Page 44

Note:
When Automatic is selected, the printer driver takes control of all
detailed settings based on the current Media Type setting and Ink
setting.
7. Adjust Speed and Quality in t he Mode box if a slider appears.
Drag the slider left or right depending on which is more
important. This setting is usually automatically decided in
accordance with your Media Type setting.
Note:
Depending on the Media Type you choose, a slider appears in the
Mode box.
8. Click the Paper tab to display the Paper menu.
3
Printing and Printer Management 3-11
Page 45

9. Select the paper size you load ed in the printer from the Paper
Size list.
Note:
Most Windows applications feature paper size settings that override
similar settings in the printer driver.
10. Select the type of paper you loaded in the printer from the
Paper Source list.
11. When roll paper is used, set the Roll Paper Settings as
required.
Auto Rotate
If your document length is shorter than the printable width
of the roll paper, the document will be turned automati cal ly
by 90 degrees and printed crosswise when you select Auto
Rotate. You can save paper by using this functio n.
Auto Cut
Roll paper will be cut automatically after printing one page
when you select Auto Cut.
Print Page Line
Page lines will be printed on the right side and below the
document for manual cutting when you select Print Page
Line.
12. Make settings for Copies, Orientation, Printable Area, and
Reduce/Enlarge boxes.
13. Click the OK button at the bot tom of the window. You r eturn
to the Print dialog box (or a similar dialog box).
14. Click Close, OK, or Print to print. You may need to click a
combination of these buttons.
3-12 Printing and Printer Management
Page 46

While printing, the EPSON Progress Meter will appear, showing
the printing progress and the status of your printer.
For details, see “Printer Software” in your Online Guide.
Cancelling printing from your PC
To cancel the printing in progress, press the Stop ( ) button on
the EPSON Progress Meter.
You can also pause or restart printing. To pause printing, press
the Pause ( ) button. To resume printing, press this button
again. To restart printing, press the Repri nt ( ) button.
3
Printing and Printer Management 3-13
Page 47

Printing From Your Macintosh
After loading the paper, you are ready to print your document
from your Macintosh.
Note:
To ensure the print quality, you may need to check the printer’s condition
before you start printing. See Chapter 4, “Checking the Printer’s
Condition”.
Making the printer driver settings
To make the printer driver settings, follow the steps below.
For details about the printer sof tware, see online help by pressing
the Help ( marked with “?“) icon bu tton in the driver setting dialog
boxes.
Note:
While many Macintosh applications override the settings made in the
printer driver, some do not, so you must verify the settings to get the
results you expect.
1. Choose PAGE SETUP from the File menu. This brings up the
Page Setup dialog box shown below.
2. Select the paper size you load ed in the printer from the Paper
Size list.
3-14 Printing and Printer Management
Page 48

3. Select the type of paper you loaded in the printer from the
Paper Source list.
4. When roll paper is used, set the Roll Paper Settings as
required.
Auto Rotate
If your document length is shorter tha n the printable width
of the roll paper, the document will be turned automatically
by 90 degrees and printed crosswise when you select Auto
Rotate. You can save paper by using this function.
Auto Cut
Roll paper will be cut automatically after a docume nt is
printed when you select Auto Cut.
Print Page Line
Page lines will be printed on the right side and belo w the
document for manual cutting when you select Print Page
Line.
5. Make settings for Orientation, Reduce or Enlarge, and
Printable Area.
3
6. After making your settings, click the OK button to close the
Page Setup dialog box.
Note:
You cannot print from the Page Setup dialog box. You can only print
from the Print dialog box.
7. Choose Print from the File menu. The Print di alog box appears
as shown below.
Printing and Printer Management 3-15
Page 49

Note:
You can also open the Print dialog box by pressing the Options
button in the Page Setup dialog box.
8. Select the media you loaded in the printer from the Media
Type list.
Note:
The Media Type setting determines what other settings are
available, so you should always make this setting first.
9. In the Ink box, select Color to pri nt in color, or Black to p ri nt
in black and white.
10. Make sure the Mode option is set to Automat ic .
Note:
When Automatic is selected, the printer driver takes control of all
detailed settings based on the current Media Type setting and Ink
settings.
3-16 Printing and Printer Management
Page 50

11. Adjust Speed and Quality in t he Mode box if a slider appear s.
Drag the slider left or right depending on which is more
important. This setting is usually automatically decided in
accordance with your Media Type setting.
Note:
Depending on the Media Type you choose, a slider appears in the
Mode box.
12. Be sure to make the settings for Copies and Pages, then click
the Print button to start printing.
Cancelling printing from your Macintosh
When background printing is on
1. Press the Power button to turn off the printer.
2. Select EPSON Monitor3 from the application menu.
3
Printing and Printer Management 3-17
Page 51

3. Click the button, then click the stop button to cancel the
print job.
When background printing is off
1. Press the Power button to turn off the printer.
2. Hold down the J key on your keyboard and press the [.]
period key to cancel the print job.
3-18 Printing and Printer Management
Page 52

Chapter 4
Checking the Printer’s Condition
Using Printer Utilities. . . . . . . . . . . . . . . . . . . . . . . . . . . . . . . . . . 4-2
Accessing the printer utilities. . . . . . . . . . . . . . . . . . . . . . . 4-2
Printing the Nozzle Check Pattern . . . . . . . . . . . . . . . . . . . . . . . 4-3
Cleaning the Print Heads. . . . . . . . . . . . . . . . . . . . . . . . . . . . . . . 4-4
Aligning the Print Heads . . . . . . . . . . . . . . . . . . . . . . . . . . . . . . . 4-6
4
Checking the Printer’s Condition 4-1
Page 53

Using Printer Utilities
To ensure the print quality, you may need to check the printer’s
condition using the following utilities from the printer software.
Note:
You can also check from the printer’s control panel. See “The Control
Panel“ in your Online Guid e.
❏ Nozzle Check
❏ Print Head Cleaning
❏ Print Head Alignment
Accessing the printer utilities
To access the printer utilitie s , follow the steps below.
For Windows
1. Double-click the My Computer icon, then double-click the
Printers folder.
2. For Windows 95 and 98, right-click your Printer icon, then
click Properties. For Windows NT 4.0, right-click your Printer
icon, then click Document Defaults. You see the printer
software window.
For Macintosh
Click Print on the File menu of your application. Then click the
utility icon in the Print dialog box.
4-2 Checking the Printer’s Condition
Page 54

Printing the Nozzle Check Pattern
You can check the print head nozzles from your computer with
the Nozzle Check utility in the printer software.
Note:
Do not start the Nozzle Check utility while printing is in progress;
otherwise, your printout may be marred.
Follow the steps below:
1. Make sure the printer is turned on and paper is loaded in the
printer. (A3 or wider paper)
2. Access the printer software. See “Accessing the printer
utilities” on page 4-2.
3. Click the Nozzle Check button.
4. Follow the messages on your screen.
The printer prints an operationa l check pag e includin g firmware
(ROM) version information and a nozzle check pattern. The
nozzle check pattern will resemble o ne of the two samples shown
below:
Nozzle Check Pattern
Good condition: Print heads do not require cleaning.
Poor condition: Print heads require cleaning.
4
Note:
Actual tests are printed in color.
Checking the Printer’s Condition 4-3
Page 55

If any segments of printed lines are missing in your nozzle check
pattern, ink nozzles are clogged and the print heads require
cleaning.
Caution:
c
Make sure that the nozzle check pattern printing is complete
before you start printing. Otherwise, print quality may decline.
Cleaning the Print Heads
You can execute the head clean from your computer using the
Head Cleaning utility in the p rinter softwa re, as explained in the
following steps.
Note:
❏ Print head cleaning uses ink. To avoid wasting ink, clean the print
heads only if print quality declines.
❏ Use the Nozzle Check utility to confirm that the print heads need to
be cleaned, as this uses only a little ink.
❏ When an Ink Out light is flashing (ink low) or on (ink out) in the
printer, you cannot clean the print heads before replacing the
appropriate ink cartridge first.
❏ Do not start the Head Cleaning or Nozzle Check utilities while
printing is in progress; otherwise, your printout may be marred.
Follow the steps below:
1. Make sure the lights on the contro l panel do not indic ate that
ink is low or ink is out.
2. Access the printer software. See “Accessing the printer
utilities” on page 4-2.
3. Click the Head Cleaning button.
4-4 Checking the Printer’s Condition
Page 56

4. Follow the messages on your screen.
The Pause light of the printer flashes during the cleaning
cycle, which takes about three minutes to complete.
Caution:
c
5. When the Pause light is on, click Print nozzle check pattern
(Windows) or the Confirmation button (Ma cintosh) in the
Head Cleaning dialog box, or print a few lines from a
document, to confirm that the heads are clean.
Nozzle Check Pattern
Good Condition: Print head clean was successful.
Poor condition: Print heads require further cleaning.
Never turn off the printer until the cleaning cycle is finished
and the Pause light has stopped flashing. Doing so may
damage the printer.
4
Note:
Actual tests are printed in color.
In the check pattern, if you find that segments are still missing
from the test lines, you may need to repeat head cleaning and
print the nozzle check pattern again.
If print quality does not improve even after repeating this
procedure several times, contact your dealer.
Checking the Printer’s Condition 4-5
Page 57

Aligning the Print Heads
You can align the print heads using the Print Head Alignment
utility in the printer software.
Note:
❏ Do not start the Print Head Alignment utility while printing is in
progress; otherwise, your printout may be marred.
❏ Alignment pattern printing requires 1.5 m roll paper.
Follow the steps below:
1. Make sure the printer is turned on, and the EPSON special
roll paper you pl an to use is loaded i n the printer. ( 297 mm or
wider roll paper)
Note:
If you plan to use paper other than EPSON spec ial paper, you may
need to align the print heads using the SelecType settings. See
“Paper Handling“ in your Online Guide.
2. Access the printer software. See “Accessing the printer
utilities” on page 4-2, depending on your system.
3. Click the Utility tab in the printer software window (Windows)
or the utility icon in the Pr int or Page Se tup dialog box
(Macintosh), t hen click the Print Head Alignment button.
4. Follow the messages on your screen. The printer prints the
head alignment patterns.
4-6 Checking the Printer’s Condition
Page 58

5. Choose the set number that has the smallest gap in each
alignment pattern. In the example below, set number 4 has
the smallest gaps.
patterns #1-5, #7, #9-12 patterns #6, #8 only
1
2
3
4
5
6
7
1
2
3
4
5
6
7
6. Select the number you chose in step 5 (for example, number
4), then click Finish.
4
Note:
If the set with the smallest gap is unclear and cannot be selected,
click the Realignment button and repeat from step 5.
Checking the Printer’s Condition 4-7
Page 59

Chapter 5
Using an Optional Interface Card
Available Optional Interface Cards . . . . . . . . . . . . . . . . . . . . . . 5-2
Installing the Optional Interface Card . . . . . . . . . . . . . . . . . . . . 5-3
5
Using an Optional Interface Card 5-1
Page 60

Available Optional Interface Cards
The optional Ethernet Interface Cards shown below let you use
your printer on a network. The Ethernet card automatically
detects the protocols on your network, so you can print from
Windows 95, 98 and NT 4.0, and Macintosh on an AppleTalk
network.
Type B Ethernet Interface Card (10BASE-T) C823623
Type B Ethernet Interface Card (100BASE-TX) C823633
5-2 Using an Optional Interface Card
Page 61

Installing the Optional Interface Card
To install an optional interface card, follow these steps:
Note:
Before you install the optional interface card, see the documentation that
comes with the card for setup information.
1. Make sure the printer is turned off.
2. Make sure that the power cord is unplugged from the
electrical outlet.
Warning:
w
3. Disconnect the existing interface cable, if necessary.
4. Use a cross-head screwdriver to remove the two screws
Do not install the interface card when the printer is connected to
an electrical outlet, as damage may occur.
securing the shield plate to th e optional interface slot; then l ift
off the plate. Be sure to keep the screws; you may need to use
them again when you re-install the shield plate.
5
Using an Optional Interface Card 5-3
Page 62

5. Set any DIP switches and jumpers on the card, if necessary.
See the interface card’s documentation for details.
6. Slide the interface card along the slots on both sides of the
interface compartment. Push it in firmly to fully insert the
connector at the rear of the interface card into the printer’s
internal socket.
7. Secure the interface card in the slot with the two screws
included with the interface card.
5-4 Using an Optional Interface Card
Page 63

8. Connect a compatible interface cable t o the interface card and
to your computer. If t he cable has a ground wire, se cure it with
one of the screws.
Also, if you are using more than one computer, reconnect the
other interface cable.
9. Make sure the printer is turned off. Then plug in the power
cord.
5
To remove an interface card, follow the above steps in reverse
order.
Using an Optional Interface Card 5-5
 Loading...