

Page 1

EPSON Stylus® Pro 9000 Series
PRINTER GUIDE
®
Page 2

Printed on recycled paper.
Copyright © 2000 by Epson America, Inc.
All rights reserved. No part of this publication may be reproduced, stored in a retrieval system, or transmitted in
any form or by any means, electronic, mechanical, photocopying, recording, or otherwise, without the prior
written permission of
with these
EPSON
printers.
SEIKO EPSON CORPORATION
is not responsible for any use of this information as applied to other printers.
EPSON
. The information contained herein is designed only for use
Trademarks
EPSON, EPSON
Stylus, ESC/P, and Micro Piezo are registered trademarks of
SEIKO EPSON CORPORATION
.
DX3, PhotoEnhance, SelecType, and EPSON Archival are trademarks and EPSON Preferred is a service mark of
Epson America, Inc.
EFI, the EFI logo, Fiery, and the Fiery logo are U.S. registered trademarks of Electronics for Imaging, Inc.
General Notice: Other product names used herein are for identification purposes only and may be trademarks of
disclaims any and all rights in those marks.
their respective owners.
The E
NERGY STAR
EPSON
emblem does not represent EPA endorsement of any product or service.
Legal Notices
Neither
SEIKO EPSON CORPORATION
nor its affiliates shall be liable to the purchaser of this product or third
parties for damages, losses, costs, or expenses incurred by purchaser or third parties as a result of: accident, misuse,
or abuse of this product or unauthorized modifications, repairs, or alterations to this product, or (excluding the
U.S.) failure to strictly comply with
SEIKO EPSON CORPORATION
SEIKO EPSON CORPORATION
shall not be liable for any damages or problems arising from the use of any options
or any consumable products other than those designated as Original
Products by
SEIKO EPSON CORPORATION
.
’s operating and maintenance instructions.
EPSON
Products or
EPSON
Approved
Part Number: CPD-10847 8/00
ii
Page 3

FCC Compliance Statement
For United States Users
This equipment has been tested and found to comply with the limits for a Class B digital device, pursuant to
Part 15 of the FCC Rules. These limits are designed to provide reasonable protection against harmful interference
in a residential installation. This equipment generates, uses, and can radiate radio frequency energy and, if not
installed and used in accordance with the instructions, may cause harmful interference to radio or television
reception. However, there is no guarantee that interference will not occur in a particular installation. If this
equipment does cause interference to radio and television reception, which can be determined by turning the
equipment off and on, the user is encouraged to try to correct the interference by one or more of the following
measures.
• Reorient or relocate the receiving antenna.
• Increase the separation between the equipment and receiver.
• Connect the equipment into an outlet on a circuit different from that to which the receiver is connected.
• Consult the dealer or an experienced radio/TV technician for help.
WARNING
The connection of a non-shielded equipment interface cable to this equipment will invalidate the FCC
Certification of this device and may cause interference levels which exceed the limits established by the FCC for
this equipment. It is the responsibility of the user to obtain and use a shielded equipment interface cable with this
device. If this equipment has more than one interface connector, do not leave cables connected to unused
interfaces. Changes or modifications not expressly approved by the manufacturer could void the user’s authority to
operate the equipment.
For Canadian Users
This Class B digital apparatus meets all requirements of the Canadian Interference-Causing Equipment
Regulations.
Cet appareil numérique de la classe B respecte toutes les exigences du Règlement sur le materiel brouilleur du Canada.
iii
Page 4

Contents
Introduction
How To Use Your Manuals . . . . . . . . . . . . . . . . . . . . . . . . . . . . . . . 2
Using This Printer Guide . . . . . . . . . . . . . . . . . . . . . . . . . . . . . . 3
Warnings, Cautions, and Notes . . . . . . . . . . . . . . . . . . . . . . . . . 4
Where To Get Help . . . . . . . . . . . . . . . . . . . . . . . . . . . . . . . . . . . . . 4
ENERGY STAR Compliance . . . . . . . . . . . . . . . . . . . . . . . . . . . . . . 5
Important Safety Instructions . . . . . . . . . . . . . . . . . . . . . . . . . . . . . . 6
Ink Cartridge Safety Instructions . . . . . . . . . . . . . . . . . . . . . . . . 7
1 Handling Paper and Other Media
Selecting Paper and Other Media . . . . . . . . . . . . . . . . . . . . . . . . . . . 1-1
Printing on EPSON Paper and Other Media . . . . . . . . . . . . . . . . . . 1-2
Printing Tips for EPSON Media . . . . . . . . . . . . . . . . . . . . . . . . 1-4
Using Roll Paper . . . . . . . . . . . . . . . . . . . . . . . . . . . . . . . . . . . . . . . . 1-4
Attaching Paper to the Spindle . . . . . . . . . . . . . . . . . . . . . . . . . . 1-5
Removing Paper from the Spindle . . . . . . . . . . . . . . . . . . . . . . . 1-6
Inserting the Spindle in the Printer . . . . . . . . . . . . . . . . . . . . . . . 1-7
Loading Roll Paper for Printing . . . . . . . . . . . . . . . . . . . . . . . . . 1-10
Cutting Paper Manually with the Built-in Cutter . . . . . . . . . . . . 1-13
Cutting Canvas and Other Media with the Utility Cutter . . . . . 1-14
Printing Trim Lines . . . . . . . . . . . . . . . . . . . . . . . . . . . . . . . . . . 1-15
Using Cut Sheet Paper . . . . . . . . . . . . . . . . . . . . . . . . . . . . . . . . . . . 1-15
Using Cut Sheet Paper Longer than 19 Inches . . . . . . . . . . . . . . 1-17
Printing on Posterboard . . . . . . . . . . . . . . . . . . . . . . . . . . . . . . . 1-18
Adjusting the Platen Gap for Heavy Stock . . . . . . . . . . . . . . . . . 1-20
Using the Paper Hammock . . . . . . . . . . . . . . . . . . . . . . . . . . . . . . . . 1-21
Catching Printouts in Front of the Printer . . . . . . . . . . . . . . . . . 1-21
Catching Printouts Under the Printer . . . . . . . . . . . . . . . . . . . . 1-24
Setting Paper Configurations . . . . . . . . . . . . . . . . . . . . . . . . . . . . . . 1-25
Registering Paper Thickness, Drying Time, and Suction . . . . . . 1-25
Selecting Registered Paper Settings . . . . . . . . . . . . . . . . . . . . . . . 1-26
v
Page 5

vi | Contents
2 Monitoring and Configuring the Printer
Using the Control Panel to Monitor the Printer . . . . . . . . . . . . . . . . 2-1
Monitoring Normal Printer Operation . . . . . . . . . . . . . . . . . . . . 2-2
Pausing and Resetting the Printer . . . . . . . . . . . . . . . . . . . . . . . . 2-2
Checking Printer Status . . . . . . . . . . . . . . . . . . . . . . . . . . . . . . . . . . 2-2
Printing a Status Check . . . . . . . . . . . . . . . . . . . . . . . . . . . . . . . 2-3
Printing a Nozzle Check . . . . . . . . . . . . . . . . . . . . . . . . . . . . . . . 2-3
Checking Ink Levels and Component Life . . . . . . . . . . . . . . . . . 2-4
Responding to Control Panel Lights and Messages . . . . . . . . . . . . . . 2-5
Using the Control Panel to Configure the Printer . . . . . . . . . . . . . . . 2-8
Setting Default Roll Paper Margins . . . . . . . . . . . . . . . . . . . . . . 2-8
Turning Off Paper Monitoring Features . . . . . . . . . . . . . . . . . . 2-9
Selecting the Printer’s Interface . . . . . . . . . . . . . . . . . . . . . . . . . 2-9
Configuring the Parallel Interface . . . . . . . . . . . . . . . . . . . . . . . . 2-10
Changing the Printer’s Code Page Setting . . . . . . . . . . . . . . . . . 2-11
Restoring Default Settings . . . . . . . . . . . . . . . . . . . . . . . . . . . . . 2-11
Setting the Control Panel Language . . . . . . . . . . . . . . . . . . . . . . 2-12
3 Maintaining and Transporting the Printer
Running a Nozzle Check . . . . . . . . . . . . . . . . . . . . . . . . . . . . . . . . . 3-1
Running a Cleaning Cycle . . . . . . . . . . . . . . . . . . . . . . . . . . . . . . . . 3-2
Aligning the Print Head . . . . . . . . . . . . . . . . . . . . . . . . . . . . . . . . . . 3-3
Printing the Alignment Patterns . . . . . . . . . . . . . . . . . . . . . . . . . 3-3
Completing the Alignment Procedure . . . . . . . . . . . . . . . . . . . . 3-5
Replacing Ink Cartridges . . . . . . . . . . . . . . . . . . . . . . . . . . . . . . . . . . 3-7
Replacing the Paper Cutter Blade . . . . . . . . . . . . . . . . . . . . . . . . . . . 3-11
Removing the Used Cutter Blade . . . . . . . . . . . . . . . . . . . . . . . . 3-11
Installing the New Cutter Blade . . . . . . . . . . . . . . . . . . . . . . . . . 3-14
Cleaning the Printer . . . . . . . . . . . . . . . . . . . . . . . . . . . . . . . . . . . . . 3-15
Transporting the Printer . . . . . . . . . . . . . . . . . . . . . . . . . . . . . . . . . . 3-16
Setting Up the Printer After Transporting It . . . . . . . . . . . . . . . 3-18
Moving the Printer on the Stand . . . . . . . . . . . . . . . . . . . . . . . . 3-19
Replacing the Waste Ink System . . . . . . . . . . . . . . . . . . . . . . . . . . . . 3-20
-vi
Page 6

Contents | vii
4 Resolving Problems
Diagnosing Problems . . . . . . . . . . . . . . . . . . . . . . . . . . . . . . . . . . . . 4-1
Using Hex Dump Mode . . . . . . . . . . . . . . . . . . . . . . . . . . . . . . 4-2
Improving Print Quality . . . . . . . . . . . . . . . . . . . . . . . . . . . . . . . . . . 4-2
Solving Operational Problems . . . . . . . . . . . . . . . . . . . . . . . . . . . . . . 4-5
Solving Miscellaneous Printing Problems . . . . . . . . . . . . . . . . . . . . . 4-7
Solving Paper Problems . . . . . . . . . . . . . . . . . . . . . . . . . . . . . . . . . . 4-9
Solving Roll Paper Feed Problems . . . . . . . . . . . . . . . . . . . . . . . 4-10
Clearing Paper Jams . . . . . . . . . . . . . . . . . . . . . . . . . . . . . . . . . . 4-12
5 Specifications
Printing . . . . . . . . . . . . . . . . . . . . . . . . . . . . . . . . . . . . . . . . . . . . . . 5-1
Paper . . . . . . . . . . . . . . . . . . . . . . . . . . . . . . . . . . . . . . . . . . . . . . . . 5-2
Printable Area . . . . . . . . . . . . . . . . . . . . . . . . . . . . . . . . . . . . . . . 5-3
Environmental . . . . . . . . . . . . . . . . . . . . . . . . . . . . . . . . . . . . . . . . . 5-3
Mechanical . . . . . . . . . . . . . . . . . . . . . . . . . . . . . . . . . . . . . . . . . . . . 5-3
Electrical . . . . . . . . . . . . . . . . . . . . . . . . . . . . . . . . . . . . . . . . . . . . . . 5-4
Initialization . . . . . . . . . . . . . . . . . . . . . . . . . . . . . . . . . . . . . . . . . . . 5-4
Safety Approvals . . . . . . . . . . . . . . . . . . . . . . . . . . . . . . . . . . . . . . . . 5-4
Ink Cartridges . . . . . . . . . . . . . . . . . . . . . . . . . . . . . . . . . . . . . . . . . . 5-5
Parallel Interface . . . . . . . . . . . . . . . . . . . . . . . . . . . . . . . . . . . . . . . . 5-6
Forward Channel . . . . . . . . . . . . . . . . . . . . . . . . . . . . . . . . . . . . 5-6
Reverse Channel . . . . . . . . . . . . . . . . . . . . . . . . . . . . . . . . . . . . . 5-6
ECP Mode . . . . . . . . . . . . . . . . . . . . . . . . . . . . . . . . . . . . . . . . . 5-6
Serial Interface (RS-423 Standard) . . . . . . . . . . . . . . . . . . . . . . . . . . 5-7
A Installing an Interface Card
-vii
Page 7

viii | Contents
B Using EPSON Drivers and Utilities for
Macintosh
Connecting the Printer . . . . . . . . . . . . . . . . . . . . . . . . . . . . . . . . . . B-1
Connecting to the Printer’s Parallel/USB Interface . . . . . . . . . . . B-2
Connecting to the Printer’s Built-in Serial Interface . . . . . . . . . . B-2
Setting Up Your Software . . . . . . . . . . . . . . . . . . . . . . . . . . . . . . . . . B-3
Checking System Requirements . . . . . . . . . . . . . . . . . . . . . . . . . B-4
Installing the Software . . . . . . . . . . . . . . . . . . . . . . . . . . . . . . . . B-4
Selecting Your Printer in the Chooser . . . . . . . . . . . . . . . . . . . . B-5
Setting Up Printer Sharing . . . . . . . . . . . . . . . . . . . . . . . . . . . . . B-6
Setting Print Options . . . . . . . . . . . . . . . . . . . . . . . . . . . . . . . . . . . . B-8
Choosing Page Setup Options . . . . . . . . . . . . . . . . . . . . . . . . . . B-8
Choosing Basic Print Options . . . . . . . . . . . . . . . . . . . . . . . . . . B-10
Selecting the Correct Media Type . . . . . . . . . . . . . . . . . . . . . . . B-12
Choosing Advanced Print Options . . . . . . . . . . . . . . . . . . . . . . . B-14
Managing Print Jobs . . . . . . . . . . . . . . . . . . . . . . . . . . . . . . . . . . . . . B-17
Setting Up Background Printing . . . . . . . . . . . . . . . . . . . . . . . . B-18
Using Monitor3 . . . . . . . . . . . . . . . . . . . . . . . . . . . . . . . . . . . . . B-19
Cancelling Printing . . . . . . . . . . . . . . . . . . . . . . . . . . . . . . . . . . B-21
Checking Printer Status . . . . . . . . . . . . . . . . . . . . . . . . . . . . . . . . . . B-21
Selecting Configuration Options . . . . . . . . . . . . . . . . . . . . . . . . B-22
Running Print Head Utilities . . . . . . . . . . . . . . . . . . . . . . . . . . . . . . B-24
Running Nozzle Check and Head Cleaning Utilities . . . . . . . . . B-24
Running the Print Head Alignment Utility . . . . . . . . . . . . . . . . B-25
C Using EPSON Drivers and Utilities for
Windows
Connecting the Printer . . . . . . . . . . . . . . . . . . . . . . . . . . . . . . . . . . C-1
Setting Up Your Software . . . . . . . . . . . . . . . . . . . . . . . . . . . . . . . . . C-2
Checking System Requirements . . . . . . . . . . . . . . . . . . . . . . . . . C-3
Installing the Software . . . . . . . . . . . . . . . . . . . . . . . . . . . . . . . . C-3
Setting Up Printer Sharing in Windows 95 and 98 . . . . . . . . . . C-5
Setting Up Printer Sharing in Windows NT 4.0 and 2000 . . . . . C-8
-viii
Page 8

Contents | ix
Setting Print Options . . . . . . . . . . . . . . . . . . . . . . . . . . . . . . . . . . . . C-10
Choosing Basic Print Options . . . . . . . . . . . . . . . . . . . . . . . . . . C-11
Selecting the Correct Media Type . . . . . . . . . . . . . . . . . . . . . . . C-13
Choosing Paper and Layout Options . . . . . . . . . . . . . . . . . . . . . C-15
Choosing Advanced Print Options . . . . . . . . . . . . . . . . . . . . . . . C-16
Managing Print Jobs . . . . . . . . . . . . . . . . . . . . . . . . . . . . . . . . . . . . . C-20
Using the Progress Meter . . . . . . . . . . . . . . . . . . . . . . . . . . . . . . C-20
Using the Spool Manager . . . . . . . . . . . . . . . . . . . . . . . . . . . . . . C-21
Checking Printer Status . . . . . . . . . . . . . . . . . . . . . . . . . . . . . . . . . . C-21
Using Status Monitor 2 (EPSON Stylus Pro 9000) . . . . . . . . . . C-22
Status Monitor 3 (EPSON Stylus Pro 9500) . . . . . . . . . . . . . . . C-23
Setting Monitoring Preferences . . . . . . . . . . . . . . . . . . . . . . . . . C-24
Running Printer Utilities . . . . . . . . . . . . . . . . . . . . . . . . . . . . . . . . . C-26
Running Nozzle Check and Head Cleaning Utilities . . . . . . . . . C-26
Running the Print Head Alignment Utility . . . . . . . . . . . . . . . . C-27
Running the Speed and Progress Configuration Utility . . . . . . . C-29
Index
-ix
Page 9

x | Contents
-x
Page 10

I
ntroduction
®
The EPSON Stylus
Pro 9000 series printers are the ultimate wide-format
color ink jets. Setting new standards in image quality, media handling, and
performance, the EPSON Stylus Pro 9000 has redefined the wide format
printing industry. The breakthrough EPSON Stylus Pro 9500 gives you
photographic quality with EPSON Archival
™
ink technology—for images
that last a lifetime.
EPSON’s Micro Piezo
®
dual density droplet (DX3™) print technology
includes a precise and consistent dot size and an innovative six-color,
high-capacity, quick-drying ink system. EPSON Archival ink achieves the
widest color gamut available in a pigment solution, with color performance
approaching EPSON dye-based ink.
With resolutions up to 1440 dpi, the EPSON Stylus Pro 9000 series printers
support two 44-inch media rolls and cut sheets up to 1.5 mm thick. Both
printers incorporate EPSON’s DC-based motor technology, which allows
for superior print engine accuracy, even during bidirectional printing modes
at some of the fastest production speeds in the industry.
For network productivity, a high performance EFI
®
Fiery® X2 RIP server
may be purchased. The EPSON RS-5100 server supports a variety of
network configurations and protocols, with full compatibility for
Macintosh,
Windows NT,
multitasking for simultaneous spooling, Adobe
®
Microsoft® Windows®2000, Windows 98, Windows 95,
®
and UNIX® computers. The Fiery X2 RIP provides full
®
PostScript® 3 processing,
and printing.
The printers may also be equipped with an optional 44-inch auto take-up
reel that is compatible with most lamination systems and lets you run long
print jobs unattended. For complete flexibility, the EPSON Stylus Pro 9000
series printers also support many third-party RIPs and come with custom
EPSON
®
drivers and utilities for photographs and other non-PostScript
printing.
1
Page 11

2 | Introduction
How To Use Your Manuals
This guide is part of a set, which also includes the documentation listed
below.
•
The EPSON Stylus Pro 9000/9500 Assembly and Setup Instructions
describe how to unpack and assemble the printer, install ink cartridges
and paper, and prepare for printing.
•
The EPSON Stylus Pro 9000 Series Quick Reference Guide provides a
handy summary of the procedures for daily use and printer
maintenance—loading paper, replacing ink cartridges, running cleaning
cycles, aligning the print head, and preparing the printer for
transportation. Attach it to your printer for easy reference.
•
The electronic Reference Guide on the EPSON printer driver CD-ROM
provides additional information about the printer, drivers, and utility
software. You can read the guide using a web browser, such as
Netscape
later.
®
Navigator® or Microsoft Internet Explorer, versions 3.0 or
If you have the RIP Station 5100, your documentation set includes
additional manuals for users and system administrators.
•
The RIP Station 5100 Getting Started describes how to unpack the RIP,
install user software and printer files from the User Software CD-ROM,
and set up printing. It also describes how to install printer files via the
Internet.
•
The RIP Station 5100 User Guide describes how to set printing options
and print to the RIP from Windows and Mac
•
The RIP Station 5100 Administrator Guide explains basic configuration
®
OS computers.
and administration of the RIP for the supported platforms and network
environments. It also includes guidelines for setting up UNIX,
Windows NT, and NetWare
®
servers to provide PostScript printing
services to clients.
•
The RIP Station 5100 Color Guide provides instructions for using
ColorWise
®
Pro Tools, including color calibration and workflow
recommendations. It also includes practical color printing tips,
application-specific instructions, and an introduction to color theory.
•
Release Notes provide last-minute product information and
workarounds for some of the problems you may encounter.
2
Page 12

Introduction | 3
Using This
This guide contains the following information:
Chapter 1 gives instructions for loading roll paper and cut sheets, printing
on various media, and using the paper hammock.
Chapter 2 explains how to monitor the printer’s status, respond to error
messages on the control panel, and configure printer settings.
Chapter 3 gives instructions for cleaning and aligning the print head,
replacing ink cartridges and the cutter blade, and cleaning and transporting
the printer.
Chapter 4 provides troubleshooting tips and solutions for problems
involving print quality, printer operation, and paper handling.
Chapter 5 provides the technical details on your printer, paper requirements,
and ink cartridges.
Appendix A gives instructions for installing an optional Ethernet interface
card.
Appendix B covers the installation and use of EPSON printer drivers and
utilities for Macintosh computers.
Printer Guide
Appendix C covers the installation and use of EPSON printer drivers and
utilities for Windows computers.
An Index is included at the end of the book.
3
Page 13
4 | Introduction
Warnings, Cautions, and Notes
You’ll find this information throughout this guide:
Warning
Caution
Note
Warnings must be followed carefully to avoid bodily injury.
Cautions must be observed to avoid damage to your equipment.
Notes contain important information about your printer.
Where To Get Help
EPSON provides technical support and information on the installation,
configuration, and operation of professional graphics arts products through
the EPSON Preferred
P.M
8
., Pacific Time, Monday through Friday, and 7
SM
Protection Plan. Dial (888) 377-6611, 6
A.M.
to 4
Time, Saturday.
Before you call, make sure you have your Unit ID number, which is
included with the EPSON Preferred Protection Plan information that came
with your printer. You’ll also need your printer serial number and proof of
purchase.
A.M.
P.M.
to
, Pacific
4
Page 14
Introduction | 5
EPSON also provides technical assistance 24 hours a day through the
electronic support services listed in the following table:
Service Access
World Wide Web From the Internet, you can reach EPSON’s Professional Graphics Home Page
at http://prographics.epson.com.
EPSON Internet FTP Site If you have Internet FTP capability, use your Web browser (or other software
for FTP downloading) to log onto ftp.epson.com with the user name
anonymous and your e-mail address as the password.
EPSON E-Mail Technical
Support
To receive technical advice through e-mail, go to http://support.epson.com
and complete the form under the troubleshooting tab, as requested.
You can purchase ink cartridges, paper, manuals, and accessories from
EPSON at (800) 873-7766. Or visit our web site at: www.epson.com (U.S.
sales only). In Canada, please call (800) 873-7766 for dealer referral.
ENERGY STAR Compliance
As an ENERGY STAR Partner, EPSON has determined that this product
meets the ENERGY STAR guidelines for energy efficiency.
The EPA ENERGY STAR Office Equipment program is a voluntary
partnership with the computer and office equipment industry to promote
the introduction of energy-efficient personal computers, monitors, printers,
fax machines, and copiers in an effort to reduce air pollution caused by
power generation.
5
Page 15

6 | Introduction
Caution
Always turn the printer
off using the Power
button. When you press
this button, the Operate
light flashes briefly then
goes out. Do not unplug
the printer or turn off the
power to the printer until
the Operate light is off.
This ensures that the
print head is safely
capped.
Important Safety Instructions
Before using your printer and RIP Station 5100, read the following safety
instructions to make sure you use the equipment safely and effectively.
•
Turn off and unplug the printer (and RIP Station 5100) before
cleaning. Clean with a damp cloth only. Do not spill liquid on the
printer (or RIP Station 5100).
•
Do not place the printer (or RIP Station 5100) on an unstable surface or
near a radiator or heating vent. Avoid areas subject to rapid changes in
temperature and humidity or shock and vibrations.
•
Do not place the printer near a window or in direct sunlight. Bright
light can interfere with the paper sensors, causing paper jams and related
problems.
•
Keep the entire system away from potential sources of electromagnetic
interference, such as loudspeakers or the base units of cordless
telephones.
•
Place the printer (and RIP Station 5100) on a flat surface. They will not
operate properly if they are tilted or at an angle.
•
Do not block or cover the openings in the printer case (or RIP Station
5100 case) or insert objects through the slots.
•
Use only the type of power source indicated on the label.
•
Connect all equipment to properly grounded power outlets. Avoid using
outlets on the same circuit as photocopiers or air control systems that
regularly switch on and off. Do not use outlets controlled by wall
switches or timers.
•
Place the printer (and RIP Station 5100) near a wall outlet where the
plugs can be easily unplugged.
Placez l’imprimante près d’une prise de contacte où la fiche peut être
débranchée facilement.
•
Do not let the power cords become damaged or frayed.
6
Page 16

Introduction | 7
•
If you use an extension cord with the printer, make sure the total ampere
rating of the devices plugged into the extension cord does not exceed the
cord’s ampere rating. Also, make sure the total ampere rating of all
devices plugged into the wall outlet does not exceed the wall outlet’s
ampere rating.
•
Except as specifically explained in the documentation, do not attempt to
service the printer (or RIP Station 5100) yourself. Opening or removing
those covers that are marked “Do Not Remove” may expose you to
dangerous voltage points or other risks. Refer all servicing in those
compartments to service personnel.
•
Power down the printer from the control panel, unplug the printer (or
RIP Station 5100) and refer servicing to qualified service personnel
under the following conditions:
If the power cord or plug is damaged; if liquid has entered the printer
(or RIP Station 5100); if the equipment has been dropped or the case
damaged; if the printer (or RIP Station 5100) does not operate normally
or exhibits a distinct change in performance. Adjust only those controls
that are covered by the operating instructions.
Ink Cartridge Safety Instructions
•
Do not put your hand inside the printer or touch the cartridges during
printing.
•
To avoid damaging the printer, do not move the print head by hand.
•
Under normal circumstances, ink will not come out of the cartridge. If it
does get on your skin, wash it off with soap and water. If it gets in your
eyes, flush them immediately with water.
•
Keep ink cartridges out of the reach of children and do not drink the
ink.
•
Do not store ink cartridges at high or freezing temperatures. Keep
cartridges away from direct sunlight.
•
Do not dismantle the ink cartridges or try to refill them. This could
result in damage to the print head.
•
Install the ink cartridge immediately after you remove it from its
package. Leaving the cartridge unpacked for a long time before use may
result in reduced print quality.
7
Page 17

8 | Introduction
•
Do not use an ink cartridge beyond the date printed on the cartridge
package. For best results, use cartridges within six months of installation.
•
Before transporting the printer, remove the ink cartridges, close the ink
valves, and install the carriage restraint (packing material). See page 3-16
for complete instructions.
8
Page 18

Chapter 1:
Handling
Paper and
Other Media
The EPSON Stylus Pro 9000 and 9500 print on a variety of media,
including roll paper and cut sheets up to 44 inches wide. The
straight-through paper path allows you to use heavy stock, including
posterboard up to 59 mil (1.5 mm) thick.
Unless otherwise noted, the instructions in this chapter apply to both the
EPSON Stylus Pro 9000 and 9500 printers.
•
Selecting paper and other media
•
Printing on EPSON paper and other media
•
Using roll paper
•
Using cut sheet paper
•
Using the paper hammock
•
Setting paper configurations
Selecting Paper and Other Media
You can print on most types of coated, glossy, plain paper, and other media.
The printer comes with two spindles, so you can have two types of roll paper
available for printing at all times (with manual switching). You can also
purchase an optional 3-inch spindle, which allows you to use roll paper with
a 3-inch core.
High-tension spindles are also available (in both 2-inch and 3-inch
diameters), recommended for media such as EPSON Synthetic Paper and
Fine Art Paper.
The following table shows the requirements for paper you can use in the
printer:
Paper requirements
Roll paper Cut sheets
Size 13 to 44 in. wide
(330 to 1118 mm)
Maximum
roll diameter
Thickness 3.15 to 19.7 mil (0.8 to 0.5 mm) 3.15 to 59 mil
4.05 in. (103 mm) when using 2 rolls
5.90 in. (150 mm) when using 1 roll
11 × 17 in. to 44 × 62.2 in.
(up to 1118 × 1580 mm)
—
(0.8 to 1.5 mm)
1
Page 19
1-2 | Handling Paper and Other Media
Always test samples of paper stock in the printer before purchasing large
quantities or printing large jobs. When you use non-EPSON papers or other
media, you may need to “profile” their thickness and ink drying time. See
page 1-25 for instructions.
Printing on EPSON Paper and Other Media
EPSON papers, which are specially formulated for the inks used in the
printer, ensure high-quality results. The following tables list the product
codes for the EPSON media available for your printer.
Note
Check the EPSON web
site (http://prographics.
epson.com) or your
authorized EPSON dealer
for new papers and other
media that may be
available. Some media
may not be available in
your location.
EPSON Stylus Pro 9000 media product codes
44-inch
Paper type
Presentation Matte
Paper
Glossy Paper
Heavyweight
Semigloss Paper
Heavyweight
Photo Glossy Paper SP91002 SP91001 SP91021 —
Photo Semigloss Paper SP91004 SP91003 SP91022 —
Backlight Film SP91008 SP91007 SP91023 —
Posterboard Semigloss — — — 20.25 × 28.75"
DuPont/EPSON
Publication Proofing
Paper
DuPont/EPSON
Commercial Proofing
Paper
roll
S041220 S041221 S041295 —
S041226 S041227 S041291 —
S041228 S041229 S041292 —
— S041249 S041320 13 × 19" (A3+)
— S041251 S041296 13 × 19" (A3+)
36-inch
roll
24-inch
roll
Sheet sizes
S041237
28 × 40" S041236
S041207, S041205
S041160
DuPont/EPSON
Commercial Matte
Proofing Paper
Premium Luster Photo
Paper
* Not available at time of printing. Check the EPSON web site for product codes
and availability.
— S041247 S041319 13 × 19" (A3+)
S041201, S041203
***—
1-2
Page 20
Handling Paper and Other Media | 1-3
EPSON Stylus Pro 9500 media product codes
Note
Check the EPSON web
site (http://prographics.
epson.com) or your
authorized EPSON dealer
for new papers and other
media that may be
available. Some media
may not be available in
your location.
44-inch
Paper type
Doubleweight Matte Paper S041387 S041386 S041385 —
Glossy Paper Photo Weight S041389 — S041388
Premium Semigloss Photo
Paper
Smooth Fine Art Paper S041433 S041432 S041431 24 × 30"
Backlight Film for Archival
Ink
Synthetic Paper S041401 S041400 S041399 —
Adhesive Synthetic Paper S041404 S041403 S041402 —
Photo Glossy Paper SP91002 SP91001 SP91021 —
Photo Semigloss Paper SP91004 SP91003 SP91022 —
Adhesive Vinyl S041438 S041437 S041436 —
Canvas *** —
Premium Luster Photo
Paper
roll
— — — 13 × 19" (A3+)
*** —
*** —
36-inch
roll
24-inch
roll
(22" roll)
Sheet sizes
—
S041327
S041434
36 × 44"
S041435
Semimatte Paper Photo
Weight
Posterboard for Archival Ink * * * 20.25 × 28.75"
Textured Fine Art Paper S041449 S041448 S041447 24 × 30"
Translight * * * —
™
Tyvek
Scrim Vinyl * * * —
* Not available at time of printing. Check the EPSON web site for product codes
and availability.
*** —
28 × 40"
S041450
36 × 44"
S041451
*** —
1-3
Page 21

1-4 | Handling Paper and Other Media
Printing Tips for EPSON Media
Follow these tips for using and storing printing materials:
•
Avoid touching the printable surface of the paper or other media with
bare hands. Fingerprints may affect print quality. Handle media by the
edges or use cotton gloves.
•
Always choose the correct print mode or media type setting in your print
options before you send your job.
•
Always select the correct paper source (roll or sheet) from the printer’s
control panel.
•
Keep unused media in its original packaging and store it in a cool, dry
place to avoid a decline in quality. Avoid storing media or printouts
where they will be exposed to high temperature, humidity, or direct
sunlight.
Using Roll Paper
The printer comes with two spindles, so you can have two types or sizes of
roll paper available for printing. You can use any roll paper with a 2-inch
core, up to 44 inches wide. With the optional 3-inch spindle, you can also
use roll paper that has a 3-inch core (one roll at a time). Manually switching
from one paper roll to another is a simple process.
This section covers the following:
•
Attaching and removing paper from the spindle
•
Inserting the spindle in the printer
•
Loading the paper for printing
1-4
Page 22
Handling Paper and Other Media | 1-5
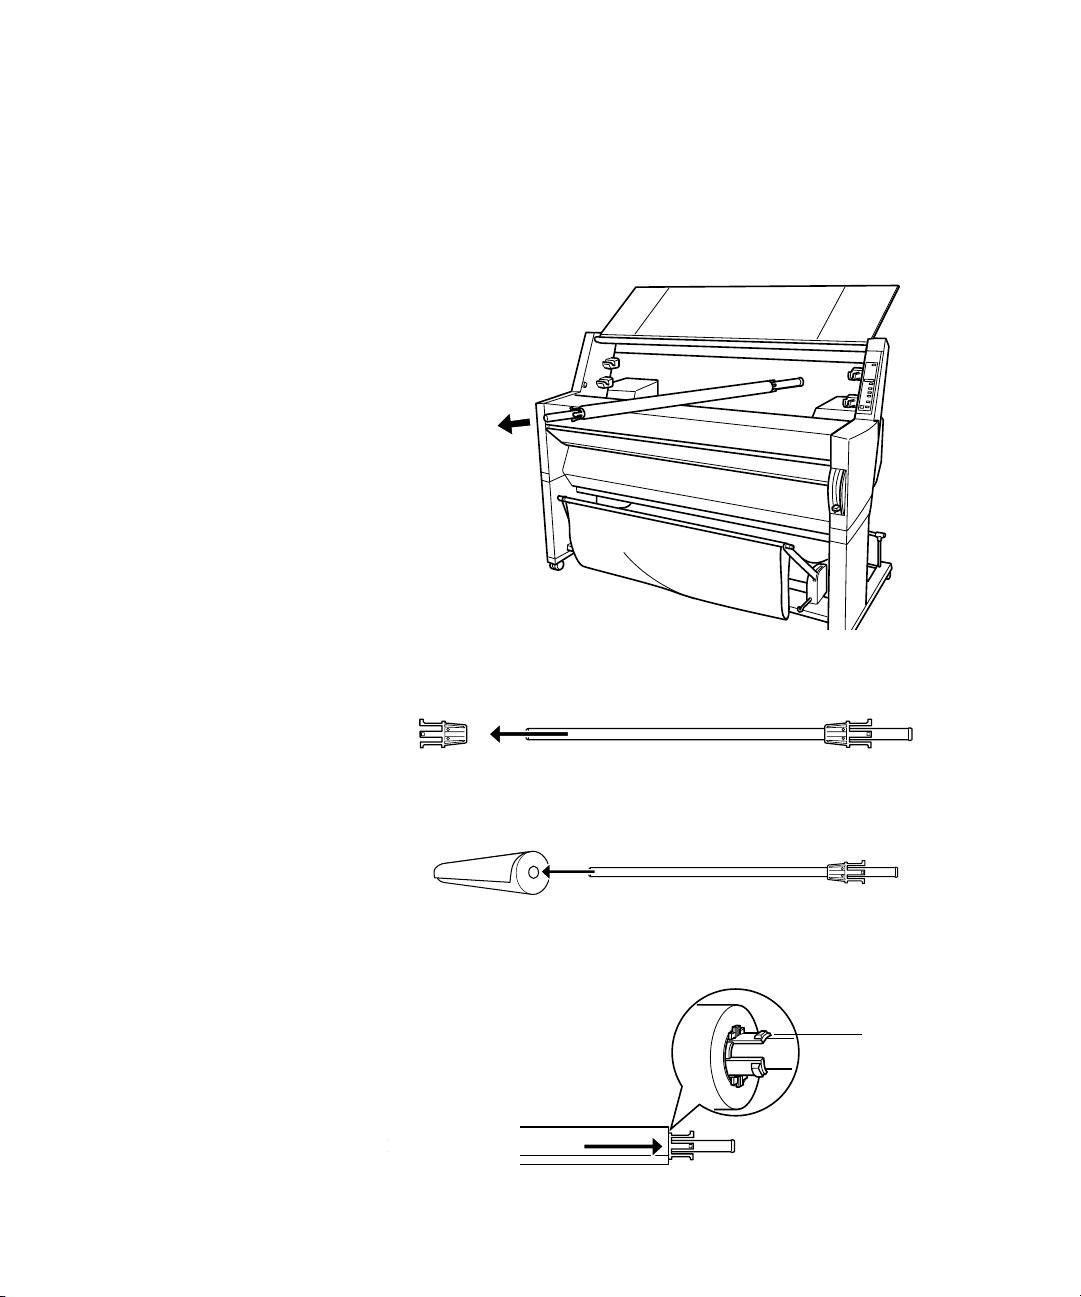
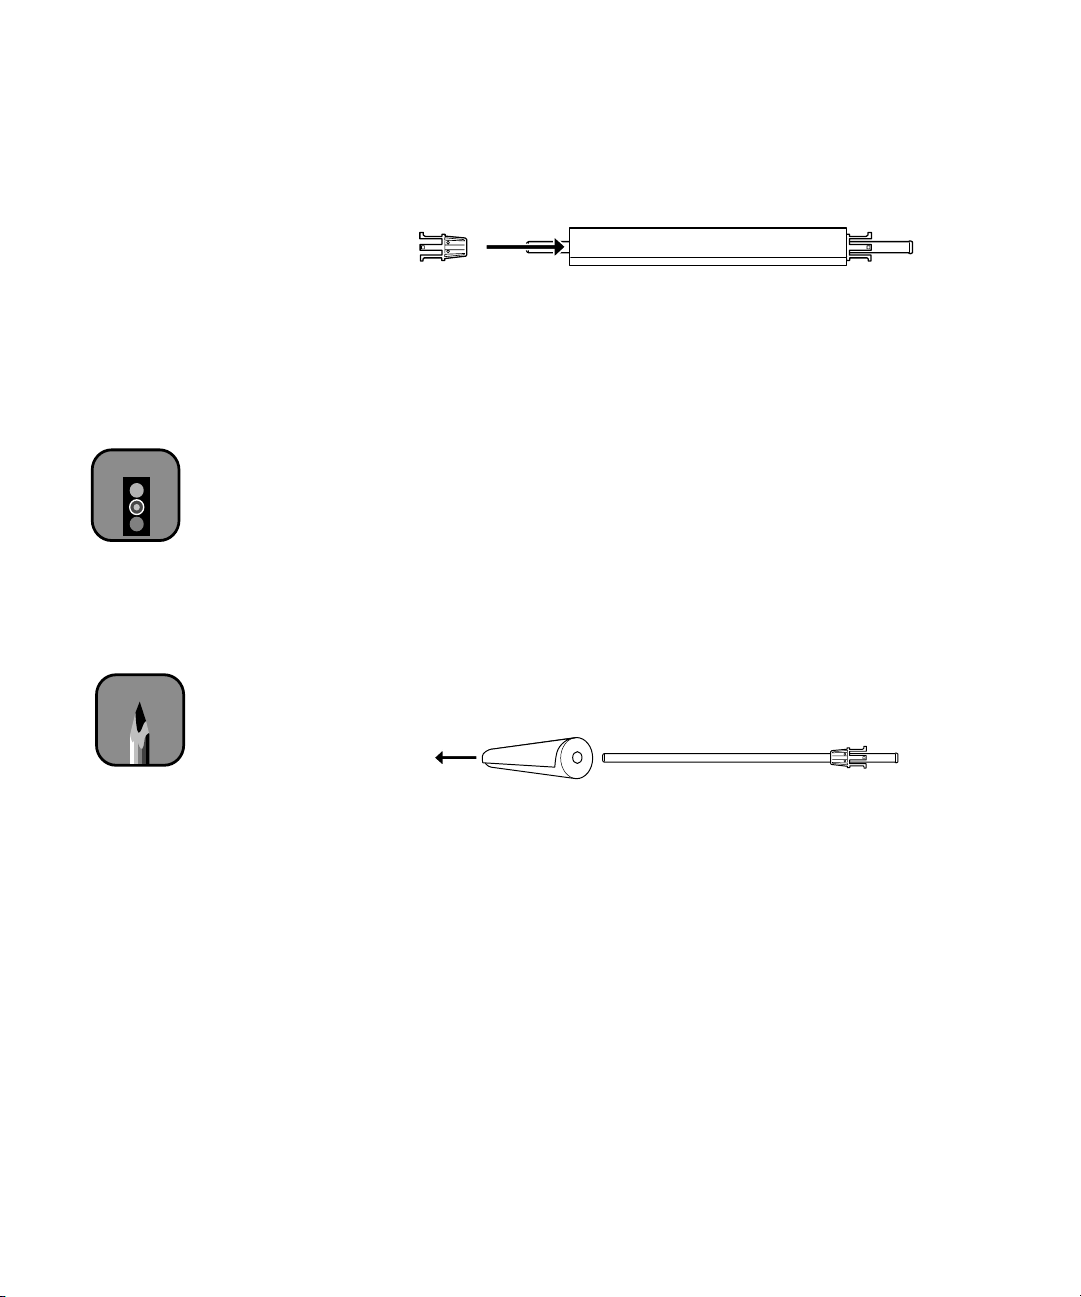
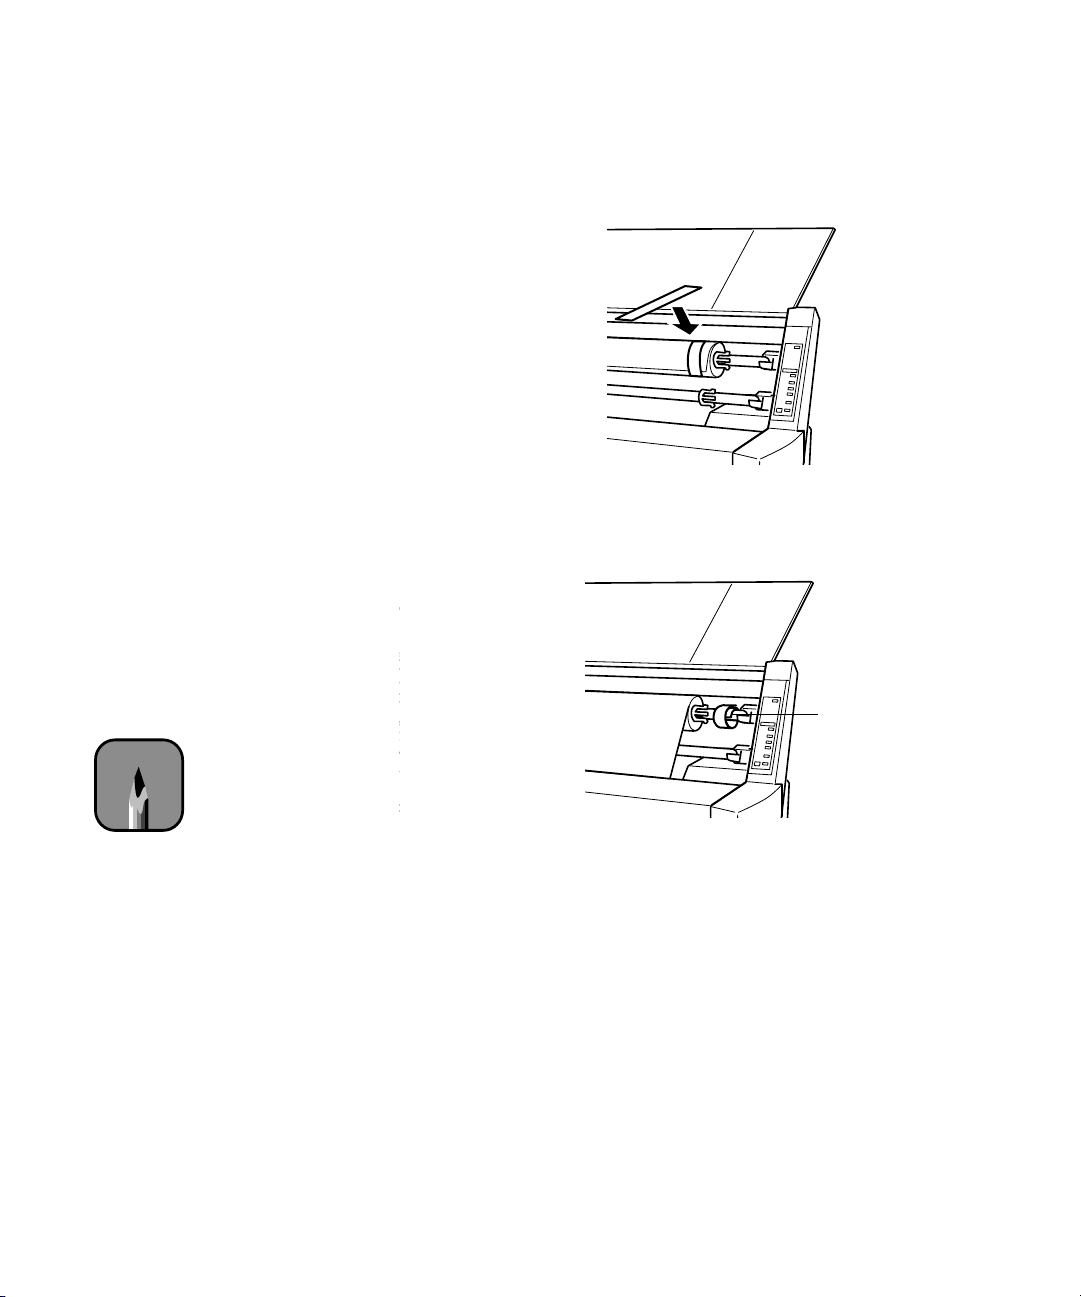
Attaching Paper to the Spindle
Follow these steps:
1. Open the roll paper cover and lift out the spindle.
2. Slide the movable paper stop (flange) off the left end of the spindle.
3. Position the roll so the paper unwinds as shown:
4. Slide the roll onto the spindle so it fits securely over the paper stop.
paper stop
1-5
Page 23
1-6 | Handling Paper and Other Media
5. Slide the movable paper stop back onto the spindle and insert it firmly
into the end of the roll.
Removing Paper from the Spindle
If you need to remove the paper roll from the spindle, follow these steps:
1. Open the roll paper cover and lift out the roll and spindle.
Caution
To avoid damage, do not
tap the end of the spindle
on the floor.
Note
Store unused roll paper in
its original package—
including the bag, end
caps, and box—to protect
the paper.
If the paper is loaded for printing, first raise the paper set lever and roll
up the paper before you remove the spindle.
2. Lay the roll down on a flat surface.
3. Loosen the movable paper stop by tapping it with your hand.
4. Slide the paper stop off the end of the spindle.
5. Remove the roll from the spindle.
1-6
Page 24
Handling Paper and Other Media | 1-7
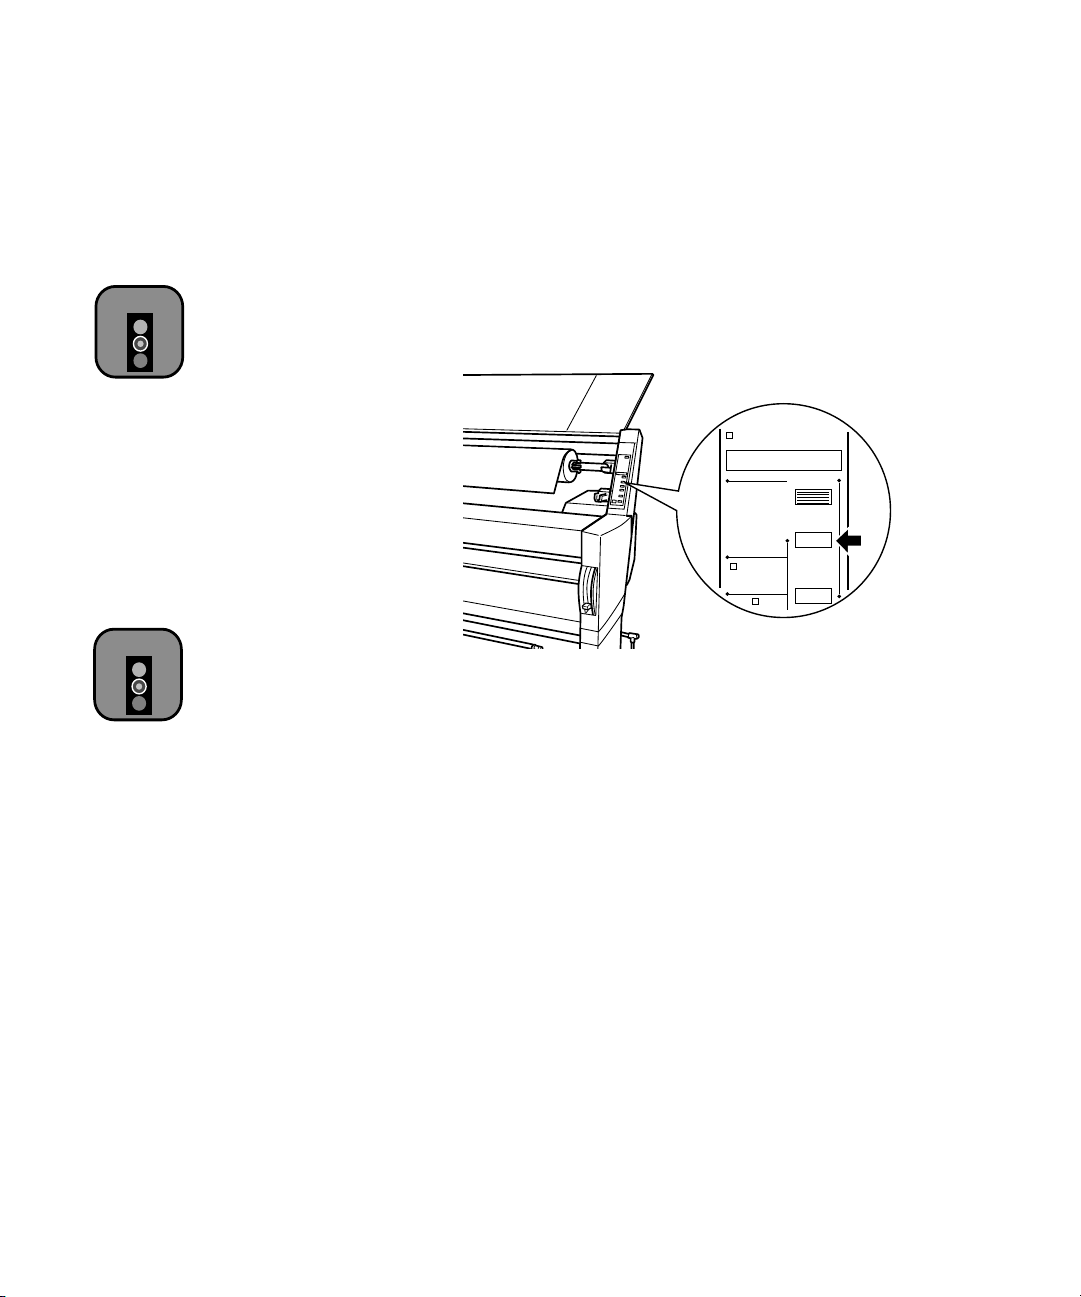
Inserting the Spindle in the Printer
After you have loaded the paper roll onto the spindle, you need to insert it
into the printer. You can have two rolls of paper in the printer at the same
time, and print on either one. (If you’re using the optional 3-inch spindle,
you can only have one roll of paper in the printer.)
Follow these steps to place the spindle and paper into the printer:
1. Open the roll paper cover.
2. Make sure the movable paper stop is firmly fixed into the left end of the
paper roll.
3. Position the spindle so that the white end (with the fixed paper stop) is
on the right.
black
white
1-7
Page 25
1-8 | Handling Paper and Other Media
4. Insert the white end into the right mounting bracket inside the printer.
You can use either the upper or lower bracket.
5. Place the black end of the spindle into the left mounting bracket inside
the printer.
1-8
Page 26
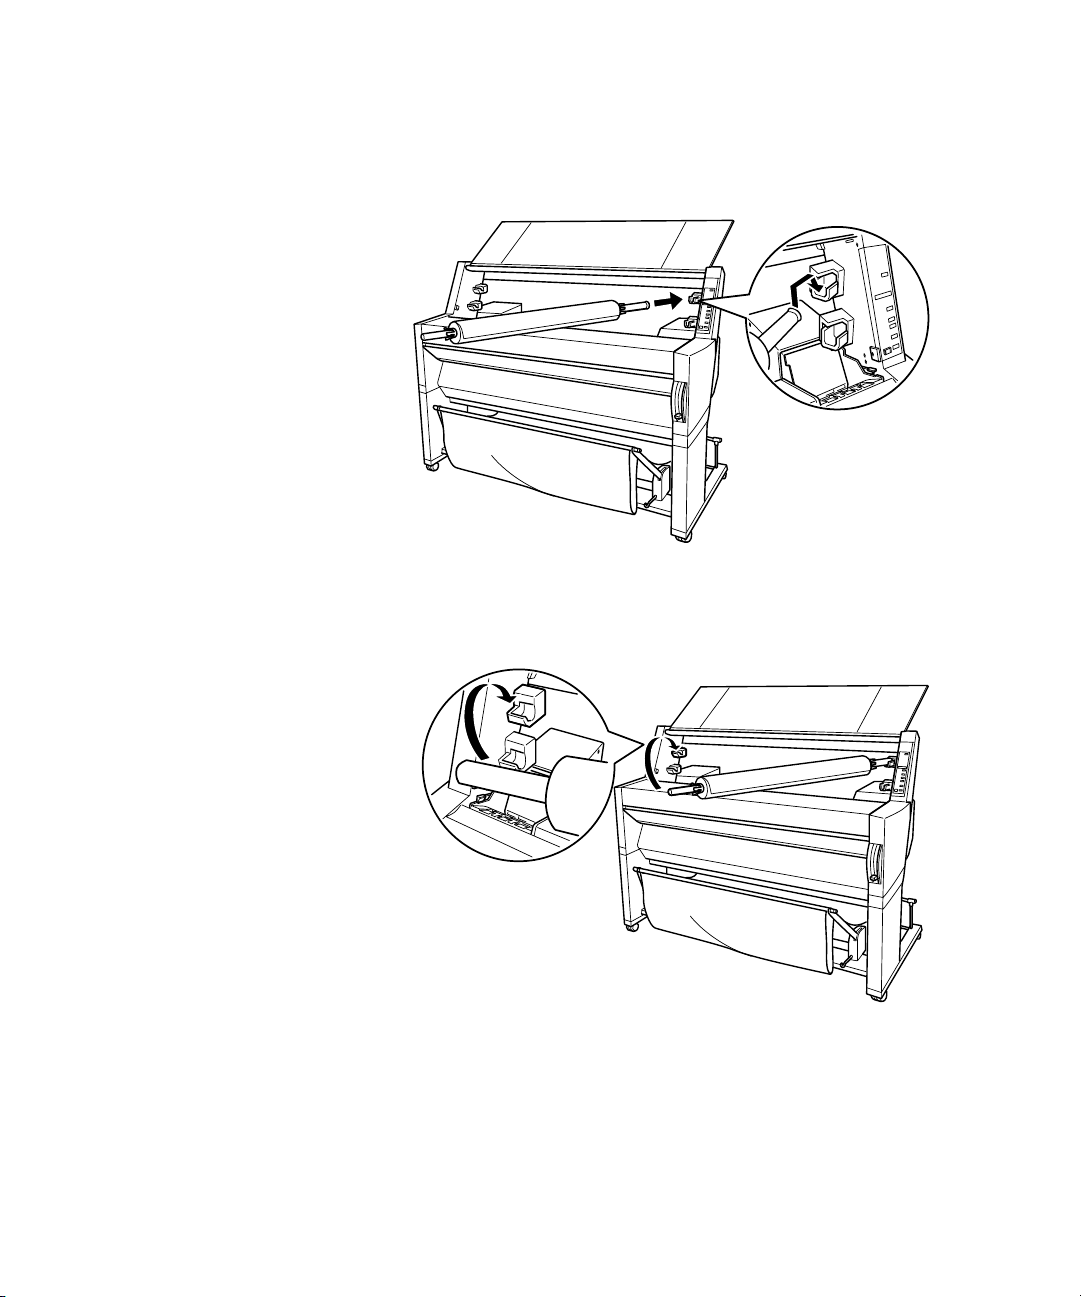
Handling Paper and Other Media | 1-9
6. To keep the paper wound when you’re not printing, use one of the roll
paper belts included with your printer.
When you’re not using the roll paper belt, keep it wound around the
end of the spindle.
Note
To remove the spindle
(and paper roll) from the
printer, first lift out the left
end and then the right
end.
roll paper belt
7. See the next section to load the paper for printing.
1-9
Page 27
1-10 | Handling Paper and Other Media
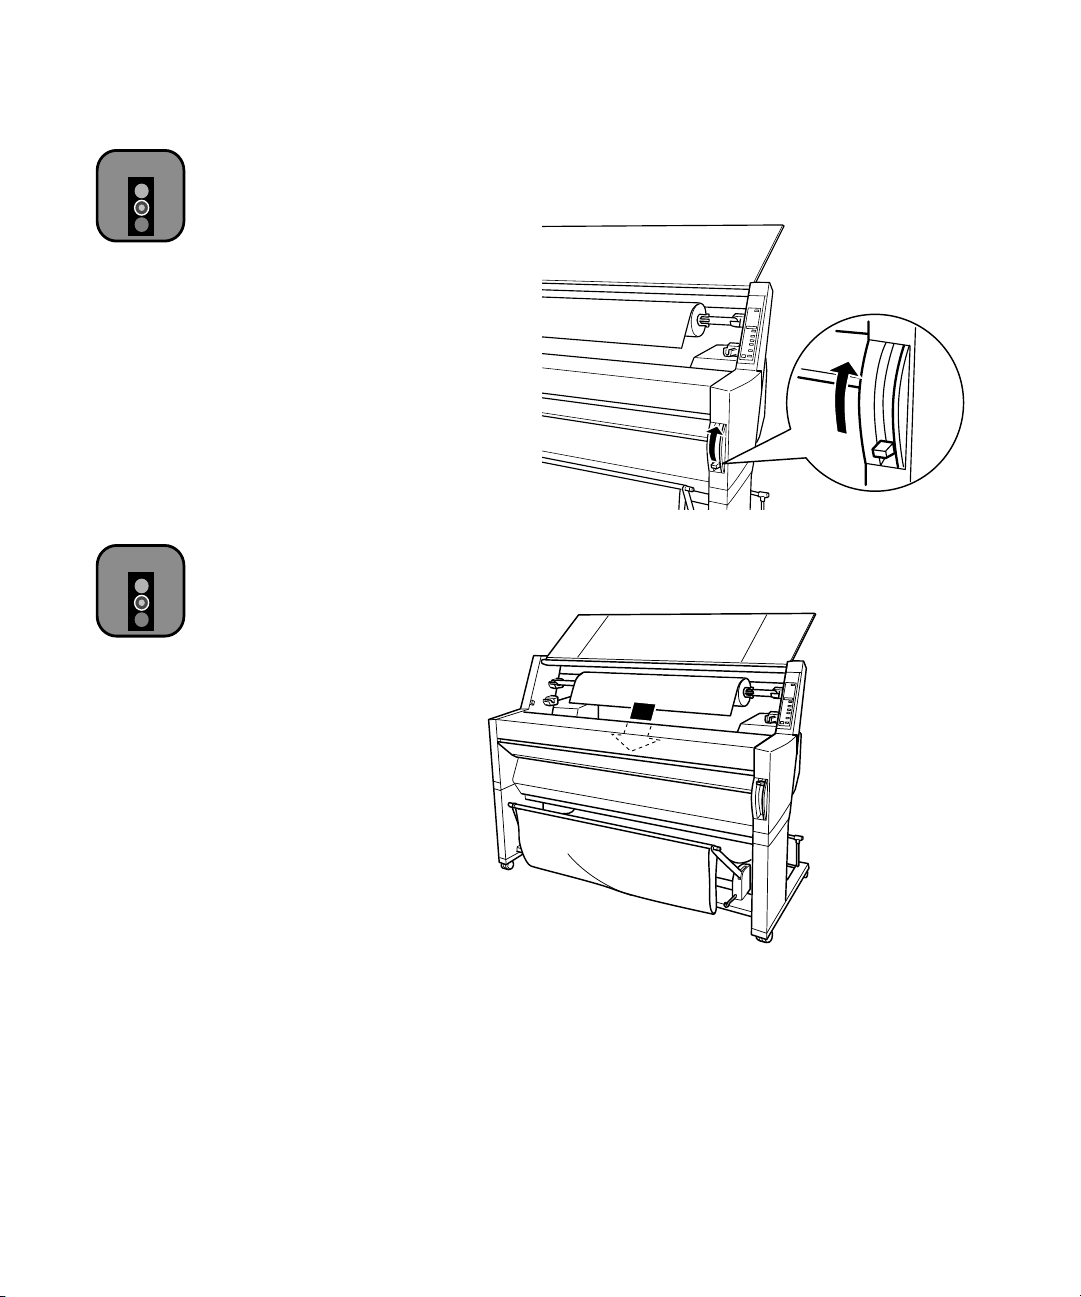
Loading Roll Paper for Printing
Once the roll paper is attached to the spindle and inserted in the printer,
you’re ready to load it for printing. First, open the roll paper cover and make
sure the spindle is inserted correctly. Then follow these steps:
Caution
To avoid feeding excess
paper through the printer,
make sure you don’t
select Sheet when you’re
using roll paper.
Caution
If you’re using canvas,
vinyl, or heavy stock,
choose Roll Cutter Off.
Media that is too thick
may damage the cutter.
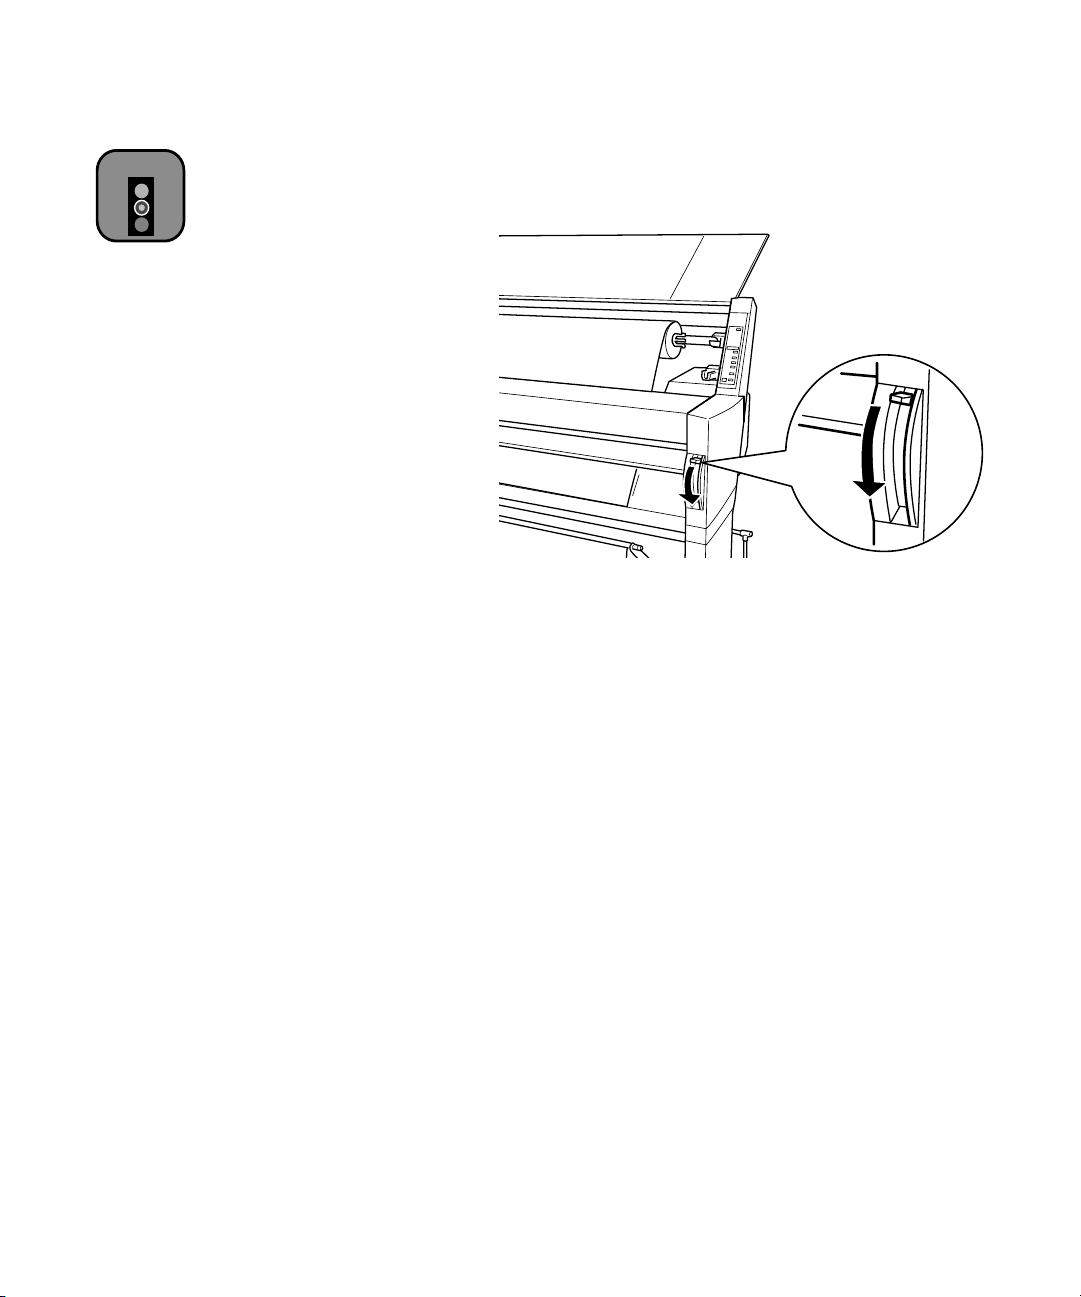
1. Make sure the printer is turned on. Then press the
button until one of the
•
Choose
Roll Auto Cut
Roll
lights comes on.
Paper out
SelecType
Paper Source
Roll
Auto Cut
Roll
Cutter Off
if you want the paper to be cut automatically
after each page is printed.
•
Choose
Roll Cutter Off
if you’re printing on canvas, vinyl, or other
heavy media, if you’re using the optional auto take-up reel, or if you
want to print a series of pages and keep them together for later
cutting.
•
If you’re using the auto cut setting, you can have a trim line printed
on the right edge of your images or pages. If you’re not using auto
cut, you can have the line printed on the right and bottom edges of
your pages. See page 1-15 for instructions.
Paper Source
Item
+
You can also select roll paper settings through your print options,
which will override the control panel settings. See the RIP Station
5100 User Guide or Appendix B or C in this manual for more
information.
1-10
Page 28
Handling Paper and Other Media | 1-11
Caution
To avoid damaging the
printer, never move the
paper set lever while the
Operate or Pause light is
flashing.
Caution
Avoid touching the
printable surface of the
paper with bare hands.
Fingerprints may affect
print quality.
2. Make sure the
Operate
light and
pull the paper set lever all the way up.
3. Feed the paper into the paper slot.
Pause
light are not flashing. Then
1-11
Page 29
1-12 | Handling Paper and Other Media
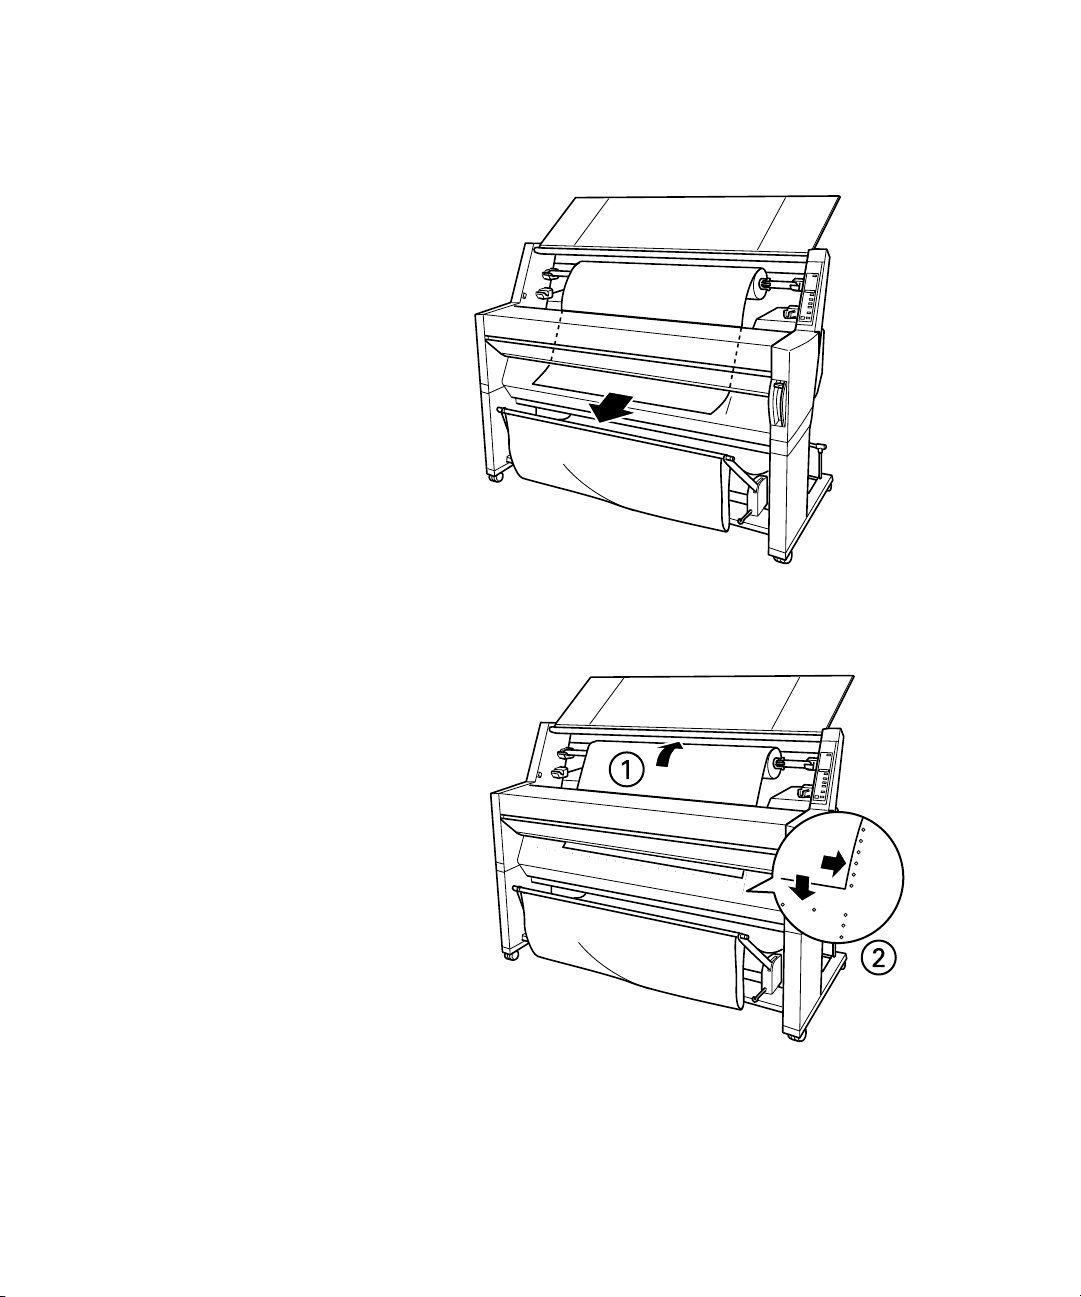
4. Pull the paper down so it extends all the way through the slot.
5. Turn the roll back to remove the slack. Then align the paper with the
two rows of holes.
1-12
Page 30
Handling Paper and Other Media | 1-13
Caution
To avoid damaging the
printer, never move the
paper set lever while the
Operate or Pause light
is flashing.
6. Push the paper set lever all the way down, then close the roll paper
PRESS PAUSE BUTTON
cover.
appears on the control panel display.
If you’re using Auto Cut and the edge of the paper is uneven, press
Cut/Eject
7. Press the
printing position automatically.
display. (Even if you don’t press
to recut the edge.
Pause
button. The print head moves and the paper feeds into
READY
Pause
appears on the control panel
, the paper and printer will move
into printing position automatically after 10 seconds.)
Cutting Paper Manually with the Built-in Cutter
When you’re not using the
manually after your print job is finished. If you’re printing on canvas, vinyl,
or other heavy media, you should use scissors or a utility cutter rather than
the built-in cutter. See page 1-14 for instructions. Follow these steps to cut
manually with the built-in cutter:
1. If the paper is not positioned correctly, press one of the
buttons to adjust the paper position. Normally, you don’t need to do
this after a print job is finished.
2. Press the
3. Press the
Paper Source
Cut/Eject
Auto Cut
setting, you need to cut the paper
button until the
button. The paper is cut.
1-13
Roll Auto Cut
Paper Feed
light comes on.
Page 31

1-14 | Handling Paper and Other Media
Cutting Canvas and Other Media with the Utility Cutter
Canvas, vinyl, and other heavy media can damage the printer’s built-in
cutter. Make sure you choose the
control panel before you print. If you’re using the EPSON Stylus Pro 9000,
you can cut the media with scissors or a utility knife.
If you have the EPSON Stylus Pro 9500, you can follow these steps to use
the utility cutter that came with the printer:
Roll Cutter Off
setting on the printer’s
Warning
1. Press the
Cut/Eject
button to feed the canvas or other material out of
the printer.
2. Press one of the
Paper Feed
buttons to position the canvas on the guide
track.
guide track
3. Place the utility cutter on the guide track, then slide it along the track to
cut the canvas.
To avoid injury, use caution
when handling the utility
cutter.
Pause
4. After cutting, press the
button to return to ready mode. You may
need to reload the canvas (or other material) to position it correctly for
printing.
1-14
Page 32

Handling Paper and Other Media | 1-15
Printing Trim Lines
You can have trim lines printed on the right edge of your images or pages (if
you’re using Auto Cut) or on the right and bottom edge (if you’re not using
auto cut). Follow these steps:
1. Press the
SelecType
button.
PRINTER SETTING MENU
appears on
the display.
2. Press the
3. Press the
4. Press the
5. Press the
Item
button until
+
button.
Enter
SelecType
PAGE LINE=ON
button to save the new setting.
PAGE LINE=OFF
appears on the display.
appears on the display.
button to exit the Printer Setting menu.
If you’re using the RIP Station 5100 or the EPSON printer driver, you can
also specify trim lines through your print options. See the RIP Station 5100
User Guide or Appendix B or C in this manual for more information.
Using Cut Sheet Paper
You can print on many types of cut sheet paper and other media. The
printer accepts sheets ranging from 11 × 17 inches to 44 × 62.2 inches. You
can leave your roll paper in the printer when you print on cut sheets; make
sure it is rolled up and fastened with the roll paper belt(s), as described on
page 1-9.
If you’re using stock more than 19 inches long or 19 mil (0.5 mm) thick, see
the following sections for additional instructions. You will not be able to
follow the “autoload” procedure described in this section.
1-15
Page 33

1-16 | Handling Paper and Other Media
Before you start, make sure the printer is on and roll paper is not loaded for
printing. Then follow these steps:
1. Make sure the roll paper cover is closed.
2. Press the
Paper Source
button repeatedly until the
Sheet
light
comes on.
3. Make sure that the paper set lever is all the way down.
4. Feed the sheet into the paper slot until it meets resistance. Make sure the
right edge of the paper is straight and aligned with the scale on the roll
paper cover.
PRESS PAUSE BUTTON
appears on the control panel
display.
5. Press the
printing position automatically.
(Even if you don’t press
Pause
button. The print head moves and the sheet feeds into
READY
Pause
, the paper and printer will move into
appears on the LCD panel.
printing position automatically after 10 seconds.)
6. Print your page. After it is finished, the sheet stays in the printer.
7. To remove your print, hold it while pressing the
Paper Feed (–)
1-16
button.
Page 34

Handling Paper and Other Media | 1-17
Using Cut Sheet Paper Longer than 19 Inches
Before you start, make sure the printer is on and roll paper is not loaded for
printing. Then follow these steps:
1. Make sure the roll paper cover is closed.
2. Press the
Paper Source
button repeatedly until the
Sheet
light
comes on.
3. Make sure the
Operate
light and
Pause
light are not flashing. Then
pull the paper set lever all the way up.
4. Feed the sheet into the paper slot until it extends through the slot. Align
the paper with the two rows of holes.
1-17
Page 35

1-18 | Handling Paper and Other Media
Caution
To avoid damaging the
printer, never move the
paper set lever while the
Operate or Pause light
is flashing.
5. Push the paper set lever all the way down.
PRESS PAUSE BUTTON
appears on the control panel display.
6. Press the
printing position automatically.
(Even if you don’t press
Pause
button. The print head moves and the paper feeds into
READY
Pause
, the paper and printer will move into
appears on the control panel.
printing position automatically after 10 seconds.)
7. Print your page. After it is finished, the printed sheet stays in the printer.
8. To remove your print, hold it while pressing the
Paper Feed (–)
button.
Note
You can’t run a cleaning
cycle when posterboard
is loaded for printing.
Printing on Posterboard
You can print on heavy stock up to 28 × 40 inches (B1), such as EPSON
Posterboard Semigloss. Follow these instructions when you print on
posterboard or other media more than 19 mil (0.5 mm) thick.
1. Set the paper hammock to catch your printouts in front of the printer.
See page 1-21 for instructions. Extend the paper guides straight out in
front of the printer to keep the board from bending.
2. Press the
Paper Source
button repeatedly until the
comes on.
3. Make sure the
Operate
light and
pull the paper set lever all the way up.
1-18
Pause
light are not flashing. Then
Sheet
light
Page 36

4. Open the lower cover.
Handling Paper and Other Media | 1-19
Note
If you’re using stock
more than 39 inches
long, load it long edge
first (in landscape
orientation).
5. Feed the posterboard into the paper slot until the bottom edge of the
board rests behind the open lower cover. Make sure the right edge is
straight and aligned with the vertical row of holes.
1-19
Page 37

1-20 | Handling Paper and Other Media
6. Push the paper set lever all the way down, then close the lower cover.
PRESS PAUSE BUTTON
7. Press the
Pause
printing position automatically.
Caution
(Even if you don’t press
printing position automatically after 10 seconds.)
appears on the control panel display.
button. The print head moves and the board feeds into
READY
Pause
, the board and printer will move into
appears on the control panel.
To avoid damaging the
printer, never move the
paper set lever while the
Operate or Pause light
is flashing.
8. Run your print job. After it is finished, the posterboard stays in the
printer.
9. To remove the print, hold it and pull the paper set lever all the way up.
Adjusting the Platen Gap for Heavy Stock
When you print on heavy stock, you may need to adjust the platen gap
setting. Normally, the
automatically. However, if print quality is not satisfactory when you use
heavy stock, change this setting to
1. Press the
SelecType
the display.
2. Press the
3. Press the
Item
+
button.
AUTO
setting allows the printer to adjust
button.
button.
PLATEN GAP=AUTO
PLATEN GAP=WIDE
1-20
WIDE.
Follow these steps:
PRINTER SETTING MENU
appears on the display.
appears on the display.
appears on
Page 38

Handling Paper and Other Media | 1-21
Note
When you print on
posterboard, set the
hammock to catch
printouts in front of
the printer.
4. Press the
5. Press the
The letter
Enter
button to save the new setting.
SelecType
W
appears on the right side of the control panel display to remind
button to exit the Printer Setting menu.
you of the wide setting. When you switch media, don’t forget to change this
setting back to
AUTO.
Using the Paper Hammock
The paper hammock (also called the paper basket) is a cloth sheet that
attaches to your printer and catches your printouts as they come out. This
keeps the printouts from getting dirty or wrinkled. You can set up the
hammock either to catch the paper roll under the printer or let it feed
straight out in front of the printer.
Catching Printouts in Front of the Printer
Follow these steps to set up the hammock in front of the printer:
1. Pull out the paper hammock hooks all the way, so they rest on the floor.
1-21
Page 39

1-22 | Handling Paper and Other Media
2. Place the two rods in front of the hammock hooks.
3. Place the shorter rod on the ends of the hooks. The longer rod should
rest on the floor under the hooks.
1-22
Page 40

Handling Paper and Other Media | 1-23
4. Push in the top of the paper hammock so that the paper will feed
forward.
5. If necessary, extend the hammock fabric out on the floor in front of the
printer (for large print jobs).
1-23
Page 41

1-24 | Handling Paper and Other Media
Catching Printouts Under the Printer
Follow these steps to set up the hammock under the printer:
1. Fit the ends of the three rods into the slots at the end of the paper
hammock arms and push the hammock hooks in.
paper
hammock arm
2. Pull out the top of the hammock so that printouts will feed backward.
1-24
Page 42

Note
Handling Paper and Other Media | 1-25
Setting Paper Configurations
When you use non-EPSON paper or other media, you may need to register
the paper’s thickness and drying time. On the EPSON Stylus Pro 9500, you
can also register the suction setting. The only way to tell if you need to
register new media is by experimentation.
When you’re using a paper stock or other printing material for the first time,
always test it on a small print job. If the ink smears or printing is blurred,
you need to register the paper’s drying time, and thickness (or suction
setting). Registration is not necessary when you use EPSON media. You can
register up to four types of paper or other media. Then you can select the
registered values whenever you print on that particular stock.
It’s a good idea to keep a
list of your registered
paper types and
numbers.
Drying time determines how long the printer will pause between pages or
before cutting.
Registering Paper Thickness, Drying Time, and Suction
To register a new paper stock, load it into the printer and follow these steps:
1. Press the
SelecType
button until
the display.
2. Press the
Item
button.
PAPER NUMBER=STD*
3. If you’re registering your first roll or batch of paper, press the
to select
PAPER NUMBER=1
For subsequent rolls, continue pressing the
number you want to register.
4. Press the
Press
PAPER THICK. NO.=1
Item
Enter
to print the paper thickness test pattern. You may see
button.
THICK. PAT=PRINT
on the display.
Following is a sample pattern:
PAPER CONFIG. MENU
appears on the display.
. Then press the
Enter
+
button to select the
appears on the display.
button.
appears on
+
button
1 2 3 4 5 6 7 8 9 10 11 12 13 14 15 16 17
1-25
Page 43

1-26 | Handling Paper and Other Media
5. Examine the printed pattern to determine which set of lines is the
straightest (shows the smallest gap), and note the corresponding
number.
In the sample pattern, the lines under number 4 are the straightest.
+
6. Press the
Enter
or
.
- button to select the number noted in step 5. Then press
7. Press the
Press the
Item
button.
+
or - button to select the time in minutes, then press
DRYING TIME=0 MIN
appears on the display.
Enter
.
Start with one minute. If ink still smears, increase the drying time.
This is how long the print head will pause between pages (or before
cutting) to let the ink dry.
For the EPSON Stylus Pro 9000, skip to step 9. For the EPSON Stylus
Pro 9500, continue with step 8.
Item
8. Press the
button.
you’re registering very thin paper, press the
LOW
setting. Then press
9. Press the
Pause
SUCTION=NORM*
Enter
SelecType
or
appears on the display. If
+
or - button to select the
.
button to exit the Paper Configuration
menu.
Selecting Registered Paper Settings
Once you have registered the drying time (and thickness) for a type of paper
or other media, you can select it whenever you print on that paper.
1. Press the
the display.
SelecType
button until
PAPER CONFIG. MENU
appears on
2. Press the
3. Press the
Item
button. You see
+
or - button to select the registered number you want to use,
or select the standard setting,
4. Press the
Pause
or
SelecType
PAPER NUMBER=1.
STD
. Then press the
Enter
button.
button to exit the Paper Configuration
menu.
When you change media, make sure you select the correct setting or
STD
change it back to
.
1-26
Page 44

Chapter 2:
Monitoring
and
Configuring
the Printer
The EPSON Stylus Pro 9000 series printers include a number of monitoring
utilities. The control panel displays status messages and error messages, and
the lights alert you when a problem occurs or your ink runs out. If you have
the RIP Station 5100, you can also use software utilities to monitor the
printer. See the RIP Station 5100 User Guide for more information.
In addition, the control panel includes a series of SelecType
™
menus that
you can use to configure the printer’s default settings and perform
maintenance operations. This chapter tells you how to respond to the lights
and messages and how to configure the printer using the control panel. The
following information is included:
•
Using the control panel to monitor the printer
•
Checking printer status
•
Responding to control panel lights and messages
•
Using the control panel to configure the printer
Using the Control Panel to Monitor the Printer
The printer’s control panel includes buttons, lights, and a liquid crystal
display (LCD):
display
Ink Out
Pause
Reset
3 sec.
SelecType
Paper Source
Item
+
Paper Feed
_
Cut /Eject
Enter
Cleaning
3 sec.
Operate
KC LCMLMY
Paper Out
Roll
Auto Cut
Roll
Cutter Off
Sheet
Power
1
Page 45

2-2 | Monitoring and Configuring the Printer
Monitoring Normal Printer Operation
Messages appear on the control panel display and lights come on or flash to
indicate various phases of printer operation. The following table explains the
status messages and lights:
Status messages
Message
READY Operate light on Printer is ready to print.
PRINTING Operate light flashing Printer is receiving data.
INK DRY
<number> MIN
RESET All lights flash briefly Printer is resetting.
PRESS PAUSE
BUTTON
WAIT Pause light on or
PAUSE Pause light on Printer is paused. To resume
Light Explanation or response
Pause light flashing Printer is paused to let ink dry.
Wait for the number of minutes
shown.
Pause light on Press the Pause button to
continue.
Printer is warming up, performing
flashing
maintenance, or charging ink.
printing, press the Pause button.
Pausing and Resetting the Printer
If you need to stop the printer during a print job, press the
Press the
Pause
button again to resume printing.
If you decide to cancel a job after the printer has started processing it, you
can reset the printer. Press the
Pause
button and hold it down for 3 seconds.
This clears all data in the printer’s memory.
Pause
button.
Checking Printer Status
You can use the control panel to print a status check or nozzle check. These
prints allow you to test the printer without sending a print job (and without
connecting the printer to the RIP). You can also check the amount of ink
remaining, total number of prints, and the status of your cutter blade and
other printer parts.
2-2
Page 46

Monitoring and Configuring the Printer | 2-3
Printing a Status Check
The status check shows the current default settings, amount of ink
remaining in each cartridge, page count, and the status of various printer
parts. To display this information on the control panel instead of printing it
out, see page 2-4.
Follow these steps to print the status check:
1. Load a sheet of paper in the printer, following the instructions on
page 1-15. (You can print test pages on roll paper, but you will use
more paper.)
2. Press the
until you see
3. Press the
SelecType
TEST PRINT MENU
Item
button on the control panel. Press it repeatedly
button until you see
on the display.
STATUS CHECK=PRINT
on the
display.
4. Press the
Enter
button. The status check prints. The amount of ink left
or component life is indicated as follows:
E*****F
E**** F
E*** F
E** F
E* F
E F
5. Press the
= full (or full life remaining
= 3/4 full (or 3/4 life remaining)
= 1/2 full (or 1/2 life remaining)
= 1/4 full (or 1/4 life remaining)
= nearly empty (or service life near end)
= empty (or service life ended)
SelecType
button to exit the Test Print menu.
)
Printing a Nozzle Check
The nozzle check prints a pattern of dots that lets you see if any print head
nozzles are clogged. If any dots are missing, you can run a cleaning cycle to
clear the nozzles. Follow these steps to print the nozzle check:
1. Load a sheet of paper in the printer, following the instructions on
page 1-15. (You can print test pages on roll paper, but you will use
more paper.)
2. Press the
until you see
SelecType
TEST PRINT MENU
button on the control panel. Press it repeatedly
on the display.
2-3
Page 47

2-4 | Monitoring and Configuring the Printer
3. Press the
Item
button. You see
NOZZLE CHECK=PRINT
on the
display.
4. Press the
Enter
button. The nozzle check prints as shown below:
Each line should be complete, with no gaps in the dot pattern. If any
dots are missing, as shown below, you need to run a cleaning cycle. Press
Cleaning
the
button on the control panel and hold it for at least
3seconds.
For more information, see page 3-2. If you’re using the EPSON printer
driver, you can run the Head Cleaning utility. See page B-24
(Macintosh) or C-26 (Windows) for instructions.
Checking Ink Levels and Component Life
You can view printer status information on the control panel display without
printing a status check. Follow these steps:
1. Press the
until you see
2. Press the
SelecType
PRINTER STATUS MENU
Item
button on the control panel. Press it several times
button. You see
on the display.
VERSION <number>
on the
display. This indicates the firmware version installed in your printer.
3. Continue pressing the
Item
button to display the amount remaining for
each of the 6 inks or service life remaining for a number of printer parts.
The indicators read as follows:
E*****F
E**** F
E*** F
E** F
E* F
<nn>% F
= full (or full life remaining
= 3/4 full (or 3/4 life remaining)
= 1/2 full (or 1/2 life remaining)
= 1/4 full (or 1/4 life remaining)
= nearly empty (or service life near end)
= less than 10% of ink (or service life) remaining
)
2-4
Page 48

Monitoring and Configuring the Printer | 2-5
Following is a list of the items displayed. Note that all parts on the list
(except the ink cartridges and paper cutter) need to be replaced by
authorized EPSON service centers.
Error messages
INK LEFT-K
INK LEFT-C
INK LEFT-M
INK LEFT-LC
INK LEFT-LM
INK LEFT-Y
CUTTER LIFE
4. Press the
(black)
(cyan)
(magenta)
(light cyan)
(light magenta)
(yellow)
(paper cutter)
SelecType
button to exit the Printer Status menu.
TOTAL PRINTS
WASTE INK
CR MOTOR
PF MOTOR
HEAD UNIT
CLEANER
(waste ink system)
(carriage motor)
(paper feed motor)
(print head)
(cleaning unit)
Responding to Control Panel Lights and Messages
When your ink or paper runs out or a problem occurs, a message appears on
the display. The lights on the control panel come on or flash. The following
table lists the messages alphabetically and includes an explanation and
instructions for correcting the problem.
Message Light Explanation Response
COVER OPEN Pause light on Lower cover is open. Close the lower cover. Make sure all
three magnetic tabs are fastened.
INK COMPART.
OPEN
INK LOW Ink Out light(s)
INK OUT Ink Out light(s) onInk cartridge(s) are empty
LOAD PAPER Paper Out
Pause light on You are replacing the ink
cartridge(s) and the ink
compartment cover is open.
Ink cartridge(s) are nearly
flashing
light on
empty (printing continues).
(printing stops).
Paper set lever is up while
loading paper.
Close the ink compartment cover
when you are finished replacing the
ink cartridge(s).
Replace ink cartridge(s) indicated by
Ink Out light(s). See page 3-7 for
instructions.
Replace the ink cartridge(s) indicated
by Ink Out light(s). See page 3-7 for
instructions.
Pull the paper set lever down after
you load paper.
2-5
Page 49

2-6 | Monitoring and Configuring the Printer
Error messages (continued)
Message Light Explanation Response
LOAD ROLL PAPER
LOAD SHEET
PAPER
MAINTENANCE
REQ. <error
number>
MAINTENANCE
REQ 0100
NO INK CARTRIDGE Ink Out light(s) onInk cartridge(s) not installed. Install ink cartridges as indicated by
OPTION I/F ERROR — Wrong interface card installed. Turn off the printer and remove the
PAPER JAM Paper Out
PAPER NOT CUT Paper Out
Paper Out
light on
— A printer part will need to be
— The waste ink system is
light flashing
light flashing
Paper source setting in print
options is different from
control panel.
replaced soon.
almost full.
Paper has jammed in the
printer.
Roll paper was not cut
completely.
Cut paper did not fall off. Remove the cut paper from the
Make sure the right paper is loaded
and the paper source setting is the
same on the control panel and print
options.
Note the error number and contact
EPSON as described in the
Introduction.
Call an authorized EPSON servicer to
schedule replacement of the waste
ink system.
the lights. See page 3-7 for
instructions.
card. See page A-3 for instructions.
Remove the jammed paper. See
page 4-12 for more information.
Cut the paper manually, then remove
the cut paper from the printer. Reload
paper, as described on page 1-10.
printer. Reload paper.
PAPER NOT
STRAIGHT
PAPER OUT Paper Out
PUSH LEVER
DOWN
Paper Out
light flashing
light on
Paper Out
light on
Paper slipped and fed into the
printer at an angle.
No paper is loaded. Load paper.
Paper ran out. Remove any printouts or paper
Paper set lever was released
during the printing process or
another operation.
Reload paper, making sure the edges
are straight and aligned with both
rows of holes.
remaining in the printer and load more
paper.
If the message appears during a print
job, reset the printer by pressing the
Pause button for 3 seconds. Then
load paper and resend the job.
Push the paper set lever down. Start
printing again from the beginning for
best results.
2-6
Page 50

Monitoring and Configuring the Printer | 2-7
Error messages (continued)
Message Light Explanation Response
RELOAD PAPER Paper Out
light on
REMOVE PAPER Paper Out
light on
SERVICE REQ.
<error number>
SERVICE REQ.
<00000100>
TURN PWR OFF
AND ON
All lights
flashing
All lights
flashing
— This message appears after
Paper could not be reversed
into the printing position.
Image is too wide for the
paper loaded in the printer.
Paper is not fully ejected. Cut the paper at the paper insertion
PAPER NOT CUT error was
cleared.
Paper is too thick for head
cleaning.
An error has occurred. Note the error number, and turn the
The waste ink system is full. Contact EPSON to have the waste ink
you clear a paper jam.
Remove the paper. Reload it so that
the right and bottom edges are
straight and aligned with both rows of
holes.
Resize your image or load wider
paper.
slot, then reload paper.
Reload paper.
Push the paper set lever down to
remove the paper. Head cleaning
automatically starts. After cleaning,
reload paper.
printer off and then on. If the
message remains, contact EPSON as
described in the Introduction.
system replaced.
Turn the printer off and then on again.
UNABLE TO PRINT — You tried to print a test pattern
while an error condition was
present or the ink
compartment cover was open.
WRONG
CARTRIDGE
Ink Out light(s) onWrong ink cartridge(s)
installed.
2-7
After 3 seconds the message
disappears. Press the Pause button
to exit SelecType mode. If the
message appears again, clear the
error before you print.
Install the correct ink cartridge(s).
Page 51

2-8 | Monitoring and Configuring the Printer
Using the Control Panel to Configure the Printer
In addition to testing the printer and checking the status of various
components, you can use the SelecType menus to configure printer settings
and perform maintenance operations. The following table lists the menus,
their functions, and where to find additional information:
SelecType menus
Menu Description
Printer Setting Configure the printer page 1-15,
Test Print Print a nozzle check or status check page 2-3
Printer Status Check ink levels and component life page 2-4
Paper
Configuration
Register paper thickness and drying time,
and select registered configurations
For more
information, see
page 1-20,
page 2-8
page 1-25
Note
Print quality may be
affected near the cut
edges if you change the
top and bottom margins
to 3 mm.
Cutter
Replacement
Head
Alignment
Replace the paper cutter blade page 3-11
Align the print head page 3-3
Setting Default Roll Paper Margins
The default margins for roll paper are .12 inches or 3 mm (left and right)
and .59 inches or 15 mm (top and bottom). You can use the Printer Settings
menu on the control panel to set all margins to 3 mm or 15 mm.
1. Press the
SelecType
button.
the display.
2. Press the
Item
button repeatedly until
appears on the display. This is the default setting.
•
Press the + button once to set all margins to 3 mm.
ROLL MARG=3MM
•
Press the + button again to set all margins to 15 mm.
ROLL MARG=15MM
+
You can use the
or – button to cycle through all three settings.
PRINTER SETTING MENU
ROLL MARG=T/B15MM*
appears on the display.
appears on the display.
appears on
2-8
Page 52

Monitoring and Configuring the Printer | 2-9
3. When you have selected the setting you want, press the
Enter
button to
save it.
4. Press the
SelecType
button to exit the Printer Setting menu.
Turning Off Paper Monitoring Features
The printer normally stops and displays an error message if you try to print
an image wider than the paper, or if paper is fed at an angle. You can turn off
the paper size check and/or paper alignment check if you don’t want to use
these monitoring features. However, ink may be sprayed on the platen if you
print an image that is too wide for the paper. Follow these steps to turn off
paper monitoring:
1. Press the
SelecType
the display.
2. Press the
PAPER ALIGN CHK=ON
3. Press the
CHK=OFF
Item
button repeatedly until
+
button.
appears on the display.
button.
PAPER SIZE CHK=OFF
PRINTER SETTING MENU
PAPER SIZE CHK=ON
appears on the display.
PAPER ALIGN
or
appears on
or
4. Press the
5. Press the
Enter
button to save your new setting.
SelecType
button to exit the Printer Setting menu.
Selecting the Printer’s Interface
The printer includes both a parallel and serial interface. You can also install
an optional interface card for networking or additional connectivity. By
default, the printer automatically switches to whichever interface is receiving
data.
You can use the control panel to select an individual interface for sending
data to the printer. Follow these steps:
1. Press the
SelecType
button.
the display.
2. Press the
Item
button repeatedly until
the display. This is the default setting.
2-9
PRINTER SETTING MENU
INTERFACE=AUTO*
appears on
appears on
Page 53

2-10 | Monitoring and Configuring the Printer
•
Press the + button once to select the parallel interface.
INTERFACE=PARALLEL
appears on the display.
Note
If you experience any
problems using ECP
mode, switch back to
compatible mode. For
USB connection, use
compatible mode.
•
Continue pressing the + button to select the
OPTION
You can use the
(optional) interface.
+
or – button to cycle through all four settings.
3. When you have selected the setting you want, press the
MAC
(serial) or
Enter
button to
save it.
4. Press the
SelecType
button to exit the Printer Setting menu.
Configuring the Parallel Interface
You can use the control panel to change the parallel interface to ECP mode
for faster printing. To use this mode, you must connect a computer directly
to the printer’s parallel interface (without a RIP), and the computer must
support ECP mode. See your computer’s documentation for more
information.
Follow these steps to configure the parallel interface:
1. Press the
SelecType
button.
the display.
2. Press the
Item
button repeatedly until
on the display. This indicates that compatible mode (the default) is
selected.
3. Press the
+
button.
PARA. I/F=ECP
parallel interface to ECP mode.
PRINTER SETTING MENU
PARA. I/F=COMPAT*
appears on the display. This sets the
appears on
appears
4. Press the
5. Press the
Enter
button to save your setting.
SelecType
button to exit the Printer Setting menu.
2-10
Page 54

Monitoring and Configuring the Printer | 2-11
Changing the Printer’s Code Page Setting
The printer uses the PC437 code page (U.S. and standard European
character sets) by default. You can use the control panel to change it to the
PC850 code page (multilingual character sets) if necessary. Follow these
steps:
1. Press the
SelecType
button.
PRINTER SETTING MENU
appears on
the display.
2. Press the
Item
button repeatedly until
CODE PAGE=PC437*
appears
on the display.
3. Press the
4. Press the
5. Press the
+
button.
Enter
SelecType
CODE PAGE=PC850
appears on the display.
button to save your setting.
button to exit the Printer Setting menu.
Restoring Default Settings
You can erase all SelecType settings you have made and restore them to their
default values. Follow these steps:
1. Press the
the display.
2. Press the
the display.
3. Press the
SelecType
Item
Enter
button.
button repeatedly until
button to erase all settings and restore the defaults.
PRINTER SETTING MENU
INIT. PANEL=EXEC
appears on
. appears on
4. Press the
SelecType
2-11
button to exit the Printer Setting menu.
Page 55

2-12 | Monitoring and Configuring the Printer
Note
The maintenance mode
also includes a MW7=A
setting, for use by an
authorized EPSON
servicer only.
Setting the Control Panel Language
All control panel messages are displayed in English. However, you can use a
special printer maintenance mode to change to any of the following
languages:
•
French
•
Italian
•
German
•
Spanish
•
Portuguese
Make sure the printer is turned off, then follow these steps to change the
language for control panel messages:
1. Press and hold the
turn on the printer.
2. Press the
3. Press the
Item
button until
+
or – button until the language you want is displayed.
Pause
button while you press the
HEX DUMP=PRINT
LANGUAGE=ENGLISH*
appears on the display.
Power
button to
is displayed.
4. Press the
5. Press the
mode.
Enter
button to select the language.
Power
button to turn the printer off and exit maintenance
2-12
Page 56

Chapter 3:
Maintaining
and
Transporting
the Printer
The EPSON Stylus Pro 9000 series printers require very little maintenance
to keep working at their best. This chapter describes the following routine
procedures:
•
Running a nozzle check
•
Running a cleaning cycle
•
Aligning the print head
•
Replacing ink cartridges
•
Replacing the paper cutter blade
•
Cleaning the printer
•
Transporting the printer
•
Replacing the waste ink system
Running a Nozzle Check
The nozzle check prints a pattern of dots that lets you see if any print head
nozzles are clogged. If any dots are missing, you can run a cleaning cycle to
clear the nozzles.
Follow these steps to print the nozzle check:
1. Load a sheet of paper in the printer, following the instructions on
page 1-15. (You can print the nozzle check on roll paper, but you will
use more paper.)
2. Press the
PRINT MENU
3. Press the
display.
SelecType
on the display.
Item
button. You see
1
button on the control panel until you see
NOZZLE CHECK=PRINT
TEST
on the
Page 57

3-2 | Maintaining and Transporting the Printer
Note
The Ink Pad number
under the nozzle check
pattern indicates the
remaining percentage of
the waste ink system.
You will need to contact
your authorized EPSON
servicer when this
number is low. The
printer will stop and
display an error message
when the system needs
to be replaced.
4. Press the
Enter
button. The nozzle check prints as shown below.
If all the lines on the check pattern are complete, with no gaps in the dot
pattern, the print head doesn’t need cleaning:
If dots are missing from the pattern, as shown below, you need to run a
cleaning cycle. See the following section for instructions.
Running a Cleaning Cycle
If your printed image is unexpectedly light or faint or dots are missing from
the image, you may need to run a cleaning cycle. This unclogs the print head
nozzles so they can deliver ink properly.
The cleaning process uses ink, so you should run it only if print quality
declines. Always run a nozzle check first to confirm that the head needs
cleaning; the nozzle check uses only a small amount of ink.
Caution
To avoid damaging the
printer, don’t turn it off
until the cleaning cycle is
finished and the Pause
light has stopped flashing.
If you have installed the EPSON printer driver and utilities, you can run the
Head Cleaning utility. See page B-24 (Macintosh) or C-26 (Windows) for
instructions.
Follow these steps to run the cleaning cycle from the printer’s control panel:
1. Make sure none of the
Ink Out
lights is on or flashing. (If so, you need
to replace the indicated ink cartridge before you can run a cleaning
cycle.)
2. Press the
Cleaning
button and hold it for at least 3 seconds. The
Pause
light flashes as the printer cleans its print head. The cleaning cycle takes
about three minutes and does not use any paper.
3. When the
Pause
light goes off, print a document or run a nozzle check
to confirm that the head is clean.
3-2
Page 58

Maintaining and Transporting the Printer | 3-3
You may need to run the cleaning cycle several times to get a clean
nozzle check pattern. For effective cleaning, always run a test print or
nozzle check between cycles. If the lines on the pattern still appear
broken after several cleaning cycles, contact EPSON for assistance.
Aligning the Print Head
If banding appears on your prints, or vertical lines are not straight, you need
to align the print head. You can use the Print Head Alignment utility if you
have the EPSON printer driver and utilities installed. See page B-25
(Macintosh) or page C-27 (Windows) for instructions.
If you don’t have the utilities installed, you can use the control panel. Both
procedures align the head for all modes and resolutions. Print head
alignment involves two phases:
•
First you print a series of alignment or adjustment patterns.
•
Then you determine which numbered row of patterns (EPSON Stylus
Pro 9000) or numbered line or box (EPSON Stylus Pro 9500) has the
best vertical alignment (smallest gaps). You enter the information on the
control panel to change the print head alignment.
Printing the Alignment Patterns
For the EPSON Stylus Pro 9000, use 13 × 19-inch EPSON coated ink jet
paper (short edge first). You’ll need 4 sheets to complete the alignment
procedure, which includes 12 patterns of 7 rows each and takes about 15
minutes.
For the EPSON Stylus Pro 9500, you can use EPSON roll paper. Six
patterns of 15 lines or boxes are printed, which takes about 10 minutes. The
patterns are repeated across the width of the paper.
Follow these steps to align the print head using the control panel:
1. Load paper in the printer.
2. Press the
displayed.
3. Press the
SelecType
Item
button.
3-3
button until
PAPER THICK=STD
HEAD ALIGNMENT MENU
appears on the display.
is
Page 59

3-4 | Maintaining and Transporting the Printer
If you’re using EPSON paper, leave this setting on
STD
.
If you’re using other media, enter the thickness value of the paper in
+
0.1-mm increments by pressing the
4. Press the
Enter
button to save the setting.
or – button.
ADJUST. PATT.= ALL
appears on the display.
5. Press the
Enter
button to print the full series of alignment patterns.
If you want to print a single alignment pattern, press the + or – button
Enter
until the pattern number appears. Then press the
•
For the EPSON Stylus Pro 9500, skip to the next section,
button.
“Completing the Alignment Procedure.”
•
For the EPSON Stylus Pro 9000, patterns 1 through 3 are printed
on the first sheet of paper. After this sheet is printed,
appears on the display and the red
PAPER OUT
PAPER OUT
light comes on.
6. Raise the paper set lever and remove the printed sheet. Even though the
Operate
light is flashing, it is safe to raise the paper set lever.
7. Load another sheet of paper. The next three patterns are printed.
8. Repeat steps 6 and 7 twice, until all 12 patterns have been printed.
9. Raise the paper set lever and remove the last printed sheet. Then lower
the lever and continue the alignment procedure in the next section.
3-4
Page 60

Maintaining and Transporting the Printer | 3-5
Completing the Alignment Procedure
After all the patterns have printed, continue with these steps.
1. Do one of the following:
•
For the EPSON Stylus Pro 9000, examine pattern #1 and
determine which row number has the smallest gaps. In the first
example below, the lines in row 4 have the smallest gaps. In the
second example, row 6 has the smallest gaps.
EPSON Stylus Pro 9000 Alignment Patterns
1
2
3
4
5
6
7
patterns #1-5, #7, #9-12
1
2
3
4
5
6
7
patterns #6, #8
3-5
Page 61

3-6 | Maintaining and Transporting the Printer
•
For the EPSON Stylus Pro 9500, examine row #1 and determine
which line or box number has the smallest gaps. In the example
below, line 8 has the smallest gaps in row 1.
EPSON Stylus Pro 9500 Alignment Patterns
Note
If row 4 (EPSON Stylus
Pro 9000) or line 8
(EPSON Stylus Pro 9500)
shows the smallest gaps
for all the sets, the head
is aligned. Press Pause to
exit head alignment
mode.
2. Check the control panel display. Use the + or – button to select the best
aligned row or line for pattern #1. Then press the
Enter
button to
register the setting.
3. Repeat steps 1 and 2 for each pattern.
If you can’t make a consistent choice as you look across the width of the
paper, choose the average or most frequent number, then print the
pattern again. Press
Enter
to cycle through the patterns until you reach
the one you want to repeat.
4. After you have registered all the patterns, press the
Pause
button to exit
head alignment mode and return to normal printer operation.
3-6
Page 62

Maintaining and Transporting the Printer | 3-7
Caution
For best results, use
genuine EPSON
cartridges and do not
refill them. Damage to
your printer attributable
to the use of other
consumables is not
covered by EPSON’s
warranty. Color accuracy
may vary if you use
non-EPSON inks.
Caution
Replacing Ink Cartridges
When one of the
Ink Out
lights is flashing (and
the control panel), the corresponding cartridge is almost out of ink. Make
sure you have a replacement cartridge. When the light stays on and
OUT
is displayed, the cartridge is empty. You must replace the cartridge
before you can continue printing. Use only the following EPSON ink
cartridges:
EPSON Stylus Pro 9000 graphic arts (dye-based) ink
•
Black T407011
•
Cyan T410011
•
Magenta T409011
EPSON Stylus Pro 9500 Archival (pigment) ink
•
Black T474011
•
Cyan T477011
•
Magenta T476011
•
•
•
•
•
•
Before you start, make sure the printer is on. Then follow these steps to
replace an ink cartridge:
1. Note the color of the
Ink Out
light that is on or flashing. This is the
cartridge that you need to replace.
INK LOW
is displayed on
Light cyan T412011
Light magenta T411011
Yellow T408011
Light cyan T479011
Light magenta T478011
Yellow T475011
INK
Leave the empty
cartridge in the printer
until you are ready to
replace it.
2. Open the roll paper cover and locate the ink cartridge that needs
replacing.
black,
cyan,
magenta
light cyan,
light magenta,
yellow
3-7
Page 63

3-8 | Maintaining and Transporting the Printer
You can leave your roll paper in the printer when you replace ink
cartridges. The illustrations show paper removed for clarity only.
3. Push the lever down and let it “bounce” back up to open the ink
compartment cover.
INK COMPART. OPEN
4. Locate the slot containing the empty ink cartridge (corresponding to the
Ink Out
light). Pull the clamp forward.
appears on the display.
3-8
Page 64

Maintaining and Transporting the Printer | 3-9
Warning
If ink gets on your hands,
wash them thoroughly with
soap and water. If ink gets
into your eyes, flush them
immediately with water.
5. Carefully pull the empty cartridge straight out of the printer.
6. Make sure the replacement cartridge is the correct color, and remove it
from its package.
If you’re using pigment ink, shake the cartridge gently before installing
it.
Note
If you can’t insert the
cartridge smoothly, you
may have the wrong
cartridge. Check the
package and product
code.
7. Hold the ink cartridge with the arrow mark face-up and pointing to the
rear of the printer. Then insert the ink cartridge into the slot. Don’t
force the cartridge.
3-9
Page 65

3-10 | Maintaining and Transporting the Printer
Note
If the Ink Out light
remains on, the cartridge
may not be installed
correctly. Remove the
cartridge and then
reinsert it as described
above.
8. Push the cartridge clamp back. Make sure the corresponding
Ink Out
light goes off.
9. Close the ink compartment cover by pushing the lever down until it
clicks into place.
3-10
Page 66

Maintaining and Transporting the Printer | 3-11
Replacing the Paper Cutter Blade
If you notice that your paper isn’t cut cleanly, the cutter blade may need to
be replaced. If you use the blade to cut heavy stock or non-EPSON media,
you may need to replace it more often. You can also check the status of your
cutter by printing the status check sheet or using the Printer Status menu on
the control panel. See page 2-3 or 2-4 for instructions.
To obtain a new cutter blade (part number C815131), contact your dealer.
To replace the cutter blade, you first need to remove the used blade, as
described in the following section.
Warning
Be careful not to cut
yourself while replacing the
paper cutter blade.
Removing the Used Cutter Blade
Make sure the printer is on, then follow these steps to remove the blade:
1. Press the
MENU
appears on the display.
2. Press the
SelecType
Item
button.
button repeatedly until
CUT. REPLACE=EXEC.
CUTTER REPLACE
Paper Out
SelecType
Roll
Auto Cut
Roll
Cutter Off
Paper Source
Item
+
appears on the display.
3-11
Page 67

3-12 | Maintaining and Transporting the Printer
Caution
To avoid damaging your
printer, never move the
paper cutter holder by
hand.
3. Press the
Enter
button. The paper cutter holder moves to the
replacement position, where the arrow appears in the illustration below:
paper cutter
location
4. When the holder stops moving and
OPEN LOWER COVER
appears on
the display, open the lower cover.
3-12
Page 68

Maintaining and Transporting the Printer | 3-13
Note
Be careful not to let the
cutter or the spring coil
pop out of the casing.
5. When
REPLACE CUTTER
appears on the display, you can open the
casing. Push in the side pin while turning the paper cutter cover to the
right.
cutter blade casing
6. Slowly take your finger off the side pin. The paper cutter raises so it can
be removed.
7. Carefully remove the cutter blade from the printer.
3-13
Page 69

3-14 | Maintaining and Transporting the Printer
Installing the New Cutter Blade
After you have removed the used cutter blade, you’re ready to install the new
one. Follow these steps:
1. Remove the new blade from its package.
2. Make sure the spring coil is inside the cutter holder. If necessary,
reinstall the coil.
3. Fully insert the new blade into the paper cutter holder in the direction
shown below.
4. Push in the side pin while turning the paper cutter cover to the left to
close the casing.
CLOSE LOWER COVER
appears on the display.
5. Close the lower cover. The cutter holder moves to the home (far right)
position and
READY
appears on the display.
3-14
Page 70

Maintaining and Transporting the Printer | 3-15
Caution
Be careful not to touch
the gears inside the
printer.
To avoid damaging the
components as well as
the case, never use
alcohol or thinners to
clean the printer.
Be careful not to get
water on the printer
mechanism or electronic
components.
Don’t use a hard or
abrasive brush.
Don’t spray the inside
of the printer with
lubricants; unsuitable
oils can damage the
mechanism. Contact your
dealer or a qualified
servicer if your printer
needs lubrication.
Cleaning the Printer
To keep your printer working at its best, you should clean it thoroughly
several times a year.
1. Make sure the printer is turned off and all the lights on the control panel
are off. Then unplug the power cord.
2. Open the roll paper cover and remove the roll paper spindles. Remove
any sheet media from the printer.
3. Make sure the ink cartridge compartments are closed. Then use a soft
brush to carefully clean away any dust or dirt.
4. Close the roll paper cover.
5. Open the lower cover and use a soft brush to carefully clean away any
dust or dirt inside the lower cover. Then close the cover.
6. Remove the paper hammock. Then clean away any dust or dirt around
the leg assembly using a soft brush.
7. If the outer case is dirty, clean it with a soft, clean cloth dampened with
mild detergent. Keep the ink cartridge compartment closed to prevent
water from getting inside.
8. If the area under the roll paper cover accidentally gets soiled with ink,
wipe it off with a damp cloth.
9. To wash the paper hammock, remove the shafts, then machine wash
with mild detergent and air dry.
3-15
Page 71

3-16 | Maintaining and Transporting the Printer
Transporting the Printer
When you need to ship your printer, you should repack it using the original
box and packing materials. Follow these steps to prepare the printer for
shipping:
1. First turn off the printer and make sure the print head is in the home
Caution
(far right) position. If not, turn the printer back on, wait until the print
head moves to the home position, then turn off the printer.
If for any reason the
printer will not be level
during shipping, a service
technician must drain all
ink from the printer
before it is shipped.
2. Remove the following parts:
•
Ink cartridges
•
Power cord
•
Interface cable
•
Paper hammock
•
Roll paper spindles
•
All paper or other media
•
Optional auto take-up reel (if installed)
After you remove the ink cartridges, store them in separate, resealable
plastic bags.
3. Make sure the ink cartridge clamps are in the upright position (closed).
Leave the ink compartment cover open. Use tape to hold the cover and
the cartridge clamps in place. This automatically closes the ink valves.
3-16
Page 72

Maintaining and Transporting the Printer | 3-17
4. Install the carriage shipping restraint (packaging material).
5. Close the ink valve locks on each side of the printer.
Open
Close
Open
Close
6. Remove the left and right side joint cover plates by spreading the ends
and pulling outward. Keep the cover plates in a safe place.
3-17
Page 73

3-18 | Maintaining and Transporting the Printer
7. While holding the printer unit, remove the screws from the left and
right sides. Keep the screws in a safe place.
Warning
The printer unit weighs
approximately 212 lb
(96 kg). Always have four
people lift it, using the hand
grip areas as shown.
8. Have four people lift the printer unit off of the leg assembly, using the
hand grips. Lift the back of the printer first, tilt it slightly to the front,
then slide it back to remove it.
9. Keep the printer level while you move it.
Setting Up the Printer After Transporting It
Setting up the printer after transporting it is almost identical to setting it up
for the first time. Whenever you set up the printer, see the Assembly and
Setup Instructions, and note the following points:
•
Don’t forget to open the side ink valve locks. The printer can’t print
while they are closed.
•
Don’t forget to remove any protective material (such as tape from the
ink cartridge clamps).
3-18
Page 74

Maintaining and Transporting the Printer | 3-19
•
The first time you start printing after moving the printer, the print head
nozzles may be clogged. You may need to run a cleaning cycle (see
page 3-2) and realign the print head (see page 3-3) to ensure good print
quality.
•
If you reinstall the cartridges you removed before transporting the
printer, make sure the printer is turned off when you install them.
Otherwise, the printer will not be able to determine the correct level of
remaining ink and the
Ink Out
lights may not flash to warn you when a
cartridge is almost empty.
Moving the Printer on the Stand
Caution
Do not roll the printer
on angled or uneven
surfaces.
When you need to move the printer a short distance, such as within the same
building or facility, you can roll the printer on its casters. Follow these steps:
1. Make sure that the power cord, interface cable, roll paper spindles and
sheet media are removed, and the roll paper cover and lower cover are
closed.
2. Release the front casters and retract the stabilizer knobs.
3. Carefully roll the printer to its new location. Relock the casters and
extend the stabilizer knobs after moving.
The first time you start printing after moving the printer, the print head
nozzles may be clogged. You may need to run a cleaning cycle (see page 3-2)
and realign the print head (see page 3-3) to ensure print quality.
3-19
Page 75

3-20 | Maintaining and Transporting the Printer
Replacing the Waste Ink System
Approximately every two years (or after 12,000 B1-size prints), you must
have your authorized EPSON servicer replace the waste ink system. This is
necessary to prevent damage to the print head and maintain print quality.
Parts and labor for this service are not covered under the terms of the limited
warranty.
You can monitor the status of the waste ink system through the control
panel (see page 2-4) or through the Ink Pad number displayed on the nozzle
check print (see page 2-3).
The printer will display the following message on the control panel when the
waste ink system is almost full:
MAINTENANCE REQ. 0100
You should call to schedule service at this point. When the waste ink system
is at full capacity, the printer will stop and display the following message:
SERVICE REQ. 00000100
3-20
Page 76

Chapter 4:
Resolving
Problems
As you use your printer, you may occasionally experience a problem. The
first thing you should do is diagnose the problem following the guidelines in
this chapter. Then try the most likely solutions until the problem is fixed.
This chapter provides instructions for the following:
•
Diagnosing problems
•
Improving print quality
•
Solving operational problems
•
Solving miscellaneous printing problems
•
Solving paper problems
Diagnosing Problems
The EPSON Stylus Pro 9000 series printers include a number of ways to
help you diagnose problems:
•
To identify the most common problems, check the messages and lights
on the printer’s control panel. See page 2-5 for more information.
•
If you have the RIP Station 5100, check for error messages on the RIP
control panel and in the Fiery Spooler or Web Spooler utilities. See the
RIP Station 5100 User Guide for more information. (The RIP Station
5100 User Guide also includes troubleshooting guidelines.)
•
If you’re using the EPSON printer driver and Monitor3 (Macintosh) or
Status Monitor (Windows) utility, check your software for error
messages. See Appendix B or C for more information.
•
To determine whether the problem is caused by the printer itself,
disconnect the printer from the RIP and run a status check. See page 2-3
for instructions.
•
You can use the printer’s hex dump mode to pinpoint communication
problems. Then you can fax the printout to a technical support
representative or interpret it yourself. See the following section for
instructions.
•
If none of the suggested solutions in this chapter solve your problem,
contact EPSON as described under “Where To Get Help” in the
Introduction.
1
Page 77

4-2 | Resolving Problems
Using Hex Dump Mode
You can use the printer’s hex dump mode to identify problems if you know
how to interpret hex code. Or, you can fax the hex printout to a technical
support representative.
Make sure the printer has paper loaded and is turned off. Then follow these
steps:
1. Press and hold the
turn on the printer.
2. Press the
Enter
button.
Pause
button while you press the
HEX DUMP=PRINT
appears on the display.
Power
button to
3. Send your problem file to the printer.
The data in the print buffer is printed with 16-byte hex data in the left
column and corresponding ASCII characters in the right column. If the
Pause
last data is less than 16 bytes, you need to press the
button to
print it.
4. After you’re finished using hex dump mode, press the
Power
button to
turn the printer off and exit maintenance mode.
Improving Print Quality
You can often improve print quality by doing the following:
•
Run a nozzle check and cleaning cycle. See page 3-1 for instructions.
•
Align the print head. See page 3-3 for instructions.
•
When you send a print job, make sure your print options are set
correctly. For more information, see the RIP Station 5100 User Guide (if
you have the RIP) or Appendix B or C (if you’re using the EPSON
printer driver).
If none of these suggestions help, try the solutions on the following page.
4-2
Page 78

Print quality problems
Problem Possible cause Solution
Resolving Problems | 4-3
Your print has
horizontal banding.
Your print has vertical
misalignment or
banding.
Colors are incorrect or
missing.
Print head nozzles are clogged. Run a nozzle check and cleaning cycle (page 3-1).
The print head is out of
alignment.
You’re printing at 720 dpi. Choose 1440 dpi to eliminate banding.
You’re using the High Speed
(Bi-directional) setting.
Print options are set incorrectly
for the media you’re using.
You’re printing on the wrong side
of the paper or other media.
Your ink supply is too old. Check the Ink Out lights and replace ink cartridges
The print head is out of
alignment.
You’re using the High Speed
(Bi-directional) setting.
Print options are set incorrectly
for the media you’re using.
You’re printing on the wrong side
of the paper or other media.
Align the print head, as described on page 3-3.
Turn off the High Speed or Bi-directional setting
in your print options.
Make sure the Print Mode or Media Type setting
is correct for the media you’re printing on.
If you’re using a cut sheet, make sure the
printable side is face up.
if necessary, as described on page 3-7.
Align the print head, as described on page 3-3.
Turn off the High Speed or Bi-directional setting
in your print options.
Make sure the Print Mode or Media Type setting
is correct for the media you’re printing on.
If you’re using roll paper, make sure it’s correctly
attached to the spindle. See page 1-5 for
instructions. If you’re using a cut sheet, make sure
the printable side is face up.
Print head nozzles are clogged. Run a nozzle check and cleaning cycle (page 3-1).
The color settings in your
application or print options are
incorrect.
Make sure your color settings are correct.
4-3
Page 79

4-4 | Resolving Problems
Print quality problems (continued)
Problem Possible cause Solution
Your print has gaps or
appears faint.
Your print appears
blurry or smeared.
Your ink is too old. Check the expiration date printed on each
cartridge. If the cartridge is too old, replace it as
described on page 3-7.
Print options are set incorrectly
for the media you’re using.
Print head nozzles are clogged. Run a nozzle check and cleaning cycle (page 3-1).
Your ink supply is low. Check the Ink Out lights and replace ink cartridges
The paper configuration setting is
too thick.
The platen gap setting is too
wide.
Print options are set incorrectly
for the media you’re using.
You’re using the wrong paper
configuration setting (for
non-EPSON media).
Your paper doesn’t meet the
required specifications or
contains too much moisture.
You’re printing on the wrong side
of the paper or other media.
Make sure the Print Mode or Media Type setting
is correct for the media you’re printing on.
if necessary, as described on page 3-7.
Use the control panel to select thinner paper. See
page 1-25 for instructions.
Use the control panel to change the setting from
WIDE to AUTO. See page 1-20 for instructions.
Make sure the Print Mode or Media Type setting
is correct for the media you’re printing on.
Use the control panel to register and select your
paper thickness and dry time. See page 1-25 for
instructions. If you’re using the RIP, you can set a
dry time between passes in seconds.
Change your paper.
If you’re using roll paper, make sure it’s correctly
attached to the spindle. See page 1-5 for
instructions. If you’re using a cut sheet, make sure
the printable side is face up.
Ink has leaked in the paper path. Wipe the paper path area of the printer with a soft,
clean cloth. See page 3-15 for cleaning
instructions.
You’re using the High Speed
(Bi-directional) setting.
The paper configuration setting is
too thin.
The platen gap setting is too
narrow.
Turn off the High Speed or Bi-directional setting
in your print options.
Use the control panel to select thicker paper. See
page 1-25 for instructions.
Use the control panel to change the setting from
AUTO to WIDE. See page 1-20 for instructions.
4-4
Page 80

Resolving Problems | 4-5
Solving Operational Problems
If you can’t turn the printer on, if it stops printing unexpectedly, or if
nothing prints, check the following:
•
The printer is turned on and the
•
The printer is plugged securely into a working electrical outlet that’s not
controlled by a switch or timer.
•
If you’re using the RIP Station 5100, make sure the interface cable is
securely connected to the printer and RIP and the RIP is turned on.
Check the RIP Station 5100 User Guide for additional troubleshooting
solutions.
If none of these suggestions help, try the solutions below:
Operational problems
Problem Possible cause Solution
The printer stops
printing
unexpectedly.
The printer sounds
like it’s printing, but
nothing prints.
If the Pause light is flashing, the
printer is performing a maintenance
procedure or waiting for ink to dry.
An error has occurred. Check the display message and lights on the
The ink valve locks are closed. Open the ink valve locks, as shown below:
Open
Check the display message and lights on the
control panel. Wait until the Pause light stops
flashing.
control panel. Follow the instructions for the
message on page 2-5.
Operate
light is on.
Close
Open
Close
4-5
Page 81

4-6 | Resolving Problems
Operational problems (continued)
Problem Possible cause Solution
Nothing prints. The printer is not connected
correctly.
Your PPD (PostScript printer
description) and/or printer driver
software are not set up correctly.
The printer port setting doesn’t
match the printer connection port
(Windows).
Turn off the printer and RIP or computer. Make
sure the interface cable is securely plugged in.
Make sure the interface cable meets the
required specifications. See Appendix B or C or
the RIP Station 5100 Getting Started guide.
If you’re not using a RIP, make sure the interface
cable is directly connected to the computer
without passing through a printer switching
device, Zip
If you are using Windows NT 4.0, try uninstalling
the EPSON printer port. Click Start, point to
Programs and EPSON Printers, then click
EPSON Printer Port Uninstall. Follow the
messages on the screen.
Make sure your software is installed correctly
and the RIP is selected.
Click Start, point to Settings and select Printers.
Right-click EPSON Stylus Pro 9000 or 9500,
then select Properties. Click the Details tab.
Make sure your printer driver is selected in the
Print using the following driver list. Then select
the port to which your printer is connected in the
Print to the following port list.
™
drive, or extension cable.
The printer driver doesn’t have
enough available memory
(Macintosh).
To increase the available memory in your
Macintosh, select Control Panel from the Apple
menu and double-click the Memory icon. You
can increase the size of virtual memory to
increase total available memory. Also, quit all
unnecessary applications.
4-6
Page 82

Solving Miscellaneous Printing Problems
If your printouts are not what you expected, try the suggestions below:
Miscellaneous printing problems
Problem Possible cause Solution
Resolving Problems | 4-7
Your print has incorrect or
garbled characters.
Your print has incorrect
margins.
Your PPD and/or printer driver
software are not set up correctly or not
selected.
You have stalled print jobs. Clear any stalled print jobs from Monitor3
The printer is not connected correctly. Turn off the printer and RIP or computer.
Page size or paper size are not set
correctly in your application.
Paper size is not set correctly in your
print options.
Paper is loaded incorrectly. Reload paper, aligning it correctly with
Make sure your software is installed
correctly and the RIP or printer is
selected.
(Macintosh) or the Progress Meter or
Spool Manager (Windows).
Make sure the interface cable is securely
plugged in at both ends.
If you are using Windows NT 4.0, try
uninstalling the EPSON printer port. Click
Start, point to Programs and EPSON
Printers, then click EPSON Printer Port
Uninstall. Follow the messages on the
screen.
Check the settings in your application.
Make sure they are within the printer’s
printable area.
Make sure the Paper Size setting in your
print options is correct for the paper
you’re using.
the row of holes in the printer. See
Chapter 1 for instructions.
The ROLL MARG (roll paper margin)
setting on the control panel is
incorrect.
Your image is inverted. The Flip Horizontal or Mirror setting
is selected in your print options.
4-7
If you’re using roll paper, check the
setting for ROLL MARG on the Printer
Setting Menu. See page 2-8 for more
information.
Turn off the setting. See your RS 5100
User Guide or page B-15 (Macintosh) or
C-18 (Windows) in this manual for
instructions.
Page 83

4-8 | Resolving Problems
Miscellaneous printing problems (continued)
Problem Possible cause Solution
Blank paper is printed. Your PPD and/or printer driver
software are not set up correctly or not
selected.
Paper size is not set correctly in your
print options.
You have selected Sheet, but you’re
using roll paper.
A ruled line on your print
appears to shift.
The bottom edge of your
print is smeared.
Color images print in black
only.
The print head is out of alignment. Align the print head as described on
The paper is curled toward the
printable side.
Print options are set incorrectly for the
media you’re using (for EPSON media).
You’re using the wrong paper
configuration setting (for non-EPSON
media).
The platen gap setting is incorrect. Use the control panel to change the
Your PPD and/or printer driver
software are not set up correctly or not
selected.
Make sure your software is installed
correctly and the RIP or printer is
selected.
Make sure the Paper Size setting in your
print options is correct for the paper
you’re using.
Make sure your Paper Source or Media
Option settings are correct.
page 3-3.
Flatten the paper or curl it toward the
other side.
Make sure the Print Mode or Media
Type setting is correct for the media
you’re printing on.
Use the control panel to register and
select your paper thickness. See
page 1-25 for instructions.
setting from AUTO to WIDE. See
page 1-20 for instructions.
Make sure your software is installed
correctly and the RIP or printer is
selected.
The printer continues to
feed paper after you have
cancelled a job.
Black printing is selected in your print
options.
The printer still has print job data in its
buffer.
4-8
Make sure color printing is selected.
Press the Pause button on the printer. If
you’re using the RIP, wait until it is idle.
Then press and hold the Pause button to
reset the printer.
Page 84

Miscellaneous printing problems (continued)
Problem Possible cause Solution
Resolving Problems | 4-9
Printing is too slow. The resolution or print quality setting in
your print options is too high.
Your system doesn’t have enough
resources.
You’re using background printing on a
Macintosh.
You’re not using ECP or Enhanced
mode and/or DMA transfers
(Windows).
Solving Paper Problems
If paper feed or paper jam problems occur frequently, try one or more of the
following solutions:
Choose a lower resolution for faster
printing.
Clear space on your hard drive or run a
defragmentation utility.
Don’t run too many applications at the
same time.
Turn off virtual memory.
Add RAM to your system.
If you’re using the EPSON driver, select
EPSON Monitor3 and increase its
memory requirements.
Turn off background printing.
If your computer supports ECP or
Enhanced mode and/or DMA transfers,
turn them on to speed up printing. See
your computer documentation and
page C-30 for more information.
•
When you’re loading roll paper, make sure you line up the edge with the
row of holes on the printer. Always turn the roll back to remove the
slack. See page 1-12 for more information.
•
If you’re not using a roll of paper that’s installed in the printer, secure it
with the roll paper belt. See page 1-9 for more information.
•
Make sure the paper is not folded, wrinkled, or damp.
•
Make sure the printer’s environment falls within the required
temperature and humidity range.
•
Make sure the paper is not too thick or too thin. See pages 1-1 and 5-2
for paper specifications.
•
Make sure no foreign objects are inside the printer.
4-9
Page 85

4-10 | Resolving Problems
•
Make sure the printer isn’t located in a brightly lit area. The paper
sensor may not be able to operate correctly.
Caution
Use the paper guides only
if paper is curled and
doesn’t feed properly.
Otherwise, the paper
guides may damage
your prints.
•
Make sure the
Print Mode
Media Type
or
setting is correct for the
media you’re printing on.
•
Make sure the platen gap setting is correct for the paper or media you’re
printing on. See page 1-20 for more information.
•
If you’re not using EPSON media, make sure you register and select
your paper’s thickness. See page 1-25 for more information.
Solving Roll Paper Feed Problems
If your roll paper is curled too tightly and doesn’t feed out of the printer, you
can use the three paper guides. Extend the guides as shown below:
4-10
Page 86

Resolving Problems | 4-11
•
If you have the paper hammock set up in front of the printer, extend the
paper guides out so they rest on the front of the hammock.
•
If you have the paper hammock set up below the printer, extend the
paper guides so that they rest on the back of the hammock.
4-11
Page 87

4-12 | Resolving Problems
Clearing Paper Jams
When paper gets jammed in the printer, printing stops and you see a
JAM
message on the control panel display. Follow these steps to clear paper
PAPER
jams:
1. If roll paper is jammed, cut it by hand at the paper slot.
2. Pull the paper set lever all the way up to release the jammed paper.
3. Open the lower cover if necessary.
4-12
Page 88

Resolving Problems | 4-13
Note
If you have two rolls of
paper installed, make
sure you secure the roll
that you are not using
with the roll paper belt.
See page 1-9 for more
information.
4. Carefully pull down the jammed paper.
TURN PWR OFF AND ON
is
displayed on the control panel.
5. Close the lower cover, if necessary, then press the
Power
button to turn
the printer off. Press it again to turn it back on.
6. Make sure the
Paper Out
light is on and
LOAD PAPER
is displayed on
the control panel. Then reload your paper.
7. If you’re not going to continue printing, make sure the print head is in
the home (far right) position, as shown below. If it’s not, turn the
printer on, wait until the print head moves to the home position, then
turn off the printer.
Caution
If the print head is not
left in the home position,
print quality may decline.
print head
4-13
Page 89

4-14 | Resolving Problems
4-14
Page 90

Ch
apter 5:
Specifications
Printing
Printing method On-demand ink jet
Nozzle configuration Black: 64 nozzles
Color: 64 nozzles for each color (cyan,
magenta, yellow, light cyan, light magenta)
Printable columns
Character mode 10 characters per inch, 437 columns
Raster graphics mode 360 dpi: 15,762 available dots
720 dpi: 31,524 available dots
1440 dpi: 63,048 available dots
Maximum printable width 43.76 inches on 44-inch paper
×
Maximum resolution 1440 dpi
Engine reliability
Total print volume 18,000 B1 images, 30% coverage
Print head life Two billion dots per nozzle
Periodic maintenance Waste ink system requires replacement after
approximately 12,000 sheets (parts and labor
not covered under warranty)
720 dpi
Cutter blade life Approximately 2,000 B1 sheets
(EPSON media up to 4.33 mil thick)
Print direction Bidirectional or unidirectional
(user-selectable)
®
Control code ESC/P
Line spacing 1/6 inch or programmable
in 1/360-inch increments
Paper feed speed 200 ± 10 milliseconds per 1/6-inch line
RAM 18MB
Character sets EPSON Courier 10 characters per inch
1
Raster
Page 91

5-2 | Specifications
Paper
Cut sheet paper specifications
Dimensions in
Size
Super B0 44 × 62.2 1118 × 1580 3.15 to 19.7 mil
B0 40.5 × 57.3 1030 × 1456
Super A0 36 × 50.9 914 × 1292
A0 33 × 46 841 × 1189
US E 34 × 44 864 × 1118
B1 28.7 × 40.5 728 × 1030 3.15 to 59 mil
US D 22 × 34 559 × 864
A1 23.4 × 33 594 × 841
B2 20.25 × 28.75 515 × 728
A2 16.5 × 23.4 420 × 594
Super A3/B 13 × 19 329 × 483
US C 17 × 22 432 × 559
B3 14.3 × 20.25 364 × 515
US B (ledger) 11 × 17 279 × 432
A3 11.7 × 16.5 297 × 420
inches (approximate)
Dimensions in
millimeters
Thickness
(0.08 to .5 mm)
(0.08 to 1.5 mm)
Roll paper specifications
Maximum roll
diameter
When using 2 rolls 5.90 in. (150 mm) 13 to 44.02 in.
When using 1 roll 4.05 in. (103 mm)
Width Thickness
3.15 to 19.7 mil
330 to 1118 mm
(0.08 to 0.5 mm)
Depending on the media, feed and print quality are guaranteed on paper
thicknesses of 3.15 to 4.33 mil (0.08 to 0.11 mm), 64 to 90 gsm.
Poor quality paper may reduce print quality and cause paper jams or other
problems. If you encounter problems, switch to a higher grade of paper.
Do not use curled, folded, or deckle-edge paper.
5-2
Page 92

Printable Area
Minimum margins for roll paper and cut sheets:
.12” (3 mm)
Specifications | 5-3
.12” (3 mm)
* Default roll paper top and bottom margins are .59 inches (15 mm). You can set
all margins to .12 inches (3 mm) or .59 inches (15 mm) using the control panel.
See page 2-8 for instructions.
.12” (3 mm)
.12” (3 mm) roll paper*
.55” (14 mm) cut sheets
Environmental
Transit (stored in
Operation Storage
Temperature 50 to 95 °F
(10 to 35 °C)
Humidity
(without
condensation)
20 to 80% RH 20 to 85% RH 5 to 85% RH
–4 to 104 °F
(–20 to 40 °C)
(1 month at 104 °F)
shipping container)
–4 to 140 °F
(–20 to 60 °C)
(120 hours at 140 °F)
Mechanical
Height 49.57 inches (1259 mm)
Width 66.46 inches (1688 mm)
Depth 27.52 inches (699 mm)
Weight 211.64 lb (96 kg), without ink cartridges
Paper feed method Friction
Paper path Roll paper or cut sheets with manual insertion
5-3
Page 93

5-4 | Specifications
Electrical
120 V model 220/240 V model
Input voltage range 90 to 132 V 208 to 264 V
Rated frequency range 50 to 60 Hz 50 to 60 Hz
Input frequency range 49 to 61 Hz 49 to 61 Hz
Rated current 1.0 A 0.5 A
Power consumption Approx. 100 W (ISO 10561 letter pattern)
30W or less in standby mode
This product is also designed for IT power systems with phase to phase
voltage 220–240V. Check the label on the back of the printer for voltage
information.
Initialization
Hardware initialization at power on:
The printer mechanism is set to its initial state.
The input data buffer and print buffer are cleared.
The printer returns to the last default settings.
Software initialization when the ESC@ (initialize the printer)
command is received:
The print buffer is cleared.
The printer returns to the last default settings.
Panel button initialization by pressing the
Pause
button on the
control panel for 3 seconds or more:
The print head is capped.
Any paper in the printer is ejected.
The input data buffer and print buffer are cleared.
The printer returns to the last default settings.
Safety Approvals
Safety standards UL 1950, CSA 22.2 No. 950
EMC FCC part 15 subpart B class B, CSA C108.8 class B
5-4
Page 94

Specifications | 5-5
Ink Cartridges
Print yield
graphic arts ink Approx. 28 pages/A0 (720 dpi, 40% duty)
Approx. 6,400 pages/A4 (360 dpi, 5% duty)
archival ink Approx. 30 pages/A0 (720 dpi, 40% duty)
Approx. 7,400 pages/A4 (360 dpi, 5% duty)
Cartridge life
graphic arts ink 2 years from production date
archival ink 2 years from production date if unopened; within
6 months after opening package, at 77 °F (25 °C)
Te m p e r a t u r e
Storage (uninstalled) –22 to 104 °F (–30 to 40 °C) 1 month at 104 °F
Storage (installed) –4 to 104 °F (–20 to 40 °C) 1 month at 104 °F
Transit –22 to 140 °F (–30 to 60 °C)
1 month at 104 °F, 120 hours at 140 °F
Freezing 5 °F (–15 °C); ink thaws and is usable after at
least 3 hours at 77 °F (25 °C)
Dimensions
Width 0.99 in. (25.1 mm)
Depth 10.24 in. (260.0 mm)
Height 4.15 in. (105.3 mm)
Weight Approximately 0.82 to 0.85 lb (370 to 385 g)
Capacity 7.4 oz (220 ml)
Print yield may vary, depending on how often you run print head cleaning
cycles and how much you use the printer. Yield of the initial cartridge set is
reduced because of ink charging.
5-5
Page 95

5-6 | Specifications
Parallel Interface
Forward Channel
Data format 8-bit parallel, IEEE-1284 compatibility mode
Synchronization STROBE
pulse
Handshake timing BUSY and ACKNLG
Signal level TTL compatible
Connector 57-30360 Amphenol connector or equivalent
signals
Reverse Channel
Transmission mode IEEE-1284 Nibble mode
Adaptable connector 57-30360 Amphenol connector or equivalent
Synchronization Refer to the IEEE-1284 specification
Handshaking Refer to the IEEE-1284 specification
Signal level IEEE-1284 Level 1 device
Data transmission timing Refer to the IEEE-1284 specification
ECP Mode
Transmission mode IEEE-1284 ECP mode
Adaptable connector 57-30360 Amphenol connector or equivalent
Synchronization Refer to the IEEE-1284 specification
Handshaking Refer to the IEEE-1284 specification
Signal level IEEE-1284 Level 1 device
Data transmission timing Refer to the IEEE-1284 specification
5-6
Page 96

Specifications | 5-7
Serial Interface (RS-423 Standard)
Standard Based on RS-423
Synchronization Synchronous
Bit rate Approx. 1.8M bps
Handshaking X-ON/X-OFF and DTR protocol
Word format Data bit: 8 bits
Parity bit: None
Start bit: 1 bit
Stop bit: 1 bit
Connector 8-pin mini-circular connector
®
Recommended cable ImageWriter
(preferably Belkin brand)
II cable
5-7
Page 97

5-8 | Specifications
5-8
Page 98

Appendix A:
Installing an
Interface Card
Warning
To prevent electric shock
and avoid damaging the
printer, do not install an
interface card when the
printer is turned on or
connected to an electrical
outlet.
If you have the RS 5100 or another RIP, you connect it to the printer using
the built-in parallel interface. For connectivity without a RIP, you can install
one of the following cards:
•
EpsonNet Internal Print Server (10BaseT / 100BaseTX) — C823632A
•
EPSON FireWire Interface Card (Type B IEEE 1394) — C823722
Before you install the card, see the documentation that came with it for
setup information. Then follow these steps:
1. Make sure the printer is turned off and the power cord is unplugged.
1
Page 99

A-2 | Installing an Interface Card
2. Use a Phillips-head (+) screwdriver to remove the two screws securing
the shield plate to the back of the printer. Then lift off the plate.
Be sure to keep the screws so you can use them if you re-install the shield
plate.
3. Make sure you set any jumpers or DIP switches on the card. See the
card’s documentation for details.
On the FireWire card, make sure DIP switch 10 is set to
ON
mode).
4. Slide the interface card along the slots on both sides of the
compartment. Push it in firmly to fully insert the connector into the
printer’s internal socket.
A-2
(advanced
Page 100

Installing an Interface Card | A-3
5. Secure the interface card in the slot with the two screws included with
the card.
6. Make sure the printer has been turned off using the
Power
button.
Then plug in the power cord.
7. To initialize the EpsonNet Internal Print Server, turn on the printer
while holding down the status sheet button on the card for about
5 seconds.
8. Connect the appropriate cable to the card and to your network hub or
computer.
To remove an interface card, turn off the printer, unplug the power cord,
and follow the above steps in reverse order.
Before you can use the EpsonNet Internal Print Server, you must configure
it for your network protocols and operating system. See the EpsonNet
Internal Print Server Administrator’s Manual for instructions.
Before you can print, you must install the printer software, as described on
page B-3 (Macintosh) or page C-2 (Windows).
A-3
 Loading...