

Page 1
Contents
Contents
Welcome! 1
Everything You Need for Photo-Quality Prints 1
What Is Your Printer Software? 1
What Is EPSON Digital PhotoLab? 1
Printer Setup 2
Unpack the Printer 2
Attach the Paper Support 3
Install the Ink Cartridges 3
Connect the Printer to Your Computer 5
Load Paper 6
Install the Software 7
Register Your Printer 15
EPSON Digital PhotoLab 15
Navigating Through EPSON Digital PhotoLab 16
What Do You Get with EPSON Digital PhotoLab? 18
Print a Page in Windows 19
Print a Page in Macintosh 23
Problems? Need Help? 27
iii
Page 2

Welcome!
Welcome!
Your EPSON Stylus® Photo 700 is the ideal printer for optimum photo-quality
printing—print any image from your favorite photos to letters and everyday
documents.
Everything You Need for Photo-Quality
Everything You Need for Photo-Quality
Prints
Prints
The EPSON Stylus Photo 700 CD-ROM includes all the software you need for
photo-quality output: your printer software and EPSON Digital PhotoLab™.
What Is Your Printer Software?
To print, you need some printer software (also known as a printer driver) to tell the
printer how to print. This software is what you use to select settings that control the
look of your documents. A step-by-step guide to printing starts on page 19 for
Windows® and on page 23 for Macintosh®.
What Is EPSON Digital PhotoLab?
To help you get the most out of your printer, EPSON Digital
PhotoLab includes award-winning photo-editing, photoorganizing, and photo-layout software. This creative software
collection is described in more detail on page 15.
1
Page 3
Printer Setup
Printer Setup
Setting up your printer is easy. Just follow the simple steps on the following pages.
Before you set up your printer, make sure your system meets the requirements
listed in the Introduction of your User’s Guide.
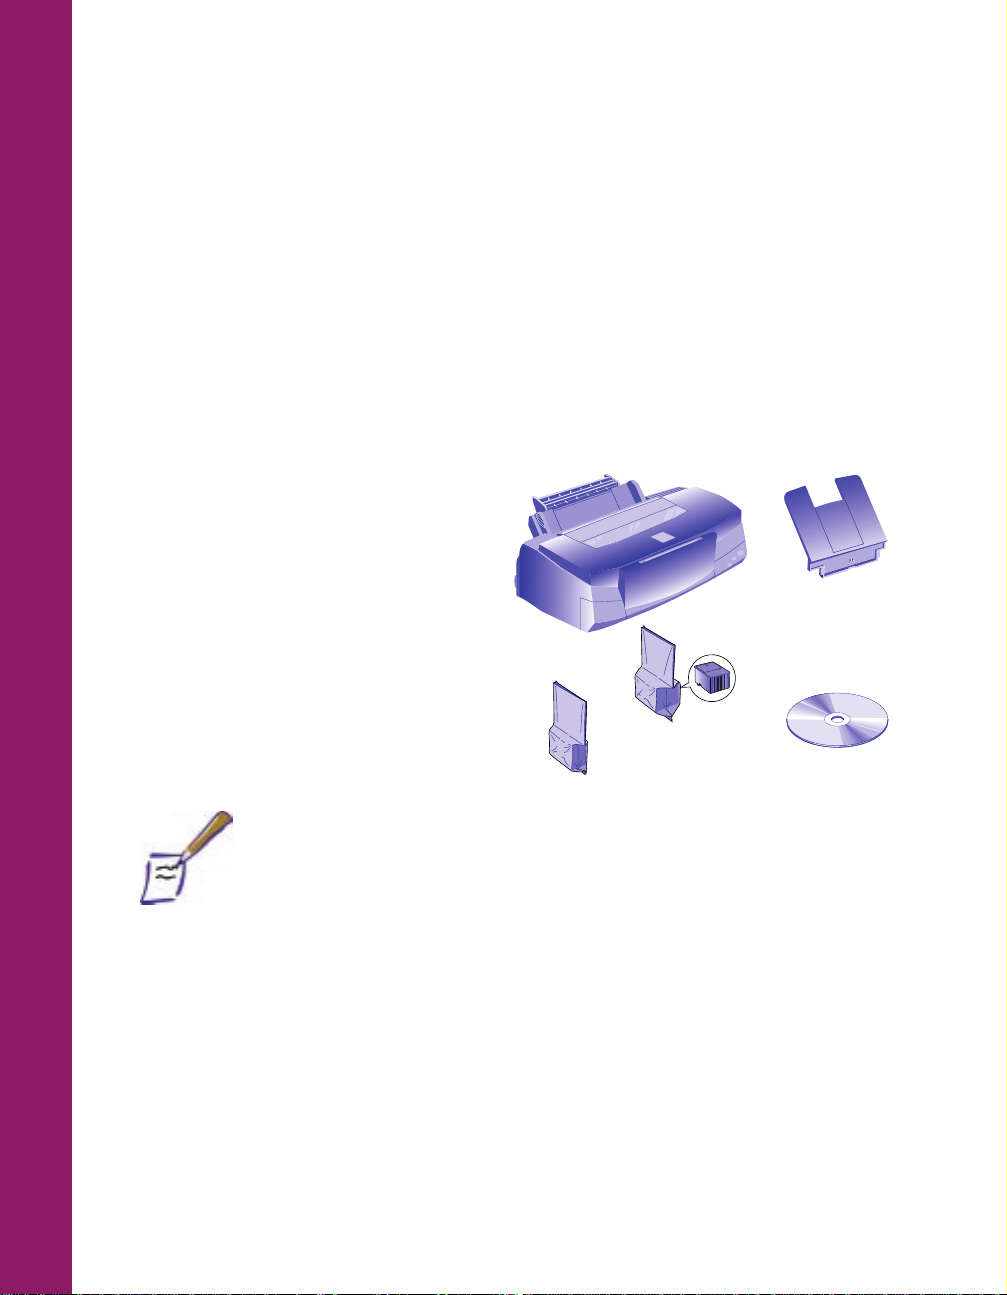
1 Unpack the Printer
Remove any packing material from the printer. See the Notice Sheet in the box for
details. Save all the packaging so you can use
it if you need to transport the printer later.
You need the following items to
set up your printer:
■
Your printer and paper support
■
Ink cartridges (black and color)
■
CD-ROM with your printer
printer
color ink
cartridge
paper support
software and EPSON Digital
PhotoLab
■
Printer cable (not included)
Note:
To connect to a PC, you’ll need a shielded, twisted-pair parallel printer
cable (6 to 10 feet long). To connect to a Macintosh, you’ll need an
Apple® System Peripheral-8 cable (Belkin brand recommended).
black ink
cartridge
CD-ROM
(located on the back of
this guide)
Place the printer flat on a stable desk near a grounded outlet. Leave plenty of room
in back for the cables and enough room in front for opening the output tray.
Do NOT put the printer:
■
In an area with high temperature or humidity
■
In direct sunlight or dusty conditions
■
Near sources of heat or electromagnetic interference, such as loudspeakers
or cordless telephone base units.
2
Be sure to follow all the Safety Instructions in your User’s Guide.
Page 4
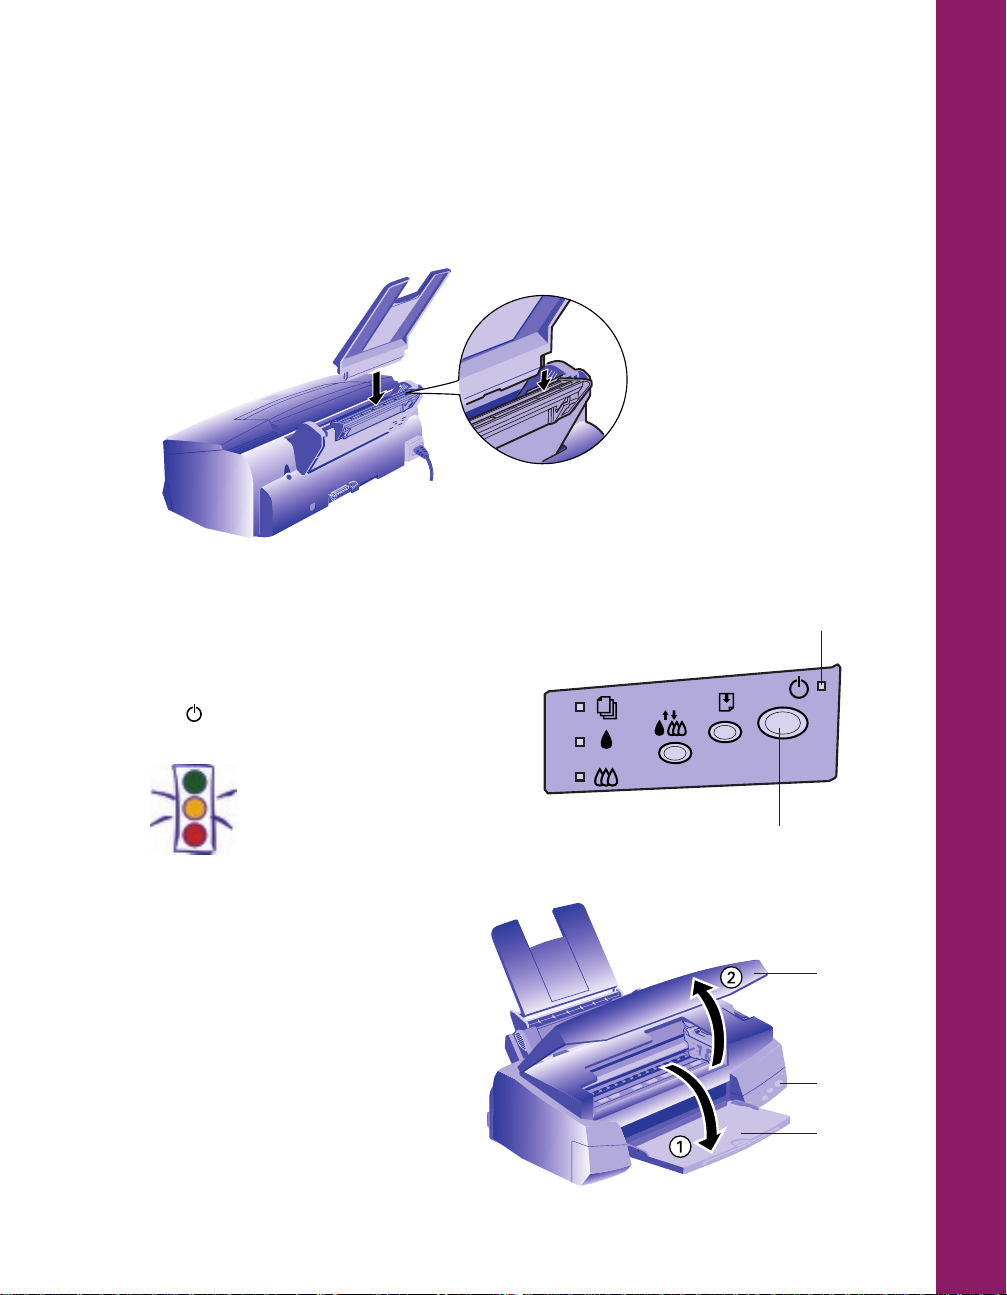
2 Attach the Paper Support
Insert the paper support in the top slot on the back of the printer.
3 Install the Ink Cartridges
1. Plug the power cord into a grounded outlet.
2. Make sure the power is off
(the power light is off).
Caution:
Don’t use an outlet controlled
by a wall switch or timer, or
one that uses the same
circuit as a large appliance.
This may disrupt the
power, which can erase
memory or even
damage the power
supply.
3. Lower the output tray and open
the printer cover.
power light
power button
printer
cover
power
button
output
tray
3
Page 5
4. Press the power button to turn on the printer. The power light flashes, the
black and color ink out lights come on, and the ink cartridge holders move
left to the installation position.
Caution:
Always use the power button to turn the printer on or off. Never use
an external switch—such as a power strip—to turn off the printer.
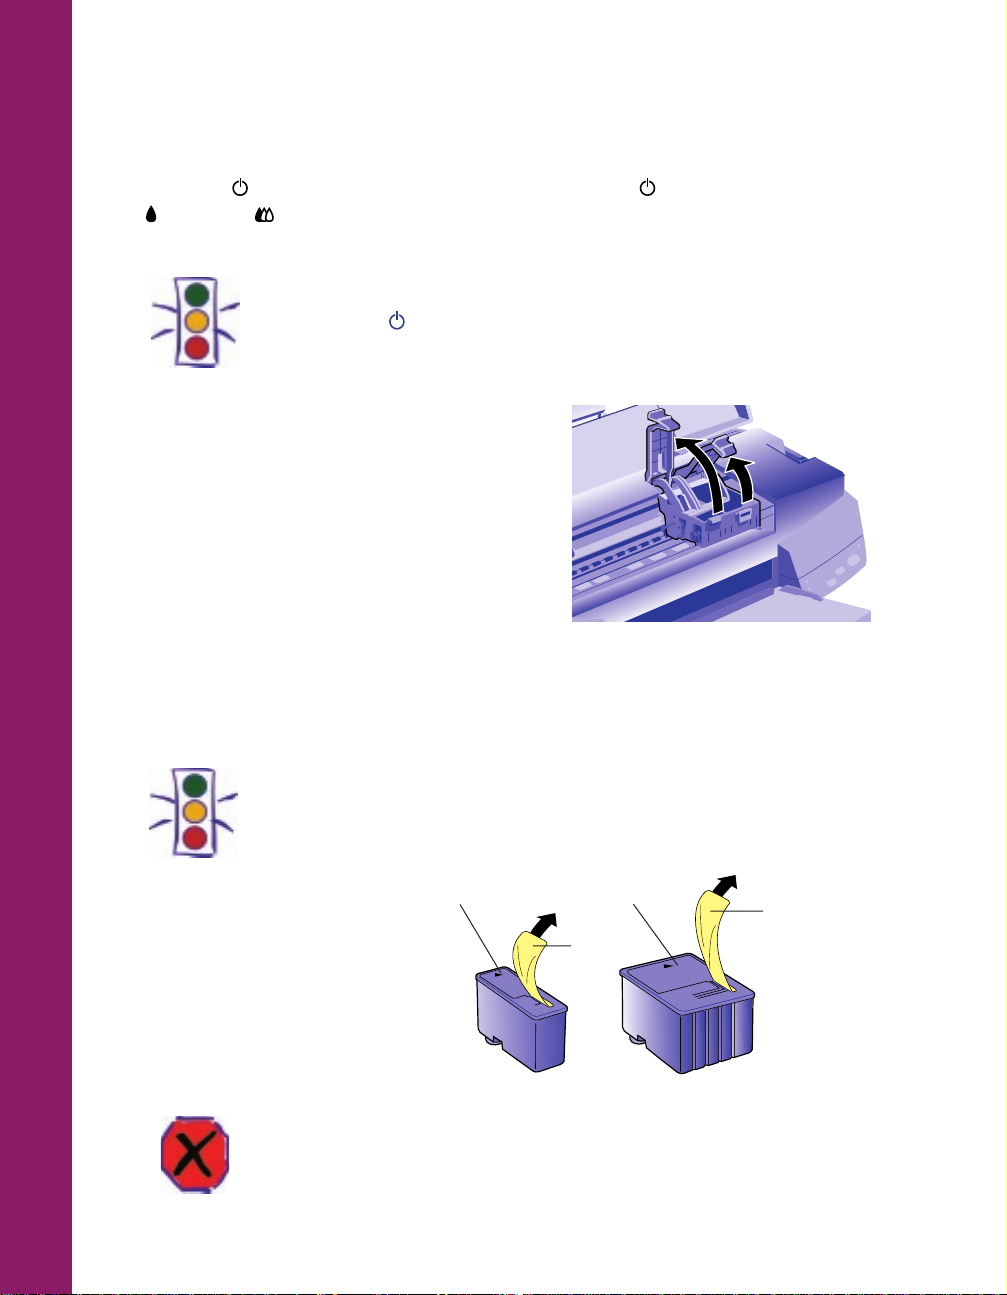
5. Lift the two ink cartridge clamps.
6. Remove the ink cartridges from their foil packages. Then remove only the
yellow part of the tape seal on the top of each cartridge. Do not remove the
white part.
4
Caution:
You must remove the yellow tape seal from the top of the cartridge or
you will permanently damage it. It’s OK if the tape does not tear off
exactly along the dotted line. Do not try to remove the clear seal from
the bottom.
Warning:
If ink gets on your hands, wash them thoroughly with soap and water. If
ink gets in your eyes, flush them immediately with water.
don’t remove
black ink cartridge
don’t remove
remove
remove
color ink cartridge
Page 6
7. Insert the ink cartridges into their holders. Be sure the labels are face up and
the arrows point toward the back of the printer. The black ink cartridge goes on
the left and the color ink cartridge goes on the right.
8. Push down the clamps until they lock in place.
9. Press the cleaning button and close the printer cover.
The printer moves the print head and begins charging the ink delivery system.
Charging can take two to four minutes. During this time, the power light
flashes, and the printer makes various sounds. Don’t turn off the printer or
interrupt the charging process or you’ll use more ink than necessary. Charging
is complete when the power light stops flashing and stays on.
Caution:
Never turn off the printer when the power light is flashing. But if the
light is still flashing after five minutes and the printer isn’t moving or
making noise, you may turn off the printer.
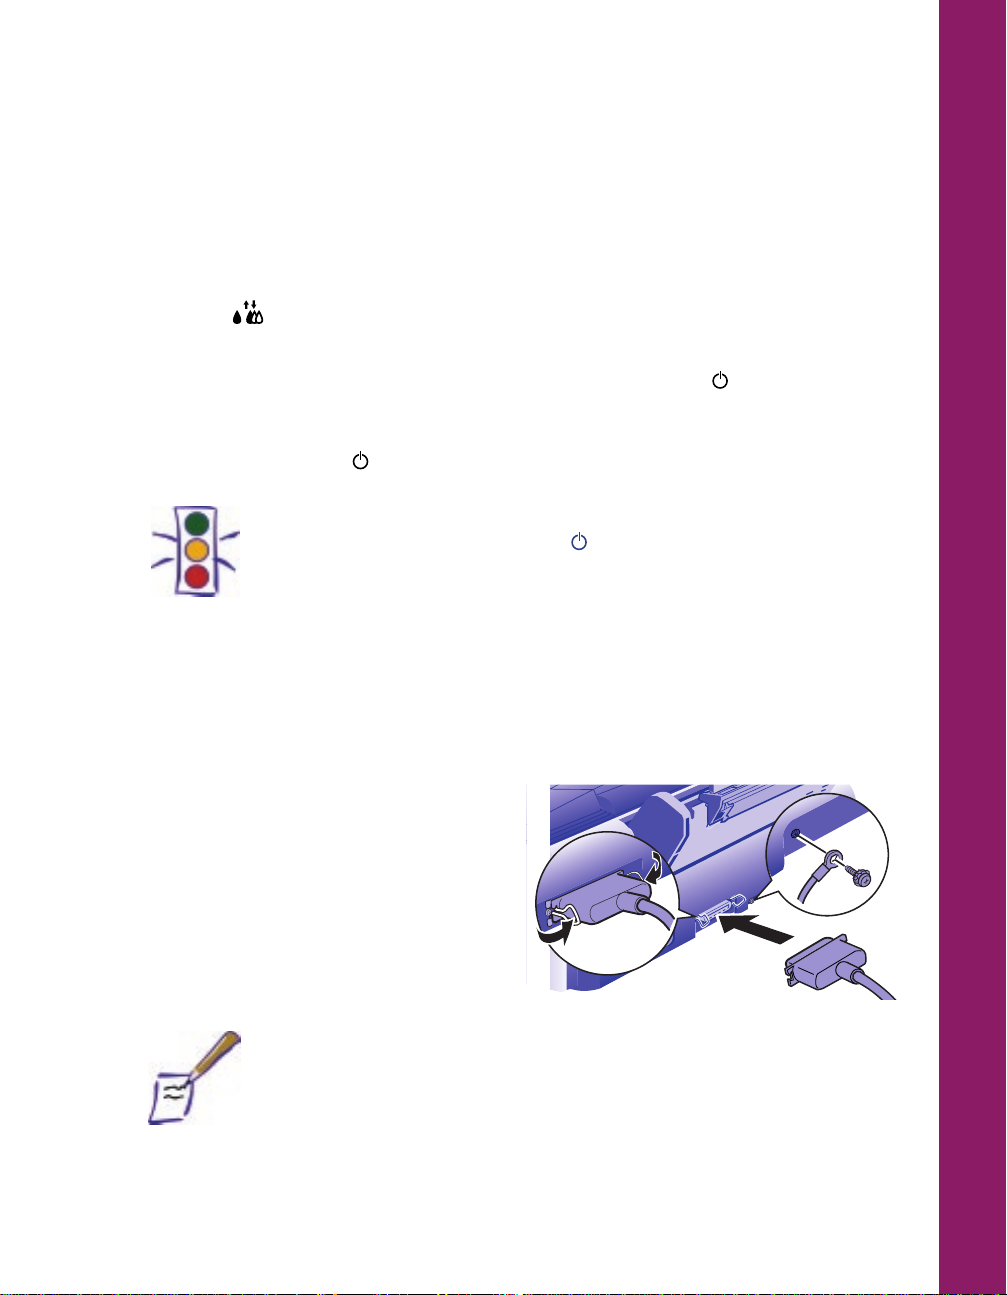
4 Connect the Printer to Your Computer
Connecting to a PC
1. Turn off the printer and your computer.
2. Connect the cable to the printer’s
parallel interface; then squeeze the
wire clips together to lock them in
place. (If your cable has a ground
wire, connect it now.)
3. Connect the other end of the cable to
your computer’s parallel port and
secure it as necessary.
Note:
The printer is automatically assigned to parallel port LPT1; if you want to
use a different port, see your Windows documentation for instructions.
5
Page 7
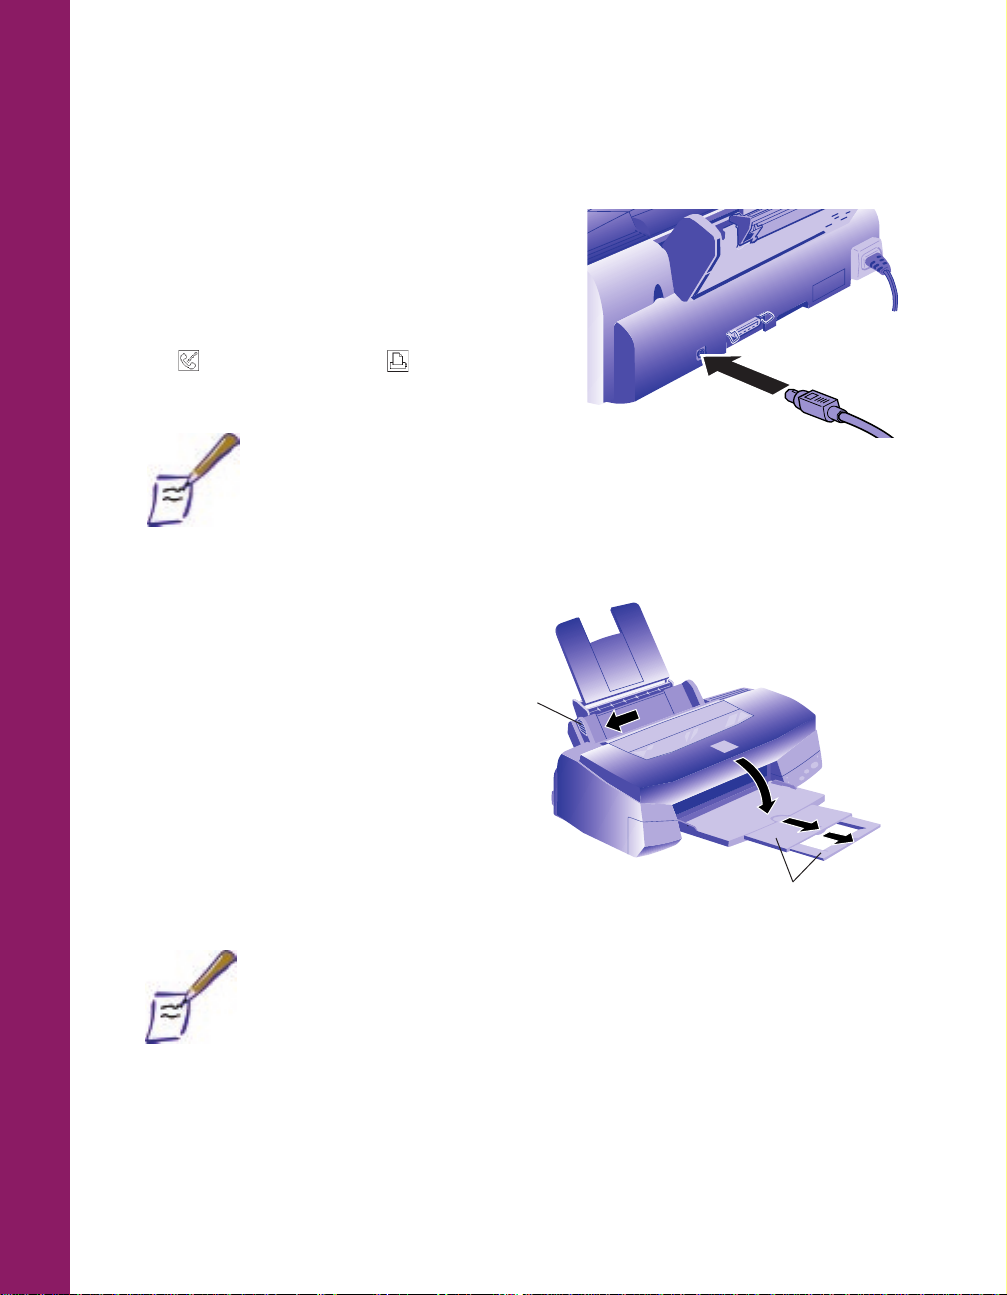
Connecting to a Macintosh
1. Turn off the printer and your Macintosh.
2. Connect the cable to the serial connector on
the back of the printer.
3. Connect the other end of the cable to either
the modem port or the printer port on
your Macintosh.
Note:
If you’re using a PowerBook™ with a combination printer/modem port,
use that port and select modem in the Chooser. Make sure AppleTalk® is
inactive before turning on the printer.
5 Load Paper
1. Slide the left edge guide all the
way to the left and pull out
the output tray extensions.
2. Fan a stack of plain paper
and then even the edges.
left edge
guide
6
3. Load the stack with the
printable surface face up.
Push the paper against the
right edge guide.
output tray
extensions
Note:
Don’t load paper above the arrow mark inside the left edge guide.
Keep unused paper in its original packaging and store it in a cool, dark
place.
Page 8
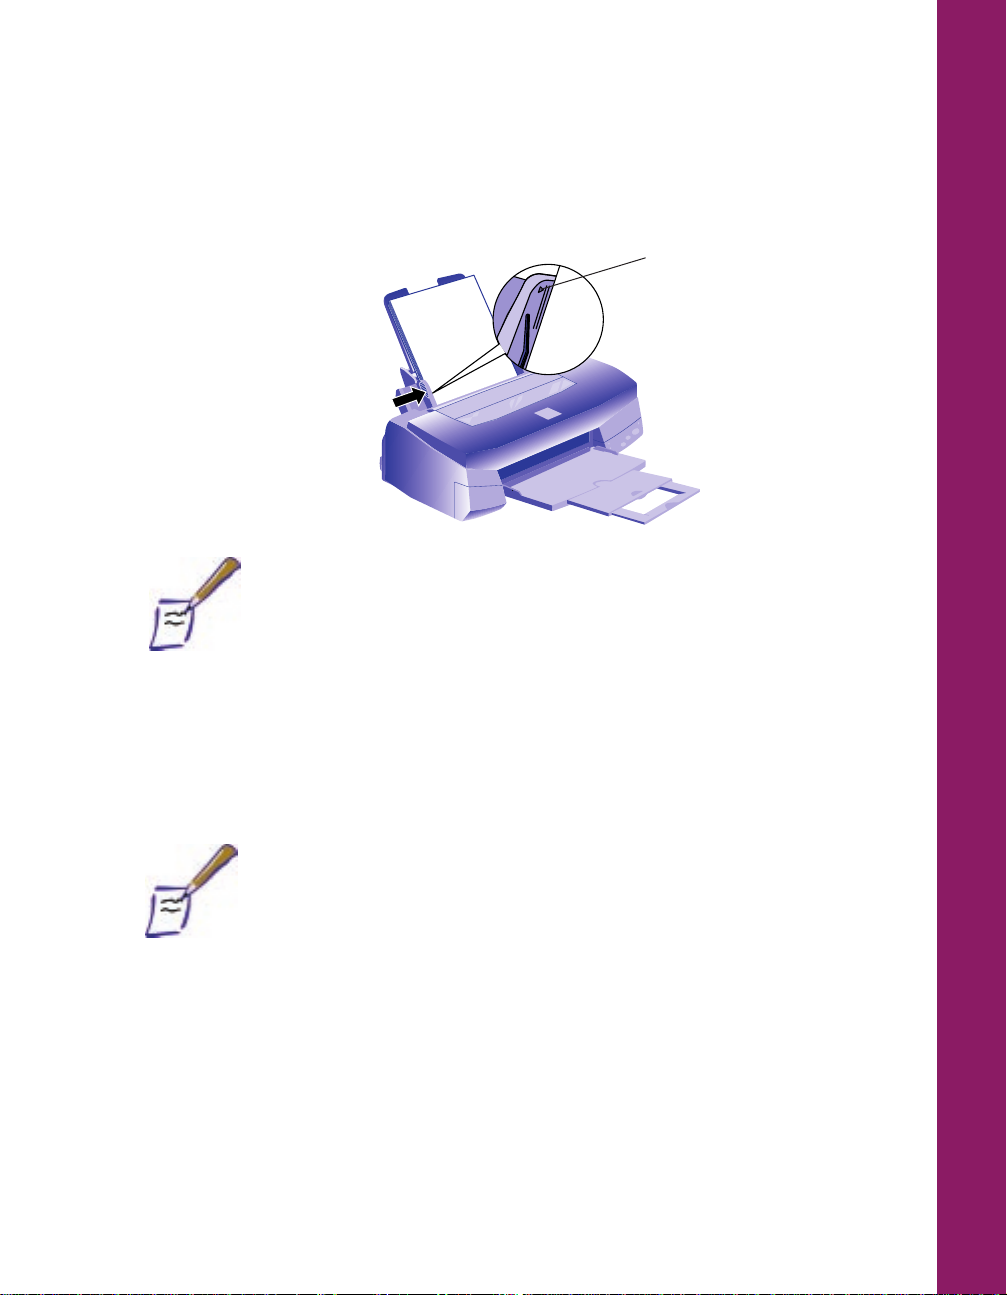
4. Slide the left edge guide against the paper stack.
Don’t load paper
above this mark.
Note:
If you like, you can run a test on your printer to see how it’s working.
Follow the steps in Chapter 6 of your User’s Guide.
6 Install the Software
Your EPSON Stylus Photo 700 CD-ROM includes printer software (also called a
printer driver) and EPSON Digital PhotoLab for both Windows and Macintosh. You
must install the printer software for the printer to work correctly.
Note:
If you don’t have a CD-ROM drive, you can use another computer
with a CD-ROM drive to make printer driver diskettes. See page 29 for
instructions. You can also order the printer driver software on diskettes
(see the inside back cover for instructions) or download it from
http://www.epson.com.
You need a CD-ROM drive to install and use EPSON Digital PhotoLab; it
is not available on diskettes.
7
Page 9
Installing the Software for Windows 95 or Later
1. Make sure your printer is connected to the computer and that both are
turned off.
2. Turn on your computer, but leave your printer turned off. Make sure
Windows 95 is running (you should see the Windows Desktop icons).
3. Insert the EPSON Stylus Photo 700 CD-ROM or diskette 1 if you’re using
diskettes.
If Windows 95 launches the installation program automatically, you see the
EPSON Setup CD window. Go to step 4.
If it doesn’t launch automatically, click Start, select Run, and type D:\Setup700
(substitute the correct drive letter if it is not D). Then click OK. You see the
EPSON Setup CD window. Go to step 4.
If you are installing from diskettes, type A:\SETUP (substitute the correct drive
letter if it is not A). Then click OK. Go to step 5.
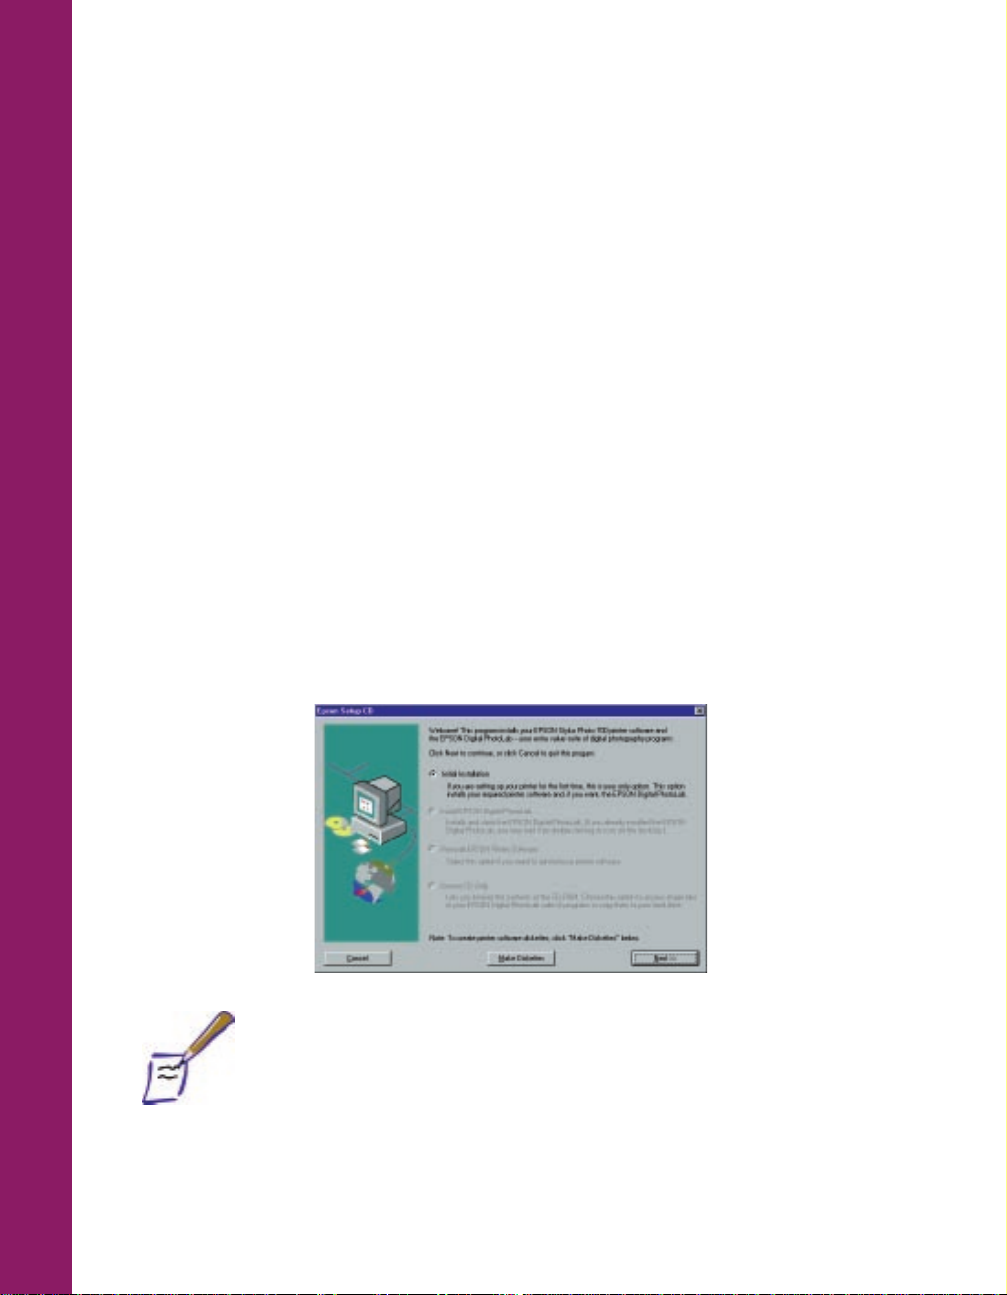
4. At the EPSON Setup CD window, make sure Initial Installation is selected and
click Next.
8
Note:
If you are installing the software for the first time, Initial Installation is
your only option. If you are reinstalling the software, you can select
Install EPSON Digital PhotoLab or Reinstall EPSON Printer Software.
If you click Exit Setup during the installation, you skip the EPSON Digital
PhotoLab installation and proceed directly to the printer software
installation.
Page 10
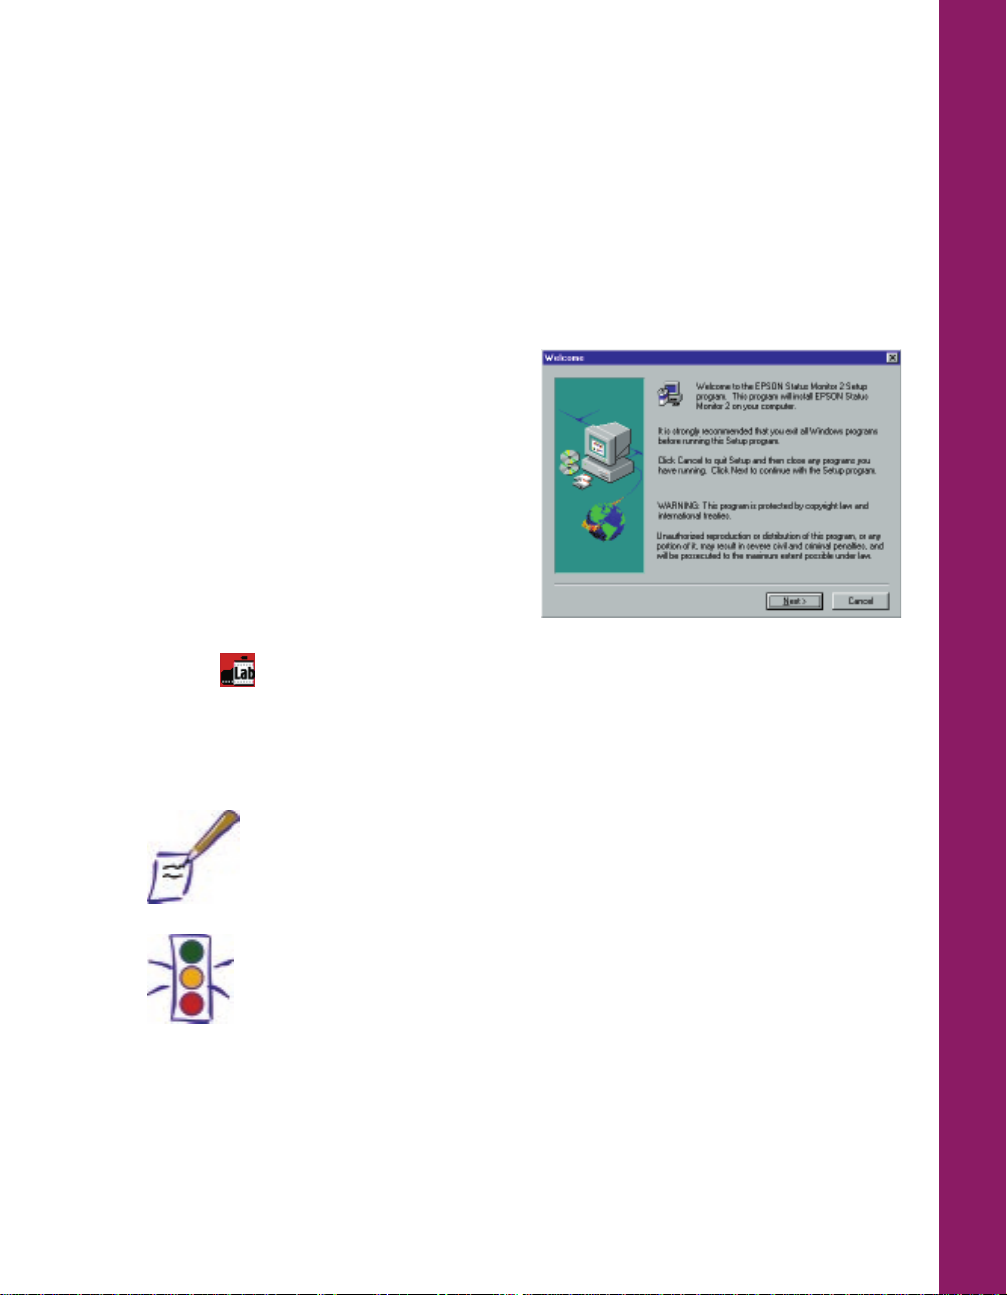
5. Follow the instructions on screen to install the software. EPSON Digital
PhotoLab is installed first. Click Finish when that installation is complete. At the
next screen, click OK to install your printer software and Status Monitor. (There
may be a brief pause before the installation begins; if you are installing the
software from diskettes, only the printer software and Status Monitor are
installed.)
Be sure to click Next to install the
Status Monitor. When the installation is
complete, you must reboot your
computer for the Status Monitor to take
effect.
Your printer software and EPSON
Digital PhotoLab icons appear in the
EPSON folder and an icon for your
printer appears in the Printers folder.
The EPSON Stylus Photo 700 printer is
set as your default Windows printer.
An icon for EPSON Digital PhotoLab also appears on your desktop. To
launch this program, double-click the icon. For details about EPSON Digital
PhotoLab, see page 15.
6. Turn your printer on.
Note:
If your computer is on a network and the printer is connected to a
remote server, you now need to set up the computer as a client. See
Appendix A of your User’s Guide for instructions.
Caution:
If you’re setting up your computer for the first time, you may see a
message asking if you want to install a printer. Be sure to select Cancel
and complete your Windows 95 setup.
If at any time you see the New Hardware Found screen and Windows 95
asks you to insert a driver diskette, always select Cancel. You can’t
install your software that way.
7. Continue with “Register Your Printer” on page 15.
9
Page 11

Installing the Software for Windows 3.1
1. Make sure your printer is connected to the computer and your computer is
turned on.
2. Make sure Windows Program Manager is running. Exit any open applications.
3. Insert the EPSON Stylus Photo 700 CD-ROM or diskette 1 if you’re using
diskettes.
4. From the Program Manager File menu, select Run.
5. If you are installing from the CD-ROM, type D:\Setup700, click OK, and continue
with step 6. If you are installing from diskettes, type A:\SETUP, click OK, and
continue with step 7. (If your drive uses a different letter, substitute it for
D or A.)
6. At the EPSON Setup CD Window, make sure Initial Installation is selected and
click Next.
10
Note:
If you are installing the printer software for the first time, Initial
Installation is your only option. If you are reinstalling the software, you
can select Install EPSON Digital PhotoLab or Reinstall EPSON Printer
Software.
If you click Exit Setup during the installation, you skip the EPSON Digital
PhotoLab installation and proceed directly to the printer software
installation.
Page 12

7. Follow the instructions on screen to install the software. EPSON Digital
PhotoLab is installed first. Click Finish when that installation is complete. At the
next screen, click OK to install your printer software. (There may be a brief
pause before the installation begins; if you are installing the software from
diskettes, only the printer software is installed.)
Your printer software icons and the EPSON Digital PhotoLab icon appear in the
EPSON program group and the EPSON Stylus Photo 700 is set as your default
Windows printer. To launch EPSON Digital PhotoLab, click this icon in the
EPSON program group. For details about this program, see page 15.
8. Continue with “Register Your Printer” on page 15.
Installing the Software for Windows NT® 4.0
If you’ve connected the printer to your Windows NT 4.0 print server, you need
to install the EPSON printer software on the server. Then set up the workstations
to share the printer. You don’t need to install the printer software on any
Windows NT 4.0 workstations if the printer software is installed on the server.
Note:
Check your Windows NT 4.0 documentation for instructions on sharing
the printer on workstations running other operating systems, such as
MS-DOS®.
1. Turn on the printer.
2. Turn on your computer and log on to Windows NT 4.0 with the appropriate
access privileges.
11
Page 13

3. Insert the EPSON Stylus Photo 700 CD-ROM or diskette 1 if you’re using
diskettes.
If Windows NT 4.0 launches the installation program automatically, you see the
EPSON Setup CD window. Go to step 4.
If it doesn’t launch automatically, click Start, select Run, and type D:\Setup700
(substitute the correct drive letter). Then click OK. You see the EPSON Setup
CD window. Go to step 4.
If you’re installing from diskettes, click Start, select Run, and type A:\SETUP.
Then click OK. Go to step 5.
4. At the EPSON Setup CD window, make sure Initial Installation is selected and
click Next.
12
Note:
If you are installing the printer software for the first time, Initial
Installation is your only option. If you are reinstalling the software, you
can select Install EPSON Digital PhotoLab or Reinstall EPSON Printer
Software.
If you click Exit Setup during the installation, you skip the EPSON Digital
Photolab installation and proceed directly to the printer software
installation.
Page 14

5. Follow the instructions on screen to install the software. EPSON Digital
PhotoLab is installed first. Click Finish when that installation is complete. At the
next screen, click OK to install your printer software. (There may be a brief
pause before the installation begins; if you are installing the software from
diskettes, only the printer software is installed.)
Your printer software icons appear in the EPSON folder and an icon for your
printer appears in the Printers folder.
An icon for EPSON Digital PhotoLab appears on your desktop. To launch this
program, double-click the icon. For details about the program, see page 15.
6. Follow the instructions in your Windows NT 4.0 documentation to set up the
workstations to share the printer.
7. Continue with “Register Your Printer” on page 15.
Installing the Software on a Macintosh
1. Make sure your printer is connected to your Macintosh and both are turned off.
2. Turn on your Macintosh and turn off your virus protection programs, as
necessary.
3. Once your Macintosh is fully started, turn on your printer.
4. Insert the EPSON Stylus Photo 700 CD-ROM or Disk 1 if you’re using diskettes.
Double-click the EPSON CD-ROM or diskette icon if it doesn’t open
automatically.
5. If you’re installing from the CD-ROM, double-click the Printer Software Installer
icon. If you’re installing from diskettes, double-click the Installer icon. Then
click Continue.
Note:
If you are installing your software for the first time, you must install the
printer software before you install EPSON Digital PhotoLab.
13
Page 15

6. Click Install for the default installation (Easy Install) and follow the instructions
on screen to install the printer software and utilities.
After the printer software installation is complete, you must reboot your
Macintosh. Then you can continue with the EPSON Digital PhotoLab
installation.
7. Double-click the EPSON Digital PhotoLab Install icon and follow the
instructions on screen to install it. An alias for EPSON Digital PhotoLab
appears on your desktop and EPSON Digital PhotoLab automatically launches.
To launch this program again later, double-click the alias. For details about the
program, see page 15.
8. Continue with “Selecting Your Printer” in the next section.
Selecting Your Printer
After you install the software, you need to select your printer using the Chooser.
Note:
If you are using a Quadra 950 or 900, you must choose Compatible in
the Control Panels, Serial Switch dialog box before selecting your printer
in the Chooser.
14
1. Open the Chooser from the Apple menu.
2. Click the SP 700 icon.
3. Click the icon for the port where you connected your printer.
4. Make sure AppleTalk is inactive if your printer is connected to the printer port.
Note:
You can activate AppleTalk only if AppleTalk or the Network Control
Panel is set to Ethernet or Remote Only.
5. Turn on background printing if you want to run print jobs and use your
Macintosh at the same time. (This may slow down printing and Macintosh
processing.)
6. Continue with “Register Your Printer” in the next section.
Page 16

Register Your Printer
Register Your Printer
Take a minute to register your printer with EPSON. Locate the registration card that
came in your printer box. Then fill it out and mail it to us.
EPSON Digital PhotoLab
EPSON Digital PhotoLab
We’ve packed lots of fun and informative software in with your printer. EPSON
Digital PhotoLab contains a collection of photo-editing, photo-organizing, and
photo-layout software. Install any one or all of them, depending on your preferences
and the space available in your computer.
We’ve also included a variety of terrific project ideas for your photos, such as
T-shirts, banners, greeting cards, and other items you might never have thought of!
Plus, you can get helpful information on EPSON products and supplies.
Be sure to run the EPSON Digital PhotoLab software suite right away to install your
creative software and check out the great projects. Here’s how...
■
In Windows 95 or Windows NT 4.0, double-click this icon on the
desktop or select EPSON Digital PhotoLab from the Start, Programs,
EPSON folder.
■
In Windows 3.1, open your EPSON program group. Then double-click this
icon: .
■
On a Macintosh, double-click the EPSON Digital PhotoLab alias on
your desktop.
Note:
If the EPSON Digital PhotoLab icon doesn’t appear, you may not have
installed it when you installed your printer software. Reinsert your
CD-ROM and follow the installation instructions.
If you selected Run from CD-ROM when you installed EPSON Digital
PhotoLab, you must have your CD-ROM in the CD-ROM drive.
For optimum viewing, set your monitor to 256 colors.
15
Page 17

Navigating Through EPSON Digital PhotoLab
In the main menu, you can select from the following:
■
INSTALL ADDITIONAL PROGRAMS. This section contains a collection of
award-winning software.
■
PHOT O WORKSHOP. See this section for cool project ideas and fun photo
products.
■
PHOTOS ON THE NET. Check out this section to see the EarthLink
Internet service provider offer, learn how to navigate the net, and find
photo-savvy web sites. Also includes the Kodak® Picture Network.
■
SCOOP ON OTHER EPSON PRODUCTS. Find out about EPSON digital
cameras, scanners, and the wide variety of EPSON media.
■
HOW TO GET HELP. If you need help with any of these programs, see this
section for information on contacting the software manufacturers.
This bar is not
active; click EXIT
to return to the
desktop
Main menu
selections
®
16
Page 18

After you select an item from the main menu, you’ll see a submenu. To return to the
main menu, click EPSON. To return to your desktop, click EXIT.
Click to
return to
the main
menu
Click to quit
EPSON Digital
PhotoLab and
return to the
desktop
Many of the submenus have tabbed sections. Select a section by clicking its tab.
Click DONE to return to the submenu screen. (You cannot click EPSON or EXIT
when you’re in a tabbed section.)
Click to open
a section
Click to view
the next page
in section
Click to return to
the submenu
Not active
Not active
17
Page 19

What Do You Get with EPSON Digital PhotoLab?
Select INSTALL ADDITIONAL PROGRAMS to install these great programs on your
system:
Windows 95 Windows 3.1 Windows NT 4.0 Macintosh
Adobe® PhotoDeluxe® 2.0
Spin
™
™
EPSON Photo Sheet
Extensis™ Portfolio™ 3.0
Pictureworks
Panorama
DíAMAR
See Creatively LE
™
®
Learning to
Follow the instructions on screen to install the programs. For more information
about a program, see its online help utility.
18
Page 20

Print a Page in Windows
Print a Page in Windows
Now that you’ve set up your printer and installed the software, you’re ready to print.
Follow the steps below to use Adobe PhotoDeluxe on Windows 95 to print a color
image. (If you haven’t installed Adobe PhotoDeluxe from the CD-ROM yet, go ahead
and install it now.)
Note:
These printing instructions are for Windows 95, but you can use the
same basic steps to print with most applications on other operating
systems. Before you print, you may need to change your printer settings
from within your application. Whenever you print, be sure to check the
Media Type and Quality/Speed settings in your printer software to make
sure they’re correct for your print job. See your User’s Guide for a
complete description of all the printer settings.
In Windows NT 4.0, click Start, select Settings, and then choose
Printers. Right-click the EPSON Stylus Photo 700 icon and click
Properties. On the Scheduling tab, select Print directly to the printer
and click OK.
1. Make sure your printer and computer are turned on. Also make sure you’ve
loaded 8.5 x 11-inch plain paper in the printer.
2. Open Adobe PhotoDeluxe.
3. Select an image to print. Click the Get Photo button. Then click the Get
Photo tab.
... then click here
Click here
first...
19
Page 21

4. Adobe PhotoDeluxe contains a
wide selection of sample images.
Click Open File and highlight
the file name for the image you
want to print (you may need to
navigate to the folder with your
file) and click Open.
5. Click File in the menu bar and
select Print from the list that
appears.
Select your
image here
Click here
20
6. You see the Print dialog box.
Click the Setup button.
Click here
Page 22

7. You see the Page Setup dialog
box. Click the Properties
Click here
button.
8. You see the dialog box for your printer software. If necessary, click the Main tab
to display the basic settings shown below.
Main tab
This setting gives good
printing results for most
types of documents
Click here to select the
type of media you’ve
loaded in the printer
Move the slider to
choose between
higher resolution or
faster printing
Click OK after you select your
basic settings
21
Page 23

9. Check the following settings:
■
Set the Mode option to Automatic; the printer software optimizes the
other settings according to the media type and ink settings you make. Or
you can click the Advanced button and select one of the predefined
Custom Settings. See Chapter 2 in your User’s Guide for details.
■
Move the Quality/Speed slider to the Quality setting. This changes the
print quality shown in the Current Settings box at the bottom of the
window to Fine - 720 dpi. (The slider is not available if you are using a
custom setting.)
■
Make sure Media Type is set to Plain paper. (If you load a different type
of paper, you need to select a corresponding Media Type.)
10. Click the Paper tab if you want to print more than one copy or if you want
to change the page orientation (for more information, see your User’s
Guide).
11. Click the Layout tab if you want to change the layout (for more information, see
your User’s Guide).
12. Click OK twice to close the printer software and Page Setup dialog boxes and
return to the Print dialog box.
13. Click OK to start printing. If you installed the Status Monitor, the Progress
Meter will appear and show the progress of your print job. For more
information, see Chapter 4 in your User’s Guide.
22
Soon you’ll see the amazing photographic detail your EPSON Stylus Photo 700
printer can produce.
Page 24

Print a Page in Macintosh
Print a Page in Macintosh
Now that you’ve set up your printer and installed the software, you’re ready to print.
Follow the steps here to use Adobe PhotoDeluxe to print a color image. (If you
haven’t installed Adobe PhotoDeluxe from the CD-ROM yet, go ahead and install it
now.) If you are using a different program, the steps you need to print may vary
from those below.
1. Make sure your printer and computer are turned on. Also make sure you’ve
loaded 8.5 x 11-inch plain paper in the printer.
2. Open Adobe PhotoDeluxe.
3. Select an image to print. Click the Get Photo button.
Click here
4. Click the Get Photo tab. Then click the Open File button.
Click here
23
Page 25

5. Adobe PhotoDeluxe contains a wide selection of sample images. Highlight the
file name for the image you want to print (you may need to navigate to the
folder with your file) and click Open.
6. Now open your printer software to get ready to print the image. Click File in
the menu bar and select Page Setup from the list that appears.
7. You see the page setup dialog box. Make any changes you want to the paper
size or orientation, then click OK to close the dialog box.
24
Page 26

8. Click File again and select Print. You see the print dialog box.
Move the slider to choose
between higher resolution
or faster printing
This setting gives good
printing results for most
types of documents
Click here to select the
type of media you’ve
loaded in the printer
9. Check the following settings:
■
Make sure the Mode option is set to Automatic; the printer software
optimizes the other settings according to the media type and ink settings
you make. Or you can click the Advanced button and select one of the
predefined Custom Settings. See Chapter 2 in your User’s Guide for
details.
Click Print after
you select your
settings
■
Move the Quality/Speed slider to the Quality setting. This changes the
print quality shown in the Current Settings box to Fine - 720 dpi. (The
slider is not available if you are using a custom setting.)
■
Make sure Media Type is set to Plain Paper. (If you load a different type
of paper, you’ll need to select a corresponding Media Type.)
10. Click Print to start printing. If you have background printing turned on, EPSON
Monitor3 opens in the background to monitor your print job. See Chapter 4 of
your User’s Guide for more details about Monitor3.
Soon you’ll see the amazing photographic detail your EPSON Stylus Photo 700
printer can produce.
25
Page 27

26
Page 28

Problems? Need Help?
Problems? Need Help?
Here are some basic troubleshooting tips if you have any problems setting up your
printer or using the software. You can also turn to Chapter 6, “Troubleshooting,” in
your User’s Guide or look in your printer software online help.
If you’re having problems installing your printer software . . .
If you see the “New Hardware Found” screen in Windows 95, click Cancel. Yo u
cannot install your printer software that way.
Make sure your printer is turned on and the printer cable is securely connected to
the printer and computer.
Make sure you’ve closed all other applications, including any screen savers. Then try
installing the software again.
If you need help with the creative software in EPSON Digital PhotoLab . . .
For assistance using the programs you installed with EPSON
Digital PhotoLab, contact the company that produced the
software. For contact information, launch EPSON Digital
PhotoLab. Then click HOW TO GET HELP.
If you installed the ink cartridges and the printer started making noise . . .
The first time you install ink cartridges, the printer must charge its state-of-the-art
ink delivery system. Charging can take two to four minutes. Please wait until
charging is finished before you turn off the printer. If you turn off the printer while
it is charging, it will begin charging the system again and use up more ink than
necessary.
27
Page 29

If your printer makes noise when you turn it on or after it has been sitting for a while . . .
Your printer is performing routine maintenance.
If you can’t see the EPSON Progress Meter or Status Monitor 2 in Windows 95 . . .
Make sure you installed the Status Monitor. If you didn’t, you can install the Status
Monitor by reinstalling the printer software and making sure you choose to install
the Status Monitor. If you installed the Status Monitor, make sure it is turned on. See
Chapter 4 of your User’s Guide for details.
If your printout is faint or has gaps in the image . . .
Make sure your paper isn’t loaded face down (the printable surface should be
loaded face up), damaged, old, or dirty. If it is, reload a new stack of paper with the
printable side up.
Your print head nozzles may need cleaning. For instructions, see Chapter 5 of your
User’s Guide.
If your printout is blurry . . .
28
Check the thickness lever position. If it’s in the + position, your printer is set for
thicker paper or envelopes and your image may smear. For most papers, set the
thickness lever to the 0 position.
Make sure your paper isn’t damp or loaded face down (the printable surface should
be loaded face up). If it’s damp, reload a new stack of paper.
Page 30

If your printout contains incorrect characters . . .
Your printer’s interface cable may not be securely connected.
Check that the cable is locked firmly in place at both ends to ensure proper
communication between your printer and computer. After adjusting the cable, try
printing from an application again.
Your printer may not be selected as the Windows default printer or as the current
printer in the Macintosh Chooser.
■
For instructions on selecting the Windows default printer, see your Windows
documentation or Windows online help.
■
To select your printer in the Macintosh Chooser, see “Selecting Your Printer”
on page 14.
If you need to make printer driver diskettes from the CD-ROM . . .
To make printer driver software installation diskettes from the CD-ROM using
another computer, see the section below for your operating system.
Note:
You need a CD-ROM drive to install and use EPSON Digital PhotoLab; it
is not available on diskettes.
29
Page 31

Making PC Diskettes
1. Prepare two blank formatted diskettes and label them diskette 1 and diskette 2.
2. Make sure Windows is running.
3. Insert the EPSON Stylus Photo 700 CD-ROM.
4. In Windows 95 or Windows NT 4.0, the installer program starts automatically
and you see the EPSON Setup CD window. (If it doesn’t start, click Start, select
Run, and type D:\Setup700 [substitute the correct drive letter]; then click OK.)
In Windows 3.1, select Run from the File menu. Then type D:\Setup700
(substitute the correct drive letter) and click OK.
5. At the EPSON Setup CD screen, click the Make Diskettes button. Select your
operating system and click OK. Follow the instructions on screen to create the
diskettes. Use the diskettes you created to install the printer software on your
computer. See page 7 for instructions.
Making Macintosh Diskettes
Before making diskettes from the CD-ROM, name the formatted diskettes you’ll use
Disk 1 and Disk 2, using a capital “D” and a space between Disk and the number. If
they’re not named correctly, the diskettes won’t be able to install your software.
30
1. Turn on the Macintosh and turn off any virus protection programs, as necessary.
2. Insert the EPSON Stylus Photo 700 CD-ROM.
3. Double-click the EPSON CD-ROM Disk 1 folder.
4. Insert the diskette you named Disk 1.
5. Select all the icons in the CD-ROM Disk 1 folder and drag them to the Disk 1
icon on your desktop.
6. After the files have been copied, eject Disk 1. Then repeat steps 3 through 5 for
the Disk 2 folder and diskette.
Use the diskettes to install the printer software on your Macintosh. See page 13 for
instructions.
Page 32

How to order printer software diskettes from EPSON
You can order printer driver software diskettes from EPSON by phone or fax for
$9.95 shipping and handling (plus tax where applicable), or you can download the
diskette image files. When you’re ready to install your printer software, see page 7
for Windows instructions or page 13 for Macintosh instructions.
Download:
■
EPSON Web Page: Point your browser to http://www.epson.com/connects
and select File Downloads (FTP)
■
EPSON Internet FTP Site: Log on to ftp.epson.com with the user name
anonymous and your e-mail address as the password
■
Epson America Forum on CompuServe®: Click on Services . . Go, then type
EPSONFOR in the dialog box
■
EPSON Download Service: Set your modem’s communications software to
8 data bits, 1 stop bit, no parity, and a maximum speed of 28.8 Kbps. Then
dial the EPSON BBS at (800) 442-2007
™
If you need downloading instructions, call EPSON’s FaxAdvice
(800) 442-2110 and request document #1220; be sure to supply a return fax
number
Fax: Send the following information by fax to EPSON at (310) 782-5266:
service at
■
Name and Company name
Street address (no P.O. boxes please)
City, State and ZIP code
■
Daytime telephone number
■
Payment method (VISA, MasterCard, or American Express)
Card number and expiration date
Be sure to sign your fax; it is required for the credit card purchase
■
Printer name (EPSON Stylus Photo 700)
■
Operating system (Windows 95, Windows 3.1, Windows NT 4.0, or
Macintosh)
Phone: Call (310) 533-8467 from 6 AM to 6 PM Pacific time, Monday through Friday
EPSON and EPSON Stylus are registered trademarks of SEIKO EPSON CORPORATION. EPSON FaxAdvice, EPSON Digital PhotoLab, and EPSON Photo Sheet
are trademarks of Epson America, Inc.
General Notice: Other product names used herein are for identification purposes only and may be trademarks of their respective owners. EPSON disclaims
any and all rights in those marks.
Printed on recycled paper with at least 10% post-consumer content.
Copyright © 1998 by Epson America, Inc. 3/98
Page 33

How to Order EPSON Ink and Paper
To order EPSON ink cartridges, paper and other printing media, contact your dealer
or call EPSON Accessories at (800) 873-7766 (U.S. sales only). In Canada, please call
(800) 873-7766 for dealer referral.
Here are the EPSON ink cartridges and media you can order:
Media name Size Part number
EPSON 360 dpi Ink Jet Paper Letter (100 count) S041060
EPSON High Quality Ink Jet Paper Letter (100 count) S041111
EPSON Photo Quality Ink Jet Paper Letter (100 count) S041062
EPSON Photo Quality Glossy Paper Letter (20 count) S041124
EPSON Photo Quality Glossy Film Letter (15 count) S041072
EPSON Photo Paper 4 x 6 (20 count) S041134
EPSON Ink Jet Transparencies Letter (30 count) S041064
EPSON Photo Quality Ink Jet Cards A6 (50 count) S041054
EPSON Photo Sticker Kit A6, 5 sheets, 16 frames per sheet S041144-KIT
EPSON Photo Sticker Refill A6, 5 sheets, 16 frames per sheet S041144
EPSON Iron-On Cool Peel Letter (10 count) S041153
Transfer Paper Letter (50 count) S041155
EPSON Photo Quality Self A4 (10 count) S041106
Adhesive Sheets
A4 (100 count) S041059
A4 (100 count) S041117
A4 (100 count) S041061
Legal (100 count) S041067
A4 (20 count) S041126
A4 (10 count) S041071
A6 (10 count) S041107
Letter (20 count) S041141
A4 (20 count) S041140
Panoramic, pre-cut, 8.3 x 23.4 inches S041145
(10 count)
A4 (30 count) S041063
8 x 10 (30 count) S041122
(includes software)
Ink cartridge Part number
Black ink cartridge S020093
Color ink cartridge S020110
 Loading...