


 Loading...
Epson PowerLite 821p Projector
Projector Parts
Lamp cover |
Control panel Power button |
Air exhaust vent
Handle
Foot release |
|
|
lever |
|
|
Front |
Zoom ring |
|
adjustable |
||
|
foot |
I/R receiver |
Focus ring |
|
Lens cap |
|
|
|
Computer1/Component |
Computer2/Component |
Security lock |
|
Video1 port |
Video2 port |
|
|
Monitor |
USB port |
I/R receiver |
|
Out port |
|||
Speaker |
|
|
|
|
|
RS-232 port |
|
|
|
|
|
Rear |
|
Rear adjustable |
Audio Out |
S-Video and related |
adjustable |
|
foot |
port |
foot |
||
Audio in port |
||||
|
|
|
Power inlet |
Video and related |
|
|
|
Audio in port |
Specifications
General
Type of display |
Poly-silicon TFT active matrix |
Lens |
F=1.75 to 2.42, |
|
focal length=24 to 38.2 mm |
Resolution |
1024 × 768 pixels |
(native format) |
|
Color |
Full color, 16.8 million colors |
reproduction |
|
Brightness |
2600 lumens (High brightness mode) |
(ANSI) |
1900 lumens (Low brightness mode) |
Contrast ratio |
500:1 |
Image size |
30 to 300 inches (0.8 to 7.6 meters) |
Projection |
2.8 to 48.3 feet (0.85 to 14.7 meters) |
distance |
|
Projection |
Front, rear, ceiling |
methods |
|
Focus adjustment |
Manual |
Zoom adjustment |
Manual |
Internal |
5 W monaural |
sound system |
|
Optical aspect |
4:3 (horizontal:vertical) |
ratio |
|
Zoom ratio |
1:1.6 |
Noise level |
36 dB (High brightness mode) |
|
30 dB (Low brightness mode) |
Keystone |
± 15° vertical (maximum) |
correction angle |
|
Projection Lamp
Power |
200 W UHE |
consumption |
|
Lamp life |
High brightness: about 2000 hours |
|
Low brightness: about 3000 hours |
Part number |
V13H010L30 |
Remote Control
Range |
20 feet (6 meters) |
Batteries (2) |
Alkaline AAA |
Operating angle |
About ± 30° horizontally |
|
About ± 15° vertically |
Mouse Compatibility
|
Supports USB (Type B) |
Dimensions |
|
Height |
4.13 to 4.8 inches foot extended |
|
(105 to 123 mm) |
Width |
13.78 inches (350 mm) |
Depth |
10.375 inches (272 mm) |
Weight |
8.9 lb (4.0 kg) |
9/04 |
Epson PowerLite 821p Projector - 1 |

Epson PowerLite 821p Projector
Electrical
Rated frequency |
50/60 Hz |
Power supply |
100 to 120 VAC, 3.2 A |
|
200 to 240 VAC, 1.6 A |
Power |
Operating: 280 W |
consumption |
Standby: 5 W |
Environmental
Temperature |
Operating: 41 to 95 °F (5 to 35 °C) |
|
|
Storage: 14 to |
140 °F (–10 to 60 °C) |
Humidity |
Operating: 20 to 80% RH, |
|
(non-condensing) |
Storage: 10 to |
90% RH |
Safety and Approvals
United States |
FCC 47CFR Part15B Class B (DoC) |
|
UL60950 Third Edition |
Canada |
ICES-003 Class B |
|
CSA C22.2 No. 60950 (cUL) |
CE Marking |
Directive 73/23/EEC, 89/336/EEC |
|
IEC60950 Third Edition |
|
EN 55022, EN 55024 |
Compatible Video Formats
The projector supports NTSC and PAL international video standards, as well as SDTV and HDTV display formats.
Mode |
Refresh Rate (Hz) |
|
|
NTSC |
60 |
NTSC 4:43 |
60 |
PAL |
50 |
M–PAL |
60 |
N–PAL |
50 |
PAL60 |
60 |
|
|
HDTV (720p) |
60 |
HDTV (1080i) |
60 |
SDTV (480i) |
60 |
SDTV (540i) |
50 |
SDTV (480p) |
60 |
|
|
Compatible Computer Display Formats
To project images from a computer, set the computer’s video card at a refresh rate (vertical frequency) compatible with the projector; see the following table for compatible formats. For best results, set the computer’s resolution to the projector’s native resolution (1024 × 768). If this resolution isn’t available, select one of the other compatible formats.
Mode |
Refresh Rate (Hz) |
Resolution |
|
|
|
|
|
VGA EGA |
70 |
640 × 350 |
|
|
|
|
|
VGA—60 |
60 |
640 × 480 |
|
VESA—60 |
60 |
640 × 480 |
|
VESA—72 |
72 |
640 × 480 |
|
VESA—75 |
75 |
640 × 480 |
|
VESA—85 |
85 |
640 × 480 |
|
|
|
|
|
SVGA—56 |
56 |
800 × 600 |
|
SVGA—60 |
60 |
800 × 600 |
|
SVGA—72 |
72 |
800 × 600 |
|
SVGA—75 |
75 |
800 × 600 |
|
SVGA—85 |
85 |
800 × 600 |
|
|
|
|
|
XGA—60 |
60 |
1024 |
× 768 |
XGA—70 |
70 |
1024 |
× 768 |
XGA—75 |
75 |
1024 |
× 768 |
XGA—85 |
85 |
1024 |
× 768 |
|
|
|
|
SXGA1—70 |
70 |
1152 |
× 864 |
SXGA1—75 |
75 |
1152 |
× 864 |
SXGA1—85 |
85 |
1152 |
× 864 |
|
|
|
|
SXGA2—60 |
60 |
1280 |
× 960 |
SXGA2—75 |
75 |
1280 |
× 960 |
SXGA2—85 |
85 |
1280 |
× 960 |
|
|
|
|
SXGA3—60 |
60 |
1280 |
× 1024 |
SXGA3—75 |
75 |
1280 |
× 1024 |
SXGA3—85 |
85 |
1280 |
× 1024 |
|
|
|
|
UXGA—60 |
60 |
1600 |
× 1200 |
|
|
|
|
iMAC VGA |
117 |
640 × 480 |
|
iMAC SVGA |
95 |
800 × 600 |
|
iMAC XGA |
75 |
1024 |
× 768 |
MAC13 |
67 |
640 × 480 |
|
MAC16 |
75 |
832 × 624 |
|
MAC19—60 |
59 |
1024 |
× 768 |
MAC19 |
75 |
1024 |
× 768 |
MAC21 |
75 |
1152 |
× 870 |
|
|
|
|
2 - Epson PowerLite 821p Projector |
9/04 |
Epson PowerLite 821p Projector
Positioning the Projector
Before connecting the projector, you need to decide where to place it. The location you choose depends on the size of the room and what you are projecting.
Place the projector on a sturdy, level surface, between 2.8 and 48.3 feet from the screen.
Make sure there is plenty of space for ventilation around and under the projector. Leave at least 8 inches between the projector and a wall.
Make sure the projector is within 6 feet of an electrical outlet or extension cord and within 5 feet of your computer and/or video source.
Place the projector directly in front of the center of the screen, facing the screen squarely. Otherwise, your image will not be rectangular.
Note:
It’s easier to position the projector when the screen is directly in front of the room. If the screen is placed diagonally in a corner, it’s much more difficult to aim the projector correctly at the screen and get a rectangular image.
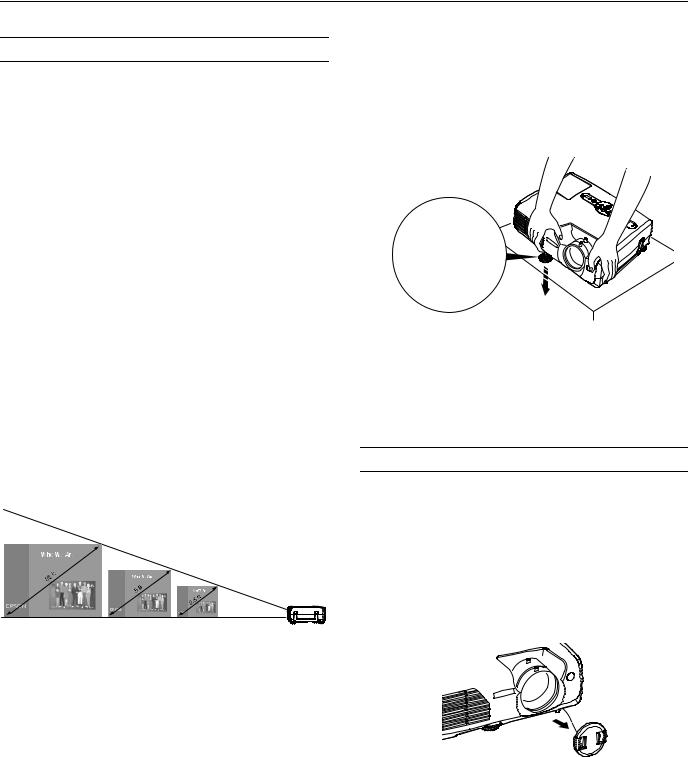
Use the figure below as a guideline to help you determine how far from the screen to place the projector. Image size generally increases with distance, but may vary depending on how you position the zoom ring and whether you have adjusted the image size with other settings.
29.8 to 48.3 feet 5.8 to 9.5 feet 2.8 to 4.7 feet
To calculate measurements, use the following formulas:
To find the projection distance when you know the screen’s diagonal dimension:
Wide (inches) = ((Diagonal screen size [inches] × 2.97334) – 2.3937) / 2.54
Tele (inches) = ((Diagonal screen size [inches] × 3.61474) – 2.06831) / 2.54
To find how large a screen’s diagonal dimension will be when you know the projection distance:
Wide (inches) = (Projection distance [inches] × 0.32827 × 2.54) + 1.6767
Tele (inches) = (Projection distance [inches] × 0.203 × 2.54) + 1.077
If you place the projector below the level of the screen, you’ll have to tilt it up by extending the front adjustable foot, as shown. Tilting the projector upward causes the image to lose its rectangular shape, but the Auto Keystone feature corrects the distortion automatically. If the image does not regain its rectangular shape, the Auto Keystone feature may have been disabled. To turn it on, see page 6.
If you place the projector level with the bottom of the screen, the image will be rectangular and you won’t have to adjust it. If you place the projector higher than the bottom of the screen, the image will still be rectangular, but you won’t be able to fill the whole screen with the image.
Starting Up the Projector
Make sure your projector and other equipment are connected correctly. Then turn on your projector, as described below.
If you turn on your computer or video equipment before starting the projector, the projector automatically detects and displays the image source. If you turn on the projector first or have multiple pieces of equipment connected, you may have to select the source manually. See page 5.
1. Remove the lens cap.
Caution:
Do not use the projector with the lens cap in place. The heat generated by the lamp can damage the cap.
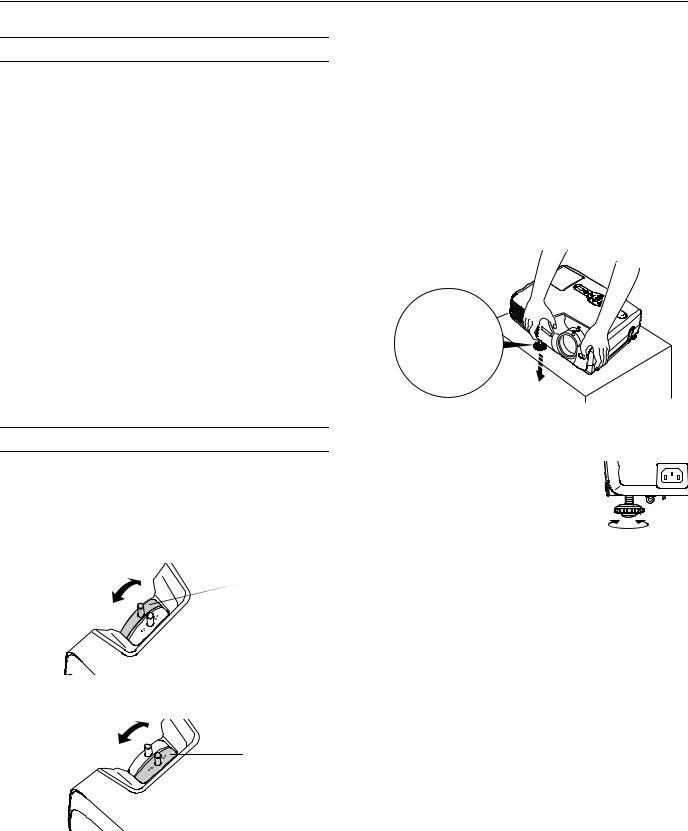
2.Connect one end of the power cord to the projector’s power inlet. Then connect the other end to an electrical outlet.
9/04 |
Epson PowerLite 821p Projector - 3 |

Epson PowerLite 821p Projector
The P Power light on top of the projector turns orange, indicating that the projector is receiving power but not yet turned on. Wait until the light stops flashing, but stays lit orange.
3.Press the P Power button on top of the projector or on the remote control.
Power button
Projector |
Remote control |
The projector beeps and the P Power light flashes green as the projector warms up. When the P Power light stops flashing, you’re ready to start.
Warning:
Never look into the lens when the lamp is on. This can damage your eyes, and is especially dangerous for children.
If you’re using a computer, turn it on (if it is not already on). In a few moments, you should see your computer display projected. If you have two computers connected at the same time, press the Comp 1 or Comp 2 button on the remote control to select either the computer connected to the Computer 1/Component Video 1 port or the computer connected to the Computer 2/ Component Video 2 port.
(Windows® only: If you see a message saying that it has found a plug-and-play monitor, click Cancel.)
If you’re projecting a video source, turn it on (if it is not already on). If you don’t see an image, press the Source Search button on the projector or remote control repeatedly until you see your image. Then press the Play button on your DVD player or other device.
If you are prompted to enter a password, see “Starting the Projector with a Password” on page 10.
If a projected image fails to appear, see “What To Do If You See a Blank Screen” in the next column.
When you’re done with your presentation, shut down the projector as described on page 7. Shutting down the projector correctly prevents premature lamp failure and possible damage from overheating.
What To Do If You See a Blank Screen
If you see a blank screen or the No Signal message after turning on your computer or video source, try the following:
Make sure the cables are connected correctly.
Make sure the P Power light is green and not flashing and the lens cover is off.
Press the Source Search button on the projector or remote control repeatedly until you see the image you want to project. See page 5 for more information about selecting the image source.
Check the Signal menu to make sure the correct input source is selected.
If you’re using a Windows notebook computer:
Hold down the Fn key and press the function key that lets you display on an external monitor. It may have an icon such
as  or it may be labelled CRT/LCD. Allow a few seconds for the projector to sync up after pressing it. Check your computer’s manual or online help for details.
On most systems, the  or CRT/LCD key lets you toggle between the LCD screen and the projector, or display on both at the same time.
Depending on your computer’s video card, you might need to use the Display utility in the Control Panel to make sure that both the LCD screen and external monitor port are enabled. See your computer’s documentation or online help for details.
If you’re using a Macintosh with OS X:
You may need to set up your system to display on the projector screen as well as the LCD screen. Follow these steps:
1.From the Apple menu, select System Preferences, then click Displays.
2.Select VGA Display or Color LCD, click Arrange or Arrangement, and make sure Mirror Displays is checked.
If you’re using a Macintosh with OS 9.x or earlier:
You may need to set up your system to display on the projector screen as well as the LCD screen. Follow these steps:
1.From the Apple menu, select Control Panels, then click
Monitors or Monitors and Sound.
2.Click the Arrange icon.
3.Drag one monitor icon on top of the other.
If the Arrange option isn’t available, try selecting one of the Simulscan resolution settings. Click the Monitor icon, if necessary, and then select a Simulscan resolution. (Allow a few seconds for the projector to sync up after making the selection.)
4 - Epson PowerLite 821p Projector |
9/04 |
Epson PowerLite 821p Projector
Selecting the Image Source
If multiple devices are connected to the projector, the easiest way to select the image source is to press the Source Search button on either the projector or remote control until the correct image is projected.
You can also press one of the following buttons on the remote control:
Comp 1 to select the device connected to the projector’s
Computer 1/Component Video 1 port.
Comp 2 button to select the device connected to the
Computer 2/Component Video 2 port.
S-Video to select the device connected to the
S-Video port.
Video button to select the device connected to the
Video port.
After you select a source, the screen goes dark for a moment before the image appears. The name of the selected source (such as Computer1 (Auto) or S-Video) appears briefly on the screen.
Adjusting the Image
Once you see your image, you may need to make certain adjustments, as described in this section.
Focusing and Zooming Your Image
Rotate the focus ring to sharpen the image.
 Focus ring
Rotate the zoom ring to reduce or enlarge the image.
Zoom ring
You can also change the image size by moving the projector closer to or farther away from the screen. You can use the E-Zoom buttons on the remote control to zoom in on a portion of the image. See “Zooming Your Image” on page 7 for instructions.
Adjusting the Height of Your Image
If the image is too low, you can raise it by extending the projector’s front adjustable foot.
1.Stand behind the projector. Press up on the blue foot release lever and lift the front of the projector to extend the front adjustable foot.
2.Once the image is positioned where you want it, release the lever to lock the foot in position.
3.To fine-tune the height of the image, rotate the feet at the back of the
projector.
If the image is no longer rectangular after raising it, see the next section.
9/04 |
Epson PowerLite 821p Projector - 5 |
Loading...